PGAUTO5NEWironing.lelit.com/wp-content/uploads/CP078-PGAUTO5NEW... · 2017-03-27 · Accendere...
24
PGAUTO5NEW GENERATORE DI VAPORE 5L 5L STEAM GENERATOR 5L DAMPFERZEUGER ПАРОГЕНЕРАТОР 5 л
Transcript of PGAUTO5NEWironing.lelit.com/wp-content/uploads/CP078-PGAUTO5NEW... · 2017-03-27 · Accendere...

PGAUTO5NEW
GENERATORE DI VAPORE 5L
5L STEAM GENERATOR 5L DAMPFERZEUGER ПАРОГЕНЕРАТОР 5 л
Pag. 2
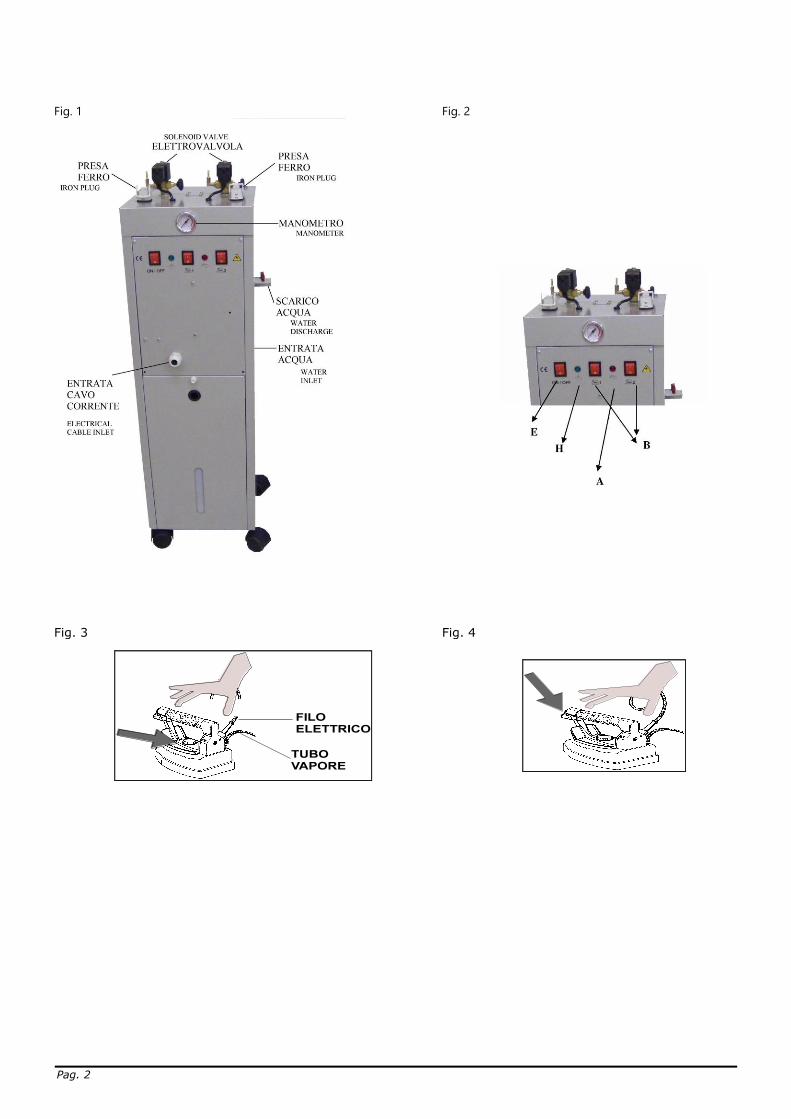
Fig. 1
Fig. 2
Fig. 3 Fig. 4

Pag. 3
Fig. 5
1 = raccordo a L / L joint
2 = filtro acqua/ water filter 3 = pompa / pump 4 = rubinetto scarico / discharge tap 5 = manometro / monometer 6 = entrata corrente / power inlet 7 = elettrovalvola / solenoid valve
7.1 = elettrovalvola /solenoid valve
Pag. 4
Italiano
IMPORTANTE:
L'installazione e l'utilizzo di questa macchina professionale deve essere eseguita da personale competente con adeguate conoscenza tecniche, rispettando tutte le norme vigenti in materia di sicurezza sul lavoro. Prima dell’arrivo del generatore nel luogo in cui verrà installato, è necessario che il cliente prepari: 1. una presa d’acqua (rubinetto con porta-gomma); il generatore verrà collegato al rubinetto con porta-gomma
denominato ENTRATA ACQUA (fig. 1) posto sul generatore tramite un tubo di gomma che abbia una tenuta di almeno 10 ATM, avendo l’avvertenza di fissarlo bene con due fascette stringi-tubo. (N.B.: prima di inserire il tubo in gomma nel porta-gomma del generatore bisogna scaricare qualche litro d’acqua per pulire i tubi dell’impianto).
2. una presa di corrente protetta e adeguata alla tensione e alla potenza del generatore. APERTURA DELL’IMBALLO:
Aprire la scatola contenente il generatore dalla parte contrassegnata con ALTO. prendere il libretto delle istruzioni e leggerlo attentamente. Estrarre il generatore dalla scatola, fissare le antenne, collegare le spine del ferro e dei tubi vapore (fig. 1), fissare i cavi del ferro nel gancio dell’antenna. ATTENZIONE: i ferri vanno riposti sul poggiaferro, sopra il tavolo da stiro.
ALLACCIAMENTO A RETE IDRICA E ACCENSIONE: 1. Allacciare il tubo in gomma al porta-gomma denominato ENTRATA ACQUA posto nel generatore (fig. 1) e
aprire l’acqua. 2. Allacciare il cavo di alimentazione ad una presa di corrente protetta con interruttore differenziale nel
rispetto delle norme vigenti e con portata corrispondente alle caratteristiche del generatore stesso.
3. Accendere l’interruttore della caldaia (fig. 2: E) e gli interruttori del ferro (fig. 2: B), attendere che la spia
verde di pronto vapore si spenga (fig. 2: H) e che il manometro segni 3,5/4 ATM. A questo punto prendere il ferro da stiro per il manico in sughero e schiacciare il tasto del ferro (fig. 4) per 3-4 volte circa, facendo uscire il vapore: quest'operazione serve per riscaldare i tubi che portano il vapore al ferro da stiro. Così facendo si evita che qualche goccia d’acqua bagni i capi da stirare (il ferro va tenuto in modo tale che non possa creare alcun danno alla persona fisica, cioè deve essere tenuto rivolto verso il basso).
4. Per regolare l’afflusso del vapore si agisce sul rubinetto di regolazione del vapore (fig. 1: elettrovalvola).
5. Ad operazione eseguita, il generatore è pronto. Durante la stiratura la spia pronto vapore (fig. 2: H) si accende e si spegne. ATTENZIONE: È importante prestare attenzione che non manchi mai acqua a disposizione del generatore per il carico, poiché questo può comportare che resti dell’aria nelle tubazioni e l’acqua non entri più in caldaia mentre è in pressione. Nel caso di mancanza acqua, la pompa funzionerà ancora per un minuto entrando poi in allarme e determinando così lo spegnimento automatico della macchina.
5. Per il generatore collegato direttamente alla rete idrica dell’acquedotto, la pressione dell’acqua non deve superare i 2,5 BAR altrimenti la pompa si blocca arrestando, di conseguenza, l’entrata di acqua in caldaia.
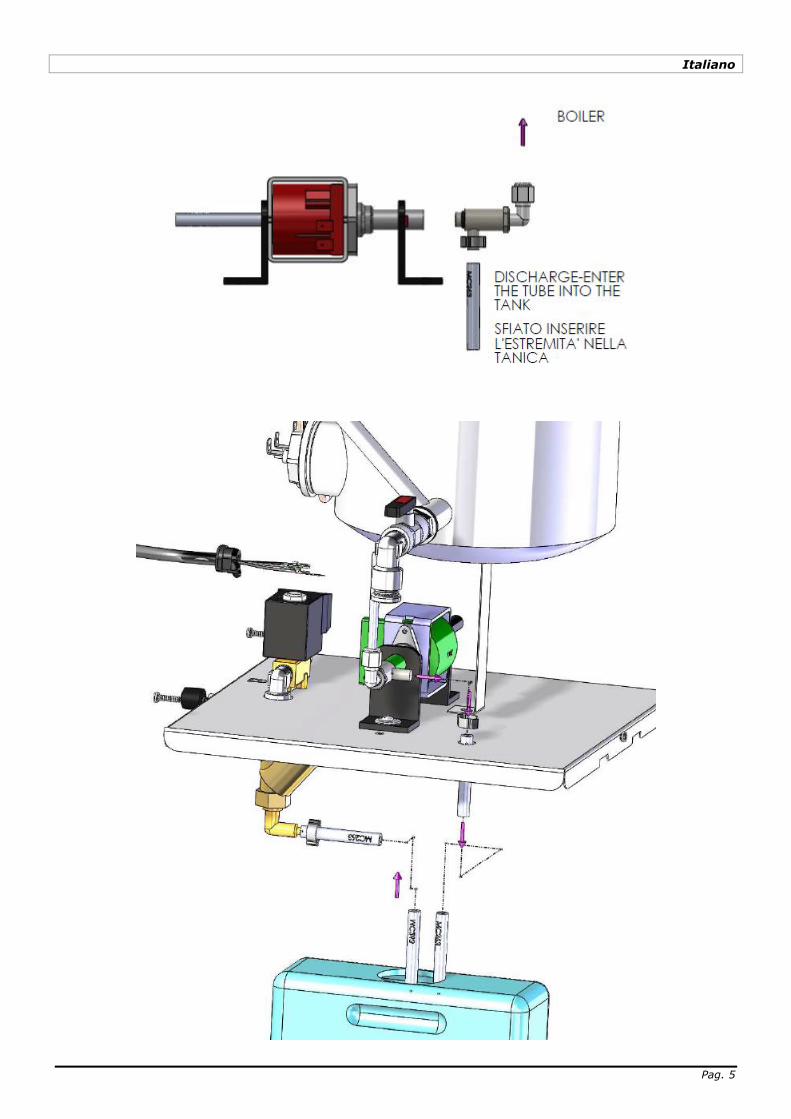
ALLACCIAMENTO A TANICA: 1. Per il funzionamento della macchina a tanica è obbligatorio l’acquisto e il montaggio del kit PG50/1. 2. Per il montaggio del kit procedere come segue:
- Aprire il pannello frontale svitando le 4 viti di fissaggio. - Svitare il dado che fissa il tubo in teflon alla pompa di carico. - Svitare dalla pompa il raccordo a “L” dove era inserito il tubo in teflon, avvitare poi il raccordo sulla
valvola MC111 fornita con il kit PG50/1. - Avvitare poi la valvola MC111 sulla pompa di carico. - Riavvitare il dado che fissa il tubo in teflon. - Inserire il tubo in silicone sulla valvola MC111 mettendo l’altra estremità nel recipiente carico acqua.
- Inserire l’altro tubo in silicone sul raccordo a L (1) mettendo l’altra estremità nel recipiente carico acqua.
Pag. 5
Italiano
Pag. 6
Italiano
OBBLIGATORIO:
1. Usare soltanto acqua normale proveniente dalla rete idrica per uso domestico. 2. Scaricare la caldaia 1 volta la settimana facendo attenzione che la macchina sia spenta e scollegata dalla
rete elettrica da almeno 3 ore, che il manometro segnali una pressione non superiore a zero ATM (fig. 1: manometro) e avendo l’avvertenza di aprire il rubinetto di scarico lentamente (fig. 5: rubinetto scarico). Durante questa operazione, indossare guanti da lavoro idonei come da normativa vigente per evitare possibili scottature.
3. Mai lasciare il ferro acceso sopra il piano del tavolo stiro. 4. Allacciare il generatore ad una presa di corrente adeguata e protetta. 5. Per quanto riguarda lo spegnimento del generatore, a lavoro finito chiudere l’acqua e ricordarsi di aprirla
prima di riaccendere il generatore (solo per le caldaia da allacciare all’acquedotto). 6. Tenere lontano i bambini dal generatore sia quando è in funzione, che quando è spento. 7. Accertarsi che la tubazione di alimentazione dell’acqua del generatore durante il periodo invernale non geli. 8. Non aggiungere additivi di alcun genere nell’acqua.
9. La manutenzione ordinaria e straordinaria devono essere eseguite da personale autorizzato e tutti i componenti devono essere sostituiti solo con ricambi originali del produttore.
STIRATURA: 1. Passare il ferro sui capi da stirare premendo ad intervalli il pulsante del vapore (fig. 4) Per una buona
stiratura si consiglia di posizionare il termostato ferro (fig. 3) verso la zona finale “cotone”. 2. Per i capi delicati si consiglia l’uso dell’apposita soletta anti-lucido. 3. Durante la stiratura si consiglia di fare attenzione alla posizione dei cavi del ferro. Essi possono essere
causa di corti circuiti qualora vengano a contatto con il tavolo da stiro o si trovino attorcigliati su se stessi. (Fig.3)
4. Per la stiratura a secco si può regolare il termostato (fig. 3.) sulle varie posizioni a seconda del tipo di tessuto che si vuole stirare (fare riferimento quindi alle indicazioni apposte sui capi). Per lo stiro a vapore si
deve regolare il termostato sulla posizione “cotone/lino”.
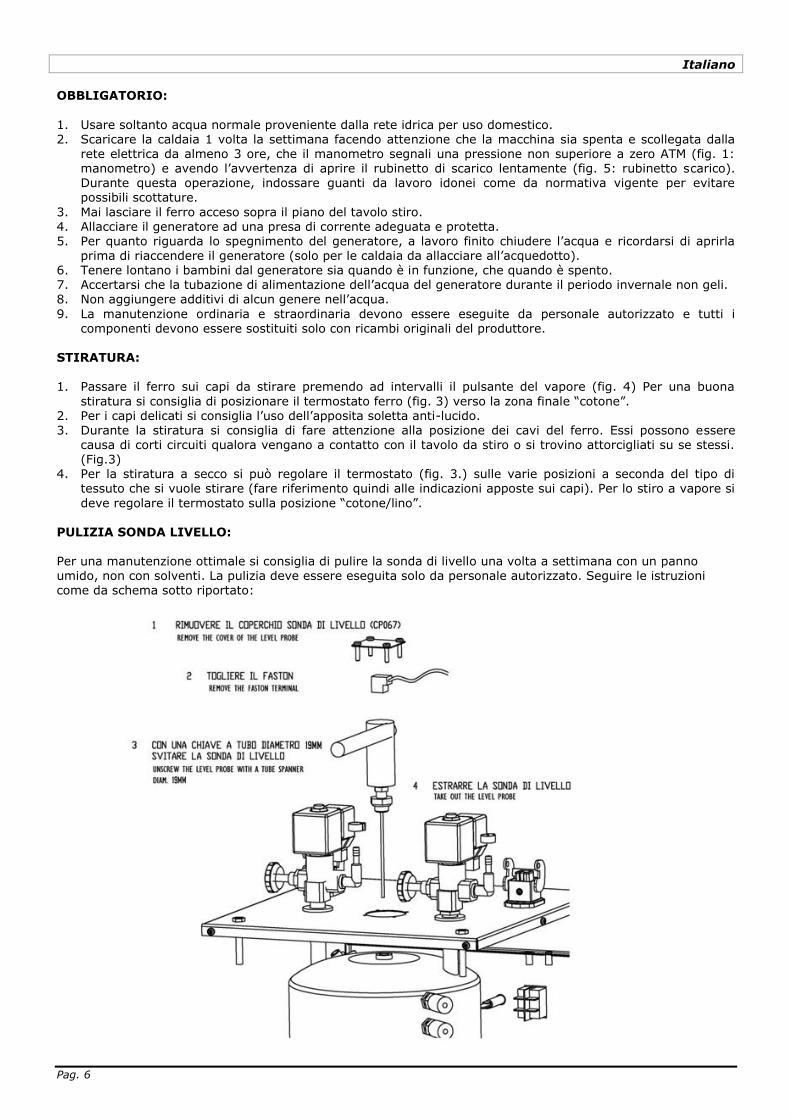
PULIZIA SONDA LIVELLO: Per una manutenzione ottimale si consiglia di pulire la sonda di livello una volta a settimana con un panno umido, non con solventi. La pulizia deve essere eseguita solo da personale autorizzato. Seguire le istruzioni come da schema sotto riportato:
Pag. 7
Italiano
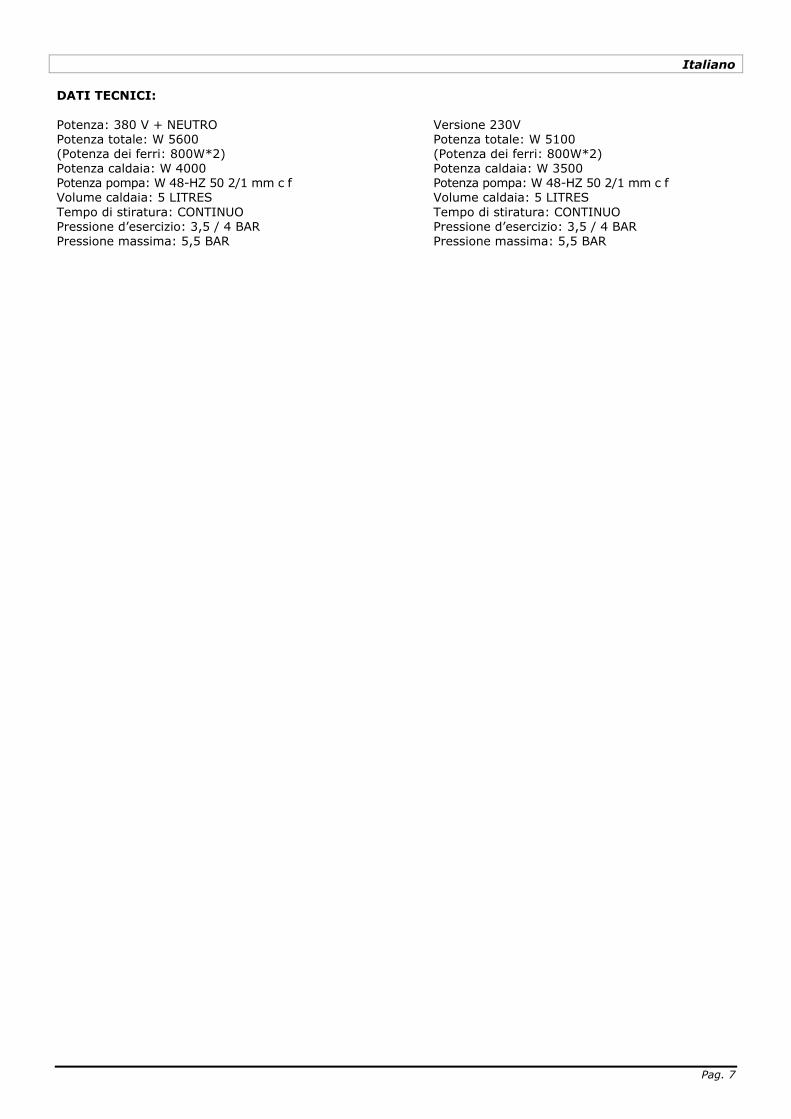
DATI TECNICI:
Potenza: 380 V + NEUTRO Versione 230V Potenza totale: W 5600 Potenza totale: W 5100 (Potenza dei ferri: 800W*2) (Potenza dei ferri: 800W*2) Potenza caldaia: W 4000 Potenza caldaia: W 3500 Potenza pompa: W 48-HZ 50 2/1 mm c f Potenza pompa: W 48-HZ 50 2/1 mm c f Volume caldaia: 5 LITRES Volume caldaia: 5 LITRES
Tempo di stiratura: CONTINUO Tempo di stiratura: CONTINUO Pressione d’esercizio: 3,5 / 4 BAR Pressione d’esercizio: 3,5 / 4 BAR Pressione massima: 5,5 BAR Pressione massima: 5,5 BAR
Pag. 8
English
IMPORTANT:
The installing and the use of this professional equipment must be done by competent personnel, that has the appropriate technical knowledge and respects the safety laws in force.
Before installing PGAUTO5NEW, it is necessary to set up the following facilities: 1. water connection (tap with hose holder); the steam generator will be connected to the tap with hose holder
called WATER INLET (fig.1), placed on PGAUTO5NEW, by means of a rubber tube which must have a pressure capacity of at least 10 ATM. This rubber tube must be fixed tightly with 2 hose clamps. (NB: before inserting the rubber tube into PGAUTO5NEW hose holder, you must exhaust a few litres of water in order to
clean the conduit). 2. protected electrical plug, suitable to the power voltage of the steam generator.
PACKAGE OPENING:
Open the box containing PGAUTO5NEW from the upper side marked as ALTO, take the instructions manual and read it carefully. Remove PGAUTO5NEW from the box, fix the wands, connect iron sockets and steam tubes (fig. 1), fix the iron
cable to cable support hook. ATTENTION: irons must be placed on their iron rests, on the ironing board.
CONNECTION TO WATER PIPE AND STARTING:
1. Connect the rubber tube to the tube holder called WATER INLET placed on the steam generator (fig. 1) and turn the water tap on.
2. Connect the power supply cable to a protected plug with earth protector switch, with observance of the law
in force and a voltage suitable to the steam generator’s features. 3. After switching on the boiler (fig. 2: E) and the irons (fig. 2: B), wait for the boiler green pilot light to switch
off (fig. 2: H) and for the manometer to indicate 3,5/4 ATM. At this point seize the iron by the cork handle
and press the steam button 3 or 4 times (fig. 4), so that the steam comes out: this operation must be carried out in order to heat up the conduit that takes steam to the iron. In this way you prevent also the falling of small drops of water on the garments (the steam iron must always be held in such a way as not to harm the operator, i.e. with the iron always pointed downwards).
4. To adjust steam flow, regulate the steam adjustment tap (fig. 1: solenoid valve). 5. After this operation, the PGAUTO5NEW is ready for use. During ironing, the “steam ready” pilot light switches on
and off (fig. 2: H). ATTENTION: Make sure that the water is always available for the steam generator, otherwise the lack of water
can cause air bubbles inside the conduit, i.e. that the water will not reach the boiler while the boiler is under pressure. In case of lack of water, the pump will function for about a minute; after that the alarm will go on and will cause the automatic shut down of the entire unit.
6.Water pressure should never go over 2,5 BAR, otherwise the pump will stop and, accordingly, the water will not reach the boiler.
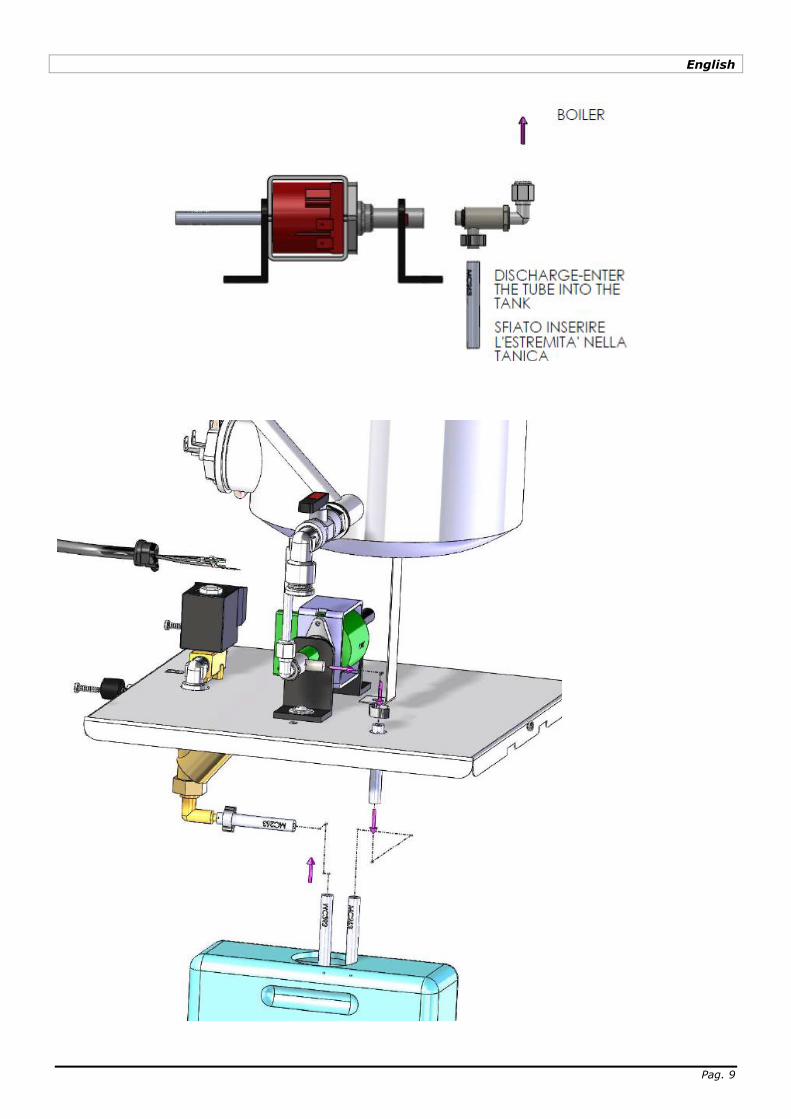
CONNECTION TO THE WATER TANK:
1.In order to make the steam generator load the water from a separate water tank, it’s obligatory to buy the accessory kit PG50/1. 2.To assemble the kit please proceed as follows:
- Open the front panel unscrewing the 4 fixing screws. - Unscrew the nut that fixes the teflon hose to the pump. - Unscrew the “L” joint from the pump, where the teflon hose was seated, screw the joint on the valve
MC111 supplied to the kit PG50/1. - Screw the valve MC111 onto the pump. - Screw the nut back on the teflon hose. - Insert the silicon hose on the valve MC111 and place the opposite end into the water tank.
- Insert the other silicon hose on the “L” joint (1), placing the other end into the water tank.
Pag. 9
English
Pag. 10
English
COMPULSORY:
1. Use only normal water. 2. Empty the boiler once a week, making sure that the unit is shut off and that the boiler pressure is not over 0
ATM (fig. 1: manometer). For carrying out this operation, open exhaust tap slowly (fig. 5: discharge tap). During this operation wear appropriate gauntlets according to the laws in force, in order to avoid burnings.
3. Never leave the hot iron on the ironing board. 4. Connect PGAUTO5NEW to suitable protected plug. 5. After finishing ironing, switch PGAUTO5NEW off and close the water tap; remember to open the water tap
before switching on the machine again (only for the units connected to the water mains). 6. Always keep children away from PGAUTO5NEW, both when it is on and off. 7. Make sure that during cold season the tubes that connect PGAUTO5NEW to water supply do not freeze. 8. Do not add additives to the water. 9. The standard and extraordinary maintenance must be carried out by authorized personnel and all the
components must be replaced only with original spare parts.
IRONING OPERATION:
1. Run the iron on garments, pressing the steam button (fig. 4) at regular intervals. For a better result, position the iron thermostat (fig. 3) on “cotton”.
2. For delicate garments, we advise you to use an anti-sheen/teflon shoe. 3. During the ironing operation, pay attention to the position of iron cables: if they twine or get in touch with
the ironing board, they might cause short circuits (fig. 3). 4. For dry ironing it is possible to adjust the thermostat (fig. 3.) on different positions according to the type of
fabric (read the
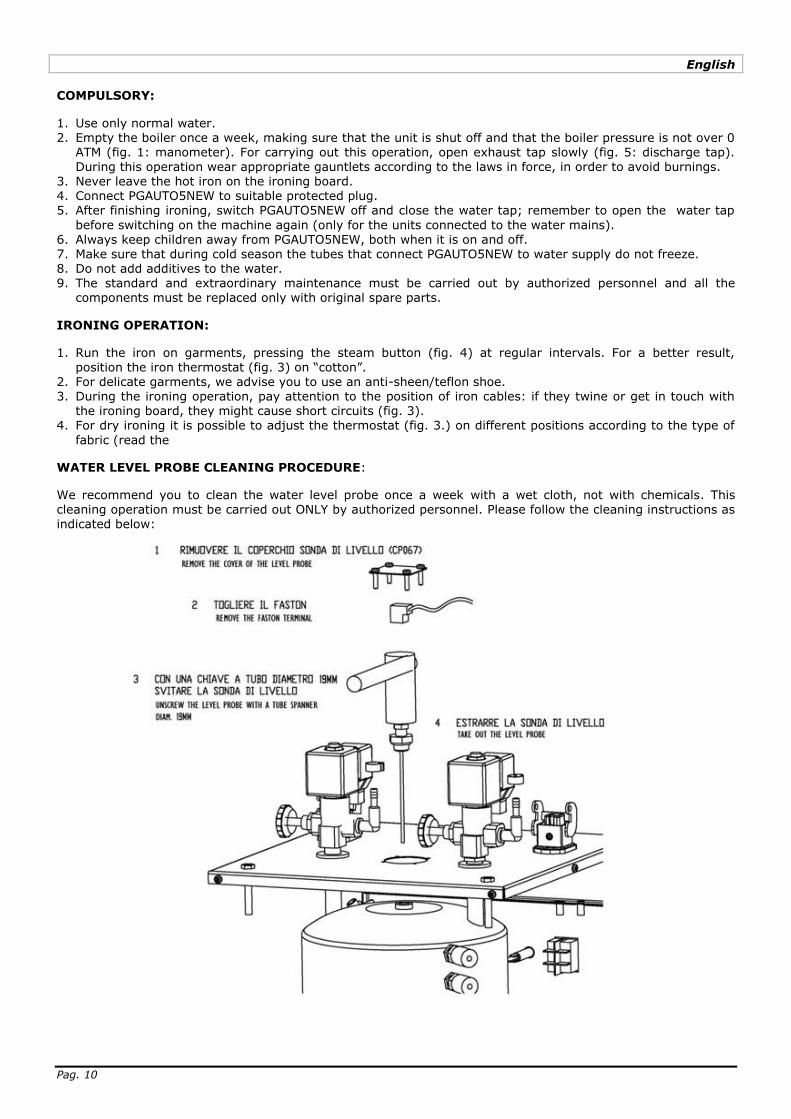
WATER LEVEL PROBE CLEANING PROCEDURE:
We recommend you to clean the water level probe once a week with a wet cloth, not with chemicals. This cleaning operation must be carried out ONLY by authorized personnel. Please follow the cleaning instructions as
indicated below:
Pag. 11
English
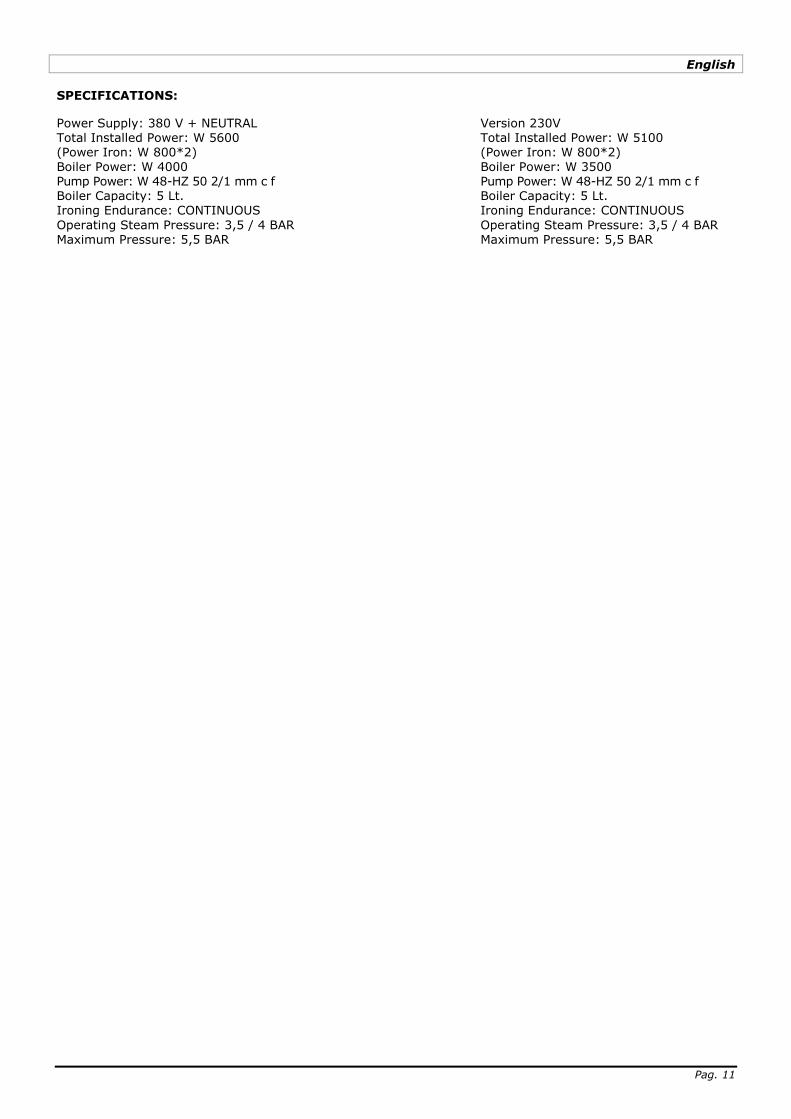
SPECIFICATIONS:
Power Supply: 380 V + NEUTRAL Version 230V Total Installed Power: W 5600 Total Installed Power: W 5100 (Power Iron: W 800*2) (Power Iron: W 800*2) Boiler Power: W 4000 Boiler Power: W 3500 Pump Power: W 48-HZ 50 2/1 mm c f Pump Power: W 48-HZ 50 2/1 mm c f Boiler Capacity: 5 Lt. Boiler Capacity: 5 Lt. Ironing Endurance: CONTINUOUS Ironing Endurance: CONTINUOUS
Operating Steam Pressure: 3,5 / 4 BAR Operating Steam Pressure: 3,5 / 4 BAR Maximum Pressure: 5,5 BAR Maximum Pressure: 5,5 BAR

Pag. 12
Deutsch
WICHTIG:
Die Inbetriebnahme und Verwendung dieses professionellen Geräts muss von Fachleute nach den Vorschriften für die Arbeitssicherheit geführt werden sein. Bevor der Ankunft des Dampferzeugers, bereiten Sie neben den Platz vor, wo der PGAUTO5NEW installiert wird: 1. Eine Wasserleitungsverbindung (Hahn mit Gummihalter); der Dampferzeuger wird am Hahn mit Hilfe eines
Gummihalters (Fig. 1 genannt Wassereingang), der mindest 10 ATM trägt, verbunden sein. Das Rohr muss mit 2 Klemmen stark und gut am Hahn fixiert werden. (Bevor Sie das Rohr am Gummihalter des
Dampferzeugers verbinden, lassen Sie ein Paar Liter Wasser dadurch fließen lassen, um die Rohren zu spülen.
2. Eine Schutzsteckdose, die der Spannung der PGAUTO5NEW entspricht.
ÖFFNUNG DER VERPACKUNG:
Öffnen Sie die Verpackung und beachten Sie, dass alle Verpackungsteile und die Schutzbeutel
weggenommen wurden. Nehmen Sie die Bedienungsanleitung und lesen Sie sie aufmerksam. Nehmen Sie der Dampferzeuger aus die Schachtel heraus, montieren Sie die Dampfschlauchträger/Stäbe, schließen Sie die Ilme Stecker des Bügeleisens und die Dampfschläuche an (Fig.1), fixieren Sie die Dampfschläuche des Bügeleisens in
den Dampfschlauchträger/Stäben. WARTUNG: die Bügeleisen müssen Sie auf den Bügeleisenteppich auf dem Bügeltisch legen.
INBETRIEBNAHME/ANSCHLUSS AN WASSERLEITUNG:
1. Verbinden Sie das Gummirohr an den Gummihalter (Wassereingang Fig 1), der sich in dem Dampferzeuger befindet und öffnen Sie das Wasser. 2. Schließen Sie den Stecker an eine geschützte Steckdose an, mit Hilfe eines Differenzialschalters nach den EU
Vorschriften und achten Sie darauf, dass es die von dem Dampferzeuger geforderte Spannung gibt. 3. Schalten Sie den Dampfkessel mittels On/Off Schalter (Fig 2; E) und die Bügeleisen mit den jeweiligen
Schaltern ein (Fig. 2; B). Warten Sie darauf, dass die Betriebslampe „Dampf bereit“ aufgeht (Fig. 2; H) und dass der Manometer den Druck von 3,5/4 ATM zeigt. Nehmen Sie das Bügeleisen in Hand und drücken Sie die Dampftaste (Fig. 4) drei-viermal. Das ist notwendig, um die Dampfschläuche des Bügeleisens zu erwärmen. So sollte kein Wassertropf aus dem Bügeleisen herauskommen, der die Bekleidungsstücke beschädigen konnte. Das Bügeleisen muss so im Hand gehalten werden, dass der Dampf nur nach unten herausgeht. Das vermeidet
irgendwelche Schaden an Personen. 4. Es ist möglich den Dampf mittels den Regulierungsknopf (Fig 1; Elektroventil) zu regulieren. 5. Das Gerät ist jetzt betriebsbereit. Während des Bügeln kann die Betriebslampe „Dampf bereit“ (Fig. 2; H) an- und aufgehen. WARTUNG: Achten Sie immer darauf, dass es Wasser in der Wasserleitung immer gibt. Wenn es kein Wasser gibt, kann Luft in den Rohren bleiben und das kann den Wassereingang ins Kessel vermeiden, wenn der Kessel
unter Druck ist. Im Fall von Wassersperre wird die Pumpe nur eine weitere Minute arbeiten und dann wird sie den Dampferzeuger in Alarmzustand ausschalten. 6. Wenn der Dampferzeuger direkt an der Wasserleitung verbunden ist, muss der Wasserdruck nie höher als
2,5 bar sein, sonst tritt die Pumpe in Alarmzustand ein und blockiert den Wassereingang.
ANSCHLUSS ZUR WASSERTANK:
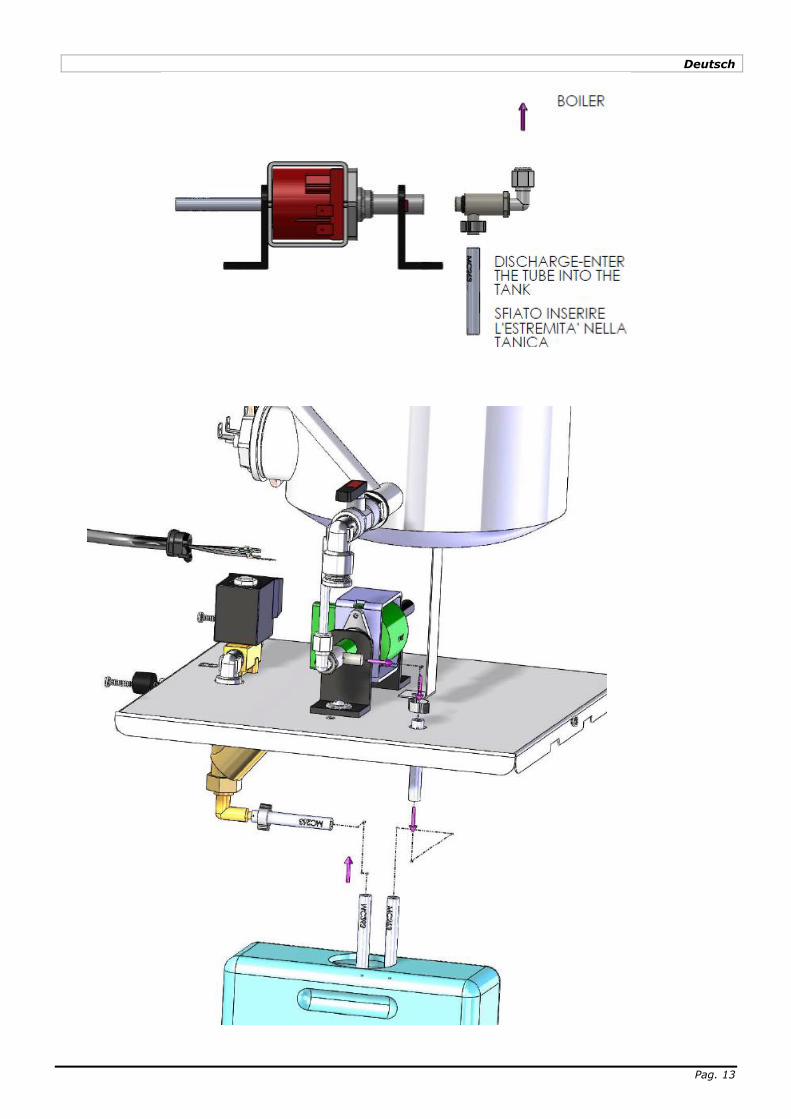
1. Für die Inbetriebnahme mit Anschluss an Wassertank, müssen Sie das Kit PG50/1 kaufen und montieren.
2. Das Kit PG50/1 soll, wie folgt, montiert worden sein: - Öffnen Sie das Bedienepanel beim Aufschrauben der 4 Befestigungschrauben. - Schrauben Sie die Schraubenmutter, die den Teflonschlauch zur Pumpe fixiert, auf. - Schrauben Sie die “L” Verbindung, wo der Teflonschlauch war, von der Pumpe auf. Schrauben Sie danach
die Verbindung auf dem Ventil MC111, die im Kit PG50/1 inbegriffen ist. - Schrauben Sie das Ventil MC111 auf der Pumpe.
- Schrauben Sie wieder die Schraubenmutter, die den Teflonschlauch fixiert. - Fügen Sie den Teflonschlauch in das Ventil MC111 ein und platzieren Sie die andere Ende des Schlauchs in
die Wassertank.
- Fügen Sie den anderen Teflonschlauch in die „L“ Verbindung (1) ein und platzieren Sie die andere Ende des Schlauchs die Wassertank.
Pag. 13
Deutsch
Pag. 14
Deutsch
OBLIGATORISCH:
1. Verwenden Sie nur normales Wasser von der Wasserleitung.
2. Einmal in der Woche öffnen Sie den Ablasshahn, um den Kessel zu reinigen aber nur wenn das Gerät seit mindest 3 Stunden vom Stromnetz ausgeschaltet ist, den Stecker von der Steckdose herausgezogen ist und das Manometer einen Druck von 0 ATM (Fig 1) zeigt. Öffnen Sie den Ablasshahn immer sehr langsam (Fig. 5) und tragen Sie immer Schutzhandschuhe nach den Sicherheitsvorschriften während dieses Verfahren, um eventuelle Verbrennungen zu vermeiden. 3. Lassen Sie auf keinem Fall das Bügeleisen eingeschaltet auf dem Tisch.
4. Schließen Sie den Dampferzeuger an eine geschützte und geeignete Steckdose an. 5. Am Ende des Bügeln oder des Arbeitstages schließen Sie das Wasser, um das Gerät auszumachen und erinnern Sie sich, das Wasser wieder zu öffnen, bevor Sie das Gerät wieder einschalten. (das gilt nur für die Geräte mit Anschluss an der Wasserleitung). 6. Lassen Sie das Gerät niemals unbeaufsichtigt, wenn es im Betrieb ist und halten Sie es von Kinder fern. 7. Achten Sie darauf, das die Rohrleitung während Winter nicht gefriert.
8. Verwenden Sie keine Zusatzstoffe, nur Leitungswasser.
9. Für die ordentliche und außerordentliche Pflege des Dampferzeugers wenden Sie sich immer an autorisierte Kundendienste. Alle Komponenten müssen immer mit originellen Ersatzteilen ersetzt werden.
BÜGELN:
1. Am Bügeln drücken Sie die Dampftaste in Abständen (Fig. 4). Um gute Ergebnisse zu haben, setzten Sie den Bügeleisenregler auf „cotone“ (Baumwolle).
2. Für zarte Bekleidungsstücke verwenden Sie immer die Teflonsohle.
3. Währen des Bügeln achten Sie immer auf die Bügelkabeln an. Die können Kurzschlüsse verursachen, wenn sie den Tisch berühren oder wenn sie sich verwickeln (Fig. 3). 4. Um ohne Dampf zu bügeln, regeln Sie den Regler (Fig. 3) gemäß den Kleidungsvorschriften. Um mit Dampf zu bügeln, regeln Sie den Regler auf „cotone/lino“ (Baumwolle/Leinen).
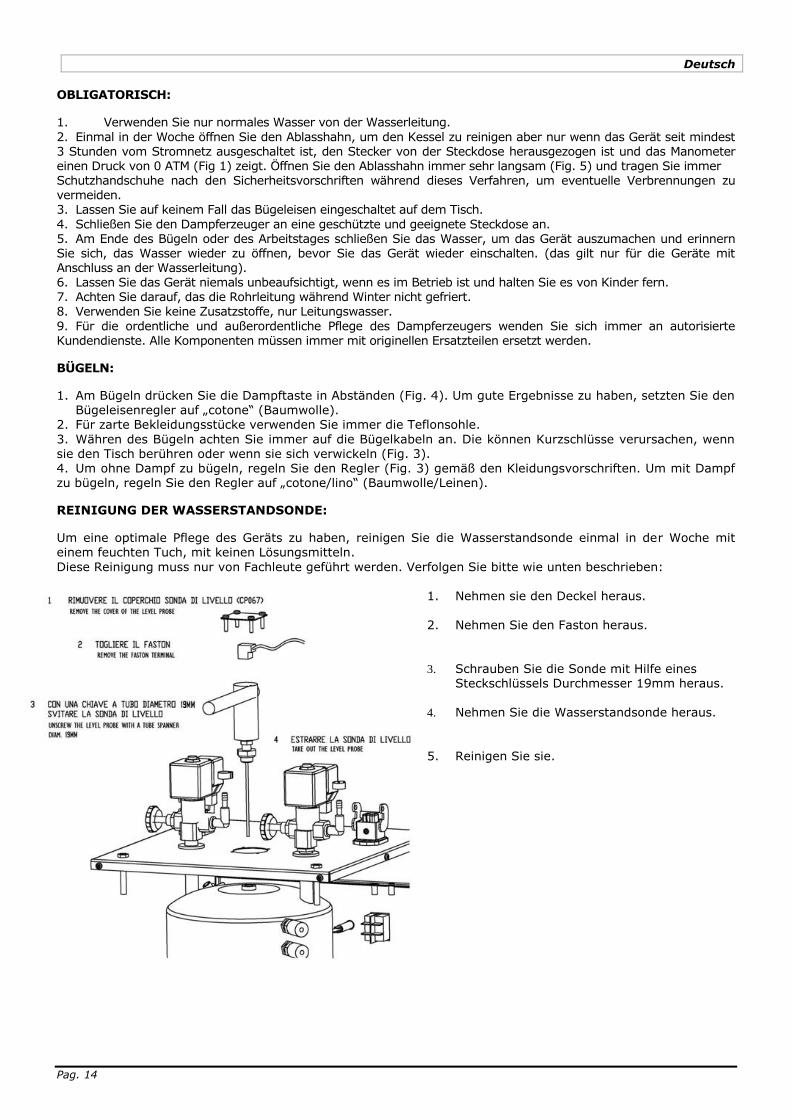
REINIGUNG DER WASSERSTANDSONDE:
Um eine optimale Pflege des Geräts zu haben, reinigen Sie die Wasserstandsonde einmal in der Woche mit einem feuchten Tuch, mit keinen Lösungsmitteln.
Diese Reinigung muss nur von Fachleute geführt werden. Verfolgen Sie bitte wie unten beschrieben: 1. Nehmen sie den Deckel heraus.
2. Nehmen Sie den Faston heraus.
3. Schrauben Sie die Sonde mit Hilfe eines
Steckschlüssels Durchmesser 19mm heraus. 4. Nehmen Sie die Wasserstandsonde heraus.
5. Reinigen Sie sie.
Pag. 15
Deutsch
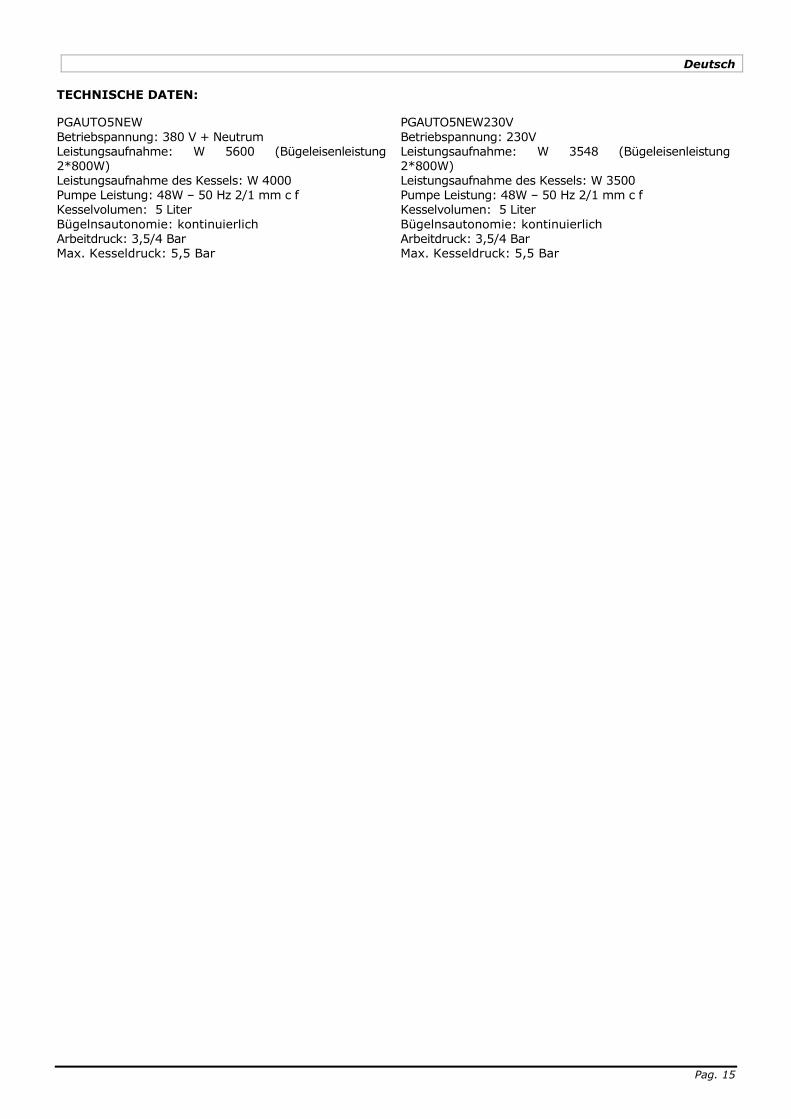
TECHNISCHE DATEN: PGAUTO5NEW
Betriebspannung: 380 V + Neutrum Leistungsaufnahme: W 5600 (Bügeleisenleistung 2*800W) Leistungsaufnahme des Kessels: W 4000 Pumpe Leistung: 48W – 50 Hz 2/1 mm c f Kesselvolumen: 5 Liter
Bügelnsautonomie: kontinuierlich Arbeitdruck: 3,5/4 Bar Max. Kesseldruck: 5,5 Bar
PGAUTO5NEW230V
Betriebspannung: 230V Leistungsaufnahme: W 3548 (Bügeleisenleistung 2*800W) Leistungsaufnahme des Kessels: W 3500 Pumpe Leistung: 48W – 50 Hz 2/1 mm c f Kesselvolumen: 5 Liter
Bügelnsautonomie: kontinuierlich Arbeitdruck: 3,5/4 Bar Max. Kesseldruck: 5,5 Bar

Pag. 16
Русский
ВНИМАНИЕ:
Установка и использование данного профессионального парогенератора, должно производиться только компетентным персоналом, со соответствующими техническими знаниями, соблюдая все действующие указания по безопасности на работе.
Перед тем как парогенератор будет установлен в рабочее положение, необходимо приготовить следующее: 1. Иметь в наличие подсоединение к водоснабжению (водопроводный кран). Парогенератор должен
подключаться к водоснабжению, через предназначенное отверстие, называемое «вход воды» (рис.1), находящееся в панели корпуса парогенератора, с помощью специального шланга, который должен выдерживать не меньше 10 АТМ давления. Необходимо хорошо закрепить шланг, на входе и выходе,
специальными стяжками. (Примечание: перед тем, как вставить шланг в парогенератор, промойте его, пропустив несколько литров воды.)
2. Вилка питания, соответствующая мощности парогенератора.
ВСКРЫТИЕ УПАКОВКИ:
1. Открывать упаковку со стороны с надписью “ALTO”, взять книжку с инструкцией по эксплуатации и внимательно прочитать.
2. Изъять парогенератор из картонной упаковки, закрепить стержни-держатели шланга в специальные отверстия, подсоединить электровилки и парошланг утюгов (рис.1), соединить моношланги к кронштейнам стержней-держателей шланга.
ВНИМАНИЕ: утюги должны ставиться на специальный резиновый термоковрик, на рабочую поверхность гладильного стола.
УСТАНОВКА И ВКЛЮЧЕНИЕ К ВОДОПРОВОДУ:
1. Подсоединить резиновый шланг к отверстию краника, называемым “ENTRATA ACQUA” – вход воды, находящегося внутри парогенератора (рис.1) и открыть воду.
2. Подключить шнур питания к электросети, защищенной необходимыми предохранителями (дифференциальным включателем, см. действующие требования техники безопасности), мощностью соответствующей характеристикам данного парогенератора. 3. Включить переключатель бойлера (рис.2: Е) и переключатели утюгов (рис.2: В), подождать,
когда зеленая лампочка «Пар готов» погаснет (рис.2: Н) и стрелка манометра укажет на 3,5/4 АТМ. Затем, взять утюг за пробковую ручку и нажать на кнопку подачи пара утюга (рис.4), примерно 3-4 раза. Эта операция служит для разогрева всех компонентов, через которые проходит пар, перед тем как попасть в утюг. Исключая этим, попадание случайной капли воды на рабочую поверхность. Во избежание травм и/или физических увечий - утюг необходимо держать всегда подошвой вниз. 4. Для регулирования подачи пара, необходимо обратиться к регулятору пара (рис. 1: ELETTROVALVOLA) – электромагнитный клапан.
5. После проведенных операций аппарат готов к эксплуатации. Во время функционирования, лампочка «Пар готов» - (рис. 2: Н) может загораться и гаснуть. 6. ВНИМАНИЕ: Очень важно держать под контролем наличие воды. Ее отсутствия может повлиять
попадание воздуха в трубопроводы и препятствовать дальнейшему проходу воды в бойлер, находящийся под давлением. В отсутствии воды насос будет работать еще одну минуту. После этого парогенератор будет автоматически выключаться.
7. Для парогенераторов подключенных напрямую к водоснабжению, давление воды не должно превышать 2,5 BAR в противном случае насос может блокироваться, впоследствии блокируя попадание воды в бойлер.
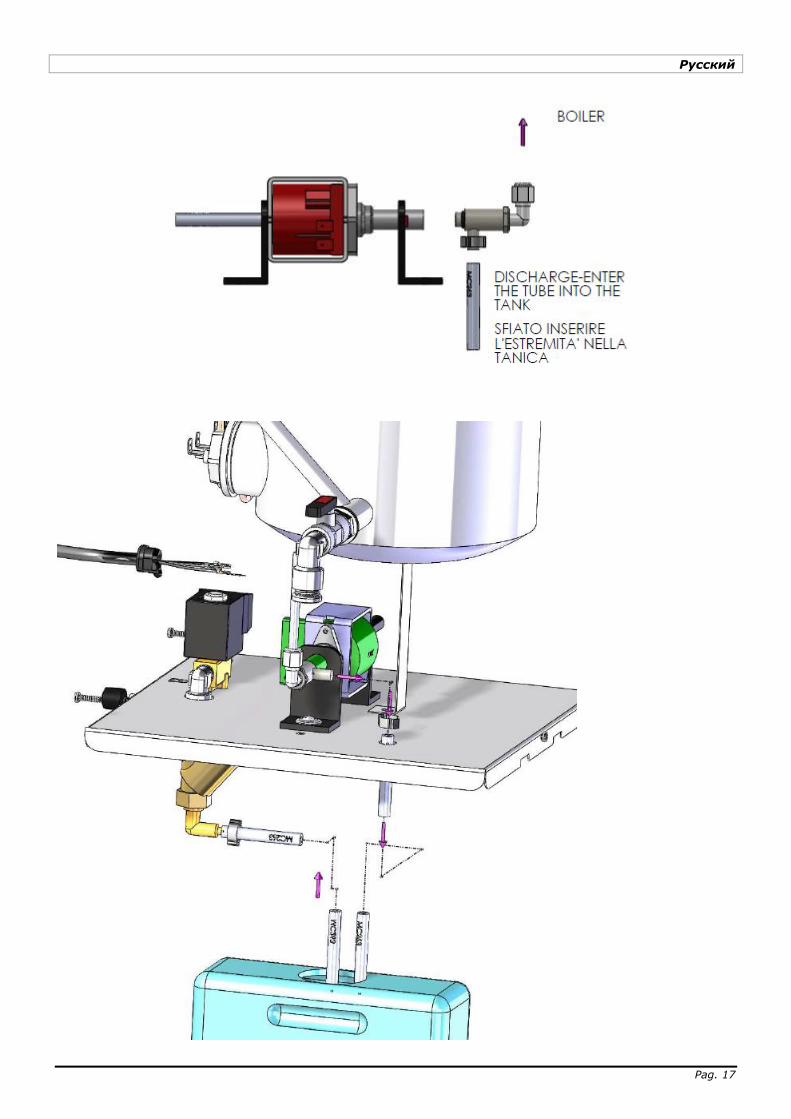
УСТАНОВКА И ПОДКЛЮЧЕНИЕ К РЕЗЕРВУAРУ С ВОДОЙ:
1. Чтобы наладить работу парогенератора с водой из резервуара, обязательно докупите
дополнительный комплект PG50/1. 2. Чтобы собрать комплект, пожалуйста, поступайте следующим образом:
- Откройте переднюю панель, отвинчивающуюся 4-мя винтами. - Отвинтите гайку, которая фиксирует тефлоновый шланг к насосу. - Отвинтите соединение “L” от насоса, там где был установлен тефлоновый шланг, вкрутите соединение в
клапан MC111, поставляемый комплекту PG50/1. - Вкрутите клапан MC111 на насос.
- Вкрутите гайку назад, которая фиксирует тефлоновый шланг. - Вставьте силиконовый шланг на клапан MC111 и поместите противоположный конец в водяной бак. - Вставьте другой силиконовый шланг на соединение “L” (1), помещая другой конец в водяной бак.
Pag. 17
Русский

Pag. 18
Русский
ОБЯЗАТЕЛЬНЫЕ МЕРЫ ПРЕДОСТОРОЖНОСТИ:
1. Пользоваться только простой водой из под крана. 2. Раз в неделю освобождать бойлер от воды. Выключить парогенератор и отсоединить его от розетки.
Подождать как минимум - 3 часа, обращая внимание, чтобы давление в бойлере не превышало 0 АТМ (рис.1: манометр). Осторожно, внимание! медленно открывать краник для слива воды (рис.1: краник для слива воды). Во время этой операции пользоваться специальными перчатками, во избежание возможных ожогов.
3. Воспрещается оставлять утюг на длительное время без внимания включенным на поверхности рабочего
стола. 4. Подключать машину только к электросети соответствующей всем техническим характеристикам
данного аппарата, а также электросети соответствующей всем нормам техники безопасности. 5. Заканчивая работу, выключить парогенератор, закрыть воду и помнить, о необходимости сначала
открывать воду, перед тем как включать парогенератор (только для парогенераторов подключенных напрямую к водоснабжению).
6. Держать вдали детей от парогенератора, даже когда он находится в отключенном состоянии. 7. Проверять, в зимний период, чтобы трубопроводы воды не замерзали. 8. Не разрешается добавлять и разбавлять воду, идущую в бойлер различными растворами. 9. Очередное и внеочередное обслуживание должно быть произведено только компетентным персоналом
и все компоненты должны быть замены только на оригинальные запчасти.
ГЛАЖЕНИЕ:
1. Во время глажения с паром, проводить утюгом по ткани, периодически нажимая на кнопку подачи пара на утюге (рис.4). Для получения хороших результатов глажения, рекомендуется держать термостат
утюга (рис.3) на последней позиции - “cotone”. 2. Для деликатных тканей предлагается пользоваться специальной тефлоновой насадкой, которая
предохраняет также от блеска. 3. Во время глажения рекомендуем держать под контролем паровой и электропроводы утюга, которые
могут вызвать короткое замыкание, если находятся на столе рабочей поверхности или скручены между
собой (рис.3).
4. При сухом глажении термостат утюга можно регулировать в различные позиции (рис.3) в зависимости от этикетки на белье, которое собираетесь гладить. При глажении с паром регулятор температуры утюга должен стоять в позиции “cotone/lino”.
УХОД И ЧИСТКА ЩУПА ПАРОГЕНЕРАТОРА:
ОБЯЗАТЕЛЕН УХОД И ЧИСТКА щупа раз в неделю мокрой тряпкой (без применения химии). ВНИМАНИЕ: если щуп не чистить регулярно, может случиться поломка парогенератора, что может повлечь за собой
отказ в гарантийном ремонте.Чистка должна быть произведена компетентным персоналом. Следуйте инструкции на схеме, приведенной ниже.
1. Снять крышку щупа, поднятием вверх.
2. Снять клемник щупа.
3. Открутить щуп, трубным ключом диам. 19 мм.
4. Вытащить щуп. 5. Произвести чистку.
Pag. 19
Русский
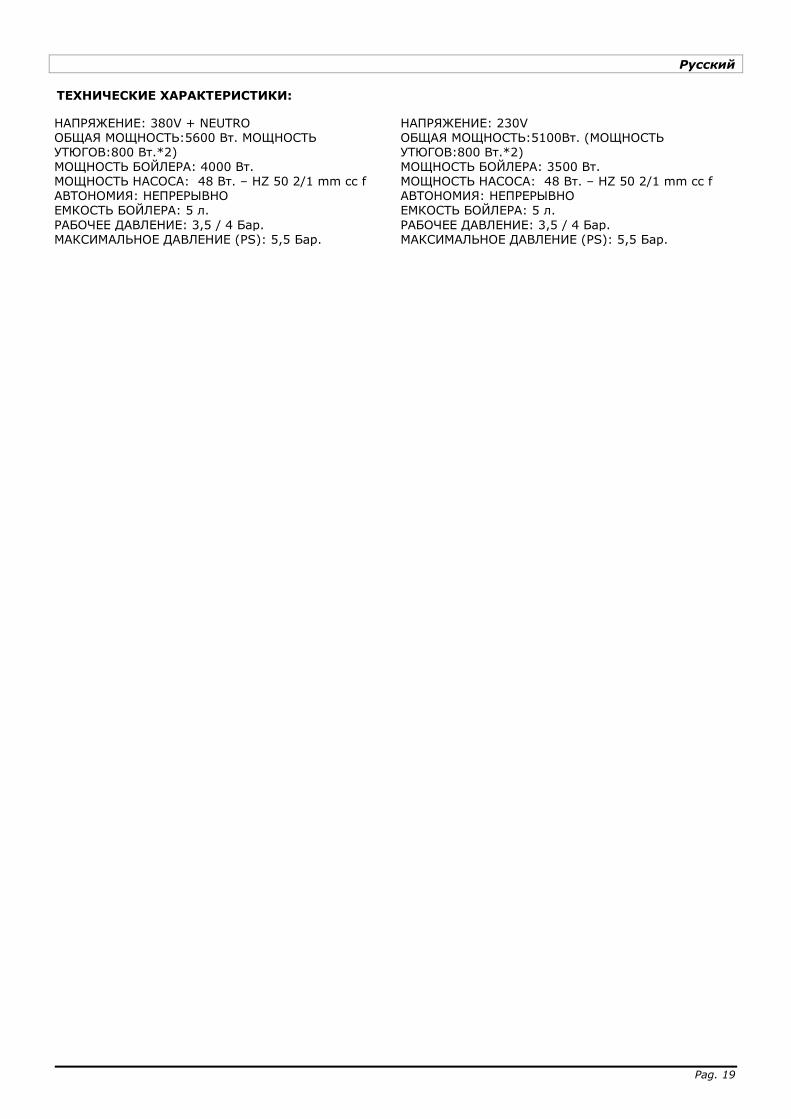
ТЕХНИЧЕСКИЕ ХАРАКТЕРИСТИКИ:
НАПРЯЖЕНИЕ: 380V + NEUTRO НАПРЯЖЕНИЕ: 230V ОБЩАЯ МОЩНОСТЬ:5600 Вт. МОЩНОСТЬ УТЮГОВ:800 Вт.*2)
ОБЩАЯ МОЩНОСТЬ:5100Вт. (МОЩНОСТЬ УТЮГОВ:800 Вт.*2)
МОЩНОСТЬ БОЙЛЕРА: 4000 Вт. МОЩНОСТЬ БОЙЛЕРА: 3500 Вт. МОЩНОСТЬ НАСОСА: 48 Вт. – HZ 50 2/1 mm cc f МОЩНОСТЬ НАСОСА: 48 Вт. – HZ 50 2/1 mm cc f АВТОНОМИЯ: НЕПРЕРЫВНО АВТОНОМИЯ: НЕПРЕРЫВНО ЕМКОСТЬ БОЙЛЕРА: 5 л. ЕМКОСТЬ БОЙЛЕРА: 5 л.
РАБОЧЕЕ ДАВЛЕНИЕ: 3,5 / 4 Бар. РАБОЧЕЕ ДАВЛЕНИЕ: 3,5 / 4 Бар. МАКСИМАЛЬНОЕ ДАВЛЕНИЕ (PS): 5,5 Бар. МАКСИМАЛЬНОЕ ДАВЛЕНИЕ (PS): 5,5 Бар.
Pag. 20
ITALIANO
AVVERTENZE PER IL CORRETTO SMALTIMENTO DEL PRODOTTO AI SENSI DELLA DIRETTIVA EUROPEA 2002/96/EC Alla fine della sua vita utile il prodotto non deve essere smaltito insieme ai rifiuti urbani. Può essere consegnato presso gli appositi centri di raccolta differenziata predisposti dalle amministrazioni comunali, oppure presso i rivenditori che forniscono questo servizio. Smaltire separatamente un elettrodomestico consente di evitare possibile conseguenze negative per l’ambiente e per la salute derivanti da un suo smaltimento inadeguato e
permette di recuperare i materiali di cui è composto al fine di ottenere un importante risparmio di energia e di risorse. Per rimarcare l’obbligo di smaltire separatamente gli elettrodomestici, sul prodotto è riportato il marchio del contenitore di spazzature mobile barrato.
DICHIARAZIONE DI CONFORMITA’ CE Gemme Italian Producers srl dichiara sotto la propria responsabilità che il prodotto PGAUTO5NEW al quale è riferita questa dichiarazione, è conforme alle seguenti norme: CEI EN 60335-1, CEI EN 60335-2-, in base alle direttive 89/392 CE, 91/368 CE, alla normativa Europea CEI EN 60204-1, 89/336 CE, 92/31 CE, 93/68 CE e EN 60 335-1, e alla direttiva 97/23/CE e recepita con D.L. del 25.02.00 nr. 93 in materia di attrezzature a pressione. Dichiara inoltre che il prodotto sopra indicato risulta conforme in base alle prove di
compatibilità elettromagnetica EMC. NB: La presente dichiarazione perde la sua validità se la macchina viene modificata senza la nostra espressa autorizzazione.
Castegnato, 2/11/2014 Amministratore Delegato
ENGLISH
IMPORTANT INFORMATION FOR CORRECT DISPOSAL OF THE PRODUCT IN ACCORDANCE WITH EC DIRECTIVE 2002/96/EC At the end of its working life, the product must not be disposed of as urban waste. It must be taken to a special local authority differential waste collection centre or to a dealer providing this service. Disposing of a household appliance separately avoids possible negative consequences for the environment and health deriving from inappropriate disposal of enables the constituent materials to be recovered to obtain significant savings in energy and resources. As a reminder of the need to dispose of household appliances separately, the products is marked with a crossed-out wheeled dustbin.
EC DECLARATION OF CONFORMITY Gemme Italian Producers srl declares under its own responsibility that the product PGAUTO5NEW, to which this declaration relates, is in accordance with the provisions of the specific directives: CEI EN 60335-1 / CEI EN 60335-2-3, on the base of the rules 89/392 CE, 91/368 CE, European rule CEI EN 60204-1, 89/336 CE, 92/31 CE, 93/68 CE and EN 60 335-1, and 97/23/CE introduced with D.L. of 25.02.00 nr. 93 regarding pressure appliances . It also declares that the above mentioned product conforms with the electromagnetic
compatibility test EMC. NB: The present declaration voids should the machine be modified without our specific authorization.
Castegnato, 2/11/2014 Amministratore Delegato

Pag. 21
DEUTSCH
WICHTIGER HINWEIS FÜR DIE KORREKTE ENTSORGUNG DES PRODUKTS IN ÜBEREINSTIMMUNG MIT DER EG-RICHTLINIE 2002/96/EG Am Ende seiner Nutzzeit darf das Produkt NICHT zusammen mit dem Siedlungsabfall beseitigt werden. Es kann zu den eigens von den städtischen Behören eingerichteten Sammelstellen oder zu den Fachhändlern, die einen Rücknahmeservice anbieten, gebracht werden. Die getrennte Entsorgung eines Haushaltsgerätes vermeidet mögliche negative Auswirkungen auf die Umwelt und die menschliche Gesundheit, die durch eine nicht
vorschriftsmäßige Entsorgung bedingt sind. Zudem ermöglicht wird die Wiederverwertung der Materialien, aus denen sich das Gerät zusammensetzt, was wiederum eine bedeutende Einsparung an Energie und Ressourcen mit sich bringt. Zur Erinnerung an die Verpflichtung, die Elektrohaushalsgeräte zu beseitigen, ist das Produkt mit einer Mülltonne, die durchgestrichen ist, gekennzeichnet.
CE–KONFORMITÄTSERKLÄRUNG Gemme Italian Producers srl erklärt auf einige Verantwortung, dass der Produkt PGAUTO5NEW, auf das sich diese Erklärung bezieht, der Vorschriften der spezifischen Richtlinien CEI EN 60335-1 / CEI EN 60335-2-3 und 89/392 CE, 91/368 CE, der Europäischen Vorschriften CEI EN 60204-1, 89/336 CE, 92/31 CE, 93/68 CE und EN 60 335-1, und 97/23/CE eingeleitet mit Ermächtigungsgesetz von 25.02.00 nr. 93 über Druckgeräte entspricht.
Die o.g. Firma erklärt, dass der oben genannte Produkt gemäß der EMC elektromagnetischen Verträglichkeitstesten produziert ist. NB: Die vorliegende Erklärung verliert Ihre Gültigkeit, wenn die Maschine ohne unsere ausdrückliche Genehmigung verändert wird.
Castegnato, 2/11/2014 Amministratore Delegato
РУССКИЙ
УКАЗАНИЯ ПРАВИЛЬНОЙ УТИЛИЗАЦИИ ИЗДЕЛИЯ В СООТВЕТСТВИИ С ЕВРОПЕЙСКОЙ ДЕРЕКТИВОЙ 2002/96/ЕС По окончании срока службы, электроприбор не следует помещать в общий контейнер с мусорными отходами. Его можно сдать в специальные центры по сбору дифференциальных отходов, предоставленных административными муниципалитетами, или в специализированные фирмы, которые занимаются таким обслуживанием. Раздельная переработка электроприборов позволяет избежать возможные негативные последствия, возникающие из-за не соответствующей переработки отходов, для окружающей среды и здоровья общества. Дает возможность достигнуть значительной экономии энергии и ресурсов, благодаря повторному использованию материалов изготовления электроприбора. Чтобы подчеркнуть
обязательство сдачи электроприбора на раздельную переработку, на изделие нанесена маркировка в виде зачеркнутого передвижного мусорного контейнера.
ДЕКЛАРАЦИЯ О СООТВЕТСТВИИ ДИРЕКТИВАМ ЕЭС Gemme Italian Producers srl заявляет с полной ответственностью, что изделие PGAUTO5NEW, к которому относится эта декларация соответствует следующим нормам: CEI EN 60335-1, CEI EN 60335-2-3 на основании директив 89/392 СЕ, 91/368 СЕ, и нормативных актов Европейского Совета CEI EN 60204-1, 89/336 CE, 92/31 CE, 93/68 CE и EN 60 335-1, и директивы 97/23/СЕ принятой Постановлением от 25.02.00 №93 по части оборудования и давление. Заявляет также, что вышеуказанное изделие отвечает требованиям, на основании результатов тестирования по электромагнитной совместимости ЕМС.
НОТА: Настоящая декларация теряет свою действительность, если в данное оборудование будут внесены какие-либо изменения без нашего официального разрешения.
Castegnato, 2/11/2014 Amministratore Delegato
Pag. 22
ITALIANO
GARANZIA LEGALE
Questo prodotto è soggetto alle norme di garanzia vigenti nello stato in cui viene venduto; informazioni specifiche in merito verranno fornite dal rivenditore o dall’importatore dello stato in cui avete acquistato il
prodotto, che ne è completamente responsabile. L’importatore è completamente responsabile anche degli adempimenti necessari a norma di legge dello stato in cui l’importatore stesso distribuisce il prodotto, compreso la gestione dello smaltimento a fine vita del prodotto. Nei paesi europei fanno riferimento le leggi nazionali di attuazione della Direttiva Comunitaria 44/99/CE.
ENGLISH
WARRANTY TERMS LEGAL WARRANTY This product is covered by the warranty laws valid in the country where the product has been sold; specific
information about the warranty terms can be given by the seller or by the importer in the country where the product has been purchased. The seller or importer is completely responsible for the product. The importer is completely responsible also for the fulfillment of the laws in force in the country where the importer distributes the product, including the correct disposal of the product at the end of its working life. Inside the European countries the laws in force are the national laws implementing the EC Directive 44/99/CE.
DEUTSCH
GARANTIEBEDINGUNGEN
GESETZLICHE GARANTIE Dieses Produkt ist von den Gesetzten gedeckt, die in dem Land gültig sind, wo das Produkt verkauft wurde.
Mehrere Informationen darüber kann der Händler oder der Importeur geben, der für das verkaufte Produkt völlig verantwortlich ist. Der Importeur ist auch für die Vollziehung der Gesetzte im dem Land, wo das Produkt verteilt wurde, völlig verantwortlich. Das enthält auch die Anordnung der korrekten Entsorgung des Produkts am Ende seiner Nutzzeit. In den EU-Ländern sind die staatlichen Gesetzte bezüglich der EU Richtlinie 44/99/CE zu betrachten.
РУССКИЙ
ГАРАНТИЙНЫЕ ОБЯЗАТЕЛЬСТВА
Эта продукция защищена гарантийным законом, действующим в стране, где она была продана; конкретная информация о гарантийных сроках может быть дана продавцом/импортером в стране, где продукция была куплена. Продавец/импортер полностью ответственны за эту продукцию. Импортер ответственен за выполнение действующих законов в стране, где распространяет продукт, включая
правильную утилизацию продукта по окончании его срока службы. В европейских странах действуют национальные законы, которые осуществляют деятельность
Директивы 44/99/CE EC.

Pag. 23

Pag. 24