wv108m-ii- mu1h1541ge23-r1212 - Honeywell | … Rev. A WV108M Einbau-Anleitung . Installation...
12
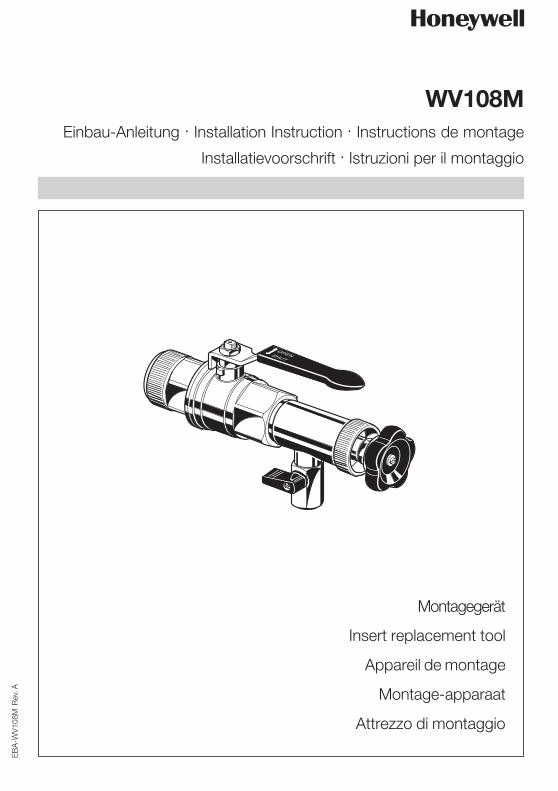
EBA-WV108M Rev. A WV108M Einbau-Anleitung . Installation Instruction . Instructions de montage Installatievoorschrift . Istruzioni per il montaggio Montagegerät Insert replacement tool Appareil de montage Montage-apparaat Attrezzo di montaggio OPEN SHUT
Transcript of wv108m-ii- mu1h1541ge23-r1212 - Honeywell | … Rev. A WV108M Einbau-Anleitung . Installation...
EBA
-WV1
08M
Rev
. A
WV108MEinbau-Anleitung . Installation Instruction . Instructions de montage
Installatievoorschrift . Istruzioni per il montaggio
Montagegerät
Insert replacement tool
Appareil de montage
Montage-apparaat
Attrezzo di montaggio
OPENSHUT
2
D
9
87 6 5
1
OPENSHUT
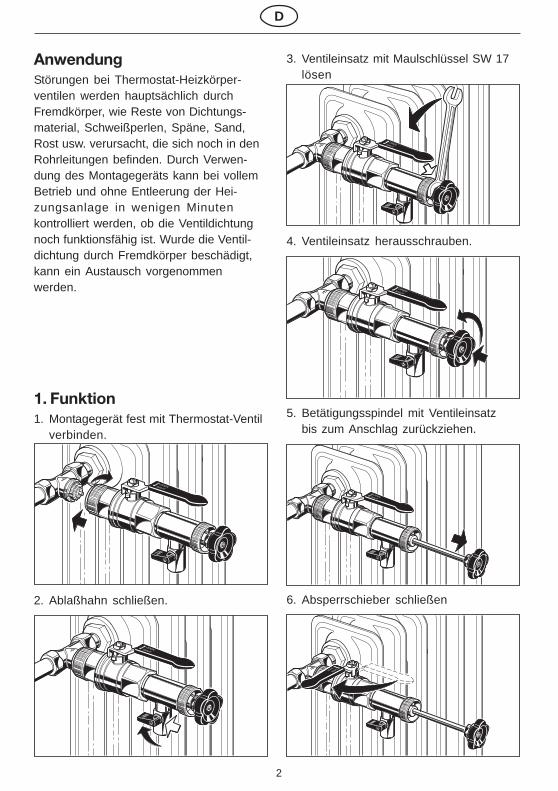
2. Ablaßhahn schließen.
3. Ventileinsatz mit Maulschlüssel SW 17lösen
4. Ventileinsatz herausschrauben.
5. Betätigungsspindel mit Ventileinsatzbis zum Anschlag zurückziehen.
6. Absperrschieber schließen
OPENSHUT
1. Funktion1. Montagegerät fest mit Thermostat-Ventil
verbinden.
OPENSHUT
OPENSHUT
SHUT OPEN
OPENSHUT
AnwendungStörungen bei Thermostat-Heizkörper-ventilen werden hauptsächlich durchFremdkörper, wie Reste von Dichtungs-material, Schweißperlen, Späne, Sand,Rost usw. verursacht, die sich noch in denRohrleitungen befinden. Durch Verwen-dung des Montagegeräts kann bei vollemBetrieb und ohne Entleerung der Hei-zungsanlage in wenigen Minutenkontrolliert werden, ob die Ventildichtungnoch funktionsfähig ist. Wurde die Ventil-dichtung durch Fremdkörper beschädigt,kann ein Austausch vorgenommenwerden.
3
D
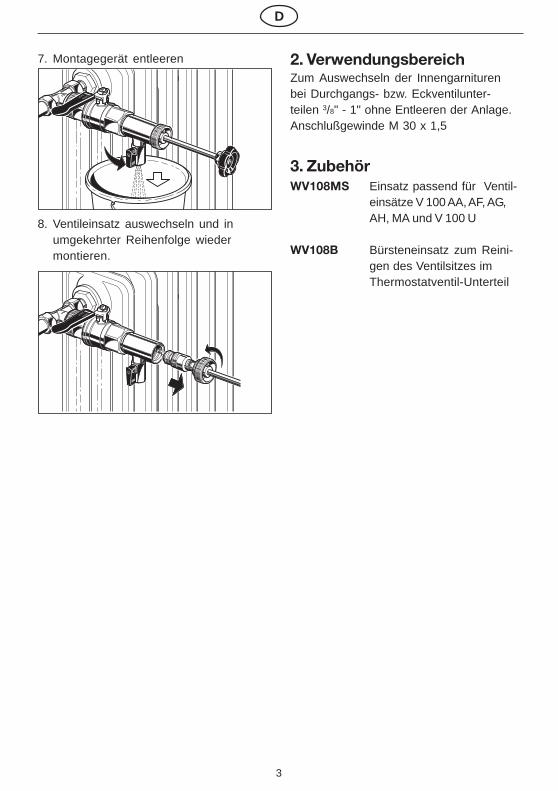
2. VerwendungsbereichZum Auswechseln der Innengarniturenbei Durchgangs- bzw. Eckventilunter-teilen 3/8" - 1" ohne Entleeren der Anlage.Anschlußgewinde M 30 x 1,5
3. ZubehörWV108MS Einsatz passend für Ventil-
einsätze V 100 AA, AF, AG,AH, MA und V 100 U
WV108B Bürsteneinsatz zum Reini-gen des Ventilsitzes imThermostatventil-Unterteil
7. Montagegerät entleeren
8. Ventileinsatz auswechseln und inumgekehrter Reihenfolge wiedermontieren.
SHUT OPEN
SHUT OPEN

4
GB
ApplicationFailures of thermostatic radiator valves arecaused mainly by foreign materials whichare present in the pipework, such assealant, welding beads, swarf, sand, rustetc. By using the insert replacement tool, avalve insert can be checked for properfunction in a few minutes with the systemoperating and without draining. If the inserthas been damaged by foreign matter, thenit can be replaced.
9
87 6 5
1
OPENSHUT
2. Close the drain valve
3. Loosen the valve insert with a 17mmwrench.
4. Unscrew the valve insertn.
5. Pull the operating spindle out with thevalve insert until it reaches stops
6. Close shutoff gate valve.
OPENSHUT
OPENSHUT
OPENSHUT
SHUT OPEN
OPENSHUT
1. Function1. Fit the insert replacement tool firmly to
the thermostatic valve body.
5
GB
2. Scope of ApplicationFor replacing the insert of 3/8" to 1" straightand angle valves without draining thesystem.
3. Accessories3. Accessories3. Accessories3. Accessories3. AccessoriesWV108MS Insert suitable for valve
inserts V 100 AA, AF, AG,AH, MA and V 100 U
WV108B Brush insert for cleaning thevalve seat in thermostaticvalve bodies.
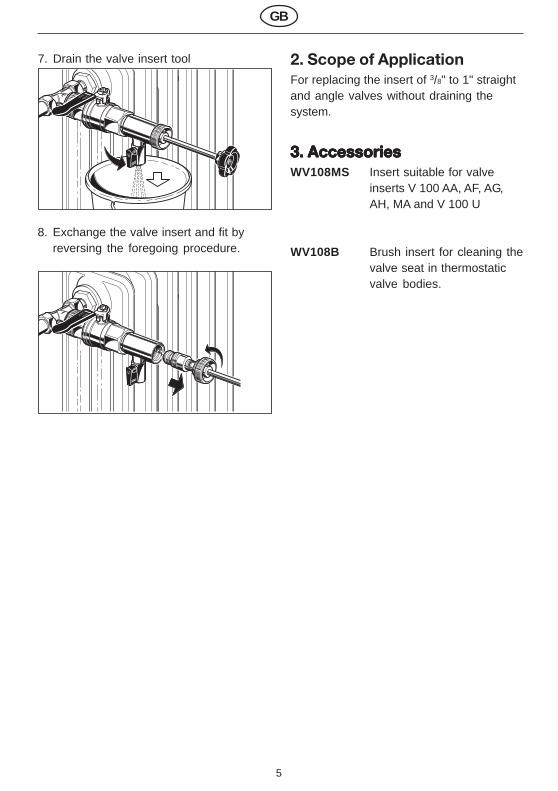
7. Drain the valve insert tool
8. Exchange the valve insert and fit byreversing the foregoing procedure.
SHUT OPEN
SHUT OPEN
6
F
UtilisationLes défaillances au niveau du thermostat,du corps de chauffe et des vannesproviennent principalement de la présencede corps étrangers ou impuretés tels querésidus de matériaux d’étanchéité, perlesde soudures, copeaux, sable, rouille etc.dans les tuyauteries. Sans purgerl’installation de chauffage et en utilisantl’appareil de montage en fonctionnementnormal, Il est possible de contrôler enquelque minutes le bon fonctionnement dujoint d’étanchéité de la vanne. Si le joint dela vanne est obstrué par des corpsétrangers, procéder au remplacement decelui-ci.
9
87 6 5
1
OPENSHUT
2. Fermer le robinet purgeur.
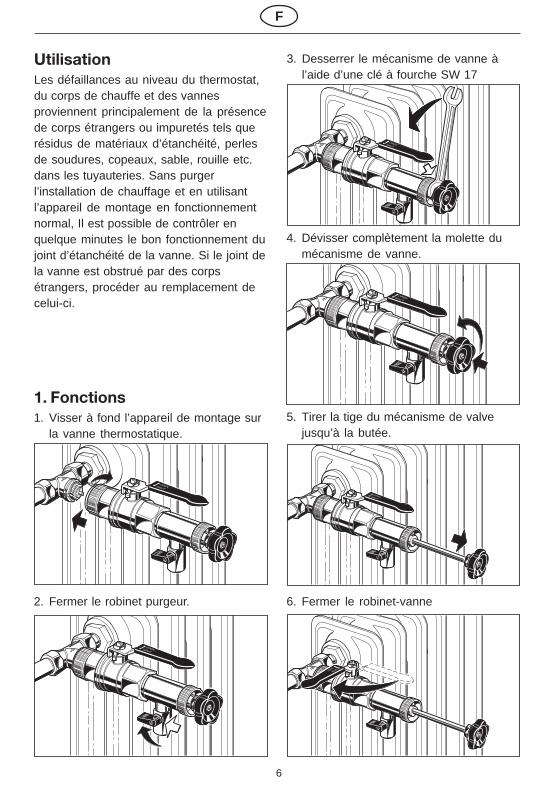
3. Desserrer le mécanisme de vanne àl’aide d’une clé à fourche SW 17
4. Dévisser complètement la molette dumécanisme de vanne.
5. Tirer la tige du mécanisme de valvejusqu’à la butée.
6. Fermer le robinet-vanne
OPENSHUT
1. Fonctions1. Visser à fond l’appareil de montage sur
la vanne thermostatique.
OPENSHUT
SHUT OPEN
OPENSHUT
OPENSHUT
7
2. Domaine d’utilisationPour le remplacement des garnituresintérieures sur un robinet droit ouéquerre en3/8" - 1" sans purge de l’installation.Vis raccord M 30 x 1,5
3. AccessoiresWV108MS Pièce de rechange univer-
selle pour les garnituresde vannes V 100 AA, AF,AG, AH, MA et V 100 U
WV108B Brosse pour le nettoyage dusiège de la vannedans la partie intérieure dela vanne thermostatique
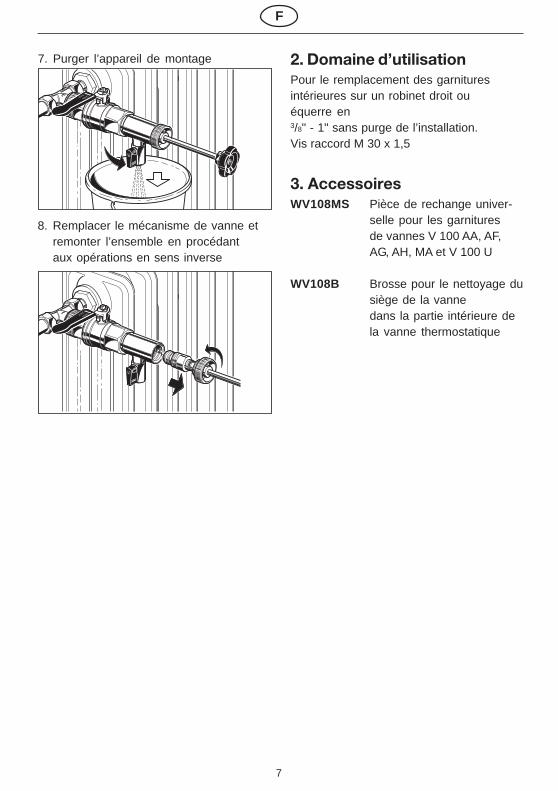
7. Purger l’appareil de montage
8. Remplacer le mécanisme de vanne etremonter l’ensemble en procédantaux opérations en sens inverse
SHUT OPEN
SHUT OPEN
F
8
NL
GebruikStoringen aan thermostaatkleppen wordenvoornamelijk veroorzaakt door in deleidingen achtergebleven vuil, zoals restenvan afdichtingsmateriaal, lasresten,metaaldelen, zand of roest. Met behulp vanhet montage-apparaat kan zonder deverwarming uit te schakelen of leeg temaken in enkele minuten wordengecontroleerd of de klepafdichting nogfunctioneert. Indien de klepafdichting doorvuil beschadigd is, kan deze wordenvervangen.
9
87 6 5
1
OPENSHUT
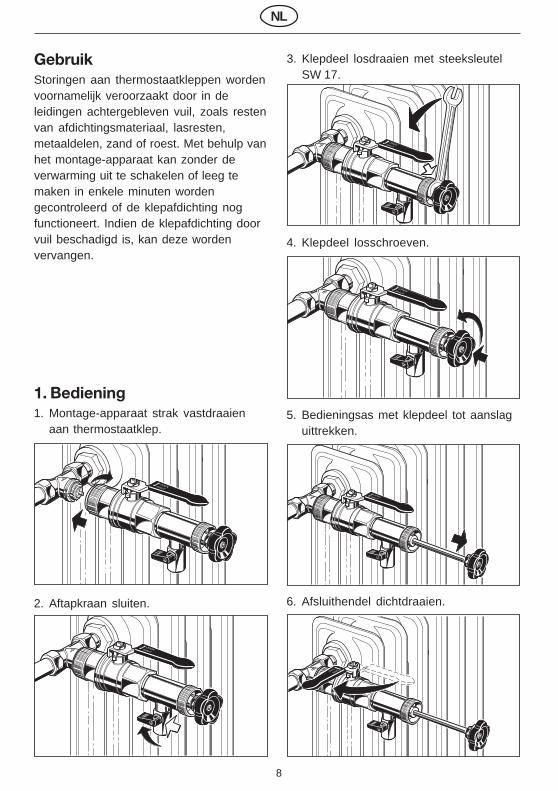
2. Aftapkraan sluiten.
3. Klepdeel losdraaien met steeksleutelSW 17.
4. Klepdeel losschroeven.
5. Bedieningsas met klepdeel tot aanslaguittrekken.
6. Afsluithendel dichtdraaien.
OPENSHUT
1. Bediening1. Montage-apparaat strak vastdraaien
aan thermostaatklep.
OPENSHUT
OPENSHUT
SHUT OPEN
OPENSHUT
9
NL
2. ToepassingHet verwisselen van de inwendigeonderdelen bij tweewegs- ofhoekklepdelen 3/8" - 1" zonder dat hetleeglopen van de installatie nodig is.Schroefdraad M 30 x 1,5.
3. AccessoiresWV108MS Inzetstuk, passend voor
kleps V 100 AA, AF, AG,AH, MA en V 100 U
WV108B Borstel voor het reinigenvan de klepzitting in dethermostaatklep.
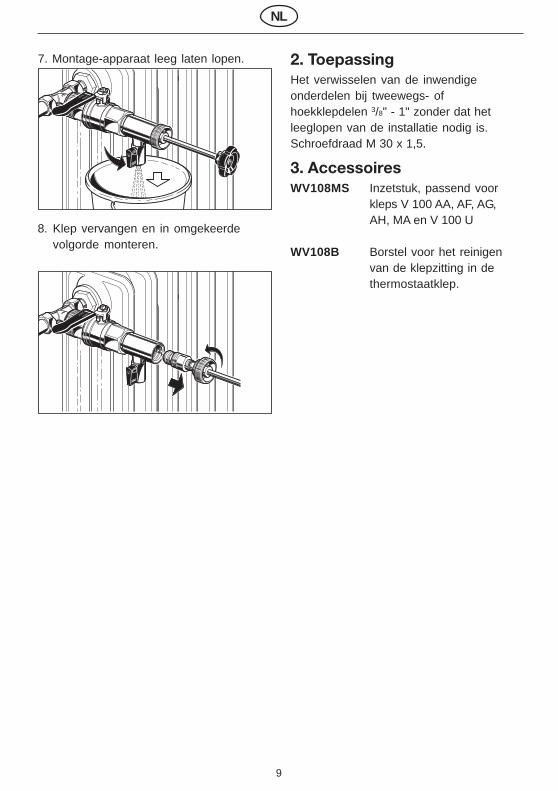
7. Montage-apparaat leeg laten lopen.
8. Klep vervangen en in omgekeerdevolgorde monteren.
SHUT OPEN
SHUT OPEN
10
I
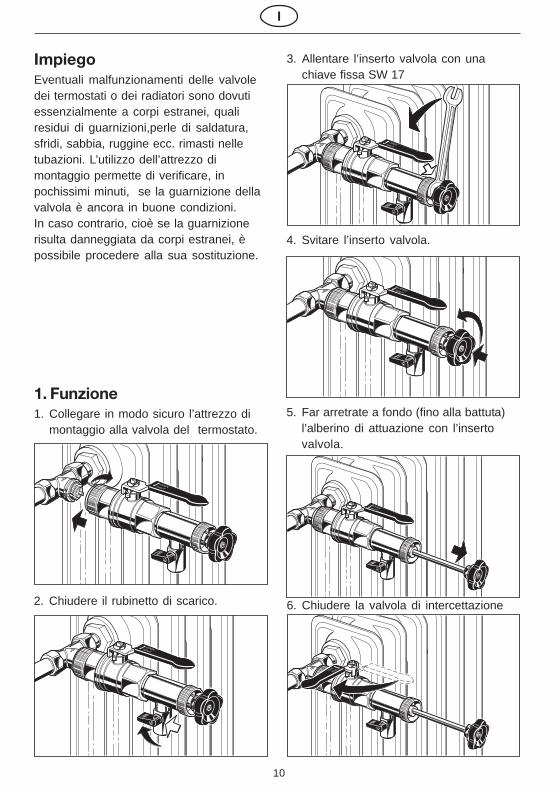
ImpiegoEventuali malfunzionamenti delle valvoledei termostati o dei radiatori sono dovutiessenzialmente a corpi estranei, qualiresidui di guarnizioni,perle di saldatura,sfridi, sabbia, ruggine ecc. rimasti nelletubazioni. L’utilizzo dell’attrezzo dimontaggio permette di verificare, inpochissimi minuti, se la guarnizione dellavalvola è ancora in buone condizioni.In caso contrario, cioè se la guarnizionerisulta danneggiata da corpi estranei, èpossibile procedere alla sua sostituzione.
1. Funzione1. Collegare in modo sicuro l’attrezzo di
montaggio alla valvola del termostato.
9
87 6 5
1
OPENSHUT
2. Chiudere il rubinetto di scarico.
3. Allentare l’inserto valvola con unachiave fissa SW 17
4. Svitare l’inserto valvola.
5. Far arretrate a fondo (fino alla battuta)l’alberino di attuazione con l’insertovalvola.
6. Chiudere la valvola di intercettazione
OPENSHUT
OPENSHUT
SHUT OPEN
OPENSHUT
OPENSHUT
11
2. UtilizzoPer la sostituzione di guarnizioni internedei componenti delle valvolediritte o ad angolo da 3/8" - 1" senza che sianecessario svuotare l’impianto.Filettatura di connessione M 30 x 1,5
3. AccessoriWV108MS Inserto adatto per l’inserto
valvola V 100 AA, AF, AG,AH, MA e V 100 U
WV108B Inserto a spazzola per lapulizia della sede valvolanella parte inferiore dellavalvola del termostato
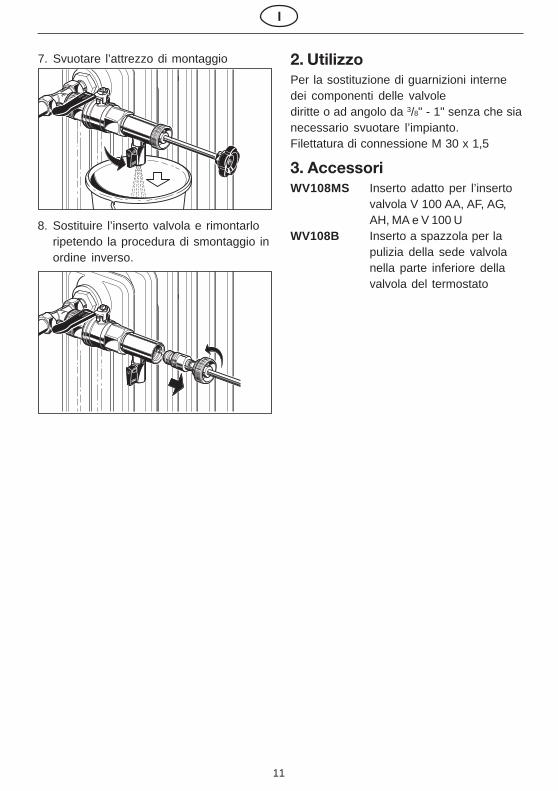
7. Svuotare l’attrezzo di montaggio
8. Sostituire l’inserto valvola e rimontarloripetendo la procedura di smontaggio inordine inverso.
SHUT OPEN
SHUT OPEN
I

MU
1H-1
541G
E23
R12
12
Environmental and Combustion ControlsHoneywell GmbHHardhofweg74821 MOSBACHGERMANYPhone: +49 (6261) 810Fax: +49 (6261) 81393http://ecc.emea.honeywell.com
© 2012 Honeywell International Inc.Subject to change without noticeManufactured for and on behalf of the Environmental andCombustion Controls Division of Honeywell TechnologiesSàrl, Z.A. La Pièce 16, 1180 Rolle, Switzerland or itsAuthorized Representative.