TERMOSTATO ELETTRONICO DA PARETE ... - CPF Tecnocontrol GECA · All’inserimento delle batterie e...
8
SCARICA IL MANUALE UTILIZZANDO IL SEGUENTE QR CODE,OPPURE COLLEGANDOTI AI SITI INTERNET : www.gecasrl.it - www.tecnocontrol.it DESCRIZIONE GENERALE DESCRIZIONE GENERALE DESCRIZIONE GENERALE DESCRIZIONE GENERALE DESCRIZIONE GENERALE Polo è un termostato che Vi permette di impostare con facilità la tem- peratura della vostra casa ruotando semplicemente l’ergonimica Ma- nopola. Polo è dotato di una un display retroilluminato con visualizzazione digita- le della temperatura misurata e della temperatura impostata. Esso permette il comando di impianti di riscaldamento e di condizionamento. Polo permette di memorizzare fino a 5 temperature in modalità ESTATE e 5 temperature in modalità INVERNO. Esso evita gli sprechi di energia azionando l’impianto di riscaldamento o condizionamento solo quando serve. INSTALLAZIONE INSTALLAZIONE INSTALLAZIONE INSTALLAZIONE INSTALLAZIONE Polo può essere installato direttamente su scatola da incasso 3 moduli oppure su parete. In entrambi i casi l’altezza consigliata è di 1,5m dal pavimento, in luogo asciutto, esente da correnti d’aria e lontano da fonti di calore. INSTALLAZIONE SU SCATOLA 503 INSTALLAZIONE SU SCATOLA 503 INSTALLAZIONE SU SCATOLA 503 INSTALLAZIONE SU SCATOLA 503 INSTALLAZIONE SU SCATOLA 503 Dopo aver effettuato il collegamento elettrico fissare il termostato Polo direttamente sulla scatola da incasso 3 moduli utilizzando le viti tipo “A” in dotazione (Fig.3). 1 - Fissare la BASE alla scatola 503 con le viti “C” (Fig.4). 2 - Fissare il FRONTALE alla BASE con le viti “A” (Fig.5). 3 - Montare l’ANTINA sul FRONTALE inserendo i 4 ganci nelle apposite fessure (Fig.6). Fig.4 INSTALLAZIONE A PARETE INSTALLAZIONE A PARETE INSTALLAZIONE A PARETE INSTALLAZIONE A PARETE INSTALLAZIONE A PARETE Dopo aver fissato la BASE alla parete (Fig.7) mediante tasselli e viti tipo “B” in dotazione, collegare elettricamente il termostato e fissarlo alla BASE con le viti tipo “A” (Fig.8). Infine montare l’ANTINA sul FRONTALE. (Fig.9) Fig.3 Viti in dotazione VITI “C” VITI “A” Fig.5 Fig.7 Fig.6 VITI “A” Fig.8 VITI “B” BASE FRONTALE BASE CESTELLO BASE BASE FRONTALE COLLEGAMENTO ELETTRICO COLLEGAMENTO ELETTRICO COLLEGAMENTO ELETTRICO COLLEGAMENTO ELETTRICO COLLEGAMENTO ELETTRICO ANTINA FRONTALE TERMOSTATO TERMOSTATO TERMOSTATO TERMOSTATO TERMOSTATO ELETTRONICO ELETTRONICO ELETTRONICO ELETTRONICO ELETTRONICO DA DA DA DA DA PARETE PARETE PARETE PARETE PARETE Polo Collegamento con bruciatore, cal- daia murale, impianto di condizionamento, valvola di zona con ritorno a molla (Fig.1): Collegamento con valvola di zona (Fig.2): Fig.1 Fig.2 1 2 3 Polo apre chiude COM NC NA COM NC NA U Polo 1 2 3 Italiano Made Made Made Made Made in in in in in Italy Italy Italy Italy Italy 1 2 3.536.2155 TE231 3.537.2156 TE232 COLORE COLORE COLORE COLORE COLORE Bianco Antracite
-
Upload
doankhuong -
Category
Documents
-
view
215 -
download
0
Transcript of TERMOSTATO ELETTRONICO DA PARETE ... - CPF Tecnocontrol GECA · All’inserimento delle batterie e...

SCARICA IL MANUALE UTILIZZANDO ILSEGUENTE QR CODE,OPPURECOLLEGANDOTI AI SITI INTERNET:www.gecasrl.it - www.tecnocontrol.it
DESCRIZIONE GENERALEDESCRIZIONE GENERALEDESCRIZIONE GENERALEDESCRIZIONE GENERALEDESCRIZIONE GENERALEPolo è un termostato che Vi permette di impostare con facilità la tem-peratura della vostra casa ruotando semplicemente l’ergonimica Ma-nopola.Polo è dotato di una un display retroilluminato con visualizzazione digita-le della temperatura misurata e della temperatura impostata.Esso permette il comando di impianti di riscaldamento e dicondizionamento.Polo permette di memorizzare fino a 5 temperature in modalità ESTATEe 5 temperature in modalità INVERNO.Esso evita gli sprechi di energia azionando l’impianto di riscaldamento ocondizionamento solo quando serve.
INSTALLAZIONEINSTALLAZIONEINSTALLAZIONEINSTALLAZIONEINSTALLAZIONEPolo può essere installato direttamente su scatola da incasso 3 modulioppure su parete.In entrambi i casi l’altezza consigliata è di 1,5m dal pavimento, in luogoasciutto, esente da correnti d’aria e lontano da fonti di calore.
INSTALLAZIONE SU SCATOLA 503INSTALLAZIONE SU SCATOLA 503INSTALLAZIONE SU SCATOLA 503INSTALLAZIONE SU SCATOLA 503INSTALLAZIONE SU SCATOLA 503Dopo aver effettuato il collegamento elettrico fissare il termostato Polodirettamente sulla scatola da incasso 3 moduli utilizzando le viti tipo “A”in dotazione (Fig.3).1 - Fissare la BASE alla scatola 503 con le viti “C” (Fig.4).2 - Fissare il FRONTALE alla BASE con le viti “A” (Fig.5).3 - Montare l’ANTINA sul FRONTALE inserendo i 4 ganci nelleapposite fessure (Fig.6).
Fig.4
INSTALLAZIONE A PARETEINSTALLAZIONE A PARETEINSTALLAZIONE A PARETEINSTALLAZIONE A PARETEINSTALLAZIONE A PARETEDopo aver fissato la BASE alla parete (Fig.7) mediante tasselli e vititipo “B” in dotazione, collegare elettricamente il termostato e fissarloalla BASE con le viti tipo “A” (Fig.8).Infine montare l’ANTINA sul FRONTALE. (Fig.9)
Fig.3 Viti in dotazione
VITI “C”
VITI “A”
Fig.5
Fig.7
Fig.6
VITI “A”Fig.8
VITI “B”
BASE
FRONTALE
BASE
CESTELLO
BASE
BASE
FRONTALE
COLLEGAMENTO ELETTRICOCOLLEGAMENTO ELETTRICOCOLLEGAMENTO ELETTRICOCOLLEGAMENTO ELETTRICOCOLLEGAMENTO ELETTRICO ANTINA
FRONTALE
TERMOSTATO TERMOSTATO TERMOSTATO TERMOSTATO TERMOSTATO ELETTRONICO ELETTRONICO ELETTRONICO ELETTRONICO ELETTRONICO DA DA DA DA DA PARETEPARETEPARETEPARETEPARETE
Polo
Collegamento con bruciatore, cal-daia murale, impianto dicondizionamento, valvola di zonacon ritorno a molla (Fig.1):
Collegamento con valvola dizona (Fig.2):
Fig.1 Fig.2
1 2 3
Polo
apre
chiude
COM NC NACOM NC NA
U
Polo
1 2 3
ItalianoMadeMadeMadeMadeMadeinininininItalyItalyItalyItalyItaly
1 2
3.536.2155 TE231 3.537.2156 TE232
COLORECOLORECOLORECOLORECOLORE
BiancoAntracite

ALIMENTAZIONEALIMENTAZIONEALIMENTAZIONEALIMENTAZIONEALIMENTAZIONEIl termostato Polo va alimentato con due comuni batterie Alcaline AAA(ministilo) da 1,5V che ne garantiscono il funzionamento per almeno 2anni (in funzionamento STAND-BY).Le batterie vanno inserite nell’apposito vano situato sotto l’ANTINA se-guendo la polarità indicata sulla plastica (Fig.10).
ACCENSIONE / RESETACCENSIONE / RESETACCENSIONE / RESETACCENSIONE / RESETACCENSIONE / RESETAll’inserimento delle batterie e all’avvio della funzione RESET il termo-stato effettua un ciclo di controllo accendendo tutti i segmenti del displaye attivando il carico per pochi secondi (Fig.11A). Successivamente il ter-mostato si pone nella fase di STAND-BY ON (Fig.11B).
Fig.9
Fig.10
La funzione di RESET si attiva premendo contemporaneamente percirca due secondi i tasti Set>, °C/h e Memory.La funzione RESET cancella completamente la memoria.
Fig.11A Fig.11 B
IMPOSTAZIONE DELL’ORAIMPOSTAZIONE DELL’ORAIMPOSTAZIONE DELL’ORAIMPOSTAZIONE DELL’ORAIMPOSTAZIONE DELL’ORAQuando il termostato è in STAND-BY, tenere premuto il tasto Set> finoal LAMPEGGIO dei MINUTI.(Fig.12A).Il pulsante Memory incrementa i MINUTI, mentre il pulsante °C/h lidecrementa.
Per impostare le ORE (Fig.12B) premere brevemente il pulsante Set>.
Impostare le ORE nello stesso modo eseguito per i MINUTI.
E’ possibile passare alternativamente dall’impostazione dei MINUTI edelle ORE premendo brevemente il pulsante Set>.
Per confermare l’orario tenere premuto il pulsante Set> finchè sia iMINUTI che le ORE terminino di lampeggiare, e inizino a lampeggiarei due punti.
Se non viene confermato l’orario impostato, dopo 10 secondi iltermostato ritorna in modalità STAND-BY mantenendo l’orarioprecedente.
MODALITA’ STAND-BYMODALITA’ STAND-BYMODALITA’ STAND-BYMODALITA’ STAND-BYMODALITA’ STAND-BYIn modalità STAND-BY il termostato Polo si presenta con laretroilluminazione spenta. Sul display è visualizzata la temperatura ol’orario.Per visualizzare la temperatura oppure l’orario premere il pulsante °C/h.Sul display potrebbero essere presenti i seguenti simboli:
La presenza della fiamma indica che l’impianto è in funzione. La presenza del simbolo batteria indica che le batterie sono scariche.
Fig.12A Fig.12B Fig.12C
FUNZIONAMENTOFUNZIONAMENTOFUNZIONAMENTOFUNZIONAMENTOFUNZIONAMENTOLa parete frontale del termostato Polo presenta una Manopola perl’impostazione della soglia della temperatura ambiente desideratanell’intervallo di regolazione compreso tra 5°C ( ) e 35 °C (Fig.13A).
Fig.13A Fig.13B
Ad ogni rotazione della Manopola il termostato misura istantaneamentela temperatura ambiente e di conseguenza l’eventuale attivazione/disattivazione dell’impianto di riscaldamento/raffrescamento (Caldaia-Bruciatore - Valvola di zona ecc.) avviene immediatamente.
Vi sarà l’attivazione dell’impianto quando sul display comparirà il sim-bolo della FIAMMA (Fig.13B) .
Se la Manopola non viene ruotata la misurazione della temperatura e l’eventuale attivazione/disattivazione dell’impianto avviene ogni minuto.
MODALITA’ ESTATE/INVERNOMODALITA’ ESTATE/INVERNOMODALITA’ ESTATE/INVERNOMODALITA’ ESTATE/INVERNOMODALITA’ ESTATE/INVERNO
OFF
Sotto l’ANTINA FRONTALE si trova un SELETTORE (Fig.14) chepermette di impostare la modalità di funzionamento stagionaleINVERNO ( ) per impianti di riscaldamento o ESTATE ( ) perimpianti di condizionamento.
OFF
ANTINA
FRONTALE
Fig.14
3 4
OFF
CONDIZIONI GENERALI DI GARANZIAIL PRESENTE CERTIFICATO E' L' UNICO DOCUMENTO CHE
DA' DIRITTO ALLA RIPARAZIONE DEL PRODOTTO INGARANZIA
- Il prodotto é GARANTITO per un periodo di 24 mesi dalla data di acquisto.- Non sono coperti da GARANZIA eventuali danni derivati da manomissioni,uso ed installazione errati o impropri.- La GARANZIA è valida solo se debitamente compilata.- In caso di difetti coperti da GARANZIA, il produttore riparerà o sostituirà ilprodotto gratuitamente.PRESTAZIONI FUORI GARANZIA:Trascorsi i termini o la durata della GARANZIA le eventuali riparazioni verrannoaddebitate in funzione alle parti sostituite e al costo della manodopera.
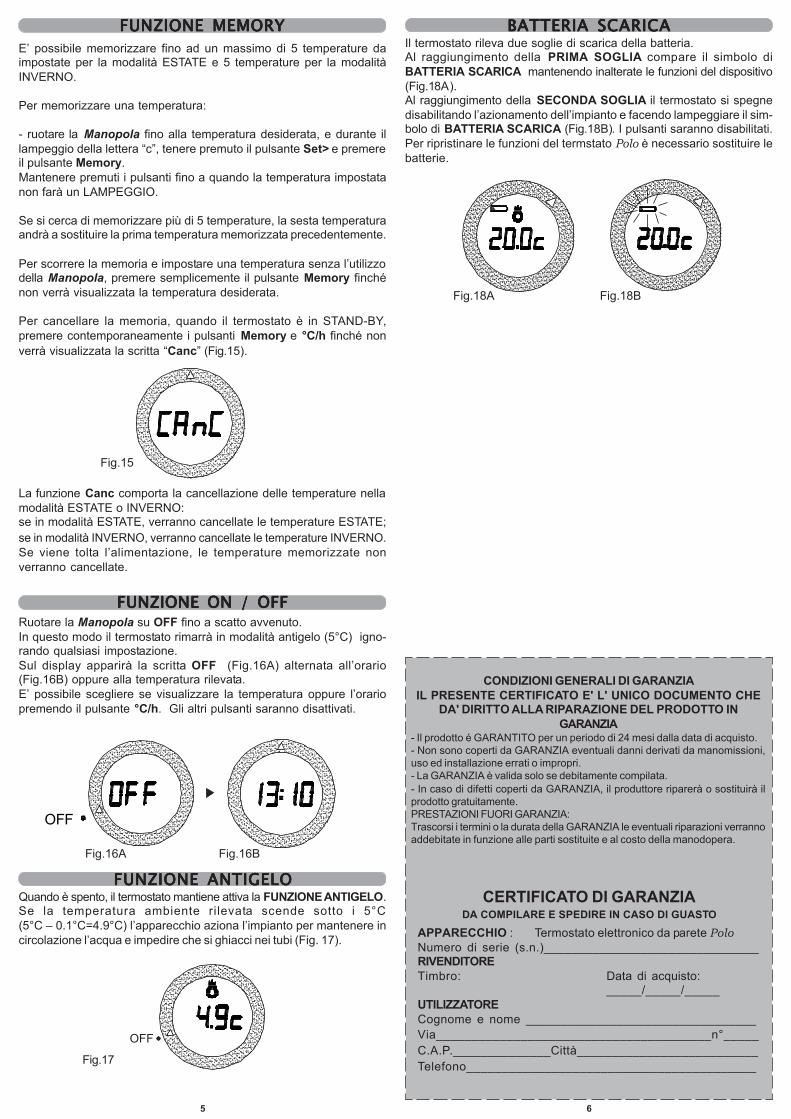
FUNZIONE ANTIGELOFUNZIONE ANTIGELOFUNZIONE ANTIGELOFUNZIONE ANTIGELOFUNZIONE ANTIGELOQuando è spento, il termostato mantiene attiva la FUNZIONE ANTIGELO.Se la temperatura ambiente rilevata scende sotto i 5°C(5°C – 0.1°C=4.9°C) l’apparecchio aziona l’impianto per mantenere incircolazione l’acqua e impedire che si ghiacci nei tubi (Fig. 17).
Ruotare la Manopola su OFF fino a scatto avvenuto.In questo modo il termostato rimarrà in modalità antigelo (5°C) igno-rando qualsiasi impostazione.Sul display apparirà la scritta OFF (Fig.16A) alternata all’orario(Fig.16B) oppure alla temperatura rilevata.E’ possibile scegliere se visualizzare la temperatura oppure l’orariopremendo il pulsante °C/h. Gli altri pulsanti saranno disattivati.
FUNZIONE ON / OFFFUNZIONE ON / OFFFUNZIONE ON / OFFFUNZIONE ON / OFFFUNZIONE ON / OFF
FUNZIONE MEMORYFUNZIONE MEMORYFUNZIONE MEMORYFUNZIONE MEMORYFUNZIONE MEMORY
Fig.16A Fig.16B
Il termostato rileva due soglie di scarica della batteria.Al raggiungimento della PRIMA SOGLIA compare il simbolo diBATTERIA SCARICA mantenendo inalterate le funzioni del dispositivo(Fig.18A).Al raggiungimento della SECONDA SOGLIA il termostato si spegnedisabilitando l’azionamento dell’impianto e facendo lampeggiare il sim-bolo di BATTERIA SCARICA (Fig.18B). I pulsanti saranno disabilitati.Per ripristinare le funzioni del termstato Polo è necessario sostituire lebatterie.
BATTERIA SCARICABATTERIA SCARICABATTERIA SCARICABATTERIA SCARICABATTERIA SCARICA
Fig.18A Fig.18B
E’ possibile memorizzare fino ad un massimo di 5 temperature daimpostate per la modalità ESTATE e 5 temperature per la modalitàINVERNO.
Per memorizzare una temperatura:
- ruotare la Manopola fino alla temperatura desiderata, e durante illampeggio della lettera “c”, tenere premuto il pulsante Set> e premereil pulsante Memory.Mantenere premuti i pulsanti fino a quando la temperatura impostatanon farà un LAMPEGGIO.
Se si cerca di memorizzare più di 5 temperature, la sesta temperaturaandrà a sostituire la prima temperatura memorizzata precedentemente.
Per scorrere la memoria e impostare una temperatura senza l’utilizzodella Manopola, premere semplicemente il pulsante Memory finchénon verrà visualizzata la temperatura desiderata.
Per cancellare la memoria, quando il termostato è in STAND-BY,premere contemporaneamente i pulsanti Memory e °C/h finché nonverrà visualizzata la scritta “Canc” (Fig.15).
Fig.15
La funzione Canc comporta la cancellazione delle temperature nellamodalità ESTATE o INVERNO:se in modalità ESTATE, verranno cancellate le temperature ESTATE;se in modalità INVERNO, verranno cancellate le temperature INVERNO.Se viene tolta l’alimentazione, le temperature memorizzate nonverranno cancellate.
Fig.17
OFF
5 6
CERTIFICATO DI GARANZIADA COMPILARE E SPEDIRE IN CASO DI GUASTO
APPARECCHIO : Termostato elettronico da parete PoloNumero di serie (s.n.)_______________________________RIVENDITORETimbro: Data di acquisto:
_____/_____/_____UTILIZZATORECognome e nome _________________________________Via_______________________________________n°_____C.A.P.______________Città__________________________Telefono_________________________________________
OFF
Set >
°C/h
Memory
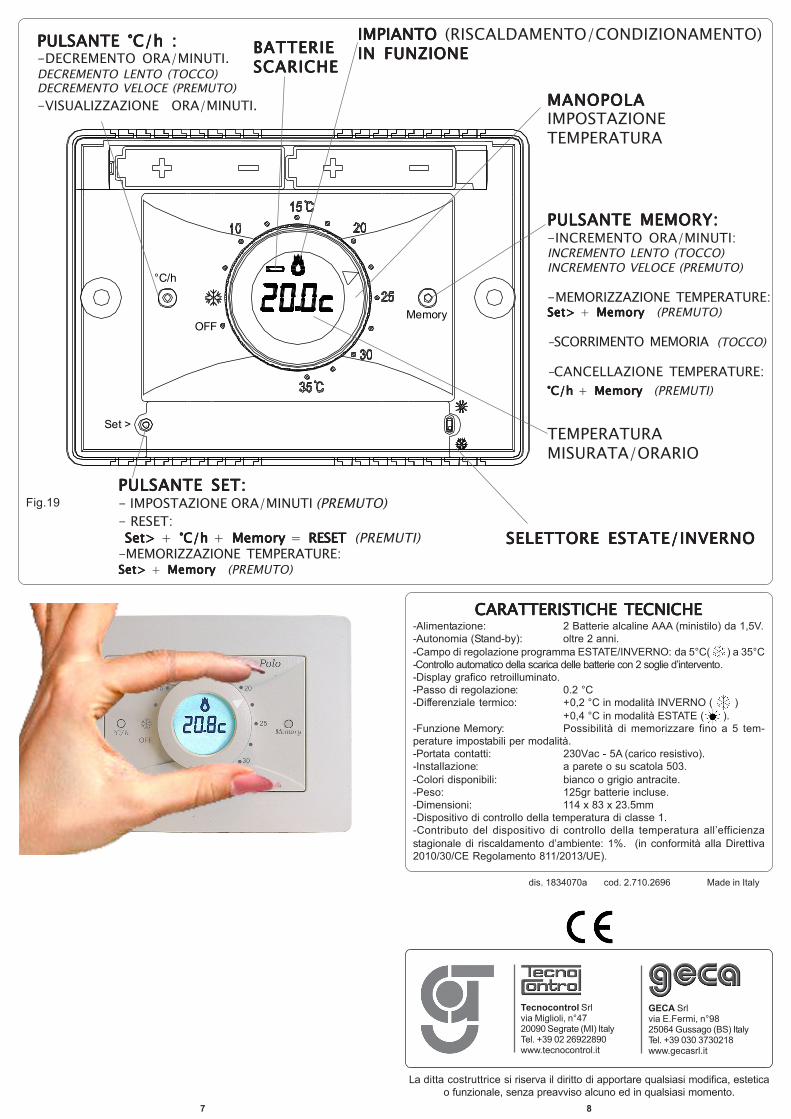
CARATTERISTICHE TECNICHECARATTERISTICHE TECNICHECARATTERISTICHE TECNICHECARATTERISTICHE TECNICHECARATTERISTICHE TECNICHE-Alimentazione: 2 Batterie alcaline AAA (ministilo) da 1,5V.-Autonomia (Stand-by): oltre 2 anni.-Campo di regolazione programma ESTATE/INVERNO: da 5°C( ) a 35°C-Controllo automatico della scarica delle batterie con 2 soglie d’intervento.-Display grafico retroilluminato.-Passo di regolazione: 0.2 °C-Differenziale termico: +0,2 °C in modalità INVERNO ( )
+0,4 °C in modalità ESTATE ( ).-Funzione Memory: Possibilità di memorizzare fino a 5 tem-perature impostabili per modalità.-Portata contatti: 230Vac - 5A (carico resistivo).-Installazione: a parete o su scatola 503.-Colori disponibili: bianco o grigio antracite.-Peso: 125gr batterie incluse.-Dimensioni: 114 x 83 x 23.5mm-Dispositivo di controllo della temperatura di classe 1.-Contributo del dispositivo di controllo della temperatura all’efficienzastagionale di riscaldamento d’ambiente: 1%. (in conformità alla Direttiva2010/30/CE Regolamento 811/2013/UE).
TEMPERATURAMISURATA/ORARIO
PULSANTE MEMORY:PULSANTE MEMORY:PULSANTE MEMORY:PULSANTE MEMORY:PULSANTE MEMORY:-INCREMENTO ORA/MINUTI:INCREMENTO LENTO (TOCCO)INCREMENTO VELOCE (PREMUTO)
-MEMORIZZAZIONE TEMPERATURE:Set>Set>Set>Set>Set> + MemoryMemoryMemoryMemoryMemory (PREMUTO)
-SCORRIMENTO MEMORIA (TOCCO)
-CANCELLAZIONE TEMPERATURE:°C/h°C/h°C/h°C/h°C/h + MemoryMemoryMemoryMemoryMemory (PREMUTI)
SELETTORE ESTATE/INVERNOSELETTORE ESTATE/INVERNOSELETTORE ESTATE/INVERNOSELETTORE ESTATE/INVERNOSELETTORE ESTATE/INVERNO
Fig.19PULSANTE SET:PULSANTE SET:PULSANTE SET:PULSANTE SET:PULSANTE SET:- IMPOSTAZIONE ORA/MINUTI (PREMUTO)- RESET: Set> Set> Set> Set> Set> + °C/h°C/h°C/h°C/h°C/h + MemoryMemoryMemoryMemoryMemory = RESET RESET RESET RESET RESET (PREMUTI)-MEMORIZZAZIONE TEMPERATURE:Set>Set>Set>Set>Set> + MemoryMemoryMemoryMemoryMemory (PREMUTO)
PULSANTE °C/h :PULSANTE °C/h :PULSANTE °C/h :PULSANTE °C/h :PULSANTE °C/h :-DECREMENTO ORA/MINUTI.DECREMENTO LENTO (TOCCO)DECREMENTO VELOCE (PREMUTO)-VISUALIZZAZIONE ORA/MINUTI. MANOPOLAMANOPOLAMANOPOLAMANOPOLAMANOPOLA
IMPOSTAZIONETEMPERATURA
IMPIANTOIMPIANTOIMPIANTOIMPIANTOIMPIANTO (RISCALDAMENTO/CONDIZIONAMENTO)IN FUNZIONEIN FUNZIONEIN FUNZIONEIN FUNZIONEIN FUNZIONEBATTERIEBATTERIEBATTERIEBATTERIEBATTERIE
SCARICHESCARICHESCARICHESCARICHESCARICHE
dis. 1834070a cod. 2.710.2696 Made in Italy
La ditta costruttrice si riserva il diritto di apportare qualsiasi modifica, esteticao funzionale, senza preavviso alcuno ed in qualsiasi momento.
1234567812345678
1234567812345678
121212121212
Tecnocontrol Srlvia Miglioli, n°4720090 Segrate (MI) ItalyTel. +39 02 26922890www.tecnocontrol.it
GECA Srlvia E.Fermi, n°9825064 Gussago (BS) ItalyTel. +39 030 3730218www.gecasrl.it
7 8
English
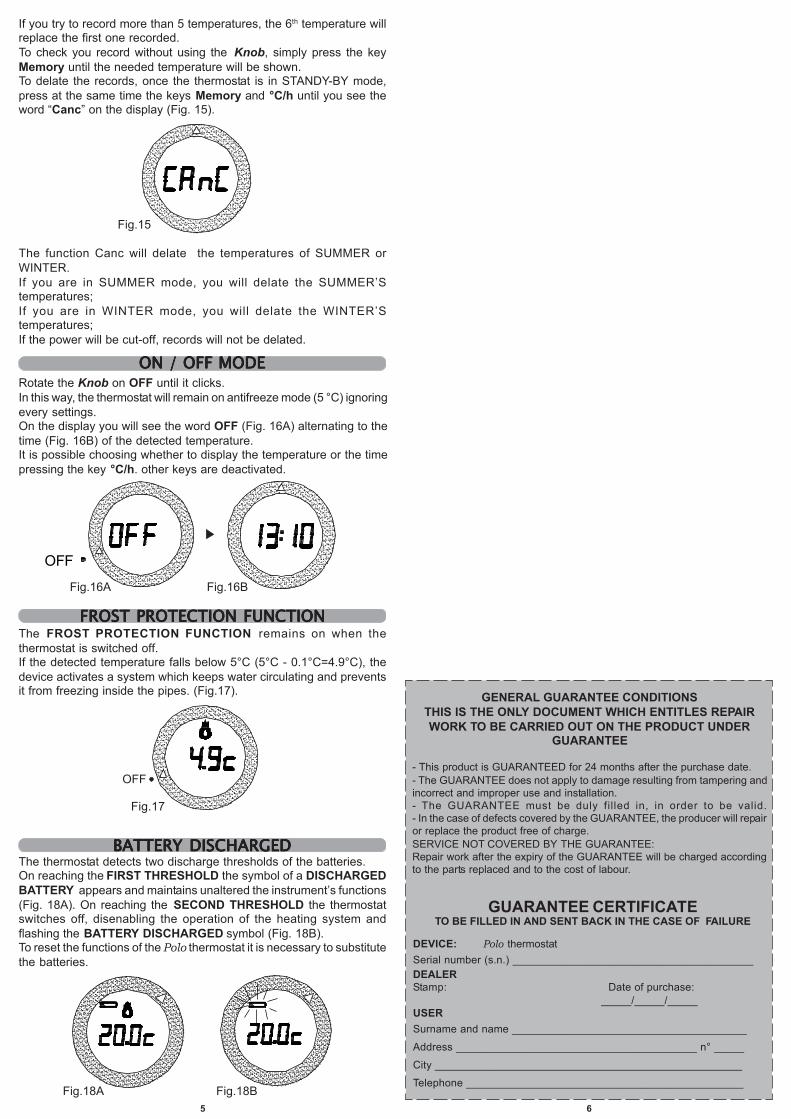
INSTALLATIONINSTALLATIONINSTALLATIONINSTALLATIONINSTALLATIONPolo can be installed directly on the 3 module built-in box or on thewall.In both cases we recommend installing it at a height of 1.5 m from thefloor, in dry places, away from air drafts and heat sources.
ELECTRICAL CONNECTIONELECTRICAL CONNECTIONELECTRICAL CONNECTIONELECTRICAL CONNECTIONELECTRICAL CONNECTION
INSTALLATION ON A 503 BOXINSTALLATION ON A 503 BOXINSTALLATION ON A 503 BOXINSTALLATION ON A 503 BOXINSTALLATION ON A 503 BOXAfter carrying out the electrical connection fix the Polo thermostatdirectly on the built-in box using the A type screws supplied (Fig. 3).1-Fix the BASE to the box 503 using the C screws (Fig.4).2-Fix the FRONT piece to the BASE using the A screws (Fig.5).3- Mount the lid on the FRONT PIECE by inserting the 4 hooks in theslots (Fig. 6).ATTENTION: AVOID EXCESSIVE TIGHTENING SO AS NOT TODEFORM THE FRONT PIECE.
Fig.4
WALL INSTALLATIONWALL INSTALLATIONWALL INSTALLATIONWALL INSTALLATIONWALL INSTALLATIONAfter fixing the BASE to the wall (Fig.7) using the supplied Fishers andscrews (type B), connect the thermostat to the electric supply and fix itto the BASE using type “A” screws (Fig. 8).Finally mount the LID on the FRONT PIECE (Fig.9)
Fig.3 Screws supplied
“A” SCREWS
Fig.5
Fig.7
Fig.6
Fig.8
BASE
FRONT PIECE
BASE
BASKET
BASE
BASE
“C” SCREWS
“B” SCREWS
3.536.2155 TE231 3.537.2156 TE232
Connection to burners, wall-mounted boilers, conditioningsystems and spring return zonevalves (Fig. 1):
Connection to the zone valve(Fig.2):
Fig.1 Fig.2
Fig.9
COLOURCOLOURCOLOURCOLOURCOLOUR
WhiteAnthracite grey
1 2
DOWNLOAD THE MANUALUSING THE FOLLOWING QR CODEOR LINKING AT WEB SITEwww.gecasrl.it - www.tecnocontrol.it
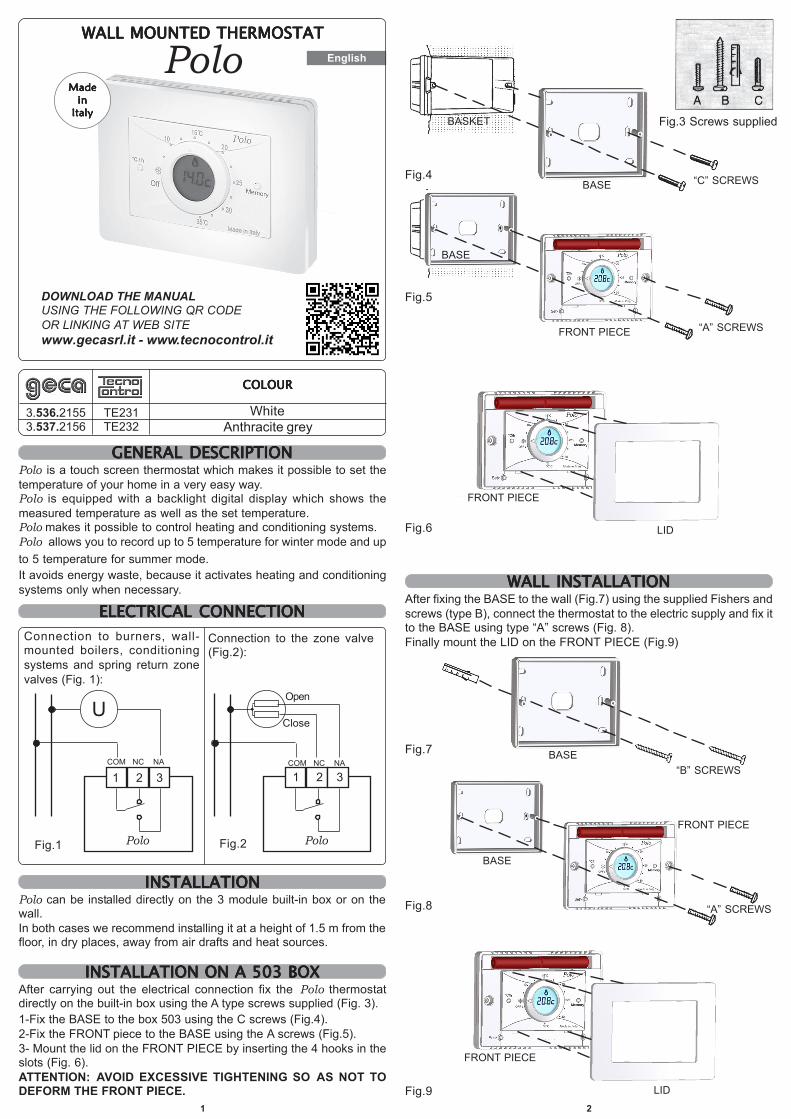
GENERAL DESCRIPTIONGENERAL DESCRIPTIONGENERAL DESCRIPTIONGENERAL DESCRIPTIONGENERAL DESCRIPTIONPolo is a touch screen thermostat which makes it possible to set thetemperature of your home in a very easy way.Polo is equipped with a backlight digital display which shows themeasured temperature as well as the set temperature.Polo makes it possible to control heating and conditioning systems.Polo allows you to record up to 5 temperature for winter mode and upto 5 temperature for summer mode.It avoids energy waste, because it activates heating and conditioningsystems only when necessary.
COM NC NA
U
Polo
1 2 3 1 2 3
Polo
Open
Close
COM NC NA
LID
FRONT PIECE
“A” SCREWS
LID
FRONT PIECE
FRONT PIECE
WALL MOUNTED THERMOSTATWALL MOUNTED THERMOSTATWALL MOUNTED THERMOSTATWALL MOUNTED THERMOSTATWALL MOUNTED THERMOSTAT
PoloMadeMadeMadeMadeMadeinininininItalyItalyItalyItalyItaly

POWER SUPPLYPOWER SUPPLYPOWER SUPPLYPOWER SUPPLYPOWER SUPPLYTwo standard 1.5 AAA Alkaline batteries supply power to the thermostat.They guarantee a period of operation of at least 2 years (in the STAND-BY mode).Batteries can be inserted easily in the compartment under the LID byobserving the polarity shown on the plastic part .(Fig.10).
Fig.10
SWITCHING ON / RESETSWITCHING ON / RESETSWITCHING ON / RESETSWITCHING ON / RESETSWITCHING ON / RESETAfter inserting the batteries and starting the RESET, the thermostatcarries out a control cycle by switching on all segments of the displayand activating the load within a few seconds (fig. 11a); then, thethermostat goes over to the STAND-BY phase. (fig. 11B).
The function of RESET of the thermostat is activated by pressingcontemporarily – for 2 seconds – Set>, °C/h e Memory.The function RESET, completely delate the records.
Fig.11A Fig.11 B
TIME SETTINGTIME SETTINGTIME SETTINGTIME SETTINGTIME SETTINGWhen the thermostat is in STAND-BY mode, press the key Set> till theminutes start flashing. (Fig. 12A)The key Memory increases the minutes, the key °C/h decreases theminutes.
To set the hours, (Fig. 12B) press the key Set>, the use same procedureas per minutes.It is possible pass from the setting of minutes to the setting of thehours by pressing briefly the key Set>.To confirm the time keep pressing the key Set>, till the minutes andthe hour stop flashing.If you do not confirm the time, the thermostat get back to STAND-BYmode keeping the old time.
STAND-BY MODESTAND-BY MODESTAND-BY MODESTAND-BY MODESTAND-BY MODEThe thermostat Polo in STAND-BY mode is with backlit off.On the display you can see the temperature or the time.To check the temperature or the time, press °C/h.The display can show:
The presence of the flame inform that the system is ON.
The presence of the symbol of the battery inform that thebatteries are low.
Fig.12A Fig.12B Fig.12C
SUMMER/WINTER MODESUMMER/WINTER MODESUMMER/WINTER MODESUMMER/WINTER MODESUMMER/WINTER MODE
OFF
Under the front piece you have the selector ( Fig. 14) that allows youto set seasonal’ s program; winter ( ) for heating and summer( ) for air condition.
OFF
Fig.14
If you do not rotate the Knob, the measurement of the temperatureand eventual activation/deactivation of the system are done everyminute.
It is possible recording maximum 5 temperatures for summer modeand 5 temperatures for winter mode.
To record a temperature:
-Rotate the Knob till the chosen temperature, while the letter “c” isflashing, press the keys Set> and Memory. Keep those keys pressedtill the set temperature will flash once.
MEMORY FUNCTIONMEMORY FUNCTIONMEMORY FUNCTIONMEMORY FUNCTIONMEMORY FUNCTION
3 4
FUNCTIONINGFUNCTIONINGFUNCTIONINGFUNCTIONINGFUNCTIONINGThe frontal part of the thermostat has a control knob to set the thresholdof the temperature between 5°C ( ) and 35°C (Fig.13A).
Fig.13A Fig.13B
At every rotation of the Knob the thermostat immediately measure thetemperature of the ambient and if necessary activate/deactivate theheating/ cooling system (Boiler, burner, valve etc.)The system will be ON once is visualized the symbol of the flame.
At every rotation of the Knob the thermostat immediately measure thetemperature of the ambient and if necessary activate/deactivate theheating/ cooling system (Boiler, burner, valve etc.)
The system will be ON once is visualized the symbol of the flame(Fig.13B).
OFF
GENERAL GUARANTEE CONDITIONSTHIS IS THE ONLY DOCUMENT WHICH ENTITLES REPAIRWORK TO BE CARRIED OUT ON THE PRODUCT UNDER
GUARANTEE
- This product is GUARANTEED for 24 months after the purchase date.- The GUARANTEE does not apply to damage resulting from tampering andincorrect and improper use and installation.- The GUARANTEE must be duly filled in, in order to be valid.- In the case of defects covered by the GUARANTEE, the producer will repairor replace the product free of charge.SERVICE NOT COVERED BY THE GUARANTEE:Repair work after the expiry of the GUARANTEE will be charged accordingto the parts replaced and to the cost of labour.
FROST PROTECTION FUNCTIONFROST PROTECTION FUNCTIONFROST PROTECTION FUNCTIONFROST PROTECTION FUNCTIONFROST PROTECTION FUNCTIONThe FROST PROTECTION FUNCTION remains on when thethermostat is switched off.If the detected temperature falls below 5°C (5°C - 0.1°C=4.9°C), thedevice activates a system which keeps water circulating and preventsit from freezing inside the pipes. (Fig.17).
ON / OFF MODEON / OFF MODEON / OFF MODEON / OFF MODEON / OFF MODE
Fig.16A Fig.16B
Fig.18A Fig.18B
If you try to record more than 5 temperatures, the 6th temperature willreplace the first one recorded.To check you record without using the Knob, simply press the keyMemory until the needed temperature will be shown.To delate the records, once the thermostat is in STANDY-BY mode,press at the same time the keys Memory and °C/h until you see theword “Canc” on the display (Fig. 15).
Fig.15
The function Canc will delate the temperatures of SUMMER orWINTER.If you are in SUMMER mode, you will delate the SUMMER’Stemperatures;If you are in WINTER mode, you will delate the WINTER’Stemperatures;If the power will be cut-off, records will not be delated.
Fig.17
OFF
The thermostat detects two discharge thresholds of the batteries.On reaching the FIRST THRESHOLD the symbol of a DISCHARGEDBATTERY appears and maintains unaltered the instrument’s functions(Fig. 18A). On reaching the SECOND THRESHOLD the thermostatswitches off, disenabling the operation of the heating system andflashing the BATTERY DISCHARGED symbol (Fig. 18B).To reset the functions of the Polo thermostat it is necessary to substitutethe batteries.
BATTERY DISCHARGEDBATTERY DISCHARGEDBATTERY DISCHARGEDBATTERY DISCHARGEDBATTERY DISCHARGED
GUARANTEE CERTIFICATETO BE FILLED IN AND SENT BACK IN THE CASE OF
FAILURE
DEVICE: Polo thermostatSerial number (s.n.) ________________________________________DEALERStamp: Date of purchase:
_____/_____/_____USERSurname and name _______________________________________
Address ________________________________________ n° _____
City ___________________________________________________
Telephone ______________________________________________
5 6
Rotate the Knob on OFF until it clicks.In this way, the thermostat will remain on antifreeze mode (5 °C) ignoringevery settings.On the display you will see the word OFF (Fig. 16A) alternating to thetime (Fig. 16B) of the detected temperature.It is possible choosing whether to display the temperature or the timepressing the key °C/h. other keys are deactivated.

OFF
Set >
°C/h
Memory
TECHNICAL CHARACTERISTICSTECHNICAL CHARACTERISTICSTECHNICAL CHARACTERISTICSTECHNICAL CHARACTERISTICSTECHNICAL CHARACTERISTICS-Power source: 2 x 1.5V AAA alkaline batteries.-Autonomy (Stand-by): more than 2 years.-Regulation range SUMMER/WINNER mode: from 5°C ( ) to 35°C.-Automatic control of the battery discharge with two intervention thresholds.-Backlight display.-Regulation range 0.2°C-Adjustment steps: +0,2 °C in modalità INVERNO ( )
+0,4 °C in modalità ESTATE ( ).-Memory function: you can record up to 5 temperatures per mode.-Contact capacity: 230Vac - 5A (resistive load).-Installation: wall mounted or directly onto a 503 pattress box.-Colours available: white or anthracite grey.-Weight: 110gr including the batteries.-Dimensions: 114 x 83 x 23.5mm-Device for temperature regulation of class 1.-Device temperature control at the efficiency seasonal heatingenvironment: 1% (in accordance with Directive 2010/30 / EC Regulation811/2013 / EU).
MEASUREDTEMPERATURE/TIME
PULSANTE MEMORY’S KEYS:PULSANTE MEMORY’S KEYS:PULSANTE MEMORY’S KEYS:PULSANTE MEMORY’S KEYS:PULSANTE MEMORY’S KEYS:-INCREASE HOURS/MINUTESSLOW DECREASE (TOUCH)FAST DECREASE (PRESS)
-RECORD TEMPERATURE:Set>Set>Set>Set>Set> + MemoryMemoryMemoryMemoryMemory (PRESS)
- CHECK RECORDS (TOUCH)
- DELATE RECORDS°C/h°C/h°C/h°C/h°C/h + MemoryMemoryMemoryMemoryMemory (PRESS)
SUMMER/WINTER SELECTORSUMMER/WINTER SELECTORSUMMER/WINTER SELECTORSUMMER/WINTER SELECTORSUMMER/WINTER SELECTOR
Fig.19SET KEY:SET KEY:SET KEY:SET KEY:SET KEY:- SET HOURS/MINUTES (PRESS)- HOW TO RESET: Set> Set> Set> Set> Set> + °C/h°C/h°C/h°C/h°C/h + MemoryMemoryMemoryMemoryMemory = RESET RESET RESET RESET RESET (PRESS)-HOW TO RECORD TEMPERATURE:Set>Set>Set>Set>Set> + MemoryMemoryMemoryMemoryMemory (PRESS)
KEY °C/h :KEY °C/h :KEY °C/h :KEY °C/h :KEY °C/h :-DECREASE HOURS/MINUTESSLOW DECREASE (TOUCH)FAST DECREASE (PRESS)-SHOW HOURS/MINUTES. CONTROL KNOBCONTROL KNOBCONTROL KNOBCONTROL KNOBCONTROL KNOB
(Setting temperature)
SISTEM ONSISTEM ONSISTEM ONSISTEM ONSISTEM ON (Heating/Cooling)DESCHARGEDESCHARGEDESCHARGEDESCHARGEDESCHARGEBATTERIESBATTERIESBATTERIESBATTERIESBATTERIES
dis. 1834070a cod. 2.710.2696 Made in Italy
The manufacturer firm reserves the right to make any aesthetic or functionalmodificationswithout notice and at any moment.
GECA Srlvia E.Fermi, n°9825064 Gussago (BS) ItalyTel. +39 030 3730218www.gecasrl.it
Tecnocontrol Srlvia Miglioli, n°4720090 Segrate (MI) ItalyTel. +39 02 26922890www.tecnocontrol.it
7 8