POMPA DOSATRICE AD INGRANAGGI Serie N - cucchipumpe.de · Essenzialmente la pompa è costituita da...
58
POMPA DOSATRICE AD INGRANAGGI Serie N MANUALE D’USO E MANUTENZIONE GEAR METERING PUMP N Series OPERATING AND MAINTENANCE MANUAL POMPE CUCCHI s.r.l. POMPE CUCCHI s.r.l. 20090 Opera (MI) - ITALY Via dei Pioppi, 39 Tel.(+39) 02 57606287 (R.A.) Fax (+39) 02 57602257 e-mail: [email protected]
Transcript of POMPA DOSATRICE AD INGRANAGGI Serie N - cucchipumpe.de · Essenzialmente la pompa è costituita da...

POMPA DOSATRICE AD INGRANAGGI
Serie N
MANUALE D’USO E MANUTENZIONE
GEAR METERING PUMP
N Series
OPERATING AND MAINTENANCE MANUAL
POMPE CUCCHI s.r.l.
POMPE CUCCHI s.r.l. 20090 Opera (MI) - ITALY Via dei Pioppi, 39
Tel.(+39) 02 57606287 (R.A.) Fax (+39) 02 57602257 e-mail: [email protected]

Pompa Dosatrice ad Ingranaggi - Serie N Gear Metering Pump - N Series
PAGINA BIANCA/BLANK PAGE

Pompa Dosatrice ad Ingranaggi - Serie N Gear Metering Pump - N Series
3
INDICE
1. GENERALITA’ ..............................................................................................................................7
1.1 CONDIZIONI DI FORNITURA...........................................................................................7 1.2 FABBRICANTE.................................................................................................................7 1.3 CONTENUTO DEL LIBRO D’USO....................................................................................7 1.4 DESIGNAZIONE, TIPO.....................................................................................................8 1.5 EMISSIONI SONORE .......................................................................................................8 1.6 CAMPI E LIMITI DI APPLICAZIONE. USI CONSENTITI E NON.......................................8
2. TRASPORTO, MOVIMENTAZIONE, IMBALLO, IMMAGAZZINAMENTO ....................................9
3. DESCRIZIONE DELLA POMPA E DEL GRUPPO DI POMPAGGIO .........................................................9
3.1 DESCRIZIONE GENERALE DELLA MACCHINA..............................................................9 3.2 AVVERTENZE..................................................................................................................9 3.3 DISPOSITIVO DI PROTEZIONE.....................................................................................10 3.4 DESCRIZIONI ADDIZIONALI RELATIVE AGLI ACCESSORI .........................................10
3.4.1 Organi di tenuta ..................................................................................................10 4. INSTALLAZIONE, MONTAGGIO................................................................................................11
4.1 ATTREZZI SPECIALI PER IL MONTAGGIO...................................................................11 4.2 DATI RELATIVI AL SITO DI INSTALLAZIONE................................................................11
4.2.1 Requisiti spaziali per il funzionamento e l’installazione........................................11 4.2.2 Ispezione prima dell’inizio dell’operazione...........................................................11 4.2.3 Dettagli del basamento, fondazione ....................................................................11 4.2.4 Requisiti di allineamento .....................................................................................11 4.2.5 Altezza di aspirazione .........................................................................................11
4.3 INSTALLAZIONE INIZIALE.............................................................................................13 4.3.1 Gruppo di pompaggio completo ..........................................................................13 4.3.2 Pompa ad asse nudo ..........................................................................................13
4.4 MONTAGGIO DELL’AZIONAMENTO E DEGLI ACCESSORI.........................................15 4.4.1 Motore ................................................................................................................15 4.4.2 Installazione dei dispositivi di sicurezza e di controllo..........................................15
4.5 CONNESSIONI ELETTRICHE, CAVI DI COLLEGAMENTO ...........................................15 4.6 TUBAZIONI.....................................................................................................................15
4.6.1 Generalità ...........................................................................................................15 4.6.2 Forze e momenti agenti sulle flange di aspirazione e di mandata. .......................15 4.6.3 Coppie di serraggio per le viti ..............................................................................16
5. MESSA IN SERVIZIO, FUNZIONAMENTO, ARRESTO..............................................................16
5.1 DOCUMENTAZIONE ......................................................................................................16 5.2 PREPARAZIONE DELLA POMPA PER IL FUNZIONAMENTO.......................................16
5.2.1 Riempimento / scarico.........................................................................................16 5.2.2 Connessioni elettriche.........................................................................................16
Pompa Dosatrice ad Ingranaggi - Serie N Gear Metering Pump - N Series
4
5.2.3 Verifica del senso di rotazione.............................................................................16 5.3 DISPOSITIVI DI SICUREZZA .........................................................................................16
5.3.1 Meccanici (protezioni per organi rotanti)..............................................................16 5.3.2 Isolamento acustico ............................................................................................17 5.3.3 Protezione contro gli spruzzi ...............................................................................17 5.3.4 Regolamentazione relativa alla parte elettrica .....................................................17
5.4 MESSA IN SERVIZIO .....................................................................................................17 5.4.1 Messa in servizio iniziale.....................................................................................17 5.4.2 Avvio in seguito ad interruzioni del funzionamento ..............................................17 5.4.3 Requisiti dell’impianto relativi alla pompa ............................................................18 5.4.4 Frequenza di avviamento/arresto ........................................................................18 5.4.5 Funzionamento ed avviamento a valvola chiusa..................................................18
5.5 ARRESTO ......................................................................................................................18 5.5.1 Messa fuori servizio ............................................................................................18 5.5.2 Svuotamento.......................................................................................................18
6. MANUTENZIONE ED ISPEZIONE ..............................................................................................18
6.1 PRECAUZIONI D’USO....................................................................................................18 6.2 MATERIALI SOGGETTI AD USURA...............................................................................19 6.3 SORVEGLIANZA DURANTE IL FUNZIONAMENTO.......................................................19 6.4 MANUTENZIONE PREVENTIVA ....................................................................................19 6.5 SMONTAGGIO E RIMONTAGGIO DELLA POMPA........................................................19
6.5.1 Attrezzatura.........................................................................................................19 6.5.2 Procedura di smontaggio/rimontaggio .................................................................19
7. GUASTI: CAUSE E RIMEDI........................................................................................................24
8. CONDIZIONI DI GARANZIA .......................................................................................................26
9. ALLEGATI/ANNEXES ................................................................................................................47
Pompa Dosatrice ad Ingranaggi - Serie N Gear Metering Pump - N Series
5
CONTENTS
1. GENERAL INFORMATION .........................................................................................................27
1.1 SUPPLY CONDITIONS...................................................................................................27
1.2 MANUFACTURER..........................................................................................................27
1.3 USER MANUAL CONTENT ............................................................................................27
1.4 NAME, TYPE ..................................................................................................................28
1.5 NOISE EMISSIONS........................................................................................................28
1.6 APPLICATION FIELDS AND LIMITS. ALLOWED AND NOT ALLOWED USES..............28
2. TRANSPORT, HANDLING, PACKAGING, STORAGE...............................................................29
3. DESCRIPTION OF THE PUMP AND THE PUMP UNIT ..............................................................29
3.1 GENERAL DESCRIPTION OF THE MACHINE...............................................................29
3.2 WARNINGS ....................................................................................................................29
3.3 PROTECTION DEVICE ..................................................................................................30
3.4 ADDITIONAL DESCRIPTION OF ACCESSORIES .........................................................30 3.4.1 Seal parts............................................................................................................30
4. INSTALLATION, ASSEMBLY.....................................................................................................31
4.1 SPECIAL ASSEMBLY TOOLS........................................................................................31
4.2 INSTALLATION SITE INFORMATION ............................................................................31 4.2.1 Space requirements for operation and installation...............................................31 4.2.2 Inspection before starting installation ..................................................................31 4.2.3 Baseplate, foundation plate details......................................................................31 4.2.4 Alignment requirements ......................................................................................31 4.2.5 Suction lift ...........................................................................................................31
4.3 INITIAL INSTALLATION..................................................................................................33 4.3.1 Complete pump unit ............................................................................................33 4.3.2 Free shaft pump..................................................................................................33
4.4 DRIVE UNIT AND ACCESSORY ASSEMBLY ................................................................35 4.4.1 Motor ..................................................................................................................35 4.4.2 Installation of safety and control devices .............................................................35
4.5 ELECTRICAL CONNECTIONS, CONNECTION CABLES ..............................................35
4.6 PIPING............................................................................................................................35 4.6.1 General ...............................................................................................................35 4.6.2 Forces and moments which operate on suction and delivery flanges. .................35 4.6.3 Fastening screw torques .....................................................................................36
5. COMMISSIONING, OPERATION, SHUTDOWN .........................................................................36
5.1 DOCUMENTATION ........................................................................................................36
5.2 PUMP PREPARATION FOR STARTUP .........................................................................36 5.2.1 Filling / discharge ................................................................................................36 5.2.2 Electrical connections .........................................................................................36

Pompa Dosatrice ad Ingranaggi - Serie N Gear Metering Pump - N Series
6
5.2.3 Verifying the direction of rotation .........................................................................36
5.3 SAFETY DEVICES .........................................................................................................36 5.3.1 Mechanical safety devices (guards for rotating parts)..........................................36 5.3.2 Acoustic insulation ..............................................................................................37 5.3.3 Splash-proof cover ..............................................................................................37 5.3.4 Regulation on the electric components................................................................37
5.4 STARTING THE PUMP...................................................................................................37 5.4.1 Initial commissioning ...........................................................................................37 5.4.2 Startup after shutdowns ......................................................................................37 5.4.3 Pump system requirements.................................................................................38 5.4.4 Startup/shutdown frequency................................................................................38 5.4.5 Operation and startup with closed valve ..............................................................38
5.5 SHUTDOWN...................................................................................................................38 5.5.1 Decommissioning................................................................................................38 5.5.2 Emptying.............................................................................................................38
6. MAINTENANCE AND INSPECTION...........................................................................................38
6.1 USE PRECAUTIONS......................................................................................................38
6.2 WEARABLE MATERIALS ...............................................................................................39
6.3 SURVEILLANCE DURING OPERATION ........................................................................39
6.4 PREVENTIVE MAINTENANCE.......................................................................................39
6.5 PUMP DISASSEMBLY AND REASSEMBLY ..................................................................39 6.5.1 Tools...................................................................................................................39 6.5.2 Disassembly/reassembly procedure....................................................................39
7. FAULTS: CAUSES AND SOLUTIONS .......................................................................................44
8. WARRANTY CONDITIONS ........................................................................................................46
9. ANNEXES...................................................................................................................................47

Pompa Dosatrice ad Ingranaggi - Serie N Gear Metering Pump - N Series
7
1. GENERALITA’
1.1 CONDIZIONI DI FORNITURA A seconda degli accordi col Cliente, la pompa può essere fornita sia ad asse nudo sia come gruppo di pompaggio. Per gruppo di pompaggio si intende la pompa allineata con il motore, comprendente gli elementi di trasmissione, il basamento e qualsiasi apparecchio ausiliario. Il gruppo viene fornito con coprigiunto di sicurezza.
1.2 FABBRICANTE Il Fabbricante della pompa è la POMPE CUCCHI S.R.L., cui ci si può rivolgere per assistenza, al seguente indirizzo:
Via dei Pioppi 39 - 20090 OPERA (MI) ITALY Tel. +39.02.57.60.62.87 (R.A.) Fax +39.02.57.60.22.57 E-mail : [email protected]
1.3 CONTENUTO DEL LIBRO D’USO Il seguente libro d’uso contiene tutte le informazioni necessarie per garantire un uso ragionevolmente sicuro e corretto della macchina. Esso è stato redatto - per quanto applicabile - secondo il punto 5.5 della norma EN 292 parte 2-1992 - Sicurezza del macchinario, secondo il punto 7 della norma UNI EN 809-2000 Pompe e Gruppi di pompaggio per liquidi - Requisiti generali di sicurezza - e secondo il punto 1.7.4 della direttiva 98/37/CE 1998 (ex 89/392 CE). Nel libro si fa costantemente riferimento alle istruzioni relative alla sicurezza. Per visualizzare costantemente tale aspetto, le istruzioni sono accompagnate dai seguenti pittogrammi:
Indica le istruzioni relative alla sicurezza fornite nel manuale, la cui mancata osservanza provocherebbe una compromissione della sicurezza stessa.
E' presente quando è in gioco la sicurezza elettrica.
Indica le istruzioni relative alla sicurezza che devono essere considerate per motivi di funzionamento in sicurezza della pompa o del gruppo di pompaggio o per la protezione della pompa o del gruppo di pompaggio stessi.
Pompa Dosatrice ad Ingranaggi - Serie N Gear Metering Pump - N Series
8
1.4 DESIGNAZIONE, TIPO L’esecuzione standard della pompa è quella costruita in acciaio inox AISI 316L con supporti in grafite e tenuta meccanica in ceramica/grafite/viton. La serie completa copre diverse esecuzioni relativamente alle portate, ai materiali ed alle tenute meccaniche. Inoltre sono previste anche esecuzioni con camere di preriscaldo, tenute meccaniche doppie, trascinamento magnetico, attacchi sanitari ecc. L’identificazione della pompa è realizzata mediante un codice alfanumerico, di cui si riporta un esempio : - 0NAX010/D0HF0C0: pompa tipo N, famiglia A, esecuzione in acciaio inossidabile AISI
316L, portata nominale 10 l/min. a 1500 rpm (cilindrata 7,8 cm3/giro), ingranaggi in AISI 316L, boccole in grafite, tenuta meccanica doppia, provvista di camera di preriscaldo.
1.5 EMISSIONI SONORE - Normativa di riferimento: CEN/TC 197/SC3 N 21 E -fig.8- ISO 3744 su 6 posizioni - Valori rilevati:
1 - Livello di pressione acustica continuo equivalente ponderato Leq = 75 dB(A); 2 - Valore massimo della pressione acustica istantanea ponderata C (livello di picco) Lpc < 78 dB(C).
- Condizioni di prova: Durante la misura della rumorosità il liquido pompato (riferito ad acqua con viscosità 1 cP) deve entrare in un impianto prova tale per cui la sua velocità sia sicuramente inferiore a 0,8 m/s nelle tubazioni. Bisogna comunque che assuma regime laminare (quindi la velocità e la viscosità devono essere in relazione) e che siano rispettate le condizioni esposte in questo manuale.
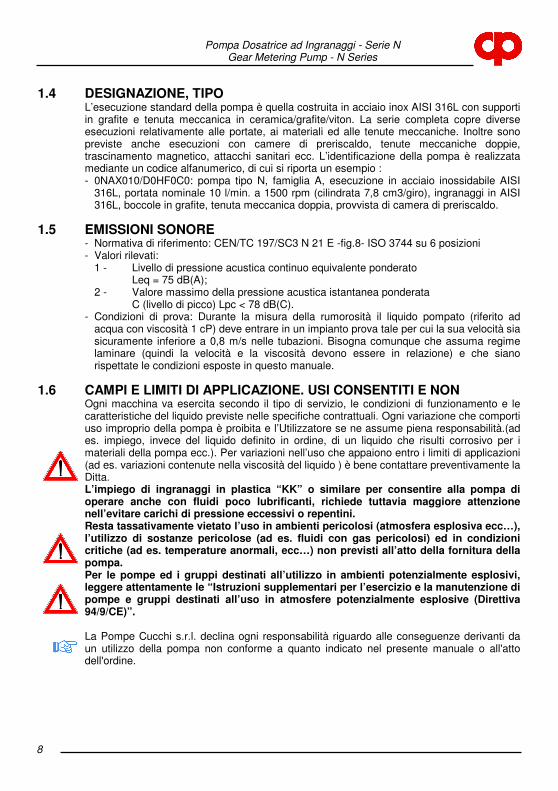
1.6 CAMPI E LIMITI DI APPLICAZIONE. USI CONSENTITI E NON Ogni macchina va esercita secondo il tipo di servizio, le condizioni di funzionamento e le caratteristiche del liquido previste nelle specifiche contrattuali. Ogni variazione che comporti uso improprio della pompa è proibita e l’Utilizzatore se ne assume piena responsabilità.(ad es. impiego, invece del liquido definito in ordine, di un liquido che risulti corrosivo per i materiali della pompa ecc.). Per variazioni nell’uso che appaiono entro i limiti di applicazioni (ad es. variazioni contenute nella viscosità del liquido ) è bene contattare preventivamente la Ditta. L’impiego di ingranaggi in plastica “KK” o similare per consentire alla pompa di operare anche con fluidi poco lubrificanti, richiede tuttavia maggiore attenzione nell’evitare carichi di pressione eccessivi o repentini. Resta tassativamente vietato l’uso in ambienti pericolosi (atmosfera esplosiva ecc…), l’utilizzo di sostanze pericolose (ad es. fluidi con gas pericolosi) ed in condizioni critiche (ad es. temperature anormali, ecc…) non previsti all’atto della fornitura della pompa. Per le pompe ed i gruppi destinati all’utilizzo in ambienti potenzialmente esplosivi, leggere attentamente le “Istruzioni supplementari per l’esercizio e la manutenzione di pompe e gruppi destinati all’uso in atmosfere potenzialmente esplosive (Direttiva 94/9/CE)”. La Pompe Cucchi s.r.l. declina ogni responsabilità riguardo alle conseguenze derivanti da un utilizzo della pompa non conforme a quanto indicato nel presente manuale o all'atto dell'ordine.
Pompa Dosatrice ad Ingranaggi - Serie N Gear Metering Pump - N Series
9
2. TRASPORTO, MOVIMENTAZIONE, IMBALLO, IMMAGAZZINAMENTO
La Pompe Cucchi vende “franco fabbrica”. Conseguentemente il trasporto dall’officina di produzione al luogo di destinazione è a cura e sotto la responsabilità del Cliente. Per ogni trasporto è assicurato un imballo adeguato standard oppure secondo le specifiche del Cliente che, in ogni caso, è tenuto a dare informazioni sul tipo di spedizione che dovrà essere effettuata (terrestre, aerea, “ overseas “). In caso di sosta prolungata in ambiente critico (per elevata umidità e/o salinità ecc.) la fornitura dovrà essere ricoverata in ambiente protetto.
3. DESCRIZIONE DELLA POMPA E DEL GRUPPO DI POMPAGGIO
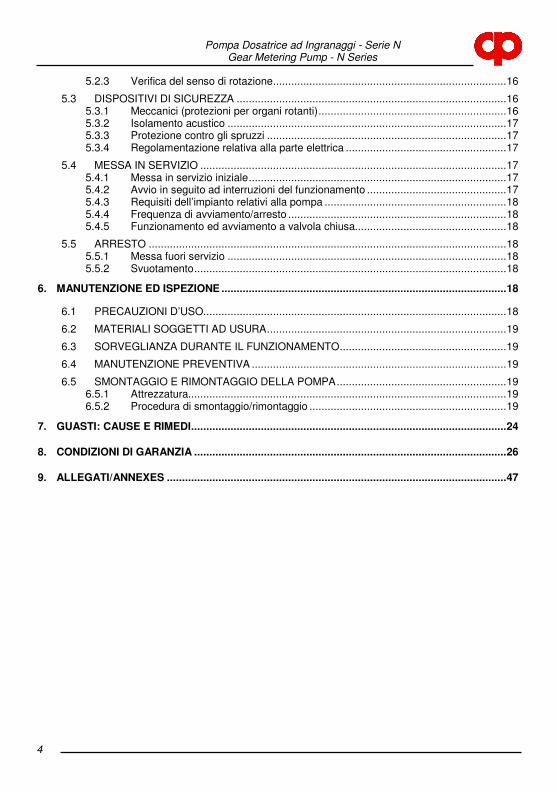
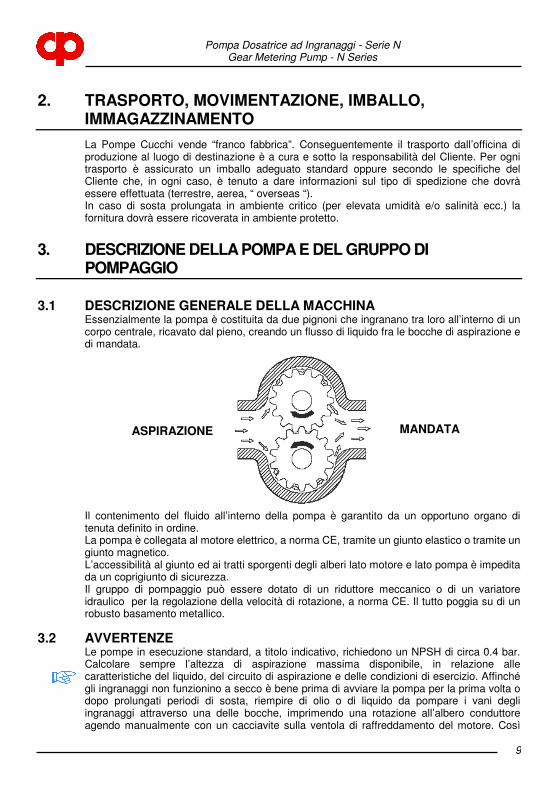
3.1 DESCRIZIONE GENERALE DELLA MACCHINA Essenzialmente la pompa è costituita da due pignoni che ingranano tra loro all’interno di un corpo centrale, ricavato dal pieno, creando un flusso di liquido fra le bocche di aspirazione e di mandata.
Il contenimento del fluido all’interno della pompa è garantito da un opportuno organo di tenuta definito in ordine. La pompa è collegata al motore elettrico, a norma CE, tramite un giunto elastico o tramite un giunto magnetico. L’accessibilità al giunto ed ai tratti sporgenti degli alberi lato motore e lato pompa è impedita da un coprigiunto di sicurezza. Il gruppo di pompaggio può essere dotato di un riduttore meccanico o di un variatore idraulico per la regolazione della velocità di rotazione, a norma CE. Il tutto poggia su di un robusto basamento metallico.
3.2 AVVERTENZE Le pompe in esecuzione standard, a titolo indicativo, richiedono un NPSH di circa 0.4 bar. Calcolare sempre l’altezza di aspirazione massima disponibile, in relazione alle caratteristiche del liquido, del circuito di aspirazione e delle condizioni di esercizio. Affinché gli ingranaggi non funzionino a secco è bene prima di avviare la pompa per la prima volta o dopo prolungati periodi di sosta, riempire di olio o di liquido da pompare i vani degli ingranaggi attraverso una delle bocche, imprimendo una rotazione all’albero conduttore agendo manualmente con un cacciavite sulla ventola di raffreddamento del motore. Così
ASPIRAZIONE MANDATA
Pompa Dosatrice ad Ingranaggi - Serie N Gear Metering Pump - N Series
10
facendo si può facilmente verificare che gli organi in rotazione non presentino impuntamenti o attriti troppo elevati. Per salvaguardare il motore, sistemare nel quadro elettrico un salvamotore tarato a circa il 110% rispetto alla corrente nominale indicata nella targhetta. Nelle nostre pompe il senso di rotazione è indicato in posizione ben evidente con una freccia rivolta nel senso appropriato. La temperatura di esercizio delle pompe in esecuzione normale può arrivare sino attorno agli 80°C. Nelle esecuzioni speciali si possono raggiungere temperature fino a 180°C ed oltre. Per prevenire i pericoli al personale derivanti dalle temperature che si sviluppano durante l’esercizio per effetto di un contatto accidentale (ustione), l’Utente dovrà provvedere a ridurre le temperature di superficie esterna delle pompe mediante coibentazioni, rivestimenti, schermi, barriere ecc. Come temperatura limite di riferimento della superficie di contatto è consigliabile assumere 55°C. Al di sotto di questo valore, per superfici lisce calde di metallo nudo, la soglia di ustione è assente. Per approfondire il problema in relazione ai vari casi particolari, l’Utente potrà utilmente consultare la norma UNI EN 563 Ed.’94, dove sono riportate le soglie di ustione in funzione dei parametri “temperatura della superficie – tempo di contatto” per vari tipi di superficie. Il liquido pompato non deve presentare sospensioni abrasive o solide, perché usurerebbero la pompa in brevi periodi. A tal riguardo è sempre bene installare sul tubo di aspirazione della pompa un filtro di dimensioni adeguate che non permetta il passaggio di tali impurità. Quando si installano più pompe in uno stesso impianto è necessario che le aspirazioni siano separate perché potrebbero interferire tra loro.
3.3 DISPOSITIVO DI PROTEZIONE Il coprigiunto installato dal Fabbricante è costituito da una robusta lamiera metallica, fissata al basamento mediante viti, opportunamente sagomato in modo da impedire il contatto delle dita con le parti in movimento. Esso potrà essere asportato solo mediante l’uso di un attrezzo.
3.4 DESCRIZIONI ADDIZIONALI RELATIVE AGLI ACCESSORI
3.4.1 Organi di tenuta La pompa viene normalmente fornita corredata di tenuta meccanica. Se il tipo di tenuta è prescritto dal Cliente, la Pompe Cucchi s.r.l. installa la tenuta richiesta dopo aver verificato la compatibilità delle dimensioni della tenuta con quelle della pompa. Se il Cliente richiede solo la marca della tenuta, l’Azienda fa selezionare il tipo di tenuta alla Casa costruttrice, fornendo le informazioni di cui è in possesso riguardo le caratteristiche del liquido pompato. Tra le tenute di impiego si citano: - Tenuta meccanica semplice - Tenuta meccanica doppia in tandem con serbatoio per liquido di flussaggio statico - Tenuta meccanica doppia contrapposta con liquido di flussaggio esterno in pressione Queste ultime vanno installate quando il prodotto pompato ha caratteristiche tali che ne impediscono l’impiego come fonte di flussaggio o per maggiore sicurezza (monitoraggio visivo). Il serbatoio delle tenute meccaniche in tandem non è pressurizzato e, oltre ad evitare il funzionamento a secco della tenuta esterna, ha lo scopo di denunciare visivamente eventuali perdite della tenuta meccanica interna Per le pompe con trascinamento magnetico la tenuta è assicurata unicamente da guarnizioni statiche, essendo l’albero della pompa completamente racchiuso all’interno del corpo pompa.
Pompa Dosatrice ad Ingranaggi - Serie N Gear Metering Pump - N Series
11
4. INSTALLAZIONE, MONTAGGIO
4.1 ATTREZZI SPECIALI PER IL MONTAGGIO La pompa non richiede attrezzi speciali per il montaggio, ad eccezione degli estrattori della tenuta (vedi Manutenzione).
4.2 DATI RELATIVI AL SITO DI INSTALLAZIONE
4.2.1 Requisiti spaziali per il funzionamento e l’installazione Lo spazio previsto dal cliente per l’installazione deve essere sufficiente per l’allocazione del gruppo e per le operazioni di manutenzione, accessibilità compresa.
4.2.2 Ispezione prima dell’inizio dell’operazione Prima dell’installazione, il Cliente deve accertare che nel sito prescelto le condizioni ambientali siano conformi a quanto contrattualmente definito. In particolare, se non esplicitamente richiesto ed accettato in ordine, nel sito di destinazione non devono sussistere condizioni ambientali, quali: - temperatura anormale; - umidità elevata; - atmosfera corrosiva; - zone a rischio di esplosione e/o incendio; - polvere, tempeste di sabbia; - terremoti ed altre condizioni esterne di tipo similare; - elevato livello di vibrazioni; - altitudine elevata; - zone a rischio di inondazioni.
4.2.3 Dettagli del basamento, fondazione Il basamento metallico deve essere di adeguate dimensioni e di sufficiente robustezza e rigidità per resistere alle sollecitazioni indotte. Quando il gruppo è installato esso deve essere reso stabile mediante l’uso di bulloni di fissaggio oppure mediante l’impiego di altri metodi di ancoraggio. I bulloni per il fissaggio a terra o gli altri metodi di ancoraggio devono essere sufficientemente resistenti da impedire il movimento fisico accidentale del gruppo.
4.2.4 Requisiti di allineamento L’allineamento non deve creare tensioni radiali ed assiali del complesso, quindi il disassamento residuo deve sempre essere inferiore ai limiti di tolleranza previsti per il giunto stesso. Particolare cura deve essere osservata per l’allineamento dei gruppi dotati di giunto a trascinamento magnetico.
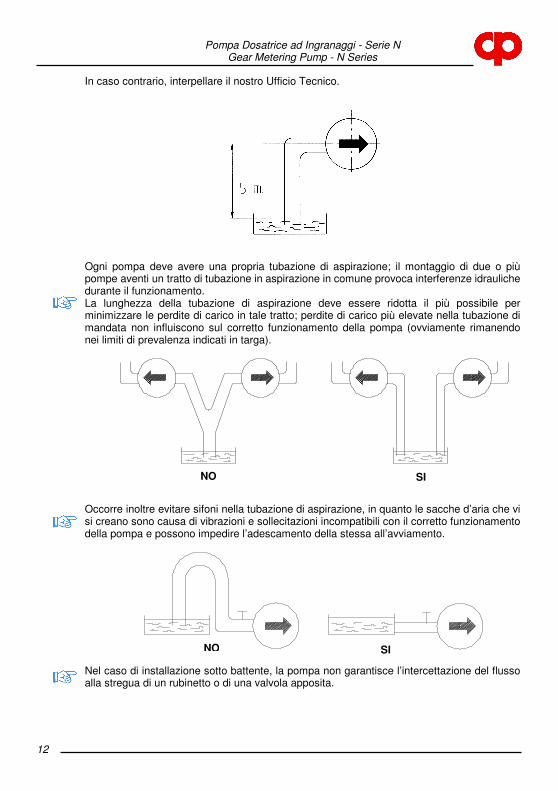
4.2.5 Altezza di aspirazione L’altezza di aspirazione ,ossia la distanza verticale fra la mezzeria della bocca di aspirazione della pompa ed il pelo libero del serbatoio cui è collegata, non deve essere superiore a 5 m. per consentire l’adescamento della pompa ed evitare fenomeni di cavitazione.
Pompa Dosatrice ad Ingranaggi - Serie N Gear Metering Pump - N Series
12
In caso contrario, interpellare il nostro Ufficio Tecnico.
Ogni pompa deve avere una propria tubazione di aspirazione; il montaggio di due o più pompe aventi un tratto di tubazione in aspirazione in comune provoca interferenze idrauliche durante il funzionamento. La lunghezza della tubazione di aspirazione deve essere ridotta il più possibile per minimizzare le perdite di carico in tale tratto; perdite di carico più elevate nella tubazione di mandata non influiscono sul corretto funzionamento della pompa (ovviamente rimanendo nei limiti di prevalenza indicati in targa).
Occorre inoltre evitare sifoni nella tubazione di aspirazione, in quanto le sacche d’aria che vi si creano sono causa di vibrazioni e sollecitazioni incompatibili con il corretto funzionamento della pompa e possono impedire l’adescamento della stessa all’avviamento.
Nel caso di installazione sotto battente, la pompa non garantisce l’intercettazione del flusso alla stregua di un rubinetto o di una valvola apposita.
NO SI
NO SI
Pompa Dosatrice ad Ingranaggi - Serie N Gear Metering Pump - N Series
13
4.3 INSTALLAZIONE INIZIALE A seconda delle condizioni di fornitura si distinguono due casi:
4.3.1 Gruppo di pompaggio completo In questo caso il Cliente deve provvedere al fissaggio del basamento su un supporto rigido per garantire il corretto allineamento degli assi in tutte le condizioni di funzionamento. Si consiglia l’impiego di antivibranti sotto la base della pompa e di tronchetti antivibranti sulle tubazioni in prossimità delle bocche della pompa. Messo così il gruppo in posizione, si deve: a) collegare le tubazioni di aspirazione e di mandata alle rispettive bocche della pompa; b) collegare il motore all’alimentazione elettrica, facendo bene attenzione che la tensione e
la frequenza del motore siano compatibili con quelle dell’impianto; c) aprire i rubinetti sulle tubazioni di mandata e di aspirazione , se previsti; d) avviare per un istante il motore, per verificare che la pompa ruoti nel senso stabilito dalla
freccia impressa sulla pompa stessa.
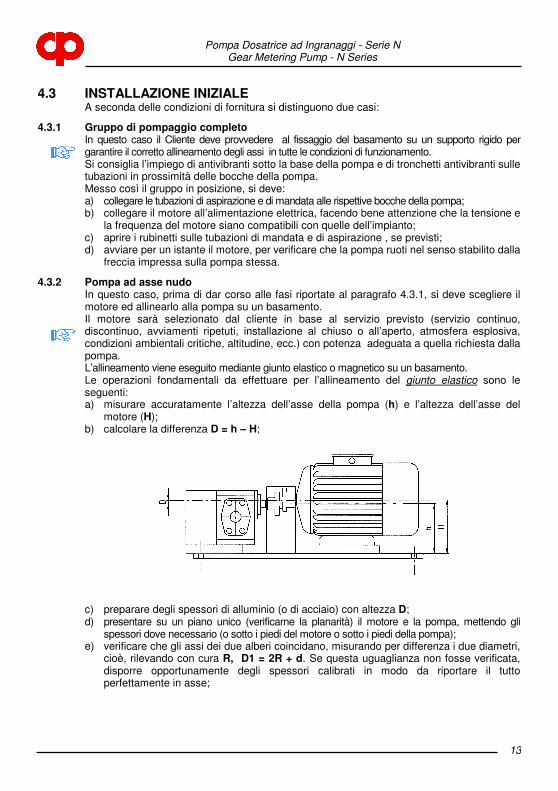
4.3.2 Pompa ad asse nudo In questo caso, prima di dar corso alle fasi riportate al paragrafo 4.3.1, si deve scegliere il motore ed allinearlo alla pompa su un basamento. Il motore sarà selezionato dal cliente in base al servizio previsto (servizio continuo, discontinuo, avviamenti ripetuti, installazione al chiuso o all’aperto, atmosfera esplosiva, condizioni ambientali critiche, altitudine, ecc.) con potenza adeguata a quella richiesta dalla pompa. L’allineamento viene eseguito mediante giunto elastico o magnetico su un basamento. Le operazioni fondamentali da effettuare per l’allineamento del giunto elastico sono le seguenti: a) misurare accuratamente l’altezza dell’asse della pompa (h) e l’altezza dell’asse del
motore (H); b) calcolare la differenza D = h – H;
c) preparare degli spessori di alluminio (o di acciaio) con altezza D; d) presentare su un piano unico (verificarne la planarità) il motore e la pompa, mettendo gli
spessori dove necessario (o sotto i piedi del motore o sotto i piedi della pompa); e) verificare che gli assi dei due alberi coincidano, misurando per differenza i due diametri,
cioè, rilevando con cura R, D1 = 2R + d. Se questa uguaglianza non fosse verificata, disporre opportunamente degli spessori calibrati in modo da riportare il tutto perfettamente in asse;
Pompa Dosatrice ad Ingranaggi - Serie N Gear Metering Pump - N Series
14
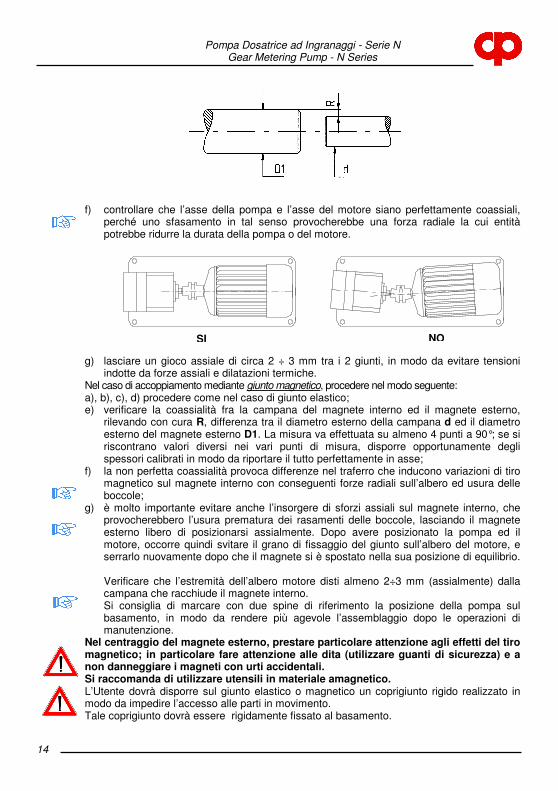
f) controllare che l’asse della pompa e l’asse del motore siano perfettamente coassiali, perché uno sfasamento in tal senso provocherebbe una forza radiale la cui entità potrebbe ridurre la durata della pompa o del motore.
g) lasciare un gioco assiale di circa 2 ÷ 3 mm tra i 2 giunti, in modo da evitare tensioni indotte da forze assiali e dilatazioni termiche.
Nel caso di accoppiamento mediante giunto magnetico, procedere nel modo seguente: a), b), c), d) procedere come nel caso di giunto elastico; e) verificare la coassialità fra la campana del magnete interno ed il magnete esterno,
rilevando con cura R, differenza tra il diametro esterno della campana d ed il diametro esterno del magnete esterno D1. La misura va effettuata su almeno 4 punti a 90°; se si riscontrano valori diversi nei vari punti di misura, disporre opportunamente degli spessori calibrati in modo da riportare il tutto perfettamente in asse;
f) la non perfetta coassialità provoca differenze nel traferro che inducono variazioni di tiro magnetico sul magnete interno con conseguenti forze radiali sull’albero ed usura delle boccole;
g) è molto importante evitare anche l’insorgere di sforzi assiali sul magnete interno, che provocherebbero l’usura prematura dei rasamenti delle boccole, lasciando il magnete esterno libero di posizionarsi assialmente. Dopo avere posizionato la pompa ed il motore, occorre quindi svitare il grano di fissaggio del giunto sull’albero del motore, e serrarlo nuovamente dopo che il magnete si è spostato nella sua posizione di equilibrio. Verificare che l’estremità dell’albero motore disti almeno 2÷3 mm (assialmente) dalla campana che racchiude il magnete interno. Si consiglia di marcare con due spine di riferimento la posizione della pompa sul basamento, in modo da rendere più agevole l’assemblaggio dopo le operazioni di manutenzione.
Nel centraggio del magnete esterno, prestare particolare attenzione agli effetti del tiro magnetico; in particolare fare attenzione alle dita (utilizzare guanti di sicurezza) e a non danneggiare i magneti con urti accidentali. Si raccomanda di utilizzare utensili in materiale amagnetico. L’Utente dovrà disporre sul giunto elastico o magnetico un coprigiunto rigido realizzato in modo da impedire l’accesso alle parti in movimento. Tale coprigiunto dovrà essere rigidamente fissato al basamento.
SI NO
Pompa Dosatrice ad Ingranaggi - Serie N Gear Metering Pump - N Series
15
4.4 MONTAGGIO DELL’AZIONAMENTO E DEGLI ACCESSORI
4.4.1 Motore L’Azienda monta motori elettrici a norma CE, di potenza adeguata a quella della pompa, selezionati in base alle previste condizioni di servizio ed alle caratteristiche dell’ambiente. In particolare se il gruppo è previsto per servizio in atmosfera esplosiva il motore è scelto in esecuzione antideflagrante (si ricorda che per l’utilizzo in ambito CE, anche la pompa e gli accessori devono essere in esecuzione conforme alla direttiva 94/9/CE).
4.4.2 Installazione dei dispositivi di sicurezza e di controllo Se richiesto in ordine, l’Azienda fornisce a corredo della pompa la valvola di sfioro, la cui taratura va effettuata in modo da salvaguardare la pompa. Una volta effettuata la corretta regolazione, la valvola non deve essere in alcun modo manomessa, dato che le pompe volumetriche possono raggiungere rapidamente, a mandata chiusa, valori elevatissimi di pressione, con conseguente gravissimo pericolo. Eventuali regolazioni devono obbligatoriamente essere eseguite a pompa ferma e depressurizzata. L’Utente dovrà provvedere all’installazione di un manometro in mandata della pompa, a monte della valvola di sfioro; è raccomandabile prevedere la possibilità di installare un vacuometro in prossimità della bocca di aspirazione della pompa. Qualora sull’impianto sia presente anche una valvola di sicurezza, assicurarsi che la pressione di taratura differisca sensibilmente da quella di sfioro, per evitare di innescare pericolosi fenomeni di risonanza (rottura delle tubazioni e/o delle valvole).
4.5 CONNESSIONI ELETTRICHE, CAVI DI COLLEGAMENTO La macchina deve essere collegata al sistema di protezione esterna di messa a terra mediante l’apposito morsetto, che va identificato con la lettera PE. I cavi di collegamento devono essere di adeguata sezione ed isolamento. Prima della connessione alla alimentazione elettrica verificare sempre la compatibilità della tensione e della frequenza di linea con quella del motore.
4.6 TUBAZIONI
4.6.1 Generalità Le tubazioni dovranno essere di diametro adeguato per consentire un flusso regolare con basse perdite di carico. Si consiglia quindi di impiegare, almeno in aspirazione, tubazioni con diametro interno uguale o superiore a quello della bocca di aspirazione della pompa, specialmente quando l’entità della viscosità diventa ragguardevole. Al fine di minimizzare le perdite di carico nel circuito, si raccomanda, per quanto possibile, di evitare brusche variazioni di sezione e di direzione (curve) lungo il percorso delle tubazioni, particolarmente nel tratto in aspirazione.
4.6.2 Forze e momenti agenti sulle flange di aspirazione e di mandata. Come regola generale sarebbe opportuno interporre tronchetti elastici fra la pompa e le tubazioni dell’impianto; si raccomanda comunque di curare che le flange delle tubazioni di collegamento si presentino sempre, in posizione libera, con i piani paralleli a quelli delle flange delle bocche di aspirazione e di mandata onde evitare che dopo il serraggio si ingenerino momenti e forze di valore eccessivo. L’Utente dovrà comunque accertarsi che i carichi indotti sulle flange della pompa, nelle condizioni di funzionamento più gravose, non eccedano i valori indicati dalle norme UNI EN ISO 14847.
Pompa Dosatrice ad Ingranaggi - Serie N Gear Metering Pump - N Series
16
4.6.3 Coppie di serraggio per le viti La coppia di serraggio per le viti delle nostre pompe deve essere: - per viti da M6 11-12 Nm - per viti da M8 20-22 Nm - per viti da M10 38-40 Nm Per ogni ulteriore informazione, interpellare il nostro Ufficio Tecnico.
5. MESSA IN SERVIZIO, FUNZIONAMENTO, ARRESTO
5.1 DOCUMENTAZIONE Libro d’uso e manutenzione
5.2 PREPARAZIONE DELLA POMPA PER IL FUNZIONAMENTO
5.2.1 Riempimento / scarico Affinché gli ingranaggi non funzionino a secco, è bene prima di avviare la pompa per la prima volta o dopo prolungati periodi di sosta riempire di olio o di liquido da pompare i vani degli ingranaggi attraverso una delle bocche, imprimendo una rotazione all’albero conduttore agendo manualmente con un cacciavite sulla ventola di raffreddamento del motore. Così facendo si può facilmente verificare che gli organi in rotazione non presentino impuntamenti o attriti troppo elevati. Lo scarico della pompa, se si tratta di liquido tossico, nocivo, o comunque pericoloso, dovrà avvenire con tutte le cautele del caso. In particolare il corpo pompa dovrà essere svuotato con opportune manovre di esercizio. Successivamente la pompa (ad esclusione del modello NAX2.5) sarà soggetta ad un lavaggio mediante ciclo CIP assicurato da una canalizzazione interna che, mettendo in depressione, previa parziale chiusura della valvola di aspirazione, la zona di supportazione e la camera di tenuta, elimina completamente le tracce del liquido convogliato.
5.2.2 Connessioni elettriche I conduttori devono essere scelti in modo che siano adatti alle condizioni di funzionamento (per es. tensione, corrente, protezione contro le scosse elettriche, raggruppamento di cavi) ed alle influenze esterne (per es. temperatura ambiente, presenza di acqua o sostanze corrosive, sollecitazioni meccaniche, rischi di incendio). Si ricorda inoltre che il dimensionamento dei conduttori deve essere tale da assicurare che la caduta di tensione dal punto d’ingresso dell’alimentazione al punto di applicazione del carico non superi il 4%.
5.2.3 Verifica del senso di rotazione Aprire le valvole di aspirazione e di mandata. Il controllo del senso di rotazione si effettua avviando il motore per un istante, solo per controllare che la pompa ruoti nel verso indicato dalle frecce.
5.3 DISPOSITIVI DI SICUREZZA
5.3.1 Meccanici (protezioni per organi rotanti) La zona pericolosa, definita dai tratti sporgenti degli alberi lato pompa e lato motore e dal giunto di accoppiamento, deve essere protetta contro il contatto accidentale mediante un robusto coprigiunto metallico opportunamente sagomato, fissato rigidamente al basamento.
Pompa Dosatrice ad Ingranaggi - Serie N Gear Metering Pump - N Series
17
5.3.2 Isolamento acustico I valori di emissione acustica sono riportati nel presente manuale. L’Utente dovrà sempre verificare se i regolamenti del proprio Paese prevedono, in relazione alla frequenza di esposizione e/o ai valori di emissione, l’uso di dispositivi di protezione individuale. In caso positivo egli dovrà uniformarsi a quanto richiesto da detti regolamenti a protezione dell’operatore.
5.3.3 Protezione contro gli spruzzi Nel caso la pompa tratti un liquido comunque pericoloso, l’operatore dovrà essere comunque protetto contro il rischio di eventuali proiezioni di liquido con l’uso di opportuni dispositivi di protezione individuale.
5.3.4 Regolamentazione relativa alla parte elettrica Si ricorda che in conformità alla norma EN 60204-1 Ed1998-04, come dispositivo di sezionamento dell’alimentazione, una combinazione presa/spina è consentita per una macchina per corrente nominale non superiore a 16 A ed una potenza totale non superiore a 3 kW.
5.4 MESSA IN SERVIZIO
5.4.1 Messa in servizio iniziale - Assicurarsi che il gruppo sia correttamente collegato alla rete di terra. - Qualora la pompa sia munita di camera di preriscaldo, occorre attivare quest’ultima fino a
raggiungere la temperatura di regime e cominciare gradualmente il pompaggio del liquido fino a raggiungere le condizioni di esercizio in situazione di equilibrio termico.
- Verificare che le tubazioni di aspirazione siano ben unite tra di loro onde evitare infiltrazioni d’aria che impedirebbero l’adescamento della pompa.
- Verificare che non si creino, in aspirazione, sifoni tali per cui la pompa non riesca a togliere completamente l’aria. In questo caso si può avere una diminuzione di portata ed un aumento della rumorosità pur avendo la pompa aspirato il liquido, con conseguente usura precoce delle boccole di sopportazione e degli organi in movimento.
- Ove previsto, verificare che le tubazioni per il flussaggio esterno delle tenute meccaniche siano correttamente connesse.
- Verificare il corretto funzionamento della valvola di sfioro; per fare ciò occorre aumentare lentamente la pressione, agendo sul rubinetto posto sulla tubazione di mandata, fino a raggiungere il valore di taratura previsto. A questo punto, ad una ulteriore rotazione del rubinetto, la pressione di mandata deve rimanere inferiore al valore di taratura. In caso contrario, dopo avere arrestato la macchina e depressurizzato la pompa, occorre smontare il cappellotto della valvola, sfilare la guarnizione sottostante, allentare il dado e ruotare in senso antiorario la vite di registro del precarico della molla (in senso orario per aumentare il precarico). Riserrare il controdado, interporre la guarnizione e riavvitare il cappellotto di protezione. La vite di registro non è dotata di fermo, per cui occorre fare attenzione nello svitarla a non procurare una fuoriuscita del fluido pompato.
5.4.2 Avvio in seguito ad interruzioni del funzionamento Il caso più comune di arresto della pompa – a parte il black out dell’alimentazione elettrica – è dovuto all’intervento della protezione di sovraccarico del motore elettrico. In questo caso , prima di riavviare la pompa analizzare le cause che hanno provocato l’intervento della protezione e rimuoverle. Nelle pompe a trascinamento magnetico, può accadere che , in seguito al superamento del valore della massima coppia trasmissibile, la pompa si arresti mentre il motore ruota a vuoto. In questo caso occorre arrestare immediatamente il motore, attendere il raffreddamento della”campana” del magnete interno (riscaldatasi a causa dell’effetto delle correnti parassite), e riavviare il motore dopo aver rimosso le cause del guasto.
Pompa Dosatrice ad Ingranaggi - Serie N Gear Metering Pump - N Series
18
5.4.3 Requisiti dell’impianto relativi alla pompa Nelle pompe volumetriche, la prevalenza non dipende dalla portata e/o dalla velocità di rotazione; di conseguenza bisogna evitare di installare sulla tubazione di mandata valvole di intercetto e, comunque, tra la pompa e la valvola di intercetto deve essere sempre installata una valvola di sicurezza.
5.4.4 Frequenza di avviamento/arresto Le pompe che siano state ordinate con espressi requisiti di avviamenti frequenti e ripetuti non presentano problemi per questo tipo di esercizio.
5.4.5 Funzionamento ed avviamento a valvola chiusa E’ vietato l’avviamento con rubinetto di mandata chiuso, che provocherebbe un brusco innalzamento della pressione al di sopra dei valori limite con conseguente grippaggio.
5.5 ARRESTO
5.5.1 Messa fuori servizio Nel caso di messa fuori servizio del gruppo di pompaggio, è necessario sezionare l’alimentazione elettrica per rendere impossibili avviamenti intempestivi.
5.5.2 Svuotamento Una pompa od un gruppo di pompaggio che funzioni con un liquido infiammabile, tossico, corrosivo o comunque pericoloso, oppure con un liquido ad una temperatura maggiore di 55°C, deve essere dotata di un dispositivo quale una tubazione di raccordo, da realizzarsi a cura dell’utente, per la raccolta e lo smaltimento di tutto il liquido drenato o proveniente da eventuali perdite dalla tenuta dell’albero o scaricato da una valvola limitatrice della pressione.
6. MANUTENZIONE ED ISPEZIONE
6.1 PRECAUZIONI D’USO Prima di eseguire qualsiasi intervento di manutenzione, osservare le seguenti precauzioni: - Non effettuare mai interventi con la pompa in funzione. - Sezionare l’alimentazione elettrica del gruppo di pompaggio. - Indossare guanti, occhiali e tute protettive adeguate alle caratteristiche del liquido
pompato. - Attendere che la pompa si raffreddi. - Non aprire mai il gruppo di pompaggio e/o la valvola di sfioro con la pompa in pressione. - Chiudere i rubinetti sulle tubazioni di mandata e di aspirazione, ove previsti. - Scollegare la pompa dalle tubazioni di aspirazione e di mandata, avendo cura di porre un
recipiente di raccolta per il liquido presente nelle tubazioni. - Nel caso siano impiegate tenute meccaniche flussate esternamente, scollegare le relative
tubazioni. - Sconnettere i collegamenti elettrici del motore con la rete e la messa a terra. - Svitare le viti di fondazione e rimuovere l’intero gruppo di pompaggio con il suo
basamento. - Smontare il coprigiunto di protezione e scollegare la pompa dal motore.
Pompa Dosatrice ad Ingranaggi - Serie N Gear Metering Pump - N Series
19
- Nel caso, prestare particolare attenzione agli effetti del tiro magnetico; in particolare fare attenzione alle dita (utilizzare guanti di sicurezza) e a non danneggiare i magneti con urti accidentali. Si raccomanda di utilizzare utensili in materiale amagnetico.
- Scollegare la pompa dal basamento. - Predisporre un recipiente per la raccolta del liquido presente nella pompa. - Effettuare l’intervento di manutenzione. - Effettuare con cura l’allineamento pompa-motore e fissare la pompa al basamento. - Collegare la pompa al motore e montare il coprigiunto di protezione. - Fissare il basamento mediante le viti di fondazione. - Collegare la pompa alle tubazioni di aspirazione e di mandata. - Ripristinare i collegamenti elettrici del motore con la rete e con la messa a terra. - Aprire i rubinetti sulle tubazioni di mandata e di aspirazione, ove previsti. - Dissezionare l’alimentazione elettrica del gruppo di pompaggio.
6.2 MATERIALI SOGGETTI AD USURA Gli organi di normale usura, prevedibili come dotazione di ricambio per un esercizio di 2 anni, sono i seguenti: - boccole di sopportazione; - organi di tenuta (tenuta meccanica, guarnizioni); - ingranaggi; - alberi.
6.3 SORVEGLIANZA DURANTE IL FUNZIONAMENTO Il gruppo di pompaggio non richiede la presenza di un Operatore durante l’esercizio. E’ una decisione autonoma dell’Utilizzatore prevedere una sorveglianza periodica in funzione della criticità e dell’importanza del servizio. I relativi controlli saranno mirati a rilevare anormali livelli di rumore, di vibrazione, di temperatura e/o gocciolamento dalle tenute, variazioni di pressione e/o di portata, ecc.
6.4 MANUTENZIONE PREVENTIVA E’ sempre consigliabile, per l’affidabilità e l’economicità dell’esercizio, adottare una politica di manutenzione preventiva. Il periodo di servizio indicato per gli organi soggetti ad usura indicato nel presente manuale può servire come indicazione per il primo periodo di funzionamento. Successivamente l’utilizzatore potrà affinare gli MTBM (Mean Time Between Maintenance) in seguito all’esperienza acquisita.
6.5 SMONTAGGIO E RIMONTAGGIO DELLA POMPA
6.5.1 Attrezzatura Non è richiesta attrezzatura specifica ad eccezione degli estrattori della tenuta.
6.5.2 Procedura di smontaggio/rimontaggio Prima di procedere allo smontaggio della pompa, occorre attuare le operazioni indicate al punto 6.1 "PRECAUZIONI D’USO". Fare riferimento ai disegni ed alla nomenclatura allegati al termine del manuale.
Pompa Dosatrice ad Ingranaggi - Serie N Gear Metering Pump - N Series
20
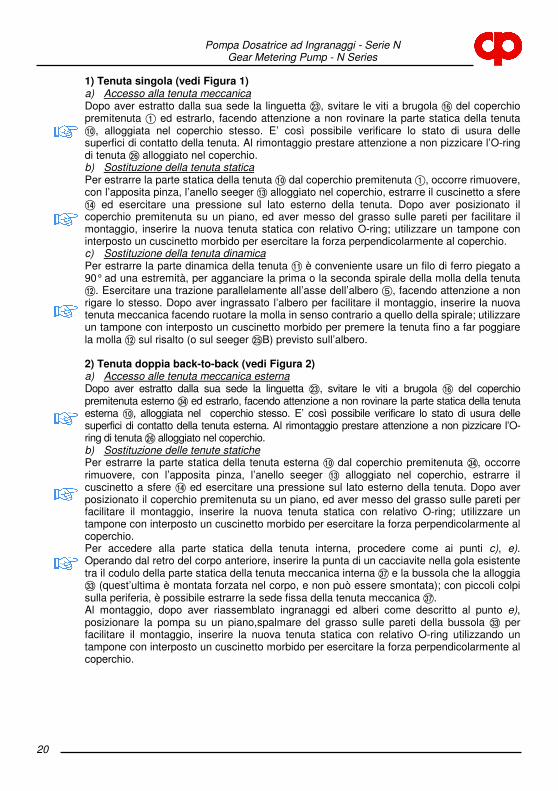
1) Tenuta singola (vedi Figura 1) a) Accesso alla tenuta meccanica Dopo aver estratto dalla sua sede la linguetta G, svitare le viti a brugola @ del coperchio premitenuta 1 ed estrarlo, facendo attenzione a non rovinare la parte statica della tenuta :, alloggiata nel coperchio stesso. E’ così possibile verificare lo stato di usura delle superfici di contatto della tenuta. Al rimontaggio prestare attenzione a non pizzicare l’O-ring di tenuta J alloggiato nel coperchio. b) Sostituzione della tenuta statica Per estrarre la parte statica della tenuta : dal coperchio premitenuta 1, occorre rimuovere, con l’apposita pinza, l’anello seeger = alloggiato nel coperchio, estrarre il cuscinetto a sfere > ed esercitare una pressione sul lato esterno della tenuta. Dopo aver posizionato il coperchio premitenuta su un piano, ed aver messo del grasso sulle pareti per facilitare il montaggio, inserire la nuova tenuta statica con relativo O-ring; utilizzare un tampone con interposto un cuscinetto morbido per esercitare la forza perpendicolarmente al coperchio. c) Sostituzione della tenuta dinamica Per estrarre la parte dinamica della tenuta ; è conveniente usare un filo di ferro piegato a 90° ad una estremità, per agganciare la prima o la seconda spirale della molla della tenuta <. Esercitare una trazione parallelamente all’asse dell’albero 5, facendo attenzione a non rigare lo stesso. Dopo aver ingrassato l’albero per facilitare il montaggio, inserire la nuova tenuta meccanica facendo ruotare la molla in senso contrario a quello della spirale; utilizzare un tampone con interposto un cuscinetto morbido per premere la tenuta fino a far poggiare la molla < sul risalto (o sul seeger IB) previsto sull’albero. 2) Tenuta doppia back-to-back (vedi Figura 2) a) Accesso alle tenuta meccanica esterna Dopo aver estratto dalla sua sede la linguetta G, svitare le viti a brugola @ del coperchio premitenuta esterno R ed estrarlo, facendo attenzione a non rovinare la parte statica della tenuta esterna :, alloggiata nel coperchio stesso. E’ così possibile verificare lo stato di usura delle superfici di contatto della tenuta esterna. Al rimontaggio prestare attenzione a non pizzicare l’O-ring di tenuta J alloggiato nel coperchio. b) Sostituzione delle tenute statiche Per estrarre la parte statica della tenuta esterna : dal coperchio premitenuta R, occorre rimuovere, con l’apposita pinza, l’anello seeger = alloggiato nel coperchio, estrarre il cuscinetto a sfere > ed esercitare una pressione sul lato esterno della tenuta. Dopo aver posizionato il coperchio premitenuta su un piano, ed aver messo del grasso sulle pareti per facilitare il montaggio, inserire la nuova tenuta statica con relativo O-ring; utilizzare un tampone con interposto un cuscinetto morbido per esercitare la forza perpendicolarmente al coperchio. Per accedere alla parte statica della tenuta interna, procedere come ai punti c), e). Operando dal retro del corpo anteriore, inserire la punta di un cacciavite nella gola esistente tra il codulo della parte statica della tenuta meccanica interna U e la bussola che la alloggia Q (quest’ultima è montata forzata nel corpo, e non può essere smontata); con piccoli colpi sulla periferia, è possibile estrarre la sede fissa della tenuta meccanica U. Al montaggio, dopo aver riassemblato ingranaggi ed alberi come descritto al punto e), posizionare la pompa su un piano,spalmare del grasso sulle pareti della bussola Q per facilitare il montaggio, inserire la nuova tenuta statica con relativo O-ring utilizzando un tampone con interposto un cuscinetto morbido per esercitare la forza perpendicolarmente al coperchio.
Pompa Dosatrice ad Ingranaggi - Serie N Gear Metering Pump - N Series
21
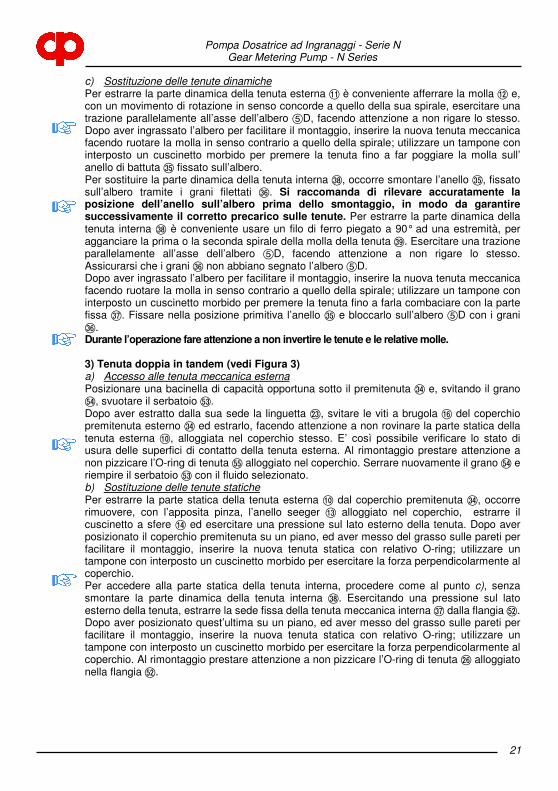
c) Sostituzione delle tenute dinamiche Per estrarre la parte dinamica della tenuta esterna ; è conveniente afferrare la molla < e, con un movimento di rotazione in senso concorde a quello della sua spirale, esercitare una trazione parallelamente all’asse dell’albero 5D, facendo attenzione a non rigare lo stesso. Dopo aver ingrassato l’albero per facilitare il montaggio, inserire la nuova tenuta meccanica facendo ruotare la molla in senso contrario a quello della spirale; utilizzare un tampone con interposto un cuscinetto morbido per premere la tenuta fino a far poggiare la molla sull’ anello di battuta S fissato sull’albero. Per sostituire la parte dinamica della tenuta interna V, occorre smontare l’anello S, fissato sull’albero tramite i grani filettati T. Si raccomanda di rilevare accuratamente la posizione dell’anello sull’albero prima dello smontaggio, in modo da garantire successivamente il corretto precarico sulle tenute. Per estrarre la parte dinamica della tenuta interna V è conveniente usare un filo di ferro piegato a 90° ad una estremità, per agganciare la prima o la seconda spirale della molla della tenuta W. Esercitare una trazione parallelamente all’asse dell’albero 5D, facendo attenzione a non rigare lo stesso. Assicurarsi che i grani T non abbiano segnato l’albero 5D. Dopo aver ingrassato l’albero per facilitare il montaggio, inserire la nuova tenuta meccanica facendo ruotare la molla in senso contrario a quello della spirale; utilizzare un tampone con interposto un cuscinetto morbido per premere la tenuta fino a farla combaciare con la parte fissa U. Fissare nella posizione primitiva l’anello S e bloccarlo sull’albero 5D con i grani T. Durante l’operazione fare attenzione a non invertire le tenute e le relative molle. 3) Tenuta doppia in tandem (vedi Figura 3) a) Accesso alle tenuta meccanica esterna Posizionare una bacinella di capacità opportuna sotto il premitenuta R e, svitando il grano f, svuotare il serbatoio e. Dopo aver estratto dalla sua sede la linguetta G, svitare le viti a brugola @ del coperchio premitenuta esterno R ed estrarlo, facendo attenzione a non rovinare la parte statica della tenuta esterna :, alloggiata nel coperchio stesso. E’ così possibile verificare lo stato di usura delle superfici di contatto della tenuta esterna. Al rimontaggio prestare attenzione a non pizzicare l’O-ring di tenuta g alloggiato nel coperchio. Serrare nuovamente il grano f e riempire il serbatoio e con il fluido selezionato. b) Sostituzione delle tenute statiche Per estrarre la parte statica della tenuta esterna : dal coperchio premitenuta R, occorre rimuovere, con l’apposita pinza, l’anello seeger = alloggiato nel coperchio, estrarre il cuscinetto a sfere > ed esercitare una pressione sul lato esterno della tenuta. Dopo aver posizionato il coperchio premitenuta su un piano, ed aver messo del grasso sulle pareti per facilitare il montaggio, inserire la nuova tenuta statica con relativo O-ring; utilizzare un tampone con interposto un cuscinetto morbido per esercitare la forza perpendicolarmente al coperchio. Per accedere alla parte statica della tenuta interna, procedere come al punto c), senza smontare la parte dinamica della tenuta interna V. Esercitando una pressione sul lato esterno della tenuta, estrarre la sede fissa della tenuta meccanica interna U dalla flangia d. Dopo aver posizionato quest’ultima su un piano, ed aver messo del grasso sulle pareti per facilitare il montaggio, inserire la nuova tenuta statica con relativo O-ring; utilizzare un tampone con interposto un cuscinetto morbido per esercitare la forza perpendicolarmente al coperchio. Al rimontaggio prestare attenzione a non pizzicare l’O-ring di tenuta J alloggiato nella flangia d.

Pompa Dosatrice ad Ingranaggi - Serie N Gear Metering Pump - N Series
22
c) Sostituzione delle tenute dinamiche Per estrarre la parte dinamica della tenuta esterna ; è conveniente afferrare la molla < e, con un movimento di rotazione in senso concorde a quello della sua spirale, esercitare una trazione parallelamente all’asse dell’albero 5D, facendo attenzione a non rigare lo stesso. Dopo aver ingrassato l’albero per facilitare il montaggio, inserire la nuova tenuta meccanica facendo ruotare la molla in senso contrario a quello della spirale; utilizzare un tampone con interposto un cuscinetto morbido per premere la tenuta fino a far poggiare la molla sull’ anello esterno di battuta S fissato sull’albero. Per sostituire la parte dinamica della tenuta interna V, occorre smontare l’anello esterno S, fissato sull’albero tramite i grani filettati T. Si raccomanda di rilevare accuratamente la posizione dell’anello sull’albero prima dello smontaggio, in modo da garantire successivamente il corretto precarico sulle tenute. Svitare le viti a brugola h e smontare la flangia d (con la parte statica della tenuta meccanica interna) e l’O-ring J. Per estrarre la parte dinamica della tenuta interna V è conveniente usare un filo di ferro piegato a 90° ad una estremità, per agganciare la prima o la seconda spirale della molla della tenuta W. Esercitare una trazione parallelamente all’asse dell’albero 5D, facendo attenzione a non rigare lo stesso. Assicurarsi che i grani T non abbiano segnato l’albero 5D. Dopo aver ingrassato l’albero per facilitare il montaggio, inserire la nuova tenuta meccanica facendo ruotare la molla in senso contrario a quello della spirale; utilizzare un tampone con interposto un cuscinetto morbido per premere la tenuta fino a far poggiare la molla W sull’anello interno S (o sul seeger) fissato sull’albero. 4) Giunto a trascinamento magnetico (vedi Figura 4) a) Accesso al magnete interno Predisporre un recipiente di capacità adeguata sotto la campana del magnete interno; svitare le viti a brugola _ e smontare la campana Y e l’O-ring `. Svitare la vite ^, sfilare la rondella ] e smontare il magnete interno Z. Al rimontaggio prestare attenzione a non pizzicare l’O-ring di tenuta J alloggiato sull'anello di centraggio X. Si raccomanda l’uso di attrezzi in materiale amagnetico.
d) Sostituzione boccole di sopportazione Procedere come indicato ai punti a), b), c), e). Per sostituire le boccole di sopportazione in grafite 9, occorre romperle con uno scalpello o simile, prestando molta attenzione a non rovinare il diametro della sede delle boccole ed il loro piano di appoggio. Prima di inserire le nuove boccole, pulire accuratamente le sedi con alcool per togliere tutte le impurità ed asciugare bene. Inserire le boccole nuove stendendo un velo di colla del tipo “LOCTITE 648” sui loro diametri esterni, curando l’accoppiamento fra la boccola tagliata e quella intera. Introdurre per prima la boccola intera e successivamente l’altra, lasciando poi asciugare la
colla per circa 10÷15 minuti. Terminata l’operazione, portare a zero i rasamenti delle boccole con i coperchi di alloggiamento. Se non è disponibile una rettifica piana, si può ovviare con piano d’appoggio levigato e tela smeriglio con grana tipo P80 per la sgrossatura e tipo 400 per la finitura, agendo con un movimento circolare. Per il montaggio seguire quanto indicato ai punti e), c), b), a). e) Sostituzione ingranaggi ed alberi Procedere come indicato ai punti a), b), c). Sfilare le viti a brugola ? che fissano il coperchio posteriore 4 ed estrarlo, tenendo presente che l’operazione potrebbe essere resa difficoltosa per la precisione degli alberi e delle spine di centraggio A. Per le pompe di dimensioni maggiori alla NEX400, sfilare le viti a brugola presenti sul coperchio anteriore.
Pompa Dosatrice ad Ingranaggi - Serie N Gear Metering Pump - N Series
23
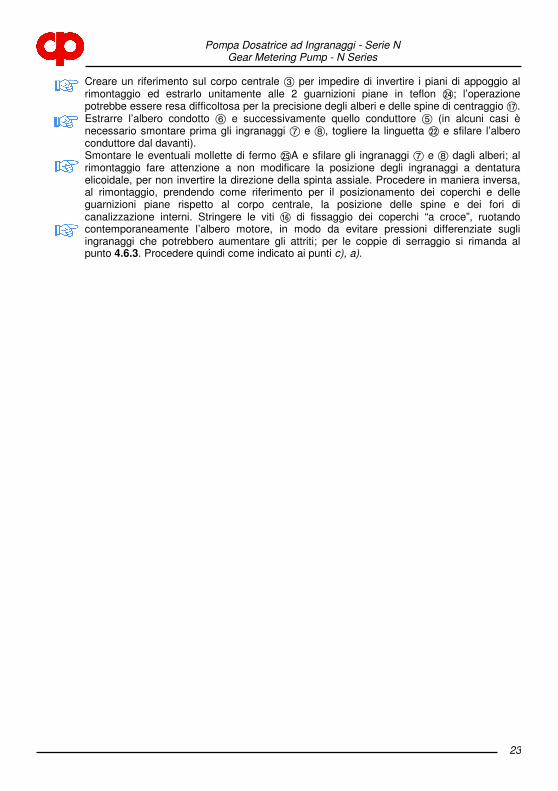
Creare un riferimento sul corpo centrale 3 per impedire di invertire i piani di appoggio al rimontaggio ed estrarlo unitamente alle 2 guarnizioni piane in teflon H; l’operazione potrebbe essere resa difficoltosa per la precisione degli alberi e delle spine di centraggio A. Estrarre l’albero condotto 6 e successivamente quello conduttore 5 (in alcuni casi è necessario smontare prima gli ingranaggi 7 e 8, togliere la linguetta F e sfilare l’albero conduttore dal davanti). Smontare le eventuali mollette di fermo IA e sfilare gli ingranaggi 7 e 8 dagli alberi; al rimontaggio fare attenzione a non modificare la posizione degli ingranaggi a dentatura elicoidale, per non invertire la direzione della spinta assiale. Procedere in maniera inversa, al rimontaggio, prendendo come riferimento per il posizionamento dei coperchi e delle guarnizioni piane rispetto al corpo centrale, la posizione delle spine e dei fori di canalizzazione interni. Stringere le viti @ di fissaggio dei coperchi “a croce”, ruotando contemporaneamente l’albero motore, in modo da evitare pressioni differenziate sugli ingranaggi che potrebbero aumentare gli attriti; per le coppie di serraggio si rimanda al punto 4.6.3. Procedere quindi come indicato ai punti c), a).
Pom
pa D
osatric
e a
d In
gra
naggi - S
erie
N
Gear M
ete
ring P
um
p - N
Serie
s
24
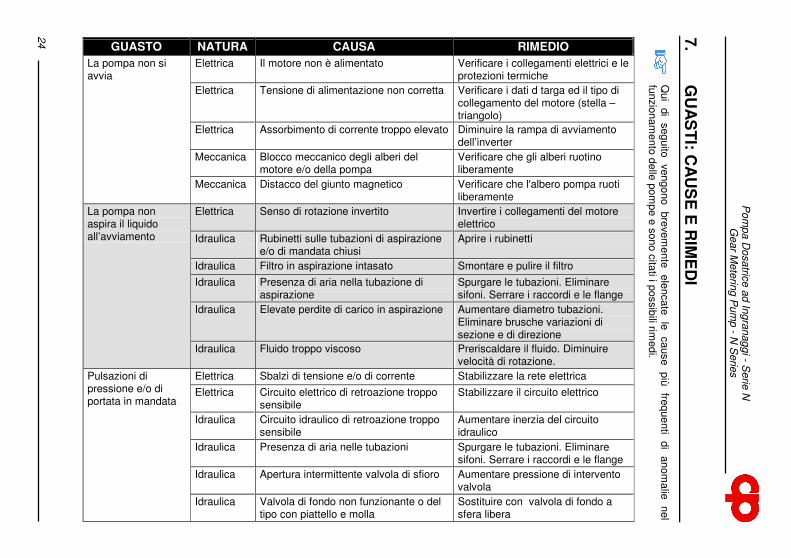
7.
GU
AS
TI: C
AU
SE
E R
IME
DI
Qui
di
seguito
vengono
bre
vem
ente
ele
ncate
le
cause
più
fre
quenti
di
anom
alie
nel
funzio
nam
ento
delle
pom
pe e
sono c
itati i p
ossib
ili rimedi.
RIMEDIO
Verificare i collegamenti elettrici e le protezioni termiche
Verificare i dati d targa ed il tipo di collegamento del motore (stella – triangolo)
Diminuire la rampa di avviamento dell’inverter
Verificare che gli alberi ruotino liberamente
Verificare che l'albero pompa ruoti liberamente
Invertire i collegamenti del motore elettrico
Aprire i rubinetti
Smontare e pulire il filtro
Spurgare le tubazioni. Eliminare sifoni. Serrare i raccordi e le flange
Aumentare diametro tubazioni. Eliminare brusche variazioni di sezione e di direzione
Preriscaldare il fluido. Diminuire velocità di rotazione.
Stabilizzare la rete elettrica
Stabilizzare il circuito elettrico
Aumentare inerzia del circuito idraulico
Spurgare le tubazioni. Eliminare sifoni. Serrare i raccordi e le flange
Aumentare pressione di intervento valvola
Sostituire con valvola di fondo a sfera libera
CAUSA
Il motore non è alimentato
Tensione di alimentazione non corretta
Assorbimento di corrente troppo elevato
Blocco meccanico degli alberi del motore e/o della pompa
Distacco del giunto magnetico
Senso di rotazione invertito
Rubinetti sulle tubazioni di aspirazione e/o di mandata chiusi
Filtro in aspirazione intasato
Presenza di aria nella tubazione di aspirazione
Elevate perdite di carico in aspirazione
Fluido troppo viscoso
Sbalzi di tensione e/o di corrente
Circuito elettrico di retroazione troppo sensibile
Circuito idraulico di retroazione troppo sensibile
Presenza di aria nelle tubazioni
Apertura intermittente valvola di sfioro
Valvola di fondo non funzionante o del tipo con piattello e molla
NATURA
Elettrica
Elettrica
Elettrica
Meccanica
Meccanica
Elettrica
Idraulica
Idraulica
Idraulica
Idraulica
Idraulica
Elettrica
Elettrica
Idraulica
Idraulica
Idraulica
Idraulica
GUASTO
La pompa non si avvia
La pompa non aspira il liquido all’avviamento
Pulsazioni di pressione e/o di portata in mandata
Pom
pa D
osatric
e a
d In
gra
naggi - S
erie
N
Gear M
ete
ring P
um
p - N
Serie
s
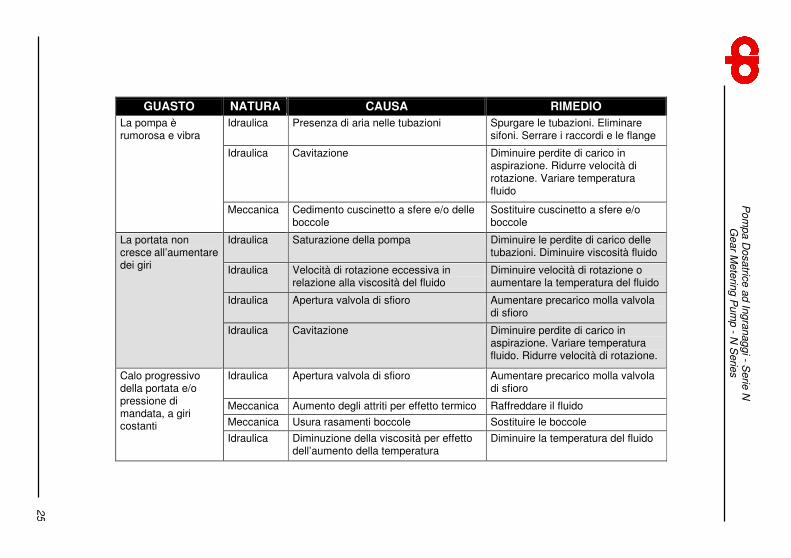
25
RIMEDIO
Spurgare le tubazioni. Eliminare sifoni. Serrare i raccordi e le flange
Diminuire perdite di carico in aspirazione. Ridurre velocità di rotazione. Variare temperatura fluido
Sostituire cuscinetto a sfere e/o boccole
Diminuire le perdite di carico delle tubazioni. Diminuire viscosità fluido
Diminuire velocità di rotazione o aumentare la temperatura del fluido
Aumentare precarico molla valvola di sfioro
Diminuire perdite di carico in aspirazione. Variare temperatura fluido. Ridurre velocità di rotazione.
Aumentare precarico molla valvola di sfioro
Raffreddare il fluido
Sostituire le boccole
Diminuire la temperatura del fluido
CAUSA
Presenza di aria nelle tubazioni
Cavitazione
Cedimento cuscinetto a sfere e/o delle boccole
Saturazione della pompa
Velocità di rotazione eccessiva in relazione alla viscosità del fluido
Apertura valvola di sfioro
Cavitazione
Apertura valvola di sfioro
Aumento degli attriti per effetto termico
Usura rasamenti boccole
Diminuzione della viscosità per effetto dell’aumento della temperatura
NATURA
Idraulica
Idraulica
Meccanica
Idraulica
Idraulica
Idraulica
Idraulica
Idraulica
Meccanica
Meccanica
Idraulica
GUASTO
La pompa è rumorosa e vibra
La portata non cresce all’aumentare dei giri
Calo progressivo della portata e/o pressione di mandata, a giri costanti
Pompa Dosatrice ad Ingranaggi - Serie N Gear Metering Pump - N Series
26
8. CONDIZIONI DI GARANZIA
La Pompe Cucchi s.r.l. garantisce le pompe ed i gruppi di pompaggio esenti da vizi e/o da difetti di fabbricazione e di assemblaggio per un periodo di 12 (dodici) mesi dalla data di consegna (indicata sul D.D.T.). La garanzia del compratore è limitata alla sostituzione gratuita dei pezzi riconosciuti difettosi, escludendo il diritto del compratore di richiedere la risoluzione del contratto o la riduzione del prezzo o altri danni. I termini della garanzia decadono qualora l’Utente faccia un uso della pompa difforme da quanto dichiarato nell’ordine o comunque non si attenga alle istruzioni del presente manuale. Danni derivanti da urti e/o manomissioni non sono coperti da garanzia. La garanzia non si applica alle parti soggette a normale usura ed ai danni derivanti da incuria e scarsa manutenzione. Per l’applicazione della garanzia occorre che: - il Cliente comunichi immediatamente alla Pompe Cucchi s.r.l. l’inconveniente che addebita
a difetto della pompa; - la pompa non sia stata manomessa; - la pompa pervenga alla Pompe Cucchi s.r.l. pulita, dopo aver eliminato ogni traccia del
liquido di processo e con idoneo imballo di protezione; - sia fornita, per iscritto, una breve descrizione del guasto riscontrato con i parametri
operativi della pompa o del gruppo; - se richiesto, sia fornita l’analisi chimica o un campione del fluido di processo. Non verranno prese in considerazione le pompe contenenti all’interno il liquido di processo o installazioni esterne al gruppo di pompaggio. Nel caso la Pompe Cucchi s.r.l. riconosca il difetto in garanzia, non sarà effettuato alcun addebito né per il materiale sostituito né per la mano d’opera. Le spese di spedizione dal Cliente alla Pompe Cucchi s.r.l. restano a carico del Cliente.
Pompa Dosatrice ad Ingranaggi - Serie N Gear Metering Pump - N Series
27
1. GENERAL INFORMATION
1.1 SUPPLY CONDITIONS According to Customer’s requirements, the pump can be provided both as bare shaft pump and as pump unit. By pump unit it is meant the pump aligned with the engine, including driving elements, baseplate and any auxiliary machinery. The pumping group is supplied with safety coupling guard.
1.2 MANUFACTURER The pump Manufacturer is POMPE CUCCHI S.R.L.. You can apply for assistance by sending a request to the following address:
Via dei Pioppi 39 - 20090 OPERA (MI) ITALY Tel. +39.02.57.60.62.87 (Hunting Line) Fax +39.02.57.60.22.57 E-mail : [email protected]
1.3 USER MANUAL CONTENT This user manual provides all the necessary information to ensure a safe and correct use of the machine. It was written – when applicable – according to point 5.5 of Standard EN 292 part 2-1992 - Machinery Safety; according to point 7 of Standard UNI EN 809-2000 Pumps and Pump Units for Liquids - Common Safety Requirements - and according to point 1.7.4 of Directive 98/37/EC 1998 (ex 89/392 EC). In this manual it is constantly referred to safety instructions. Such instructions are identified by the following symbols:
It represents the safety instructions contained in this manual, whose non-observance may compromise safety.
It is shown when electrical safety is essential to worker protection.
It indicates the safety instructions which should be taken into account for the safe operation of either the pump, the pump unit or the pump or pump unit protection.
Pompa Dosatrice ad Ingranaggi - Serie N Gear Metering Pump - N Series
28
1.4 NAME, TYPE The standard pump construction is made of AISI 316L stainless steel with graphite supports and mechanical seal in ceramic/graphite/viton. The complete series includes several models which vary in size, materials and mechanical seals. Furthermore, the Manufacturer can also provide models with preheating chambers, double mechanical seals, magnetic drive, sanitary fittings, etc. The pump identification is obtained by an alphanumeric code, an example of which is shown below: - 0NAX010/D0HF0C0: N type pump, A class, construction in AISI 316L stainless steel,
rated flow 10 l/min. at 1500 rpm (cubic capacity 7.8 cm3/revolution), gears in AISI 316L, graphite bushes, dual mechanical seal, equipped with preheating chamber.
1.5 NOISE EMISSIONS - Reference standard: CEN/TC 197/SC3 N 21 E -fig.8- ISO 3744 on 6 positions
- Measured values: 1 - Equivalent weighted continuous acoustic pressure level Leq = 75 dB(A); 2 - Maximum weighted instantaneous acoustic pressure C (peak level) Lpc < 78 dB(C).
- Test conditions: When measuring noise, the pumped liquid (ref. to a liquid with 1 cP viscosity) must be introduced into the testing system at a speed of less than 0.8 m/s into pipes. It must however reach laminar flow regime (thus the speed must be related to the viscosity) and the conditions outlined in this manual must be respected.
1.6 APPLICATION FIELDS AND LIMITS. ALLOWED AND NOT ALLOWED USES Each machine shall be used according to the type of application, operating conditions and liquid characteristics provided in contract specifications. Each variation which alters the intended use of the pump is forbidden and the User is fully responsible for it (e.g. the use of a liquid which is corrosive to pump materials rather than the recommended fluid, etc.). For variations in use within the application limits (e.g. fluid viscosity variations) it is advised to contact the Manufacturer in advance. In any case, the use of “KK” or alike plastic gears to allow the pump to operate also with poorly lubricating fluids, requires greater attention to avoid excessive or unexpected pressure loads. It is absolutely forbidden to use the machine in hazardous environments (explosive atmosphere, etc…), the use of hazardous substances (e.g. fluids with dangerous gases), in critical conditions (e.g. abnormal temperatures, etc…), which are not supplied with the pump. For pumps and pump units intended to be used in potentially explosive environments, please read carefully “Additional instructions for the operation and management of pumps and pump units intended to be used in potentially explosive atmospheres (Directive 94/9/EC)”. Pompe Cucchi S.r.l. declines every responsibility for the consequences arising from an improper use of the machine which does not comply with what prescribed in this manual or specifically requested when ordering.
Pompa Dosatrice ad Ingranaggi - Serie N Gear Metering Pump - N Series
29
2. TRANSPORT, HANDLING, PACKAGING, STORAGE
Pompe Cucchi sells “ex works”. Consequently, transport from the manufacturing shop to the named place of destination is carried out by the Customer under his own responsibility. For each transport a suitable standard packaging is ensured or established based on Customer requirements who, in any case, must give information about the type of shipment to be performed (by land, air, “overseas“). In case of long stationary periods under critical environmental conditions (such as: high humidity and/or salinity, etc.) the supply shall be stored in a protected environment.
3. DESCRIPTION OF THE PUMP AND THE PUMP UNIT
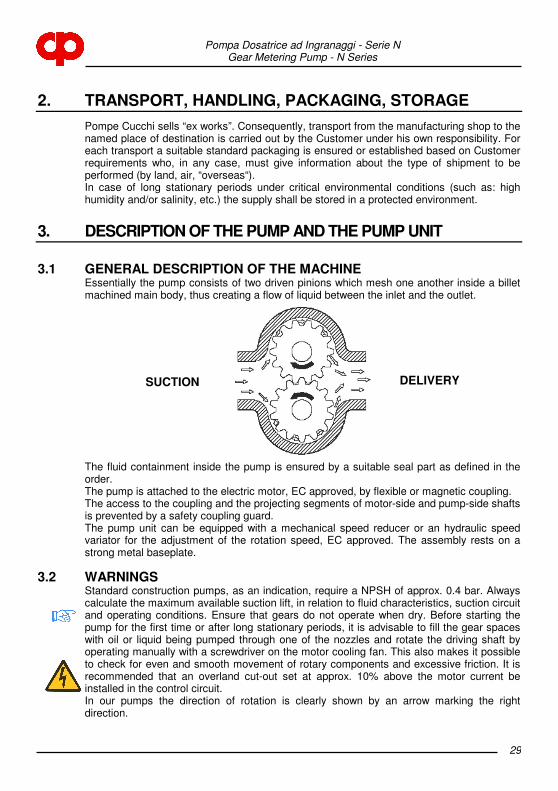
3.1 GENERAL DESCRIPTION OF THE MACHINE Essentially the pump consists of two driven pinions which mesh one another inside a billet machined main body, thus creating a flow of liquid between the inlet and the outlet.
The fluid containment inside the pump is ensured by a suitable seal part as defined in the order. The pump is attached to the electric motor, EC approved, by flexible or magnetic coupling. The access to the coupling and the projecting segments of motor-side and pump-side shafts is prevented by a safety coupling guard. The pump unit can be equipped with a mechanical speed reducer or an hydraulic speed variator for the adjustment of the rotation speed, EC approved. The assembly rests on a strong metal baseplate.
3.2 WARNINGS Standard construction pumps, as an indication, require a NPSH of approx. 0.4 bar. Always calculate the maximum available suction lift, in relation to fluid characteristics, suction circuit and operating conditions. Ensure that gears do not operate when dry. Before starting the pump for the first time or after long stationary periods, it is advisable to fill the gear spaces with oil or liquid being pumped through one of the nozzles and rotate the driving shaft by operating manually with a screwdriver on the motor cooling fan. This also makes it possible to check for even and smooth movement of rotary components and excessive friction. It is recommended that an overland cut-out set at approx. 10% above the motor current be installed in the control circuit. In our pumps the direction of rotation is clearly shown by an arrow marking the right direction.
SUCTION DELIVERY
Pompa Dosatrice ad Ingranaggi - Serie N Gear Metering Pump - N Series
30
The pump operating temperature in normal working conditions is about 80°C. In special pump versions, working temperatures of 180°C and more may be achieved. To protect personnel from dangers due to the temperatures reached during the operation of the machine, in the event of accidental contact (burn), the User must reduce the external pump temperature by means of insulation plates, coatings, screens, barriers, etc. As limit reference temperature for the contact surface it is advisable to take 55°C. Below this value, for hot smooth surfaces in bare metal, there is no burn threshold. For a detailed knowledge of this problem in relation to different particular cases, the User can read the standard UNI EN 563 Ed.’94, where burn thresholds are specified for several types of surface according to the “surface temperature - contact time” parameters. Liquids to be pumped must not contain abrasive or solid suspension as this will greatly reduce the pump life. At this purpose we recommend the installation of a properly sized filter on the suction line if solids may be present. When pumps are installed in parallel, the suction lines should be adequately separated to prevent unnecessary turbulence.
3.3 PROTECTION DEVICE The coupling guard installed by the Manufacturer is made of a strong metal plate, fastened to the baseplate by screws, duly shaped to prevent fingers from coming into contact with moving parts. It can be removed only by using a proper tool.
3.4 ADDITIONAL DESCRIPTION OF ACCESSORIES
3.4.1 Seal parts The pump is usually supplied equipped with mechanical seal. If the Customer requires a particular type of seal, Pompe Cucchi S.r.l. installs the desired seal after verifying if its dimensions are compatible with those of the pump. In case the Customer requires only the seal mark, the Company leaves the Manufacturer to select the type of seal, by giving information about the pumped liquid. Among the seals used we can mention the following:
- Single mechanical seal - Double tandem mechanical seals with tank and pressureless flowing liquid - Double opposed mechanical seals with external pressurized flowing liquid These last must be installed when the pumped product has characteristics which prevent it from being used as flowing source or for greater safety (visual inspection). The tank for tandem mechanical seals is not pressurized and it is used to avoid dry operation of the external seal and visually detect any possible leakage of the internal mechanical seal. For magnetic drive pumps sealing is only ensured by static gaskets, since the pump shaft is completely enclosed within the pump body.
Pompa Dosatrice ad Ingranaggi - Serie N Gear Metering Pump - N Series
31
4. INSTALLATION, ASSEMBLY
4.1 SPECIAL ASSEMBLY TOOLS To assemble the pump you do not need special tools, except for seal extractors (see Maintenance).
4.2 INSTALLATION SITE INFORMATION
4.2.1 Space requirements for operation and installation The space destined by the Customer to the installation of the machine should be enough to gain access to, install and maintain the pump unit.
4.2.2 Inspection before starting installation Before installation, the Customer must ensure that the environmental conditions of the selected site comply with requirements specified under the contract. In particular, unless expressly required and accepted in the order, the installation site should not be exposed to the following environmental conditions:
- abnormal temperature;
- high humidity; - corrosive atmosphere;
- explosion and/or fire hazard areas;
- dust, sandstorms;
- earthquakes and other similar external conditions;
- high level of vibrations; - high altitude;
- flood hazard areas.
4.2.3 Baseplate, foundation plate details The metal base plate shall be of sufficient size and strength to support induced stress. When the pump unit is installed, it shall be firmly fixed in place by fastening bolts or by using other securing methods. Ground fastening bolts or other securing methods shall be of sufficient strength to prevent the pump unit from moving accidentally.
4.2.4 Alignment requirements The alignment operation must not submit the pump unit to axial and radial stress, therefore the offset must always be lower than the tolerance limits expected fot the coupling. Great care shall be taken to align pump units equipped with magnetic drive coupling.
4.2.5 Suction lift The suction lift, that is the vertical distance between the pump inlet mid-point and the free surface of the tank to which the pump is attached, must not exceed 5 m to allow pump priming and avoid cavitation phenomena.
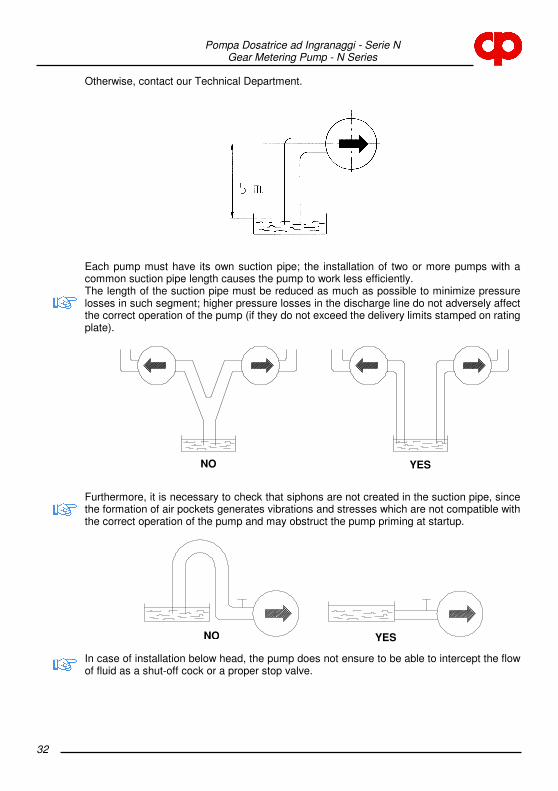
Pompa Dosatrice ad Ingranaggi - Serie N Gear Metering Pump - N Series
32
Otherwise, contact our Technical Department.
Each pump must have its own suction pipe; the installation of two or more pumps with a common suction pipe length causes the pump to work less efficiently. The length of the suction pipe must be reduced as much as possible to minimize pressure losses in such segment; higher pressure losses in the discharge line do not adversely affect the correct operation of the pump (if they do not exceed the delivery limits stamped on rating plate).
Furthermore, it is necessary to check that siphons are not created in the suction pipe, since the formation of air pockets generates vibrations and stresses which are not compatible with the correct operation of the pump and may obstruct the pump priming at startup.
In case of installation below head, the pump does not ensure to be able to intercept the flow of fluid as a shut-off cock or a proper stop valve.
NO YES
NO YES

Pompa Dosatrice ad Ingranaggi - Serie N Gear Metering Pump - N Series
33
4.3 INITIAL INSTALLATION According to the conditions of supply, the pump can be delivered as follows:
4.3.1 Complete pump unit In this case the Customer must fasten the baseplate to a solid support in order to ensure the correct axis alignment in all operating conditions. We recommend the use of vibration dampers below the pump base and vibration damping sections on pipes near pump inlets. Once the pump unit has been positioned, proceed as described below: a) connect suction and discharge pipes respectively to the pump inlet and outlet; b) power the motor, by carefully controlling the compatibility of motor voltage and
frequency with those of the system; c) open the intake and discharge pipe valves, if any; d) run the motor for a while to verify that the pump rotates in the direction indicated by the
arrow stamped on the pump.
4.3.2 Bare shaft pump In this case, before following the steps described at Paragraph 4.3.1, choose the type of motor and align it to the pump on a baseplate. The motor must be selected by the Customer depending on the type of operation for which it is specifically requested (continuous operation, discontinuous operation, repeated startups, indoor or outdoor installation, explosive atmosphere, critical environmental conditions, altitude, etc.) with power compatible with that required by the pump. The alignment is performed by flexible or magnetic coupling on a baseplate. To align the flexible coupling make the following basic operations: a) accurately measure the height of the pump axis (h) and the height of the motor axis (H); b) calculate the difference D = h – H;
c) prepare some aluminium (or steel) shims with height D; d) place motor and pump on a single plane (verify their flatness), by placing shims where
necessary (or under the motor feet or the pump feet); e) verify that the axes of the two shafts coincide, by measuring the two diameters by
difference, that is, by accurately measuring R, D1 = 2R + d. If this equality is not verified, properly place calibrated shims so as to align perfectly the pump unit;
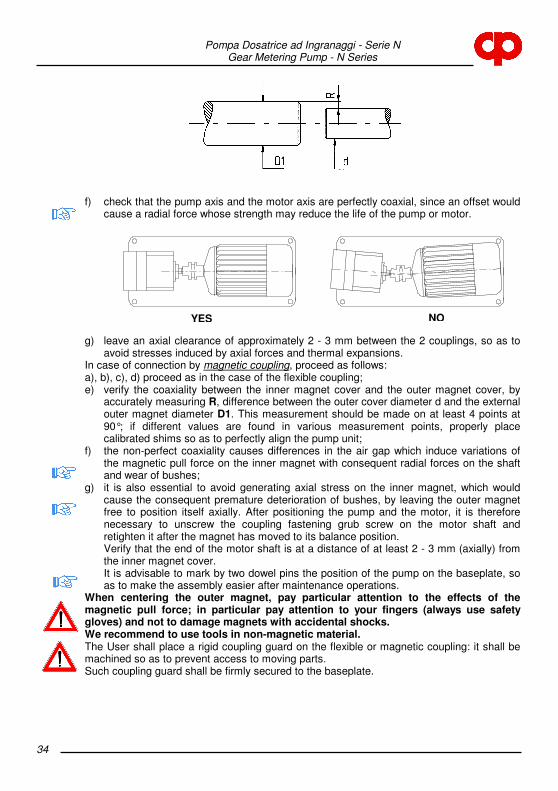
Pompa Dosatrice ad Ingranaggi - Serie N Gear Metering Pump - N Series
34
f) check that the pump axis and the motor axis are perfectly coaxial, since an offset would cause a radial force whose strength may reduce the life of the pump or motor.
g) leave an axial clearance of approximately 2 - 3 mm between the 2 couplings, so as to avoid stresses induced by axial forces and thermal expansions.
In case of connection by magnetic coupling, proceed as follows: a), b), c), d) proceed as in the case of the flexible coupling; e) verify the coaxiality between the inner magnet cover and the outer magnet cover, by
accurately measuring R, difference between the outer cover diameter d and the external outer magnet diameter D1. This measurement should be made on at least 4 points at 90°; if different values are found in various measurement points, properly place calibrated shims so as to perfectly align the pump unit;
f) the non-perfect coaxiality causes differences in the air gap which induce variations of the magnetic pull force on the inner magnet with consequent radial forces on the shaft and wear of bushes;
g) it is also essential to avoid generating axial stress on the inner magnet, which would cause the consequent premature deterioration of bushes, by leaving the outer magnet free to position itself axially. After positioning the pump and the motor, it is therefore necessary to unscrew the coupling fastening grub screw on the motor shaft and retighten it after the magnet has moved to its balance position. Verify that the end of the motor shaft is at a distance of at least 2 - 3 mm (axially) from the inner magnet cover. It is advisable to mark by two dowel pins the position of the pump on the baseplate, so as to make the assembly easier after maintenance operations.
When centering the outer magnet, pay particular attention to the effects of the magnetic pull force; in particular pay attention to your fingers (always use safety gloves) and not to damage magnets with accidental shocks. We recommend to use tools in non-magnetic material. The User shall place a rigid coupling guard on the flexible or magnetic coupling: it shall be machined so as to prevent access to moving parts. Such coupling guard shall be firmly secured to the baseplate.
YES NO
Pompa Dosatrice ad Ingranaggi - Serie N Gear Metering Pump - N Series
35
4.4 DRIVE UNIT AND ACCESSORY ASSEMBLY
4.4.1 Motor The Company installs EC approved electric motors, of power compatible with that required by the pump, selected according to the desired operating conditions and environmental characteristics. In particular if the pump unit is required to operate in explosive atmosphere, the motor is chosen in explosion-proof execution (we remind that, to be used within the European Union, also the execution of the pump and the relevant fittings must comply with directive 94/9/EC).
4.4.2 Installation of safety and control devices If specifically requested in the order form, the Company provides the pump with the relief valve, which must be calibrated to protect the pump from damage. Once it has been properly calibrated, the valve must not be tampered with in any way, since volumetric pumps can reach quickly, with the delivery closed, extremely high pressure values, with consequent very serious danger. Any pressure adjustment shall be compulsorily made with the pump stopped and depressurized. The User shall install a pressure gauge in the pump outlet, upstream of the relief valve; it is advisable to install a vacuum gauge near the pump inlet. In case also a safety valve is installed on the system, make sure that its calibration pressure differs considerably from the one of the relief valve not to generate dangerous resonance phenomena (pipe and/or valve break).
4.5 ELECTRICAL CONNECTIONS, CONNECTION CABLES The machine shall be connected to the external ground protection system by the appropriate terminal, which must be identified by the PE letter. Connection cables shall be properly sized and insulated. Before energizing the machine, always verify that the mains voltage and frequency are compatible with those of the motor.
4.6 PIPING
4.6.1 General Pipes shall have a suitable diameter to allow a regular flow with low pressure losses. Therefore, we recommend to use, at least for the suction line, pipes with inner diameter equal to or greater than that of the pump inlet, mostly when the viscosity level becomes considerable. To minimize pressure losses in the circuit, we recommend to avoid, as much as possible, abrupt variations of section and direction (curves) along the pipe run, particularly in the suction line.
4.6.2 Forces and moments which operate on suction and delivery flanges. As general rule it would be necessary to interpose flexible vibration damping sections between the pump and the system piping; therefore, we recommend to verify that the flanges of the connection pipes are always placed, in free position, with the planes parallel to those of the flanges of the suction and delivery nozzles to avoid that, after fastening them, forces and moments of excessive value are generated. In any case, the User shall make sure that the loads induced on the pump flanges, under the most critical operating conditions, do not exceed the values prescribed by Standards UNI EN ISO 14847.
Pompa Dosatrice ad Ingranaggi - Serie N Gear Metering Pump - N Series
36
4.6.3 Fastening screw torques The fastening torque for the screws of our pumps shall be:
- for M6 screws 11-12 Nm
- for M8 screws 20-22 Nm - for M10 screws 38-40 Nm For more detailed information, contact our Technical Department.
5. COMMISSIONING, OPERATION, SHUTDOWN
5.1 DOCUMENTATION Operating and maintenance manual
5.2 PUMP PREPARATION FOR STARTUP
5.2.1 Filling / discharge To prevent gears from running dry, before starting the pump for the first time or after long stationary periods it is advisable to fill the gear spaces with oil or liquid being pumped through one of the nozzles and rotate the driving shaft by operating manually with a screwdriver on the motor cooling fan. This also makes it possible to check for even and smooth movement of rotary components and excessive friction. The pump discharge, if it is about toxic, harmful or, in any case, dangerous fluid, shall be carried out with the greatest care. In particular, the pump body shall be emptied with appropriate operating manoeuvres. Later the pump (except for the NAX2.5 model) shall be submitted to a CIP cycle washing ensured by an internal drain line which, by creating a vacuum, after partially closing the intake valve, in the bearing area and the seal chamber, removes completely any traces of conveyed liquid.
5.2.2 Electrical connections It is necessary to choose wires which satisfy the operating conditions required by the Customer (e.g. voltage, current, electric shock protection, bundle of cables) and can support external influences (e.g. ambient temperature, presence of water or corrosive substances, mechanical stresses, fire hazards). Moreover, we remind that wires must be properly sized to ensure the voltage drop from the power supply inlet to the point of load application does not exceed 4%.
5.2.3 Verifying the direction of rotation Open the intake and discharge valves. To verify the direction of rotation run the motor for a while only to check that the pump rotates in the direction marked by the arrows.
5.3 SAFETY DEVICES
5.3.1 Mechanical safety devices (guards for rotating parts) The hazardous area, represented by the projecting sections of pump side and motor side shafts and the coupling, shall be protected against accidental contact using a duly shaped strong metal coupling guard which must be firmly secured to the baseplate.
Pompa Dosatrice ad Ingranaggi - Serie N Gear Metering Pump - N Series
37
5.3.2 Acoustic insulation Sound emission values are specified in this manual. The User should always verify if the regulations of his own country prescribe, in relation to the frequency of exposure to emission values, the use of individual protection devices. If it is, he must comply with the requirements contained in the above-mentioned regulations to protect the operator’s health and safety.
5.3.3 Splash-proof cover In the event the liquid being pumped is dangerous, the operator must be in any case protected against the risk of any accidental contact with jets of liquid by wearing appropriate individual protection devices.
5.3.4 Regulation on the electric components We remind that in accordance with Standard EN 60204-1 Ed1998-04, as power disconnecting switch, a plug/socket combination is allowed for a machine with rated power equal to or lower than 16 A and a total power equal to or lower than 3 kW.
5.4 STARTING THE PUMP
5.4.1 Initial commissioning
- Ensure that the pump unit is properly earthed.
- In case the pump is equipped with preheating chamber, it is necessary to operate this last up to reach the normal operating temperature and gradually start the liquid pumping up to reach the operating conditions in thermal equilibrium.
- Verify that suction pipes are properly joined one another to avoid air infiltrations which would prevent the pump from priming. - Check that siphons are not created in the suction pipes so that pump can completely
remove the air. In this case, if the air is not completely removed then the flow rate may decrease and the noise level may increase although the pump has taken in the liquid, with consequent premature deterioration of bearing bushes and moving parts.
- Where applicable, verify that the pipes for the external flow of mechanical seals are properly connected.
- Verify the proper operation of the relief valve; to do so it is necessary to gradually increase pressure, by acting on the valve located on the discharge pipe, up to reach the expected calibration value. Now, after a further rotation of the valve, the discharge pressure shall remain lower than the calibration value. Otherwise, after stopping the machine and depressurizing the pump, it is necessary to disassemble the valve cap, remove the gasket below, loosen the nut and rotate counterclockwise the spring pre-load adjusting screw (clockwise to increase the pre-load). Retighten the lock nut, interpose the gasket and rescrew the protection cap. The adjusting screw is not equipped with retainer, therefore it is necessary to pay attention, when unscrewing it, not to cause a leakage of the fluid being pumped.
5.4.2 Startup after shutdowns The most common case in which the pump may stop working - apart from the power supply failure (black out) – is when the electric motor overcharge protection comes into operation. In this case, before starting the pump examine the causes which triggered the activation of the protection and remove them. In magnetic drive pumps, it may happen that, once the maximum transmissible torque value has been exceeded, the pump stops while the motor is idling. In this case, it is necessary to stop immediately the motor, wait until the inner magnet cover (which became hot as a result of eddy currents) is cooled and restart the motor after troubleshooting.

Pompa Dosatrice ad Ingranaggi - Serie N Gear Metering Pump - N Series
38
5.4.3 Pump system requirements In volumetric pumps, pressure is not related to flow rate and/or rotation speed; therefore, avoid installing shut-off valves on the discharge pipe and, in any case, between the pump and the stop valve a relief valve must always be installed.
5.4.4 Startup/shutdown frequency Pumps which are expressly requested by the Customer to start frequently and repeatedly do not show any problems for this kind of operation.
5.4.5 Operation and startup with closed valve It is forbidden to start the pump with the discharge valve closed: such mistake would cause an abrupt pressure rise above the limit values with consequent seizing.
5.5 SHUTDOWN
5.5.1 Decommissioning In case of decommissioning of the pump unit, it is necessary to disconnect the power supply to make unexpected and accidental startups impossible.
5.5.2 Emptying A pump or a pump unit which operates with a flammable, toxic, corrosive or, in any way, hazardous fluid, or with a liquid at a temperature higher than 55°C, shall be equipped with a device such as a connection pipe, to be provided by the User, to collect and dispose the liquid drained or coming from any possible leakage from the shaft seal or discharged by a pressure relief valve.
6. MAINTENANCE AND INSPECTION
6.1 USE PRECAUTIONS Before performing any maintenance operation, please observe the following safety precautions: - Never execute maintenance operations with the pump running.
- Cut the power supply to the pump unit.
- Wear gloves, glasses and protective suits adequate to the characteristics of the liquid being pumped. - Wait until the pump is cooled. - Never open the pump unit and/or the relief valve when the pump is pressurized.
- Close suction and discharge pipe valves, if any.
- Disconnect the pump from suction and discharge pipes, by paying attention to put a collecting basin for the pipe liquid. - In case externally flowed mechanical seals are used, disconnect the relevant pipes.
- Cut the power supply to the motor and disconnect the earth cable.
- Unscrew anchoring screws and remove the pump unit complete with its baseplate.
- Disassemble the protection coupling guard and disconnect the pump from the motor.
Pompa Dosatrice ad Ingranaggi - Serie N Gear Metering Pump - N Series
39
- If necessary, pay particular attention to the effects of the magnetic pull force; in particular pay attention to your fingers (always wear safety gloves) and not to damage magnets by accidental shocks. We recommend to use tools in non-magnetic material. - Disconnect the pump from the baseplate.
- Place a collecting basin for the pump liquid.
- Perform the maintenance operation.
- Align carefully pump and motor and fasten the pump to the baseplate.
- Connect the pump to the motor and assemble the protection coupling guard. - Secure the baseplate by anchoring screws.
- Connect the pump to suction and discharge pipes.
- Reconnect the power supply to the motor and the earth cable.
- Open suction and discharge pipe valves, if any.
- Reconnect the power supply to the pump unit.
6.2 WEARABLE MATERIALS The normal wear parts, included as spares in the 2-year warranty are the following: - bearing bushes;
- seal parts (mechanical seal, gaskets);
- gears;
- shafts.
6.3 SURVEILLANCE DURING OPERATION The pump unit does not need the presence of an Operator during the work cycle. It is up to the User to provide or not a periodic surveillance depending on the importance and seriousness of the operation. The relevant checks shall be aimed to detect abnormal noise, vibration, temperature levels and/or some dripping from the mechanical seals, variations of pressure and/or flow rate, etc.
6.4 PREVENTIVE MAINTENANCE It is always advisable, for a reliable and cost-effective operation, to adopt a policy of preventive maintenance. The service time specified for wearable component parts in this manual can be used as reference for the first period of operation. Later the user will be able to improve the MTBM (Mean Time Between Maintenance) as a result of the acquired experience.
6.5 PUMP DISASSEMBLY AND REASSEMBLY
6.5.1 Tools No special tools are requested, except for seal extractors.
6.5.2 Disassembly/reassembly procedure Before disassembling the pump, it is necessary to perform the operations mentioned at point 6.1 "USE PRECAUTIONS". Refer to the drawings and nomenclature attached at the end of the manual.

Pompa Dosatrice ad Ingranaggi - Serie N Gear Metering Pump - N Series
40
1) Single seal (see Figure 1) a) Access to the mechanical seal After removing the feather key G from its seat, loosen the hexagonal head screws @ of the seal cover 1 and extract it, by paying attention not to damage the seal static part :, housed in the cover. It is thus possible to check the state of wear and tear of the seal contact surfaces. On reassembly, pay attention not to pinch the sealing O-ring J housed in the cover. b) Replacing static seal To remove the static part of the seal : from the seal cover 1, it is necessary to extract, by using special pliers, the seeger ring = housed in the cover, remove the ball bearing > and exert a pressure upon the external side of the seal. After placing the seal cover on a plane and greasing the walls to make assembly easier, insert the new static seal with the relevant O-ring; use a pad interposed with a soft bearing to exert the force perpendicularly to the cover. c) Replacing dynamic seal To remove the dynamic part of the seal ; it is advisable to use an iron wire bent at 90° at one end to hook the first or the second coil of the seal spring <. Exert a traction force parallel to the shaft 5, by paying attention not to scratch this last. After greasing the shaft to make assembly easier, insert the new mechanical seal by rotating the spring in the direction opposite to that of the coil; use a pad interposed with soft bearing to press the seal up to make the spring < rest on the projection (or on the seeger IB) provided on the shaft. 2) Double back-to-back seals (see Figure 2) a) Access to the external mechanical seal
After removing the feather key G from its seat, loosen the hexagonal head screws @ of the external seal cover R and remove this last, by paying attention not to damage the static part of the external seal :, housed in the cover. It is thus possible to check the state of wear and tear of the external seal contact surfaces. On reassembly, pay attention not to pinch the sealing O-ring J housed in the cover. b) Replacing static seals To remove the static part of the external seal : from the seal cover R, it is necessary to extract, by using special pliers, the seeger ring = housed in the cover, remove the ball bearing > and exert a pressure upon the external side of the seal. After placing the seal cover on a plane and greasing the walls to make assembly easier, insert the new static seal with the relevant O-ring; use a pad interposed with a soft bearing to exert the force perpendicularly to the cover. To gain access to the static part of the internal seal, proceed as described at points c), e). By acting from the back of the front body insert the point of a screwdriver in the existing cavity between the tang of the static part of the internal mechanical seal U and the bush which houses this last Q (the bush is forced into the body and cannot be disassembled); with small blows on the surrounding area, it is possible to remove the fixed seat of the mechanical seal U. On assembly, after reassembling gears and shafts as described at point e), place the pump on a plane, grease the bush walls Q to make assembly easier, insert the new static seal with the relevant O-ring by using a pad interposed with a soft bearing to exert the force perpendicularly to the cover.

Pompa Dosatrice ad Ingranaggi - Serie N Gear Metering Pump - N Series
41
c) Replacing dynamic seals To remove the dynamic part of the external seal ; it is advisable to hold the spring < and, with a rotation movement in the same direction as that of its coil, exert a traction force parallel to the shaft 5D, by paying attention not to scratch this last. After greasing the shaft to make assembly easier, insert the new mechanical seal by rotating the spring in the direction opposite to that of the coil; use a pad interposed with a soft bearing to press the seal up to make the spring rest on the stop ring S fixed on the shaft. To replace the dynamic part of the internal seal V, it is necessary to disassemble the ring S, fixed on the shaft by means of threaded grub screws T. We recommend to mark accurately the ring position on the shaft before disassembly, so as to ensure the correct seal pre-load later. To remove the dynamic part of the internal seal V it is advisable to use an iron wire bent at 90° at one end to hook the first or the second coil of the seal spring W. Exert a traction force parallel to the shaft 5D, by paying attention not to scratch this last. Make sure that grub screws T did not scratch the shaft 5D. After greasing the shaft to make assembly easier, insert the new mechanical seal by rotating the spring in the direction opposite to that of the coil; use a pad interposed with a soft bearing to press the seal up to make it match the fixed part U. Secure the ring S in the original position and lock it on the shaft 5D by using grub screws T. During operation, pay attention not to invert seals and relevant springs. 3) Double tandem mechanical seals (see Figure 3) a) Access to the external mechanical seal Place a basin of suitable size and capacity under the seal cover R and, by loosening the grub screw f, empty the tank e.
After removing the feather key G from its seat, loosen the hexagonal head screws @ of the external seal cover R and extract this last, by paying attention not to damage the static part of the external seal :, housed in the cover. It is thus possible to verify the state of wear and tear of the external seal contact surfaces. On reassembly, pay attention not to pinch the sealing O-ring g housed in the cover. Retighten the grub screw f and fill the tank e with the recommended fluid. b) Replacing static seals To remove the static part of the external seal : from the seal cover R, it is necessary to extract, by using special pliers, the seeger ring = housed in the cover, remove the ball bearing > and exert a pressure upon the external side of the seal. After placing the seal cover on a plane and greasing the walls to make assembly easier, insert the new static seal with the relevant O-ring; use a pad interposed with a soft bearing to exert the force perpendicularly to the cover. To gain access to the static part of the internal seal, proceed as described at point c), without disassembling the dynamic part of the internal seal V. By exerting a pressure on the external side of the seal, remove the fixed seat of the internal mechanical seal U from the flange d. After placing this last on a plane and greasing the walls to make assembly easier, insert the new static seal with the relevant O-ring; use a pad interposed with a soft bearing to exert the force perpendicularly to the cover. On reassembly, pay attention not to pinch the sealing O-ring J housed in the flange d.

Pompa Dosatrice ad Ingranaggi - Serie N Gear Metering Pump - N Series
42
c) Replacing dynamic seals To remove the dynamic part of the external seal ; it is advisable to hold the spring < and, with a rotation movement in the same direction as that of its coil, exert a traction force parallel to the shaft 5D, by paying attention not to scratch this last. After greasing the shaft to make assembly easier, insert the new mechanical seal by rotating the spring in the direction opposite to that of the coil; use a pad interposed with a soft bearing to press the seal up to make the spring rest on the external stop ring S fixed on the shaft. To replace the dynamic part of the internal seal V, it is necessary to disassemble the external ring S, secured on the shaft by means of threaded grub screws T. We recommend to mark accurately the ring position on the shaft before disassembly, so as to ensure the correct seal pre-load later. Loosen the hexagonal head screws h and disassemble the flange d (with the static part of the internal mechanical seal) and the O-ring J. To extract the dynamic part of the internal seal V it is advisable to use an iron wire bent at 90° at one end to hook the first or the second coil of the seal spring W. Exert a traction force parallel to the shaft 5D, by paying attention not to scratch this last. Ensure that grub screws T did not scratch the shaft 5D. After greasing the shaft to make assembly easier, insert the new mechanical seal by rotating the spring in the direction opposite to that of the coil; use a pad interposed with a soft bearing to press the seal up to make the spring W rest on the internal ring S (or on the seeger) fixed on the shaft. 4) Magnetic drive coupling (see Figure 4) a) Access to inner magnet Place a basin of suitable size and capacity under the inner magnet cover; loosen the hexagonal head screws _ and disassemble the cover Y and the O-ring `. Unscrew the screw ^, remove the washer ] and disassemble the inner magnet Z. On reassembly, pay attention not to pinch the sealing O-ring J housed on the centering ring X. We recommend the use of tools in non-magnetic material.
d) Replacing bearing bushes Proceed as described at points a), b), c), e). To replace the graphite bearing bushes 9, it is necessary to break them with a chisel or other convenient tool, by paying great attention not to damage the seat diameter of bushes and their base plane. Before inserting new bushes, clean very carefully bush seats with alcohol in order to remove all impurities and dry well. Fit new bushes by spreading a layer of glue of “LOCTITE 648” type over their outer diameters, by paying attention that the cut bush and the integer bush match perfectly. First introduce
the integer bush and then the other, by letting glue dry for about 10÷15 minutes. When the operation is over, set to zero the bush shims with the relevant housing covers. If a surfacing feed is not available, you can choose a base plane abraded with fine emery cloth with P80 type grain for rough grinding and 400 type grain for finishing, by making a circular motion. For assembly, follow the instructions at points e), c), b), a).
e) Replacing gears and shafts Proceed as described at points a), b), c). Loosen the hexagonal head screws ? which fasten the rear cover 4 and remove this last, by keeping into account that the operation may become difficult for the accuracy of shafts and dowel pins A. For pumps of size greater than that of NEX400, loosen the hexagonal head screws on the front cover.
Pompa Dosatrice ad Ingranaggi - Serie N Gear Metering Pump - N Series
43
Draw a reference mark on the main body 3 to avoid reversing base planes on reassembly and remove it together with the 2 teflon flat gaskets H; the operation may become difficult for the accuracy of shafts and dowel pins A. Remove the driven shaft 6 and then the driving shaft 5 (in some cases it is necessary first to disassemble the gears 7 and 8, and then extract the feather key F and remove the driving shaft from the front side). Disassemble the locking spring clips IA, if any, and extract the gears 7 and 8 from shafts; on reassembly, pay attention not to modify the position of the helical gearing, not to reverse the direction of the axial thrust. On reassembly, reverse the procedure, by taking as reference the position of covers and flat gaskets with respect to the main body, the position of dowel pins and internal drain line holes. Tighten the screws @ which fasten covers in a cross-wise way, by rotating at the same time the motor shaft, so as to avoid differentiated pressures on gears which may increase friction; for tightening torques please refer to point 4.6.3. Then, proceed as described at points c), a).

Pom
pa D
osatric
e a
d In
gra
naggi - S
erie
N
Gear M
ete
ring P
um
p - N
Serie
s
44
7.
FA
UL
TS
: CA
US
ES
AN
D S
OL
UT
ION
S
Here
belo
w th
e m
ost c
om
mon c
auses o
f malfu
nctio
ns in
the o
pera
tion o
f pum
ps a
re s
hortly
lis
ted to
geth
er w
ith th
e p
ossib
le s
olu
tions.
SOLUTION
Verify electrical connections and thermal protections
Verify rating and type of (star - delta) motor connection
Reduce the inverter start ramp
Verify that shafts rotate freely
Verify that the pump shaft rotates freely
Reverse electric motor connections
Open valves
Disassemble and clean the filter
Drain pipes. Remove siphons. Tighten fittings and flanges
Increase the pipe diameter. Remove abrupt variations of section and direction
Preheat the fluid. Decrease the speed of rotation.
Stabilize the mains voltage
Stabilize the electric circuit
Increase the inertia of the hydraulic circuit
Drain pipes. Remove siphons. Tighten fittings and flanges
Increase the valve operating pressure
Replace with free ball foot valve
CAUSE
The motor is not powered
Incorrect supply voltage
Excessive power consumption
Mechanical lock of motor and/or pump shafts
Magnetic coupling detachment
Direction of rotation reversed
Valves on suction and/or discharge pipes closed
Suction filter clogged
Presence of air in the suction pipe
High pressure losses in the suction line
Fluid too viscous
Overvoltage and/or overcurrent
Feedback electric circuit too sensitive
Feedback hydraulic circuit too sensitive
Presence of air in pipes
Intermittent opening of the relief valve
Foot valve not working properly or of the type with plate and spring
ORIGIN
Electrical
Electrical
Electrical
Mechanical
Mechanical
Electrical
Hydraulic
Hydraulic
Hydraulic
Hydraulic
Hydraulic
Electrical
Electrical
Hydraulic
Hydraulic
Hydraulic
Hydraulic
FAULT
The pump does not start
The pump does not suck liquid at startup
Pressure and/or flow rate pulses in the discharge line
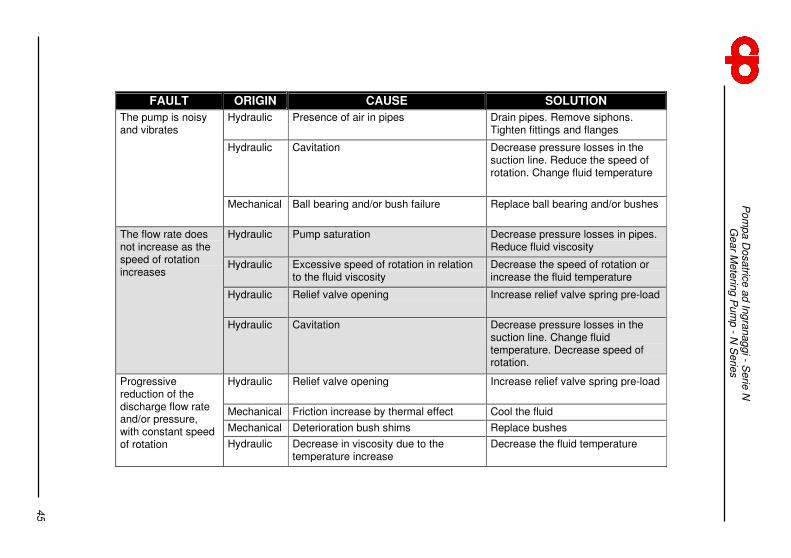
Pom
pa D
osatric
e a
d In
gra
naggi - S
erie
N
Gear M
ete
ring P
um
p - N
Serie
s
45
SOLUTION
Drain pipes. Remove siphons. Tighten fittings and flanges
Decrease pressure losses in the suction line. Reduce the speed of rotation. Change fluid temperature
Replace ball bearing and/or bushes
Decrease pressure losses in pipes. Reduce fluid viscosity
Decrease the speed of rotation or increase the fluid temperature
Increase relief valve spring pre-load
Decrease pressure losses in the suction line. Change fluid temperature. Decrease speed of rotation.
Increase relief valve spring pre-load
Cool the fluid
Replace bushes
Decrease the fluid temperature
CAUSE
Presence of air in pipes
Cavitation
Ball bearing and/or bush failure
Pump saturation
Excessive speed of rotation in relation to the fluid viscosity
Relief valve opening
Cavitation
Relief valve opening
Friction increase by thermal effect
Deterioration bush shims
Decrease in viscosity due to the temperature increase
ORIGIN
Hydraulic
Hydraulic
Mechanical
Hydraulic
Hydraulic
Hydraulic
Hydraulic
Hydraulic
Mechanical
Mechanical
Hydraulic
FAULT
The pump is noisy and vibrates
The flow rate does not increase as the speed of rotation increases
Progressive reduction of the discharge flow rate and/or pressure, with constant speed of rotation

Pompa Dosatrice ad Ingranaggi - Serie N Gear Metering Pump - N Series
46
8. WARRANTY CONDITIONS
Pompe Cucchi S.r.l. guarantees that pumps and pump units are free from defects in material, construction, workmanship and assembly for a period of 12 (twelve) months from the delivery date (specified on the D.D.T.). Purchaser's warranty covers only free replacement of components whose defectiveness is proven. Such warranty excludes the purchaser's right to claim for rescission of contract, price reduction or further damages. Warranty is void in case of misuse or improper use of the pump by the User. The pump shall be used according to what expressly requested in the order or based on the instructions contained in this manual. Any damages resulting from shocks and/or tampering are not covered by this warranty. Warranty does not apply to normal wear parts and damages due to negligence and poor maintenance. For the application of the warranty it is necessary that:
- the Customer informs immediately Pompe Cucchi S.r.l. about the pump defect causing the trouble;
- the pump was not tampered with;
- the pump is returned to Pompe Cucchi s.r.l. clean, after removing any trace of the process fluid and in a proper packaging; - a short description of the fault is provided in writing together with the operating parameters
of the pump or the pump unit;
- if required, a chemical analysis or a sample of the process fluid is provided. Pumps which have not been emptied of the process fluid or installations outside the pump unit will not be taken into account. In the event Pompe Cucchi S.r.l. acknowledges the defect under warranty, no charge will be made to the Customer both for the replaced material and the workmanship. The forwarding charges from the Customer to Pompe Cucchi S.r.l. remain to the Sender’s (Customer) account.

Pompa Dosatrice ad Ingranaggi - Serie N Gear Metering Pump - N Series
47
9. ALLEGATI/ANNEXES
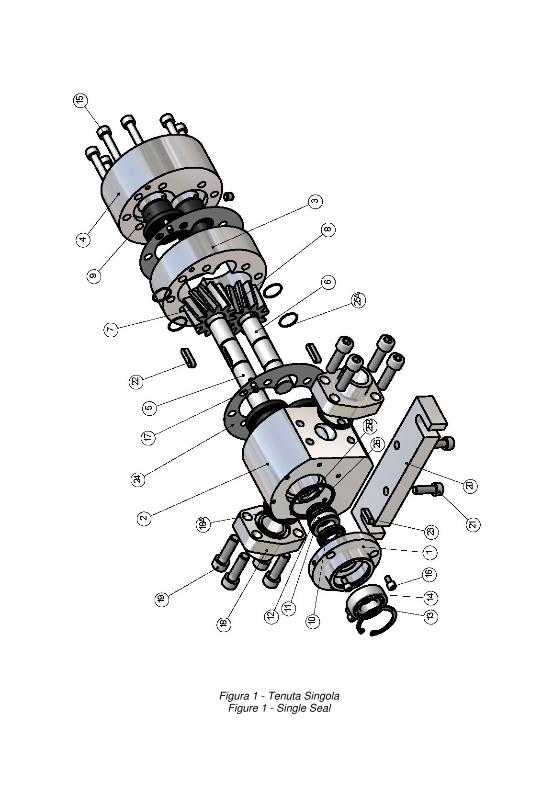
Figura 1 - Tenuta Singola Figure 1 - Single Seal
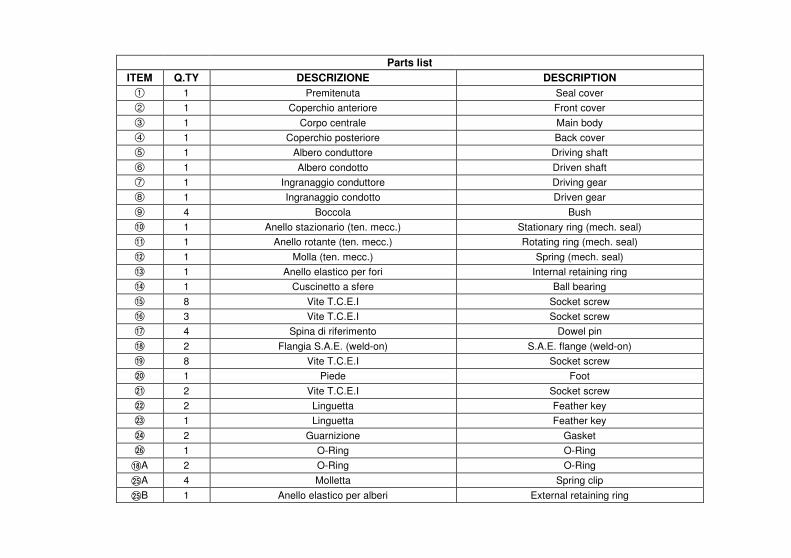
DESCRIPTION
Seal cover
Front cover
Main body
Back cover
Driving shaft
Driven shaft
Driving gear
Driven gear
Bush
Stationary ring (mech. seal)
Rotating ring (mech. seal)
Spring (mech. seal)
Internal retaining ring
Ball bearing
Socket screw
Socket screw
Dowel pin
S.A.E. flange (weld-on)
Socket screw
Foot
Socket screw
Feather key
Feather key
Gasket
O-Ring
O-Ring
Spring clip
External retaining ring
DESCRIZIONE
Premitenuta
Coperchio anteriore
Corpo centrale
Coperchio posteriore
Albero conduttore
Albero condotto
Ingranaggio conduttore
Ingranaggio condotto
Boccola
Anello stazionario (ten. mecc.)
Anello rotante (ten. mecc.)
Molla (ten. mecc.)
Anello elastico per fori
Cuscinetto a sfere
Vite T.C.E.I
Vite T.C.E.I
Spina di riferimento
Flangia S.A.E. (weld-on)
Vite T.C.E.I
Piede
Vite T.C.E.I
Linguetta
Linguetta
Guarnizione
O-Ring
O-Ring
Molletta
Anello elastico per alberi
Q.TY
1
1
1
1
1
1
1
1
4
1
1
1
1
1
8
3
4
2
8
1
2
2
1
2
1
2
4
1
Parts list
ITEM
1
2
3
4
5
6
7
8
9
:
;
<
=
>
?
@
A
B
C
D
E
F
G
H
J
BA
IA
IB
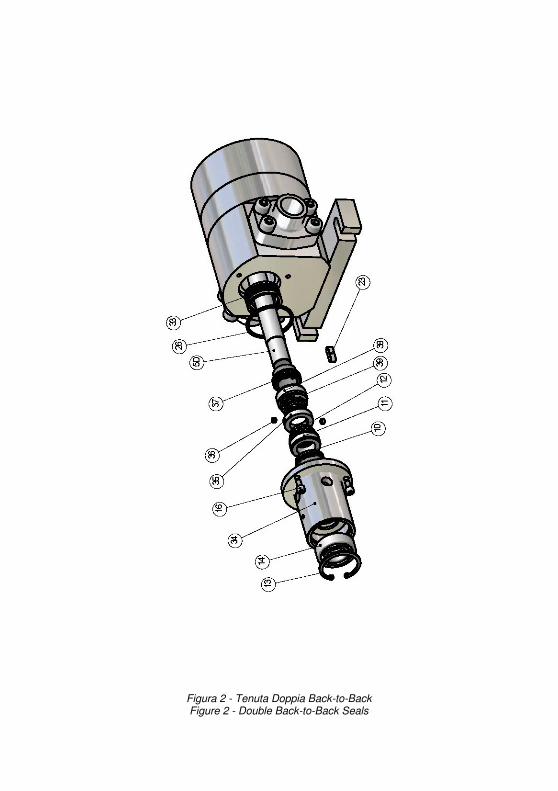
Figura 2 - Tenuta Doppia Back-to-Back Figure 2 - Double Back-to-Back Seals

DESCRIPTION
Stationary ring (ext. mech. seal)
Rotating ring (ext. mech. seal)
Spring (ext. mech. seal)
Internal retaining ring
Ball bearing
Socket screw
Feather key
O-Ring
Inner seat bush
Seal cover
Ring
Grub screw
Stationary ring (int. mech. seal)
Rotating ring (int. mech. seal)
Spring (int. mech. seal)
Driving shaft
DESCRIZIONE
Anello stazionario (ten. mecc. est.)
Anello rotante (ten. mecc. est.)
Molla (ten. mecc. est.)
Anello elastico per fori
Cuscinetto a sfere
Vite T.C.E.I
Linguetta
O-Ring
Bussola per sede interna
Premitenuta
Anello
Grano
Anello stazionario (ten. mecc. int.)
Anello rotante (ten. mecc. int.)
Molla (ten. mecc. int.)
Albero conduttore
Q.TY
1
1
1
1
1
3
1
1
1
1
1
2
1
1
1
1
Parts list
ITEM
:
;
<
=
>
@
G
J
Q
R
S
T
U
V
W
5D
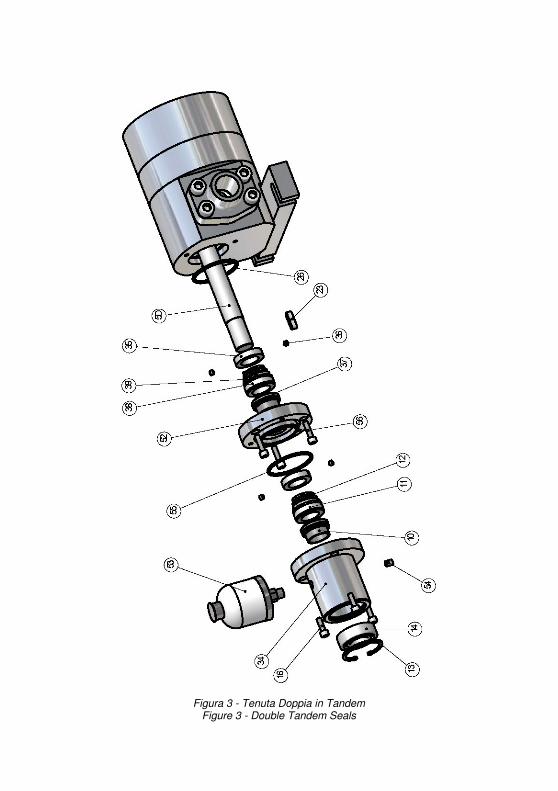
Figura 3 - Tenuta Doppia in Tandem Figure 3 - Double Tandem Seals
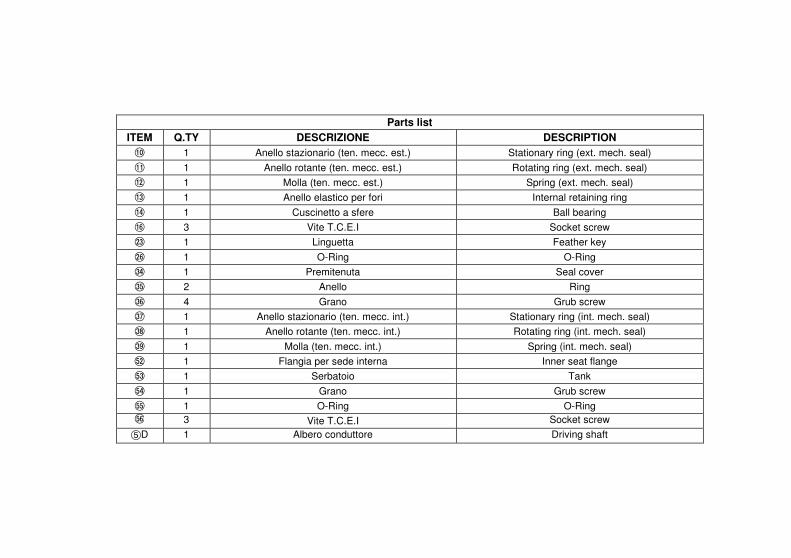
DESCRIPTION
Stationary ring (ext. mech. seal)
Rotating ring (ext. mech. seal)
Spring (ext. mech. seal)
Internal retaining ring
Ball bearing
Socket screw
Feather key
O-Ring
Seal cover
Ring
Grub screw
Stationary ring (int. mech. seal)
Rotating ring (int. mech. seal)
Spring (int. mech. seal)
Inner seat flange
Tank
Grub screw
O-Ring
Socket screw
Driving shaft
DESCRIZIONE
Anello stazionario (ten. mecc. est.)
Anello rotante (ten. mecc. est.)
Molla (ten. mecc. est.)
Anello elastico per fori
Cuscinetto a sfere
Vite T.C.E.I
Linguetta
O-Ring
Premitenuta
Anello
Grano
Anello stazionario (ten. mecc. int.)
Anello rotante (ten. mecc. int.)
Molla (ten. mecc. int.)
Flangia per sede interna
Serbatoio
Grano
O-Ring
Vite T.C.E.I
Albero conduttore
Q.TY
1
1
1
1
1
3
1
1
1
2
4
1
1
1
1
1
1
1
3
1
Parts list
ITEM
:
;
<
=
>
@
G
J
R
S
T
U
V
W
d
e
f
g
h
5D
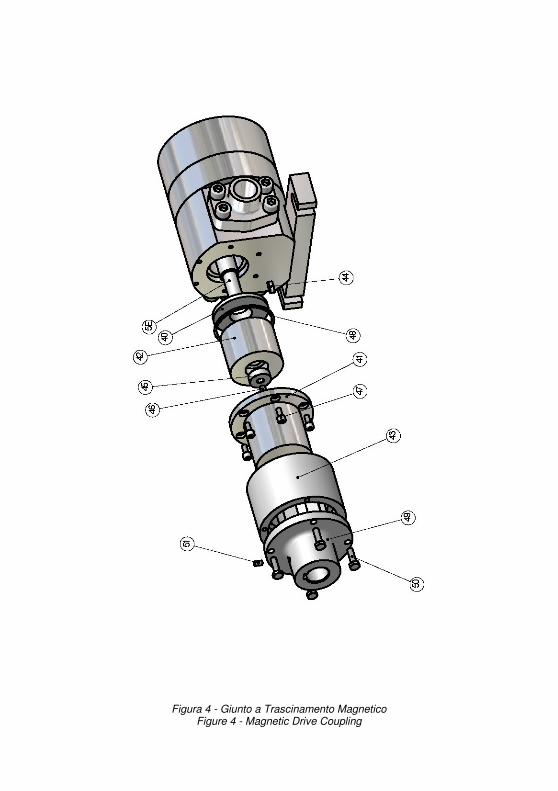
Figura 4 - Giunto a Trascinamento Magnetico Figure 4 - Magnetic Drive Coupling
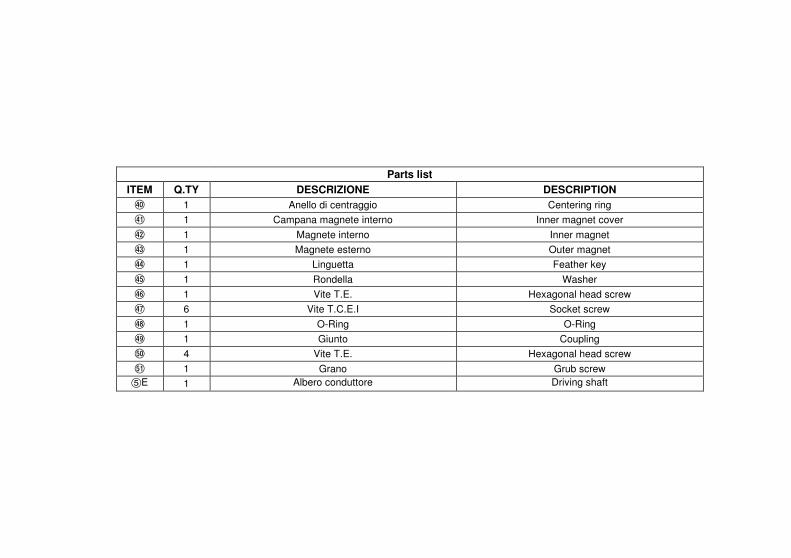
DESCRIPTION
Centering ring
Inner magnet cover
Inner magnet
Outer magnet
Feather key
Washer
Hexagonal head screw
Socket screw
O-Ring
Coupling
Hexagonal head screw
Grub screw
Driving shaft
DESCRIZIONE
Anello di centraggio
Campana magnete interno
Magnete interno
Magnete esterno
Linguetta
Rondella
Vite T.E.
Vite T.C.E.I
O-Ring
Giunto
Vite T.E.
Grano
Albero conduttore
Q.TY
1
1
1
1
1
1
1
6
1
1
4
1
1
Parts list
ITEM
X
Y
Z
[
\
]
^
_
`
a
b
c
5E
POMPE CUCCHI S.R.L. Via dei pioppi, n°39, cap 20090, Opera (MI), Italy Tel. +39 02.57.60.62.87 Fax. +39 02.57.60.22.57 http://www.pompecucchi.com e-mail:[email protected]
DICHIARAZIONE DI CONFORMITA’ La POMPE CUCCHI s.r.l. dichiara, sotto la propria esclusiva responsabilità, che i gruppi di pompaggio serie B, F, FM, FT, MX, N, WPP, WPL, CP, CPP, CMP, CM, DMP, AM5 sono conformi a quanto prescritto dalle seguenti Direttive: 98/37/CE, 93/68/CE, 73/23/CE, 89/336/CE.
DECLARATION OF CONFORMITY POMPE CUCCHI s.r.l. declares, under its own responsability, that pumping sets series B, F, FM, FT, MX, N, WPP, WPL, CP, CPP, CMP, CM, DMP, AM5 are in accordance with the following Directives: 98/37/EC, 93/68/EC, 73/23/EC, 89/336/EC. Date POMPE CUCCHI s.r.l. 30/09/2005 Product Manager (Mario Cucchi)

POMPE CUCCHI S.R.L. Via dei pioppi, n°39, cap 20090, Opera (MI), Italy Tel. +39 02.57.60.62.87 Fax. +39 02.57.60.22.57 http://www.pompecucchi.com e-mail:[email protected]
DICHIARAZIONE DI INCORPORAZIONE PER FORNITURA DI POMPE AD ASSE NUDO
La POMPE CUCCHI s.r.l. dichiara, sotto la propria esclusiva responsabilità, che le pompe serie B, F, FM, FT, MX, N, WPP, WPL, CP, CPP, CMP, CM, DMP, AM5 sono conformi per progetto a quanto prescritto dalla Direttiva 98/37/CE. Esse non possono essere messe in servizio prima che i gruppi di pompaggio siano stati correttamente assemblati e dichiarati conformi alle seguenti Direttive: 98/37/CE, 93/68/CE, 73/23/CE, 89/336/CE.
DECLARATION OF INCORPORATION FOR SUPPLY OF BARE SHAFT PUMPS
POMPE CUCCHI s.r.l. declares, under its own responsability, that pumps series B, F, FM, FT, MX, N, WPP, WPL, CP, CPP, CMP, CM, DMP, AM5 have been designed in accordance with the 98/37/EC Directive. They cannot be put into operation before the pumping sets have been correctly assembled and declared in accordance with the following Directives: 98/37/EC, 93/68/EC, 73/23/EC, 89/336/EC.
Date POMPE CUCCHI s.r.l. 30/09/2005 Product Manager (Mario Cucchi)

Edizione : 02/2006 Edition : 02/2006
POMPE CUCCHI s.r.l.