46916.004 Tastiera IP per controllo PTZ IP keyboard for ... · 4.3 Richiamo o interruzione di...
28
Manuale per l’installazione e l’uso Installation and operation manual 46916.004 Tastiera IP per controllo PTZ IP keyboard for PTZ control
Transcript of 46916.004 Tastiera IP per controllo PTZ IP keyboard for ... · 4.3 Richiamo o interruzione di...

Manuale per l’installazione e l’usoInstallation and operation manual
46916.004Tastiera IP per controllo PTZIP keyboard for PTZ control
2IT
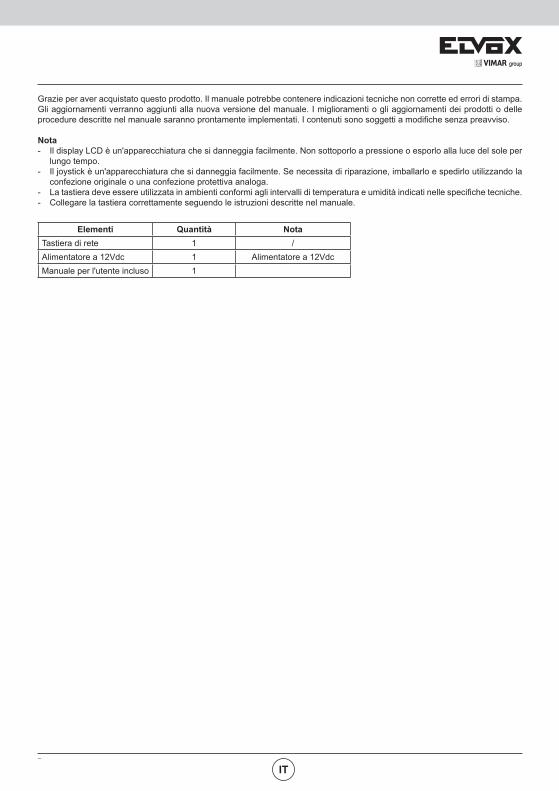
Grazie per aver acquistato questo prodotto. Il manuale potrebbe contenere indicazioni tecniche non corrette ed errori di stampa. Gli aggiornamenti verranno aggiunti alla nuova versione del manuale. I miglioramenti o gli aggiornamenti dei prodotti o delle procedure descritte nel manuale saranno prontamente implementati. I contenuti sono soggetti a modifiche senza preavviso.
Nota- Il display LCD è un'apparecchiatura che si danneggia facilmente. Non sottoporlo a pressione o esporlo alla luce del sole per
lungo tempo.- Il joystick è un'apparecchiatura che si danneggia facilmente. Se necessita di riparazione, imballarlo e spedirlo utilizzando la
confezione originale o una confezione protettiva analoga.- La tastiera deve essere utilizzata in ambienti conformi agli intervalli di temperatura e umidità indicati nelle specifiche tecniche.- Collegare la tastiera correttamente seguendo le istruzioni descritte nel manuale.
Elementi Quantità NotaTastiera di rete 1 /Alimentatore a 12Vdc 1 Alimentatore a 12VdcManuale per l'utente incluso 1

1VIMAR groupIT
Indice1 Introduzione ................................................................................................................................................................... 2 1.1 Introduzione........................................................................................................................................................... 2 1.2 Istruzioni per il pannello posteriore........................................................................................................................ 2 1.3 Istruzioni per il pannello anteriore ......................................................................................................................... 2 1.4 Regole per l'uso dei tasti ....................................................................................................................................... 4 1.5 Comando con Joystick .......................................................................................................................................... 42 Configurazione .............................................................................................................................................................. 5 2.1 Avvio della tastiera ................................................................................................................................................ 5 2.2 Configurazione del sistema ................................................................................................................................... 5 2.2.1 Impostazione della password ...................................................................................................................... 5 2.2.2 Impostazione dell'ID della tastiera ............................................................................................................... 6 2.2.3 Impostazione della rete ............................................................................................................................... 6 2.2.4 Impostazione valori predefiniti ..................................................................................................................... 6 2.2.5 Impostazione domanda di sicurezza ........................................................................................................... 6 2.3 Impostazione PTZ ................................................................................................................................................. 6 2.4 Impostazione della lingua ...................................................................................................................................... 6 2.5 Test ........................................................................................................................................................................ 63 Modo PTZ ....................................................................................................................................................................... 7 3.1 Impostazione del modo ......................................................................................................................................... 7 3.2 Impostazione IP PTZ ............................................................................................................................................. 7 3.3 Attivazione della PTZ............................................................................................................................................. 7 3.4 Passaggio a un'altra PTZ ...................................................................................................................................... 74. Controllo PTZ ................................................................................................................................................................ 8 4.1 Movimento o arresto.............................................................................................................................................. 8 4.2 Impostazione o richiamo di preset......................................................................................................................... 8 4.3 Richiamo o interruzione di cruise/percorso ........................................................................................................... 8 4.4 Focus +/- ............................................................................................................................................................... 9 4.5 Zoom +/- ................................................................................................................................................................ 9 4.6 Iris +/- .................................................................................................................................................................... 9 4.7 Avvio o interruzione della scansione automatica ................................................................................................... 10 4.8 Attivazione/disattivazione della luce ...................................................................................................................... 10 4.9 Attivazione/disattivazione del tergicristallo ............................................................................................................ 10 4.10 Riproduzione registrazione.................................................................................................................................. 105 Altre funzioni .................................................................................................................................................................. 12 5.1 Visualizzazione delle informazioni ......................................................................................................................... 12 5.2 Blocco.................................................................................................................................................................... 126 Specifiche....................................................................................................................................................................... 13Appendice
2IT
1 Introduzione
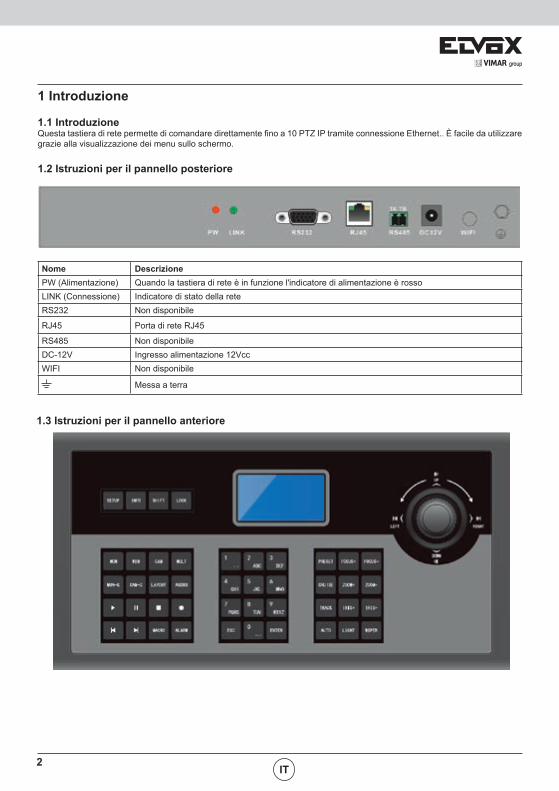
1.1 IntroduzioneQuesta tastiera di rete permette di comandare direttamente fino a 10 PTZ IP tramite connessione Ethernet.. È facile da utilizzare grazie alla visualizzazione dei menu sullo schermo.
1.2 Istruzioni per il pannello posteriore
1.3 Istruzioni per il pannello anteriore
Nome DescrizionePW (Alimentazione) Quando la tastiera di rete è in funzione l'indicatore di alimentazione è rossoLINK (Connessione) Indicatore di stato della reteRS232 Non disponibile
RJ45 Porta di rete RJ45
RS485 Non disponibileDC-12V Ingresso alimentazione 12VccWIFI Non disponibile
Messa a terra
3VIMAR group
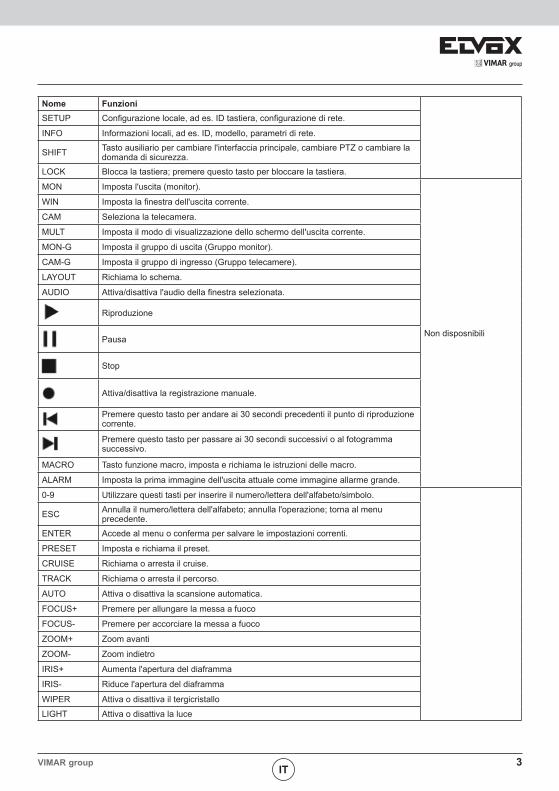
Nome FunzioniSETUP Configurazione locale, ad es. ID tastiera, configurazione di rete.
INFO Informazioni locali, ad es. ID, modello, parametri di rete.
SHIFT Tasto ausiliario per cambiare l'interfaccia principale, cambiare PTZ o cambiare la domanda di sicurezza.
LOCK Blocca la tastiera; premere questo tasto per bloccare la tastiera.
MON Imposta l'uscita (monitor).
Non disposnibili
WIN Imposta la finestra dell'uscita corrente.
CAM Seleziona la telecamera.
MULT Imposta il modo di visualizzazione dello schermo dell'uscita corrente.
MON-G Imposta il gruppo di uscita (Gruppo monitor).
CAM-G Imposta il gruppo di ingresso (Gruppo telecamere).
LAYOUT Richiama lo schema.
AUDIO Attiva/disattiva l'audio della finestra selezionata.
Riproduzione
Pausa
Stop
Attiva/disattiva la registrazione manuale.
Premere questo tasto per andare ai 30 secondi precedenti il punto di riproduzione corrente.
Premere questo tasto per passare ai 30 secondi successivi o al fotogramma successivo.
MACRO Tasto funzione macro, imposta e richiama le istruzioni delle macro.
ALARM Imposta la prima immagine dell'uscita attuale come immagine allarme grande.
0-9 Utilizzare questi tasti per inserire il numero/lettera dell'alfabeto/simbolo.
ESC Annulla il numero/lettera dell'alfabeto; annulla l'operazione; torna al menu precedente.
ENTER Accede al menu o conferma per salvare le impostazioni correnti.
PRESET Imposta e richiama il preset.
CRUISE Richiama o arresta il cruise.
TRACK Richiama o arresta il percorso.
AUTO Attiva o disattiva la scansione automatica.
FOCUS+ Premere per allungare la messa a fuoco
FOCUS- Premere per accorciare la messa a fuoco
ZOOM+ Zoom avanti
ZOOM- Zoom indietro
IRIS+ Aumenta l'apertura del diaframma
IRIS- Riduce l'apertura del diaframma
WIPER Attiva o disattiva il tergicristallo
LIGHT Attiva o disattiva la luce
IT
4
1.4 Regole per l'uso dei tastiPressione ripetuta del tasto con intervallo inferiore ai 2 secondi tra le pressioni. Si utilizza principalmente per inserire lettere dell'alfabeto. Ad esempio, premere due volte 2 per inserire A, premere tre volte 2 per inserire B. Vedere l'appendice per informazioni dettagliate sull'uso dei tasti. Per selezionare o passare a un determinato elemento funzionale, in genere si inizia con il tasto numerico e si chiude con il tasto funzione corrispondente. Vedere quanto segue come esempio. 10+PRESET (premere 1, 0 e quindi PRESET)—— richiama il preset 10
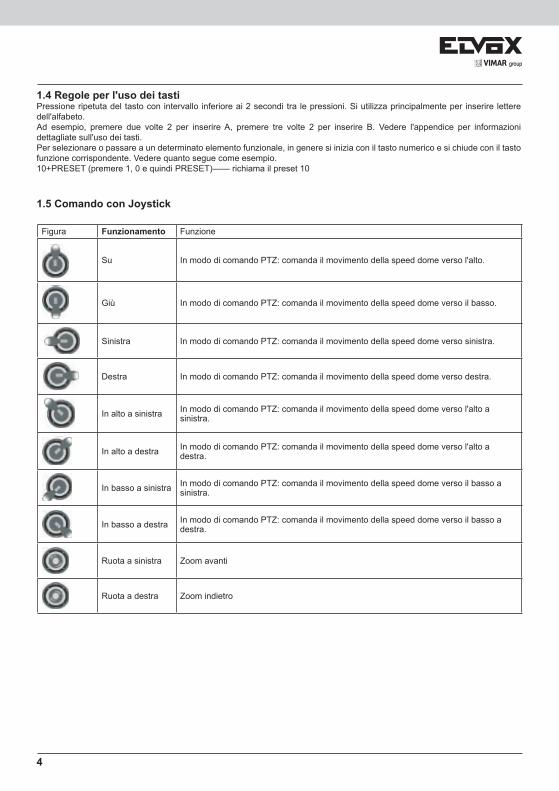
1.5 Comando con Joystick
Figura Funzionamento Funzione
Su In modo di comando PTZ: comanda il movimento della speed dome verso l'alto.
Giù In modo di comando PTZ: comanda il movimento della speed dome verso il basso.
Sinistra In modo di comando PTZ: comanda il movimento della speed dome verso sinistra.
Destra In modo di comando PTZ: comanda il movimento della speed dome verso destra.
In alto a sinistra In modo di comando PTZ: comanda il movimento della speed dome verso l'alto a sinistra.
In alto a destra In modo di comando PTZ: comanda il movimento della speed dome verso l'alto a destra.
In basso a sinistra In modo di comando PTZ: comanda il movimento della speed dome verso il basso a sinistra.
In basso a destra In modo di comando PTZ: comanda il movimento della speed dome verso il basso a destra.
Ruota a sinistra Zoom avanti
Ruota a destra Zoom indietro
5VIMAR groupIT
2 Configurazione
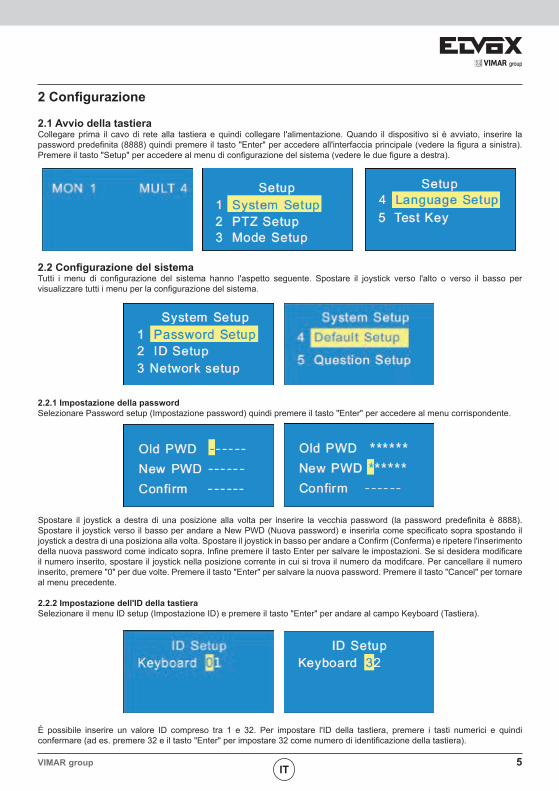
2.1 Avvio della tastieraCollegare prima il cavo di rete alla tastiera e quindi collegare l'alimentazione. Quando il dispositivo si è avviato, inserire la password predefinita (8888) quindi premere il tasto "Enter" per accedere all'interfaccia principale (vedere la figura a sinistra). Premere il tasto "Setup" per accedere al menu di configurazione del sistema (vedere le due figure a destra).
2.2 Configurazione del sistemaTutti i menu di configurazione del sistema hanno l'aspetto seguente. Spostare il joystick verso l'alto o verso il basso per visualizzare tutti i menu per la configurazione del sistema.
2.2.1 Impostazione della passwordSelezionare Password setup (Impostazione password) quindi premere il tasto "Enter" per accedere al menu corrispondente.
Spostare il joystick a destra di una posizione alla volta per inserire la vecchia password (la password predefinita è 8888). Spostare il joystick verso il basso per andare a New PWD (Nuova password) e inserirla come specificato sopra spostando il joystick a destra di una posiziona alla volta. Spostare il joystick in basso per andare a Confirm (Conferma) e ripetere l'inserimento della nuova password come indicato sopra. Infine premere il tasto Enter per salvare le impostazioni. Se si desidera modificare il numero inserito, spostare il joystick nella posizione corrente in cui si trova il numero da modifcare. Per cancellare il numero inserito, premere "0" per due volte. Premere il tasto "Enter" per salvare la nuova password. Premere il tasto "Cancel" per tornare al menu precedente.
2.2.2 Impostazione dell'ID della tastieraSelezionare il menu ID setup (Impostazione ID) e premere il tasto "Enter" per andare al campo Keyboard (Tastiera).
È possibile inserire un valore ID compreso tra 1 e 32. Per impostare l'ID della tastiera, premere i tasti numerici e quindi confermare (ad es. premere 32 e il tasto "Enter" per impostare 32 come numero di identificazione della tastiera).
6IT
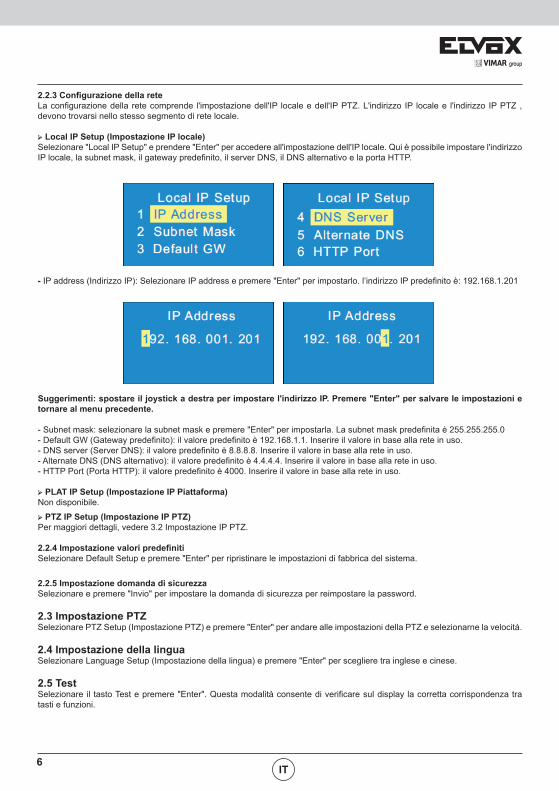
2.2.3 Configurazione della reteLa configurazione della rete comprende l'impostazione dell'IP locale e dell'IP PTZ. L'indirizzo IP locale e l'indirizzo IP PTZ , devono trovarsi nello stesso segmento di rete locale.
➢ Local IP Setup (Impostazione IP locale)Selezionare "Local IP Setup" e prendere "Enter" per accedere all'impostazione dell'IP locale. Qui è possibile impostare l'indirizzo IP locale, la subnet mask, il gateway predefinito, il server DNS, il DNS alternativo e la porta HTTP.
- IP address (Indirizzo IP): Selezionare IP address e premere "Enter" per impostarlo. l’indirizzo IP predefinito è: 192.168.1.201
Suggerimenti: spostare il joystick a destra per impostare l'indirizzo IP. Premere "Enter" per salvare le impostazioni e tornare al menu precedente.
- Subnet mask: selezionare la subnet mask e premere "Enter" per impostarla. La subnet mask predefinita è 255.255.255.0- Default GW (Gateway predefinito): il valore predefinito è 192.168.1.1. Inserire il valore in base alla rete in uso.- DNS server (Server DNS): il valore predefinito è 8.8.8.8. Inserire il valore in base alla rete in uso.- Alternate DNS (DNS alternativo): il valore predefinito è 4.4.4.4. Inserire il valore in base alla rete in uso.- HTTP Port (Porta HTTP): il valore predefinito è 4000. Inserire il valore in base alla rete in uso.
➢ PLAT IP Setup (Impostazione IP Piattaforma)Non disponibile.
➢ PTZ IP Setup (Impostazione IP PTZ)Per maggiori dettagli, vedere 3.2 Impostazione IP PTZ.
2.2.4 Impostazione valori predefinitiSelezionare Default Setup e premere "Enter" per ripristinare le impostazioni di fabbrica del sistema.
2.2.5 Impostazione domanda di sicurezzaSelezionare e premere "Invio" per impostare la domanda di sicurezza per reimpostare la password.
2.3 Impostazione PTZSelezionare PTZ Setup (Impostazione PTZ) e premere "Enter" per andare alle impostazioni della PTZ e selezionarne la velocità.
2.4 Impostazione della linguaSelezionare Language Setup (Impostazione della lingua) e premere "Enter" per scegliere tra inglese e cinese.
2.5 TestSelezionare il tasto Test e premere "Enter". Questa modalità consente di verificare sul display la corretta corrispondenza tra tasti e funzioni.
7VIMAR groupIT
3 Modo PTZ
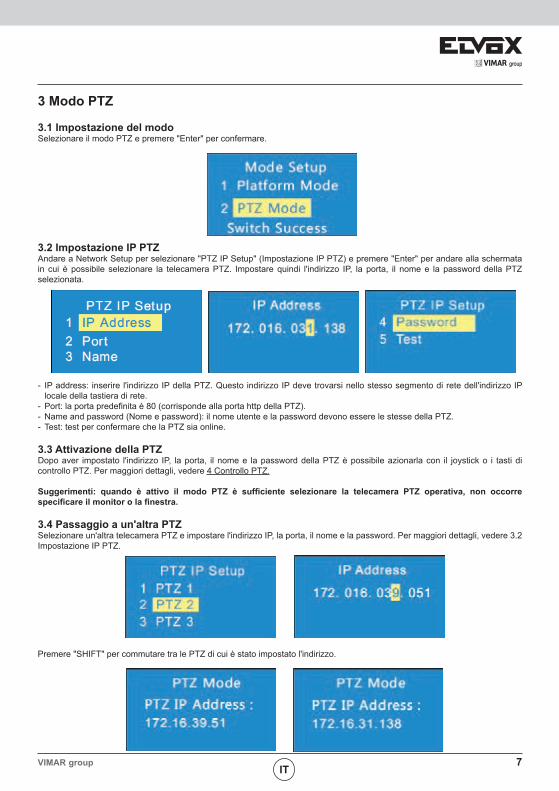
3.1 Impostazione del modoSelezionare il modo PTZ e premere "Enter" per confermare.
3.2 Impostazione IP PTZAndare a Network Setup per selezionare "PTZ IP Setup" (Impostazione IP PTZ) e premere "Enter" per andare alla schermata in cui è possibile selezionare la telecamera PTZ. Impostare quindi l'indirizzo IP, la porta, il nome e la password della PTZ selezionata.
- IP address: inserire l'indirizzo IP della PTZ. Questo indirizzo IP deve trovarsi nello stesso segmento di rete dell'indirizzo IP
locale della tastiera di rete.- Port: la porta predefinita è 80 (corrisponde alla porta http della PTZ).- Name and password (Nome e password): il nome utente e la password devono essere le stesse della PTZ.- Test: test per confermare che la PTZ sia online.
3.3 Attivazione della PTZDopo aver impostato l'indirizzo IP, la porta, il nome e la password della PTZ è possibile azionarla con il joystick o i tasti di controllo PTZ. Per maggiori dettagli, vedere 4 Controllo PTZ.
Suggerimenti: quando è attivo il modo PTZ è sufficiente selezionare la telecamera PTZ operativa, non occorre specificare il monitor o la finestra.
3.4 Passaggio a un'altra PTZSelezionare un'altra telecamera PTZ e impostare l'indirizzo IP, la porta, il nome e la password. Per maggiori dettagli, vedere 3.2 Impostazione IP PTZ.
Premere "SHIFT" per commutare tra le PTZ di cui è stato impostato l'indirizzo.

8IT
4 Controllo PTZIl comando PTZ ha effetto solo se l''indirizzo IP selezionato è quello di un dispositivo con capacità PTZ (o telecamera speed dome).
4.1 Movimento o arrestoLa procedura di impostazione è la seguente: 1 - Comandare la telecamera speed dome/PTZ muovendo il joystick. Quando si riporta il joystick nella posizione iniziale, la
telecamera speed interrompe il movimento.
Nota: Il tipo di telecamera nell'esempio precedente deve essere un dispositivo PTZ (o telecamera speed dome) altrimenti la chiamata non ha effetto. È possibile inserire un valore di preset compreso tra 1 e 255. È possibile inserire un valore di cruise compreso tra 1 e 8. È possibile inserire un valore di percorso compreso tra 1 e 4. Se il numero richiamato va oltre l'intervallo viene visualizzato un messaggio di errore sullo schermo.
4.2 Impostazione o richiamo di preset Per impostare il preset 1 - Impostare la posizione del preset utilizzando il joystick. 2 - Premere il tasto numerico sulla tastiera per selezionare il numero del preset. Tenere quindi premuto il tasto "PRESET" per
più di 2 secondi per impostare il preset. Ad esempio, inserire 1 e tenere premuto il tasto "PRESET" per più di 2 secondi per impostare il preset n. 1.
Per richiamare un preset 1 - Selezionare il preset. Ad esempio, inserire 1 quindi premere "PRESET".
4.3 Richiamo o interruzione di cruise/percorso Per richiamare il cruise/percorso 1 - Selezionare il cruise/percorso. Ad esempio, inserire 1 quindi premere "CRUISE/TRACK".

9VIMAR groupIT
Per interrompere il cruise/percorso 1 - Selezionare il cruise/percorso. Ad esempio, inserire 0 quindi premere "CRUISE/TRACK" o premere direttamente "CRUISE/TRACK".
4.4 Focus +/- Per impostare la messa a fuoco +/- 1 - Premere "FOCUS+" o "FOCUS-".
4.5 Zoom +/- Per impostare lo zoom +/- 1 - Premere "ZOOM+" o "ZOOM-".
4.6 Iris +/- Per impostare l'apertura diaframma +/- 1 - Premere "IRIS+" o "IRIS-".
10IT
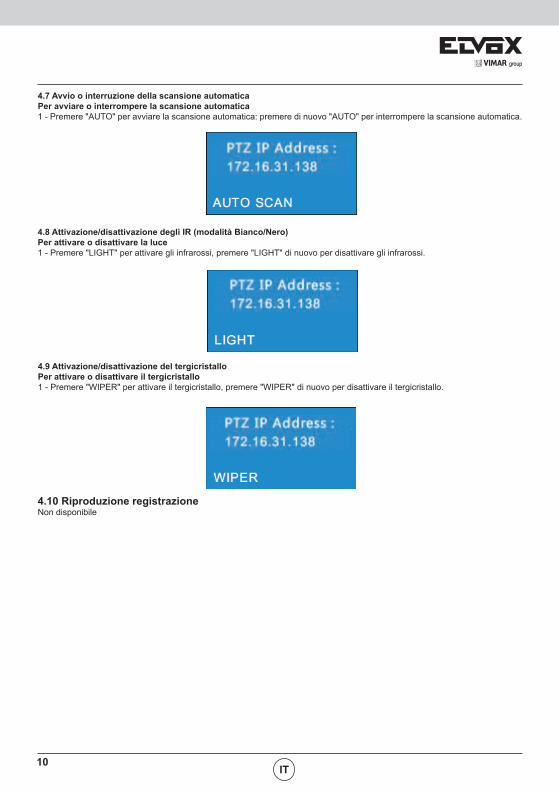
4.7 Avvio o interruzione della scansione automatica Per avviare o interrompere la scansione automatica 1 - Premere "AUTO" per avviare la scansione automatica: premere di nuovo "AUTO" per interrompere la scansione automatica.
4.8 Attivazione/disattivazione degli IR (modalità Bianco/Nero)Per attivare o disattivare la luce 1 - Premere "LIGHT" per attivare gli infrarossi, premere "LIGHT" di nuovo per disattivare gli infrarossi.
4.9 Attivazione/disattivazione del tergicristallo Per attivare o disattivare il tergicristallo 1 - Premere "WIPER" per attivare il tergicristallo, premere "WIPER" di nuovo per disattivare il tergicristallo.
4.10 Riproduzione registrazioneNon disponibile
11VIMAR groupIT
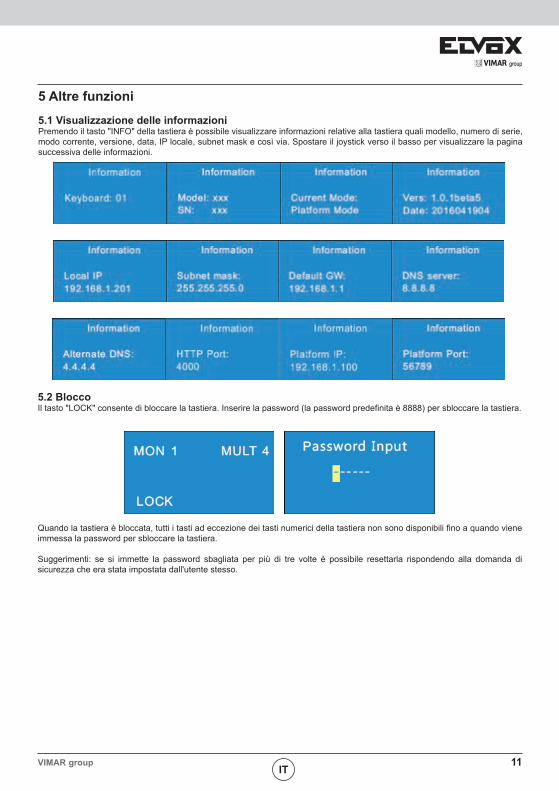
Quando la tastiera è bloccata, tutti i tasti ad eccezione dei tasti numerici della tastiera non sono disponibili fino a quando viene immessa la password per sbloccare la tastiera.
Suggerimenti: se si immette la password sbagliata per più di tre volte è possibile resettarla rispondendo alla domanda di sicurezza che era stata impostata dall'utente stesso.
5 Altre funzioni5.1 Visualizzazione delle informazioniPremendo il tasto "INFO" della tastiera è possibile visualizzare informazioni relative alla tastiera quali modello, numero di serie, modo corrente, versione, data, IP locale, subnet mask e così via. Spostare il joystick verso il basso per visualizzare la pagina successiva delle informazioni.
5.2 BloccoIl tasto "LOCK" consente di bloccare la tastiera. Inserire la password (la password predefinita è 8888) per sbloccare la tastiera.
12IT
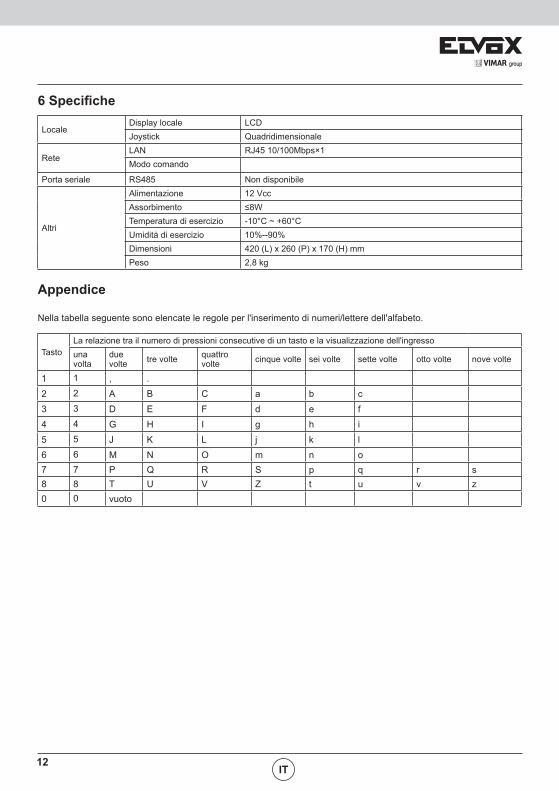
6 Specifiche
LocaleDisplay locale LCDJoystick Quadridimensionale
ReteLAN RJ45 10/100Mbps×1Modo comando
Porta seriale RS485 Non disponibile
Altri
Alimentazione 12 VccAssorbimento ≤8WTemperatura di esercizio -10°C ~ +60°CUmidità di esercizio 10%--90%Dimensioni 420 (L) x 260 (P) x 170 (H) mmPeso 2,8 kg
Appendice
Nella tabella seguente sono elencate le regole per l'inserimento di numeri/lettere dell'alfabeto.
TastoLa relazione tra il numero di pressioni consecutive di un tasto e la visualizzazione dell'ingressouna volta
due volte tre volte quattro
volte cinque volte sei volte sette volte otto volte nove volte
1 1 , .2 2 A B C a b c3 3 D E F d e f4 4 G H I g h i5 5 J K L j k l6 6 M N O m n o7 7 P Q R S p q r s8 8 T U V Z t u v z0 0 vuoto
13VIMAR group
Thank you for purchasing our product. There may be several technically incorrect places or printing errors in this manual. The updates will be added into the new version of this manual. We will readily improve or update the products or procedures described in the manual. The content is subject to change without notice.
Note- LCD display can be easily damaged. Please do not press or exposure in sunshine for a long time.- The joystick can be easily damaged. If it needs to be repaired, please wrap and ship it by using original or safety
packaging.- This keyboard should be used in certain range of temperature and humidity, referring the specifications.- Please connect the keyboard correctly as this manual requires.
Items Quantity NoteNetwork keyboard 1 /12Vdc power adapter 1 12Vdc power adapterIncluded user manual 1

14
Contents1 Introduction .......................................................................................................................................................15 1.1 Introduction ...............................................................................................................................................15 1.2 Rear Panel Instructions ............................................................................................................................15 1.3 Front Panel Instructions ............................................................................................................................15 1.4 Rules of Key Press ...................................................................................................................................17 1.5 Joystick Control ........................................................................................................................................172 Setup..................................................................................................................................................................18 2.1 Startup the Keyboard ................................................................................................................................18 2.2 System Setup ...........................................................................................................................................18 2.2.1 Password Setup ..............................................................................................................................18 2.2.2 Keypad ID Setup .............................................................................................................................18 2.2.3 Network Setup .................................................................................................................................19 2.2.4 Default Setup ...................................................................................................................................19 2.2.5 Question Setup ................................................................................................................................19 2.3 PTZ Setup .................................................................................................................................................19 2.4 Language Setup .......................................................................................................................................19 2.5 Test ...........................................................................................................................................................193 PTZ Mode ..........................................................................................................................................................20 3.1 Mode Setup ..............................................................................................................................................20 3.2 PTZ IP Setup ............................................................................................................................................20 3.3 PTZ Operation ..........................................................................................................................................20 3.4 PTZ Shift ...................................................................................................................................................204 PTZ Control .......................................................................................................................................................23 4.1 Move or Stop ......................................................................................................................................29 4.2 Set or Call Preset ...............................................................................................................................29 4.3 Call or Stop Cruise/Track ....................................................................................................................29 4.4 Focus +/- .............................................................................................................................................22 4.5 Zoom +/- .............................................................................................................................................22 4.6 Iris +/- ..................................................................................................................................................22 4.7 Start or Stop Auto Scan ......................................................................................................................23 4.8 Enable/Disable Light ...........................................................................................................................23 4.9 Enable/Disable Wiper .........................................................................................................................23 4.10 Record Playback .....................................................................................................................................235 Others ................................................................................................................................................................24 5.1 View Information .......................................................................................................................................24 5.2 Lock ..........................................................................................................................................................246 Specifications ...................................................................................................................................................25Appendix ..............................................................................................................................................................25
EN
15VIMAR group
1 Introduction
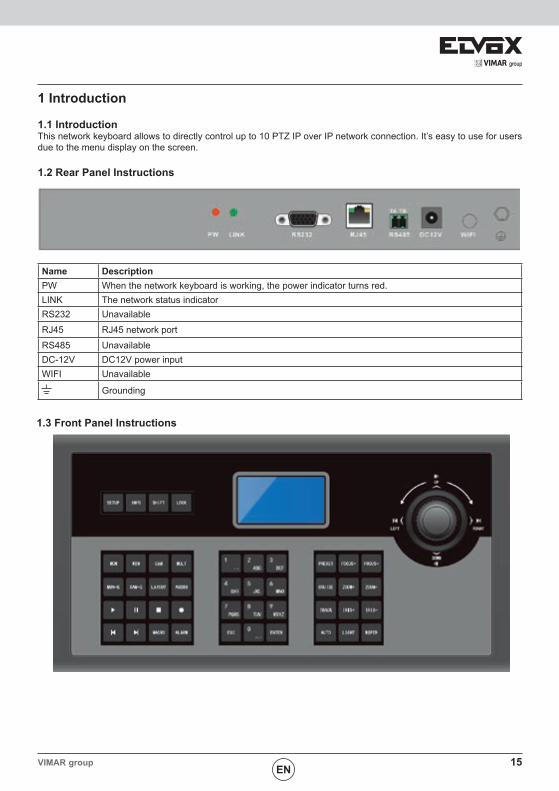
1.1 IntroductionThis network keyboard allows to directly control up to 10 PTZ IP over IP network connection. It’s easy to use for users due to the menu display on the screen.
1.2 Rear Panel Instructions
1.3 Front Panel Instructions
EN
Name DescriptionPW When the network keyboard is working, the power indicator turns red.LINK The network status indicatorRS232 Unavailable
RJ45 RJ45 network port
RS485 UnavailableDC-12V DC12V power inputWIFI Unavailable
Grounding
16EN
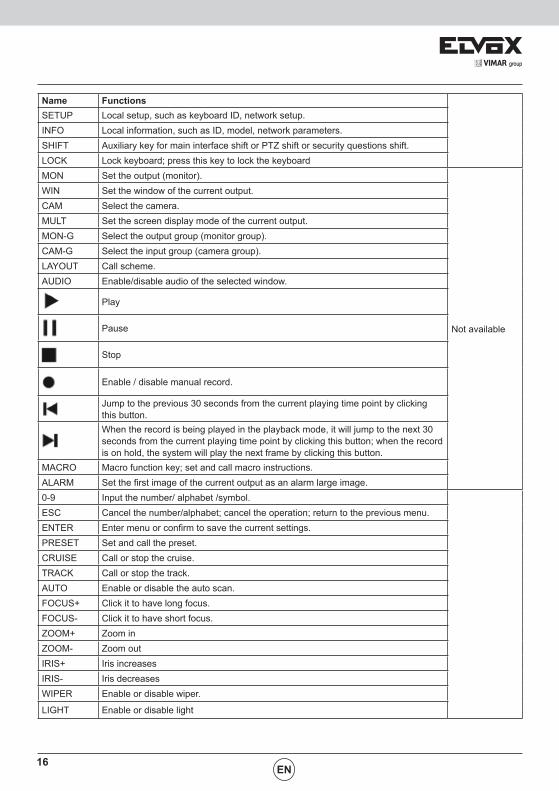
Name FunctionsSETUP Local setup, such as keyboard ID, network setup.INFO Local information, such as ID, model, network parameters.SHIFT Auxiliary key for main interface shift or PTZ shift or security questions shift.LOCK Lock keyboard; press this key to lock the keyboardMON Set the output (monitor).
Not available
WIN Set the window of the current output.CAM Select the camera.MULT Set the screen display mode of the current output.MON-G Select the output group (monitor group).CAM-G Select the input group (camera group).LAYOUT Call scheme.AUDIO Enable/disable audio of the selected window.
Play
Pause
Stop
Enable / disable manual record.
Jump to the previous 30 seconds from the current playing time point by clicking this button.
When the record is being played in the playback mode, it will jump to the next 30 seconds from the current playing time point by clicking this button; when the record is on hold, the system will play the next frame by clicking this button.
MACRO Macro function key; set and call macro instructions.ALARM Set the first image of the current output as an alarm large image.0-9 Input the number/ alphabet /symbol.ESC Cancel the number/alphabet; cancel the operation; return to the previous menu.ENTER Enter menu or confirm to save the current settings.PRESET Set and call the preset.CRUISE Call or stop the cruise.TRACK Call or stop the track.AUTO Enable or disable the auto scan.FOCUS+ Click it to have long focus.FOCUS- Click it to have short focus.ZOOM+ Zoom inZOOM- Zoom outIRIS+ Iris increasesIRIS- Iris decreasesWIPER Enable or disable wiper.
LIGHT Enable or disable light
17VIMAR group
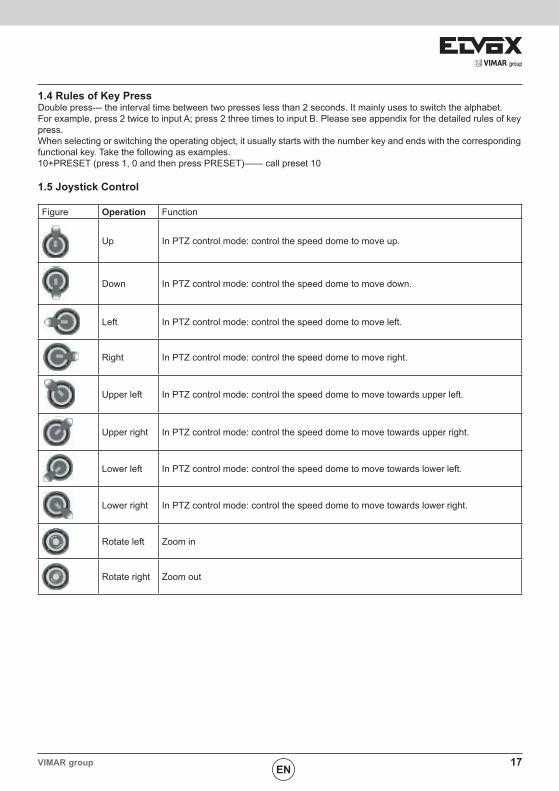
1.4 Rules of Key PressDouble press--- the interval time between two presses less than 2 seconds. It mainly uses to switch the alphabet. For example, press 2 twice to input A; press 2 three times to input B. Please see appendix for the detailed rules of key press. When selecting or switching the operating object, it usually starts with the number key and ends with the corresponding functional key. Take the following as examples. 10+PRESET (press 1, 0 and then press PRESET)—— call preset 10
1.5 Joystick Control
EN
Figure Operation Function
Up In PTZ control mode: control the speed dome to move up.
Down In PTZ control mode: control the speed dome to move down.
Left In PTZ control mode: control the speed dome to move left.
Right In PTZ control mode: control the speed dome to move right.
Upper left In PTZ control mode: control the speed dome to move towards upper left.
Upper right In PTZ control mode: control the speed dome to move towards upper right.
Lower left In PTZ control mode: control the speed dome to move towards lower left.
Lower right In PTZ control mode: control the speed dome to move towards lower right.
Rotate left Zoom in
Rotate right Zoom out

18
2 Setup
2.1 Startup the KeyboardFirst connect the network cable to the keyboard and then connect the power. After the device starts, please input the default password (8888) and then press “Enter” key to go to main interface (see left figure). Press “Setup” key to go to the system setup menu (see right two figures).
EN
2.2 System SetupAll system setup menus are as follow. You can move the joystick up or down to see all system setup menus.
2.2.1 Password SetupSelect the password setup menu and press “Enter” key to go to password setup.
Input the old password by moving the joystick right one by one (the default password is 8888). Select the new password by moving the joystick down and then input the new password as the above mentioned method. Finally confirm the new password and press “Enter” key to save the settings. If you want to change the inputted number, please move the joystick to current position to change the current number. If you want to cancel the inputted number, you can press “0” for two times. Press “Enter” key to save the new password. Press “Cancel” key to return to the previous menu.
2.2.2 Keypad ID SetupSelect the keypad ID setup menu and press “Enter” key to go to keypad ID setup.
The effective value of the ID is from 1 to 32. To set keypad ID, press digital number and enter key (eg. press 32 and then press “Enter” to set the keypad ID at 32).
19VIMAR group
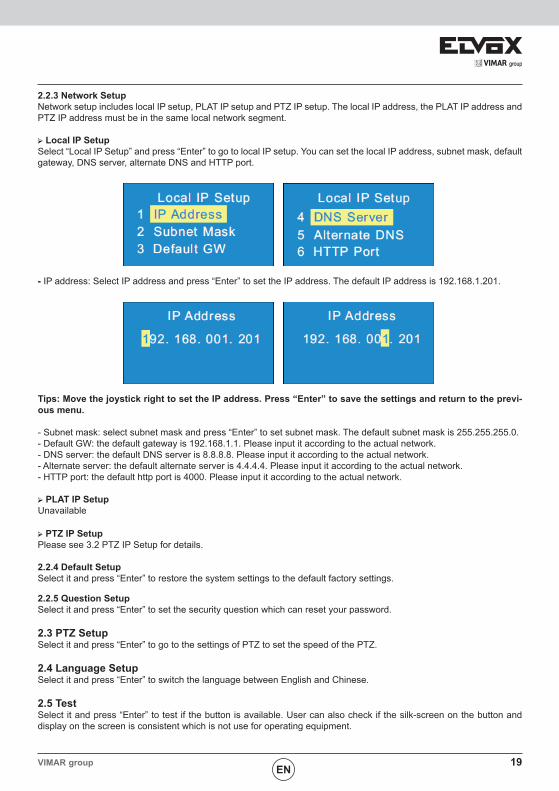
2.2.3 Network SetupNetwork setup includes local IP setup, PLAT IP setup and PTZ IP setup. The local IP address, the PLAT IP address and PTZ IP address must be in the same local network segment.
➢ Local IP SetupSelect “Local IP Setup” and press “Enter” to go to local IP setup. You can set the local IP address, subnet mask, default gateway, DNS server, alternate DNS and HTTP port.
EN
- IP address: Select IP address and press “Enter” to set the IP address. The default IP address is 192.168.1.201.
Tips: Move the joystick right to set the IP address. Press “Enter” to save the settings and return to the previ-ous menu.
- Subnet mask: select subnet mask and press “Enter” to set subnet mask. The default subnet mask is 255.255.255.0.- Default GW: the default gateway is 192.168.1.1. Please input it according to the actual network.- DNS server: the default DNS server is 8.8.8.8. Please input it according to the actual network.- Alternate server: the default alternate server is 4.4.4.4. Please input it according to the actual network.- HTTP port: the default http port is 4000. Please input it according to the actual network.
➢ PLAT IP SetupUnavailable
➢ PTZ IP SetupPlease see 3.2 PTZ IP Setup for details.
2.2.4 Default SetupSelect it and press “Enter” to restore the system settings to the default factory settings.
2.2.5 Question SetupSelect it and press “Enter” to set the security question which can reset your password.
2.3 PTZ SetupSelect it and press “Enter” to go to the settings of PTZ to set the speed of the PTZ.
2.4 Language SetupSelect it and press “Enter” to switch the language between English and Chinese.
2.5 TestSelect it and press “Enter” to test if the button is available. User can also check if the silk-screen on the button and display on the screen is consistent which is not use for operating equipment.

20
3 PTZ Mode
3.1 Mode SetupPlatform mode and PTZ mode are optional. Select PTZ mode and press “Enter” to select.
EN
3.2 PTZ IP SetupGo to Network Setup to select “PTZ IP Setup” and press “Enter” to go to select the PTZ. Then set the IP address, port, name, password of the PTZ selected.
- IP address: input the IP address of the PTZ. This IP address must be in the same local network segment with the
local IP address of the network keyboard.- Port: the default port is 80 (the http port of the PTZ).- Name and password: the name and password must be the same with that of the PTZ.- Test: To test if the PTZ is online.
3.3 PTZ OperationAfter setting up the IP address, port, name and password of the PTZ you can operate the PTZ by joystick or PTZ con-troller keys. Please see 4 PTZ Control for more details.
Tips: In PTZ mode, you only need to select operational PTZ, do not need to choose the output and the window.
3.4 PTZ ShiftSelect other PTZ and setup the IP address, port, name and password. Please see 3.2 PTZ IP Setup for more details.
Press “SHIFT” to switch the PTZs of which the IP address is setup well.
21VIMAR group
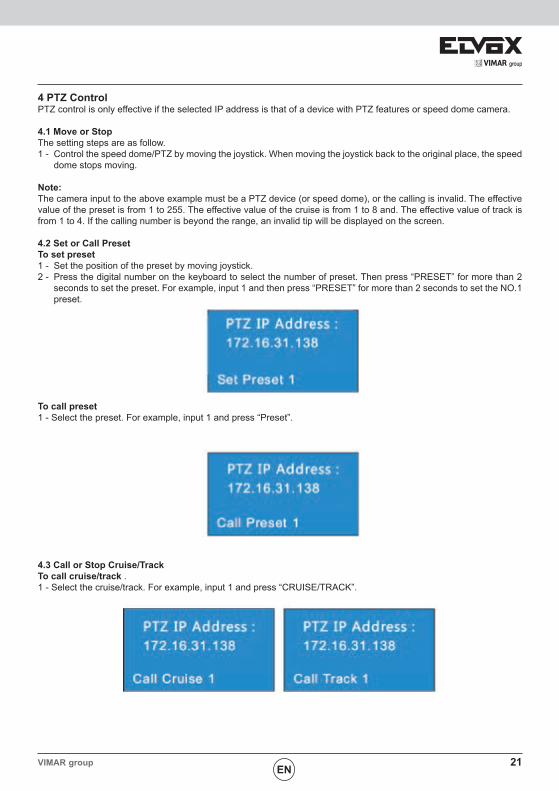
4 PTZ ControlPTZ control is only effective if the selected IP address is that of a device with PTZ features or speed dome camera.
4.1 Move or StopThe setting steps are as follow. 1 - Control the speed dome/PTZ by moving the joystick. When moving the joystick back to the original place, the speed
dome stops moving.
Note: The camera input to the above example must be a PTZ device (or speed dome), or the calling is invalid. The effective value of the preset is from 1 to 255. The effective value of the cruise is from 1 to 8 and. The effective value of track is from 1 to 4. If the calling number is beyond the range, an invalid tip will be displayed on the screen.
4.2 Set or Call Preset To set preset 1 - Set the position of the preset by moving joystick. 2 - Press the digital number on the keyboard to select the number of preset. Then press “PRESET” for more than 2
seconds to set the preset. For example, input 1 and then press “PRESET” for more than 2 seconds to set the NO.1 preset.
EN
To call preset 1 - Select the preset. For example, input 1 and press “Preset”.
4.3 Call or Stop Cruise/Track To call cruise/track . 1 - Select the cruise/track. For example, input 1 and press “CRUISE/TRACK”.
22
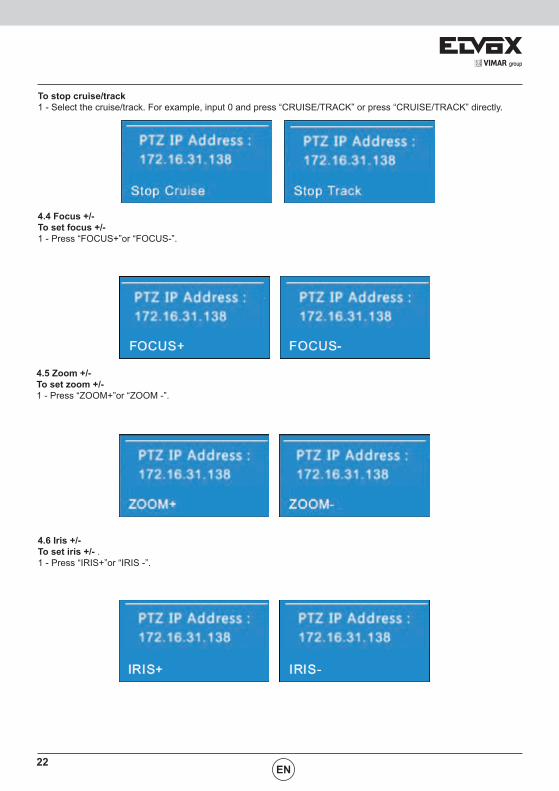
To stop cruise/track 1 - Select the cruise/track. For example, input 0 and press “CRUISE/TRACK” or press “CRUISE/TRACK” directly.
EN
4.4 Focus +/- To set focus +/- 1 - Press “FOCUS+”or “FOCUS-”.
4.5 Zoom +/- To set zoom +/- 1 - Press “ZOOM+”or “ZOOM -”.
4.6 Iris +/- To set iris +/- . 1 - Press “IRIS+”or “IRIS -”.
23VIMAR group
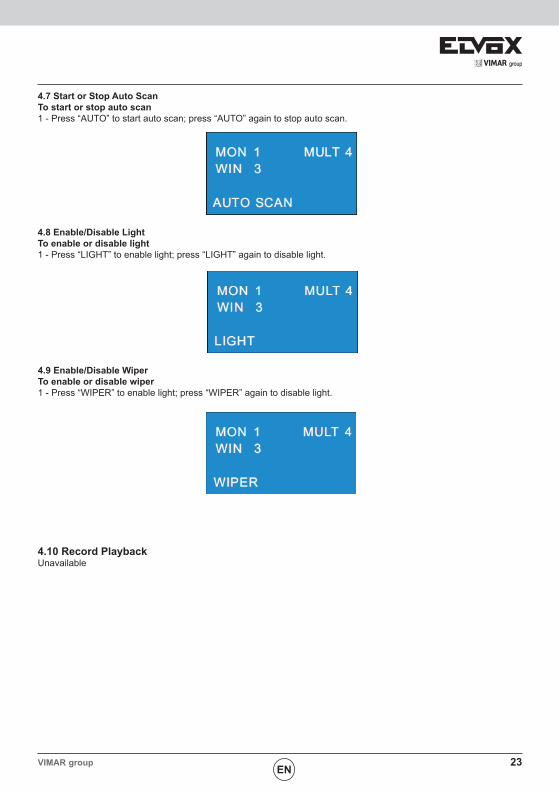
4.7 Start or Stop Auto Scan To start or stop auto scan 1 - Press “AUTO” to start auto scan; press “AUTO” again to stop auto scan.
EN
4.8 Enable/Disable Light To enable or disable light 1 - Press “LIGHT” to enable light; press “LIGHT” again to disable light.
4.9 Enable/Disable Wiper To enable or disable wiper 1 - Press “WIPER” to enable light; press “WIPER” again to disable light.
4.10 Record PlaybackUnavailable
24EN
5 Others
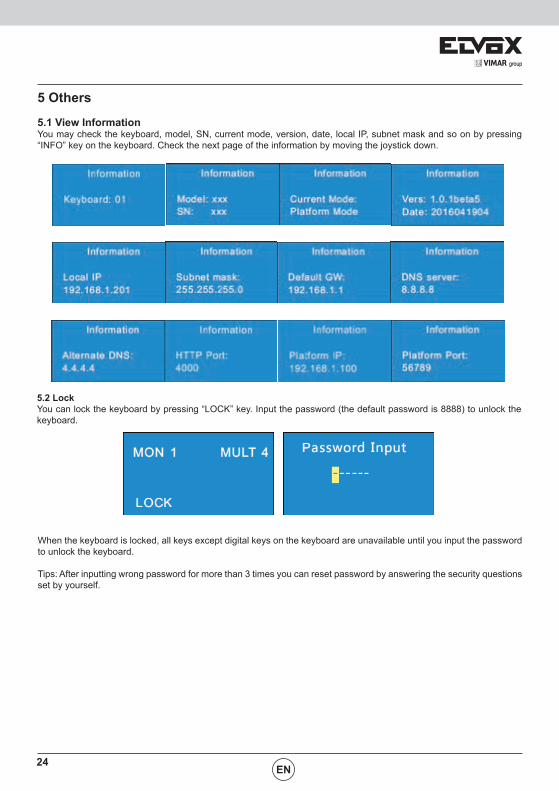
5.1 View InformationYou may check the keyboard, model, SN, current mode, version, date, local IP, subnet mask and so on by pressing “INFO” key on the keyboard. Check the next page of the information by moving the joystick down.
5.2 LockYou can lock the keyboard by pressing “LOCK” key. Input the password (the default password is 8888) to unlock the keyboard.
When the keyboard is locked, all keys except digital keys on the keyboard are unavailable until you input the password to unlock the keyboard.
Tips: After inputting wrong password for more than 3 times you can reset password by answering the security questions set by yourself.
25VIMAR groupEN
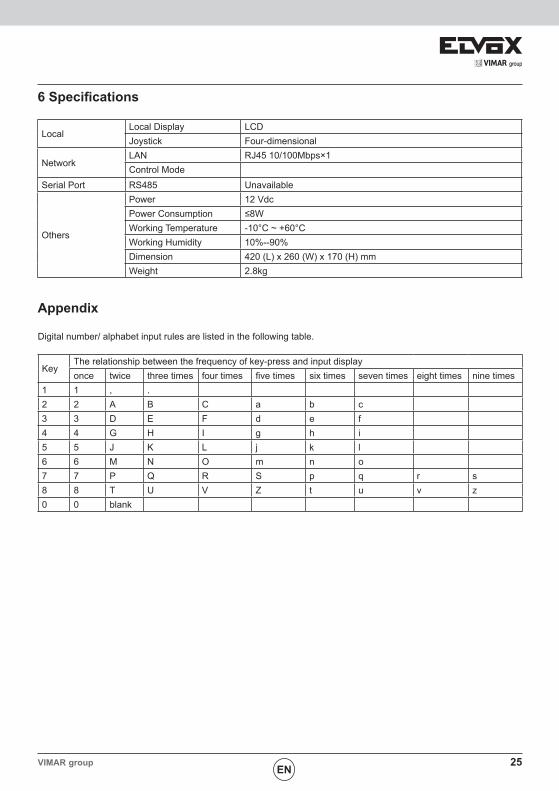
6 Specifications
LocalLocal Display LCDJoystick Four-dimensional
NetworkLAN RJ45 10/100Mbps×1Control Mode
Serial Port RS485 Unavailable
Others
Power 12 VdcPower Consumption ≤8WWorking Temperature -10°C ~ +60°CWorking Humidity 10%--90%Dimension 420 (L) x 260 (W) x 170 (H) mmWeight 2.8kg
Appendix
Digital number/ alphabet input rules are listed in the following table.
KeyThe relationship between the frequency of key-press and input displayonce twice three times four times five times six times seven times eight times nine times
1 1 , .2 2 A B C a b c3 3 D E F d e f4 4 G H I g h i5 5 J K L j k l6 6 M N O m n o7 7 P Q R S p q r s8 8 T U V Z t u v z0 0 blank

Viale Vicenza, 1436063 Marostica VI - Italy
www.vimar.com49401117A0 00 1610