150SESPIN - Tau · 150SESPIN SBLOCCO ESTERNO (SPIN) / EXTERNAL RELEASE (SPIN) ... - Retirer le...
4
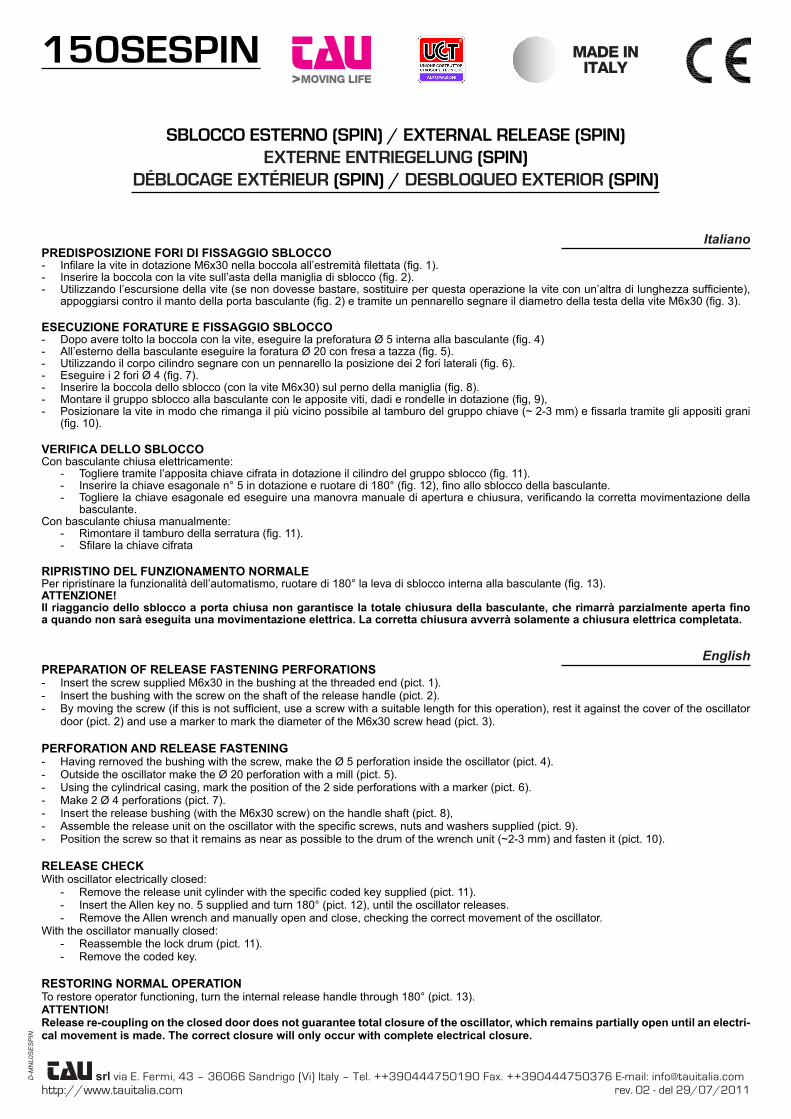
http://www.tauitalia.com rev. 02 - del 29/07/2011 D-MNL0SESPIN srl via E. Fermi, 43 – 36066 Sandrigo (Vi) Italy – Tel. ++390444750190 Fax. ++390444750376 E-mail: [email protected] 150SESPIN SBLOCCO ESTERNO (SPIN) / EXTERNAL RELEASE (SPIN) EXTERNE ENTRIEGELUNG (SPIN) DÉBLOCAGE EXTÉRIEUR (SPIN) / DESBLOQUEO EXTERIOR (SPIN) PREDISPOSIZIONE FORI DI FISSAGGIO SBLOCCO - Infilare la vite in dotazione M6x30 nella boccola all’estremità filettata (fig. 1). - Inserire la boccola con la vite sull’asta della maniglia di sblocco (fig. 2). - Utilizzando l’escursione della vite (se non dovesse bastare, sostituire per questa operazione la vite con un’altra di lunghezza sufficiente), appoggiarsi contro il manto della porta basculante (fig. 2) e tramite un pennarello segnare il diametro della testa della vite M6x30 (fig. 3). ESECUZIONE FORATURE E FISSAGGIO SBLOCCO - Dopo avere tolto la boccola con la vite, eseguire la preforatura Ø 5 interna alla basculante (fig. 4) - All’esterno della basculante eseguire la foratura Ø 20 con fresa a tazza (fig. 5). - Utilizzando il corpo cilindro segnare con un pennarello la posizione dei 2 fori laterali (fig. 6). - Eseguire i 2 fori Ø 4 (fig. 7). - Inserire la boccola dello sblocco (con la vite M6x30) sul perno della maniglia (fig. 8). - Montare il gruppo sblocco alla basculante con le apposite viti, dadi e rondelle in dotazione (fig, 9), - Posizionare la vite in modo che rimanga il più vicino possibile al tamburo del gruppo chiave (~ 2-3 mm) e fissarla tramite gli appositi grani (fig. 10). VERIFICA DELLO SBLOCCO Con basculante chiusa elettricamente: - Togliere tramite l’apposita chiave cifrata in dotazione il cilindro del gruppo sblocco (fig. 11). - Inserire la chiave esagonale n° 5 in dotazione e ruotare di 180° (fig. 12), fino allo sblocco della basculante. - Togliere la chiave esagonale ed eseguire una manovra manuale di apertura e chiusura, verificando la corretta movimentazione della basculante. Con basculante chiusa manualmente: - Rimontare il tamburo della serratura (fig. 11). - Sfilare la chiave cifrata RIPRISTINO DEL FUNZIONAMENTO NORMALE Per ripristinare la funzionalità dell’automatismo, ruotare di 180° la leva di sblocco interna alla basculante (fig. 13). ATTENZIONE! Il riaggancio dello sblocco a porta chiusa non garantisce la totale chiusura della basculante, che rimarrà parzialmente aperta fino a quando non sarà eseguita una movimentazione elettrica. La corretta chiusura avverrà solamente a chiusura elettrica completata. PREPARATION OF RELEASE FASTENING PERFORATIONS - Insert the screw supplied M6x30 in the bushing at the threaded end (pict. 1). - Insert the bushing with the screw on the shaft of the release handle (pict. 2). - By moving the screw (if this is not sufficient, use a screw with a suitable length for this operation), rest it against the cover of the oscillator door (pict. 2) and use a marker to mark the diameter of the M6x30 screw head (pict. 3). PERFORATlON AND RELEASE FASTENING - Having rernoved the bushing with the screw, make the Ø 5 perforation inside the oscillator (pict. 4). - Outside the oscillator make the Ø 20 perforation with a mill (pict. 5). - Using the cylindrical casing, mark the position of the 2 side perforations with a marker (pict. 6). - Make 2 Ø 4 perforations (pict. 7). - Insert the release bushing (with the M6x30 screw) on the handle shaft (pict. 8), - Assemble the release unit on the oscillator with the specific screws, nuts and washers supplied (pict. 9). - Position the screw so that it remains as near as possible to the drum of the wrench unit (~2-3 mm) and fasten it (pict. 10). RELEASE CHECK With oscillator electrically closed: - Remove the release unit cylinder with the specific coded key supplied (pict. 11). - Insert the Allen key no. 5 supplied and turn 180° (pict. 12), until the oscillator releases. - Remove the Allen wrench and manually open and close, checking the correct movement of the oscillator. With the oscillator manually closed: - Reassemble the lock drum (pict. 11). - Remove the coded key. RESTORING NORMAL OPERATION To restore operator functioning, turn the internal release handle through 180° (pict. 13). ATTENTION! Release re-coupling on the closed door does not guarantee total closure of the oscillator, which remains partially open until an electri- cal movement is made. The correct closure will only occur with complete electrical closure. Italiano English
Transcript of 150SESPIN - Tau · 150SESPIN SBLOCCO ESTERNO (SPIN) / EXTERNAL RELEASE (SPIN) ... - Retirer le...
http://www.tauitalia.com rev. 02 - del 29/07/2011
D-MNL0SESPIN
srl via E. Fermi, 43 – 36066 Sandrigo (Vi) Italy – Tel. ++390444750190 Fax. ++390444750376 E-mail: [email protected]
150SESPIN
SBLOCCO ESTERNO (SPIN) / EXTERNAL RELEASE (SPIN)EXTERNE ENTRIEGELUNG (SPIN)
DÉBLOCAGE EXTÉRIEUR (SPIN) / DESBLOQUEO EXTERIOR (SPIN)
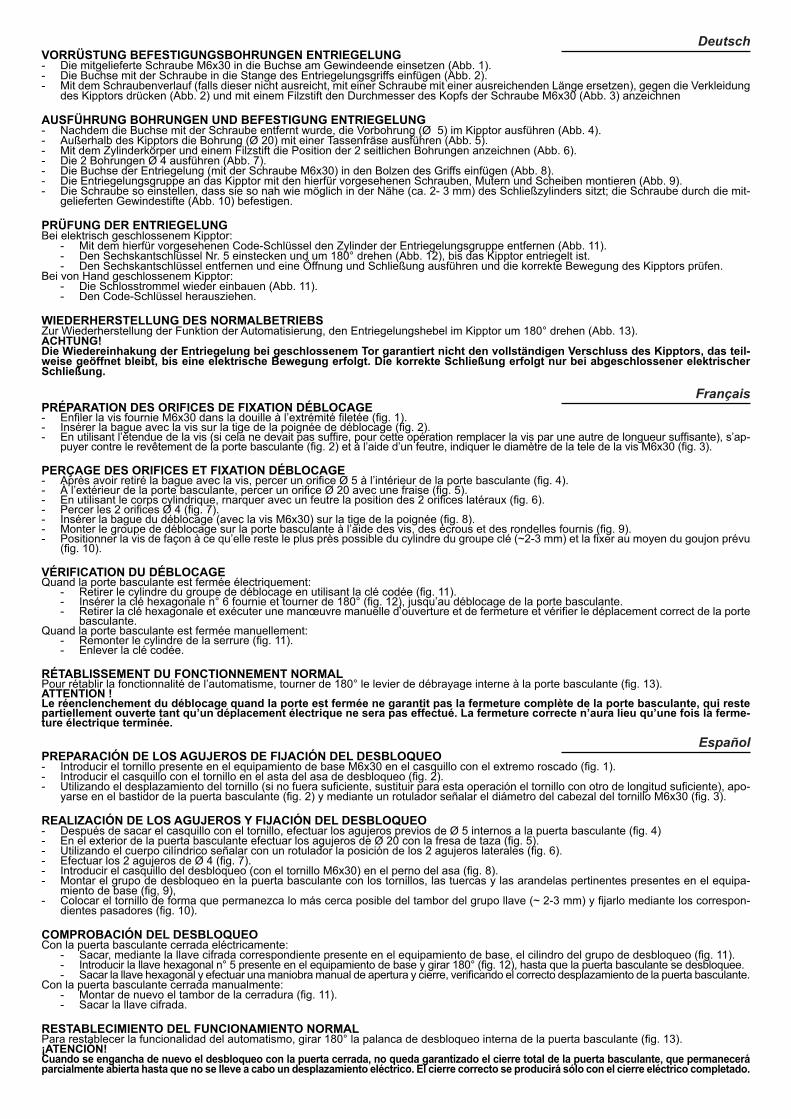
PREDISPOSIZIONE FORI DI FISSAGGIO SBLOCCO- Infilare la vite in dotazione M6x30 nella boccola all’estremità filettata (fig. 1).- Inserire la boccola con la vite sull’asta della maniglia di sblocco (fig. 2).- Utilizzando l’escursione della vite (se non dovesse bastare, sostituire per questa operazione la vite con un’altra di lunghezza sufficiente),
appoggiarsi contro il manto della porta basculante (fig. 2) e tramite un pennarello segnare il diametro della testa della vite M6x30 (fig. 3).
ESECUZIONE FORATURE E FISSAGGIO SBLOCCO- Dopo avere tolto la boccola con la vite, eseguire la preforatura Ø 5 interna alla basculante (fig. 4)- All’esterno della basculante eseguire la foratura Ø 20 con fresa a tazza (fig. 5).- Utilizzando il corpo cilindro segnare con un pennarello la posizione dei 2 fori laterali (fig. 6).- Eseguire i 2 fori Ø 4 (fig. 7).- Inserire la boccola dello sblocco (con la vite M6x30) sul perno della maniglia (fig. 8).- Montare il gruppo sblocco alla basculante con le apposite viti, dadi e rondelle in dotazione (fig, 9),- Posizionare la vite in modo che rimanga il più vicino possibile al tamburo del gruppo chiave (~ 2-3 mm) e fissarla tramite gli appositi grani
(fig. 10).
VERIFICA DELLO SBLOCCOCon basculante chiusa elettricamente:
- Togliere tramite l’apposita chiave cifrata in dotazione il cilindro del gruppo sblocco (fig. 11).- Inserire la chiave esagonale n° 5 in dotazione e ruotare di 180° (fig. 12), fino allo sblocco della basculante.- Togliere la chiave esagonale ed eseguire una manovra manuale di apertura e chiusura, verificando la corretta movimentazione della
basculante.Con basculante chiusa manualmente:
- Rimontare il tamburo della serratura (fig. 11).- Sfilare la chiave cifrata
RIPRISTINO DEL FUNZIONAMENTO NORMALEPer ripristinare la funzionalità dell’automatismo, ruotare di 180° la leva di sblocco interna alla basculante (fig. 13).ATTENZIONE!Il riaggancio dello sblocco a porta chiusa non garantisce la totale chiusura della basculante, che rimarrà parzialmente aperta fino a quando non sarà eseguita una movimentazione elettrica. La corretta chiusura avverrà solamente a chiusura elettrica completata.
PREPARATION OF RELEASE FASTENING PERFORATIONS- Insert the screw supplied M6x30 in the bushing at the threaded end (pict. 1).- Insert the bushing with the screw on the shaft of the release handle (pict. 2).- By moving the screw (if this is not sufficient, use a screw with a suitable length for this operation), rest it against the cover of the oscillator
door (pict. 2) and use a marker to mark the diameter of the M6x30 screw head (pict. 3).
PERFORATlON AND RELEASE FASTENING- Having rernoved the bushing with the screw, make the Ø 5 perforation inside the oscillator (pict. 4).- Outside the oscillator make the Ø 20 perforation with a mill (pict. 5).- Using the cylindrical casing, mark the position of the 2 side perforations with a marker (pict. 6).- Make 2 Ø 4 perforations (pict. 7).- Insert the release bushing (with the M6x30 screw) on the handle shaft (pict. 8),- Assemble the release unit on the oscillator with the specific screws, nuts and washers supplied (pict. 9).- Position the screw so that it remains as near as possible to the drum of the wrench unit (~2-3 mm) and fasten it (pict. 10).
RELEASE CHECKWith oscillator electrically closed:
- Remove the release unit cylinder with the specific coded key supplied (pict. 11).- Insert the Allen key no. 5 supplied and turn 180° (pict. 12), until the oscillator releases.- Remove the Allen wrench and manually open and close, checking the correct movement of the oscillator.
With the oscillator manually closed:- Reassemble the lock drum (pict. 11).- Remove the coded key.
RESTORING NORMAL OPERATIONTo restore operator functioning, turn the internal release handle through 180° (pict. 13).ATTENTION!Release re-coupling on the closed door does not guarantee total closure of the oscillator, which remains partially open until an electri-cal movement is made. The correct closure will only occur with complete electrical closure.
Italiano
English

1 2
3 4
5 6

7 8
9 10
11 1312
PRÉPARATION DES ORIFICES DE FIXATION DÉBLOCAGE- Enfiler la vis fournie M6x30 dans la douille à l’extrémité filetée (fig. 1).- Insérer la bague avec la vis sur la tige de la poignée de déblocage (fig. 2).- En utilisant l’étendue de la vis (si cela ne devait pas suffire, pour cette opération remplacer la vis par une autre de longueur suffisante), s’ap-
puyer contre le revêtement de la porte basculante (fig. 2) et à l’aide d’un feutre, indiquer le diamètre de la tele de la vis M6x30 (fig. 3).
PERÇAGE DES ORIFICES ET FIXATlON DÉBLOCAGE- Après avoir retiré la bague avec la vis, percer un orifice Ø 5 à l’intérieur de la porte basculante (fig. 4).- À l’extérieur de la porte basculante, percer un orifice Ø 20 avec une fraise (fig. 5).- En utilisant le corps cylindrique, rnarquer avec un feutre la position des 2 orifices latéraux (fig. 6).- Percer les 2 orifices Ø 4 (fig. 7).- Insérer la bague du déblocage (avec la vis M6x30) sur la tige de la poignée (fig. 8).- Monter le groupe de déblocage sur la porte basculante à l’aide des vis, des écrous et des rondelles fournis (fig. 9).- Positionner la vis de façon à ce qu’elle reste le plus près possible du cylindre du groupe clé (~2-3 mm) et la fixer au moyen du goujon prévu
(fig. 10).
VÉRIFICATION DU DÉBLOCAGEQuand la porte basculante est fermée électriquement:
- Retirer le cylindre du groupe de déblocage en utilisant la clé codée (fig. 11).- Insérer la clé hexagonale n° 6 fournie et tourner de 180° (fig. 12), jusqu’au déblocage de la porte basculante.- Retirer la clé hexagonale et exécuter une manœuvre manuelle d’ouverture et de fermeture et vérifier le déplacement correct de la porte
basculante.Quand la porte basculante est fermée manuellement:
- Remonter le cylindre de la serrure (fig. 11).- Enlever la clé codée.
RÉTABLISSEMENT DU FONCTIONNEMENT NORMALPour rétablir la fonctionnalité de l’automatisme, tourner de 180° le levier de débrayage interne à la porte basculante (fig. 13).ATTENTION !Le réenclenchement du déblocage quand la porte est fermée ne garantit pas la fermeture complète de la porte basculante, qui reste partiellement ouverte tant qu’un déplacement électrique ne sera pas effectué. La fermeture correcte n’aura lieu qu’une fois la ferme-ture électrique terminée.
VORRÜSTUNG BEFESTIGUNGSBOHRUNGEN ENTRIEGELUNG- Die mitgelieferte Schraube M6x30 in die Buchse am Gewindeende einsetzen (Abb. 1).- Die Buchse mit der Schraube in die Stange des Entriegelungsgriffs einfügen (Abb. 2).- Mit dem Schraubenverlauf (falls dieser nicht ausreicht, mit einer Schraube mit einer ausreichenden Länge ersetzen), gegen die Verkleidung
des Kipptors drücken (Abb. 2) und mit einem Filzstift den Durchmesser des Kopfs der Schraube M6x30 (Abb. 3) anzeichnen
AUSFÜHRUNG BOHRUNGEN UND BEFESTIGUNG ENTRIEGELUNG- Nachdem die Buchse mit der Schraube entfernt wurde, die Vorbohrung (Ø 5) im Kipptor ausführen (Abb. 4). - Außerhalb des Kipptors die Bohrung (Ø 20) mit einer Tassenfräse ausführen (Abb. 5).- Mit dem Zylinderkörper und einem Filzstift die Position der 2 seitlichen Bohrungen anzeichnen (Abb. 6).- Die 2 Bohrungen Ø 4 ausführen (Abb. 7).- Die Buchse der Entriegelung (mit der Schraube M6x30) in den Bolzen des Griffs einfügen (Abb. 8).- Die Entriegelungsgruppe an das Kipptor mit den hierfür vorgesehenen Schrauben, Mutern und Scheiben montieren (Abb. 9).- Die Schraube so einstellen, dass sie so nah wie möglich in der Nähe (ca. 2- 3 mm) des Schließzylinders sitzt; die Schraube durch die mit-
gelieferten Gewindestifte (Abb. 10) befestigen.
PRÜFUNG DER ENTRIEGELUNGBei elektrisch geschlossenem Kipptor:
- Mit dem hierfür vorgesehenen Code-Schlüssel den Zylinder der Entriegelungsgruppe entfernen (Abb. 11).- Den Sechskantschlüssel Nr. 5 einstecken und um 180° drehen (Abb. 12), bis das Kipptor entriegelt ist.- Den Sechskantschlüssel entfernen und eine Öffnung und Schließung ausführen und die korrekte Bewegung des Kipptors prüfen.
Bei von Hand geschlossenem Kipptor:- Die Schlosstrommel wieder einbauen (Abb. 11).- Den Code-Schlüssel herausziehen.
WIEDERHERSTELLUNG DES NORMALBETRIEBSZur Wiederherstellung der Funktion der Automatisierung, den Entriegelungshebel im Kipptor um 180° drehen (Abb. 13).ACHTUNG!Die Wiedereinhakung der Entriegelung bei geschlossenem Tor garantiert nicht den vollständigen Verschluss des Kipptors, das teil-weise geöffnet bleibt, bis eine elektrische Bewegung erfolgt. Die korrekte Schließung erfolgt nur bei abgeschlossener elektrischer Schließung.
PREPARACIÓN DE LOS AGUJEROS DE FIJACIÓN DEL DESBLOQUEO- Introducir el tornillo presente en el equipamiento de base M6x30 en el casquillo con el extremo roscado (fig. 1).- Introducir el casquillo con el tornillo en el asta del asa de desbloqueo (fig. 2).- Utilizando el desplazamiento del tornillo (si no fuera suficiente, sustituir para esta operación el tornillo con otro de longitud suficiente), apo-
yarse en el bastidor de la puerta basculante (fig. 2) y mediante un rotulador señalar el diámetro del cabezal del tornillo M6x30 (fig. 3).
REALIZACIÓN DE LOS AGUJEROS Y FIJACIÓN DEL DESBLOQUEO- Después de sacar el casquillo con el tornillo, efectuar los agujeros previos de Ø 5 internos a la puerta basculante (fig. 4)- En el exterior de la puerta basculante efectuar los agujeros de Ø 20 con la fresa de taza (fig. 5).- Utilizando el cuerpo cilíndrico señalar con un rotulador la posición de los 2 agujeros laterales (fig. 6).- Efectuar los 2 agujeros de Ø 4 (fig. 7).- Introducir el casquillo del desbloqueo (con el tornillo M6x30) en el perno del asa (fig. 8).- Montar el grupo de desbloqueo en la puerta basculante con los tornillos, las tuercas y las arandelas pertinentes presentes en el equipa-
miento de base (fig, 9),- Colocar el tornillo de forma que permanezca lo más cerca posible del tambor del grupo llave (~ 2-3 mm) y fijarlo mediante los correspon-
dientes pasadores (fig. 10).
COMPROBACIÓN DEL DESBLOQUEOCon la puerta basculante cerrada eléctricamente:
- Sacar, mediante la llave cifrada correspondiente presente en el equipamiento de base, el cilindro del grupo de desbloqueo (fig. 11).- Introducir la llave hexagonal n° 5 presente en el equipamiento de base y girar 180° (fig. 12), hasta que la puerta basculante se desbloquee.- Sacar la llave hexagonal y efectuar una maniobra manual de apertura y cierre, verificando el correcto desplazamiento de la puerta basculante.
Con la puerta basculante cerrada manualmente:- Montar de nuevo el tambor de la cerradura (fig. 11).- Sacar la llave cifrada.
RESTABLECIMIENTO DEL FUNCIONAMIENTO NORMALPara restablecer la funcionalidad del automatismo, girar 180° la palanca de desbloqueo interna de la puerta basculante (fig. 13).¡ATENCIÓN!Cuando se engancha de nuevo el desbloqueo con la puerta cerrada, no queda garantizado el cierre total de la puerta basculante, que permanecerá parcialmente abierta hasta que no se lleve a cabo un desplazamiento eléctrico. El cierre correcto se producirá sólo con el cierre eléctrico completado.
Español
Deutsch
Français