RUNNER FRAMELESS - l-tech.it fileStuccare,rasare,levigare e successivamente tinteggiare. Coat with...
2
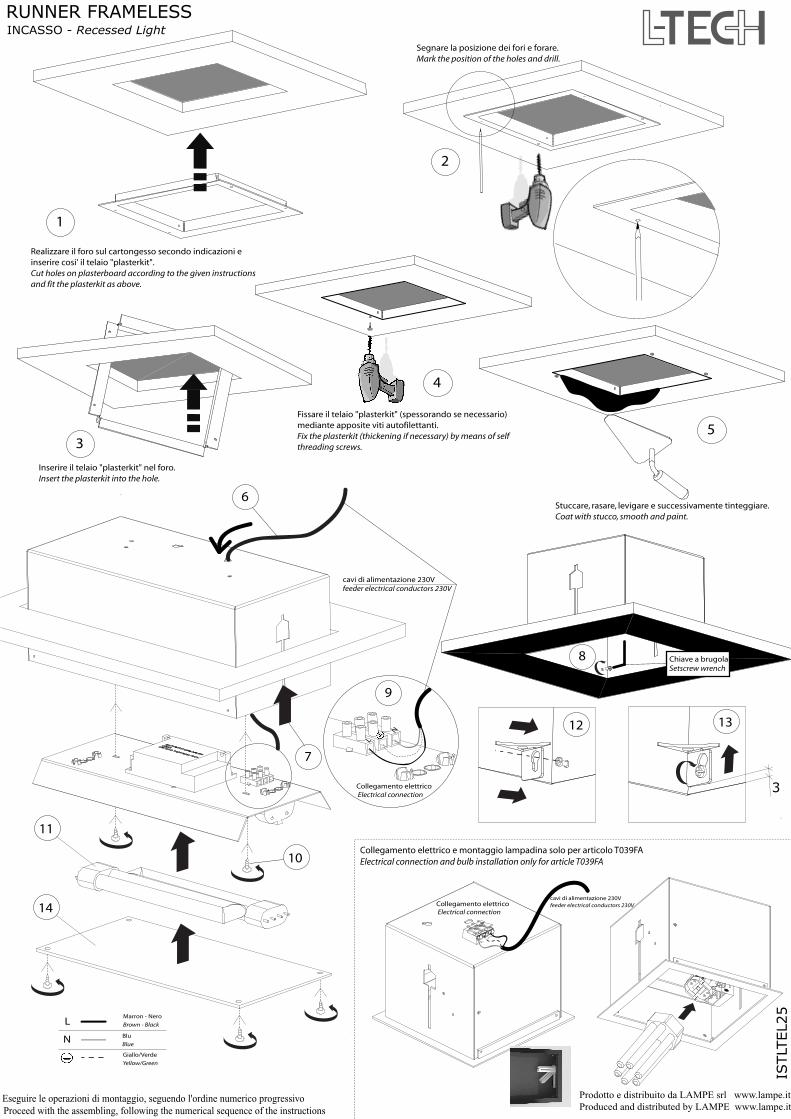
L Marron - Nero Brown - Black N Blu Blue Giallo/Verde Yellow/Green Collegamento elettrico Electrical connection cavi di alimentazione 230V feeder electrical conductors 230V 6 9 7 10 L N Collegamento elettrico Electrical connection cavi di alimentazione 230V feeder electrical conductors 230V Collegamento elettrico e montaggio lampadina solo per articolo T039FA Electrical connection and bulb installation only for article T039FA Inserire il telaio "plasterkit" nel foro. Insert the plasterkit into the hole. Stuccare, rasare, levigare e successivamente tinteggiare. Coat with stucco, smooth and paint. ISTLTEL25 Prodotto e distribuito da LAMPE srl www.lampe.it Produced and distributed by LAMPE www.lampe.it 3 4 5 Chiave a brugola Setscrew wrench Realizzare il foro sul cartongesso secondo indicazioni e inserire cosi' il telaio "plasterkit". Cut holes on plasterboard according to the given instructions and fit the plasterkit as above. Segnare la posizione dei fori e forare. Mark the position of the holes and drill. 1 2 Fissare il telaio "plasterkit" (spessorando se necessario) mediante apposite viti autofilettanti. Fix the plasterkit (thickening if necessary) by means of self threading screws. RUNNER FRAMELESS INCASSO - Recessed Light 8 11 13 14 12 3
Transcript of RUNNER FRAMELESS - l-tech.it fileStuccare,rasare,levigare e successivamente tinteggiare. Coat with...
LMarron - Nero
Brown - Black
N Blu
Blue
Giallo/Verde
Yellow/Green
Collegamento elettrico Electrical connection
cavi di alimentazione 230Vfeeder electrical conductors 230V
6
9
7
10
L
N
Collegamento elettrico Electrical connection
cavi di alimentazione 230Vfeeder electrical conductors 230V
Collegamento elettrico e montaggio lampadina solo per articolo T039FAElectrical connection and bulb installation only for article T039FA
Inserire il telaio "plasterkit" nel foro.Insert the plasterkit into the hole.
Stuccare, rasare, levigare e successivamente tinteggiare.Coat with stucco, smooth and paint.
ISTLT
EL2
5
Prodotto e distribuito da LAMPE srl www.lampe.itProduced and distributed by LAMPE www.lampe.it
3
4
5
Chiave a brugolaSetscrew wrench
Realizzare il foro sul cartongesso secondo indicazioni einserire cosi' il telaio "plasterkit".Cut holes on plasterboard according to the given instructionsand fit the plasterkit as above.
Segnare la posizione dei fori e forare.Mark the position of the holes and drill.
1
2
Fissare il telaio "plasterkit" (spessorando se necessario)mediante apposite viti autofilettanti.Fix the plasterkit (thickening if necessary) by means of selfthreading screws.
cavi di alimentazione 230Vfeeder electrical conductors 230V
Power supply not included
Collegare l'idoneo alimentatore (non incluso) seguendo le relative istruzioni fornite dalcostruttore. Collegare la messa a terra sia all'alimentatore (se previsto) che al prodotto mediante cavo terra.
LMarron - Nero
Brown - Black
N Blu
Blue
Giallo/Verde
Yellow/Green
ISTLT
EL1
4
Connect the appropriate power supply(not included) following the related instructionsprovided by the constructor. Connect the earthingboth to the power supply (if required) and tothe product throught the earth wire.
Alimentatore non incluso
ATTENZIONE: VERSIONE IODURI METALLICIATTENTION: METAL HALIDE VERSION
6
11,5V
230V
trasformatore non incluso
transformer not included
cavi di alimentazione 230Vfeeder electrical conductors 230V
Collegamento elettricoElectrical connection
6
Collegare l'idoneo trasformatore (non incluso) seguendo le relative istruzioni fornite dalcostruttore.
Connect the appropriate electronic transformer (not includet) following the related instructions,which are provided by the constructor.
IMPIANTO ELETTRICO 12VElectrical system 12V
Prodotto e distribuito da LAMPE srl www.lampe.itProduced and distributed by LAMPE www.lampe.it
7
8Chiave a brugolaSetscrew wrench
RUNNER FRAMELESS
INCASSO - Recessed Light
8
11
13
14
12
3