
MANUALE D’ISTRUZIONI OWNER’S MANUAL · Non ostruire le aperture o le prese d’aria presenti...
24
MANUALE D’ISTRUZIONI OWNER’S MANUAL
Transcript of MANUALE D’ISTRUZIONI OWNER’S MANUAL · Non ostruire le aperture o le prese d’aria presenti...

MANUALE D’ISTRUZIONIOWNER’S MANUAL
Manuale d’istruzioni | Earth112
2
Novembre 2018November 2018
ITALIANO 3 - 9
ENGLISH 10 - 16
APPENDIX 18 - 21Dati tecnici | Technical specificationsConnettori | ConnectorsEsempi di collegamento | Connection examplesParti di ricambio | Spare parts
Earth112 | Manuale d’istruzioni
3
INDICE
Introduzione..........................................................4
Descrizione.............................................................4
Pannello controlli e connessioni..........................5
Esempi di collegamento......................................6 - 7
Importante..........................................................8 - 9
Appendix
Dati tecnici..........................................................18
Connettori.........................................................18
Esempi di collegamento.................................19 - 20
Parti di ricambio..................................................21
ITALIANOIl lampo con la freccia inserito in un triangolo equilatero avvisa l’utilizzatore della presenza di tensione pericolosa, senza isolamento, all’interno dell’apparecchio che potrebbe essere sufficientemente alta da generare il rischio di scossa elettrica.
Il punto esclamativo inserito in un triangolo equilatero avvisa l’utilizzatore della presenza di importanti istruzioni per l’utilizzo e per la manutenzione.
CONTENUTO DELL’IMBALLO
◗ Subwoofer attivo
◗ Cavo di alimentazione
◗ Manuale d’istruzioni
◗ Certificato di garanzia
◗ Dichiarazione di conformità CE
IMPORTANTE | NORME DI SICUREZZAATTENZIONENell’interesse della propria e della altrui sicurezza, e per non invalidare la garanzia, si raccomanda una attenta lettura di questa sezione prima di utilizzare il prodotto.
Questo apparecchio è stato progettato e costruito per essere utilizzato come sistema di altoparlanti con amplificatore nel contesto tipico di un sistema di amplificazione sonora e/o di un sistema di registrazione sonora. L’utilizzo per scopi diversi da questi non è contemplato dal costruttore, ed avviene pertanto sotto la diretta responsabilità dell’utilizzatore/installatore.Questo apparecchio è conforme alla Classe di isolamento I (deve essere collegato alla presa di rete con un collegamento a terra di protezione).
PER EVITARE IL RISCHIO DI INCENDIO E/O DI FOLGORAZIONE:
• Non esporre il prodotto alla pioggia, non utilizzarlo in presenza di elevata umidità o vicino all’acqua. L’apparecchio non deve essere sottoposto a stillicidio o a spruzzi d’acqua e nessun oggetto pieno di liquido, quali vasi, deve essere posto sull’apparecchio. Non lasciare penetrare all’interno dell’apparecchio alcun liquido, né alcun oggetto solido. In caso ciò avvenga, scollegare immediatamente l’apparecchio dalla rete elettrica e rivolgersi ad un servizio di assistenza qualificato prima di adoperarlo nuovamente. Non appoggiare candele accese o altre sorgenti di fiamma nuda sopra l’apparecchio.
• Prima di collegare l’apparecchio alla rete elettrica assicurarsi che la tensione corrisponda a quella indicata sull’apparecchio stesso.
• Collegare questo apparecchio esclusivamente ad una presa di corrente dotata di contatto di terra, rispondente alle norme di sicurezza vigenti, tramite il cavo di alimentazione in dotazione. Nel caso in cui il cavo necessiti di sostituzione, utilizzare esclusivamente un cavo di identiche caratteristiche.
• L’apparecchio è collegato alla rete anche quando l’interruttore di rete è in posizione ’0’ (spento) e la spia luminosa è spenta. All’interno sono presenti potenziali elettrici pericolosi. Prima di qualunque intervento di manutenzione, scollegare il cavo di alimentazione dalla presa di rete.
• Non appoggiare alcun oggetto sul cavo di alimentazione. Non posarlo dove possa costituire intralcio e causare inciampo. Non schiacciarlo e non calpestarlo.
• Installare questo apparecchio prevedendo ampio spazio circostante per un’abbon-dante circolazione d’aria, necessaria al raffreddamento. Non ostruire le aperture o le prese d’aria presenti sull’apparecchio. Lasciare spazio sufficiente per accedere alla presa di alimentazione elettrica e al connettore di rete sul pannello posteriore.
• In caso di sostituzione del fusibile esterno, utilizzare esclusivamente un fusibile di caratteristiche identiche, come riportato sull’apparecchio.
• Prima di effettuare qualsiasi operazione di collegamento, assicurarsi che l’interruttore di accensione dell’apparecchio sia in posizione ’0’.
• Prima di effettuare qualsiasi spostamento del prodotto già installato o in funzione, rimuovere tutti i cavi di collegamento.
• Per scollegare l’apparecchio dalla rete elettrica, non tirare mai lungo il cavo, ma afferrarlo sempre per il connettore.
ATTENZIONEQuesto apparecchio non contiene parti interne destinate all’intervento diretto da parte dell’utilizzatore. Per evitare il rischio di incendio e/o folgorazione, non smontarlo e non rimuovere il pannello posteriore. Per qualsiasi intervento di manutenzione o riparazione, rivolgetevi alla Elettronica Montarbo srl e/o a personale altamente qualificato specificamente segnalato da questa.
• Nel predisporre l’apparecchio all’utilizzo, assicurarsi che la forma e la portata della superficie di appoggio siano idonee a sostenerlo, considerando sia il peso che l’ingombro del prodotto. Nel caso si desideri installare la cassa su di un’asta di supporto, utilizzarne una di portata adeguata al peso del prodotto, inserendola nell’apposito adattatore. Nel caso si sovrappongano due casse, assicurarsi che la stabilità sia garantita dall’incastro tra i piedini della cassa superiore e gli incavi di quella inferiore. • Per evitare urti, calci, inciampi, riservate come luogo per l’istallazione del prodotto un’area protetta inaccessibile a personale non qualificato. • Questo prodotto è in grado di generare pressioni acustiche molto elevate, pericolose per la salute del sistema uditivo. Evitarne quindi l’utilizzo ad elevati livelli acustici se il pubblico si trova eccessivamente vicino al prodotto. Qualora l’apparecchio venga utilizzato in presenza di bambini e animali, si rende necessaria una strettissima sorveglianza.• Questo prodotto è in grado di generare pressioni acustiche molto elevate, pericolose per la salute del sistema uditivo. Evitarne quindi l’utilizzo ad elevati livelli acustici se il pubblico si trova eccessivamente vicino al prodotto.
[!] Non esporre i bambini a forti sorgenti sonore.
Manuale d’istruzioni | Earth112
4
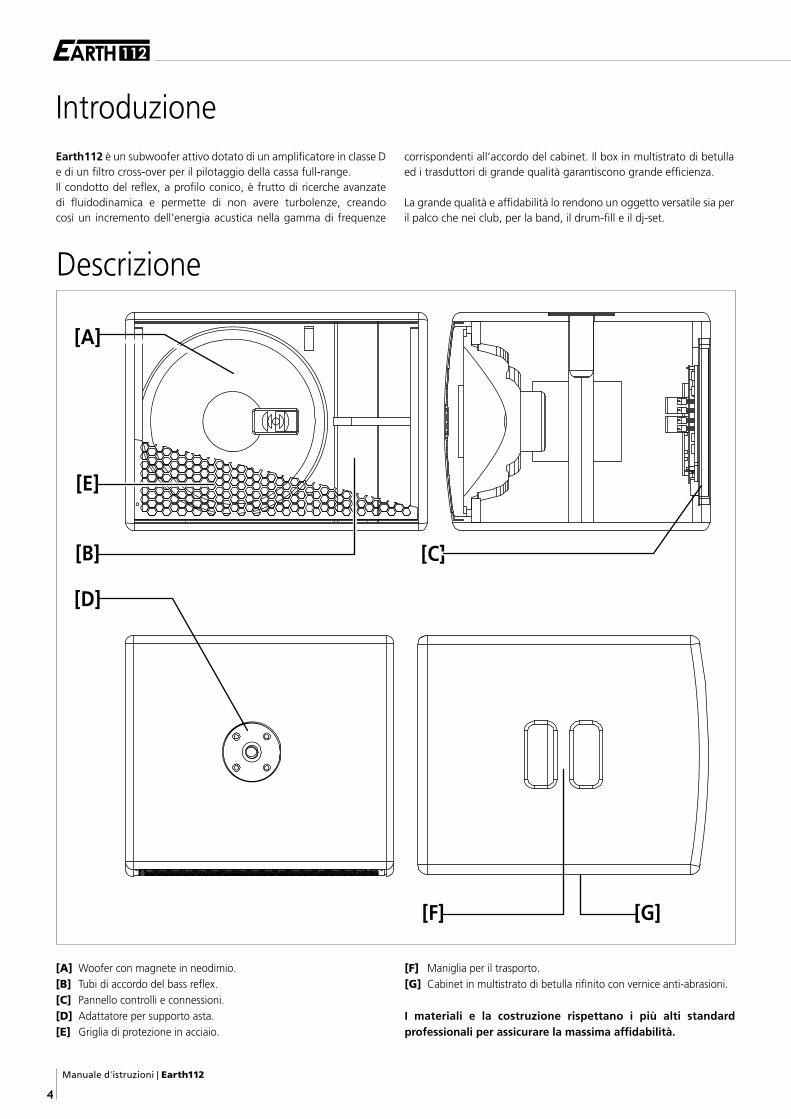
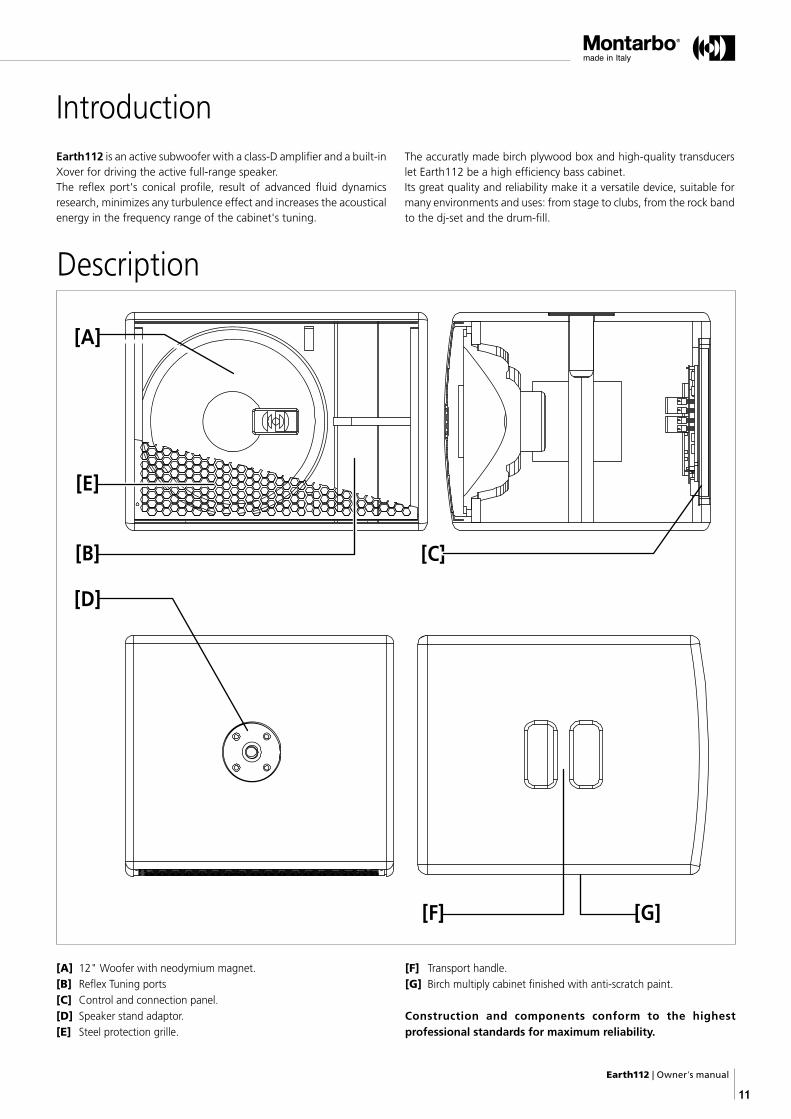
Descrizione
[A] Woofer con magnete in neodimio.[B] Tubi di accordo del bass reflex.[C] Pannello controlli e connessioni.[D] Adattatore per supporto asta.[E] Griglia di protezione in acciaio.
[F] Maniglia per il trasporto.[G] Cabinet in multistrato di betulla rifinito con vernice anti-abrasioni. I materiali e la costruzione rispettano i più alti standard professionali per assicurare la massima affidabilità.
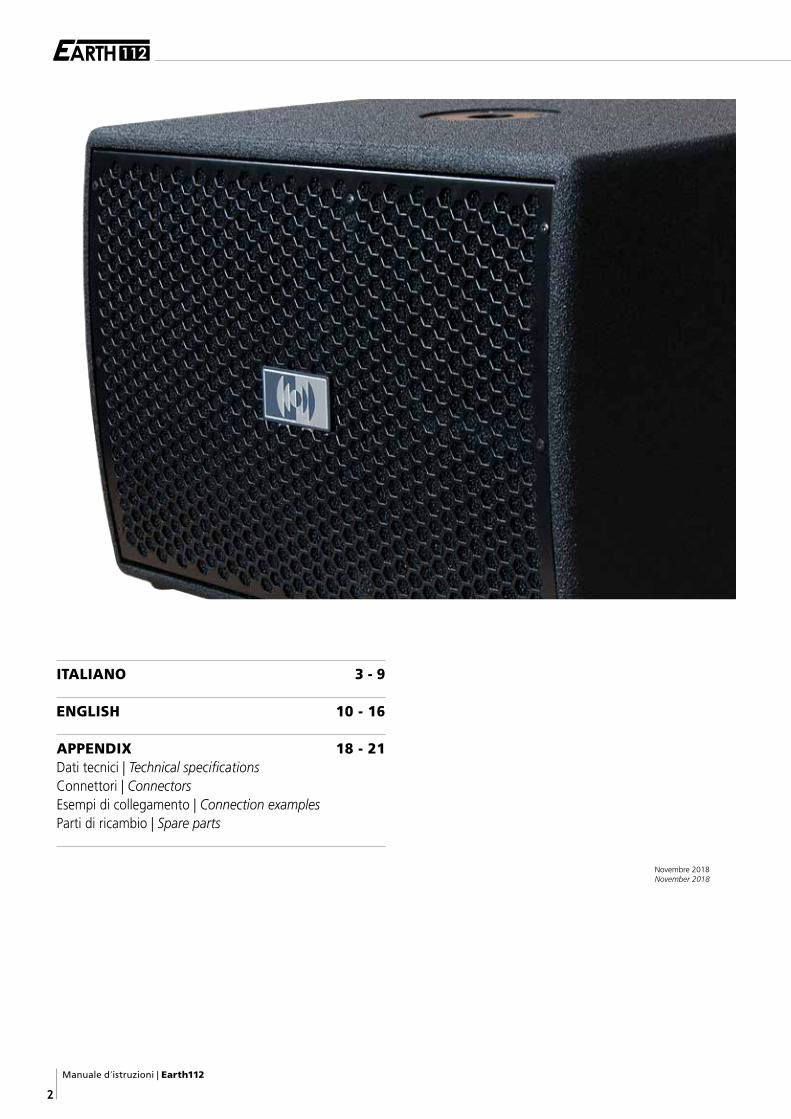
IntroduzioneEarth112 è un subwoofer attivo dotato di un amplificatore in classe D e di un filtro cross-over per il pilotaggio della cassa full-range.Il condotto del reflex, a profilo conico, è frutto di ricerche avanzate di fluidodinamica e permette di non avere turbolenze, creando così un incremento dell’energia acustica nella gamma di frequenze
corrispondenti all’accordo del cabinet. Il box in multistrato di betulla ed i trasduttori di grande qualità garantiscono grande efficienza.
La grande qualità e affidabilità lo rendono un oggetto versatile sia per il palco che nei club, per la band, il drum-fill e il dj-set.
[C]
[D]
[E]
[F] [G]
[A]
[B]
Earth112 | Manuale d’istruzioni
5
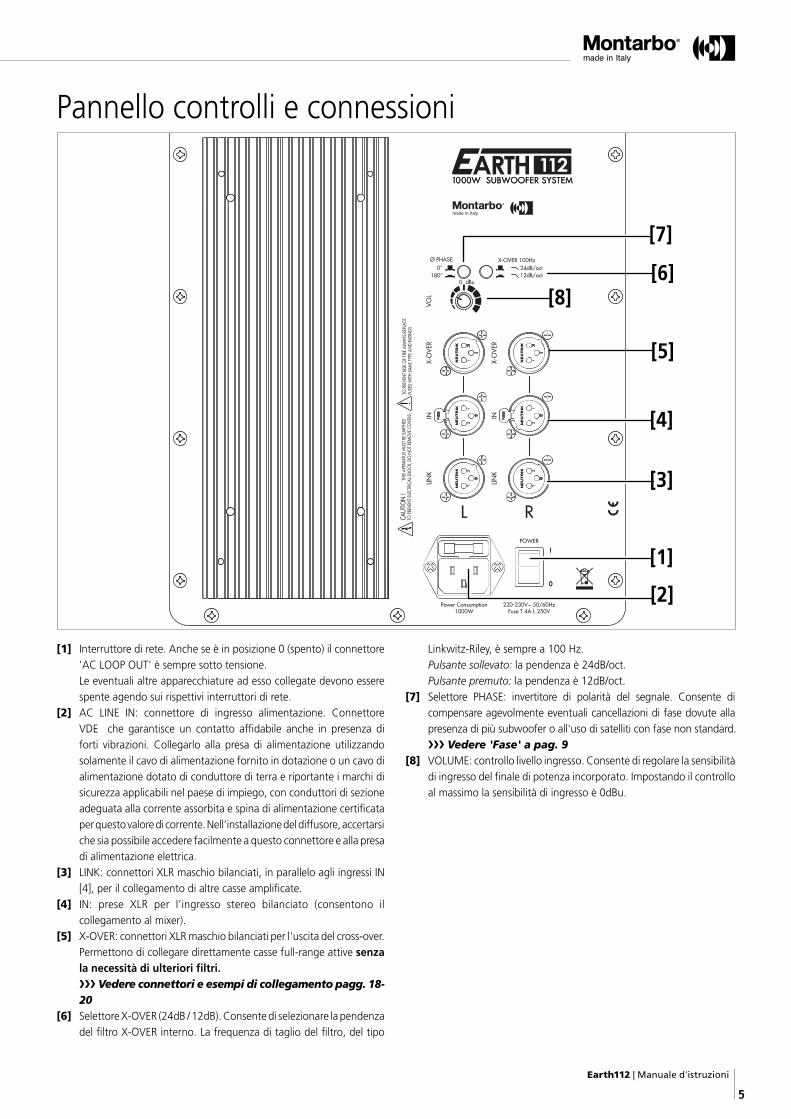
[1] Interruttore di rete. Anche se è in posizione 0 (spento) il connettore 'AC LOOP OUT' è sempre sotto tensione. Le eventuali altre apparecchiature ad esso collegate devono essere spente agendo sui rispettivi interruttori di rete.
[2] AC LINE IN: connettore di ingresso alimentazione. Connettore VDE che garantisce un contatto affidabile anche in presenza di forti vibrazioni. Collegarlo alla presa di alimentazione utilizzando solamente il cavo di alimentazione fornito in dotazione o un cavo di alimentazione dotato di conduttore di terra e riportante i marchi di sicurezza applicabili nel paese di impiego, con conduttori di sezione adeguata alla corrente assorbita e spina di alimentazione certificata per questo valore di corrente. Nell’installazione del diffusore, accertarsi che sia possibile accedere facilmente a questo connettore e alla presa di alimentazione elettrica.
[3] LINK: connettori XLR maschio bilanciati, in parallelo agli ingressi IN [4], per il collegamento di altre casse amplificate.
[4] IN: prese XLR per l’ingresso stereo bilanciato (consentono il collegamento al mixer).
[5] X-OVER: connettori XLR maschio bilanciati per l'uscita del cross-over.Permettono di collegare direttamente casse full-range attive senza la necessità di ulteriori filtri. ❯❯❯ Vedere connettori e esempi di collegamento pagg. 18-20
[6] Selettore X-OVER (24dB / 12dB). Consente di selezionare la pendenza del filtro X-OVER interno. La frequenza di taglio del filtro, del tipo
Pannello controlli e connessioni
Linkwitz-Riley, è sempre a 100 Hz. Pulsante sollevato: la pendenza è 24dB/oct. Pulsante premuto: la pendenza è 12dB/oct.
[7] Selettore PHASE: invertitore di polarità del segnale. Consente di compensare agevolmente eventuali cancellazioni di fase dovute alla presenza di più subwoofer o all'uso di satelliti con fase non standard. ❯❯❯ Vedere 'Fase' a pag. 9
[8] VOLUME: controllo livello ingresso. Consente di regolare la sensibilità di ingresso del finale di potenza incorporato. Impostando il controllo al massimo la sensibilità di ingresso è 0dBu.
[4]
[3]
[6][8]
[7]
[5]
[2]
[1]
Manuale d’istruzioni | Earth112
6
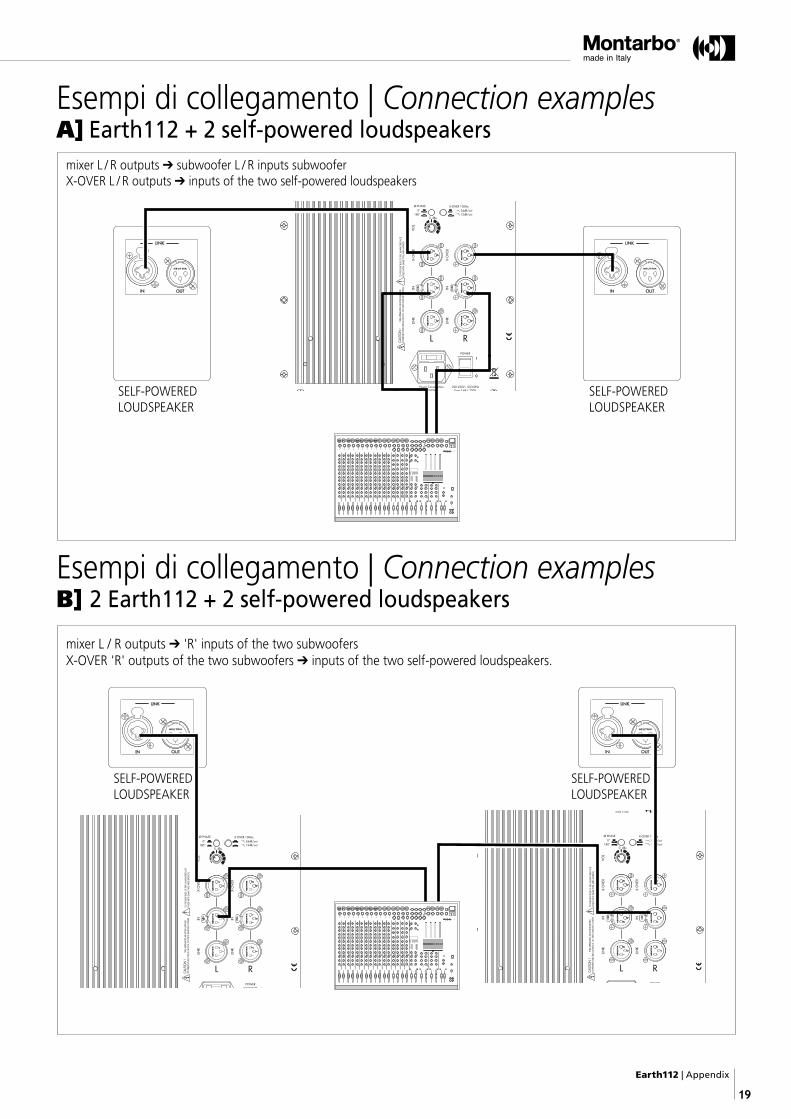
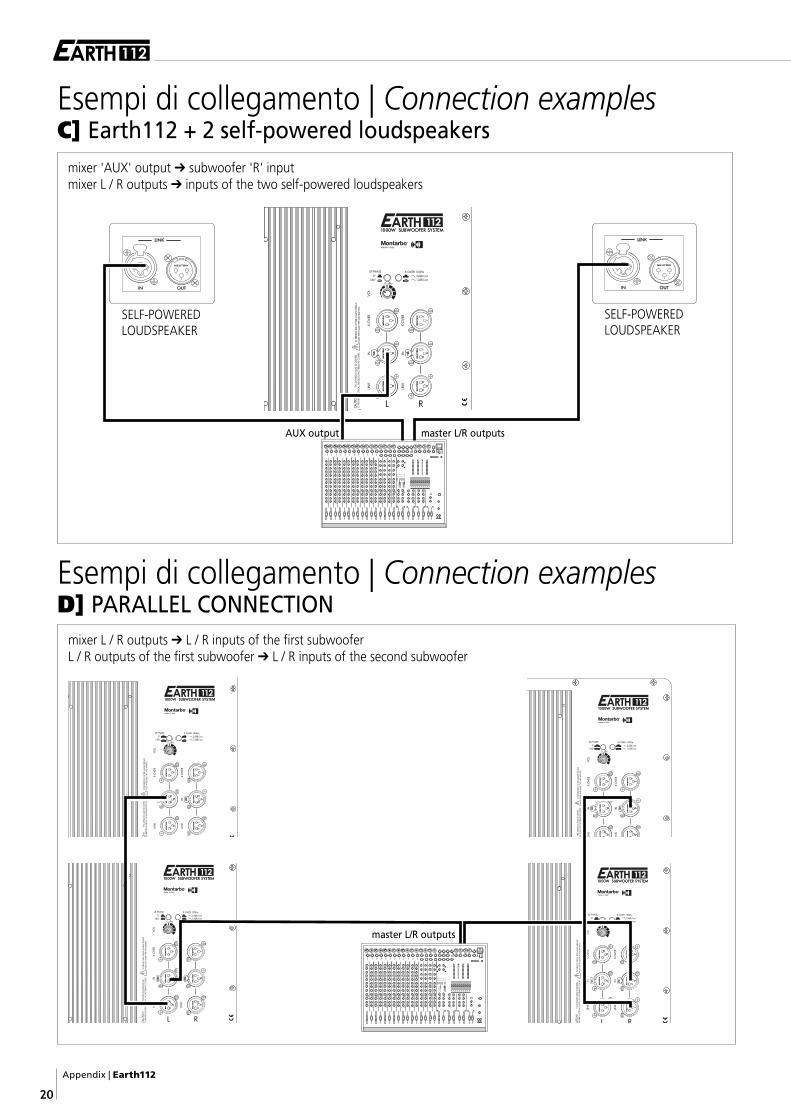
Esempi di collegamentoESEMPIO C: 1 Earth112 + 2 casse autoamplificate Questa utilizzazione è più complessa, ma consente di rinforzare selettivamente le basse frequenze (ad esempio, solo per le percussioni e le tastiere e non per i fiati e le voci).Nota: È consigliabile posizionare il subwoofer al centro rispetto alle casse.
uscita 'AUX' del mixer ➔ ingresso 'R' di un subwoofer
uscite L / R del mixer ➔ ingressi delle 2 casse attive
❯❯❯ Vedere esempio di collegamento 'C' a pagina 20
• Collegare una uscita AUSILIARIA (AUX) del mixer all’ingresso [4] 'R' del subwoofer.• Collegare le uscite L ed R del mixer agli ingressi delle casse attive.• Per selezionare gli strumenti da inviare al subwoofer usare i controlli di mandata AUX dei corrispondenti canali di ingresso. Il controllo di volume del subwoofer e quello dell’uscita AUX del mixer regolano solo le basse frequenze.
ESEMPIO D: collegamento in parallelo di due o più subwoofer Earth112
uscite L / R del mixer ➔ ingressi L / R del primo subwoofer
uscite LINK L / R del primo subwoofer ➔ ingressi L / R del secondo subwoofer
❯❯❯ Vedere esempio di collegamento a pagina 20
• Collegare le uscite L ed R del mixer agli ingressi [4] L ed R del subwoofer. • Collegare le uscite LINK [3] L ed R del primo subwoofer agli ingressi [4] L ed R del secondo subwoofer.
L’omnidirezionalità delle bassissime frequenze riprodotte dal subwoofer Earth112 rende la sua installazione per nulla critica. È sempre preferibile posizionare il subwoofer vicino alle casse acustiche, ma quando necessità di spazio o praticità di montaggio lo richiedano il subwoofer può essere montato anche a distanza dalle casse stesse (ad esempio: sotto palco, centro palco). Occorre tenere sempre presente che il rischio di rientri acustici (feedback), con conseguenti inneschi o 'code' indesi-derate, aumenta a causa della maggiore estensione della risposta in frequenza. È quindi importante prestare attenzione ed installare il sub-woofer su strutture rigide, che non trasmettano vibrazioni ai microfoni.
Descriviamo qui di seguito alcune tra le configurazioni possibili più comuni, che troverete illustrate alle pagine 19 e 20.
❯ Utilizzare sempre cavi schermati di adeguata sezione e di buona qualità.
ESEMPIO A: 1 Earth112 + 2 casse autoamplificate L’uscita stereo del crossover incorporato semplifica al massimo questo tipo di collegamento, solitamente molto più complesso in altri sistemi.Nota: È consigliabile posizionare il subwoofer al centro rispetto alle casse. Questo set-up permette di beneficiare di un incremento della dinamica fornita dal crossover elettronico presente nel subwoofer.
uscite L / R del mixer ➔ ingressi L / R del subwoofer
uscite 'x-over' L / R del subwoofer ➔ ingressi delle 2 casse attive ❯❯❯ Vedere esempio di collegamento 'A' a pagina 19
• Collegare le uscite L ed R del mixer agli ingressi [4] L ed R del subwoofer. • Collegare le uscite X-OVER [5] L ed R del subwoofer agli ingressi delle due casse attive. • Il controllo 'VOLUME' [8] del subwoofer non regola il volume delle casse acustiche satellite.
ESEMPIO B: 2 Earth112 + 2 casse autoamplificateÈ l’esempio di utilizzazione più classico, dove ogni subwoofer pilota una cassa acustica autoamplificata.
uscite L / R del mixer ➔ ingressi 'R' dei 2 subwoofer
uscite 'x-over' R dei 2 subwoofer ➔ ingressi delle 2 casse attive
❯❯❯ Vedere esempio di collegamento 'B' a pagina 19
• Collegare le uscite L ed R del mixer agli ingressi (4) 'R' dei due subwoofer.• Collegare le uscite X-OVER 'R' (5) dei due subwoofer agli ingressi delle due casse attive.• Il controllo 'VOLUME' (8) del subwoofer non regola il volume delle casse acustiche satellite.
Earth112 | Manuale d’istruzioni
7
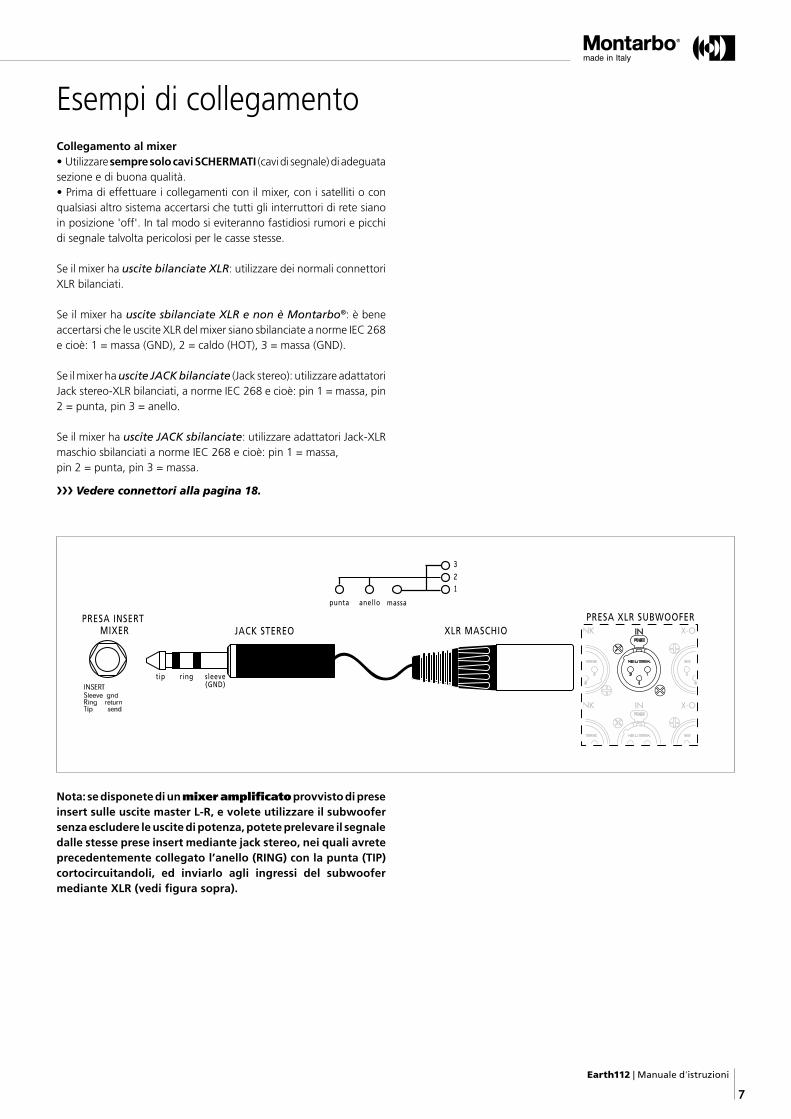
Collegamento al mixer• Utilizzare sempre solo cavi SCHERMATI (cavi di segnale) di adeguata sezione e di buona qualità.• Prima di effettuare i collegamenti con il mixer, con i satelliti o con qualsiasi altro sistema accertarsi che tutti gli interruttori di rete siano in posizione 'off'. In tal modo si eviteranno fastidiosi rumori e picchi di segnale talvolta pericolosi per le casse stesse.
Se il mixer ha uscite bilanciate XLR: utilizzare dei normali connettori XLR bilanciati.
Se il mixer ha uscite sbilanciate XLR e non è Montarbo®: è bene accertarsi che le uscite XLR del mixer siano sbilanciate a norme IEC 268 e cioè: 1 = massa (GND), 2 = caldo (HOT), 3 = massa (GND).
Se il mixer ha uscite JACK bilanciate (Jack stereo): utilizzare adattatori Jack stereo-XLR bilanciati, a norme IEC 268 e cioè: pin 1 = massa, pin 2 = punta, pin 3 = anello.
Se il mixer ha uscite JACK sbilanciate: utilizzare adattatori Jack-XLR maschio sbilanciati a norme IEC 268 e cioè: pin 1 = massa,pin 2 = punta, pin 3 = massa.
❯❯❯ Vedere connettori alla pagina 18.
Esempi di collegamento
tip ring sleeve(GND)
PRESA INSERT MIXER JACK STEREO XLR MASCHIO
PRESA XLR SUBWOOFER
IN
IN
anellopunta massa
123
Nota: se disponete di un mixer amplificato provvisto di prese insert sulle uscite master L-R, e volete utilizzare il subwoofer senza escludere le uscite di potenza, potete prelevare il segnale dalle stesse prese insert mediante jack stereo, nei quali avrete precedentemente collegato l’anello (RING) con la punta (TIP) cortocircuitandoli, ed inviarlo agli ingressi del subwoofer mediante XLR (vedi figura sopra).
Manuale d’istruzioni | Earth112
8
CURA E MANUTENZIONE DEL PRODOTTO• Evitare di esporre le casse alla radiazione solare diretta, ad eccessive vibrazioni e ad urti violenti.• Non porre sulla cassa sorgenti di fiamme nude, quali candele accese. Posizionare le casse lontano da fonti di calore (lampade, fari, sorgenti luminose di alta potenza, caloriferi o qualsiasi altro oggetto che produca calore).• Evitare l’uso ed il deposito del sistema in ambienti polverosi o umidi: si eviteranno così cattivi funzionamenti e deterioramento anticipato delle prestazioni. • Evitare l’uso del sistema vicino a fonti di interferenze elettromagnetiche (monitor video, cavi elettrici di alta potenza). Ciò potrebbe compromettere la qualità audio.• Nel caso in cui il sistema venga utilizzato all’aperto fare attenzione a proteggerlo dalla pioggia.• Proteggere l’apparecchio dal rovesciamento accidentale di liquidi o sostanze di qualsiasi tipo. In particolare nelle condizioni di utilizzo tipi-che, prestare la massima attenzione alla collocazione dell’apparecchio onde evitare che il pubblico, i musicisti, i tecnici o chicchessia possa poggiarvi sopra bicchieri, tazze, contenitori di cibo o di bevande, posacenere o sigarette accese.• Non rimuovere la griglia di protezione dalle casse.• Per rimuovere la polvere usate un pennello o un soffio d’aria, non usare mai detergenti, solventi o alcool.• Avere cura dei cavi di collegamento, avvolgerli evitando nodi e torsioni.• Non forzare i connettori.• All’interno dell’apparecchio possono essere presenti potenziali elettrici pericolosi anche quando l’interruttore di rete è in posizione '0' (spento) e la spia luminosa è spenta. Prima di qualunque intervento di manutenzione, scollegare il cavo di alimentazione dalla presa di rete.
COLLEGAMENTO ALLA RETE• Accertarsi che l’interruttore di rete sia in posizione '0' (spia luminosa spenta).• Accertarsi che la tensione di rete corrisponda a quella indicata sul pannello.• Collegare il cavo di alimentazione ad una presa di corrente dotata di contatto di terra di sicura efficienza. Utilizzare solamente il cavo di alimentazione fornito con l’apparecchio o un altro dotato di contatto di terra e riportante i marchi di sicurezza applicabili nel paese di impiego.• Lasciare spazio sufficiente per accedere alla presa di alimentazione elettrica e al connettore di rete sul pannello posteriore. All’interno dell’apparecchio possono essere presenti potenziali elettrici pericolosi anche quando l’interruttore di rete è in posizione '0' (spento) e la spia luminosa è spenta. Prima di qualunque intervento di manutenzione, scollegare il cavo di alimentazione dalla presa di rete.
Importante
Earth112 | Manuale d’istruzioni
9
Importante FASELa fase, in un sistema di diffusione sonora, riveste un’importanza fondamentale. Due diffusori che emettono lo stesso programma musicale interagiscono fra loro e possono provocare interferenze distruttive. Ciò significa che le onde sonore prodotte dai due diffusori che arrivino in un punto (un ascoltatore, o una parte della platea da servire) con fase diversa (due punti diversi dell’onda) si possono combinare in modo 'errato', ed invece di produrre un’onda sonora di ampiezza maggiore (un suono più 'forte' di quello prodotto dal singolo diffusore), ne producono una di ampiezza minore. Detto in altri termini, i due suoni si sottraggono anziché sommarsi. Nella condizione peggiore, nella quale la fase dei due segnali è opposta (sfasamento di 180°, o 'controfase') il risultato è l’annullamento del suono. Se in un certo istante, infatti, la prima onda arriva all’ascoltatore col suo valore massimo (+), e la seconda arriva col suo valore minimo (-) il risultato può essere nullo (o comunque un suono molto più debole rispetto a quello prodotto dal singolo diffusore). La disposizione nello spazio dell’ascoltatore e dei diffusori, il tipo di carico acustico usato, l’ambiente ed altro (crossover, processori elettronici, ecc) sono alcune fra le possibili cause di queste differenze di fase.Il pulsante di inversione di fase (6) serve ad evitare la condizione più drammatica(controfase), ed a limitare in molti altri casi le cancellazioni dovute a questo fenomeno fisico. Spesso si usa questa soluzione nei sistemi semplici, in cui non viene utilizzato un processore per la gestione dei PA (il quale, nei sistemi più complessi, gestisce il riallineamento in fase in modo molto più raffinato mediante l’introduzione di opportuni ritardi fra le diverse vie del sistema).Il più classico degli utilizzi è nel rifasamento fra subwoofer e satellite. Nella regione di cross-over (100/120Hz per i sistemi Montarbo®) si potrebbe creare un 'buco' nella risposta in frequenza dovuta allo sfasamento presente fra subwoofer e satellite (ancora una volta causato dalla disposizione nello spazio, ecc). In questo caso è sufficiente invertire la fase del subwoofer per ridurre questo effetto indesiderato. È fondamentale porre la massima attenzione alla fase impostata sui diversi subwoofer. Una inversione (dovuta alla errata pressione del tasto) su uno o più di essi rispetto agli altri comporta una quasi completa cancellazione del suono prodotto. In situazioni standard tutti i subwoofer devono avere la stessa fase (tutti regolati su 0° o tutti su 180°).
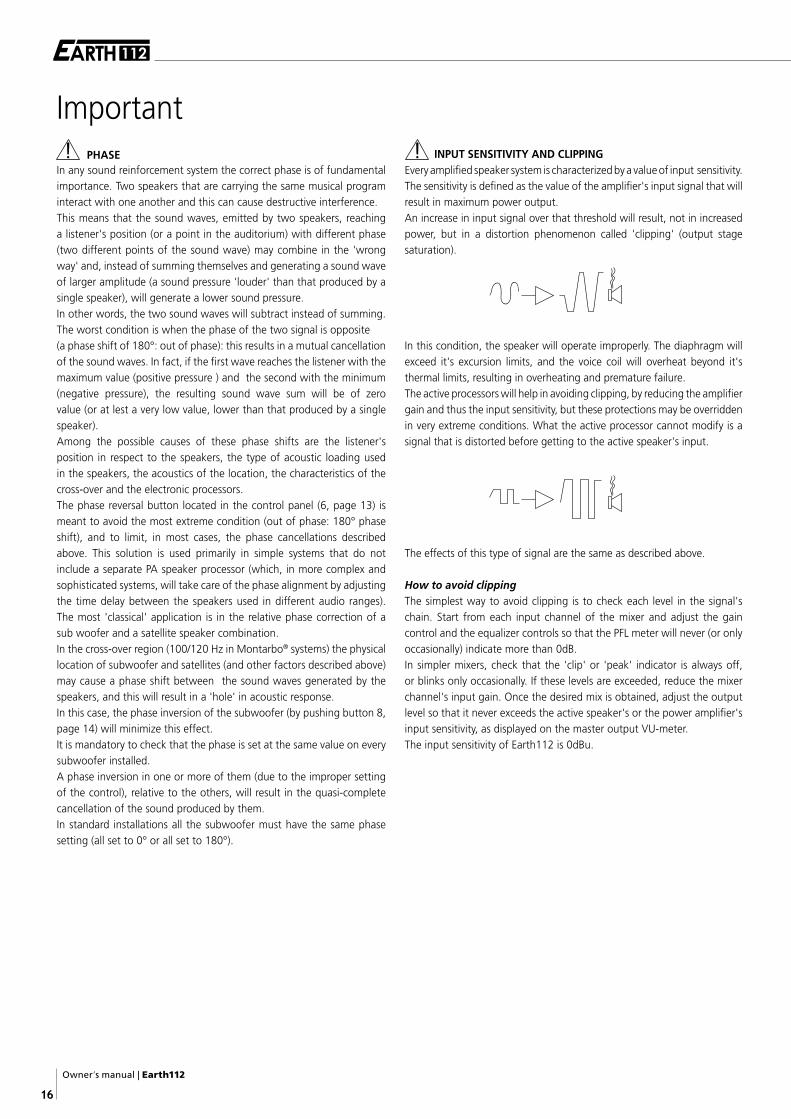
SENSIBILITÀ E CLIPPING. COME EVITARE IL CLIPPINGOgni sistema amplificatore-altoparlante è caratterizzato da una sensibilità di ingresso. La sensibilità è definita come il valore del segnale di ingresso all’amplificatore che produce la massima potenza in uscita. Aumentando il segnale oltre tale valore, infatti, non si ottiene una maggiore potenza di uscita, ma soltanto un fenomeno di distorsione detto 'clipping' (saturazione).
In questa situazione l’altoparlante lavora in modo improprio. Si hanno delle sovraescursioni e una dissipazione anomala nella bobina mobile, che si surriscalda e può rompersi. I processori attivi possono evitare solo parzialmente il clipping, abbassando il guadagno dell’amplificatore. È possibile, in casi estremi, oltrepassare anche questo tipo di protezione. Ciò che il processore non può modificare è un'onda che arrivi già distorta in ingresso all’amplificatore.
Gli effetti di un segnale di questo tipo sono gli stessi descritti sopra.
Come evitare il clippingIl metodo più semplice sta nel controllare i livelli della catena del segnale. Partendo dal canale del mixer bisogna impostare i controlli (gain ed equalizzatori) in modo tale che il VU-meter del PFL non oltrepassi mai (o solo occasionalmente) gli 0dB o, in mixer più semplici, che la spia 'clip' o 'peak' non si accenda mai (o solo occasionalmente). Se si oltrepassano tali livelli occorre diminuire il gain del canale. Una volta impostato il giusto mix, bisogna fare attenzione ad impostare il livello di uscita in modo tale che il VU-meter non oltrepassi mai il livello della sensibilità di ingresso della cassa amplificata o del finale di potenza. Nel caso del modello Earth112 la sensibilità di ingresso è 0dBu.
Owner’s manual | Earth112
10
ENGLISHThe lighting flash with arrowhead symbol within an equilateral triangle, is intended to alert the user to the presence of uninsulated ’dangerous voltage’ within the product’s enclosure, that may be of sufficient magnitude to constitute a risk of electric shock to humans.
The exclamation point within an equilateral triangle, is intended to alert the user to the presence of important operating and maintenance (servicing) instructions.
IMPORTANT | SAFETY INSTRUCTIONSWARNINGIn order to protect your own and others’ safety and to avoid invalidation of the warranty of this product, please read this section carefully before operating this product.
This product has been designed and manufactured for being operated as active speaker system in the applications tipical of a sound reinforcement system or of a sound recording system. Operation for purposes and applications other than these has not been covered by the manufacturer in the design of the product, and is therefore to be undertaken at end user’s and/or installer’s sole risk and responsability.
This unit conforms to Class I insulation, and for safe use it is required that the protective earth contact is connected to a grounded (earthed) outlet.
TO AVOID THE RISK OF FIRE AND/OR ELECTRIC SHOCK:
• Never expose this product to rain or moisture, never use it in proximity of water or on a wet surface. Avoid dripping water or water sprays, moreover never place objects full of liquid, such as vases, on top of it. Never let any liquid, as well as any object, enter the product. In case, immediately disconnect it from the mains supply and refer to servicing before operating it again. Never place burning candles or other sources of open flame on top of the device.
• Before connecting this product to the mains supply, always make sure that the voltage on the mains outlet corresponds to that stated on the product.
• This product must be connected only to a grounded mains outlet complying to the safety regulations in force via the supplied power cable. In case the power cable needs to be substituted, use exclusively a cable of the same type and characteristics.
• This device is connected to the power line even when the mains switch is in the O (off) position and the power indicator is off. As long as it is plugged in there are potentially dangerous electrical potentials inside the device, so, before undertaking any sort of maintenance work etc., always make sure it has been unplugged from the mains socket.
• Never place any object on the power cable. Never lay the power cable on a walkway where one could trip over it. Never press or pinch it.
• Never install the product without providing adequate airflow to cool it. Never obstruct the air intake openings on it. Leave enough room to get to the mains power socket and the mains connector on the back panel.
• In case the external fuse needs replacement, substitute it only with one of the same type and rating, as stated on the product.
• Always make sure the Power switch is in its ’0’ (= off) position before doing any operation on the connections of the product.
• Before attempting to move the product after it has been installed, remove all the connections.
• To disconnect the power cable of this product from the mains supply never pull the cable directly. Hold the body of the plug firmly and pull it gently from the mains supply outlet.
CAUTIONThis product does not contain user serviceable parts. To prevent fire and/or electrical shock, never disassemble it or remove the rear panel. For maintenance and servicing always refer to the official Elettronica Montarbo srl Distributor in your Country or to qualified personnel specifically authorised by the Distributor.
• Before placing the product on a surface of any kind, make sure that its shape and load rating safely match the product size and weight. When installing the speaker system on a stand, use a stable stand that will fit in the adapter and may carry the loudspeaker weight. When two loudspeakers are laid one upon the other, make sure that stability is guaranteed by matching the upper loudspeaker feet to the lower loudspeaker cavities.
• To avoid shocks, kicks, or whatever action, always reserve a protected area with no access to unqualified personnel as installation site of the product. In case the product is used near children and animals closest supervision is necessary.
• This product can generate very high acoustic pressures which are dangerous to the hearing system. Always avoid operation at loud levels if anyone is excessively near to the product.
[!] Never expose children to high sound sources.
INDEX
Introduction.........................................................11
Description...........................................................11
Control and connection panel..............................12
Connection examples......................................13 - 14
Important........................................................15 - 16
Appendix
Technical specifications.......................................18
Connectors..........................................................18
Connection examples...................................19 - 20
Spare parts..........................................................21
PACKAGE CONTENTS
◗ Active subwoofer
◗ Power supply cable
◗ Owner’s manual
◗ Warranty certificate
◗ CE declaration of conformity
Earth112 | Owner’s manual
11
IntroductionEarth112 is an active subwoofer with a class-D amplifier and a built-in Xover for driving the active full-range speaker.The reflex port's conical profile, result of advanced fluid dynamics research, minimizes any turbulence effect and increases the acoustical energy in the frequency range of the cabinet's tuning.
The accuratly made birch plywood box and high-quality transducers let Earth112 be a high efficiency bass cabinet.Its great quality and reliability make it a versatile device, suitable for many environments and uses: from stage to clubs, from the rock band to the dj-set and the drum-fill.
Description
[A] 12" Woofer with neodymium magnet.[B] Reflex Tuning ports[C] Control and connection panel.[D] Speaker stand adaptor.[E] Steel protection grille.
[F] Transport handle.[G] Birch multiply cabinet finished with anti-scratch paint.
Construction and components conform to the highest professional standards for maximum reliability.
[C]
[D]
[E]
[F] [G]
[A]
[B]
Owner’s manual | Earth112
12
Control and connection panel
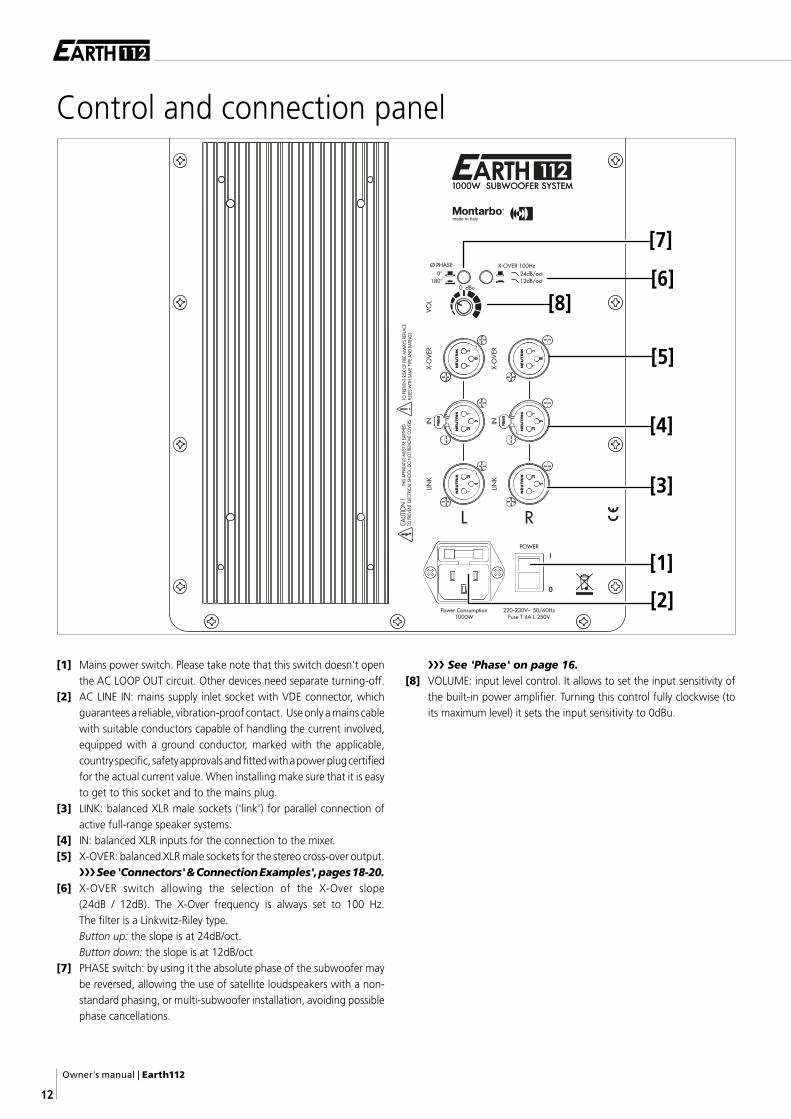
[1] Mains power switch. Please take note that this switch doesn't open the AC LOOP OUT circuit. Other devices need separate turning-off.
[2] AC LINE IN: mains supply inlet socket with VDE connector, which guarantees a reliable, vibration-proof contact. Use only a mains cable with suitable conductors capable of handling the current involved, equipped with a ground conductor, marked with the applicable, country specific, safety approvals and fitted with a power plug certified for the actual current value. When installing make sure that it is easy to get to this socket and to the mains plug.
[3] LINK: balanced XLR male sockets ('link') for parallel connection of active full-range speaker systems.
[4] IN: balanced XLR inputs for the connection to the mixer. [5] X-OVER: balanced XLR male sockets for the stereo cross-over output.
❯❯❯ See 'Connectors' & Connection Examples', pages 18-20.[6] X-OVER switch allowing the selection of the X-Over slope
(24dB / 12dB). The X-Over frequency is always set to 100 Hz. The filter is a Linkwitz-Riley type.Button up: the slope is at 24dB/oct.Button down: the slope is at 12dB/oct
[7] PHASE switch: by using it the absolute phase of the subwoofer may be reversed, allowing the use of satellite loudspeakers with a non-standard phasing, or multi-subwoofer installation, avoiding possible phase cancellations.
❯❯❯ See 'Phase' on page 16.[8] VOLUME: input level control. It allows to set the input sensitivity of
the built-in power amplifier. Turning this control fully clockwise (to its maximum level) it sets the input sensitivity to 0dBu.
[4]
[3]
[6][8]
[7]
[5]
[2]
[1]

Earth112 | Owner’s manual
13
Connection examplesEXAMPLE C: 1 Earth112 + 2 self-powered loudspeakers This is a more complex configuration which enables selective enhancement of the low-frequencies (for example, only on drums and keyboards, not on voices or brasses).Note: it is advisable to place the subwoofer in the center, between the two self-powered loudspeakers.
mixer 'AUX' output ➔ subwoofer 'R' input
mixer L / R outputs ➔ inputs of the two self-powered loudspeakers
❯❯❯ See connection example C, page 20
• Connect the AUXILIARY output of the mixer to the 'R' input [4] of the subwoofer.• Connect the L and R outputs of the mixer to the inputs of the two self-powered loudspeakers respectively.• This type of set-up allows you to use the subwoofer to extend the low frequency response of only those instruments that really need it (e.g. drum machines, bass, keyboards). These instruments are selected by means of the AUX send controls on the corresponding channels. The subwoofer's volume control and the mixer's AUX output level control adjust only the very low frequencies.
EXAMPLE D: parallel connection of two or more Earth112mixer L / R outputs ➔ L / R inputs of the first subwoofer
L / R outputs of the first subwoofer ➔ L / R inputs of the second subwoofer
❯❯❯ See connection example D, page 20
• Connect the L and R outputs of the mixer to the L and R inputs [4] of the subwoofer.• Connect the 'LINK' L and R outputs [3] of the subwoofer to the L and R inputs [4] of the second subwoofer.
The very low frequency range reproduced by a subwoofer is essentially omnidirectional, thus allowing easy installation of the enclosure. In most cases the subwoofer can be placed near the satellite loudspeaker system, but when space or set up reason dictate it, the subwoofer can be positioned at some distance from the satellite system (e.g.: under the stage floor). You must always consider that the extended low frequency range increases the risk of acoustic feedback, with undesired 'howls' and reduced clarity. It is thus essential to place the subwoofer on a rigid structure, that does not transmit vibrations to the microphones.
Some connection examples – among the most common possible configurations are described below and also illustrated on pages 19 and 20 of this manual.
❯ Always make sure to use only heavy gauge, high quality shielded cables.
EXAMPLE A: 1 Earth112 + 2 self-powered loudspeakersThe complex connections that most other systems require for this configuration are made extremely simple with this subwoofer thanks to the L/R outputs of the built-in stereo electronic cross-over.Note: it is advisable to place the subwoofer in the center, between the two self-powered loudspeakers.
This set-up allows them to benefit from the increase in dynamic range provided by the electronic crossover of the subwoofer.
mixer L / R outputs ➔ subwoofer L / R inputs
subwoofer 'x-over' L / R outputs ➔ inputs of the 2 self-powered loudspeakers. ❯❯❯ See connection example A, page 19.
• Connect the L and R outputs of the mixer to the L and R inputs [4] of the subwoofer.• Connect the X-OVER L and R outputs [5] of the subwoofer to the inputs of the 2 self-powered loudspeakers. • The output levels of the two self-powered loudspeakers are not affected by the 'VOLUME' control [8] of the subwoofer.
EXAMPLE B: 2 Earth112 + 2 self-powered loudspeakersThis is the most typical configuration where each subwoofer drives one self-powered loudspeaker.
mixer L / R outputs ➔ 'R' inputs of the two subwoofers
x-over 'R' outputs of the 2 subwoofers ➔ inputs of the 2 self-powered loudspeakers.
❯❯❯ See connection example B, page 19.
• Connect the L and R outputs of the mixer to the 'R' inputs [4] of the two subwoofers.• Connect the X-OVER 'R' outputs [5] of the two subwoofers to the inputs of the two self-powered loudspeakers.• The output levels of the self-powered loudspeakers are not affected by the 'VOLUME' control [8] of the subwoofers.
Owner’s manual | Earth112
14
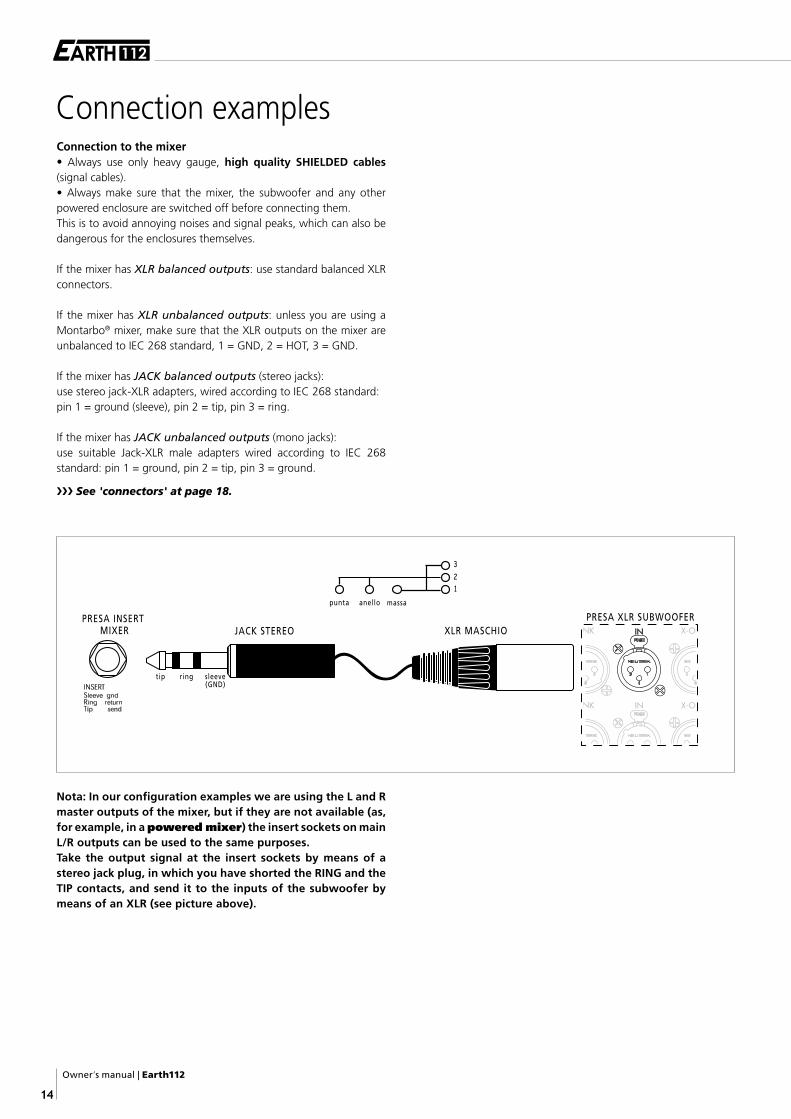
Connection examplesConnection to the mixer• Always use only heavy gauge, high quality SHIELDED cables (signal cables).• Always make sure that the mixer, the subwoofer and any other powered enclosure are switched off before connecting them. This is to avoid annoying noises and signal peaks, which can also be dangerous for the enclosures themselves.
If the mixer has XLR balanced outputs: use standard balanced XLR connectors.
If the mixer has XLR unbalanced outputs: unless you are using a Montarbo® mixer, make sure that the XLR outputs on the mixer are unbalanced to IEC 268 standard, 1 = GND, 2 = HOT, 3 = GND.
If the mixer has JACK balanced outputs (stereo jacks): use stereo jack-XLR adapters, wired according to IEC 268 standard: pin 1 = ground (sleeve), pin 2 = tip, pin 3 = ring.
If the mixer has JACK unbalanced outputs (mono jacks): use suitable Jack-XLR male adapters wired according to IEC 268 standard: pin 1 = ground, pin 2 = tip, pin 3 = ground.
❯❯❯ See 'connectors' at page 18.
tip ring sleeve(GND)
PRESA INSERT MIXER JACK STEREO XLR MASCHIO
PRESA XLR SUBWOOFER
IN
IN
anellopunta massa
123
Nota: In our configuration examples we are using the L and R master outputs of the mixer, but if they are not available (as, for example, in a powered mixer) the insert sockets on main L/R outputs can be used to the same purposes. Take the output signal at the insert sockets by means of a stereo jack plug, in which you have shorted the RING and the TIP contacts, and send it to the inputs of the subwoofer by means of an XLR (see picture above).
Earth112 | Owner’s manual
15
PRODUCT CARE AND MAINTENANCE• Never expose the enclosures to direct sunlight, excessive vibrations or mechanical shocks.• Never place burning candles or other sources of open flame on top of the device. Do not expose the enclosures to heat sources (lamps, lights, high power light sources, radiators or other heat producing equipment).• Avoid operating and storing the system in damp or dusty places: this may lead to malfunctions and premature degradation of performances. • Avoid using the system close to strong sources of electromagnetic interference (e.g. video monitors, high power electrical cabling). This may lead to degradation of audio quality.• When setting up the system outdoors, be sure to protect it against rain and moisture.• Care should be taken to prevent small objects or liquids from falling or spilling into the enclosure. In public events don't allow musicians, technicians or anyone else, put glasses, cups, ashtrays or cigarettes on the enclosures.• Always leave the protective grid mounted on the enclosures.• Use a soft brush or a jet of air to clean the enclosure. Do not use alcohol, solvents or detergents.• Take care of the connecting cables. Make sure that they are not damaged, knotted or twisted.• Do not force connectors and controls.• As long as it is plugged in, dangerous electrical potentials may be present inside the device, so, before undertaking any sort of maintenance work etc., always make sure it has been unplugged from the mains socket.
POWER SUPPLY CONNECTION• Make sure the mains power switch is off ('0') before starting any connection.• Check that mains voltage corresponds to the voltage indicated on the panel.• Use only the factory supplied mains cable or, if a different plug style is needed, a suitable cable with a ground connection and marked with the safety approvals valid in the country of use.• Leave enough room to get to the mains power socket and the mains connector on the back panel. As long as it is plugged in, dangerous electrical potentials may be present inside the device, even when the mains switch is in the '0' (off) position and the power indicator is off so, before undertaking any sort of maintenance work etc., always make sure it has been unplugged from the mains socket.
Important
Owner’s manual | Earth112
16
Important PHASEIn any sound reinforcement system the correct phase is of fundamental importance. Two speakers that are carrying the same musical program interact with one another and this can cause destructive interference.This means that the sound waves, emitted by two speakers, reaching a listener's position (or a point in the auditorium) with different phase (two different points of the sound wave) may combine in the 'wrong way' and, instead of summing themselves and generating a sound wave of larger amplitude (a sound pressure 'louder' than that produced by a single speaker), will generate a lower sound pressure. In other words, the two sound waves will subtract instead of summing.The worst condition is when the phase of the two signal is opposite (a phase shift of 180°: out of phase): this results in a mutual cancellation of the sound waves. In fact, if the first wave reaches the listener with the maximum value (positive pressure ) and the second with the minimum (negative pressure), the resulting sound wave sum will be of zero value (or at lest a very low value, lower than that produced by a single speaker).Among the possible causes of these phase shifts are the listener's position in respect to the speakers, the type of acoustic loading used in the speakers, the acoustics of the location, the characteristics of the cross-over and the electronic processors.The phase reversal button located in the control panel (6, page 13) is meant to avoid the most extreme condition (out of phase: 180° phase shift), and to limit, in most cases, the phase cancellations described above. This solution is used primarily in simple systems that do not include a separate PA speaker processor (which, in more complex and sophisticated systems, will take care of the phase alignment by adjusting the time delay between the speakers used in different audio ranges). The most 'classical' application is in the relative phase correction of a sub woofer and a satellite speaker combination. In the cross-over region (100/120 Hz in Montarbo® systems) the physical location of subwoofer and satellites (and other factors described above) may cause a phase shift between the sound waves generated by the speakers, and this will result in a 'hole' in acoustic response. In this case, the phase inversion of the subwoofer (by pushing button 8, page 14) will minimize this effect.It is mandatory to check that the phase is set at the same value on every subwoofer installed.A phase inversion in one or more of them (due to the improper setting of the control), relative to the others, will result in the quasi-complete cancellation of the sound produced by them.In standard installations all the subwoofer must have the same phase setting (all set to 0° or all set to 180°).
INPUT SENSITIVITY AND CLIPPINGEvery amplified speaker system is characterized by a value of input sensitivity. The sensitivity is defined as the value of the amplifier's input signal that will result in maximum power output. An increase in input signal over that threshold will result, not in increased power, but in a distortion phenomenon called 'clipping' (output stage saturation).
In this condition, the speaker will operate improperly. The diaphragm will exceed it's excursion limits, and the voice coil will overheat beyond it's thermal limits, resulting in overheating and premature failure.The active processors will help in avoiding clipping, by reducing the amplifier gain and thus the input sensitivity, but these protections may be overridden in very extreme conditions. What the active processor cannot modify is a signal that is distorted before getting to the active speaker's input.
The effects of this type of signal are the same as described above.
How to avoid clippingThe simplest way to avoid clipping is to check each level in the signal's chain. Start from each input channel of the mixer and adjust the gain control and the equalizer controls so that the PFL meter will never (or only occasionally) indicate more than 0dB. In simpler mixers, check that the 'clip' or 'peak' indicator is always off, or blinks only occasionally. If these levels are exceeded, reduce the mixer channel's input gain. Once the desired mix is obtained, adjust the output level so that it never exceeds the active speaker's or the power amplifier's input sensitivity, as displayed on the master output VU-meter. The input sensitivity of Earth112 is 0dBu.
Earth112 | Appendix
17
Dati tecniciTechnical specifications
ConnettoriConnectors
Esempi di collegamentoConnection examples
Parti di ricambio Spare parts
APPENDIX 18
18
19 - 20
21
Appendix | Earth112
18
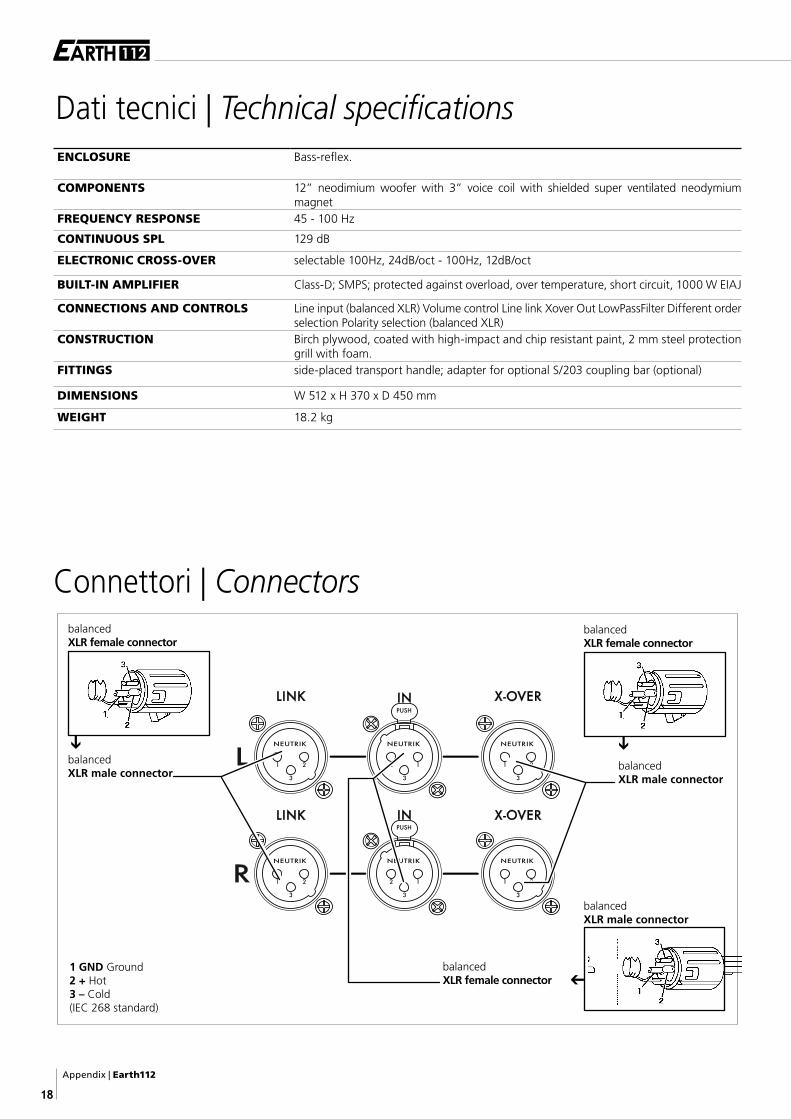
Dati tecnici | Technical specificationsENCLOSURE Bass-reflex.
COMPONENTS 12” neodimium woofer with 3” voice coil with shielded super ventilated neodymium magnet
FREQUENCY RESPONSE 45 - 100 Hz
CONTINUOUS SPL 129 dB
ELECTRONIC CROSS-OVER selectable 100Hz, 24dB/oct - 100Hz, 12dB/oct
BUILT-IN AMPLIFIER Class-D; SMPS; protected against overload, over temperature, short circuit, 1000 W EIAJ
CONNECTIONS AND CONTROLS Line input (balanced XLR) Volume control Line link Xover Out LowPassFilter Different order selection Polarity selection (balanced XLR)
CONSTRUCTION Birch plywood, coated with high-impact and chip resistant paint, 2 mm steel protection grill with foam.
FITTINGS side-placed transport handle; adapter for optional S/203 coupling bar (optional)
DIMENSIONS W 512 x H 370 x D 450 mm
WEIGHT 18.2 kg
Connettori | Connectors
1 GND Ground2 + Hot3 – Cold(IEC 268 standard)
balancedXLR female connector
balancedXLR male connector
balancedXLR male connector
balancedXLR female connector
➔
balancedXLR male connector
balancedXLR female connector
➔
➔
Earth112 | Appendix
19
Esempi di collegamento | Connection examples
A] Earth112 + 2 self-powered loudspeakersmixer L / R outputs ➔ subwoofer L / R inputs subwoofer X-OVER L / R outputs ➔ inputs of the two self-powered loudspeakers
Esempi di collegamento | Connection examplesB] 2 Earth112 + 2 self-powered loudspeakers
mixer L / R outputs ➔ 'R' inputs of the two subwoofersX-OVER 'R' outputs of the two subwoofers ➔ inputs of the two self-powered loudspeakers.
SELF-POWERED LOUDSPEAKER
SELF-POWERED LOUDSPEAKER
SELF-POWERED LOUDSPEAKER
SELF-POWERED LOUDSPEAKER
Appendix | Earth112
20
Esempi di collegamento | Connection examples
C] Earth112 + 2 self-powered loudspeakers
Esempi di collegamento | Connection examplesD] PARALLEL CONNECTION
mixer 'AUX' output ➔ subwoofer 'R' inputmixer L / R outputs ➔ inputs of the two self-powered loudspeakers
SELF-POWERED LOUDSPEAKER
SELF-POWERED LOUDSPEAKER
AUX output master L/R outputs
master L/R outputs
mixer L / R outputs ➔ L / R inputs of the first subwoofer L / R outputs of the first subwoofer ➔ L / R inputs of the second subwoofer
maximum position
SELF-POWERED LOUDSPEAKER
Appendix | Earth112
20
Esempi di collegamento | Connection examples
C] Earth112 + 2 self-powered loudspeakers
Esempi di collegamento | Connection examplesD] PARALLEL CONNECTION
mixer 'AUX' output ➔ subwoofer 'R' inputmixer L / R outputs ➔ inputs of the two self-powered loudspeakers
SELF-POWERED LOUDSPEAKER
AUX output master L/R outputs
master L/R outputs
mixer L / R outputs ➔ L / R inputs of the first subwoofer L / R outputs of the first subwoofer ➔ L / R inputs of the second subwoofer
Earth112 | Appendix
21
Parti di ricambio | Spare parts
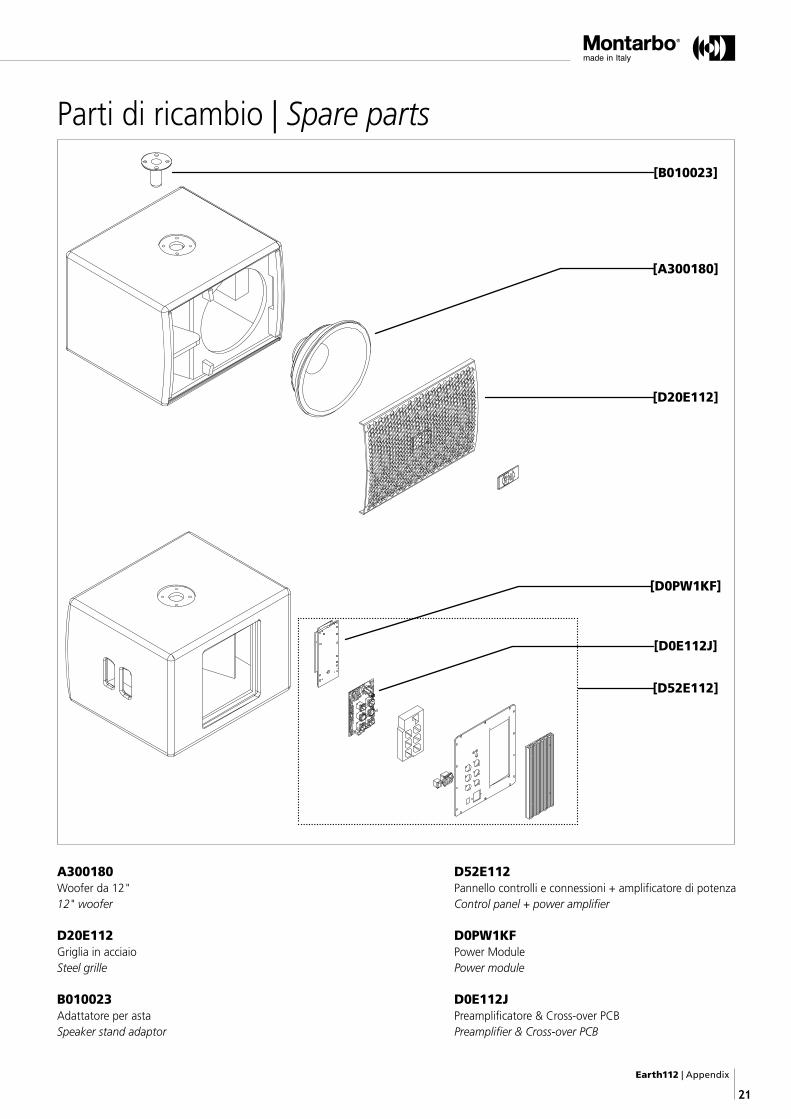
A300180Woofer da 12"12" woofer
D20E112 Griglia in acciaioSteel grille
B010023 Adattatore per astaSpeaker stand adaptor
D52E112Pannello controlli e connessioni + amplificatore di potenzaControl panel + power amplifier
D0PW1KFPower ModulePower module
D0E112J Preamplificatore & Cross-over PCBPreamplifier & Cross-over PCB
[D0E112J]
[D52E112]
[D0PW1KF]
[D20E112]
[A300180]
[B010023]
Safety instructions | Earth112
22
من أجل حمايتك أنت والآخرين ومن أجل عدم حدوث إلغاء لشهادة الضمان الخاصة وع بتشغيل بهذا المنتج٬ يرجى قراءة هذا الجزء من دليل الستخدام بعناية قبل ال�ش
هذا المنتج.لقد تم تصنيع وتصميم هذا المنتج بعناية فائقة ليتم استخدامه كنظام سماعات فعال . ي
ي التطبيقات النموذجية الذي يقوم بتعزيز نظام الصوت أو نظام التسجيل الصو�ت�ف
كة إن عملية الستخدام لأغراض وتطبيقات أخرى لم يتم التنويه عنها عن طريق ال�شي تتعلق بتصميم هذا المنتج، ولذلك تقع المسؤولية عىل عاتق
الصانعة ح�ت الآن وال�تكيب نظام السماعات. المستخدم أو عىل الشخص الذي قام ب�ت
من أجل تفادي الحرائق أو التعرض لصدمة الكهربائية:مثل بالسوائل، مليئة أشياء أية أو الرش أو للتقط�ي الجهاز يتعرض أن يجوز ل ي توضع عىل الجهاز. ول تدع أي سائل يمكن أن يت�ب داخل المنتج.
المزهريات، ال�ت، وارجع إىل التعليمات ي
ي حالة ت�ب أي سائل، قم عىل الفور بفصل التيار الكهربا�أو�ف
الخاصة بالصيانة قبل عملية التشغيل مرة أخرى.الجزء بتوصيل ننصح الأمن ولالستخدام العزل، من 1 درجة إىل مطابق المنتج هذا
. ي( مع المخرج الأر�ف ي
المحمي )الأر�فيرجى عدم وضع أي شمع مشتعل عىل سطح هذا المنتج أو أي مصادر أخرى.
عىل الموجود الفولتيج من تأكد الرئيسي التيار إىل المنتج هذا بتوصيل القيام قبل المخرج الرئيسي هو المطابق والمحدد عىل المنتج.
وط السالمة من خالل ي متوافق مع �شي مخرج أر�ف
يجب أن يكون هذا المنتج موصول �فكيبل الكهرباء المرفق.
عند الحاجة إىل استبدال كيبل الكهرباء يرجى استخدام نفس النوعية حرصيا بالمواصفات والخصائص.
الرئيسي ي الكهربا�أ المفتاح كان لو ح�ت الكهرباء منفذ مع موصول المنتج هذا يعت�ب
ي ي حالة توقف. مادام المنتج موصول بالكهرباء فهذا يع�ف
ي حالة توقف ومؤ�ش الطاقة �ف�ف
يرجى بأية صيانة البدء وقبل ولذلك للمنتج، ي الكهربا�أ بالجهد كامن هناك خطر بان
التأكد من فصل الكيبل من المفتاح الرئيسي للتيار.ء عىل كيبل الكهرباء مطلقا، كذلك عدم وضع كيبل الكهرباء ي
يرجى عدم وضع أي �شعليه الضغط عدم كذلك فوقة، من المرور عند الناس به يتع�ش ل ح�ت الطريق ي
�فمطلقا.
كيب. يد المنتج قبل البدء بال�ت يرجى التأكد من توف�ي مصدر للهواء من أجل ت�بللوصول كافية مساحة إبقاء وكذلك مطلق للمنتج الهواء مصدر إغالق عدم يرجى
ي الجزء الخلفي.إىل مفتاح الطاقة الرئيسي وكذلك الرابط الرئيسي �ف
عند الحاجة إىل استبدال أي فيوز خارجي، استبدله فقط بنفس النوع الأصىلي والتصنيف كما هو مذكور عىل المنتج.
ي أي خطوة بتوصيل المنتج وع �ف ي حالة توقف قبل ال�ش
دائما تأكد بأن مفتاح التشغيل �ف. ي
بالتيار الكهربا�أ
قبل المحاولة بتحريك المنتج وبعد تركيبة يرجى فصل جميع التوصيالت.ة، قم بتثبيت قيل القيام بفصل كيبل الكهرباء للمنتج، يرجى عدم سحب الكيبل مبا�ش
. ي الرئيسيجسم القابس أول ومن ثم سحبه ببطء من مخرج التيار الكهربا�أ
هذا المنتج ال يحوي قطع غيار خاصة تفيد المستخدم. من أجل تفادي حدوث أي صدمة كهربائية للمنتج يرجى عدم فتح هذا المنتج أو أزاحه الجزء الخلفي. ومن أجل ي بلدك وإحضار المنتج
الصيانة والخدمة يرجى الرجوع إىل وكيل مونتاربو الرئيسي �ف. ف بالصيانة عن طريق الوكيل الرئيسي إىل االأشخاص المخول�ي
التحمل المنتج عىل أي سطح من أي نوع تأكد من الشكل والحجم وقوة تثبيت قبل أن تكون مطابقة لحجم ووزن المنتج عن طريق سلسة، كذلك يرجى بأي حال من الأحوال ف إل إذا كان ينصح به من قبل المصنع مثل )الحبال، عدم تعليق المنتج عىل مكان مع�ياغي، المنجل أو السالسل، الأحزمة أو المقبض المحمولة المتوسطة الحجم، كذلك ال�بكيب( عىل الحائط، يجب اس )لل�ت ي حالة إذا كان المنتج مزود من المصنع بم�ت
ه(. و�ف غ�يكيب ومعاينة قوة تحمل هذا الجزء الصلب إثناء الحمل أو تعليق دائما التأكد قبل ال�تالوزن حيث من السالمة لمواصفات مطابق يكون أن بحيث ف مع�ي المنتج عىل سطح
كة المصنعة. والنسبة الموضوعة من قبل ال�ش
مكان بتوف�ي قم دائما المنتج عىل تأث�ي أي أو ركالت أو أي صدمات تجنب أجل من ي
و�ف المنتج، كيب ل�ت ف مؤهل�ي غ�ي لأشخاص السماح وكذلك عدم المنتج لحفظ خاص اف �ش حالة استخدام المنتج بالقرب من دواليب الأطفال والحيوانات فأن المراقبة والإ
هنالك مطلوب.ي عاىلي والذي يشكل خطر عىل النظام السمعي،
يمكن أن يصدر هذا المنتج ضغط صو�تي حالة إذا كان أي شخص قريب للمنتج )يجب
دائما تجنب التشغيل لمستويات عالية و�فأن تكون هنالك مسافة م�ت عىل الأقل(.
. يرجى عدم تعريض االأطفال لمصدر ذو صوت عاىلي
العربيةهام! التعليمات الخاصة بالسالمة والعناية
تحذير!إنذار!
Earth112 | Safety instructions
23
English
WARNING!In order to protect your own and other's safety and to avoid invalidation
of the warranty of this product, please read this section carefully before
operating this product.
This product has been designed and manufactured for being operated as
active speaker system in the applications typical of a sound reinforcement
system or a sound recording system. Operation for purposes and in
applications other than these has not been covered by the manufacturer in
the design of the product, and is therefore to be undertaken at end user's
and/or installer's sole risk and responsabiIity.
TO AVOID THE RISK OF FIRE AND/OR ELECTRIC SHOCK:
The apparatus shall not be exposed to dripping or splashing and no objects
filled with liquids, such as vases, shall be placed on the apparatus. Never
let any liquid, as well as any object, enter the product. In case, immediately
disconnect it from the mains supply and refer to servicing before operating
it again.
This unit conforms to CLASS I insulation, and for safe use it is required that
the protective earth contact is connected to a grounded (earthed) outlet.
Never place burning candles or other sources of open flame on top of the
device.
Before connecting this product to the mains supply, always make sure that
the voltage on the mains outlet corresponds to that stated on the product.
This product must be connected only to a grounded mains outlet complying
to the safety regulations in force via the supplied power cable.
In case the power cable needs to be substituted, use exclusively a cable of the
same type and characteristics.
This device is connected to the power line even when the mains switch is
in the 'O' (=off) position and the power indicator is off. As long as it is
plugged in there are dangerous electrical potentials inside the device, so,
before undertaking any sort of maintenance work etc., always make sure it
has been unplugged from the mains socket.
Never place any object on the power cable. Never lay the power cable on a
walkway where one could trip over it. Never press or pinch it.
Never install the product without providing adequate air flow to cool it.
Never obstruct the air intake openings on it. Leave enough room to get to
the mains power socket and the mains connector on the back panel.
In case the external fuse needs replacement, substitute it only with one of
the same type and rating, as stated on the product.
Always make sure the Power switch is in its 'O' (=off) position before doing
any operation on the connections of the product.
Before attempting to move the product after it has been installed, remove
alI the connections.
To disconnect the power cable of this product from the mains supply never
pull the cable directly. Hold the body of the plug firmly and pull it gently from
the mains supply outlet.
CAUTION!This product does not contain user serviceable parts.
To prevent fire and/or electrical shock, never disassemble it or remove
the rear panel. For maintenance and servicing always refer to the
official Montarbo Distributor in your Country or to qualified personnel
specifically authorized by the Distributor.
Before placing the product on a surface of any kind, make sure that its
shape and load rating safely match the product size and weight. Never
attempt to hang the product by any means not expressly provided or
approved by the manufacturer (i.e. ropes, chains, belts or whatever
medium, through carrying handles, bolts, hooks or whatever). In case
the product is factory-fitted with specific mounting hardware, always
verify before installation that the lifting and/or hanging system you
intend to use is of a proper type and can carry the product weight
with the safety ratio required by the regulations in force.
To avoid shocks, kicks, or whatever action, always reserve a protected
area with no access to unqualified personnel as installation site of the
product. In case the product is used near children and animals, closest
supervision is necessary.
This product can generate very high acoustic pressures which are
dangerous for the hearing system. Always avoid operation at loud
levels if anyone is excessively near to the product (at least 1 m of
distance).
Never expose children to high sound sources.
IMPORTANT SAFETY INSTRUCTIONS
Le informazioni contenute in questo manuale sono state attentamente redatte e controllate.
Tuttavia non si assume alcuna responsabilità per eventuali inesattezze. Questo manuale
non può contenere una risposta a tutti i singoli problemi che possono presentarsi
durante l’installazione e l’uso dell’apparecchio. Siamo a vostra disposizione per fornirvi
eventuali ulteriori informazioni e consigli. Elettronica Montarbo srl non può essere ritenuta
responsabile per danni o incidenti a cose o persone, causati o connessi all’utilizzazione
o malfunzionamento dell’apparecchio.
The information contained in this manual have been carefully drawn up and checked.
However no responsibility will be assumed for any incorrectness. This manual cannot
cover all the possible contingencies which may arise during the product installation and
use. Should further information be desired, please contact us or our local distributor.
Elettronica Montarbo srl can not be considered responsible for damages which may be
caused to people and things when using this product.
Direttiva RAEE Attenzione! Il prodotto è contrassegnato da questo simbolo che segnala di non smaltire le apparecchiature elettriche ed elettroniche tramite la normale procedura di smaltimento dei rifiuti domestici. Per questi prodotti è previsto un sistema di raccolta differenziato in conformità alla legislazione che richiede il trattamento, il recupero e il riciclaggio adeguato dei suddetti prodotti. Per maggiori informazioni si prega di contattare l’autorità locale competente. La barra nera sotto il simbolo indica che il prodotto è stato immesso sul mercato dopo il 13 Agosto 2005.INFORMAZIONI PER UN CORRETTO SMALTIMENTOPer gli utenti privatiNell’Unione europea | Attenzione: Per smaltire il presente dispositivo, non utilizzare il normale bidone della spazzatura! Le apparecchiature elettriche ed elettroniche usate devono essere gestite a parte e in conformità alla legislazione che richiede il trattamento, il recupero e il riciclaggio adeguato dei suddetti prodotti. In seguito alle disposizioni attuate dagli Stati membri, i privati residenti nella UE possono conferire gratuitamente le apparecchiature elettriche ed elettroniche usate a centri di raccolta designati*. In alcuni paesi (*), anche il rivenditore locale può ritirare gratuitamente il vecchio prodotto se l’utente acquista un altro nuovo di tipologia simile. *Per maggiori informazioni si prega di contattare l’autorità locale competente. In paesi che non fanno parte dell’UE | Contattare le autorità locali e informarsi sul metodo di smaltimento corretto. In Svizzera | Le apparecchiature elettriche o elettroniche usate possono essere restituite gratuitamente al rivenditore, anche se non si acquista un prodotto nuovo. Altri centri di raccolta sono elencati sulle homepage di www.swico.ch o di www.sens.ch.Per gli utenti professionali Nell’Unione europea | Attenzione: Se il prodotto è impiegato a scopi professionali, procedere come segue per eliminarlo: contattare il proprio rivenditore Montarbo® che fornirà informazioni circa il ritiro del prodotto. Potrebbero essere addebitate le spese di ritiro e riciclaggio. Prodotti piccoli (e quantitativi ridotti) potranno essere ritirati anche dai centri di raccolta locali. In Spagna | contattare il sistema di raccolta ufficiale o l’ente locale preposto al ritiro dei prodotti usati. In paesi che non fanno parte dell’UE | Contattare le autorità locali e informarsi sul metodo di smaltimento corretto.
Waste from Electrical and Electronic Equipment Attention! The crossed out wheeled bin symbol that can be found on this product means that the product is covered by the Waste from Electrical and Electronic Equipment Directive. The symbol is intended to indicate that waste from electrical and electronic equipment must be subject to a selective collection. For more details on available collection facilities please contact your local government office or the retailer where you purchased this product. The solid bar underneath indicates that the product has been put on the market after 13th August 2005.INFORMATION ON PROPER DISPOSALInformation on Disposal for Users (private households)In the European Union | Attention: If you want to dispose of this equipment, please do not use the ordinary dust bin! Used electrical and electronic equipment should not be disposed of via the normal household waste stream but must be treated separately and in accordance with legislation that requires proper treatment, recovery and recycling of used electrical and electronic equipment. Following the implementation by member states, private households within the EU states may return their used electrical and electronic equipment to designated collection facilities free of charge*. In some countries* your local retailer may also take back your old product free of charge if you purchase a similar new one. *Please contact your local authority for further details. In other Countries outside the EU | If you wish to dispose of this product, please contact your local authorities and ask for the correct method of disposal. In Switzerland | Used electrical or electronic equipment can be returned free of charge to the dealer, even if you don’t purchase a new product. Further collection facilities are listed on the homepage of www.swico.ch or www.sens.ch.Information on Disposal for Professional UsersIn the European Union | If the product is used for business purposes and you want to discard it: please contact your Montarbo® dealer who will inform you about the take-back of the product. You might be charged for the costs arising from take-back and recycling. Small products (and small amounts) might be taken back by your local collection facilities. In Spain | Please contact the established collection system or your local authority for takeback of your used products. In other Countries outside the EU | Please contact your local authorities and ask for the correct method of disposal.
Prodotto in Italia. Prodotto conforme alle normative della Comunità Europea.Made in Italy. The product is compliant with the EU legislation.
Caratteristiche e dati tecnici possono essere modificati senza preavviso.Specifications and features are subject to change without prior notice.
Elettronica Montarbo srlVia O. Pigini 8 - Z.I. Aneto - 62010 Montelupone (MC) Italy - T +39 0733 227 1 - F +39 0733 227 250 - MONTARBO.COM
Company under the control of EKO Music Group SpA - EKOMUSICGROUP.COM ©20
18 E
lett
roni
ca M
onta
rbo
srl
|
Rev.
01
| N
ovem
bre
201
8 -
Nov
embe
r 20
18


![KD625-2 - kohlerengines.com.cnkohlerengines.com.cn/engines/onlinecatalog/pdf/kd625_2_om.pdf · owner’s manual uso-manutenzione ... *dudq]ld /lplwdwd 'l $qql 0rwruh 'lhvho .rkohu](https://static.fdocumenti.com/doc/165x107/5b5b151f7f8b9ab8578d59b4/kd625-2-owners-manual-uso-manutenzione-dudqld-lplwdwd-l-qql-0rwruh.jpg)