INSTALLATION GUIDE - Termignonitermignoni.it/wp-content/uploads/2017/01/D170_ISTRUZIONI...Vi sarà...
15
INSTALLATION GUIDE ITA-ENG COMPLETE SYSTEM O N L Y F O R R A C E U S E DUCATI PANIGALE 1199-1299 C o d e : D17009400ITC www.termignoni.com
Transcript of INSTALLATION GUIDE - Termignonitermignoni.it/wp-content/uploads/2017/01/D170_ISTRUZIONI...Vi sarà...

INSTALLATION GUIDEITA-ENG
COMPLETE SYSTEM
O N L Y F O R R A C E U S E
DUCATI PANIGALE1199-1299
C o d e : D 1 7 0 0 9 4 0 0 I T C
w w w . t e r m i g n o n i . c o m
c o m p o n e n t iL i s t aP a c k i n g l i s t
D17009400ITC DUCATI Panigale 1199-1299 F u l l s y s tem
2 w w w . t e r m i g n o n i . c o m

c o m p o n e n t iL i s t aP a c k i n g l i s t
D17009400ITC DUCATI Panigale 1199-1299 F u l l s y s tem
3 w w w . t e r m i g n o n i . c o m
PART N° QTA' DESCRIZIONE1 1 ATTACCO TESTA ORRIZZONTALE2 1 ATTACCO TESTA VERTICALE3 1 COLLETTORE ORRIZZONTALE4 1 COLLETTORE VERTICALE5 1 CORPO CENTRALE6 1 CORPO FINALE7 1 SILENZIATORE DX8 1 SILENZIATORE SX9 3 VITE TEF M5X12 8.8 STSTR00810 1 VITE TCEI INOX M8X3511 2 VITE TCEI INOX M8X2512 3 VITE TCEI INOX M6X1613 10 VITE TBEI M5X14 TESTA LARGA NERA14 10 TUBETTO IN SILICONE THT NERO15 1 TIRAMOLLE16 1 TAPPO SONDA LAMBDA M10X1,2517 1 TAPPO CONNETT.ELETTR. 1199 / 129918 1 STAFFA SUPPORTO SIL. ANODIZZATO NERO19 1 STAFFA SUPPORTO CARENA SX D17020 1 SILENT BLOCK21 6 ROSETTA 8,25X14X1,5 ARAMIDICA22 2 RONDELLE RAME 18X2223 2 RONDELLA INOX VITI TE M8X1624 1 RONDELLA GREMBIALINA INOX M8X2425 3 RONDELLA GREMB INOX M6X1826 1 RONDELLA 42020010A RAME 10X14X127 2 RIDUTTORE DA M18 A M1228 1 PARATACCO SX29 1 PARATACCO DX30 1 PARACALORE SX31 1 PARACALORE DX32 8 MOLLA LUNGA33 2 MOLLA LG.56 CORTA (TER009)34 2 GUARNIZIONE DI SCARICO 080135 9 FISS.RAPIDO M5 (COLL M1100)36 1 ECCENTRICO ALTO PER SILENT-BLOCK FEMMINA37 6 DIST.C/COLLARE D5.2XD8.4XH238 2 DADO FLANGIATO M5 H6
I n f o r m a z i o n i
ISTRUZIONI di INSTALLAZIONE ITA
La ringraziamo per aver scelto di acquistare questo impianto Termignoni.La preghiamo di leggere completamente questa guida all’installazione prima di utilizzare l’impianto di scarico Termignoni.
Termignoni investe molto sulla soddisfazione dei suoi clienti, per questo si riserva di consigliare alcune procedure preliminari al montaggio dell’impianto di scarico.L’impianto Termignoni cosi come viene fornito non è modificabile in nessuna sua parte.Ogni modifica attuata dall’utente compresa l’impropria manutenzione, compromette la conformità dello scarico a norma di legge e la relativa garanzia fornita.
Le consigliamo di farsi installare questo prodotto da professionisti esperti nel montaggio e nell’utilizzo di impianti di scarico per motocicli.Il montaggio deve essere eseguito osservando le istruzioni riportate in questo manuale.Termignoni S.p.A declina ogni responsabilità, riguardante lesioni personali o danni, derivanti dal montaggio errato dell’impianto di scarico.La garanzia Termignoni non copre danni arrecati al sistema di scarico mediante montaggio, utilizzo o manutenzione im-propri.Se ha dei dubbi riguardo le corrette operazioni di montaggio del suo impianto, può contattare il rivenditore locale Termignoni, oppure visitare il nostro sito ufficiale: www.termignoni.com.Le ricordiamo che le informazioni fornite riguardanti lo smontaggio dell’impianto di serie sono puramente informative, e che a tal proposito le consigliamo di fare comunque riferimento alle istruzioni fornite dal produttore del veicolo.
Nel caso in cui il suo impianto di scarico fosse ONLY FOR RACE USE, e cioè non omologato all’utilizzo su alcune strade, le consigliamo di utilizzare nel caso in cui lo richieda la legge lo scarico originale del suo veicolo al fine di non incorrere in sanzioni.
La informiamo infine che ogni impianto di scarico Termignoni è soggetto a modifiche senza preavviso riguardanti le pro-
prie specifiche tecniche.
INSTALLATION INSTRUCTION ENG
Thank you for choosing this Termignoni product.Please read this installation guide completely before using the Termignoni exhaust system.
Termignoni invests heavily on the satisfaction of its customers, for this it reserves to recommend a few preliminary steps to the exhaust assembly.The Termignoni exhaust as supplied cannot be changed in any of its parts.Any change implemented by the user including improper maintenance, compromises compliance discharge according to law and the relevant warranty provided.
We recommend to install our products by experienced professionals in the installation and use of exhaust systems for motorcycles.The module must be installed according to instructions in this manual.Termignoni S.p.A. disclaims any liability concerning personal injury or damage resulting from incorrect installation of the exhaust system.The Termignoni warranty does not cover damage to the exhaust system caused by assembly, improper use or maintenan-ce.When in doubt about the correct assembly of your system, you can contact your local dealer Termignoni, or visit our offi-cial website: www.termignoni.comWe remind you that the information provided regarding the disassembly of the original exhaust is purely informative, and that in this respect we recommend doing anyway refer to the instructions provided by the vehicle manufacturer.
In case that your exhaust system was ONLY FOR RACE USE, if not approved for use on some streets, we advise you to use in the event that the law requires the original exhaust of your vehicle in order not to run into sanctions.
We inform you that every Termignoni exhaust system is subject to change without notice concerning its technical specifi-
cations.
4 w w w . t e r m i g n o n i . c o m
NOTE Remember that the original plate holder and passengers foot pegs , don’t fit with complete system Termignoni code D170.It will be possible to buy aftermarket our dedicated plate holder(, passengers foot pegs, e lock to open posterior seat.
N.B. Si ricorda che il portatarga e le pedane passeggero di serie non sono montabili con lo scarico completo Termignoni codice D170.Vi sarà la possibilità di acquistare aftermarket presso i nostri rivenditori lo speciale portatarga dedicato con frecce incluse (non omologato), le pedane passeggero ed in nottolino dedicato per l'apertura della sella posteriore compatibili con il sistema completo Termignoni.

D17009400ITC DUCATI Panigale 1199-1299 F u l l s y s tem
ITA Rimuovere le carene inferiori destra e sinistra della moto, svitando le viti di supporto.
ENG Remove the lower fairing right and left of the bike, removing the screws
ITA Rimuovere la fascetta innesto svitando la vite.ENG Remove the small metal bracket unscrewing the screws
ITA Rimuovere la vite supporto carter inferiore in plasticaENG Remove the lower cover support screw
ITA Svitare i dadi della staffa anteriore supporto silenziatore destro e sinistro
ENG Unscrew the nuts of the front bracket support silencer left and right
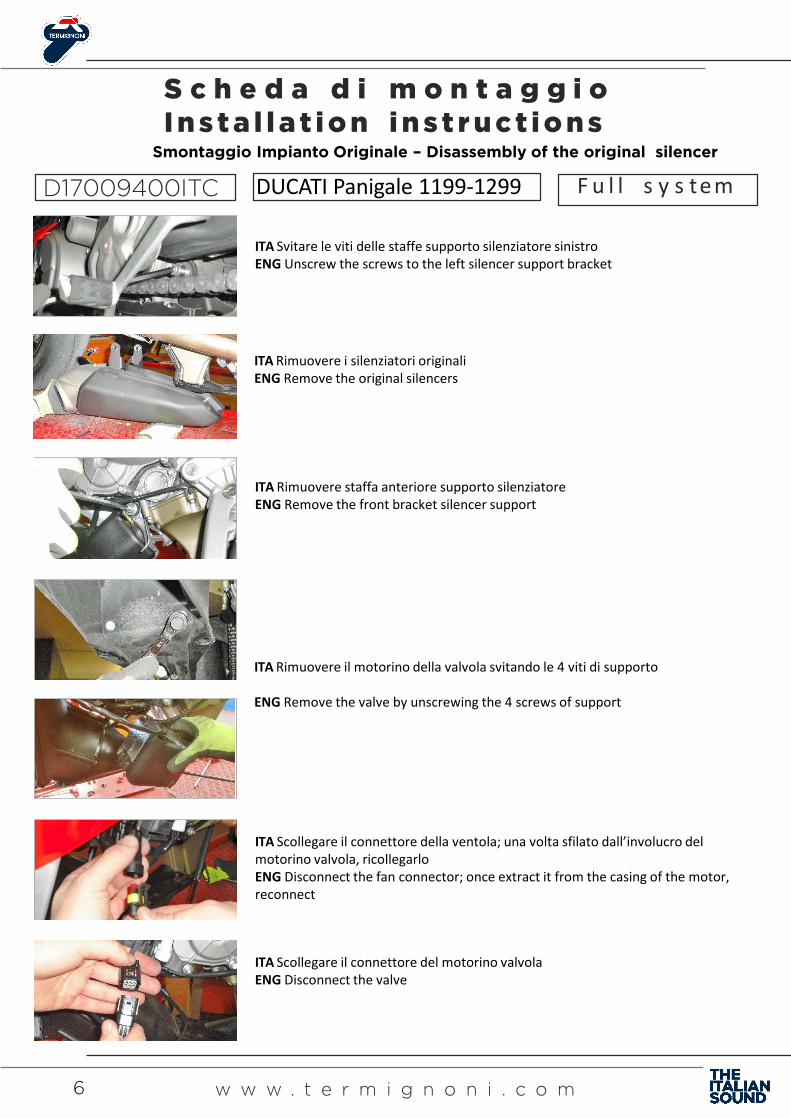
ITA Svitare le viti delle staffe supporto silenziatore destro ENG Unscrew the screws to the right silencer support bracket
S c h e d a d i m o n t a g g i o I n s t a l l a t i o n i n s t r u c t i o n s
Smontaggio Impianto Originale – Disassembly of the original silencer
5 w w w . t e r m i g n o n i . c o m
D17009400ITC DUCATI Panigale 1199-1299 F u l l s y s tem
ITA Rimuovere il motorino della valvola svitando le 4 viti di supporto
ENG Remove the valve by unscrewing the 4 screws of support
S c h e d a d i m o n t a g g i o I n s t a l l a t i o n i n s t r u c t i o n s
Smontaggio Impianto Originale – Disassembly of the original silencer
6 w w w . t e r m i g n o n i . c o m
ITA Rimuovere i silenziatori originali ENG Remove the original silencers
ITA Rimuovere staffa anteriore supporto silenziatoreENG Remove the front bracket silencer support
ITA Svitare le viti delle staffe supporto silenziatore sinistro ENG Unscrew the screws to the left silencer support bracket
ITA Scollegare il connettore della ventola; una volta sfilato dall’involucro del motorino valvola, ricollegarlo ENG Disconnect the fan connector; once extract it from the casing of the motor, reconnect
ITA Scollegare il connettore del motorino valvola ENG Disconnect the valve
D17009400ITC DUCATI Panigale 1199-1299 F u l l s y s tem
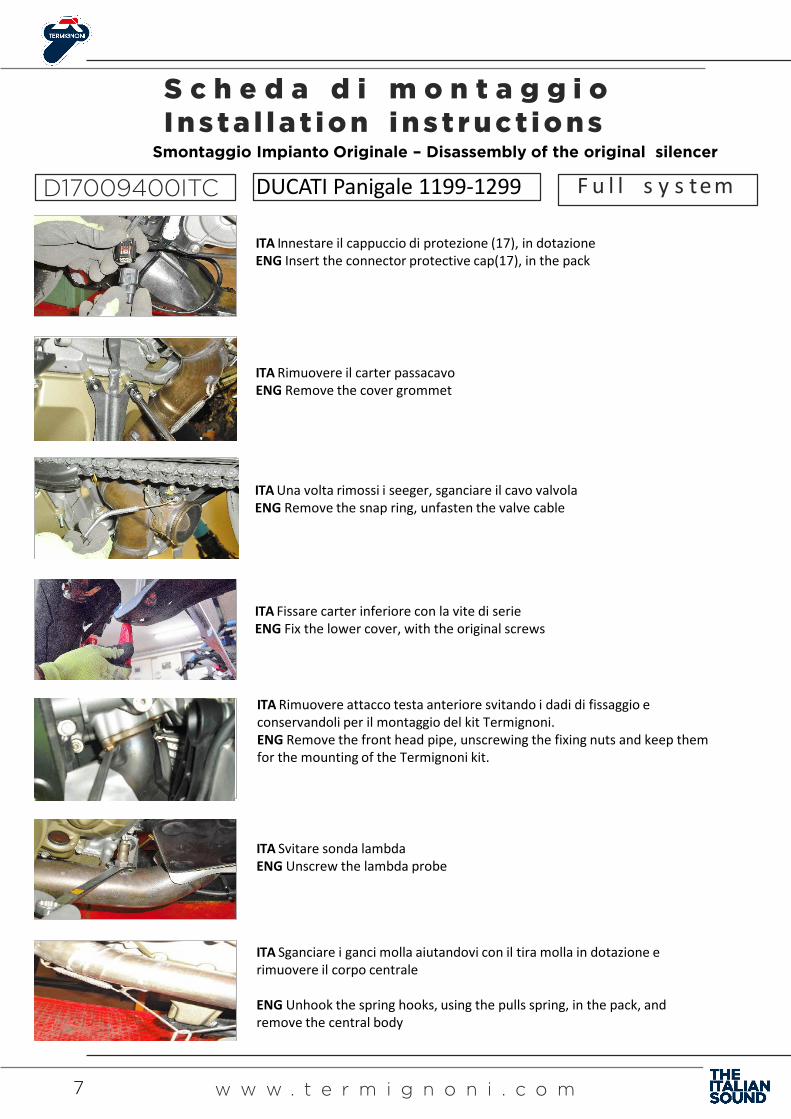
ITA Innestare il cappuccio di protezione (17), in dotazione ENG Insert the connector protective cap(17), in the pack
ITA Rimuovere il carter passacavo ENG Remove the cover grommet
S c h e d a d i m o n t a g g i o I n s t a l l a t i o n i n s t r u c t i o n s
Smontaggio Impianto Originale – Disassembly of the original silencer
7 w w w . t e r m i g n o n i . c o m
ITA Una volta rimossi i seeger, sganciare il cavo valvola ENG Remove the snap ring, unfasten the valve cable
ITA Fissare carter inferiore con la vite di serie ENG Fix the lower cover, with the original screws
ITA Rimuovere attacco testa anteriore svitando i dadi di fissaggio e conservandoli per il montaggio del kit Termignoni.ENG Remove the front head pipe, unscrewing the fixing nuts and keep them for the mounting of the Termignoni kit.
ITA Svitare sonda lambda ENG Unscrew the lambda probe
ITA Sganciare i ganci molla aiutandovi con il tira molla in dotazione e rimuovere il corpo centrale
ENG Unhook the spring hooks, using the pulls spring, in the pack, and remove the central body

D17009400ITC DUCATI Panigale 1199-1299 F u l l s y s tem
ITA Svitare le viti fissaggio codino al motore e sollevarlo tenendolo separato da quest’ultimo posizionando uno spessore ENG Unscrew the screws holding the tail of the bike to the motor and lift it, keeping them separate using a spacer
S c h e d a d i m o n t a g g i o I n s t a l l a t i o n i n s t r u c t i o n s
Smontaggio Impianto Originale – Disassembly of the original silencer
8 w w w . t e r m i g n o n i . c o m
ITA Rimuovere il paracalore posteriore svitando le viti di fissaggio ENG Remove the rear heat shield, unscrewing the fixing screws
ITA Svitare sonda lambda ENG Unscrew the lambda probe
ITA Sganciare i ganci molla aiutandovi con il tira molla in dotazione e rimuovere la curva verticale ENG Unhook the spring hooks, using the pulls spring, in the pack, and remove the vertical curve
ITA Rimuovere attacco testa posteriore svitando i dadi di fissaggio e conservarli per il montaggio del kit Termignoni ENG Remove the rear head pipe unscrewing the fixing nuts and keep them for the mounting Termignoni kit
ITA Rimuovere i paracalori attacco testa anteriore e tenerli per il montaggio del kit Termignoni ENG Remove the heat shield of the front head pipe and keep them for the mounting Termignoni kit
ITA Rimuovere sedile passeggeroENG Remove the passenger foot peg

D17009400ITC DUCATI Panigale 1199-1299 F u l l s y s tem
S c h e d a d i m o n t a g g i o I n s t a l l a t i o n i n s t r u c t i o n s
Smontaggio Impianto Originale – Disassembly of the original silencer
ITA Svitare viti e rimuovere i paratacchi destro e sinistro
ENG Loosen screws and remove right and left heel guards
ITA Svitare le viti supporto porta targaENG Loosen the screw support plate holder
ITA Rimuovere pedana passeggero ENG Remove the passenger foot peg
9 w w w . t e r m i g n o n i . c o m
ITA Scollegare connettori e rimuovere porta targaENG Disconnect connectors and remove plate holder
D17009400ITC DUCATI Panigale 1199-1299 F u l l s y s tem
S c h e d a d i m o n t a g g i o I n s t a l l a t i o n i n s t r u c t i o n s
Montaggio del kit Termignoni – Mounting the Termignoni kit
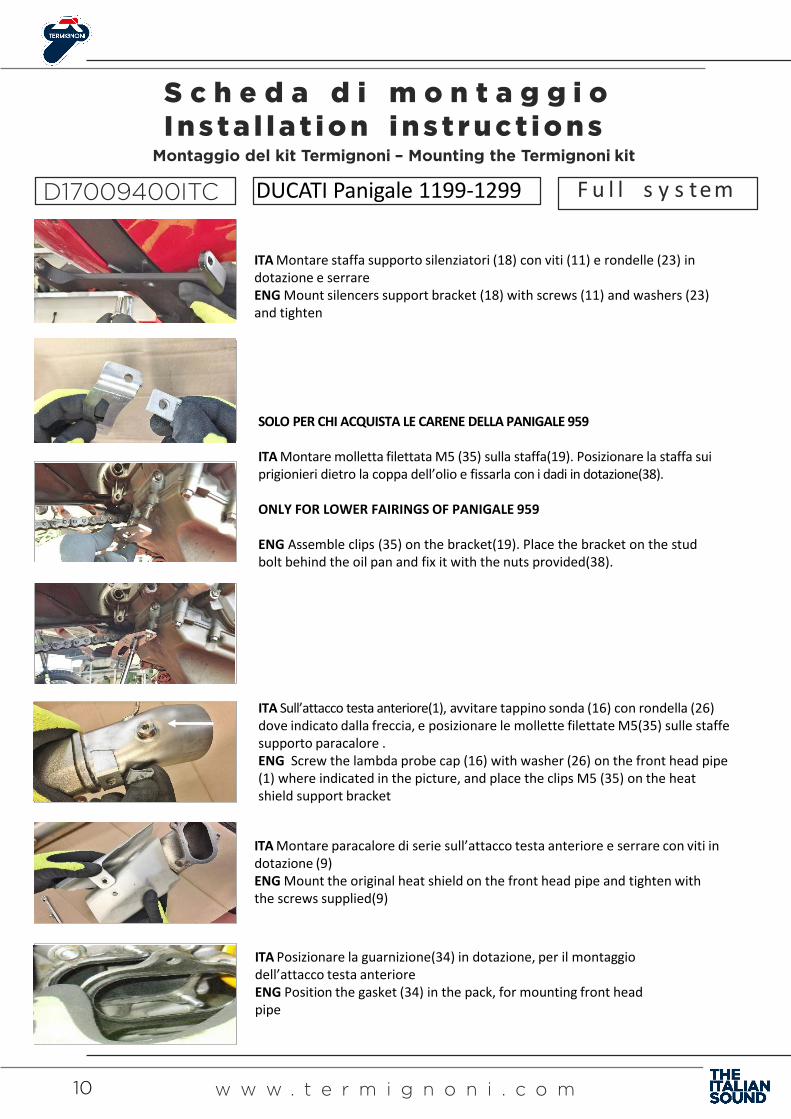
ITA Montare paracalore di serie sull’attacco testa anteriore e serrare con viti in dotazione (9)ENG Mount the original heat shield on the front head pipe and tighten with the screws supplied(9)
ITA Sull’attacco testa anteriore(1), avvitare tappino sonda (16) con rondella (26) dove indicato dalla freccia, e posizionare le mollette filettate M5(35) sulle staffe supporto paracalore .ENG Screw the lambda probe cap (16) with washer (26) on the front head pipe (1) where indicated in the picture, and place the clips M5 (35) on the heat shield support bracket
SOLO PER CHI ACQUISTA LE CARENE DELLA PANIGALE 959
ITA Montare molletta filettata M5 (35) sulla staffa(19). Posizionare la staffa sui prigionieri dietro la coppa dell’olio e fissarla con i dadi in dotazione(38).
ONLY FOR LOWER FAIRINGS OF PANIGALE 959
ENG Assemble clips (35) on the bracket(19). Place the bracket on the studbolt behind the oil pan and fix it with the nuts provided(38).
ITA Montare staffa supporto silenziatori (18) con viti (11) e rondelle (23) in dotazione e serrare ENG Mount silencers support bracket (18) with screws (11) and washers (23) and tighten
10 w w w . t e r m i g n o n i . c o m
ITA Posizionare la guarnizione(34) in dotazione, per il montaggio dell’attacco testa anteriore ENG Position the gasket (34) in the pack, for mounting front head pipe

D17009400ITC DUCATI Panigale 1199-1299 F u l l s y s tem
S c h e d a d i m o n t a g g i o I n s t a l l a t i o n i n s t r u c t i o n s
Montaggio del kit Termignoni – Mounting the Termignoni kit
ITA Agganciare il collettore con le molle lunghe con gommino, usando il tira-molla(15) in dotazioneENG Hook the collector through the long spring with rubber, using the pull spring(15), in the pack
ITA Inserire il collettore verificando che tutti gli innesti vadano in battutaENG Insert the collector making sure that all the pipes are at the end of their stroke
ITA Innestare curva verticale (4) e curva orizzontale (3) al corpo centrale (5)
ENG Insert the vertical curve (4) and the horizontal (3) curve to the central body (5)
ITA Ripetere il procedimento per l’attacco testa posteriore(2)ENG Repeat this process for the rear head attack(2)
ITA Fissare l’attacco testa anteriore con i dadi originali, senza serrare ENG Fix the front head pipe with the original nuts, without tightening
11 w w w . t e r m i g n o n i . c o m
ITA Inserire le gomme (14) alle molle lunghe e corte (32) (33)ENG Insert the rubbers (14) in the long and short springs (32) (33)

D17009400ITC DUCATI Panigale 1199-1299 F u l l s y s tem
S c h e d a d i m o n t a g g i o I n s t a l l a t i o n i n s t r u c t i o n s
Montaggio del kit Termignoni – Mounting the Termignoni kit
ITA Inserire corpo finale (6) nel collettore e agganciare i due particolare con le molle usando il tira molle (15) in dotazione
ENG Insert the final body (6) in the collector and hook them through the longspring with rubber, using the pull spring (15) in the pack
ITA Avvitare sonda lambda e serrare. Ripetere la stessa operazione per la sonda posteriore.ENG Screw the lambda probe and tighten. Repeat the same operation for the rear probe.
ITA Inserire riduzione sonda (27) con rondella (22) e avvitare
ENG Insert lambda probe adapter (27) with washer (22) and tighten.
ITA Fissare la staffa con vite (10) e rondella (24) in dotazione. ENG Fix the bracket with screw (10) and washer (24) supplied.
ITA Inserire distanziale(25) e silent block (36) nella parte posteriore della staffa supporto collettoreENG Place silent block (25) and spacer (36) in the back side of the collectorsupport bracket
12 w w w . t e r m i g n o n i . c o m
D17009400ITC DUCATI Panigale 1199-1299 F u l l s y s tem
S c h e d a d i m o n t a g g i o I n s t a l l a t i o n i n s t r u c t i o n s
Montaggio del kit Termignoni – Mounting the Termignoni kit
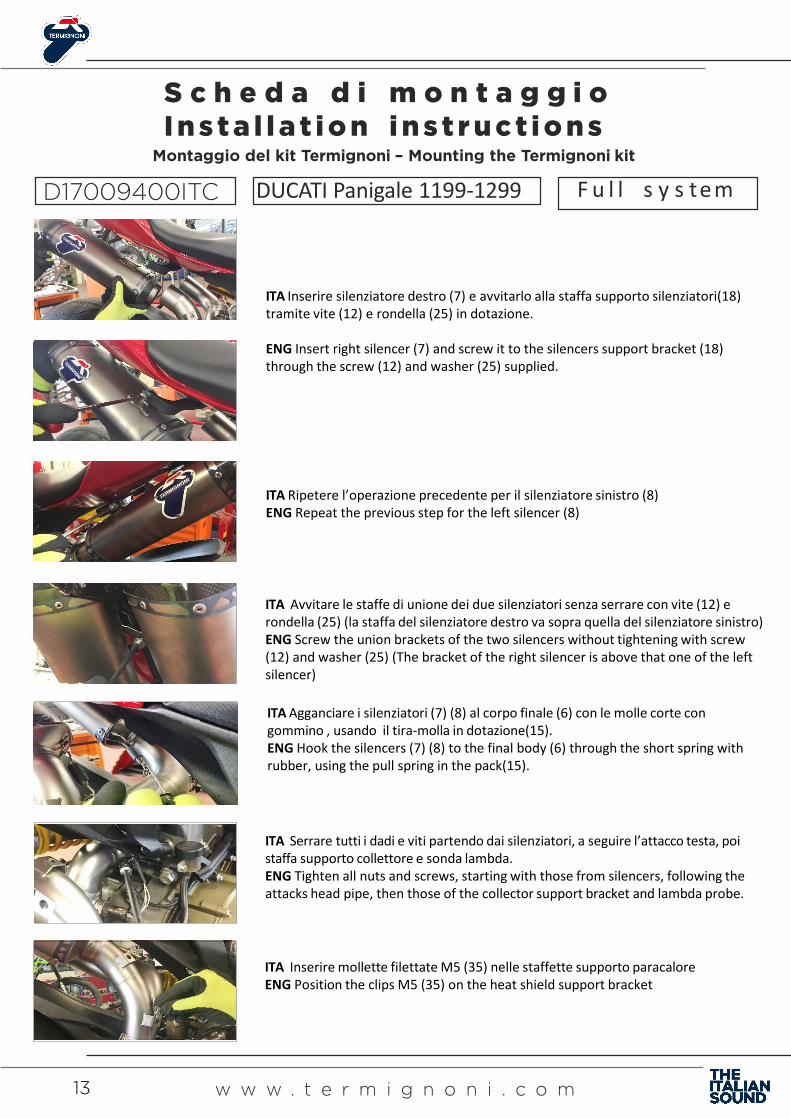
ITA Agganciare i silenziatori (7) (8) al corpo finale (6) con le molle corte con gommino , usando il tira-molla in dotazione(15). ENG Hook the silencers (7) (8) to the final body (6) through the short spring with rubber, using the pull spring in the pack(15).
ITA Avvitare le staffe di unione dei due silenziatori senza serrare con vite (12) e rondella (25) (la staffa del silenziatore destro va sopra quella del silenziatore sinistro)ENG Screw the union brackets of the two silencers without tightening with screw (12) and washer (25) (The bracket of the right silencer is above that one of the left silencer)
ITA Inserire silenziatore destro (7) e avvitarlo alla staffa supporto silenziatori(18) tramite vite (12) e rondella (25) in dotazione.
ENG Insert right silencer (7) and screw it to the silencers support bracket (18) through the screw (12) and washer (25) supplied.
13 w w w . t e r m i g n o n i . c o m
ITA Ripetere l’operazione precedente per il silenziatore sinistro (8)ENG Repeat the previous step for the left silencer (8)
ITA Inserire mollette filettate M5 (35) nelle staffette supporto paracaloreENG Position the clips M5 (35) on the heat shield support bracket
ITA Serrare tutti i dadi e viti partendo dai silenziatori, a seguire l’attacco testa, poi staffa supporto collettore e sonda lambda.ENG Tighten all nuts and screws, starting with those from silencers, following the attacks head pipe, then those of the collector support bracket and lambda probe.
D17009400ITC DUCATI Panigale 1199-1299 F u l l s y s tem
S c h e d a d i m o n t a g g i o I n s t a l l a t i o n i n s t r u c t i o n s
Montaggio del kit Termignoni – Mounting the Termignoni kit
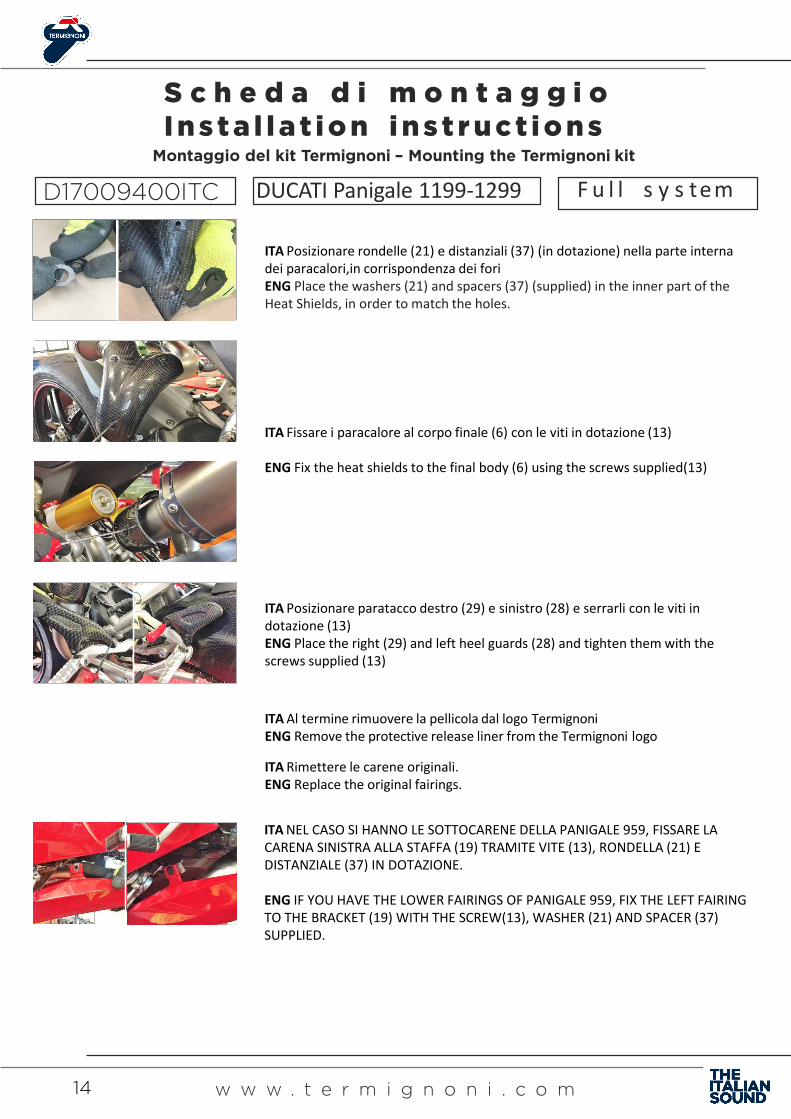
ITA Fissare i paracalore al corpo finale (6) con le viti in dotazione (13)
ENG Fix the heat shields to the final body (6) using the screws supplied(13)
14 w w w . t e r m i g n o n i . c o m
ITA Posizionare paratacco destro (29) e sinistro (28) e serrarli con le viti in dotazione (13)ENG Place the right (29) and left heel guards (28) and tighten them with the screws supplied (13)
ITA NEL CASO SI HANNO LE SOTTOCARENE DELLA PANIGALE 959, FISSARE LA CARENA SINISTRA ALLA STAFFA (19) TRAMITE VITE (13), RONDELLA (21) E DISTANZIALE (37) IN DOTAZIONE.
ENG IF YOU HAVE THE LOWER FAIRINGS OF PANIGALE 959, FIX THE LEFT FAIRING TO THE BRACKET (19) WITH THE SCREW(13), WASHER (21) AND SPACER (37) SUPPLIED.
ITA Al termine rimuovere la pellicola dal logo TermignoniENG Remove the protective release liner from the Termignoni logo
ITA Posizionare rondelle (21) e distanziali (37) (in dotazione) nella parte interna dei paracalori,in corrispondenza dei foriENG Place the washers (21) and spacers (37) (supplied) in the inner part of the Heat Shields, in order to match the holes.
ITA Rimettere le carene originali. ENG Replace the original fairings.

TERMIGNONI
w w w . t e r m i g n o n i . c o m
Share with us your exhuast on: