
Guida a Cool Edit Pro - Libero.it · Regolazione dei parametri dell’analisi in frequenza 1. per...
229
Guida a Cool Edit Pro integrazione del manuale ufficiale ad uso degli allievi del corso di Elementi di Informatica Musicale Conservatorio “G. Tartini” - Trieste
Transcript of Guida a Cool Edit Pro - Libero.it · Regolazione dei parametri dell’analisi in frequenza 1. per...

Guida a Cool Edit Pro integrazione del manuale ufficiale ad uso degli allievi del corso di
Elementi di Informatica Musicale
Conservatorio “G. Tartini” - Trieste
Ascoltare suoni 1. regolare opportunamente il mixer del sistema operativo (sia quello di riproduzione che quello di registrazione) 2. aprire un file audio (ad esempio con estensione wav)
a. Menu File -> Open; b. click sulla casella di testo alla destra della voce “Cerca in” per navigare all’interno delle directory; c. una volta trovato il file, doppio click per aprirlo. (ricordo che in C:\Windows\Media esistono alcuni file wav che si possono aprire)
3. avviare la riproduzione del file
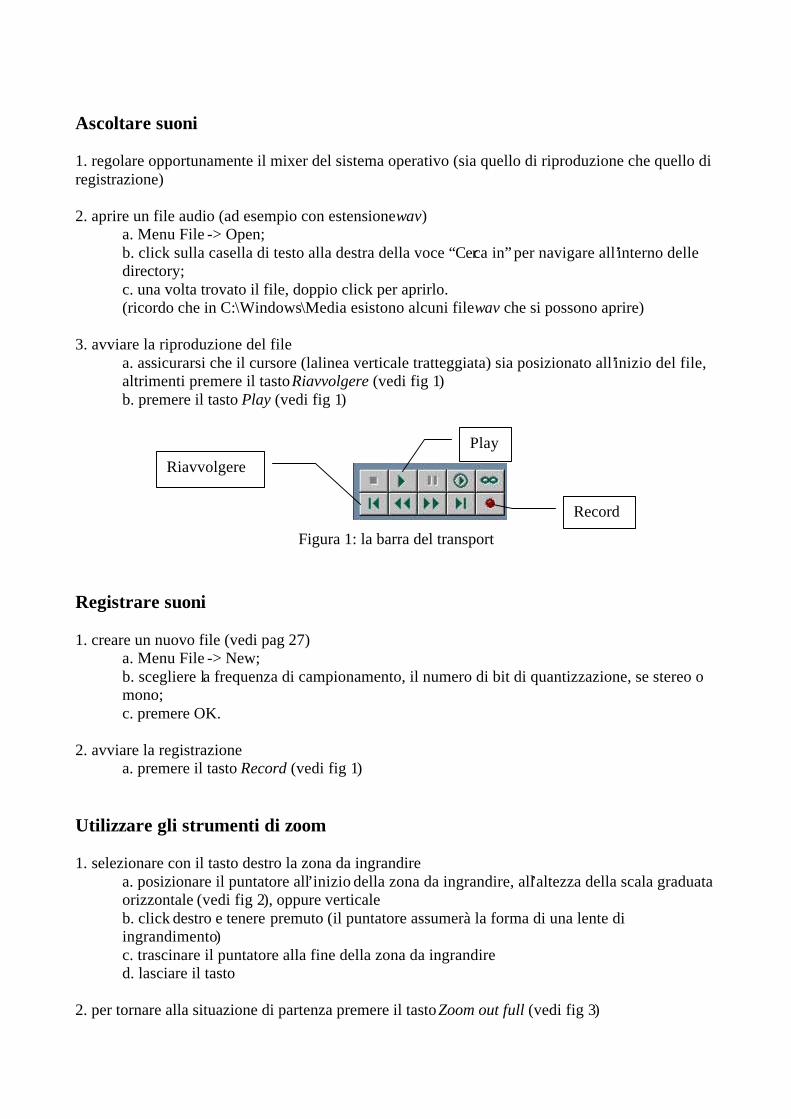
a. assicurarsi che il cursore (lalinea verticale tratteggiata) sia posizionato all’inizio del file, altrimenti premere il tasto Riavvolgere (vedi fig 1) b. premere il tasto Play (vedi fig 1)
Figura 1: la barra del transport
Registrare suoni 1. creare un nuovo file (vedi pag 27)
a. Menu File -> New; b. scegliere la frequenza di campionamento, il numero di bit di quantizzazione, se stereo o mono; c. premere OK.
2. avviare la registrazione
a. premere il tasto Record (vedi fig 1) Utilizzare gli strumenti di zoom 1. selezionare con il tasto destro la zona da ingrandire
a. posizionare il puntatore all’inizio della zona da ingrandire, all’altezza della scala graduata orizzontale (vedi fig 2), oppure verticale b. click destro e tenere premuto (il puntatore assumerà la forma di una lente di ingrandimento) c. trascinare il puntatore alla fine della zona da ingrandire d. lasciare il tasto
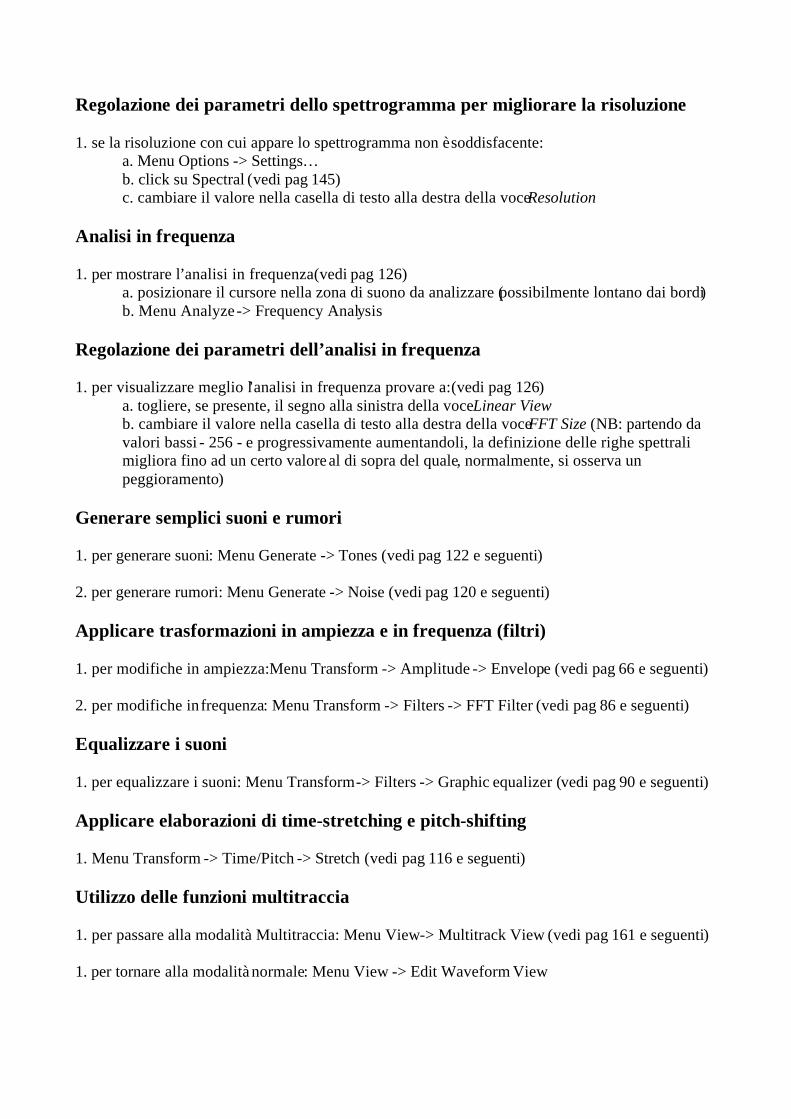
2. per tornare alla situazione di partenza premere il tasto Zoom out full (vedi fig 3)
Play Riavvolgere
Record
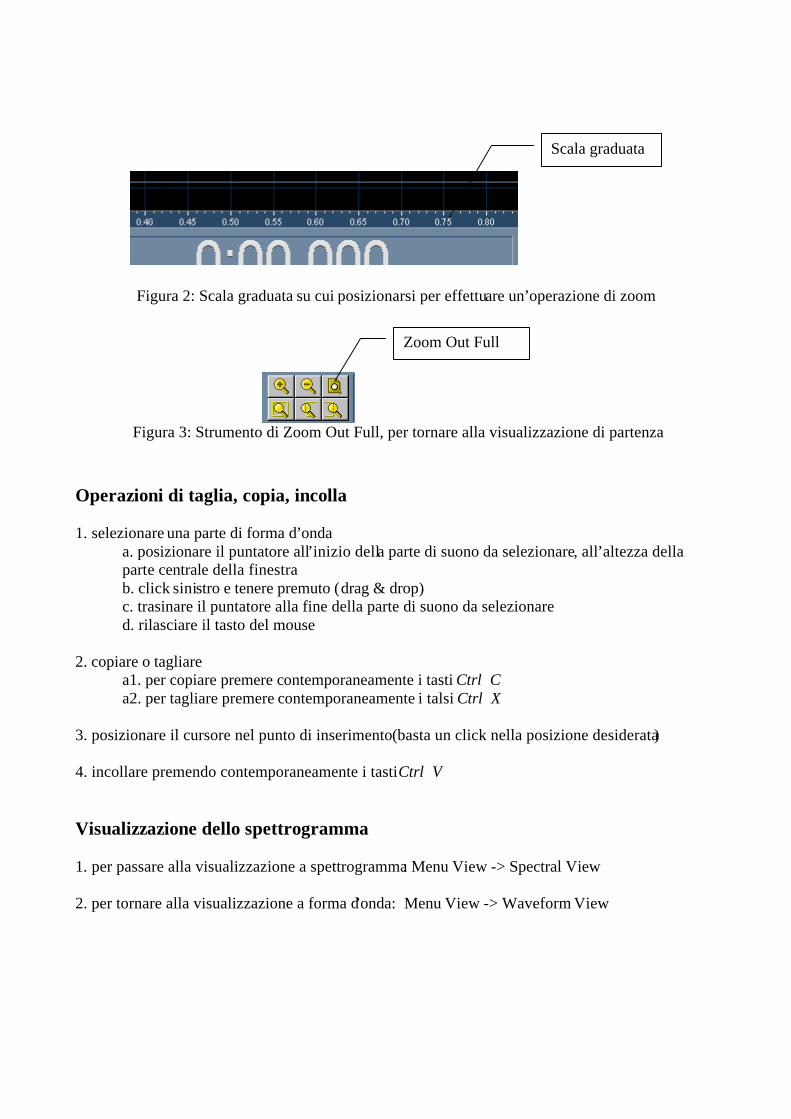
Figura 2: Scala graduata su cui posizionarsi per effettuare un’operazione di zoom
Figura 3: Strumento di Zoom Out Full, per tornare alla visualizzazione di partenza
Operazioni di taglia, copia, incolla 1. selezionare una parte di forma d’onda
a. posizionare il puntatore all’inizio della parte di suono da selezionare, all’altezza della parte centrale della finestra b. click sinistro e tenere premuto (drag & drop) c. trasinare il puntatore alla fine della parte di suono da selezionare d. rilasciare il tasto del mouse
2. copiare o tagliare
a1. per copiare premere contemporaneamente i tasti Ctrl C a2. per tagliare premere contemporaneamente i talsi Ctrl X
3. posizionare il cursore nel punto di inserimento (basta un click nella posizione desiderata) 4. incollare premendo contemporaneamente i tasti Ctrl V Visualizzazione dello spettrogramma 1. per passare alla visualizzazione a spettrogramma: Menu View -> Spectral View 2. per tornare alla visualizzazione a forma d’onda: Menu View -> Waveform View
Zoom Out Full
Scala graduata
Regolazione dei parametri dello spettrogramma per migliorare la risoluzione 1. se la risoluzione con cui appare lo spettrogramma non è soddisfacente:
a. Menu Options -> Settings… b. click su Spectral (vedi pag 145) c. cambiare il valore nella casella di testo alla destra della voce Resolution
Analisi in frequenza 1. per mostrare l’analisi in frequenza (vedi pag 126)
a. posizionare il cursore nella zona di suono da analizzare (possibilmente lontano dai bordi) b. Menu Analyze -> Frequency Analysis
Regolazione dei parametri dell’analisi in frequenza 1. per visualizzare meglio l’analisi in frequenza provare a: (vedi pag 126)
a. togliere, se presente, il segno alla sinistra della voce Linear View b. cambiare il valore nella casella di testo alla destra della voce FFT Size (NB: partendo da valori bassi - 256 - e progressivamente aumentandoli, la definizione delle righe spettrali migliora fino ad un certo valore al di sopra del quale, normalmente, si osserva un peggioramento)
Generare semplici suoni e rumori 1. per generare suoni: Menu Generate -> Tones (vedi pag 122 e seguenti) 2. per generare rumori: Menu Generate -> Noise (vedi pag 120 e seguenti) Applicare trasformazioni in ampiezza e in frequenza (filtri) 1. per modifiche in ampiezza: Menu Transform -> Amplitude -> Envelope (vedi pag 66 e seguenti) 2. per modifiche in frequenza: Menu Transform -> Filters -> FFT Filter (vedi pag 86 e seguenti) Equalizzare i suoni 1. per equalizzare i suoni: Menu Transform -> Filters -> Graphic equalizer (vedi pag 90 e seguenti) Applicare elaborazioni di time-stretching e pitch-shifting 1. Menu Transform -> Time/Pitch -> Stretch (vedi pag 116 e seguenti) Utilizzo delle funzioni multitraccia 1. per passare alla modalità Multitraccia: Menu View -> Multitrack View (vedi pag 161 e seguenti) 1. per tornare alla modalità normale: Menu View -> Edit Waveform View
Version 1.1 User Guide Copyright 1998 Syntrillium Software Corporation.
Overview [See Version 1.1 Addendum for updates!]
Installing and uninstalling Cool Edit Pro
Getting to Know Cool Edit Pro and Its Main Screens
Wave file formats Supported by Cool Edit Pro
Keyboard and Mouse Command Shortcuts
Function Presets
Navigating the Edit View screen
File Menu (Edit View)
Edit Menu (Edit View)
View Menu (Edit View)
Transform Menu (Edit View)
Generate Menu (Edit View)
Analyze Menu (Edit View)
Favorites Menu (Edit View)
Options Menu
Windows Menu (Edit View)
Help Menu
Navigating the Multitrack View screen
File Menu (Multitrack View)
Edit Menu (Multitrack View)
View Menu (Multitrack View)
Insert List (Multitrack View)
Synchronization Using SMPTE Time Code
Understanding MIDI
A Short Course in Digital Signal Processing
Miscellaneous Notes on Using Cool Edit Pro
Answers to common Questions (a.k.a. Troubleshooting)
Brainwave Synchronization

2
More Information About Filters
Why is -94dB SNR better than infinity?
About Cool Edit Pro's Creator
About the author
Contacting Syntrillium Software
Technical Support
3
Overview
Cool Edit Pro is a comprehensive multitrack digital audio editor for Windows 95and Windows NT. To use it, you need only a PC compatible computer running oneof these operating systems, one or more Windows-compatible sound cards, andsome imagination.
Designed as a complete audio environment, Cool Edit Pro puts all of thefunctionality needed for taking an audio project from conception to completion inone package, eliminating the need for separate applications, or "plug-ins". Fromrecording to mixdown, you'll find everything to do the job in Cool Edit Pro, suchas session notes for planning and sketching out your session, and the flexibility ofunlimited multiple sound card support, for complete freedom in routing youraudio. Once you've recorded (…up to 64 tracks!), you can apply Cool Edit Pro'sunmatched DSP and editing power. Tweak EQ, and other effects in real-time toget things just right. Arrange your tracks with drag and drop, down-to-the-sampleor frame precision; snap-to guides, crossfades, and images will help you get itdone. When you're ready to mix, there's separate level, pan, mute, solo, androuting for each track.
While Cool Edit Pro does provide an all in one audio solution, it also works withthe rest of your audio tools as part of your studio. Support for Microsoft'sDirectX/ActiveMovie means you can use DSP modules from leadingmanufacturers like Waves and QTools from within Cool Edit Pro. If you're needsgo beyond audio to include working with MIDI or video, you'll findCool Edit Pro's MIDI/SMPTE synchronization provides seamless integration withthese mediums.
Though Cool Edit Pro is loaded with features, its layout is such that you're notencumbered by excess windows; you won't need a 20-inch monitor to get the jobdone. Get at just the features you want. You'll find this under-the-hoodarchitecture throughout Cool Edit Pro.
Above all, Cool Edit Pro is fun! Once you've played with it for a while, you'll seehow it got its name!
Cool Features
Cool Edit Pro's combination of digital recording and editing features includes:
• Multi-track editing and mixing—up to 64 tracks!
• 30 distinct effects modules, including Delay and Echo effects,Noise/Hiss/Click-and-Pop Reduction, Reverberation, Pitch and Tempoadjustment, Graphic and Parametric Equalizers, and more
• Support for more than 16 distinct file formats (not including sub-formats)
• Noise, Tone, and DTMF Tone generation
• 32-bit sample resolution support and full 32-bit internal processing
• "Phrase" recognition (auto cue generation) (will change somewhat)
4
• Cue and Play List support for multiple files and for segments within files
• Scientific filters, text export capability, and file-statistics gatheringfunctions for data analysis
• Scripting and Batch-Processing capability
• Waveform and Spectral View options
• Multi-track SMPTE/MTC chase locking synchronization
With Cool Edit Pro and any Windows sound card, you have the power of acomplete digital recording studio under your fingertips!
Notes on how to navigate your way around the manual
• The icon gives hints on "noteworthy" information.
• The icon alerts you to hints that are just too cool to pass up!
• The icon alerts you to a short simple exercise that can be used toquickly learn about a specific Cool Edit Pro option or function.
5
Installing and uninstalling Cool Edit Pro
If for any reason your installation of Cool Edit Pro becomes corrupt, simply re-install the program by selecting Settings - Control Panel - Add/RemovePrograms, choose the Add/Remove Programs icon, install the Cool Edit ProCD-ROM into your drive and follow the simple installation instructions. If youneed to remove Cool Edit Pro from your system, for some reason, we atSyntrillium will be very sorry! However, we have provided an easy "Uninstall"procedure: just click on the Windows Start button, select Settings - ControlPanel - Add/Remove Programs, select Cool Edit Pro in the list of installedsoftware, and click on the Add/Remove button.
6
Getting to Know Cool Edit Pro and Its Main Screens
Cool Edit Pro can be thought of as being two programs in one. It can be used as asingle-waveform editor that can be used to edit and process mono and stereowaveforms and it can also be a multitrack hard disk recording system that candigitally mix numerous audio files (using up to 64 tracks!) to either a singlesound card or multiple sound cards, while also providing for real-time level andpan mix capabilities in a non-destructive editing environment.
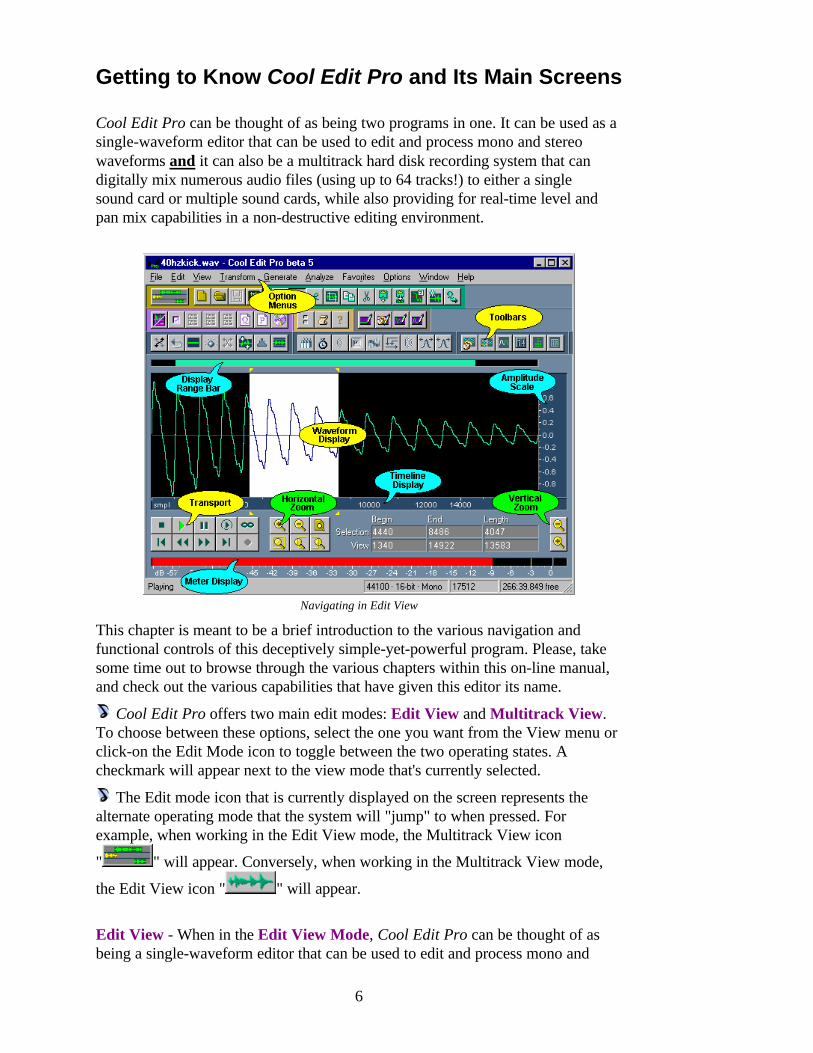
Navigating in Edit View
This chapter is meant to be a brief introduction to the various navigation andfunctional controls of this deceptively simple-yet-powerful program. Please, takesome time out to browse through the various chapters within this on-line manual,and check out the various capabilities that have given this editor its name.
Cool Edit Pro offers two main edit modes: Edit View and Multitrack View.To choose between these options, select the one you want from the View menu orclick-on the Edit Mode icon to toggle between the two operating states. Acheckmark will appear next to the view mode that's currently selected.
The Edit mode icon that is currently displayed on the screen represents thealternate operating mode that the system will "jump" to when pressed. Forexample, when working in the Edit View mode, the Multitrack View icon
" " will appear. Conversely, when working in the Multitrack View mode,
the Edit View icon " " will appear.
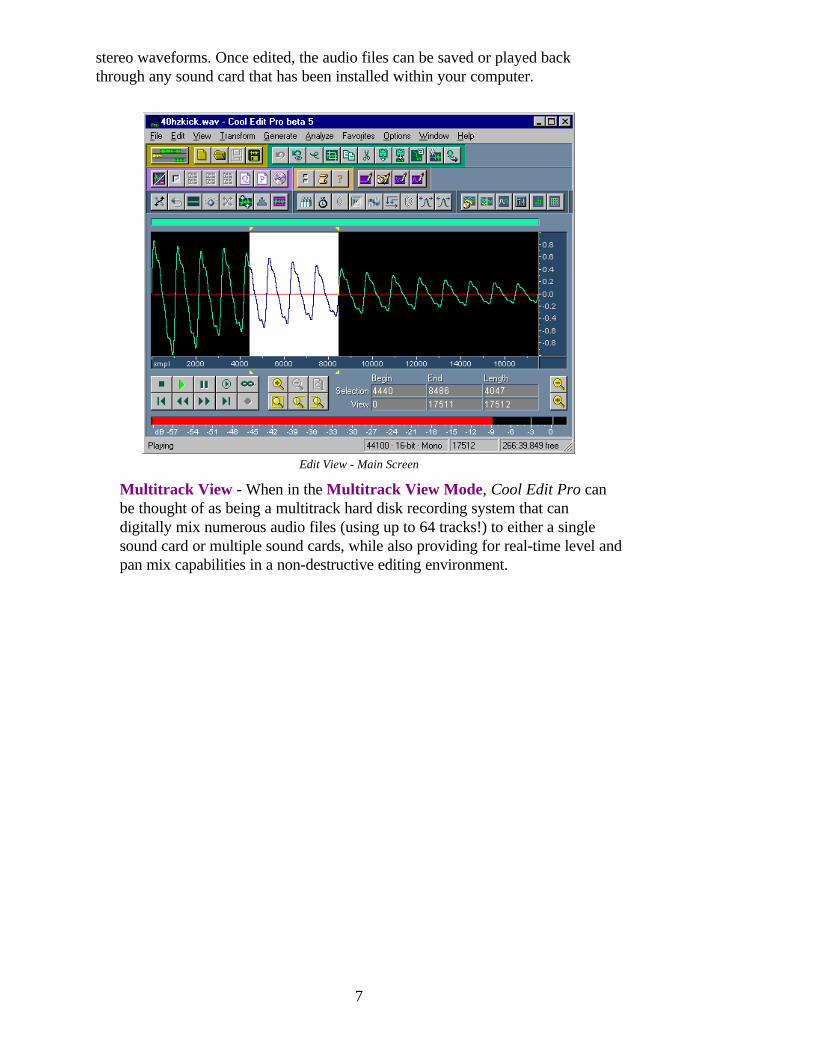
Edit View - When in the Edit View Mode, Cool Edit Pro can be thought of asbeing a single-waveform editor that can be used to edit and process mono and
7
stereo waveforms. Once edited, the audio files can be saved or played backthrough any sound card that has been installed within your computer.
Edit View - Main Screen
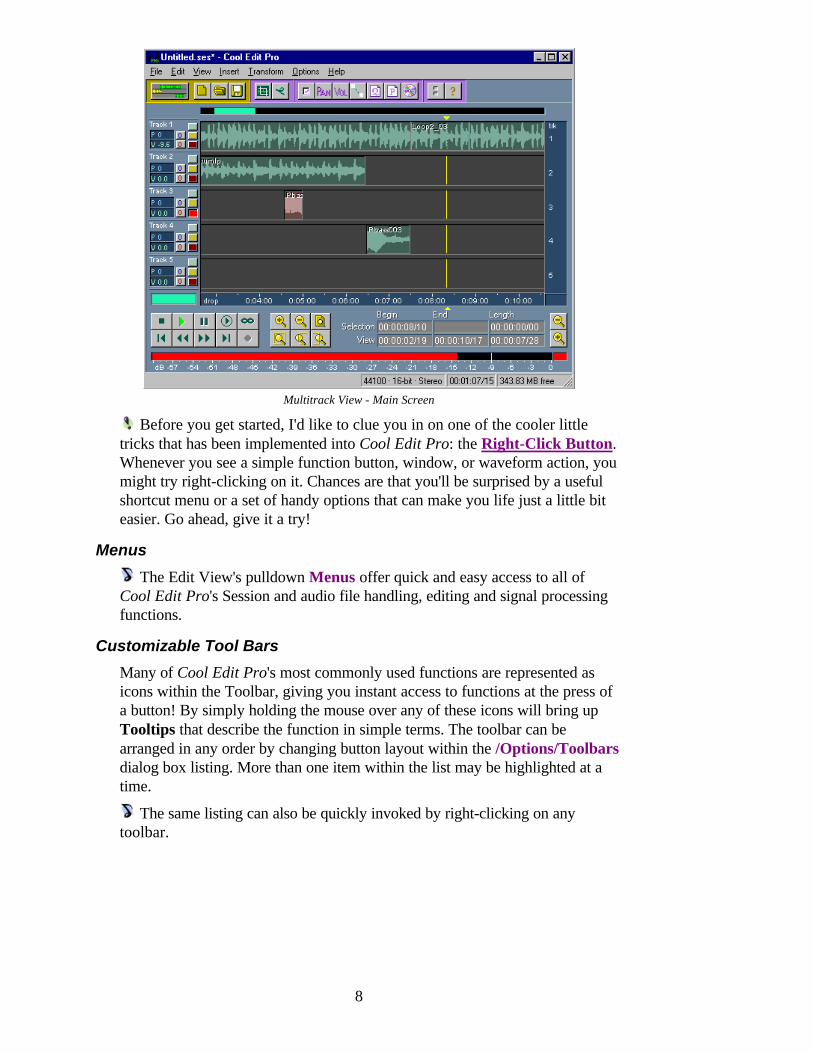
Multitrack View - When in the Multitrack View Mode, Cool Edit Pro canbe thought of as being a multitrack hard disk recording system that candigitally mix numerous audio files (using up to 64 tracks!) to either a singlesound card or multiple sound cards, while also providing for real-time level andpan mix capabilities in a non-destructive editing environment.
8
Multitrack View - Main Screen
Before you get started, I'd like to clue you in on one of the cooler littletricks that has been implemented into Cool Edit Pro: the Right-Click Button.Whenever you see a simple function button, window, or waveform action, youmight try right-clicking on it. Chances are that you'll be surprised by a usefulshortcut menu or a set of handy options that can make you life just a little biteasier. Go ahead, give it a try!
Menus
The Edit View's pulldown Menus offer quick and easy access to all ofCool Edit Pro's Session and audio file handling, editing and signal processingfunctions.
Customizable Tool Bars
Many of Cool Edit Pro's most commonly used functions are represented asicons within the Toolbar, giving you instant access to functions at the press ofa button! By simply holding the mouse over any of these icons will bring upTooltips that describe the function in simple terms. The toolbar can bearranged in any order by changing button layout within the /Options/Toolbarsdialog box listing. More than one item within the list may be highlighted at atime.
The same listing can also be quickly invoked by right-clicking on anytoolbar.
9
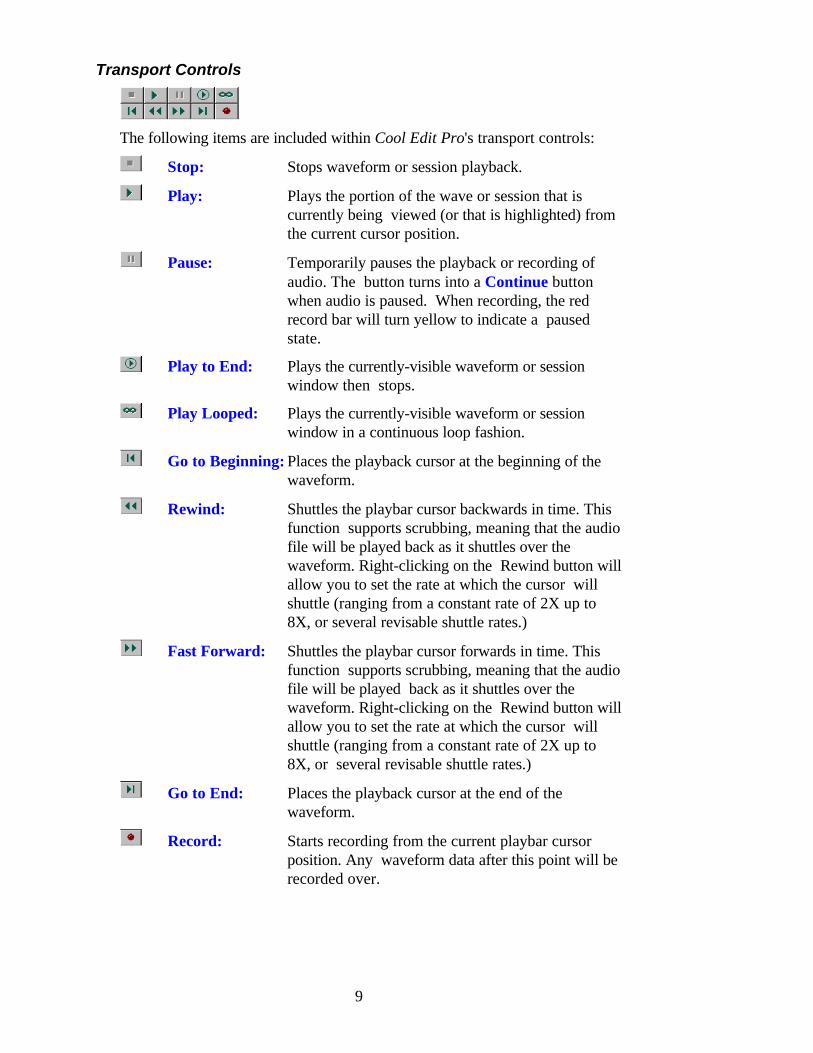
Transport Controls
The following items are included within Cool Edit Pro's transport controls:
Stop: Stops waveform or session playback.
Play: Plays the portion of the wave or session that iscurrently being viewed (or that is highlighted) fromthe current cursor position.
Pause: Temporarily pauses the playback or recording ofaudio. The button turns into a Continue buttonwhen audio is paused. When recording, the redrecord bar will turn yellow to indicate a pausedstate.
Play to End: Plays the currently-visible waveform or sessionwindow then stops.
Play Looped: Plays the currently-visible waveform or sessionwindow in a continuous loop fashion.
Go to Beginning: Places the playback cursor at the beginning of thewaveform.
Rewind: Shuttles the playbar cursor backwards in time. Thisfunction supports scrubbing, meaning that the audiofile will be played back as it shuttles over thewaveform. Right-clicking on the Rewind button willallow you to set the rate at which the cursor willshuttle (ranging from a constant rate of 2X up to8X, or several revisable shuttle rates.)
Fast Forward: Shuttles the playbar cursor forwards in time. Thisfunction supports scrubbing, meaning that the audiofile will be played back as it shuttles over thewaveform. Right-clicking on the Rewind button willallow you to set the rate at which the cursor willshuttle (ranging from a constant rate of 2X up to8X, or several revisable shuttle rates.)
Go to End: Places the playback cursor at the end of thewaveform.
Record: Starts recording from the current playbar cursorposition. Any waveform data after this point will berecorded over.
10
Recording and playing files with Cool Edit Pro
Recording with Cool Edit Pro is easy. You can record from a microphone,your computer's CD player, a MIDI source, or any signal you can plug into themicrophone or "Line in" ports on the back of your sound card.
To start recording, simply use /File/New to open a new file, select the samplerate, bit resolution, and number of channels (stereo or mono) that you want touse, press OK, and click on the Record button in the lower left area of themain window to begin. When you are done recording, click on Stop and thensave your recording.
You may need to adjust your input signal to obtain the optimum recordingand signal-to-noise levels.
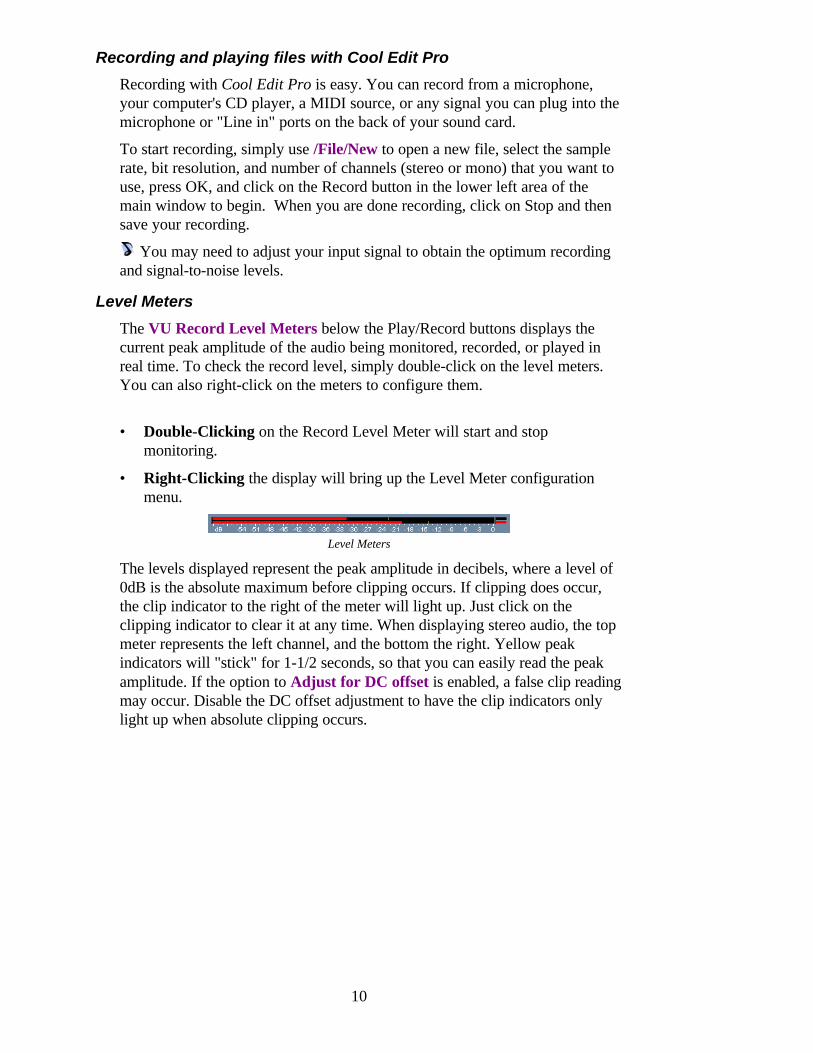
Level Meters
The VU Record Level Meters below the Play/Record buttons displays thecurrent peak amplitude of the audio being monitored, recorded, or played inreal time. To check the record level, simply double-click on the level meters.You can also right-click on the meters to configure them.
• Double-Clicking on the Record Level Meter will start and stopmonitoring.
• Right-Clicking the display will bring up the Level Meter configurationmenu.
Level Meters
The levels displayed represent the peak amplitude in decibels, where a level of0dB is the absolute maximum before clipping occurs. If clipping does occur,the clip indicator to the right of the meter will light up. Just click on theclipping indicator to clear it at any time. When displaying stereo audio, the topmeter represents the left channel, and the bottom the right. Yellow peakindicators will "stick" for 1-1/2 seconds, so that you can easily read the peakamplitude. If the option to Adjust for DC offset is enabled, a false clip readingmay occur. Disable the DC offset adjustment to have the clip indicators onlylight up when absolute clipping occurs.
11
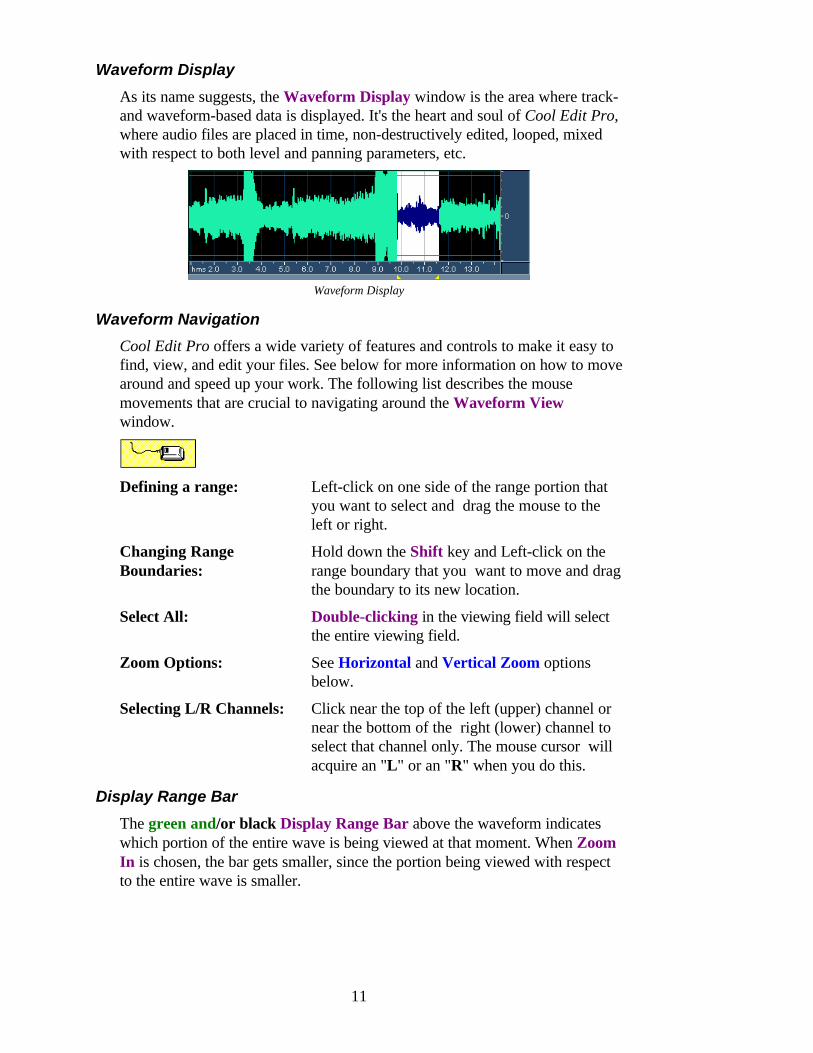
Waveform Display
As its name suggests, the Waveform Display window is the area where track-and waveform-based data is displayed. It's the heart and soul of Cool Edit Pro,where audio files are placed in time, non-destructively edited, looped, mixedwith respect to both level and panning parameters, etc.
Waveform Display
Waveform Navigation
Cool Edit Pro offers a wide variety of features and controls to make it easy tofind, view, and edit your files. See below for more information on how to movearound and speed up your work. The following list describes the mousemovements that are crucial to navigating around the Waveform Viewwindow.
Defining a range: Left-click on one side of the range portion thatyou want to select and drag the mouse to theleft or right.
Changing Range Hold down the Shift key and Left-click on theBoundaries: range boundary that you want to move and drag
the boundary to its new location.
Select All: Double-clicking in the viewing field will selectthe entire viewing field.
Zoom Options: See Horizontal and Vertical Zoom optionsbelow.
Selecting L/R Channels: Click near the top of the left (upper) channel ornear the bottom of the right (lower) channel toselect that channel only. The mouse cursor willacquire an "L" or an "R" when you do this.
Display Range Bar
The green and/or black Display Range Bar above the waveform indicateswhich portion of the entire wave is being viewed at that moment. When ZoomIn is chosen, the bar gets smaller, since the portion being viewed with respectto the entire wave is smaller.
12
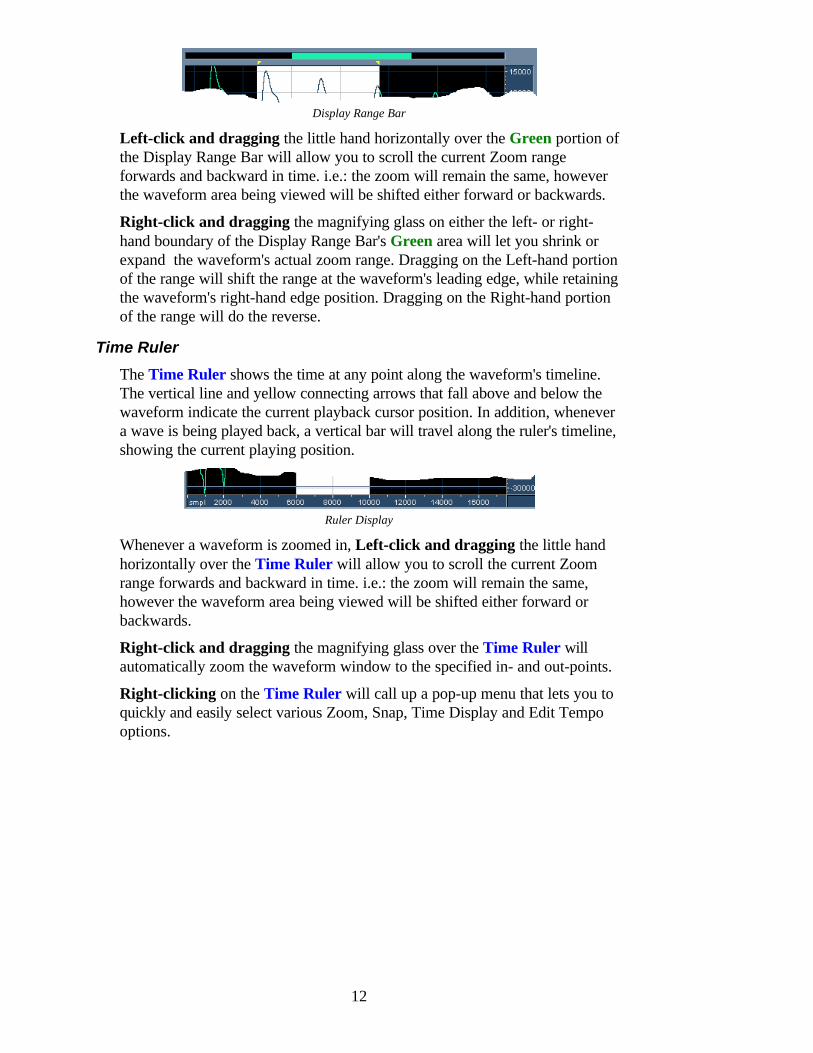
Display Range Bar
Left-click and dragging the little hand horizontally over the Green portion ofthe Display Range Bar will allow you to scroll the current Zoom rangeforwards and backward in time. i.e.: the zoom will remain the same, howeverthe waveform area being viewed will be shifted either forward or backwards.
Right-click and dragging the magnifying glass on either the left- or right-hand boundary of the Display Range Bar's Green area will let you shrink orexpand the waveform's actual zoom range. Dragging on the Left-hand portionof the range will shift the range at the waveform's leading edge, while retainingthe waveform's right-hand edge position. Dragging on the Right-hand portionof the range will do the reverse.
Time Ruler
The Time Ruler shows the time at any point along the waveform's timeline.The vertical line and yellow connecting arrows that fall above and below thewaveform indicate the current playback cursor position. In addition, whenevera wave is being played back, a vertical bar will travel along the ruler's timeline,showing the current playing position.
Ruler Display
Whenever a waveform is zoomed in, Left-click and dragging the little handhorizontally over the Time Ruler will allow you to scroll the current Zoomrange forwards and backward in time. i.e.: the zoom will remain the same,however the waveform area being viewed will be shifted either forward orbackwards.
Right-click and dragging the magnifying glass over the Time Ruler willautomatically zoom the waveform window to the specified in- and out-points.
Right-clicking on the Time Ruler will call up a pop-up menu that lets you toquickly and easily select various Zoom, Snap, Time Display and Edit Tempooptions.
13
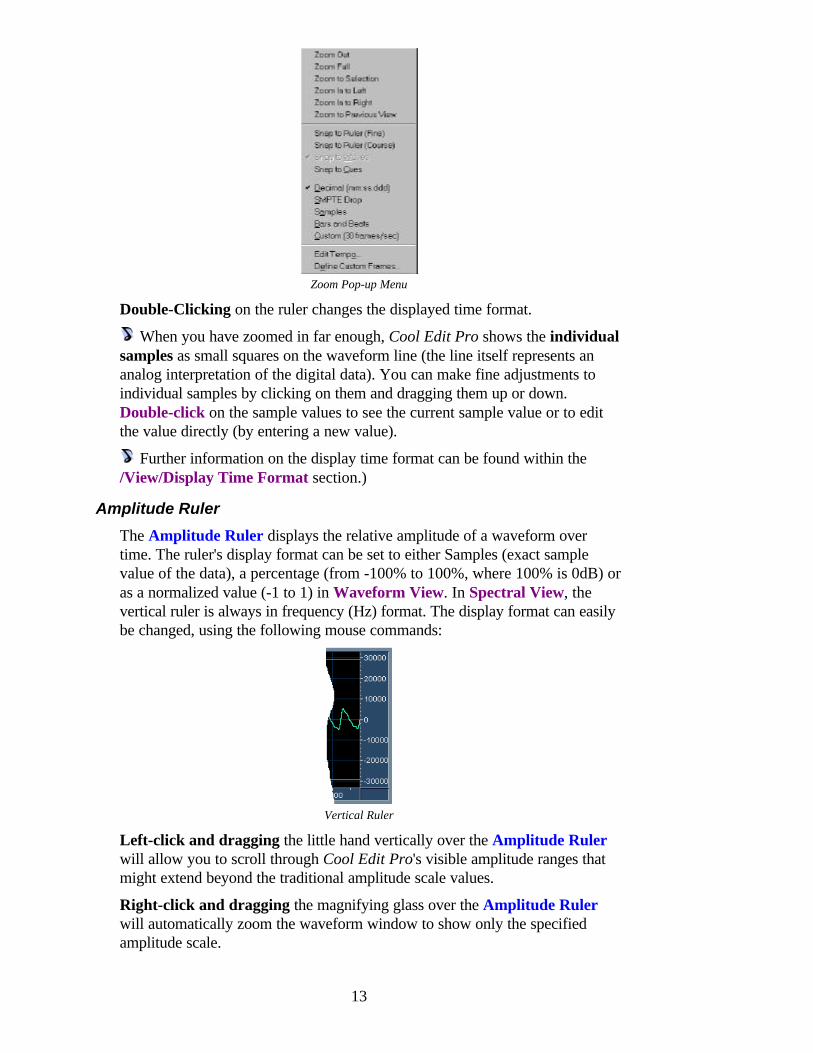
Zoom Pop-up Menu
Double-Clicking on the ruler changes the displayed time format.
When you have zoomed in far enough, Cool Edit Pro shows the individualsamples as small squares on the waveform line (the line itself represents ananalog interpretation of the digital data). You can make fine adjustments toindividual samples by clicking on them and dragging them up or down.Double-click on the sample values to see the current sample value or to editthe value directly (by entering a new value).
Further information on the display time format can be found within the/View/Display Time Format section.)
Amplitude Ruler
The Amplitude Ruler displays the relative amplitude of a waveform overtime. The ruler's display format can be set to either Samples (exact samplevalue of the data), a percentage (from -100% to 100%, where 100% is 0dB) oras a normalized value (-1 to 1) in Waveform View. In Spectral View, thevertical ruler is always in frequency (Hz) format. The display format can easilybe changed, using the following mouse commands:
Vertical Ruler
Left-click and dragging the little hand vertically over the Amplitude Rulerwill allow you to scroll through Cool Edit Pro's visible amplitude ranges thatmight extend beyond the traditional amplitude scale values.
Right-click and dragging the magnifying glass over the Amplitude Rulerwill automatically zoom the waveform window to show only the specifiedamplitude scale.
14
Double-clicking on the Amplitude Ruler will toggle the display betweeneither Samples (exact sample value of the data), a percentage (from -100% to100%, where 100% is 0dB) or as a normalized value (-1 to 1) in WaveformView. In Spectral View, the vertical ruler is always in frequency (Hz) format.
Right-clicking on the Amplitude Ruler will call up a pop-up dialog windowthat lets you to quickly and easily select various Zoom and display options.
Further information on the vertical scale format can be found within the/View/Vertical Scale Format section.)
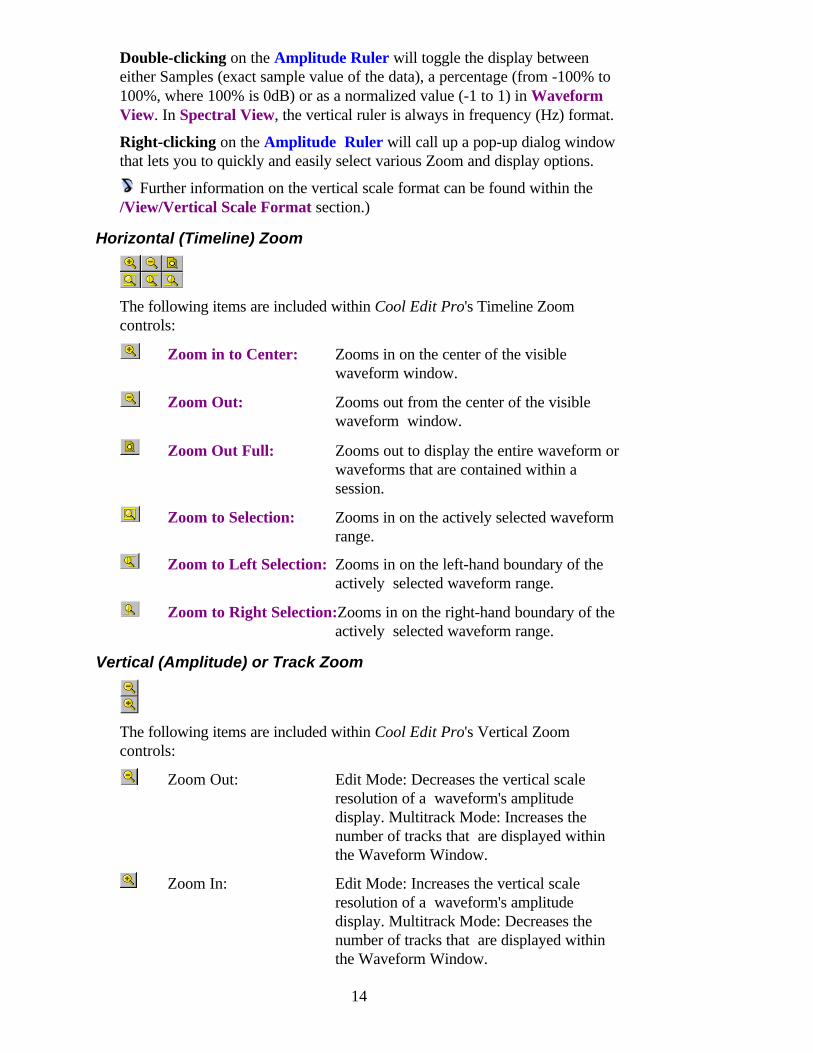
Horizontal (Timeline) Zoom
The following items are included within Cool Edit Pro's Timeline Zoomcontrols:
Zoom in to Center: Zooms in on the center of the visiblewaveform window.
Zoom Out: Zooms out from the center of the visiblewaveform window.
Zoom Out Full: Zooms out to display the entire waveform orwaveforms that are contained within asession.
Zoom to Selection: Zooms in on the actively selected waveformrange.
Zoom to Left Selection: Zooms in on the left-hand boundary of theactively selected waveform range.
Zoom to Right Selection:Zooms in on the right-hand boundary of theactively selected waveform range.
Vertical (Amplitude) or Track Zoom
The following items are included within Cool Edit Pro's Vertical Zoomcontrols:
Zoom Out: Edit Mode: Decreases the vertical scaleresolution of a waveform's amplitudedisplay. Multitrack Mode: Increases thenumber of tracks that are displayed withinthe Waveform Window.
Zoom In: Edit Mode: Increases the vertical scaleresolution of a waveform's amplitudedisplay. Multitrack Mode: Decreases thenumber of tracks that are displayed withinthe Waveform Window.
15
Other Important Display Functions:
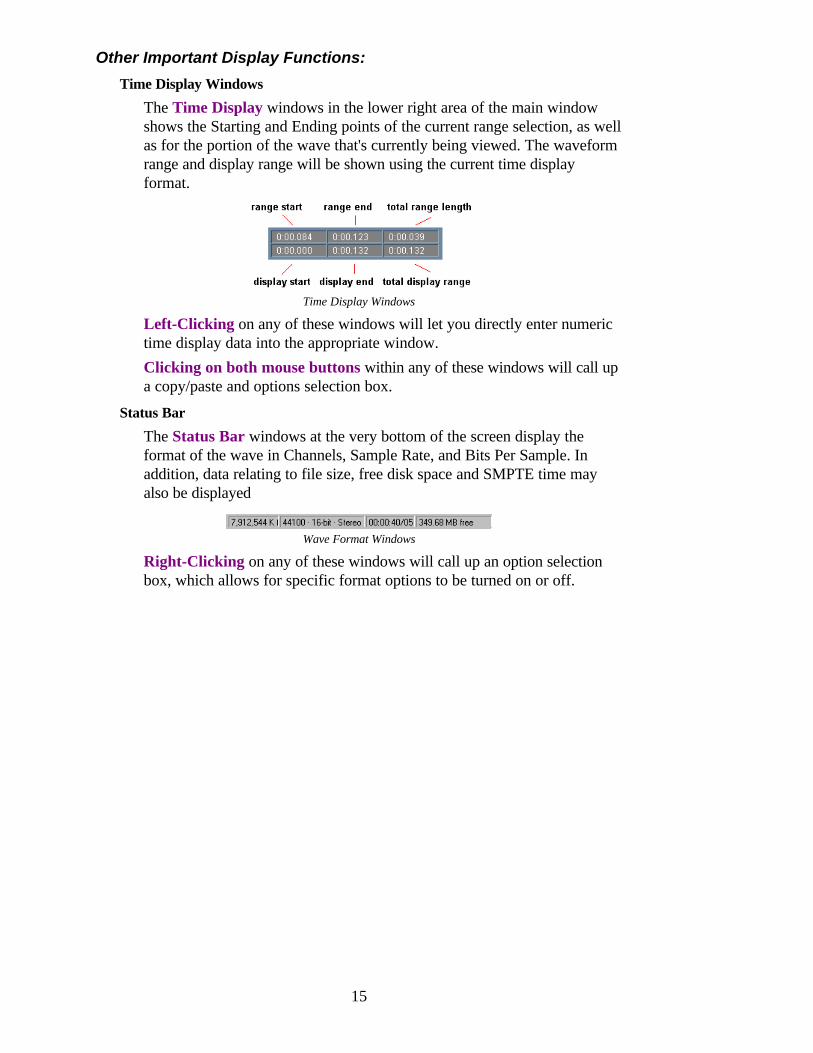
Time Display Windows
The Time Display windows in the lower right area of the main windowshows the Starting and Ending points of the current range selection, as wellas for the portion of the wave that's currently being viewed. The waveformrange and display range will be shown using the current time displayformat.
Time Display Windows
Left-Clicking on any of these windows will let you directly enter numerictime display data into the appropriate window.Clicking on both mouse buttons within any of these windows will call upa copy/paste and options selection box.
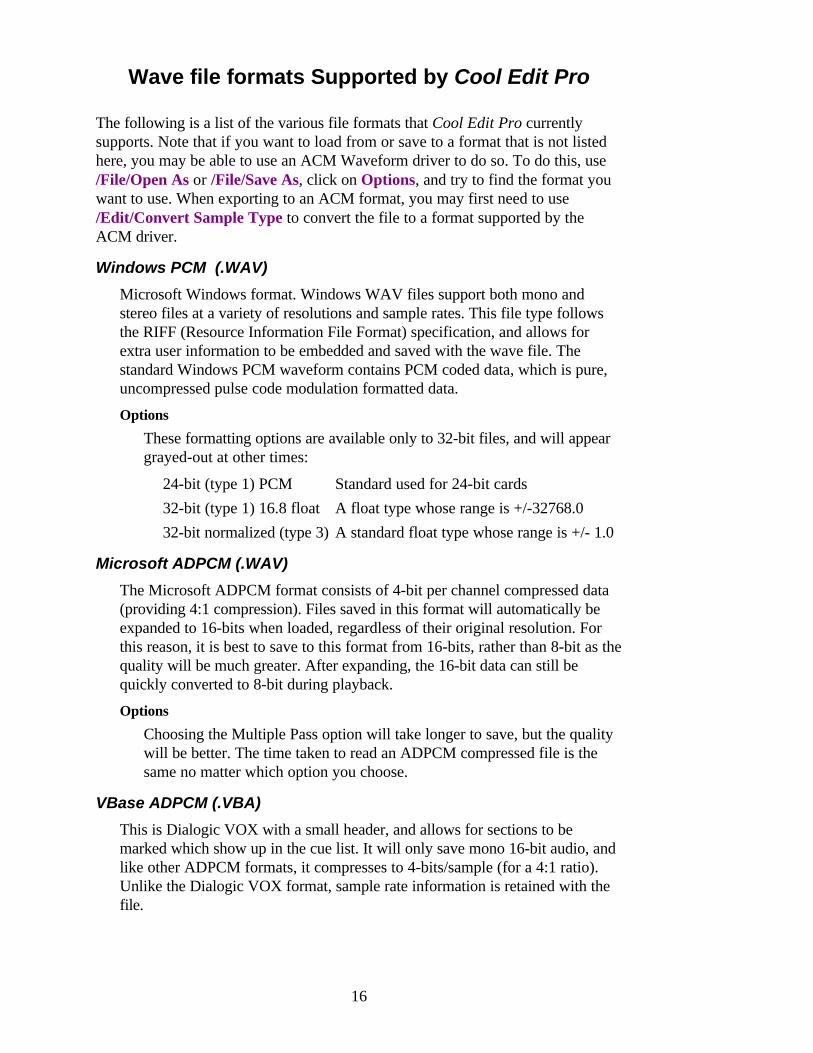
Status Bar
The Status Bar windows at the very bottom of the screen display theformat of the wave in Channels, Sample Rate, and Bits Per Sample. Inaddition, data relating to file size, free disk space and SMPTE time mayalso be displayed
Wave Format Windows
Right-Clicking on any of these windows will call up an option selectionbox, which allows for specific format options to be turned on or off.
16
Wave file formats Supported by Cool Edit Pro
The following is a list of the various file formats that Cool Edit Pro currentlysupports. Note that if you want to load from or save to a format that is not listedhere, you may be able to use an ACM Waveform driver to do so. To do this, use/File/Open As or /File/Save As, click on Options, and try to find the format youwant to use. When exporting to an ACM format, you may first need to use/Edit/Convert Sample Type to convert the file to a format supported by theACM driver.
Windows PCM (.WAV)
Microsoft Windows format. Windows WAV files support both mono andstereo files at a variety of resolutions and sample rates. This file type followsthe RIFF (Resource Information File Format) specification, and allows forextra user information to be embedded and saved with the wave file. Thestandard Windows PCM waveform contains PCM coded data, which is pure,uncompressed pulse code modulation formatted data.
Options
These formatting options are available only to 32-bit files, and will appeargrayed-out at other times:
24-bit (type 1) PCM Standard used for 24-bit cards32-bit (type 1) 16.8 float A float type whose range is +/-32768.032-bit normalized (type 3) A standard float type whose range is +/- 1.0
Microsoft ADPCM (.WAV)
The Microsoft ADPCM format consists of 4-bit per channel compressed data(providing 4:1 compression). Files saved in this format will automatically beexpanded to 16-bits when loaded, regardless of their original resolution. Forthis reason, it is best to save to this format from 16-bits, rather than 8-bit as thequality will be much greater. After expanding, the 16-bit data can still bequickly converted to 8-bit during playback.
Options
Choosing the Multiple Pass option will take longer to save, but the qualitywill be better. The time taken to read an ADPCM compressed file is thesame no matter which option you choose.
VBase ADPCM (.VBA)
This is Dialogic VOX with a small header, and allows for sections to bemarked which show up in the cue list. It will only save mono 16-bit audio, andlike other ADPCM formats, it compresses to 4-bits/sample (for a 4:1 ratio).Unlike the Dialogic VOX format, sample rate information is retained with thefile.
17
DVI/IMA ADPCM (.WAV)
The International Multimedia Association (IMA) flavor of ADPCMcompresses 16-bit data to 4-bits/sample (4:1) using a different (faster) methodthan Microsoft ADPCM, and has different distortion characteristics, which cangive better, or worse results depending on the sample being compressed. Aswith Microsoft ADPCM, it is best to save to this format from 16-bit ratherthan 8-bit. This format also allows for 3-bit compression (5.3:1) as well at aslightly lower quality, though few sound drivers support the 3-bit ADPCM (wehave found none that actually work properly). In building this format, wefollowed the specification to the letter without making any assumptions.
In the past, we have seen audio drivers that did not play DVI/IMA compresseddata properly, but lately this has been changing as other manufacturers areproviding DVI/IMA audio drivers that can read the files saved by Cool Edit inthis format just fine. (Although we have yet to see a 3-bit DVI audio driverthat plays stereo waves properly.) If you have other software that does notplay files saved in this format properly, please contact the vendor and try toobtain the latest driver they have.
We have also implemented a 2-bit and a 5-bit version of compression by usingthe index tables {-1, 2, -1, 2} and {-1, -1, -1, -1, -1, -1, -1, -1, 1, 2, 4, 6, 8, 10,13, 16, -1, -1, -1, -1, -1, -1, -1, -1, 1, 2, 4, 6, 8, 10, 13, 16} respectively. Thesecompression rates are less compatible than the standard 4-bit, and may notwork with other systems. We have found that the preceding index tablesprovided the best quality.
This compression scheme can be a good alternative to MPEG; it providesreasonably fast decoding of 4:1 compression, and it degrades sample qualityonly slightly.
A/mu-Law Wave (.WAV)
A-Law and mu-Law formats (CCITT standard G.711) are common intelephony applications. These encoding formats compress original 16-bit audiodown to 8 bits (for a 2:1 compression ratio) with a dynamic range of about 13-bit. Thus, a-law and mu-law encoded waveforms have a higher s/n ration than8-bit PCM, but at the price of a bit more distortion than the original 16-bitaudio. The quality is higher than you would get with 4-bit ADPCM formats.
Options
Mu-law 8-bit is the international standard telecommunications encodingformat, while A-Law is a slight variation found in European systems.Files saved in this format will automatically be expanded to 16-bits whenloaded, so you should not save to this format from 8-bit.
Sound Blaster (.VOC)
Sound Blaster and Sound Blaster Pro voice file format. This format onlysupports 8-bit audio; mono to 44.1 kHz, and stereo to 22 kHz. Voc files cancontain information for looping and silence. If the file you are loading containsloops and silence blocks, they will be expanded while loading.
18
Apple AIFF (.AIF, .SND)
This is Apple's standard wave file format. Like Windows WAV, AIFF filessupport mono or stereo, 16-bit or 8-bit, and a wide range of sample rates.Cool Edit Pro only supports the PCM encoded portion of the data, eventhough this format (like Windows WAV) can contain any one of a number ofdata formats. The AIFF format is a good choice for PC/Mac cross-platformcompatibility. When opening in Cool Edit Pro, you can simply add the .AIFextension to the file and load it using this file filter. When transferred to a Mac,you can add the four character code "AIFF" in the file's resource fork to have itrecognized (The Macintosh identifies a file through its “resource,” which isstripped away when a file is opened on a PC. However, many Mac applicationswhich support AIFF can recognize the PCM data without this identifier.)
NMS VCE (.VCE)
Natural MicroSystems (NMS) ADPCM This is an optimized G.721 ADPCMvariant used in telephony applications. A .vce file contains a single voicemessage in 2, 3, or 4-bits per sample at 8000 samples per second. This formatsupports only mono, 16-bit at 8kHz. The 8-bit sample format at 8000 samplesper second is framed A-law or mu-law. The .vce file is a flat file with noheader. Multiple .vce files and a header are contained in a single NMS .vox filewhich is not supported by Cool Edit Pro.
Options
Options displays the various compression schemes for this format.
ASCII Text Data (.TXT)
Data can be read to or written from files in a standard text format, with eachsample separated by a carriage return and channels separated by a tabcharacter. Options allow data to be normalized between -1.0 and 1.0, orwritten out and read in raw sample values. An optional header can be placedbefore the data. If there is no header text, then the data is assumed to be 16-bitsigned decimal integers. The header is formatted as KEYWORD:value withthe keywords being: SAMPLES, BITSPERSAMPLE, CHANNELS,SAMPLERATE, and NORMALIZED. The values for NORMALIZED areeither TRUE or FALSE. For example,
SAMPLES: 1582BITSPERSAMPLE: 16CHANNELS: 2SAMPLERATE: 22050NORMALIZED: FALSE164 <tab> -1372492 <tab> -876etc...
19
Options
An optional header can be placed before the data. Data can also benormalized between -1.0 and 1.0, or written out and read in raw samplevalues.
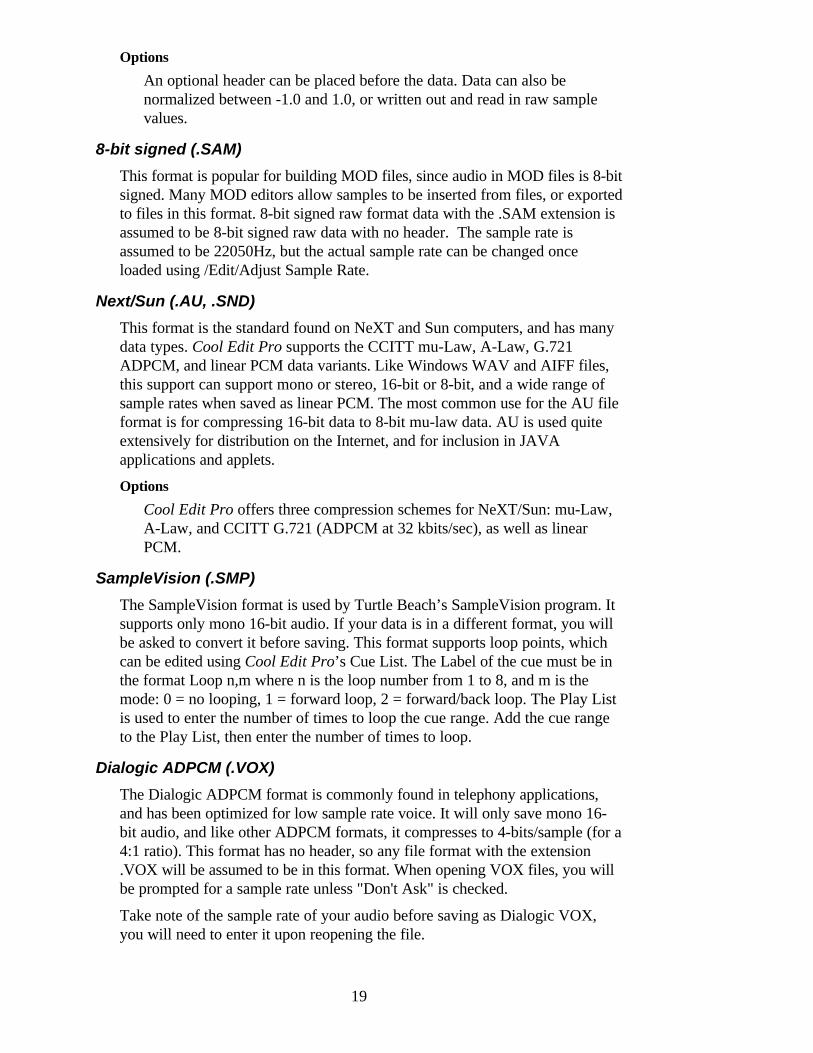
8-bit signed (.SAM)
This format is popular for building MOD files, since audio in MOD files is 8-bitsigned. Many MOD editors allow samples to be inserted from files, or exportedto files in this format. 8-bit signed raw format data with the .SAM extension isassumed to be 8-bit signed raw data with no header. The sample rate isassumed to be 22050Hz, but the actual sample rate can be changed onceloaded using /Edit/Adjust Sample Rate.
Next/Sun (.AU, .SND)
This format is the standard found on NeXT and Sun computers, and has manydata types. Cool Edit Pro supports the CCITT mu-Law, A-Law, G.721ADPCM, and linear PCM data variants. Like Windows WAV and AIFF files,this support can support mono or stereo, 16-bit or 8-bit, and a wide range ofsample rates when saved as linear PCM. The most common use for the AU fileformat is for compressing 16-bit data to 8-bit mu-law data. AU is used quiteextensively for distribution on the Internet, and for inclusion in JAVAapplications and applets.
Options
Cool Edit Pro offers three compression schemes for NeXT/Sun: mu-Law,A-Law, and CCITT G.721 (ADPCM at 32 kbits/sec), as well as linearPCM.
SampleVision (.SMP)
The SampleVision format is used by Turtle Beach’s SampleVision program. Itsupports only mono 16-bit audio. If your data is in a different format, you willbe asked to convert it before saving. This format supports loop points, whichcan be edited using Cool Edit Pro’s Cue List. The Label of the cue must be inthe format Loop n,m where n is the loop number from 1 to 8, and m is themode: 0 = no looping, 1 = forward loop, 2 = forward/back loop. The Play Listis used to enter the number of times to loop the cue range. Add the cue rangeto the Play List, then enter the number of times to loop.
Dialogic ADPCM (.VOX)
The Dialogic ADPCM format is commonly found in telephony applications,and has been optimized for low sample rate voice. It will only save mono 16-bit audio, and like other ADPCM formats, it compresses to 4-bits/sample (for a4:1 ratio). This format has no header, so any file format with the extension.VOX will be assumed to be in this format. When opening VOX files, you willbe prompted for a sample rate unless "Don't Ask" is checked.
Take note of the sample rate of your audio before saving as Dialogic VOX,you will need to enter it upon reopening the file.
20
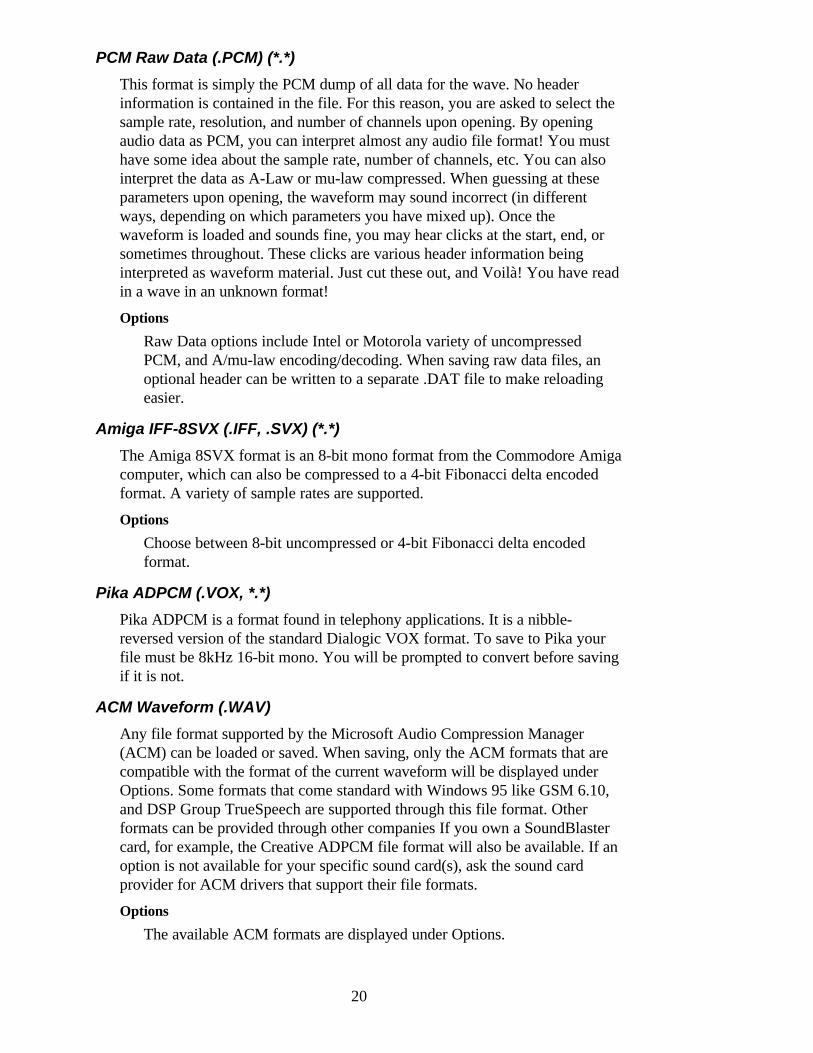
PCM Raw Data (.PCM) (*.*)
This format is simply the PCM dump of all data for the wave. No headerinformation is contained in the file. For this reason, you are asked to select thesample rate, resolution, and number of channels upon opening. By openingaudio data as PCM, you can interpret almost any audio file format! You musthave some idea about the sample rate, number of channels, etc. You can alsointerpret the data as A-Law or mu-law compressed. When guessing at theseparameters upon opening, the waveform may sound incorrect (in differentways, depending on which parameters you have mixed up). Once thewaveform is loaded and sounds fine, you may hear clicks at the start, end, orsometimes throughout. These clicks are various header information beinginterpreted as waveform material. Just cut these out, and Voilà! You have readin a wave in an unknown format!
Options
Raw Data options include Intel or Motorola variety of uncompressedPCM, and A/mu-law encoding/decoding. When saving raw data files, anoptional header can be written to a separate .DAT file to make reloadingeasier.
Amiga IFF-8SVX (.IFF, .SVX) (*.*)
The Amiga 8SVX format is an 8-bit mono format from the Commodore Amigacomputer, which can also be compressed to a 4-bit Fibonacci delta encodedformat. A variety of sample rates are supported.
Options
Choose between 8-bit uncompressed or 4-bit Fibonacci delta encodedformat.
Pika ADPCM (.VOX, *.*)
Pika ADPCM is a format found in telephony applications. It is a nibble-reversed version of the standard Dialogic VOX format. To save to Pika yourfile must be 8kHz 16-bit mono. You will be prompted to convert before savingif it is not.
ACM Waveform (.WAV)
Any file format supported by the Microsoft Audio Compression Manager(ACM) can be loaded or saved. When saving, only the ACM formats that arecompatible with the format of the current waveform will be displayed underOptions. Some formats that come standard with Windows 95 like GSM 6.10,and DSP Group TrueSpeech are supported through this file format. Otherformats can be provided through other companies If you own a SoundBlastercard, for example, the Creative ADPCM file format will also be available. If anoption is not available for your specific sound card(s), ask the sound cardprovider for ACM drivers that support their file formats.
Options
The available ACM formats are displayed under Options.
21
Please note that the ACM driver you want to use may require that the filebe in a specific format before saving. For example, if you want to save afile in the DSP Group TrueSpeech format, you should first use/Edit/Convert Sample Type to convert the file to 8KHz/mono/16bit,because that is the only format supported by the TrueSpeech ACM driver.For more information on any particular ACM driver, contact the creator ofthe format (such as DSP Group for TrueSpeech, or CCITT for the variousCCITT formats) or the manufacturer of the hardware that uses the formatin question (such as Creative Labs for the SoundBlaster ACM driver).Name: This displays the name of any saved format presets. Three areprovided initially: CD, Radio, and Telephone Quality (standard PCM).Save As: Click this button to save preset format/attribute combinations.Format: This is the ACM format you wish to save in. Note that this listwill display only those formats that are compatible with the currentwaveform's properties (stereo/mono, resolution, etc.).Attributes: The available attributes will depend on the original attributes ofthe file (sample rate, etc.) and the Format chosen.
DiamondWare Digitized (.DWD)
This is the audio format used by DiamondWare's Sound Toolkit, aprogrammer's library that lets you quickly and easily add high qualityinteractive audio to games and multimedia applications. It supports both monoand stereo files at a variety of resolutions and sample rates. Seehttp://www.dw.com for more information.
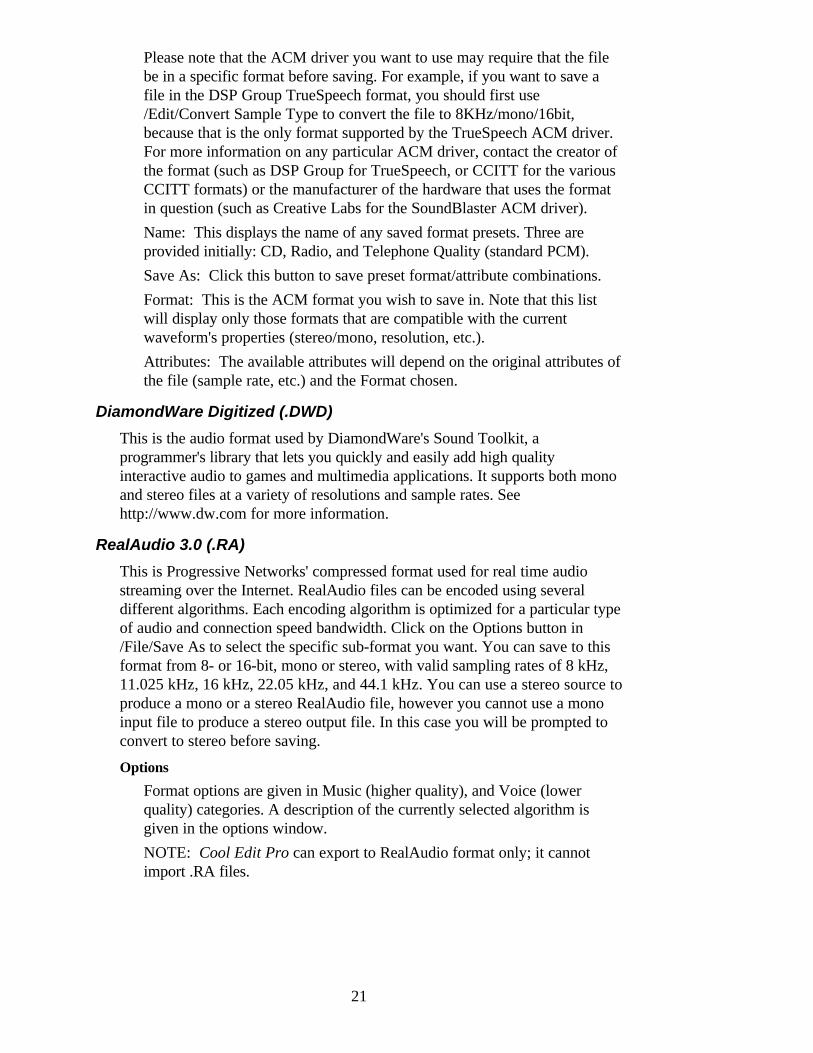
RealAudio 3.0 (.RA)
This is Progressive Networks' compressed format used for real time audiostreaming over the Internet. RealAudio files can be encoded using severaldifferent algorithms. Each encoding algorithm is optimized for a particular typeof audio and connection speed bandwidth. Click on the Options button in/File/Save As to select the specific sub-format you want. You can save to thisformat from 8- or 16-bit, mono or stereo, with valid sampling rates of 8 kHz,11.025 kHz, 16 kHz, 22.05 kHz, and 44.1 kHz. You can use a stereo source toproduce a mono or a stereo RealAudio file, however you cannot use a monoinput file to produce a stereo output file. In this case you will be prompted toconvert to stereo before saving.
Options
Format options are given in Music (higher quality), and Voice (lowerquality) categories. A description of the currently selected algorithm isgiven in the options window.NOTE: Cool Edit Pro can export to RealAudio format only; it cannotimport .RA files.
22
Keyboard and Mouse Command Shortcuts
Cool Edit Pro offers a wide variety of keyboard command shortcuts that can beused to speed up the editing process. The following list fully details the defaultshortcut commands that can be executed, either from your computer's keyboard orvia the mouse.
These commands, as well as commands that can be given using the keys on astandard MIDI keyboard instrument, can be easily edited from the/Options/Shortcuts (Keyboard and MIDI Triggers) menu.
KEYBOARD
Selection controls:Ctrl+B Select Both ChannelsCtrl+L Select Left ChannelCtrl+R Select Right ChannelCtrl+A Select Entire WaveformLeft Arrow Adjust left side of highlight one pixel to the leftRight Arrow Adjust left side of highlight one pixel to the rightShift+Left Arrow Adjust right side of highlight one pixel to the leftShift+Right Arrow Adjust right side of highlight one pixel to the rightF4 Adjust Settings - colors, sound card devices, memory
buffering, et ceteraEscape (Esc) Unselect (if any selection made, it is unselected) and
reset cursor to start
Editing controls:Ctrl+C Copy selection to internal clipboardCtrl+T Trim to selectionCtrl+V Paste from internal clipboard (or Windows clipboard
if internal clipboard is empty)Shift+Insert Paste from internal clipboard (or Windows clipboard
if internal clipboard is empty)Alt+Backspace UndoDelete Delete selectionShift+Delete Cut selection to internal clipboardCtrl+Insert Copy to internal clipboardCtrl+X Cut waveform to internal clipboardCtrl+M Mix pasteCtrl+Z Undo
Play and Record controls:Space Toggle Play / StopCtrl+Space Toggle Record / PauseAlt+S Stop (like Space when already Playing)Shift+Space Toggle "Play from Cursor To End" / Pause
23
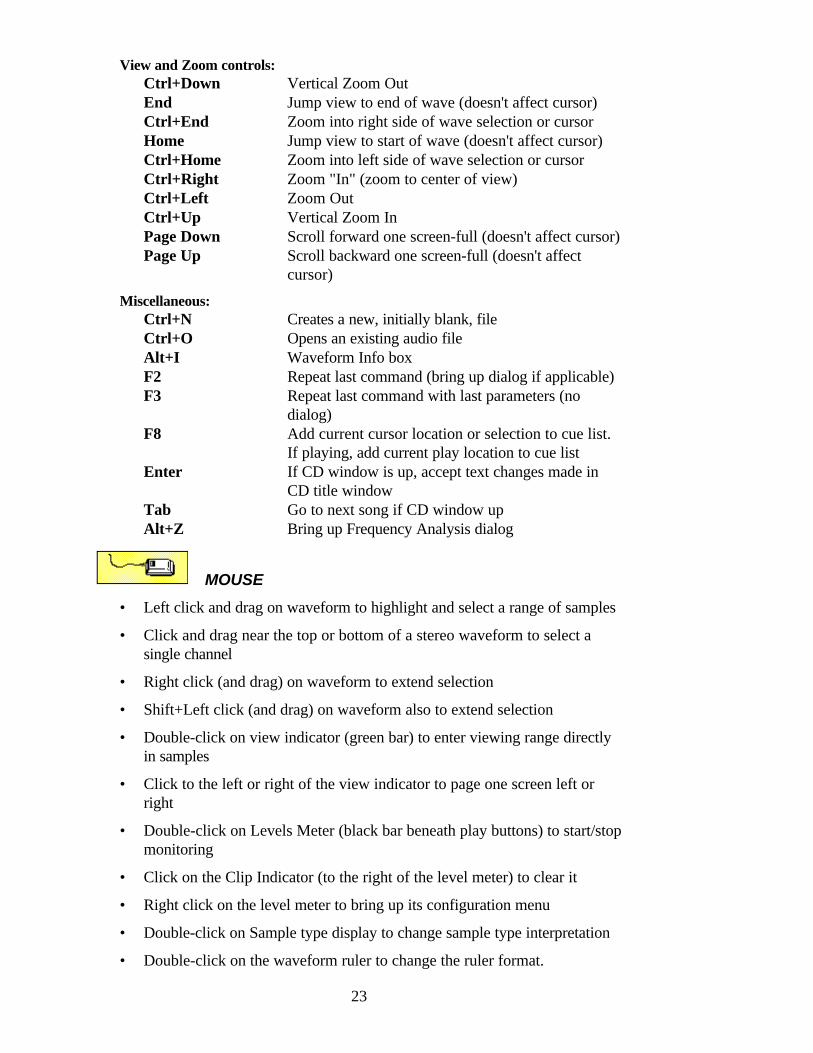
View and Zoom controls:Ctrl+Down Vertical Zoom OutEnd Jump view to end of wave (doesn't affect cursor)Ctrl+End Zoom into right side of wave selection or cursorHome Jump view to start of wave (doesn't affect cursor)Ctrl+Home Zoom into left side of wave selection or cursorCtrl+Right Zoom "In" (zoom to center of view)Ctrl+Left Zoom OutCtrl+Up Vertical Zoom InPage Down Scroll forward one screen-full (doesn't affect cursor)Page Up Scroll backward one screen-full (doesn't affect
cursor)
Miscellaneous:Ctrl+N Creates a new, initially blank, fileCtrl+O Opens an existing audio fileAlt+I Waveform Info boxF2 Repeat last command (bring up dialog if applicable)F3 Repeat last command with last parameters (no
dialog)F8 Add current cursor location or selection to cue list.
If playing, add current play location to cue listEnter If CD window is up, accept text changes made in
CD title windowTab Go to next song if CD window upAlt+Z Bring up Frequency Analysis dialog
MOUSE
• Left click and drag on waveform to highlight and select a range of samples
• Click and drag near the top or bottom of a stereo waveform to select asingle channel
• Right click (and drag) on waveform to extend selection
• Shift+Left click (and drag) on waveform also to extend selection
• Double-click on view indicator (green bar) to enter viewing range directlyin samples
• Click to the left or right of the view indicator to page one screen left orright
• Double-click on Levels Meter (black bar beneath play buttons) to start/stopmonitoring
• Click on the Clip Indicator (to the right of the level meter) to clear it
• Right click on the level meter to bring up its configuration menu
• Double-click on Sample type display to change sample type interpretation
• Double-click on the waveform ruler to change the ruler format.
24
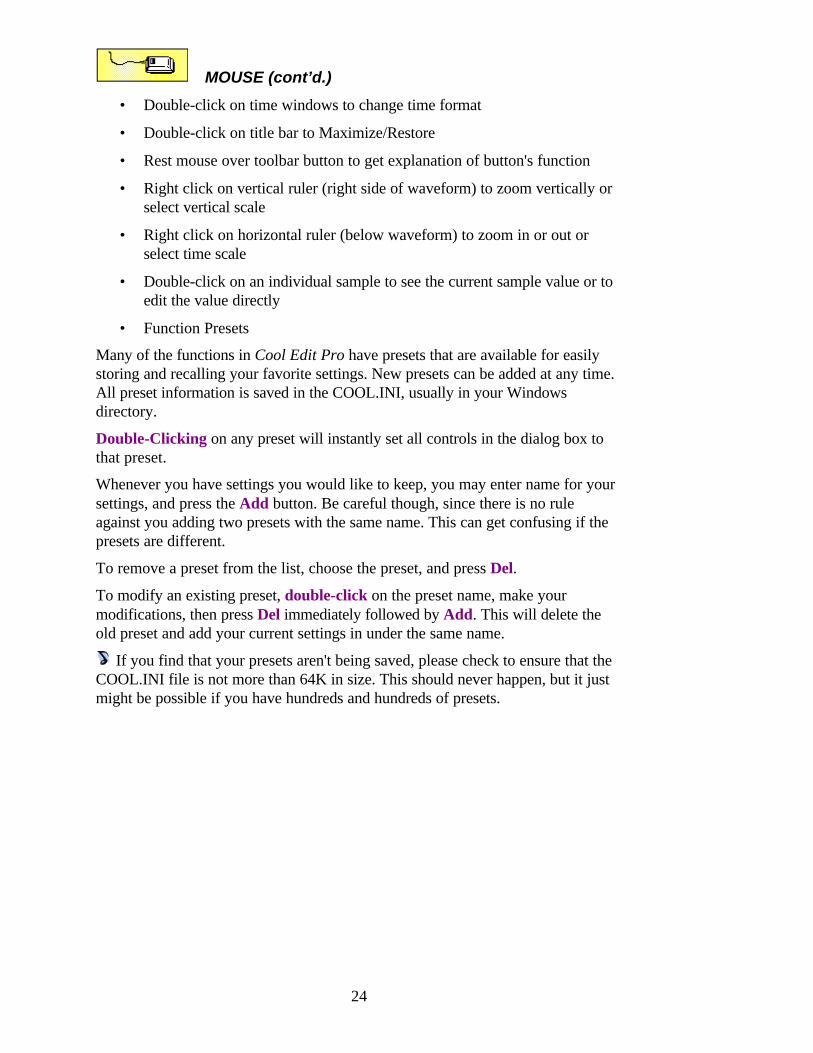
MOUSE (cont’d.)
• Double-click on time windows to change time format
• Double-click on title bar to Maximize/Restore
• Rest mouse over toolbar button to get explanation of button's function
• Right click on vertical ruler (right side of waveform) to zoom vertically orselect vertical scale
• Right click on horizontal ruler (below waveform) to zoom in or out orselect time scale
• Double-click on an individual sample to see the current sample value or toedit the value directly
• Function Presets
Many of the functions in Cool Edit Pro have presets that are available for easilystoring and recalling your favorite settings. New presets can be added at any time.All preset information is saved in the COOL.INI, usually in your Windowsdirectory.
Double-Clicking on any preset will instantly set all controls in the dialog box tothat preset.
Whenever you have settings you would like to keep, you may enter name for yoursettings, and press the Add button. Be careful though, since there is no ruleagainst you adding two presets with the same name. This can get confusing if thepresets are different.
To remove a preset from the list, choose the preset, and press Del.
To modify an existing preset, double-click on the preset name, make yourmodifications, then press Del immediately followed by Add. This will delete theold preset and add your current settings in under the same name.
If you find that your presets aren't being saved, please check to ensure that theCOOL.INI file is not more than 64K in size. This should never happen, but it justmight be possible if you have hundreds and hundreds of presets.
25
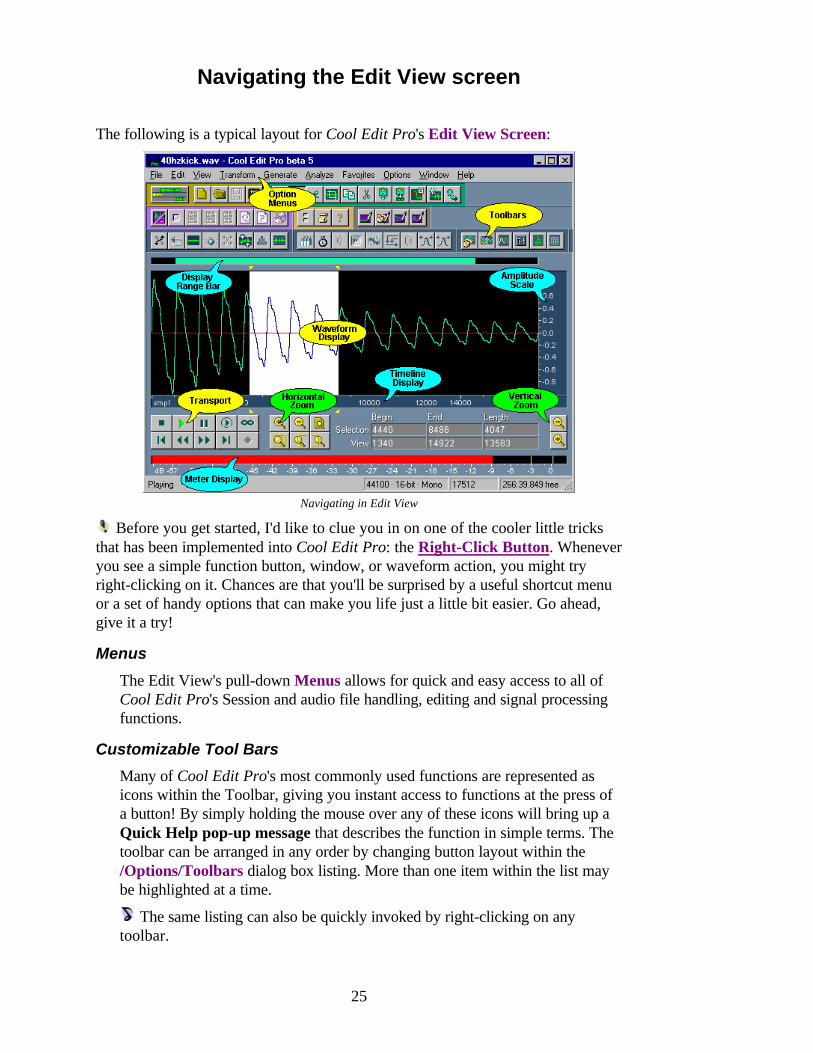
Navigating the Edit View screen
The following is a typical layout for Cool Edit Pro's Edit View Screen:
Navigating in Edit View
Before you get started, I'd like to clue you in on one of the cooler little tricksthat has been implemented into Cool Edit Pro: the Right-Click Button. Wheneveryou see a simple function button, window, or waveform action, you might tryright-clicking on it. Chances are that you'll be surprised by a useful shortcut menuor a set of handy options that can make you life just a little bit easier. Go ahead,give it a try!
Menus
The Edit View's pull-down Menus allows for quick and easy access to all ofCool Edit Pro's Session and audio file handling, editing and signal processingfunctions.
Customizable Tool Bars
Many of Cool Edit Pro's most commonly used functions are represented asicons within the Toolbar, giving you instant access to functions at the press ofa button! By simply holding the mouse over any of these icons will bring up aQuick Help pop-up message that describes the function in simple terms. Thetoolbar can be arranged in any order by changing button layout within the/Options/Toolbars dialog box listing. More than one item within the list maybe highlighted at a time.
The same listing can also be quickly invoked by right-clicking on anytoolbar.
26
The File Save icon can be interpreted as a Save As or a Save Now (withoutany dialog asking for a filename if the file is already named) by making theappropriate choice after File Save.
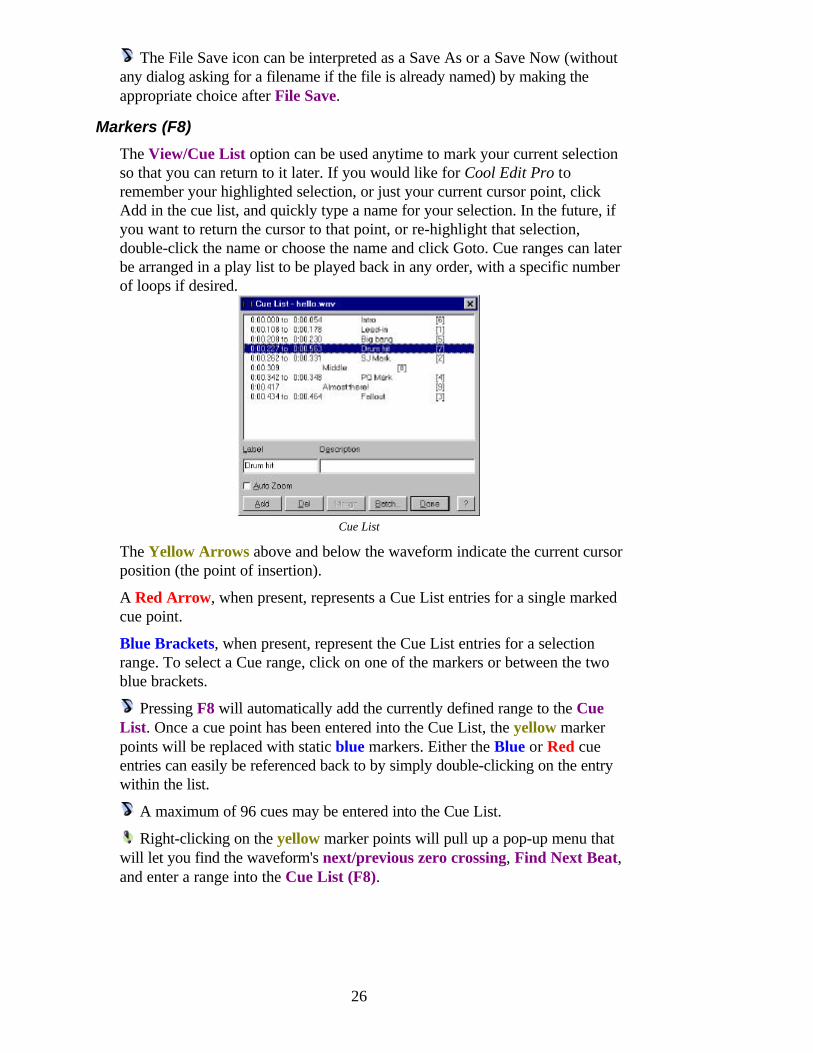
Markers (F8)
The View/Cue List option can be used anytime to mark your current selectionso that you can return to it later. If you would like for Cool Edit Pro toremember your highlighted selection, or just your current cursor point, clickAdd in the cue list, and quickly type a name for your selection. In the future, ifyou want to return the cursor to that point, or re-highlight that selection,double-click the name or choose the name and click Goto. Cue ranges can laterbe arranged in a play list to be played back in any order, with a specific numberof loops if desired.
Cue List
The Yellow Arrows above and below the waveform indicate the current cursorposition (the point of insertion).
A Red Arrow, when present, represents a Cue List entries for a single markedcue point.
Blue Brackets, when present, represent the Cue List entries for a selectionrange. To select a Cue range, click on one of the markers or between the twoblue brackets.
Pressing F8 will automatically add the currently defined range to the CueList. Once a cue point has been entered into the Cue List, the yellow markerpoints will be replaced with static blue markers. Either the Blue or Red cueentries can easily be referenced back to by simply double-clicking on the entrywithin the list.
A maximum of 96 cues may be entered into the Cue List.
Right-clicking on the yellow marker points will pull up a pop-up menu thatwill let you find the waveform's next/previous zero crossing, Find Next Beat,and enter a range into the Cue List (F8).
File Menu (Edit View)
The file menu displays all of Cool Edit Pro's Edit View file-handling options.These are:
New (Ctrl+N)
Use /File/New to create a new waveform. When you create a new waveform,Cool Edit Pro will ask you to specify the waveform's properties.
Higher sampling rates, stereo, and/or higher bit resolutions will result inhigher quality sounds, but do require more hard disk space.
Sample Rate: The sampling rate you choose determines the overallbandwidth (how many frequencies can be encoded within the audio signal),with higher sampling rates yielding a wider bandwidth. You can enter anysample rate directly, or choose a common sample rate from the list. Note thatmost sound cards support only certain sample rates.
Channels: Mono waveforms support one channel of audio information.Stereo files require twice the disk space, because they represent two channelsof information, a left channel and a right channel.
Resolution
Select the bit resolution for the file:8-bit: Select this for use in telephony/Internet applications.16-bit: Select this for standard professional/CD quality.32-bit: Work at the 32-bit level for best quality when processing
your audio. When done, you can convert down to 16- or 8-bit for output using dither and achieve better results then ifstaying in the 8- or 16-bit domain. You can also use 32-bitfor sound cards that go beyond the 16-bit standard (as in a24-bit card). Press the Options button in the Save As...dialog to access 32-bit options.
To achieve higher quality, you may want to work at the 32-bit levelwhile processing your audio. Since current sound cards cannot playbackaudio that has been stored and processed using the full 32-bits, this ratemust be converted downward for playback. It's best to use this mode whenusing audio cards that have resolutions greater than 16-bit (20-bits as ofthis writing).
Certain combinations of sample rate, channels, and resolution may notbe available on your system. To see the capabilities of your system, checkthe Devices tab under /Options/Settings. Although Cool Edit Pro cancreate and edit those files, your sound card may not be able to play themproperly.
27
Open (Ctrl+O)
Opens an existing sound file. Cool Edit Pro supports a wide variety of datatypes. When you load a file for editing, Cool Edit Pro converts the waveform
28
type to its own internal temporary file type for faster editing and betterhandling of larger file sizes.
Recent Directories: This displays the most recently used directories forquicker access to common locations.
Look In: Navigates through all available drives and directories.
File Name: You can specify the name of the file you wish to open here, if itresides in the current directory. Entering *.extension will display all files withthat extension at your current location, and *.* will display all files.
Files of Type: Select from the list of supported file types to display any fileswith a corresponding extension.
Don't ask for further details: If you check this option, Cool Edit Pro willnot prompt you for more information about the file format after you select afile to open. For example, if you double-click on a raw (headerless) PCM file,Cool Edit Pro won't prompt you for the sample rate, bit resolution, A-law/mu-law compression, or other information about the file. Instead, it will use thelast settings specified when you opened a headerless file.
Show File Information: Displays basic information about the audio file, suchas the file format, uncompressed file size, and running time.
Auto Play: With Auto Play enabled, any selected file in the Open dialog willbe auditioned, provided that its format can normally be played on your system.You can also play individual files when Auto Play is un-checked by selectingthem and clicking on the Play button, and you can stop Auto Play for thecurrent file by clicking on the Stop button (which replaces Play when AutoPlay is playing).
You can open several files at once (with each being appended one afteranother) by selecting them with the Shift (for contiguous selection) or Ctrl (fornon-contiguous selection) key pressed. When you open multiple filessimultaneously, Cool Edit converts all file types to that of the first file that isopened.
Whenever multiple files are open, you can easy select between these filesusing the Control-Shift keys (which shifts between open files in the forwarddirection) or using the Control-Shift-Tab keys (which shifts between open filesin the reverse direction).
Open As
Like Open, Open As lets you specify the sample format before opening a file toallow automatic conversion to a sample-rate, bit-rate or channel-type.However, Open As offers a "quick-and-easy" conversion method: if the targetsample rate is different, it will not try to pre-filter or post-filter the samples.This function is handy for opening files as different bit rates and number ofchannels, but for differing sample rates, open the file with Open, and then useConvert Sample Type.
29
Open Append
You can append any waveform to the end of the current waveform with/File/Open Append. If the waveform being appended is of a different type, itwill be quickly converted as it is being copied.
You'll get best results if you only append files of the same sample rate,because no number-crunching would be required to change from one rate tothe native rate.
You'll notice that appended file cue points are placed within the Cue List,making it easy to find the edit boundaries at a later time.
Open an audio file, choose /File/Open Append and append anotherwaveform at the end. If the two don't have the same format, Cool Edit Pro willconvert the appended waveform to the current format.
Revert to Saved
Reloads the current waveform from disk, discarding any edits that were madesince the last time the file was saved.
Close
This will close the currently opened audio file (bye, bye!). When a waveform isclosed, the associated temporary file is removed, thus freeing up the hard diskspace that was previously being used.
Close All
This command has options for closing multiple waveforms at once.
Waves Not in Use: Closes any open waveforms not currently in use by thecurrent Session (not inserted in the multitrack environment).
Waves and Session: Closes all open waveforms and the currently openSession (if any) in Multitrack View.
Save
Saves the audio file under its current name and format.
Save As
Use /File/Save As… to save the current wave to a new name or location, orformat.
Recent Directories: This displays the most recently used directories, forquicker access to common locations.
Save In: Navigates through all available drives and directories.
File Name: Specify a name for the file.
Save as Type: Select the format you wish to save as from the supported list.Some formats cannot be written to from certain sample types. In this case,Cool Edit Pro will ask if you wish to convert before saving.
Save extra non-audio information: If you don't want to save header fieldssuch as the copyright, author, and others, un-check the this box.

30
Options: Some file formats support various options that can be modified here.
Save Selection
/File/Save Selection allows for saving of just the highlighted selection to a file.Its properties are identical to those in Save As…
This feature is very useful for saving small segments of a larger audio file.For example, Should you wish to record a number of samples from a friend'ssampler, you could record then as a single, continuous audio file. At a latertime, you could highlight and process each file (EQ, normalize, etc.) separatelyand then save them to their own directory, using the /File/Save Selectionfeature.
Recent Directories: This displays the most recently used directories, forquicker access to common locations.
Save In: Navigates through all available drives and directories.
File Name: Specify a name for the file.
Save as Type: Select the format you wish to save as from the supported list.Some formats cannot be written to from certain sample types. In this case,Cool Edit Pro will ask if you wish to convert before saving.
Save extra non-audio information: If you do not want to save header fieldssuch as the copyright, author, and others, un-check the this box.
Options: Some file formats support various options that can be modified here.
Flush Virtual File
Cool Edit opens a .wav file and uses it directly without making a backup in thetemp directory. If the .wav file needs to be closed (to delete, or be opened byanother program for writing), then flushing it will copy the .wav file's contentsto the temp directory and close the file. A file is automatically flushed if theentire file is modified by Cool Edit, since all changes are written to the tempdirectory.
In a nutshell: this option allows a audio file that's currently being used byCool Edit Pro to be simultaneously used by another program or resourceapplication.
Free Hard Drive Space...
The Free Hard Drive Space function provides a way to manageCool Edit Pro’s use of the space available on your drive. This dialog can beentered into at any time by choosing it from the from the File menu, or it willautomatically pop up if space available nears 0k. On systems with lots of harddrive space, undo levels will be cleared automatically, so this box may notappear often.
Waveform: The Waveform list displays the names of the currently openwaveforms. Select the name of the file for which you would like to removeUndo instances. You can also press the Close File button to the right to closethe selected file if no longer needed. This will free up hard drive space as well.
31
Undo History: Lists the "undone actions" that are currently being retained inmemory. Each instance listed here consumes hard drive space equivalent to theamount used by the original file (the one highlighted in the Waveform list). Forexample, if the file selected in the Waveform list is a 500k file, each item in theUndo History list uses an additional 500k. To remove items from the Historylist, select it from the list and press the Clear Undo(s) button. All items at theselected level and below are removed.
Lower Hard Drive Reserves: Cool Edit Pro creates temporary files for usewhen performing edits on your audio. The Primary and Secondary drives listedhere are those set in Options/Settings/System, and are used to store thesetemp files. You can enter an amount (in MB) to keep free on each drive, whichCool Edit Pro will not make use of should available space get that low. TheSet Reserves button registers the Reserve amounts you have entered with therest of the program. Press this button before exiting the dialog if you wish tokeep the settings listed there.
Total Available Space: This displays the total amount of available space foruse by Cool Edit Pro (the sum of your Primary and Secondary Drives). Thisvalue should grow as you free up space.
Cancel Last Operation: You can press this button to stop any action inprogress, such as a Transform, or other edit. This becomes useful only if theFree Hard Drive Space dialog has been invoked automatically byCool Edit Pro, indicating you have run out of space.
MRU List
The "most recently used" audio file list, displays the eight files that were mostrecently opened. You can quickly open any of these files again by selecting itfrom the list with the mouse or by typing the number that's associated with thedesired file.
This is an easy one to show you. Simply open up a few audio files and thenshut Cool Edit Pro down. Upon re-opening Cool Edit Pro, you'll see a listingwithin the File Menu that shows the files that you've recently opened. Simplyclick on a favorite file, and it pops up in the Waveform View window, readyfor playback or editing.
Exit
Closes Cool Edit Pro. (I'm outta here, man!) At close time, you will be asked ifyou would like to save any unsaved files which were modified, and anytemporary files that were created will be removed.

32
Edit Menu (Edit View)
The edit menu displays all of the options that relate to basic waveform editing inthe Edit View mode. These options are:
Undo (Ctrl+Z or Alt+Backpsace)
Undoes the last action.
Can't Undo
Ya gotta do something first, before you can undo it!
Undo information is stored as a temporary file on your hard drive. If the Undofunction is enabled in the /Options/Settings option, an unlimited number ofundos can be retained (actually, the number's only limited by your hard drivespace.) This means that those of us who are less than perfect, can back out ofalmost any corner that we might paint ourselves into, as the information will beautomatically saved as one or more files (~NDOnnnn) in your temporarydirectory until the changes have been saved as a audio file.
When working with very large audio files, it's possible that you might not haveenough disk space to save the Undo information before continuing on with anoperation. It's also possible that the time required to save the Undo informationof very large audio files can slow your work down. In either case the problemcan be solved by turning the undo function off in the settings dialog box byremoving the check from /Edit/Enable Undo before processing, or you cansimply press the "Skip" button in the Saving Undo Data dialog while Undoinformation is being saved.
If you find that you don't have enough disk space to save the Undoinformation, you can change the Temp Directory to a different drive, ifavailable. You can do this under /Options/Settings/System/Temp Directory.
Enable/Disable Undo
Turns the Undo functions on and off.
Because Undo requires extra disk space for its temporary files, and time tosave them before processing, you may want to disable the Undo feature. Forexample, if you are running a function on a 5-minute file, you may not want towait while the undo information is saved to disk.
Repeat Last Command (F2 or F3)
Guess what? This function repeats the last command. Select /Edit/RepeatLast Command or press F2 to repeat the last function that modifiedwaveform data. Press F3 to immediately repeat the command, bypassing anysettings dialogs. In the latter case, Cool Edit Pro will automatically apply thelast settings that were used.
33
Windows Clipboard
You can use this option to copy waveform data to, or paste it from, thestandard Windows clipboard. Data on the Windows clipboard is available toother Windows applications, while data on Cool Edit Pro's internal clipboardis not. However, Cool Edit Pro's internal clipboard doesn't have the memorylimitations of the Windows clipboard.
Copy: Copies selection or wave to the Windows clipboard.
Paste: Inserts waveform data from the Windows clipboard at the insertionpoint, or replacing the currently selected data. If the format of the waveformdata in the clipboard differs from the format it is being pasted into,Cool Edit Pro converts it before pasting.
Paste to New: Creates a new file and inserts the waveform data from theWindows clipboard. The new file will automatically adopt the properties(sample rate, etc.) from the original clipboard material.
Copy (Ctrl+C or Ctrl+Insert)
This copies the current selection or wave to the internal clipboard.
Cool Edit Pro can use two different clipboards: the standard Windowsclipboard or its own internal one. The internal clipboard is faster and canhandle larger copy and paste operations, but it cannot copy to or paste fromother applications. If you want to copy data to another application, use/Edit/Windows Clipboard/Copy.
Cut (Ctrl+X or Shift+delete)
Removes the current selection and places it on the internal clipboard.
Paste (Ctrl+V)
Inserts data from the internal clipboard at the insertion point, or replaces thecurrently selected data. If the format of the waveform data on the clipboarddiffers from the format of the file it is being pasted into, Cool Edit Pro willconvert it before pasting.
Paste to New
Creates a new file and inserts waveform data from the internal clipboard. Thenew file automatically adopts the properties (sample rate, etc.) from theoriginal clipboard material.
Mix Paste (Ctrl+M)
Use Mix Paste to mix any audio data from either the Windows or the internalclipboard with the current wave. Clipboard data is inserted or overlappedstarting at the current insertion point or selection. If the format of thewaveform data on the clipboard differs from the format of the file it is beingpasted into, Cool Edit Pro will convert it before pasting.
34
Volume
Use the volume slides to paste an amplified/attenuated version of theclipboard wave into the current waveform. You can paste single channelsby adjusting the volume slides. Volume is represented as a percentage. Forexample, 10% is about -10dB, 50% is -6dB, etc.
Invert
Choose Invert to invert the data on the clipboard before pasting. This isvery handy in taking the difference between two samples. For example,after filtering, you can listen to the audio that was filtered by copying theselection, choosing Undo, then Mix Paste with Invert checked. Afterauditioning, you can restore the original sample with Undo.
Lock left/Right
When checked, the volume slide bars are locked, so that both left and rightvolumes can be adjusted at the same time.
Insert
Inserts clipboard waveform data at the current location or selection,replacing any selected data. If no selection has been made, Cool Edit Proinserts clipboard material at the cursor location, moving any existing datato the end of the inserted material.
Overlap
When Overlap is checked, the clipboard wave does not replace thecurrently highlighted selection, but is mixed at the selected volume with thecurrent waveform. If the clipboard waveform is longer than the currentselection, the waveform will continue beyond the selection.
Modulate
Modulates the clipboard data with the current waveform. This is similar tooverlapping, except that the values of the two waveforms are multiplied byeach other, sample by sample, instead of added.
To quickly modulate by a sine wave, use the Generate Tones function,which has a Modulate by Source option.
Crossfade (in milliseconds)
Set a fade time (in milliseconds) to apply to the beginning and end of theclipboard data. Cool Edit Pro fades in the first n-milliseconds and fades outthe last n-milliseconds of pasted data. Use this option for smoothertransitions to/from pasted material.
From Clipboard
Choose From Clipboard to paste audio data currently on Cool Edit Pro'sinternal clipboard.
From Windows Clipboard
Choose From Windows Clipboard to paste audio data currently on theWindows clipboard.
35
From File
Pastes the contents of a file. If the amount of data you want to paste is toolarge for the clipboard, you can use Save Selection to save the highlightedselection to a file using a non-compressed file format. Then you can pastethe data from the file by using this option. The Select File button pops up awindow similar to Cool Edit Pro's Open dialog.
Loop Paste
When checked, the clipboard waveform is pasted the number of timesentered. If the clipboard waveform is longer than the current selection, thewaveform will continue beyond the selection.
Open a waveform and highlight a range portion or all of it and copy it intothe clipboard (Ctrl-C). Now open a new wave and use Mix Paste to mix thefiles together at any beginning point you want to (using the dialog's defaultvalues for now.)
Insert in Multitrack
Inserts the currently highlighted range as a waveform block within themultitrack View window. The block will be consecutively inserted into the nextavailable track at the beginning of the window's timeline.
An easy way to enter a waveform range from the Edit View into theMultitrack View is by selecting the /Edit/Insert In Multitrack option. Thissimple-yet-powerful function simply takes the highlighted Edit View range andpastes it into the Multitrack View window (within the next available track atthe beginning of the session's timeline).
Say, for example, that you wanted to loop a short percussion riff. A simpleway to accomplish this would be to use the /Edit/Find Beats function to easysearch for the loop points and the select Insert In Multitrack, switch to theMultitrack View mode and Choose the /Edit/Loop Duplicate function tocreate the number of loops that you want.
Select Entire Wave (Ctrl+A)
This option selects the entire waveform (from zero to the end of the wave) asthe active range. It makes no difference whether the view is zoomed in or not(unlike double-clicking on the waveform, which selects only the visible portionof the wave.)
You can also select the entire wave by simply double-left clicking withinthe waveform display window.
Delete Selection (del)
Removes the current selection. The deleted portion is not copied to theclipboard, and can only be retrieved through Undo, or Revert to Saved if youhaven't saved the file since deleting.
Trim (Ctrl+T)
Basically, this is the exact opposite of Delete Selection, meaning thateverything is deleted except the selected portion. Use Trim to remove
36
unwanted material around a selection. The deleted portion(s) are not copied tothe clipboard, and can only be retrieved through Undo, or Revert to Saved ifyou haven't saved the file since trimming.
Zero Crossings
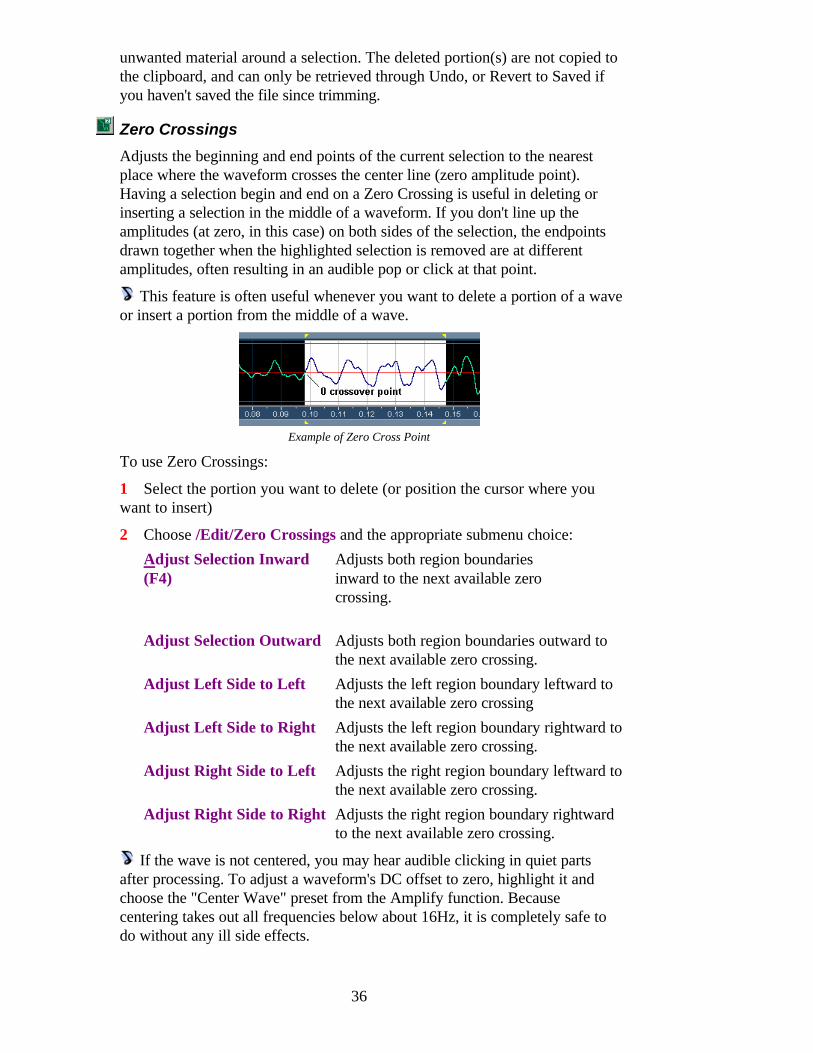
Adjusts the beginning and end points of the current selection to the nearestplace where the waveform crosses the center line (zero amplitude point).Having a selection begin and end on a Zero Crossing is useful in deleting orinserting a selection in the middle of a waveform. If you don't line up theamplitudes (at zero, in this case) on both sides of the selection, the endpointsdrawn together when the highlighted selection is removed are at differentamplitudes, often resulting in an audible pop or click at that point.
This feature is often useful whenever you want to delete a portion of a waveor insert a portion from the middle of a wave.
Example of Zero Cross Point
To use Zero Crossings:
1 Select the portion you want to delete (or position the cursor where youwant to insert)
2 Choose /Edit/Zero Crossings and the appropriate submenu choice:Adjust Selection Inward Adjusts both region boundaries(F4) inward to the next available zero
crossing.
Adjust Selection Outward Adjusts both region boundaries outward tothe next available zero crossing.
Adjust Left Side to Left Adjusts the left region boundary leftward tothe next available zero crossing
Adjust Left Side to Right Adjusts the left region boundary rightward tothe next available zero crossing.
Adjust Right Side to Left Adjusts the right region boundary leftward tothe next available zero crossing.
Adjust Right Side to Right Adjusts the right region boundary rightwardto the next available zero crossing.
If the wave is not centered, you may hear audible clicking in quiet partsafter processing. To adjust a waveform's DC offset to zero, highlight it andchoose the "Center Wave" preset from the Amplify function. Becausecentering takes out all frequencies below about 16Hz, it is completely safe todo without any ill side effects.
37
If the amplitude levels between two waveforms don't match up at an edit orloop point, you may hear audible clicking as an edit passes or a loop repeats.To adjust for this, you can revert to the original source file and use the ZeroCrossings feature to match initial and ending levels. If there is a DC offset, thisDC level difference can be set to zero by highlighting it and choosing the"Center Wave" preset from the Amplify function.
Open a waveform and zoom in until the individual waveform excursionsbecome visible. Now select a range (simply click-drag the cursor over thewaveform), then choose any zero-crossing option to watch the boundariesmove to the nearest zero-crossing point(s).
Find Beats
Cool Edit Pro lets you find the boundaries that make up musical beats in anexisting music audio file. This allows you to easily find start and end looppoints for constructing drum loops and similar phrases.
To use Find Beats:
1 Place the play cursor in the waveform to the left of your targeted loopstarting point.
2 Select /Edit/Find Beats/Find Next Beat (Left) to locate the beginning ofthe current beat; and press F11 (to repeat) until you arrive at the desired loopstarting point.
3 Select /Edit/Find Beats/Find Next Beat (Right) to select from thecurrent cursor position (now the loop start) to the next beat; and press F12until you arrive at the desired end for your loop.
4 Press the Play Loop button in the transport toolbar to audition your loop.
5 After any necessary tweaking you can then save, paste, or add the loop tothe cue list.
If the waveform levels don't match up at the loop point, you may hearaudible clicking as the loop repeats. To adjusts for this, you can revert to theoriginal source file and use the Zero Crossings feature to match initial andending levels. If there is a DC offset, this DC level difference can be set to zeroby highlighting it and choosing the "Center Wave" preset from the Amplifyfunction. Because centering takes out all frequencies below about 16Hz, it iscompletely safe to do without any ill side effects.
Snapping
In this case, the term "snap" simply means that whenever a waveform cursor isplaced within a certain distance of a defined location point timeline or cuelocation point, that cursor will automatically "jump" or "snap" to that preciseboundary point.
Snap to Ruler (Fine)
This option allows the selected waveform to snap to each of thesubdivisions (decimal, SMPTE, samples, etc.) within the timeline window.Zooming in on the timeline (which is done by left-clicking and draggingwithin the timeline across the desired waveform area) will generally break
38
the display down into more accurate sub-divisions, letting you place awaveform more accurately within the timeline. Both the (Fine) and(Course) snap settings can be easily accessed by right-clicking on thetimeline.
Snap to Ruler (Course)
This option allows the selected waveform to only snap to the majornumeric divisions (decimal, SMPTE, samples, etc.) in the timeline window.Both the (Fine) and (Course) snap settings can be easily accessed by right-clicking on the timeline.
Snap to Cue
This option allows the selected waveform to snap to a defined Cue point(see /View/Cue List section for information on how to define Cue Points.)
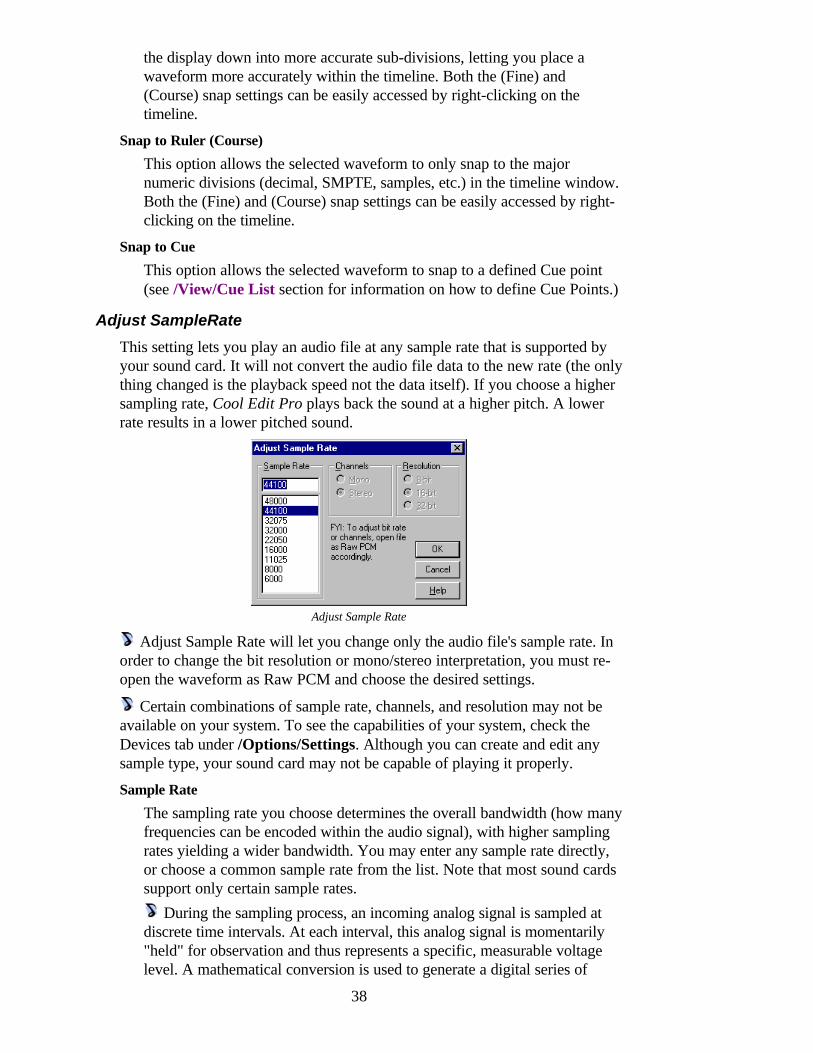
Adjust SampleRate
This setting lets you play an audio file at any sample rate that is supported byyour sound card. It will not convert the audio file data to the new rate (the onlything changed is the playback speed not the data itself). If you choose a highersampling rate, Cool Edit Pro plays back the sound at a higher pitch. A lowerrate results in a lower pitched sound.
Adjust Sample Rate
Adjust Sample Rate will let you change only the audio file's sample rate. Inorder to change the bit resolution or mono/stereo interpretation, you must re-open the waveform as Raw PCM and choose the desired settings.
Certain combinations of sample rate, channels, and resolution may not beavailable on your system. To see the capabilities of your system, check theDevices tab under /Options/Settings. Although you can create and edit anysample type, your sound card may not be capable of playing it properly.
Sample Rate
The sampling rate you choose determines the overall bandwidth (how manyfrequencies can be encoded within the audio signal), with higher samplingrates yielding a wider bandwidth. You may enter any sample rate directly,or choose a common sample rate from the list. Note that most sound cardssupport only certain sample rates.
During the sampling process, an incoming analog signal is sampled atdiscrete time intervals. At each interval, this analog signal is momentarily"held" for observation and thus represents a specific, measurable voltagelevel. A mathematical conversion is used to generate a digital series of
39
numbers that represent the signal level at that particular instant in time.Once the conversion has been made, it can be digitally stored or processed.The sampling rate is defined as the number of samples (or snapshots) thatare taken of an audio signal per second. Since sampling is tied directly tothe component of time, a system's sampling rate will determine a system'soverall bandwidth (how many frequencies can be encoded within the audiosignal), with higher sampling rates yielding a wider bandwidth. The mostcommonly encountered sample rates used for digital audio editing are:11,025 Hz Poor AM Radio Quality/Speech (low-end multimedia)22,050 Hz Near FM Radio Quality (high-end multimedia)32,000 Hz Better than FM Radio Quality (standard broadcast rate)44,100 Hz CD Quality48,000 Hz DAT Quality96,000 Hz DVD Quality
Non-standard sample rates can be entered directly into the numericsample rate window.
Channels
You cannot adjust this setting in Adjust Sample Rate.
Resolution
You cannot adjust this setting in Adjust Sample Rate.
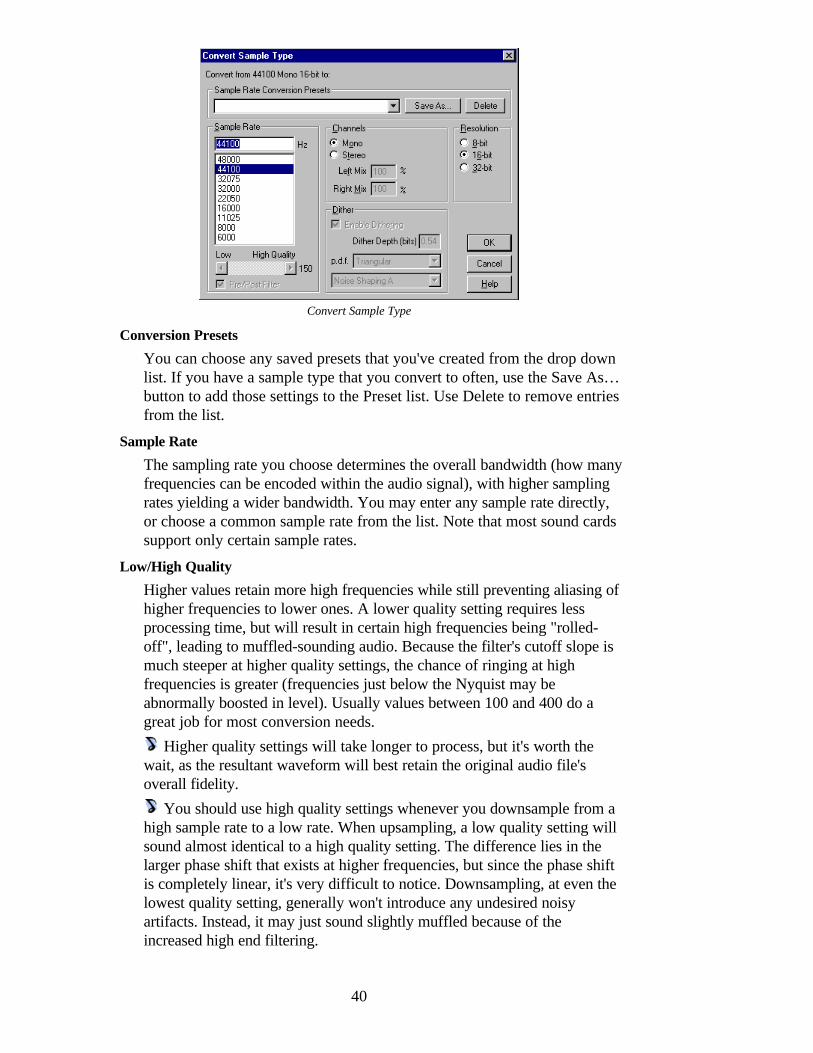
Convert Sample Type
This function directly converts the sample-rate, bit-rate, and channel format ofan audio file that's currently loaded in Cool Edit Pro into a new format type(such as 44KHz/16-bit/stereo to 22KHz/8-bit/mono). Unlike /Edit/AdjustSample Rate, Convert Sample Type directly processes the samples within thefile, or re-samples the data, so that the audio will retain the same pitch andduration as the original file.
You can choose various levels of quality, and changes in overall and relativeL/R volume levels can easily be made when converting between mono andstereo formats. You can also add Dither to reduce granulation noise whenconverting to lower bit-rates. Various other options are also available, allowingyou to customize the conversion process to suit your own particular needs.
40
Convert Sample Type
Conversion Presets
You can choose any saved presets that you've created from the drop downlist. If you have a sample type that you convert to often, use the Save As…button to add those settings to the Preset list. Use Delete to remove entriesfrom the list.
Sample Rate
The sampling rate you choose determines the overall bandwidth (how manyfrequencies can be encoded within the audio signal), with higher samplingrates yielding a wider bandwidth. You may enter any sample rate directly,or choose a common sample rate from the list. Note that most sound cardssupport only certain sample rates.
Low/High Quality
Higher values retain more high frequencies while still preventing aliasing ofhigher frequencies to lower ones. A lower quality setting requires lessprocessing time, but will result in certain high frequencies being "rolled-off", leading to muffled-sounding audio. Because the filter's cutoff slope ismuch steeper at higher quality settings, the chance of ringing at highfrequencies is greater (frequencies just below the Nyquist may beabnormally boosted in level). Usually values between 100 and 400 do agreat job for most conversion needs.
Higher quality settings will take longer to process, but it's worth thewait, as the resultant waveform will best retain the original audio file'soverall fidelity.
You should use high quality settings whenever you downsample from ahigh sample rate to a low rate. When upsampling, a low quality setting willsound almost identical to a high quality setting. The difference lies in thelarger phase shift that exists at higher frequencies, but since the phase shiftis completely linear, it's very difficult to notice. Downsampling, at even thelowest quality setting, generally won't introduce any undesired noisyartifacts. Instead, it may just sound slightly muffled because of theincreased high end filtering.
41
Pre/Post Filter
To prevent any chance of aliasing, the pre-filter on downsampling, or post-filter on upsampling will remove all frequencies above the Nyquist limit,thereby keeping them from generating false frequencies at the low end ofthe spectrum. In general, you should enable this option for best results.
Channels
Mono/Stereo: Choose whether the new sample type will be mono orstereo. If you decide to convert to Stereo from Mono, or to Mono fromStereo, you can adjust the left and right channel volumes.Left Mix: When converting from Mono to Stereo, you can choose therelative amplitude with which the original mono signal will be placed intoeach side of the new stereo signal. This way, you can place the monosource on the left channel only, the right channel only, or any balance pointin between. If you are converting to from Stereo to Mono, this percentagecontrols the amount of signal from the respective channel that will bemixed into the final mono waveform. The most common mixing methodsare to use 50% of both left and right channels when converting to Mono,and 100% for both values when converting to Stereo.
To do a vocal cut you can convert the stereo waveform to mono with aLeft Mix of 100% and a Right Mix of -100%. Most vocal tracks arepositioned in the middle of the stereo field in-phase, so converting thesignal so that it's out-of-phase will often greatly reduce the vocal track'slevel.Right Mix: When converting from Mono to Stereo, you can choose therelative amplitude with which the original mono signal will be placed intoeach side of the new stereo signal. This way, you can place the monosource on the left channel only, the right channel only, or any balance pointin between. If you are converting to from Stereo to Mono, this percentagecontrols the amount of signal from the respective channel that will bemixed into the final mono waveform. The most common mixing methodsare to use 50% of both left and right channels when converting to Mono,and 100% for both values when converting to Stereo.
To do a vocal cut you can convert the stereo waveform to mono with aLeft Mix of 100% and a Right Mix of -100%. Most vocal tracks arepositioned in the middle of the stereo field in-phase, so converting thesignal so that it's out-of-phase will often greatly reduce the vocal track'slevel.
Resolution
Choose the bit resolution to convert to. Converting to a lower resolutionenables the Dither options below.
Dither
Use Dither to reduce noise and distortion to figures below their currentlevels through the addition of small amounts of white noise (a randomsignal that includes all the frequencies across the entire audio spectrum).Although a small amount of noise is introduced into the circuit, the result isfar preferable to the increased distortion that you would otherwise be

42
listening to at low signal levels. When converting to lower resolutions,dithering allows you to hear sounds that would otherwise be masked by thenoise and distortion limits of 8-bit audio (or quieter than the 16-bit limitprovides when converting from 32-bit.) If Dither isn't checked, quiet audiopassages will just fade in and out of a disruptive, "choppy" sound thatresembles falling rain or static. Whether or not dithering is used depends onthe audio that's being converted and, of course, your preferences.Enable Dithering: Enables/disables Dithering. If Dithering is not enabled,Cool Edit Pro truncates instead (bits that are not used are simply choppedoff and discarded). This gives a "crackly" effect that fades in and out onvery quiet audio passages.Dither Depth (bits): This sets the bit amount of Dither to be applied.Generally, values of 0.2 to 0.7 give the best results without adding toomuch noise. If Dithering is disabled, Cool Edit Pro simply truncates thedata, which can give a crackly effect that fades in and out on very quietaudio. With about 0.2 bits of dithering or more, you can hear a softconstant hiss in the background instead. Note, however, that as this value islowered, other unwanted harmonic distortion noise will appear. You canusually get away with lower values for the Dither Depth when you usenoise shaping curves.p.d.f.: The "Probability Distribution Function" controls how the ditherednoise is distributed away from the original audio sample value. Arectangular function means there is an equal chance that the noise valueadded will lie anywhere between +1 and -1 (i.e. the likelihood of a value of-0.8 being chosen is the same as that of 0.2, or 0.3, or any value between -1 and +1). The Triangular function chooses random numbers that aregenerally closer to 0 than to the edges -1 or +1 (i.e. the chance of 0 beingchosen is twice as great as the chance of choosing 0.5 or -0.5). Alldithering distribution functions can linearize the quantization noise,meaning that the noise that's heard doesn't depend on the frequency of thedithered audio, thus no harmonic distortion appears. The SNR Loss ismeasured against the undithered case. If modulation is present, the audiblenoise floor will rise and fall depending on the amplitude of the signal, sogenerally one doesn't want this either.
p.d.f. SNR Loss Modulation
Rectangular 3dB YesTriangular 4.8dB NoGaussian 6dB NegligibleShaped Triangular 4.8dB NoShaped Gaussian 6dB Negligible
Generally, a Triangular p.d.f. function is a wise choice, because it givesthe best tradeoff between SNR, distortion, and noise modulation. Theshaped versions force the noise to be skewed so that more high frequencynoise and less low frequency noise exists.Noise Shaping: The various noise shaping curves determine theplacement when moving noise to different frequencies. The same amount
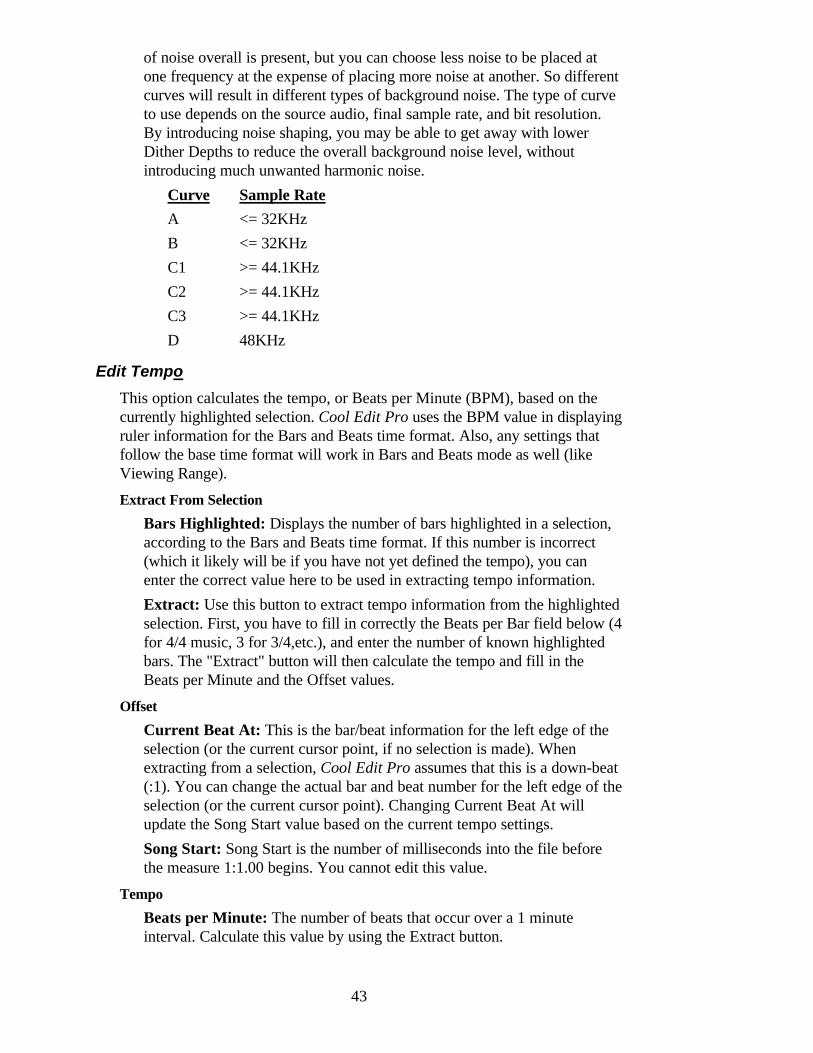
43
of noise overall is present, but you can choose less noise to be placed atone frequency at the expense of placing more noise at another. So differentcurves will result in different types of background noise. The type of curveto use depends on the source audio, final sample rate, and bit resolution.By introducing noise shaping, you may be able to get away with lowerDither Depths to reduce the overall background noise level, withoutintroducing much unwanted harmonic noise.
Curve Sample Rate
A <= 32KHzB <= 32KHzC1 >= 44.1KHzC2 >= 44.1KHzC3 >= 44.1KHzD 48KHz
Edit Tempo
This option calculates the tempo, or Beats per Minute (BPM), based on thecurrently highlighted selection. Cool Edit Pro uses the BPM value in displayingruler information for the Bars and Beats time format. Also, any settings thatfollow the base time format will work in Bars and Beats mode as well (likeViewing Range).
Extract From Selection
Bars Highlighted: Displays the number of bars highlighted in a selection,according to the Bars and Beats time format. If this number is incorrect(which it likely will be if you have not yet defined the tempo), you canenter the correct value here to be used in extracting tempo information.Extract: Use this button to extract tempo information from the highlightedselection. First, you have to fill in correctly the Beats per Bar field below (4for 4/4 music, 3 for 3/4,etc.), and enter the number of known highlightedbars. The "Extract" button will then calculate the tempo and fill in theBeats per Minute and the Offset values.
Offset
Current Beat At: This is the bar/beat information for the left edge of theselection (or the current cursor point, if no selection is made). Whenextracting from a selection, Cool Edit Pro assumes that this is a down-beat(:1). You can change the actual bar and beat number for the left edge of theselection (or the current cursor point). Changing Current Beat At willupdate the Song Start value based on the current tempo settings.Song Start: Song Start is the number of milliseconds into the file beforethe measure 1:1.00 begins. You cannot edit this value.
Tempo
Beats per Minute: The number of beats that occur over a 1 minuteinterval. Calculate this value by using the Extract button.
44
Beats per Bar: Use Beats per Bar to assign the right number of beats thatoccur to form one measure. This number is usually the top number in thetime signature (e.g. use 4 for 4/4 time, 6 for 6/8 time, or 3 for 3/4 time,etc.).Ticks per Beat: The number of sections each beat is divided into, or thevalue displayed after the decimal point: 1:1.12. You can set Ticks per Beatto any value from 2 to 3600. If you use 32 ticks/beat, then a time setting of4:2.16 would be the eighth note (half way) between beats 2 and 3, incommon time.
Open an audio file that is rhythmic in nature. Right-click on the waveformwindow's Timeline Display and choose the Bars and Beats timeline option.Now, highlight a range that spans several musical measures and select the/Edit/Edit Tempo option and press the Extract button. You'll notice that thebeats and measures have now been automatically calculated. Once OK ispressed, the Timeline Display will be set to the correct musical Beat/Bar timingrelationship for that piece of music.
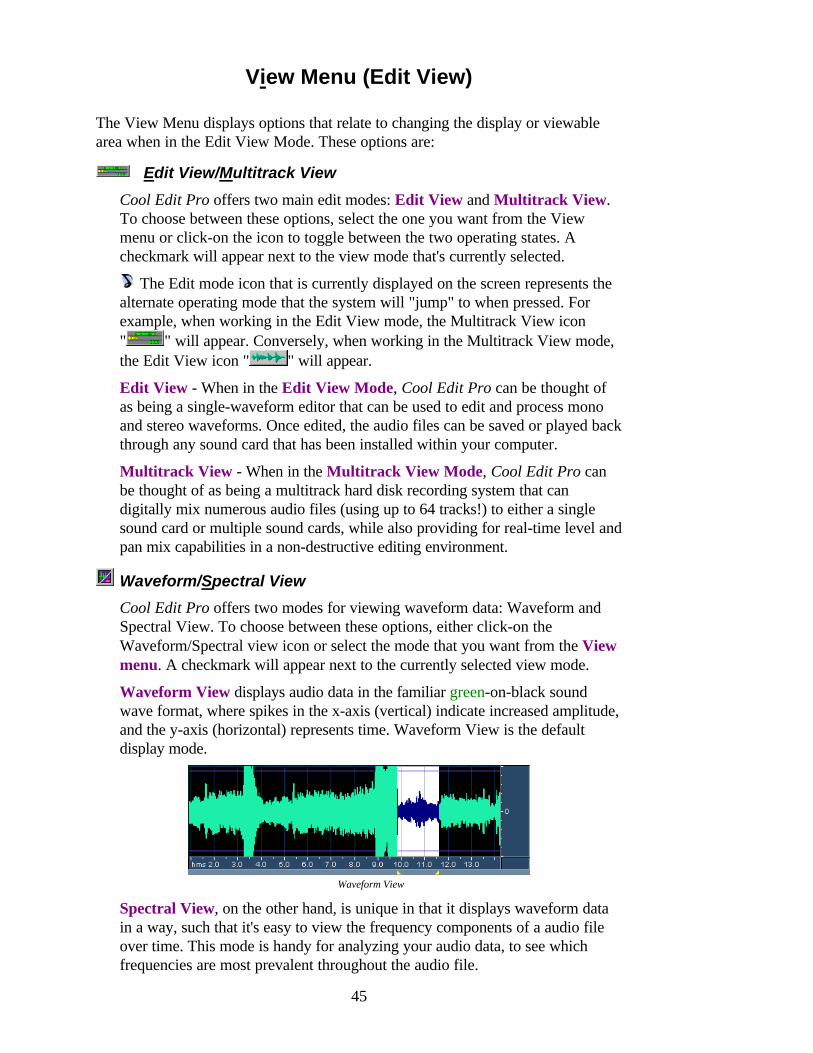
45
View Menu (Edit View)
The View Menu displays options that relate to changing the display or viewablearea when in the Edit View Mode. These options are:
Edit View/Multitrack View
Cool Edit Pro offers two main edit modes: Edit View and Multitrack View.To choose between these options, select the one you want from the Viewmenu or click-on the icon to toggle between the two operating states. Acheckmark will appear next to the view mode that's currently selected.
The Edit mode icon that is currently displayed on the screen represents thealternate operating mode that the system will "jump" to when pressed. Forexample, when working in the Edit View mode, the Multitrack View icon" " will appear. Conversely, when working in the Multitrack View mode,the Edit View icon " " will appear.
Edit View - When in the Edit View Mode, Cool Edit Pro can be thought ofas being a single-waveform editor that can be used to edit and process monoand stereo waveforms. Once edited, the audio files can be saved or played backthrough any sound card that has been installed within your computer.
Multitrack View - When in the Multitrack View Mode, Cool Edit Pro canbe thought of as being a multitrack hard disk recording system that candigitally mix numerous audio files (using up to 64 tracks!) to either a singlesound card or multiple sound cards, while also providing for real-time level andpan mix capabilities in a non-destructive editing environment.
Waveform/Spectral View
Cool Edit Pro offers two modes for viewing waveform data: Waveform andSpectral View. To choose between these options, either click-on theWaveform/Spectral view icon or select the mode that you want from the Viewmenu. A checkmark will appear next to the currently selected view mode.
Waveform View displays audio data in the familiar green-on-black soundwave format, where spikes in the x-axis (vertical) indicate increased amplitude,and the y-axis (horizontal) represents time. Waveform View is the defaultdisplay mode.
Waveform View
Spectral View, on the other hand, is unique in that it displays waveform datain a way, such that it's easy to view the frequency components of a audio fileover time. This mode is handy for analyzing your audio data, to see whichfrequencies are most prevalent throughout the audio file.

46
Spectral View
In Spectral View, the greater a signal's amplitude component within a specificfrequency range is, the brighter the displayed color will be. Colors range fromdark blue (next to no amplitude components exist in this frequency range) tobright yellow (frequencies in this range are high in amplitude.)
Lower frequencies are displayed near the bottom of the display, while higherfrequencies are displayed from the middle-to-top part of the scale. The top ofthe spectrum represents frequencies at just below the Nyquist frequency, or 1/2the sample rate. So if a bright spot appears near the top of the display for asignal sampled at 44.1 kHz, the frequency being represented is near 20 kHz.
On 256 or higher color displays, there will be more gradations between thecolors, and the frequency resolution, window type, colors, and energy plot canall be fine tuned. For more information on the various settings that relate toeither the Waveform or Spectral View modes, see the Settings topic in theEdit View Options Menu.
To gain higher resolution and see more detail in the lower frequencies, useConvert Sample Type to downsample the waveform to a lower sample rate.The highest displayed frequency value will be one half the new sample rate.
Show Grid
When in the Waveform View Mode, this option turns on or off a grid displaythat marks off time (in the horizontal axis) and amplitude (in the vertical axis.)
Show Grid
The Show Grid option is not available when in the Spectral View mode.
Show Boundaries
When in the Waveform View Mode, this option turns on or off the Bluehorizontal boundary lines that visually indicates where the waveform'samplitude exceeds or approaches the clipping level (0 dB).
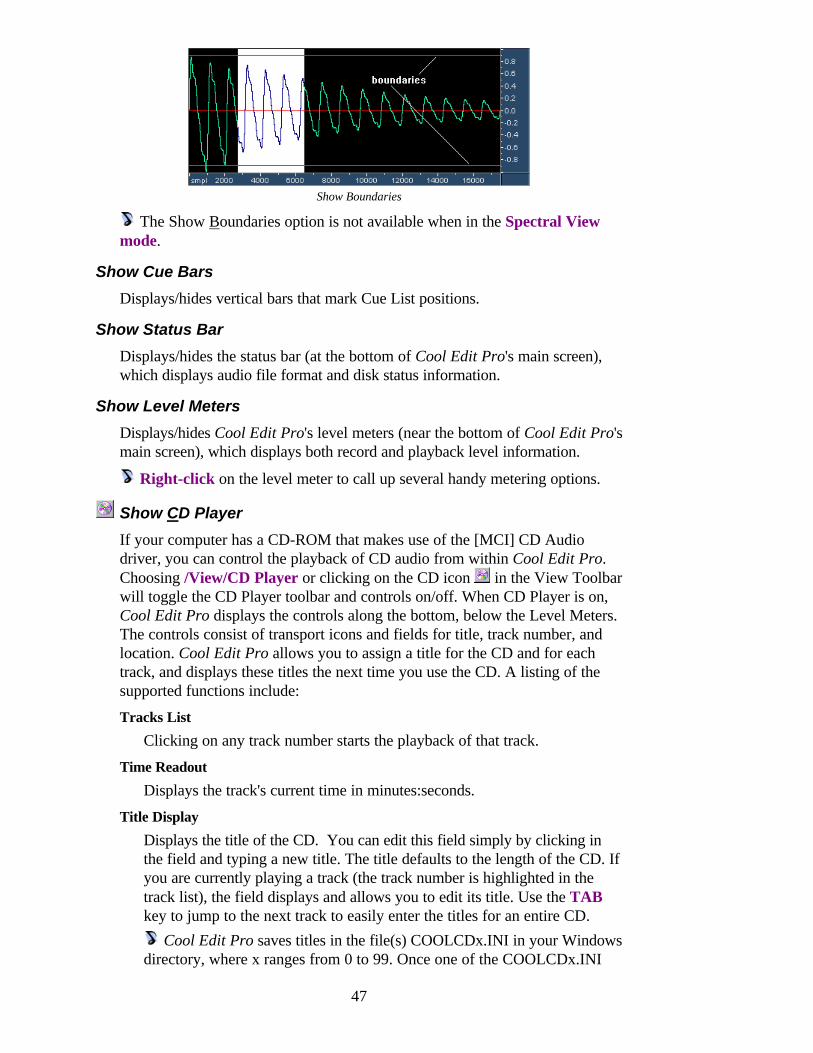
47
Show Boundaries
The Show Boundaries option is not available when in the Spectral Viewmode.
Show Cue Bars
Displays/hides vertical bars that mark Cue List positions.
Show Status Bar
Displays/hides the status bar (at the bottom of Cool Edit Pro's main screen),which displays audio file format and disk status information.
Show Level Meters
Displays/hides Cool Edit Pro's level meters (near the bottom of Cool Edit Pro'smain screen), which displays both record and playback level information.
Right-click on the level meter to call up several handy metering options.
Show CD Player
If your computer has a CD-ROM that makes use of the [MCI] CD Audiodriver, you can control the playback of CD audio from within Cool Edit Pro.Choosing /View/CD Player or clicking on the CD icon in the View Toolbarwill toggle the CD Player toolbar and controls on/off. When CD Player is on,Cool Edit Pro displays the controls along the bottom, below the Level Meters.The controls consist of transport icons and fields for title, track number, andlocation. Cool Edit Pro allows you to assign a title for the CD and for eachtrack, and displays these titles the next time you use the CD. A listing of thesupported functions include:
Tracks List
Clicking on any track number starts the playback of that track.
Time Readout
Displays the track's current time in minutes:seconds.
Title Display
Displays the title of the CD. You can edit this field simply by clicking inthe field and typing a new title. The title defaults to the length of the CD. Ifyou are currently playing a track (the track number is highlighted in thetrack list), the field displays and allows you to edit its title. Use the TABkey to jump to the next track to easily enter the titles for an entire CD.
Cool Edit Pro saves titles in the file(s) COOLCDx.INI in your Windowsdirectory, where x ranges from 0 to 99. Once one of the COOLCDx.INI
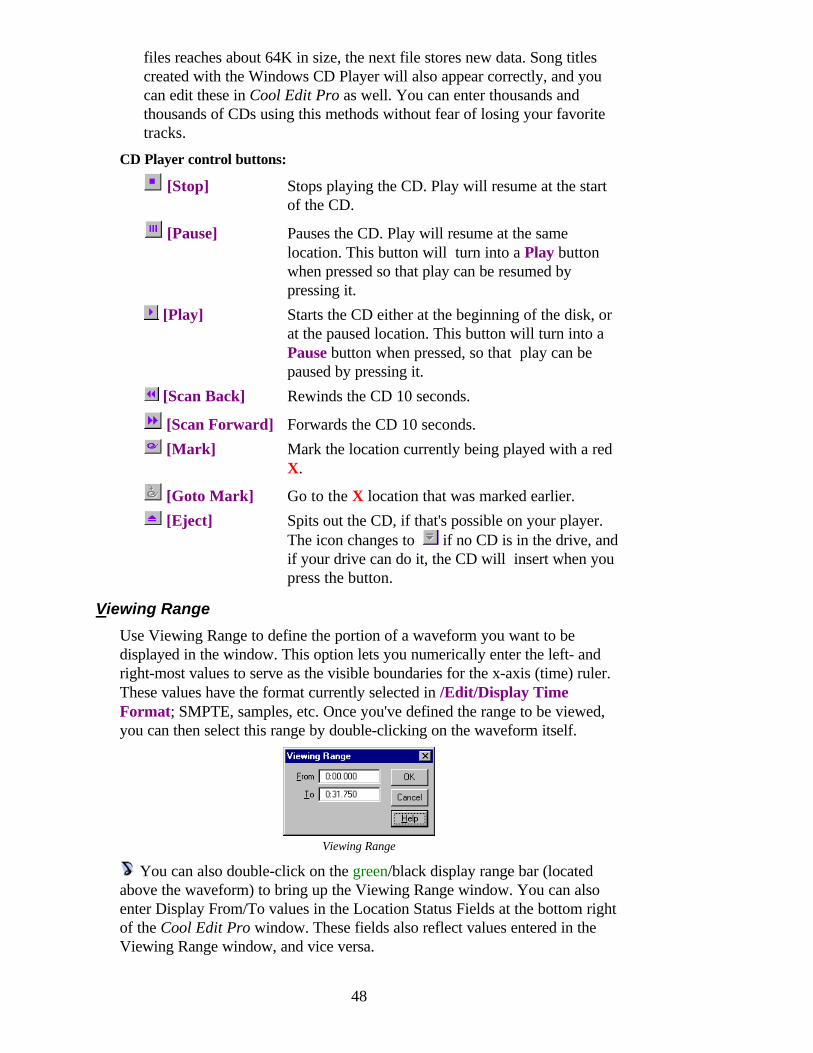
48
files reaches about 64K in size, the next file stores new data. Song titlescreated with the Windows CD Player will also appear correctly, and youcan edit these in Cool Edit Pro as well. You can enter thousands andthousands of CDs using this methods without fear of losing your favoritetracks.
CD Player control buttons:
[Stop] Stops playing the CD. Play will resume at the startof the CD.
[Pause] Pauses the CD. Play will resume at the samelocation. This button will turn into a Play buttonwhen pressed so that play can be resumed bypressing it.
[Play] Starts the CD either at the beginning of the disk, orat the paused location. This button will turn into aPause button when pressed, so that play can bepaused by pressing it.
[Scan Back] Rewinds the CD 10 seconds.
[Scan Forward] Forwards the CD 10 seconds. [Mark] Mark the location currently being played with a red
X.
[Goto Mark] Go to the X location that was marked earlier. [Eject] Spits out the CD, if that's possible on your player.
The icon changes to if no CD is in the drive, andif your drive can do it, the CD will insert when youpress the button.
Viewing Range
Use Viewing Range to define the portion of a waveform you want to bedisplayed in the window. This option lets you numerically enter the left- andright-most values to serve as the visible boundaries for the x-axis (time) ruler.These values have the format currently selected in /Edit/Display TimeFormat; SMPTE, samples, etc. Once you've defined the range to be viewed,you can then select this range by double-clicking on the waveform itself.
Viewing Range
You can also double-click on the green/black display range bar (locatedabove the waveform) to bring up the Viewing Range window. You can alsoenter Display From/To values in the Location Status Fields at the bottom rightof the Cool Edit Pro window. These fields also reflect values entered in theViewing Range window, and vice versa.
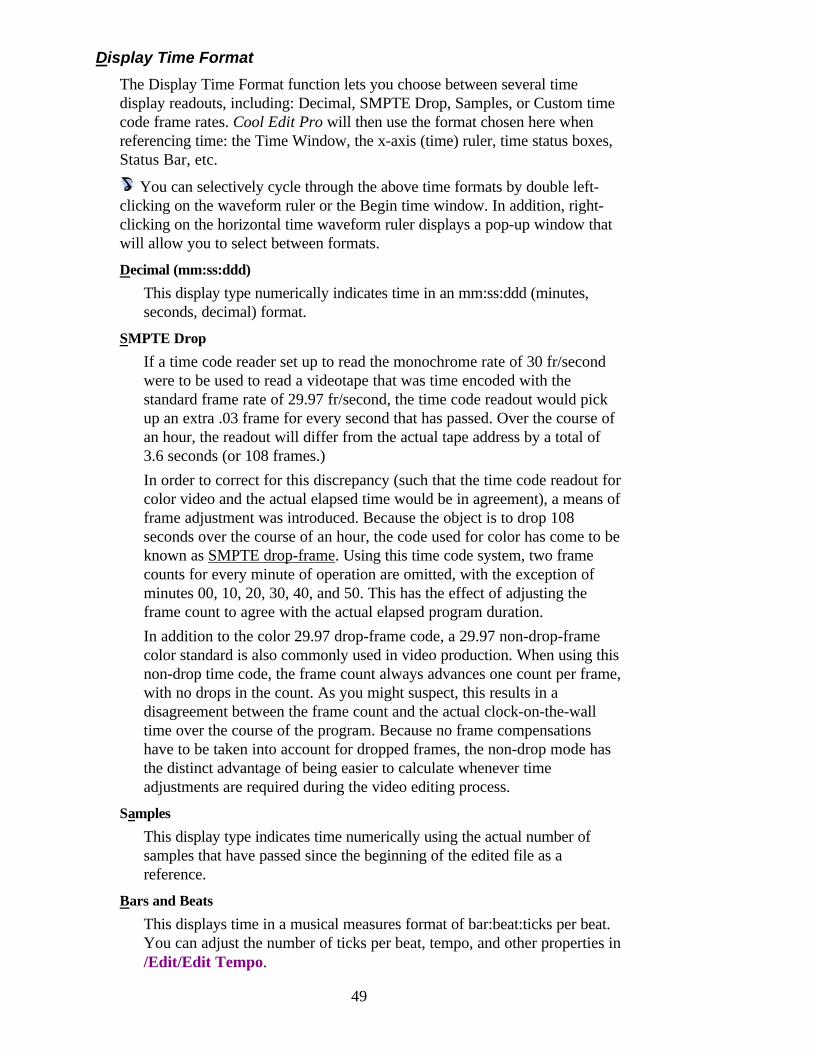
49
Display Time Format
The Display Time Format function lets you choose between several timedisplay readouts, including: Decimal, SMPTE Drop, Samples, or Custom timecode frame rates. Cool Edit Pro will then use the format chosen here whenreferencing time: the Time Window, the x-axis (time) ruler, time status boxes,Status Bar, etc.
You can selectively cycle through the above time formats by double left-clicking on the waveform ruler or the Begin time window. In addition, right-clicking on the horizontal time waveform ruler displays a pop-up window thatwill allow you to select between formats.
Decimal (mm:ss:ddd)
This display type numerically indicates time in an mm:ss:ddd (minutes,seconds, decimal) format.
SMPTE Drop
If a time code reader set up to read the monochrome rate of 30 fr/secondwere to be used to read a videotape that was time encoded with thestandard frame rate of 29.97 fr/second, the time code readout would pickup an extra .03 frame for every second that has passed. Over the course ofan hour, the readout will differ from the actual tape address by a total of3.6 seconds (or 108 frames.)In order to correct for this discrepancy (such that the time code readout forcolor video and the actual elapsed time would be in agreement), a means offrame adjustment was introduced. Because the object is to drop 108seconds over the course of an hour, the code used for color has come to beknown as SMPTE drop-frame. Using this time code system, two framecounts for every minute of operation are omitted, with the exception ofminutes 00, 10, 20, 30, 40, and 50. This has the effect of adjusting theframe count to agree with the actual elapsed program duration.In addition to the color 29.97 drop-frame code, a 29.97 non-drop-framecolor standard is also commonly used in video production. When using thisnon-drop time code, the frame count always advances one count per frame,with no drops in the count. As you might suspect, this results in adisagreement between the frame count and the actual clock-on-the-walltime over the course of the program. Because no frame compensationshave to be taken into account for dropped frames, the non-drop mode hasthe distinct advantage of being easier to calculate whenever timeadjustments are required during the video editing process.
Samples
This display type indicates time numerically using the actual number ofsamples that have passed since the beginning of the edited file as areference.
Bars and Beats
This displays time in a musical measures format of bar:beat:ticks per beat.You can adjust the number of ticks per beat, tempo, and other properties in/Edit/Edit Tempo.
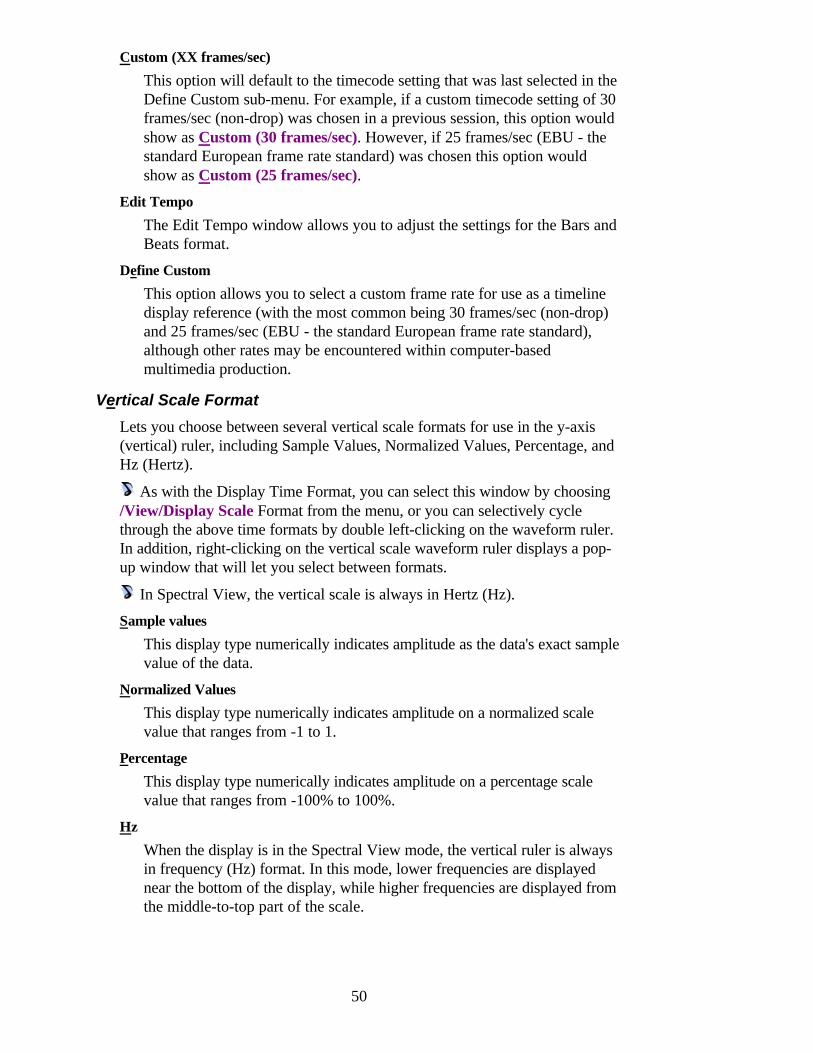
50
Custom (XX frames/sec)
This option will default to the timecode setting that was last selected in theDefine Custom sub-menu. For example, if a custom timecode setting of 30frames/sec (non-drop) was chosen in a previous session, this option wouldshow as Custom (30 frames/sec). However, if 25 frames/sec (EBU - thestandard European frame rate standard) was chosen this option wouldshow as Custom (25 frames/sec).
Edit Tempo
The Edit Tempo window allows you to adjust the settings for the Bars andBeats format.
Define Custom
This option allows you to select a custom frame rate for use as a timelinedisplay reference (with the most common being 30 frames/sec (non-drop)and 25 frames/sec (EBU - the standard European frame rate standard),although other rates may be encountered within computer-basedmultimedia production.
Vertical Scale Format
Lets you choose between several vertical scale formats for use in the y-axis(vertical) ruler, including Sample Values, Normalized Values, Percentage, andHz (Hertz).
As with the Display Time Format, you can select this window by choosing/View/Display Scale Format from the menu, or you can selectively cyclethrough the above time formats by double left-clicking on the waveform ruler.In addition, right-clicking on the vertical scale waveform ruler displays a pop-up window that will let you select between formats.
In Spectral View, the vertical scale is always in Hertz (Hz).
Sample values
This display type numerically indicates amplitude as the data's exact samplevalue of the data.
Normalized Values
This display type numerically indicates amplitude on a normalized scalevalue that ranges from -1 to 1.
Percentage
This display type numerically indicates amplitude on a percentage scalevalue that ranges from -100% to 100%.
Hz
When the display is in the Spectral View mode, the vertical ruler is alwaysin frequency (Hz) format. In this mode, lower frequencies are displayednear the bottom of the display, while higher frequencies are displayed fromthe middle-to-top part of the scale.
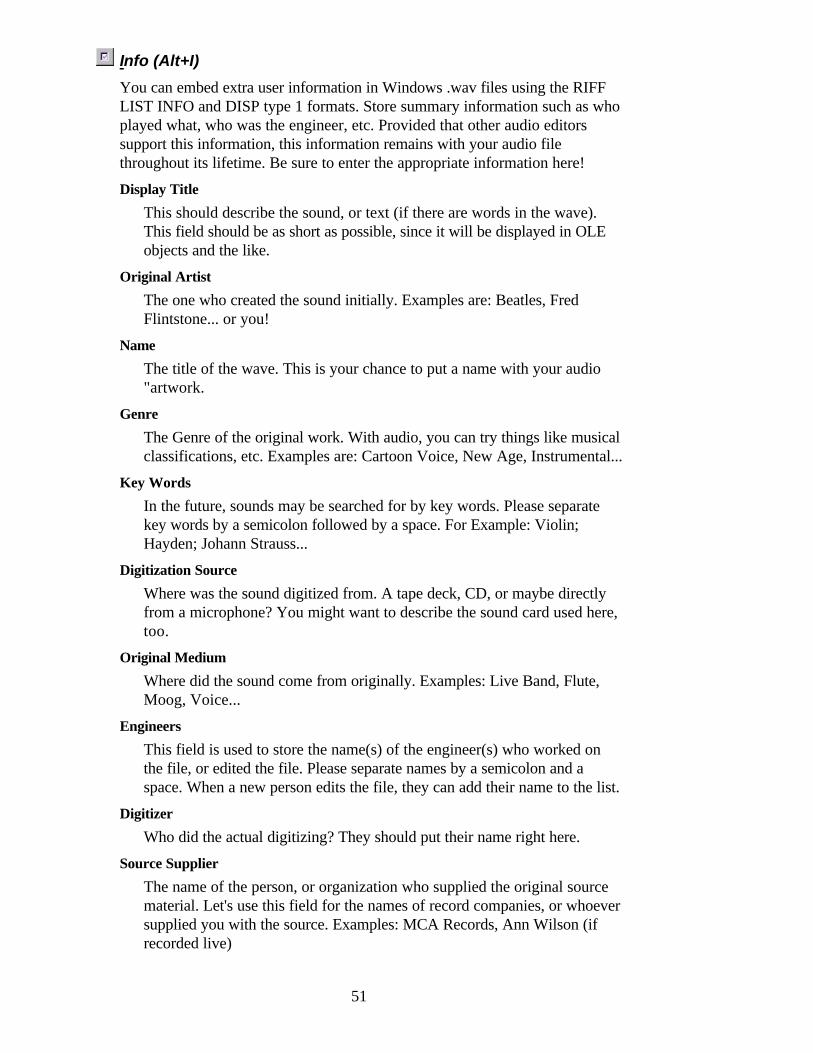
51
Info (Alt+I)
You can embed extra user information in Windows .wav files using the RIFFLIST INFO and DISP type 1 formats. Store summary information such as whoplayed what, who was the engineer, etc. Provided that other audio editorssupport this information, this information remains with your audio filethroughout its lifetime. Be sure to enter the appropriate information here!
Display Title
This should describe the sound, or text (if there are words in the wave).This field should be as short as possible, since it will be displayed in OLEobjects and the like.
Original Artist
The one who created the sound initially. Examples are: Beatles, FredFlintstone... or you!
Name
The title of the wave. This is your chance to put a name with your audio"artwork.
Genre
The Genre of the original work. With audio, you can try things like musicalclassifications, etc. Examples are: Cartoon Voice, New Age, Instrumental...
Key Words
In the future, sounds may be searched for by key words. Please separatekey words by a semicolon followed by a space. For Example: Violin;Hayden; Johann Strauss...
Digitization Source
Where was the sound digitized from. A tape deck, CD, or maybe directlyfrom a microphone? You might want to describe the sound card used here,too.
Original Medium
Where did the sound come from originally. Examples: Live Band, Flute,Moog, Voice...
Engineers
This field is used to store the name(s) of the engineer(s) who worked onthe file, or edited the file. Please separate names by a semicolon and aspace. When a new person edits the file, they can add their name to the list.
Digitizer
Who did the actual digitizing? They should put their name right here.
Source Supplier
The name of the person, or organization who supplied the original sourcematerial. Let's use this field for the names of record companies, or whoeversupplied you with the source. Examples: MCA Records, Ann Wilson (ifrecorded live)
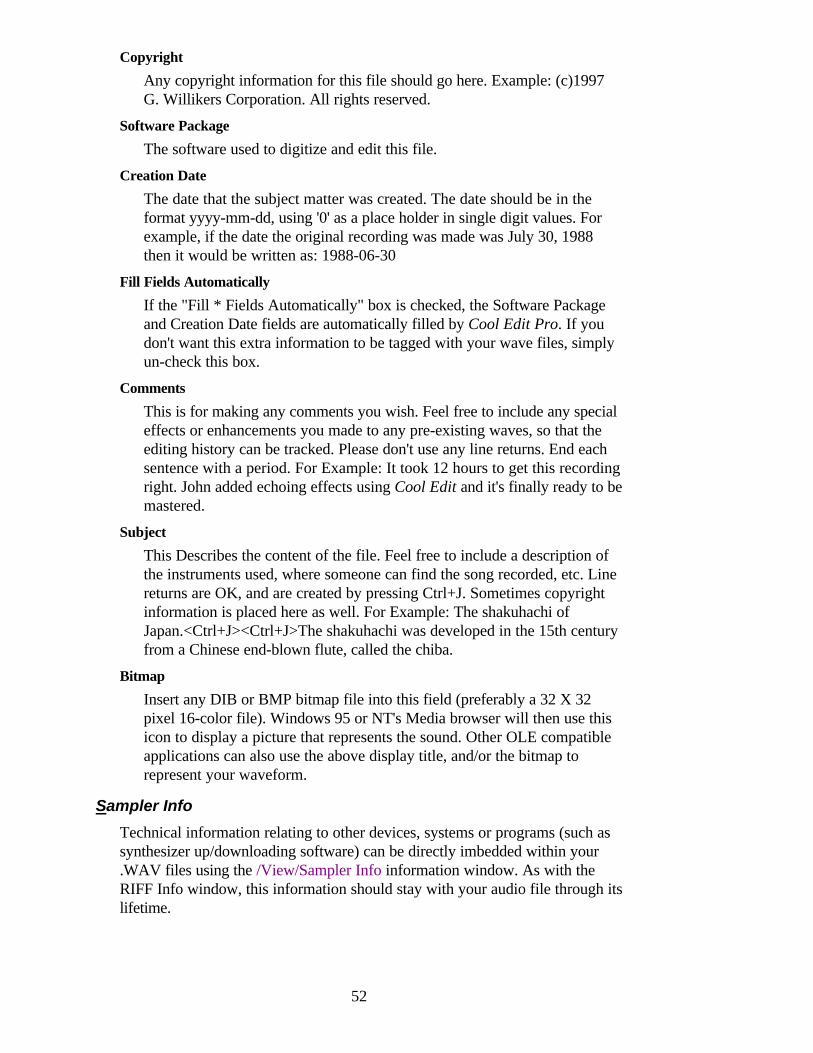
52
Copyright
Any copyright information for this file should go here. Example: (c)1997G. Willikers Corporation. All rights reserved.
Software Package
The software used to digitize and edit this file.
Creation Date
The date that the subject matter was created. The date should be in theformat yyyy-mm-dd, using '0' as a place holder in single digit values. Forexample, if the date the original recording was made was July 30, 1988then it would be written as: 1988-06-30
Fill Fields Automatically
If the "Fill * Fields Automatically" box is checked, the Software Packageand Creation Date fields are automatically filled by Cool Edit Pro. If youdon't want this extra information to be tagged with your wave files, simplyun-check this box.
Comments
This is for making any comments you wish. Feel free to include any specialeffects or enhancements you made to any pre-existing waves, so that theediting history can be tracked. Please don't use any line returns. End eachsentence with a period. For Example: It took 12 hours to get this recordingright. John added echoing effects using Cool Edit and it's finally ready to bemastered.
Subject
This Describes the content of the file. Feel free to include a description ofthe instruments used, where someone can find the song recorded, etc. Linereturns are OK, and are created by pressing Ctrl+J. Sometimes copyrightinformation is placed here as well. For Example: The shakuhachi ofJapan.<Ctrl+J><Ctrl+J>The shakuhachi was developed in the 15th centuryfrom a Chinese end-blown flute, called the chiba.
Bitmap
Insert any DIB or BMP bitmap file into this field (preferably a 32 X 32pixel 16-color file). Windows 95 or NT's Media browser will then use thisicon to display a picture that represents the sound. Other OLE compatibleapplications can also use the above display title, and/or the bitmap torepresent your waveform.
Sampler Info
Technical information relating to other devices, systems or programs (such assynthesizer up/downloading software) can be directly imbedded within your.WAV files using the /View/Sampler Info information window. As with theRIFF Info window, this information should stay with your audio file through itslifetime.
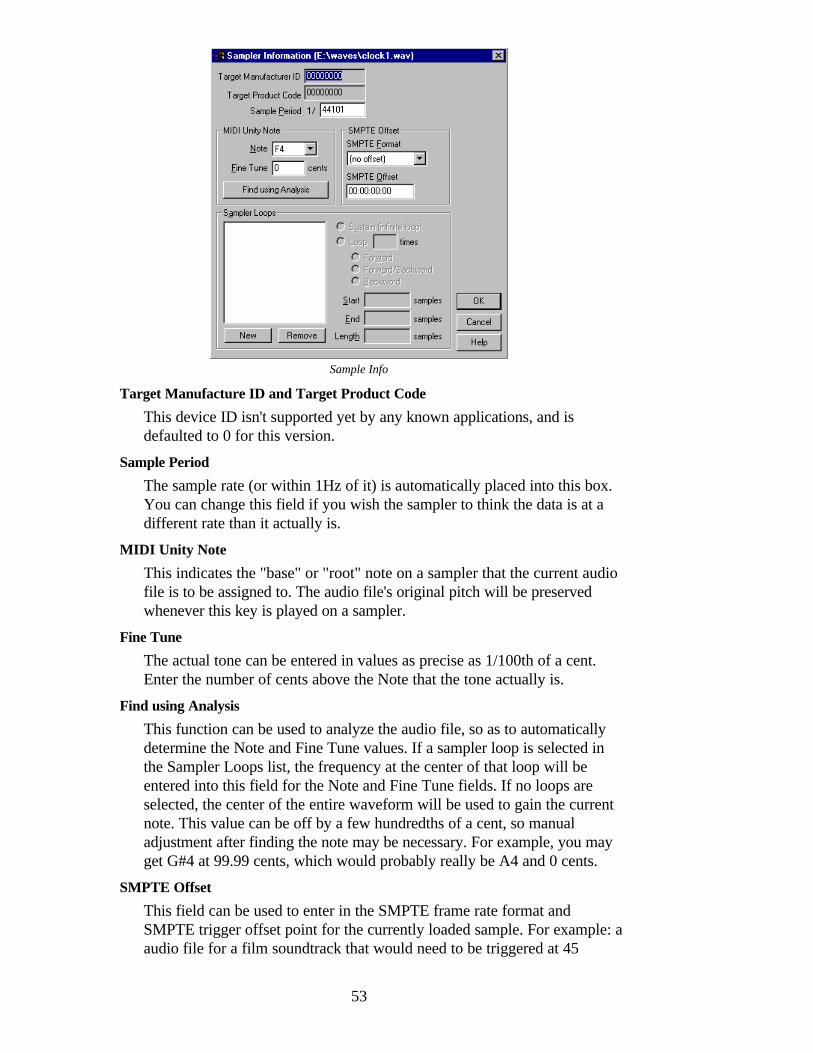
53
Sample Info
Target Manufacture ID and Target Product Code
This device ID isn't supported yet by any known applications, and isdefaulted to 0 for this version.
Sample Period
The sample rate (or within 1Hz of it) is automatically placed into this box.You can change this field if you wish the sampler to think the data is at adifferent rate than it actually is.
MIDI Unity Note
This indicates the "base" or "root" note on a sampler that the current audiofile is to be assigned to. The audio file's original pitch will be preservedwhenever this key is played on a sampler.
Fine Tune
The actual tone can be entered in values as precise as 1/100th of a cent.Enter the number of cents above the Note that the tone actually is.
Find using Analysis
This function can be used to analyze the audio file, so as to automaticallydetermine the Note and Fine Tune values. If a sampler loop is selected inthe Sampler Loops list, the frequency at the center of that loop will beentered into this field for the Note and Fine Tune fields. If no loops areselected, the center of the entire waveform will be used to gain the currentnote. This value can be off by a few hundredths of a cent, so manualadjustment after finding the note may be necessary. For example, you mayget G#4 at 99.99 cents, which would probably really be A4 and 0 cents.
SMPTE Offset
This field can be used to enter in the SMPTE frame rate format andSMPTE trigger offset point for the currently loaded sample. For example: aaudio file for a film soundtrack that would need to be triggered at 45
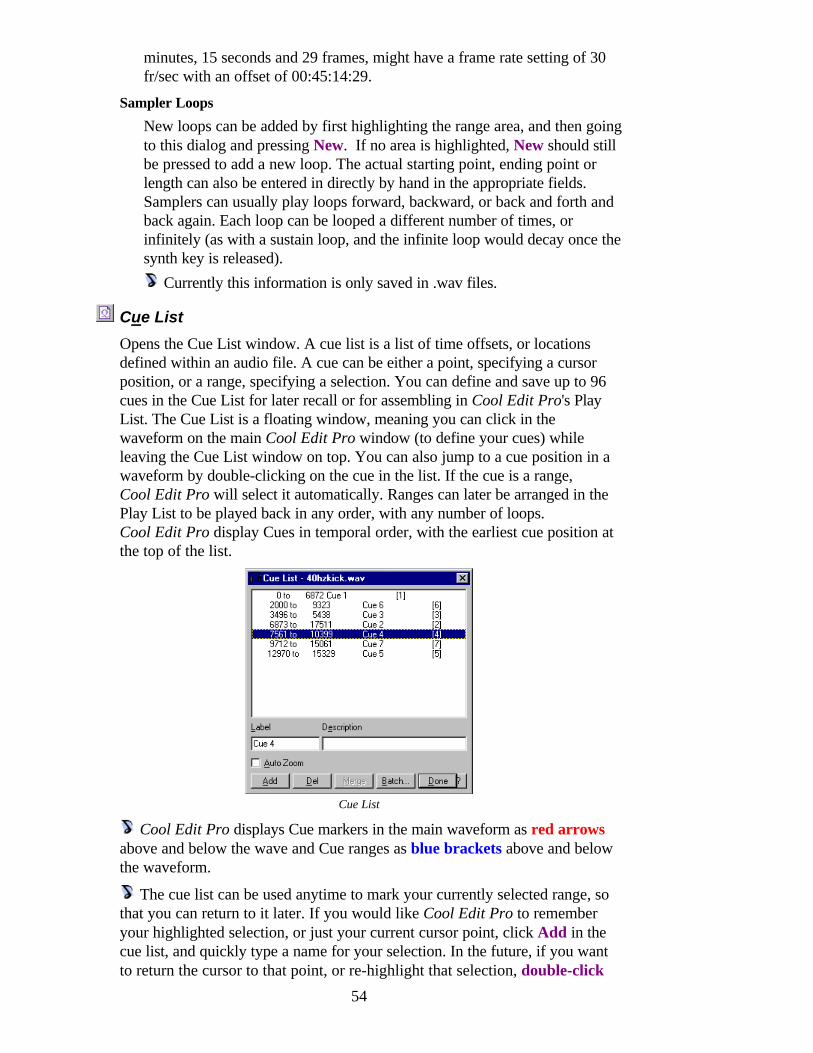
54
minutes, 15 seconds and 29 frames, might have a frame rate setting of 30fr/sec with an offset of 00:45:14:29.
Sampler Loops
New loops can be added by first highlighting the range area, and then goingto this dialog and pressing New. If no area is highlighted, New should stillbe pressed to add a new loop. The actual starting point, ending point orlength can also be entered in directly by hand in the appropriate fields.Samplers can usually play loops forward, backward, or back and forth andback again. Each loop can be looped a different number of times, orinfinitely (as with a sustain loop, and the infinite loop would decay once thesynth key is released).
Currently this information is only saved in .wav files.
Cue List
Opens the Cue List window. A cue list is a list of time offsets, or locationsdefined within an audio file. A cue can be either a point, specifying a cursorposition, or a range, specifying a selection. You can define and save up to 96cues in the Cue List for later recall or for assembling in Cool Edit Pro's PlayList. The Cue List is a floating window, meaning you can click in thewaveform on the main Cool Edit Pro window (to define your cues) whileleaving the Cue List window on top. You can also jump to a cue position in awaveform by double-clicking on the cue in the list. If the cue is a range,Cool Edit Pro will select it automatically. Ranges can later be arranged in thePlay List to be played back in any order, with any number of loops.Cool Edit Pro display Cues in temporal order, with the earliest cue position atthe top of the list.
Cue List
Cool Edit Pro displays Cue markers in the main waveform as red arrowsabove and below the wave and Cue ranges as blue brackets above and belowthe waveform.
The cue list can be used anytime to mark your currently selected range, sothat you can return to it later. If you would like Cool Edit Pro to rememberyour highlighted selection, or just your current cursor point, click Add in thecue list, and quickly type a name for your selection. In the future, if you wantto return the cursor to that point, or re-highlight that selection, double-click
55
the name or choose the name and click Goto. One great use for markers is tohighlight a wave from a zero crossing point. To do this, go to the start of waveportion you wish to highlight, and zoom in as far as needed to position thecursor exactly on the zero-crossing point. Add that position to the cue list.Now zoom out, go to the end of the wave portion, and once again zoom in tofind the ending zero crossing. Now, double-click on marker name in the cuelist, hold down on the Shift key to extend the selection, and click on the endingzero crossing. Voila! You can choose "Zoom In" now to see your waveportion if you like... it's now selected.
Use the Cue List with the Find Beats and Zero Crossings commands tocapture the perfect loop:
1 Find the loop start and end with /Edit/Find Beats/Find Next Beat (Left) and/Edit/Find Beats/Find Next Beat (Right).
2 With your loop selected use /Edit/Zero Crossings/Adjust Left Side to Leftto place the left edge at a zero point.
3 With your loop selected use /Edit/Zero Crossings/Adjust Right Side toRight to place the right edge at a zero point.
4 Click Add in the Cue List or simply press F8 (add to Cue List)
You now have a loop transition that's completely smooth with both beginningand end points at zero. By clicking on this selection within the Cue List, youcan recall this loop point at any time (as long as the source audio file iscurrently active within the Waveform window.)
You can also assign any cue range you've added to a key on your keyboard:give the cue range a label of the form KEY N, where "N" is any key on thekeyboard (CAPITOL LETTERS ONLY). When you go back to editing thewaveform, pressing the key will play the cue range you selected. You canassign any portion of the waveform to any key on the keyboard.
If you have any problems when playing audio by pressing the assigned keys,try increasing the STACKS line in CONFIG.SYS to read STACKS=12,512.
Label
Lets you enter a short text label describing the selection.
Description
Lets you add a text description of the wave data, if necessary. Also can beused as a comment field.
Add (F8)
Adds the currently highlighted selection, or cursor position to the Cue List.Cool Edit Pro displays the items in temporal order, with the earliest cueposition at the top of the list. Press F8 when editing a waveform to add thecurrent range or cursor location to the Cue List.
You can press F8 to automatically add the currently selected position orrange to the Cue List. Once a range or point has been entered into the CueList, the yellow marker points will be replaced with static blue markers.Individual cursor positions can be added to the list and will be displayed as
56
a red marker. These cue entries can easily be referenced back to by simplydouble-clicking on the cue entry within the list.
Don't underestimate the power of the Cue List within the Edit Viewmode. If a waveform range or cursor position that you know will be ofparticular interest to you in the near future, simply press F8. This will addthe selected range to the Cue List. Calling up the Cue List will allow you torecall any range or cursor point within the session, simply by double-clicking on the cue selection.
Del
Removes the selected cue from the list. To select more than one cue item inthe list, hold down on the SHIFT key for contiguous selection or theCTRL key for noncontiguous selection.
Merge
The Merge function is able to take any two selected cue items (whetherthey are ranges or markers themselves) and merge them into a single,combined cue, spanning the earliest and latest locations in the two cues. Toselect more than one cue item in the list, hold down on the SHIFT key forcontiguous selection or the CTRL key for noncontiguous selection. Thenew merged item inherits the name from the earliest item chosen (thehighest item in the list). You loose the information entered in the Name andDescription fields for the subsequent merged items.
Done
Closes the Cue List window.
Play List
Opens Cool Edit Pro's Play List window. The play list is an arrangement ofCue List entries that you can play back in any order and loop a specifiednumber of times. The Play List can include up to 64 entries at any one time. Aswith the Cue List, the Play List is a floating window meaning you can click inthe waveform in the main Cool Edit Pro window (to define your cues) whileleaving the Play List and Cue List windows on top.
Cool Edit Pro saves the Play List in .WAV file format in the 'plst' chunk.
Add Before
Adds the currently highlighted selection from the cue list to the play list.The selection is inserted before the currently highlighted play list item, or atthe end, if nothing is selected.
Remove
Removes the selected play list item from the list.
Loops
The number of cue ranges that are to be looped within the play list.
Play
Plays the cue ranges in the order listed, looping selections if necessary. Playbegins at the currently highlighted item in the Play List. If [end] or if youhaven't selected a cue range, Cool Edit Pro plays the entire list.
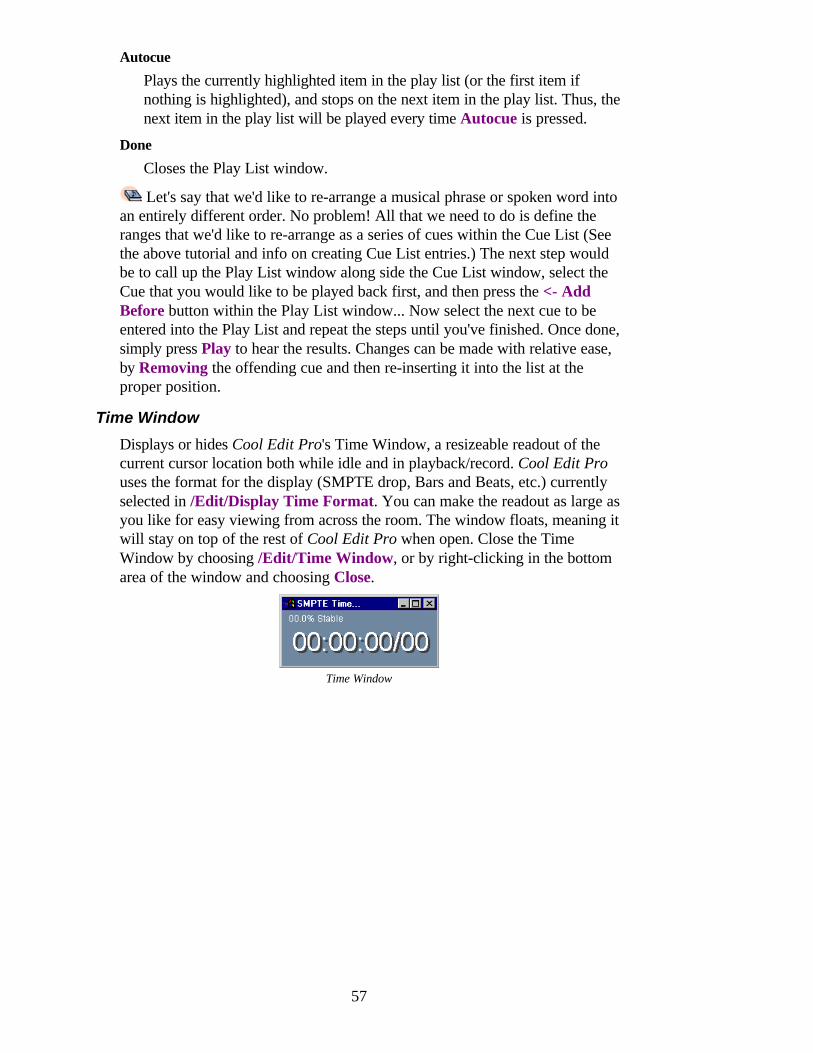
57
Autocue
Plays the currently highlighted item in the play list (or the first item ifnothing is highlighted), and stops on the next item in the play list. Thus, thenext item in the play list will be played every time Autocue is pressed.
Done
Closes the Play List window.
Let's say that we'd like to re-arrange a musical phrase or spoken word intoan entirely different order. No problem! All that we need to do is define theranges that we'd like to re-arrange as a series of cues within the Cue List (Seethe above tutorial and info on creating Cue List entries.) The next step wouldbe to call up the Play List window along side the Cue List window, select theCue that you would like to be played back first, and then press the <- AddBefore button within the Play List window... Now select the next cue to beentered into the Play List and repeat the steps until you've finished. Once done,simply press Play to hear the results. Changes can be made with relative ease,by Removing the offending cue and then re-inserting it into the list at theproper position.
Time Window
Displays or hides Cool Edit Pro's Time Window, a resizeable readout of thecurrent cursor location both while idle and in playback/record. Cool Edit Prouses the format for the display (SMPTE drop, Bars and Beats, etc.) currentlyselected in /Edit/Display Time Format. You can make the readout as large asyou like for easy viewing from across the room. The window floats, meaning itwill stay on top of the rest of Cool Edit Pro when open. Close the TimeWindow by choosing /Edit/Time Window, or by right-clicking in the bottomarea of the window and choosing Close.
Time Window
58
Transform Menu (Edit View)
The Transform menu displays all the options that relate to waveformtransformation (signal processing) functions when in the Edit View mode. Theseoptions are:
Invert
This function simply inverts the samples, so that all positive offsets arenegative and all negative offsets are positive. Inverting does not produce anaudible effect, but it can be useful in lining up amplitude curves when creatingloops, or pasting. On stereo waveforms, both channels are inverted.
Reverse
Causes a selection to play backwards by reversing the order of its samples.Useful for creating special effects.
Silence
This option will silence out the selected range. Unlike deleting, or cutting, aselection (which splices the surrounding material together), Silence leaves theduration of the selection intact, and simply zeros the amplitude within it.
DirectX
Cool Edit Pro fully supports third-party plug-in signal processing applicationsthat conform to Microsoft's new DirectX architecture (which makes theplug-ins available to any Windows program on your system that supportsDirectX). In plain English, this means that plug-in applications thatconform to the DirectX specification can be directly accessed, at any time,by Cool Edit Pro. Note: DirectX is also known as ActiveMovie.
Microsoft's DirectX drivers must be loaded onto your system in orderfor you to use DirectX filters within Cool Edit Pro. Cool Edit's Setupprogram can install these drivers for you. To install them, insert theCool Edit Pro CD into your CD drive, run Setup, and click on the item markedMicrosoft DirectX Media Runtime.
Amplitude Effects
The options in this menu can be used to alter the amplitude (volume level) of aaudio file or selected range in any of the following ways:
Amplify
Amplify increases or decreases the volume of a waveform or selection. Youcan choose between Constant Amplification (in which the same amount of gainchange is applied throughout the audio file) or Fade (in which gain varies overthe course of the waveform or selection) by clicking on the appropriate tab.
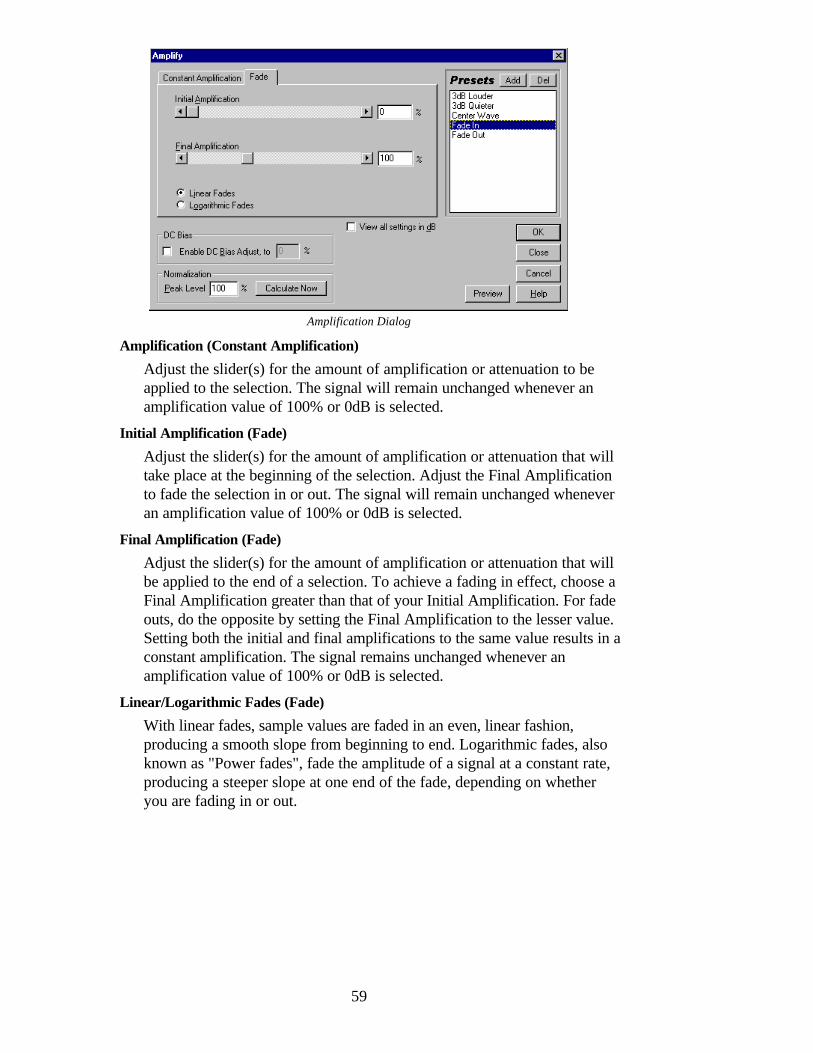
59
Amplification Dialog
Amplification (Constant Amplification)
Adjust the slider(s) for the amount of amplification or attenuation to beapplied to the selection. The signal will remain unchanged whenever anamplification value of 100% or 0dB is selected.
Initial Amplification (Fade)
Adjust the slider(s) for the amount of amplification or attenuation that willtake place at the beginning of the selection. Adjust the Final Amplificationto fade the selection in or out. The signal will remain unchanged wheneveran amplification value of 100% or 0dB is selected.
Final Amplification (Fade)
Adjust the slider(s) for the amount of amplification or attenuation that willbe applied to the end of a selection. To achieve a fading in effect, choose aFinal Amplification greater than that of your Initial Amplification. For fadeouts, do the opposite by setting the Final Amplification to the lesser value.Setting both the initial and final amplifications to the same value results in aconstant amplification. The signal remains unchanged whenever anamplification value of 100% or 0dB is selected.
Linear/Logarithmic Fades (Fade)
With linear fades, sample values are faded in an even, linear fashion,producing a smooth slope from beginning to end. Logarithmic fades, alsoknown as "Power fades", fade the amplitude of a signal at a constant rate,producing a steeper slope at one end of the fade, depending on whetheryou are fading in or out.
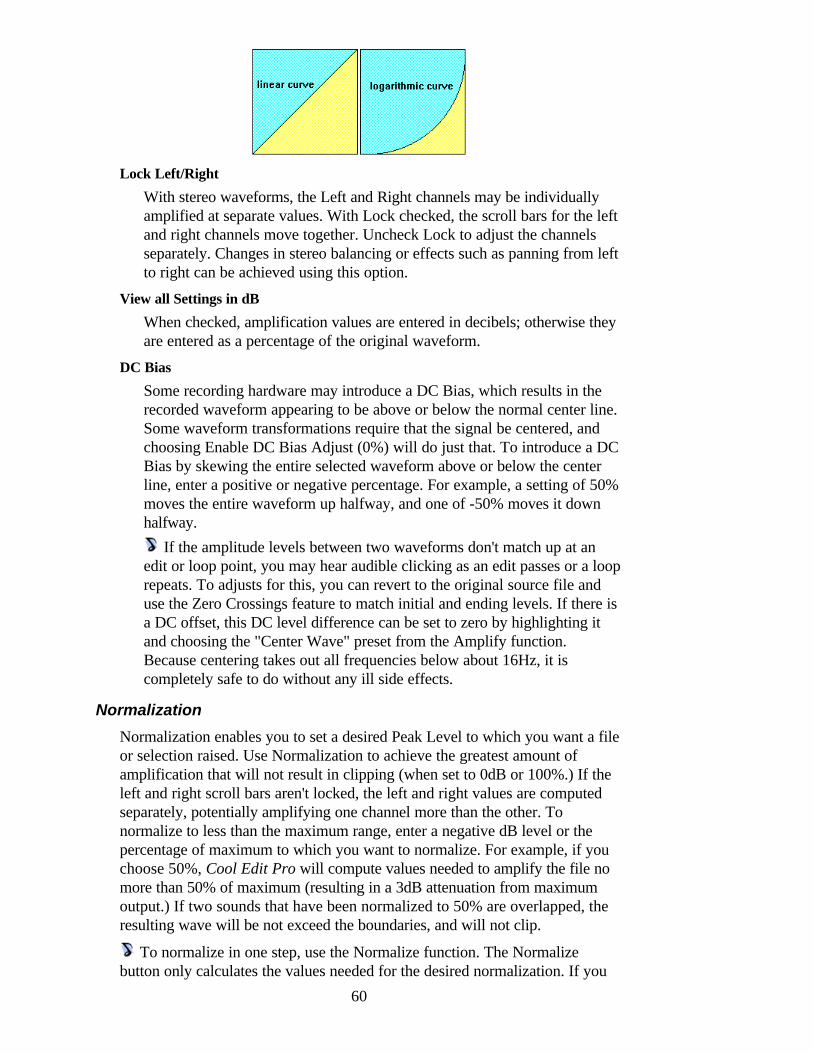
60
Lock Left/Right
With stereo waveforms, the Left and Right channels may be individuallyamplified at separate values. With Lock checked, the scroll bars for the leftand right channels move together. Uncheck Lock to adjust the channelsseparately. Changes in stereo balancing or effects such as panning from leftto right can be achieved using this option.
View all Settings in dB
When checked, amplification values are entered in decibels; otherwise theyare entered as a percentage of the original waveform.
DC Bias
Some recording hardware may introduce a DC Bias, which results in therecorded waveform appearing to be above or below the normal center line.Some waveform transformations require that the signal be centered, andchoosing Enable DC Bias Adjust (0%) will do just that. To introduce a DCBias by skewing the entire selected waveform above or below the centerline, enter a positive or negative percentage. For example, a setting of 50%moves the entire waveform up halfway, and one of -50% moves it downhalfway.
If the amplitude levels between two waveforms don't match up at anedit or loop point, you may hear audible clicking as an edit passes or a looprepeats. To adjusts for this, you can revert to the original source file anduse the Zero Crossings feature to match initial and ending levels. If there isa DC offset, this DC level difference can be set to zero by highlighting itand choosing the "Center Wave" preset from the Amplify function.Because centering takes out all frequencies below about 16Hz, it iscompletely safe to do without any ill side effects.
Normalization
Normalization enables you to set a desired Peak Level to which you want a fileor selection raised. Use Normalization to achieve the greatest amount ofamplification that will not result in clipping (when set to 0dB or 100%.) If theleft and right scroll bars aren't locked, the left and right values are computedseparately, potentially amplifying one channel more than the other. Tonormalize to less than the maximum range, enter a negative dB level or thepercentage of maximum to which you want to normalize. For example, if youchoose 50%, Cool Edit Pro will compute values needed to amplify the file nomore than 50% of maximum (resulting in a 3dB attenuation from maximumoutput.) If two sounds that have been normalized to 50% are overlapped, theresulting wave will be not exceed the boundaries, and will not clip.
To normalize in one step, use the Normalize function. The Normalizebutton only calculates the values needed for the desired normalization. If you
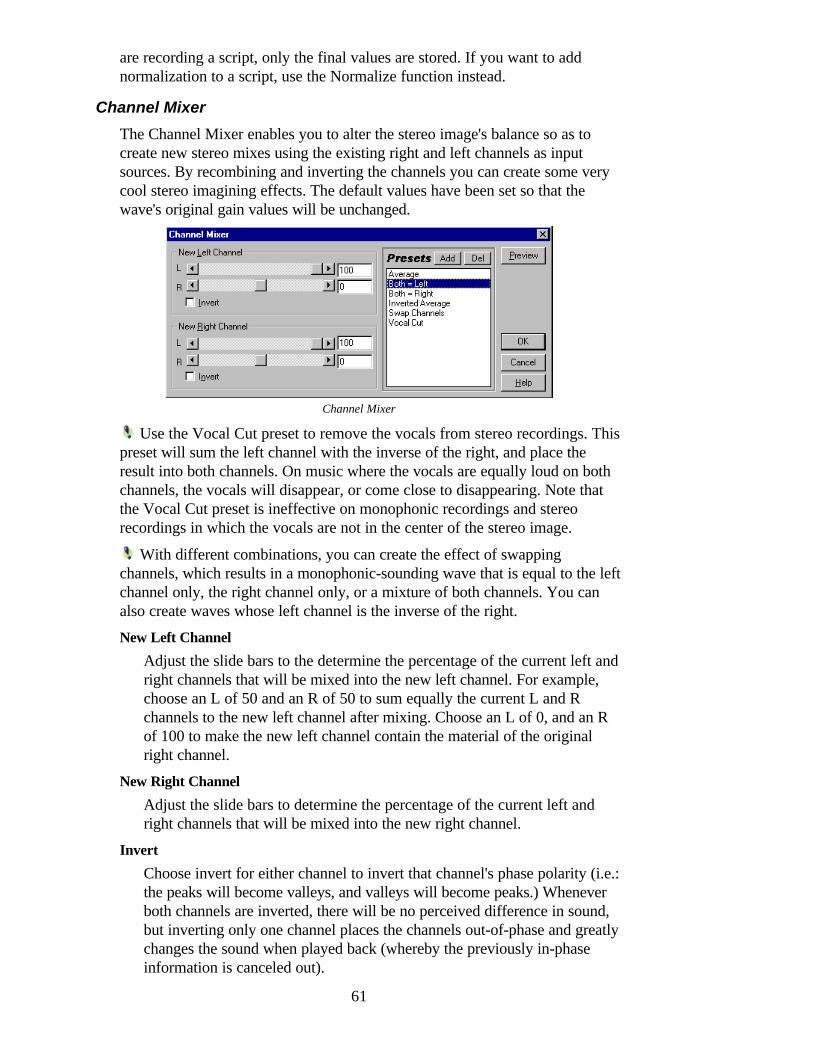
61
are recording a script, only the final values are stored. If you want to addnormalization to a script, use the Normalize function instead.
Channel Mixer
The Channel Mixer enables you to alter the stereo image's balance so as tocreate new stereo mixes using the existing right and left channels as inputsources. By recombining and inverting the channels you can create some verycool stereo imagining effects. The default values have been set so that thewave's original gain values will be unchanged.
Channel Mixer
Use the Vocal Cut preset to remove the vocals from stereo recordings. Thispreset will sum the left channel with the inverse of the right, and place theresult into both channels. On music where the vocals are equally loud on bothchannels, the vocals will disappear, or come close to disappearing. Note thatthe Vocal Cut preset is ineffective on monophonic recordings and stereorecordings in which the vocals are not in the center of the stereo image.
With different combinations, you can create the effect of swappingchannels, which results in a monophonic-sounding wave that is equal to the leftchannel only, the right channel only, or a mixture of both channels. You canalso create waves whose left channel is the inverse of the right.
New Left Channel
Adjust the slide bars to the determine the percentage of the current left andright channels that will be mixed into the new left channel. For example,choose an L of 50 and an R of 50 to sum equally the current L and Rchannels to the new left channel after mixing. Choose an L of 0, and an Rof 100 to make the new left channel contain the material of the originalright channel.
New Right Channel
Adjust the slide bars to determine the percentage of the current left andright channels that will be mixed into the new right channel.
Invert
Choose invert for either channel to invert that channel's phase polarity (i.e.:the peaks will become valleys, and valleys will become peaks.) Wheneverboth channels are inverted, there will be no perceived difference in sound,but inverting only one channel places the channels out-of-phase and greatlychanges the sound when played back (whereby the previously in-phaseinformation is canceled out).

62
Dynamics Processing
The dynamics processor varies the output level of a waveform, based on theinput level. This lets you limit or compress the dynamic range of a sample sothat the perceived loudness is kept below a defined limit, or so that thewaveform's overall dynamic range is kept at roughly the same level. You canalso expand or gate the signal so that low-level signals are reduced in level,thereby increasing the perceived dynamic range, or so that signals that fallbelow a certain threshold [i.e. noise] are eliminated. This is all accomplished byuse of a transfer function that is drawn using a graph. The graph depicts inputlevel along the x-axis (left and right) and the new output level along the y-axis(up and down). A linear line that flows from lower-left to upper-right (default)depicts a signal that has been left unchanged, since every input value goes tothe exact matching output value. For the not-so-faint-at-heart, Weird transferfunctions can also be drawn. For example, you can boost all input that has alevel of around -20dB, and leave everything else unchanged. You can alsodraw an inverse line (a line from upper-left to lower-right) that willdramatically boost low amplitudes while dramatically suppressing highamplitudes (that is, all quiet sounds will be loud, and all loud sounds will bequiet.)
Dynamics Dialog
Compressors are used for purpose of reducing the dynamic range of an audiosignal. It is generally an amplifier with two gain levels: the gain is unity forinput signal levels below a certain threshold, and less than unity for signals withlevels that fall above the threshold. For example, compressors can be used toeliminate the variations in the peaks of an electric bass output signal byclamping them to a constant level (thus providing an even solid bass line.)Compressors can also be useful to compensate for the wide variations in the
63
signal level produced by a singer who moves frequently or has an erraticdynamic range.
Limiters are compressors with a compression ratio of 10:1. This has the effectof reducing or "limiting" input signals that exceed a specified threshold level,so that the output will not increase in gain beyond that point. In other words, alimiter will only allow the dynamic range at its input to increase up to a certainpoint (determined by the threshold setting), beyond this level, as the inputcontinues to increase in gain, the output level will remain relatively constantand will not increase in volume.
Expanders are used to expand the dynamic range of an audio signal (basically,they're the opposite of a compressor.) It can also be considered an amplifierwith two gain levels: the gain is unity for input signal levels above a certainthreshold, and less than unity for signals with levels below the threshold. Theexpander is used to expand the dynamic range of an audio signal by boostingthe high-level signals and attenuating the low-level signals.
Noise Gates are a special type of expander that can be used to reduce oreliminate noise below a threshold level. It does this by heavily attenuatingsignals with levels that fall below the threshold. It's often used to totally cut offthe signal level during a musical pause so as not to pass background noise. Itcan also be used to silence the pauses in speech.
Gain Processor
The Gain Processor section affects the signal before output.
Output Gain
This is a gain applied to the output signal and is the last step performed onthe audio.
Attack Time
This is the attack time applied just before output. Attack time determines the time in milliseconds that it takes for the
processed output signal to reach its specified output volume. If there issuddenly a quiet portion that drops 30dB, it will take this much time beforethe output actually drops to its corresponding volume level. If the sum ofAttack and Release times is too short (less than about 20 ms total), audibleeffects, such as a "vibrating" sound, can be heard at around 1000 Hz/mstotal. For example, if the Attack and Release times are each set to 5 ms(making 10 ms total), then a vibrating sound at 100Hz can be heard. Thus,a total value of about 30 ms is about as low as you can go withoutintroducing these effects.
Release Time
This is the release time that is applied just before output. This is the time it takes the end of a previous output level to reach the
specified output volume. For example, where the Attack is the time it takesfor the start of a pulse to reach the desired output volume, the Release isthe time it takes for the end of the pulse to reach the desired level.
64
Joint Channels
In Stereo, each channel can be compressed independently, sometimescausing the surrounding background noise to get louder on one channel ata time. This can sound strange. For example, a loud drum beat in the leftchannel will make the background noise sound louder in the right than inthe left. If Joint Channels is checked, both channels are used to find a singleinput dB value, and both channels will be amplified together by the sameamount (thus preserving the stereo center-channel image). For example, aloud drum beat on the left channel will also cause the right channel to bereduced in level by an equal amount.
Level Detector
This section gets the current amplitude information from the audio todetermine the amount by which the original signal will be amplified.
Input Gain
This is the gain added to the signal before it goes into the Level Detector(the section that detects the current level). This essentially "pushes" thegraph up or down by the gain given.
Attack Time
This is the attack time that is applied when retrieving the current amplitudeinformation.
Attack time determines the time in milliseconds that it takes for theprocessed output signal to reach its specified output volume. If there issuddenly a quiet portion that drops 30dB, it will take this much time beforethe output actually drops to its corresponding volume level. If the sum ofAttack and Release times is too short (less than about 20 ms total), audibleeffects, such as a "vibrating" sound, can be heard at around 1000 Hz/mstotal. For example, if the Attack and Release times are each set to 5 ms(making 10 ms total), then a vibrating sound at 100Hz can be heard. Thus,a total value of about 30 ms is about as low as you can go withoutintroducing these effects.
Release Time
This is the release time applied when retrieving the current amplitudeinformation.
Release Time is the time it takes for the end of a previous output levelto reach the specified output volume. For example, where the Attack is thetime it takes for the start of a pulse to reach the desired output volume, theRelease is the time it takes for the end of the pulse to reach the desiredlevel.
Peak
Peak mode is a graph interpretation method that is a little more difficult touse than RMS, and is a bit outdated. It equates to the RMS value timestwo. That is, if the RMS value is -20dB, then the equivalent peak value willbe -40dB. This occurs because the RMS value calculated was mapped to apeak sample value for output. This method is basically here for backwardcompatibility.
65
RMS
This is a new graph interpretation method that more closely matches theway people hear volume. This mode causes the output to be exactly theRMS amplitude that is specified in the graph. For example, a limiter (flathorizontal line) at -10dB causes the RMS amplitude of the result toaverage -10dB (where 0dB is a maximum amplitude sine wave withoutclipping).
Low Cutoff
This is the lowest frequency that dynamics processing will affect. You candefine a band, or range, to which compression or expansion is applied,within the current frequency range. The Low Cutoff point is the bottomboundary in defining this band. For example, with values of 1000 for LowCutoff and 5000 for High Cutoff, dynamics processing only affects audio inthe frequency range of 1kHz to 5kHz. To use the entire frequency range ofthe source material, leave this setting at 0.
High Cutoff
This is the highest frequency that dynamics processing will affect. The HighCutoff point is the top boundary in defining this band. For example, withvalues of 1000 for Low Cutoff and 5000 for High Cutoff, dynamicsprocessing only affects audio in the frequency range of 1kHz to 5kHz. Touse the entire frequency range of the source material, leave this setting at 0.To use the entire frequency range of the source material, this setting shouldbe at 1/2 the current sample rate (24000 for 48kHz, 11025 for 22kHz,etc.).
Leaving this setting at the default of 24000 will affect the entirefrequency range for all sample rates below 48kHz.
Lookahead Time
Lookahead Time is used to handle sharp spikes that may occur at the onsetof a louder signal. At times, and for brief instances, these onsets can gobeyond the limits of your compressor settings, which may be desirable incertain compression scenarios since it can enhance the impact of, say, adrum hit. However, this is obviously not desirable if you are using limitingin order to reduce the maximum amplitude of the audio.
The spikes occur because it takes a little time to determine (the LevelDetector's attack value) and react (the Gain Processor's attack value) to thecurrent signal level, so Lookahead Time will actually cause the attacks tostart before the audio gets loud, instead of right on top of the transient.Otherwise, with a Lookahead Time of 0, a spike will stay loud until all ofthe attack times have elapsed.
Graph
The graph depicts input level along the x-axis (left and right) and the newoutput level along the y-axis (up and down). A line that flows directly fromthe lower-left to the upper-right (default) depicts a signal that has been leftuntouched, since every input value goes to the exact matching outputvalue. Adjusting the shape of this line will adjust the input or outputassignments, thereby altering the dynamic range. For example, you can
boost all input that has a level of around -20dB, leaving everything elseunchanged. You can also draw an inverse line (a line from upper-left tolower-right) that will dramatically boost low amplitudes while dramaticallysuppressing high amplitudes (that is, all quiet sounds will be loud, and allloud sounds will be quiet.)To add a point to the graph, click in the grid at the location where youwould like the point placed. To remove points, simply click-on the one tobe removed and drag it off the edge of the graph.To move a point on the graph, click and hold on the point and drag it to anew location. When the mouse cursor is located over a point, you will seeit change from an arrow to a hand.To numerically enter input and output signal levels for an Edit Point, rightclick on the point to bring up the edit box.
Flat
The Flat button resets the graph to its default state of an unchanged signal,removing all control points.
Invert
The invert button changes the graph to one that will function as the exactopposite. For example, if a transfer function with a compressorcharacteristic is being displayed, pressing Invert will change the graph toone with the corresponding expander characteristic. For a graph to beinvertable, it must have points in the two default corners (-100,-100 and0,0) and its output level must always increase from left to right (i.e. eachEdit Point must be higher than the one to its left).
Create Envelope
You can use this option to apply any dynamics processing, and have theresult returned as an amplitude envelope. This envelope can then be copiedand used with /Edit/Mix Paste (modulate) to modulate it with anothersound's amplitude. Of course, it is also useful for just seeing what theamplitude envelope of your audio is.
Envelope
Envelopes give you control over which parts of your wave are amplified, andby how much. The top of the graph represents 100% (normal) amplification,the bottom represents full attenuation (silence.) This function is handy whenmodifying tones that are generated with Cool Edit Pro, so as to create morerealistic sounding instruments and effects. To add control handles, simply clickin the graph area. Once created, you can simply drag control points up anddown, or drag a control point off the graph area to remove it.
66
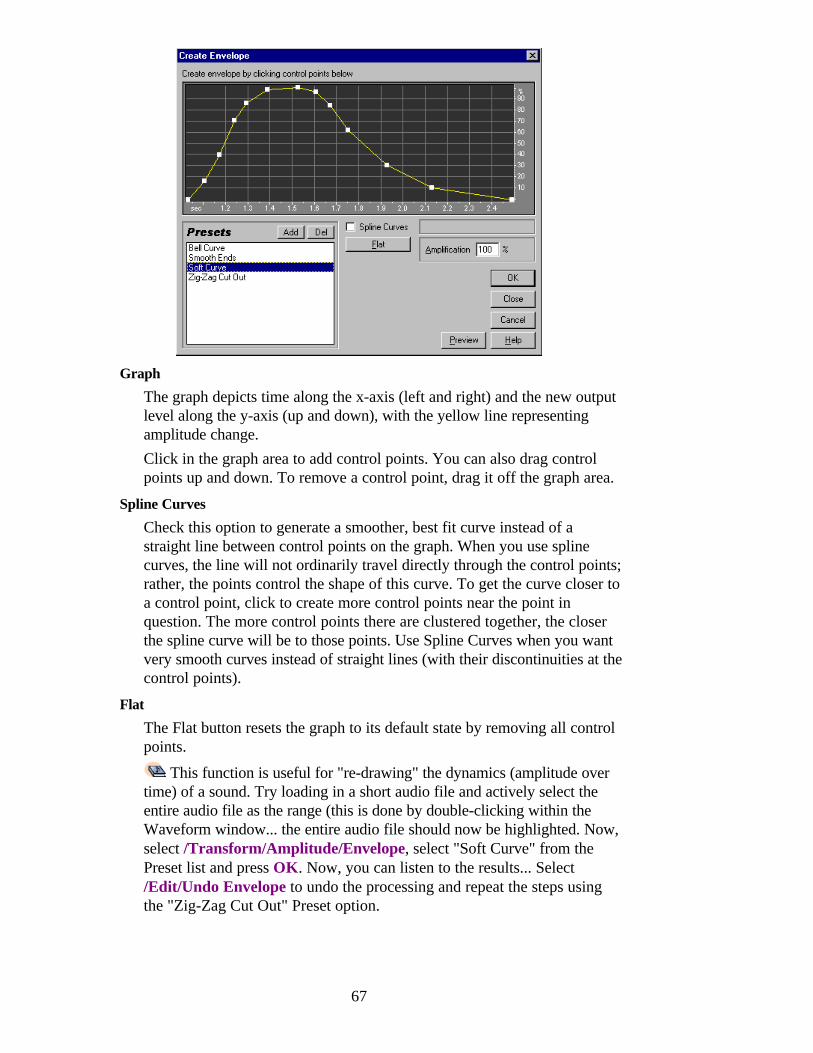
Graph
The graph depicts time along the x-axis (left and right) and the new outputlevel along the y-axis (up and down), with the yellow line representingamplitude change.Click in the graph area to add control points. You can also drag controlpoints up and down. To remove a control point, drag it off the graph area.
Spline Curves
Check this option to generate a smoother, best fit curve instead of astraight line between control points on the graph. When you use splinecurves, the line will not ordinarily travel directly through the control points;rather, the points control the shape of this curve. To get the curve closer toa control point, click to create more control points near the point inquestion. The more control points there are clustered together, the closerthe spline curve will be to those points. Use Spline Curves when you wantvery smooth curves instead of straight lines (with their discontinuities at thecontrol points).
Flat
The Flat button resets the graph to its default state by removing all controlpoints.
This function is useful for "re-drawing" the dynamics (amplitude overtime) of a sound. Try loading in a short audio file and actively select theentire audio file as the range (this is done by double-clicking within theWaveform window... the entire audio file should now be highlighted. Now,select /Transform/Amplitude/Envelope, select "Soft Curve" from thePreset list and press OK. Now, you can listen to the results... Select/Edit/Undo Envelope to undo the processing and repeat the steps usingthe "Zig-Zag Cut Out" Preset option.
67
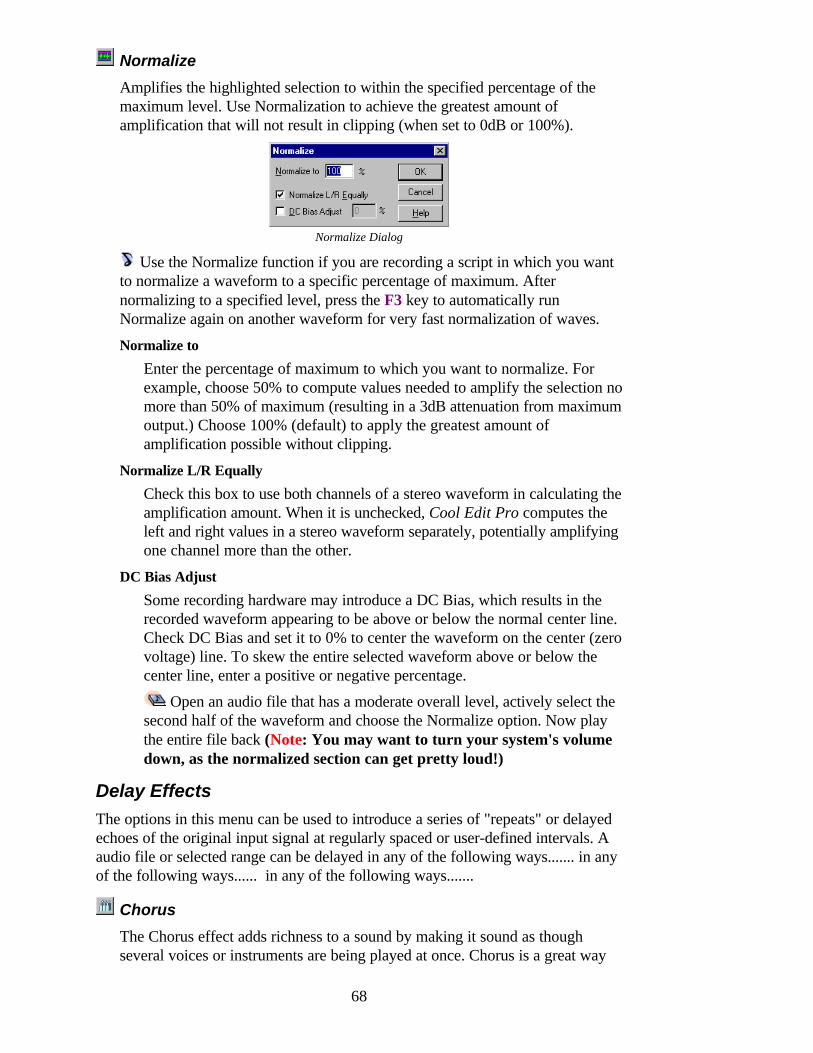
68
Normalize
Amplifies the highlighted selection to within the specified percentage of themaximum level. Use Normalization to achieve the greatest amount ofamplification that will not result in clipping (when set to 0dB or 100%).
Normalize Dialog
Use the Normalize function if you are recording a script in which you wantto normalize a waveform to a specific percentage of maximum. Afternormalizing to a specified level, press the F3 key to automatically runNormalize again on another waveform for very fast normalization of waves.
Normalize to
Enter the percentage of maximum to which you want to normalize. Forexample, choose 50% to compute values needed to amplify the selection nomore than 50% of maximum (resulting in a 3dB attenuation from maximumoutput.) Choose 100% (default) to apply the greatest amount ofamplification possible without clipping.
Normalize L/R Equally
Check this box to use both channels of a stereo waveform in calculating theamplification amount. When it is unchecked, Cool Edit Pro computes theleft and right values in a stereo waveform separately, potentially amplifyingone channel more than the other.
DC Bias Adjust
Some recording hardware may introduce a DC Bias, which results in therecorded waveform appearing to be above or below the normal center line.Check DC Bias and set it to 0% to center the waveform on the center (zerovoltage) line. To skew the entire selected waveform above or below thecenter line, enter a positive or negative percentage.
Open an audio file that has a moderate overall level, actively select thesecond half of the waveform and choose the Normalize option. Now playthe entire file back (Note: You may want to turn your system's volumedown, as the normalized section can get pretty loud!)
Delay Effects
The options in this menu can be used to introduce a series of "repeats" or delayedechoes of the original input signal at regularly spaced or user-defined intervals. Aaudio file or selected range can be delayed in any of the following ways....... in anyof the following ways...... in any of the following ways.......
Chorus
The Chorus effect adds richness to a sound by making it sound as thoughseveral voices or instruments are being played at once. Chorus is a great way
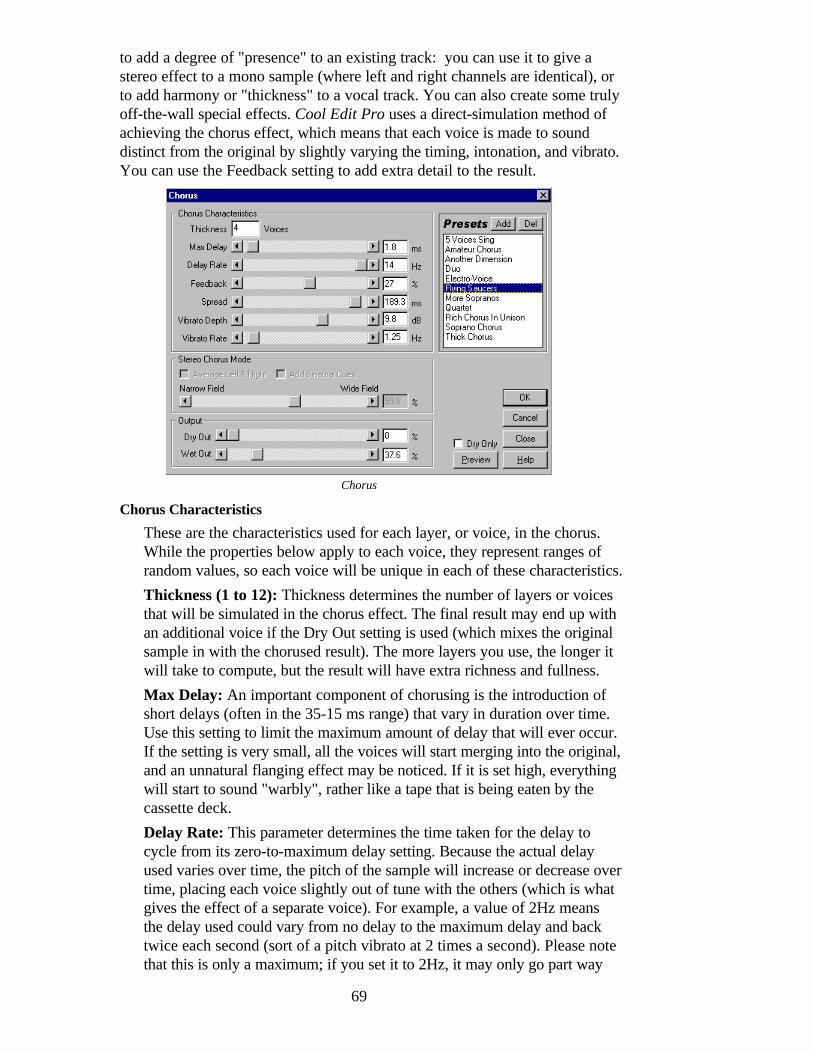
69
to add a degree of "presence" to an existing track: you can use it to give astereo effect to a mono sample (where left and right channels are identical), orto add harmony or "thickness" to a vocal track. You can also create some trulyoff-the-wall special effects. Cool Edit Pro uses a direct-simulation method ofachieving the chorus effect, which means that each voice is made to sounddistinct from the original by slightly varying the timing, intonation, and vibrato.You can use the Feedback setting to add extra detail to the result.
Chorus
Chorus Characteristics
These are the characteristics used for each layer, or voice, in the chorus.While the properties below apply to each voice, they represent ranges ofrandom values, so each voice will be unique in each of these characteristics.Thickness (1 to 12): Thickness determines the number of layers or voicesthat will be simulated in the chorus effect. The final result may end up withan additional voice if the Dry Out setting is used (which mixes the originalsample in with the chorused result). The more layers you use, the longer itwill take to compute, but the result will have extra richness and fullness.Max Delay: An important component of chorusing is the introduction ofshort delays (often in the 35-15 ms range) that vary in duration over time.Use this setting to limit the maximum amount of delay that will ever occur.If the setting is very small, all the voices will start merging into the original,and an unnatural flanging effect may be noticed. If it is set high, everythingwill start to sound "warbly", rather like a tape that is being eaten by thecassette deck.Delay Rate: This parameter determines the time taken for the delay tocycle from its zero-to-maximum delay setting. Because the actual delayused varies over time, the pitch of the sample will increase or decrease overtime, placing each voice slightly out of tune with the others (which is whatgives the effect of a separate voice). For example, a value of 2Hz meansthe delay used could vary from no delay to the maximum delay and backtwice each second (sort of a pitch vibrato at 2 times a second). Please notethat this is only a maximum; if you set it to 2Hz, it may only go part way
70
between zero and the maximum delay, and then start cycling back beforereaching the maximum. If this setting is very low, the individual voiceswon't vary much in pitch at all. If it is set high, the voices may vary soquickly that "warbling" effects can be heard.Feedback: The final mix of chorused voices can be recycled back into themix, which can give an extra echo or reverb effect.
Be very careful with this setting. Just a little feedback (less than10%) can give an extra richness to the effect (and even this depends onthe delay and vibrato settings). If too much feedback is used, moretraditional feedback will be heard, like loud ringing or other artifacts,and these may get so loud that they will clip and destroying the signal.Sometimes this can be a desired effect, as in the "Flying Saucers"setting, where it generates sounds that are reminiscent of warblysaucers whizzing around your head.
Spread: The spread setting gives an added delay to each voice, separatingthem in time by as much as 200 milliseconds (1/5th of a second). Highspread values will cause the separate voices to start at different times – thehigher the value, the further apart the onset of each word may be forexample. With low values, the effect is of all the voices singing in unison.Depending on other settings, low values may also bring out some flangingeffects, which may be undesirable if your goal is a realistic chorus effect.Vibrato Depth: Another property that varies with each voice is vibrato,which describes how the amplitude varies over time. This value determinesthe maximum variation in amplitude that will occur. For example, a valueof 5dB may alter a chorused voice by varying its amplitude by as much as5dB louder or quieter than the original. If this setting is extremely low (lessthan 1dB) the vibrato may be unnoticeable unless the Vibrato Rate hasbeen set extremely high. If vibrato depth is set too high, however, thesound may cut in and out, creating an objectionable warble. Naturalvibratos occur around 2dB to 5dB. Please note that this is a maximumdepth -- just as in the delay settings, the vibrato volume may not go as lowas the setting indicates at times. This limitation is intentional, as it gives amore natural feel to the effect.Vibrato Rate: The Vibrato Rate determines the maximum rate at whichvibrato will occur. With very low values, instead of a vibrato effect, theresulting voice will slowly get louder and quieter, like a singer that cannotkeep his or her breath steady. If the vibrato rate is set high, the result canbe very unnatural-- more like a singer who had too much coffee. With veryhigh settings, you can achieve interesting special effects (as in the preset"Another Dimension").
Stereo Chorus Mode
These settings (which are only active when working with stereo files)determine where the individual voices will be placed in the stereo field, aswell as how the original stereo signal will be interpreted. For greatesteffect, convert mono files to stereo first before applying the chorus effect.Average Left and Right: Cool Edit Pro can either average the originalleft and right channels or keep them separate in order to preserve any
71
stereo image that may already exist. If you leave the box unchecked, whenprocessing a stereo source file, the stereo image will be preserved (forexample, spatial binaural cues such as those that exist in reverberated audioor live stereo recordings will be preserved.) Note that there is no need tocheck this box if the sample was originally monophonic, as it will have noresult, except that if the box is checked, Cool Edit Pro will process thesample more slowly.Add Binaural Cues: Check this option to add separate delays to the leftand right outputs of each voice. This can make each voice appear to becoming from a different direction, but only when played throughheadphones. If the audio is meant to be played through speakers, thisoption should be turned off. In addition, when you add binaural cues, thevolume of the right channel for a voice panned all the way to the left is stillsignificant, whereas if no cues are added, no output would be sent to theright channel. This is why greater separation can be heard when listeningthrough speakers if binaural cues are not used.Stereo Field Settings: Stereo field denotes where in space instruments orother sources are placed within the L/R image of a stereo waveform. Awaveform that contains sound sources that are spread widely from left toright is said to have a wide stereo field, while those having images that arecentered around the middle are said to have a narrow stereo field. In thecase of Cool Edit Pro's Stereo Field Settings, the narrower the stereo field,the greater the chance that the chorused voices will be placed in the centerof the L/R stereo image. At a setting of 50%, all the voices will be spacedevenly about a half circle from left to right. For example, if a thickness of 5is used, each voice will be panned such that voice #1 will be to your left,voice #2 will be left-of-center, voice #3 will appear in the center, voice #4will be right-of-center and voice #5 will be on your right. At settings higherthan 50%, the voices start migrating to the outer edges: voices to the leftgo farther to the left, and those to the right go farther right. If you use anodd number of voices, then there will always be one voice directly in thecenter. With an even number of voices, and very high stereo field settings,all voices are pushed either hard left or hard right.
Output
The final output can be a mix between the original input (dry) signal andthe chorused (wet) signal. Ordinarily, both settings should be less than100%; otherwise the overlaying of several voices may cause clipping.Dry Out: This setting determines how much of the unprocessed signal ismixed into the final output. If you set it to zero, Cool Edit Pro will add theoriginal voice to the number of processed voices (which is determined bythe Thickness setting).
You can keep the original signal near 100% and reduce the Wet Outto give the singer or instrument a "backup chorus". Reduce the blend to30% or so to blend the original signal with the processed chorus. Youcan also use Cool Edit Pro's multitrack mixing capabilities todynamically bring in and fade out the chorus: chorus a copy of theoriginal audio and set this value to zero to create a chorus-only version
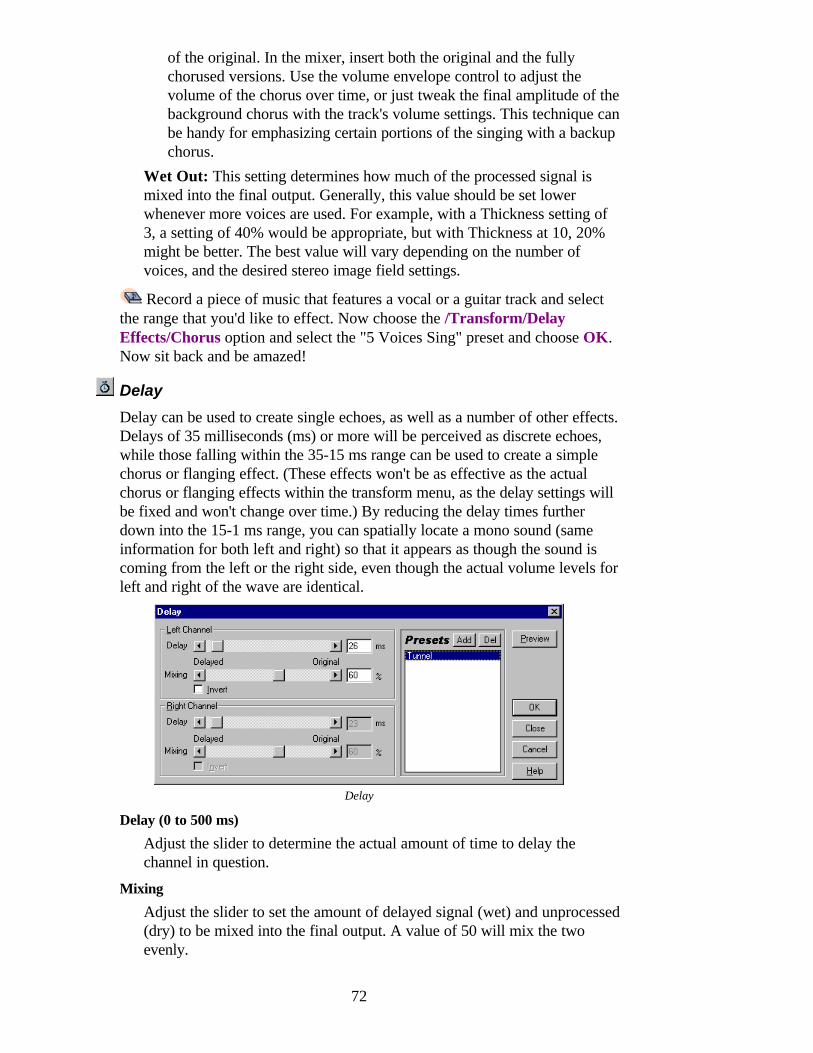
72
of the original. In the mixer, insert both the original and the fullychorused versions. Use the volume envelope control to adjust thevolume of the chorus over time, or just tweak the final amplitude of thebackground chorus with the track's volume settings. This technique canbe handy for emphasizing certain portions of the singing with a backupchorus.
Wet Out: This setting determines how much of the processed signal ismixed into the final output. Generally, this value should be set lowerwhenever more voices are used. For example, with a Thickness setting of3, a setting of 40% would be appropriate, but with Thickness at 10, 20%might be better. The best value will vary depending on the number ofvoices, and the desired stereo image field settings.
Record a piece of music that features a vocal or a guitar track and selectthe range that you'd like to effect. Now choose the /Transform/DelayEffects/Chorus option and select the "5 Voices Sing" preset and choose OK.Now sit back and be amazed!
Delay
Delay can be used to create single echoes, as well as a number of other effects.Delays of 35 milliseconds (ms) or more will be perceived as discrete echoes,while those falling within the 35-15 ms range can be used to create a simplechorus or flanging effect. (These effects won't be as effective as the actualchorus or flanging effects within the transform menu, as the delay settings willbe fixed and won't change over time.) By reducing the delay times furtherdown into the 15-1 ms range, you can spatially locate a mono sound (sameinformation for both left and right) so that it appears as though the sound iscoming from the left or the right side, even though the actual volume levels forleft and right of the wave are identical.
Delay
Delay (0 to 500 ms)
Adjust the slider to determine the actual amount of time to delay thechannel in question.
Mixing
Adjust the slider to set the amount of delayed signal (wet) and unprocessed(dry) to be mixed into the final output. A value of 50 will mix the twoevenly.
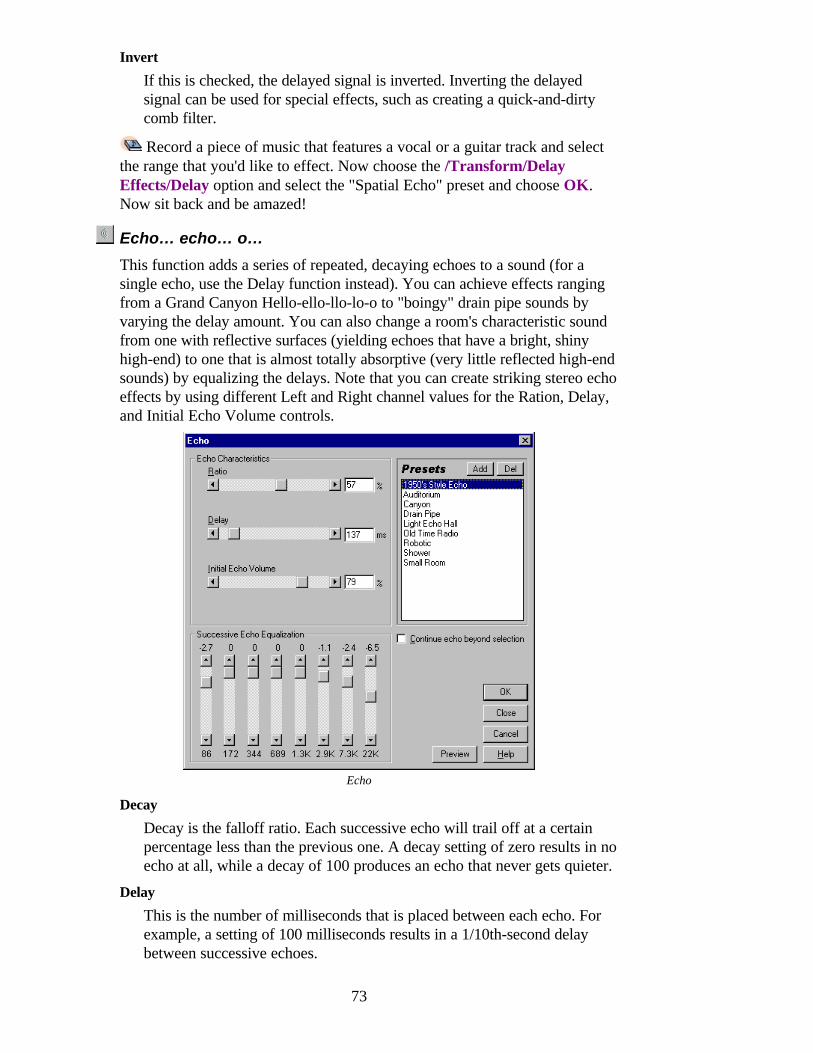
73
Invert
If this is checked, the delayed signal is inverted. Inverting the delayedsignal can be used for special effects, such as creating a quick-and-dirtycomb filter.
Record a piece of music that features a vocal or a guitar track and selectthe range that you'd like to effect. Now choose the /Transform/DelayEffects/Delay option and select the "Spatial Echo" preset and choose OK.Now sit back and be amazed!
Echo… echo… o…
This function adds a series of repeated, decaying echoes to a sound (for asingle echo, use the Delay function instead). You can achieve effects rangingfrom a Grand Canyon Hello-ello-llo-lo-o to "boingy" drain pipe sounds byvarying the delay amount. You can also change a room's characteristic soundfrom one with reflective surfaces (yielding echoes that have a bright, shinyhigh-end) to one that is almost totally absorptive (very little reflected high-endsounds) by equalizing the delays. Note that you can create striking stereo echoeffects by using different Left and Right channel values for the Ration, Delay,and Initial Echo Volume controls.
Echo
Decay
Decay is the falloff ratio. Each successive echo will trail off at a certainpercentage less than the previous one. A decay setting of zero results in noecho at all, while a decay of 100 produces an echo that never gets quieter.
Delay
This is the number of milliseconds that is placed between each echo. Forexample, a setting of 100 milliseconds results in a 1/10th-second delaybetween successive echoes.
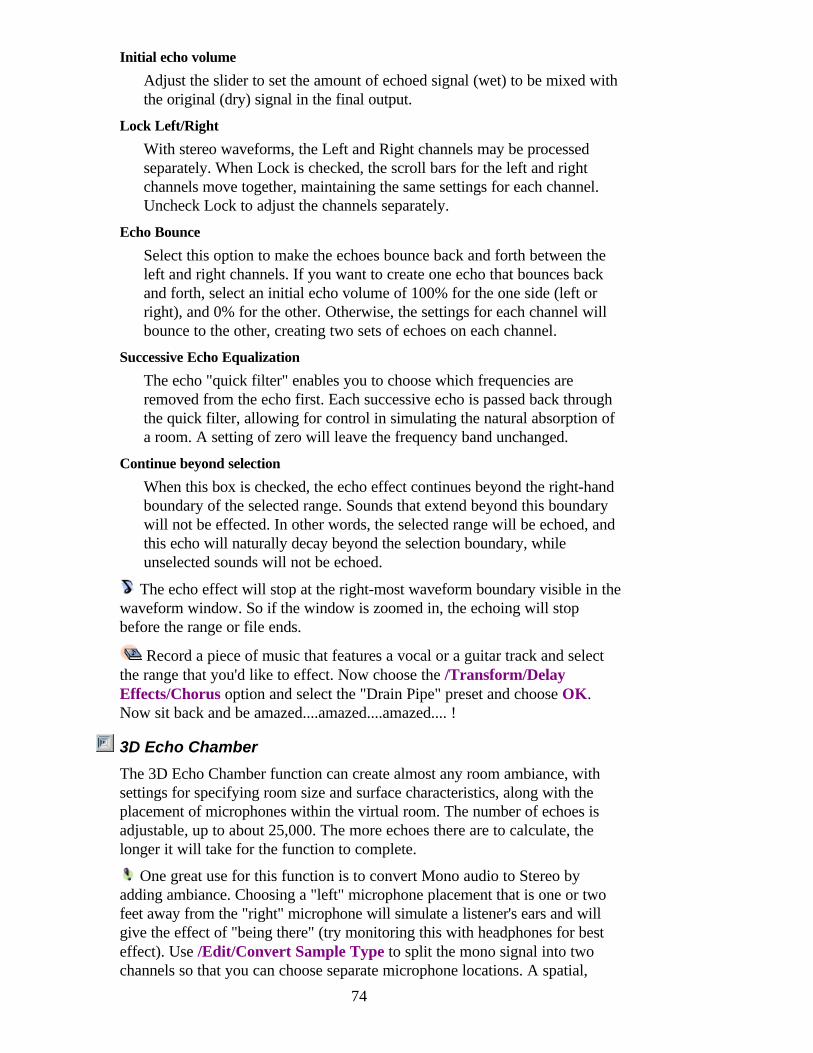
74
Initial echo volume
Adjust the slider to set the amount of echoed signal (wet) to be mixed withthe original (dry) signal in the final output.
Lock Left/Right
With stereo waveforms, the Left and Right channels may be processedseparately. When Lock is checked, the scroll bars for the left and rightchannels move together, maintaining the same settings for each channel.Uncheck Lock to adjust the channels separately.
Echo Bounce
Select this option to make the echoes bounce back and forth between theleft and right channels. If you want to create one echo that bounces backand forth, select an initial echo volume of 100% for the one side (left orright), and 0% for the other. Otherwise, the settings for each channel willbounce to the other, creating two sets of echoes on each channel.
Successive Echo Equalization
The echo "quick filter" enables you to choose which frequencies areremoved from the echo first. Each successive echo is passed back throughthe quick filter, allowing for control in simulating the natural absorption ofa room. A setting of zero will leave the frequency band unchanged.
Continue beyond selection
When this box is checked, the echo effect continues beyond the right-handboundary of the selected range. Sounds that extend beyond this boundarywill not be effected. In other words, the selected range will be echoed, andthis echo will naturally decay beyond the selection boundary, whileunselected sounds will not be echoed.
The echo effect will stop at the right-most waveform boundary visible in thewaveform window. So if the window is zoomed in, the echoing will stopbefore the range or file ends.
Record a piece of music that features a vocal or a guitar track and selectthe range that you'd like to effect. Now choose the /Transform/DelayEffects/Chorus option and select the "Drain Pipe" preset and choose OK.Now sit back and be amazed....amazed....amazed.... !
3D Echo Chamber
The 3D Echo Chamber function can create almost any room ambiance, withsettings for specifying room size and surface characteristics, along with theplacement of microphones within the virtual room. The number of echoes isadjustable, up to about 25,000. The more echoes there are to calculate, thelonger it will take for the function to complete.
One great use for this function is to convert Mono audio to Stereo byadding ambiance. Choosing a "left" microphone placement that is one or twofeet away from the "right" microphone will simulate a listener's ears and willgive the effect of "being there" (try monitoring this with headphones for besteffect). Use /Edit/Convert Sample Type to split the mono signal into twochannels so that you can choose separate microphone locations. A spatial,
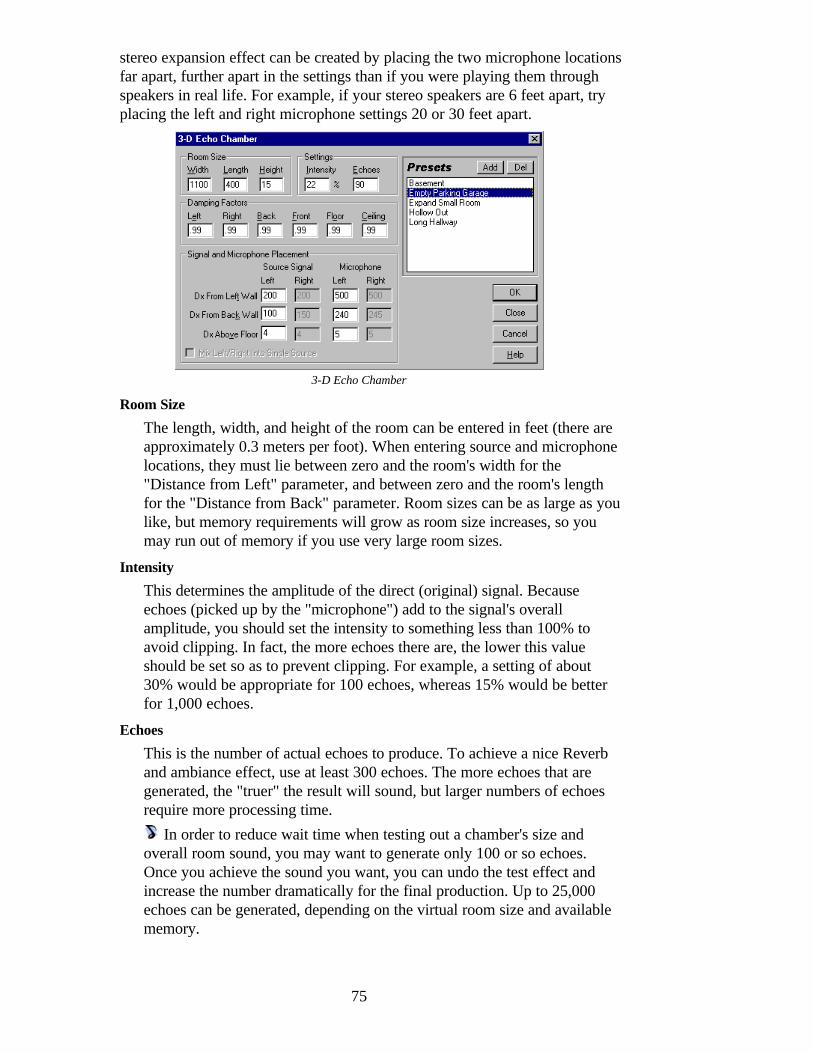
75
stereo expansion effect can be created by placing the two microphone locationsfar apart, further apart in the settings than if you were playing them throughspeakers in real life. For example, if your stereo speakers are 6 feet apart, tryplacing the left and right microphone settings 20 or 30 feet apart.
3-D Echo Chamber
Room Size
The length, width, and height of the room can be entered in feet (there areapproximately 0.3 meters per foot). When entering source and microphonelocations, they must lie between zero and the room's width for the"Distance from Left" parameter, and between zero and the room's lengthfor the "Distance from Back" parameter. Room sizes can be as large as youlike, but memory requirements will grow as room size increases, so youmay run out of memory if you use very large room sizes.
Intensity
This determines the amplitude of the direct (original) signal. Becauseechoes (picked up by the "microphone") add to the signal's overallamplitude, you should set the intensity to something less than 100% toavoid clipping. In fact, the more echoes there are, the lower this valueshould be set so as to prevent clipping. For example, a setting of about30% would be appropriate for 100 echoes, whereas 15% would be betterfor 1,000 echoes.
Echoes
This is the number of actual echoes to produce. To achieve a nice Reverband ambiance effect, use at least 300 echoes. The more echoes that aregenerated, the "truer" the result will sound, but larger numbers of echoesrequire more processing time.
In order to reduce wait time when testing out a chamber's size andoverall room sound, you may want to generate only 100 or so echoes.Once you achieve the sound you want, you can undo the test effect andincrease the number dramatically for the final production. Up to 25,000echoes can be generated, depending on the virtual room size and availablememory.
76
Damping Factors
Use damping factors to describe the type of room in which the audio isbeing played. These factors can simulate wall coverings, floor coverings,and other objects in the room that absorb sound. Granted, in real life,various objects absorb different frequencies, but in this simulation allfrequencies are reflected equally. For example, the fact that cement reflectshigh frequencies better than low ones isn't accounted for, but great effectscan still be achieved (and they're much more realistic than those of basicEcho functions). The effects of speaker placement enhancing or cancelingcertain frequencies, though, is still accurate. A damping factor of 1.0 is thehighest, simulating total reflectivity, while a factor of 0.0 is the lowest,which represents complete sound absorption (no reflecting surface).
To give more control over the environment, damping factors can beapplied to any of the 4 walls, floor, and ceiling. If a wall has a dampeningfactor of 1.0, it is totally reflective (rather like cement). If a wall has a verylow dampening factor, like 0.05, it will absorb most of the sound (likecarpeting or sound proofing panels). You can also lower the dampeningfactor of some of the walls to simulate other objects in the room, whicheffectively absorb some of the audio.
Source Signal Placement
The source (originally highlighted audio range) can be placed anywhere inthe room, with settings for distance from the back wall, left wall, and floor.The signal will then simulate a single, non-directional point source,meaning that the sound will radiate outwards in all directions. The distancebetween the source and the walls affects which frequencies are enhancedand is crucial to the overall ambient effect. When using a stereo source,each channel can be placed independently of each other.
Use the Distance values in conjunction with Room Size values todetermine exact 3D placement. If you use a values greater than thedimensions of the room (a Dx Above Floor of 21 ft. in a room with aHeight of 20 ft., for example), Cool E will use the greatest possible value(20 ft. in this case).
Microphone Placement
You can place up to two virtual microphone pickups in the room. Stereosignals will have two pick up microphones, while mono signals will haveonly one. Each microphone is routed to its own respective channel of astereo audio file. The resulting echoes are exactly what the microphonewould pick up if it were in the room at the specified location. Place themicrophones in a stereo setting one foot apart to simulate human ears. Theplacement of and distance between the microphones gives the brain cuesabout the directions of each echo and the size of the room. Try listeningwith headphones to microphones that have been placed far apart; this givesa very large "aural" or "Spacey" feeling to the sound.
Always place the microphone(s) sufficiently far away from the source. Ifthe microphone and source are too close together, you will just hear thesource and no echoes, since it is analogous to placing your ear right next tothe sound source, where you will hear the sound only (due to its loudness).

77
Mix Left/Right Into Single Source
When working with stereo audio, there are actually two source signals (leftand right) that can be placed independently. In most instances, the stereoeffect will be dramatically enhanced and sound fuller and often richer whenthe Combine L&R is turned off. This does, however, require twice as manycalculations as a single audio source, so for faster processing, check thisoption this option will sum the left and right channels of a stereo source filebefore routing to the effects processor.
= unchecked = checked
Record a piece of music that features a vocal or a guitar track and selectthe range that you'd like to effect. Now choose the /Transform/DelayEffects/Echo Chamber option and select the "Empty Parking Garage" presetand choose OK. Now sit back and be amazed!
Flanger
Flanging was originally achieved by sending an audio signal to two reel-to-reeltape recorders, and then physically slowing down the reels of one machine. Theresulting sound is a phase-shifted, time delay effect characteristic of thepsychedelic sounding recordings in of the 60's. Cool Edit Pro can be used tocreate the same effect by slightly delaying and phasing a signal atpredetermined or random intervals.
Flanger
Original - Delayed Slider
Use this slide control to adjust the mix between the amount of original(dry) and flanged (wet) signal. If the Original is at 100%, the result is noflanging at all. If the delayed signal is at 100%, the result is a waveringsound, rather like a bad tape player. Portions of both signals must bepresent if you want to achieve the characteristic cancellation andreinforcement that occurs during flanging.
Initial Mix Delay
This sets the point in milliseconds at which flanging will start behind theoriginal. The flanging effect occurs by cycling over time from an initialdelay setting to a second (or final) delay setting.
78
Final Mix Delay
This sets the point in milliseconds at which flanging will end behind theoriginal. It refers to the flange effect's secondary (or final) delay setting ,with the flange being cycled between this and the initial delay at a specifiedrate.
Stereo Phasing
This control lets you set the left and right delays at separate values. Forexample, a setting of 180 puts the right channel at the initial delay value atthe same time that the left channel is at the final delay value. This settingcan reverse the initial/final delay settings for the left and right channels,thus creating a circular, psychedelic effect.
Inverted
Check this option to invert the delayed signal when flanging. This causesthe waves to cancel out periodically, instead of reinforcing the signal. If theOriginal - Delayed mix settings are set at 50/50, the waves will cancel outto silence whenever the delay is at zero.
Special EFX
This effect mixes both normal and inverted flanging effect, with the delayedsignal being summed and the leading signal being subtracted out.
Sinusoidal
If this option is checked, the transition from initial delay to final delay andback will follow a sine curve. Otherwise, the transition is linear, and delaysfrom the initial setting to the final setting at a constant rate. With sinusoidalchecked, the signal is at the initial and final delays more often than it isbetween delays.
The Invert, Special EFX, and Sinusoidal options give you a lot ofcontrol over the flanging effect, so try experimenting with them to achievethe effect you want.
Frequency (Hz)
The Frequency, Period, and Cycles settings refer to the rate at which thedelay cycles between the initial delay and the final delay. The flanging willcycle (using settings that include frequency times per second, periodseconds per complete cycle, or a total of complete cycles) over the entireselection. Different settings can result in widely varying effects. Forexample, a setting of 0.5 cycles causes the effect to start with the initialdelay, and end with the final delay. If a frequency of 4 is chosen, theflanging will cycle from the initial delay to the final delay and back again 4times per second.
Period (secs)
The Frequency, Period, and Cycles settings refer to the rate at which thedelay cycles between the initial delay and the final delay. The flanging willcycle (using settings that include frequency times per second, periodseconds per complete cycle, or a total of complete cycles) over the entireselection. Different settings can result in widely varying effects. Forexample, a setting of 0.5 cycles causes the effect to start with the initial
79
delay, and end with the final delay. If a frequency of 4 is chosen, theflanging will cycle from the initial delay to the final delay and back again 4times per second.
Total Cycles
The Frequency, Period, and Cycles settings refer to the rate at which thedelay cycles between the initial delay and the final delay. The flanging willcycle (using settings that include frequency times per second, periodseconds per complete cycle, or a total of complete cycles) over the entireselection. Different settings can result in widely varying effects. Forexample, a setting of 0.5 cycles causes the effect to start with the initialdelay, and end with the final delay. If a frequency of 4 is chosen, theflanging will cycle from the initial delay to the final delay and back again 4times per second.
Record a piece of music that features a vocal or a guitar track and selectthe range that you'd like to effect. Now choose the /Transform/DelayEffects/Flanger option and select the "Sci-Fi 60s" preset and choose OK.Now sit back and be amazed!
Multitap Delay
Multitap Delay is sort of a combination of Delay, Echo, Filter, and Reverbeffects. Up to 10 delay units can be created, each with their own delay,feedback, and filtering settings. If one delay unit is placed inside another (asviewed in the chart above the controls) then the echo will occur more oftenthan just once. As audio travels down the delay line (represented in the chartby the bottom horizontal arrow pointing to the right) portions at any point canbe fed back into the delay line anywhere behind the given offset and at anyfeedback amount, with any high or low cut filter. With experimentation, youcan achieve some very interesting effects.
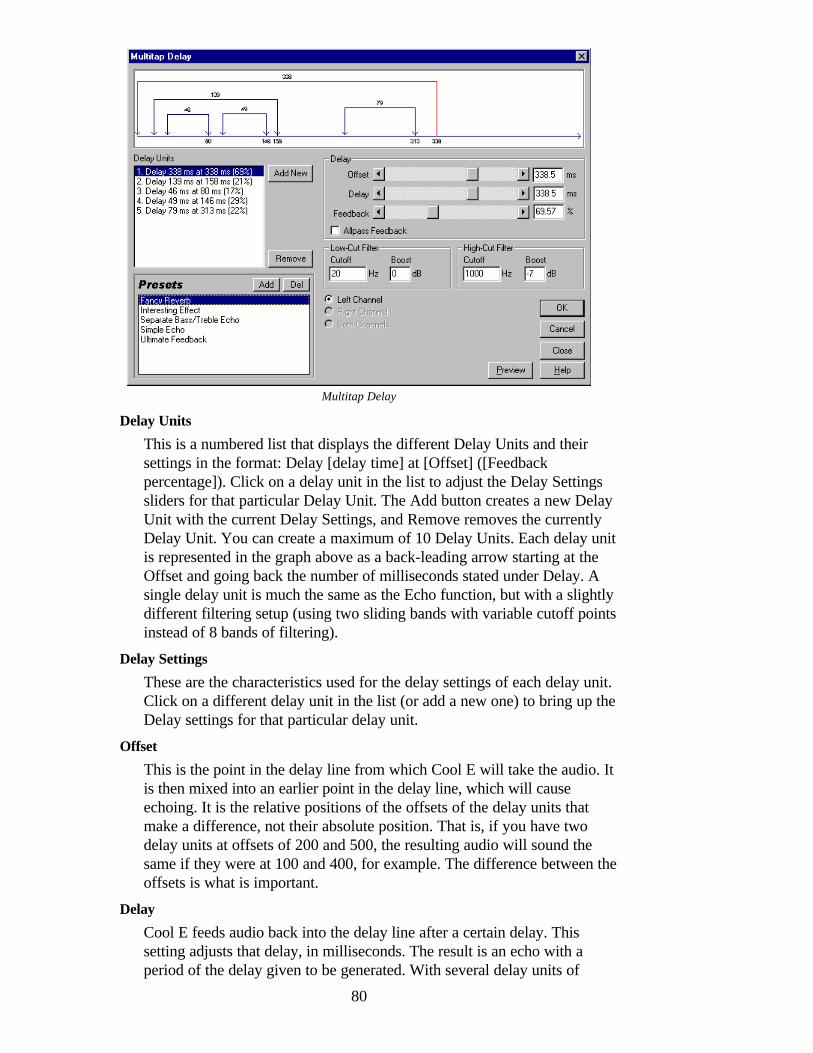
80
Multitap Delay
Delay Units
This is a numbered list that displays the different Delay Units and theirsettings in the format: Delay [delay time] at [Offset] ([Feedbackpercentage]). Click on a delay unit in the list to adjust the Delay Settingssliders for that particular Delay Unit. The Add button creates a new DelayUnit with the current Delay Settings, and Remove removes the currentlyDelay Unit. You can create a maximum of 10 Delay Units. Each delay unitis represented in the graph above as a back-leading arrow starting at theOffset and going back the number of milliseconds stated under Delay. Asingle delay unit is much the same as the Echo function, but with a slightlydifferent filtering setup (using two sliding bands with variable cutoff pointsinstead of 8 bands of filtering).
Delay Settings
These are the characteristics used for the delay settings of each delay unit.Click on a different delay unit in the list (or add a new one) to bring up theDelay settings for that particular delay unit.
Offset
This is the point in the delay line from which Cool E will take the audio. Itis then mixed into an earlier point in the delay line, which will causeechoing. It is the relative positions of the offsets of the delay units thatmake a difference, not their absolute position. That is, if you have twodelay units at offsets of 200 and 500, the resulting audio will sound thesame if they were at 100 and 400, for example. The difference between theoffsets is what is important.
Delay
Cool E feeds audio back into the delay line after a certain delay. Thissetting adjusts that delay, in milliseconds. The result is an echo with aperiod of the delay given to be generated. With several delay units of
81
varying delays added, the final echo pattern can become very complex.Very short delays give ringing or robotic sounding events, while longerdelays give more distinct echoes.
Feedback
This is the amount of signal to feed back into the delay line. If the feedbackis set too high, definite ringing and true feedback will occur, where theaudio gets louder and louder until it clips and becomes distorted.Sometimes you may want this effect—it is like the feedback you hear whena microphone is set too close to the speaker. If the feedback percentage isextremely low, then not very much of the original signal will be fed backinto the loop, resulting in a very subtle effect.
Allpass Feedback
To help prevent the DC component from getting out of hand (thewaveform tending upwards or downwards until it clips), try enablingAllpass Feedback. When turned on, audio from the destination of the delayloop is mixed back into audio from the originating delay offset. Instead ofgoing one way (from the offset back a certain number of milliseconds) italso goes from the destination up to the source—a sort of forwardfeedback, or "feedforward". This setting is handy when designing reverbeffects.
Low-Cut and High-Cut Filters
Audio being fed back into the delay line can also be filtered before goingback in. With a low-cut filter, the low frequencies are reduced (or boosted)depending on the Cutoff and Boost settings. The High-Cut filter can alsocut or even boost the high frequencies. This will make each successiveecho filtered slightly differently, for interesting effects. When designing areverb, it helps to cut some of the high frequencies to simulate absorptionof the high frequencies by the surrounding walls.
Cutoff
Frequencies below this setting are affected by the Low-Cut filter, or abovethis setting for the High-Cut filter. Changes in the cutoff value affect thetone of the echoes, as more or less of the frequencies are affected by thefilter.
Boost
This is the amount of filtering to perform. Boost settings are usuallynegative, which means the audio is being cut or reduced in the affectedfrequency range. So lower negative values result in more audio being cut.Positive values result in boosted frequencies. Generally, when echoing,frequencies are not boosted, but you can create interesting effects byentering positive values. Boosting a low-cut filter while reducing thefeedback setting is identical to reducing a high cut filter and increasing thefeedback setting.
Channels
With a stereo source, each delay unit can be set to affect both channels, orjust the left or right channel individually. To spread out the effect in the
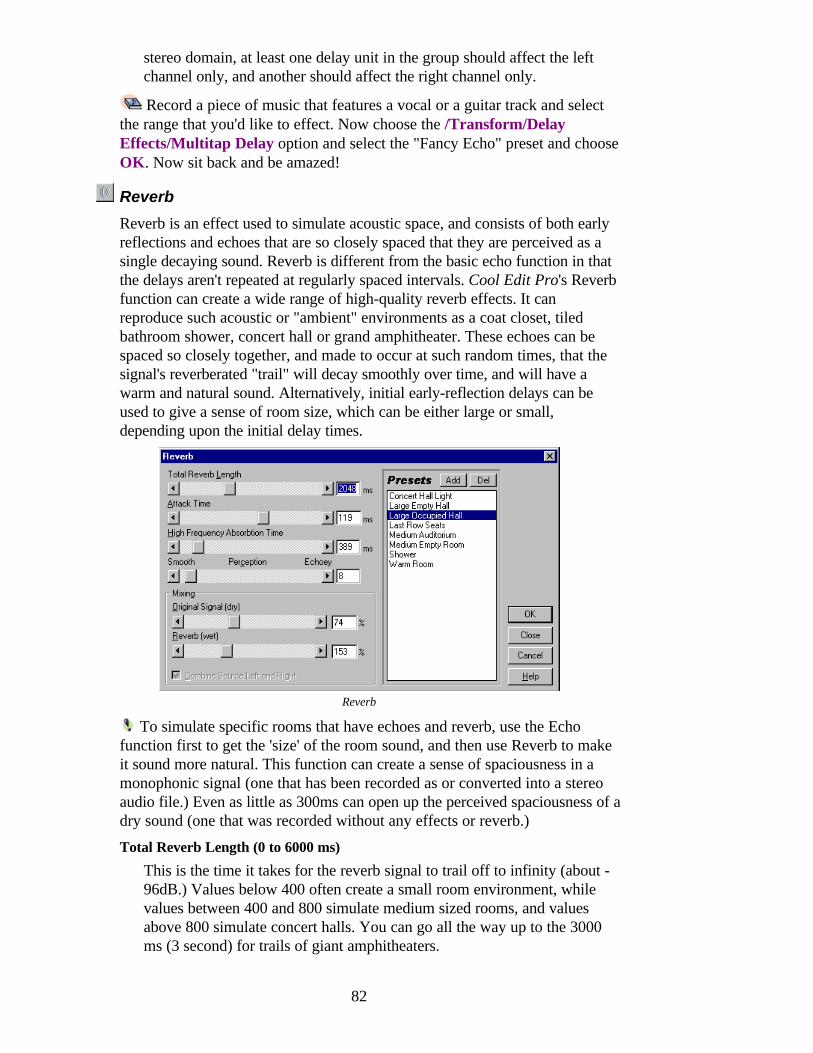
82
stereo domain, at least one delay unit in the group should affect the leftchannel only, and another should affect the right channel only.
Record a piece of music that features a vocal or a guitar track and selectthe range that you'd like to effect. Now choose the /Transform/DelayEffects/Multitap Delay option and select the "Fancy Echo" preset and chooseOK. Now sit back and be amazed!
Reverb
Reverb is an effect used to simulate acoustic space, and consists of both earlyreflections and echoes that are so closely spaced that they are perceived as asingle decaying sound. Reverb is different from the basic echo function in thatthe delays aren't repeated at regularly spaced intervals. Cool Edit Pro's Reverbfunction can create a wide range of high-quality reverb effects. It canreproduce such acoustic or "ambient" environments as a coat closet, tiledbathroom shower, concert hall or grand amphitheater. These echoes can bespaced so closely together, and made to occur at such random times, that thesignal's reverberated "trail" will decay smoothly over time, and will have awarm and natural sound. Alternatively, initial early-reflection delays can beused to give a sense of room size, which can be either large or small,depending upon the initial delay times.
Reverb
To simulate specific rooms that have echoes and reverb, use the Echofunction first to get the 'size' of the room sound, and then use Reverb to makeit sound more natural. This function can create a sense of spaciousness in amonophonic signal (one that has been recorded as or converted into a stereoaudio file.) Even as little as 300ms can open up the perceived spaciousness of adry sound (one that was recorded without any effects or reverb.)
Total Reverb Length (0 to 6000 ms)
This is the time it takes for the reverb signal to trail off to infinity (about -96dB.) Values below 400 often create a small room environment, whilevalues between 400 and 800 simulate medium sized rooms, and valuesabove 800 simulate concert halls. You can go all the way up to the 3000ms (3 second) for trails of giant amphitheaters.
83
Attack Time
The amount of time it takes for the reverb to gain full strength is known asthe attack time. For short reverb times, the attack time should be smaller.In general, a value of about 10% of the total reverb time works well;however, you can create interesting and subtle effects by using longerattack times with shorter reverb lengths, or, conversely, by combining veryshort attack times with long reverb lengths.
High Frequency Absorption Time
In acoustic environments, higher frequencies tend to attenuate faster thanlower frequencies. Use this parameter to simulate this natural absorption sothat the high frequencies are reduced in level during the reverb's decaytime. Faster absorption times simulate rooms that are occupied and havefurniture and carpeting, like night clubs or theaters. Slower times(especially over 1000ms) simulate rooms that are emptier, like gymnasiumsor auditoriums, where higher frequency reflections are more prevalent.
Perception
This parameter gives subtle qualities to the environment by enabling you tochange the characteristics of the reflections that occur within a room. Withlower values, the reverb is "smoother" and doesn't have as many distinctechoes. Higher values cause more variation in the reverb amplitudes andadd more spaciousness by creating distinct reflections over time. In general,higher values (up to 60%) simulate large rooms, and lower values (down to0%) simulate smaller rooms.
A setting of 100 and a reverb length of 2000 (2 seconds) or morecreates interesting canyon effects.
Mixing - Original Signal
This setting determines how much of the unprocessed (dry) signal is mixedinto the final output. To add spaciousness to an instrument, keep the drysignal higher, or at 100%. If you're trying to achieve a special effect withreverb, you might want to reduce the volume of the original signal. If thereverb is so great that audio begins to clip, try reducing both the dry andthe reverberated signal strength. In general, the more reverb you add, thelower the original signal volume should be. In most cases, a value of 90%or so should work well.
Mixing - Reverb
This setting determines how much of the reverberated (wet) signal is mixedinto the final effect output. In modern production, the wet amount shouldordinarily be lower than the dry signal to add spaciousness to a track;however, you may want to increase this amount to simulate physicaldistance from the audio source (where reverb is heard in greaterproportions to the original signal).
Combine Source Left and Right
When working with stereo audio, there are actually two source signals (leftand right), that can be placed independently. This does, however, requiretwice as many calculations as a single audio source, so you can check this
84
option for faster processing. When it is checked, Cool E sums the left andright channels of a stereo source file before routing to the effectsprocessor. When unchecked, the original signal and its respective reverbedsignal remain in its own channel.
= unchecked = checked If you know that both channels are identical (that is, if they originated
from a monophonic sample), you should definitely check this option tominimize processing time.
Try experimenting with the different parameters to find just the reverb youwant. The "Large Occupied Hall" simulates a very nice live theateratmosphere, while the "Concert Hall Light" setting creates a nice professionalperformance reverb—this preset is especially useful in enhancing a non-reverberated vocal track.
Record a piece of music that features a vocal or a guitar track and selectthe range that you'd like to effect. Now choose the /Transform/DelayEffects/Reverb option and select the "Large Occupied Hall" preset and chooseOK. Now sit back and be amazed!
Sweeping Phaser
Like the Flanger effect, a Phaser introduces a variable phase-shift to a splitsignal and recombines it, creating special effects popularized by guitarists ofthe 60's. The Sweeping Phaser sweeps a notch or boost type filter back andforth about a center frequency. A phase is similar to a flange, except thatinstead of using a simple delay, frequencies are phase-shifted over time. Whenused on stereo files, the stereo image can be dramatically altered to createsome truly interesting sounds.
Sweep Gain: Sweep Gain is the gain applied to the phased signal. Take careto avoid clipping when applying higher positive values
Center Frequency: This is the frequency around which the phase will sweep.Frequencies closer to the middle of the dynamic range of the selected audiowill produce more dramatic results.
Depth: This setting determines the degree of phasing. The value is given as aQ value, which is a ratio of width to center frequency. Greater Depth settingscause the sweep to extend farther away from the center frequency in bothdirections (covering a greater frequency range), producing a wider tremoloeffect.
Resonance: This is the amount of phase-shift that is applied to the signal. Youcan think of it as a "strength" setting for the phase. The value is given as a Qvalue, which is a ratio of width to center frequency.
Sweeping Rate: The Sweeping Rate is the speed at which the filter sweepsaround the center frequency, covering the dynamic range specified by theDepth setting. Values are given in Hertz (Hz), or cycles per second, Period(milliseconds), and Tempo (beats per minute). You can adjust the rate with theslider, or enter a value directly into one of the text boxes. To have the sweepoccur in time with a song for example, enter the BPM of the music, or a
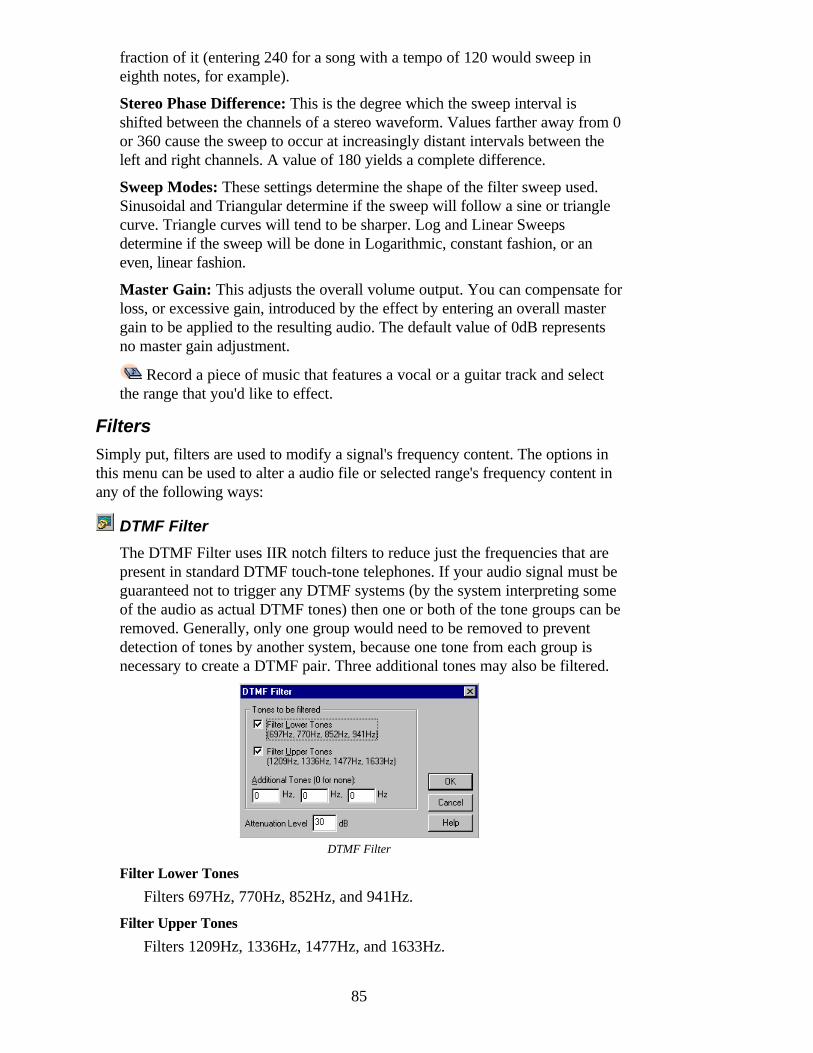
85
fraction of it (entering 240 for a song with a tempo of 120 would sweep ineighth notes, for example).
Stereo Phase Difference: This is the degree which the sweep interval isshifted between the channels of a stereo waveform. Values farther away from 0or 360 cause the sweep to occur at increasingly distant intervals between theleft and right channels. A value of 180 yields a complete difference.
Sweep Modes: These settings determine the shape of the filter sweep used.Sinusoidal and Triangular determine if the sweep will follow a sine or trianglecurve. Triangle curves will tend to be sharper. Log and Linear Sweepsdetermine if the sweep will be done in Logarithmic, constant fashion, or aneven, linear fashion.
Master Gain: This adjusts the overall volume output. You can compensate forloss, or excessive gain, introduced by the effect by entering an overall mastergain to be applied to the resulting audio. The default value of 0dB representsno master gain adjustment.
Record a piece of music that features a vocal or a guitar track and selectthe range that you'd like to effect.
Filters
Simply put, filters are used to modify a signal's frequency content. The options inthis menu can be used to alter a audio file or selected range's frequency content inany of the following ways:
DTMF Filter
The DTMF Filter uses IIR notch filters to reduce just the frequencies that arepresent in standard DTMF touch-tone telephones. If your audio signal must beguaranteed not to trigger any DTMF systems (by the system interpreting someof the audio as actual DTMF tones) then one or both of the tone groups can beremoved. Generally, only one group would need to be removed to preventdetection of tones by another system, because one tone from each group isnecessary to create a DTMF pair. Three additional tones may also be filtered.
DTMF Filter
Filter Lower Tones
Filters 697Hz, 770Hz, 852Hz, and 941Hz.
Filter Upper Tones
Filters 1209Hz, 1336Hz, 1477Hz, and 1633Hz.
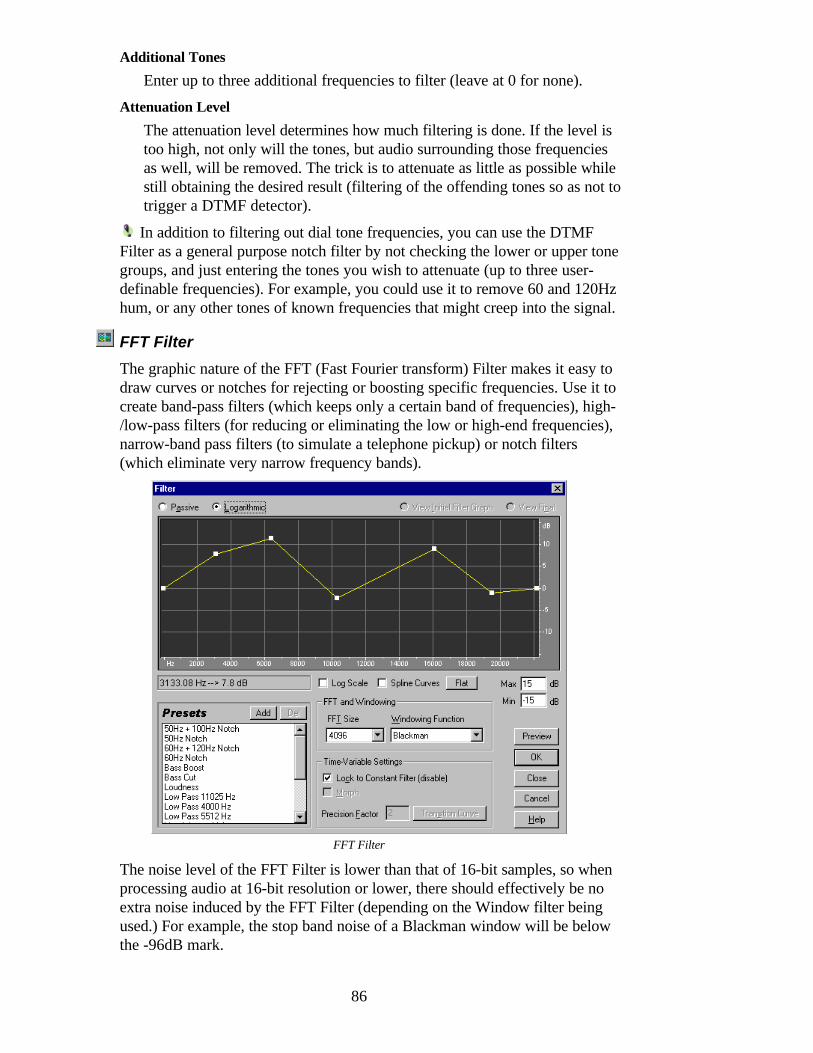
Additional Tones
Enter up to three additional frequencies to filter (leave at 0 for none).
Attenuation Level
The attenuation level determines how much filtering is done. If the level istoo high, not only will the tones, but audio surrounding those frequenciesas well, will be removed. The trick is to attenuate as little as possible whilestill obtaining the desired result (filtering of the offending tones so as not totrigger a DTMF detector).
In addition to filtering out dial tone frequencies, you can use the DTMFFilter as a general purpose notch filter by not checking the lower or upper tonegroups, and just entering the tones you wish to attenuate (up to three user-definable frequencies). For example, you could use it to remove 60 and 120Hzhum, or any other tones of known frequencies that might creep into the signal.
FFT Filter
The graphic nature of the FFT (Fast Fourier transform) Filter makes it easy todraw curves or notches for rejecting or boosting specific frequencies. Use it tocreate band-pass filters (which keeps only a certain band of frequencies), high-/low-pass filters (for reducing or eliminating the low or high-end frequencies),narrow-band pass filters (to simulate a telephone pickup) or notch filters(which eliminate very narrow frequency bands).
FFT Filter
The noise level of the FFT Filter is lower than that of 16-bit samples, so whenprocessing audio at 16-bit resolution or lower, there should effectively be noextra noise induced by the FFT Filter (depending on the Window filter beingused.) For example, the stop band noise of a Blackman window will be belowthe -96dB mark.
86
For best results, filter using 32-bit samples. If your source audio is 8-bit or16-bit, try converting to 32-bit to do the filtering, and when done, you canconvert back to the lower resolution with dithering. This will produce betterresults than processing at lower resolutions, especially if more than onetransform will be performed on the audio.
Passive/Logarithmic
Select Passive mode to express frequency changes (boosts or cuts) in termsof percentages, where a setting of 100% represents no change. SelectLogarithmic mode when you want to express changes in terms of dB,where 0dB represents no change.
View Initial Filter Graph/View Final
When the Lock to Constant Filter is not set, you can choose both an Initialand a Final filter setting. Filtering will gradually go from the initial state tothe final state. The rate at which the filter migrates from the Initial to Finalsettings depends on the Transition Curve settings.
• To add a control point to the graph, click in the grid at the locationwhere you want to place the point.
• To enter frequency and amplification for a control point numerically,right click on the point to bring up the edit box, or double-click on thecurve.
• To move a point on the graph, click and hold on the point and drag to anew location.
• When the mouse cursor is located over a point, you will see it changefrom an arrow to a hand.
Log Scale
Check this option to display the x axis (frequency scale) logarithmicallyrather than in linear fashion. When Log Scale is checked, the graphrepresents the frequency curve more closely to the way the ear hearssound. To do finer editing in low frequencies, leave Log Scale checked.For detailed high frequency work, or work with evenly spaced intervals infrequency, uncheck this option.
Spline Curves
Check this option to generate a smoother, best fit curve instead of astraight line between control points on the graph. When you use splinecurves, the line will not ordinarily travel directly through the control points;rather, the points control the shape of this curve. To get the curve closer toa control point, click to create more control points near the point inquestion. The more control points there are clustered together, the closerthe spline curve will be to those points. Use Spline Curves when you wantvery smooth curves instead of straight lines (with their discontinuities at thecontrol points).
Flat
The Flat button will reset the curve to its default state of an unchangedsignal, removing all Control Points.
87
Min/Max
These boxes allow you to enter a minimum and maximum value for thegraph's y axis. Cool E displays the values in the ruler to the right of thegraph. These settings affect the maximum boost or cut that the frequencycurve can represent.
FFT Size
The FFT Size parameter specifies the size of the FFT to use, which canaffect processing speed and quality. For cleaner sounding filters, use highervalues. This value must be a power of two. Recommend values arebetween 1024 and 8192.
Use lower values (512 or so) when tweaking your filter for fasterPreview response. When you have the settings the way you want them,switch to a higher FFT size for better quality when processing.
Windowing Function
The windowing function determines the amount of transition width andripple cancellation that occurs during filtering, with each one resulting in adifferent frequency response curve. These range in order from smallestwidth and greatest ripples to widest width and least ripples. The filters withthe least ripples are also those that more precisely follow the drawn graph,and have the steepest slopes, even though they are wider, and pass morefrequencies in a band-pass operation. The Hamming and Blackman filtersgive excellent overall results. Try different windowing functions if youthese don't give you the effect you want.
Lock to Constant Filter
Check this option to apply a constant filter to the waveform. Uncheck it tochoose both an Initial and a Final filter setting. The rate at which the filtermigrates from the Initial to Final settings depends on the Transition Curvesettings.
Morph
If Morph is checked, the transition from the initial filter settings to the finalfilter settings will actually "morph" from one to the other. If this is notchecked, the settings simply change in linear fashion over time. Forexample, if you leave Morph unchecked and have a spike at 10kHz for theinitial filter and a spike at 1kHz for the final filter, the spike at 10kHz willgradually decrease, and the spike at 1K will gradually increase over time,but frequencies between 1kHz and 10kHz will not be affected. If morphingis on, the spike itself will "ooze" from 10kHz down to 1kHz, passing manyof the frequencies in between.
For a cool example of morphing, try choosing Passive mode, and set aninitial curve with the first half at 100%, and the second half at zero. For thefinal curve, set the right 1/10th or so at 100% with the rest at zero. Thisselects high frequencies for the initial configuration, and low frequenciesfor the final configuration. To get a nice blending from high to low, choosemorph to include all the frequency combinations between the two filters.To see exactly what's happening as the filtering changes from the initial
88
configuration to the final, choose Transition to view the actual settings thatwill be used over the duration of your selection.
Precision Factor
This determines how accurately you want to filter over time when separateinitial and final settings are used. A larger number (low factor) means thefilter settings will change roughly, or in chunks, from initial to final, whilesmaller numbers (higher factor) will make the transition much smoother. Inany case, the higher the precision factor, the longer it will take to filter yourselection, but the nicer it will sound. Since the FFT function takes a largegroup of samples, and filters them all at once, the precision factordetermines how many samples from the entire group will actually be saved.A factor of 2 means that half of the samples are saved, while a factor of 10means that 1/10 of the samples are saved. Since there can be only one filtersetting for the entire group of samples, you may want a more accurate (orsmaller) setting if the EQ curve varies wildly over short periods of time.
FFT Transition Curve
Displays a graphical representation of the transition from initial to finalfilter settings. The top graph shows time along the x axis (with the leftrepresenting the start of your sample, and the right side representing theend), and where in the transition you are allowed the y axis (with 0%representing your initial filter, and 100% representing your final filter). Allpoints in between are a combination of your initial and final filterarrangements. The readout below the graph displays the current x, yposition of your mouse.Flat: The Flat button will reset the curve to its default state of anunchanged signal, removing all Control Points.Graph response at point: Check this option to have the bottom graphupdate in response to your mouse position in the top graph.The bottom graph shows the filter at any given point in the transition(provided the Graph response option is checked), and corresponds directlyto the position of the mouse in the top graph (click, or click and drag toupdate the view). Watch how the filter settings change as you move yourmouse up and down in the top graph—depending on the position youselect, you can decide whether you want a morphing transition, or a lineartransition. Each type of transition will give different filter settings for thepoints between your initial and final filter settings.Morphing is generally any technique used to transform one object intoanother. In the case of filter settings, it is a way to smoothly transform onesetting (represented by a graph) to another by estimating all the possiblecombinations of the two settings. Over time, the first setting becomes thesecond. At some point, the setting will stop looking like the initialconfiguration, and start looking like the final configuration. In the filteringworld, this means that frequencies between the ones selected to be filteredwill also be filtered.In migrating from the initial to the final filter configuration, the points inthe "in-between" settings are just the average between the two settings. For
89
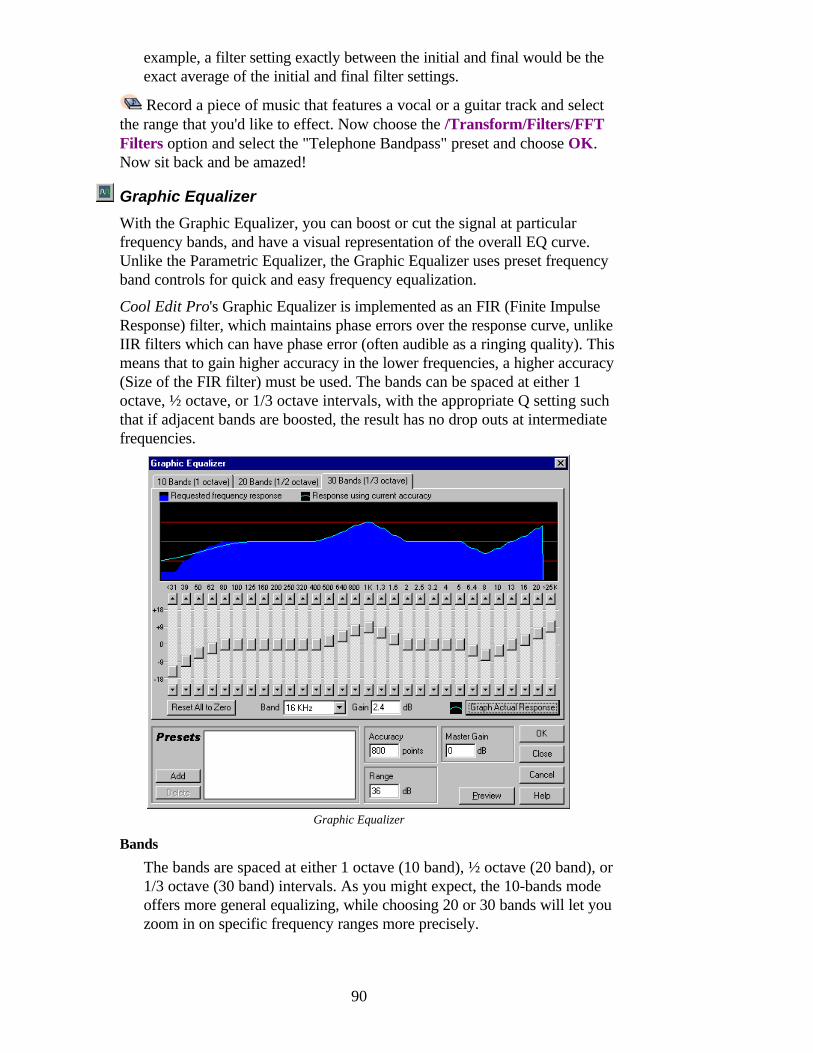
example, a filter setting exactly between the initial and final would be theexact average of the initial and final filter settings.
Record a piece of music that features a vocal or a guitar track and selectthe range that you'd like to effect. Now choose the /Transform/Filters/FFTFilters option and select the "Telephone Bandpass" preset and choose OK.Now sit back and be amazed!
Graphic Equalizer
With the Graphic Equalizer, you can boost or cut the signal at particularfrequency bands, and have a visual representation of the overall EQ curve.Unlike the Parametric Equalizer, the Graphic Equalizer uses preset frequencyband controls for quick and easy frequency equalization.
Cool Edit Pro's Graphic Equalizer is implemented as an FIR (Finite ImpulseResponse) filter, which maintains phase errors over the response curve, unlikeIIR filters which can have phase error (often audible as a ringing quality). Thismeans that to gain higher accuracy in the lower frequencies, a higher accuracy(Size of the FIR filter) must be used. The bands can be spaced at either 1octave, ½ octave, or 1/3 octave intervals, with the appropriate Q setting suchthat if adjacent bands are boosted, the result has no drop outs at intermediatefrequencies.
Graphic Equalizer
Bands
The bands are spaced at either 1 octave (10 band), ½ octave (20 band), or1/3 octave (30 band) intervals. As you might expect, the 10-bands modeoffers more general equalizing, while choosing 20 or 30 bands will let youzoom in on specific frequency ranges more precisely.
90
Reset All to Zero
This sets all sliders to 0dB, so there is no equalization.
Band
You can select the band to be modified from this drop down list.
Gain
The exact value for the gain being used in the chosen band.
Graph Actual Response
Because this is an FIR filter, the response may not actually match thedesired equalization curve at lower accuracy levels. Press this button to seethe actual response of the equalizer.
Accuracy
Higher accuracy levels (longer FIR filters) will give better frequencyresponse in the lower ranges. Higher values require more processing time,but you can use lower accuracy levels if you only want to equalize higherfrequencies. If you are equalizing very low frequencies, you shouldprobably raise the accuracy. Values between 500 and 5000 work well.
Range (4dB to 180dB)
Defines the range of the slider controls. Standard hardware equalizersusually have a range of 30dB to 48dB.
Master Gain
After the EQ settings have been adjusted, the overall volume level might betoo loud or too soft. You can compensate for this by entering an overallmaster gain to be applied to the resulting audio. The default value of 0dBrepresents no master gain adjustment.
91
Parametric Equalizer
Parametric equalizers are used for fine editing of frequencies within a sound.Parametric equalizers differs from equalizers that offer a specific number offrequencies and Q bandwidths (which determines how many overallfrequencies will be effected by a single, selected frequency control) in that theygive you continuous control over the frequency, Q and gain settings. Forexample, with the parametric equalizer, you can boost a broad range offrequencies that are centered around 1000 Hertz (1kHz), or you can boost thelow frequencies while simultaneously inserting a 60 Hz notch filter.Cool Edit Pro's Parametric Equalizer uses IIR filters (second order), which arevery fast and can give very precise resolution, even at the lower frequencies(for example, it's easy to boost just the bass at 40Hz to 45Hz).
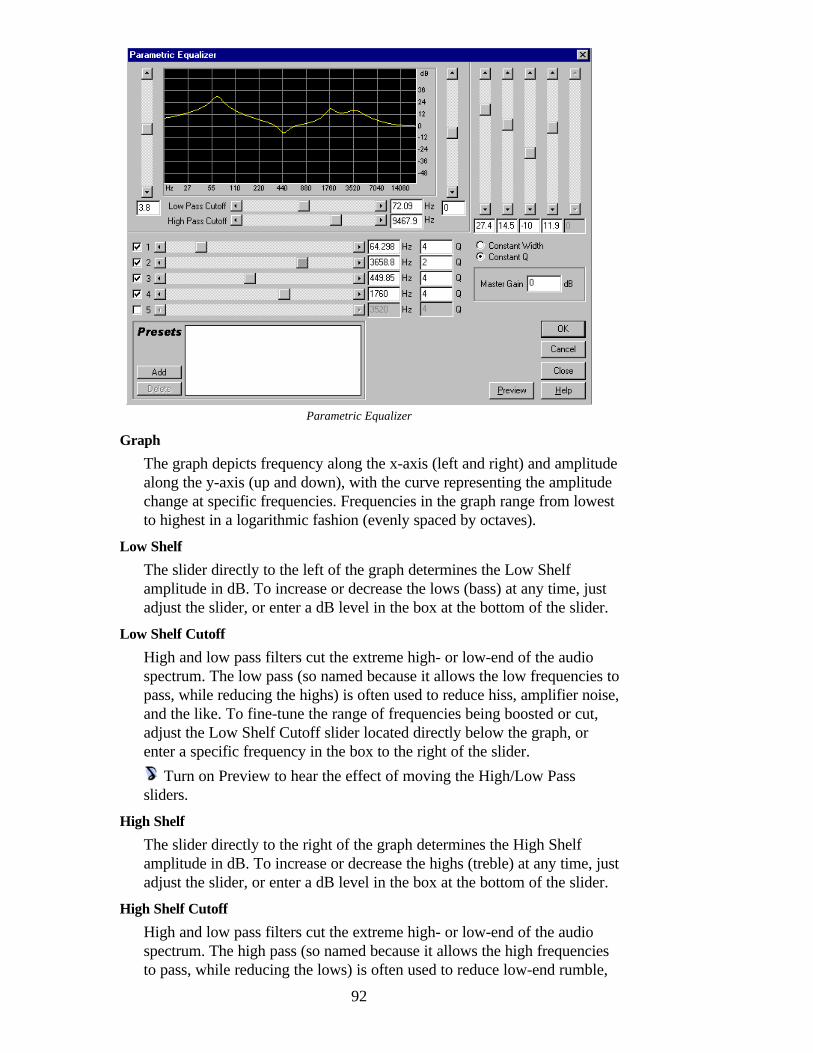
92
Parametric Equalizer
Graph
The graph depicts frequency along the x-axis (left and right) and amplitudealong the y-axis (up and down), with the curve representing the amplitudechange at specific frequencies. Frequencies in the graph range from lowestto highest in a logarithmic fashion (evenly spaced by octaves).
Low Shelf
The slider directly to the left of the graph determines the Low Shelfamplitude in dB. To increase or decrease the lows (bass) at any time, justadjust the slider, or enter a dB level in the box at the bottom of the slider.
Low Shelf Cutoff
High and low pass filters cut the extreme high- or low-end of the audiospectrum. The low pass (so named because it allows the low frequencies topass, while reducing the highs) is often used to reduce hiss, amplifier noise,and the like. To fine-tune the range of frequencies being boosted or cut,adjust the Low Shelf Cutoff slider located directly below the graph, orenter a specific frequency in the box to the right of the slider.
Turn on Preview to hear the effect of moving the High/Low Passsliders.
High Shelf
The slider directly to the right of the graph determines the High Shelfamplitude in dB. To increase or decrease the highs (treble) at any time, justadjust the slider, or enter a dB level in the box at the bottom of the slider.
High Shelf Cutoff
High and low pass filters cut the extreme high- or low-end of the audiospectrum. The high pass (so named because it allows the high frequenciesto pass, while reducing the lows) is often used to reduce low-end rumble,
93
hum, or other unwanted low-frequency sounds. To fine-tune the range offrequencies being boosted or cut, adjust the High Shelf Cutoff sliderlocated directly below the graph, or enter a specific frequency in the box tothe right of the slider.
Turn on Preview to hear the effect of moving the High/Low Passsliders.
Intermediate Bands
You can place up to 5 intermediate bands into the EQ circuit. This givesyou very fine control over the shape of the equalization curve. Check theslider box to activate the band and its corresponding volume slider. Thevertical sliders in the upper right control the amount of boost or cut (youcan also enter boost/cut amount (dB) in the entry box below each slider).The horizontal sliders located below the Cutoff sliders control the centerfrequency at which the boost or cut will occur (a frequency may also beentered in the box to the right of the slider).
Center Frequency
This is the frequency at which boost/cut will occur for a particular band.This number reflects changes made by the band's slider. You can also entera frequency directly in this box.
Width
The Q or Width value (depending on Constant Q/Width setting below)controls the width of the affected frequency band. With lower Q values (orgreater Width values), a larger range of frequencies will be affected. If a Qvalue is very high (above 100), only a very narrow band will be affected,which is ideal for notch filters where only a particular frequency needs tobe removed, like a 60-cycle hum. You should be aware that whenever avery narrow band is boosted, it will tend to "ring" or resonate at the audioat that frequency. Q values of 1 to 10 are used most often for generalequalization.
Constant Width/Constant Q
This parameter describes a band's width. This can be a Q value (which is aratio of width to center frequency) or an absolute width value in Hz.Constant Q is the most common setting, but you may want to use aconstant width if ,for example, you want the length of ringing to be aconstant, no matter which frequency is being boosted.
Master Gain
After the EQ settings have been adjusted, the overall volume level might betoo loud or too soft. This can be compensated for by entering an overallmaster gain to be applied to the resultant audio.
Record a piece of music that features a vocal or a guitar track and selectthe range that you'd like to effect. Now choose the/Transform/Filters/Parametric Equalizer option and activate filters 1, 2,and 3 and then vary the gain sliders for any effect that you'd like and chooseOK. Now sit back and be amazed!
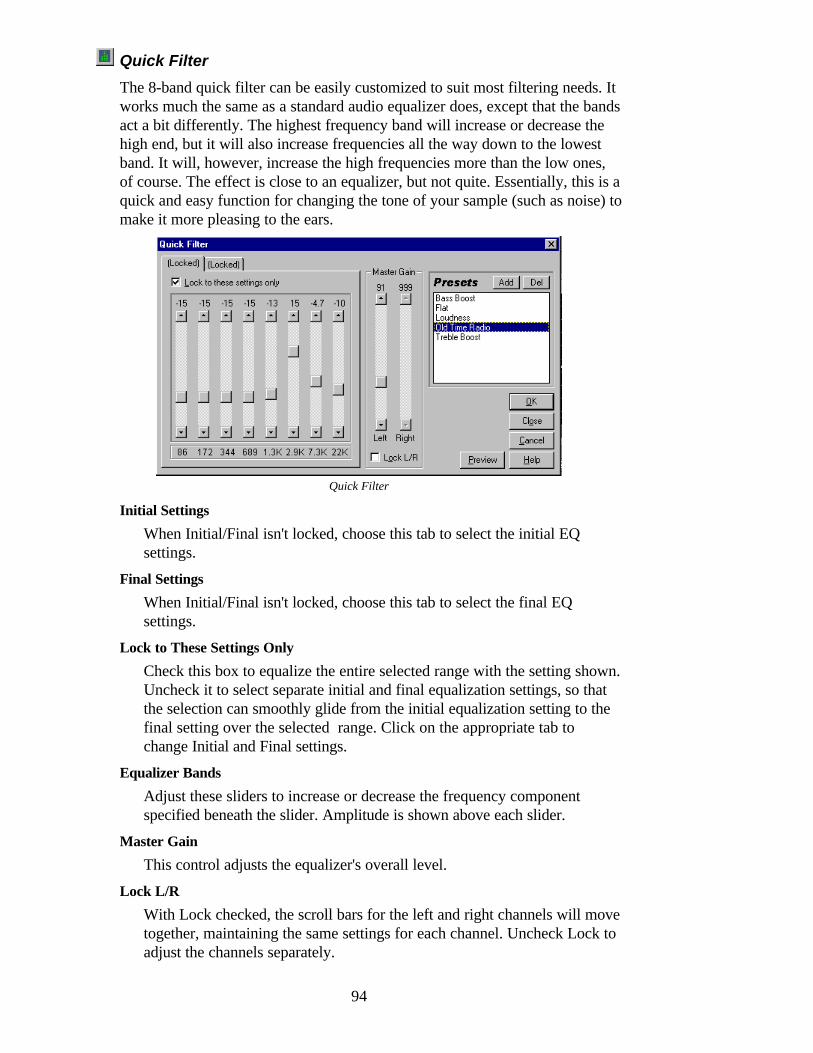
94
Quick Filter
The 8-band quick filter can be easily customized to suit most filtering needs. Itworks much the same as a standard audio equalizer does, except that the bandsact a bit differently. The highest frequency band will increase or decrease thehigh end, but it will also increase frequencies all the way down to the lowestband. It will, however, increase the high frequencies more than the low ones,of course. The effect is close to an equalizer, but not quite. Essentially, this is aquick and easy function for changing the tone of your sample (such as noise) tomake it more pleasing to the ears.
Quick Filter
Initial Settings
When Initial/Final isn't locked, choose this tab to select the initial EQsettings.
Final Settings
When Initial/Final isn't locked, choose this tab to select the final EQsettings.
Lock to These Settings Only
Check this box to equalize the entire selected range with the setting shown.Uncheck it to select separate initial and final equalization settings, so thatthe selection can smoothly glide from the initial equalization setting to thefinal setting over the selected range. Click on the appropriate tab tochange Initial and Final settings.
Equalizer Bands
Adjust these sliders to increase or decrease the frequency componentspecified beneath the slider. Amplitude is shown above each slider.
Master Gain
This control adjusts the equalizer's overall level.
Lock L/R
With Lock checked, the scroll bars for the left and right channels will movetogether, maintaining the same settings for each channel. Uncheck Lock toadjust the channels separately.
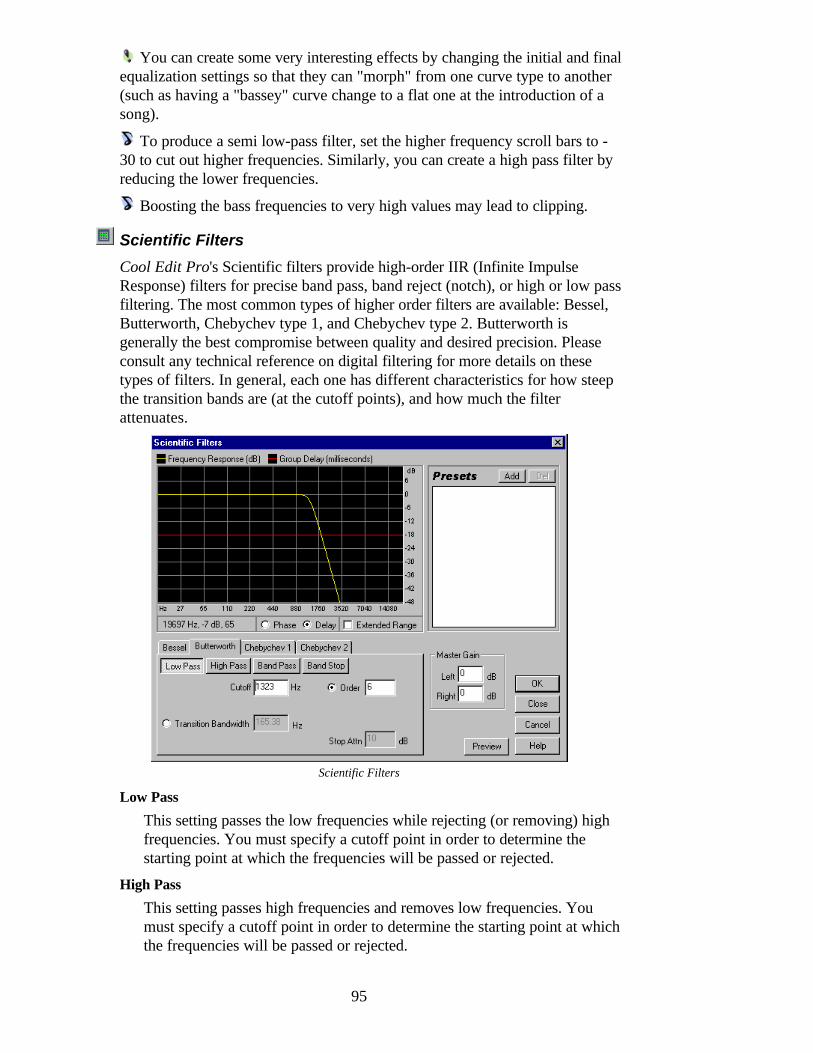
95
You can create some very interesting effects by changing the initial and finalequalization settings so that they can "morph" from one curve type to another(such as having a "bassey" curve change to a flat one at the introduction of asong).
To produce a semi low-pass filter, set the higher frequency scroll bars to -30 to cut out higher frequencies. Similarly, you can create a high pass filter byreducing the lower frequencies.
Boosting the bass frequencies to very high values may lead to clipping.
Scientific Filters
Cool Edit Pro's Scientific filters provide high-order IIR (Infinite ImpulseResponse) filters for precise band pass, band reject (notch), or high or low passfiltering. The most common types of higher order filters are available: Bessel,Butterworth, Chebychev type 1, and Chebychev type 2. Butterworth isgenerally the best compromise between quality and desired precision. Pleaseconsult any technical reference on digital filtering for more details on thesetypes of filters. In general, each one has different characteristics for how steepthe transition bands are (at the cutoff points), and how much the filterattenuates.
Scientific Filters
Low Pass
This setting passes the low frequencies while rejecting (or removing) highfrequencies. You must specify a cutoff point in order to determine thestarting point at which the frequencies will be passed or rejected.
High Pass
This setting passes high frequencies and removes low frequencies. Youmust specify a cutoff point in order to determine the starting point at whichthe frequencies will be passed or rejected.
96
Band Pass
This mode preserves a range of frequencies (that is, a band) whileremoving all other frequencies. You must specify two cutoff points todefine the edges of the band.
Band Stop (Notch filter)
Also known as a Notch filter, this mode is the opposite of Band Pass, andwill reject any frequencies within the specified range. You must specify twocutoff points to define the edges of the band.
Cutoff
This parameter defines the frequency serving as a border between passedand rejected frequencies. It is at this point that the filter will switch frompassing to attenuating or vice versa. In filters requiring a range (Band Passand Band Stop), this serves as the lower frequency, while High Cutoffdefines the high frequency border.
High Cutoff
In filters requiring a range (Band Pass and Band Stop), this serves as thehigher frequency, while Cutoff defines the lower frequency border.
Order
The higher the order, the more precise the filter (with steeper slopes at thecutoff points, etc.), however very high orders can also have high levels ofphase distortion.
Transition Bandwidth
Some filter types allow the specification of the width of the transitionband (lower values have steeper slopes). If you choose a transitionbandwidth, the Order will be filled in automatically, and vice-versa. Infilters requiring a range (Band Pass and Band Stop), this serves as thelower frequency transition, while High Width defines the higher frequencytransition.
High Width
In filters requiring a range (Band Pass and Band Stop), this serves as thehigher frequency transition, while Transition Bandwidth defines the lowerfrequency transition.
Pass Ripple/Actual Ripple
Some high-order filter types give you the ability to choose the maximumallowable amount of ripple. Ripple is the effect of unwanted boosting andcutting of frequencies near the cutoff point.
Stop Attn
The Stop Band Attenuation control determines how much gain reduction isto be used when removing frequencies.
Master Gain
After the EQ settings have been adjusted, the overall volume level might betoo loud or too soft. You can compensate for this by entering an overallmaster gain to be applied to the resulting audio.

97
Noise Reduction [See the Manual Addendum for updates!]
The options in this menu can be used to reduce background noise and generalbroad band noise without having an adverse effect on the overall quality of theoriginally-recorded signal.
To reduce noise from a file quickly, select at least one half second of the file(preferably one with ONLY the noise and no foreground audio), and select/Transform/Noise Reduction. Click on Get Noise Profile From Selection tosample the noise. Then click on Close, select the entire file (or the portion youwant to noise-reduce), go to /Transform/Noise Reduction again, and click onOK to perform the noise reduction.
Click/Pop Eliminator
The Click/Pop Eliminator works by searching for anomalies in the audio datathat could be construed as clicks or pops (Detection), and then replacing orrepairing the damaged location (Correction). Using the Click/Pop Eliminator ismore accurate than just cutting out the click, or replacing the data with astraight line. You can correct an entire selection or instantly remove a singleclick if one is highlighted (hint: use a high zoom level to isolate the click). Tospeed up the repairing of single clicks, configure the F3 key to correct themwhen they are highlighted by first choosing the Click/Pop filter and pressing"Fill Single Click Now". The F3 key then repeats the last action withoutbringing up the dialog box. You can also create a quick key for filling in singleclicks from the Favorites menu.
Click/Pop/Crackle Eliminator
Use the Spectral View feature with the spectral resolution set to 256 bandsand a Window Width of 40% to see the clicks in a program. See/Options/Settings/Spectral to adjust these parameters. Clicks will ordinarily be
98
visible as bright vertical bars that go all the way from the top to the bottom ofthe display.
To hear all the clicks that were removed, save a copy of the original filesomewhere, then Mix Paste it (overlap it) over the corrected audio with asetting of 100% and Invert enabled.
It may take a little trial and error to find the right settings, but the results arewell worth it—much better than searching for and replacing each clickindividually. The parameters that make the most difference in determining howmany clicks are repaired are the Detection and Rejection thresholds (the latterof which requires Second Level Verification). Make adjustments to these willhave the greatest effects; you might try settings from 10 for a lot of correction,50 for very little correction on the detection threshold, or 5 to 40 on therejection threshold. The next parameter that affects the output most is the RunSize. A setting of about 25 is best for high-quality work. If you have the time,running at least 3 passes will improve the output even more. Each successivepass will be faster than the previous one.
Thresholds Graph
This graph shows the exact threshold levels to be used at each amplitude,with amplitude along the x-axis (left and right) and the threshold levelalong the y-axis (up and down). Cool E will use values on the curve to theright (above -20dB or so) in processing louder audio, and settings towardsthe left in processing software sections. There are separate curves fordetection and rejection.
Detection Parameters
Threshold Levels (Max, Avg, Min dB): There are three definable levels(Max, Avg, Min; given in dB) for which you can specify unique detectionand rejection threshold settings. These levels are ordinarily set to themaximum amplitude, average amplitude, and minimum amplitude of theaudio. For example, if your audio has a maximum RMS amplitude of -10dB then you may set the Max Threshold to -10dB. If the minimum RMSamplitude was -55dB then set Min Threshold to -55, etc. Press the FindThreshold Levels button to fill in these levels automatically with themaximum, average, and minimum levels. Generally, less correction isrequired for louder audio, as the audio itself will mask many of the clicksso that their repair is not necessary. Clicks are very noticeable in very quietaudio, so quiet audio will tend to require lower detection and rejectionthreshold levels. Once the levels are in place, assign appropriate detectionand rejection thresholds to be used at each of the levels.Detection Threshold (1 to 150): This setting determines how sensitive thefilter is in finding clicks and pops, where lower detection thresholds resultin more clicks being found. Start with a threshold to 35 for high-amplitudeaudio (above -15dB), 25 for average amplitudes, and 10 for low-amplitudeaudio (below -50dB). These settings will find most clicks, and often all ofthe louder clicks. If there is a constant crackle in the background of yoursource audio, try lowering the Minimum threshold level more, or increasingthe dB level to which the threshold is assigned. This value can be as low as6, but if the setting is placed any lower, then the filter may removed sounds
99
that are not actually clicks. The more clicks that are detected, the morerepair processing there is, which increases the possibility of distortion. Withtoo much distortion of this type, the audio begins to sound flat and lifeless.If this happens, try setting the detection threshold rather low and enablingthe Second Level Verification, which will re-analyze the detected clicksand throw out (that is, leave unfiltered) the ones that are less likely to beclicks. Generally, if you still hear clicks after filtering your audio, trylowering the detection threshold, but if this distorts the audio too much, tryeither increasing the threshold or enabling Second Level Verification.Rejection Threshold (1 to 150): If Second Level Verification is enabled,the rejection threshold determines how many potential clicks (found usingthe Detection Threshold) are rejected. As with detection, lower settingsresult in more clicks being repaired. Increasing the rejection threshold willprevent more clicks from being repaired, as they may not be actual validclicks. The idea is to reject as many detected clicks as possible, but stillremove all audible clicks. A good starting value for this setting is 30. If atrumpet-like horn sound has clicks in it, and the clicks are not beingremoved, try lowering this value to reject fewer potential clicks. If aparticular sound or instrument is "fuzzing out" and getting distorted, thenincrease the rejection threshold to keep repairs at a minimum (the fewerrepairs that are needed to get good results, the better). Cool E mayinterpret some valid audio as clicks, depending on the nature of thewaveform in question. Some waveforms have sharp, albeit periodic, spikesthroughout. The rejection algorithm looks to see if this click is isolated(meaning it is a real click) or has neighbors (meaning it is probably part of adesired waveform).
Find Threshold Levels
Find Threshold Levels will automatically fill in the Max, Avg, and Minthreshold level settings. Use this button to auto-set the threshold levels,before setting the Max and Min detection and rejection levels (it is a goodidea to settle on Max and Min settings first, because once they are in place,they usually need not be adjusted much). After Max and Min, set the Avglevel to about three quarters the way up between the min and max settings(for example, Max of 30, Min of 10, then try about 25 for Avg). Afterauditioning a small piece of repaired audio, you can go back and adjust thesettings accordingly. For example, if a quiet part still has a lot of clicks,lower the min thresholds a bit. If a loud piece still has clicks, lower the Avgor Max settings. The loud, average, and quiet portions of the audio arehandled differently based on the detection and rejection settings.
Detect Big Pops (30 to 200)
With some audio, large unwanted events (those more than a few hundredsamples wide) may not be interpreted as clicks by the normal detectionalgorithm. Check this option if you want Cool E to remove these largeclicks as well. Note that a sharp sound like a loud snare drum hit can havethe same characteristic as a very large pop, so you should only enable thisoption if you know the audio has very large pops (like a recording from arecord with a very big scratch in it). If you find that obvious, loud pops are
100
not being fixed, then enable this option, and use settings from about 30(find kind of quiet pops) to 70 or so (only fix the very loudest pops). If thisoption is enabled, and drum hits sound softer, then the onset of the drum isbeing considered a big pop and is being "repaired". If this happens, tryincreasing the threshold a bit until the obvious pops are fixed.
Second Level Verification
Enable Second Level Verification to start rejecting some of the potentialclicks that were found by the detection algorithm. In some types of audio,such as trumpets, saxophones, female vocals, and snare drum hits, some ofthe peaks in the natural waveform may be detected as clicks. If these peaksare corrected as clicks, the resulting audio may sound muffled. WithSecond Level Verification enabled, these peaks will be rejected, and notcorrected after all. True clicks, on the other hand, will not be rejected.Because this option slows down the restoration, you should first trycorrecting the audio with this option turned off, and only use it for sectionsthat are very troublesome. See Rejection Threshold for more information.
Smooth Light Crackle
This will smooth out one-sample errors when detected, and can have theeffect of removing more background crackle. If this makes the resultingaudio sound thinner, flatter, or more tinny, leave this option turned off.
Correction Parameters
FFT Size (8 to 512): This is the size of the FFT that will be used to repairthe clicks, pops, and crackle. In general, it is a good idea to just let theprogram itself decide on good FFT size choices by checking Auto. Youmay wish to override the automatic setting and give a specific FFT size touse for click repair when processing some types of audio. A good startingpoint is an FFT Size of 32. If the clicks are still quite audible, then tryincreasing this value to 48, then 64, etc. Any number between about 8 and512 should work fine. The higher this value, the slower the correction willbe, but with potentially better results. However, if the value is too high,there may be some extra unwanted low frequency distortion, which sounds"rumbly". If you are repairing clicks one at a time using Fill Single ClickNow, then a high FFT size (128 to 256) should work rather nicely.Pop Oversamples (0 to 300): This value is used to give the clicks a littleextra buffer space when being repaired. When a potential click is found, itsbeginning and end points are marked as closely as possible. Theoversamples value will expand that range, and consider more samples tothe left and right of the click as being part of the click. If clicks aren't beingcorrected fully enough (for example, if clicks become quieter but are stillevident), try increasing this value. Start with a value of 8, and increase toslowly as much as 30 or 40. Audio that does not contain a click should notchange very much if it is corrected, so this buffer area should remainmostly untouched by the replacement algorithm. Increasing theoversamples will also force larger FFT sizes to be used when in Automode. This setting may remove clicks more cleanly, but if set too high,audio will start to distort where the clicks were removed.
101
Run Size (0 to 1000): The repair algorithm may not work well on twoconsecutive clicks that are extremely close together. The Run Size settingsets a ceiling on the potential distance between two clicks—that is, any twoclicks closer together than the Run Size will be treated as one. A goodstarting point would be to set this value somewhere around 25 (or half theFFT size if you are not using the Auto setting). If Run Size is too large(over 100 or so) then the corrections may become more noticeable, as verylarge blocks of data are repaired at once. If you set the Run Size too small,then clicks that are very close together may not be repaired completely onthe first pass.Fill Single Click Now: You can correct a single click by highlighting it andpushing the Fill Single Click Now button. This is the manual override forclick restoration. If FFT Size is set to Auto, then an appropriate FFT sizewill be used for the restoration based on the size of the area being restored.Otherwise, settings of 128 to 256 work very well when filling in singleclicks. Once a single click is filled, the F3 (Repeat Last Command key) keywill be set to repeat this action, so filling in future clicks requires onlypressing F3.
Previously Corrected/Rejected
After running a click repair, re-enter the Click/Pop Eliminator to displaythe number of previously corrected clicks. The dialog will also show thenumber of rejected clicks that would have been corrected if Second LevelVerification were not enabled.
Multiple Pass (2 to 32)
Some clicks may be too close together to be repaired effectively, so goingover the audio with another pass will often catch those clicks that weren'tfound the first time around. If this option is checked, then any number ofpasses will automatically be performed (up to 32). Cool E will performfewer passes if no more clicks are found and all detected clicks have beenrepaired. Generally, about half as many or fewer clicks are repaired on eachsuccessive pass. When using multiple pass mode, a higher detectionthreshold may lead to fewer interventions in repairing, and increase thequality of the result somewhat while still removing all clicks. In the samevein, higher rejection thresholds may lead to better results.
Hiss Reduction [See the Manual Addendum for updates!]
This function removes all audio in all frequencies that are below a certainthreshold (generally the noise or hiss level). If audio has a constant backgroundhiss (white noise hiss is removed most effectively) then that hiss can be "noisegated" or removed completely. Any audio in any frequency band louder thanthe cutoff level will remain untouched. Use Hiss Reduction to removeannoying hiss from cassette recordings, record albums (after click/popremoval), or microphone recordings.
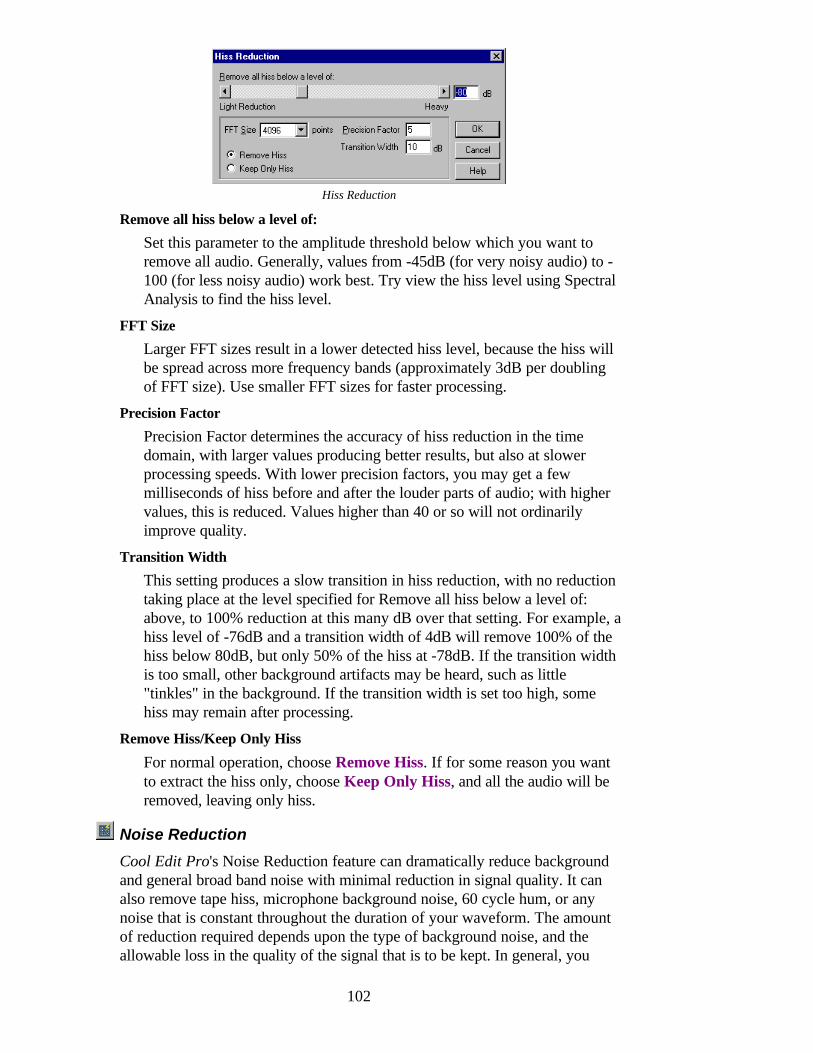
102
Hiss Reduction
Remove all hiss below a level of:
Set this parameter to the amplitude threshold below which you want toremove all audio. Generally, values from -45dB (for very noisy audio) to -100 (for less noisy audio) work best. Try view the hiss level using SpectralAnalysis to find the hiss level.
FFT Size
Larger FFT sizes result in a lower detected hiss level, because the hiss willbe spread across more frequency bands (approximately 3dB per doublingof FFT size). Use smaller FFT sizes for faster processing.
Precision Factor
Precision Factor determines the accuracy of hiss reduction in the timedomain, with larger values producing better results, but also at slowerprocessing speeds. With lower precision factors, you may get a fewmilliseconds of hiss before and after the louder parts of audio; with highervalues, this is reduced. Values higher than 40 or so will not ordinarilyimprove quality.
Transition Width
This setting produces a slow transition in hiss reduction, with no reductiontaking place at the level specified for Remove all hiss below a level of:above, to 100% reduction at this many dB over that setting. For example, ahiss level of -76dB and a transition width of 4dB will remove 100% of thehiss below 80dB, but only 50% of the hiss at -78dB. If the transition widthis too small, other background artifacts may be heard, such as little"tinkles" in the background. If the transition width is set too high, somehiss may remain after processing.
Remove Hiss/Keep Only Hiss
For normal operation, choose Remove Hiss. If for some reason you wantto extract the hiss only, choose Keep Only Hiss, and all the audio will beremoved, leaving only hiss.
Noise Reduction
Cool Edit Pro's Noise Reduction feature can dramatically reduce backgroundand general broad band noise with minimal reduction in signal quality. It canalso remove tape hiss, microphone background noise, 60 cycle hum, or anynoise that is constant throughout the duration of your waveform. The amountof reduction required depends upon the type of background noise, and theallowable loss in the quality of the signal that is to be kept. In general, you
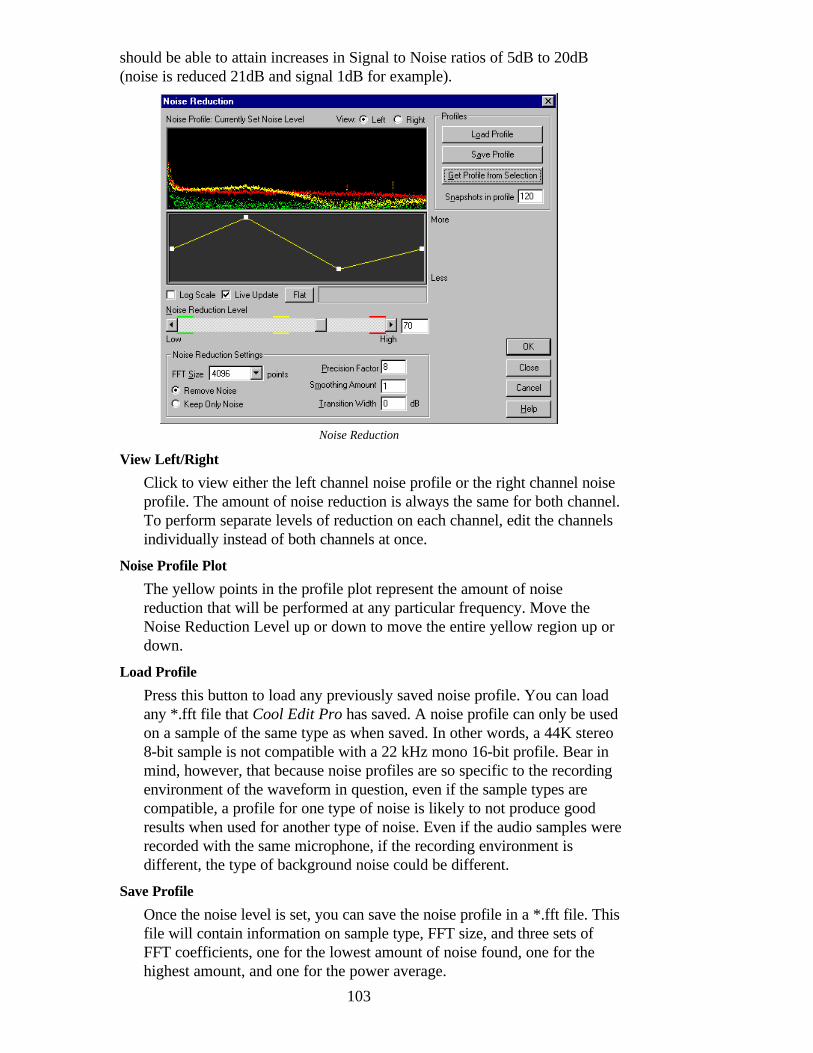
103
should be able to attain increases in Signal to Noise ratios of 5dB to 20dB(noise is reduced 21dB and signal 1dB for example).
Noise Reduction
View Left/Right
Click to view either the left channel noise profile or the right channel noiseprofile. The amount of noise reduction is always the same for both channel.To perform separate levels of reduction on each channel, edit the channelsindividually instead of both channels at once.
Noise Profile Plot
The yellow points in the profile plot represent the amount of noisereduction that will be performed at any particular frequency. Move theNoise Reduction Level up or down to move the entire yellow region up ordown.
Load Profile
Press this button to load any previously saved noise profile. You can loadany *.fft file that Cool Edit Pro has saved. A noise profile can only be usedon a sample of the same type as when saved. In other words, a 44K stereo8-bit sample is not compatible with a 22 kHz mono 16-bit profile. Bear inmind, however, that because noise profiles are so specific to the recordingenvironment of the waveform in question, even if the sample types arecompatible, a profile for one type of noise is likely to not produce goodresults when used for another type of noise. Even if the audio samples wererecorded with the same microphone, if the recording environment isdifferent, the type of background noise could be different.
Save Profile
Once the noise level is set, you can save the noise profile in a *.fft file. Thisfile will contain information on sample type, FFT size, and three sets ofFFT coefficients, one for the lowest amount of noise found, one for thehighest amount, and one for the power average.
104
Get Profile from Selection
Press this button to extract a Noise Profile from the highlighted selection.Try to select a portion of the waveform that has no important signal in it(only has background noise), and then press Get Profile from Selection.Cool E then gathers the statistical information about the background noise,after which you can remove all noise of this type from your waveform.
If the selection used for gathering the noise level is too small, then theGet Profile from Selection button will not activate. Reduce the FFT Size orselect a larger section of noise by using Copy and Paste for reasonableresults with very short noise samplings.
Snapshots in profile
This number describes how many snapshots of noise to take in thehighlighted interval when Get Noise Profile From Selection is pressed. Thelarger this number, the more accurate the statistical data is. A value of 64 isplenty. You will notice that using very small numbers of statistical sampleswill greatly affect the quality of the various noise reduction levels. Withmore samples, a noise reduction level of 100 will likely cut out more noise,but also cut out more original signal as well. However, a low noisereduction level with more samples will also cut out more noise, but likelywill not disrupt the intended signal.
Reduction Graph
Use the reduction graph to set the amount of noise reduction at certainfrequency ranges. For example, if you need noise reduction only in thehigher frequencies, adjust the chart to give less noise reduction in the lowfrequencies, or alternatively, more reduction in the higher frequencies. Thegraph depicts frequency along the x-axis (left and right) and the amount ofnoise reduction (in percent) along the y-axis (up and down). If it is set toFlat, then the amount of noise reduction used is based on the noise profileexactly. The readout below the graph displays the current x, y position ofyour mouse.
• To add a point to the graph, click in the grid at the location where youwould like the point placed.
• To move a point on the graph, click and hold on the point and drag to anew location.
• When the mouse cursor is located over a point, you will see it changefrom an arrow to a hand.
Log Scale
You can view the chart of the noise profile in either linear or logarithmicfashion. Check Log Scale to divide the graph evenly into 10 octaves.Uncheck it to divide it linearly, with each 1000kHz (for example) taking upthe same amount of horizontal width.
Live Update
When you check this option, the noise profile plot updates as control pointsare moved around on the chart. Otherwise, the profile plot is only updatedwhen the control point is placed in its new location.
105
FFT Size
The FFT Size parameter causes the most drastic changes in quality. Goodsettings for the size range from 4096 to 12000. The FFT Size determinesthe number of individual frequency bands that are analyzed—the noise ineach frequency band is treated separately, so the more bands you have, thefiner frequency detail you get in removing noise. For example, if there is a120Hz hum, but not many frequency bands, frequencies from 80Hz on upto 160Hz may be affected. With more bands, there is less spacing betweenbands, so the actual noise can be detected and removed with moreprecision. However, with too many bands, time slurring occurs, which canmake the result sound reverberant or "echoey" (with pre- and post-echoes).So the tradeoff is frequency resolution vs. time resolution, with lower FFTsizes giving better time resolution and higher FFT sizes giving betterfrequency resolution.
Remove Noise/Keep Only Noise
For normal operation, choose Remove Noise. If for some reason you wantto extract the noise for other purposes, choose Keep Only Noise, and allthe audio will be removed, leaving only noise.
Precision Factor
This affects distortions in amplitude. With values of 3 or less, the FFT isperformed in giant blocks that are not very continuous between the blocks.This means that after each block is processed, there can be a drop or spikein volume at the interval between blocks. Values of 5 and up work best.Beyond 10 or so, there is no noticeable change in quality—only in the timeit takes to compute. Try using 5 or 7 (odd numbers are best for symmetricproperties).
Smoothing Amount
Smoothing Amount takes into account the standard deviation, or variance,of the noise signal at each band. Bands that vary greatly when analyzed(white noise) will be smoothed differently than constant bands (like a 60cycle hum). Generally, increasing the smoothing amount (up to 2 or so)will reduce the 'burbly' background artifacts at the expense of raising theoverall background broadband noise level.
Transition Width
This setting determines how sharp the division is between what isconsidered noise and what should be kept. For instance, with a TransitionWidth of zero, a sharp (noise gate type) curve is applied to each frequencyband. If the audio in the band is just above the threshold, it stays; if it is justbelow, it is truncated to silence. Conversely, you can specify a range overwhich the audio will fade to silence based upon the input level. Forexample, with a transition width of 10dB, and a cutoff point (scanned noiselevel for the particular band) of -60dB, then audio at -60dB would stay thesame, at -62dB it would be reduced some (to about -64dB), and so on untilaudio at -70dB would be removed entirely. Again, if the width is zero, thenaudio just below -60dB is entirely removed, while audio just above itwould remain untouched. Negative widths simply go about the other side,
106
so in the above example, a -10dB width would have ranged from -60dB to-50dB.
You can reduce the noise incurred by the sound board's circuitry duringrecording--just record a second of silence before whatever you want to recordand tell the noise reducer to remove the sound of that silence in order tofurther reduce the noise level by up to 10dB.
Noise reduction works best on 16- and 32-bit samples. Although it willwork with 8-bit audio, it is impossible to get the noise level to less than about -45dB if even that. Noise at -45dB is very audible, as owners of 8-bit soundcards can attest. You can get much better results by converting to 16 bits first,reducing the noise, and downsampling back to 8 bits, than by reducing noise in8-bit samples directly.
The noise reduction works best if the original signal is centered. To center asignal, highlight it and choose the "Center Wave" preset from the Amplifyfunction. Centering the wave adjusts the DC offset to zero. If the wave is notcentered, you may hear audible clicking in quiet parts after processing. Becausecentering takes out all frequencies below about 16Hz, it is completely safe todo without any ill side effects.
You can generate interesting effects by choosing valid "foreground" audioas your profile "footprint" rather than background noise or hiss. For example,within a vocal line, you can select the vowel "O" to be used as the profile.Processing this vocal file (remember, it's best to process a copy of the originalfile) will then reduce or eliminate the "O" sounds... thereby creating a ratherwild effect.
Great effects can be generated by setting the noise level to some valid signalcomponent in the waveform, and not the background noise. Whateverfrequencies are present in the highlighted selection when Set Noise Level ischosen will be removed when the reduction level is set to 100.
Record a piece of music that has tape hiss or other background noise.Select a short range (at least one half second) that contains only the noise thatyou'd like to reduce. Now choose the /Transform/Noise Reduction/NoiseReduction option and click on Get Noise Profile From Selection to samplethe noise. Then click on Close, select the entire file (or the portion you want tonoise-reduce), go to /Transform/Noise Reduction again, and click on OK toperform the noise reduction.
Special
The options in this menu can be used to introduce some processing effects that areboth innovative and wild-n-wacky. Have fun and experiment!
Brainwave Synchronizer
The Brainwave Synchronizer can produce files that, when listened to withstereo headphones, will put the listener into any desired state of awareness. Forexample, by listening to "waved" files, you can achieve states such as deepsleep, theta meditation, or alpha relaxation. Because of the nature of thisfunction, it only works on Stereo waveform data, and to be effective, it must
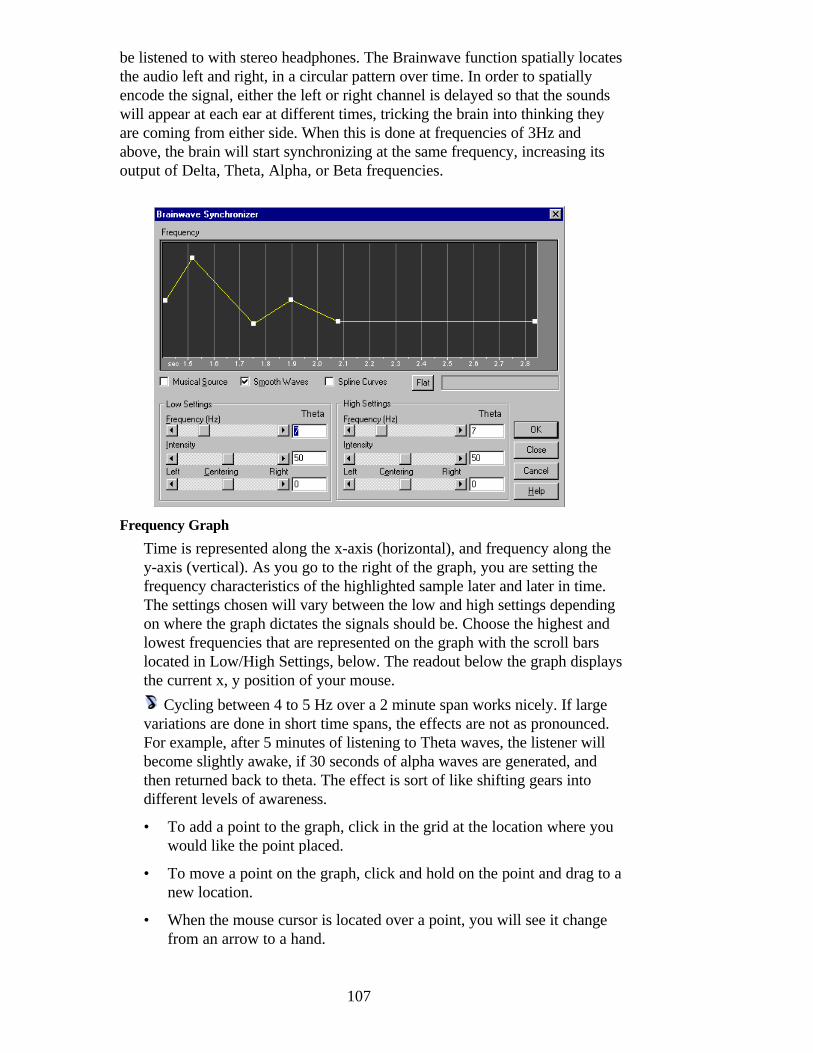
107
be listened to with stereo headphones. The Brainwave function spatially locatesthe audio left and right, in a circular pattern over time. In order to spatiallyencode the signal, either the left or right channel is delayed so that the soundswill appear at each ear at different times, tricking the brain into thinking theyare coming from either side. When this is done at frequencies of 3Hz andabove, the brain will start synchronizing at the same frequency, increasing itsoutput of Delta, Theta, Alpha, or Beta frequencies.
Frequency Graph
Time is represented along the x-axis (horizontal), and frequency along they-axis (vertical). As you go to the right of the graph, you are setting thefrequency characteristics of the highlighted sample later and later in time.The settings chosen will vary between the low and high settings dependingon where the graph dictates the signals should be. Choose the highest andlowest frequencies that are represented on the graph with the scroll barslocated in Low/High Settings, below. The readout below the graph displaysthe current x, y position of your mouse.
Cycling between 4 to 5 Hz over a 2 minute span works nicely. If largevariations are done in short time spans, the effects are not as pronounced.For example, after 5 minutes of listening to Theta waves, the listener willbecome slightly awake, if 30 seconds of alpha waves are generated, andthen returned back to theta. The effect is sort of like shifting gears intodifferent levels of awareness.
• To add a point to the graph, click in the grid at the location where youwould like the point placed.
• To move a point on the graph, click and hold on the point and drag to anew location.
• When the mouse cursor is located over a point, you will see it changefrom an arrow to a hand.
108
Musical Source
If the selection being brainwaved is musical, check this setting to calculatethe wave patterns in such a way as to eliminate clicks and pops. If thesource is noisy (waterfall, ocean, nature recordings, etc.) do NOT checkthis. If you do, it will actually add interference.
Smooth Wave
When checked, the audio that appears at the left and right channels will besmoothed out. The left and right channels will delay and un-delay followinga smooth curve such that the delay difference between the left and rightchannels will follow a sine wave pattern, even though the brain will hearthe audio as traveling around the head in a circle. When Smooth Wave isnot checked, the net delays are the same, but are achieved by holding onechannel constant (at no delay) while the other channel is delayed followinghalf a sine wave. The boundary between holding non-delayed and delayingsignal is discontinuous in that the dD/dt (difference in delay over time)jumps from zero to a positive delay value without hitting any values in-between. When Smooth Wave is checked, the dD/dt is always continuous,which will cause less noticeable distortion in either channel when heardindependently.
Spline Curves
Check this option to generate a smoother, best fit curve instead of astraight line between control points on the graph. When you use splinecurves, the line will not ordinarily travel directly through the control points;rather, the points control the shape of this curve. To get the curve closer toa control point, click to create more control points near the point inquestion. The more control points there are clustered together, the closerthe spline curve will be to those points. Use Spline Curves when you wantvery smooth curves instead of straight lines (with their discontinuities at thecontrol points).
Flat
The Flat button will reset the graph to its default state, removing all controlpoints.
Low/High Settings
There are two sets of settings for control of brainwave frequencies. Lowsettings all correspond to the lower part of the graph (points dragged near thebottom), and High settings affect the top.
Frequency
This is the brainwave frequency that will be encoded into the final process.Different brainwave frequencies stimulate the brain into synching todifferent levels of consciousness (e.g. sleep, meditation, wakefulness, etc.)
For special spatial panning effects, choose wave frequencies of 1Hz orless. A mono source (left and right the same) will appear to move from leftto right and back at period of 1/frequency. For example, a frequency of0.1Hz will pan the audio in a "full circle" over the period of 10 seconds.
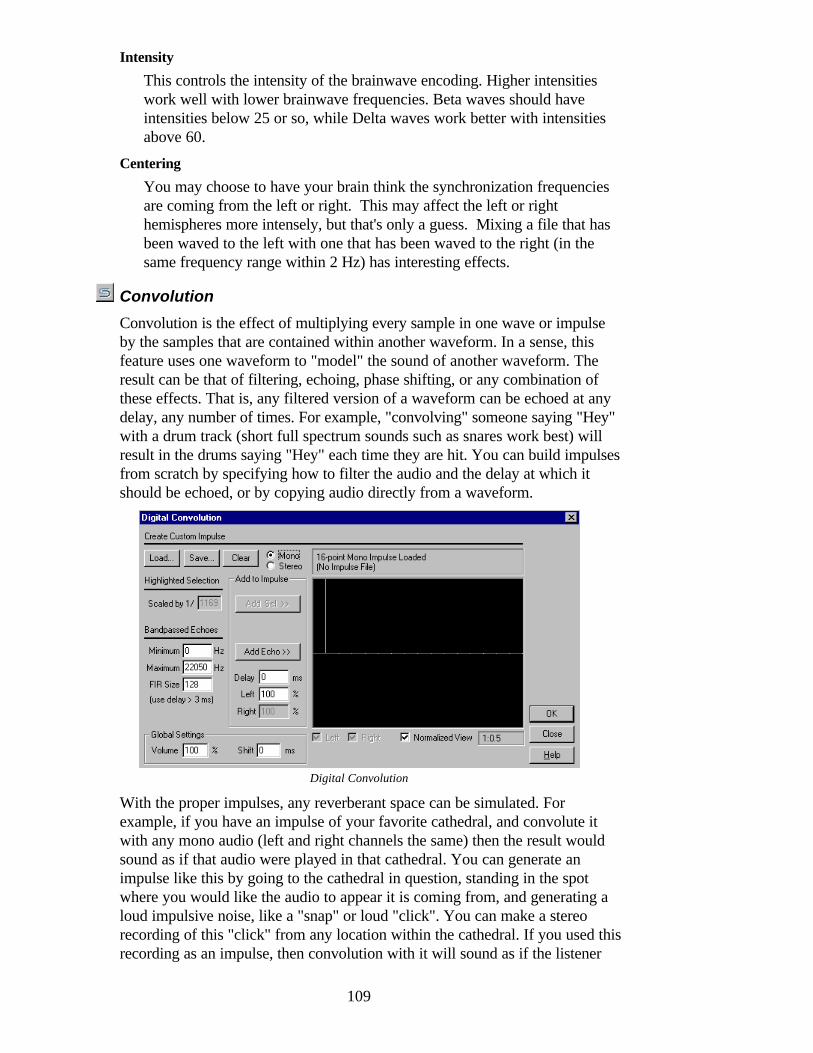
109
Intensity
This controls the intensity of the brainwave encoding. Higher intensitieswork well with lower brainwave frequencies. Beta waves should haveintensities below 25 or so, while Delta waves work better with intensitiesabove 60.
Centering
You may choose to have your brain think the synchronization frequenciesare coming from the left or right. This may affect the left or righthemispheres more intensely, but that's only a guess. Mixing a file that hasbeen waved to the left with one that has been waved to the right (in thesame frequency range within 2 Hz) has interesting effects.
Convolution
Convolution is the effect of multiplying every sample in one wave or impulseby the samples that are contained within another waveform. In a sense, thisfeature uses one waveform to "model" the sound of another waveform. Theresult can be that of filtering, echoing, phase shifting, or any combination ofthese effects. That is, any filtered version of a waveform can be echoed at anydelay, any number of times. For example, "convolving" someone saying "Hey"with a drum track (short full spectrum sounds such as snares work best) willresult in the drums saying "Hey" each time they are hit. You can build impulsesfrom scratch by specifying how to filter the audio and the delay at which itshould be echoed, or by copying audio directly from a waveform.
Digital Convolution
With the proper impulses, any reverberant space can be simulated. Forexample, if you have an impulse of your favorite cathedral, and convolute itwith any mono audio (left and right channels the same) then the result wouldsound as if that audio were played in that cathedral. You can generate animpulse like this by going to the cathedral in question, standing in the spotwhere you would like the audio to appear it is coming from, and generating aloud impulsive noise, like a "snap" or loud "click". You can make a stereorecording of this "click" from any location within the cathedral. If you used thisrecording as an impulse, then convolution with it will sound as if the listener
110
were in the exact position of the recording equipment, and the audio beingconvoluted were at the location of the "click".
To send any portion of unprocessed "dry" signal back out, simply add a fullspectrum echo at 0 ms. The Left and Right volume percentages will be theresulting volume of the dry signal in the left and right channels.
Another interesting use for convolution is to generate an infinite sustainedsound of anything. For example, one singing "aaaaaah" for one second couldbe turned into thousands of people singing "aaaaaah" for any length of time byusing some dynamically expanded white noise (which sounds a lot like radiostatic).
Create Custom Impulse
Load: Press this button to load a previously saved impulse.The sample rate of an impulse will affect the outcome of convolution. Forexample, if an impulse was created at 44100Hz, and reloaded and used ona 22050Hz file, then everything will be stretched out 2:1. All filteredechoes will be at half the frequency, and all delays will be twice as long.Save: Press this button to save an impulse for later recall.Clear: This clears the impulse completely.Mono/Stereo: Mono impulses work with both mono or stereo data (theleft and right channels will be convoluted with the same impulse). Stereoimpulses convolute the left and right channels separately.
Highlighted Selection
Any audio can be added to an impulse directly. The scaling factor to usewhen adding a highlighted selection to an impulse determines its volume.By default, Cool E automatically estimates good starting value for you.Lower this value to increase the amplitude of the impulse.
Bandpassed Echoes
Use these options to add any echo at any frequency to the impulse.Minimum: When adding bandpassed echoes, this is the lower cutofffrequency of the echo. For example, to echo just the range from 500Hz to1000Hz, enter 500Hz for the minimum value.Maximum: When adding bandpassed echoes, this is the upper cutofffrequency of the echo. For example, to echo just the range from 500Hz to1000Hz, enter 1000Hz for the maximum value.FIR Size: This parameter sets the size of the FIR filter to use to generatethe filtered echo.
Cool Edit Pro recommends a minimum delay (below the FIR entry box)when you add this echo. If you use a smaller delay than that suggested, theecho may contain more frequencies than you want. You can ignore thisdelay for full spectrum echoes, as they are just single sample ticks in theimpulse.
111
Add to Impulse
Add Sel.: This setting adds the currently highlighted selection to theimpulse at the delay and left/right volumes specified. You can add as manyselections of actual audio as you like.
You can make any audio data part of an impulse by first highlighting theaudio and then using the Add Sel. button. Ordinarily, you should first scaledown any such selection to a lower volume; otherwise the convolution willcome out extremely loud.Add Echo: This will add the bandpassed echo to the impulse at the delayand left/right volumes specified. You can add as many echoes as you like.
To add a tick at any volume, enter the volume percentages after the Leftand Right settings, and the Delay at which the tick should appear. This willcause an echo of the specified volume to occur at the given delay afterconvolution. Besides just echoes, you can add filtered versions of echoesby entering the minimum and maximum frequencies to echo. To echo allfrequencies outside the range, add a full spectrum echo (e.g. from 0Hz to22050Hz) at a specific delay, then add another echo at the same delay, butwith different minimum and maximum values, and the opposite Left andRight percentages (e.g. at -100% instead of 100%).
Delay
This parameter sets the amount (in ms) by which samples are delayed. Forpre-echoes, place at least one echo that is full spectrum (Minimum=0Hz,Maximum=22050Hz) at a larger delay (like 1000ms). Then any echoplaced before 1000ms will be a pre-echo.
Left
This setting specifies the left volume (in percent) at which to make the echoor selection being added to the impulse.
Right
This setting specifies the right volume (in percent) at which to make theecho or selection being added to the impulse.
Global Settings
These settings effect how the given impulse will be used duringconvolution.Volume: If the convoluted audio comes out too soft or too loud, enter anappropriate value to amplify or attenuate the audio.Shift: This value is generally set to ½ the FIR Size when building impulsesfrom scratch, to compensate for the delay incurred when the minimumdelay used was only ½ the FIR Size. Adjust this shift setting if you findthat the convoluted audio is migrating too far to the right with respect tothe original audio.
View Settings
These settings affect the impulse display.Left: Check this to enable display of the impulse for the left channel.
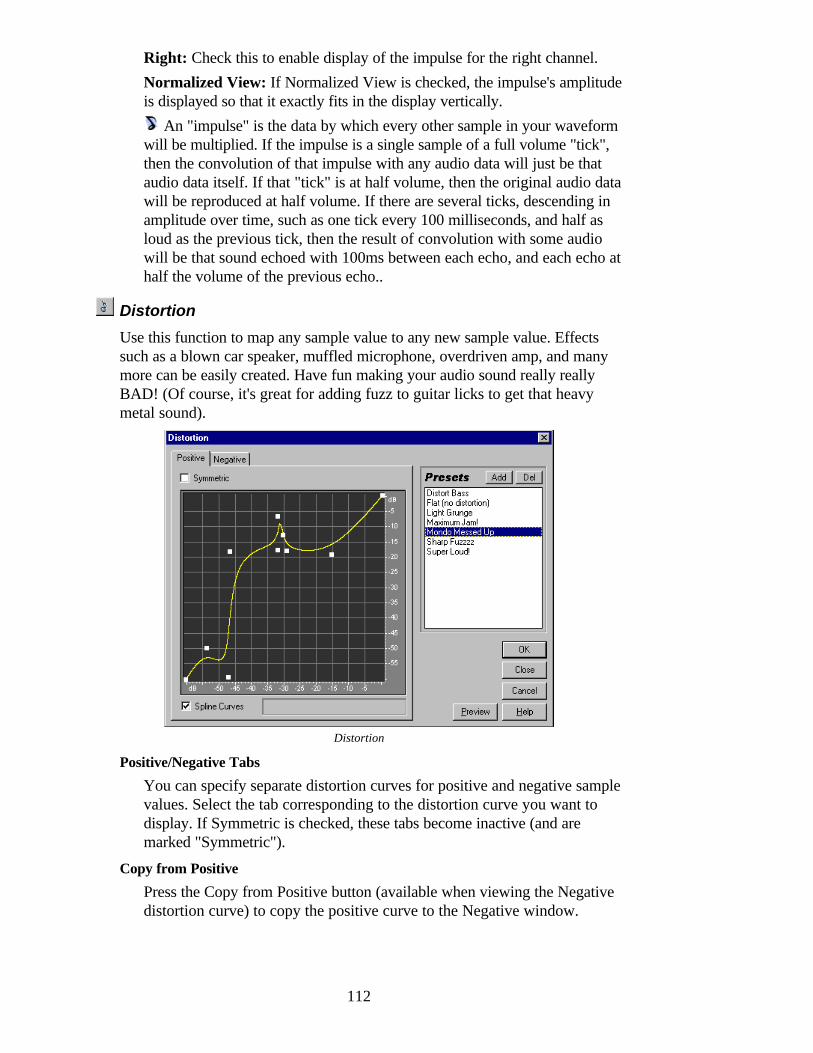
112
Right: Check this to enable display of the impulse for the right channel.Normalized View: If Normalized View is checked, the impulse's amplitudeis displayed so that it exactly fits in the display vertically.
An "impulse" is the data by which every other sample in your waveformwill be multiplied. If the impulse is a single sample of a full volume "tick",then the convolution of that impulse with any audio data will just be thataudio data itself. If that "tick" is at half volume, then the original audio datawill be reproduced at half volume. If there are several ticks, descending inamplitude over time, such as one tick every 100 milliseconds, and half asloud as the previous tick, then the result of convolution with some audiowill be that sound echoed with 100ms between each echo, and each echo athalf the volume of the previous echo..
Distortion
Use this function to map any sample value to any new sample value. Effectssuch as a blown car speaker, muffled microphone, overdriven amp, and manymore can be easily created. Have fun making your audio sound really reallyBAD! (Of course, it's great for adding fuzz to guitar licks to get that heavymetal sound).
Distortion
Positive/Negative Tabs
You can specify separate distortion curves for positive and negative samplevalues. Select the tab corresponding to the distortion curve you want todisplay. If Symmetric is checked, these tabs become inactive (and aremarked "Symmetric").
Copy from Positive
Press the Copy from Positive button (available when viewing the Negativedistortion curve) to copy the positive curve to the Negative window.
113
Symmetric
If Symmetric is checked, the positive and negative curves are identical. Tospecify separate Positive and Negative curves, turn OFF Symmetric andchoose the appropriate tab.
Distortion Graph
This graph depicts the input sample value in dB along the x-axis (left andright) and the output sample value in dB along the y-axis (up and down). Aline that flows directly from the lower-left to the upper-right (default)depicts a signal that has been left untouched, since every input value goesto the exact matching output value. Adjusting the shape of this line willadjust the input to output assignments. The readout below the graphdisplays the current x, y position of your mouse.
• To add a point to the graph, click in the grid at the location where youwant to place the point.
• To move a point on the graph, click and hold on the point and drag itto a new location.
• When the mouse cursor is located over a point, you will see it changefrom an arrow to a hand.
• To numerically enter input and output signal levels for an Edit Point,right click on the point to bring up the edit box.
Spline Curves
Check this option to generate a smoother, best fit curve instead of astraight line between control points on the graph. When you use splinecurves, the line will not ordinarily travel directly through the control points;rather, the points control the shape of this curve. To get the curve closer toa control point, click to create more control points near the point inquestion. The more control points there are clustered together, the closerthe spline curve will be to those points. Use Spline Curves when you wantvery smooth curves instead of straight lines (with their discontinuities at thecontrol points).
Music
Cool Edit Pro's Music feature can use any highlighted selection as a "voice" tosynthesize music or harmonize a wave using a particular chord. To choose aclipping for your sample, select the range you wish to use as a quarter note. Ifno range is selected, Cool E will use the data on the clipboard. Note that theclipboard data will be filled with your sample automatically once music isgenerated, thus selecting music a second time will automatically use your lastsample.
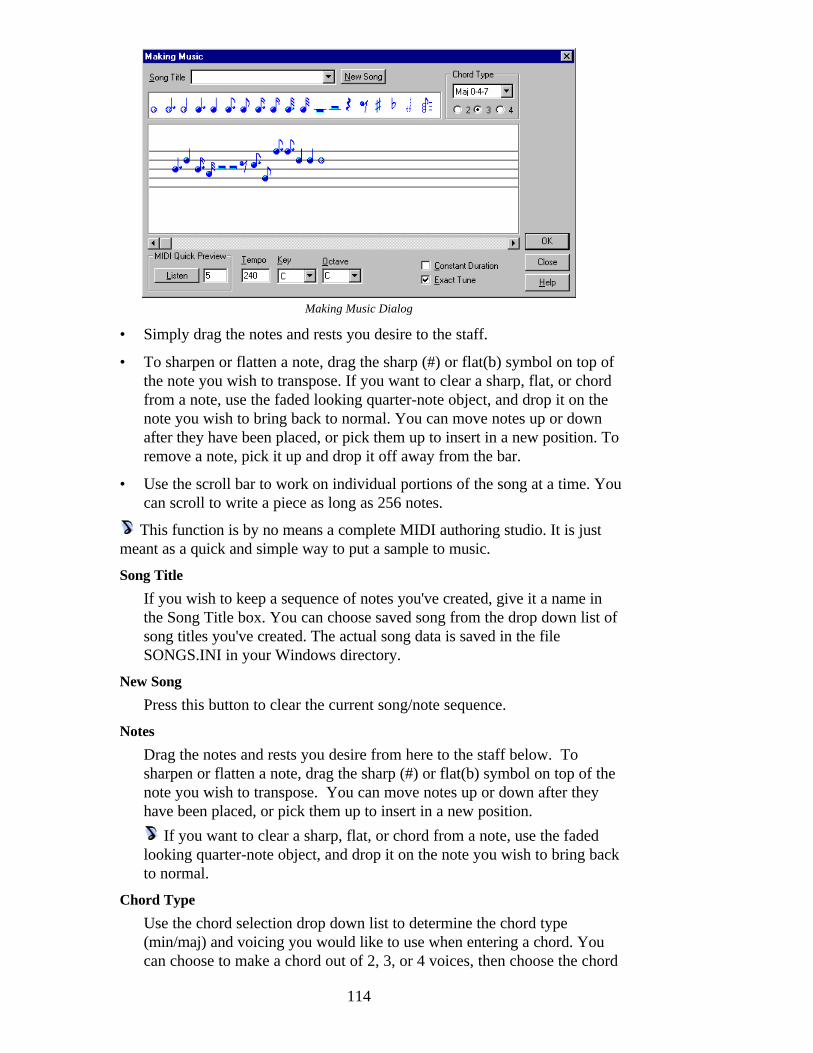
114
Making Music Dialog
• Simply drag the notes and rests you desire to the staff.
• To sharpen or flatten a note, drag the sharp (#) or flat(b) symbol on top ofthe note you wish to transpose. If you want to clear a sharp, flat, or chordfrom a note, use the faded looking quarter-note object, and drop it on thenote you wish to bring back to normal. You can move notes up or downafter they have been placed, or pick them up to insert in a new position. Toremove a note, pick it up and drop it off away from the bar.
• Use the scroll bar to work on individual portions of the song at a time. Youcan scroll to write a piece as long as 256 notes.
This function is by no means a complete MIDI authoring studio. It is justmeant as a quick and simple way to put a sample to music.
Song Title
If you wish to keep a sequence of notes you've created, give it a name inthe Song Title box. You can choose saved song from the drop down list ofsong titles you've created. The actual song data is saved in the fileSONGS.INI in your Windows directory.
New Song
Press this button to clear the current song/note sequence.
Notes
Drag the notes and rests you desire from here to the staff below. Tosharpen or flatten a note, drag the sharp (#) or flat(b) symbol on top of thenote you wish to transpose. You can move notes up or down after theyhave been placed, or pick them up to insert in a new position.
If you want to clear a sharp, flat, or chord from a note, use the fadedlooking quarter-note object, and drop it on the note you wish to bring backto normal.
Chord Type
Use the chord selection drop down list to determine the chord type(min/maj) and voicing you would like to use when entering a chord. Youcan choose to make a chord out of 2, 3, or 4 voices, then choose the chord
115
type from the list. Then, pick up the chord object (the 3 notes on top ofeach other) from the Notes area and drop it on a note above. The note youdrop it on will be the starting note of the chord, and the other notes willautomatically appear above it in the right ratios.
Staff
Drag notes from the Notes area, and place them here. The note location(A, E-flat) will determine the playback pitch for your sample.
Listen
If you have MIDI play capabilities, you can listen to a preview of yoursequence before actually applying it. Play begins at the leftmost note visibleon the staff, which means play begins at the position you are scrolled to,and continues on to the end of the song. The music is played throughchannels 1 and 13 for Extended and Base level compatibility. Theinstrument can be chosen by typing its MIDI instrument number in the boxto the right. You can record music played by the listen preview button.Simply hit the record button first, then go into the music dialog and pressListen. When the song is done, hit Cancel, and then Stop to stop therecorder.
Tempo
The tempo is given in quarter notes (beats) per minute. Your sample'slength is the length of a quarter note. If your note is longer than the perioddetermined by the tempo, then the notes will overlap.
Key
Choose a key for the "song" from the drop down list. Only standard Majorkey signatures are listed, so for a minor key simply choose the relativemajor (B flat for C# minor, for example). The key of C is the default.
Octave
Transposes the sequence by octaves. Choosing "C" plays the notes atnormal transposition.
Constant Duration
When you select Constant Duration, all notes will be the same length as theoriginal sample, regardless of pitch. The operation that does this takeslonger to calculate, but high pitched notes will be the same length as lowerpitched notes. The Interval Overlap method is used with an overlap of 80%and an interval of 30 Hz. If not checked, the note is created by directlystretching or compressing the original sample, resulting in higher pitchesbeing shorter than lower pitches.
Exact Tune
Choose Exact Tune to tune your sample so that when played at A (abovemiddle C), the frequency of your sample is at 440Hz. If this is not checked,your sample's original frequency will be played at A (above middle C).
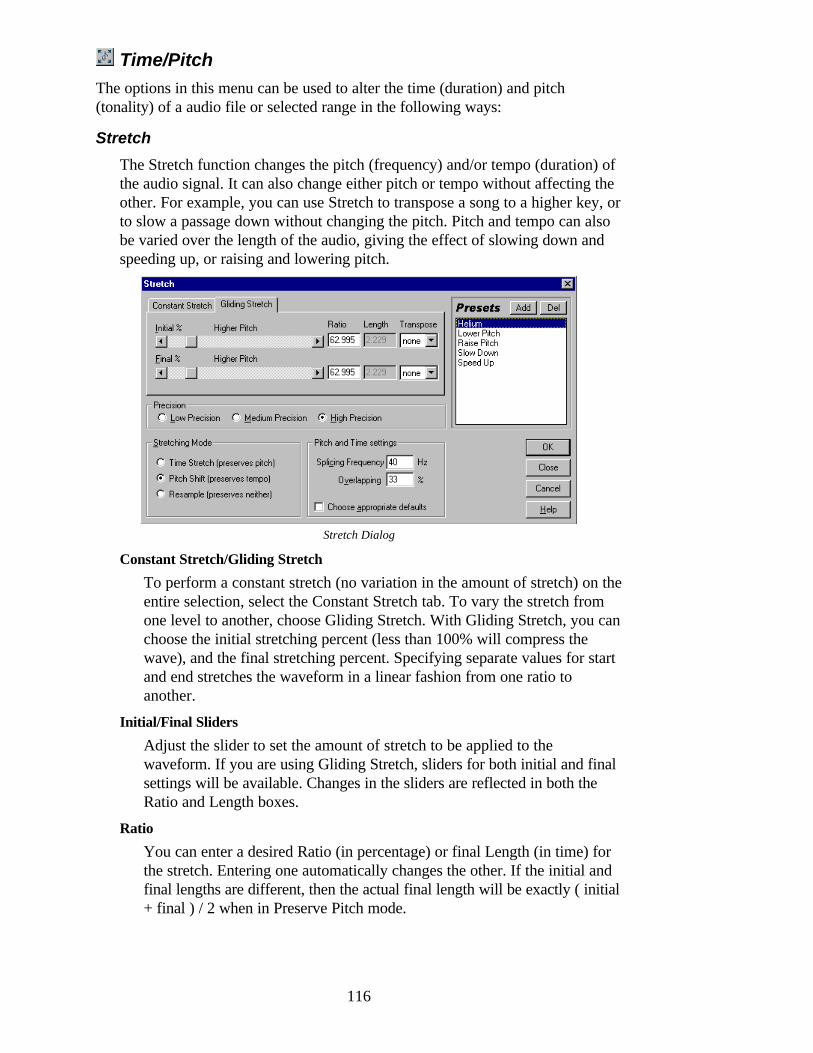
Time/Pitch
The options in this menu can be used to alter the time (duration) and pitch(tonality) of a audio file or selected range in the following ways:
Stretch
The Stretch function changes the pitch (frequency) and/or tempo (duration) ofthe audio signal. It can also change either pitch or tempo without affecting theother. For example, you can use Stretch to transpose a song to a higher key, orto slow a passage down without changing the pitch. Pitch and tempo can alsobe varied over the length of the audio, giving the effect of slowing down andspeeding up, or raising and lowering pitch.
Stretch Dialog
Constant Stretch/Gliding Stretch
To perform a constant stretch (no variation in the amount of stretch) on theentire selection, select the Constant Stretch tab. To vary the stretch fromone level to another, choose Gliding Stretch. With Gliding Stretch, you canchoose the initial stretching percent (less than 100% will compress thewave), and the final stretching percent. Specifying separate values for startand end stretches the waveform in a linear fashion from one ratio toanother.
Initial/Final Sliders
Adjust the slider to set the amount of stretch to be applied to thewaveform. If you are using Gliding Stretch, sliders for both initial and finalsettings will be available. Changes in the sliders are reflected in both theRatio and Length boxes.
Ratio
You can enter a desired Ratio (in percentage) or final Length (in time) forthe stretch. Entering one automatically changes the other. If the initial andfinal lengths are different, then the actual final length will be exactly ( initial+ final ) / 2 when in Preserve Pitch mode.
116

Length
You can enter a desired Ratio (in percentage) or final Length (in time) forthe stretch. Entering one automatically changes the other. If the initial andfinal lengths are different, then the actual final length will be exactly ( initial+ final ) / 2 when in Preserve Pitch mode.
Transpose
You can use this drop down list to select musical transposition amounts.The corresponding numerical values are entered into the stretch slidersautomatically. For example, to transpose your sound up 1 semi-tone (onehalf-step on a keyboard) choose 1# for 1 sharp.
Precision
When preserving pitch or tempo, the degree of precision (overallfaithfulness to the sound's quality) that an audio file should be processedwith is often balanced against the time that it takes to process that file. Asyou might expect, the tradeoff to having a precision factor that's set toohigh is that it uses up a great deal of processing power (and thus time.) 8-bit or low-quality audio files can be processed in a short amount of time,using the Low Precision setting, whereas a professionally-recorded audiofile may require stretching using the higher-quality algorithm. This will takelonger, but the results can be worth it. A quick way to determine thequality factor to use is to process a small portion at the lowest setting andthe move up the scale until you've achieved the best balance of quality vs.processing time.
Stretching Mode
Time Stretch: Lower percentages slow down the tempo, while higherones increase the tempo. The pitch remains the same throughout.Pitch Shift: This setting raises or lowers pitch, while the tempo or speedof play remains the same. Higher percentages will lower the pitch, whilelower percentages will increase the pitch. Try using differing initial andfinal percentages to raise and lower the pitch without affecting the tempo.Resample: When you use this setting, both the pitch and tempo settingsare affected. When using percentages above 100, the tempo will slow,while at the same time the pitch will lower. For lower percentages, thetempo will speed up and the pitch will increase.
Pitch and Time settings
Splicing Frequency: This is an important method for preserving pitch ortempo. You will notice less distortion when you use samples that werederived from one source and that contain a relatively low number offundamental frequencies. For example, a single instrument will tend towork well, while an orchestra or ensemble music will not work as well.When stretching or compressing, the wave is broken up into chunks thatbegin and end when the waveform crosses zero, or the midpoint. Chunks ofsound are repeated, or thrown out depending on the compression ratio andthe cutoff frequency. Chunks smaller than the cutoff frequency will not bethrown out or repeated. Try cutoff frequencies between 50Hz and 300Hzfor best results when using this method.
117
This setting determines the size of a 'chunk' of audio data. Splicingfrequencies can create an audible hollow sound when large rates (above50Hz) are used. If the rate is too low, echoing will be very noticeable whenraising pitch, or slowing down tempo, or chopped syllables will benoticeable when lowering pitch, or speeding up tempo. Values of 20Hz to40Hz usually produce good results.Overlapping: When preserving pitch or tempo, the waveform must beelongated or truncated smoothly and preserve as much of the originalinformation without adding noticeable distortion. This is one of twomethods that can be used to achieve this. The amount of distortionintroduced is not dependent on the type of sample (e.g. music or speech).When stretching or compressing, the appropriate chunk from the originalwave is output to the transformed wave, and overlapped with thepreviously transformed chunkThe overlapping determines how much of the previous chunk is overlappedwith the current chunk. This overlapping can produce a chorus effect. Toreduce the chorus effect, lower the overlapping percentage. When theoverlapping is reduced, a choppy sound may appear. Adjust theoverlapping to your taste to strike a balance between choppiness andchorusing. Overlapping can be as high as about 400%, but you should onlyuse this for really high speed increases (like 200% or more).This determines how much the current chunk will be overlap with theprevious and next chunks. The maximum allowed overlap can be as greatas 1000%, in which case up to 10 sections of a waveform will beoverlapped together. Whenever the overlap setting is reduced, a choppinessto the sound may appear. You might simply want to adjust this setting toyour taste, so as to strike a balance between choppiness and chorusing.
If the low precision mode is used, you can improve the quality ofstretched mono-tonal (pure tone) samples by choosing an Interval Ratethat's evenly divisible into the frequency of the sample. Use the FrequencyAnalysis window to find the sample's base frequency, then divide by aninteger to get the Interval Rate. For example, if the tone was reported to be438Hz, dividing by 20 gives 21.9Hz. Thus, using 21.9Hz as the IntervalRate will greatly improve the quality by reducing phase artifacts. For non-tonal or noisy samples, the Interval Rate doesn't matter as much.Choose Appropriate Defaults: When you preserve pitch or tempo, theChoose Appropriate Defaults box automatically selects good default valuesfor the Splicing Frequency and Overlapping settings.
Record a piece of music that features a vocal or a guitar track andselect the range that you'd like to effect. Now choose the/Transform/Time Pitch/Stretch option and select the "Slow Down"preset and choose OK. Now sit back and be amazed!
118
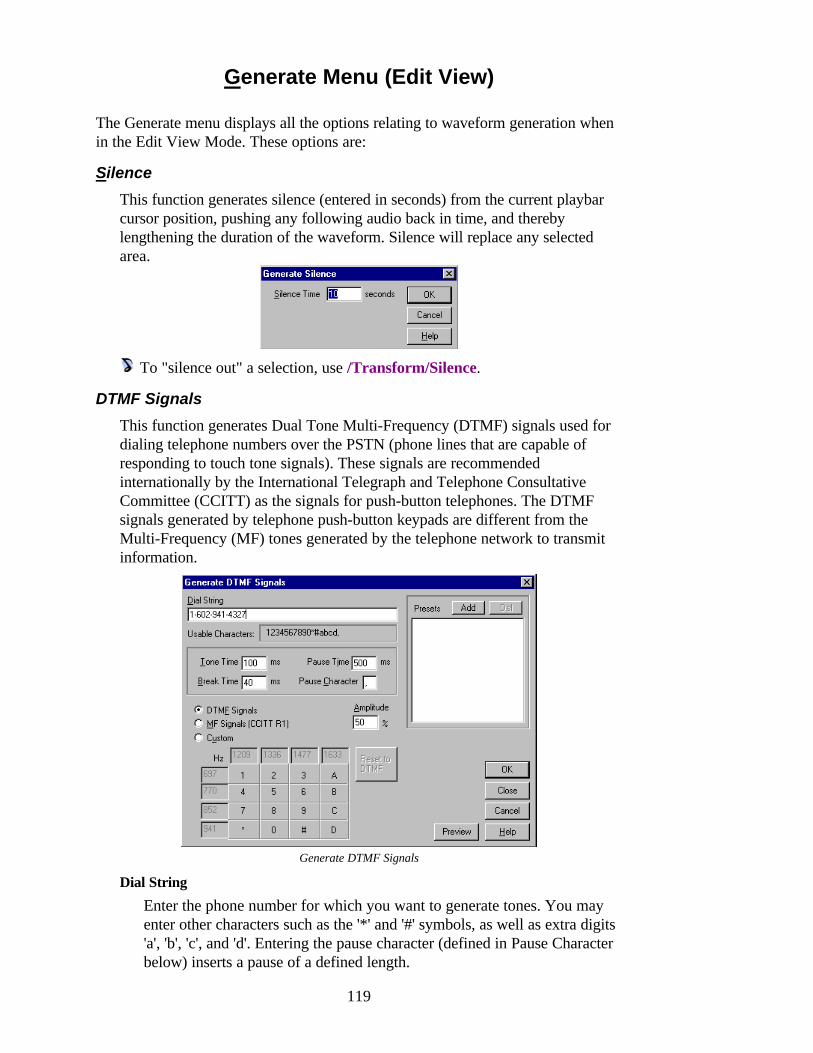
119
Generate Menu (Edit View)
The Generate menu displays all the options relating to waveform generation whenin the Edit View Mode. These options are:
Silence
This function generates silence (entered in seconds) from the current playbarcursor position, pushing any following audio back in time, and therebylengthening the duration of the waveform. Silence will replace any selectedarea.
To "silence out" a selection, use /Transform/Silence.
DTMF Signals
This function generates Dual Tone Multi-Frequency (DTMF) signals used fordialing telephone numbers over the PSTN (phone lines that are capable ofresponding to touch tone signals). These signals are recommendedinternationally by the International Telegraph and Telephone ConsultativeCommittee (CCITT) as the signals for push-button telephones. The DTMFsignals generated by telephone push-button keypads are different from theMulti-Frequency (MF) tones generated by the telephone network to transmitinformation.
Generate DTMF Signals
Dial String
Enter the phone number for which you want to generate tones. You mayenter other characters such as the '*' and '#' symbols, as well as extra digits'a', 'b', 'c', and 'd'. Entering the pause character (defined in Pause Characterbelow) inserts a pause of a defined length.
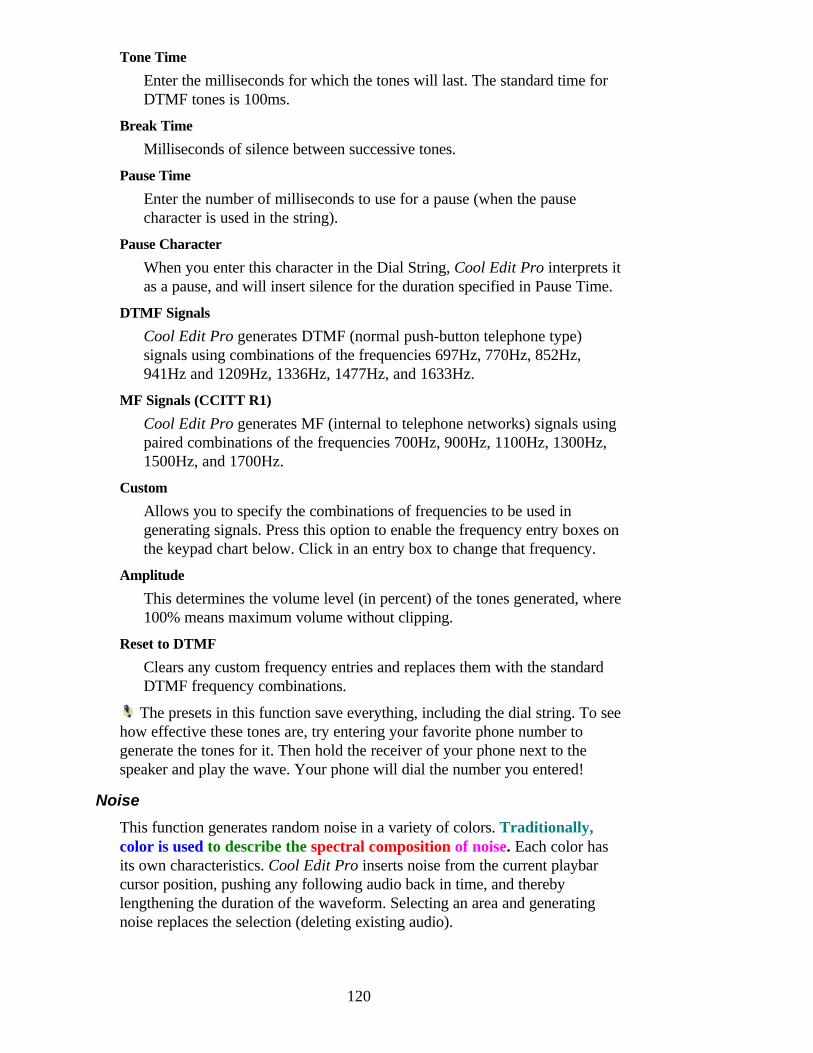
Tone Time
Enter the milliseconds for which the tones will last. The standard time forDTMF tones is 100ms.
Break Time
Milliseconds of silence between successive tones.
Pause Time
Enter the number of milliseconds to use for a pause (when the pausecharacter is used in the string).
Pause Character
When you enter this character in the Dial String, Cool Edit Pro interprets itas a pause, and will insert silence for the duration specified in Pause Time.
DTMF Signals
Cool Edit Pro generates DTMF (normal push-button telephone type)signals using combinations of the frequencies 697Hz, 770Hz, 852Hz,941Hz and 1209Hz, 1336Hz, 1477Hz, and 1633Hz.
MF Signals (CCITT R1)
Cool Edit Pro generates MF (internal to telephone networks) signals usingpaired combinations of the frequencies 700Hz, 900Hz, 1100Hz, 1300Hz,1500Hz, and 1700Hz.
Custom
Allows you to specify the combinations of frequencies to be used ingenerating signals. Press this option to enable the frequency entry boxes onthe keypad chart below. Click in an entry box to change that frequency.
Amplitude
This determines the volume level (in percent) of the tones generated, where100% means maximum volume without clipping.
Reset to DTMF
Clears any custom frequency entries and replaces them with the standardDTMF frequency combinations.
The presets in this function save everything, including the dial string. To seehow effective these tones are, try entering your favorite phone number togenerate the tones for it. Then hold the receiver of your phone next to thespeaker and play the wave. Your phone will dial the number you entered!
Noise
This function generates random noise in a variety of colors. Traditionally,color is used to describe the spectral composition of noise. Each color hasits own characteristics. Cool Edit Pro inserts noise from the current playbarcursor position, pushing any following audio back in time, and therebylengthening the duration of the waveform. Selecting an area and generatingnoise replaces the selection (deleting existing audio).
120
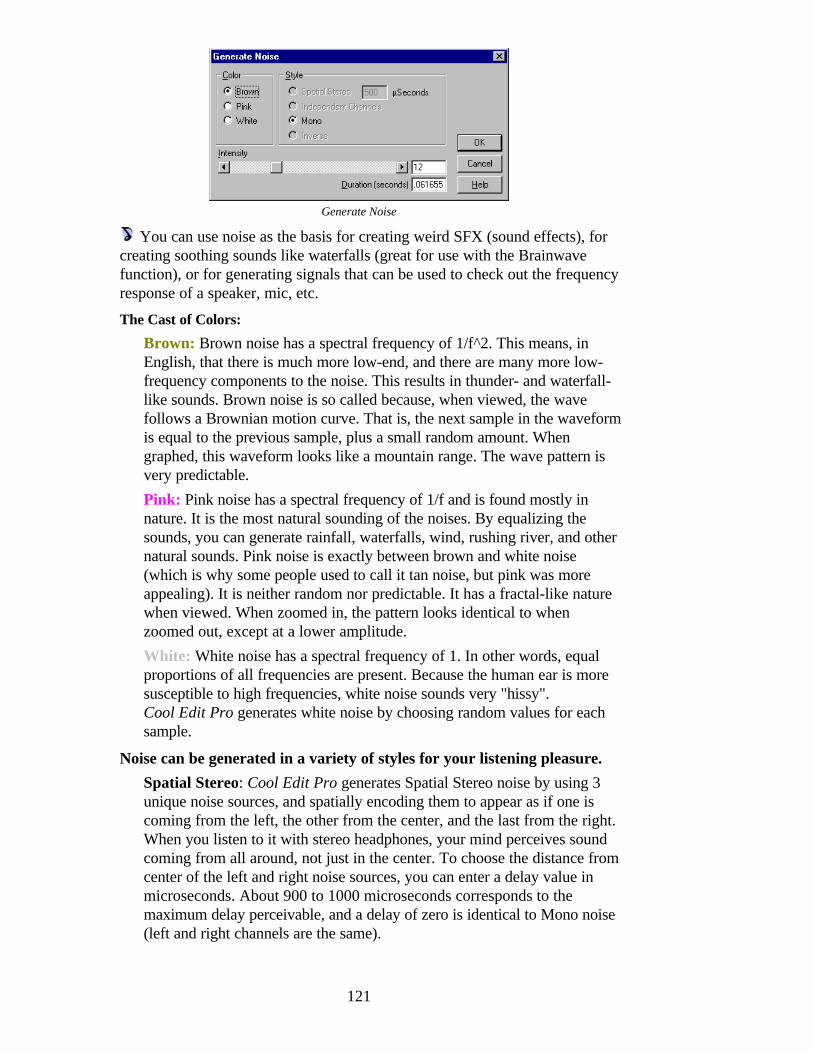
Generate Noise
You can use noise as the basis for creating weird SFX (sound effects), forcreating soothing sounds like waterfalls (great for use with the Brainwavefunction), or for generating signals that can be used to check out the frequencyresponse of a speaker, mic, etc.
The Cast of Colors:
Brown: Brown noise has a spectral frequency of 1/f^2. This means, inEnglish, that there is much more low-end, and there are many more low-frequency components to the noise. This results in thunder- and waterfall-like sounds. Brown noise is so called because, when viewed, the wavefollows a Brownian motion curve. That is, the next sample in the waveformis equal to the previous sample, plus a small random amount. Whengraphed, this waveform looks like a mountain range. The wave pattern isvery predictable.Pink: Pink noise has a spectral frequency of 1/f and is found mostly innature. It is the most natural sounding of the noises. By equalizing thesounds, you can generate rainfall, waterfalls, wind, rushing river, and othernatural sounds. Pink noise is exactly between brown and white noise(which is why some people used to call it tan noise, but pink was moreappealing). It is neither random nor predictable. It has a fractal-like naturewhen viewed. When zoomed in, the pattern looks identical to whenzoomed out, except at a lower amplitude.White: White noise has a spectral frequency of 1. In other words, equalproportions of all frequencies are present. Because the human ear is moresusceptible to high frequencies, white noise sounds very "hissy".Cool Edit Pro generates white noise by choosing random values for eachsample.
Noise can be generated in a variety of styles for your listening pleasure.
Spatial Stereo: Cool Edit Pro generates Spatial Stereo noise by using 3unique noise sources, and spatially encoding them to appear as if one iscoming from the left, the other from the center, and the last from the right.When you listen to it with stereo headphones, your mind perceives soundcoming from all around, not just in the center. To choose the distance fromcenter of the left and right noise sources, you can enter a delay value inmicroseconds. About 900 to 1000 microseconds corresponds to themaximum delay perceivable, and a delay of zero is identical to Mono noise(left and right channels are the same).
121
Generate Tones
Generate Tones will create a simple waveform, with control over numerousamplitude- and frequency-related settings. Generating tones is a great way toprovide a base sound to create spectacular special sound effects.
Independent Channels: Cool Edit Pro generates this noise by using 2unique noise sources, one for each channel. The left channel's noise iscompletely independent of the right channel's noise.Mono: Cool Edit Pro generates Mono noise by using 1 noise source, withthe left and right channels set equal to the same noise source.Inverse: Cool Edit Pro generates Inverse noise by using 1 noise source aswell, but this time with the left channel's noise exactly inverse of the rightchannel's noise. When you listen to it with stereo headphones, the effect isthat of the sound coming from the center of your head instead of out inspace somewhere.
Intensity (2 to 40)
With higher intensities, the noise becomes more erratic, and sounds harsherand louder. You can adjust the slider, or enter the value numerically in theentry box.
Duration
Enter here the number of seconds of noise you want to generate. For very long periods of noise, it is faster to generate a shorter period of
about 10 to 20 seconds, delete excess noise at the beginning and end sothat the waves are starting and ending at the midpoint, then copy, and loop(using /Edit/Mix Paste) as many times as needed.
Open a new waveform and select the /Generate/Noise option and selectthe default setting (12 seconds of spatial, brown noise) Now sit back and berelaxed!
122
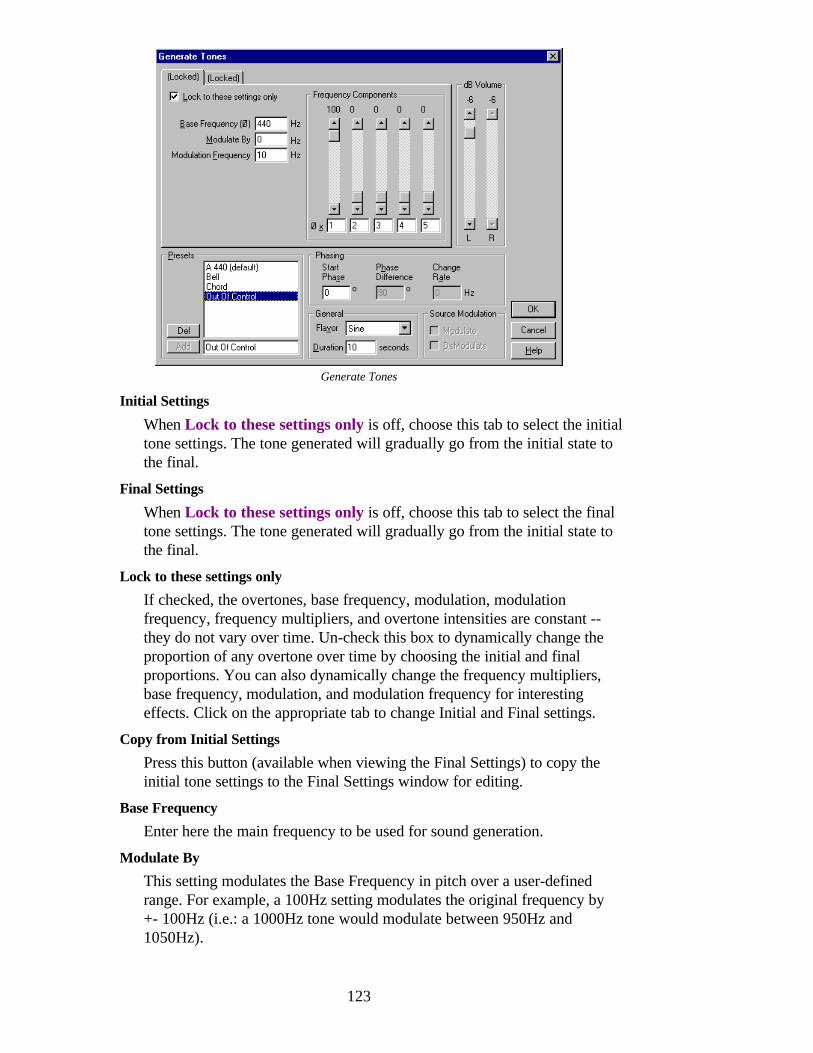
Generate Tones
Initial Settings
When Lock to these settings only is off, choose this tab to select the initialtone settings. The tone generated will gradually go from the initial state tothe final.
Final Settings
When Lock to these settings only is off, choose this tab to select the finaltone settings. The tone generated will gradually go from the initial state tothe final.
Lock to these settings only
If checked, the overtones, base frequency, modulation, modulationfrequency, frequency multipliers, and overtone intensities are constant --they do not vary over time. Un-check this box to dynamically change theproportion of any overtone over time by choosing the initial and finalproportions. You can also dynamically change the frequency multipliers,base frequency, modulation, and modulation frequency for interestingeffects. Click on the appropriate tab to change Initial and Final settings.
Copy from Initial Settings
Press this button (available when viewing the Final Settings) to copy theinitial tone settings to the Final Settings window for editing.
Base Frequency
Enter here the main frequency to be used for sound generation.
Modulate By
This setting modulates the Base Frequency in pitch over a user-definedrange. For example, a 100Hz setting modulates the original frequency by+- 100Hz (i.e.: a 1000Hz tone would modulate between 950Hz and1050Hz).
123
Modulation Frequency
This is the rate (times per second) at which the frequency modulates.Entering a value of 10, for example, generates tones that warble inamplitude at the rate of 10 times per second.
Frequency Components (Overtones)
Up to 5 overtones can be added to the fundamental frequency (BaseFrequency). You can enter the multiplier for each overtone below the slider(the actual frequency will be this many times the fundamental.) You canmix each of the individual components (0 to 100%) in proportion to oneanother, and you can adjust the overall gain (signal level) via the stereosliders. If Lock is not checked, all of these can change over the duration ofthe audio file, so that they morph from the initial to final settings.
You can generate many really great effects with just these 5 overtones.Just experiment and have fun!
dB Volume (-80 dB to 0 dB)
Use the Volume sliders to select the overall gain for each channel. You cancontrol both channels independently when generating stereo tones.
Start Phase
This is the starting location in the cycle that will be produced. If you startat 0 degrees phase, waves will start at the baseline. If you start at 90degrees, the wave will start at full amplitude (generating a noticeable clickas well). If you are working in great detail with tones and need to have thephase "just so", this option allows you to control that.
Phase Difference
This setting purposefully allows the left channel to be out of phase with theright channel. A value of 0 will be completely in-phase, and 180 will becompletely out of phase.
Change Rate
Use this setting to dynamically change the relative phase between the twochannels of a stereo audio file over time at a given rate. For example, if youenter 1Hz, the phase difference will cycle through 360 degrees eachsecond.
Flavor
Choose the type of waveform to use. Sine waves sound soft, while Triangleand Sawtooth waves are sharper. Each flavor has a particular sound uniqueunto itself.Sine Fundamental, no harmonics (pure tone)Triangle Odd harmonics with amplitude of 1 to itself (squared)Square Odd harmonics with amplitude of 1 to itselfSawtooth All harmonics with amplitude of 1 to itself
Duration
This setting lets you enter the length of the generated tone (in seconds).
124
Modulate
Modulate requires a highlighted selection. Instead of generating new tones,the currently highlighted wave data is be "ring modulated", or multiplied,by the current tone settings. This is great for adding really weird specialeffects.
Demodulate
Demodulate requires a highlighted selection. Instead of generating newtones, the currently highlighted wave data is be "ring modulated", ormultiplied, by the current tone settings.
Open a new waveform and select the /Generate/Tones option and selectthe "Out of Control" preset. Now sit back and be spaceialized!
125
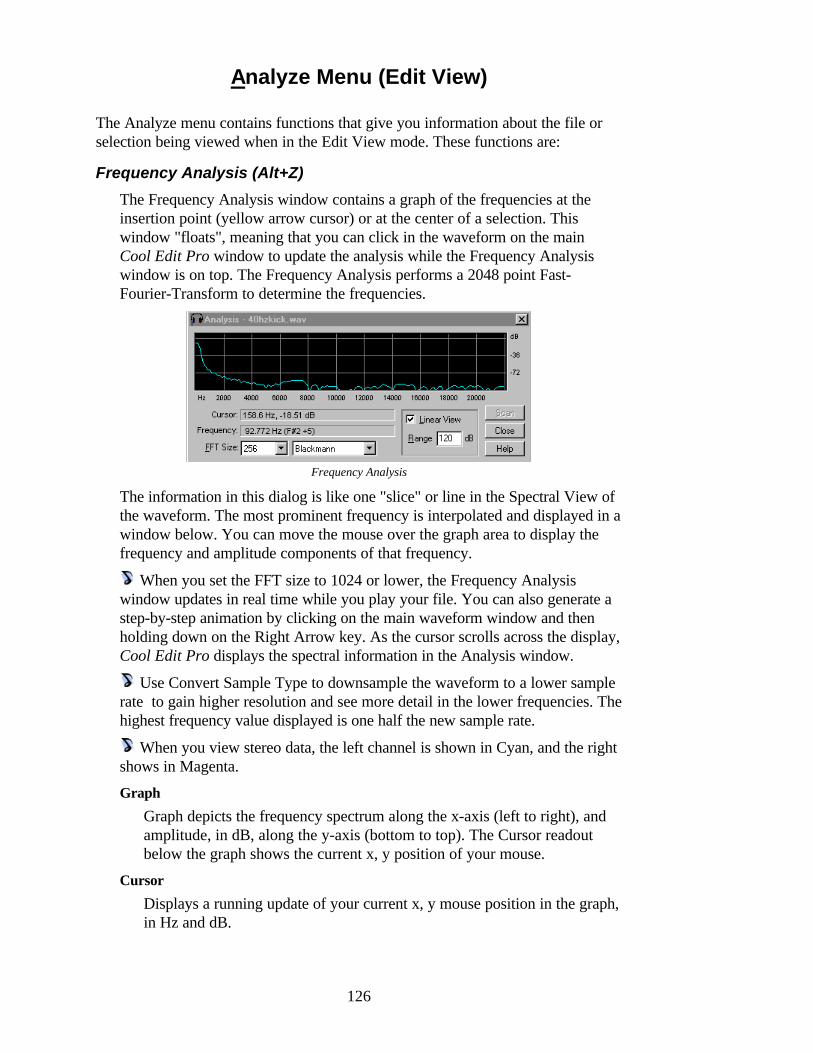
Analyze Menu (Edit View)
The Analyze menu contains functions that give you information about the file orselection being viewed when in the Edit View mode. These functions are:
Frequency Analysis (Alt+Z)
The Frequency Analysis window contains a graph of the frequencies at theinsertion point (yellow arrow cursor) or at the center of a selection. Thiswindow "floats", meaning that you can click in the waveform on the mainCool Edit Pro window to update the analysis while the Frequency Analysiswindow is on top. The Frequency Analysis performs a 2048 point Fast-Fourier-Transform to determine the frequencies.
Frequency Analysis
The information in this dialog is like one "slice" or line in the Spectral View ofthe waveform. The most prominent frequency is interpolated and displayed in awindow below. You can move the mouse over the graph area to display thefrequency and amplitude components of that frequency.
When you set the FFT size to 1024 or lower, the Frequency Analysiswindow updates in real time while you play your file. You can also generate astep-by-step animation by clicking on the main waveform window and thenholding down on the Right Arrow key. As the cursor scrolls across the display,Cool Edit Pro displays the spectral information in the Analysis window.
Use Convert Sample Type to downsample the waveform to a lower samplerate to gain higher resolution and see more detail in the lower frequencies. Thehighest frequency value displayed is one half the new sample rate.
When you view stereo data, the left channel is shown in Cyan, and the rightshows in Magenta.
Graph
Graph depicts the frequency spectrum along the x-axis (left to right), andamplitude, in dB, along the y-axis (bottom to top). The Cursor readoutbelow the graph shows the current x, y position of your mouse.
Cursor
Displays a running update of your current x, y mouse position in the graph,in Hz and dB.
126
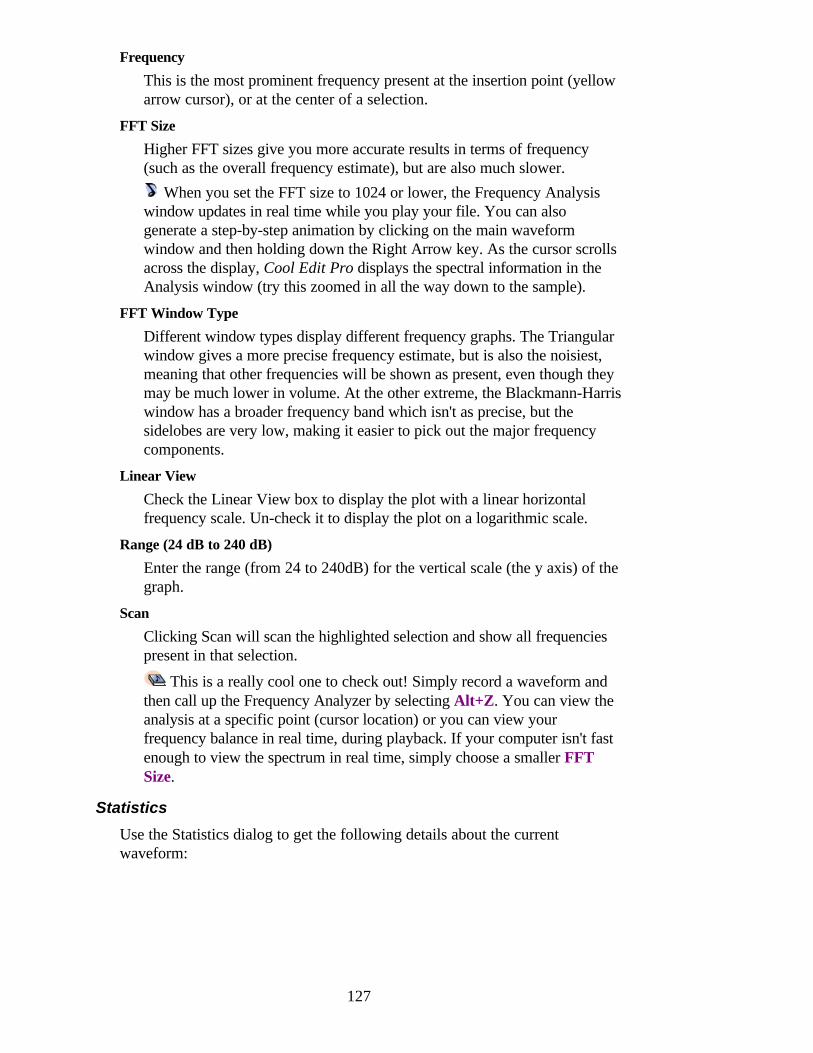
Frequency
This is the most prominent frequency present at the insertion point (yellowarrow cursor), or at the center of a selection.
FFT Size
Higher FFT sizes give you more accurate results in terms of frequency(such as the overall frequency estimate), but are also much slower.
When you set the FFT size to 1024 or lower, the Frequency Analysiswindow updates in real time while you play your file. You can alsogenerate a step-by-step animation by clicking on the main waveformwindow and then holding down the Right Arrow key. As the cursor scrollsacross the display, Cool Edit Pro displays the spectral information in theAnalysis window (try this zoomed in all the way down to the sample).
FFT Window Type
Different window types display different frequency graphs. The Triangularwindow gives a more precise frequency estimate, but is also the noisiest,meaning that other frequencies will be shown as present, even though theymay be much lower in volume. At the other extreme, the Blackmann-Harriswindow has a broader frequency band which isn't as precise, but thesidelobes are very low, making it easier to pick out the major frequencycomponents.
Linear View
Check the Linear View box to display the plot with a linear horizontalfrequency scale. Un-check it to display the plot on a logarithmic scale.
Range (24 dB to 240 dB)
Enter the range (from 24 to 240dB) for the vertical scale (the y axis) of thegraph.
Scan
Clicking Scan will scan the highlighted selection and show all frequenciespresent in that selection.
This is a really cool one to check out! Simply record a waveform andthen call up the Frequency Analyzer by selecting Alt+Z. You can view theanalysis at a specific point (cursor location) or you can view yourfrequency balance in real time, during playback. If your computer isn't fastenough to view the spectrum in real time, simply choose a smaller FFTSize.
127
Statistics
Use the Statistics dialog to get the following details about the currentwaveform:
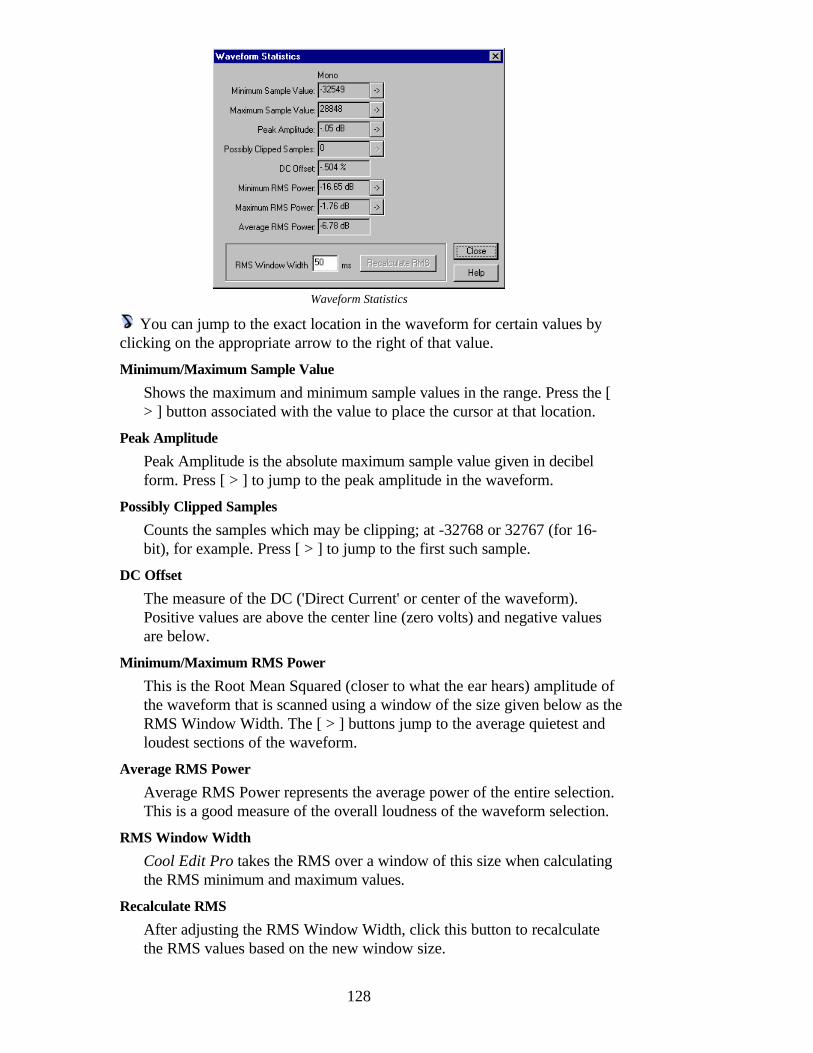
128
Waveform Statistics
You can jump to the exact location in the waveform for certain values byclicking on the appropriate arrow to the right of that value.
Minimum/Maximum Sample Value
Shows the maximum and minimum sample values in the range. Press the [> ] button associated with the value to place the cursor at that location.
Peak Amplitude
Peak Amplitude is the absolute maximum sample value given in decibelform. Press [ > ] to jump to the peak amplitude in the waveform.
Possibly Clipped Samples
Counts the samples which may be clipping; at -32768 or 32767 (for 16-bit), for example. Press [ > ] to jump to the first such sample.
DC Offset
The measure of the DC ('Direct Current' or center of the waveform).Positive values are above the center line (zero volts) and negative valuesare below.
Minimum/Maximum RMS Power
This is the Root Mean Squared (closer to what the ear hears) amplitude ofthe waveform that is scanned using a window of the size given below as theRMS Window Width. The [ > ] buttons jump to the average quietest andloudest sections of the waveform.
Average RMS Power
Average RMS Power represents the average power of the entire selection.This is a good measure of the overall loudness of the waveform selection.
RMS Window Width
Cool Edit Pro takes the RMS over a window of this size when calculatingthe RMS minimum and maximum values.
Recalculate RMS
After adjusting the RMS Window Width, click this button to recalculatethe RMS values based on the new window size.
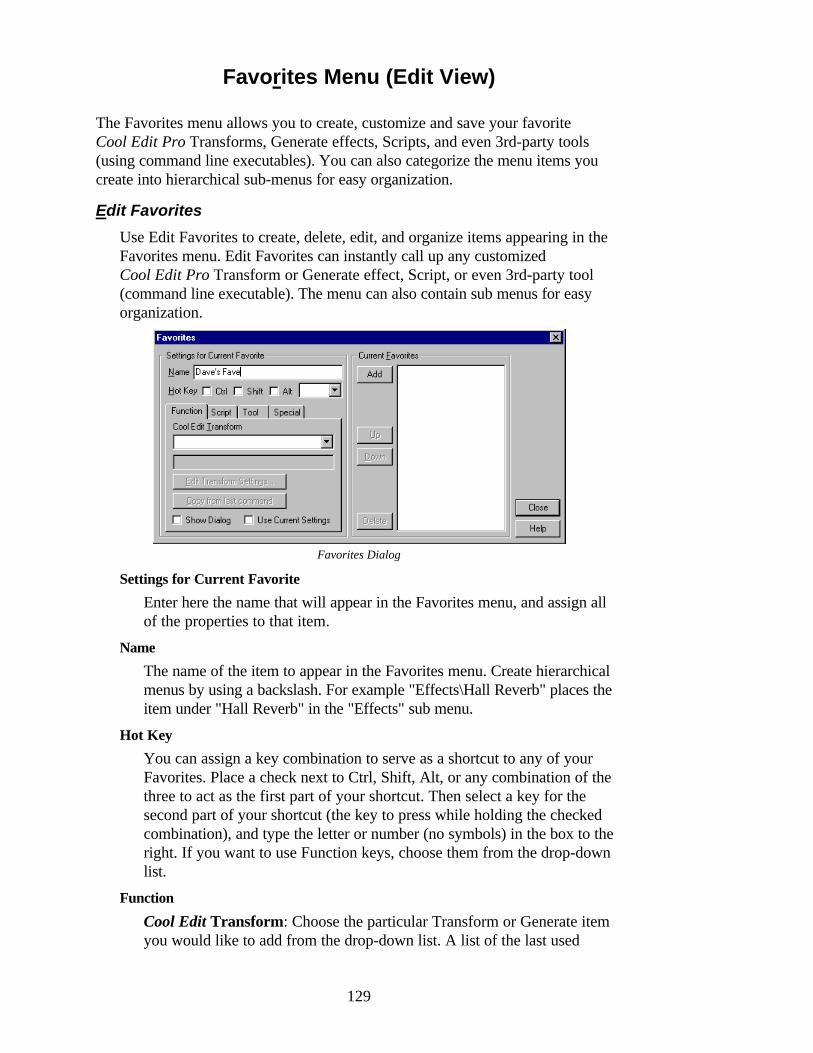
129
Favorites Menu (Edit View)
The Favorites menu allows you to create, customize and save your favoriteCool Edit Pro Transforms, Generate effects, Scripts, and even 3rd-party tools(using command line executables). You can also categorize the menu items youcreate into hierarchical sub-menus for easy organization.
Edit Favorites
Use Edit Favorites to create, delete, edit, and organize items appearing in theFavorites menu. Edit Favorites can instantly call up any customizedCool Edit Pro Transform or Generate effect, Script, or even 3rd-party tool(command line executable). The menu can also contain sub menus for easyorganization.
Favorites Dialog
Settings for Current Favorite
Enter here the name that will appear in the Favorites menu, and assign allof the properties to that item.
Name
The name of the item to appear in the Favorites menu. Create hierarchicalmenus by using a backslash. For example "Effects\Hall Reverb" places theitem under "Hall Reverb" in the "Effects" sub menu.
Hot Key
You can assign a key combination to serve as a shortcut to any of yourFavorites. Place a check next to Ctrl, Shift, Alt, or any combination of thethree to act as the first part of your shortcut. Then select a key for thesecond part of your shortcut (the key to press while holding the checkedcombination), and type the letter or number (no symbols) in the box to theright. If you want to use Function keys, choose them from the drop-downlist.
Function
Cool Edit Transform: Choose the particular Transform or Generate itemyou would like to add from the drop-down list. A list of the last used
130
settings for the item chosen appears in a window just below the Transformlist.Edit Transform Settings: Click on this button to call up the settingswindow that corresponds to the particular Transform function. You canthen change the settings to be used when this item is chosen from theFavorites menu.Copy from last command: Copies all the settings from the last functionthat was started successfully.Show Dialog: Check Show Dialog to bring up the settings dialog for theparticular Transform when you call the Favorite. The settings dialog willshow the settings you chose in Edit Transform Settings. Un-check ShowDialog to automatically use the chosen settings to run the function.Use Current Settings: Check this option to apply to the Favorite thesettings last used for that particular Transform.
Script
Script Collection: Displays the current script collection in use.Choose Script File: Brings up a browse dialog to choose a scriptcollection (*.scp) file.Script: This drop-down list contains all scripts available in the selectedcollection. Choose the particular script you want to run.Pause at Dialogs: If checked, the script stops at each settings dialog toallow you to modify the values. Otherwise, the entire script will run tocompletion before control returns.
Tool
Command Line: Type the command line for the tool you want to runhere, including any command line switches the particular tool may need.Browse: Click to browse for a particular tool.
Special
Use this option if you'd like to enter a separator bar into the Favorites listto separate one function type from others. You can do this by entering aseries of dashes (e.g. "------") into the Name box. If you want more thanone separator, enter a different number of dashes, or change the text sothat it doesn't match something already in the list (e.g. "------2" isconsidered a valid separator; the 2 after the dashes will be ignored). Tocreate a separator bar for a sub menu, enter the sub menu path first (e.g."Effects\------"). You can also enter any text you would like the Favoritesmenu to display. The text will be nonfunctional, of course.
Current Favorites
Once you fill in the name and attributes for the item, it can be added toyour Favorites list. All items in this list will appear in the Favorites menu.
Add/Update
Add the Favorite currently being edited to the list, or update an item in thelist if its name already exists. If you modify the settings for a current
131
favorite, you must press Update to make the changes permanent. To add acompletely new item to the list, just type a new name in the Name field,and choose the appropriate settings.
Delete
Removes the selected item from the Favorites list.
Up
Moves the selected item up in the list. The order of this list is the same asin the Favorites menu.
Down
Moves the selected item down in the list. The order of this list is the sameas in the Favorites menu.
Favorites List
This list displays items currently in the Favorites menu. Choose any item inthe Favorites list to call up the settings for that item. If you change some ofthose settings, be sure to press Update to permanently change the settingsin the list. The order of this list is the same as in the Favorites menu.
Let's add a Normalize function to the Favorites List. First, select EditFavorites.. from the Favorites menu, then let’s name the function"Normalize"... select the Amplitude\Normalize from the Function Tab. Bypressing the Edit Transform Settings, we can tailor any variables that we'd like.Next, press Add to add "Normalize" to the list and press Close. Next time youwant to normalize a waveform, you can simply call it up from the FavoritesList.
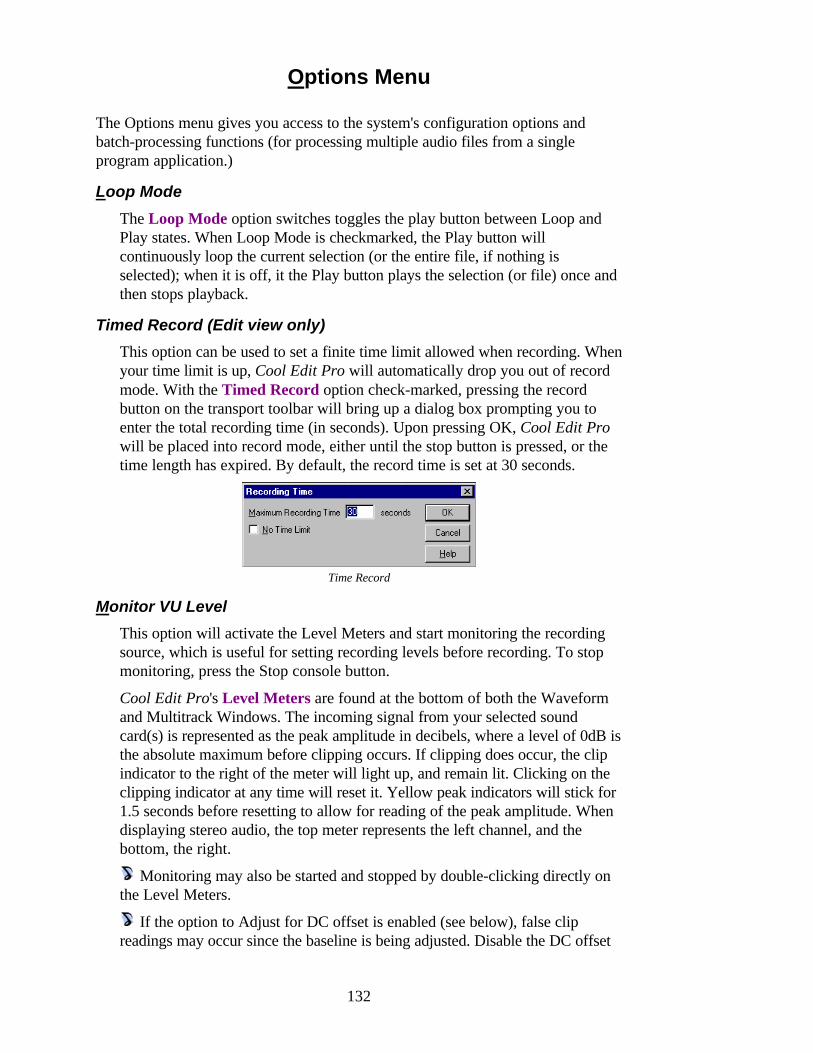
132
Options Menu
The Options menu gives you access to the system's configuration options andbatch-processing functions (for processing multiple audio files from a singleprogram application.)
Loop Mode
The Loop Mode option switches toggles the play button between Loop andPlay states. When Loop Mode is checkmarked, the Play button willcontinuously loop the current selection (or the entire file, if nothing isselected); when it is off, it the Play button plays the selection (or file) once andthen stops playback.
Timed Record (Edit view only)
This option can be used to set a finite time limit allowed when recording. Whenyour time limit is up, Cool Edit Pro will automatically drop you out of recordmode. With the Timed Record option check-marked, pressing the recordbutton on the transport toolbar will bring up a dialog box prompting you toenter the total recording time (in seconds). Upon pressing OK, Cool Edit Prowill be placed into record mode, either until the stop button is pressed, or thetime length has expired. By default, the record time is set at 30 seconds.
Time Record
Monitor VU Level
This option will activate the Level Meters and start monitoring the recordingsource, which is useful for setting recording levels before recording. To stopmonitoring, press the Stop console button.
Cool Edit Pro's Level Meters are found at the bottom of both the Waveformand Multitrack Windows. The incoming signal from your selected soundcard(s) is represented as the peak amplitude in decibels, where a level of 0dB isthe absolute maximum before clipping occurs. If clipping does occur, the clipindicator to the right of the meter will light up, and remain lit. Clicking on theclipping indicator at any time will reset it. Yellow peak indicators will stick for1.5 seconds before resetting to allow for reading of the peak amplitude. Whendisplaying stereo audio, the top meter represents the left channel, and thebottom, the right.
Monitoring may also be started and stopped by double-clicking directly onthe Level Meters.
If the option to Adjust for DC offset is enabled (see below), false clipreadings may occur since the baseline is being adjusted. Disable the DC offset
133
adjustment to have the clip indicators light up only when absolute clippingoccurs.
To access the Meter Level configuration menu, right-click in the meter area.The following options are available:
Start/Stop Meter
Start or Stop monitoring of the input source. When monitoring is active,the meters will respond directly to the audio input.
Show on Play and Record
Activates the meters while playing and recording in Cool Edit Pro.
Clear Clip Indicators
The box(es) at the right will light up if audio is clipping. Click on the boxor choose this option to reset the indicator. Note: The clip indicators willalways light if clipping occurs, but if Adjust for DC is enabled, theindicators may light up when the audio has a DC offset.
Adjust for DC
Many sound boards record audio with a slight DC offset, which means thatthe center of the waveform being recorded is not at the exact center of thewaveform display, but a little above or below it. This can dramaticallythrow the level meters off since the amount the waveform is displacedcould be interpreted as a constant sound that loud. To compensate, makesure this menu item is checked. The recording meters will dynamicallyadjust to the DC offset, and display the true amplitude of the signal indecibels.
Show Valleys
Just as the yellow indicators show peak levels, if Show Valleys is chosen,valley levels (minimum amplitudes) will be marked as well. This gives agood indication of the dynamic range of the audio. If the valley indicatorsare close to the peak indicators, the dynamic range is low. If they arespread far apart, the dynamic range is high (the difference between thequietest sounds and loudest sounds is greater).
90dB Range to 30dB Range
This is the range that the meter covers. When recording 8-bit audio, thereis no need for anything greater than a 45dB range, since 8-bit audio can notreally record anything below a volume level of -45dB. Use a lower rangeto see the loud portions more clearly. Use a higher range to see the quieterportions for very high dynamic range audio. Note: You may find thatwhen you think your sound board is recording pure silence, you will see themeters fluctuating between points around -87dB up to -60dB instead ofgoing all the way down. This is because of noise in the sound board.Some sound boards have higher signal-to-noise ratios than others.Generally, the higher quality the sound board, the lower the meters will godown during pure silence. To quickly see how noisy your own sound cardis, choose /File/New and create a new 44.1Khz 16-bit file. Then start thelevel meters, and choose the 90dB Range. This test only works for 16-bit
134
sound cards, since 8-bit sound cards have a maximum dynamic range ofaround 45dB.
Dynamic / Static Peaks
Choosing Dynamic Peaks will cause the yellow peak level indicators toreset to a new peak level after 1-1/2 seconds. In Static mode, the peaksnever reset. Use Dynamic mode to easily see visually the peak amplituderight now. As audio gets quieter, the peak indicators will start backing offas well. Use Static mode to retain the maximum amplitude of the signalsince monitoring, playing, or recording began. The peak can still be resetmanually at any time by clearing the clip indicators (clicking on the clipindicator at the right). Static mode is great for finding out how loud a songwill get before recording it. Just start the meters and start playing thesong. When the song is over, the peak indicators will show how loud theloudest part of the song was.
MIDI Trigger Enable
By check-marking MIDI Trigger Enable, any of Cool Edit Pro's Shortcuts thathave been assigned to MIDI events can be called from a MIDI keyboard, asequencer, or any other device capable of issuing a MIDI command. Disablethis option if you don't wish to have Shortcuts respond to MIDI events.
Before attempting to enable MIDI triggering, you will need to choose adevice for MIDI In that is recognized by Windows (such as a sound card'sbuilt-in MIDI interface, a MIDI interface card or other hardware deviceoptions.) To do this, go to /Options/Settings/Devices to bring up the deviceswindow. Set MIDI In (Sync/Trigger) to the source to be used for Triggering(commonly YourDevice: In 1).
SMPTE Slave Enable
With this option turned on, Cool Edit Pro can synchronize its playback toSMPTE time code (MTC) generated from another device, such as a MIDIsequencer, or with the appropriate hardware, a VCR or tape deck. This iscommonly referred to as slaving. With SMPTE Slave enabled, Cool Edit Prowill update its current sync status in the lower left of the Status Bar, withOpened MIDI Input Device when waiting, Synchronizing when establishinglockup, and Playback Synchronized when sync is actually established.
To establish sync, you must:First, set a SMPTE offset (a time code location for Cool Edit Pro to beginplayback/record) if this value is other than 00:00:00:00: In Multitrack viewselect View -> Info. Enter a SMPTE location where you would likeCool Edit Pro to begin playback, in the format hrs:min:sec:frames.Next, tell Cool Edit Pro to wait for SMPTE, choose Options -> SMPTESlave Enable. Start playback on the "master" device and Cool Edit Proshould pick up the time code and give a running update in the SMPTEreadout at the lower right of the main window. Playback in Cool Edit Prowill then begin at your SMPTE location.
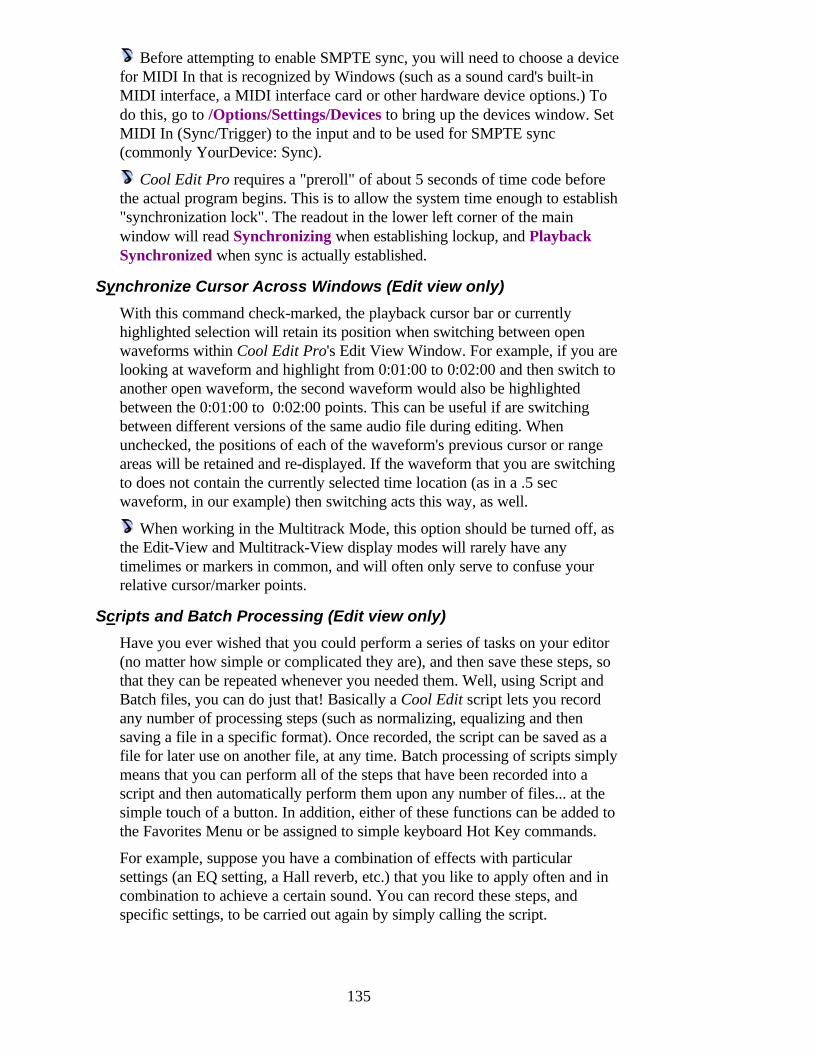
135
Before attempting to enable SMPTE sync, you will need to choose a devicefor MIDI In that is recognized by Windows (such as a sound card's built-inMIDI interface, a MIDI interface card or other hardware device options.) Todo this, go to /Options/Settings/Devices to bring up the devices window. SetMIDI In (Sync/Trigger) to the input and to be used for SMPTE sync(commonly YourDevice: Sync).
Cool Edit Pro requires a "preroll" of about 5 seconds of time code beforethe actual program begins. This is to allow the system time enough to establish"synchronization lock". The readout in the lower left corner of the mainwindow will read Synchronizing when establishing lockup, and PlaybackSynchronized when sync is actually established.
Synchronize Cursor Across Windows (Edit view only)
With this command check-marked, the playback cursor bar or currentlyhighlighted selection will retain its position when switching between openwaveforms within Cool Edit Pro's Edit View Window. For example, if you arelooking at waveform and highlight from 0:01:00 to 0:02:00 and then switch toanother open waveform, the second waveform would also be highlightedbetween the 0:01:00 to 0:02:00 points. This can be useful if are switchingbetween different versions of the same audio file during editing. Whenunchecked, the positions of each of the waveform's previous cursor or rangeareas will be retained and re-displayed. If the waveform that you are switchingto does not contain the currently selected time location (as in a .5 secwaveform, in our example) then switching acts this way, as well.
When working in the Multitrack Mode, this option should be turned off, asthe Edit-View and Multitrack-View display modes will rarely have anytimelimes or markers in common, and will often only serve to confuse yourrelative cursor/marker points.
Scripts and Batch Processing (Edit view only)
Have you ever wished that you could perform a series of tasks on your editor(no matter how simple or complicated they are), and then save these steps, sothat they can be repeated whenever you needed them. Well, using Script andBatch files, you can do just that! Basically a Cool Edit script lets you recordany number of processing steps (such as normalizing, equalizing and thensaving a file in a specific format). Once recorded, the script can be saved as afile for later use on another file, at any time. Batch processing of scripts simplymeans that you can perform all of the steps that have been recorded into ascript and then automatically perform them upon any number of files... at thesimple touch of a button. In addition, either of these functions can be added tothe Favorites Menu or be assigned to simple keyboard Hot Key commands.
For example, suppose you have a combination of effects with particularsettings (an EQ setting, a Hall reverb, etc.) that you like to apply often and incombination to achieve a certain sound. You can record these steps, andspecific settings, to be carried out again by simply calling the script.
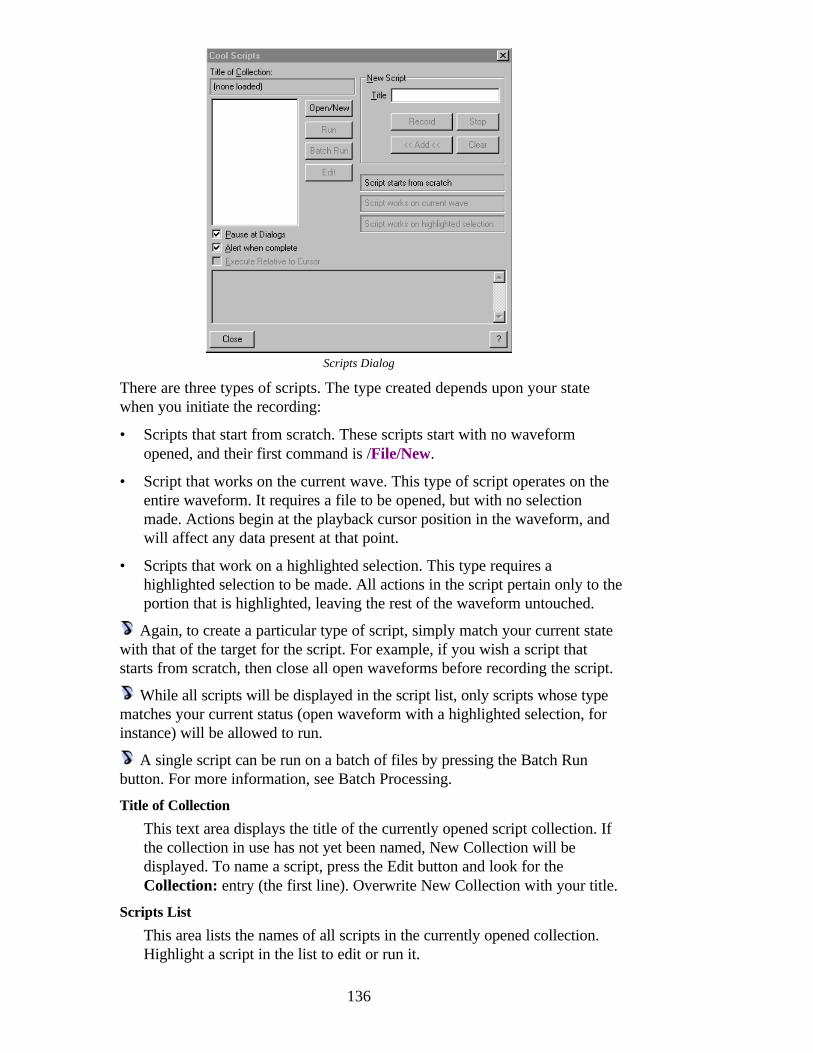
136
Scripts Dialog
There are three types of scripts. The type created depends upon your statewhen you initiate the recording:
• Scripts that start from scratch. These scripts start with no waveformopened, and their first command is /File/New.
• Script that works on the current wave. This type of script operates on theentire waveform. It requires a file to be opened, but with no selectionmade. Actions begin at the playback cursor position in the waveform, andwill affect any data present at that point.
• Scripts that work on a highlighted selection. This type requires ahighlighted selection to be made. All actions in the script pertain only to theportion that is highlighted, leaving the rest of the waveform untouched.
Again, to create a particular type of script, simply match your current statewith that of the target for the script. For example, if you wish a script thatstarts from scratch, then close all open waveforms before recording the script.
While all scripts will be displayed in the script list, only scripts whose typematches your current status (open waveform with a highlighted selection, forinstance) will be allowed to run.
A single script can be run on a batch of files by pressing the Batch Runbutton. For more information, see Batch Processing.
Title of Collection
This text area displays the title of the currently opened script collection. Ifthe collection in use has not yet been named, New Collection will bedisplayed. To name a script, press the Edit button and look for theCollection: entry (the first line). Overwrite New Collection with your title.
Scripts List
This area lists the names of all scripts in the currently opened collection.Highlight a script in the list to edit or run it.
137
Open/New
Pressing this button brings up a standard Open dialog with which you canbrowse your directories for script (.SCP) files. Double click an existing.SCP file to open that script collection. To create a new script collection,navigate through the dialog to the directory that you would like to save the.SCP file, and enter a name for it in the File Name: field. Next, press Opento save the file (it will then open for use as the current script collection).
Run
Runs the currently selected script. If the script type is not compatible withyour current state (i.e. trying to run from scratch script with a file open) itwill not run until your condition matches the requirements (in this case,closing all open files).
Batch Run
A single script can be run repeatedly over a group of source files. Thescript must have been recorded in a "Works on Current Wave" mode, thatis, before the script was recorded there must have been an open waveform(perhaps blank) and no highlighted selection. The Batch Run button willonly be selectable if a script of this type is selected from the Scripts list.Pressing this button will bring up the Batch Process dialog, allowing you toselect the files to process.
For more information, see the section on Batch Processing.
Edit
This will open the currently selected script as a text file for editing.
New Script
Title: Before creating a new script, you must first supply a title here.Record: After titling your soon-to-be script, hit the Record button to begincapturing the steps to be included.Stop: After completing all of the steps to be included in the script, returnto the Cool Scripts dialog and press Stop.Add: This button will add the script you have just created to the currentlyopen Script Collection. Remember that if you wish to supply a descriptionfor the script (in the Description text area below) do so before hitting thisbutton.Clear: This option allows you to clear the script you have just recorded, ifyou do not wish to add it to the collection. This button is only availableimmediately after pressing Stop. If you wish to remove a script after it hasbeen added, you will need to edit the script by pressing the Edit button.
Script Type
These three fields indicate what type of script is currently highlighted in theScripts List. There are three possible script types, with each operating uponeither the entire waveform, a selection, or from scratch. The type of thescript currently selected will darken, leaving the other two "grayed out".
138
Pause at Dialogs
Check this option to make the script stop at each dialog, allowing you tomodify the values of that function. Pressing Cancel in any dialog will stopthe script, pressing OK will continue it.
Alert when complete
A dialog box will signal the completion of the script if this option ischecked.
Execute Relative to Cursor
When using "Works on Current Wave" script types, you can have all scriptoperations performed relative the original positioning, as opposed to at theoriginal position. For example, suppose you have a script which wasoriginally recorded with a cursor position of 0:10:00. Checking this optionwill apply the script at the current cursor location, plus 10 seconds (if yourcursor is at 0:05:00, the results would be at 0:15:00). With this optionunchecked, the script will be performed at the original location (0:10:00 inour example).
To make a script which you will execute at the current cursor position,record the script at a 0:00:00 position, and check this option.
Description
Immediately after recording a script, you may enter a description in thistext area for the script you have just recorded. This description will appear(in a non-editable form) when the user of the script highlights the script torun.
The only time you can enter a description in this box is after recording,not before, and not after it has been added to a script collection file. If youwish to enter or edit a description thereafter, you can do so by pressing theEdit button to edit the text file directly.
Batch Processing
A single script can be run repeatedly over a group (batch) of source files. Thescript must have been recorded in a "Works on Current Wave" mode, that is,before the script was recorded there must have been an open waveform(perhaps blank) and no highlighted selection. The Batch Run button will onlybe selectable if a script of this type is selected from the Scripts list.
You can customize Cool Edit Pro's colors, use of memory and hard disk space,spectral view, behavior when pasting, and miscellaneous other settings in/Options/Settings. See below for information on the individual settingsavailable.
Source Files
This is the list of files to be included in the batch for processing. Press theAdd Files… button to add a file to the list, or Remove to remove a filefrom the list. To remove multiple files from the list, hold down on theSHIFT key for contiguous selections, or the CTRL key for noncontiguousselections.
The wave files can be in different formats if desired.
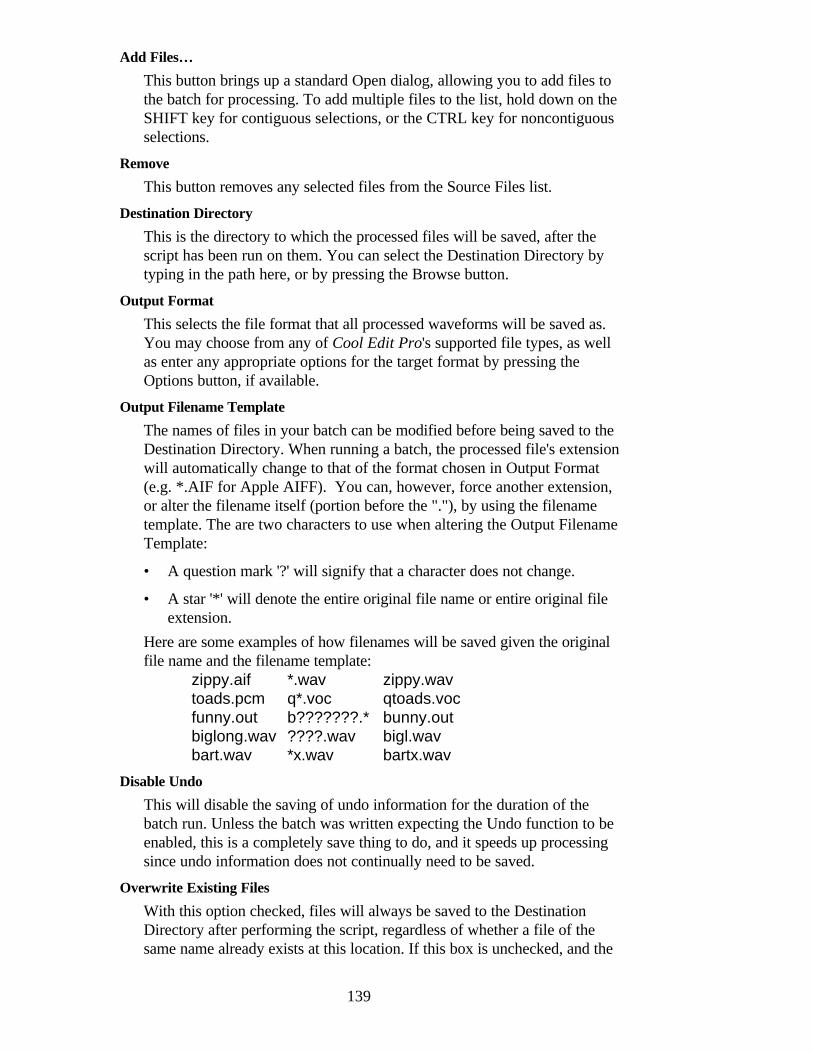
139
Add Files…
This button brings up a standard Open dialog, allowing you to add files tothe batch for processing. To add multiple files to the list, hold down on theSHIFT key for contiguous selections, or the CTRL key for noncontiguousselections.
Remove
This button removes any selected files from the Source Files list.
Destination Directory
This is the directory to which the processed files will be saved, after thescript has been run on them. You can select the Destination Directory bytyping in the path here, or by pressing the Browse button.
Output Format
This selects the file format that all processed waveforms will be saved as.You may choose from any of Cool Edit Pro's supported file types, as wellas enter any appropriate options for the target format by pressing theOptions button, if available.
Output Filename Template
The names of files in your batch can be modified before being saved to theDestination Directory. When running a batch, the processed file's extensionwill automatically change to that of the format chosen in Output Format(e.g. *.AIF for Apple AIFF). You can, however, force another extension,or alter the filename itself (portion before the "."), by using the filenametemplate. The are two characters to use when altering the Output FilenameTemplate:
• A question mark '?' will signify that a character does not change.
• A star '*' will denote the entire original file name or entire original fileextension.
Here are some examples of how filenames will be saved given the originalfile name and the filename template:
zippy.aif *.wav zippy.wavtoads.pcm q*.voc qtoads.vocfunny.out b???????.* bunny.outbiglong.wav ????.wav bigl.wavbart.wav *x.wav bartx.wav
Disable Undo
This will disable the saving of undo information for the duration of thebatch run. Unless the batch was written expecting the Undo function to beenabled, this is a completely save thing to do, and it speeds up processingsince undo information does not continually need to be saved.
Overwrite Existing Files
With this option checked, files will always be saved to the DestinationDirectory after performing the script, regardless of whether a file of thesame name already exists at this location. If this box is unchecked, and the
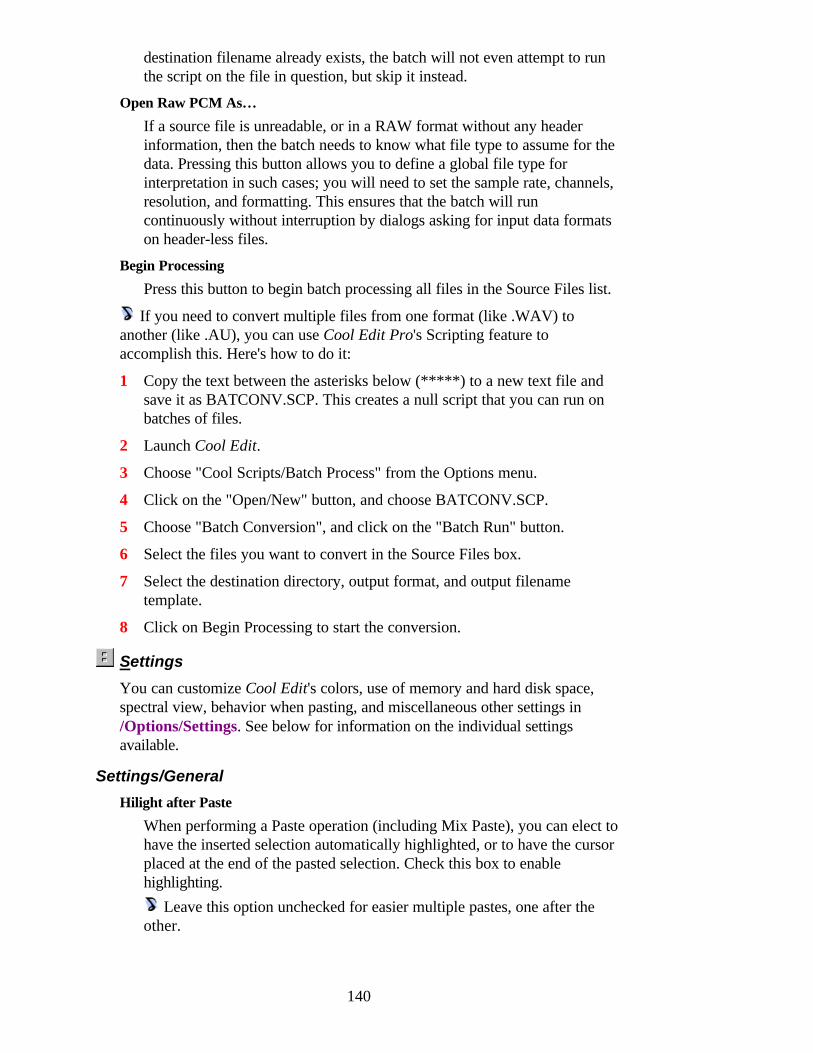
140
destination filename already exists, the batch will not even attempt to runthe script on the file in question, but skip it instead.
Open Raw PCM As…
If a source file is unreadable, or in a RAW format without any headerinformation, then the batch needs to know what file type to assume for thedata. Pressing this button allows you to define a global file type forinterpretation in such cases; you will need to set the sample rate, channels,resolution, and formatting. This ensures that the batch will runcontinuously without interruption by dialogs asking for input data formatson header-less files.
Begin Processing
Press this button to begin batch processing all files in the Source Files list.
If you need to convert multiple files from one format (like .WAV) toanother (like .AU), you can use Cool Edit Pro's Scripting feature toaccomplish this. Here's how to do it:
1 Copy the text between the asterisks below (*****) to a new text file andsave it as BATCONV.SCP. This creates a null script that you can run onbatches of files.
2 Launch Cool Edit.
3 Choose "Cool Scripts/Batch Process" from the Options menu.
4 Click on the "Open/New" button, and choose BATCONV.SCP.
5 Choose "Batch Conversion", and click on the "Batch Run" button.
6 Select the files you want to convert in the Source Files box.
7 Select the destination directory, output format, and output filenametemplate.
8 Click on Begin Processing to start the conversion.
Settings
You can customize Cool Edit's colors, use of memory and hard disk space,spectral view, behavior when pasting, and miscellaneous other settings in/Options/Settings. See below for information on the individual settingsavailable.
Settings/General
Hilight after Paste
When performing a Paste operation (including Mix Paste), you can elect tohave the inserted selection automatically highlighted, or to have the cursorplaced at the end of the pasted selection. Check this box to enablehighlighting.
Leave this option unchecked for easier multiple pastes, one after theother.

141
Use old style file open/save dialogs
Check this box to have Cool Edit Pro's File Open and File Save dialogssimilar to those used in 16-bit Windows applications, as opposed to theWindows 95 style. You may wish to use this older style if you are used tothem and do not want the extra features of Windows 95 Explorer dialogssuch as New Folder, Delete, Move, List View with file sizes and dates, etc.One advantage to the older style is that directories are listed separate fromfiles.
Auto-play on command-line load
When launching Cool Edit Pro, this option will automatically play a filethat has been specified on the command line. For example, if you chooseStart - Run and enter "c:\cool\coolpro.exe thisfile.wav" as your commandline, then Cool Edit Pro will open, and begin playing thisfile.wav.
Play From Cursor
When no selection is highlighted, you can have playback begin from eitherthe current playback cursor location, or from the left edge of the waveformdisplay. Check this box to start playback from the current cursor position.
Live update during record
This enables live waveform drawing while recording. On faster machines,you can have the waveform displayed in real-time as audio is beingrecorded. However, if you find the recorded audio becoming choppy, leavethis option disabled. In Spectral View mode, and at lower spectralresolutions (around 256) a nice scrolling spectral plot can be performedwhile recording with this option on.
Auto-scroll during Play and Record
If enabled, the waveform display will scroll in sync with playback. This onlyaffects when you are zoomed in on a portion of a waveform, and play pastthe viewed portion (by pressing Shift+Play, for example).
Show center line on top
Check this box to have the center line (zero amplitude) for each channeldisplayed on top of the waveform itself. If disabled, the waveform isdisplayed on top of the center line.
Beat Sensing
Decibel Rise (dB): This is rise in amplitude needed to constitute a beatwhen using the Find Beats function. The waveform must rise by thisamount within the specified Rise Time to be considered a beat.Rise Time (ms): This is the amount of time (in milliseconds) in which theamplitude must rise by the Decibel Rise setting in order to be considered abeat when using the Find Beats function.
Maximum Display on Load (seconds)
This is the maximum number of seconds into the audio file to display whena file is first loaded. When working with large files, you may wish to limitthe initial display area to 10 or 20 seconds so that you do not have to wait
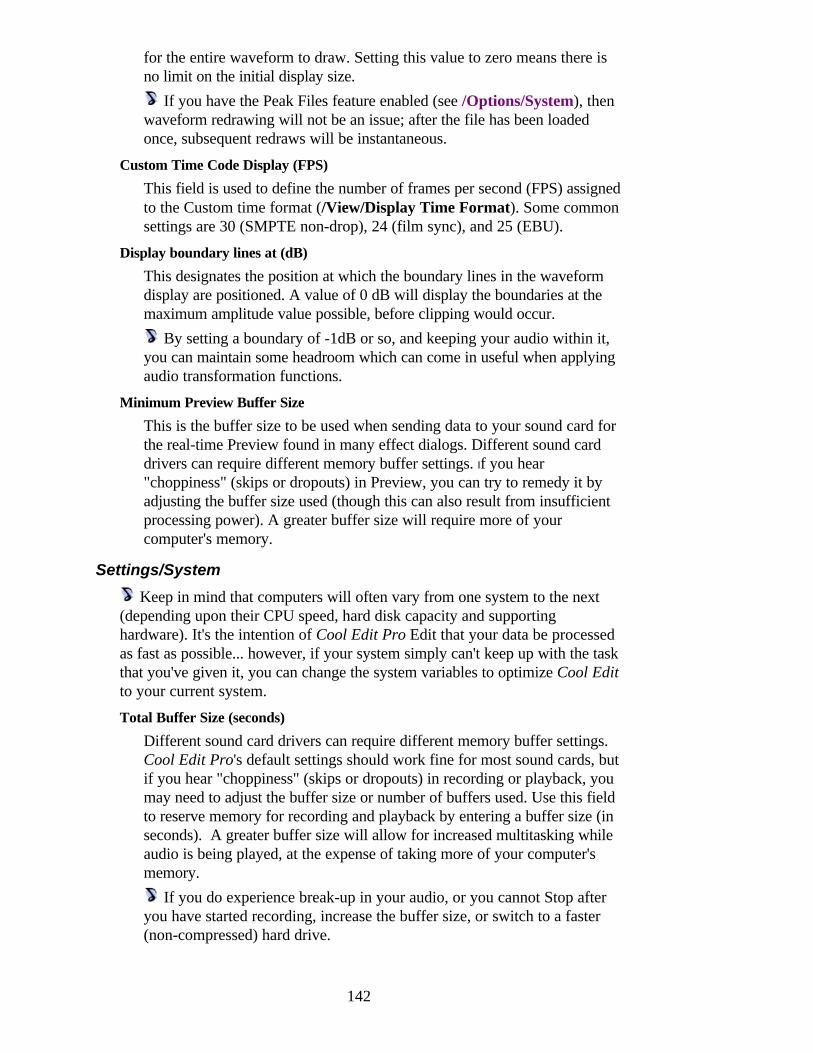
142
for the entire waveform to draw. Setting this value to zero means there isno limit on the initial display size.
If you have the Peak Files feature enabled (see /Options/System), thenwaveform redrawing will not be an issue; after the file has been loadedonce, subsequent redraws will be instantaneous.
Custom Time Code Display (FPS)
This field is used to define the number of frames per second (FPS) assignedto the Custom time format (/View/Display Time Format). Some commonsettings are 30 (SMPTE non-drop), 24 (film sync), and 25 (EBU).
Display boundary lines at (dB)
This designates the position at which the boundary lines in the waveformdisplay are positioned. A value of 0 dB will display the boundaries at themaximum amplitude value possible, before clipping would occur.
By setting a boundary of -1dB or so, and keeping your audio within it,you can maintain some headroom which can come in useful when applyingaudio transformation functions.
Minimum Preview Buffer Size
This is the buffer size to be used when sending data to your sound card forthe real-time Preview found in many effect dialogs. Different sound carddrivers can require different memory buffer settings. If you hear"choppiness" (skips or dropouts) in Preview, you can try to remedy it byadjusting the buffer size used (though this can also result from insufficientprocessing power). A greater buffer size will require more of yourcomputer's memory.
Settings/System
Keep in mind that computers will often vary from one system to the next(depending upon their CPU speed, hard disk capacity and supportinghardware). It's the intention of Cool Edit Pro Edit that your data be processedas fast as possible... however, if your system simply can't keep up with the taskthat you've given it, you can change the system variables to optimize Cool Editto your current system.
Total Buffer Size (seconds)
Different sound card drivers can require different memory buffer settings.Cool Edit Pro's default settings should work fine for most sound cards, butif you hear "choppiness" (skips or dropouts) in recording or playback, youmay need to adjust the buffer size or number of buffers used. Use this fieldto reserve memory for recording and playback by entering a buffer size (inseconds). A greater buffer size will allow for increased multitasking whileaudio is being played, at the expense of taking more of your computer'smemory.
If you do experience break-up in your audio, or you cannot Stop afteryou have started recording, increase the buffer size, or switch to a faster(non-compressed) hard drive.
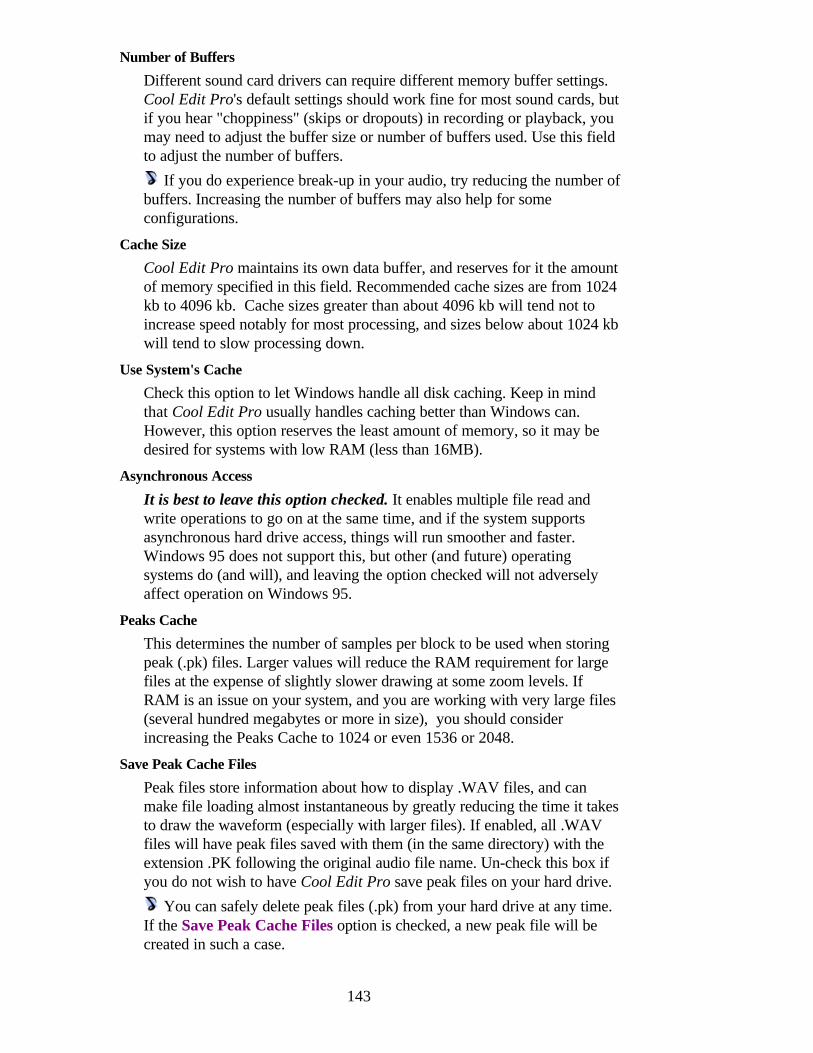
143
Number of Buffers
Different sound card drivers can require different memory buffer settings.Cool Edit Pro's default settings should work fine for most sound cards, butif you hear "choppiness" (skips or dropouts) in recording or playback, youmay need to adjust the buffer size or number of buffers used. Use this fieldto adjust the number of buffers.
If you do experience break-up in your audio, try reducing the number ofbuffers. Increasing the number of buffers may also help for someconfigurations.
Cache Size
Cool Edit Pro maintains its own data buffer, and reserves for it the amountof memory specified in this field. Recommended cache sizes are from 1024kb to 4096 kb. Cache sizes greater than about 4096 kb will tend not toincrease speed notably for most processing, and sizes below about 1024 kbwill tend to slow processing down.
Use System's Cache
Check this option to let Windows handle all disk caching. Keep in mindthat Cool Edit Pro usually handles caching better than Windows can.However, this option reserves the least amount of memory, so it may bedesired for systems with low RAM (less than 16MB).
Asynchronous Access
It is best to leave this option checked. It enables multiple file read andwrite operations to go on at the same time, and if the system supportsasynchronous hard drive access, things will run smoother and faster.Windows 95 does not support this, but other (and future) operatingsystems do (and will), and leaving the option checked will not adverselyaffect operation on Windows 95.
Peaks Cache
This determines the number of samples per block to be used when storingpeak (.pk) files. Larger values will reduce the RAM requirement for largefiles at the expense of slightly slower drawing at some zoom levels. IfRAM is an issue on your system, and you are working with very large files(several hundred megabytes or more in size), you should considerincreasing the Peaks Cache to 1024 or even 1536 or 2048.
Save Peak Cache Files
Peak files store information about how to display .WAV files, and canmake file loading almost instantaneous by greatly reducing the time it takesto draw the waveform (especially with larger files). If enabled, all .WAVfiles will have peak files saved with them (in the same directory) with theextension .PK following the original audio file name. Un-check this box ifyou do not wish to have Cool Edit Pro save peak files on your hard drive.
You can safely delete peak files (.pk) from your hard drive at any time.If the Save Peak Cache Files option is checked, a new peak file will becreated in such a case.
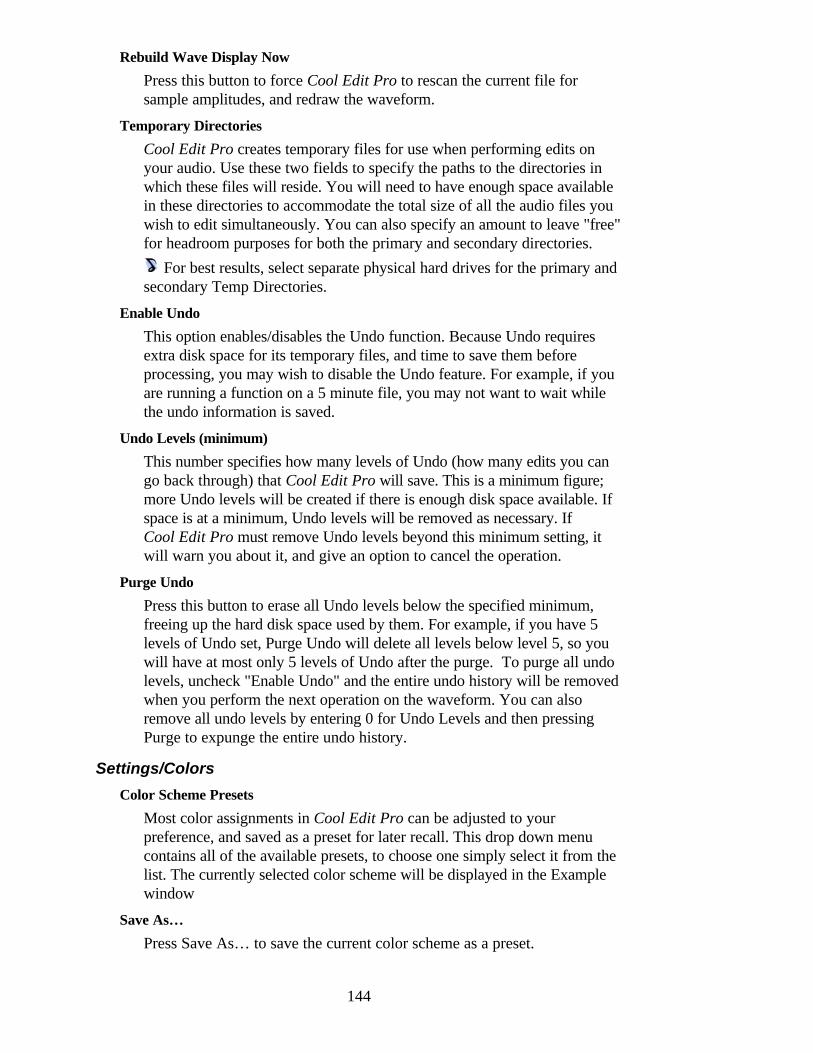
144
Rebuild Wave Display Now
Press this button to force Cool Edit Pro to rescan the current file forsample amplitudes, and redraw the waveform.
Temporary Directories
Cool Edit Pro creates temporary files for use when performing edits onyour audio. Use these two fields to specify the paths to the directories inwhich these files will reside. You will need to have enough space availablein these directories to accommodate the total size of all the audio files youwish to edit simultaneously. You can also specify an amount to leave "free"for headroom purposes for both the primary and secondary directories.
For best results, select separate physical hard drives for the primary andsecondary Temp Directories.
Enable Undo
This option enables/disables the Undo function. Because Undo requiresextra disk space for its temporary files, and time to save them beforeprocessing, you may wish to disable the Undo feature. For example, if youare running a function on a 5 minute file, you may not want to wait whilethe undo information is saved.
Undo Levels (minimum)
This number specifies how many levels of Undo (how many edits you cango back through) that Cool Edit Pro will save. This is a minimum figure;more Undo levels will be created if there is enough disk space available. Ifspace is at a minimum, Undo levels will be removed as necessary. IfCool Edit Pro must remove Undo levels beyond this minimum setting, itwill warn you about it, and give an option to cancel the operation.
Purge Undo
Press this button to erase all Undo levels below the specified minimum,freeing up the hard disk space used by them. For example, if you have 5levels of Undo set, Purge Undo will delete all levels below level 5, so youwill have at most only 5 levels of Undo after the purge. To purge all undolevels, uncheck "Enable Undo" and the entire undo history will be removedwhen you perform the next operation on the waveform. You can alsoremove all undo levels by entering 0 for Undo Levels and then pressingPurge to expunge the entire undo history.
Settings/Colors
Color Scheme Presets
Most color assignments in Cool Edit Pro can be adjusted to yourpreference, and saved as a preset for later recall. This drop down menucontains all of the available presets, to choose one simply select it from thelist. The currently selected color scheme will be displayed in the Examplewindow
Save As…
Press Save As… to save the current color scheme as a preset.
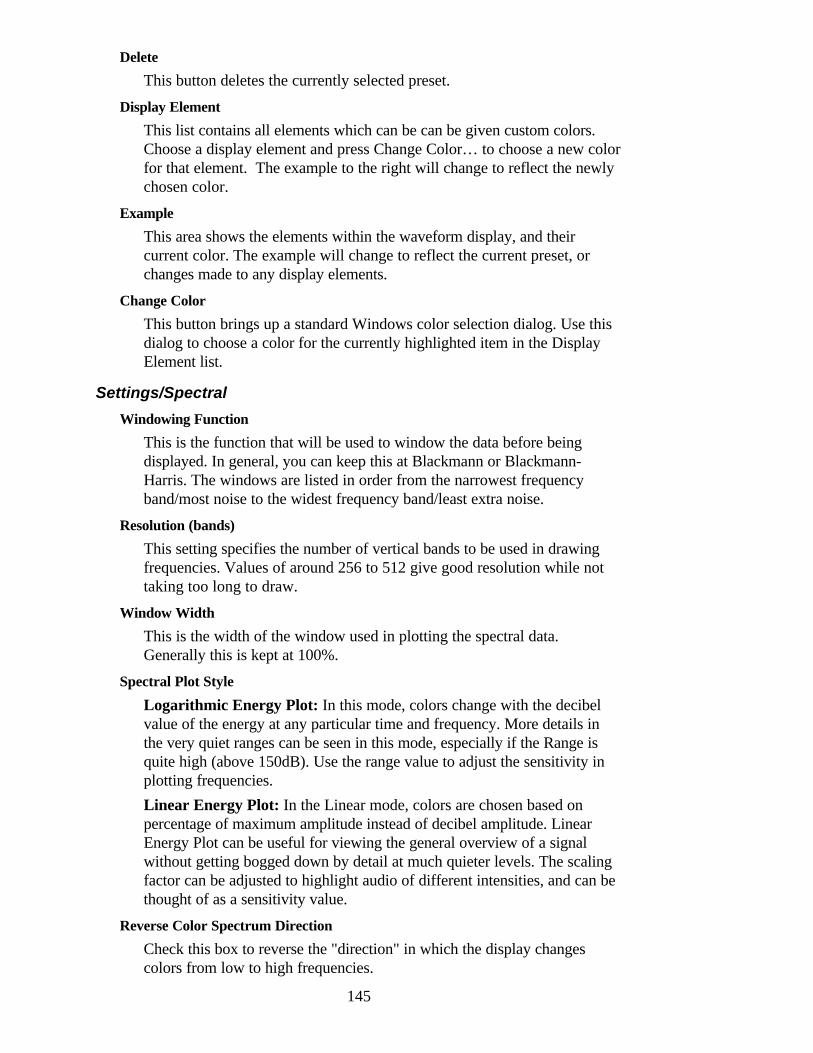
Delete
This button deletes the currently selected preset.
Display Element
This list contains all elements which can be can be given custom colors.Choose a display element and press Change Color… to choose a new colorfor that element. The example to the right will change to reflect the newlychosen color.
Example
This area shows the elements within the waveform display, and theircurrent color. The example will change to reflect the current preset, orchanges made to any display elements.
Change Color
This button brings up a standard Windows color selection dialog. Use thisdialog to choose a color for the currently highlighted item in the DisplayElement list.
Settings/Spectral
Windowing Function
This is the function that will be used to window the data before beingdisplayed. In general, you can keep this at Blackmann or Blackmann-Harris. The windows are listed in order from the narrowest frequencyband/most noise to the widest frequency band/least extra noise.
Resolution (bands)
This setting specifies the number of vertical bands to be used in drawingfrequencies. Values of around 256 to 512 give good resolution while nottaking too long to draw.
Window Width
This is the width of the window used in plotting the spectral data.Generally this is kept at 100%.
Spectral Plot Style
Logarithmic Energy Plot: In this mode, colors change with the decibelvalue of the energy at any particular time and frequency. More details inthe very quiet ranges can be seen in this mode, especially if the Range isquite high (above 150dB). Use the range value to adjust the sensitivity inplotting frequencies.Linear Energy Plot: In the Linear mode, colors are chosen based onpercentage of maximum amplitude instead of decibel amplitude. LinearEnergy Plot can be useful for viewing the general overview of a signalwithout getting bogged down by detail at much quieter levels. The scalingfactor can be adjusted to highlight audio of different intensities, and can bethought of as a sensitivity value.
Reverse Color Spectrum Direction
Check this box to reverse the "direction" in which the display changescolors from low to high frequencies.
145
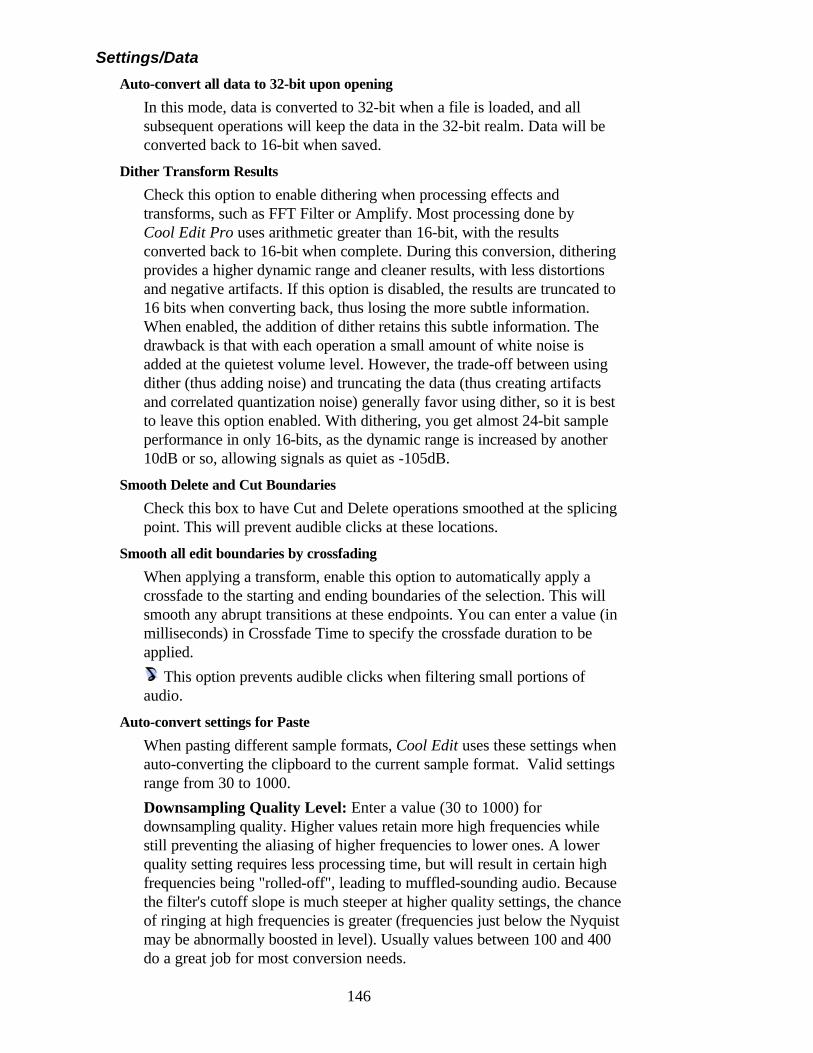
146
Settings/Data
Auto-convert all data to 32-bit upon opening
In this mode, data is converted to 32-bit when a file is loaded, and allsubsequent operations will keep the data in the 32-bit realm. Data will beconverted back to 16-bit when saved.
Dither Transform Results
Check this option to enable dithering when processing effects andtransforms, such as FFT Filter or Amplify. Most processing done byCool Edit Pro uses arithmetic greater than 16-bit, with the resultsconverted back to 16-bit when complete. During this conversion, ditheringprovides a higher dynamic range and cleaner results, with less distortionsand negative artifacts. If this option is disabled, the results are truncated to16 bits when converting back, thus losing the more subtle information.When enabled, the addition of dither retains this subtle information. Thedrawback is that with each operation a small amount of white noise isadded at the quietest volume level. However, the trade-off between usingdither (thus adding noise) and truncating the data (thus creating artifactsand correlated quantization noise) generally favor using dither, so it is bestto leave this option enabled. With dithering, you get almost 24-bit sampleperformance in only 16-bits, as the dynamic range is increased by another10dB or so, allowing signals as quiet as -105dB.
Smooth Delete and Cut Boundaries
Check this box to have Cut and Delete operations smoothed at the splicingpoint. This will prevent audible clicks at these locations.
Smooth all edit boundaries by crossfading
When applying a transform, enable this option to automatically apply acrossfade to the starting and ending boundaries of the selection. This willsmooth any abrupt transitions at these endpoints. You can enter a value (inmilliseconds) in Crossfade Time to specify the crossfade duration to beapplied.
This option prevents audible clicks when filtering small portions ofaudio.
Auto-convert settings for Paste
When pasting different sample formats, Cool Edit uses these settings whenauto-converting the clipboard to the current sample format. Valid settingsrange from 30 to 1000.Downsampling Quality Level: Enter a value (30 to 1000) fordownsampling quality. Higher values retain more high frequencies whilestill preventing the aliasing of higher frequencies to lower ones. A lowerquality setting requires less processing time, but will result in certain highfrequencies being "rolled-off", leading to muffled-sounding audio. Becausethe filter's cutoff slope is much steeper at higher quality settings, the chanceof ringing at high frequencies is greater (frequencies just below the Nyquistmay be abnormally boosted in level). Usually values between 100 and 400do a great job for most conversion needs.
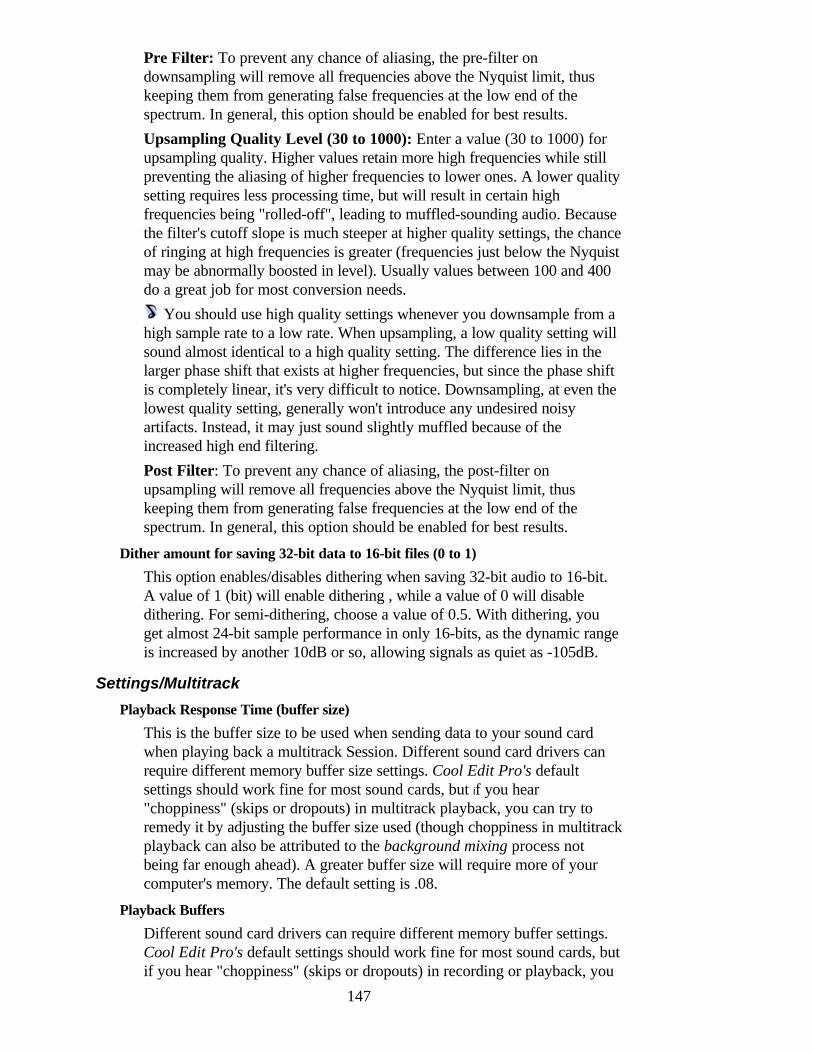
147
Pre Filter: To prevent any chance of aliasing, the pre-filter ondownsampling will remove all frequencies above the Nyquist limit, thuskeeping them from generating false frequencies at the low end of thespectrum. In general, this option should be enabled for best results.Upsampling Quality Level (30 to 1000): Enter a value (30 to 1000) forupsampling quality. Higher values retain more high frequencies while stillpreventing the aliasing of higher frequencies to lower ones. A lower qualitysetting requires less processing time, but will result in certain highfrequencies being "rolled-off", leading to muffled-sounding audio. Becausethe filter's cutoff slope is much steeper at higher quality settings, the chanceof ringing at high frequencies is greater (frequencies just below the Nyquistmay be abnormally boosted in level). Usually values between 100 and 400do a great job for most conversion needs.
You should use high quality settings whenever you downsample from ahigh sample rate to a low rate. When upsampling, a low quality setting willsound almost identical to a high quality setting. The difference lies in thelarger phase shift that exists at higher frequencies, but since the phase shiftis completely linear, it's very difficult to notice. Downsampling, at even thelowest quality setting, generally won't introduce any undesired noisyartifacts. Instead, it may just sound slightly muffled because of theincreased high end filtering.Post Filter: To prevent any chance of aliasing, the post-filter onupsampling will remove all frequencies above the Nyquist limit, thuskeeping them from generating false frequencies at the low end of thespectrum. In general, this option should be enabled for best results.
Dither amount for saving 32-bit data to 16-bit files (0 to 1)
This option enables/disables dithering when saving 32-bit audio to 16-bit.A value of 1 (bit) will enable dithering , while a value of 0 will disabledithering. For semi-dithering, choose a value of 0.5. With dithering, youget almost 24-bit sample performance in only 16-bits, as the dynamic rangeis increased by another 10dB or so, allowing signals as quiet as -105dB.
Settings/Multitrack
Playback Response Time (buffer size)
This is the buffer size to be used when sending data to your sound cardwhen playing back a multitrack Session. Different sound card drivers canrequire different memory buffer size settings. Cool Edit Pro's defaultsettings should work fine for most sound cards, but if you hear"choppiness" (skips or dropouts) in multitrack playback, you can try toremedy it by adjusting the buffer size used (though choppiness in multitrackplayback can also be attributed to the background mixing process notbeing far enough ahead). A greater buffer size will require more of yourcomputer's memory. The default setting is .08.
Playback Buffers
Different sound card drivers can require different memory buffer settings.Cool Edit Pro's default settings should work fine for most sound cards, butif you hear "choppiness" (skips or dropouts) in recording or playback, you
148
may need to adjust the buffer size or number of buffers used. Use this fieldto adjust the number of buffers used for playback in the multitrackenvironment. If you do experience break-up in your audio, try reducing thenumber of buffers. Increasing the number of buffers may also help for someconfigurations. The default setting is 10.
Recording Buffer Size
Use this field to reserve memory for recording in a multitrack Session byentering a buffer size (in seconds). Different sound card drivers can requiredifferent memory buffer size settings. Cool Edit Pro's default settingsshould work fine for most sound cards. If you experience dropout whilerecording in multitrack (especially when playback seems fine), tryincreasing this setting (first be sure the background mixing process issufficiently complete when you go to record as this may cause the samesymptom). A greater buffer size will require more of your computer'smemory. The default setting is 2.
Recording Buffers
Different sound card drivers can require different memory buffer settings.Cool Edit Pro's default settings should work fine for most sound cards, butif you hear "choppiness" (skips or dropouts) in recording or playback, youmay need to adjust the buffer size or number of buffers used. Use this fieldto adjust the number of buffers used for recording in the multitrackenvironment. If you do experience break-up in your audio, try reducing thenumber of buffers. Increasing the number of buffers may also help for someconfigurations. The default setting is 10.
Background Mixing Priority Level
This setting assigns a level of priority to the background mixing processdone in a multitrack session. Lower values indicate a higher level ofpriority above other system events. You can enter fractional numbers, as in0.8, the default setting.
Delete old takes after merging
Check this box to have Cool Edit Pro automatically delete any unusedtakes created during a Punch-In when you select a take to go with (this isdone by choosing Merge Current Take from /Edit/Take History in theMultitrack View). If this setting is off, unused takes remain available to theSession (in the Insert menu) and occupy hard drive space.
Crossfade time (ms)
This is the amount of time over which crossfading occurs when a takecreated using Punch-In is merged back into the surrounding waveform.
Playback Mixing
This is the bit size used for the background mixing process. Best quality isachieved by leaving this at the default 32-bit setting, however if usingmultiple sound cards, it may be advantageous to choose 16-bit for PlaybackMixing as less data will be transferred across the hard drive(s), speedingthings up. For single output device situations, or faster hard drives, 32-bitis better as it provides optimization at mix down.
149
Mixdowns
When performing a Mixdown (merging the selected, or all, waveforms intoa single waveform by choosing /Edit/Mixdown from the Multitrack View),this is the bit-resolution that will be used. Regardless of the session format(16 or 32 bit), Mixdowns can be generated at either 16-bit or 32-bit qualitywith this option. The default is 16-bit.
Minimum track height for full waveform display
This setting determines the minimum track height at which waveform datawill still be drawn in the Multitrack View. When viewing a large number oftracks in the waveform display, or zooming out on a session, the height ofindividual tracks diminishes. At a certain point, trying to display thewaveform data in each track may slow things down or be undesirable (andif zoomed out far enough, will not be possible). This is the minimumheight, in pixels, at which attempt to display waveforms.
Settings/SMPTE
Lead Time (ms): This sets is the amount of time Cool Edit Pro has toestablish sync with the incoming Time Code. Lower settings (200ms) willresult in faster response (when pressing Play), but at the risk of true syncnot being established. 500 to 1000 ms should provide plenty of Lead Timeto establish lock-up.Stopping Time (ms): Stopping Time is the amount of time Cool Edit Prowill continue playing if a drop-out in the Time Code is encountered.Lag Time (samples): This setting fine tunes the relationship between TimeCode coming in and audio data coming out, and can be used to make upfor any discrepancies introduced by your sound card buffers.Slack (frames): This sets the number of frames Cool Edit Pro canperiodically be "out of sync" with the time code before either repositioningthe playback cursor to match the code, or perform a full re-sync. Generallya setting of about 2.5 frames will do, as there are occasions when the timecode frame location numbers may be incorrect, usually corrected on thenext frame sent. This will not cause a sync problem in the audio sense.Reposition playback cursor when slack used: If checked, the playbackposition will readjust if the sync is off by the Slack amount.Full re-sync when slack used: If checked, a full re-sync will be performedif the sync is off by the Slack amount.
Settings/Devices
If you have multiple sound cards, or a single card that has multiple outputs,you can use the Devices tab to choose the input and output devices you wouldlike Cool Edit Pro to be assigned to. If your system is equipped with MIDIdevices, you can also choose the MIDI in, and MIDI out sources, using thissetup option. The capabilities of the recording and playback devices will bedisplayed in the given tables.
150
These settings will be remembered in the [Cool Edit] section of Window'sWIN.INI file, which means if you install a new sound driver or card, Cool willnot access it until you choose it from this dialog.
MIDI In (Sync/Trigger)
This setting is used to assign a MIDI source to Cool Edit Pro's MIDI InSync/Trigger input. The Sync source will provide a MIDI Time Codesource that Cool Edit can synchronize to, while a trigger source can beused to transmit MIDI not on messages for triggering individually assignedwaveforms.
MIDI Out (Music preview)
This setting is used to assign Cool Edit Pro's Music Preview function (see/Transform/Special/Music) to a MIDI destination (such as a sequencer orMIDI instrument).
Waveform Playback
Use this determines the sound card, or outputs to assign to Cool Edit Profor playback.
Waveform Record
Specifies the device to be used when recording sound data. Selecting a mapper device such as the Wave Mapper or Sound Mapper
allows Windows to select an appropriate device that is to be used for thecurrent sound data.
Play 16-bit files as 8-bit
If your sound board is only capable of 8-bit audio, you can still create andedit 16-bit audio files. To listen to 16-bit files on your 8-bit card, simplycheck the Play 16-bit files as 8-bit option. When you choose Play, theaudio data will be converted to 8-bit before being sent to the sound board.
Shortcuts (Keyboard and MIDI Triggers)
Shortcuts are used to speed up the editing process by allowing you to executealmost any command in Cool Edit Pro from your computer and/or MIDIkeyboard. For example, instead of using your mouse to go to the Edit menuand selecting Cut to cut the highlighted portion of a waveform, you can simplypress Ctrl+X (this labeling technique translates to “hold the first key down[Ctrl], and press the second [X] ). Likewise, you can execute commands froma MIDI keyboard, a sequencer, or any other device capable of issuing a MIDIcommand. This type of Shortcut is referred to as a MIDI Trigger. An exampleof this would be assigning the Play command in Cool Edit Pro to the C4 noteon your MIDI keyboard.
Before attempting to enable MIDI triggering, you will need to choose a devicefor MIDI In that is recognized by Windows (such as a sound card's built-inMIDI interface, a MIDI interface card or other hardware device options.) Todo this, go to /Options/Settings/Devices to bring up the devices window. SetMIDI In (Sync/Trigger) to the input and to be used for Triggering (commonlyYourDevice: In 1).
151
When using Cool Edit Pro with a MIDI sequencer, you can trigger audio fromyour MIDI sequence by embedding a controller event at a specific location,and assigning playback in Cool Edit Pro to that event. This works well forshorter samples, but for longer audio segments you should use SMPTE toensure synchronization.
This list displays all of the assignable commands in Cool Edit Pro. Click on acommand name in the list to see or change its’ Shortcut.
Shortcut Key
Use this section if you wish to be able to execute the currently highlightedcommand from you computer's keyboard. You can select from the Ctrl,Shift, and Alt keys, or any combination of the three, to be used as the firsthalf of the Shortcut combination (the part to hold down), and the secondhalf of the Shortcut (a single key) can be typed in or selected from the dropdown list.
MIDI Trigger
Checkmark Enable Trigger to have the currently highlighted commandassigned to a MIDI event. You can select the MIDI channel to receive thetrigger on from the drop down list to the right (default is 1). The type ofMIDI event used for the Trigger is selected by choosing either Note orController. For Note events, you can select the note number (middle C isC4 for example) from the drop down list. For Controller events, type in theController number and Value to the right (for on/off controllers, such asHold Pedal [64], values of 0 and 127 represent on and off, respectively).
Conflicting Keys
If a command’s Shortcut key combination is already in use, you will beinformed here.
Toolbars
The Toolbar options allow for only the toolbars that relate to your everydaywork to be displayed within Cool Edit Pros main screen. These toolbarsinclude: File, Edit, View and Options toolbars.
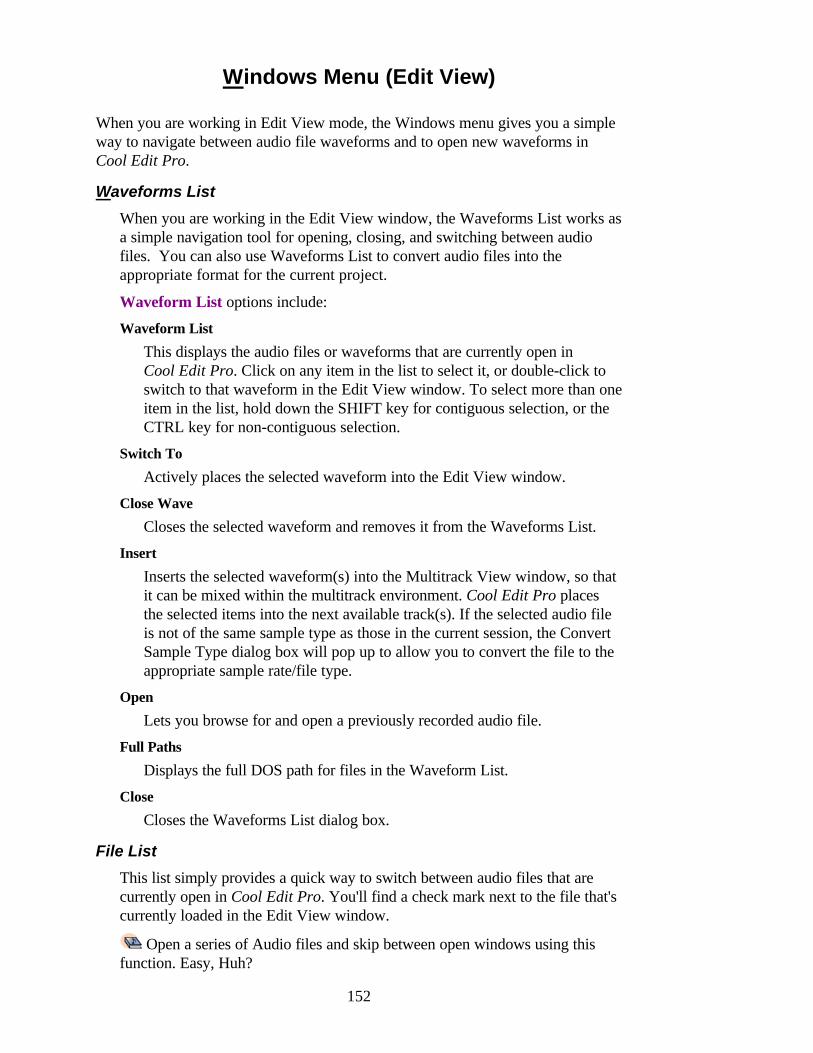
152
Windows Menu (Edit View)
When you are working in Edit View mode, the Windows menu gives you a simpleway to navigate between audio file waveforms and to open new waveforms inCool Edit Pro.
Waveforms List
When you are working in the Edit View window, the Waveforms List works asa simple navigation tool for opening, closing, and switching between audiofiles. You can also use Waveforms List to convert audio files into theappropriate format for the current project.
Waveform List options include:
Waveform List
This displays the audio files or waveforms that are currently open inCool Edit Pro. Click on any item in the list to select it, or double-click toswitch to that waveform in the Edit View window. To select more than oneitem in the list, hold down the SHIFT key for contiguous selection, or theCTRL key for non-contiguous selection.
Switch To
Actively places the selected waveform into the Edit View window.
Close Wave
Closes the selected waveform and removes it from the Waveforms List.
Insert
Inserts the selected waveform(s) into the Multitrack View window, so thatit can be mixed within the multitrack environment. Cool Edit Pro placesthe selected items into the next available track(s). If the selected audio fileis not of the same sample type as those in the current session, the ConvertSample Type dialog box will pop up to allow you to convert the file to theappropriate sample rate/file type.
Open
Lets you browse for and open a previously recorded audio file.
Full Paths
Displays the full DOS path for files in the Waveform List.
Close
Closes the Waveforms List dialog box.
File List
This list simply provides a quick way to switch between audio files that arecurrently open in Cool Edit Pro. You'll find a check mark next to the file that'scurrently loaded in the Edit View window.
Open a series of Audio files and skip between open windows using thisfunction. Easy, Huh?
153
Help Menu
Use this menu to access Cool Edit Pro's on-line help.
Contents
Click on this topic to bring up Cool Edit Pro's Help Index.
Quick Reference…
This Quick Reference Index gives you quick access to most of Cool Edit Pro'soperating features. Using the Find dialog box, you can search for informationon topics using a single key word.
Overview…
Choose this option to see a general description of Cool Edit Pro and itsfeatures.
Multitrack Editing…
This Help topic will give you tips and guidelines on operating in a multitrackenvironment.
Search for Help On…
Use this option to search for a specific Help topic by keyword.
Tip of the Day
You can access Cool Edit Pro's "Tip of the Day" feature through this option.
Syntrillium on the Web
Use this option to access Syntrillium's web site at http://www.syntrillium.comand find out what's new!
About Cool Edit Pro
This dialog lets you know what software version of Cool Edit Pro is currentlyloaded onto your computer and to whom it is licensed, as well as how tocontact us (the folks at Syntrillium).
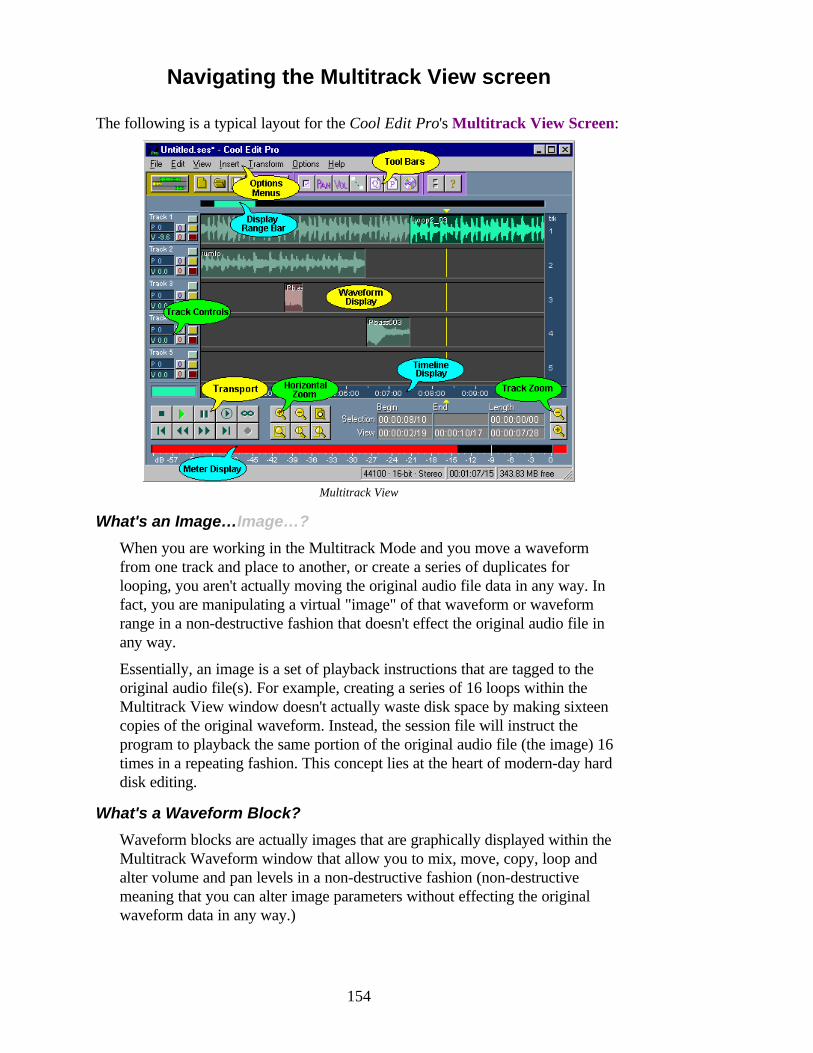
154
Navigating the Multitrack View screen
The following is a typical layout for the Cool Edit Pro's Multitrack View Screen:
Multitrack View
What's an Image…Image…?
When you are working in the Multitrack Mode and you move a waveformfrom one track and place to another, or create a series of duplicates forlooping, you aren't actually moving the original audio file data in any way. Infact, you are manipulating a virtual "image" of that waveform or waveformrange in a non-destructive fashion that doesn't effect the original audio file inany way.
Essentially, an image is a set of playback instructions that are tagged to theoriginal audio file(s). For example, creating a series of 16 loops within theMultitrack View window doesn't actually waste disk space by making sixteencopies of the original waveform. Instead, the session file will instruct theprogram to playback the same portion of the original audio file (the image) 16times in a repeating fashion. This concept lies at the heart of modern-day harddisk editing.
What's a Waveform Block?
Waveform blocks are actually images that are graphically displayed within theMultitrack Waveform window that allow you to mix, move, copy, loop andalter volume and pan levels in a non-destructive fashion (non-destructivemeaning that you can alter image parameters without effecting the originalwaveform data in any way.)
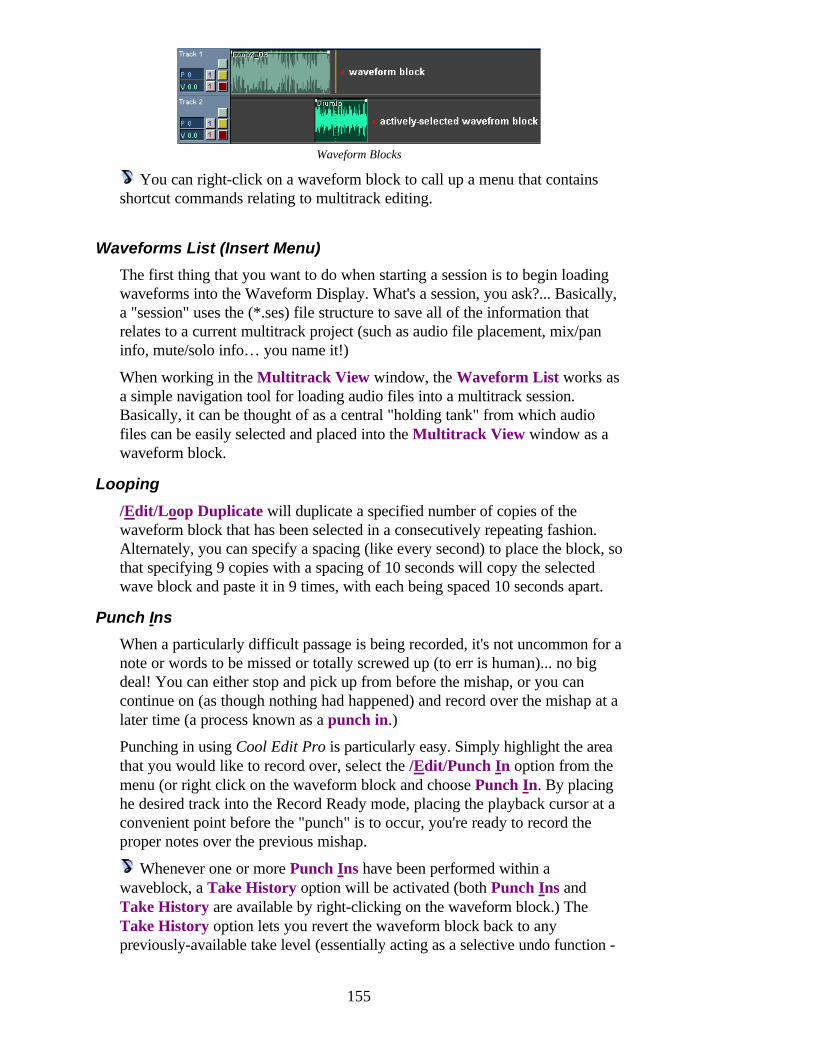
155
Waveform Blocks
You can right-click on a waveform block to call up a menu that containsshortcut commands relating to multitrack editing.
Waveforms List (Insert Menu)
The first thing that you want to do when starting a session is to begin loadingwaveforms into the Waveform Display. What's a session, you ask?... Basically,a "session" uses the (*.ses) file structure to save all of the information thatrelates to a current multitrack project (such as audio file placement, mix/paninfo, mute/solo info… you name it!)
When working in the Multitrack View window, the Waveform List works asa simple navigation tool for loading audio files into a multitrack session.Basically, it can be thought of as a central "holding tank" from which audiofiles can be easily selected and placed into the Multitrack View window as awaveform block.
Looping
/Edit/Loop Duplicate will duplicate a specified number of copies of thewaveform block that has been selected in a consecutively repeating fashion.Alternately, you can specify a spacing (like every second) to place the block, sothat specifying 9 copies with a spacing of 10 seconds will copy the selectedwave block and paste it in 9 times, with each being spaced 10 seconds apart.
Punch Ins
When a particularly difficult passage is being recorded, it's not uncommon for anote or words to be missed or totally screwed up (to err is human)... no bigdeal! You can either stop and pick up from before the mishap, or you cancontinue on (as though nothing had happened) and record over the mishap at alater time (a process known as a punch in.)
Punching in using Cool Edit Pro is particularly easy. Simply highlight the areathat you would like to record over, select the /Edit/Punch In option from themenu (or right click on the waveform block and choose Punch In. By placinghe desired track into the Record Ready mode, placing the playback cursor at aconvenient point before the "punch" is to occur, you're ready to record theproper notes over the previous mishap.
Whenever one or more Punch Ins have been performed within awaveblock, a Take History option will be activated (both Punch Ins andTake History are available by right-clicking on the waveform block.) TheTake History option lets you revert the waveform block back to anypreviously-available take level (essentially acting as a selective undo function -
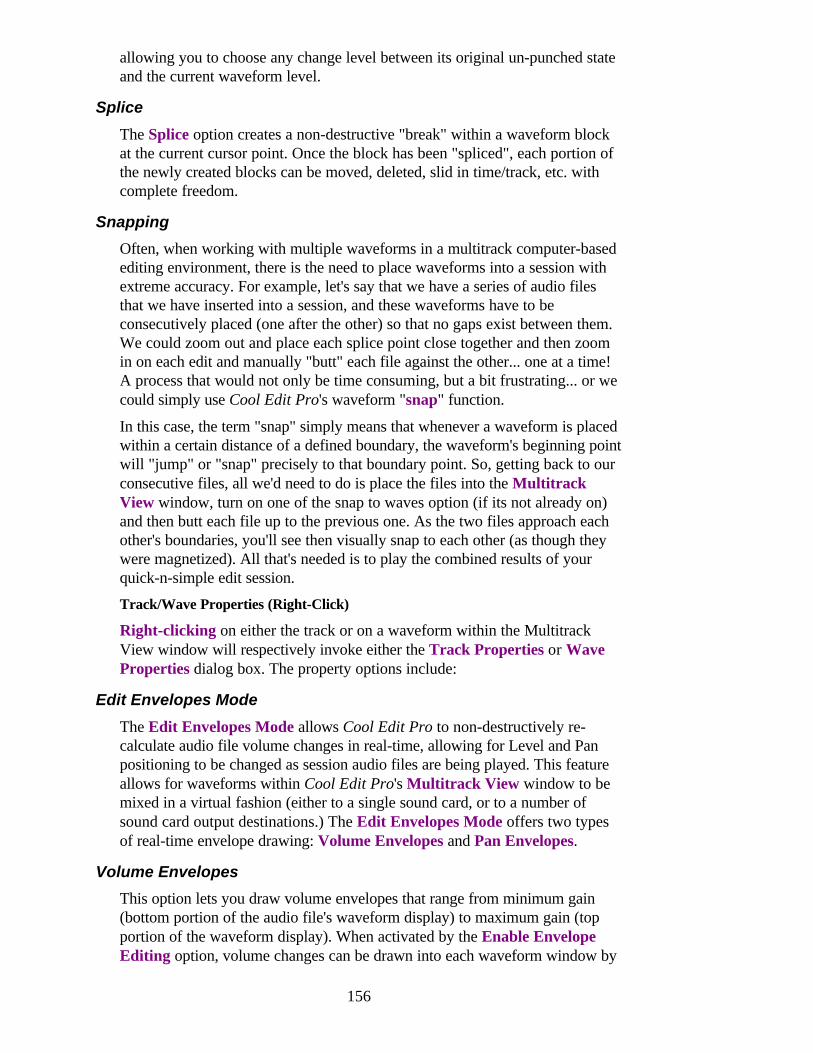
156
allowing you to choose any change level between its original un-punched stateand the current waveform level.
Splice
The Splice option creates a non-destructive "break" within a waveform blockat the current cursor point. Once the block has been "spliced", each portion ofthe newly created blocks can be moved, deleted, slid in time/track, etc. withcomplete freedom.
Snapping
Often, when working with multiple waveforms in a multitrack computer-basedediting environment, there is the need to place waveforms into a session withextreme accuracy. For example, let's say that we have a series of audio filesthat we have inserted into a session, and these waveforms have to beconsecutively placed (one after the other) so that no gaps exist between them.We could zoom out and place each splice point close together and then zoomin on each edit and manually "butt" each file against the other... one at a time!A process that would not only be time consuming, but a bit frustrating... or wecould simply use Cool Edit Pro's waveform "snap" function.
In this case, the term "snap" simply means that whenever a waveform is placedwithin a certain distance of a defined boundary, the waveform's beginning pointwill "jump" or "snap" precisely to that boundary point. So, getting back to ourconsecutive files, all we'd need to do is place the files into the MultitrackView window, turn on one of the snap to waves option (if its not already on)and then butt each file up to the previous one. As the two files approach eachother's boundaries, you'll see then visually snap to each other (as though theywere magnetized). All that's needed is to play the combined results of yourquick-n-simple edit session.
Track/Wave Properties (Right-Click)
Right-clicking on either the track or on a waveform within the MultitrackView window will respectively invoke either the Track Properties or WaveProperties dialog box. The property options include:
Edit Envelopes Mode
The Edit Envelopes Mode allows Cool Edit Pro to non-destructively re-calculate audio file volume changes in real-time, allowing for Level and Panpositioning to be changed as session audio files are being played. This featureallows for waveforms within Cool Edit Pro's Multitrack View window to bemixed in a virtual fashion (either to a single sound card, or to a number ofsound card output destinations.) The Edit Envelopes Mode offers two typesof real-time envelope drawing: Volume Envelopes and Pan Envelopes.
Volume Envelopes
This option lets you draw volume envelopes that range from minimum gain(bottom portion of the audio file's waveform display) to maximum gain (topportion of the waveform display). When activated by the Enable EnvelopeEditing option, volume changes can be drawn into each waveform window by
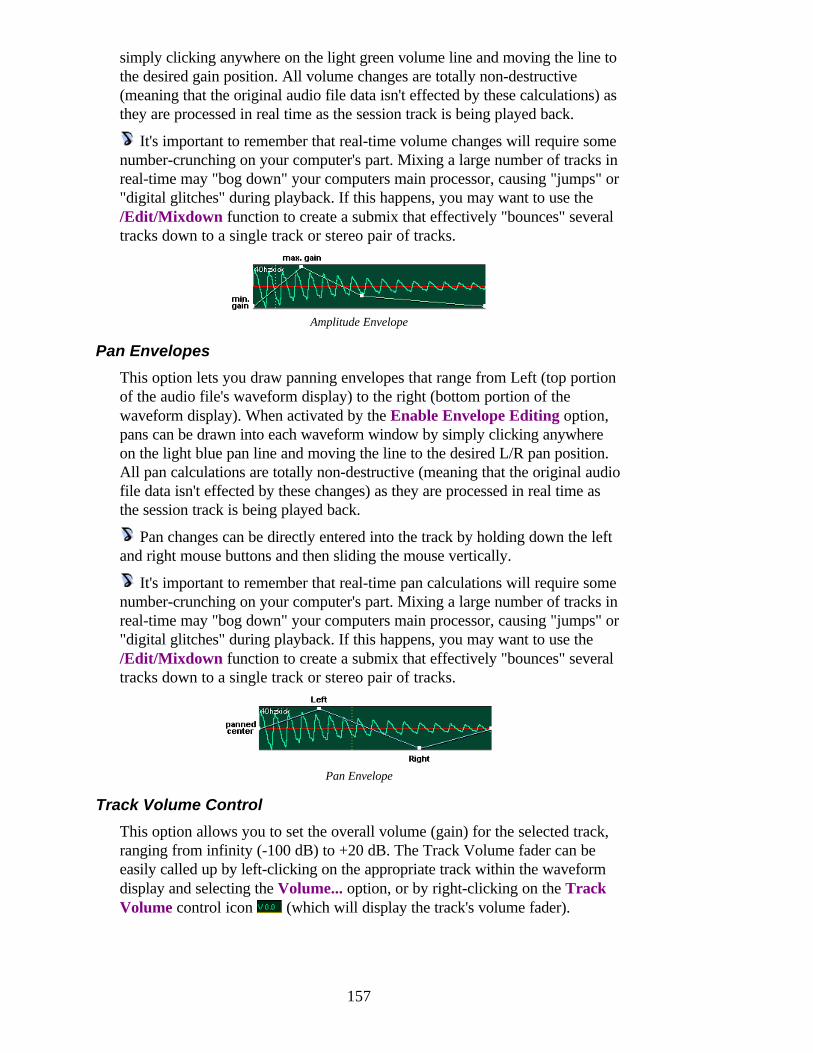
157
simply clicking anywhere on the light green volume line and moving the line tothe desired gain position. All volume changes are totally non-destructive(meaning that the original audio file data isn't effected by these calculations) asthey are processed in real time as the session track is being played back.
It's important to remember that real-time volume changes will require somenumber-crunching on your computer's part. Mixing a large number of tracks inreal-time may "bog down" your computers main processor, causing "jumps" or"digital glitches" during playback. If this happens, you may want to use the/Edit/Mixdown function to create a submix that effectively "bounces" severaltracks down to a single track or stereo pair of tracks.
Amplitude Envelope
Pan Envelopes
This option lets you draw panning envelopes that range from Left (top portionof the audio file's waveform display) to the right (bottom portion of thewaveform display). When activated by the Enable Envelope Editing option,pans can be drawn into each waveform window by simply clicking anywhereon the light blue pan line and moving the line to the desired L/R pan position.All pan calculations are totally non-destructive (meaning that the original audiofile data isn't effected by these changes) as they are processed in real time asthe session track is being played back.
Pan changes can be directly entered into the track by holding down the leftand right mouse buttons and then sliding the mouse vertically.
It's important to remember that real-time pan calculations will require somenumber-crunching on your computer's part. Mixing a large number of tracks inreal-time may "bog down" your computers main processor, causing "jumps" or"digital glitches" during playback. If this happens, you may want to use the/Edit/Mixdown function to create a submix that effectively "bounces" severaltracks down to a single track or stereo pair of tracks.
Pan Envelope
Track Volume Control
This option allows you to set the overall volume (gain) for the selected track,ranging from infinity (-100 dB) to +20 dB. The Track Volume fader can beeasily called up by left-clicking on the appropriate track within the waveformdisplay and selecting the Volume... option, or by right-clicking on the TrackVolume control icon (which will display the track's volume fader).
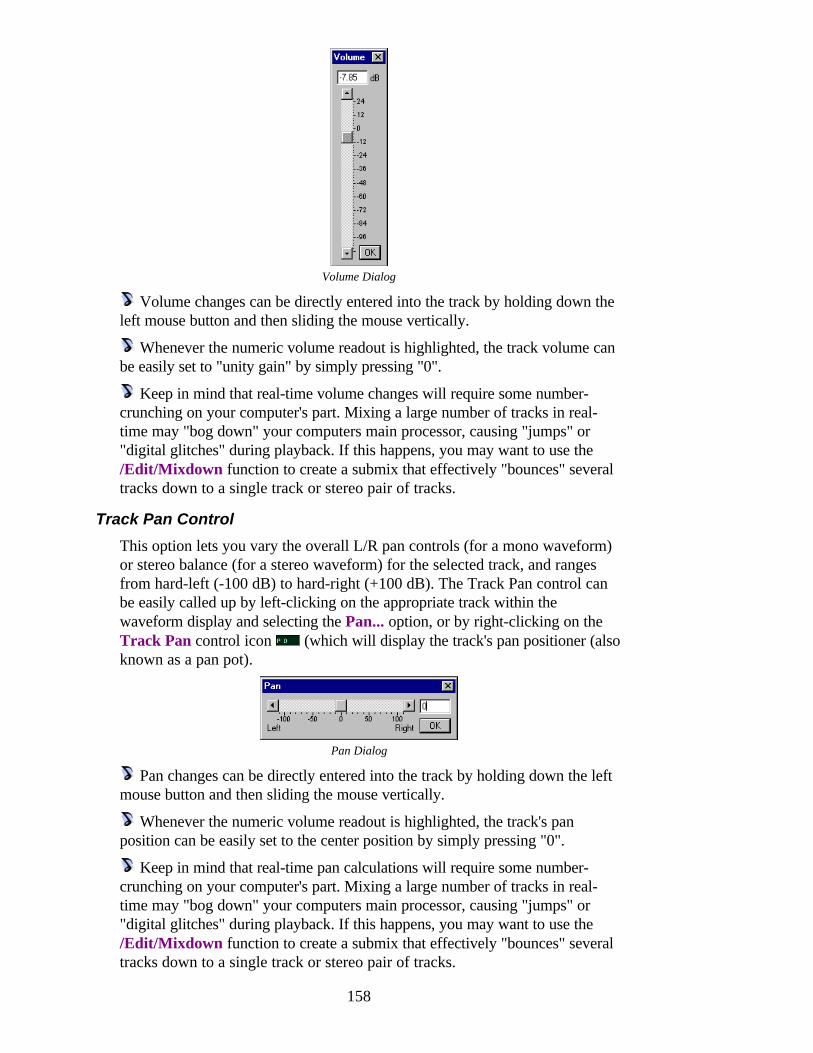
158
Volume Dialog
Volume changes can be directly entered into the track by holding down theleft mouse button and then sliding the mouse vertically.
Whenever the numeric volume readout is highlighted, the track volume canbe easily set to "unity gain" by simply pressing "0".
Keep in mind that real-time volume changes will require some number-crunching on your computer's part. Mixing a large number of tracks in real-time may "bog down" your computers main processor, causing "jumps" or"digital glitches" during playback. If this happens, you may want to use the/Edit/Mixdown function to create a submix that effectively "bounces" severaltracks down to a single track or stereo pair of tracks.
Track Pan Control
This option lets you vary the overall L/R pan controls (for a mono waveform)or stereo balance (for a stereo waveform) for the selected track, and rangesfrom hard-left (-100 dB) to hard-right (+100 dB). The Track Pan control canbe easily called up by left-clicking on the appropriate track within thewaveform display and selecting the Pan... option, or by right-clicking on theTrack Pan control icon (which will display the track's pan positioner (alsoknown as a pan pot).
Pan Dialog
Pan changes can be directly entered into the track by holding down the leftmouse button and then sliding the mouse vertically.
Whenever the numeric volume readout is highlighted, the track's panposition can be easily set to the center position by simply pressing "0".
Keep in mind that real-time pan calculations will require some number-crunching on your computer's part. Mixing a large number of tracks in real-time may "bog down" your computers main processor, causing "jumps" or"digital glitches" during playback. If this happens, you may want to use the/Edit/Mixdown function to create a submix that effectively "bounces" severaltracks down to a single track or stereo pair of tracks.
159
Track Controls
Here's a brief description of the controls in the Multitrack window:
Mute Track
Solo Track
Record Enable Track
Playback Device - left click to choose device
Record Device - left click to choose device
Track Name - left click for track information
Track Pan - right click for slider or left-click and hold for directadjustment (adjustments are made by sliding the mouse vertically)
Track Volume - right click for slider or left-click and hold fordirect adjustment (adjustments are made by sliding the mousevertically)
Left-click within the blue Track Name area to call up the Track Infodialog, which allows you to directly assign such information and gain-changevariables to a track as:
Track Info Dialog
Mix Gauge
The green Mix Gauge (which is located at the left-hand side of the MultitrackView screen) indicates how much background processing Cool Edit Pro hascompleted. In a sense, it can be thought of as a fuel tank gauge, except that itmeasures how much processing needs to be carried out by Cool Edit Probehind the scenes. The further that the Mix Gauge's green bar progresses tothe right the more processing has been done to complete its current mixingtasks. Once the processing has been completed, the bar lights up to a brightshade of green (meaning the entire session is fully mixed).
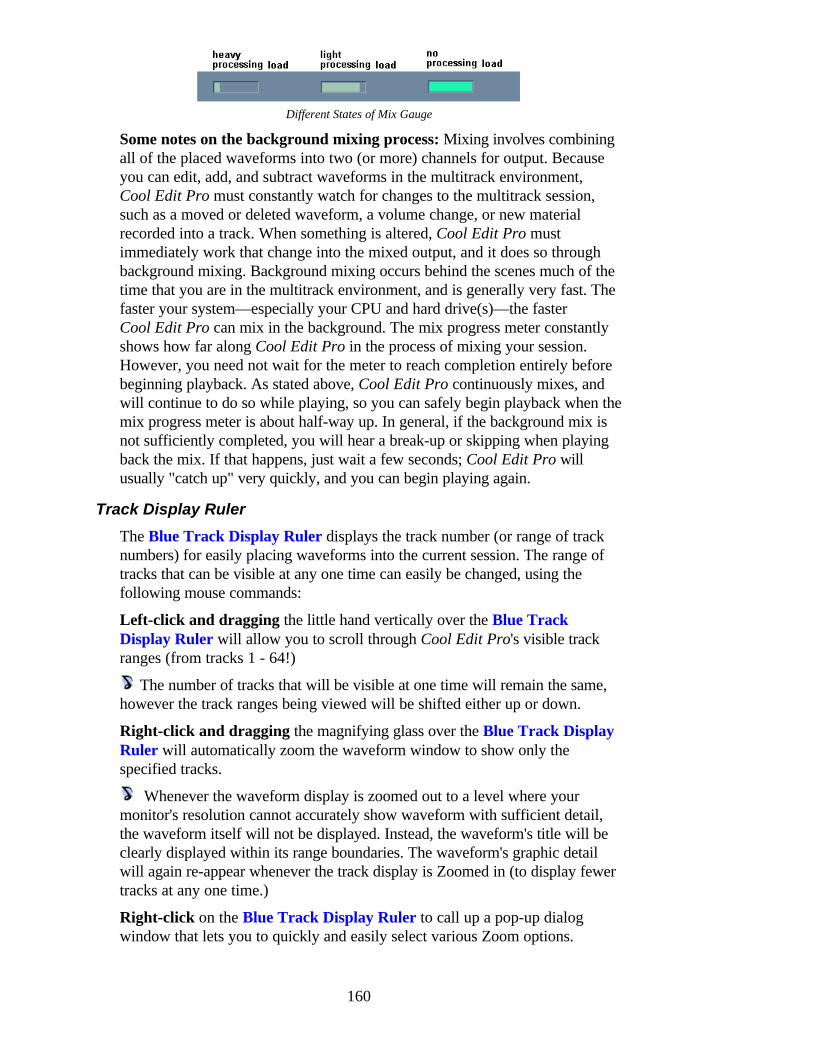
160
Different States of Mix Gauge
Some notes on the background mixing process: Mixing involves combiningall of the placed waveforms into two (or more) channels for output. Becauseyou can edit, add, and subtract waveforms in the multitrack environment,Cool Edit Pro must constantly watch for changes to the multitrack session,such as a moved or deleted waveform, a volume change, or new materialrecorded into a track. When something is altered, Cool Edit Pro mustimmediately work that change into the mixed output, and it does so throughbackground mixing. Background mixing occurs behind the scenes much of thetime that you are in the multitrack environment, and is generally very fast. Thefaster your system—especially your CPU and hard drive(s)—the fasterCool Edit Pro can mix in the background. The mix progress meter constantlyshows how far along Cool Edit Pro in the process of mixing your session.However, you need not wait for the meter to reach completion entirely beforebeginning playback. As stated above, Cool Edit Pro continuously mixes, andwill continue to do so while playing, so you can safely begin playback when themix progress meter is about half-way up. In general, if the background mix isnot sufficiently completed, you will hear a break-up or skipping when playingback the mix. If that happens, just wait a few seconds; Cool Edit Pro willusually "catch up" very quickly, and you can begin playing again.
Track Display Ruler
The Blue Track Display Ruler displays the track number (or range of tracknumbers) for easily placing waveforms into the current session. The range oftracks that can be visible at any one time can easily be changed, using thefollowing mouse commands:
Left-click and dragging the little hand vertically over the Blue TrackDisplay Ruler will allow you to scroll through Cool Edit Pro's visible trackranges (from tracks 1 - 64!)
The number of tracks that will be visible at one time will remain the same,however the track ranges being viewed will be shifted either up or down.
Right-click and dragging the magnifying glass over the Blue Track DisplayRuler will automatically zoom the waveform window to show only thespecified tracks.
Whenever the waveform display is zoomed out to a level where yourmonitor's resolution cannot accurately show waveform with sufficient detail,the waveform itself will not be displayed. Instead, the waveform's title will beclearly displayed within its range boundaries. The waveform's graphic detailwill again re-appear whenever the track display is Zoomed in (to display fewertracks at any one time.)
Right-click on the Blue Track Display Ruler to call up a pop-up dialogwindow that lets you to quickly and easily select various Zoom options.
File Menu (Multitrack View)
The File menu offers functions relating to opening, saving, and otherwisemanipulating session files.
What's a Session?
Before we even begin, you'll need to know that a "session" uses the (*.ses) filestructure to save all of the information that relates to a current multitrackproject (such as audio file placement, mix/pan info, mute/solo info... you nameit!). All of your multitrack masterpieces are saved to and recalled from disk asa session (*.ses) file.
Keep in mind that your session files save information that relates to acurrent multitrack project and doesn't save the waveform (i.e.: *.wav) fileswithin these files. It's important to keep your waveform files intact and withintheir original directory... And remember, whenever possible, BACK YOURIMPORTANT DATA UP!
New Session (Ctrl+N)
New Session… creates a new, empty Session, where you record or insertaudio into multiple tracks. When creating a new Session, you will be promptedto specify its properties: sample rate, and bit-resolution. Any audio files to beused in a session must share these properties, or be converted upon insertingthem.
Sample Rate
The sampling rate you choose will determine the overall bandwidth (howmany frequencies can be encoded within the audio signal), with highersampling rates yielding a wider bandwidth. You may enter any sample ratedirectly, or choose a common sample rate from the list. Note that mostsound cards support only certain sample rates.
Resolution
Select the bit resolution to use for the Session:8-bit: for use in telephony/Internet applications16-bit: standard professional/CD quality32-bit: this signal processing mode is supported by some high
end sound cards and other equipment To achieve higher quality, you may want to work at the 32-bit level
while processing your audio. Since current sound cards cannot playbackaudio that has been stored and processed using the full 32-bits, this ratemust be converted downward for playback. It's best to use this mode whenusing audio cards that have resolutions greater than 16-bit (20-bits as ofthis writing).
Certain combinations of sample rate, channels, and resolution may notbe available on your system. To see the capabilities of your system, checkthe Devices tab under /Options/Settings. Although Cool Edit Pro can
161

162
create and edit those files, your sound card may not be able to play themproperly.
Open Session
Opens an existing Session file (.SES), along with all audio files used in theSession.
Recent Directories
This displays the most recently used directories, for quicker access tocommon locations.
Look In
Navigates through all available drives and directories.
File Name
You can specify the name of the file you wish to open here, if it resides inthe current directory.
Files of Type
Select from the list of supported file types to display any files with acorresponding extension.
Append to Session
This opens an existing Session and all associated audio files, and begins trackplacement at the end of the currently open Session. For example, if thecurrently open session has material in tracks 1-4, then using Append toSession… to open another four track session would place the new materialinto tracks 5-8. The selected Session must have the same file properties (samplerate, bit resolution) as the Session to be appended to.
Recent Directories
This displays the most recently used directories, for quicker access tocommon locations.
Look In
Navigates through all available drives and directories.
File Name
You can specify the name of the file you wish to open here, if it resides inthe current directory.
Files of Type
Select from the list of supported file types to display any files with acorresponding extension.
You should note that the appended tracks are loaded into the session at thebeginning of the project's timeline (i.e.: all of the tracks will load in at theproject from its beginning point.) Once loaded, the appended waveforms caneasily be moved into place by actively selecting the desired waveforms and byright-clicking on any one of them and then dragging them into position.
If you'd like to add a previously created session to your current session,this can easily be done using the /File/Append to Session command. For
163
example, lets say that we'd like to insert an existing multitrack compositionthat's been saved as a session. Appending the desired session into our currentworkspace (which will place them at the beginning of the timeline, onto thenext available set of open tracks) we can now select and move the appropriatesession waveforms into place (often using the Ctrl-Right Click mousecommand to select multiple waveforms)... and Voila... you've integrated twosessions into a whole new composition.
Close Session
Closes the Multitrack Session currently in use. You will be asked if you wouldlike to save the file if not saved since the last modification.
Close Session and Waveforms
Closes the Multitrack Session currently in use, and also closes all wave files inthat session. You will be asked if you would like to save the file if not savedsince the last modification.
Save Session
Saves the current Session back to disk, overwriting the original withoutconfirmation. If the Session does not yet exist as a file (not previously saved),you will presented with the Save Session As… window.
Save Session As
Saves the current Session to a new name or location, along with all wave filesused in the Session.
Recent Directories
This displays the most recently used directories, for quicker access tocommon locations.
Look In
Navigates through all available drives and directories.
File Name
Specify a name for the Session.
Files of Type
Select from the list of supported file types to display any files with acorresponding extension.
Most Recently Used File List
The Most Recently Used (MRU) file list displays the eight files that were mostrecently opened by Cool Edit Pro. You can quickly re-open any of these filesby selecting one from the list with the mouse or by typing the numberassociated with the desired file.
Exit
Closes Cool Edit Pro. At close time, Cool Edit Pro asks if you want to saveany unsaved files that were modified. Any temporary files that were createdwill be removed.
164
Edit Menu (Multitrack View)
The edit menu displays all of the options that relate to basic waveform editing inthe Multitrack View mode. These options are:
Wave Block Info...
Selecting a Waveform Block from within the Multitrack Waveform Viewwindow and selecting Edit/Wave Block Info... will inform you as to the sourceaudio file (from which the waveform block derives its audio data), as well asallowing you to define certain placement and mixing parameters that relatespecifically to this soundblock.
Volume Levels
Allows you to set volume levels for the selected waveform block.
Pan Position
Allows you to set relative L/R pan positions for the selected waveformblock.
File Name
Displays the waveform block's original source audio file (from which thewaveform block derives its audio data).
Time Offset
Allows you to place the waveform's beginning point at a specific pointwithin the session's timeline.
Mute
Mutes the selected waveform Block.
Lock in Time
This command "locks" any selected waveform (or combination ofwaveforms) to its current time location in the multitrack session. Locking awaveform is useful when you have decided upon its position in time, anddo not want to accidentally move the waveform when right-clicking on it,etc. While a waveform which has been locked cannot be moved in time(left or right), it may be vertically repositioned, allowing you to move itbetween tracks. To unlock a waveform, simply select it and choose Lock inTime to free it for horizontal movement.
Lock to Play Only
Lock for Play Only will set the selected waveform block so that it may not berecorded into. The Locked waveform will not become red when positioned in arecord-enabled track. To re-enable recording for a waveform, uncheck thisbox, or choose /Edit/Lock for Play Only.
Crossfade
Crossfades are used to create smooth transitions from the end of one audiosegment to the beginning of another. They do so by creating a fade out and afade in over the transition region. Waveforms to crossfade between should be
165
positioned in different tracks (or can be in the same track, in a back-to-backmanner), adjacent if possible.
To crossfade, make a selection with your mouse and include in it the beginningand ending sections of any waveforms you wish to include in the crossfade.The highlight should extend a bit beyond the end of the waveform(s) to fadefrom, and should start a bit before the beginning of the waveform(s) to fade to.Or, if Edit/Snapping/Snap to Waves is enabled, the highlight will easilyadjust itself to the beginnings and endings of the waveforms. (You can alsoadjust the highlight by holding Shift when doing a left-click near the edge ofthe selection.) After establishing a highlighted area, you need to select thewaveforms to include in the crossfade by using ctrl+left-click. Next, chooseCrossfade to fade out the endings of the selected waveforms, and then have thebeginnings fade in.
You can choose between Linear and Sinusoidal crossfades. Choose Linear foran even grade, and Sinusoidal for a curved, sine-like slope to the fade.
The fade curves created with Crossfade can be modified by enabling choosingShow Volume Envelopes and Enable Envelope Editing from the View menu.
Try highlighting the crossfade area in one of the waveforms, then usingCtrl+left-click to activate other waveforms to be used in the crossfade. Youcan also adjust the highlight by holding Shift when doing a left-click near theedge of the highlight. If Snap to Waveforms is enabled, the highlight will adjustitself very nicely to the beginnings and endings of the waveforms. WhenCrossfade is chosen, then the endings of all selected waveforms will fade out,and the beginnings will all fade in linearly. The fade curve can be modified byenabling the Volume envelope and Edit Points feature.
Punch In
When a particularly difficult passage is being recorded, it's not uncommon for anote or words to be missed or totally screwed up (to err is human)... no bigdeal! You can either stop and pick up from before the mishap, or you cancontinue on (as though nothing had happened) and record over the mishap at alater time (a process known as a punch in.)
Punch in using Cool Edit Pro is particularly easy. Simply highlight the area thatyou would like to record over, select the /Edit/Punch In option from themenu (or right click on the waveform block and choose Punch In. By placinghe desired track into the Record Ready mode, placing the playback cursor at aconvenient point before the "punch" is to occur, you're ready to record theproper notes over the previous mishap.
Take History
Whenever one or more Punch Ins have been performed within a waveblock, aTake History option will be activated (both Punch Ins and Take History areavailable by right-clicking on the waveform block.) The Take History optionlets you revert the waveform block back to any previously-available take level(essentially acting as a selective undo function - allowing you to choose anychange level between its original un-punched state and the current waveformlevel.
166
Merge Current Take
Choose this to Merge a take created with Punch In back into thesurrounding material.
Delete Current Take
Deletes the most recent punch in and reverts to the previous punch state(basically an undo function that lets you easy revert to the previous take.)
Mix down
The Mix down function creates a two-track stereo mix that is the summationof the virtual tracks that are contained within an entire session or selectedportions of the current session. Of course, the resulting mixdown track willcontain all of the session's mix parameters (including volume and pan changes,loops, muting, etc.)
All Waves
Selecting All Waves will mix the entire session to a stereo track pair and enterthe results into the Edit View window.
Selected Waves
Choosing Selected Waves will mixdown only those waveform blocks that havebeen highlighted and will enter the enter the results into the Edit View window.
This function comes in handy for "bouncing down" tracks to a single, stereotrack pair. In the recording studio, the tracks on an analog multitrack tapemachine (and even on Modular Digital Multitracks) are often bounced fromvarious recorded tracks to a single track or pair of tracks. This process freescreates a single "submix" of the previous tracks, so that they can be freed upfor the recording of new material.
There are two possible reasons for mixing down several tracks to a singlestereo pair. The first would be to create a final stereo mix of your session forsaving your creation to disk as a stereo .Wav file. Secondly, you can use thisfeature to free up hard disk access and CPU processing time. As some of youmay have found out, not all computers are made to be as fast as lightning andhave hard limitless hard disk space. By bouncing down tracks to a single trackor set of tracks, you can drastically reduce the amount of hard disk space andtime that is taken by the CPU to number crunch large numbers of tracks(especially, if there's lots of real-time mixing going on.) So, we've created thishandy-dandy function for you folks that have run up against the limits of yourPC... (and few of us haven't at one time or another.)
Once you've created a session, you can choose the Edit/Mix Down (AllWaves) function to create a stereo mixdown of your entire session. Oncecreated, simply save the resulting mix as a file. That's all there is to it. If you'dlike to create a submix of a several vocal overdubs (for example), you cansimply highlight the waveform blocks that you'd like to be mixed down fromthe desired tracks and choose the Selected Waves function. Once the waveshave been mixed, the results will appear within the Edit View window. Youcan then re-enter the mixdown back into your session by selecting the entirewaveform and choosing the Insert in Multitrack function within the Edit
167
View menu. Once you've switched back to the Multitrack View window, youcan now place the mixed tracks at the proper beginning point and mute (orremove) the previous tracks from the session.
Loop Duplicate
Loop Duplicate will duplicate a specified number of image copies of thewaveform block that has been selected in a consecutively repeating fashion.Alternately, you can specify a spacing (like every second) to place the block, sothat specifying 9 copies with a spacing of 10 seconds will copy the selectedwave block and paste it in 9 times, with each being spaced 10 seconds apart.
Duplicate Waveform
This is the number of images that you would like to created.
Waveform Spacing
This determines the spacing at which to place the duplicated Image(s). TheNo Gaps setting, places each subsequent image directly after the precedingblock, for a continuous loop. Choose Evenly Spaced if you would like todefine a spacing to use. The entry box to the right will display the spacingin the current Time Display format. It defaults to the length of the selectedwaveform block, which function identically to No Gaps. Entering a greatervalue will put space between each waveform block, a lesser value willcause them to overlap.
You can add some cool effects to an existing audio file in the MultitrackView window by Shift-right clicking on the waveform (possiblycontaining vocals, a guitar lick, claps... you name it) and creating aduplicate image. The duplicate waveform can then be placed onto a newtrack (possibly below the existing track)... and then shifted in time (relativeto the original file), to create cool phase shifts (small time offset), delays(15-50 ms offsets) or discrete echoes (50 ms or greater offsets)... withouthaving to alter the original audio file waveform. Go ahead... create anumber of image waveforms and see just how wild of an effect you cancome up with... You might want to reduce the volume levels slightly foreach image, as the combined waveforms will increase the track's overalllevel in the mix.Using the Show Volume- and Show Pan Envelopes, you can also changethe relative volume and pan levels so that the effect will change over timeor stop/start at a particular time.
Record or open up an audio file that has a beat to it. Use the Edit/FindBeats option within the Edit Menu to create a loop that doesn't have anybreaks or gap points (if you've done it, congratulations, you're now aloopologist!) Now choose the Insert in Multitrack function within the EditView menu. Once you've switched back to the Multitrack View window, youcan now select the loop's waveform block and either right-click on the blockand choose Loop Duplicate or choose it from the Edit menu. and choose thenumber of times that you'd like to loop the segment. Now press play and listento your cool groove.

168
Convert to Unique Copy
This command will take the selected waveform block and create a new audiofile from it. This is useful for when you have a waveform block in a track thathas been edited in some way (trimmed, spliced, etc.), and you now wish it torepresent its own audio file.
For example, let's say you have a guitar part, guitar.wav, placed in Track1. You decide to use the end of this part again later, in Track 2. To accomplishthis, you create an Image of the waveform using Shift+Right-Click, and dragthe Image to Track 2. After highlighting the end portion of the Image that youwant played, you then use /Edit/Adjust Boundaries to trim it. Now, becausethe material in Track 2 is an Image, any changes to the end of the waveform inTrack 1 will be reflected in the Image, at its location in Track 2. However,selecting the trimmed Image and choosing Make Unique will create a newaudio file with the material displayed in the Image as its contents, thus avoidingits being affected when editing guitar.wav.
A way to add effects to an existing audio file in the Multitrack Viewwindow is by creating an actual copy of the waveform (this can be done usingthe Convert to Unique Copy command in the Multitrack View mode or bysaving the file under a new name using the Save As command within the EditView Mode). Once a copy of the original file has been made, it can beprocessed in any way you'd like and then be placed onto another track, suchthat it will simultaneously play back with the original file. Using this method,you can then vary the effected track's volume and pan controls (in a non-destructive, automated fashion) without altering the original audio file in anyway.
Although the Transform function doesn't exist within the Multitrack View,you can simply double-click on a waveform block (which will open up theselected waveform into the Edit View window)... From here, you can use the/Edit/Save Selection option to create a copy of the file that can be effectedusing any Edit View Transform function... Once done, the newly processed filecan be placed into the Multitrack View window.
Mute
Mutes and Un-mutes the selected Waveform, effectively allowing a specificwaveform within a session to be ignored during playback.
Lock in Time
This command "locks" any selected waveform (or combination of waveforms)to its current time location in the multitrack session. Locking a waveform isuseful when you have decided upon its position in time, and do not want toaccidentally move the waveform when right-clicking on it, etc. While awaveform which has been locked cannot be moved in time (left or right), itmay be vertically repositioned, allowing you to move it between tracks. Tounlock a waveform, simply select it and choose Lock in Time to free it forhorizontal movement.
Locked waveforms are identified by a TAN colored border at the top andbottom of the waveform.
169
Lock for Play Only
This command marks the selected waveforms as play only. Lock for Play Onlydisables the ability of a waveform block to be recorded into, so while the trackthey reside in may be record enabled (have the red button on the TrackConsole depressed), the marked waveform will not be recorded over. This issignified by the waveform not turning red in color when the track is recordenabled.
Allow Multiple Takes
With this option enabled a Take History is preserved for the selected waveformin the event that it is recorded over. With Allow Multiple Takes, material is notoverwritten when recording into an existing waveform block, instead a newinstance, or take, of the block is created and recorded into, preserving theprevious waveform. With this disabled, recording is done into the same spoteach time. The Punch In function will automatically enable Allow MultipleTakes for the selected Punch area.
Splice
The Splice option creates a non-destructive "break" within a waveform blockat the current cursor point. Once the block has been "spliced", each portion ofthe newly created blocks can be moved, deleted, slid in time/track, etc. withcomplete freedom.
To save time, simply right-click on a waveform block and choose Splice.
Merge/Rejoin Splice
Merge/Rejoin Splice will recombine a spliced segment of a waveform blockwith the original surrounding material, provided that the spliced segment sits atthe same relative location as where it was spliced from, and in the same trackas the original segment(s). The boundaries of the segments are joined togetherusing a 30 millisecond crossfade. This command can also be used to rejoin atake created using Punch In to the rest of the waveform.
This merge operation is destructive in that it does alter your sound file (whenrejoining a Punch In segment, the file is rewritten with the new material, forexample).
Select All Waves (Ctrl-A)
This command selects all waveforms within the current session. Selectedwaveforms will appear brighter in color than their non-selected counterparts;record enabled waveforms (red) will become bright red when selected, regularunmuted waveforms (green) will become bright green whenever they areselected.
Trim / Expand
This function will adjust the boundaries of the selected waveform block eitherinwardly or outwardly. After highlighting to define an area to adjust to, anymaterial in the waveform block that lies within this highlight will be retained orexposed, removing that which is outside of the highlight (or including material
170
inside the selection that is not currently revealed). For example, with a 5second waveform block, highlighting the middle second and choosingTrim/Expand will trim off the surrounding material, leaving just the middlesecond. If you decide you should not have trimmed off so much, you canhighlight the middle second plus a little to the right, for instance, and againchoose Trim/Expand to bring back that little bit to the right, therebylengthening the waveform block.
Unlike the Trim command in the Edit Waveform View, using Trim/Expandto trim does not remove any data from the actual waveform. Trimming inMultitrack View simply tells Cool Edit Pro to “disregard this material” whenplaying back. You may return any trimmed waveform to its original state atany time by selecting it and choosing /Edit/Full.
To fine tune your adjustments in this example, you could also have double-clicked on the trimmed block to bring up the Edit Waveform View, double-click to highlight the displayed area, then zoom out to adjust the highlightboundaries to your satisfaction. When finished, switch back to multitrack view(the highlight will be retained) and choose Trim/Expand to have the waveformblock re-adjust to match your highlight.
Cut
Cut will remove any highlighted portion of a selected waveform. Once awaveform range has been selected, the Cut function will remove only theselected range and will leave those areas that haven't been selected intact. Thisis also useful for eliminating extraneous noises, breaths, talking... basicallyanything that you would like to have removed. For example, if track 3 containsa waveform that is 5 seconds in length, selecting it, highlighting the middle 1second, and choosing Cut will remove the middle 1 second, leaving the 2second portions on both sides. Use Trim to remove unwanted material arounda highlighted region.
Unlike Cut in Edit View, this Cut command does not remove any datafrom the actual waveform, and places nothing on the clipboard. Using Cut inMultitrack View simply tells Cool Edit Pro to "disregard this material" whenplaying back. You may return any Cut waveform to its original state at anytime by selecting it and choosing /Edit/Full.
Full
This option returns any selected waveform to its original state (the fullwaveform). Any material that has been removed using Trim or Cut (while inMultitrack View) will be replaced.
Snapping
Enable Snapping to have the edges of any waveform "snap" to certain timelocations when being dragged. This allows you to easily line up any number ofwaveforms at a specific start time, without having to zoom in and manuallyfind the location. The Snap To locations (which vary depending on theSnapping option you have selected) act as magnets for any waveforms draggedin their proximity, and have the effect of pulling the waveform toward them.For example, if your vertical ruler's format is hours:minutes:seconds, with
171
seconds showing as the division at your current zoom level (1.0, 2.0, etc.),then dragging a waveform which starts at 1.6 seconds to the right will result init snapping to the 2.0 location as it nears it. You can, of course, keep draggingbeyond 2.0 in this case, if you wish. You can choose among three options indetermining the time locations to Snap To.
Open a single waveform block into the waveform window and perform a"Splice" (which effectively splits it into two blocks). Turn the Snapping optionoff. By right-clicking on the second block and moving it, try to manually rejointhe blocks. You'll notice that it may not be so easy to re-join them, so thatplayback is continuous. Now, turn the Snap to Waves option on and try torejoin them... you'll find that the second block "magnetically" snaps to the firstblock and will play back continuously, with little effort on your part.
Refresh Now
Forces Cool Edit Pro to start the background mixing process "from scratch".
Remove Waves
Removes any selected waveforms from a multitrack Session. Removedwaveforms will still be available in Edit View, and to the Session through theInsert menu until the audio files are Closed.
Waveforms can be selected individually or they can be selected into groupsby holding down the Control (Ctrl) key and then left-clicking on thewaveforms that you would like to select. De-selection is done by keeping theControl key held down and then left-clicking on the waveform to be de-selected again.
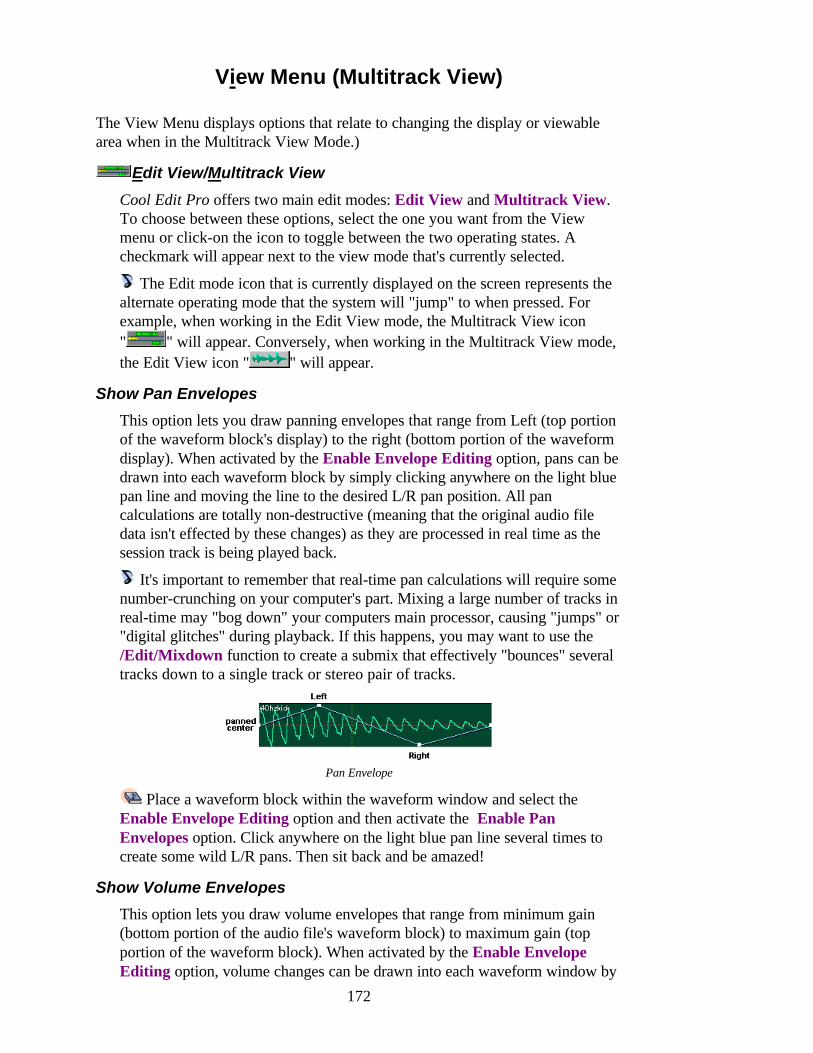
172
View Menu (Multitrack View)
The View Menu displays options that relate to changing the display or viewablearea when in the Multitrack View Mode.)
Edit View/Multitrack View
Cool Edit Pro offers two main edit modes: Edit View and Multitrack View.To choose between these options, select the one you want from the Viewmenu or click-on the icon to toggle between the two operating states. Acheckmark will appear next to the view mode that's currently selected.
The Edit mode icon that is currently displayed on the screen represents thealternate operating mode that the system will "jump" to when pressed. Forexample, when working in the Edit View mode, the Multitrack View icon" " will appear. Conversely, when working in the Multitrack View mode,the Edit View icon " " will appear.
Show Pan Envelopes
This option lets you draw panning envelopes that range from Left (top portionof the waveform block's display) to the right (bottom portion of the waveformdisplay). When activated by the Enable Envelope Editing option, pans can bedrawn into each waveform block by simply clicking anywhere on the light bluepan line and moving the line to the desired L/R pan position. All pancalculations are totally non-destructive (meaning that the original audio filedata isn't effected by these changes) as they are processed in real time as thesession track is being played back.
It's important to remember that real-time pan calculations will require somenumber-crunching on your computer's part. Mixing a large number of tracks inreal-time may "bog down" your computers main processor, causing "jumps" or"digital glitches" during playback. If this happens, you may want to use the/Edit/Mixdown function to create a submix that effectively "bounces" severaltracks down to a single track or stereo pair of tracks.
Pan Envelope
Place a waveform block within the waveform window and select theEnable Envelope Editing option and then activate the Enable PanEnvelopes option. Click anywhere on the light blue pan line several times tocreate some wild L/R pans. Then sit back and be amazed!
Show Volume Envelopes
This option lets you draw volume envelopes that range from minimum gain(bottom portion of the audio file's waveform block) to maximum gain (topportion of the waveform block). When activated by the Enable EnvelopeEditing option, volume changes can be drawn into each waveform window by
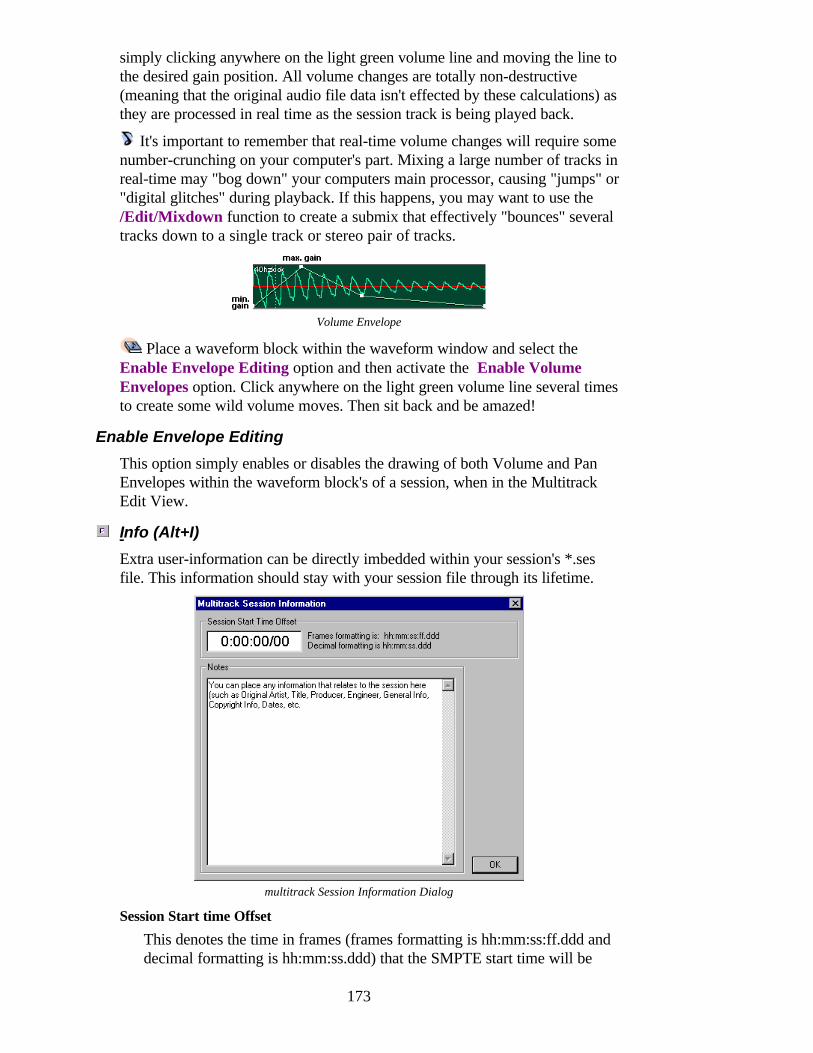
173
simply clicking anywhere on the light green volume line and moving the line tothe desired gain position. All volume changes are totally non-destructive(meaning that the original audio file data isn't effected by these calculations) asthey are processed in real time as the session track is being played back.
It's important to remember that real-time volume changes will require somenumber-crunching on your computer's part. Mixing a large number of tracks inreal-time may "bog down" your computers main processor, causing "jumps" or"digital glitches" during playback. If this happens, you may want to use the/Edit/Mixdown function to create a submix that effectively "bounces" severaltracks down to a single track or stereo pair of tracks.
Volume Envelope
Place a waveform block within the waveform window and select theEnable Envelope Editing option and then activate the Enable VolumeEnvelopes option. Click anywhere on the light green volume line several timesto create some wild volume moves. Then sit back and be amazed!
Enable Envelope Editing
This option simply enables or disables the drawing of both Volume and PanEnvelopes within the waveform block's of a session, when in the MultitrackEdit View.
Info (Alt+I)
Extra user-information can be directly imbedded within your session's *.sesfile. This information should stay with your session file through its lifetime.
multitrack Session Information Dialog
Session Start time Offset
This denotes the time in frames (frames formatting is hh:mm:ss:ff.ddd anddecimal formatting is hh:mm:ss.ddd) that the SMPTE start time will be
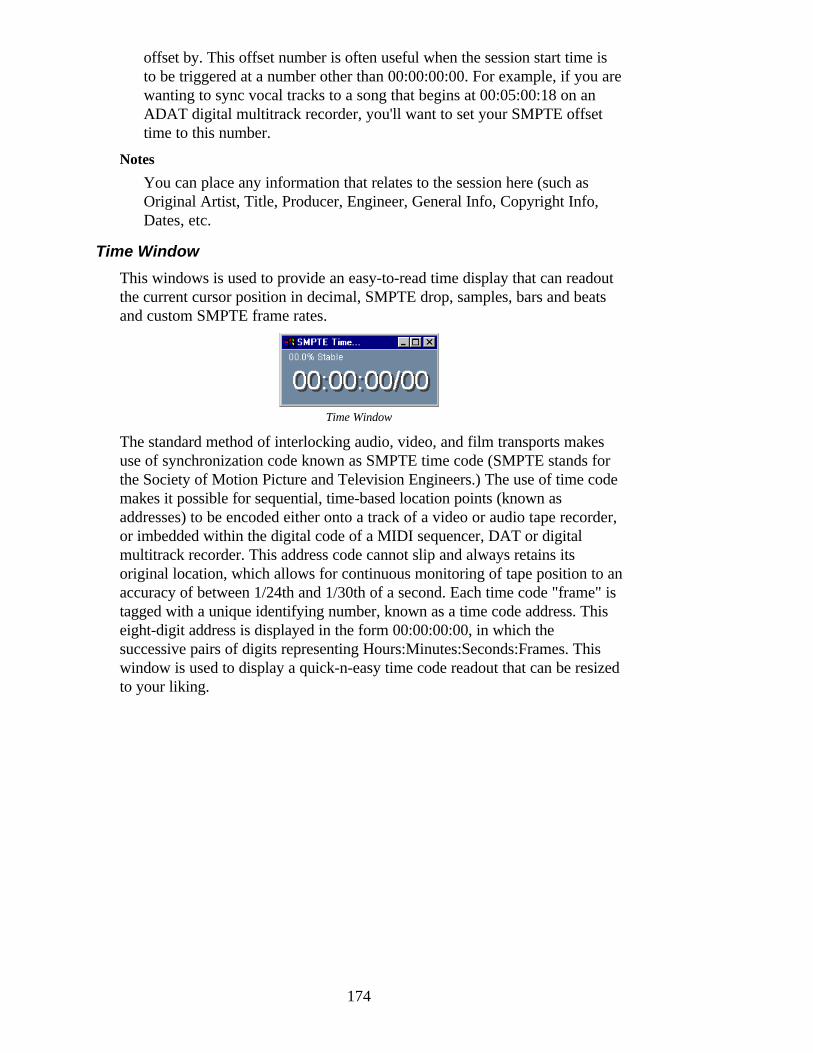
174
offset by. This offset number is often useful when the session start time isto be triggered at a number other than 00:00:00:00. For example, if you arewanting to sync vocal tracks to a song that begins at 00:05:00:18 on anADAT digital multitrack recorder, you'll want to set your SMPTE offsettime to this number.
Notes
You can place any information that relates to the session here (such asOriginal Artist, Title, Producer, Engineer, General Info, Copyright Info,Dates, etc.
Time Window
This windows is used to provide an easy-to-read time display that can readoutthe current cursor position in decimal, SMPTE drop, samples, bars and beatsand custom SMPTE frame rates.
Time Window
The standard method of interlocking audio, video, and film transports makesuse of synchronization code known as SMPTE time code (SMPTE stands forthe Society of Motion Picture and Television Engineers.) The use of time codemakes it possible for sequential, time-based location points (known asaddresses) to be encoded either onto a track of a video or audio tape recorder,or imbedded within the digital code of a MIDI sequencer, DAT or digitalmultitrack recorder. This address code cannot slip and always retains itsoriginal location, which allows for continuous monitoring of tape position to anaccuracy of between 1/24th and 1/30th of a second. Each time code "frame" istagged with a unique identifying number, known as a time code address. Thiseight-digit address is displayed in the form 00:00:00:00, in which thesuccessive pairs of digits representing Hours:Minutes:Seconds:Frames. Thiswindow is used to display a quick-n-easy time code readout that can be resizedto your liking.
175
Insert List (Multitrack View)
When in the Multitrack View mode, the Windows menu gives you a simple way tonavigate between audio file waveforms and to place waveforms intoCool Edit Pro's Multitrack View window.
Waveforms List
The first thing that you want to do when starting a session, is to begin loadingwaveforms into the Waveform Display.
When working in the Multitrack View window, the Waveform List works asa simple navigation tool for loading audio files into a multitrack session.Basically, it can be thought of as a central "holding tank" from which audiofiles can be easily selected and placed into the Multitrack View window. Youcan also use Waveforms List to convert audio files into the appropriate formatfor the current project.
Waveform List options include:
Waveform List
This displays the audio files or waveforms that are currently open inCool Edit Pro. Click on any item in the list to select it, or double-click toswitch to that waveform in the Edit View window. To select more than oneitem in the list, hold down the SHIFT key for contiguous selection, or theCTRL key for non-contiguous selection.
You can quickly insert waveforms at specific locations through drag-and-drop. Left-click on a waveform in the list and drag it (keep the mouse buttonheld) into the Multitrack View window at the desired track and timeplacement, and then simply release the mouse button. It's that easy!
Switch to
Places the selected waveform into the Edit View window.
Close Wave
Closes the selected waveform and removes it from the Waveforms List. Ifthe file being closed is currently being used in the Multitrack environment,all references to this file (Images, etc.) will be removed from the currentmix. A dialog box will appear as a fail-safe, asking you if this is what youreally want to do.
Insert
Inserts the selected waveform(s) into the Multitrack View window, so thatit can be mixed within the multitrack environment. Cool Edit Pro placesthe selected items into the next available track(s). If the selected audio fileis not of the same sample type as those in the current session, the ConvertSample Type dialog box will pop up to allow you to convert the file to theappropriate sample rate/file type.
Open
Lets you browse for and open a recorded audio file.
176
Full Paths
Displays the full DOS path for files in the Waveform List.
Close
Closes the Waveforms List dialog box.
List of loaded waveforms
This list displays all currently open waveforms. Simply select the waveformname to insert it into the Multitrack View window, so it can be mixed withinthe multitrack environment. Inserted waveforms will be successively placedinto the next available empty track, beginning at the left-most point of thewindow's visible timeline. Files names are given as full paths.

177
Synchronization Using SMPTE Time Code
By David Miles Huber
Assigning a SMPTE Source to Cool Edit Pro
If your system is equipped with MIDI devices, you can also choose the MIDIin source that will be used to deliver MIDI Time Code to Cool Edit Pro. Thisis done using the MIDI In (Sync/Trigger) dialog box within the Devicessetup tab of the /Options/Settings menu.
What is SMPTE?*
The standard method of interlocking audio, video, and film transports makesuse of synchronization code known as SMPTE time code (SMPTE stands forthe Society of Motion Picture and Television Engineers.) The use of timecode makes it possible for sequential, time-based location points (known asaddresses) to be encoded either onto a track of a video or audio tape recorder,or imbedded within the digital code of a MIDI sequencer, DAT or digitalmultitrack recorder. This address code cannot slip and always retains itsoriginal location, which allows for continuous monitoring of tape position to anaccuracy of between 1/24th and 1/30th of a second. Each time code "frame" istagged with a unique identifying number, known as a time code address. Thiseight-digit address is displayed in the form 00:00:00:00, in which thesuccessive pairs of digits representing Hours:Minutes:Seconds:Frames. Thiswindow (which can be accessed using the /View/Time Window command) isused to display a quick-n-easy time code readout that can be resized to yourliking.
What is MIDI Time Code?*
For decades, SMPTE time code has been the standard timing reference withinaudio and video production. This is due to the fact that it is an absolute timingreference that remains constant throughout an entire program.
In order for MIDI-based devices to operate on an absolute timing referencethat is independent of tempo, Chris Meyer and Evan Brooks of Digidesigncreated MIDI time code or MTC. Basically, MIDI time code provides a cost-effective and easily implemented means for translating SMPTE time code intoMIDI messages. It also allows for time-based code and commands to bedistributed throughout the MIDI chain to those devices or instruments that arecapable of understanding and executing MTC commands.
MTC makes use of a reasonably small percentage of the available MIDIbandwidth (about 7.68% at 30-fr/second). Although it's able to travel the samesignal path as conventional MIDI data, it is recommended, wherever possible(within a 32- or more MIDI channel system), that the MTC signal path be keptseparate from the MIDI performance path in order to reduce the possibility ofdata bottlenecking or delay.

178
* Excerpted with permission from The MIDI Manual - David Miles Huber,Focal Press (Boston/London), www.bh.com/focalpress
179
Understanding MIDI
By David Miles Huber
Assigning a MIDI Source/destination to Cool Edit Pro
If you have multiple sound cards, or a single card that has multiple outputs,you can use the Devices tab to choose the input and output devices you wouldlike Cool Edit Pro to be assigned to. This is done using the MIDI In(Sync/Trigger) and MIDI Out (Music Preview) dialog boxes within theDevices setup tab of the /Options/Settings menu. If your system is equippedwith MIDI devices, you can also choose the MIDI in, and MIDI out sources,using this setup option.
These settings will be remembered in the [Cool Edit] section of Window'sWIN.INI file, which means if you install a new sound driver or card, Cool willnot access it until you choose it from this dialog.
MIDI In (Sync/Trigger)
This setting is used to assign a MIDI source to Cool Edit Pro's MIDI InSync/Trigger input. The Sync source will provide a MIDI Time Codesource that Cool Edit can synchronize to, while a trigger source can beused to transmit MIDI not on messages for triggering individually assignedwaveforms.
MIDI Out (Music Preview)
This setting is used to assign Cool Edit Pro's Music Preview function (see/Transform/Special/Music) to a MIDI destination (such as a sequencer orMIDI instrument).
What is MIDI?*
MIDI (short for Musical Instrument Digital Interface is a digitalcommunications "protocol". That is to say, it is a standardized controllanguage and hardware specification that allows multiple electronic musicalinstruments and devices (that can transmit and/or respond to this controllanguage) to communicate real-time and non real-time performance and controldata.
MIDI is a specified data format that must be strictly adhered to by those whodesign and manufacture MIDI-equipped instruments and devices. In this way,performances and task-related automation functions can be communicatedbetween devices with relative transparency, speed and ease. Thus, whenperforming a task (such as controlling multiple instruments from a keyboardcontroller or transmitting a patch bank from a patch librarian to a synthesizer),the user need only consider the control parameters of the involved devices andnot those of the transmission medium itself (in this case, MIDI). This could belikened to our English language, through which ideas can be transmitted fromone person to an audience. We, as English speaking people, are able toconcentrate wholly upon the content of a lecture without having to think about
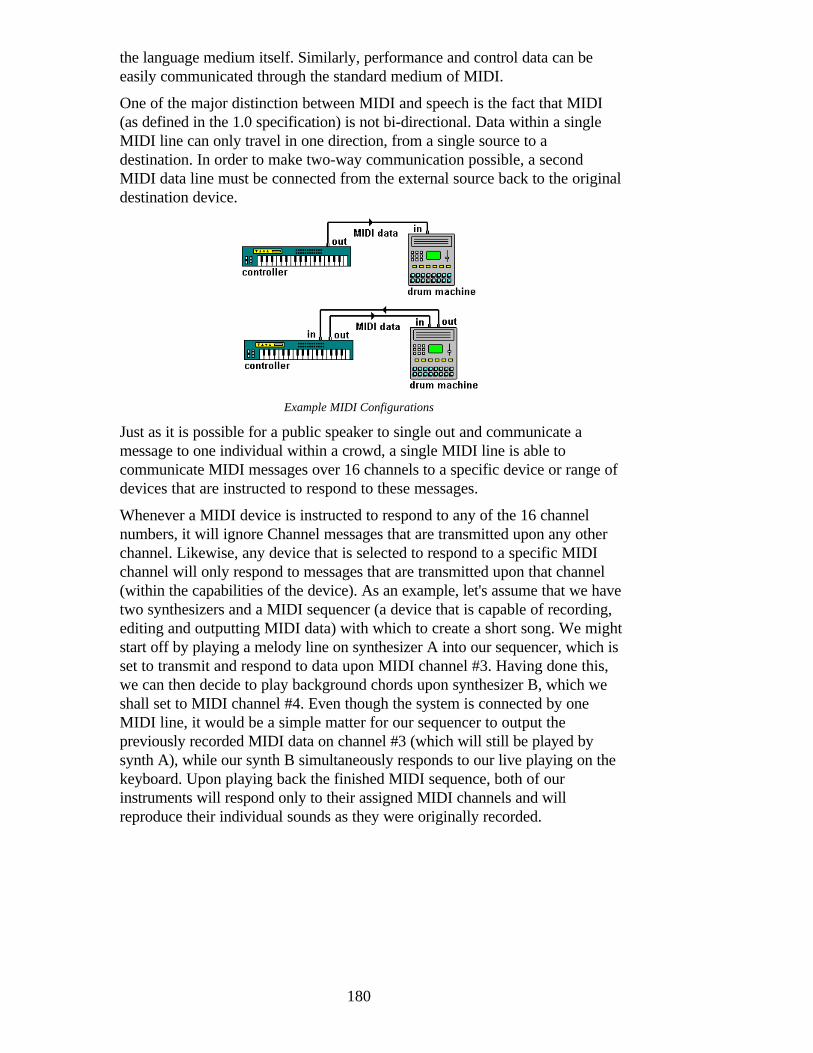
180
the language medium itself. Similarly, performance and control data can beeasily communicated through the standard medium of MIDI.
One of the major distinction between MIDI and speech is the fact that MIDI(as defined in the 1.0 specification) is not bi-directional. Data within a singleMIDI line can only travel in one direction, from a single source to adestination. In order to make two-way communication possible, a secondMIDI data line must be connected from the external source back to the originaldestination device.
Example MIDI Configurations
Just as it is possible for a public speaker to single out and communicate amessage to one individual within a crowd, a single MIDI line is able tocommunicate MIDI messages over 16 channels to a specific device or range ofdevices that are instructed to respond to these messages.
Whenever a MIDI device is instructed to respond to any of the 16 channelnumbers, it will ignore Channel messages that are transmitted upon any otherchannel. Likewise, any device that is selected to respond to a specific MIDIchannel will only respond to messages that are transmitted upon that channel(within the capabilities of the device). As an example, let's assume that we havetwo synthesizers and a MIDI sequencer (a device that is capable of recording,editing and outputting MIDI data) with which to create a short song. We mightstart off by playing a melody line on synthesizer A into our sequencer, which isset to transmit and respond to data upon MIDI channel #3. Having done this,we can then decide to play background chords upon synthesizer B, which weshall set to MIDI channel #4. Even though the system is connected by oneMIDI line, it would be a simple matter for our sequencer to output thepreviously recorded MIDI data on channel #3 (which will still be played bysynth A), while our synth B simultaneously responds to our live playing on thekeyboard. Upon playing back the finished MIDI sequence, both of ourinstruments will respond only to their assigned MIDI channels and willreproduce their individual sounds as they were originally recorded.
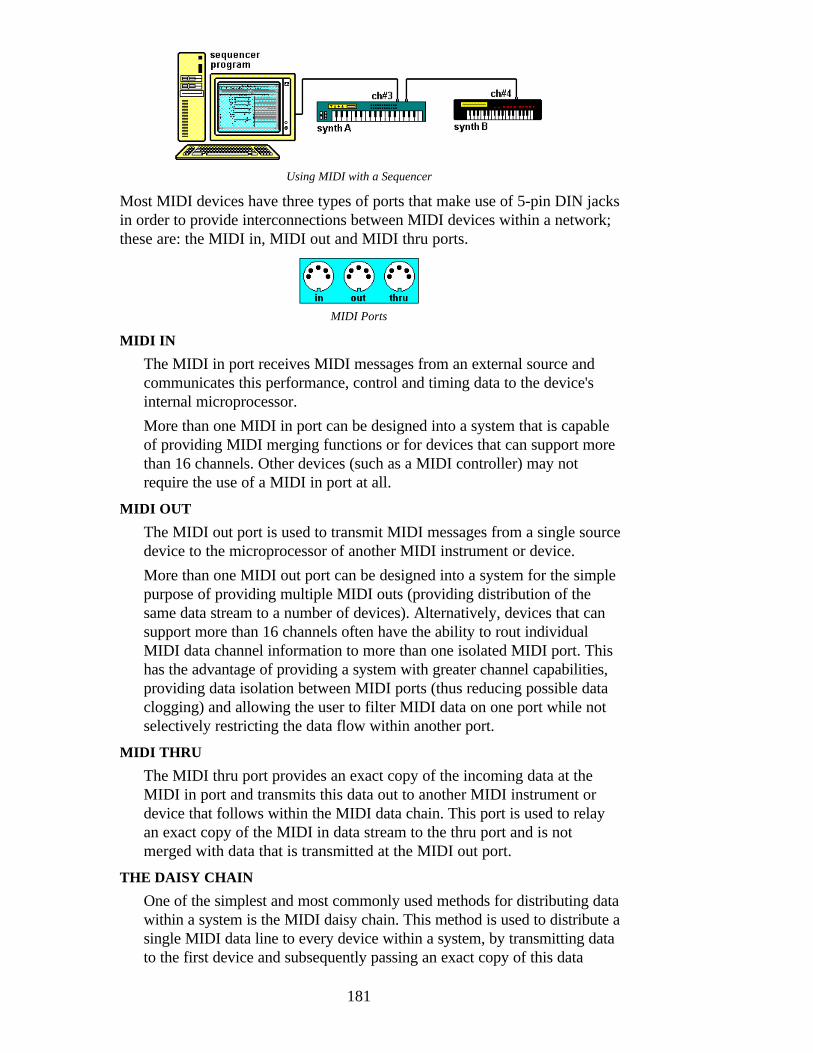
181
Using MIDI with a Sequencer
Most MIDI devices have three types of ports that make use of 5-pin DIN jacksin order to provide interconnections between MIDI devices within a network;these are: the MIDI in, MIDI out and MIDI thru ports.
MIDI Ports
MIDI IN
The MIDI in port receives MIDI messages from an external source andcommunicates this performance, control and timing data to the device'sinternal microprocessor.More than one MIDI in port can be designed into a system that is capableof providing MIDI merging functions or for devices that can support morethan 16 channels. Other devices (such as a MIDI controller) may notrequire the use of a MIDI in port at all.
MIDI OUT
The MIDI out port is used to transmit MIDI messages from a single sourcedevice to the microprocessor of another MIDI instrument or device.More than one MIDI out port can be designed into a system for the simplepurpose of providing multiple MIDI outs (providing distribution of thesame data stream to a number of devices). Alternatively, devices that cansupport more than 16 channels often have the ability to rout individualMIDI data channel information to more than one isolated MIDI port. Thishas the advantage of providing a system with greater channel capabilities,providing data isolation between MIDI ports (thus reducing possible dataclogging) and allowing the user to filter MIDI data on one port while notselectively restricting the data flow within another port.
MIDI THRU
The MIDI thru port provides an exact copy of the incoming data at theMIDI in port and transmits this data out to another MIDI instrument ordevice that follows within the MIDI data chain. This port is used to relayan exact copy of the MIDI in data stream to the thru port and is notmerged with data that is transmitted at the MIDI out port.
THE DAISY CHAIN
One of the simplest and most commonly used methods for distributing datawithin a system is the MIDI daisy chain. This method is used to distribute asingle MIDI data line to every device within a system, by transmitting datato the first device and subsequently passing an exact copy of this data
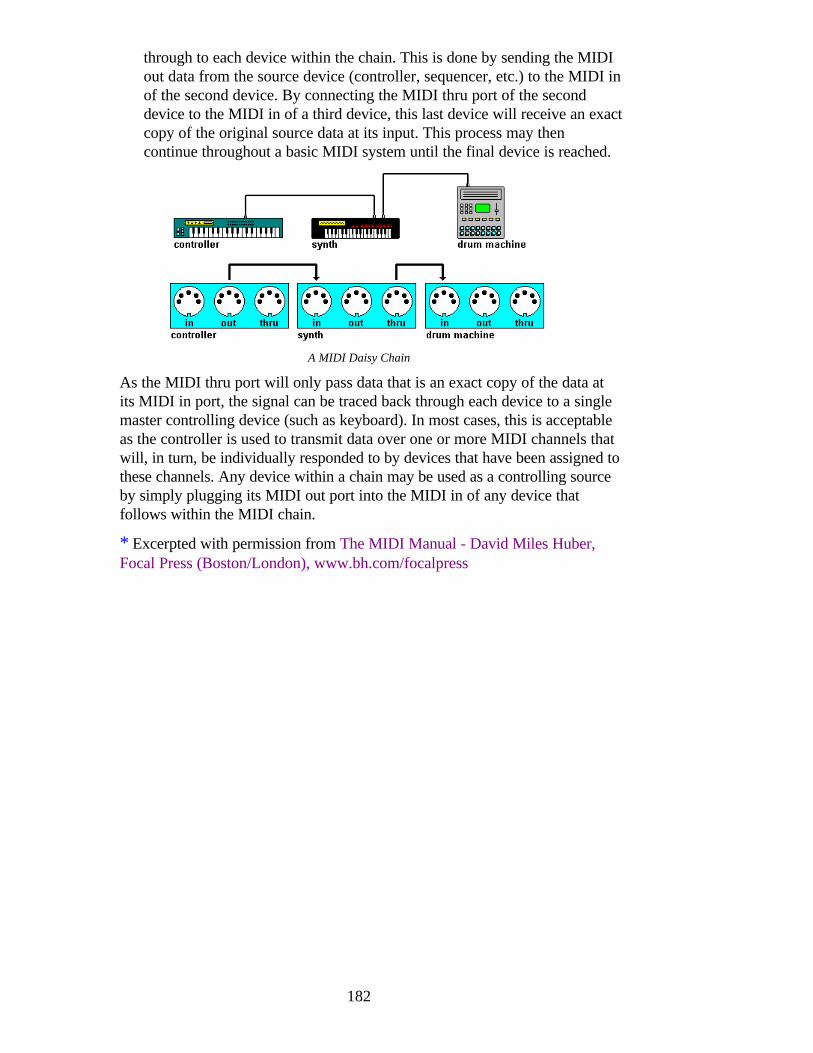
182
through to each device within the chain. This is done by sending the MIDIout data from the source device (controller, sequencer, etc.) to the MIDI inof the second device. By connecting the MIDI thru port of the seconddevice to the MIDI in of a third device, this last device will receive an exactcopy of the original source data at its input. This process may thencontinue throughout a basic MIDI system until the final device is reached.
A MIDI Daisy Chain
As the MIDI thru port will only pass data that is an exact copy of the data atits MIDI in port, the signal can be traced back through each device to a singlemaster controlling device (such as keyboard). In most cases, this is acceptableas the controller is used to transmit data over one or more MIDI channels thatwill, in turn, be individually responded to by devices that have been assigned tothese channels. Any device within a chain may be used as a controlling sourceby simply plugging its MIDI out port into the MIDI in of any device thatfollows within the MIDI chain.
* Excerpted with permission from The MIDI Manual - David Miles Huber,Focal Press (Boston/London), www.bh.com/focalpress
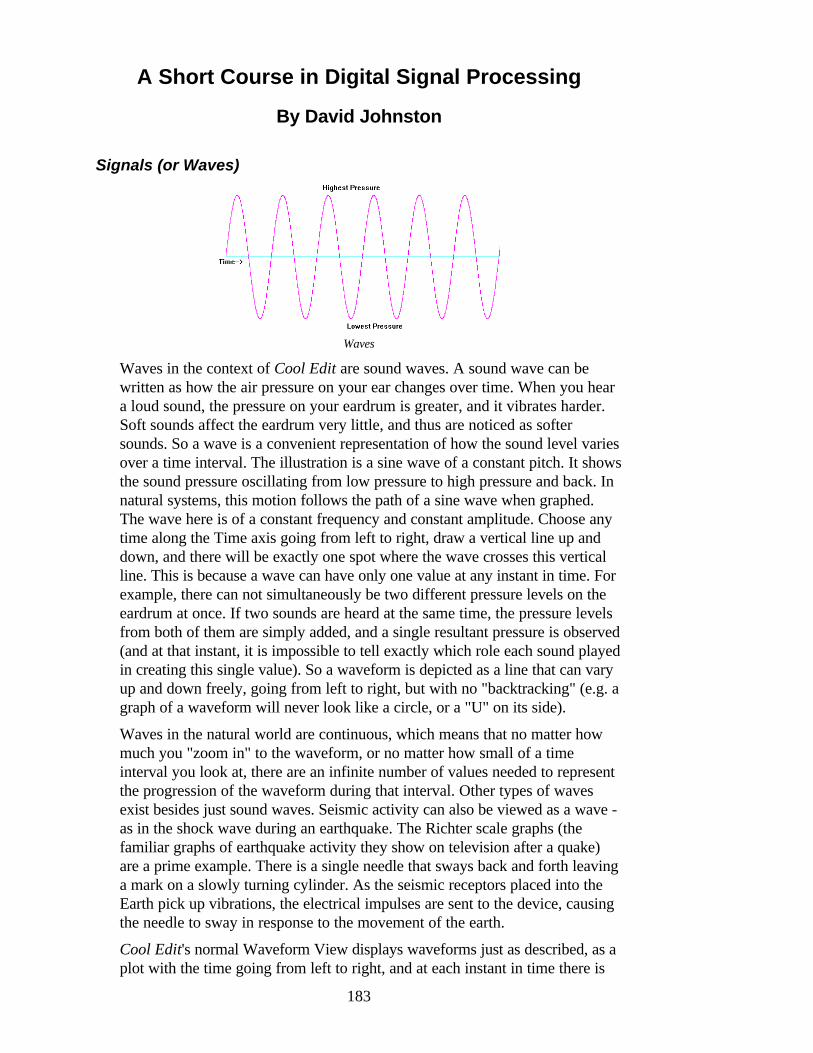
183
A Short Course in Digital Signal Processing
By David Johnston
Signals (or Waves)
Waves
Waves in the context of Cool Edit are sound waves. A sound wave can bewritten as how the air pressure on your ear changes over time. When you heara loud sound, the pressure on your eardrum is greater, and it vibrates harder.Soft sounds affect the eardrum very little, and thus are noticed as softersounds. So a wave is a convenient representation of how the sound level variesover a time interval. The illustration is a sine wave of a constant pitch. It showsthe sound pressure oscillating from low pressure to high pressure and back. Innatural systems, this motion follows the path of a sine wave when graphed.The wave here is of a constant frequency and constant amplitude. Choose anytime along the Time axis going from left to right, draw a vertical line up anddown, and there will be exactly one spot where the wave crosses this verticalline. This is because a wave can have only one value at any instant in time. Forexample, there can not simultaneously be two different pressure levels on theeardrum at once. If two sounds are heard at the same time, the pressure levelsfrom both of them are simply added, and a single resultant pressure is observed(and at that instant, it is impossible to tell exactly which role each sound playedin creating this single value). So a waveform is depicted as a line that can varyup and down freely, going from left to right, but with no "backtracking" (e.g. agraph of a waveform will never look like a circle, or a "U" on its side).
Waves in the natural world are continuous, which means that no matter howmuch you "zoom in" to the waveform, or no matter how small of a timeinterval you look at, there are an infinite number of values needed to representthe progression of the waveform during that interval. Other types of wavesexist besides just sound waves. Seismic activity can also be viewed as a wave -as in the shock wave during an earthquake. The Richter scale graphs (thefamiliar graphs of earthquake activity they show on television after a quake)are a prime example. There is a single needle that sways back and forth leavinga mark on a slowly turning cylinder. As the seismic receptors placed into theEarth pick up vibrations, the electrical impulses are sent to the device, causingthe needle to sway in response to the movement of the earth.
Cool Edit's normal Waveform View displays waveforms just as described, as aplot with the time going from left to right, and at each instant in time there is
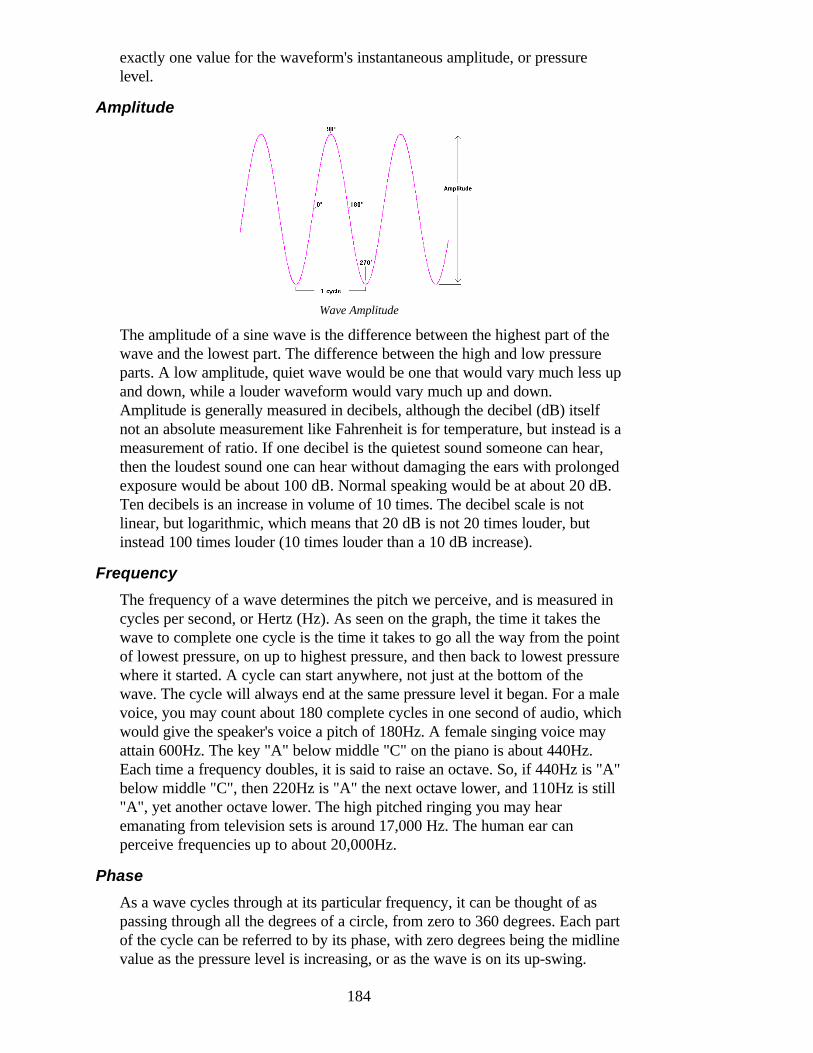
184
exactly one value for the waveform's instantaneous amplitude, or pressurelevel.
Amplitude
Wave Amplitude
The amplitude of a sine wave is the difference between the highest part of thewave and the lowest part. The difference between the high and low pressureparts. A low amplitude, quiet wave would be one that would vary much less upand down, while a louder waveform would vary much up and down.Amplitude is generally measured in decibels, although the decibel (dB) itselfnot an absolute measurement like Fahrenheit is for temperature, but instead is ameasurement of ratio. If one decibel is the quietest sound someone can hear,then the loudest sound one can hear without damaging the ears with prolongedexposure would be about 100 dB. Normal speaking would be at about 20 dB.Ten decibels is an increase in volume of 10 times. The decibel scale is notlinear, but logarithmic, which means that 20 dB is not 20 times louder, butinstead 100 times louder (10 times louder than a 10 dB increase).
Frequency
The frequency of a wave determines the pitch we perceive, and is measured incycles per second, or Hertz (Hz). As seen on the graph, the time it takes thewave to complete one cycle is the time it takes to go all the way from the pointof lowest pressure, on up to highest pressure, and then back to lowest pressurewhere it started. A cycle can start anywhere, not just at the bottom of thewave. The cycle will always end at the same pressure level it began. For a malevoice, you may count about 180 complete cycles in one second of audio, whichwould give the speaker's voice a pitch of 180Hz. A female singing voice mayattain 600Hz. The key "A" below middle "C" on the piano is about 440Hz.Each time a frequency doubles, it is said to raise an octave. So, if 440Hz is "A"below middle "C", then 220Hz is "A" the next octave lower, and 110Hz is still"A", yet another octave lower. The high pitched ringing you may hearemanating from television sets is around 17,000 Hz. The human ear canperceive frequencies up to about 20,000Hz.
Phase
As a wave cycles through at its particular frequency, it can be thought of aspassing through all the degrees of a circle, from zero to 360 degrees. Each partof the cycle can be referred to by its phase, with zero degrees being the midlinevalue as the pressure level is increasing, or as the wave is on its up-swing.
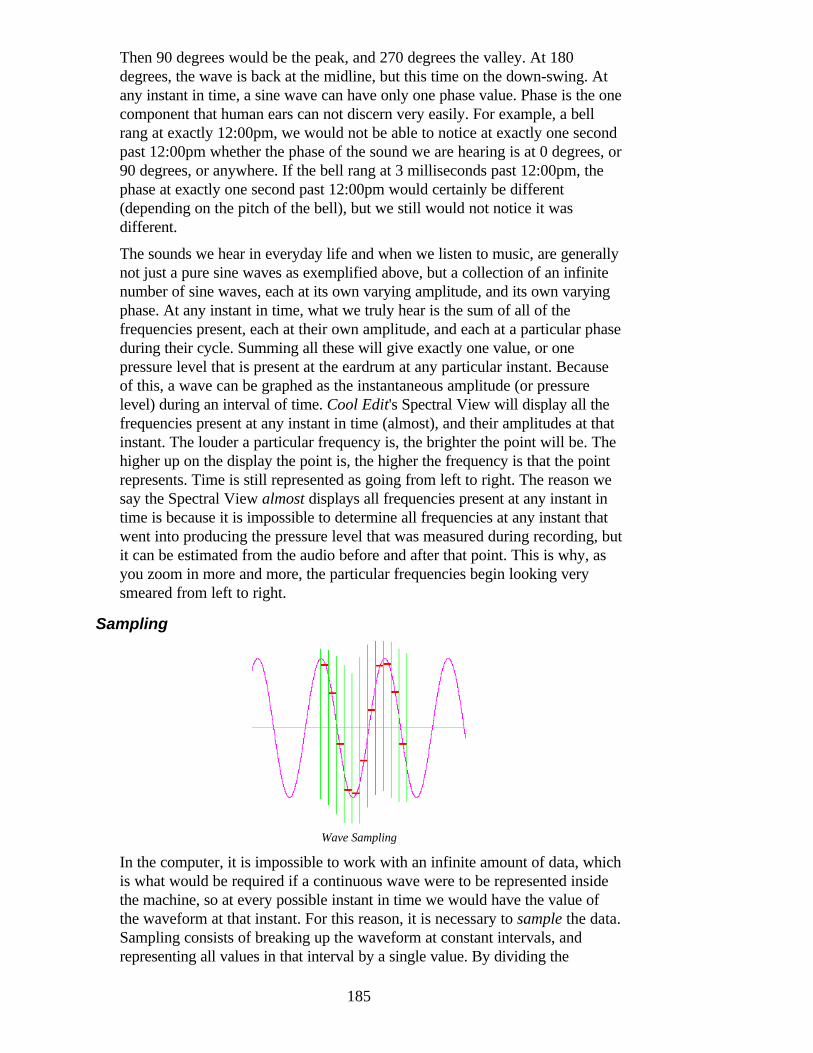
185
Then 90 degrees would be the peak, and 270 degrees the valley. At 180degrees, the wave is back at the midline, but this time on the down-swing. Atany instant in time, a sine wave can have only one phase value. Phase is the onecomponent that human ears can not discern very easily. For example, a bellrang at exactly 12:00pm, we would not be able to notice at exactly one secondpast 12:00pm whether the phase of the sound we are hearing is at 0 degrees, or90 degrees, or anywhere. If the bell rang at 3 milliseconds past 12:00pm, thephase at exactly one second past 12:00pm would certainly be different(depending on the pitch of the bell), but we still would not notice it wasdifferent.
The sounds we hear in everyday life and when we listen to music, are generallynot just a pure sine waves as exemplified above, but a collection of an infinitenumber of sine waves, each at its own varying amplitude, and its own varyingphase. At any instant in time, what we truly hear is the sum of all of thefrequencies present, each at their own amplitude, and each at a particular phaseduring their cycle. Summing all these will give exactly one value, or onepressure level that is present at the eardrum at any particular instant. Becauseof this, a wave can be graphed as the instantaneous amplitude (or pressurelevel) during an interval of time. Cool Edit's Spectral View will display all thefrequencies present at any instant in time (almost), and their amplitudes at thatinstant. The louder a particular frequency is, the brighter the point will be. Thehigher up on the display the point is, the higher the frequency is that the pointrepresents. Time is still represented as going from left to right. The reason wesay the Spectral View almost displays all frequencies present at any instant intime is because it is impossible to determine all frequencies at any instant thatwent into producing the pressure level that was measured during recording, butit can be estimated from the audio before and after that point. This is why, asyou zoom in more and more, the particular frequencies begin looking verysmeared from left to right.
Sampling
Wave Sampling
In the computer, it is impossible to work with an infinite amount of data, whichis what would be required if a continuous wave were to be represented insidethe machine, so at every possible instant in time we would have the value ofthe waveform at that instant. For this reason, it is necessary to sample the data.Sampling consists of breaking up the waveform at constant intervals, andrepresenting all values in that interval by a single value. By dividing the
186
waveform up like this, one second of audio can now be represented by a finitenumber of values. The sample rate is the number of divisions taken per onesecond of audio. As you can see by the graph, the sampled waveform(horizontal dashes) contains much less information about the shape of the wavethan the original continuous wave itself. The highest frequency that can berepresented by this method is exactly one half the sample rate. So, if a samplerate of 22,050 slices per second was used, the highest frequency that can berepresented would be a tone of 11,025 Hz. This frequency is known as theNyquist frequency. The higher the sample rate, the higher the frequencies arethat can be represented by sampling. The human ear can hear frequencies up toabout 20,000 Hz (or 20 kHz), so to represent all sounds that humans can hear,a sample rate of at least 40,000 Hz must be used, which would yield 40,000values for the computer for each second of audio. This is why CD playerssample at 44,100 Hz, to be enough above twice the highest frequency anyonecan hear.
So far we have broken time into discrete intervals. What about the actualvalues, or amplitude, at each of those intervals? The wave above can bethought of as going from values between 100 (at the top) to -100 (at thebottom). This would cause the short sequence of 11 samples to be given to thecomputer as roughly 93.7, 51.5, -22.1, -89.4, -97.6, -48.0, 25.7, 92.1, 93.9,54.5, and -21.1. The same problem as with having continuous time exists withthe values at each interval as well. There are an infinite number of possiblevalues the wave can have during each of these intervals. For example, insteadof the first value being 93.7, it could just as easily have been93.716746352231... These values must also be broken up into intervals (whichmay or may not be evenly spaced) so that computers can deal with them. Thisbreaking up of continuous values to a specific number of values is known asquantizing. An 8-bit sound card, for example, can have any one of 256 uniquevalues, where the continuous range of real numbers has been quantized to 256steps. The reason 8-bit sound has 256 possible values is because 2 to the 8thpower (2 x 2 x 2... eight times) is 256. The 16-bit sound cards can have anyone of 65,536 values for each interval. The quantization level, directly relatesto the dynamic range (difference between the softest and loudest sound) thatcan be represented (if the range has been evenly divided into equal spacedsteps). With only 256 levels, the sound quality is comparable to that of AMradio. With the 65,536 levels possible with 16-bit audio, the quality iscomparable to that of compact discs, which can have much louder 'louds', andmuch softer 'softs'. So, where the sample rate (divisions in time) determines thehighest frequency sound that can be represented, the quantization level(divisions in amplitude) determines the highest dynamic range that can berepresented. If the divisions in amplitude are not evenly spaced, but there aremore divisions with lower values, and fewer with higher values, softer soundscan be represented with fewer volume levels, at the expense of less precision athigher volume levels. The A-law and m-law file formats do just this -- theysave only 256 unique volume levels, but have more levels at the lowervolumes. The result is the dynamic range equivalent to having 4096 volumelevels (comparable to a high quality cassette), but with some distortion (likedistortion heard on broadcast FM radio, but a little worse).
187
Sound Reproduction
The hardware in your sound card has a special chip for converting the analog(continuous time) signal to digital (discrete or sampled) signal called an A/Dconverter. It also has the reciprocal chip, which converts the digital signal fromthe computer to an analog signal that can be piped to a pair of headphones, orto your stereo system which is called a D/A converter. Even though thesampled signal has far fewer samples than a continuous time analog signal, theD/A convert can reproduce the original analog signal perfectly. This means thatthe only loss in going from the analog domain to digital, then back to analogagain is the loss in higher frequencies (those above 1/2 the sampling rate), andloss in the dynamic range (depending on the quantization level used). Ofcourse, with lower quality components, there will be loss in the A/D converterby the converter not perfectly converting the original analog signal to digital.Also, there can be loss in the pre-amplifier of the sound card after the signalhas been converted from digital back to analog. What this means, though, isthat it is perfectly safe to take any audio signal, convert it to digital, work withit in the digital domain (on the computer using Cool Edit), and convert it backto analog (play the sound). This means we are no longer restricted to thelimitations of electronic components in filters, special effects boxes, etc.
Quality Issues
As alluded to before, there are many sacrifices, gives, and takes that must beconsidered when going from the analog domain to the digital. With enoughmoney, you can purchase a 'high quality' sound card that has excellent A/D andD/A converters, and high quality pre-amplifiers for getting the signals from thereal world into the computer, and back out again. But no amount of money inthe world will make a 16-bit sample have a higher dynamic range than 96 dB,or a wave sampled at 22,050Hz able to contain frequencies above 11,025Hz.The current sound cards, though, are about matched in quality between theiranalog components and digital specifications. That is, the components canhandle frequencies up to 24 kHz, and have a signal to noise (S/N) ratiosapproaching 96dB, which matches the digital specifications of a 48 kHz samplerate, and 16-bit word size. Some high quality amplifiers on the market canamplify signals upwards of 30 kHz, and also have S/N ratios of around 110 dB,perhaps more. Even though the digital portion may be trivial (sampling at 60kHz, and using a 20-bit word size), a sound card of this caliber may be largerthan your PC! If the components in the sound card can not handle these higherspecifications, then the extra space required by the PC to store larger samples(20 bits instead of 16 bits) and more samples per second (60,000 as opposed to48,000) would just be wasted.
Noise
In general, noise is the opposite of pure tones or sine waves. Instead of soundat exactly one frequency, noise consists of random collections of allfrequencies. At any instant in time, any number of frequencies may be present,at any volume, at any phase. The effect is that of the static you hear whentuning between FM radio stations, or the sound of your TV when it is nottuned to any broadcast. See the Generate Noise function for examples of typesof noise, and try generating some yourself. Notice that in the Spectral View,
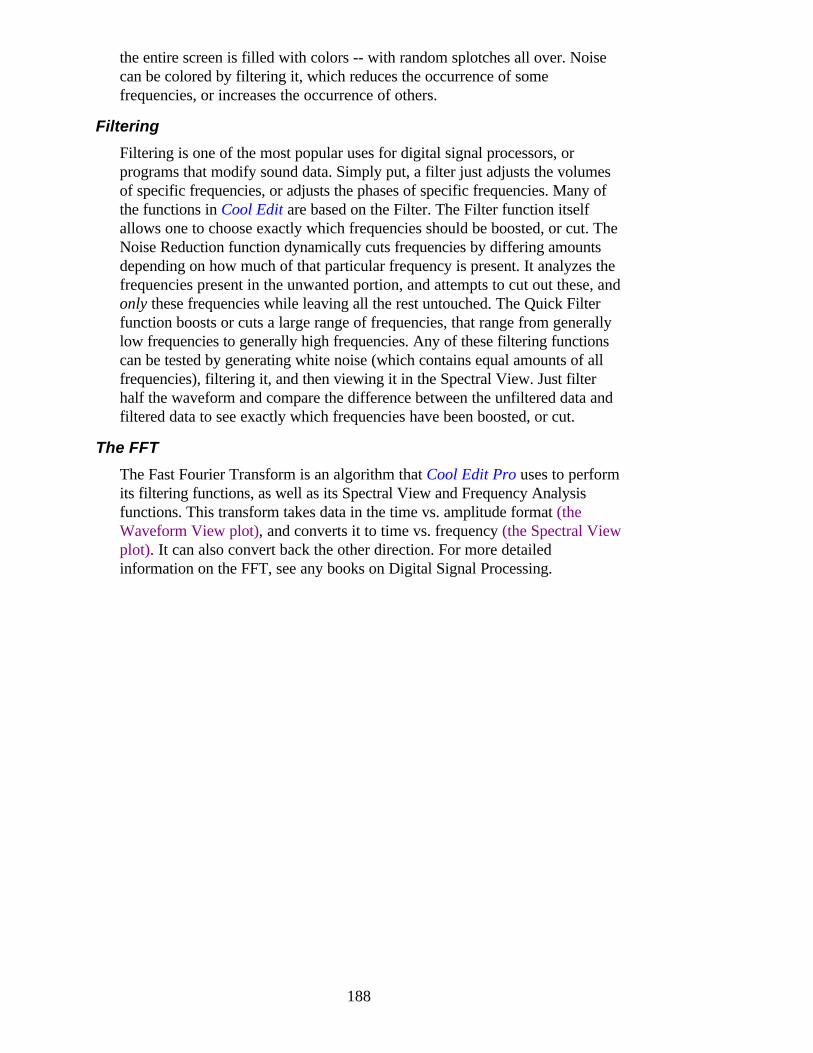
188
the entire screen is filled with colors -- with random splotches all over. Noisecan be colored by filtering it, which reduces the occurrence of somefrequencies, or increases the occurrence of others.
Filtering
Filtering is one of the most popular uses for digital signal processors, orprograms that modify sound data. Simply put, a filter just adjusts the volumesof specific frequencies, or adjusts the phases of specific frequencies. Many ofthe functions in Cool Edit are based on the Filter. The Filter function itselfallows one to choose exactly which frequencies should be boosted, or cut. TheNoise Reduction function dynamically cuts frequencies by differing amountsdepending on how much of that particular frequency is present. It analyzes thefrequencies present in the unwanted portion, and attempts to cut out these, andonly these frequencies while leaving all the rest untouched. The Quick Filterfunction boosts or cuts a large range of frequencies, that range from generallylow frequencies to generally high frequencies. Any of these filtering functionscan be tested by generating white noise (which contains equal amounts of allfrequencies), filtering it, and then viewing it in the Spectral View. Just filterhalf the waveform and compare the difference between the unfiltered data andfiltered data to see exactly which frequencies have been boosted, or cut.
The FFT
The Fast Fourier Transform is an algorithm that Cool Edit Pro uses to performits filtering functions, as well as its Spectral View and Frequency Analysisfunctions. This transform takes data in the time vs. amplitude format (theWaveform View plot), and converts it to time vs. frequency (the Spectral Viewplot). It can also convert back the other direction. For more detailedinformation on the FFT, see any books on Digital Signal Processing.
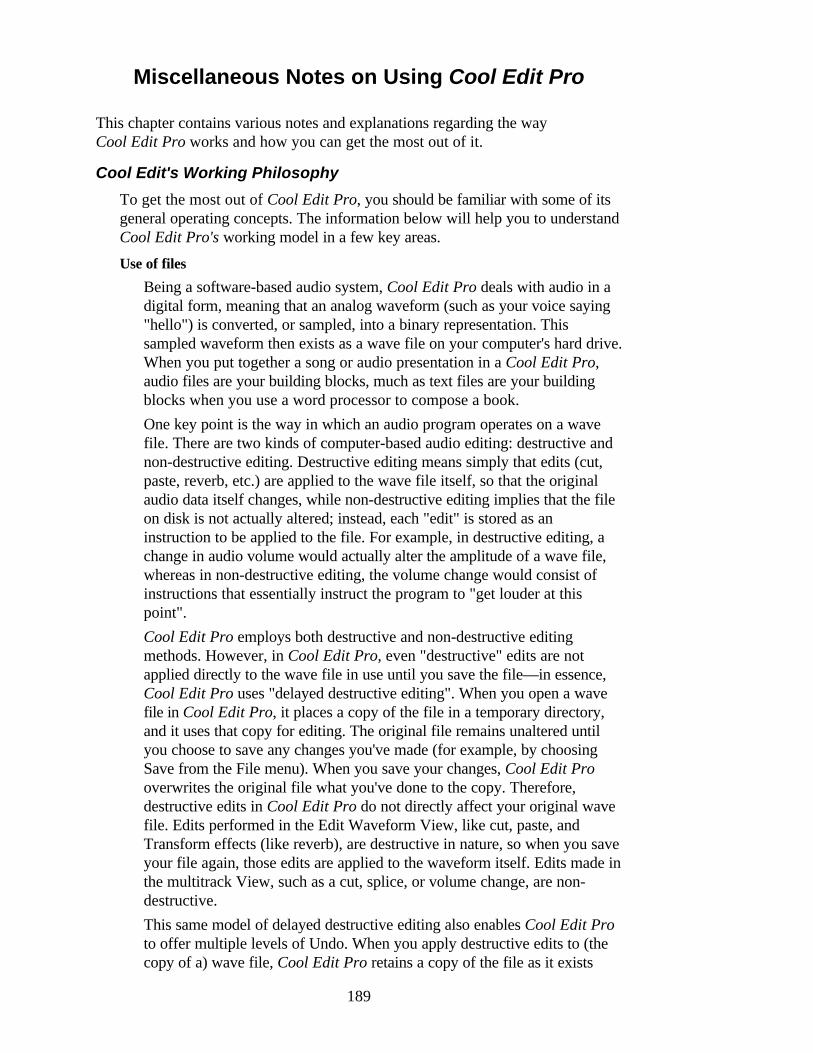
189
Miscellaneous Notes on Using Cool Edit Pro
This chapter contains various notes and explanations regarding the wayCool Edit Pro works and how you can get the most out of it.
Cool Edit's Working Philosophy
To get the most out of Cool Edit Pro, you should be familiar with some of itsgeneral operating concepts. The information below will help you to understandCool Edit Pro's working model in a few key areas.
Use of files
Being a software-based audio system, Cool Edit Pro deals with audio in adigital form, meaning that an analog waveform (such as your voice saying"hello") is converted, or sampled, into a binary representation. Thissampled waveform then exists as a wave file on your computer's hard drive.When you put together a song or audio presentation in a Cool Edit Pro,audio files are your building blocks, much as text files are your buildingblocks when you use a word processor to compose a book.One key point is the way in which an audio program operates on a wavefile. There are two kinds of computer-based audio editing: destructive andnon-destructive editing. Destructive editing means simply that edits (cut,paste, reverb, etc.) are applied to the wave file itself, so that the originalaudio data itself changes, while non-destructive editing implies that the fileon disk is not actually altered; instead, each "edit" is stored as aninstruction to be applied to the file. For example, in destructive editing, achange in audio volume would actually alter the amplitude of a wave file,whereas in non-destructive editing, the volume change would consist ofinstructions that essentially instruct the program to "get louder at thispoint".Cool Edit Pro employs both destructive and non-destructive editingmethods. However, in Cool Edit Pro, even "destructive" edits are notapplied directly to the wave file in use until you save the file—in essence,Cool Edit Pro uses "delayed destructive editing". When you open a wavefile in Cool Edit Pro, it places a copy of the file in a temporary directory,and it uses that copy for editing. The original file remains unaltered untilyou choose to save any changes you've made (for example, by choosingSave from the File menu). When you save your changes, Cool Edit Prooverwrites the original file what you've done to the copy. Therefore,destructive edits in Cool Edit Pro do not directly affect your original wavefile. Edits performed in the Edit Waveform View, like cut, paste, andTransform effects (like reverb), are destructive in nature, so when you saveyour file again, those edits are applied to the waveform itself. Edits made inthe multitrack View, such as a cut, splice, or volume change, are non-destructive.This same model of delayed destructive editing also enables Cool Edit Proto offer multiple levels of Undo. When you apply destructive edits to (thecopy of a) wave file, Cool Edit Pro retains a copy of the file as it exists
190
before the edit. It does this for each edit you perform, enabling you totravel back through your edits to previous states of the wave file. MultipleUndo you tremendous freedom in working on wave files without having toworry about "destructiveness" in the least; however, it also requiresadditional hard drive space to store these copies (copies are automaticallydeleted from you hard drive when you close a file or exit the program).You can disable the Undo feature if your disk space runs too low.
Real time preview
Cool Edit Pro offers real time preview for many of its DSP effects. Thismeans that you can monitor the processed signal before applying the effectto the waveform (remember: the effect is actually applied to a copy of thewaveform, and can be freely undone). The preview feature updates in realtime, meaning that changes you make to effect parameters while in thedialog for that effect become audible immediately, while the audio isplaying. Keep in mind, however, that this system performance affects thepreview feature. On slower systems, some effects may tend to break orskip during preview.
Multitrack
Cool Edit Pro's multitrack environment enables you to place any number ofwaveforms into different tracks for simultaneous playback and mixdown.This mixing process involves combining all of the placed waveforms intotwo (or more) channels for output. Because you can edit, add, and subtractwaveforms in the multitrack environment, Cool Edit Pro must constantlywatch for changes to the multitrack session, such as a moved or deletedwaveform, a volume change, or new material recorded into a track. Whensomething is altered, Cool Edit Pro must immediately work that changeinto the mixed output, and it does so through background mixing.Background mixing occurs behind the scenes much of the time that you arein the multitrack environment, and is generally very fast. The faster yoursystem—especially your CPU and hard drive(s)—the faster Cool Edit Procan mix in the background. The mix progress meter in the lower left cornerof the Multitrack View constantly shows how far along Cool Edit Pro inthe process of mixing your session. The meter goes from "empty" to "full"as it mixes the session, and it turns bright green when the entire session isfully mixed. You can think of this meter as a "ready" indicator; however,you need not wait for the meter to reach completion entirely beforebeginning playback. As stated above, Cool Edit Pro continuously mixes,and will continue to do so while playing, so you can safely begin playbackwhen the mix progress meter is about half-way up. In general, if thebackground mix is not sufficiently completed, you will hear a break-up orskipping when playing back the mix. If that happens, just wait a fewseconds; Cool Edit Pro will usually "catch up" very quickly, and you canbegin playing again.Again, playback can be directed to a pair of outputs (as in a single stereosound card) or to multiple outputs (as in multiple stereo sound cards, or asingle card with multiple outputs). Cool Edit Pro generates a mix for eachset of outputs used. If you are using one stereo sound card, Cool Edit Progenerates just one mix, but if you have multiple outputs, it must create a
191
separate mix for each output device (typically a stereo pair). The additionalmixing required for multiple outputs demands more processing power andtherefore tends to slow down the mixing process.
Wave Files and Session Files
If wave files are the building blocks of songs, session files are the recordedsongs themselves. Managing all of these files and the relationships betweenthem can be tricky. For example, if you create a session with a file calledC:\MYWAVES\HIHAT.WAV, and later use another program (likeExplorer) to move DRUMS.WAV to a new subdirectory calledC:\MYWAVES\DRUMS, Cool Edit Pro won't know you moved the filethe next time you load the session. Try to keep this in mind as you manageyour wave and session files so that you don't end up losing tracks orobjects inside your sessions. If you want to move an entire session file andall of its embedded waves to a new directory, you can use /File/SaveSession As in Multitrack View and check the box labeled "Save copies ofall associated files" in the Save Session dialog.
Function Presets
Many of the functions have presets that are available for easily storing andrecalling your favorite settings. New presets can be added at any time. Allpreset information is saved in the cool.ini, usually in your Windows directory.
You can Double-Click on any preset to instantly set all controls in the dialogbox to that preset.
Whenever you have settings you would like to keep, you may enter name foryour settings, and press the Add button. Be careful though, since there is norule against you adding two presets with the same name. This can getconfusing if the presets are different.
To remove a preset from the list, choose the preset, and press Del.
To modify an existing preset, double-click on the preset name, make yourmodifications, and then press Del immediately followed by Add. This willdelete the old preset and add your current settings in under the same name.
If you find that your presets aren't being saved, please check to ensure thatthe cool.ini file is not more than 64K in size. This should never happen, but itjust might be possible if you have hundreds and hundreds of presets.
Some Cool Tips to Help You Along...
Edit View
Don't forget.. Try right-clicking on everything!!!!!!!! You'll besurprised how many option shortcuts can be accessed from the mainwindow in this way.
It should be remembered that computers will often vary from onesystem to the next (depending upon their CPU speed, hard disk capacityand supporting hardware). It's the intention of Cool Edit Pro Edit that yourdata be processed as fast as possible... however, if your system simply can'tkeep up with the task that you've given it, you can change the system

192
variables to optimize Cool Edit to your current system using the Systemstab within the Setup menu.
Whenever multiple files are open, you can easy select between thesefiles using the Control-Shift keys (which shifts between open files in theforward direction) or using the Control-Shift-Tab keys (which shiftsbetween open files in the reverse direction).
Don't under-estimate the power of the Cue List within the Edit Viewmode. If a waveform range or cursor position that you know will be ofparticular interest to you in the near future, simply press F8. This will addthe selected range to the Cue List. Calling up the Cue List will allow you torecall any range or cursor point within the session, simply by double-clicking on the cue selection.
Pressing F8 will automatically add the currently defined range to theCue List. Once a cue point has been entered into the Cue List, the yellowmarker points will be replaced with static blue markers. Individual cursorpositions can be added to the list and will be displayed as a red marker.These cue entries can easily be referenced back to by simply double-clicking on the cue entry within the list.
Right-clicking on the yellow marker points will pull up a pop-up menuthat will let you find the waveform's next/previous zero crossing, FindNext Beat, and enter a range into the Cue List (F8).
If the amplitude levels between two waveforms don't match up at anedit or loop point, you may hear audible clicking as an edit passes or a looprepeats. To adjusts for this, you can revert to the original source file anduse the Zero Crossings feature to match initial and ending levels. If there isa DC offset, this DC level difference can be set to zero by highlighting itand choosing the "Center Wave" preset from the Amplify function.Because centering takes out all frequencies below about 16Hz, it iscompletely safe to do without any ill side effects.
Interesting effects can be generated from the /transform/noisereduction/noise reduction module by choosing valid "foreground" audioas your profile "footprint" rather than background noise or hiss. Forexample, within a vocal line, you can select the vowel "O" to be used as theprofile. Processing this vocal file (remember, it's best to process a copy ofthe original file) will then reduce or eliminate the "O" sounds... therebycreating a rather wild effect.
Multitrack View
One of the easiest ways to open up a session is by "associating"Cool Edit Pro to all files with the ".ses" extension. Once a session has beensave to disk, an easy way to associate the extension with the program is toopen up either My Computer or Explorer, locate and double-click on asession file. An association dialog box will automatically pop up asking youfor a program file to associate the session to... Click on browse and locatethe coolpro directory, select coolpro.exe and click OK. Now every timeyou double-click on a session file, Cool Edit Pro will automatically open upwith the session fully intact and ready to go.
193
Don't under-estimate the power of the Cue List within the MultitrackView mode. If a waveform range or cursor position that you know will beof particular interest to you in the near future, simply press F8. This willadd the selected range to the Cue List. Calling up the Cue List will allowyou to recall any range or cursor point within the session, simply bydouble-clicking on the cue selection.
Pressing F8 will automatically add the currently defined range to theCue List. Once a cue point has been entered into the Cue List, the yellowmarker points will be replaced with static blue markers. Individual cursorpositions can be added to the list and will be displayed as a red marker.These cue entries can easily be referenced back to by simply double-clicking on the cue entry within the list.
You can add some cool effects to an existing audio file in the MultitrackView window by shift-right clicking on the waveform (possiblycontaining vocals, a guitar lick, claps... you name it) and creating aduplicate image. The duplicate waveform can then be placed onto a newtrack (possibly below the existing track)... and then shifted in time (relativeto the original file), to create cool phase shifts (small time offset), delays(15-50 ms offsets) or discrete echoes (50 ms or greater offsets)... withouthaving to alter the original audio file waveform. Go ahead... create anumber of image waveforms and see just how wild of an effect you cancome up with... You might want to reduce the volume levels slightly foreach image, as the combined waveforms will increase the track's overalllevel in the mix.Using the Show Volume- and Show Pan Envelopes, you can also changethe relative volume and pan levels so that the effect will change over timeor stop/start at a particular time.
Another way to add effects to an existing audio file in the MultitrackView window is by creating an actual copy of the waveform (this can bedone using the Create Copy command in the Multitrack View mode or bysaving the file under a new name using the Save As command within theEdit View Mode). Once a copy of the original file has been made, it can beprocessed in any way you'd like and then be placed onto another track,such that it will simultaneously play back with the original file. Using thismethod, you can then vary the effected track's volume and pan controls (ina non-destructive, automated fashion) without altering the original audiofile in any way.
Although the Transform function doesn't exist within the MultitrackView, you can simply double-click on a multitrack waveform (which willopen up the selected waveform into the Edit View window)... From here,you can use the /Edit/Save Selection option to create a copy of the filethat can be effected using any Edit View Transform function... Once done,the newly processed file can be placed into the Multitrack View window.
By choosing the MixDown option, you can mix any number ofinstruments down to a single track or stereo track pair. In this way, youcan create a submix that will be imported into the Edit View window forfurther processing, or for re-insertion back into the Multitrack window. For
194
example, you could record several backing vocal tracks and then mix themdown to a stereo track pair for further processing or for reducing the strainon the CPU/hard disk of having to simultaneously mix the numerous musicbed and vocal tracks at one time.You could also use the MixDown option to create a single composite trackof several existing takes. For example, let's say that we've done extensiveediting on a guitar track (involving several takes and countless edits).Personally, I'd consider it wise to mix my efforts down into a compositetrack... if nothing than for safety's sake.
An easy way to enter a waveform range from the Edit View into theMultitrack View is by selecting the /Edit/Insert In Multitrack option.This simple-yet-powerful function simply takes the highlighted Edit Viewrange and pastes it into the Multitrack View window (within the nextavailable track at the beginning of the session's timeline).Say, for example, that you wanted to loop a short percussion riff. A simpleway to accomplish this would be to use the /Edit/Find Beats function toeasy search for the loop points and the select Insert In Multitrack, switchto the Multitrack View mode and Choose the /Edit/Loop Duplicatefunction to create the number of loops that you want.
If you'd like to add a previously created session to your current session,this can easily be done using the /File/Append to Session command. Forexample, lets say that we'd like to insert an existing multitrack compositionthat's been saved as a session. Appending the desired session into ourcurrent workspace (which will place them at the beginning of the timeline,onto the next available set of open tracks) we can now select and move theappropriate session waveforms into place (often using the Ctrl-RightClick mouse command to select multiple waveforms)... and Voila... you'veintegrated two sessions into a whole new composition.
Spline Curves
Some DSP effects have user definable charts in them, and some of these chartsoffer a Spline Curves option. Normally, a graph is created by clicking controlpoints on the chart, and that graph is used to control the given effect. When theSpline Curves option is active, instead of using straight lines to connect thecontrol points, a curve is inserted that smoothly transitions from one point tothe next is used instead. Most of the time, this curve will not go through all thecontrol points, but rather the control points will be used to control the shape ofthis curve.
In order to get the curve closer to a control point, you must create morecontrol points near the point in question. The more control points that areclustered together, the closer the spline curve will be averaged to those points.
Whenever very smooth curves are desired instead of straight lines (withtheir associated discontinuities at the control points), it's best to use the SplineCurves option.
The functions that make use of spline curves are: Envelope, FFT Filter andBrainwave Synchronizer.
195
Using ACM
Cool Edit Pro provides support for Microsoft's ACM (Audio CompressionManager) driver, which enables you to load and save files in a variety offormats other than those supported by Cool Edit's own converters, such asDSP Group TrueSpeech and GSM 6.10. Some of these formats come as astandard part of Windows 95, while you may acquire others when you installother software. To save a file in an alternate format using the ACM driver, use/File/Save As, select ACM Waveform as your target format, and click onOptions. You can select from among various quality levels, and each level willgive you different options for formats and attributes.
Please note that the ACM driver you want to use may require that the file be ina specific format before saving. For example, if you want to save a file in theDSP Group TrueSpeech format, you should first use /Edit/Convert SampleType to convert the file to 8KHz/mono/16bit, because that is the only formatsupported by the TrueSpeech ACM driver. For more information on anyparticular ACM driver, contact the creator of the format (such as DSP Groupfor TrueSpeech, or CCITT for the various CCITT formats) or themanufacturer of the hardware that uses the format in question (such asCreative Labs for the SoundBlaster ACM driver).
Using Cool Edit Pro with Cakewalk Pro Audio
When you install Cool E, it automatically registers itself for use withCakewalk® Pro Audio™ from Twelve Tone Systems. This means you canuse Cool Edit Pro as your waveform editor from within Cakewalk. Cool Editshows up as an item in Cakewalk's Tools menu; when you select a wave filewithin a track, Cakewalk will automatically load that wave into Cool Edit forediting.
You must have Cakewalk Pro Audio 5.0b or higher to integrate Cool Editwith it.
Mono to Stereo Conversion
Use the /Edit/Convert Sample Type function to convert a waveform fromMono to Stereo. There are other methods that work as well...
You can copy the wave at its current volume directly to one channel orthe other.
• Copy the wave in question to the clipboard by highlighting it and choosingEdit -> Copy.
• Go to the stereo wave in question, and uncheck Edit Left or Edit Right inthe Edit menu. Now paste the wave with Edit -> Paste. The wave will bepasted to the channel that remained checked in the menu.
If you wish to place separate waveforms on each channel of a stereo waveand mix at different volume levels, you can use the /Edit/Mix Pasteoption.
• Choose /File/New and create a new stereo wave of the sample rate youwish.

196
• Open a new instance of the program, and open the mono wave you want toplace on the left channel. If you want to place a stereo wave, you may wishto use the Channel Mixer to mix both channels at 50% first.
• Highlight the section you wish to place on the left channel, and choose/Edit/Copy.
• Select the new blank stereo waveform, and choose /Edit/Mix Paste. Makesure Overlap is checked, looping is turned off, Lock L/R is turned off, andthe left volume is 100% while the right volume is at 0%.
• To do the right channel, copy the section as you did for the left.
• Place the cursor at the start of the new waveform, and choose /Edit/MixPaste. Change the volume levels so that the left volume is 0% and the rightvolume is 100%.
Adjusting recording and playback levels
Cool Edit Pro doesn't control the recording (gain) or playback (volume) leveldirectly, but you can adjust it with the mixer that came with your card or withthe mixer built into Windows 95. You may need to do this if your recordingsare too quiet or if you can't hear them when you play them in Cool Edit. Here'show to do it with the Windows 95 Volume Control applet:
• Click on Start - Programs - Accessories - Multimedia - Volume Control
• To adjust the Play (output) level, make sure Select is checked for thesource you want to use and move the slider up to the level you want.
• To adjust the Record (input) level, select Properties from the Options menuin the mixer and click on the Recording button in the "Adjust volume for..."box. Then check the source you want to use and adjust the slider.
If you want to monitor the audio while recording, you may need to look fora "monitor while recording" setting for your sound card. This can sometimesbe found by pressing the Advanced button (if available) in the RecordingControl dialog.
The "Record" (input) and "Play" (output) levels are separate settings. Onecontrols the input level of the audio source, and the other controls the volumeof the sound going to your speakers.
Spline Curves
Some DSP effects have user definable charts in them, and some of these chartsoffer a Spline Curves option. Normally, a graph is created by clicking controlpoints on the chart, and that graph is used to control the given effect. When theSpline Curves option is active, instead of using straight lines to connect thecontrol points, a curve is inserted that smoothly transitions from one point tothe next is used instead. Most of the time, this curve will not go through all thecontrol points, but rather the control points will be used to control the shape ofthis curve.
197
In order to get the curve closer to a control point, you must create morecontrol points near the point in question. The more control points that areclustered together, the closer the spline curve will be averaged to those points.
Whenever very smooth curves are desired instead of straight lines (withtheir associated discontinuities at the control points), it's best to use the SplineCurves option.
The functions that make use of spline curves are: Envelope, FFT Filter andBrainwave Synchronizer.
Creating Sound Effects
Two types of sound effects can be created using Cool Edit Pro: Noise based,and Tone based. To create a sound effect, you must first generate some noiseor tones upon which to base your effect. The basic method is to create a fewseconds of tones or noise, and then use the transformation functions tomanipulate the wave and create the desired effect. With these to soundsources, noise and tone, practically any effect can be created.
Noise Effects:
Waterfall, wind, and rainThunder, snare drum, cymbals, jet enginesFantasy sounds such as time tunnel vortex, etc.
Tone Effects:
Siren, pipe organ, piano, and other musical instrumentsSpace ship sounds, whining, whistles, etc.
• First generate a few seconds of noise or tones using the Generatefunctions.
• Experiment with the different settings (e.g. white noise, pink noise,overtones, etc.
• Add some silence to the end of the sample by clicking the cursor at theend of the wave, and choosing /Generate/Silence. This will give someroom for transformations that "bleed over" such as echo.
• Try effects such as Flanging, Filter, and Quick Filter with noisesources, or Stretch and Echo with tone sources.
• Try reversing, or copying and loop pasting portions of the wave.
• The possibilities for sound effects are only limited by your imagination!
198
Answers to common Questions (a.k.a.Troubleshooting)
If you're having trouble with some aspect of Cool Edit, you may find a solutionbelow.
Q: I can record just fine in Edit View, but when I try to record in MultitrackView, I get a flat line or nothing at all. What's wrong?
A: Your sound card and its drivers probably don't support simultaneousplay and record (known as "full duplex" capability). When you're inMultitrack View, Cool Edit Pro is always in full-duplex mode, so even ifyou're only trying to record one track, you must still be able to record andplay at the same time to do it in Multitrack View. If it doesn't work foryou, use Edit View to record and then insert the recorded track(s) intoMultitrack View. If you think your card ought to support simultaneousplay and record, contact the manufacturer of the card to see whatlimitations may apply.
Q: Why does Cool Edit create files with the extension ".pk" alongside my audiofiles?
A: These are "peak files". They enable Cool Edit to load, save, and redrawfiles more quickly than it could do without them.
Q: I am using Cool Edit Pro to master .WAV files for use with CD-R equipment,and there is an annoying click after each track. Why is that?
A: Some CD-ROM Recording equipment does not read the RIFF .WAVfile correctly, and interprets some of the information chunks as audio. TheRIFF specification is available from Microsoft for these companies. In themeantime, you can force Cool Edit not to write any extra information bynot using the Cue or Play lists (these are saved in the .WAV file as per thestandard), and by clearing out all information in the /Options/Info dialog.Uncheck the Fill * fields automatically checkbox to prevent Cool Edit Profrom automatically filling in the date and software package fields in thefuture.
Q: When repeatedly hitting Play too fast, or starting and stopping MonitorSource too quickly, my system hangs or crashes.
A: Try increasing the STACKS line in CONFIG.SYS to STACKS=12,512.On some configurations, if the stacks are set too low, there will beproblems starting and stopping audio too quickly.
Q: Some of the features I want to use are unavailable ("grayed") in the menusand toolbar. What's wrong?
A: Probably nothing is wrong. You must first select all or a portion of awaveform before you can use features like Reverb, Noise Reductions, andothers. Try loading a file and selecting some or all of it with the mouse; youshould see those features "light up" in the menus and toolbar once you'vedone this.
199
Q: Can Cool Edit Pro convert files, either singly or in batches?
A: Yes! To convert a single file, use /File/Open to open the file inCool Edit Pro, select /File/Save As, and specify the file type at the bottomof the Save As dialog.
Q: I can't record. When I try, I get a flat line, and no sound when I play. What'swrong?
A: Probably you have the record level set too low for the audio signalyou're trying to record. Try adjusting your sound card's record levels in itsmixer or in the one built into Windows (Start - Run - sndvol32exe).
Q: When I record (or play), I hear skipping and dropouts. What can I do toeliminate this?
A: You probably have a too-small buffer size in the Settings dialog. Aminimal buffer size is about 2 seconds for fast machines, about 8 for slowones. Also try decreasing or increasing the number of buffers. Please notethat some audio drivers have problems with too many buffers. Using acompressed hard drive on a slow PC could also eat up so many CPU cyclesthat there isn't time left to do recording. Either try adjusting the buffer sizeup or down, or record at a lower data rate (i.e. 8 bits instead of 16, or 32Kinstead of 44K). We have tried very hard to ensure that recordings wouldsound perfect, without any data loss. If you have problems, see if otherrecording software has the same problems. If so, you may have a hardwareincompatibility between you sound card and your main board, video board,or other installed boards. If the problem persists, see below for a list ofsuggestions on solving it:
1 Try reducing (or perhaps increasing) the Play/Record buffer size underOptions:Settings.
2 Try reducing to as little as 3 (or increasing up to 12) the number ofbuffers under Settings.
3 Add or update the line in CONFIG.SYS to read "STACKS=16,512".
4 Add the following lines to the SYSTEM.INI file (16meg systems use2048, and 8meg systems use 1024):[vcache]MinFileCache=4096MaxFileCache=4096
5 Check to make sure that if your hard drive (the one pointed to by theTemp Directory setting in Options:Settings) requires a DMA or IRQsetting, it is not somehow conflicting with that of your sound card. Thisis common for digital I/O cards and SCSI drives.
6 If your sound card has a choice for "Single Mode DMA", do not enablethis item.
7 Set the hard disk priority to "Network Server" and caching to 32Klookahead (not the default 64K) in Control Panel-System-Performance-File System.
200
8 Go to Control Panel/System/Performance/Virtual Memory and choose"Let me specify my own virtual memory settings" and choose a nicefast hard disk (assuming you have one) with at least 30 MB or so free.Then enter 20 for Minimum and 20 for Maximum. If you need morevirtual memory, go as high as 60 for min and max.
Q: When I try to record or play, I get RecordVoc Error" "MMsystem032 Thespecified format cannot be translated or supported. Use the Capabilities functionto view supported formats." What does this mean?
A: This indicates you're trying to record or play a file in a format notsupported by your sound card or its drivers. See /Options/Devices to findout what your card can do. Many 16-bit cards, for example, can't handle48khz, so if you try to play a 48khz file with such a card in Cool Edit, youwill see this error. Similarly, this error will come up if you try to play a 16-bit file on an old 8-bit sound card.
Q: The program crashes right away if I try to Play or Record anything!
A: The real-time VU meters may be incompatible with some sound cardsor their drivers. Try disabling them by right-clicking on the VU meter at thebottom of the window, and unchecking the "Show on Play and Record"option.
Q: I keep running out memory. How can I free up more RAM?
A: If you are editing very large files (several hundred megabytes or more),try increasing the Peaks Cache in /Options/Settings/System to 1024 oreven 1536 or 2048 to use less RAM. You can also try reducing the WaveCache size in /Options/Settings/System and/or increasing the virtualmemory settings for the system.
Q: I just installed a 16-bit audio card, but my 16-bit sound files still sound awful.Should I take my card back?
A: No. Your card is probably fine. Check to see that the "Play 16-bit filesas 8-bit" box is not checked in the Settings dialog. If it is checked, yourfiles are being converted to 8-bit before being played. Also be sure you areusing the right DMA settings. The lower DMA channels can only support8-bit audio. Please check your sound board manuals for this information.
Q: Why are some functions not selectable?
A: Some functions require that you select part of the waveform before theyare selectable, while others only work on stereo files, such as Wave andChannel Mixer (which becomes Invert for mono waves).
Q: How can I see my wave size information in samples instead of time?
A: Double-click on the time (or samples Start and End) window to togglethe display between time and samples. This, and double-clicking on thewave to select all, are the only functions that do not have a correspondingmenu item or button associated with them. Other shortcuts are double-clicking on the waveform type display to change the waveforminterpretation (i.e. interpret the 44.1 kHz wave as a 22 kHz wave), anddouble-clicking on the green bar to bring up the viewing samples data entrybox.
201
Q: Cool Edit doesn't seem to know the format of waves that have headers.
A: If you find you cannot load or save .WAV format waveforms, if you tryto load a .WAV waveform file and the "Choose Sample Rate" dialogappears, or have any trouble with loading and saving in the proper format,this problem could be the result of running a separate program with thesame name as the .FLT file (e.g. wave.flt will not be used if an applicationcalled wave.exe is running). If this is the case, simply rename the .flt file(e.g. rename wave.flt to wav.flt).
Q: Some functions don't work when I have low memory on the hard drive... ?
A: If the TEMP environment variable points to an invalid directory, somefunctions may fail. Be sure the TEMP environment variable is set to a validdirectory with plenty (at least 1 meg) of hard drive space. Alternatively,you can add the TEMPOVERRIDE= line to the [Size] section of cool.ini(found in the Windows directory) and set it to your temporary drive anddirectory. You should have as much free space on the temporary files driveas twice the size of the largest file you will be working with, as a rule ofthumb.
202
Brainwave Synchronization
By David Johnston
About Brainwave Files
Cool Edit Pro's Brainwave feature (/Transform/Special/BrainwaveSynchronizer) works like many meditation tapes and light/sound devices onthe market, which range in price from $200 to $500. There are even boardsavailable with plug in glasses (which have blinking lights) for your PC in theprice range of $495. The files created using the 'Wave' transformation are evenmore powerful, and are definitely more pleasing to the ears. Most other devicesand tapes have a "humming" sound or some other tones to induce the rightbrainwave frequencies. This program allows you to use ANY sound to encodethe frequencies with. The most effective we have found are by using the NoiseGenerator, which creates pleasing waterfall like sounds. This function onlyworks on stereo waveforms, and the effects work if only if listened to withstereo headphones.
Listening to sounds that have been waved for periods of 5 minutes or more willproduce the desired state of awareness in the listener. Sessions of 25 minutesor so work really well!
Major brainwave pattern frequencies and possible uses forbrainwave synchronization
Delta 1-3 Hz Deep sleep, lucid dreaming, increased immune functions.
Theta 4-7 Hz Deep relaxation, meditation, increased memory and focus.
Alpha 8-12 Hz Light relaxation, "superlearning", positive thinking.
Beta 13-25 Hz Normal state of alertness, stress and anxiety.
Gamma 30 Hz on up Hyper-awareness
High Gamma 200+ Hz Various effects
Immediate Relaxation and Stress Relief - Choose between 5hz and 10 Hzfor different levels of relaxation.
Meditation - Choose between 4hz and 7hz, either cycle between a few, or stayat a particular frequency for different results.
Sleep Replacement - A 30 minute session at 5Hz replaces about 2-3 hours ofsleep, allowing one to wake up in the morning more refreshed. Try listening1/2 hour before waking up in the morning, or 1/2 hour before going to bed.
Improved Sleeping Patterns - Any of the Alpha and Theta frequencies (8Hzto 4Hz) for 30-45 minute sessions at the same time each day.
203
Treatment of Insomnia - Choose between 4hz and 6hz for starters (the first10 minutes), then go into frequencies below 3.5hz (for 20-30 minutes), settlingon about 2.5hz before fading out.
Improved and Lasting Sense of Well Being - Try Theta (4Hz to 7Hz) for 45minutes, daily.
Creative Visualization - About 6hz for a while, then up to 10hz works wellwhile using visualization techniques.
Alleviation of Migraines and Headaches - Experiment with Alpha and Thetacombinations. Try and visualize the pain getting smaller and smaller until itdisappears.
Reduction of Depression Symptoms - Again, Alpha and Theta combinations,mostly theta.
Self Hypnosis - Choose about 8hz to 10hz while playing any self-hypnosistape, or guided meditation.
Accelerated Learning - Choose about 7hz to 9hz while playing any learningtapes, like foreign language tapes, etc. to increase comprehension. Also, whilestudying, take breaks every half hour and listen to 10 minutes of Alpha (10Hz)while reflecting on the material you just learned.
Subliminal Programming - Choose 5hz to 7hz while playing your favoritesubliminal tapes, or make your own by recording some affirmations, and mixpasting (Edit:Paste Special) them from the clipboard at barely audible volumes.
Improve Intuition (or ESP?) - Theta frequencies help in this area, 4hz to 7hz.
Reaching Higher States of Consciousness - Theta again, with daily half hourminimum sessions. Give at least a month for results.
Quick Refresher on long days - Low Alpha 8hz to 10hz for about 15 minutesworks well. Sort of induces a cat-nap.
Increased Immune System - Relaxing to Alpha and Theta combinations daily.Learning how to relax, and relaxing more often can lower blood pressure andincrease the body's natural defenses. Using Alpha Synchronization (8Hz to12Hz), expect similar increases in the neuro-chemical levels of Norepinephrin(11%), Serotonin (21%) and Beta-Endorphins (25%).
DISCLAIMER
By using this program, you agree that the author will not be responsible forany damage as a result, direct or indirect, of using this program. The authormakes no claims about the effectiveness of these sounds for any particular
204
purpose. The user is encouraged to do his/her own research into the area ofbrainwave synchronization via auditory stimulation.
WARNING
Sounds generated by the wave function may not suitable for epileptics orpersons undergoing psychiatric treatment.
About Carrier Waves
A carrier wave is needed to transport the brainwave frequencies. Because thecarrier wave is not what you hear through the headphones directly, you do notneed to buy super high-end headphones (5Hz-25KHz) to reproduce the effects.These sounds may be recorded using any stereo cassette recorder and playedback on any stereo cassette player without losing effectiveness. In other words,your headphones do not need to be able to reproduce a 5Hz signal if you aregenerating a 5Hz theta-frequency brainwave file, and your tape deck does notneed to be able to record frequencies this low either. The brain does howeverrespond better to the lower frequencies because of the nature of thesynchronization algorithm, so the better the headphones you buy, the moredramatic the results may be. The best headphones are the kind that cover theentire ear, so outside noise does not get in. Plus, these headphones have muchhigher response to low frequencies. The active ingredient, so to speak, are thefrequencies from about 40Hz up to about 2khz depending on the frequencybeing encoded and the intensity.
Carrier waves must have some correlation between the left and right channels,no matter how slight. So mono (total correlation), inverse (total negativecorrelation), and spatial (natural recordings that have some of the same soundscoming in both channels) will work great.
The best sounds to use as carriers are sounds that are spread across the entirefrequency range, or at least most of the lower frequency range. Good examplesare ocean, waterfall (most any recordings from nature), and noise generated bythis program. Experiment with mono (both left and right channels the same),inverted (like mono, but the left channel is the inverse of the right, obtained byusing the Channel Mixer), and spatial stereo (spatially encoded sounds innature, recorded with microphones about 9 inches apart to simulate separationbetween the ears). But don't let this stop you from digitizing your favoritemusic, and using it as a carrier, or converting your favorite to a mono orinverted wave.
To generate a carrier wave, you can do three things:
Record a sample - Once recorded, use the Channel Mixer to create a mono,or inversed wave. The channel mixer will also allow you to put in just theamount of correlation you desire (for example, a 20% mixture of bothchannels, leaving the rest untouched.) Or just leave it the way it was recorded.You may find changes in effectiveness of the brainwave files depending on howyou use the Channel Mixer. Keep in mind that this function only operates onstereo waves, so when "mono" is mentioned, it means that the exact samesignal is present on both channels--the left channel and right channel are thesame.
205
Generate Tones - You may use the Generate Tones function to find apleasing, relaxing tone for the background (but we find "noise" sounds morerelaxing). The way tones work the best is if the left channel's tone frequency is5-6 Hz different from the right channel's tone. This creates a beat pattern equalto the frequency difference, which the brain responds to somewhat (this is theproperty that many theta-inducers rely on). To do this, generate one tone withleft volume at 40, and right volume at zero. Then generate the second tonewith the left and right volumes reversed. Finally, Paste Special (with overlap)one tone on top of the other. Use low frequency tones, like 50Hz to 120Hz forbest results. These tones, by themselves, will help coerce the mind into thestate associated with the difference between the frequencies. For example, for atheta state of 6Hz, use a 70Hz and a 76Hz tone. Combining this tones samplewith an existing brainwave file, by overlap pasting at a quiet volume (20%) iseven more effective.
Generate Noise - Use the Generate Noise function (pink and brown workbest) in any of the modes: mono, inverse, or spatial stereo (independentchannels noise will not work as a carrier for brainwave frequencies at all, sincethere is no correlation between the left and right channels). Using pink noise inspatial stereo, and running it through the Quick Filter to get rid off some of the"edge" if any works the best. Inverse works quite well too, but the brainwave"effect" is more pronounced, and can be distracting, and some sound boardshave trouble reproducing sound that is inversed between channels.
Once you have found a pleasing sound, about 10 seconds or so of amonotonous sound (tones, river, waterfall, noise...) you're ready to start. If amonotonous sound is used, more disk space can be saved because we will usethe play list to repeat portions. If a music sample were used, it is quitenoticeable that the same 10-second piece is being played over and over andover again.
If you're curious you can also spatially locate a mono sound to the left or right.Do this if you wish to have the illusion that a particular sound is coming fromone side or the other. The function works by pasting a mono sound sample intoa stereo waveform, and using the Digital Delay function. Having a quiet "ping"(generated by using the sine wave tone generator with the bell curve envelope)play spatially on the left, then on the right at about 5 second intervals is veryrelaxing.
Encoding Brainwave Information
There are two types of brainwave files that you can create: A flat file, anda cued file. The flat file takes more memory, and plays straight throughfrom beginning to end, while the cued file is actually contains pieces of theentire audio program, that when played in the proper order become thebrainwave file. The cued file takes less memory, and can very quickly bemodified at any time by re-arranging the audio pieces. The average lengthof a cued file is about 3-4 minutes for a program that can last as long asdesired. The flat file is a standard wave file, which means to create a longprogram, you must have enough space for it. The only advantage to using aflat file is if you are waving music, since music cannot be split into piecesand rearranged, otherwise it would sound discontinuous. Creating
206
brainwave files using the flat file method will be discussed first, since it ismore straightforward.
Flat Brainwave File Generation
Create a file the length you wish to make your relaxation program using thecarrier wave(s) of your choice. Either record music, or use the pink noisegenerator and copy and paste (or Paste Special) to the desired length. Ifyou are using a monotonous sound, you would be better off using the cuedfile method. Lengths of good relaxation programs vary from 15 to 30minutes, and beyond. This means you must have enough hard drive spacefor the entire file. Since the temporary file takes up hard drive space aswell, the maximum size of file you can create, and be able to save, will beone that takes up half of the initial free hard drive space.Use the Wave function to encode the brainwave patterns into the carrierwave by highlighting a section of the wave, or the whole thing, andchoosing Transform:Wave, or click the wave icon. With the wavetransformation, you have complete control over the brainwave frequencybeing encoded, the strength of the signal, and the positioning of the signalleft or right. Over the selection highlighted, the intensity, and positionremain constant, but the frequency can be varied using the graphical inputcontrol. See the section on Authoring Brainwave Files to learn whatsettings to use for the Wave function, and how to build effective files.Once the entire file has been waved to your satisfaction, you can save thefile if you wish, and play it using the Play button. An interesting side effectis that different sounds are heard if you listen to one channel, listen to bothchannels with one ear, or listen to each channel with each ear.
Cued Brainwave File Generation
These files contain many short snippets of brainwave encodings at differentfrequencies. Each snippet is cued using the Cue List, and a Play List isgenerated by adding entries from the Cue List, and looping them ifnecessary. To listen to a cued brainwave file, you must use the Play buttonin the Play List dialog box.First you must figure out how you want to divide up the brainwaveprogram (your 20-30 minute masterpiece) into components. For example,you may want to have patterns of 5Hz, 7Hz, and 9Hz at different points inthe program. In this case, you will need at least three pieces for yourcreation. The actual file will just be 10 seconds of carrier wave at 5Hz,followed by 10 seconds at 7hz, followed by 10 seconds at 9Hz. All thepieces are placed in the cue list by highlighting the piece, and choosingAdd. It is best to add the piece to the cue list once it is created, or pastedat the end of the current waveform. To create the final program, the piecesare added to the Play List in the order you wish to listen to them. Eachpiece can be looped if needed. So a 20 minute program can be generatedfrom 3 10-second pieces by adding the cues to the play list and looping.First you need to create 10 to 20 seconds of carrier wave, and save in aspecial file in case you need the carrier wave again later. Highlight thewave, and Edit:Copy. When you need another copy of the initial carrierwave, you need only to Paste it.
207
Add the first carrier wave snippet to the Cue List by pressing the Addbutton in the Cue List dialog. Give the cue for this snippet a name thatreflects the waveform transformation you will be using, for example, "6Hzto 5Hz drop".Choose the Transform:Wave function to encode the proper patterns intothe carrier wave. Look at the section on Authoring Brainwave Files tolearn what settings to choose.Click past the end of the wave file (make sure the rightmost part of the fileis in view), and choose Paste to insert another copy of the carrier wave.Once you do this, you can add the newly inserted selection to the cue list,and give it a name. Repeat the step above for creating a brainwaveencoding over the carrier wave you just inserted. Do this as many times asneeded until you have all the pieces you need to build the final brainwavefile.Once all the pieces have been generated, add them in the order you like tothe play list. To make pieces last longer (if the beginning and ending of thepiece are at the same brainwave frequency), increase the number of loopsfor that entry in the play list.When Played from the play list, the pieces will be played in the ordershown, and looped if necessary.To get familiar with the cue list, and play list, open one of your favoritewave files, and highlight sections then add them to the cue list. After youhave a few selections in the cue list, add them to the play list, and choose aloop count of greater than one for some of them. Choose Play from theplay list, and listen to what you've just created.
Authoring Brainwave Files
After learning about carrier waves, and encoding procedures, all you needto know is what frequencies to use, and when to use them during thecourse of the listening session. Once you know what frequencies to use,and at what intensity, you can generate the completed file using either ofthe methods above.Effective brainwave files have some sort of encoding going on the entirelength of the session. For the first 3 minutes or so of the session, thelistener will not be in a "relaxed" state, and will not respond greatly to thefrequencies being presented. During this warm-up period, graduallydecreasing from about 12Hz down to 8Hz works nicely. After about 4minutes, the listener's brainwave patterns will start to synchronize with thepatterns in the headphones, and the serious brainwave programming canbegin.Frequencies of 8-10Hz correspond to an alpha state -- light relaxation, likea quick afternoon siesta. Frequencies of 6-7Hz correspond to a theta state -- meditation. 4-5Hz correspond to deep relaxation. You can create asession that is constant, in one of these states, or create a session thatdynamically flows from one to the other. When going down in frequency,give the listener about one minute to catch up, and stay in sync with thewave. Going up in frequency does not require the listener to catch up. In
208
other words, if you go from 6Hz down to 4Hz over a 20 second timespan,and hold at 4Hz, the listener may not be at 4Hz for another minute. Whengoing from 4Hz to 8Hz in 20 seconds, the listener will be at 8Hz at the endof the 20 seconds. It appears to take extra time when going down infrequency, but no extra time when going up. This basically holds true forthe first 20-30 minutes of a session. After that, the opposite tends to occur.It is easier to go lower than go higher. This means that to bring a listenerfrom 4Hz (where she has been for the last 30 minutes) up to 12 Hz, itshould be done over a 5 minute period or so. One nice trick to do is tokeep the listener at around 4-5 Hz for a while, then about once every 2minutes, go up to 8Hz and back over a 20 second span. This will alert thelistener slightly, and make them aware for a few seconds of what they arethinking. This is great for getting creative insights and the like. It acts as asort of window to the subconscious, allowing one to remember what isgoing on. It's kind of like remembering dreams: you do it better if you areawakened in the middle of one.Another effective method of producing relaxation files is to overlap them.That is, have portions that are one frequency, and slightly spatially locatedto one side overlapped with a slightly differing frequency spatially locatedslightly to the other side. This gives the listener the chance to decide whichfrequency to be at, and gives them more freedom over the experience. Forexample, a session could go from 8Hz to 4Hz over 10 minutes overlappedwith 7Hz to 5Hz over the same 10 minutes.For nice super-relaxing effects, generate panning waves (frequencies of0.05 to 0.2) over your session after encoding the initial brainwave patterns.For example, if you are generating a brainwave file out of 20-secondpieces, after generating the main brainwave frequency over the 20 secondperiod, generate a panning wave of 0.05 or 0.1 (which means a period of20 or 10 seconds) with an intensity of about 50 or so. This will make thesound appear to shift left and right to the listener over a 20 or 10 secondperiod. Now, overlapping a 24-second piece panned at 0.125 (8 secondperiod) at 5Hz with a 0.167 (6 second period) at 6Hz will combine thepractices of multiple frequencies with panning for an extremely super-natural effect! Once you get started creating a few files, and see what thedifferent frequency ranges do, you will become familiar with the differenteffects and how to generate just the effects you want.High Gamma frequencies of 200Hz or more seem to help in relaxation, anddo something no doubt. This is an area you can experiment with. Whengenerating frequencies above 40Hz or so, it is best to keep the intensityvery low, like 7 or 8. The higher the frequency, the lower the intensity hasto be, otherwise the encoding will overwrite itself and the signal will belost.
209
Sample Theta File - Step-by-Step
Create a new blank file with File:New. Choose a Stereo file, either 8 or 16 bitand a 11025, 22050, or 44100 sampling rate. The final file size will be one ofthe following sizes listed below depending on your choice:
11025 22050 441008-bit 2.6M 5.2M 10.5M16-bit 5.2M 10.5M 21.2M
You must make sure you have enough memory for a file of this size, plus anadditional meg for working space. If you plan on saving the file when you aredone, you must have at least twice this amount of hard drive space available,since a temporary file is used instead of memory while working on the wave.
Choose Generate:Noise. Select Pink, Spatial Stereo (500 µSeconds) for 15seconds at an intensity of 3 . This is usually the longest portion of thegeneration of brainwave files. Because of this, it is advised that you save thispiece of noise so that in generating future files, you can just load in this pre-calculated noise as a starting point.
Choose Edit:Copy. From now on, we will paste the noise in when we need it!
Make sure the noise is highlighted. If it is not, select all by double-clicking onthe waveform until it is highlighted.
Choose Add in the Cue list, and give the entry a Label of 10Hz to 8Hz, and aDescription of "Warm-Up"
Choose Transform:Wave to bring up the brainwave dialog box. Enter 10 forthe Highest Frequency, and 8 for the Lowest Frequency, and an Intensity of35. On the graph above, click the leftmost dot, and drag it to the top of thegraph. Click the rightmost dot, and drag it to the bottom of the graph. This willproduct a frequency encoded at 10Hz at the beginning, and glide down to 8Hzby the end. Choose OK to generate the encoding. This shouldn't take nearly aslong as it did to generate the noise.
Click the mouse at the rightmost portion of the wave (just beyond the blackwaveform display area). When you do this, the yellow cursor arrows should beall the way to the right of the wave. You must always add new pattern blocksat the end of the current waveform.
Choose Edit:Paste to insert another copy of the original noise that we hadcopied originally.
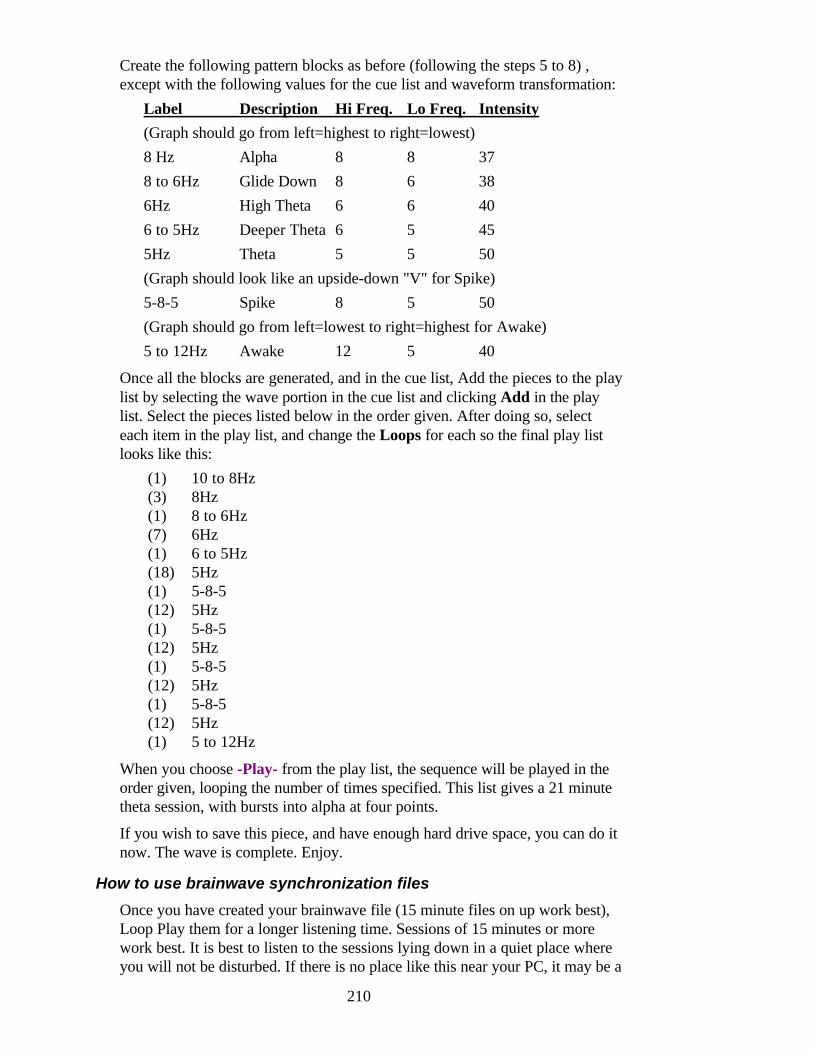
210
Create the following pattern blocks as before (following the steps 5 to 8) ,except with the following values for the cue list and waveform transformation:
Label Description Hi Freq. Lo Freq. Intensity
(Graph should go from left=highest to right=lowest)8 Hz Alpha 8 8 378 to 6Hz Glide Down 8 6 386Hz High Theta 6 6 406 to 5Hz Deeper Theta 6 5 455Hz Theta 5 5 50(Graph should look like an upside-down "V" for Spike)5-8-5 Spike 8 5 50(Graph should go from left=lowest to right=highest for Awake)5 to 12Hz Awake 12 5 40
Once all the blocks are generated, and in the cue list, Add the pieces to the playlist by selecting the wave portion in the cue list and clicking Add in the playlist. Select the pieces listed below in the order given. After doing so, selecteach item in the play list, and change the Loops for each so the final play listlooks like this:
(1) 10 to 8Hz (3) 8Hz (1) 8 to 6Hz (7) 6Hz (1) 6 to 5Hz (18) 5Hz (1) 5-8-5 (12) 5Hz (1) 5-8-5 (12) 5Hz (1) 5-8-5 (12) 5Hz (1) 5-8-5 (12) 5Hz (1) 5 to 12Hz
When you choose -Play- from the play list, the sequence will be played in theorder given, looping the number of times specified. This list gives a 21 minutetheta session, with bursts into alpha at four points.
If you wish to save this piece, and have enough hard drive space, you can do itnow. The wave is complete. Enjoy.
How to use brainwave synchronization files
Once you have created your brainwave file (15 minute files on up work best),Loop Play them for a longer listening time. Sessions of 15 minutes or morework best. It is best to listen to the sessions lying down in a quiet place whereyou will not be disturbed. If there is no place like this near your PC, it may be a
211
good idea to record the session on tape and listen to it where you can becomfortable and relaxed. When you're fully comfortable, start the session, closeyour eyes, and let the magical sounds from Cool Edit do the work. Remember,this only works if you listen to the sounds with stereo headphones.
You may notice helicopter, or "washing" type noises moving around in yourhead. These sounds are actually created inside your head, and are not comingdirectly out of either channel from the sound board. It is this noise that is doingthe work of helping your brainwaves get synchronized to the patterns you havechosen. When you have mixed two different (but similar in frequency ranges)brainwave files together, you may notice a jet airplane noise moving slowlyfrom left to right in the background. Some people don't hear these artifacts atall, while others hear them extremely well.
Another side effect is that of a wandering mind. When you use frequenciesunder 8hz, you may find yourself thinking of the strangest things. You may findthat you are not thinking of anything in particular, and your thoughts becomevery interesting. The feeling is also "warm" and "happy" for some people.Others start recalling their favorite memories as a child, even some theythought they had forgotten forever!
After a session of 15 minutes or more, you may feel quite refreshed, light, airy,clear-headed, etc. Some claim that doing this for 30 minutes a day can result insubtle but great changes in your life. ESP experiences increase, and you may beable to reach new levels of awareness in your everyday life.
References on Brainwave Synchronization
Adams, H. B. (1965). A case utilizing sensory deprivation procedures. In L. P.Ullman and L. Krasner (Eds.), Case Studies in Behavior Modification. NewYork: Holt, Rinehart and Winston.
Adrian, E. D. and Yamagiwa, K. (1935). "The origin of the Berger Rhythm."Brain, 58, 323-351.
Atwater, F. H. (1988). "The Monroe Institute's Hemisync process: ATheoretical Perspective." Faber, Va: Monroe Institute.
Bandler, R. (1985). "Using Your Brain--For a Change." Moab, UT: RealPeople Press.
Barber, T. X. (1957). "Experiments in hypnosis." Scientific American, 196,54-61.
Bremer, F. (1958a). "Physiology of the corpus callosum." Proceedings of theAssociation of Research on Nervous Disorders, 36, 424-448.
Bermer, F. (1958b). "Cerebral and cerebellar potentials." PhysiologicalReview, 38, 357-388.
Brackopp, G. W. (1984). Review of research on Multi-Modal sensorystimulation with clinical implications and research proposals. Unpublishedmanuscript--see Hutchison (1986).
212
Budzynski, T. (1973). "Some applications of biofeedback-produced twilightstates." In D. Shapiro, et al (Eds.), Biofeedback and Self-Control: 1972.Chicago: Aldine-Atherton.
Budzynski, T. H. (1976). "Biofeedback and the twilight states ofconsciousness." In G. E. Schwartz and D. Shapiro (Eds.), Consciousness andSelf-Regulation, Vol. 1, New York: Plenum Press.
Budzynski, T. H. (1977). "Tuning in on the twilight zone." Psychology Today,August.
Budzynski, T. H. (1979). "Brain lateralization and biofeedback." In B. Shapinand T. Coly (Eds.), Brain/Mind and Parapsychology. New York:Parapsychology Foundation.
Budzynski, T. H. (1981). "Brain lateralization and rescripting." Somatics, 3, 1-10.
Budzynski, T. H. (1986). "Clinical applications of non-drug-induced states." InB. Wolman and M. Ullman (Eds.), Handbook of States of Consciousness. NewYork: Van Nostrand-Reinhold.
Budzynski, T. H. (1990) "Hemispheric asymmetry and REST." In Suefeld, P.Turner, J. W., Jr. and Fine, T. H. (Eds.), Restricted EnvironmentalStimulation, New York: Springer-Verlag.
Cade, C. M. and Coxhead, N. (1979) "The Awakened Mind: Biofeedback andthe Development of Higher States of Consciousness." New York: DelacortePress.
Cheek, D. (1976). "Short-term hypnotherapy for fragility using exploration ofearly life attitudes." The American Journal of Clinical Hypnosis, 18, 75-82.
Davidson, R. J., Ekman, P., Saron, C. D., Senulis, J. A., and Friesen, W. V.(1990). "Approach-withdrawal and cerebral asymmetry: Emotional expressionand brain physiology." Journal of Personality and Social Psychology, 58, 330-341.
Deikman, A. (1969). "De-automatization and the mystic experience." In C. T.Tart (Ed.), Altered States of Consciousness. New York: John Wiley and Sons.
Deikman, A. (1971). "Bimodal consciousness." Archives of GeneralPsychiatry, 25, 481-489.
Donker, D. N. J., Nijo, L., Storm Van Leeuwen, W. and Wienke, G. (1978)."Interhemispheric relationships of responses to sine wave modulated light innormal subjects and patients." Electroencephalography and ClinicalNeurophysiology, 44, 479-489.
Evans, F. J., Gustafson, L. A., O'Connell, D. N., Orne, M. T. and Shor, R. E.(1966). "Response during sleep with intervening waking amnesia." Science,152, 666-667.
Evans, F. J., Gustafson, L. A., O'Connell, D. N., Orne, M. T. and Shor, R. E.(1970). "Verbally-induced behavioral response during sleep." Journal ofNervous and Mental Disease, 1, 1-26.
213
Evans, C. and Richardson, P. H. (1988) "Improved recovery and reducedpostoperative stay after therapeutic suggestions during general anaesthetic."Lancet, 2, 491.
Felipe, A. (1965). "Attitude change during interrupted sleep." Unpublisheddoctoral dissertation. Yale University.
Foster, D. S. (1990) "EEG and subjective correlates of alpha frequencybinaural beats stimulation combined with alpha biofeedback." Ann Arbor, MI:UMI, Order No. 9025506.
Foulkes, D. and Vogel, G. (1964). "Mental activity at sleep-onset." Journal ofAbnormal Psychology, 70, 231-243.
Glicksohn, J. (1986). "Photic driving and altered states of consciousness: Anexploratory study." Imagination, Cognition and Personality, 6, 167-182.
Green, E. E., Green, A. M. (1971). "On the meaning of the transpersonal:Some metaphysical perspectives." Journal of Transpersonal Psychology, 3,27-46.
Green, E. E., and Green, A. M. (1986). "Biofeedback and States ofConsciousness." In B. B. Wolman and M. Ullman (Eds.). Handbook of Statesof Consciousness. New York: Van Nostrand Reinhold.
Harding, G. F. and Dimitrakoudi, M. (1977). "The visual evoked potential inphotosensitive epilepsy." In J. E. Desmedt (Ed.), Visual Evoked Potentials inMan: New Developments. Oxford: Clarendon.
Henriques, J. B. and Davidson, R. J. (1990). "Regional brain electricalasymmetries discriminate between previously depressed and healthy controlsubjects." Journal of Abnormal Psychology, 99, 22-31.
Hoovey, Z. B., Heinemann, U. and Creutzfeldt, O. D. (1972). "Inter-hemispheric 'synchrony' of alpha waves." Electroencephalography andClinical Neurophysiology, 32, 337-347.
Hutchison, M. (1986). Megabrain. New York: Beech Tree Books. WilliamMorrow.
Hutchison, M. (1990). "Special issue on sound/light." Megabrain Report: Vol1, No. 2.
Iamblichus. "The epistle of Porphyry to the Egyptian Anebo." In Iamblichus onthe Mysteries of the Egyptians, Chaldeans, and Assyrians. Trans. by Taylor,T. London: B. Dobell, and Reeves and Turner, 1895.
Janet, P. (1889). L'Automatisme Psychologique. Paris: Alcan.
Koestler, A. (1981). The Act of Creation. London: Pan Books.
Kooi, K. A. (1971). Fundamentals of Electroencephalography. New York:Harper and Row.
Kubie, L. (1943). "The use of induced hypnagogic reveries in the recovery ofrepressed amnesic data." Bull. Menninger Clinic, 7, 172-182.
Lankton, S. R., and Lankton, C. H. (1983). The Answer Within: A ClinicalFramework of Ericksonian Hypnotherapy. New York: Bruner/Mazel.
214
Leman, K. and Carlson, R. (1989). Unlocking the Secrets of Your ChildhoodMemories. Nashville: Thomas Nelson.
Lilly, J. C. (1972)). Programming and Metaprogramming in the HumanBiocomputer. New York: Julian.
Lubar, J. F. (1989). "Electroencephalographic biofeedback and neurologicalapplications." In J. V. Basmajian (Ed.), Biofeedback: Principles and Practice,New York: Williams and Wilkins.
Mavromatis, A. Hypnagogia: The Unique State of Consciousness BetweenWakefulness and Sleep. New York: Routledge and Kegan Paul, 1987.
Miller, E. E. (1987). Software for the Mind: How to program Your Mind forOptimum Health and Performance. Berkeley, CA: Celestial Arts.
Moscu, K. I. and Vranceanu, M. (1970). "Quelques resultats concernantl'action differentielle des mots affectogenes et nonaffectogenes pendant lesomneil naturel." In M. Bertini (Ed.), Psicofisiologia del Sonno e del Sogno.Milan: Editrice Vita e Pensiero.
Moses, R. A. (1970). Adler's Physiology of the Eye: Clinical Applications. St.Louis: Mosby.
Nemiah, J. C. (1984). The unconscious and psychopathology. In S., andMeichenbaum, D. New York: John Wiley and Sons, pp. 49-87.
Oster, G. (1973). "Auditory beats in the brain." Scientific American, 229, 94-102.
Peniston, E. G. and Kulkowski, P. J. (1989). "Alpha-Theta brainwave trainingand B-endorphin levels in alcoholics." Alcoholism, 13, 271-279.
Richardson, A. and McAndres, F. (1990) "The effects of photic stimulationand private self-consciousness on the complexity of visual imaginationimagery." British Journal of Psychology, 81, 381-394.
Rossi, E. L. (1986). The Psychobiology of Mind-Body Healing. New York:W. W. Norton.
Rubin, F. (1968). (Ed.), Current Research in Hypnopaedia. London:MacDonald.
Rubin, F. (1970). "Learning and sleep." Nature, 226, 447.
Schacter, D. L. (1977). "EEG theta waves and psychological phenomena: Areview and analysis." Psychology, 5, 47-82.
Schultz, J. and Luthe, W. (1959). Autogenic Training: A PsychophysiologicalApproach in Psychotherapy. New York: Grune and Stratton.
Sittenfeld, P., Budzynski, T. and Stoyva, J. (1976). "Differential shaping ofEEG Theta rhythms." Biofeedback and Self-Regulation, 1, 31-45.
Stoyva, J. M. (1973), "Biofeedback techniques and the conditions forhallucinatory activity" In McGulgan, F. J. and Schoonover, R. (Eds), ThePsychophysiology of Thinking. New York: Academic Press.
215
Svyandoshch, A. (1968). "The assimilation and memorization of speech duringnatural sleep." In F. Rubin (Ed.), Current Research in Hypnopaedia. London:MacDonald.
Swedenborg, E. Rational Psychology. Philadelphia: Swedenborg ScientificAssociation, 1950.
Tomarken, A. J., Davidson, R. J., and Henriques, J. B. (1990). "Resting frontalbrain asymmetry predicts affective responses to films." Journal of Personalityand Social Psychology, 59, 791-801.
Townsend, R. E. (1973). "A device for generation and presentation ofmodulated light stimuli." Electroencephalography and ClinicalNeurophysiology, 34, 97-99.
Tucker, D. M. (1981). "Lateral brain function, emotion, andconceptualization." Psychological Bulletin, 89, 19-46.
Van der Tweel, L. H. and Verduyn Lunel, H. F. E. (1965). "Human visualresponses to sinusoidally modulated light." Electroencephalography andClinical Neurology, 18, 587-598.
Van Dusen, W. (1975). The Presence of Other Worlds. London: WildwoodHouse.
Walter, V. J. and Walter, W. G. (1949). "The central effects of rhythmicsensory stimulation." Electroencephalography and Clinical Neurophysiology,1, 57-86.
Wickramasekera, I. E. (1988). Clinical Behavioral Medicine: Some Conceptsand Procedures. New York: Plenum Press.
216
More Information About Filters
by David Johnston
Filters are used to modify a signal's frequency content. As such, most filters allowsome frequencies to pass unchanged (The Passband), while some are reduced oreliminated (the Stopband). This, however, is not the only effect a filter can have.Infinite Impulse Response (iir) filters also affect the relative time-delay at variousfrequencies differently. This is known as Phase Shift or Group Delay, and it can bea desirable effect, an undesirable effect, or something you don't care about. Thephase shift "curve" of a filter defines its ringing and overshoot properties, whichmay or may not matter in a given application. The design of a given filter is aproblem with many variables, which can be traded off against each other dependingon what's important to the designer at the time. Several "standard" approachesexist, and these are named after the person who first invented or popularized them.There is nothing particularly magic about any of them, it's just that each has beendesigned to maximize one variable at the expense of the others and is therefore insome sense ideal if what you want is what was optimized in the given type. Seebelow for more information on each of the filter types available in Cool Edit Pro.
Bessel: Bessel filters have the best phase response possible for an analog filter,with almost a constant time-delay at all frequencies, and virtually no ringing orovershoot. This comes at the expense of a "flat" passband, which is droopy nearthe corners, and high rejection in the stopband. Bessel filters are used most oftenwhere preserving the shape of pulse-type signals is of paramount concern. Toaccomplish this, the rejection in the early part of the stopband is the poorest of thetypes. Bessel filters eventually reach a falloff rate of 6 dB/octave per order, but thisdoesn't happen until well into the stopband. The nearly flat-phase property ofBessel filters only somewhat translates into the digital version, so these are ofquestionable use. If you need "perfect" phase, there is another way to get this in adigital filter, with an FIR filter, provided in the FIR Filter or Graphic Equalizerfunctions.
Butterworth: Butterworth filters are optimized for a flat passband at the expenseof the other variables. As it turns out, phase shift, ringing and overshoot are stillnot too bad-- usually under 10% for most designs. Due to other issues beyond thescope of this discussion, Butterworth filters are also "computer friendly" in thesense that they move well into the digital domain with their properties intact, andare among the easiest to compute at high orders with good precision. Butterworthfilters have much better stopband rejection than Bessel filters, and only slightlyworse than the Chebychev types, making them probably the most used types ineither analog or digital domains. "Try Butterworth first" is a good rule, as thiscompromise handles more cases well than any other. The stopband rejection forButterworth types is 6 dB/octave/order like the Bessel, but this value is reachedmuch sooner in the stopband.
Chebychev type 1: for this type, passband "flatness" is traded off to get the bestpossible rejection in the first part of the stopband. Phase response is the worst ofthe types, and ringing and overshoot goes with this. They are used where rejecting
217
the stopband seems almost more important than keeping the passband accurate. Inthe golden analog days, Chebychev filters were used whenever you needed to builda lot of them and the fact that you could sometimes do a "good enough"Chebychev with a lower order than a Butterworth saved some money. Since this isnow all in software, and quite fast, the cost of additional filter sections is minimal,and there is less need for this type. Also, because Chebychevs tend to have higher"Q" internal sections, they are more prone to overflow troubles at high orders.Like Butterworth and Bessel, the ultimate slope between the pass and stop bandsis 6 dB/octave/order. All you get with Chebychev over Butterworth is passbandripple, worse phase response, and somewhat quicker initial falloff. If you design aChebychev with 0 passband ripple, you get a Butterworth.
Chebychev type 2: this is also sometimes called a Cauer filter though that is notquite correct. A "true" Cauer has more ripple in the passband and better rejection--but much worse phase, ringing etc. Cool Edit's version of Chebychev type 2consists of a Butterworth filter for the passband, with notches (or zeros) added tothe stopband for additional rejection. In between the notches, the signal "bouncesback" somewhat, so there is now ripple in the stopband instead of the passband.This is still a useful compromise in the digital domain. You get most of the"goodness" of Butterworth with potentially great stopband rejection. You mustspecify how much the signal is allowed to "bounce back" for this type. You arebasically trading off good "initial" rejection for worse "ultimate" rejectioncompared to types that have no "bounce". This is a decent compromise for manyproblems. In addition, since the passband is Butterworth-like, most of the phaseshift or group-delay distortion falls into the stopband, where presumably you don'tcare about it. With this type, you can build a quite impressive bandstop filter thatleaves the passband almost totally unaltered. Because the passband is Butterworth-like, this type also has fewer internal overload problems than the Chebychev type1. Passband "ripple" is reported or specified for this type as well. In this case, thepassband has some "droop" near its edge due to the complete cancellationoccurring just after it. This "droop" is lessened by going to higher orders.
Which filter type should I use? You can construct even a Bessel filter withdecent rejection if the order is high enough. But it will still have some phase error,and this goes up with increasing order, as do errors due to non-infinite-precisionmath. Conversely, the phase response and ringing of a low order Chebychev aren'ttoo bad. But for the huge majority of cases, the Butterworth is simply the bestcompromise you can make. This is definitely helped by the low "cost per order" inthis domain. In analog, when you need more than about a 6th-order filter, mostauthors question whether you are trying to do with a filter what you should bedoing with some other technique, such as a phase locked loop. This is partlybecause higher order filters are hard to make in analog due to the necessity foraccurate tuning etc., and extremely accurate components are not readily available.Contrast that with the fact that this package can do a more than 60th-orderButterworth filter with good accuracy. However, an order that high is rarely if everneeded for any "real" problem, though it sure looks impressive on a plot! Mostaudio uses of this will never need more than about 6th-10th order if even that. You'llfind that really steep rejection, and the phase shift associated with that, sounds"fakey" or "overprocessed" -- which of course could be what you're after. Forreference, most tone controls are first order filters, most equalizers (like the
218
Parametric Equalizer) are second order. So if you're using these in a productionenvironment, you will probably want to use the lower order filters.
As you might guess, a lowpass filter passes the low frequencies, and stops the highfrequencies. The highpass is just the reverse. A bandpass filter rejects frequenciesoutside some "band", while a bandstop filter rejects frequencies inside some band.
To specify a lowpass filter some numbers are needed. The most important one isthe "cuttoff" frequency. This would be the highest frequency that you want thefilter to pass -- or the "end" of the passband. In many cases you will also specifyanother frequency for the "beginning" of the stopband. This is done in conjunctionwith a dB number to specify how much attenuation or rejection must be achievedby this frequency. In our package, this is what is going on when TransitionBandwidth is chosen (and order is filled in automatically). You specify what youwant, and Cool Edit Pro figures out how big a filter that would take for you. For ahighpass filter, it's the same, except that the lowest frequency is now the stopbandending, and the next frequency is the start of the passband. You may well be ableto figure out how this all translates to the band-types, but now you need twice asmany frequencies to specify the filter.
Cool Edit Pro attempts to give as much flexibility as possible when designingfilters. You can specify pass and stop band frequencies and an attenuation dB, andCool Edit Pro will do the rest. However, advanced users may want to set the orderof the filter for a number of reasons. Cool Edit Pro lets you do that too whenOrder is chosen. With this option, you specify passband corner frequency andorder, and take the stopband you get. You might want to do this for severalreasons. First, high-order filters have lots of phase shift, and if you are going to usethe filtered signal in conjunction with the original signal or other filtered signals,you can encounter problems with this: things no longer happen at the same time asthey did before filtering. Another reason you might want to specify the orderyourself (other than speed) is for the Chebychev type 1, which has passband ripple.For a 3 dB ripple lowpass filter of this type, the gain at DC is -3dB for even orderfilters, and exactly 0 dB for odd order. So if DC gain is important, you will want tospecify order yourself for this type. There is also an option 2 for this type. For this,you specify everything but passband ripple, and Cool Edit Pro picks that. This canlead to some pretty strange-looking filters, but is good to give you an idea of thetradeoffs involved if nothing else. This is a holdover from the bad old days whenfilters were expensive and one was always trying to push what could be done witha low order filter. Now it's just there as a learning tool.
219
Why is -94dB SNR better than infinity?
By David Johnston
Pure digital silence (that generated with the Generate Silence function inCool Edit) is actually at a signal-to-noise ratio of negative infinity (digital zero's allthe way). The quietest, most faint signal that could appear on a CD in 16-bit isaround -94dB (closer to -93.86). With very faint signals around the -90dB range, ifthe samples were simply truncated (those between -1.0 and 1.0 get set to zero)then very noticeable unwanted artifacts would be introduced. These would beharmonic distortions that would be correlated with the signal being truncatedwhich is 99% of the time unwanted in the audio business. It may sound great formaking distorted guitar effects, but not great if your piano sounds like that samedistorted guitar. Also, as the audio gets quieter, as in doing a fade out, straighttruncation will cause the audio to flutter between total silence and -94dB withoutany amplitudes in between. So generally, truncation is bad because it introducesthis quantization noise.
So why is -94dB better than -infinity, especially when doing Fades? When doingfades in Cool Edit, it is possible to fade out a signal well below -94dB and stillhear the signal if dithering of transform results is enabled under Settings/Data! Thisis because the noise itself still contains audio information that is audible. Signals asquiet as -118dB (that's 22dB below the -96dB so-called "limit") can still be heard,even though the S/N ratio is still -94dB. In other words, the S/N ratio is 94dBwhile the dynamic range is closer to 118dB. So to fade out completely, you wantthe loudest audio near the end of the fade when fading out (or at the quietestportion of the fade) to be faded out to at least -118dB.
To test this theory, go to a regular section of music, use Analyze/Statistics andnote the maximum RMS power. Then subtract it from -104 (for example, the maxRMS power was -10dB, so -104 - (-10) = -94. Go to Amplify and amplify by thisamount (-94dB in the example). This will make the maximum RMS power -104dB. When you use Analyze/Statistics, you see a reading of about -93.8dBthough, but the audio is really still down there. Now Amplify it back up about80dB and listen to it. You will be able to hear the music still, behind thebackground noise! If you did not have "Dither Transform Results" checked, youwould have gotten digital silence, and would not hear anything when boosting theresult back up 80dB. With "Dither Transform Results" enabled, the music youwere listening too had a power no greater than -104dB, which is 8dB quieter thanthat -96dB limit of 16-bit audio.
Now, why is -83dB better than -94dB? You probably will at first think this soundsnuts, but a -83dB SNR really can be perceived as higher quality than a -94dBSNR. Above, Cool Edit uses a straight "triangular" probability distributionfunction (p.d.f.) for dithering, which is flat across the spectrum (there is just asmuch noise at 500Hz as there is at 10KHz). If that background noise is ditheredusing a different p.d.f. and shaped such that most of the noise is pushed into thehigher frequencies, above the range of human hearing, and above which mostanalog equipment will cut off due to filtering, then the perceived noise level will go
220
down. In Cool Edit, using a shaped triangular p.d.f., and the "C3" noise shapingcurve, the S/N ratio (as seen in the minimum RMS power under Analyze/Statistics)will increase to about 11dB to -83dB. But, since most of this noise is above15.5KHz, and because the ear itself is already much less sensitive to audio above15.5Khz, we should only analyze the noise below 15.5Khz. Doing this reveals thatthe S/N ratio from 0Hz to 15.5Khz is 94.5dB. If just we look at the range in whichmost music resides, 50Hz to about 8KHz then the S/N ratio is a whopping 109dB!And around 3Khz to 4KHz, where the ear is extremely sensitive, the S/N ratio is135dB. This means that a lot of the music below the 96dB limit can be heardclearly, if the analog equipment's D/A converters and amplifiers own noise doesn'tmask it out.
This can be demonstrated using Cool Edit Pro by taking a short 10 second snippetor so of your favorite music, and converting to 32-bit (Edit->Convert SampleType). Then reduce the amplitude as in the previous example so the peak is nogreater than -104dB. Then go to Edit->Convert Sample Type again, and convertto 16-bit (always working at 44.1Khz) and choose the Shaped Triangluar p.d.f.,and Noise Shaping C3 curve. If you used the same music for both examples, you'llnotice that the noise-shaped version here sounds much clearer, and much faintersounds can be heard than before.
Different noise shaping curves are provided for use at different sample rates, andquality levels that will depend on the source audio being used.
Using this method, one can trade off frequency response for signal-to-noise ratioalso. With 48KHz sampled audio at 20 bit resolution for example (which isconverted to Cool Edit's internal 32-bit float format) dithering and noise shapingcan be used to boost the SNR while sacrificing some of the frequency response -bringing the frequency response down from a maximum of 24KHz to about20KHz. The loss in frequency response will not be noticeable, but the gain in SNRwill be noticeable. Using noise shaping curve "D", convert the 32-bit 48KHz audioto 16-bit 48KHz. Most of the quantization noise will be pushed up above 19KHz,well out of the range of most ears. If converting to 44.1KHz, use curve "D" orcurve "C". The 44.1KHz audio will retain the subtler audio information that waspresent at the original 20-bit resolution at 48KHz sample rate. For most practicalpurposes, you will be getting 48KHz 20-bit quality in 44.1Khz 16-bit audio.
These same principles can be applied when going to 8-bit audio as well with someplaying around with the parameters. At 8 bit though, the type of hiss may not beacceptable when doing noise shaping because it is so loud at 8 bits - again, it willbe a matter of individual taste and the material being converted.
221
About Cool Edit Pro's Creator
David Johnston has been working with sound technology since 1991, and has beentoying with electronic synthesizers since the 70's. He started programming while inhigh school on a Commodore PET computer. In 1982, he started his programmingcareer on an Atari 800; he has since written software for Apple II's, Commodore64's, Macintoshes, PC-compatible computers, and numerous mainframes andworkstations.
David attended Eastern Montana College for two years and then moved to theSeattle area, where in 1991 he acquired a Bachelor's Degree of Science inComputer Science and Engineering from the University of Washington. Heworked as a software engineer for several years at Microsoft, both during and afterfinishing college. In his spare time, he wrote programs for the challenge and fun ofit. Two of those applications became some of the most popular sharewareprograms available: Cool Edit, upon which Cool Edit Pro is based, andKaleidoscope, a screen saver for Windows that responds to music.
In 1995, David and Bob Ellison co-founded Syntrillium Software Corporation toenhance and market Cool Edit, Kaleidoscope, and other products. David nowdevotes all his programming energies toward creating the most powerful and easy-to-use software products around, with a special emphasis on applications thatwork with sound. In 1996, he created Wind Chimes, which simulates the sound ofreal wind chimes on the computer. It can also sound like a pianist playing with atune, a violin section working on theme variations, or even a gunfight.
You can find out more about David's and Syntrillium Software's creations onSyntrillium's web site at http://www.syntrillium.com.
222
About the author
Official bio
David Miles Huber is widely acclaimed in the recording industry as adigital audio consultant, author, engineer, university professor and guestlecturer. In addition, he's also a professional musician (having performed,produced, and engineered over 15 of his own CDs.)
David received a degree in recording techniques (I.M.P.) from IndianaUniversity and was the first American to be admitted into the prestigiousTonmeister program at the University of Surrey in Guildford, Surrey, England.He has authored numerous books on the subjects of recording and electronicmusic. His most prominent book Modern Recording Techniques (Focal Press -Boston/London - www.bh.com/focalpress) has been an industry standard textworldwide for over 16 years.
un-Official bio
Where's he from? - Born in Connersville, Indiana to OliverWendel and Myrtle May Huber.
What were his first words? - Whaaah! Seriously, folks, I've been told bymy family that my 3rd word was "record!"
Where does he live? - In the hills of Western Washington..Don'tcha just love the mountains, the waterand (ahem...) the rain!
What does he do for a living? - He writes books (about seven, so far,including Modern Recording Techniques,The MIDI Manual (Focal Press), Hard DiskRecording for Musicians (Music Press), etc.He's an electronic musician (had to turn out15 of his own CD's before he had the gutsto say... Yea, I'm a musician!), He's writesfor EQ magazine (www. eqmag.com) andteaches recording at the University ofWashington (cause he's a natural-born ham).Any more questions?
Favorite drink? - Scotch or diet Coke...
Astro statistics? - Sagittarius sun, Gemini moon with aCapricorn ascendant.
Newest toy? - A 1981 Suzuki GS450t motorcycle with lessthan 6k miles on it (not any more, I've beenhaving too much fun with it!...) and not ascratch!
Favorite movies? - Young Frankenstein, Betelgeuse, Hairsprayand anything to do with Star Trek.

223
Contacting Syntrillium Software
If you have any comments, or a question to which you cannot find an answer inour documentation, please feel free to contact us. Syntrillium Software can bereached during the hours of 9AM - 4PM PST (Pacific Standard Time) or by Fax oremail at any time. Our web site is also available at any time for the latestinformation and updates, and for technical support. We have at our disposal, all ofthe popular communication technologies of the day:
Phone 9AM - 4PM PST (Pacific Standard Time)
+1 (602) 941 - 4327
General: [email protected]
Technical support: [email protected]
Fax
+1 (602) 941 - 8170
Web
http://www.syntrillium.com
224
Technical Support
Cool Edit Pro is designed to be easy to use, but on occasion you may need someexplanation or help with an issue. In most cases, you'll find the help you need rightin your computer; this Help file, and the Cool Edit Pro manual should contain theanswers to most of your questions. In addition, you'll find extensive supportmaterial available around-the-clock at our site on the World Wide Web. If you stillexperience difficulties, our technical support staff is available via Email, FAX, orphone. We recommend sending your technical questions electronically (Email) forthe most efficient handling of your request.
Before contacting Syntrillium for support, please be sure to check the following:
1. Please check our online documentation and manual for answers to yourquestions.
2. Make sure you have registered your copy of Cool Edit Pro with SyntrilliumSoftware.
3. Be able to provide detailed information about your system, such as the CPU,sound card type, and hard drive space available.
4. Have your serial number ready if you call (located on back cover of the CDJewel case).
Web Site Support
Syntrillium's web site provides an extensive amount of support materials, andthe solution or answer you seek may already be posted. There may also be anupdate you can download to resolve the problem.
• http://www.syntrillium.com/support/
Email Support
You may submit your technical questions and problems via Email. Thetechnical support mailbox is checked throughout the day for new messages.Syntrillium responds to emails within two business days (same day reply inmost cases).
• Include your Name, phone number, serial number, as well as your returnEmail address.
• Describe your problem or question in detail.
• Please do NOT attach any file to your e-mail message unless requested.
• Email address: [email protected]
Phone Support
When calling for support:
• Have your serial number ready. The serial number is located on the backcover of the CD Jewel case.
• Be ready to describe the problem or question in detail.
225
• Have your computer turned on and be ready to duplicate the problem onyour system with our technical support representative.
• Support hours are Monday through Friday between 9:00 am - 4:00 p.m.(PST), excluding holidays.
• Call +1 (602) 941-4327
Fax Support
You may submit your technical questions and problems via facsimile.
• Please indicate on the cover page that the FAX is intended for technicalsupport.
• Have your name, company, address, telephone and FAX numbers clearlyon the cover page.
• Indicate your serial number on the FAX.
• Please describe your problem or question in detail.
• FAX: +1 (602) 941-8170