Catalogo suelos antimanchas Greendesign 2016
28
CATALOGO PRODOTTI/PRODUCT CATALOGUE
-
Upload
greendesign -
Category
Documents
-
view
213 -
download
0
description
Los suelos de exterior antimanchas de Greendesign son el resultado de una tecnología extraordinaria y un moderno uso de la madera y la síntesis de plástico. Duración de hasta 25 años después de la instalación, este producto ofrece todo el diseño de la madera natural sin necesidad de mantenimiento
Transcript of Catalogo suelos antimanchas Greendesign 2016
CATALOGO PRODOTTI/PRODUCT CATALOGUE
2
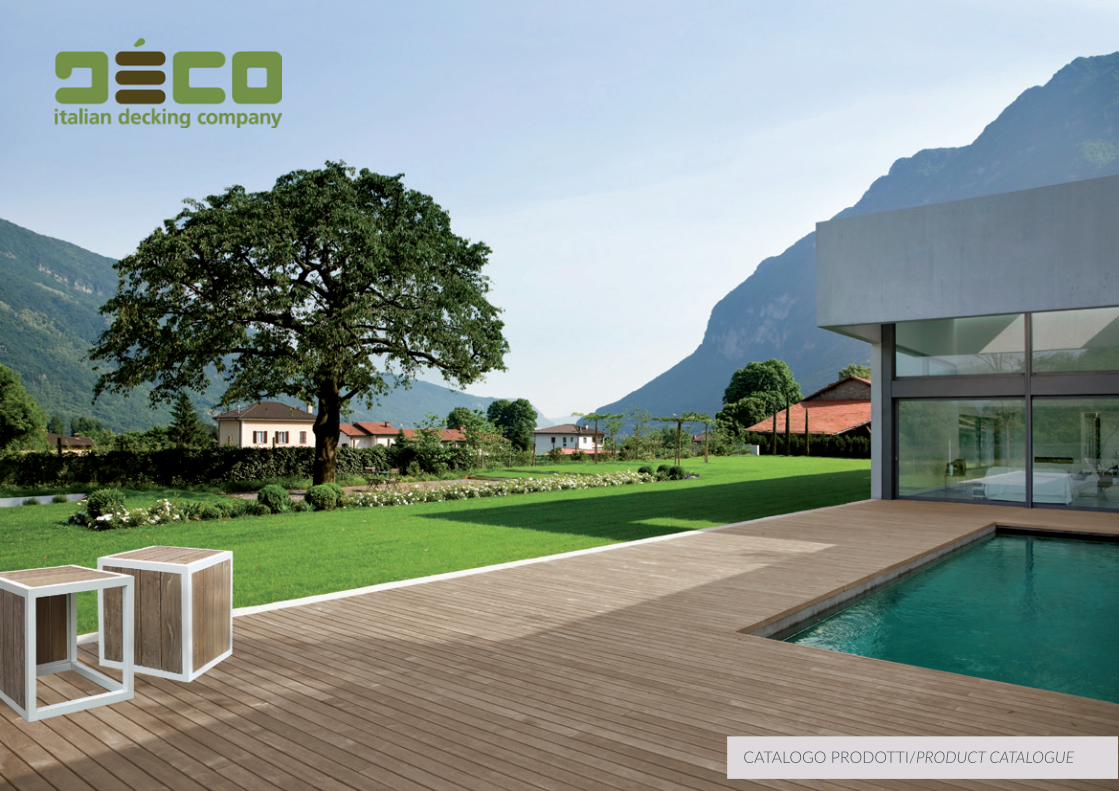
Déco è un’azienda autorevole e consolidata, che vanta una specializzazione
unica nel settore del decking. La profonda conoscenza del prodotto, unita alla grande passione delle persone che le hanno dato vita, fanno oggi di Déco una preziosa realtà italiana. Un’accurata selezione di prodotti di altissima qualità, oltre a un ampio magazzino e soluzioni su misura per progetti specifici.Esperienza e flessibilità, unite a una profonda conoscenza di settore.Ben più di un semplice fornitore, Déco si pone l’obiettivo di essere vero e proprio partner del rivenditore, offrendo strumenti e servizi che hanno l’obiettivo di valorizzare la relazione professionale con il cliente: la vostra soddisfazione è la nostra missione.
Déco is a modern and dynamic company, focusing and specializing on the decking
industry. With our distinct product know-how and the great passion of our founders, today Déco is a precious Italian reality. A careful selection of proven, quality products, as well as a large stock and bespoke solutions for specific projects.Experience and flexibility, together with a deep knowledge of the market.Far from being just a simple supplier, the goal of Déco is to be a real partner for its dealers, by offering tools and services to build a powerful and long-lasting professional relationship with the customers - your satisfaction is our mission.
Italian mood, eternal wood
3
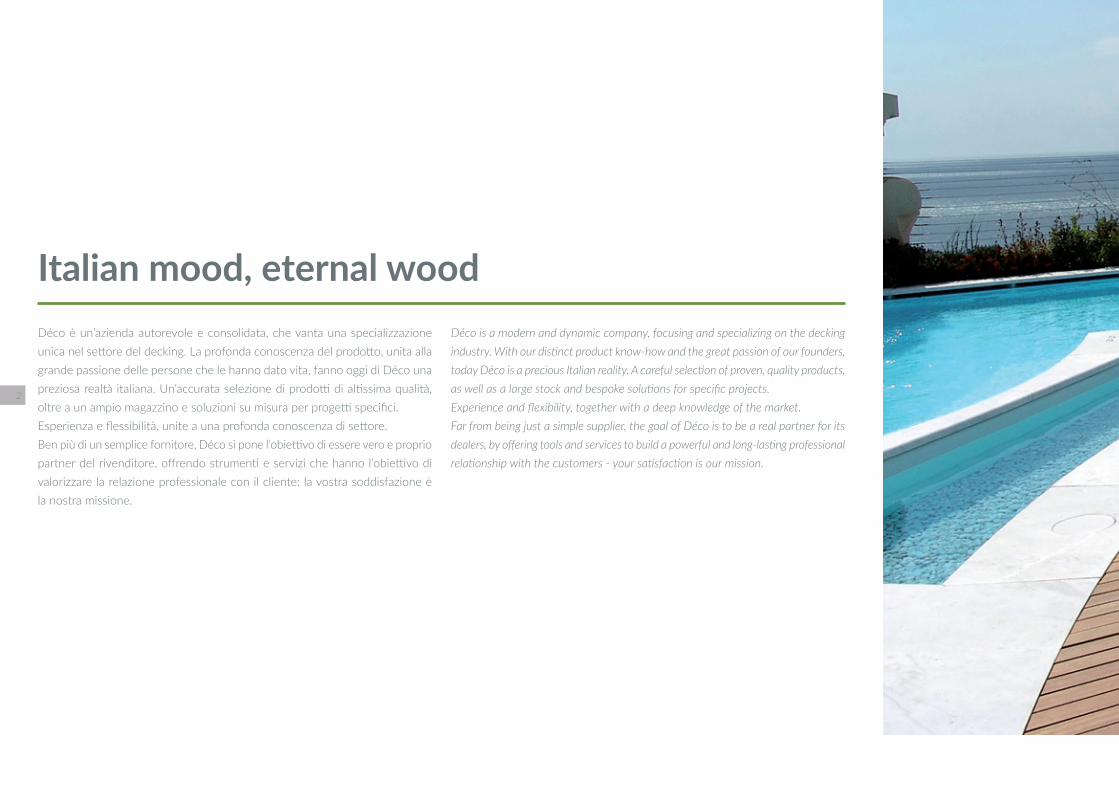
Naturalezza e design, oggi all’aperto …Senza timore!Decking di alta qualità è: stabilità, resistenza e design.
Déco ha fatto di queste virtù i propri valori portanti. Legni estremamente resistenti, che non temono le intemperie nè l’usura nel tempo e che non necessitano di manutenzione, permettono di portare
all’aria aperta tutta la classe e il calore del parquet domestico.
Nature and elegance, now outdoor …And fearless!
High Italian decking quality is: stability, resistance and design.
Déco has turned these drivers into its structural values. Extremely durable and resistant hardwoods, which do not fear any weather conditions nor decay and with no need for maintenance, allow you to bring outside all the class and warmth of the indoor parquet.
4
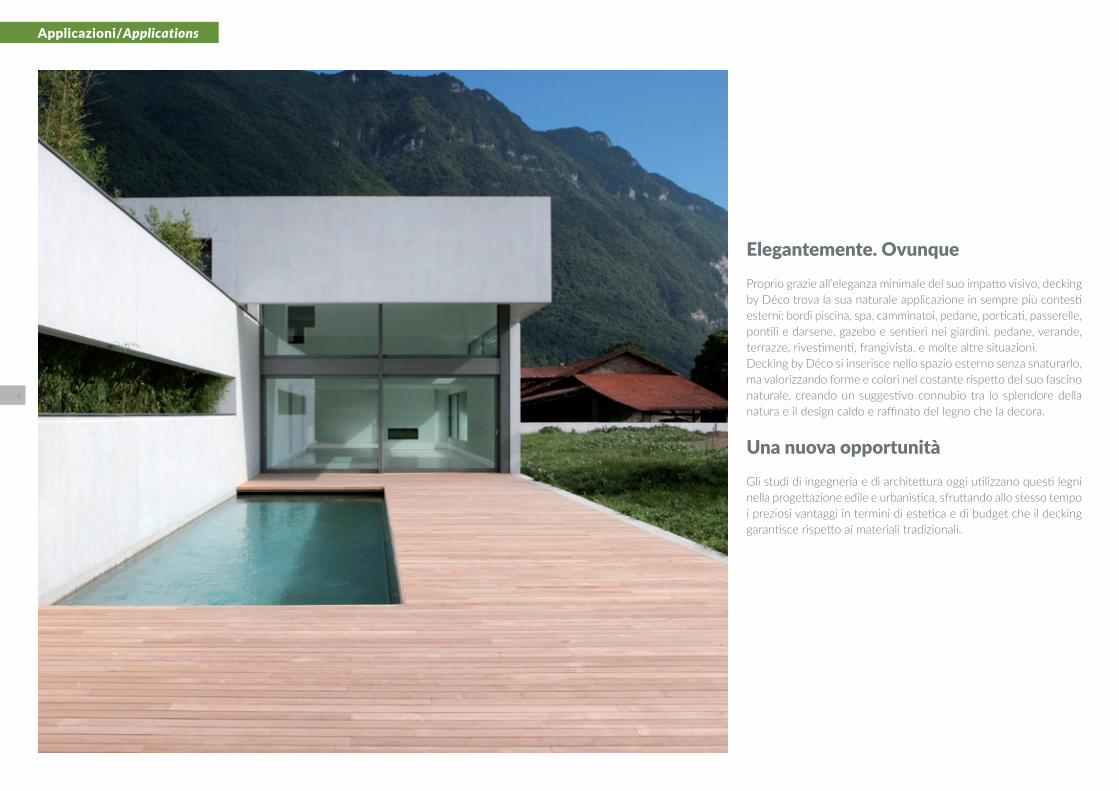
Elegantemente. Ovunque
Proprio grazie all’eleganza minimale del suo impatto visivo, decking by Déco trova la sua naturale applicazione in sempre più contesti esterni: bordi piscina, spa, camminatoi, pedane, porticati, passerelle, pontili e darsene, gazebo e sentieri nei giardini, pedane, verande, terrazze, rivestimenti, frangivista, e molte altre situazioni.Decking by Déco si inserisce nello spazio esterno senza snaturarlo, ma valorizzando forme e colori nel costante rispetto del suo fascino naturale, creando un suggestivo connubio tra lo splendore della natura e il design caldo e raffinato del legno che la decora.
Una nuova opportunità
Gli studi di ingegneria e di architettura oggi utilizzano questi legni nella progettazione edile e urbanistica, sfruttando allo stesso tempo i preziosi vantaggi in termini di estetica e di budget che il decking garantisce rispetto ai materiali tradizionali.
Applicazioni/Applications
5
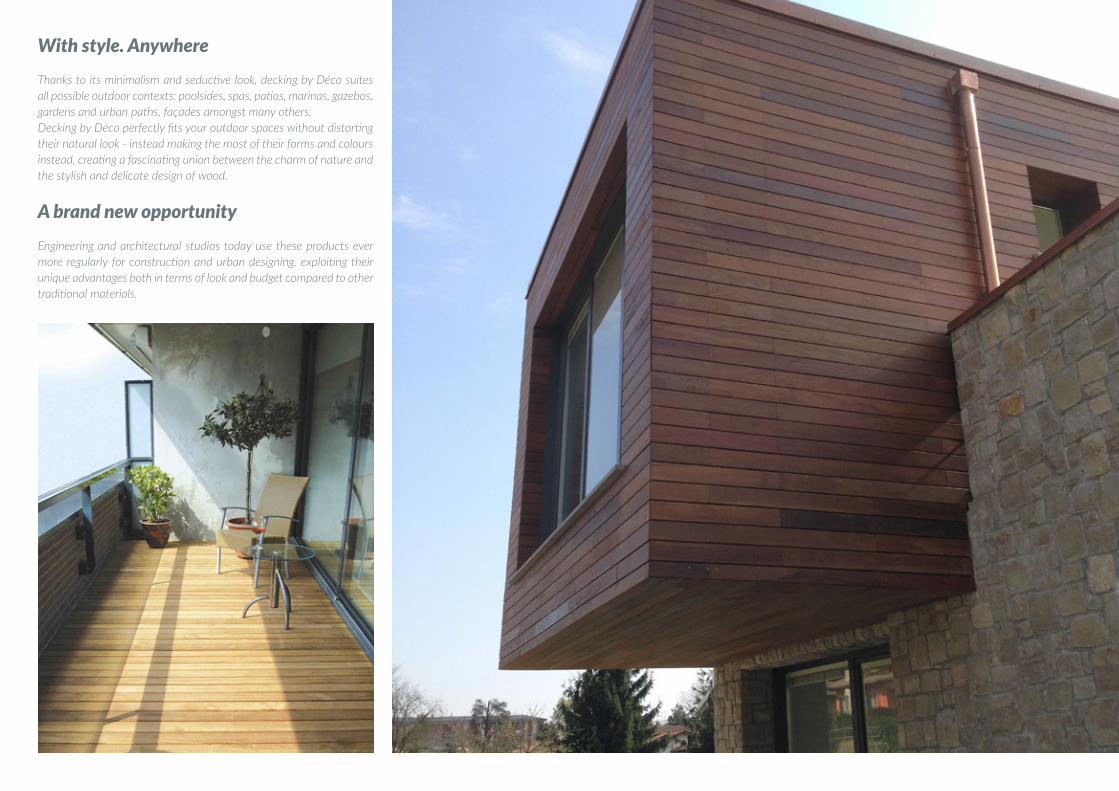
With style. AnywhereThanks to its minimalism and seductive look, decking by Déco suites all possible outdoor contexts: poolsides, spas, patios, marinas, gazebos, gardens and urban paths, façades amongst many others.Decking by Déco perfectly fits your outdoor spaces without distorting their natural look - instead making the most of their forms and colours instead, creating a fascinating union between the charm of nature and the stylish and delicate design of wood.
A brand new opportunityEngineering and architectural studios today use these products ever more regularly for construction and urban designing, exploiting their unique advantages both in terms of look and budget compared to other traditional materials.

6
Ultrashield: Nuova generazione
Innovazione, qualità ed estetica sono le parole d’ordine di UltraShield. UltraShield è unico nella sua categoria e rappresenta una novità assoluta per il mercato del decking. Una nuova generazione di legno composito, pensato e progettato per unire performance ed estetica senza eguali. Frutto di oltre cinque anni di ricerca e di una rivoluzionaria tecnologia, UltraShield apporta una determinante innovazione al settore dei legni compositi: fondere la comprovata resistenza di fibre di legni duri e polietilene ad alta densità con uno scudo esterno completamente in polimero, che incapsula la doga avvolgendola in un film impermeabile e protettivo, altamente resistente a graffi, formazione di macchie e variazioni di colore nel tempo. UltraShield è la risposta alla necessità di innovazione del settore dei legni compositi: una doga che come nessun’altra unisce ai vantaggi del legno composito tutto il fascino e la bellezza essenziale del legno naturale.
Ultrashield: Next GenerationInnovation, quality, aesthetics are Ultrashield’s watchwords. Ultrashield is unique in its category, an absolute news in the decking industry. A new generation of composite wood, conceived to offer unmatched performance and beauty. Five years of R&D led to a revolutionary technology, Ultrashield brings about a crucial improvement for composite wood. It combines the proven strength of high density polyethylene plastic and wood fibers with an outer shell of polymer that completely encapsulates the board in an impermeable layer of protection from scratches, stains and fading.
Legni Compositi/Composite Woods

7
UltraShield® è un composito in legno-plastica incapsulato: è infatti dotato di uno scudo di qualità superiore, tecnologicamente avanzato, che riveste sui 4 lati il nucleo centrale. Lo scudo e il nucleo vengono coestrusi in uno stampo a temperatura altissima, evitando in questo modo collanti o sostanze chimiche dannose per l’ambiente.Il nucleo è costituito da materiali riciclati attentamente selezionati e da fibre riciclate di legno duro e polietilene ad alta densità, che garantiscono maggiore resistenza e durabilità. Meglio ancora, è riciclabile al 100%. Lo scudo utilizza un tecnopolimero avanzato con una formulazione che fornisce alle tavole Protezione Ultra contro:
> Macchie Qualsiasi residuo esterno può essere
facilmente eliminato dalla superficie in quanto non viene mai assorbito dallo scudo.
> Muffa - Decomposizione Spaccature - Crepe Lo scudo
è uno strato al 100% impermeabile che impedisce la formazione di qualsiasi muffa o spaccatura.
> Viraggio di colore La speciale formula dello scudo assicura una impareggiabile stabilità cromatica negli anni, tale da rendere impossibile per l’occhio umano riscontrarne cambiamenti [Test svolti: il risultato di 3000 ore in un laboratorio di prova QUV ad agenti atmosferici accelerati è di Delta E<4.0].
> Deterioramento estetico Le tonalità multicromatiche uniche di UltraShield sono parte integrante della formulazione dello scudo, che negli anni non necessiterà mai di essere verniciato, carteggiato o oliato.
UltraShield® is a capped wood plastic composite, which means it has an advanced premium shield encasing all four sides around its inner core. The shield and core are extruded
together under a very high temperature mold simultaneously, so there are no adhesives or chemicals that are harmful to the environment.The core in made from carefully selected recycled material
and highly dense recycled hardwood and softwood fibers that allow for greater strength and durability, and best of all it’s 100% recyclable.The shield uses an advanced engineering polymer to create a formulation which gives the boards Ultra Protection against:
> Wine, coffe, soy sauce, vegetable oil etc cannot stain the
board. Messes can be easily wiped off the surface because the liquid never gets absorbed by the shield, which makes Ultrashield very easy to clean and low maintenance.
> Stains Any external residue can be easily eliminated from the surface as the shield prevents absorption.
> Mould – Decomposition – Cracks – Splits The shield is
a 100% waterproof layer that prevents the formation of any mould or cracks.
> Fading The shield’s special formula guarantees unrivalled chromatic stability over the years; no changes are visible to the human eye [Trials: 3000 in a QUV Accelerated Weathering Testing and Delta E lab <4.0].
> Aesthetic deterioration The unique multichromatic tones of UltraShield are an integral part of the shield, which won’t need painting, sanding or varnishing once over the years.
Tecnologia Ultrashield
Ultrashield Technology

8
Teak Antique
La serie UltraShield Naturale offre delicate colorazioni multicromatiche e finiture che conferiscono alla doga un sorprendente realismo oltre a tutto il calore e il fascino essenziale del legno naturale, senza bisogno di alcuna manutenzione.
The UltraShield Naturale series offers delicate multichromatic colourways and surprisingly realistic finishes that imbue the board with all the warmth and simple charm of natural wood, with no need for maintenance.
ZIGRINATO/ANTISLIP
VENATO/VEINED
LISCIO/SMOOTH
ZIGRINATO/ANTISLIP
VENATO/VEINED
LISCIO/SMOOTH
Legni Compositi/Composite Woods
Ultrashield: colori e finiture Ultrashield: colours and finishes

9
Scheda Tecnica/Technical Features Test eseguiti da Intertek (Organismo Internazionale Indipendente)Tests performed by Intertek (Internati onal Organizati on Independent)
StandardStandard
Caratt eristi caCharacter
RisultatoResult
ASTM D6109 Resistenza alla fl essioneFlexural strenght (MOR)
26,3 MPa
Rigidezza alla fl essioneFlexural sti ff ness (MOE)
2620 MPa
ASTM D4226 Resistenza all’impatt oImpact resistance
MFE>396J
ASTM D785 Durevolezza RockwellRockwell hardness (HRR)
78,7R
ASTM D7032 Recupero del creep (24h)Creep-Recovery (24h)
82,2%1
EN 319 Resistenza alla trazione
Tensile strenght (bond quality)>2,08 MPa
ASTM G21 Resistenza alla muff a (28 giorni)Mould resistance (28 days)
Valutazione 02
Rati ng 0
ASTM D4060 Resistenza all’abrasioneAbrasion Resistance
Indice 333
Index 33
ASTM D1037 Contenuto di umidità prima dell’immersioneMoisture content before submersion
0,21%
Contenuto di umidità dopo l’immersioneMoisture content aft er submersion
0,33%
Gonfi amento dello spessoreThickness swelling
0,32%
ISO 4892-1 Resistenza agli agenti atmosferici (2000h)Weathering resistance (2000h)
E=2,5 Scala di grigi 3-4E=2,5 Grey scale 3-4
DIN 51130 Resistenza allo scivolamentoFloor slip resistance
Angolo: 19,7° Gruppo R114
Angle: 19,7° Group R11
1 Interasse di 384mm / The test span is 384mm2 Valore 0: nulla (nessuna crescita) / Rati ng 0: none (no growth on specimen surface)3 Perdita di peso dopo 800 cicli 27mg, dopo 1000 clicli 33mg / Weight loss aft er 800 cycles 27mg, weight loss aft er 1000 cycles 27mg4 Gruppo R11: valore idoneo per spazi pubblici / Group R11: suitable public spaces

10
Decowood
Décowood è il frutto di una straordinaria tecnologia moderna di sintesi tra legno e plastica. Resistente fino a 25 anni dalla posa, questo prodotto offre tutto il design e il tatto del legno naturale senza alcun bisogno di manutenzione nel tempo. Proprio perché imputrescibile, è assolutamente immune da qualsiasi tipo di aggressione esterna: da quelle naturali come insetti, termiti, funghi e altri microrganismi, pioggia, grandine, neve e raggi UV, a quelle chimiche, come acidi diluiti e soluzioni saline o clorate.
DecowoodDécowood is the result of an extraordinary modern technology using wood and plastic synthesis. Lasting up to 25 years after installation, this product offers all the design of natural wood without any need for maintenance.Completely rot-proof, Décowood is absolutely immune from any kind of external aggression: from natural ones, including insects, termites, fungi and other microorganisms, rain, hail, snow and UV rays, to chemicals, such as dilute acids and salt solutions or chlorine.
Legni Compositi/Composite Woods
11
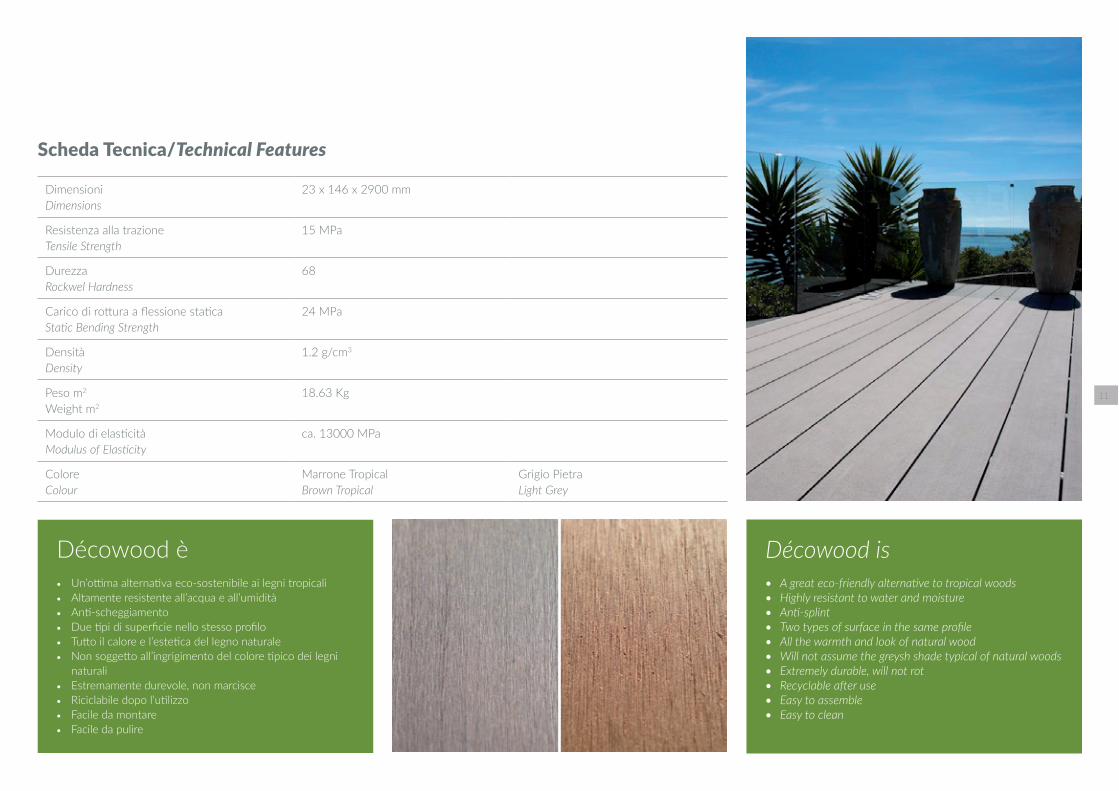
DimensioniDimensions
23 x 146 x 2900 mm
Resistenza alla trazione
Tensile Strength
15 MPa
Durezza
Rockwel Hardness68
Carico di rott ura a fl essione stati caStati c Bending Strength
24 MPa
Densità
Density
1.2 g/cm3
Peso m2
Weight m2
18.63 Kg
Modulo di elasti citàModulus of Elasti city
ca. 13000 MPa
Colore
Colour
Marrone TropicalBrown Tropical
Grigio PietraLight Grey
Scheda Tecnica/Technical Features
Décowood is• A great eco-friendly alternati ve to tropical woods • Highly resistant to water and moisture • Anti -splint • Two types of surface in the same profi le • All the warmth and look of natural wood• Will not assume the greysh shade typical of natural woods • Extremely durable, will not rot • Recyclable aft er use • Easy to assemble• Easy to clean
Décowood è• Un’otti ma alternati va eco-sostenibile ai legni tropicali• Altamente resistente all’acqua e all’umidità• Anti -scheggiamento• Due ti pi di superfi cie nello stesso profi lo• Tutt o il calore e l’esteti ca del legno naturale• Non soggett o all’ingrigimento del colore ti pico dei legni
naturali
• Estremamente durevole, non marcisce• Riciclabile dopo l’uti lizzo• Facile da montare• Facile da pulire
12
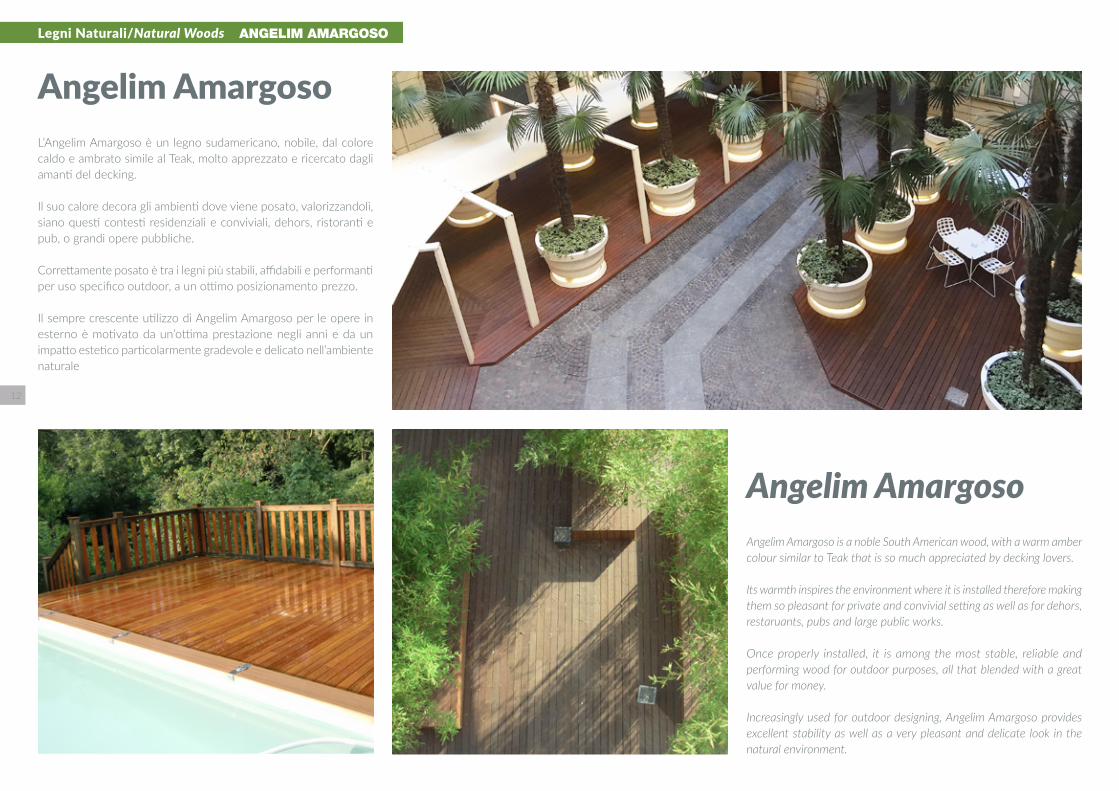
Angelim Amargoso
L’Angelim Amargoso è un legno sudamericano, nobile, dal colore caldo e ambrato simile al Teak, molto apprezzato e ricercato dagli amanti del decking.
Il suo calore decora gli ambienti dove viene posato, valorizzandoli, siano questi contesti residenziali e conviviali, dehors, ristoranti e pub, o grandi opere pubbliche.
Correttamente posato è tra i legni più stabili, affidabili e performanti per uso specifico outdoor, a un ottimo posizionamento prezzo.
Il sempre crescente utilizzo di Angelim Amargoso per le opere in esterno è motivato da un’ottima prestazione negli anni e da un impatto estetico particolarmente gradevole e delicato nell’ambiente naturale
Angelim AmargosoAngelim Amargoso is a noble South American wood, with a warm amber colour similar to Teak that is so much appreciated by decking lovers.
Its warmth inspires the environment where it is installed therefore making them so pleasant for private and convivial setting as well as for dehors, restaruants, pubs and large public works.
Once properly installed, it is among the most stable, reliable and performing wood for outdoor purposes, all that blended with a great value for money.
Increasingly used for outdoor designing, Angelim Amargoso provides excellent stability as well as a very pleasant and delicate look in the natural environment.
Legni Naturali/Natural Woods ANGELIM AMARGOSO

13
DimensioniDimensions
19 x 90 x 1000/4600 mm
Provenienza
Origin
Brasile
Brazil
Denominazione commercialeCommercial Name
Angelim Amargoso
FamigliaFamily
Fabaceae
Nome botanicoScienti fi c Name
Hymenolobium spp
MediaMean
Deviazione StandardStandard Deviati on
Densità
Density
0,80 g/cm3 0,07
Durezza
Monnin Hardness6,3 1,7
Coeffi ciente di riti ro volumetricoCoef of volumetric shrinkage
0,67% 0,09
Riti ro TangenzialeTangenti al Shrinkage
8,3% 1,5%
Riti ro RadialeRadial Shrinkage
4,9% 0,8%
Carico di rott ura a compressione assialeCrushing Strength
67 MPa 7
Carico di rott ura a fl essione stati caStati c Bending Strength
117 MPa 15
Modulo di elasti citàModulus of Elasti city
28870 MPa 3828
Durabilità rispett o a funghi e muff eDurability to Fungi and Mildew
Classe 3: moderatamente durabile (UNI CEN/TS 15083-1/2005)
Scheda Tecnica/Technical Features Fonte/Source - Tropix (Cirad UE)
Proprietà fi siche basate su campioni di durame maturo. Possono variare in base alla zona di origine e alle condizioni di crescita.Il legno è un elemento naturale: le dimensioni delle doghe potrebbero variare fi no a un 3% rispett o alle misure nominali.
Physical Properti es based on mature heartwood specimens. Can vary greatly depending on the origin and growth conditi ons.Wood is natural element: the dimensions of the boards might vary up to a 3% diff erence compared to the nominal measures.
14
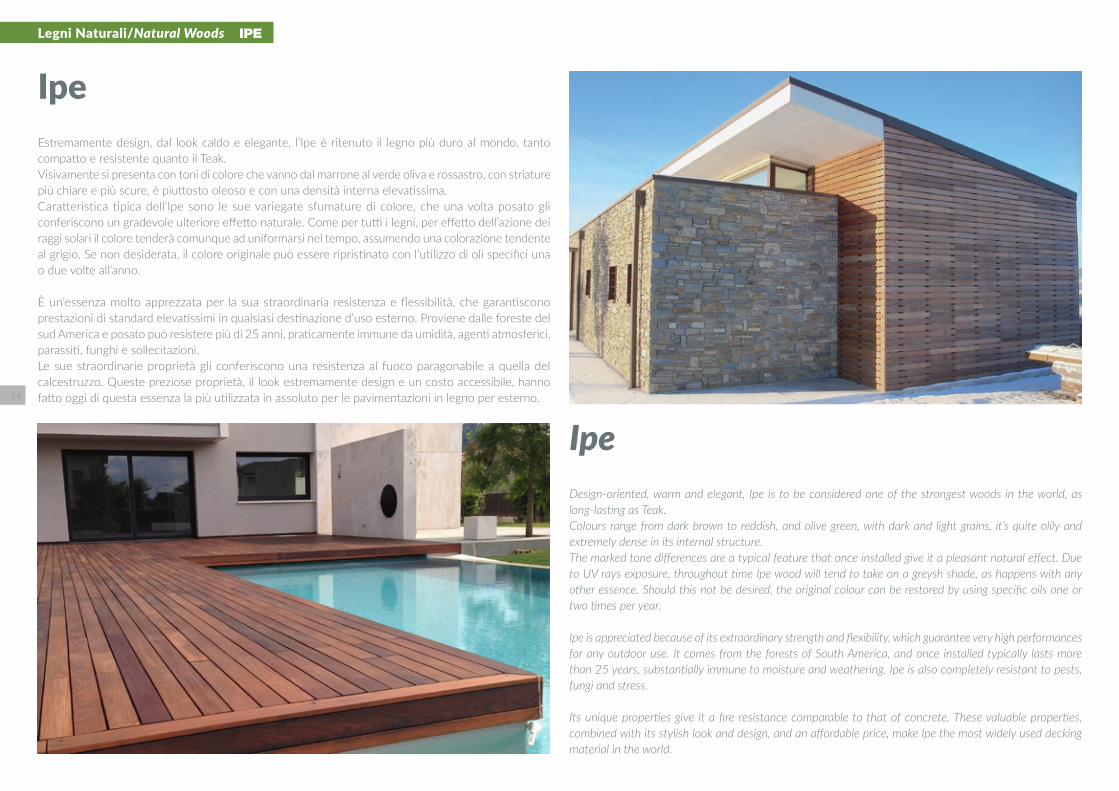
IpeEstremamente design, dal look caldo e elegante, l’Ipe è ritenuto il legno più duro al mondo, tanto compatto e resistente quanto il Teak.Visivamente si presenta con toni di colore che vanno dal marrone al verde oliva e rossastro, con striature più chiare e più scure, è piuttosto oleoso e con una densità interna elevatissima.Caratteristica tipica dell’Ipe sono le sue variegate sfumature di colore, che una volta posato gli conferiscono un gradevole ulteriore effetto naturale. Come per tutti i legni, per effetto dell’azione dei raggi solari il colore tenderà comunque ad uniformarsi nel tempo, assumendo una colorazione tendente al grigio. Se non desiderata, il colore originale può essere ripristinato con l’utilizzo di oli specifici una o due volte all’anno.
È un’essenza molto apprezzata per la sua straordinaria resistenza e flessibilità, che garantiscono prestazioni di standard elevatissimi in qualsiasi destinazione d’uso esterno. Proviene dalle foreste del sud America e posato può resistere più di 25 anni, praticamente immune da umidità, agenti atmosferici, parassiti, funghi e sollecitazioni. Le sue straordinarie proprietà gli conferiscono una resistenza al fuoco paragonabile a quella del calcestruzzo. Queste preziose proprietà, il look estremamente design e un costo accessibile, hanno fatto oggi di questa essenza la più utilizzata in assoluto per le pavimentazioni in legno per esterno.
IpeDesign-oriented, warm and elegant, Ipe is to be considered one of the strongest woods in the world, as long-lasting as Teak. Colours range from dark brown to reddish, and olive green, with dark and light grains, it’s quite olily and extremely dense in its internal structure.
The marked tone differences are a typical feature that once installed give it a pleasant natural effect. Due to UV rays exposure, throughout time Ipe wood will tend to take on a greysh shade, as happens with any other essence. Should this not be desired, the original colour can be restored by using specific oils one or two times per year.
Ipe is appreciated because of its extraordinary strength and flexibility, which guarantee very high performances for any outdoor use. It comes from the forests of South America, and once installed typically lasts more
than 25 years, substantially immune to moisture and weathering. Ipe is also completely resistant to pests, fungi and stress.
Its unique properties give it a fire resistance comparable to that of concrete. These valuable properties, combined with its stylish look and design, and an affordable price, make Ipe the most widely used decking material in the world.
Legni Naturali/Natural Woods IPE
15
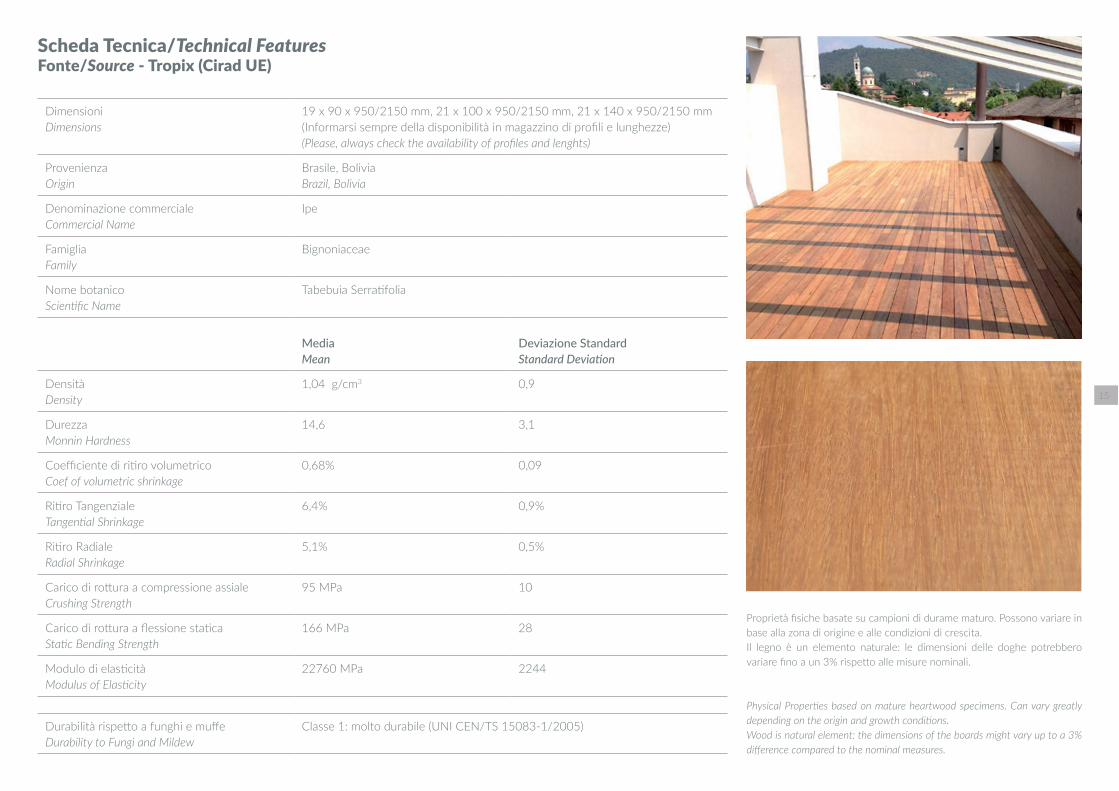
DimensioniDimensions
19 x 90 x 950/2150 mm, 21 x 100 x 950/2150 mm, 21 x 140 x 950/2150 mm (Informarsi sempre della disponibilità in magazzino di profi li e lunghezze)(Please, always check the availability of profi les and lenghts)
Provenienza
Origin
Brasile, Bolivia
Brazil, Bolivia
Denominazione commercialeCommercial Name
Ipe
FamigliaFamily
Bignoniaceae
Nome botanicoScienti fi c Name
Tabebuia Serrati folia
MediaMean
Deviazione StandardStandard Deviati on
Densità
Density
1,04 g/cm3 0,9
Durezza
Monnin Hardness14,6 3,1
Coeffi ciente di riti ro volumetricoCoef of volumetric shrinkage
0,68% 0,09
Riti ro TangenzialeTangenti al Shrinkage
6,4% 0,9%
Riti ro RadialeRadial Shrinkage
5,1% 0,5%
Carico di rott ura a compressione assialeCrushing Strength
95 MPa 10
Carico di rott ura a fl essione stati caStati c Bending Strength
166 MPa 28
Modulo di elasti citàModulus of Elasti city
22760 MPa 2244
Durabilità rispett o a funghi e muff eDurability to Fungi and Mildew
Classe 1: molto durabile (UNI CEN/TS 15083-1/2005)
Scheda Tecnica/Technical Features Fonte/Source - Tropix (Cirad UE)
Proprietà fi siche basate su campioni di durame maturo. Possono variare in base alla zona di origine e alle condizioni di crescita.Il legno è un elemento naturale: le dimensioni delle doghe potrebbero variare fi no a un 3% rispett o alle misure nominali.
Physical Properti es based on mature heartwood specimens. Can vary greatly depending on the origin and growth conditi ons.Wood is natural element: the dimensions of the boards might vary up to a 3% diff erence compared to the nominal measures.
16
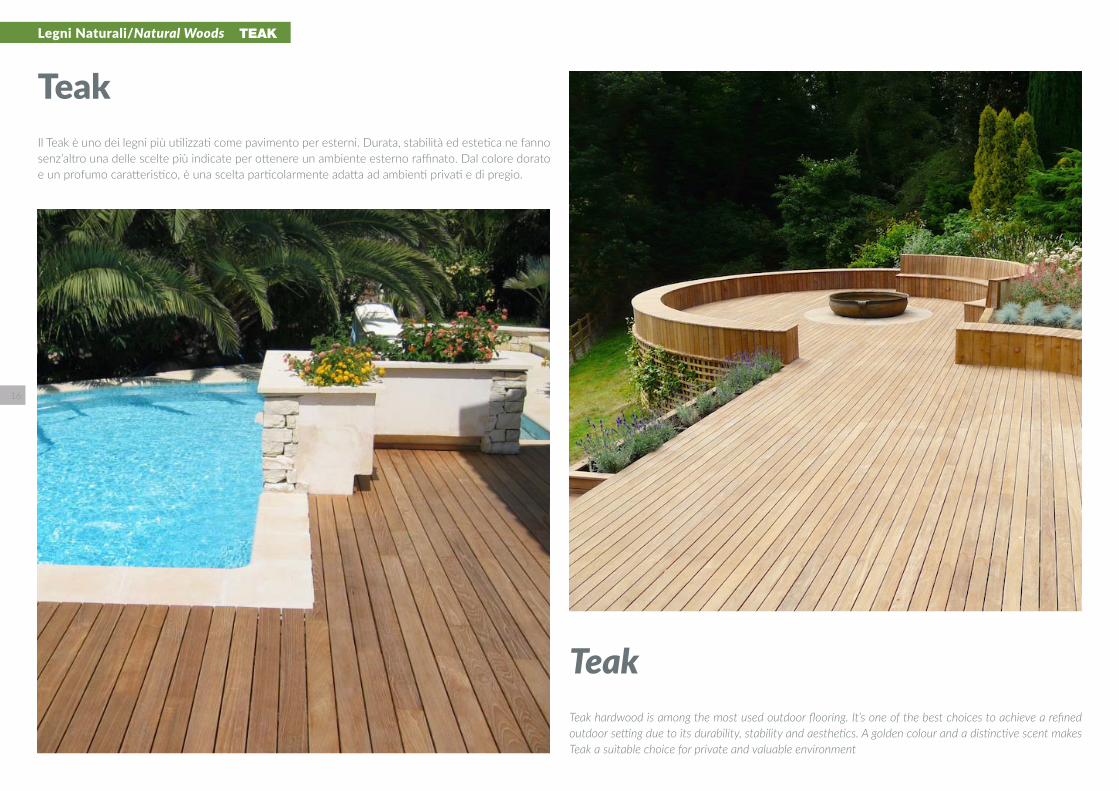
TeakIl Teak è uno dei legni più utilizzati come pavimento per esterni. Durata, stabilità ed estetica ne fanno senz’altro una delle scelte più indicate per ottenere un ambiente esterno raffinato. Dal colore dorato e un profumo caratteristico, è una scelta particolarmente adatta ad ambienti privati e di pregio.
TeakTeak hardwood is among the most used outdoor flooring. It’s one of the best choices to achieve a refined outdoor setting due to its durability, stability and aesthetics. A golden colour and a distinctive scent makes Teak a suitable choice for private and valuable environment
Legni Naturali/Natural Woods TEAK

17
Scheda Tecnica/Technical Features Fonte/Source - Tropix (Cirad UE)
DimensioniDimensions
19 x 90 x 900/2400 mm, 19 x 120 x 900/2400 mm(Informarsi sempre della disponibilità in magazzino di profi li e lunghezze)(Please, always check the availability of profi les and lenghts)
Provenienza
Origin
Asia
Denominazione commercialeCommercial Name
Teak
FamigliaFamily
Lamiaceae
Nome botanicoScienti fi c Name
Tectona Grandis
MediaMean
Deviazione StandardStandard Deviati on
Densità
Density
0,67 g/cm3 0,06
Durezza
Monnin Hardness4,2 1,3
Coeffi ciente di riti ro volumetricoCoef of volumetric shrinkage
0,34% 0,07%
Riti ro TangenzialeTangenti al Shrinkage
4,7% 0,8%
Riti ro RadialeRadial Shrinkage
2,6% 0,4%
Carico di rott ura a compressione assialeCrushing Strength
56 MPa 6
Carico di rott ura a fl essione stati caStati c Bending Strength
98 MPa 13
Modulo di elasti citàModulus of Elasti city
13740 MPa 2749
Durabilità rispett o a funghi e muff eDurability to Fungi and Mildew
Classe 1: molto durabile (UNI CEN/TS 15083-1/2005)
Proprietà fi siche basate su campioni di durame maturo. Possono variare in base alla zona di origine e alle condizioni di crescita.Il legno è un elemento naturale: le dimensioni delle doghe potrebbero variare fi no a un 3% rispett o alle misure nominali.
Physical Properti es based on mature heartwood specimens. Can vary greatly depending on the origin and growth conditi ons.Wood is natural element: the dimensions of the boards might vary up to a 3% diff erence compared to the nominal measures.
18
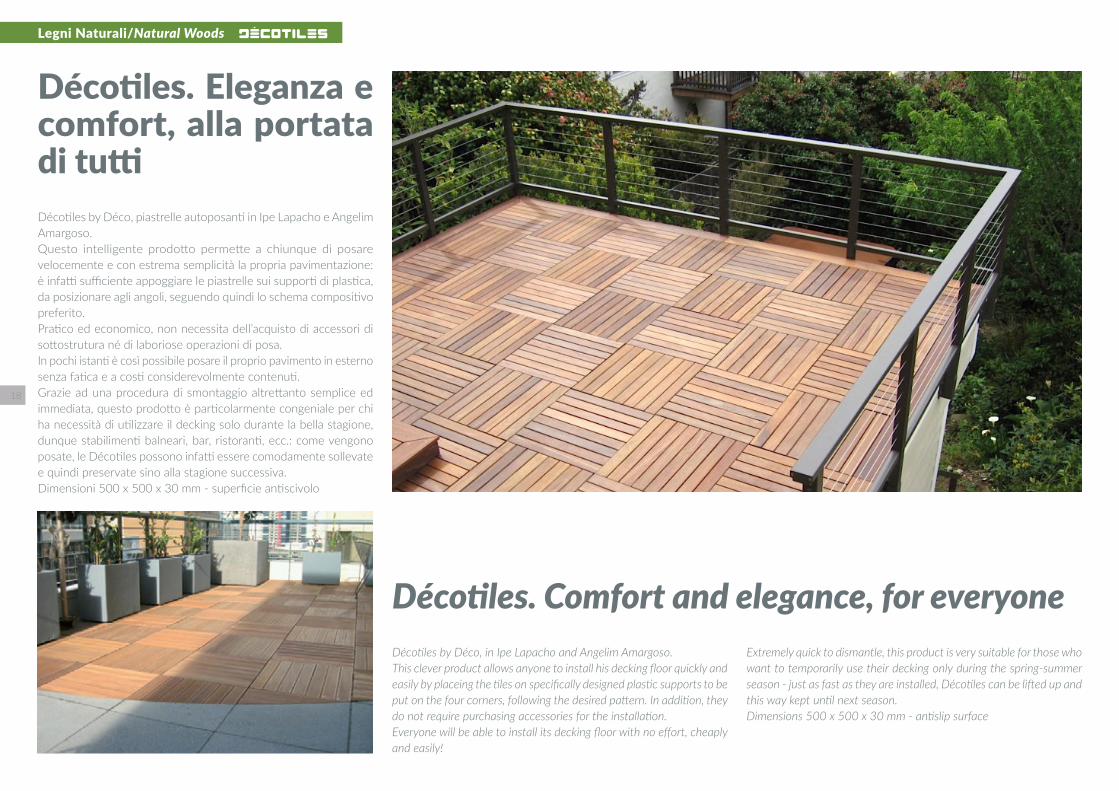
Décotiles. Eleganza e comfort, alla portata
di tuttiDécotiles by Déco, piastrelle autoposanti in Ipe Lapacho e Angelim Amargoso.Questo intelligente prodotto permette a chiunque di posare velocemente e con estrema semplicità la propria pavimentazione: è infatti sufficiente appoggiare le piastrelle sui supporti di plastica, da posizionare agli angoli, seguendo quindi lo schema compositivo preferito. Pratico ed economico, non necessita dell’acquisto di accessori di sottostrutura né di laboriose operazioni di posa.In pochi istanti è così possibile posare il proprio pavimento in esterno senza fatica e a costi considerevolmente contenuti.Grazie ad una procedura di smontaggio altrettanto semplice ed immediata, questo prodotto è particolarmente congeniale per chi ha necessità di utilizzare il decking solo durante la bella stagione, dunque stabilimenti balneari, bar, ristoranti, ecc.: come vengono posate, le Décotiles possono infatti essere comodamente sollevate e quindi preservate sino alla stagione successiva.Dimensioni 500 x 500 x 30 mm - superficie antiscivolo
Décotiles. Comfort and elegance, for everyoneDécotiles by Déco, in Ipe Lapacho and Angelim Amargoso.This clever product allows anyone to install his decking floor quickly and easily by placeing the tiles on specifically designed plastic supports to be put on the four corners, following the desired pattern. In addition, they do not require purchasing accessories for the installation.Everyone will be able to install its decking floor with no effort, cheaply and easily!
Extremely quick to dismantle, this product is very suitable for those who want to temporarily use their decking only during the spring-summer season - just as fast as they are installed, Décotiles can be lifted up and this way kept until next season.Dimensions 500 x 500 x 30 mm - antislip surface
Legni Naturali/Natural Woods

19
Progetti su misuraBespoke designs Frangisole, sedute, fioriere, arredo urbano e residenziale: con i prodotti Déco è possibile dare libero sfogo ai propri desideri per conferire agli ambienti una ricercata originalità
Sunscreens, seats, flower boxes, urban and residential furniture: Déco’s products make it possible to set free one’s own desires so as to give every environment a valued originality.
20
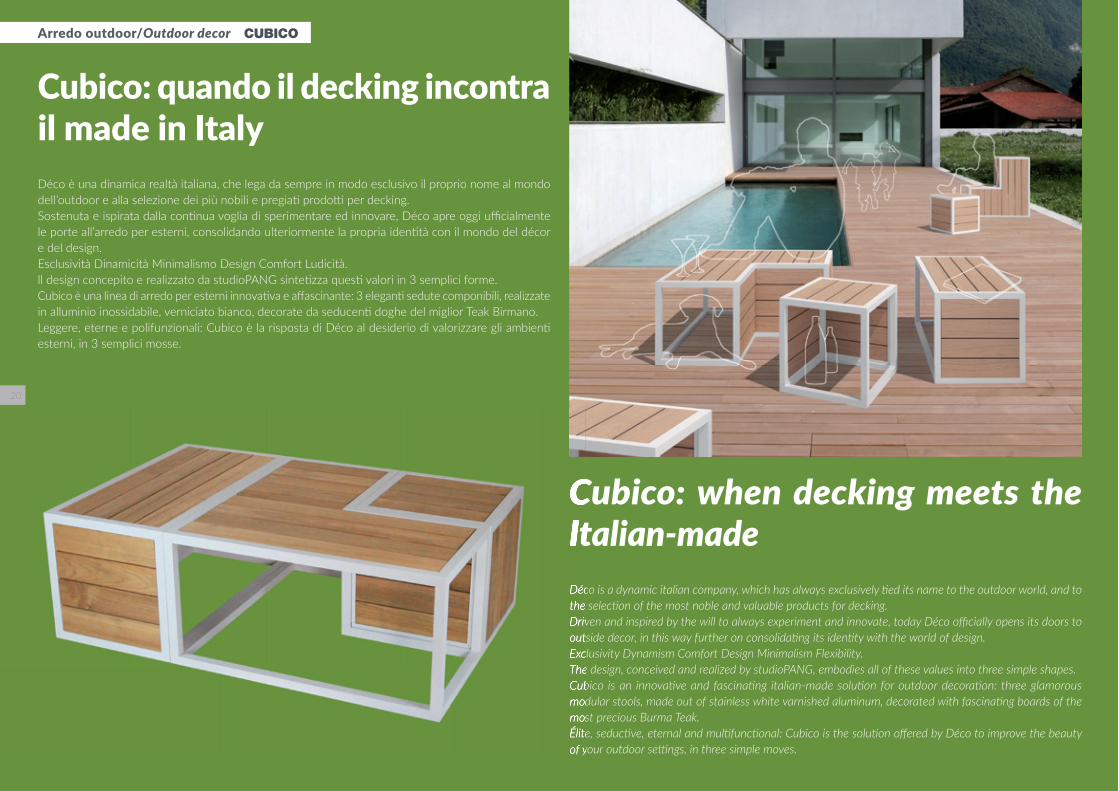
Arredo outdoor/Outdoor decor CUBICO
Cubico: quando il decking incontra il made in ItalyDéco è una dinamica realtà italiana, che lega da sempre in modo esclusivo il proprio nome al mondo dell’outdoor e alla selezione dei più nobili e pregiati prodotti per decking.Sostenuta e ispirata dalla conti nua voglia di sperimentare ed innovare, Déco apre oggi uffi cialmente le porte all’arredo per esterni, consolidando ulteriormente la propria identi tà con il mondo del décor e del design.Esclusività Dinamicità Minimalismo Design Comfort Ludicità.ll design concepito e realizzato da studioPANG sinteti zza questi valori in 3 semplici forme.Cubico è una linea di arredo per esterni innovati va e aff ascinante: 3 eleganti sedute componibili, realizzate in alluminio inossidabile, verniciato bianco, decorate da seducenti doghe del miglior Teak Birmano.Leggere, eterne e polifunzionali: Cubico è la risposta di Déco al desiderio di valorizzare gli ambienti esterni, in 3 semplici mosse.
Cubico: when decking meets the Italian-madeDéco is a dynamic italian company, which has always exclusively ti ed its name to the outdoor world, and to the selecti on of the most noble and valuable products for decking.Driven and inspired by the will to always experiment and innovate, today Déco offi cially opens its doors to outside decor, in this way further on consolidati ng its identi ty with the world of design.Exclusivity Dynamism Comfort Design Minimalism Flexibility.The design, conceived and realized by studioPANG, embodies all of these values into three simple shapes.Cubico is an innovati ve and fascinati ng italian-made soluti on for outdoor decorati on: three glamorous modular stools, made out of stainless white varnished aluminum, decorated with fascinati ng boards of the most precious Burma Teak.Élite, seducti ve, eternal and multi functi onal: Cubico is the soluti on off ered by Déco to improve the beauty of your outdoor setti ngs, in three simple moves.
Cubico: when decking meets the Italian-madeDéco is a dynamic italian company, which has always exclusively ti ed its name to the outdoor world, and to the selecti on of the most noble and valuable products for decking.Driven and inspired by the will to always experiment and innovate, today Déco offi cially opens its doors to outside decor, in this way further on consolidati ng its identi ty with the world of design.Exclusivity Dynamism Comfort Design Minimalism Flexibility.The design, conceived and realized by studioPANG, embodies all of these values into three simple shapes.Cubico is an innovati ve and fascinati ng italian-made soluti on for outdoor decorati on: three glamorous modular stools, made out of stainless white varnished aluminum, decorated with fascinati ng boards of the most precious Burma Teak.Élite, seducti ve, eternal and multi functi onal: Cubico is the soluti on off ered by Déco to improve the beauty of your outdoor setti ngs, in three simple moves.

21

22
Sottostrutture e Legni Naturali - ISTRUZIONI DI POSALe indicazioni di Preparazione del suolo e di Installazione dei magatelli di sottostruttura nella presente sezione si applicano sia ai Legni Naturali, che ai Legni Compositi Ultrashield e Décowood. Mentre per indicazioni specifiche e dedicate alla posa dei Legni Compositi si prega di consultare le sezioni successive.
Non solo qualità ed estetica. La procedura di posa del decking è determinante per soddisfare le aspettative del cliente finale. Attenersi scrupolosamente alle indicazioni di posa permette di contenere sensibilmente il rischio che il legno, elemento vivo e naturale, possa muoversi compromettendo la tenuta complessiva della pavimentazione. Invitiamo pertanto a leggere con la massima attenzione le seguenti prescrizioni. Qualora dubbi o perplessità dovessero nascere nel corso della progettazione o della posa, vi invitiamo a non esitare a contattarci: saremo lieti di offrirvi tutta l’assistenza necessaria.Le istruzioni riguardanti la preparazione del suolo e dei magatelli sono generali e si applicano allo stesso modo al legno massello, a Ultrashield e a Décowood. Le indicazioni specifiche per la posa di Ultrashield e Décowood sono invece riportate nelle pagine successive
1. PREPARAZIONE DEL SUOLO
Il suolo deve essere reso piano con una pendenza di circa 1 cm ogni metro lineare. Per correggere le pendenze è possibile utilizzare “tacchi di compensazione” ovvero spessoratori ricavati dagli stessi magatelli e fissati al suolo e/o ai magatelli.In caso di posa su terreno instabile (Fig. 1) è necessario livellare la superficie (nel caso di posa su terra, stendere uno strato di tessuto-non-tessuto per evitare la ricrescita di erba). Al fine di stabilizzare la superficie su cui posino i magatelli, è quindi necessario utilizzare putrelle di cemento di dimensione 40x40cm o simili (Fig. 1). Si consiglia in ogni caso di costruire una doppia orditura perpendicolare (Fig. 1): la prima con interasse 50/100cm (in base alla solidità della prima orditura), la seconda con interasse circa 30 cm (in caso di posa con clip) o circa 45 cm (in caso di posa con viti a vista). Tale accorgimento è in grado di conferire una perfetta stabilità al pavimento.Per conferire la migliore stabilità possibile alla pavimentazione, Déco raccomanda di costruire la sottostruttura in legno durevole, anche nel caso di recupero di quote e dislivelli. Tale raccomandazione è valida sia nel caso di posa di pavimenti in legno massello, sia nel caso di Ultrashield e Décowood.
2. INSTALLAZIONE DEI MAGATELLI DI SOTTOSTRUTTURA
I magatelli, che devono essere quanto più possibile dritti, vanno fissati al cemento con viti o tasselli (Fig. 2). Qualora non fosse possibile fissare i magatelli al cemento (es. terrazzo con guaina catramata), sarà necessario costruire una struttura portante con controventature (Fig. 3) oppure una doppia orditura (v. sopra).È imperativo prevedere che tutte le teste delle doghe vengano fissate su un magatello, progettando e montando la sottostruttura di conseguenza, eventualmente raddoppiando i magatelli laddove due teste siano adiacenti; questo perché le teste delle doghe sono la zona più sensibile per i movimenti del legno ed è importante che siano bene ancorate alla sottostruttura, venendo ad essa fissate con due viti o due clip.
3. INSTALLAZIONE DEL DECKING
Per una corretta installazione del decking è innanzitutto necessario lavare le doghe prima di procedere. Questo per far sì che il tannino eventualmente presente nel legno possa essere rilasciato dallo stesso ed evitare che in futuro possa macchiare superfici adiacenti alla pavimentazione.Esistono due modi per installare i pavimenti in legno per esterno: con viti a vista o con clip.a. VITE A VISTA (Fig. 4)Le viti a vista sono senza dubbio il metodo più sicuro poiché consentono di ancorare direttamente le doghe alla sottostruttura. Nonostante la resa estetica sia da taluni ritenuta meno gradevole, rimane il metodo consigliato.
La procedura è come segue:• Montare la prima fila di doghe, che deve essere perfettamente dritta.• È sempre necessario effettuare un preforo (Fig. 4.1) e svasare prima di
installare le viti. Queste devono essere a una distanza di ca. 2 centimetri dalle estremità delle doghe per evitare screpolature nel legno (Fig. 4.2).
• Le doghe vanno poi montate con la parte convessa verso le doghe precedenti e inizialmente fissate con viti solo alle estremità. L’estremità dovrà naturalmente essere spinta verso la doga precedente, determinando la corretta distanza tra le due doghe (ca. 5 mm) (Fig. 4.2).
• Una volta installate tutte le doghe sarà necessario utilizzare uno scalpello (o qualsiasi oggetto adatto a fungere da leva) per distanziare le doghe uniformemente di 5 mm.
• Sarà quindi possibile avvitare le doghe all’altezza dei magatelli (Fig. 4.2), utilizzando un filo a battere per tracciare una linea perfettamente dritta e migliorare così l’estetica della pavimentazione (Fig. 4.3).
b. MONTAGGIO CON CLIP (Fig. 5)Le clip non consentono di fissare le doghe direttamente ai magatelli, esponendo la pavimentazione al possibile rischio di movimenti. Questo tipo di installazione è dunque consigliato solo con legni di provata stabilità. Si sottolinea inoltre che l’ispezionabilità e/o la sostituzione di doghe danneggiate risulta estremamente difficoltosa con questo tipo di posa.
La procedura è come segue:• Montare la prima fila di doghe, che deve essere perfettamente dritta e
fissata sul lato esterno con viti a vista (Fig. 5.1).• Inserire le clip nella fresatura, avendo cura che siano correttamente in
sede (Fig. 5.2).• Avvitare la clip al magatello di sottostruttura (Fig. 5.1).• Procedere con le file successive, verificando ogni 3 o 4 doghe che la
distanza tra la prima doga e le successive sia sempre la stessa lungo tutta la fila. Diversamente è necessario rivedere i parallelismi.
• Completare la pavimentazione fissando il lato esterno dell’ultima doga con viti a vista.
• In figura 5.3 è mostrato un possibile schema di posa.
4. OLIATURA (opzionale)
Una volta installato il pavimento si consiglia di stendere due mani di olio specifico per esterni a distanza di 72 ore l’una dall’altra. Tale operazione, da ripetersi ogni 6 mesi/1 anno a seconda delle condizioni atmosferiche, è raccomandata per preservare il colore originale del legno ed evitare microfessurazioni, in particolare sulle estremità delle doghe. La mancanza di questo tipo di manutenzione non compromette comunque la stabilità strutturale della pavimentazione.

23
Understructure and Natural Woods - INSTALLATION GUIDELINESInstructions about Preparation of Soil and Installation of the Substructure are to be applied both to Natural Woods and Composite Woods - Ultrashield and Décowood. While for all specific instructions about Composite Woods, please see next pages.
Not only about great quality and look. The procedure for installing your decking highly contributes to meeting the expectations of the customer. Carefully following the installation guidelines significantly limits the risk that the wood, a natural living element, might move, therefore compromising the overall tightness of the floor. We recommend that you read carefully the following requirements.If you encounter any questions or concerns during the design or installation, please do not hesitate to contact us and we will be happy to offer you all the assistance needed.
The general instructions about the installation of joists are suitable for hardwood as well as Ultrashield and Décowood. The specifica instructions for Ultrashield and Décowood installation are in the next few pages
1. PREPARATION OF THE SOIL
The ground floor must be made flat with a slope of about 1 cm per linear meter. To correct an uneven slope you can use “compensation heels”- is wooden pieces derived from the same joists and fixed to the ground and/or to the joists.In case of installation on unstable ground (Fig. 1) it is necessary to level the surface (in case of installation on soil, spread a layer of fabric to prevent the regrowth of the grass). In order to stabilize the surface upon which the joists will be layed, it is necessary to use concrete beams sized 40x40cm or similar (Fig. 1). It is recommended to build a double frame with two perpendicular rows of joists (Fig.1), the first with 50/100cm distance (according to the strength of the first frame), the second with a distance about 30 cm (in case of installation with clips) or about 45 cm (in the case of installation with screws): this will make the structure perfectly stable.In order to achieve the best stability, Déco recommends to build the substructure in durable wood, even in case of different heights and uneven soil. This recommendations applies in case of installation of hardwood decking as well as Ultrashield or Décowood.
2. INSTALLATION OF THE SUBSTRUCTURE OF JOISTS
The joists, which must be as straight as possible, need to be fixed to the concrete with screws or bolts (Fig. 2). If the joists cannot be fixed to the cement (e.g. terrace with waterproof sheeting), build a structure with braces (Fig. 3) or a double frame.It is mandatory that all ends of the boards are placed on and fixed to a joist, designing and assembling the substructure as a result, if necessary doubling the joists where two ends meet. This is because the heads of the boards are the most sensitive area for the movement of the wood and it is important to be well anchored to the substructure, being them fixed with two screws or clips.
3. INSTALLATION OF DECKING
For a proper installation of decking, it is important to wash the boards before proceeding. This is to ensure that the tannins in the wood is released therefore preventing it from staining the areas adjacent to the pavement.There are two ways to install decking: with visible screws and with clips.a. VISIBLE SCREWS (Fig. 4)Visible screws are undoubtedly the most secure method because they allow the boards to anchor directly to the substructure. Despite the overall look is considered less attractive by some, this remains the preferred method.The procedure is as follows:• Install the first row of boards, which must be perfectly straight. • It is always necessary to make a pilot hole (Fig. 4.1) and countersink before
installing the screws. These must be at a distance of approx. 2 cm from the ends and the sides of the boards in order to avoid cracks in the wood (Fig. 4.2).
• The boards are then installed with the convex side towards the previous ones and firstly fixed with screws only at the ends. The end has to be pushed to the board , this way also determining the correct distance between the two
strips (no less than 5 mm) (Fig. 4.2).• Once having installed all the boards, it will be necessary to use a chisel (or
any suitable object to act as a lever) to space the boards evenly at 5 mm.• Finally screw the boards to the joists (Fig. 4.2), using a wiretap to draw a
perfectly straight line and this way improve the look of the pavement (Fig. 4.3).b. CLIPS (Fig. 5)The clips do not allow the boards to be directly fixed to the joists, thus exposing the flooring to the risk of movements. This type of installation is therefore recommended only with proven stability woods.Moreover, the inspection and / or replacement of damaged boards will be very difficult with this type of installation.The procedure is as follows:• Install the first row of boards, which must be perfectly straight and secured
with screws on the very outer side (Fig. 5.1).• Insert the clips into the groove, ensuring that they are properly seated (Fig. 5.2).• Tighten the clips to the underneath joist (Fig. 5.1).• Proceed this way with the further rows, then check every 3 or 4 boards that
the distance. between the first and the last ones is always the same along the whole line. Otherwise you should review the parallels.
• Complete the deck and fix the outer side of the last board with screws.• A possible pattern is shown in Fig. 5.3.
4. LUBRICATION
Once decking is installed, it is recommended to apply two coats of exterior oil, 72 hours one after the other. This operation, to be repeated every 6 months/1 year depending on weather conditions, it is necessary to preserve the colour of the wood and prevent it from cracking, especially on the ends of the boards. On the other hand the lack of this kind of maintenance does not affect the stability of the floor at all.
24
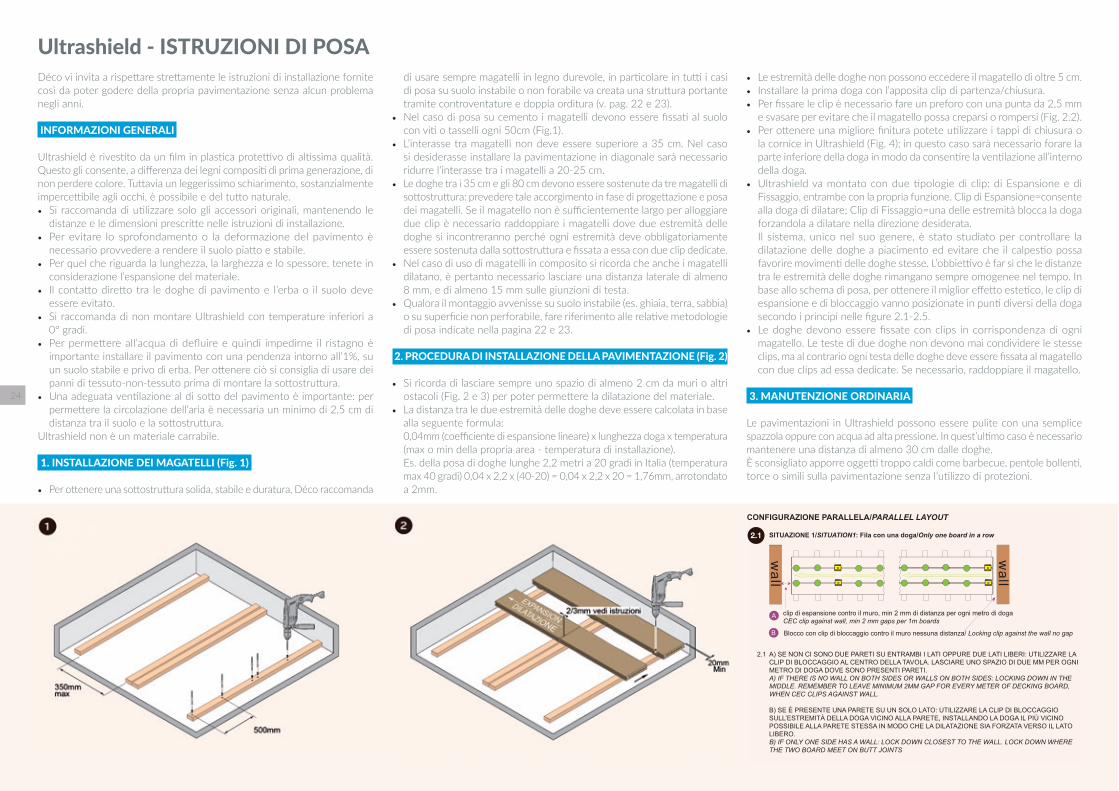
Ultrashield - ISTRUZIONI DI POSA Déco vi invita a rispettare strettamente le istruzioni di installazione fornite così da poter godere della propria pavimentazione senza alcun problema negli anni.
INFORMAZIONI GENERALI
Ultrashield è rivestito da un film in plastica protettivo di altissima qualità. Questo gli consente, a differenza dei legni compositi di prima generazione, di non perdere colore. Tuttavia un leggerissimo schiarimento, sostanzialmente impercettibile agli occhi, è possibile e del tutto naturale.• Si raccomanda di utilizzare solo gli accessori originali, mantenendo le
distanze e le dimensioni prescritte nelle istruzioni di installazione. • Per evitare lo sprofondamento o la deformazione del pavimento è
necessario provvedere a rendere il suolo piatto e stabile. • Per quel che riguarda la lunghezza, la larghezza e lo spessore, tenete in
considerazione l’espansione del materiale. • Il contatto diretto tra le doghe di pavimento e l’erba o il suolo deve
essere evitato.• Si raccomanda di non montare Ultrashield con temperature inferiori a
0° gradi.• Per permettere all’acqua di defluire e quindi impedirne il ristagno è
importante installare il pavimento con una pendenza intorno all’1%, su un suolo stabile e privo di erba. Per ottenere ciò si consiglia di usare dei panni di tessuto-non-tessuto prima di montare la sottostruttura.
• Una adeguata ventilazione al di sotto del pavimento è importante: per permettere la circolazione dell’aria è necessaria un minimo di 2,5 cm di distanza tra il suolo e la sottostruttura.
Ultrashield non è un materiale carrabile.
1. INSTALLAZIONE DEI MAGATELLI (Fig. 1)
• Per ottenere una sottostruttura solida, stabile e duratura, Déco raccomanda
di usare sempre magatelli in legno durevole, in particolare in tutti i casi di posa su suolo instabile o non forabile va creata una struttura portante tramite controventature e doppia orditura (v. pag. 22 e 23).
• Nel caso di posa su cemento i magatelli devono essere fissati al suolo con viti o tasselli ogni 50cm (Fig.1).
• L’interasse tra magatelli non deve essere superiore a 35 cm. Nel caso si desiderasse installare la pavimentazione in diagonale sarà necessario ridurre l’interasse tra i magatelli a 20-25 cm.
• Le doghe tra i 35 cm e gli 80 cm devono essere sostenute da tre magatelli di sottostruttura: prevedere tale accorgimento in fase di progettazione e posa dei magatelli. Se il magatello non è sufficientemente largo per alloggiare due clip è necessario raddoppiare i magatelli dove due estremità delle doghe si incontreranno perché ogni estremità deve obbligatoriamente essere sostenuta dalla sottostruttura e fissata a essa con due clip dedicate.
• Nel caso di uso di magatelli in composito si ricorda che anche i magatelli dilatano, è pertanto necessario lasciare una distanza laterale di almeno 8 mm, e di almeno 15 mm sulle giunzioni di testa.
• Qualora il montaggio avvenisse su suolo instabile (es. ghiaia, terra, sabbia) o su superficie non perforabile, fare riferimento alle relative metodologie di posa indicate nella pagina 22 e 23.
2. PROCEDURA DI INSTALLAZIONE DELLA PAVIMENTAZIONE (Fig. 2)
• Si ricorda di lasciare sempre uno spazio di almeno 2 cm da muri o altri ostacoli (Fig. 2 e 3) per poter permettere la dilatazione del materiale.
• La distanza tra le due estremità delle doghe deve essere calcolata in base alla seguente formula: 0,04mm (coefficiente di espansione lineare) x lunghezza doga x temperatura (max o min della propria area - temperatura di installazione). Es. della posa di doghe lunghe 2,2 metri a 20 gradi in Italia (temperatura max 40 gradi) 0,04 x 2,2 x (40-20) = 0,04 x 2,2 x 20 = 1,76mm, arrotondato a 2mm.
• Le estremità delle doghe non possono eccedere il magatello di oltre 5 cm.• Installare la prima doga con l’apposita clip di partenza/chiusura. • Per fissare le clip è necessario fare un preforo con una punta da 2,5 mm
e svasare per evitare che il magatello possa creparsi o rompersi (Fig. 2.2).• Per ottenere una migliore finitura potete utilizzare i tappi di chiusura o
la cornice in Ultrashield (Fig. 4); in questo caso sarà necessario forare la parte inferiore della doga in modo da consentire la ventilazione all’interno della doga.
• Ultrashield va montato con due tipologie di clip: di Espansione e di Fissaggio, entrambe con la propria funzione. Clip di Espansione=consente alla doga di dilatare; Clip di Fissaggio=una delle estremità blocca la doga forzandola a dilatare nella direzione desiderata.Il sistema, unico nel suo genere, è stato studiato per controllare la dilatazione delle doghe a piacimento ed evitare che il calpestio possa favorire movimenti delle doghe stesse. L’obbiettivo è far sì che le distanze tra le estremità delle doghe rimangano sempre omogenee nel tempo. In base allo schema di posa, per ottenere il miglior effetto estetico, le clip di espansione e di bloccaggio vanno posizionate in punti diversi della doga secondo i principi nelle figure 2.1-2.5.
• Le doghe devono essere fissate con clips in corrispondenza di ogni magatello. Le teste di due doghe non devono mai condividere le stesse clips, ma al contrario ogni testa delle doghe deve essere fissata al magatello con due clips ad essa dedicate. Se necessario, raddoppiare il magatello.
3. MANUTENZIONE ORDINARIA
Le pavimentazioni in Ultrashield possono essere pulite con una semplice spazzola oppure con acqua ad alta pressione. In quest’ultimo caso è necessario mantenere una distanza di almeno 30 cm dalle doghe. È sconsigliato apporre oggetti troppo caldi come barbecue, pentole bollenti, torce o simili sulla pavimentazione senza l’utilizzo di protezioni.
clip di espansione contro il muro, min 2 mm di distanza per ogni metro di dogaCEC clip against wall, min 2 mm gaps per 1m boards
Blocco con clip di bloccaggio contro il muro nessuna distanza/ Locking clip against the wall no gap
2.1
2.1 A) SE NON CI SONO DUE PARETI SU ENTRAMBI I LATI OPPURE DUE LATI LIBERI: UTILIZZARE LA CLIP DI BLOCCAGGIO AL CENTRO DELLA TAVOLA. LASCIARE UNO SPAZIO DI DUE MM PER OGNI METRO DI DOGA DOVE SONO PRESENTI PARETI.A) IF THERE IS NO WALL ON BOTH SIDES OR WALLS ON BOTH SIDES: LOCKING DOWN IN THE MIDDLE. REMEMBER TO LEAVE MINIMUM 2MM GAP FOR EVERY METER OF DECKING BOARD, WHEN CEC CLIPS AGAINST WALL.
B) SE È PRESENTE UNA PARETE SU UN SOLO LATO: UTILIZZARE LA CLIP DI BLOCCAGGIO SULL’ESTREMITÀ DELLA DOGA VICINO ALLA PARETE, INSTALLANDO LA DOGA IL PIÙ VICINO POSSIBILE ALLA PARETE STESSA IN MODO CHE LA DILATAZIONE SIA FORZATA VERSO IL LATO LIBERO.B) IF ONLY ONE SIDE HAS A WALL: LOCK DOWN CLOSEST TO THE WALL. LOCK DOWN WHERE THE TWO BOARD MEET ON BUTT JOINTS
CONFIGURAZIONE PARALLELA/PARALLEL LAYOUT
SITUAZIONE 1/SITUATION1: Fila con una doga/Only one board in a row

25
Ultrashield - INSTALLATION GUIDELINESDéco invites you to strictly respect the installation instructions so that you can enjoy your floor without any problem in the years to come.
GENERAL INFORMATION
Ultrashield is capped with an advanced premium shield. The unique formula of the shield ensures its colour stays the same over a much longer period than first gen WPCs. Its fading is not visible by the human eyes.
• Please use original items only.
• Maintain the distances and dimensions specified in the installation guidelines• To prevent the floor from collapsing or deforming it is necessary to make the
ground flat and stable. • With regard to the length, width and thickness, consider the expansion of the
material: make sure you have enough distance (about 2 cm) around the floor and from obstacles such as walls, fences, trees, etc..
• An adequate ventilation below the floor is important. To allow air circulation a minimum of 2.3 cm distance between the ground and the substructure is required. Direct contact between the boards and the grass or the ground floor must be avoided.
• Never assemble the joints of Décowood in contact against each other, but always leave an 8 mm gap at least.
• Each end of the boards must be fixed on and supported by a joist. • dÉcowood is a natural product subject to weather conditions. Never install
the pavement with a temperature below 0 degrees. • To allow water to flow and thus prevent its accumulation, it is important to
install the decking with a slope of around 1%, on a stable grass-free soil. To achieve this we recommend to lay fabric before assembling the substructure.
Décowood is not suitable for sustaining vehicles.
1. INSTALLATION OF JOISTS (Fig. 1)
• In order to build a solid, stable and long-lasintg understructure, Déco recommends to always use durable wood joists, That’s mandatory in case of installation on water-proof sheeting or unstable surface (see pag. 22-23).
• The joists must be fixed to the concrete with screws or bolts every 50 cm.• The distance between the joists must not exceed 35 cm. Should the flooring
be installed diagonally, it is necessary to reduce the distance between the joists at 20-25 cm.
• The boards shorter than 80 cm must be supported by three joists: consider this in the design and installation of the joists. Should the joist be not large enough to host two clips, it is necessary to double the joists where two ends of the boards meet. That’s because every end must be supported by and fixed to a joist.
• In case of use of composite joists, remember that they also expand. It is then necessary to leave a minimum distance of 8 mm where they are parallel, adjacent to one another, and 15 mm whereas their ends meet.
• In case of installation on unstable ground (eg. gravel, sand, soil) or unscrewable surface, refer to the relative installation procedures explained on pages 22 and 23.
2. INSTALLATION OF THE FLOOR (Fig. 2)
• Always remember to leave at least a 2 cm space from the walls or other obstacles to allow the expansion of the material.
• The distance between two ends of the boards should be of 6 mm, while on the side it is determined by the clip.
• The ends of the boards cannot exceed the joist of more than 50 cm• Install the first board with the start / end clip. • To fix the clips, you must make a pilot hole with a peak of 2.5 mm and
coutersink to prevent the boards from cracking or breaking.
• To get a better finish you can use the end cap in Décowood or the lateral frame, in which case you will need to drill holes in the bottom of the board so as to make the water drain.
• Ultrashield must be installed with two kind of clps: Expansion Clip and Blocking Clip, both with their own purpose. Expansion Clip = allows the board to dilate; Blocking Clip = one of its edge blocks the boards so as to force the dilation in the desired direction.This unique system has been designed in order to control the dilation of the boards and to avoid the any movements due to foot traffic. The aim is to keep uniform the gaps between the boards. In order to achieve the best result Déco recommends to place the plastic and stainless steel clips according to the type of installation (see fig.da 2.1-2.5).
• Boards must be fixed with clips in correspondence with each joist. The ends of two boards must not share the same clips, but on the contrary every end of the boards must be fixed to the joist with two dedicated clips. If necessary, double the joist.
3. ROUTINE MAINTENANCE
Décowood flooring can be cleaned with a simple brush or high pressure water. In the latter case it is necessary to maintain a minimum distance of 30 cm from the boards. If you need to clean the floor with intensity, just rub it hard. You may then notice a difference in colour on the surface. This is because the natural color resurfaces, but it will fade again over time. In case of very strong dirt, you can use a mild soap, but remember not to use a detergent that may affect the synthetic component of the material. It is recommended not to lay items such as hot barbecues, hot pots, torches or the like on the floor without using any protection.
FISSARE CON LA CLIP DI BLOCCAGGIO NEL PUNTO IN CUI LE DUE ESTREMITÀ DELLE DOGHE SI INCONTRANO/ LOCK DOWN ALONG THE CENTRAL LINE ON THE BUTT JOINTS AND THE NEIGHBORD BOARDS AT WHERE THEY MEET THE MIDDLE BOARD.
LE DOGHE CENTRALI VANNO FISSATE CON LA CLIP DI BLOCCAGGIO AL CENTRO. LE DUE DOGHE ESTERNE VANNO FISSATE CON LA CLIP DI BLOCCAGGIO LADDOVE INCONTRANO LE DOGHE CENTRALI IN MODO CHE LA LORO DILATAZIONE SIA FORZATA VERSO L’ESTERNO. LASCIARE UNO SPAZIO DI 2 MM PER OGNI METRO DI DOGA DOVE SONO PRESENTI PARETI.THE MIDDLE BOARD SHOULD BE AS SHORT AS POSSIBLE AND NO LONGER THAN 2 METERS, AND LEAVE 2MM GAP ON EACH SIDES.
2.2
2.3
2.2 SITUAZIONE 2:
SITUATION 2:
Fila con due doghe
Two boards in a row2.3 SITUAZIONE 3:
SITUATION 3:
Fila con tre o più doghe
Three or more boards in a row
nelle doghe centrali min 2 mm di distanza su ogni estremitàin between middle boards min 2mm gap on each side
N.B. Ogni doga può essere bloccata con la clip di bloccaggio in un solo puntoNote: Always one Locking clip on one board.
Clip di bloccaggio/Locking Clip Scorrimento/Move
Blocco/Lock
Il lato seghettato è quello che blocca la doga/Note the bite side is the lock side
Direzione di espansione e contrazione/Direction of expansion and contraction
Clip di espansione/CEC Clip
2.4
LE DOGHE CENTRALI VANNO FISSATE CON LA CLIP DI BLOCCAGGIO AL CENTRO. LE DOGHE ESTERNE VANNO FISSATE CON LA CLIP DI BLOCCAGGIO SULLE ESTREMITÀ DOVE INCONTRANO LE DOGHE CENTRALI COSÌ CHE LA LORO DILATAZIONE SIA FORZATA VERSO L’ESTERNO. LASCIARE UNO SPAZIO DI DUE MM PER OGNI PER METRO DI DOGA DOVE SONO PRESENTI PARETI.THE MIDDLE BOARD SHOULD BE AS SHORT AS POSSIBLE AND NO LONGER THAN 2 METERS, AND LEAVE 2MM GAP ON EACH SIDES.
FISSARE CON LA CLIP DI BLOCCAGGIO LUNGO LA LINEA CENTRALE DOVE SI INCONTRANO LE ESTREMITÀ DELLE DOGHELOCK DOWN ALONG THE CENTRAL LINE ON THE BUTT JOINTS. REMEMBER TO LEAVE MINIMUM 2MM GAP FOR EVERY METER OF DECKING BOARD, WHEN CEC CLIP AGAINST WALL.
2.5
2.4
CONFIGURAZIONE A MATTONI/BRICK LAYOUT
SITUAZIONE 1/SITUATION1: Layout 2-1-2
2.5 SITUAZIONE 2/SITUATION 2: Layout 3-2-3 o maggiori (ES. 4-3-4, 5-4-5, ECC)
SE È UTILIZZATO IL TAPPO DI CHIUSURA È NECESSARIO FARE UN FORO AL DI SOTTO DEL PROFILO PER FARE SCOLARE L’ACQUA/IF YOU USE FINISHING PROFILES, MAKE A HOLE IN THE BOTTOM OF THE PROFILE FOR WATER DISPOSAL.
26
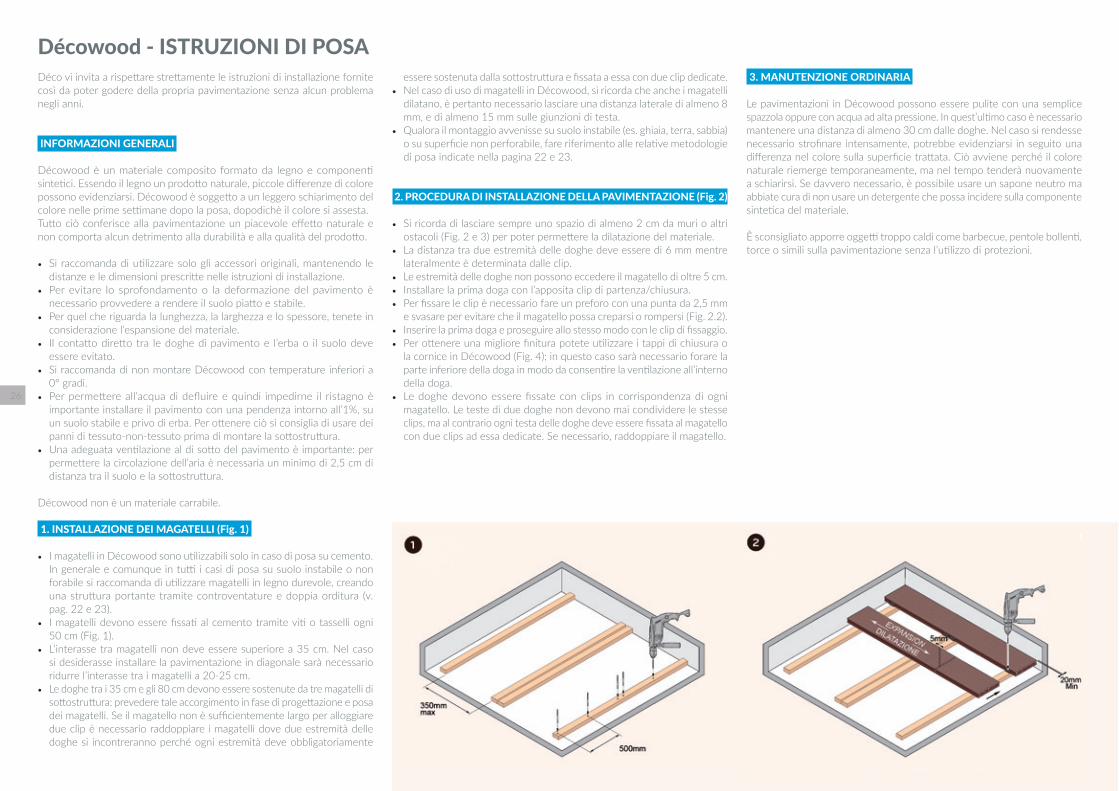
Décowood - ISTRUZIONI DI POSA Déco vi invita a rispettare strettamente le istruzioni di installazione fornite così da poter godere della propria pavimentazione senza alcun problema negli anni.
INFORMAZIONI GENERALI
Décowood è un materiale composito formato da legno e componenti sintetici. Essendo il legno un prodotto naturale, piccole differenze di colore possono evidenziarsi. Décowood è soggetto a un leggero schiarimento del colore nelle prime settimane dopo la posa, dopodichè il colore si assesta.Tutto ciò conferisce alla pavimentazione un piacevole effetto naturale e non comporta alcun detrimento alla durabilità e alla qualità del prodotto.
• Si raccomanda di utilizzare solo gli accessori originali, mantenendo le distanze e le dimensioni prescritte nelle istruzioni di installazione.
• Per evitare lo sprofondamento o la deformazione del pavimento è necessario provvedere a rendere il suolo piatto e stabile.
• Per quel che riguarda la lunghezza, la larghezza e lo spessore, tenete in considerazione l’espansione del materiale.
• Il contatto diretto tra le doghe di pavimento e l’erba o il suolo deve essere evitato.
• Si raccomanda di non montare Décowood con temperature inferiori a 0° gradi.
• Per permettere all’acqua di defluire e quindi impedirne il ristagno è importante installare il pavimento con una pendenza intorno all’1%, su un suolo stabile e privo di erba. Per ottenere ciò si consiglia di usare dei panni di tessuto-non-tessuto prima di montare la sottostruttura.
• Una adeguata ventilazione al di sotto del pavimento è importante: per permettere la circolazione dell’aria è necessaria un minimo di 2,5 cm di distanza tra il suolo e la sottostruttura.
Décowood non è un materiale carrabile.
1. INSTALLAZIONE DEI MAGATELLI (Fig. 1)
• I magatelli in Décowood sono utilizzabili solo in caso di posa su cemento. In generale e comunque in tutti i casi di posa su suolo instabile o non forabile si raccomanda di utilizzare magatelli in legno durevole, creando una struttura portante tramite controventature e doppia orditura (v. pag. 22 e 23).
• I magatelli devono essere fissati al cemento tramite viti o tasselli ogni 50 cm (Fig. 1).
• L’interasse tra magatelli non deve essere superiore a 35 cm. Nel caso si desiderasse installare la pavimentazione in diagonale sarà necessario ridurre l’interasse tra i magatelli a 20-25 cm.
• Le doghe tra i 35 cm e gli 80 cm devono essere sostenute da tre magatelli di sottostruttura: prevedere tale accorgimento in fase di progettazione e posa dei magatelli. Se il magatello non è sufficientemente largo per alloggiare due clip è necessario raddoppiare i magatelli dove due estremità delle doghe si incontreranno perché ogni estremità deve obbligatoriamente
essere sostenuta dalla sottostruttura e fissata a essa con due clip dedicate.• Nel caso di uso di magatelli in Décowood, si ricorda che anche i magatelli
dilatano, è pertanto necessario lasciare una distanza laterale di almeno 8 mm, e di almeno 15 mm sulle giunzioni di testa.
• Qualora il montaggio avvenisse su suolo instabile (es. ghiaia, terra, sabbia) o su superficie non perforabile, fare riferimento alle relative metodologie di posa indicate nella pagina 22 e 23.
2. PROCEDURA DI INSTALLAZIONE DELLA PAVIMENTAZIONE (Fig. 2)
• Si ricorda di lasciare sempre uno spazio di almeno 2 cm da muri o altri ostacoli (Fig. 2 e 3) per poter permettere la dilatazione del materiale.
• La distanza tra due estremità delle doghe deve essere di 6 mm mentre lateralmente è determinata dalle clip.
• Le estremità delle doghe non possono eccedere il magatello di oltre 5 cm.• Installare la prima doga con l’apposita clip di partenza/chiusura. • Per fissare le clip è necessario fare un preforo con una punta da 2,5 mm
e svasare per evitare che il magatello possa creparsi o rompersi (Fig. 2.2).• Inserire la prima doga e proseguire allo stesso modo con le clip di fissaggio.• Per ottenere una migliore finitura potete utilizzare i tappi di chiusura o
la cornice in Décowood (Fig. 4); in questo caso sarà necessario forare la parte inferiore della doga in modo da consentire la ventilazione all’interno della doga.
• Le doghe devono essere fissate con clips in corrispondenza di ogni magatello. Le teste di due doghe non devono mai condividere le stesse clips, ma al contrario ogni testa delle doghe deve essere fissata al magatello con due clips ad essa dedicate. Se necessario, raddoppiare il magatello.
3. MANUTENZIONE ORDINARIA
Le pavimentazioni in Décowood possono essere pulite con una semplice spazzola oppure con acqua ad alta pressione. In quest’ultimo caso è necessario mantenere una distanza di almeno 30 cm dalle doghe. Nel caso si rendesse necessario strofinare intensamente, potrebbe evidenziarsi in seguito una differenza nel colore sulla superficie trattata. Ciò avviene perché il colore naturale riemerge temporaneamente, ma nel tempo tenderà nuovamente a schiarirsi. Se davvero necessario, è possibile usare un sapone neutro ma abbiate cura di non usare un detergente che possa incidere sulla componente sintetica del materiale.
È sconsigliato apporre oggetti troppo caldi come barbecue, pentole bollenti, torce o simili sulla pavimentazione senza l’utilizzo di protezioni.
27
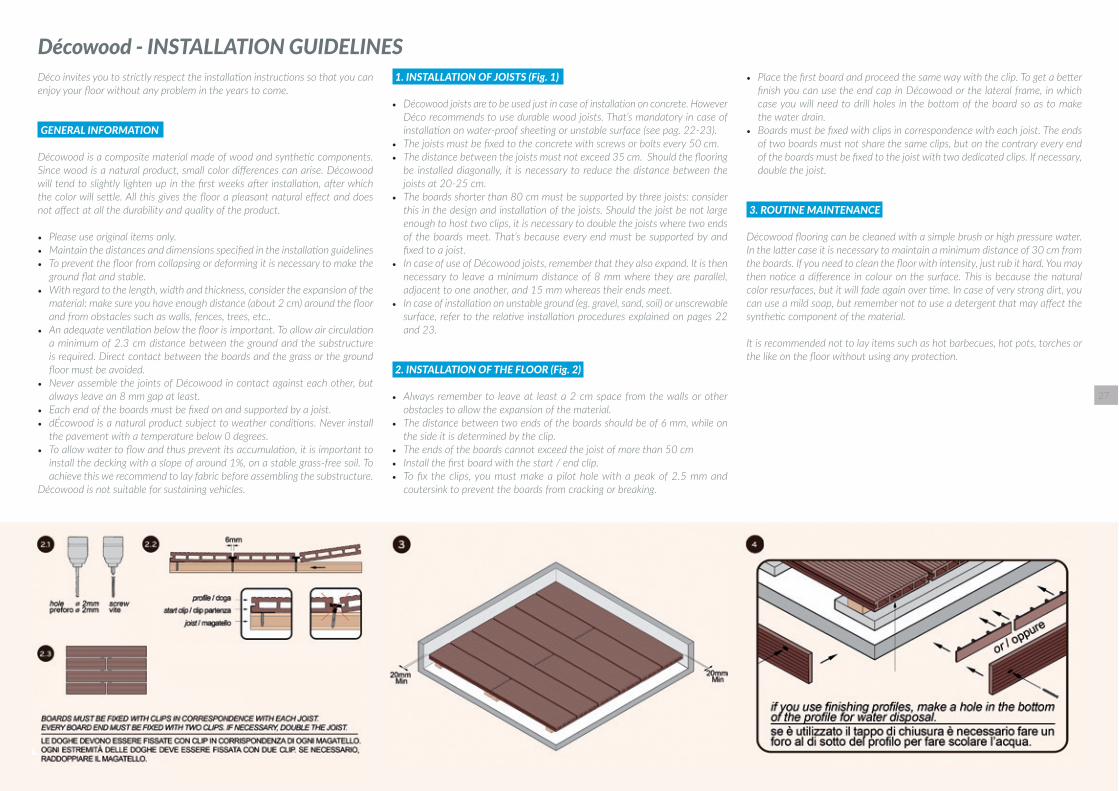
Décowood - INSTALLATION GUIDELINESDéco invites you to strictly respect the installation instructions so that you can enjoy your floor without any problem in the years to come.
GENERAL INFORMATION
Décowood is a composite material made of wood and synthetic components. Since wood is a natural product, small color differences can arise. Décowood will tend to slightly lighten up in the first weeks after installation, after which the color will settle. All this gives the floor a pleasant natural effect and does not affect at all the durability and quality of the product.
• Please use original items only.
• Maintain the distances and dimensions specified in the installation guidelines• To prevent the floor from collapsing or deforming it is necessary to make the
ground flat and stable. • With regard to the length, width and thickness, consider the expansion of the
material: make sure you have enough distance (about 2 cm) around the floor and from obstacles such as walls, fences, trees, etc..
• An adequate ventilation below the floor is important. To allow air circulation a minimum of 2.3 cm distance between the ground and the substructure is required. Direct contact between the boards and the grass or the ground floor must be avoided.
• Never assemble the joints of Décowood in contact against each other, but always leave an 8 mm gap at least.
• Each end of the boards must be fixed on and supported by a joist. • dÉcowood is a natural product subject to weather conditions. Never install
the pavement with a temperature below 0 degrees. • To allow water to flow and thus prevent its accumulation, it is important to
install the decking with a slope of around 1%, on a stable grass-free soil. To achieve this we recommend to lay fabric before assembling the substructure.
Décowood is not suitable for sustaining vehicles.
1. INSTALLATION OF JOISTS (Fig. 1)
• Décowood joists are to be used just in case of installation on concrete. However Déco recommends to use durable wood joists. That’s mandatory in case of installation on water-proof sheeting or unstable surface (see pag. 22-23).
• The joists must be fixed to the concrete with screws or bolts every 50 cm.• The distance between the joists must not exceed 35 cm. Should the flooring
be installed diagonally, it is necessary to reduce the distance between the joists at 20-25 cm.
• The boards shorter than 80 cm must be supported by three joists: consider this in the design and installation of the joists. Should the joist be not large enough to host two clips, it is necessary to double the joists where two ends of the boards meet. That’s because every end must be supported by and fixed to a joist.
• In case of use of Décowood joists, remember that they also expand. It is then necessary to leave a minimum distance of 8 mm where they are parallel, adjacent to one another, and 15 mm whereas their ends meet.
• In case of installation on unstable ground (eg. gravel, sand, soil) or unscrewable surface, refer to the relative installation procedures explained on pages 22 and 23.
2. INSTALLATION OF THE FLOOR (Fig. 2)
• Always remember to leave at least a 2 cm space from the walls or other obstacles to allow the expansion of the material.
• The distance between two ends of the boards should be of 6 mm, while on the side it is determined by the clip.
• The ends of the boards cannot exceed the joist of more than 50 cm• Install the first board with the start / end clip. • To fix the clips, you must make a pilot hole with a peak of 2.5 mm and
coutersink to prevent the boards from cracking or breaking.
• Place the first board and proceed the same way with the clip. To get a better finish you can use the end cap in Décowood or the lateral frame, in which case you will need to drill holes in the bottom of the board so as to make the water drain.
• Boards must be fixed with clips in correspondence with each joist. The ends of two boards must not share the same clips, but on the contrary every end of the boards must be fixed to the joist with two dedicated clips. If necessary, double the joist.
3. ROUTINE MAINTENANCE
Décowood flooring can be cleaned with a simple brush or high pressure water. In the latter case it is necessary to maintain a minimum distance of 30 cm from the boards. If you need to clean the floor with intensity, just rub it hard. You may then notice a difference in colour on the surface. This is because the natural color resurfaces, but it will fade again over time. In case of very strong dirt, you can use a mild soap, but remember not to use a detergent that may affect the synthetic component of the material.
It is recommended not to lay items such as hot barbecues, hot pots, torches or the like on the floor without using any protection.

prog
ett o
gra
fi co
ww
w.o
penv
iew
.it
Sede Operati va/Warehouse Via XXV Aprile 8/1024050 - Grassobbio (Bergamo) Italy
[email protected]. / f. +39 035 526209www.facebook.com/decodecking
P.iva 03702400163 - C.F. 03702400163
R0
- 03/
2015
Déco e Décowood sono marchi registrati Déco and Décowood are registered trademarks
DÈCO È FORNITORE DI