GLOBO DI LUCE - fontanaarte.com · Utilizzando la chiave a brugola, svitare il grano (1) e far...
2
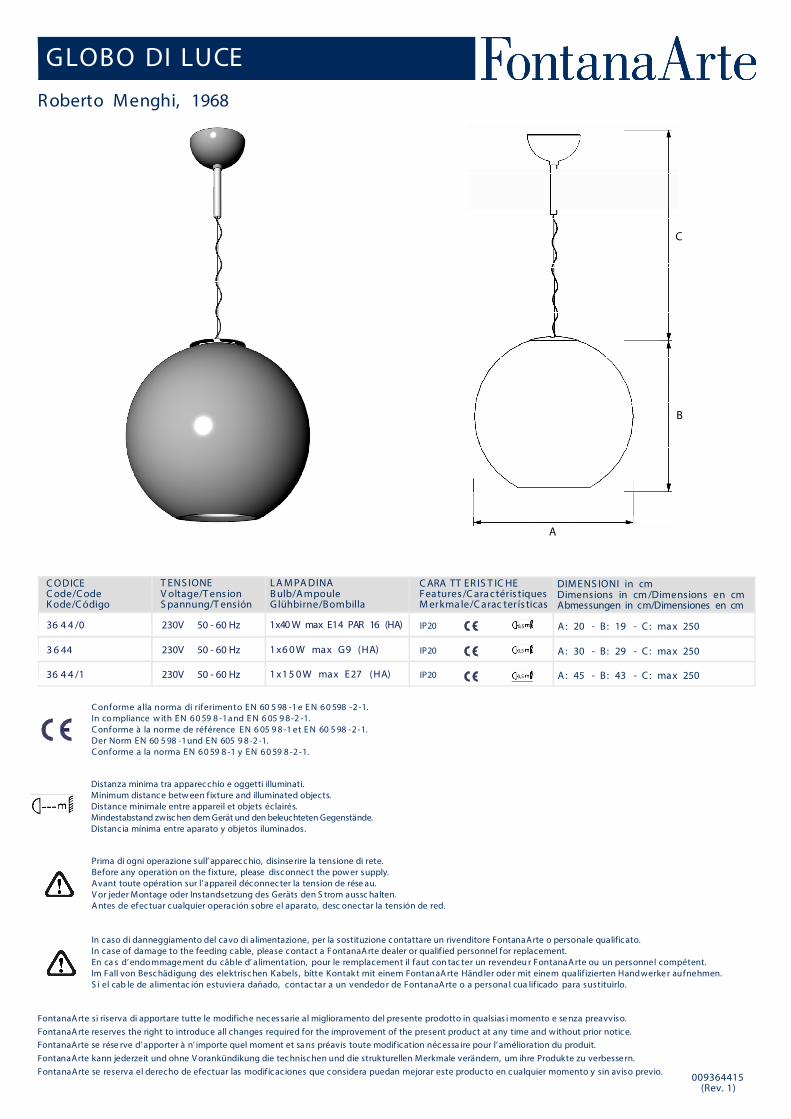
GLOBO DI LUCE Roberto Menghi, 1968 009364415 (Rev. 1) Prima di ogni operazione sull’ apparecchio, disinserire la tensione di rete. Before any operation on the fixture, please disconnect the power supply. Avant toute opération sur l’appareil déconnecter la tension de rése au. V or jeder Montage oder Instandsetzung des Geräts den S trom aussc halten. Antes de efectuar cualquier operación sobre el aparato, desc onectar la tensión de red. Conforme alla norma di riferimento EN 60 598 -1 e EN 60598 -2-1. In compliance with EN 6059 8-1 and EN 605 98-2-1. Conforme à la norme de référence EN 605 98-1 et EN 60 598 -2-1. Der Norm EN 60 598 -1 und EN 605 98-2-1. Conforme a la norma EN 6059 8-1 y EN 6059 8-2-1. In caso di danneggiamento del cavo di alimentazione, per la sostituzione contattare un rivenditore FontanaArte o personale qualificato. In case of damage to the feeding cable, please contact a FontanaArte dealer or qualified personnel for replacement. En ca s d’endommagement du câble d’alimentation, pour le remplacement il faut contac ter un revendeur FontanaArte ou un personnel compétent. Im Fall von Beschädigung des elektrischen Kabels, bitte Kontakt mit einem FontanaArte Händler oder mit einem qualifizierten Handwerker aufnehmen. S i el cab le de alimentac ión estuviera dañado, contac tar a un vendedor de FontanaArte o a personal cua lificado para sustituirlo. CODICE Code/Code Kode/Código TENSIONE Voltage/Tension Spannung/T ensión LAMPADINA Bulb/Ampoule Glühbirne/Bombilla CARA TT ERISTICHE Features/Caractéristiques Merkmale/Características DIMENSIONI in cm Dimensions in cm/Dimensions en cm Abmessungen in cm/Dimensiones en cm 36 4 4 /0 230V 50 - 60 Hz 1x40 W max E14 PAR 16 (HA) A: 20 - B: 19 - C: max 250 IP20 FontanaArte si riserva di apportare tutte le modifiche necessarie al miglioramento del presente prodotto in qualsiasi momento e senza preavviso. FontanaArte reserves the right to introduce all changes required for the improvement of the present product at any time and without prior notice. FontanaArte se rése rve d’ apporter à n’importe quel moment et sa ns préavis toute modification nécessa ire pour l’amélioration du produit. FontanaArte kann jederzeit und ohne Vorankündikung die technischen und die strukturellen Merkmale verändern, um ihre Produkte zu verbessern. FontanaArte se reserva el derecho de efectuar las modificaciones que considera puedan mejorar este producto en cualquier momento y sin aviso previo. A 3644 230V 50 - 60 Hz 1x60W max G9 (HA) A: 30 - B: 29 - C: max 250 IP20 36 4 4 /1 230V 50 - 60 Hz 1x150W max E27 (HA) A: 45 - B: 43 - C: max 250 IP20 B C Distanza minima tra apparecchio e oggetti illuminati. Minimum distance betw een fixture and illuminated objects. Distance minimale entre appareil et objets éclairés. Mindestabstand zwisc hen dem Gerät und den beleuchteten Gegenstände. Distancia mínima entre aparato y objetos iluminados . 0,5 0,5 0,5
-
Upload
truongquynh -
Category
Documents
-
view
213 -
download
0
Transcript of GLOBO DI LUCE - fontanaarte.com · Utilizzando la chiave a brugola, svitare il grano (1) e far...
GLOBO DI LUCE
Roberto Menghi, 1968
009364415(Rev. 1)
Prima di ogni operazione sull’ apparecchio, disinse rire la tensione di rete.Before any operation on the fixture, please disconnect the pow er supply.Avant toute opération sur l’appareil déconnecter la tension de rése au.V or jeder Montage oder Instandsetzung des Geräts den S trom aussc halten.A ntes de efectuar cualquier operación sobre el aparato, desc onectar la tensión de red.
C onforme alla norma di riferimento EN 60 5 98 -1 e E N 6 0 598 -2 -1.In co mpliance w ith EN 6 0 59 8 -1 and E N 6 05 9 8 -2 -1.C onforme à la norme de référence EN 6 05 9 8 -1 et E N 60 5 98 -2 -1.Der Norm EN 60 5 98 -1 und EN 605 9 8 -2 -1. C onforme a la norma EN 6 0 59 8 -1 y EN 6 0 59 8 -2 -1.
In caso di danneggiamento del cavo di alimentazione, per la sostituzione contattare un rivenditore FontanaArte o personale qualificato.In case of damage to the feeding cable, please contact a FontanaA rte dealer or qualif ied personnel for replacement.En ca s d’endommage ment du câble d’ alimentation, pour le remplacement il faut con tac ter un revendeu r FontanaA rte ou un personnel compétent.Im Fall von Beschädigung des elektrischen K abels, bitte Kontak t mit einem FontanaA rte Händler oder mit einem qualif izierten Handwerke r aufnehmen.S i el cab le de alimentac ión estuviera dañado, contac tar a un vendedor de FontanaA rte o a persona l cua lif icado para sustituirlo.
C ODICEC ode/C odeK ode/C ódigo
T ENS IONEV oltage/T ens ionS pannung/T ensión
LA M PA DINAB ulb/A mpouleG lühbirne/Bombilla
C ARA TT ER IS T IC HEFeatures /C ara ctéris tiquesM erkma le/C arac ter ís ticas
DIME NS IONI in cmDimensions in cm /Dimensions en cmAbmessungen in cm/Dimensiones en cm
36 4 4 /0 230V 50 - 60 Hz 1x40 W max E14 PAR 16 (HA) A : 20 - B : 19 - C : max 250IP20
FontanaA rte si riserva di apportare tutte le modifiche neces sarie al miglioramento del presente prodotto in qualsias i momento e se nza preavviso.FontanaA rte reserves the right to introduce all changes required for the improvement of the present product at any time and without prior notice.FontanaArte se rése rve d’ apporter à n’ importe quel moment et sa ns préavis toute modif ication nécessa ire pour l’amélioration du produit.FontanaArte kann jederzeit und ohne V orankündikung die technischen und die strukturellen Merkmale verändern, um ihre Produkte zu verbesse rn.FontanaArte se reserva el derecho de efectuar las modif icac iones que considera puedan mejorar este producto en cualquier momento y sin aviso previo.
A
3 6 44 230V 50 - 60 Hz 1 x6 0 W max G9 (HA) A : 30 - B : 29 - C : max 250IP20
36 4 4 /1 230V 50 - 60 Hz 1 x1 5 0 W max E27 (HA) A : 45 - B : 43 - C : max 250IP20
B
C
Distanza minima tra apparecchio e oggetti illuminati.Minimum distance betw een f ixture and illuminated objects.Distance minimale entre appareil et objets éclairés.Mindestabstand zwisc hen dem Gerät und den beleuchteten Gegenstände.Distancia mínima entre aparato y objetos iluminados.
0,5
0,5
0,5

Utilizzando la chiave a brugola, svitare il grano (1) e far scorrere il rosone lungo i cavi.Unscrew dowel (1) by means of the Allen wrench and make the ceiling rose run alongthe cables.Dévisser le goujon (1) à l’aide de la clé Allen et faire glisser le boîtier sur les câbles.Den Dübel (1) mit dem Inbusschlüssel lockern und die Rosette auf die Kabel schieben.Mediante la llave Allen, destornillar el tornillo prisionero (1) y hacer deslizar la coberturapor los cables.
Avvicinare la lampada al soffitto e determinare l’altezza desiderata, posizionando imorsetti fermacavo (2) e (3) in funzione della lunghezza scelta.Lift the lamp towards the ceiling and establish the desidered height by positioningcable locking clamps (2) and (3) according to the chosen height.Approcher la lampe du plafond et établir la hauteur désirée, en positionnant les serre-fils pour câble (2) et (3) à la hauteur désirée.Die Lampe der Decke nähern und die erwünschte Höhe bestimmen. Abhängig von dergewählten Länge die Klemmen (2) und (3) zur Befestigung des Kabels positionieren.Acercar la bombilla al techo y establecer la altura deseada, poniendo los dispositivosde bloqueo de los cables (2) y (3) según la altura deseada.
Agganciare la lampada al soffitto, aprire il morsetto (4) e effettuare i collegamentirispettando le posizioni dei cavi come indicato in figura e sul morsetto stesso. Chiudereil morsetto e portare il rosone in battuta al soffitto.Hook the lamp to the ceiling, open terminal (4) and carry out the electrical connectionsobserving the cable positions as shown in the picture and on the terminal itself. Closethe terminal and bring the ceiling rose agaist the ceiling.Accrocher la lampe au plafond, ouvrir la borne (4) et brancher en respectant les positionsdes câbles comme indiqué dans la figure et sur la borne elle-même. Fermer la borne etpositionner le boîtier au contact du plafond.Die Lampe an der Decke anhängen, die Klemme (4) öffnen, die Kabel anschließen,wie in der Abbildung und auf der Klemme selbst angegeben ist. Die Klemme schließenund die Rosette gegen die Decke positionieren.Fijar la lámpara al techo, abrir el borne (4) y efectuar las conexiones respetando laposición de los cables según se indica en la figura y en el borne mismo. Cerrar el borney poner la cobertura a contacto con el techo.
¦1
2
¦
¦ 3
¦4
¦Per bilanciare la lampada, sollevare la copertura (5), allentare il dispositivo (6) e regolarlospostandolo avanti e indietro fino a trovare la posizione corretta. Quindi riposizionarela copertura (5).To balance the lamp, lift cover (5), loosen device (6) and regulate it by moving it onwardand backward until you have found the correct position. Then place cover (5) again.Pour balancer la lampe, soulever la couverture (5), desserrer le dispositif (6) et le régleren le déplaçant en avant et en arrière jusqu’à trouver la position correcte. Ensuiterepositionner la couverture (5).Um die Lampe auszugleichen, die Decke (5) heben, die Einrichtung (6) lockern und sievorwärts und rückwärts bewegen, bis die richtige Position gefunden wird, um sieeinzustellen. Die Decke (5) wieder positionieren.Para equilibrar la lámpara, levantar la cobertura (5), aflojar el dispositivo (6) y regularlodesplazándolo hacia adelante o atrás hasta encontrar la posición correcta. Ponernuevamente la cobertura (5).
¦
¦ 5
6
Inserire la lampadina (7) nel portalampada (8) facendo attenzione a non toccarla a maninude.Insert bulb (7) in lamp holder (8) being careful not to touch it with bare hands.Insérer l’ampoule (7) dans la douille (8) en faisant attention à ne pas la toucher avecles mains nues.Die Glühbirne (7) in die Lampenfassung (8) einstecken, ohne sie mit bloßen Händenzu berühren.Introducir la bombilla (7) en el portalámpara (8) sin tocarla con las manos desnudas.
¦7
8
¦