FASTQC-LS - outline.itoutline.it/download/Documents/Manuals/Strumenti di misura/FASTQC-… · Il...
4
The Sound of Big Ideas FASTQC-LS OPERATING MANUAL
Transcript of FASTQC-LS - outline.itoutline.it/download/Documents/Manuals/Strumenti di misura/FASTQC-… · Il...

The Sound of Big Ideas
FASTQC-LSOPERATING MANUAL
Outline s.r.l. - Via Leonardo da Vinci, 56 - 25020 Flero (Brescia) - ItalyTel. +39-30-3581341 Fax +39-30-3580431 — Web Site: www.outline.it E-Mail: [email protected]
The Sound of Big Ideas
2
COMFORMITÀ *
*Comunità Europea
Tutte le apparecchiature elettroniche ed elettroacustiche Outline rispondono ai requisiti indicati dalle direttive CEE specificate alla fine del manuale.
* COMFORMITY
*European Community
All the Outline electroacoustic and electronic devices are in accordance with the objects stated by the CEE directives reported at the end of this manual.
In order to avoid risks for the user's and other people's safety, as well as annulling the warranty, it is advisable to read the suggestions in this section for correct use of the product.This unit was designed as part of a sound reinforcement or audio recording system.Any use other than that foreseen by the manufacturer is carried out under the sole responsibility of the user.
· Do not expose the unit to rain and don’t use it in locations with a high humidity level.
· Do not allow any type of liquid or solid object to enter the unit; should this occur, stop using the unit and contact OUTLINE or specialist staff.
· The mains power cable is supplied without a plug, to enable it to be connected according to current standards in the country of use, or according to the requirements of the specific situation. ALWAYS carry out connections following the correct procedure.
· When connecting the unit, ALWAYS check ground connection as required by technical and safety norms.
· If the original cable is worn or damaged, it must be replaced with another of the same type (in perfect condition).
· Make sure that the supply voltage corresponds to the selected value on the panel connections
· Carry out connections in an orderly fashion, only allowing access to this procedure to expert staff.
· The unit must only be switched on after having connected and switched on all the other components of the sound reinforcement/recording system, to avoid annoying noises that can sometimes damage the loudspeakers.
· The unit must only be moved when the cables are disconnected.
· Only dedicated accessories, specifically designed for the system, or any standard accessories foreseen may be used when installing.
· The mechanical operation of the product and the accessories used must be checked periodically.
· This unit produces high sound pressure levels that can damage hearing if listened to under incorrect conditions.
· The unit must only be opened and/or repaired by specialist staff.
· For any requirements of a technical nature, contact OUTLINE or authorized staff.
NORME DI SICUREZZA / SAFETY REGULATIONS
SMALTIMENTO RIFIUTI / DISPOSAL OF WASTE MATERIALS
L'apparecchio è stato progettato e prodotto con materiali e componenti di qualità elevata riciclabili e riutilizzabili. Il simbolo del cassonetto su ruote barrato indica che l'apparecchio è conforme alla Direttiva Europea 2002/96/CE e success iva modif ica
2003/108/CE. Informarsi sui regolamenti locali in merito alla raccolta differenziata di prodotti elettronici ed elettrici. Attenersi ai regolamenti locali ed evitare di smaltire i vecchi apparecchi come normali rifiuti domestici. Si ricorda che un corretto smaltimento dell'apparecchio aiuta a salvaguardare la salute e l'ambiente.
Your product is designed and manufactured with highly quality material and components, which can be recycled and reused. When this crossed-out wheeled bin symbol is attached to a product, it means the product is covered by the European Directive 2002/96/EC and subsequent
amendment 2003/108/EC. Please inform yourself about the local separate collection system for electrical and electronic products. Please act according to your local rules and do not dispose your old products with your normal household waste. The correct disposal of your old product will help prevent potential negative consequences for the environment and human health.
Onde evitare rischi per la propria e par l’altrui sicurezza, nonché l’invalidazione della garanzia, si raccomanda di leggere, nella sezione qui esposta, i consigli per un buon utilizzo del prodotto.Quest’apparecchio è stato progettato per essere parte di un sistema di amplificazione sonora o di registrazione sonora.Utilizzi diversi da quelli previsti dal costruttore sono da considerare di responsabilità dell’utilizzatore.
· Non esporre l’apparecchio alla pioggia o ad elevata uminidità.· Proteggere l’apparecchio dalla penetrazione accidentale di
liquidi o di oggetti solidi; se questo dovesse avvenire, non utilizzare più l’apparecchio e rivolgersi quanto prima ad OUTLINE o a personale competente.
· Il cavo di collegamento alla rete elettrica viene fornito senza spina per poter essere cablato secondo gli standard vigenti nei diversi paesi o secondo le esigenze nelle diverse situazioni. Eseguire i cablaggi seguendo SEMPRE le prescrizioni previste.
· Collegare l’apparecchio verificando SEMPRE il contatto di messa a terra come richiesto dalle normative.
· Se il cavo di collegamento originale presentasse segni di usura o di deterioramento, sostituirlo con uno analogo.
· Controllare che la tensione di alimentazione corrisponda a quella selezionata sul pannello connessioni.
· Eseguire i collegamenti in modo ordinato, limitarne l'accesso o l'avvicinamento solo al personale addetto.
· Accendere l’apparecchio solo dopo aver connesso ed acceso tutti gli altri componenti dell'impianto di sonorizzazione/registrazione per evitare rumori fastidiosi e talvolta dannosi per gli altoparlanti.
· La movimentazione dell’apparecchio deve avvenire solo a cavi scollegati.
· Per l’installazione utilizzare solo gli accessori dedicati, progettati appositamente per il sistema o gli accessori standard previsti.
· Controllare periodicamente la funzionalità meccanica del prodotto e degli accessori utilizzati.
· L’apparecchio produce un’elevata pressione sonora che può danneggiare l’udito se l’ascolto non avviene nelle corrette condizioni di utilizzo.
· L’apparecchio non deve essere aperto e/o riparato se non da personale competente.
· Per qualsiasi esigenza o informazione di natura tecnica rivolgersi ad OUTLINE o a personale autorizzato.
Outline s.r.l. - Via Leonardo da Vinci, 56 - 25020 Flero (Brescia) - ItalyTel. +39-30-3581341 Fax +39-30-3580431 — Web Site: www.outline.it E-Mail: [email protected]
3
FASTQC-LS
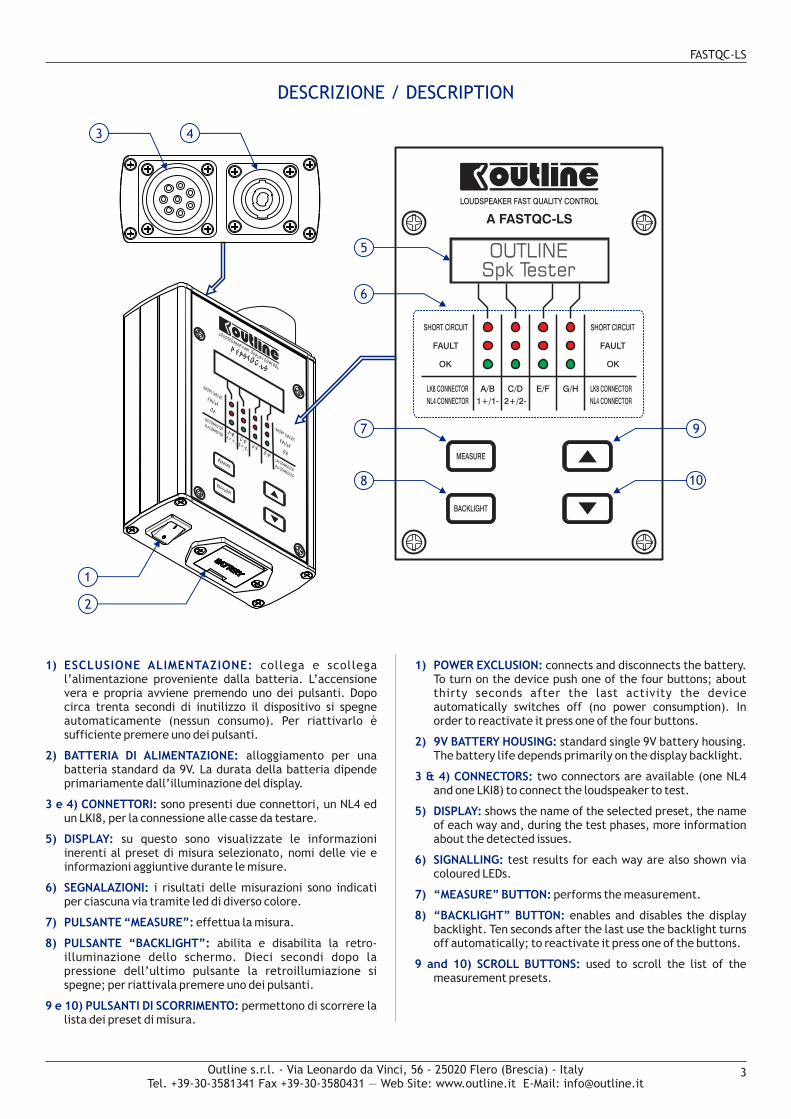
1) ESCLUSIONE ALIMENTAZIONE: collega e scollega l’alimentazione proveniente dalla batteria. L’accensione vera e propria avviene premendo uno dei pulsanti. Dopo circa trenta secondi di inutilizzo il dispositivo si spegne automaticamente (nessun consumo). Per riattivarlo è sufficiente premere uno dei pulsanti.
2) BATTERIA DI ALIMENTAZIONE: alloggiamento per una batteria standard da 9V. La durata della batteria dipende primariamente dall’illuminazione del display.
3 e 4) CONNETTORI: sono presenti due connettori, un NL4 ed un LKI8, per la connessione alle casse da testare.
5) DISPLAY: su questo sono visualizzate le informazioni inerenti al preset di misura selezionato, nomi delle vie e informazioni aggiuntive durante le misure.
6) SEGNALAZIONI: i risultati delle misurazioni sono indicati per ciascuna via tramite led di diverso colore.
7) PULSANTE “MEASURE”: effettua la misura.
8) PULSANTE “BACKLIGHT”: abilita e disabilita la retro-illuminazione dello schermo. Dieci secondi dopo la pressione dell’ultimo pulsante la retroillumiazione si spegne; per riattivala premere uno dei pulsanti.
9 e 10) PULSANTI DI SCORRIMENTO: permettono di scorrere la lista dei preset di misura.
DESCRIZIONE / DESCRIPTION
1) POWER EXCLUSION: connects and disconnects the battery. To turn on the device push one of the four buttons; about thirty seconds after the last activity the device automatically switches off (no power consumption). In order to reactivate it press one of the four buttons.
2) 9V BATTERY HOUSING: standard single 9V battery housing. The battery life depends primarily on the display backlight.
3 & 4) CONNECTORS: two connectors are available (one NL4 and one LKI8) to connect the loudspeaker to test.
5) DISPLAY: shows the name of the selected preset, the name of each way and, during the test phases, more information about the detected issues.
6) SIGNALLING: test results for each way are also shown via coloured LEDs.
7) “MEASURE” BUTTON: performs the measurement.
8) “BACKLIGHT” BUTTON: enables and disables the display backlight. Ten seconds after the last use the backlight turns off automatically; to reactivate it press one of the buttons.
9 and 10) SCROLL BUTTONS: used to scroll the list of the measurement presets.
MEASURE
BACKLIGHT
SHORT CIRCUITFAULT
OK
LK8 CONNECTORNL4 CONNECTOR
A/BC/D
E/FG/H
1+/1- 2+/2-
A FASTQC-LS
SHORT CIRCUITFAULT
OK
LK8 CONNECTORNL4 CONNECTOR
LOUDSPEAKER FAST QUALITY CONTROL
MEASURE
BACKLIGHT
SHORT CIRCUIT
FAULT
OK
LK8 CONNECTOR
NL4 CONNECTOR
A/B C/D E/F G/H
1+/1- 2+/2-
A FASTQC-LS
SHORT CIRCUIT
FAULT
OK
LK8 CONNECTOR
NL4 CONNECTOR
LOUDSPEAKER FAST QUALITY CONTROL
OUTLINESpk Tester
1
2
3 4
7
8
9
10
5
6
Outline s.r.l. - Via Leonardo da Vinci, 56 - 25020 Flero (Brescia) - ItalyTel. +39-30-3581341 Fax +39-30-3580431 — Web Site: www.outline.it E-Mail: [email protected]
4
The Sound of Big Ideas
DESCRIZIONE DEL DISPOSITIVOIl compito del dispositivo è determinare la presenza di danneggiamenti macroscopici (fili staccati, bobine bruciate, ecc...) per ciascuna via all’interno di diffusori Outline in maniera rapida ed in assenza di alimentazione di rete.Per effettuare la misura è necessario collegare una sola cassa ad uno dei connettori presenti sul dispositivo tramite un cavo di link corto, selezionare il preset di misura e premere il pulsante “MEASURE”. Il risultato viene visualizzato sul display frontale e tramite i LED colorati in corrispondenza di ciascuna via attiva.
UTILIZZO DEL DISPOSITIVO
1) Accensione: dopo essersi assicurati che la batteria sia presente e carica, portare il pulsante di esclusione alimentazione in posizione attiva (1). (1)
Premere un pulsante per accendere il dispositivo.(7-8-9-10)
Durante l’accensione viene visualizzata la versione del firmware. In seguito il display mostra la temperatura rilevata dal sensore interno e il livello di carica stimato della batteria. In questa condizione è possibile modificare l’intensità della retroilluminazione tramite i due pulsanti freccia .(9 e 10)
2) Selezione del preset di misura: premere il pulsante “MEASURE” per accedere alla lista. Scorrere con i pulsanti (7)freccia fino ad arrivare al preset relativo alla cassa da (9 e 10)testare. In questa situazione il display mostra nella prima riga il nome della cassa e nella seconda il nome delle vie, così come è riportato nell’etichetta posteriore di ciascuna cassa Outline.
3) Esecuzione della misura: premere il pulsante “MEASURE” (7). Si avvertirà un piccolo “click” e saranno mostrati i risultati della simulazione. Per ciascuna via sarà rilevato il valore di resistenza e confrontato con i limiti memorizzati nel preset di misura. Se i limiti sono rispettati si accenderà il led verde della via corrispondente, altrimenti si accenderà uno dei due led rossi e la cassa deve essere controllata in maniera più approfondita. In aggiunta il display alternerà il nome della via con il risultato della misura.
Le scritte sul display saranno: Ok Misura entro i limiti OpC Open Circuit (circuito aperto) LoR Low Resistance (resistenza troppo bassa) HiR High Resistance (resistenza troppo elevata)
4) Esecuzione di una misura successiva: premere nuovamente il tasto “MEASURE” .(7)
5) Selezione di un altro preset: premere uno dei tasti freccia (9 e 10) per navigare nella lista e ripetere il passo 3.
NOTA: il preset “No One” permette di misurare i valori numerici di resistenza per ciascuna delle quattro vie.
DESCRIZIONE / DESCRIPTION
Outline è costantemente impegnata in ricerche mirate al continuo miglioramento dei propri prodotti. Per questo motivo, nuove tecnologie, materiali e metodi di produzione, vengono continuamente incorporati nei prodotti esistenti quale espressione della nostra filosofia costruttiva. Per questa ragione qualsiasi prodotto Outline potrà lievemente differire dalla sua descrizione qui pubblicata, ma comunque uguaglierà o supererà le caratteristiche qui specificate.
© Outline 2017Manuale d’istruzioni codice: Z OMFASTQC-LSVersione: 170523Stampato in Italia
Outline carries out on-going research for product improvement. New materials, manufacturing methods and design upgrades are introduced to existing products without prior notice as a routine result of this philosophy. For this reason, any current Outline product may differ is some aspect from its description, but will always equal or exceed the original design specifications unless otherwise stated.
© Outline 2017Operating manual product code: Z OMFASTQC-LSRelease: 170523Printed in Italy
DEVICE DESCRIPTIONThe target of the described device is to identify macroscopic damages (like disconnected wires, blown coils, etc ...) for each way of the Outline speakers quicly and without the need of an external mains power.In order to perform the measure you have to connect a single speaker to one connector on the device via a short link cable, select the measurement preset and push the “MEASURE” button. The result is shown on the display and via the coloured LEDs for each active way.
DEVICE USE
1) Power up: after checking the presence of the battery and its good condition switch the power exclusion button in the (1)active position (1).
Push a button to activate the device.(7-8-9-10)
During the start-up the display shows the firmware version. Afterwards the temperature measured by the internal sensor and the estimated battery charging level are shown. In this configuration it is possible to change the intensity of the backlight via the two arrow buttons .(9 and 10)
2) Measurement preset selection: push the “MEASURE” button to open the list. Scroll it with the arrow buttons (7) (9 and 10) in order to select the preset corresponding to the enclosure to test. The display will show the name of the speaker in the first row and the name of each way in the second one, as is reported in the label attached to each Outline speaker.
3) Measuring: (7) push the “MEASURE” button . You will hear a “click” and you will see the results of the test. For each way the resistance is measured and compared to the limits saved in the measurement preset. If the detected value is within the limits the green LED of the corresponding way will light up, otherwise one of the two red LEDs will come up and the loudspeaker will have to be tested more thoroughly. In addition the display will alternate the name of the way with the result of the test.
The display will show: Ok Value within the limits OpC Open Circuit LoR Low Resistance HiR High Resistance
4) Execution of a subsequent test: push again the “MEASURE” button .(7)
5) Selection of a different preset: (9 push the arrow buttons and 10) in order to scroll the list and repeat step 3.
NOTE: via the “No One” preset you can measure the resistance of each way and the display will show the numerical values.