Deutsch (DE) Français (FR) Español (ES) Suomi (FI) · escala real Antes de la de montaje,...
3
Attenzione: Controllare che la dima di montaggio sia stampata su scala reale. Prima di la di montaggio, controllare che la dima stampata corrisponda con le dimensioni indicate nella dima del documento. Adobe Acrobat per usare le impostazioni di stampa raccomandate da Raymarine Per assicurasi che le dime di montaggio vengano stampate con le misure corrette Adobe Acrobat deve essere Quando è aperto il documento con la dima di montaggio in Acrobat Reader: 1. Selezionare File→ Proprietà. 2. Prendere nota della dimensione di pagina 3. Selezionare File→ Stampa. Viene visualizzata la di dialogo Stampa. 4. Selezionare Proprietà. 5. V che la dimensione Carta sia impostata sulle stesse dimensioni della pagina nel punto 1. 6. Cliccare su OK per ritornare alla di dialogo Stampa. 7. V che "Dimensioni pagina" e "Ridimensionamento pagina" (come appropriato) siano impostate su "Dimensione reale" oppure "Nessuno". 8. Controllare che l'opzione "Ruota automaticamente e centra" o "Orientamento auto" (come appropriato) NON abbia il segno di spunta. 9. Selezionare il corretto orientamento in modo che corrisponda quello del documento ("Verticale" o "Orizzontale"; gran parte delle dime hanno orientamento orizzontale). Mounting template printing instructions See page 3 for template Caution: Ensure mounting template is printed true-to-scale Before modifying mounting surface, ensure actual printed template matches the measurements provided in the template document. Adobe Acrobat to use Raymarine recommended print settings Adobe Acrobat must be correctly to ensure mounting templates print true-to-scale. With the mounting template document open in Acrobat Reader: 1. Select File→Properties. 2. Make a note of the Page Size. 3. Select File→Print. The print dialog is displayed. 4. Select Properties. 5. Ensure the paper size is set to the same dimensions as the page size in Step 1. 6. Click OK to return to the print settings dialog. 7. Ensure "Size Options" and "Page Scaling" options (as appropriate) are set to "Actual Size" or "None". 8. Ensure the "Auto-Rotate and Center" or "Auto portrait / landscape" option (as appropriate) is NOT ticked. 9. Select the relevant orientation to match the template document orientation ("portrait" or "landscape"; most templates are landscape). Vorsicht: Stellen Sie sicher, dass die Montageschablone in der korrekten Größe ausgedruckt wird Bevor Sie die bearbeiten, sollten Sie sich vergewissern, dass die gedruckte Vorlage den im Vorlagendokument angegebenen Abmessungen entspricht. Acrobat Reader auf die von Raymarine empfohlenen Druckeinstellungen Adobe Acrobat Reader muss korrekt sein, damit Montageschablonen in der richtigen Größe ausgedruckt werden. Bei in Acrobat Reader geöffneter Montageschablone: 1. Wählen Sie Datei→Eigenschaften. 2. Notieren Sie die Seitengröße. 3. Wählen Sie Datei→Drucken. Das Dialogfeld „Drucken“ wird angezeigt. 4. Wählen Sie Eigenschaften. 5. Stellen Sie sicher, dass das Papierformat auf die gleichen Abmessungen wie die in Schritt 1 Seitengröße eingerichtet ist. 6. Klicken Sie auf „OK“, um zum Dialogfeld „Drucken“ zurückzukehren. 7. Stellen Sie sicher, dass die Optionen „Größenoptionen“ oder „Seitenanpassung“ (wie zutreffend) auf „Originalgröße“ bzw. „Keine“ eingerichtet sind. 8. Stellen Sie sicher, dass die Optionen „Automatisch drehen und zentrieren“ oder „Automatisches Hoch-/Querformat“ (wie zutreffend) DEAKTIVIERT sind. 9. Wählen Sie die Ausrichtungsoption, die der Ausrichtung des Schablonendokuments entspricht (Hochformat oder Querformat, wobei die meisten Schablonen auf Querformat eingerichtet sind). Deutsch (DE) Français (FR) Español (ES) Suomi (FI) Italiano (IT) Nederlands (NL) Svenska (SV) Ελληνικά (EL) English (EN) Attention : Veillez à ce que le gabarit de pose soit imprimé à l'échelle Avant de la surface de montage, que le gabarit imprimé correspond aux mesures indiquées dans le document de gabarit. d'Adobe Acrobat pour utiliser les paramètres d'impression recommandés par Raymarine Il est nécessaire de Adobe Acrobat correctement pour être sûr que les gabarits de pose s'impriment à l'échelle. Le document du gabarit de pose étant ouvert dans Acrobat Reader : 1. Sélectionnez Fichier→Propriétés. 2. Prenez note du format de la page. 3. Sélectionnez Fichier→Imprimer. La boîte de dialogue d'impression s’af 4. Sélectionnez Propriétés. 5. que la taille du papier est à la même valeur que le format de page à l'étape 1. 6. Cliquez sur OK pour revenir au dialogue des paramètres d'impression. 7. que les options "Options de taille" et "Mise à l'échelle" (selon les cas) sont à "Taille réelle" ou "Aucune". 8. que l'option "Rotation auto. et centrage des pages" ou "Portrait/paysage automatique" (selon les cas) n'est PAS cochée. 9. Sélectionnez l'orientation appropriée pour correspondre à l'orientation du gabarit ("portrait" ou "paysage", la plupart des gabarits étant en mode paysage). Let op: Zorg ervoor dat de montagemal op juiste grootte wordt afgedrukt Voordat u aanpassingen doet aan het montageoppervlak dient u ervoor te zorgen dat de afgedrukte mal overeenkomst met de afmetingen in het document. Adobe Acrobat om de aanbevolen Raymarine- afdrukinstellingen te gebruiken Adobe Acrobat moet correct worden zodat montagemallen op de juiste schaal worden afgedrukt. Doe het volgende wanneer het document met de montagemal is geopend in Acrobat Reader: 1. Selecteer Bestand→ Eigenschappen. 2. Noteer de paginagrootte. 3. Selecteer Bestand→ Afdrukken. Het dialoogvenster "Afdrukken" wordt weergegeven. 4. Selecteer Eigenschappen. 5. Zorg ervoor dat de paginagrootte is ingesteld op dezelfde afmetingen als de paginagrootte die u in stap 1 hebt genoteerd. 6. Klik op OK om terug te keren naar het dialoogvenster Afdrukinstellingen. 7. Zorg ervoor dat "Grootteopties" en opties voor "Paginaformaat wijzigen" (welke van toepassing) zijn ingesteld op "Werkelijke grootte" of "Geen". 8. Zorg ervoor dat de optie "Automatisch draaien en centreren" of "Automatisch staand/liggend" (welke van toepassing) NIET is geselecteerd. 9. Selecteer de juiste afdrukstand overeenkomstig de afdrukstand van het document met de mal ("staand" of "liggend", de meeste mallen zijn liggend). Precaución: Asegúrese de que la plantilla de montaje está a escala real Antes de la de montaje, asegúrese de que la plantilla impresa se ajusta a las medidas que se indican en el documento. Cómo Adobe Acrobat para usar la de impresión recomendada por Raymarine Adobe Acrobat se debe correctamente para asegurar que las plantillas de montaje mantienen su escala real. Con el documento de la plantilla de montaje abierto en Acrobat Reader: 1. Seleccione File (Archivo) →Properties (Propiedades). 2. Anote el valor de Page Size (Tamaño de la página). 3. Seleccione File (Archivo) →Print (Imprimir). Aparece el cuadro de diálogo de impresión. 4. Seleccione Properties (Propiedades). 5. Asegúrese de que el tamaño del papel tiene las mismas dimensiones que el tamaño de la página del paso 1. 6. Haga clic en OK para volver al diálogo de de la impresión. 7. Asegúrese de que "Size Options (Opciones de tamaño)" y "Page Scaling (Escala de página)" (según corresponda) son "Actual Size (Tamaño real)" o "None (Ninguno)". 8. Asegúrese de que la opción "Auto-Rotate and Center (Rotar automáticamente y centrar)" o " Auto portrait/landscape (Vertical/horizontal automático)" (según corresponda) NO están marcadas. 9. Seleccione la orientación apropiada para la plantilla ("vertical" u "horizontal"; la mayoría de las plantillas son en horizontal). Observera! Kontrollera att monteringsmallen är skalenligt utskriven. Innan du monteringsytan kontrollerar du att aktuell mallutskrift överensstämmer med mätningarna i malldokumentet. Adobe Acrobat att använda skrivarinställningarna som Raymarine rekommenderar Adobe Acrobat måste vara korrekt för att säkerställa att monteringsmallarna skrivs ut skalenligt. Med öppet monteringsmalldokument i Acrobat Reader: 1. Välj File→Properties (Filegenskaper). 2. Anteckna sidstorleken. 3. Välj File→Print (Filutskrift). Dialogrutan för utskrift öppnas. 4. Välj Properties (Egenskaper). 5. Kontrollera att papperstorleken är inställd på samma mått som sidstorleken i Steg 1. 6. Klicka på OK för att återgå till dialogrutan för utskriftsinställningar. 7. Kontrollera att alternativen "Size Options" (Storleksalternativ) och "Page Scaling" (Sidskala) (vid behov) är inställda på "Actual Size" (Aktuell storlek) eller "None" (Ingen). 8. Kontrollera att alternativet "Auto-Rotate and Center" (Auto-rotera och -centrera) eller "Auto portrait / landscape" (Stående/liggande auto-utskrift) (vid behov) INTE är förbockat. 9. Välj relevant orientering som stämmer med malldokumentets orientering ("stående" eller "liggande". De mallarna är liggande utskrift). Huomautus: Varmista että sapluunan mittakaava vastaa todellisuutta Ennen asennuspintojen työstöä on varmistettava, että sapluunan mittakaava vastaa sapluunaan painettuja mittamerkintöjä. Adobe Acrobatin asetuksien määrittäminen vastaamaan Raymarinen suosittelevia tulostusasetuksia Adobe Acrobat on oikein jotta asennussapluunat tulostuisivat oikeaan kokoon. Asennussapluunan ollessa auki Acrobat Reader -sovelluksessa: 1. Valitse File [Tiedosto]→-ominaisuudet. 2. Kirjoita muistiin sivukoko [Page Size]. 3. Valitse File [Tiedosto]→Print [Tulosta]. Näyttöön tulee tulostuksen syöttöikkuna. 4. Valitse Ominaisuudet. 5. Varmista, että paperikooksi on määritetty vaiheessa 1 tunnistettua paperikokoa vastaava kokoasetus. 6. Palaa takaisin tulostusasetuksien ikkunaan valitsemalla OK. 7. Varmista, että "Size Options [Kokoasetukset]"- ja "Page Scaling [Sivun skaalaus]"-asetukset ovat "Actual Size [Todellinen koko]" sekä "None [Ei mitään]". 8. Varmista, että "Auto-Rotate and Center [Auto-kierräja keskitä]" tai "Auto portrait / landscape [Auto pysty/vaakakuva]" -vaihtoehto (tapauskohtaisesti) EI ole valittuna. 9. Valitse soveltuva suuntaus joka vastaa sapluunan suuntausta. Προσοχή: Βεβαιωθείτε ότι το πρότυπο τοποθέτησης έχει εκτυπωθεί σε πραγματική κλίμακα Πριν τροποποιήσετε την επιφάνεια τοποθέτησης, βεβαιωθείτε ότι το πρότυπο που έχετε εκτυπώσει αντιστοιχεί στις μετρήσεις που παρέχονται στο έγγραφο. Διαμόρφωση του Adobe Acrobat για χρήση των συνιστώμενων ρυθμίσεων εκτύπωσης της Raymarine Το Adobe Acrobat πρέπει να διαμορφωθεί σωστά προκειμένου να διασφαλιστεί η εκτύπωση των προτύπων στη σωστή κλίμακα. Αφού ανοίξετε το έγγραφο με το πρότυπο τοποθέτησης στο Acrobat Reader: 1. Επιλέξτε File (Αρχείο)→Properties (Ιδιότητες). 2. Σημειώστε το μέγεθος της σελίδας. 3. Επιλέξτε File (Αρχείο)→Print (Εκτύπωση). Θα εμφανιστεί το παράθυρο διαλόγου εκτύπωσης. 4. Επιλέξτε Properties (Ιδιότητες). 5. Βεβαιωθείτε ότι το μέγεθος χαρτιού έχει οριστεί στις ίδιες διαστάσεις με το μέγεθος της σελίδας που σημειώσατε στο Βήμα 1. 6. Κάντε κλικ στο κουμπί ΟΚ για να επιστρέψετε στο παράθυρο διαλόγου με τις ρυθμίσεις εκτύπωσης. 7. Βεβαιωθείτε ότι οι επιλογές "Size Options" (Επιλογές μεγέθους) και "Page Scaling" (Κλιμάκωση σελίδας) (ό,τι ισχύει) έχουν οριστεί στις ρυθμίσεις "Actual Size" (Πραγματικό μέγεθος) ή "None" (Καμία). 8. Βεβαιωθείτε ότι η επιλογή "Auto-Rotate and Center" (Αυτόματη περιστροφή και κεντράρισμα) ή "Auto portrait / landscape" (Αυτόματος κατακόρυφος / οριζόντιος προσανατολισμός) ΔΕΝ είναι ενεργοποιημένη. 9. Επιλέξτε τον κατάλληλο προσανατολισμό, ανάλογα με τον προσανατολισμό του εγγράφου του προτύπου. ("portrait" (κατακόρυφος) ή "landscape" (οριζόντιος). Τα περισσότερα πρότυπα έχουν οριζόντιο προσανατολισμό.)
-
Upload
trinhtuong -
Category
Documents
-
view
216 -
download
0
Transcript of Deutsch (DE) Français (FR) Español (ES) Suomi (FI) · escala real Antes de la de montaje,...
Attenzione: Controllare chela dima di montaggio siastampata su scala reale.Prima di la dimontaggio, controllare che la dimastampata corrisponda con le dimensioniindicate nella dima del documento.
Adobe Acrobat per usare leimpostazioni di stampa raccomandateda RaymarinePer assicurasi che le dime di montaggio venganostampate con le misure corrette Adobe Acrobat deveessereQuando è aperto il documento con la dima di montaggioin Acrobat Reader:1. Selezionare File→ Proprietà.2. Prendere nota della dimensione di pagina3. Selezionare File→ Stampa.
Viene visualizzata la di dialogo Stampa.4. Selezionare Proprietà.5. V che la dimensione Carta sia impostata
sulle stesse dimensioni della pagina nelpunto 1.
6. Cliccare su OK per ritornare alla di dialogoStampa.
7. V che "Dimensioni pagina" e"Ridimensionamento pagina" (come appropriato)siano impostate su "Dimensione reale" oppure"Nessuno".
8. Controllare che l'opzione "Ruota automaticamente ecentra" o "Orientamento auto" (come appropriato)NON abbia il segno di spunta.
9. Selezionare il corretto orientamento in modo checorrisponda quello del documento ("Verticale"o "Orizzontale"; gran parte delle dime hannoorientamento orizzontale).
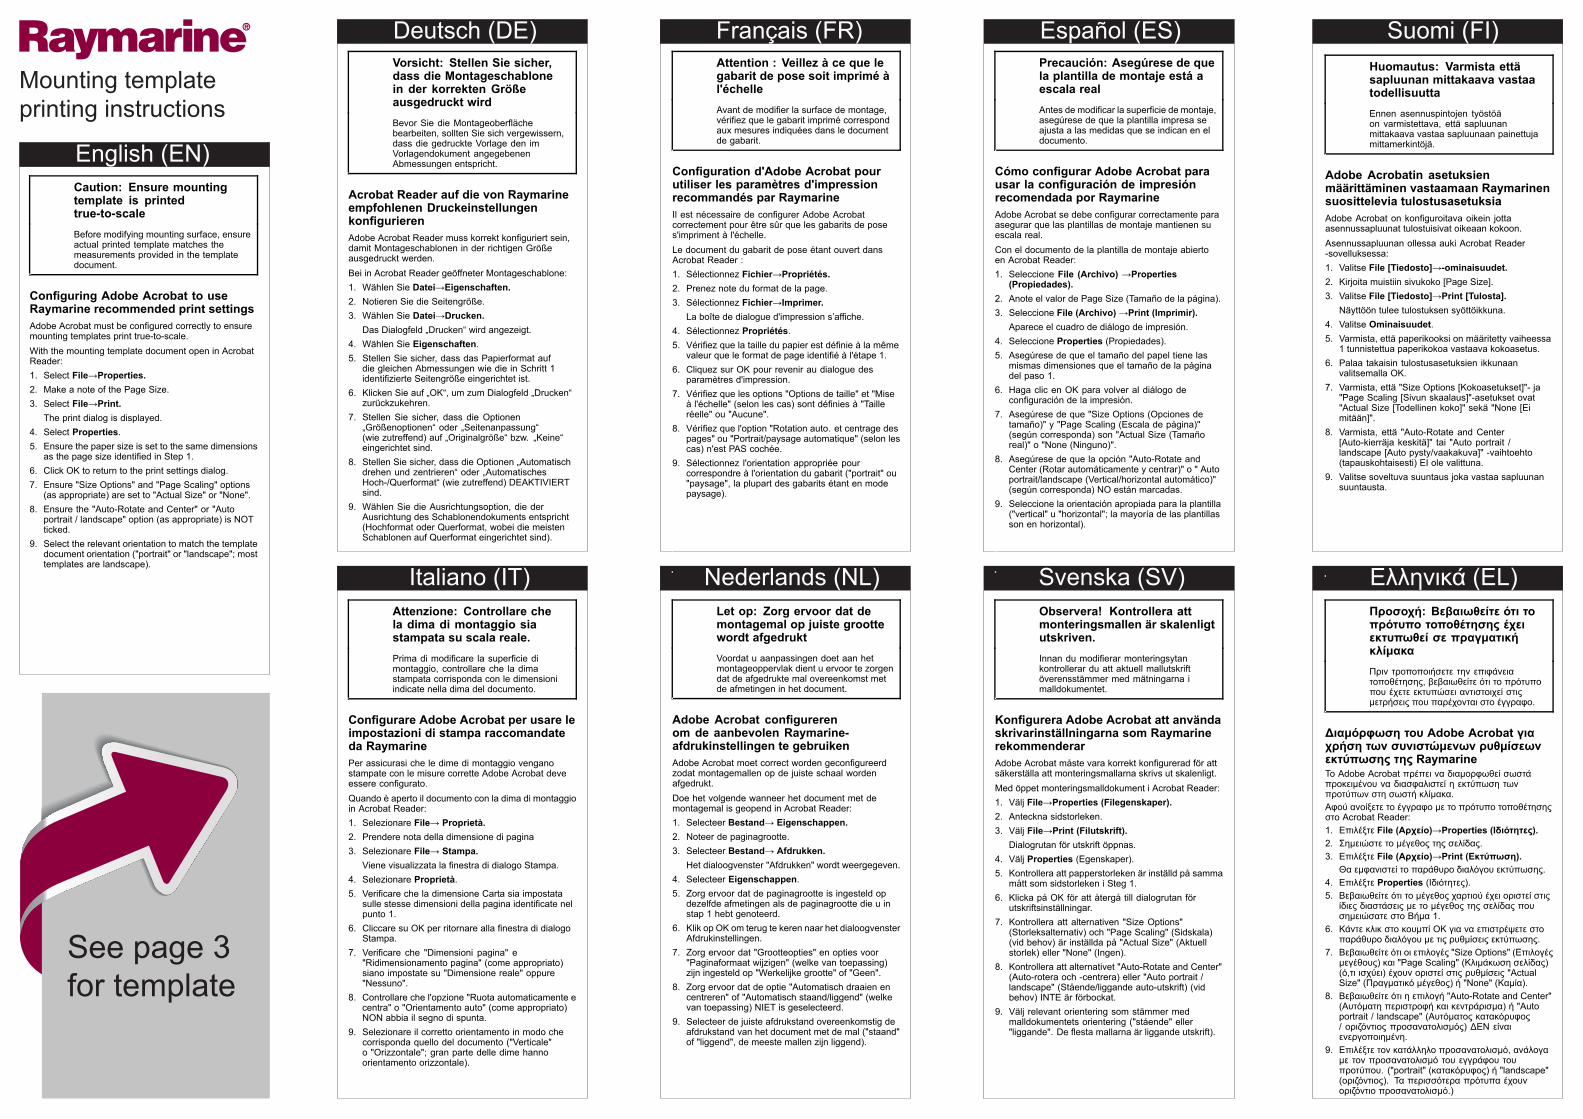
Mounting templateprinting instructions
See page 3for template
Caution: Ensure mountingtemplate is printedtrue-to-scaleBefore modifying mounting surface, ensureactual printed template matches themeasurements provided in the templatedocument.
Adobe Acrobat to useRaymarine recommended print settingsAdobe Acrobat must be correctly to ensuremounting templates print true-to-scale.With the mounting template document open in AcrobatReader:1. Select File→Properties.2. Make a note of the Page Size.3. Select File→Print.
The print dialog is displayed.4. Select Properties.5. Ensure the paper size is set to the same dimensions
as the page size in Step 1.6. Click OK to return to the print settings dialog.7. Ensure "Size Options" and "Page Scaling" options
(as appropriate) are set to "Actual Size" or "None".8. Ensure the "Auto-Rotate and Center" or "Auto
portrait / landscape" option (as appropriate) is NOTticked.
9. Select the relevant orientation to match the templatedocument orientation ("portrait" or "landscape"; mosttemplates are landscape).
Vorsicht: Stellen Sie sicher,dass die Montageschablonein der korrekten Größeausgedruckt wirdBevor Sie diebearbeiten, sollten Sie sich vergewissern,dass die gedruckte Vorlage den imVorlagendokument angegebenenAbmessungen entspricht.
Acrobat Reader auf die von Raymarineempfohlenen Druckeinstellungen
Adobe Acrobat Reader muss korrekt sein,damit Montageschablonen in der richtigen Größeausgedruckt werden.Bei in Acrobat Reader geöffneter Montageschablone:1. Wählen Sie Datei→Eigenschaften.2. Notieren Sie die Seitengröße.3. Wählen Sie Datei→Drucken.
Das Dialogfeld „Drucken“ wird angezeigt.4. Wählen Sie Eigenschaften.5. Stellen Sie sicher, dass das Papierformat auf
die gleichen Abmessungen wie die in Schritt 1Seitengröße eingerichtet ist.
6. Klicken Sie auf „OK“, um zum Dialogfeld „Drucken“zurückzukehren.
7. Stellen Sie sicher, dass die Optionen„Größenoptionen“ oder „Seitenanpassung“(wie zutreffend) auf „Originalgröße“ bzw. „Keine“eingerichtet sind.
8. Stellen Sie sicher, dass die Optionen „Automatischdrehen und zentrieren“ oder „AutomatischesHoch-/Querformat“ (wie zutreffend) DEAKTIVIERTsind.
9. Wählen Sie die Ausrichtungsoption, die derAusrichtung des Schablonendokuments entspricht(Hochformat oder Querformat, wobei die meistenSchablonen auf Querformat eingerichtet sind).
Deutsch (DE) Français (FR) Español (ES) Suomi (FI)
Italiano (IT) Nederlands (NL) Svenska (SV) Ελληνικά (EL)
English (EN)
Attention : Veillez à ce que legabarit de pose soit imprimé àl'échelleAvant de la surface de montage,
que le gabarit imprimé correspondaux mesures indiquées dans le documentde gabarit.
d'Adobe Acrobat pourutiliser les paramètres d'impressionrecommandés par RaymarineIl est nécessaire de Adobe Acrobatcorrectement pour être sûr que les gabarits de poses'impriment à l'échelle.Le document du gabarit de pose étant ouvert dansAcrobat Reader :1. Sélectionnez Fichier→Propriétés.2. Prenez note du format de la page.3. Sélectionnez Fichier→Imprimer.
La boîte de dialogue d'impression s’af4. Sélectionnez Propriétés.5. que la taille du papier est à la même
valeur que le format de page à l'étape 1.6. Cliquez sur OK pour revenir au dialogue des
paramètres d'impression.7. que les options "Options de taille" et "Mise
à l'échelle" (selon les cas) sont à "Tailleréelle" ou "Aucune".
8. que l'option "Rotation auto. et centrage despages" ou "Portrait/paysage automatique" (selon lescas) n'est PAS cochée.
9. Sélectionnez l'orientation appropriée pourcorrespondre à l'orientation du gabarit ("portrait" ou"paysage", la plupart des gabarits étant en modepaysage).
Let op: Zorg ervoor dat demontagemal op juiste groottewordt afgedruktVoordat u aanpassingen doet aan hetmontageoppervlak dient u ervoor te zorgendat de afgedrukte mal overeenkomst metde afmetingen in het document.
Adobe Acrobatom de aanbevolen Raymarine-afdrukinstellingen te gebruikenAdobe Acrobat moet correct wordenzodat montagemallen op de juiste schaal wordenafgedrukt.Doe het volgende wanneer het document met demontagemal is geopend in Acrobat Reader:1. Selecteer Bestand→ Eigenschappen.2. Noteer de paginagrootte.3. Selecteer Bestand→ Afdrukken.
Het dialoogvenster "Afdrukken" wordt weergegeven.4. Selecteer Eigenschappen.5. Zorg ervoor dat de paginagrootte is ingesteld op
dezelfde afmetingen als de paginagrootte die u instap 1 hebt genoteerd.
6. Klik op OK om terug te keren naar het dialoogvensterAfdrukinstellingen.
7. Zorg ervoor dat "Grootteopties" en opties voor"Paginaformaat wijzigen" (welke van toepassing)zijn ingesteld op "Werkelijke grootte" of "Geen".
8. Zorg ervoor dat de optie "Automatisch draaien encentreren" of "Automatisch staand/liggend" (welkevan toepassing) NIET is geselecteerd.
9. Selecteer de juiste afdrukstand overeenkomstig deafdrukstand van het document met de mal ("staand"of "liggend", de meeste mallen zijn liggend).
Precaución: Asegúrese de quela plantilla de montaje está aescala realAntes de la de montaje,asegúrese de que la plantilla impresa seajusta a las medidas que se indican en eldocumento.
Cómo Adobe Acrobat parausar la de impresiónrecomendada por RaymarineAdobe Acrobat se debe correctamente paraasegurar que las plantillas de montaje mantienen suescala real.Con el documento de la plantilla de montaje abiertoen Acrobat Reader:1. Seleccione File (Archivo) →Properties
(Propiedades).2. Anote el valor de Page Size (Tamaño de la página).3. Seleccione File (Archivo) →Print (Imprimir).
Aparece el cuadro de diálogo de impresión.4. Seleccione Properties (Propiedades).5. Asegúrese de que el tamaño del papel tiene las
mismas dimensiones que el tamaño de la páginadel paso 1.
6. Haga clic en OK para volver al diálogo dede la impresión.
7. Asegúrese de que "Size Options (Opciones detamaño)" y "Page Scaling (Escala de página)"(según corresponda) son "Actual Size (Tamañoreal)" o "None (Ninguno)".
8. Asegúrese de que la opción "Auto-Rotate andCenter (Rotar automáticamente y centrar)" o " Autoportrait/landscape (Vertical/horizontal automático)"(según corresponda) NO están marcadas.
9. Seleccione la orientación apropiada para la plantilla("vertical" u "horizontal"; la mayoría de las plantillasson en horizontal).
Observera! Kontrollera attmonteringsmallen är skalenligtutskriven.Innan du monteringsytankontrollerar du att aktuell mallutskriftöverensstämmer med mätningarna imalldokumentet.
Adobe Acrobat att användaskrivarinställningarna som RaymarinerekommenderarAdobe Acrobat måste vara korrekt för attsäkerställa att monteringsmallarna skrivs ut skalenligt.Med öppet monteringsmalldokument i Acrobat Reader:1. Välj File→Properties (Filegenskaper).2. Anteckna sidstorleken.3. Välj File→Print (Filutskrift).
Dialogrutan för utskrift öppnas.4. Välj Properties (Egenskaper).5. Kontrollera att papperstorleken är inställd på samma
mått som sidstorleken i Steg 1.6. Klicka på OK för att återgå till dialogrutan för
utskriftsinställningar.7. Kontrollera att alternativen "Size Options"
(Storleksalternativ) och "Page Scaling" (Sidskala)(vid behov) är inställda på "Actual Size" (Aktuellstorlek) eller "None" (Ingen).
8. Kontrollera att alternativet "Auto-Rotate and Center"(Auto-rotera och -centrera) eller "Auto portrait /landscape" (Stående/liggande auto-utskrift) (vidbehov) INTE är förbockat.
9. Välj relevant orientering som stämmer medmalldokumentets orientering ("stående" eller"liggande". De mallarna är liggande utskrift).
Huomautus: Varmista ettäsapluunan mittakaava vastaatodellisuuttaEnnen asennuspintojen työstöäon varmistettava, että sapluunanmittakaava vastaa sapluunaan painettujamittamerkintöjä.
Adobe Acrobatin asetuksienmäärittäminen vastaamaan Raymarinensuosittelevia tulostusasetuksiaAdobe Acrobat on oikein jottaasennussapluunat tulostuisivat oikeaan kokoon.Asennussapluunan ollessa auki Acrobat Reader-sovelluksessa:1. Valitse File [Tiedosto]→-ominaisuudet.2. Kirjoita muistiin sivukoko [Page Size].3. Valitse File [Tiedosto]→Print [Tulosta].
Näyttöön tulee tulostuksen syöttöikkuna.4. Valitse Ominaisuudet.5. Varmista, että paperikooksi on määritetty vaiheessa
1 tunnistettua paperikokoa vastaava kokoasetus.6. Palaa takaisin tulostusasetuksien ikkunaan
valitsemalla OK.7. Varmista, että "Size Options [Kokoasetukset]"- ja
"Page Scaling [Sivun skaalaus]"-asetukset ovat"Actual Size [Todellinen koko]" sekä "None [Eimitään]".
8. Varmista, että "Auto-Rotate and Center[Auto-kierräja keskitä]" tai "Auto portrait /landscape [Auto pysty/vaakakuva]" -vaihtoehto(tapauskohtaisesti) EI ole valittuna.
9. Valitse soveltuva suuntaus joka vastaa sapluunansuuntausta.
Προσοχή: Βεβαιωθείτε ότι τοπρότυπο τοποθέτησης έχειεκτυπωθεί σε πραγματικήκλίμακαΠριν τροποποιήσετε την επιφάνειατοποθέτησης, βεβαιωθείτε ότι το πρότυποπου έχετε εκτυπώσει αντιστοιχεί στιςμετρήσεις που παρέχονται στο έγγραφο.
Διαμόρφωση του Adobe Acrobat γιαχρήση των συνιστώμενων ρυθμίσεωνεκτύπωσης της RaymarineΤο Adobe Acrobat πρέπει να διαμορφωθεί σωστάπροκειμένου να διασφαλιστεί η εκτύπωση τωνπροτύπων στη σωστή κλίμακα.Αφού ανοίξετε το έγγραφο με το πρότυπο τοποθέτησηςστο Acrobat Reader:1. Επιλέξτε File (Αρχείο)→Properties (Ιδιότητες).2. Σημειώστε το μέγεθος της σελίδας.3. Επιλέξτε File (Αρχείο)→Print (Εκτύπωση).
Θα εμφανιστεί το παράθυρο διαλόγου εκτύπωσης.4. Επιλέξτε Properties (Ιδιότητες).5. Βεβαιωθείτε ότι το μέγεθος χαρτιού έχει οριστεί στις
ίδιες διαστάσεις με το μέγεθος της σελίδας πουσημειώσατε στο Βήμα 1.
6. Κάντε κλικ στο κουμπί ΟΚ για να επιστρέψετε στοπαράθυρο διαλόγου με τις ρυθμίσεις εκτύπωσης.
7. Βεβαιωθείτε ότι οι επιλογές "Size Options" (Επιλογέςμεγέθους) και "Page Scaling" (Κλιμάκωση σελίδας)(ό,τι ισχύει) έχουν οριστεί στις ρυθμίσεις "ActualSize" (Πραγματικό μέγεθος) ή "None" (Καμία).
8. Βεβαιωθείτε ότι η επιλογή "Auto-Rotate and Center"(Αυτόματη περιστροφή και κεντράρισμα) ή "Autoportrait / landscape" (Αυτόματος κατακόρυφος/ οριζόντιος προσανατολισμός) ΔΕΝ είναιενεργοποιημένη.
9. Επιλέξτε τον κατάλληλο προσανατολισμό, ανάλογαμε τον προσανατολισμό του εγγράφου τουπροτύπου. ("portrait" (κατακόρυφος) ή "landscape"(οριζόντιος). Τα περισσότερα πρότυπα έχουνοριζόντιο προσανατολισμό.)

Norsk (NO) 日本語 (JA)
Dansk (DA) Português (pt-BR)FORSIGTIG: Sørg for, atmonterings skabelonenudskrives i de rigtigestørrelsesforholdInden du ændrer monteringsskal du kontrollere, at den reelle udskrevneskabelon svarer til målene, der er angivet iskabelondokumentet.
Sådan Adobe Acrobattil at bruge Raymarine anbefaledeudskrivnings indstillinger.Adobe Acrobat skal korrekt for at sikre,at monterings skabelonerne udskrives i de rigtigestørrelsesforhold.Mens monterings skabelon dokumentet er åbent iAcrobat Reader:1. Vælg File→ (Fil) egenskaber.2. Skriv sidestørrelsen ned.3. Vælg udskrivning af File→ (Fil).
Dialogboksen for udskrivning vises.4. Vælg Properties (Egenskaber).5. Sørg for, at papirstørrelsen er indstillet til de samme
mål som papirstørrelsen, der blev i trin1.
6. Klik på OK for at vende tilbage til dialogboksen forudskrivnings indstillinger.
7. Sørg for, at indstillingerne "Size Options" (Sideindstillinger) og "Page Scaling" (Side skalering)(som relevant) er angivet til "Actual Size" (Reelstørrelse) eller "None" (Ingen).
8. Sørg for, at indstillingen "Auto-Rotate and Center"(Drej automatisk og centrér) eller "Auto portrait /landscape" (Automatisk portræt/landskab) (somrelevant) IKKE er markeret.
9. Vælg den relevante retning, der passer til skabelondokumentets retning ("portræt" eller "landskab"; de
skabeloner er landskab).
Forsiktig: Sørg for at du skriverut monteringsmalen i riktigforholdFør du gjør noe med festeunderlaget, mådu sørge for at målene på malen du harskrevet ut, stemmer overens med målene imaldokumentet.
Oppsett av Adobe Acrobat forbruk av Raymarines anbefalteutskriftsinnstillingerAdobe Acrobat må på riktig måte forat monteringsmalene kan skrives ut med de riktigeforholdene.Med monteringsmaldokumentet åpnet i Acrobat Reader:1. Velg File→Properties.2. Noter deg sidestørrelsen.3. Velg File→ og Print.
Utskriftsdialogen vises.4. Velg Properties.5. Sørg for at sidestørrelsen er satt til samme
dimensjoner som sidestørrelsen du noterte degunder trinn 1.
6. Klikk på OK for å gå tilbake til dialogboksen forutskriftsinnstillinger.
7. Sørg for at alternativene "Size Options" og "PageScaling" (etter hva som er aktuelt) er satt til "ActualSize" eller "None".
8. Sørg for at alternativet "Auto-Rotate and Center"eller "Auto portrait / landscape" (etter hva som eraktuelt) IKKE er merket av.
9. Velg riktig orientering slik at den stemmer overensmed maldokumentets orientering (stående ellerliggende; de maler er liggende).
Cuidado: Garanta que omodelo de montagem sejaimpresso em escala realAntes de a superfície demontagem, garanta que o modeloimpresso real corresponda às mediçõesfornecidas no documento do modelo.
o Adobe Acrobat parausar as de impressãorecomendadas da RaymarineO Adobe Acrobat deve ser corretamentepara garantir que os modelos de montagem sejamimpressos de modo à escala.Com o documento do modelo de montagem aberto noAcrobat Reader:1. Selecione File→Properties (Arquivo,
Propriedades).2. Tome nota do tamanho da página.3. Selecione File→Print (Arquivo, Imprimir).
A caixa de diálogo de impressão é exibida.4. Selecione Properties (Propriedades).5. Garanta que o tamanho do papel seja para
as mesmas dimensões que o tamanho da páginana Etapa 1.
6. Clique em OK para voltar ao diálogo dede impressão.
7. Garanta que as opções "Size Options" (Opçõesde tamanho) e "Page Scaling" (Escala da página)(conforme o adequado) sejam para"Tamanho real" ou "Nenhum".
8. Garanta que as opções "Auto-Rotate and Center"(Girar automaticamente e centralizar) ou "Autoportrait/landscape (Retrato/paisagem automático)(conforme adequado) NÃO estejam marcadas.
9. Selecione a orientação relevante para combinarcom a orientação do documento de modelo("retrato" ou "paisagem"; a maioria dos modelos éem paisagem).
警警警告告告: 取取取付付付テテテンンンプププレレレーーートトトががが縮縮縮尺尺尺ににに合合合致致致しししててて印印印刷刷刷ささされれれててていいいるるるここことととををを確確確認認認しししてててくくくだだださささいいい。。。
設置面を変更する前に、印刷されている実物のテンプレートが、テンプレートドキュメントに記載されている計測値と一致することを確認してください。
Raymarine 推推推奨奨奨ののの印印印刷刷刷設設設定定定ををを使使使用用用すすするるるたたためめめののの Adobe Acrobat ののの設設設定定定取付テンプレートが確実に縮尺に合致して印刷されるように、Adobe Acrobat を正しく設定する必要があります。Acrobat Reader で取付テンプレートドキュメントを開いた状態で、次の操作を実行します。1. File (フフファァァイイイルルル)→Properties (プププロロロパパパテテティィィ) ををを選選選択択択
しししままますすす。。。2. 用紙のサイズを書き留めます。3. File(フフファァァイイイルルル)→Print(印印印刷刷刷) ををを選選選択択択しししままますすす。。。
印刷ダイアログが表示されます。4. Properties(プロパティ) を選択します。5. 用紙のサイズが手順 1 で確認した用紙サイズと同
じ寸法に設定されていることを確認します。6. OK をクリックして、印刷設定ダイアログに戻
ります。7. Size Options(サイズ オプション) と Page
Scaling(ページの拡大縮小) オプションが (必要に応じて) Actual Size(実際のサイズ) または None(なし) に設定されていることを確認します。
8. Auto-Rotate and Center(自動回転と中央揃え) とAuto portrait / landscape(自動縦/横) オプションがオンになっていないことを確認します。
9. テンプレートドキュメントの向き (「縦」または「横」)に合わせて該当する向きを選択します。ほとんどのテンプレートは横向きです。
19
See page 3for template

FRO
NT
Quantum Radar Mounting Template
NOTE: This document may NOT print true to scale. Before modifying mounting surface, ensure printed template matches the measurements provided.
Document number: 87257-2Document date: 11-2015Drawing number: D13391-2
Drill hole, 8 mm (0.31 in)diameter in 4 positions, toaccept M8 fixing bolts
Center line of Radome
Cente
r line
of R
adom
e
233.0
mm
(9.17
in)
141.5 mm (5.57 in)
27.5 mm (1.08 in)
Drill hole, 8 mm (0.31 in)diameter in 1 position, toaccept M8 fixing bolt forsafety lanyard.