BRISTOL - Ceramica Rondine · The cosmopolitan air of Bristol, with a wealth of traces of the...
27
GRES PORCELLANATO SMALTATO - GLAZED PORCELAIN STONEWARE - GRES CERAME EMAILLE GLASIERTES FEINSTEINZEUG - GRES PORCELÁNICO ESMALTADO - ГЛАЗУРОВАННЫЙ КЕРАМОГРАНИТ BRISTOL
-
Upload
trannguyet -
Category
Documents
-
view
217 -
download
0
Transcript of BRISTOL - Ceramica Rondine · The cosmopolitan air of Bristol, with a wealth of traces of the...
GRES PORCELLANATO SMALTATO - GLAZED PORCELAIN STONEWARE - GRES CERAME EMAILLEGLASIERTES FEINSTEINZEUG - GRES PORCELÁNICO ESMALTADO - ГЛАЗУРОВАННЫЙ КЕРАМОГРАНИТ
BRISTOL
Ceramica Rondine mette a punto una nuova collezione: si chiama Brick Generation, è una perfetta sintesi di contemporaneità
e fascino atemporale. Parliamo infatti di un rivestimento che riproduce con impressionante fedeltà la superficie e la resa tattile
del mattone. La sua ruvidità, un’intensità materica senza precedenti, viene proposta e declinata in un’ampia tavolozza cromatica che fa
rivivere, in 10 mm di spessore, l’affascinante essenza del mattoncino. Affidarsi alla personalizzazione degli spazi in ottica brick ci consente
poi di giocare con pochi e semplici oggetti per mettere a punto un look 100% urban.
Ceramica Rondine has developed a new collection: Brick Generation, a perfect blend of contemporary style and timeless
appeal. We’re looking at a wall covering able to offer an impressively accurate reproduction of the surface and the feel of brick. The rough texture, of an unprecedented material intensity, comes in a wide variety of shades, which, in a thickness of just 10 mm, brings the marvellous essence of brick right back to life. This focus on bringing a personal touch to settings with a brickwork twist allows us to experiment with a few simple objects to create a 100% urban look.
Ceramica Rondine propose une nouvelle collection qui s’appelle Brick Generation et qui est une synthèse parfaite entre
contemporanéité et charme atemporel. Nous parlons en effet d’un revêtement qui reproduit, avec une fidélité impressionnante, la surface et le résultat tactile de la brique. Sa rugosité, une intensité matiériste sans précédents, est proposée et déclinée dans une vaste palette chromatique qui fait revivre, dans 10 mm d’épaisseur, la fascinante essence de la brique. S’en remettre à la personnalisation des espaces dans une optique de ‘briques’ nous permet aussi de jouer avec quelques objets simples afin d’élaborer un look 100% urbain.
Ceramica Rondine hat eine neue Kollektion entwickelt: sie heißt Brick Generation und ist eine perfekte Verbindung aus
Zeitgemäßheit und zeitloser Faszination. So sprechen wir von einer Verkleidung, die die Oberfläche und die Beschaffenheit von Ziegel bei der Berührung mit erstaunlicher Wirklichkeitstreue nachahmt. Ihre Rauheit, eine beispiellose intensive Beschaffenheit, wird in einer breiten Farbpalette angeboten und ausgearbeitet, die einen in 10 mm Stärke das faszinierende Wesen des Ziegelsteins nacherleben lässt. Indem wir uns der persönlichen Gestaltung der Räume mit der Brick-Optik anvertrauen, erhalten wir die Möglichkeit, danach mit einigen wenigen einfachen Gegenständen zu spielen, um einen 100%-Urban-Look zu perfektionieren.
Ceramica Rondine разработала новую коллекцию: она называется Brick Generation - безупречный синтез
современности и вневременного очарования. Отделка плитки этой коллекции с невероятной точностью воспроизводит поверхность кирпича, а также тактильные ощущения, которые возникают при прикосновении к этому материалу. Ее шероховатость, неслыханная материальная интенсивность и широкая цветовая палитра воскрешает всего в 10 мм толщины чарующую сущность кирпичной кладки. Персонализация пространства при помощи brick позволяет нам обыграть дизайн при помощи немногих простых предметов и создать новый look в 100% городском стиле.
4 54
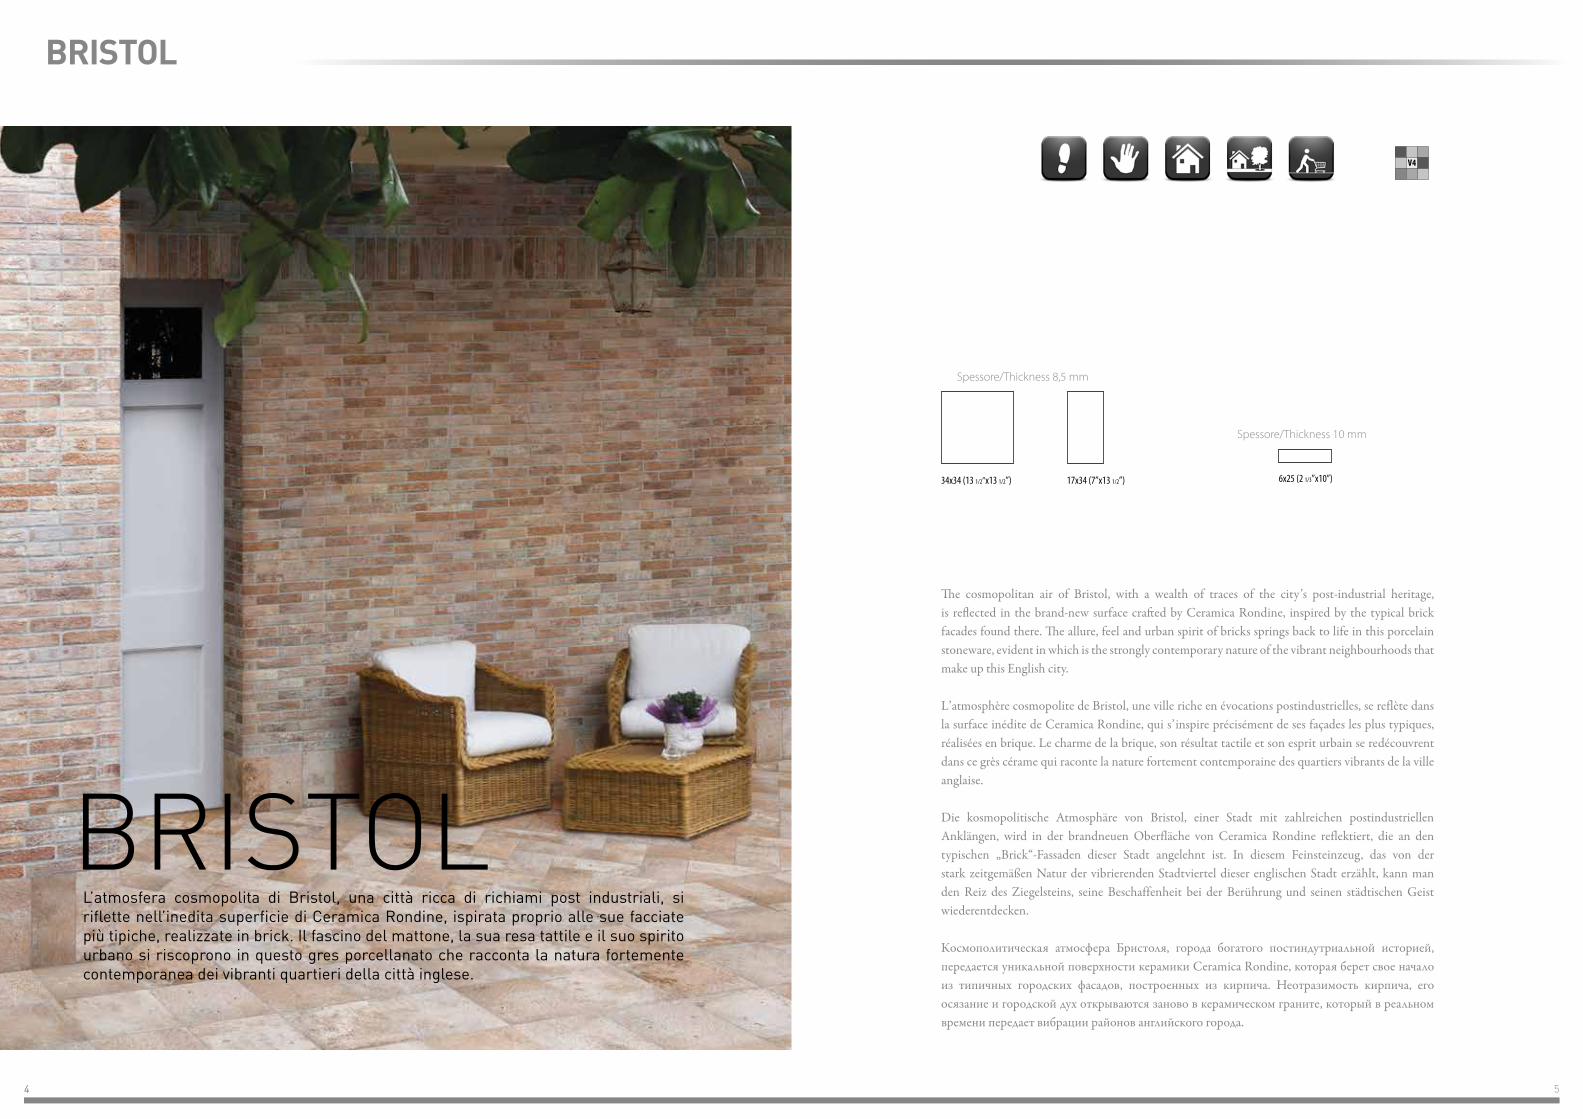
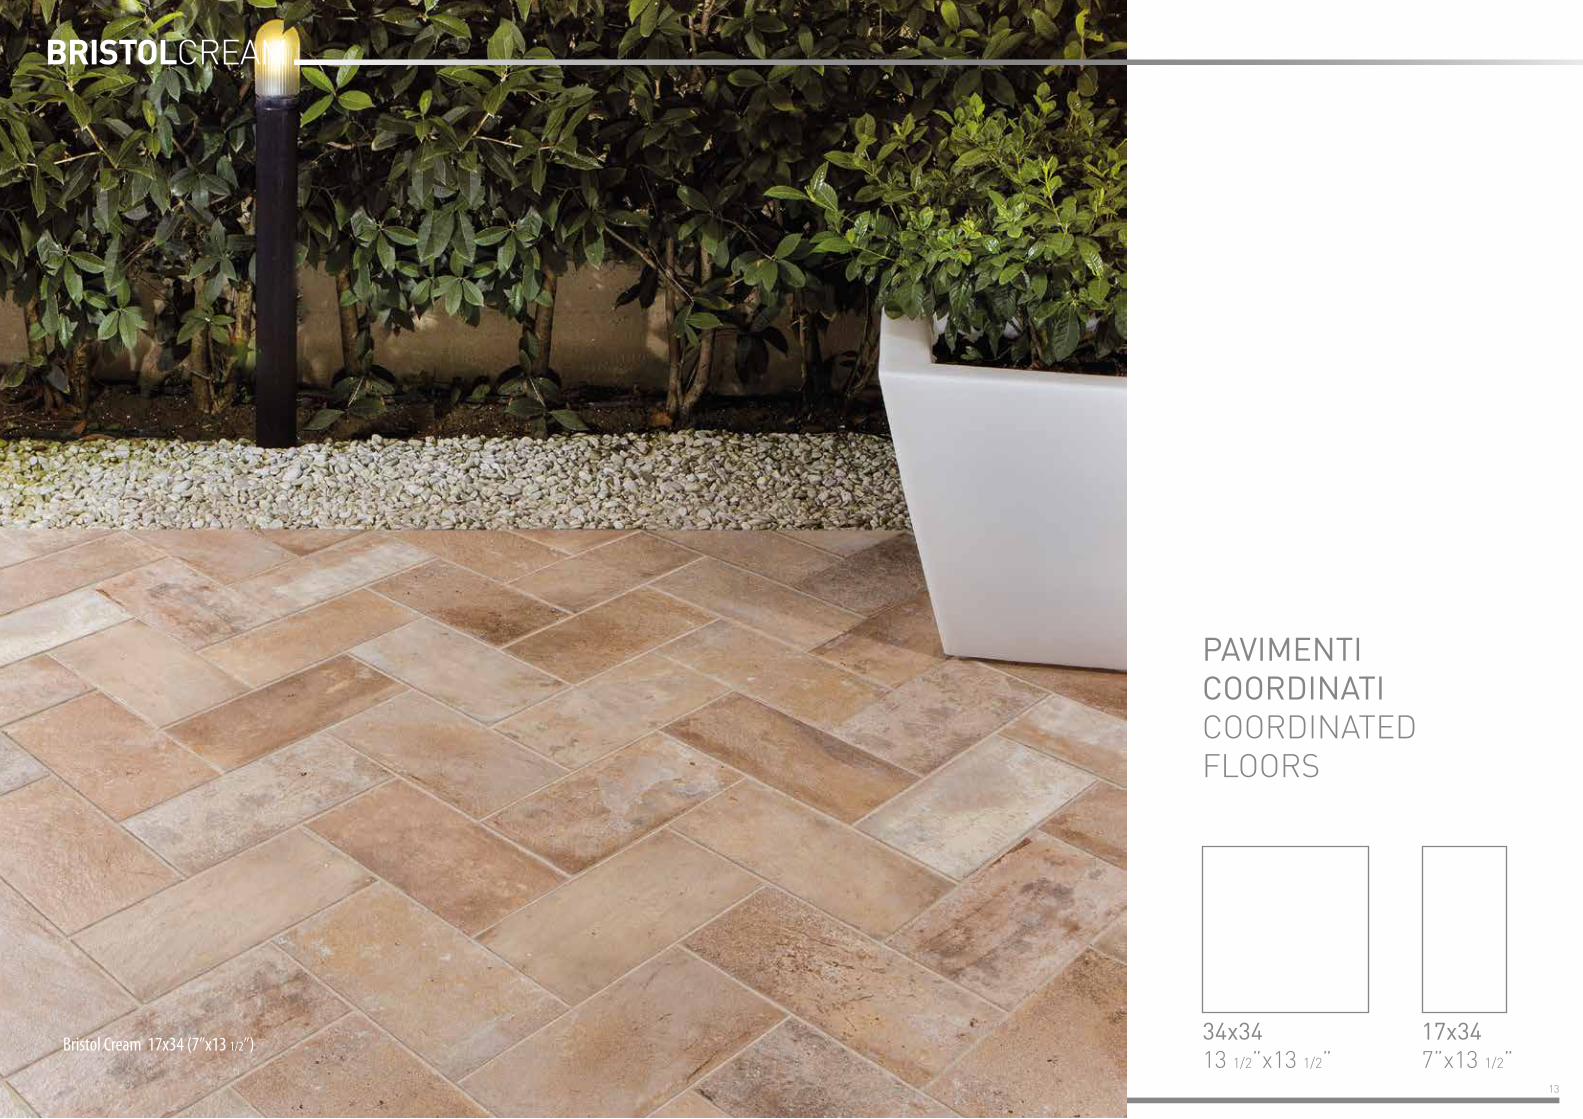
L’atmosfera cosmopolita di Bristol, una città ricca di richiami post industriali, si riflette nell’inedita superficie di Ceramica Rondine, ispirata proprio alle sue facciate più tipiche, realizzate in brick. Il fascino del mattone, la sua resa tattile e il suo spirito urbano si riscoprono in questo gres porcellanato che racconta la natura fortemente contemporanea dei vibranti quartieri della città inglese.
BRISTOL
The cosmopolitan air of Bristol, with a wealth of traces of the city’s post-industrial heritage, is reflected in the brand-new surface crafted by Ceramica Rondine, inspired by the typical brick facades found there. The allure, feel and urban spirit of bricks springs back to life in this porcelain stoneware, evident in which is the strongly contemporary nature of the vibrant neighbourhoods that make up this English city.
L’atmosphère cosmopolite de Bristol, une ville riche en évocations postindustrielles, se reflète dans la surface inédite de Ceramica Rondine, qui s’inspire précisément de ses façades les plus typiques, réalisées en brique. Le charme de la brique, son résultat tactile et son esprit urbain se redécouvrent dans ce grès cérame qui raconte la nature fortement contemporaine des quartiers vibrants de la ville anglaise.
Die kosmopolitische Atmosphäre von Bristol, einer Stadt mit zahlreichen postindustriellen Anklängen, wird in der brandneuen Oberfläche von Ceramica Rondine reflektiert, die an den typischen „Brick“-Fassaden dieser Stadt angelehnt ist. In diesem Feinsteinzeug, das von der stark zeitgemäßen Natur der vibrierenden Stadtviertel dieser englischen Stadt erzählt, kann man den Reiz des Ziegelsteins, seine Beschaffenheit bei der Berührung und seinen städtischen Geist wiederentdecken.
Космополитическая атмосфера Бристоля, города богатого постиндутриальной историей, передается уникальной поверхности керамики Ceramica Rondine, которая берет свое начало из типичных городских фасадов, построенных из кирпича. Неотразимость кирпича, его осязание и городской дух открываются заново в керамическом граните, который в реальном времени передает вибрации районов английского города.
6x25 (2 1/3”x10”)
Spessore/Thickness 8,5 mm
34x34 (13 1/2”x13 1/2”) 17x34 (7”x13 1/2”)
Spessore/Thickness 10 mm
V4
6 7Bristol Cream 6x25 (2 1/3”x10”) - Tabula Chocolate 15x100 (6”x39 1/4”)
8 9
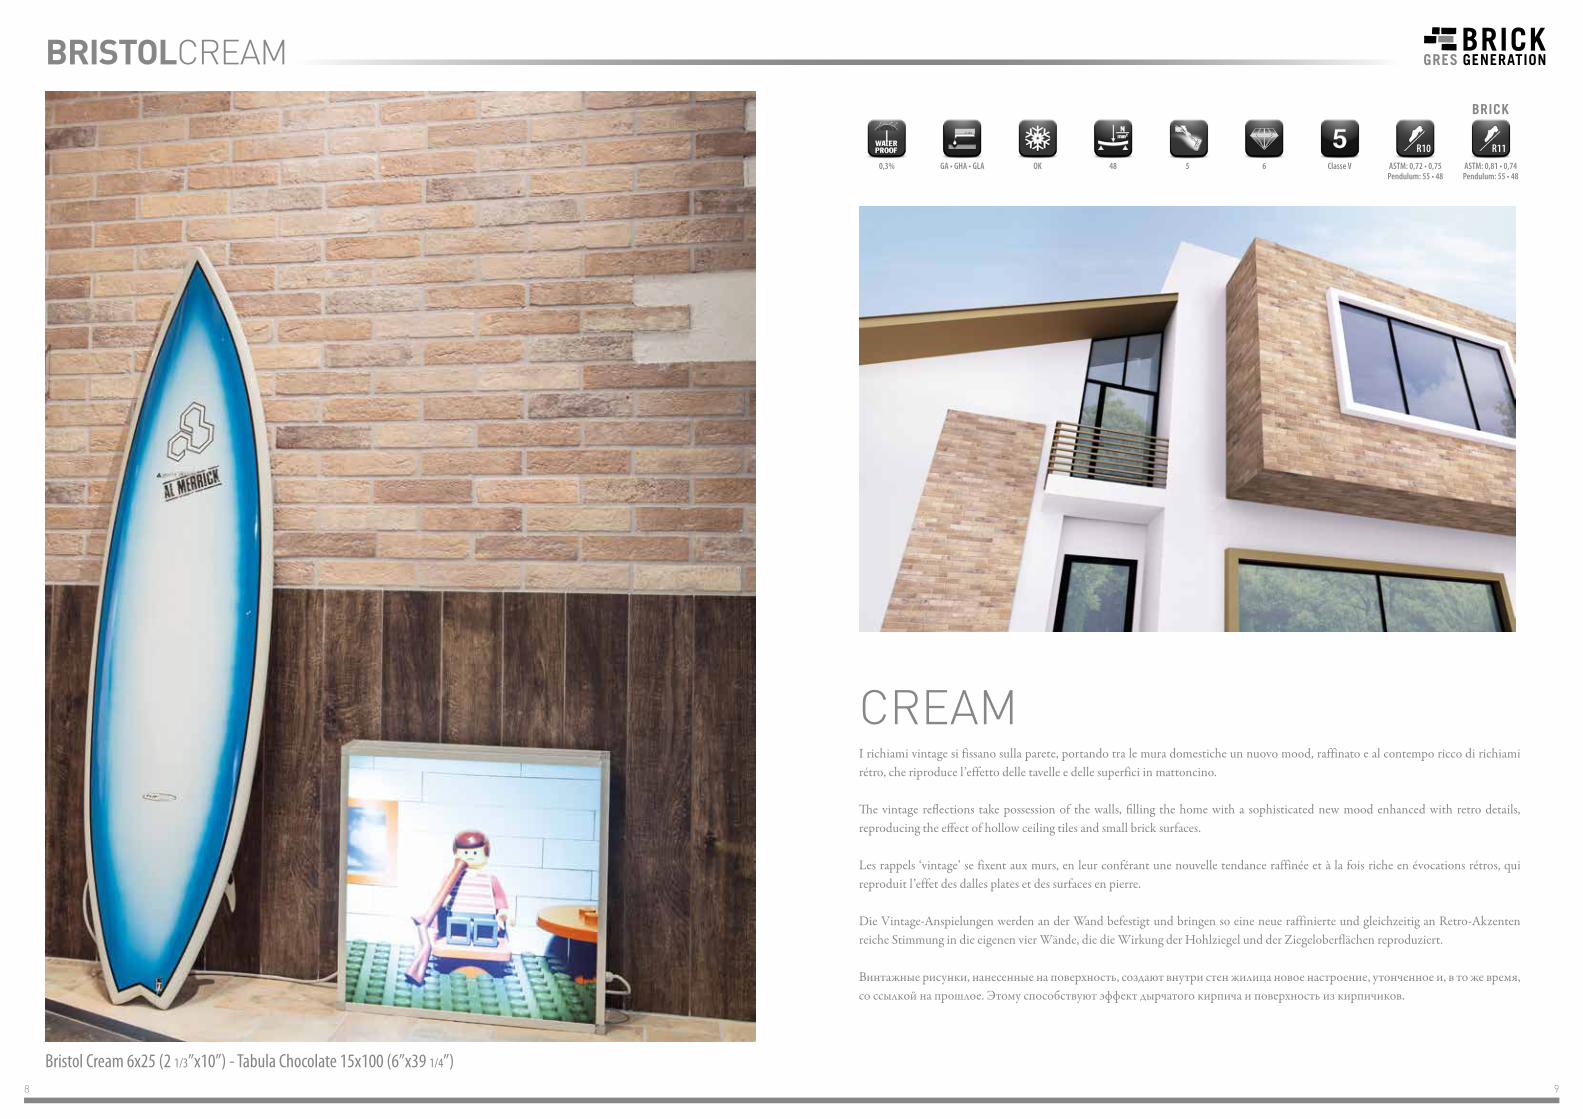
CREAM
BRISTOLCREAM
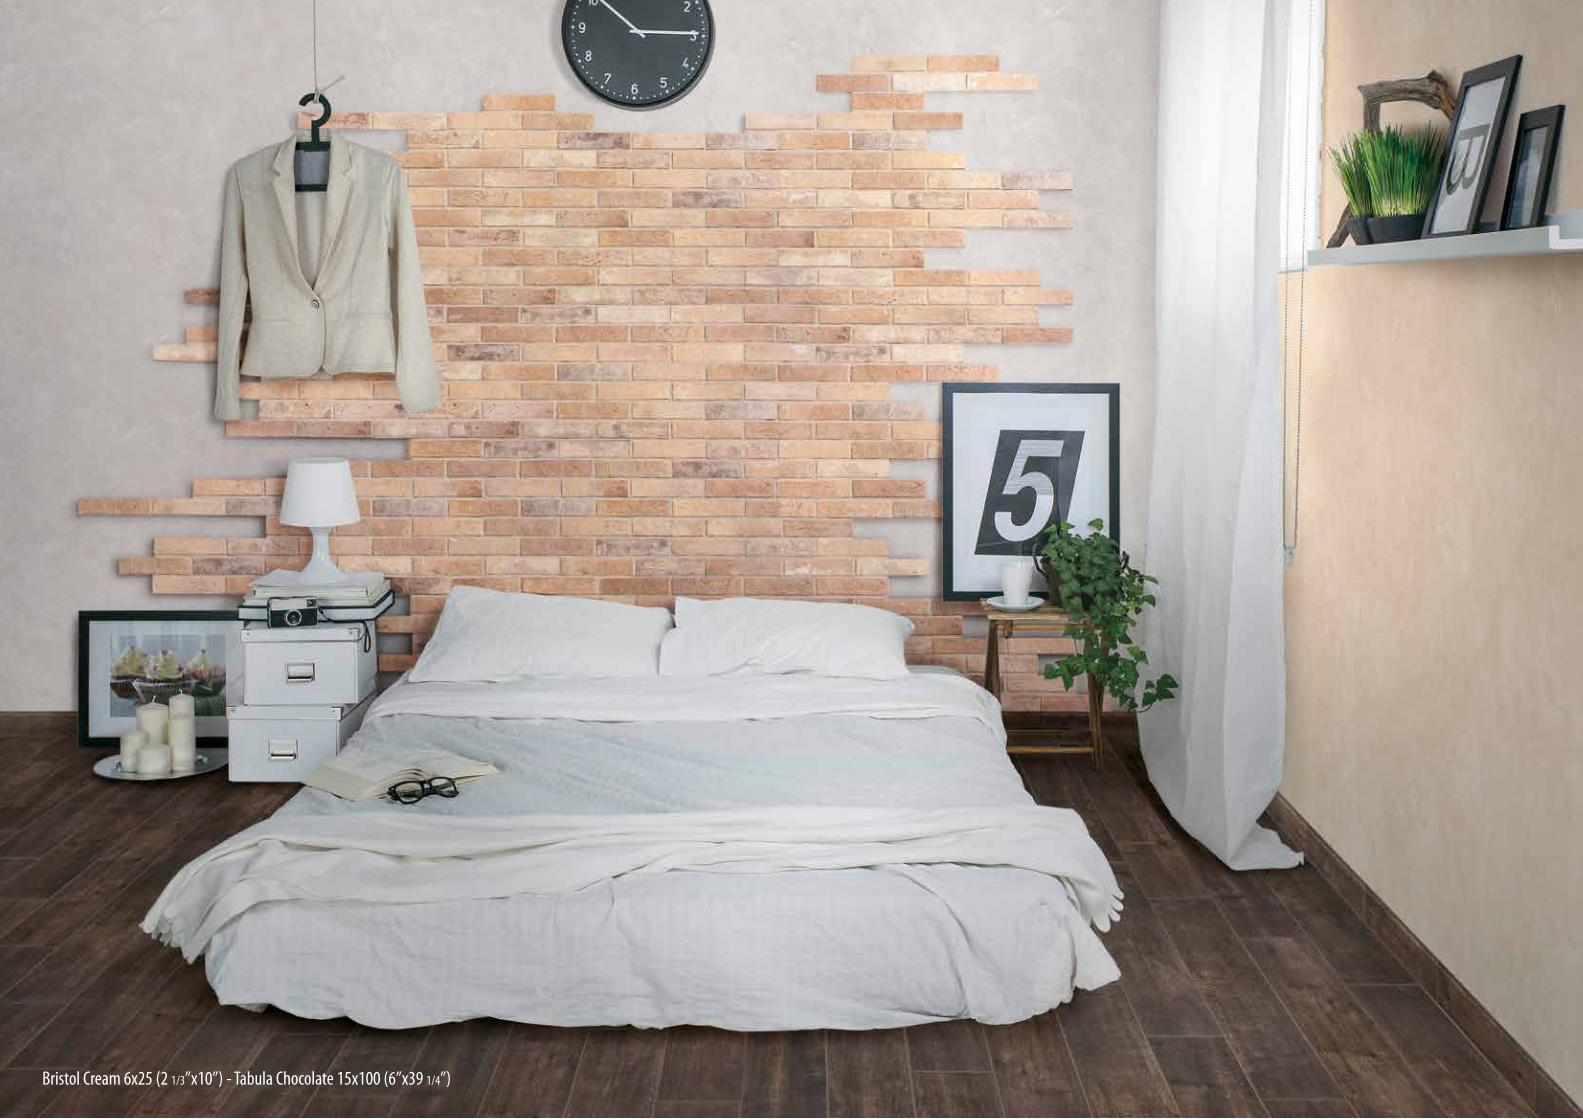
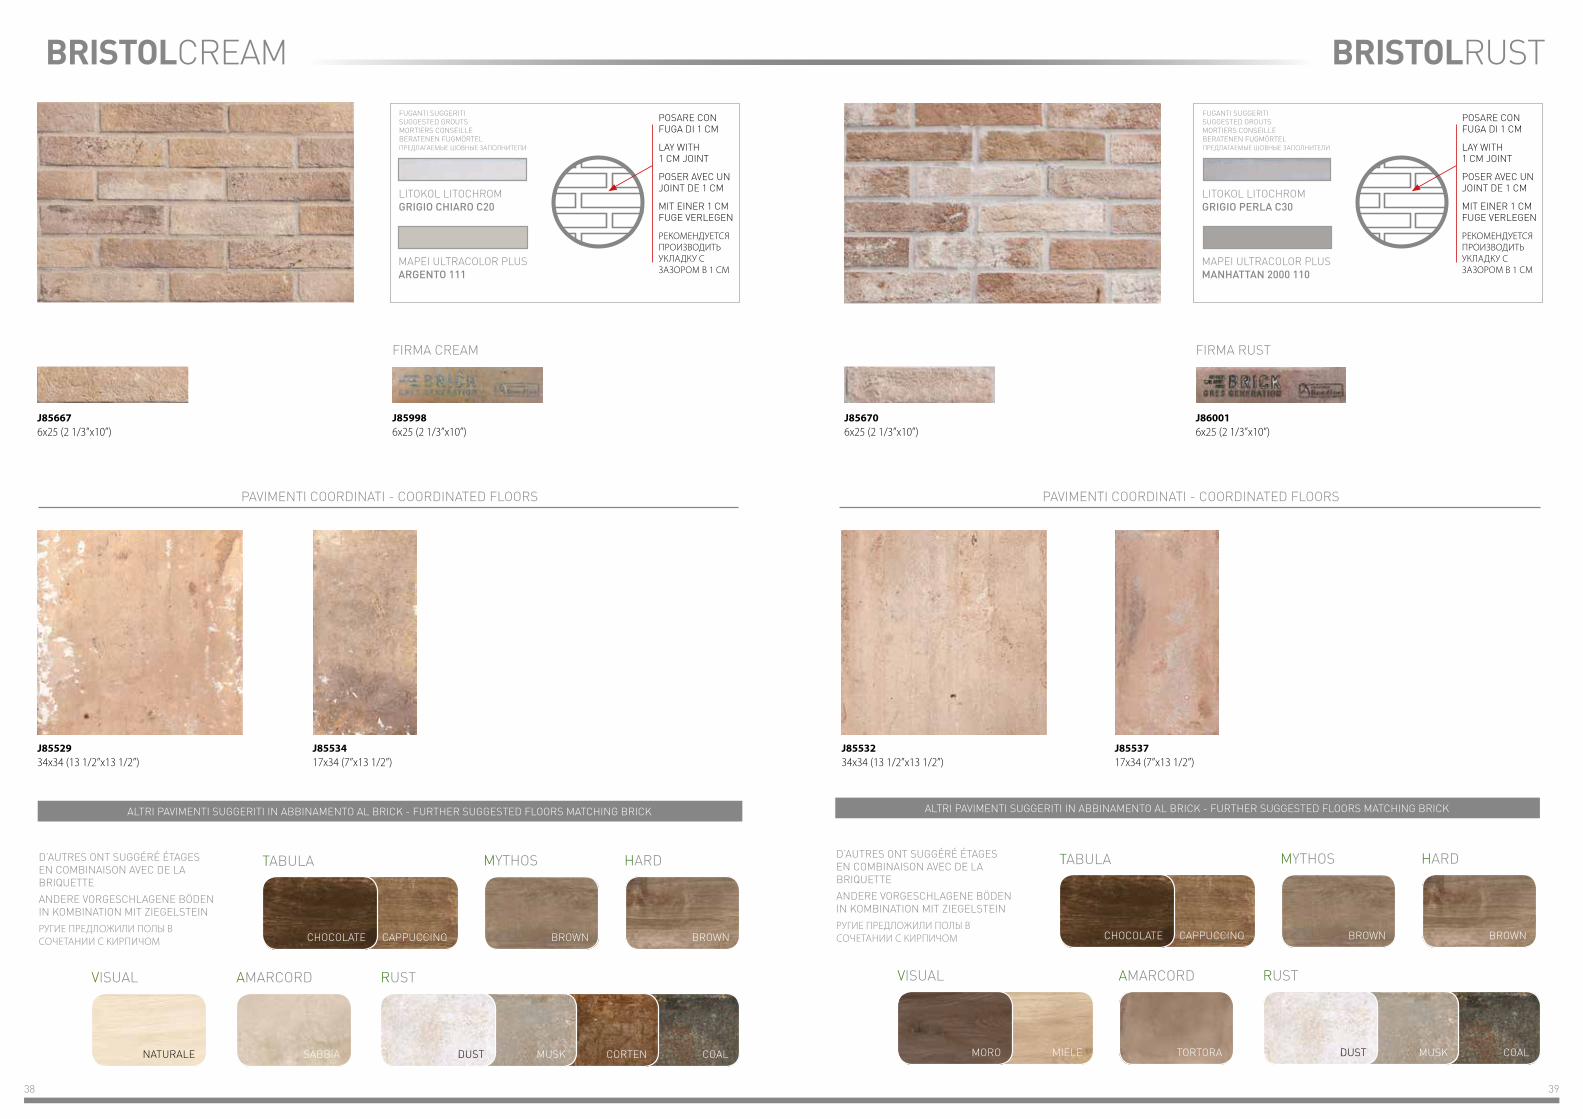
I richiami vintage si fissano sulla parete, portando tra le mura domestiche un nuovo mood, raffinato e al contempo ricco di richiami rétro, che riproduce l’effetto delle tavelle e delle superfici in mattoncino.
The vintage reflections take possession of the walls, filling the home with a sophisticated new mood enhanced with retro details, reproducing the effect of hollow ceiling tiles and small brick surfaces.
Les rappels ‘vintage’ se fixent aux murs, en leur conférant une nouvelle tendance raffinée et à la fois riche en évocations rétros, qui reproduit l’effet des dalles plates et des surfaces en pierre.
Die Vintage-Anspielungen werden an der Wand befestigt und bringen so eine neue raffinierte und gleichzeitig an Retro-Akzenten reiche Stimmung in die eigenen vier Wände, die die Wirkung der Hohlziegel und der Ziegeloberflächen reproduziert.
Винтажные рисунки, нанесенные на поверхность, создают внутри стен жилица новое настроение, утонченное и, в то же время, со ссылкой на прошлое. Этому способствуют эффект дырчатого кирпича и поверхность из кирпичиков.
0,3% GA • GHA • GLA OK 48 5 6 Classe V ASTM: 0,81 • 0,74Pendulum: 55 • 48
ASTM: 0,72 • 0,75Pendulum: 55 • 48
Bristol Cream 6x25 (2 1/3”x10”) - Tabula Chocolate 15x100 (6”x39 1/4”)
10 11Bristol Cream 6x25 (2 1/3”x10”)
12 13
Bristol Cream 17x34 (7”x13 1/2”)
BRISTOLCREAM
PAVIMENTI COORDINATI COORDINATED FLOORS
34x34 13 1/2”x13 1/2”
17x34 7”x13 1/2”
14 15
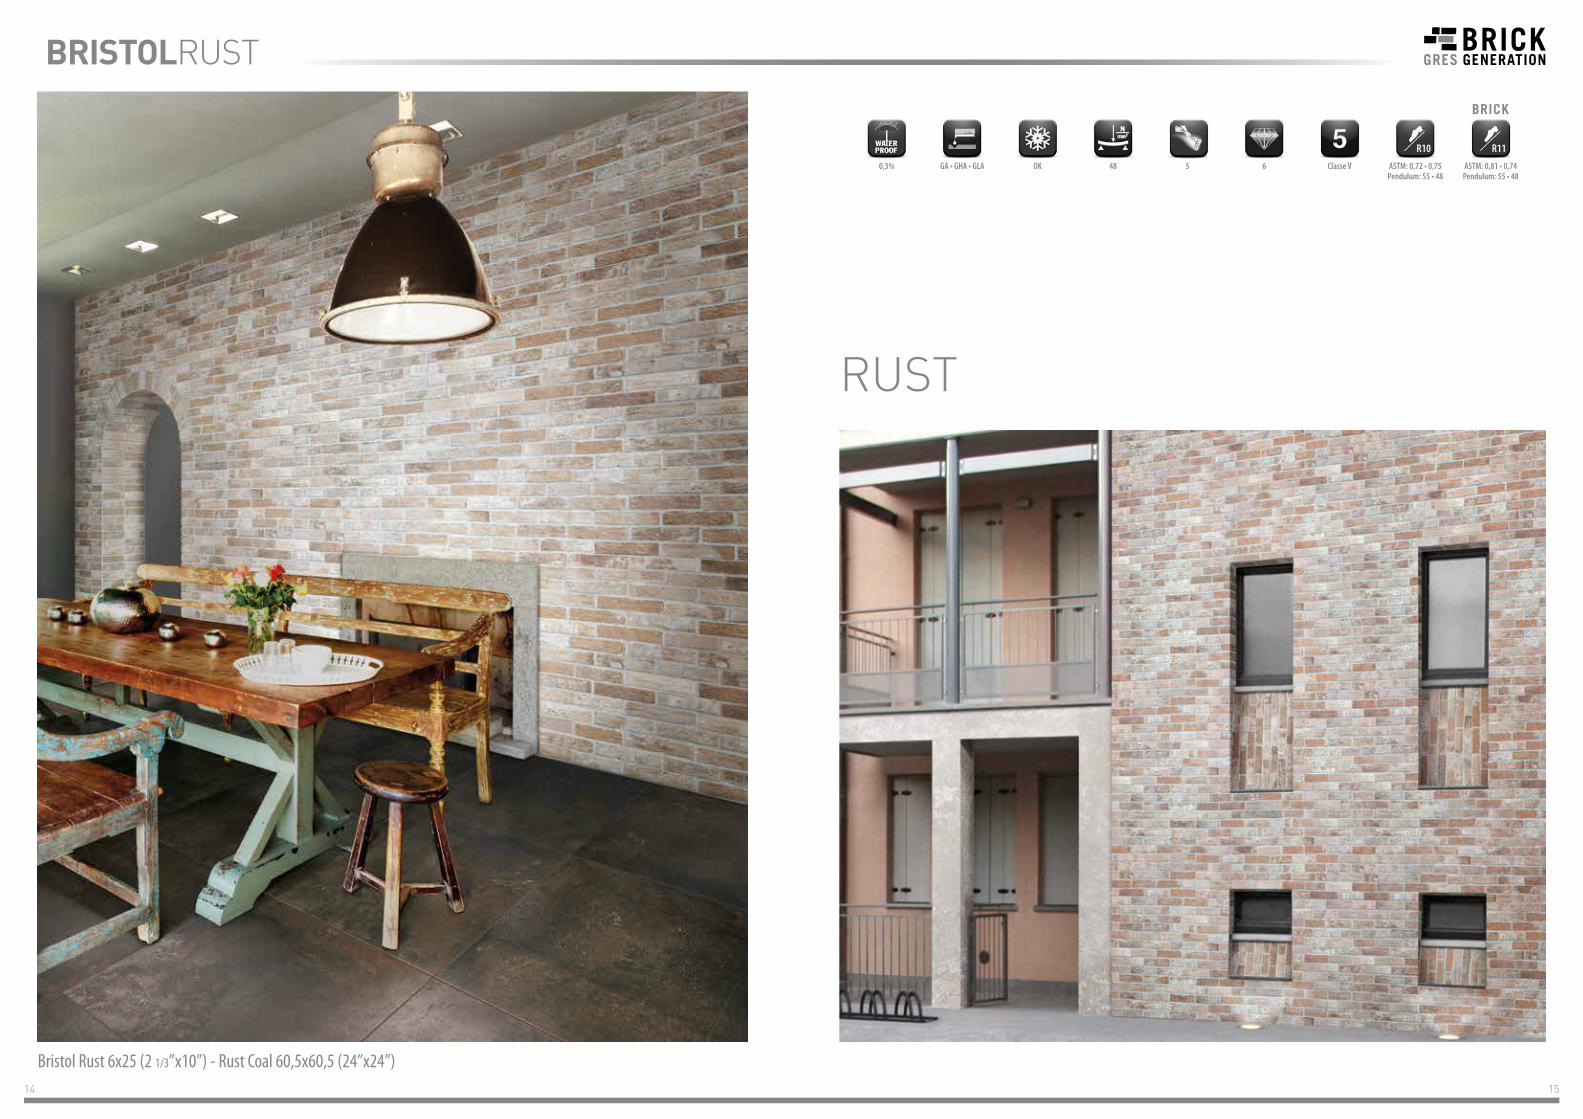
RUST
BRISTOLRUST
0,3% GA • GHA • GLA OK 48 5 6 Classe V ASTM: 0,81 • 0,74Pendulum: 55 • 48
ASTM: 0,72 • 0,75Pendulum: 55 • 48
Bristol Rust 6x25 (2 1/3”x10”) - Rust Coal 60,5x60,5 (24”x24”)
16 17
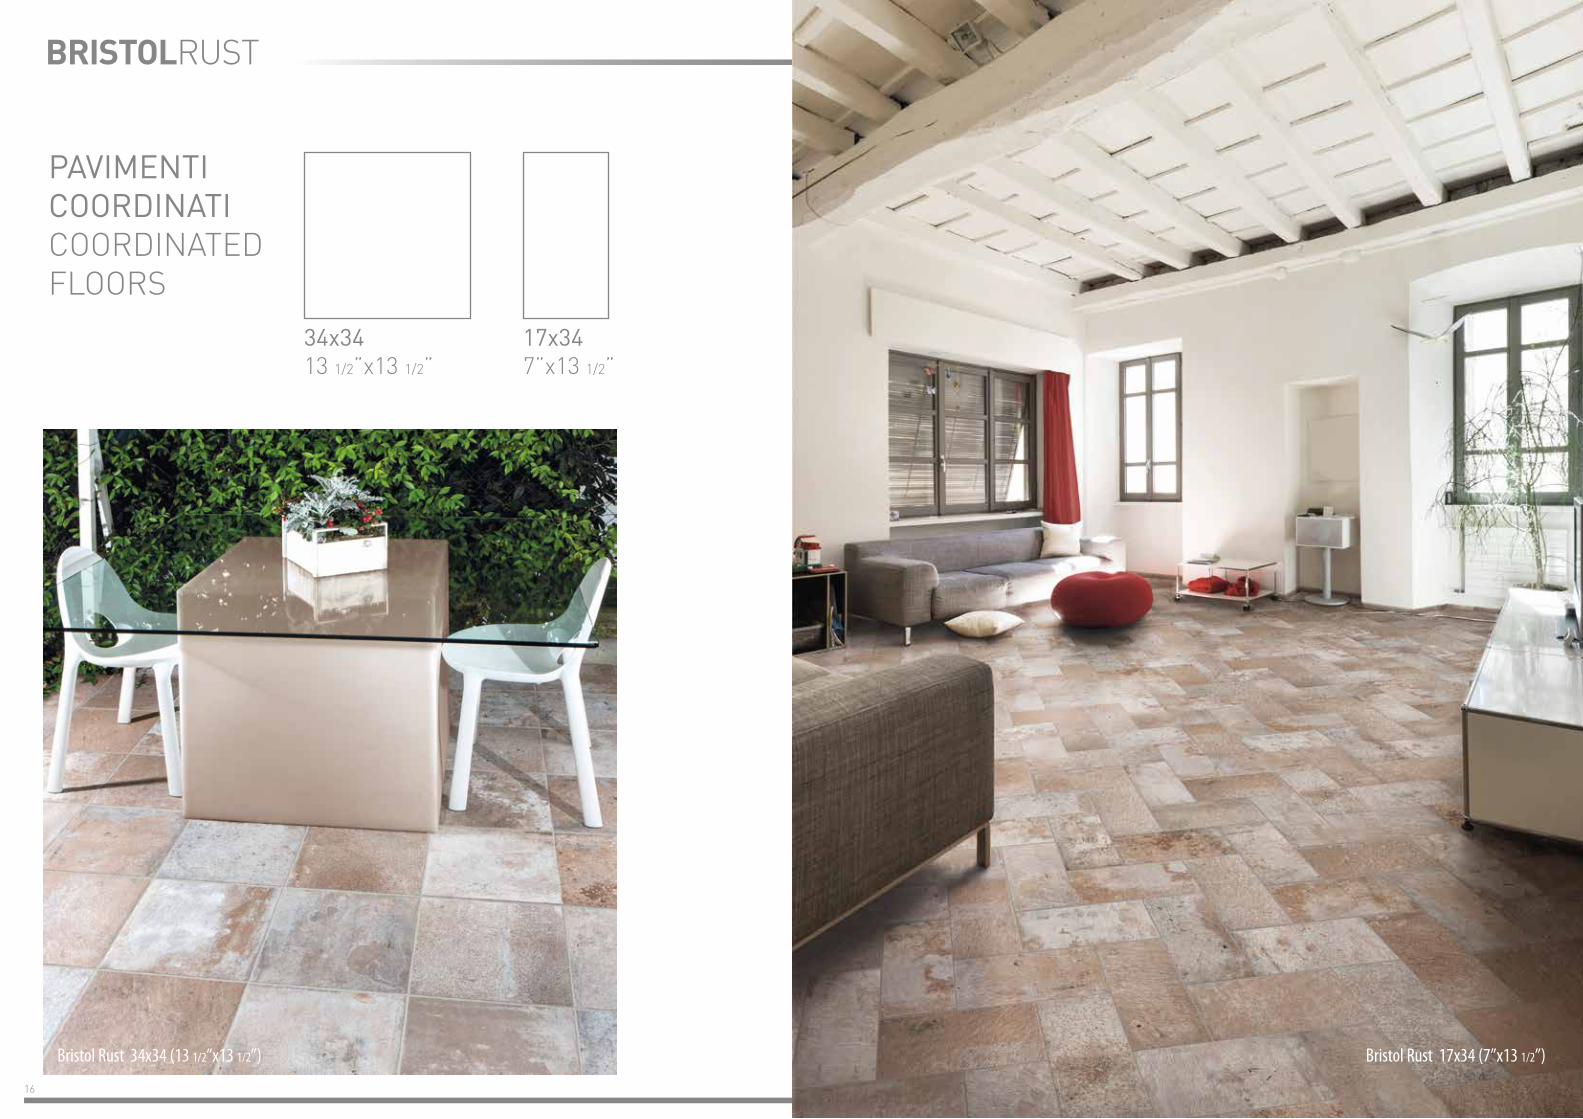
Bristol Rust 34x34 (13 1/2”x13 1/2”)
BRISTOLRUST
PAVIMENTI COORDINATI COORDINATED FLOORS
34x34 13 1/2”x13 1/2”
17x34 7”x13 1/2”
Bristol Rust 17x34 (7”x13 1/2”)
18 19
RED
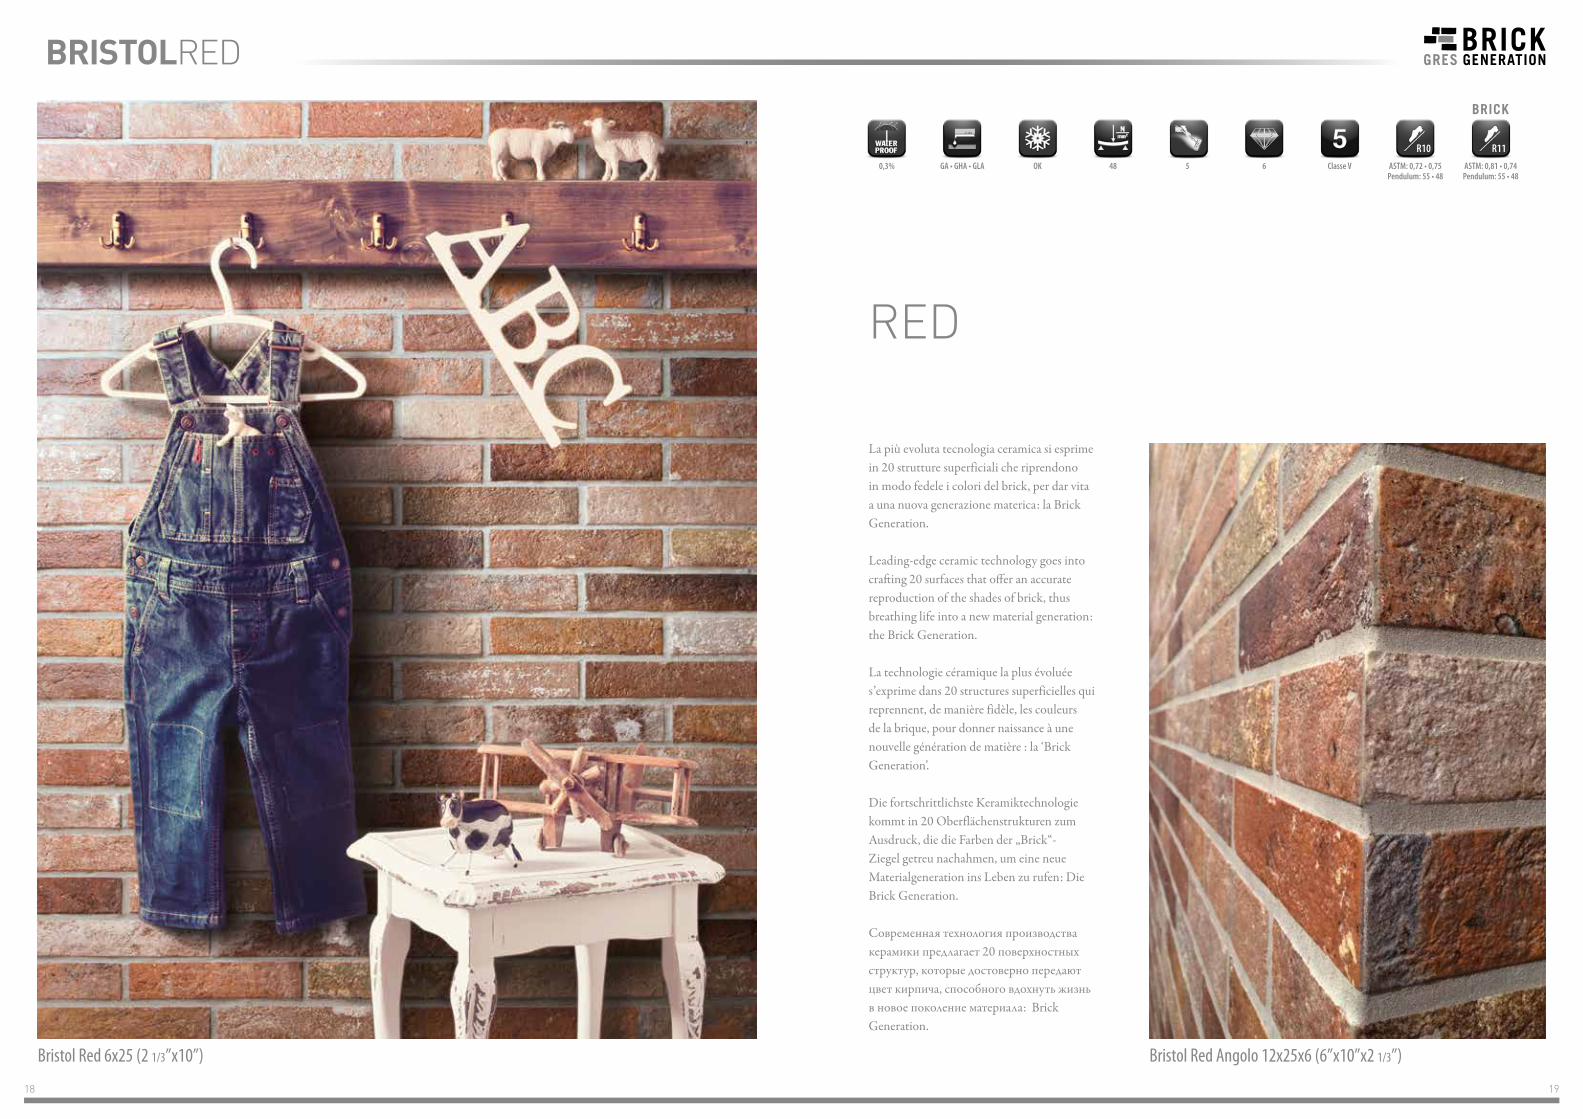
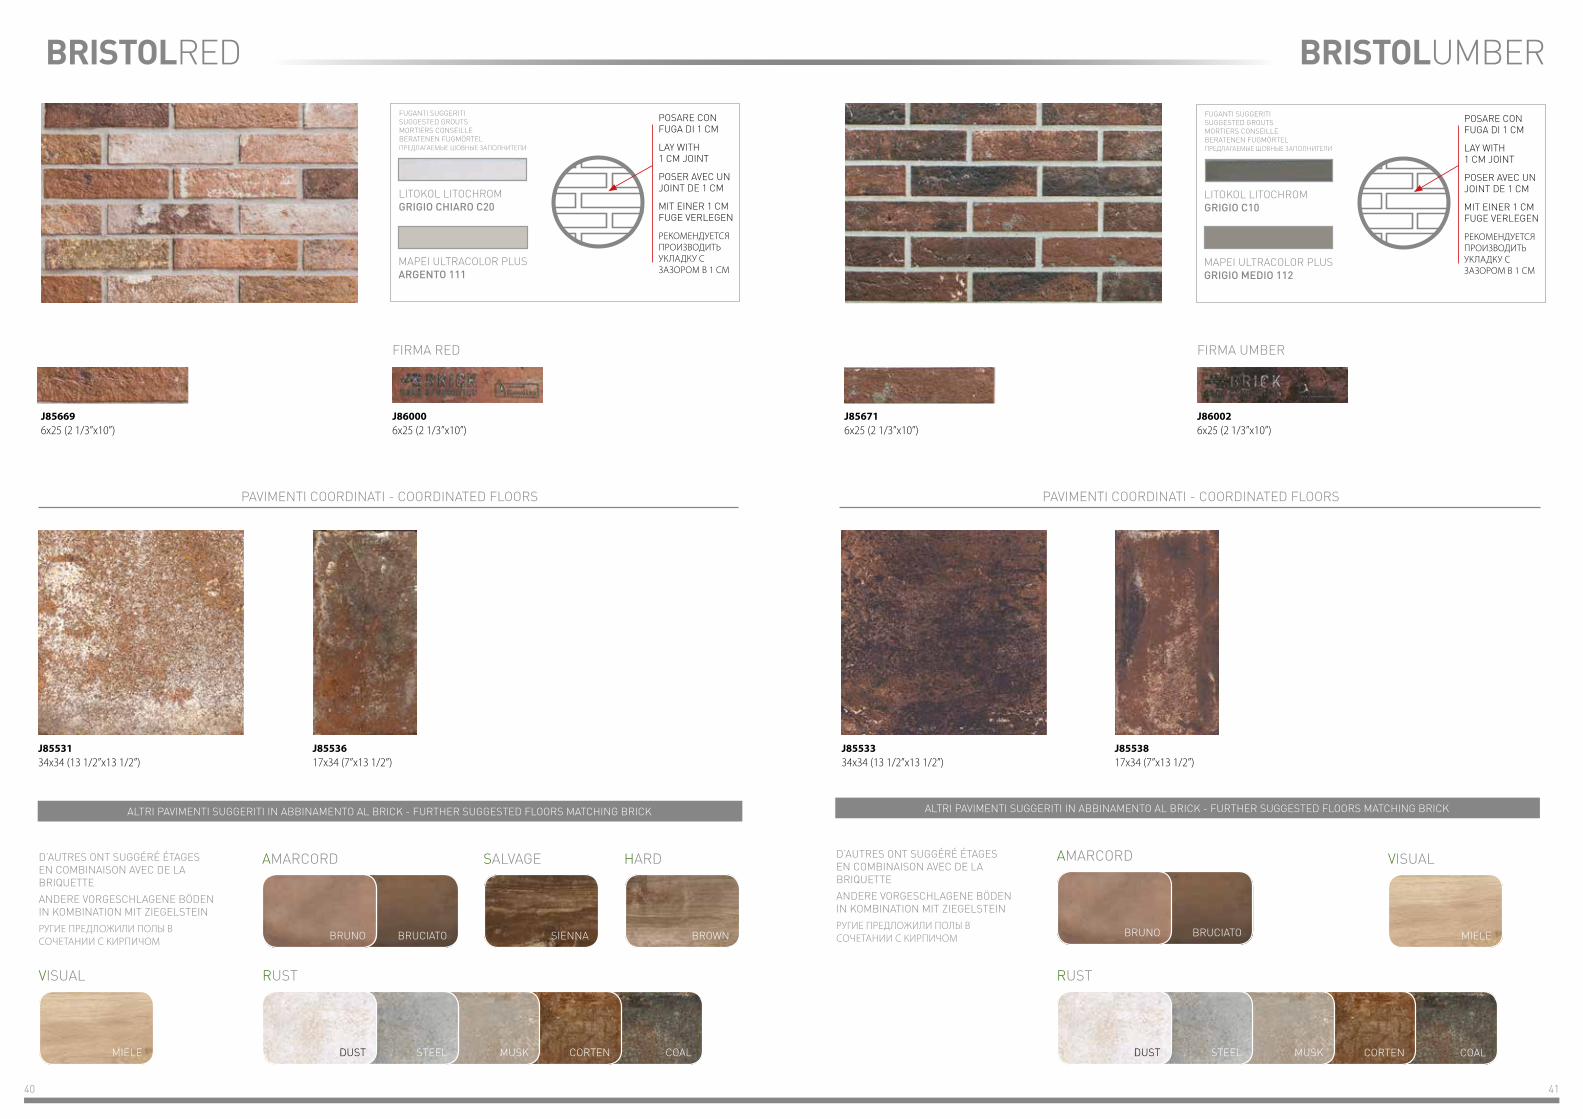
La più evoluta tecnologia ceramica si esprime in 20 strutture superficiali che riprendono in modo fedele i colori del brick, per dar vita a una nuova generazione materica: la Brick Generation.
Leading-edge ceramic technology goes into crafting 20 surfaces that offer an accurate reproduction of the shades of brick, thus breathing life into a new material generation: the Brick Generation.
La technologie céramique la plus évoluée s’exprime dans 20 structures superficielles qui reprennent, de manière fidèle, les couleurs de la brique, pour donner naissance à une nouvelle génération de matière : la ‘Brick Generation’.
Die fortschrittlichste Keramiktechnologie kommt in 20 Oberflächenstrukturen zum Ausdruck, die die Farben der „Brick“-Ziegel getreu nachahmen, um eine neue Materialgeneration ins Leben zu rufen: Die Brick Generation.
Современная технология производства керамики предлагает 20 поверхностных структур, которые достоверно передают цвет кирпича, способного вдохнуть жизнь в новое поколение материала: Brick Generation.
Bristol Red 6x25 (2 1/3”x10”)
0,3% GA • GHA • GLA OK 48 5 6 Classe V ASTM: 0,81 • 0,74Pendulum: 55 • 48
ASTM: 0,72 • 0,75Pendulum: 55 • 48
Bristol Red Angolo 12x25x6 (6”x10”x2 1/3”)
BRISTOLRED
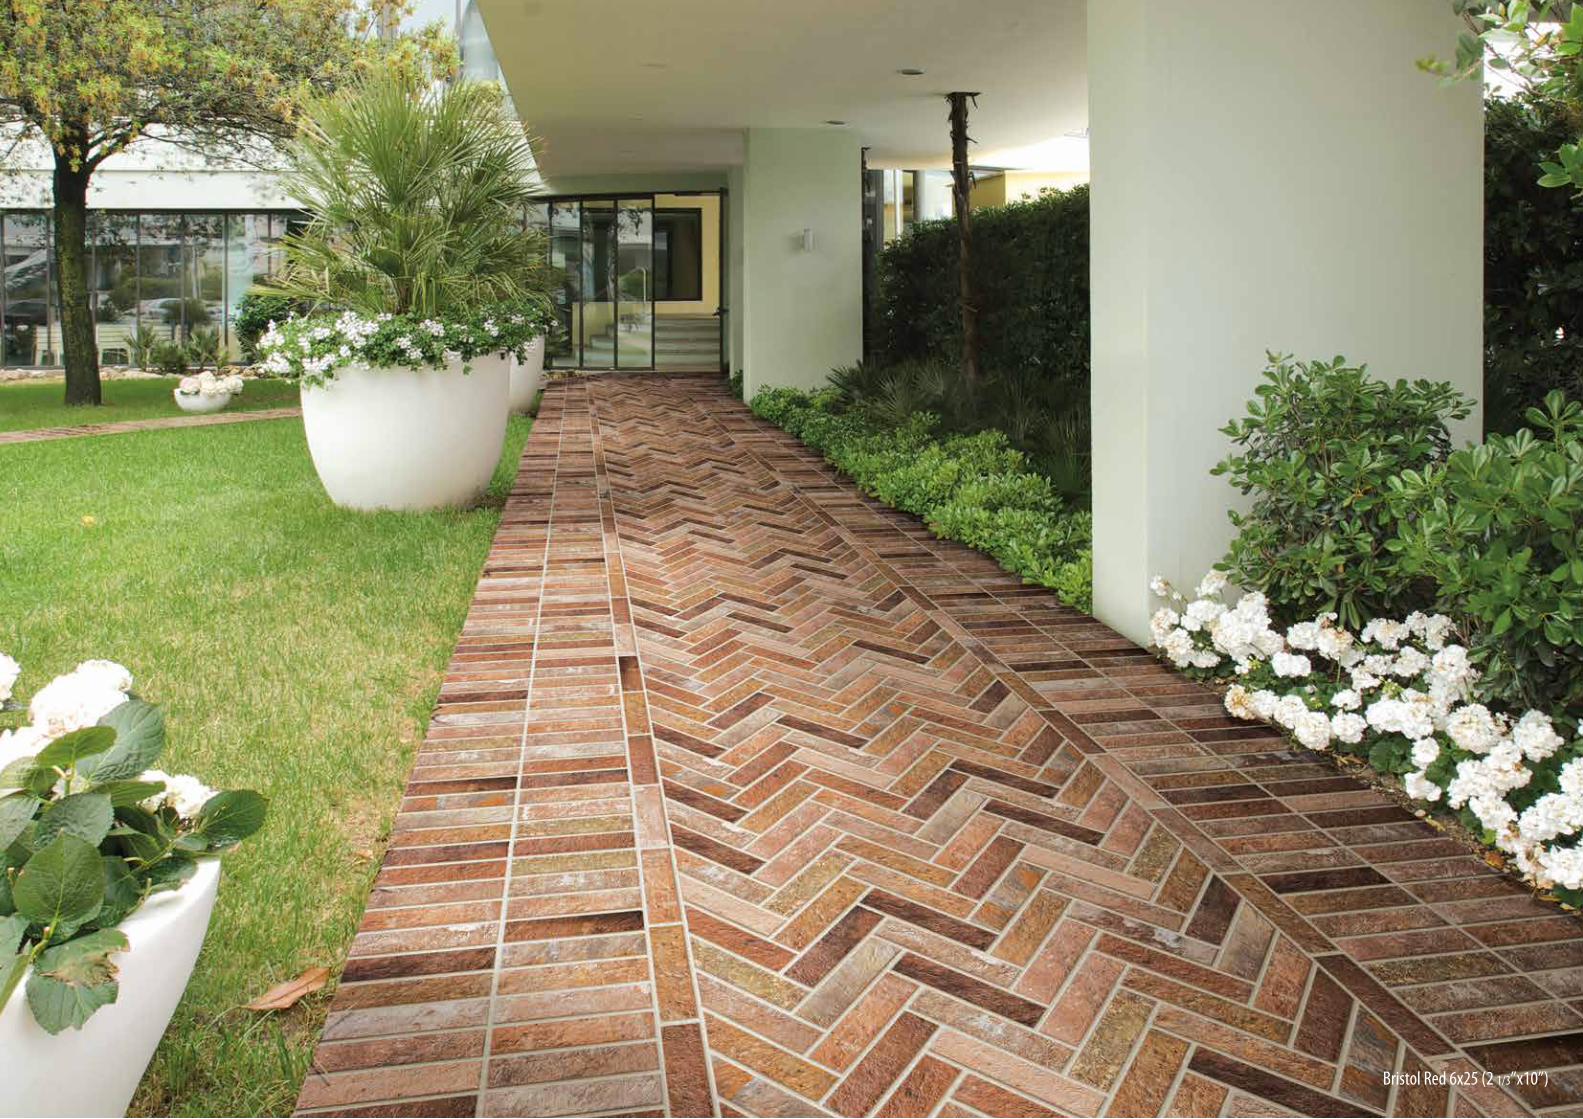
20 21Bristol Red 6x25 (2 1/3”x10”)
22 23
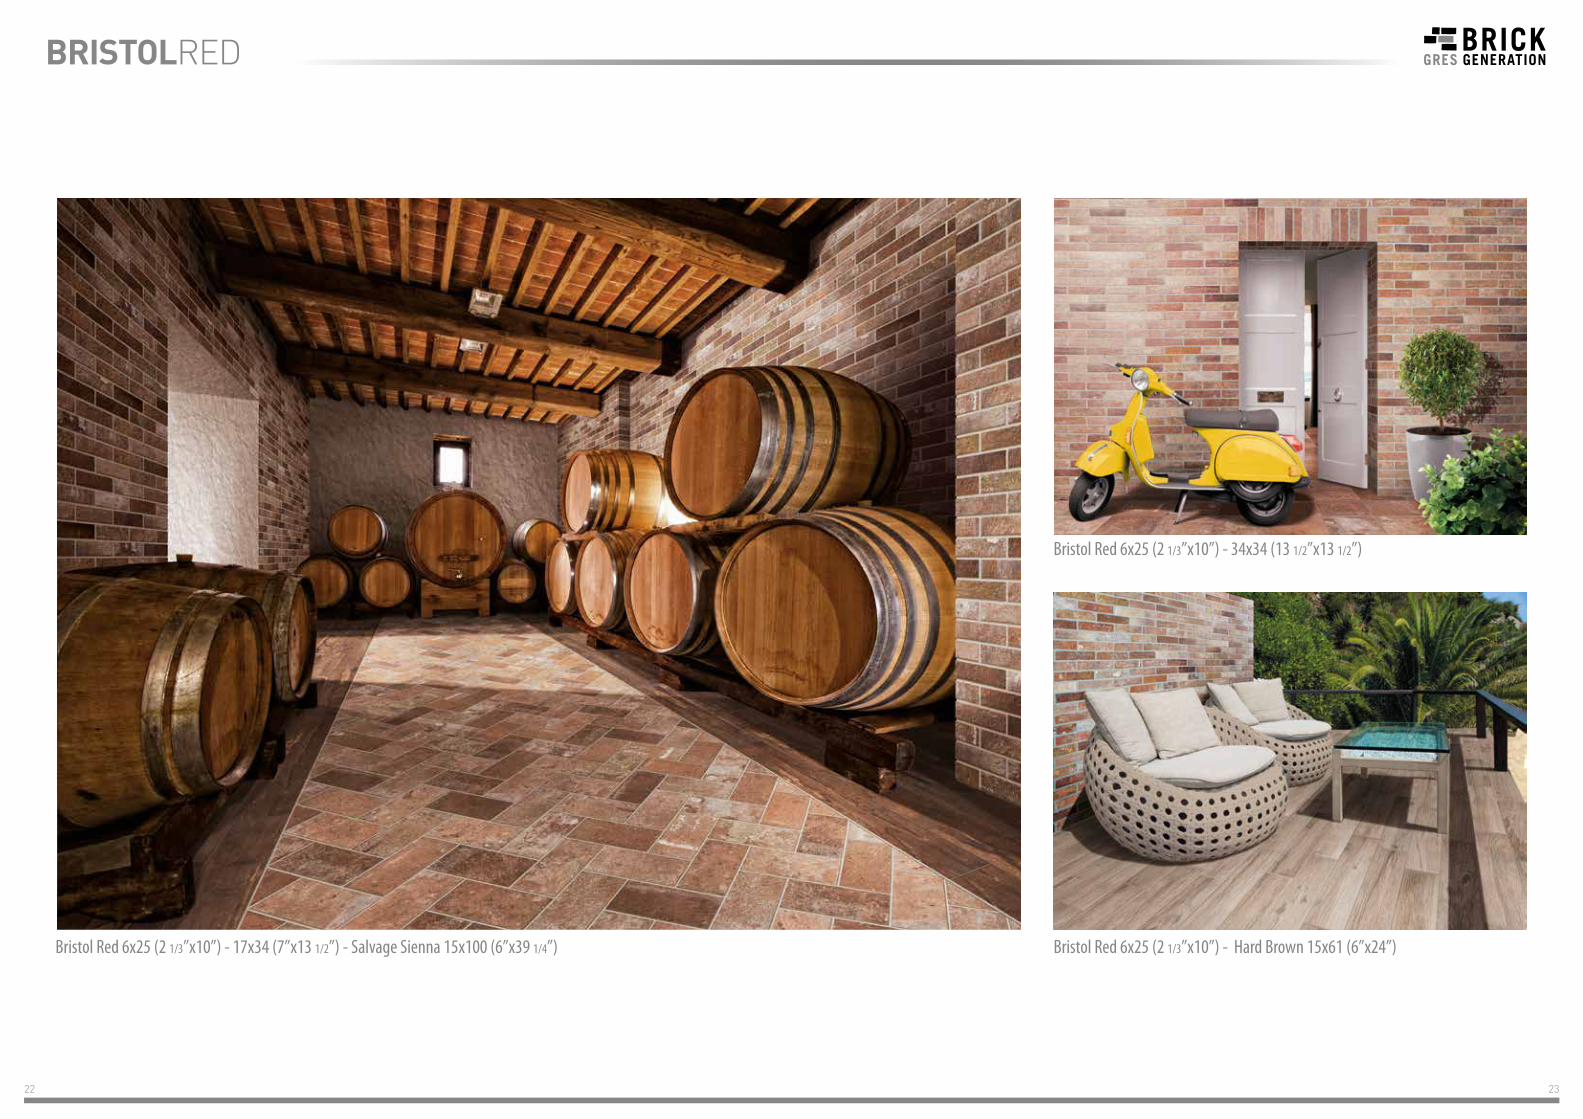
Bristol Red 6x25 (2 1/3”x10”) - 17x34 (7”x13 1/2”) - Salvage Sienna 15x100 (6”x39 1/4”) Bristol Red 6x25 (2 1/3”x10”) - Hard Brown 15x61 (6”x24”)
Bristol Red 6x25 (2 1/3”x10”) - 34x34 (13 1/2”x13 1/2”)
BRISTOLRED

24 25
Bristol Red 17x34 (7”x13 1/2”)
BRISTOLRED
PAVIMENTI COORDINATI COORDINATED FLOORS
34x34 13 1/2”x13 1/2”
17x34 7”x13 1/2”
26 27
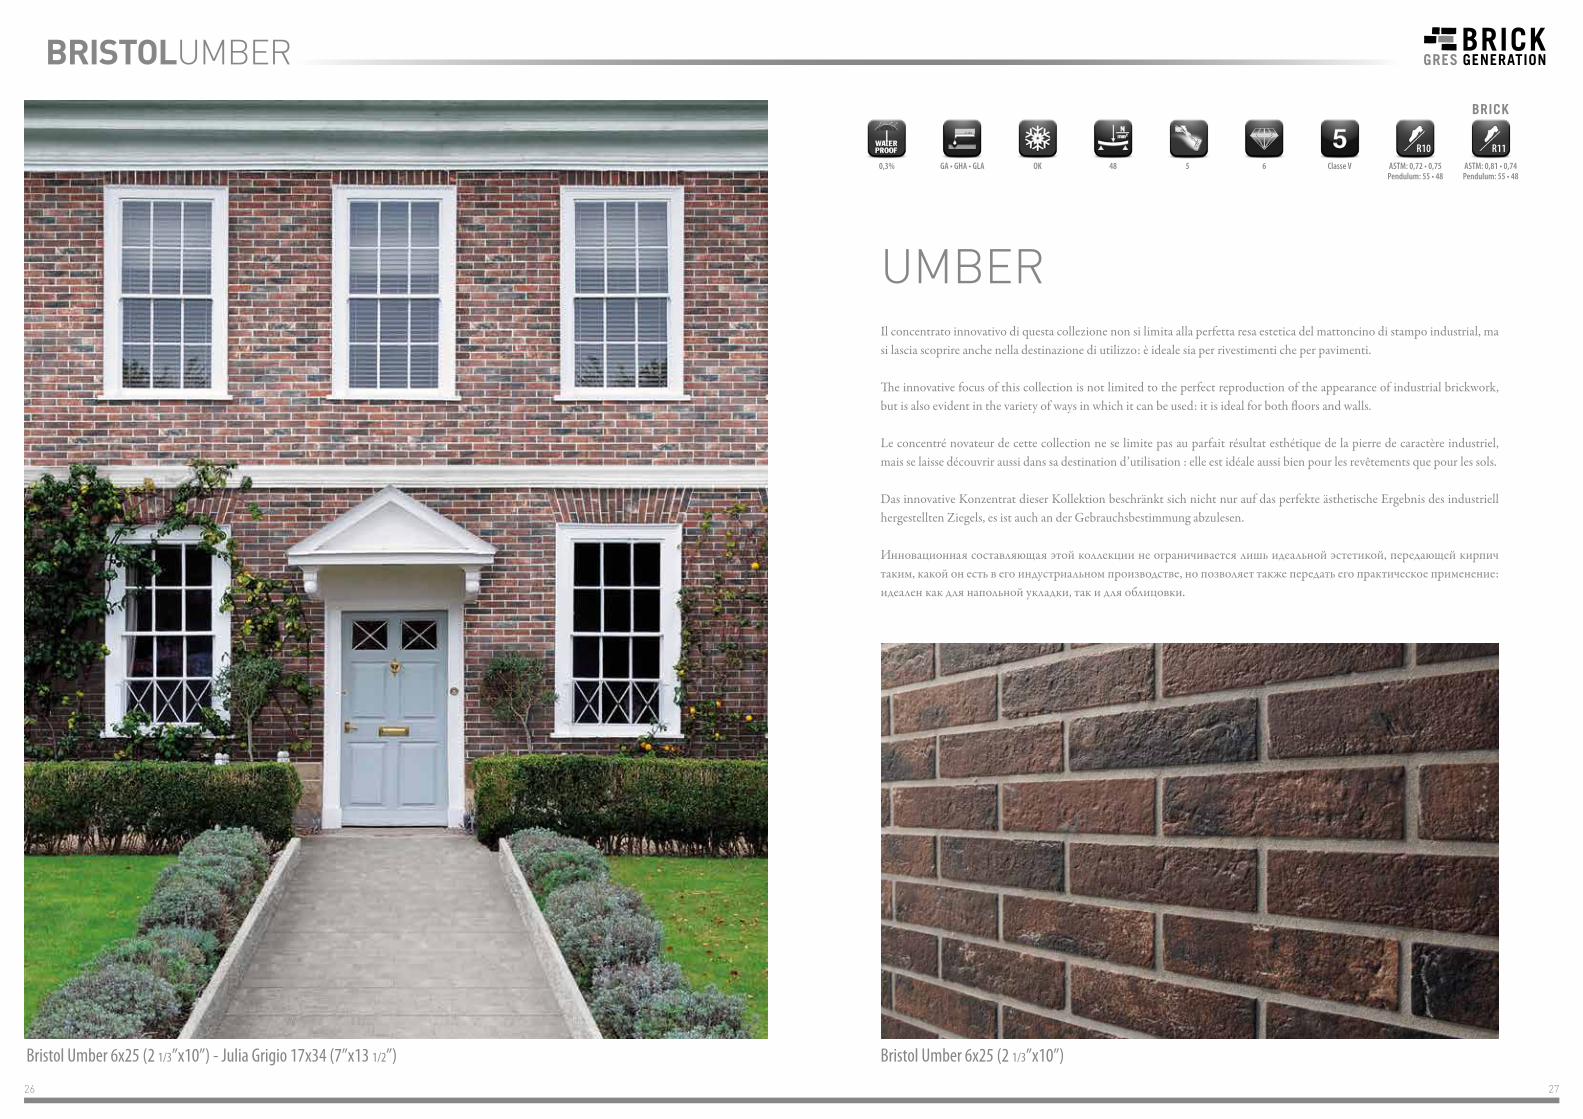
UMBERIl concentrato innovativo di questa collezione non si limita alla perfetta resa estetica del mattoncino di stampo industrial, ma si lascia scoprire anche nella destinazione di utilizzo: è ideale sia per rivestimenti che per pavimenti.
The innovative focus of this collection is not limited to the perfect reproduction of the appearance of industrial brickwork, but is also evident in the variety of ways in which it can be used: it is ideal for both floors and walls.
Le concentré novateur de cette collection ne se limite pas au parfait résultat esthétique de la pierre de caractère industriel, mais se laisse découvrir aussi dans sa destination d’utilisation : elle est idéale aussi bien pour les revêtements que pour les sols.
Das innovative Konzentrat dieser Kollektion beschränkt sich nicht nur auf das perfekte ästhetische Ergebnis des industriell hergestellten Ziegels, es ist auch an der Gebrauchsbestimmung abzulesen.
Инновационная составляющая этой коллекции не ограничивается лишь идеальной эстетикой, передающей кирпич таким, какой он есть в его индустриальном производстве, но позволяет также передать его практическое применение: идеален как для напольной укладки, так и для облицовки.
Bristol Umber 6x25 (2 1/3”x10”) - Julia Grigio 17x34 (7”x13 1/2”)
0,3% GA • GHA • GLA OK 48 5 6 Classe V ASTM: 0,81 • 0,74Pendulum: 55 • 48
ASTM: 0,72 • 0,75Pendulum: 55 • 48
Bristol Umber 6x25 (2 1/3”x10”)
BRISTOLUMBER
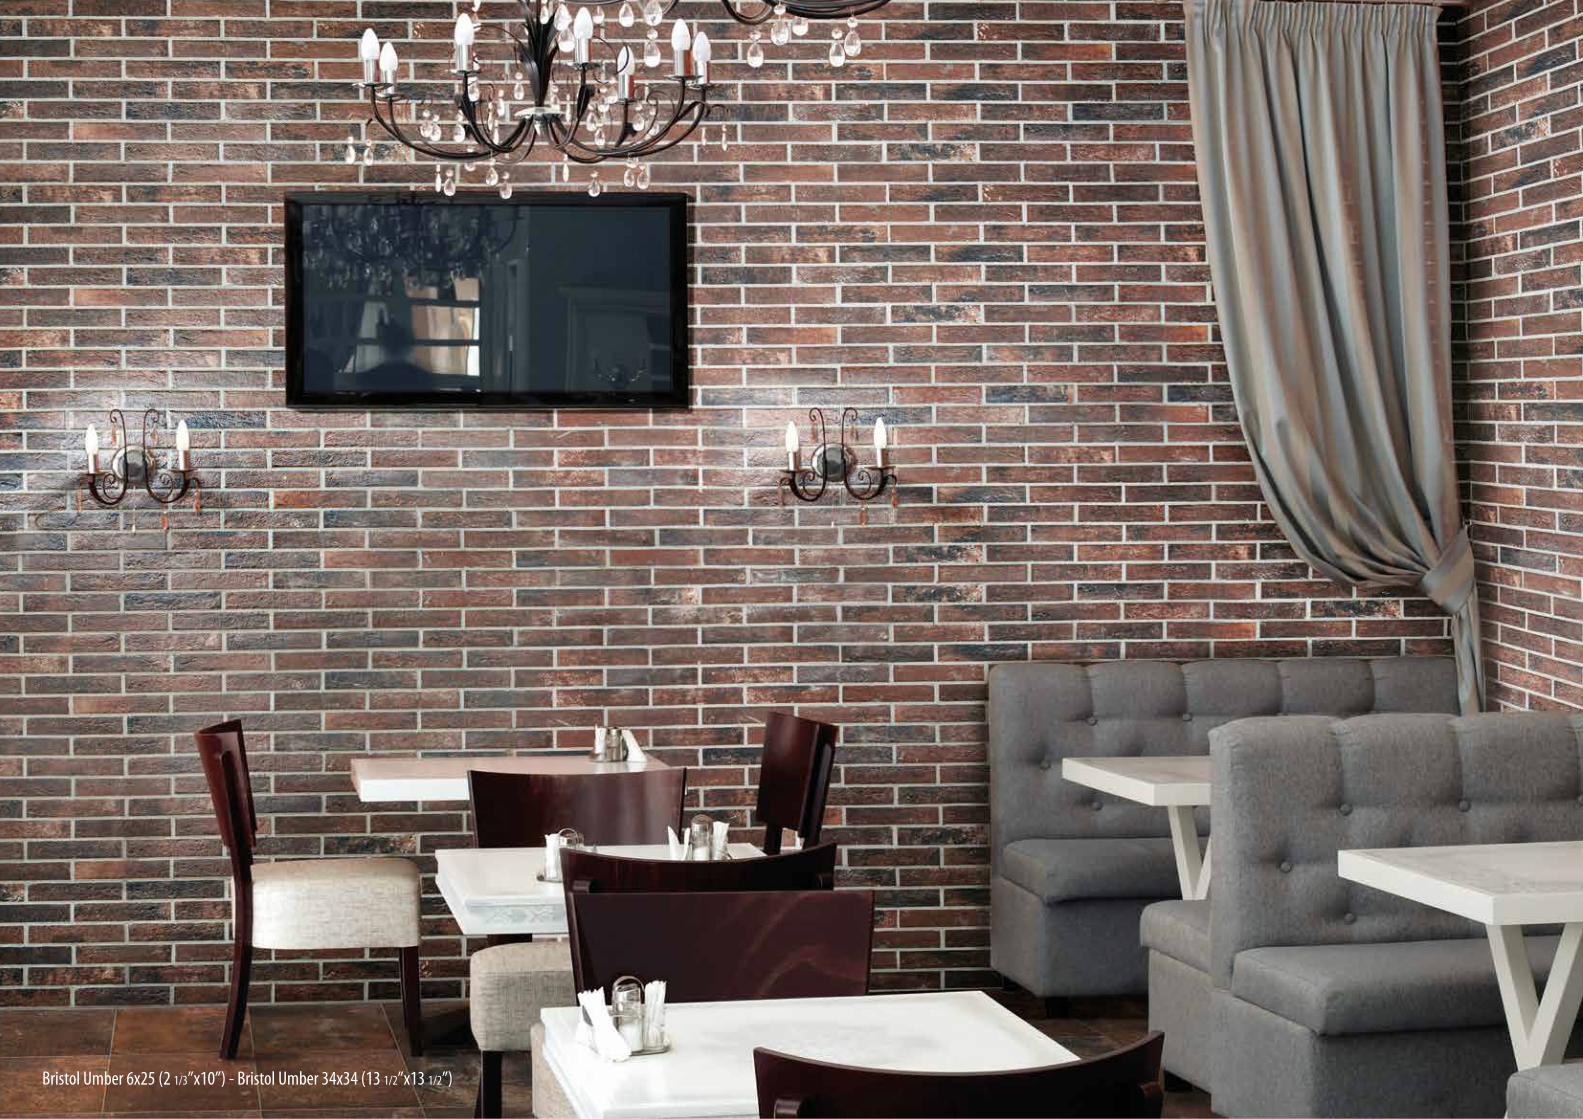
28 29Bristol Umber 6x25 (2 1/3”x10”) - Bristol Umber 34x34 (13 1/2”x13 1/2”)
30 31
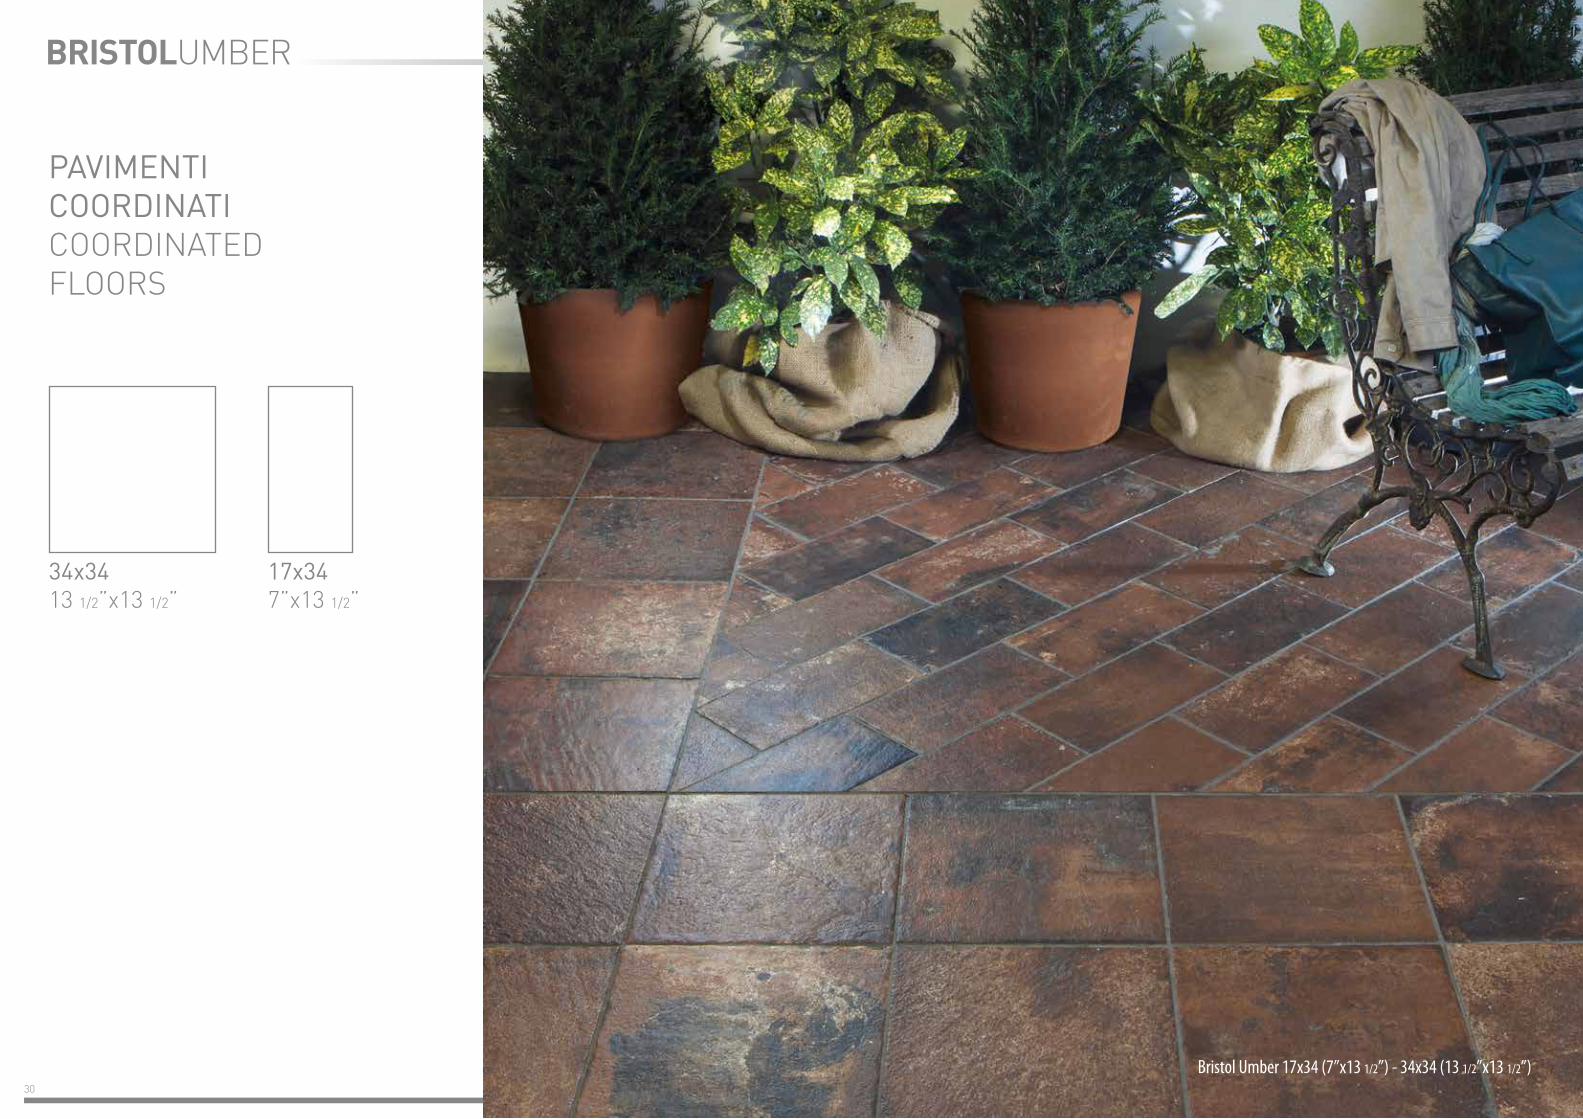
BRISTOLUMBER
PAVIMENTI COORDINATI COORDINATED FLOORS
34x34 13 1/2”x13 1/2”
17x34 7”x13 1/2”
Bristol Umber 17x34 (7”x13 1/2”) - 34x34 (13 1/2”x13 1/2”)
32 33
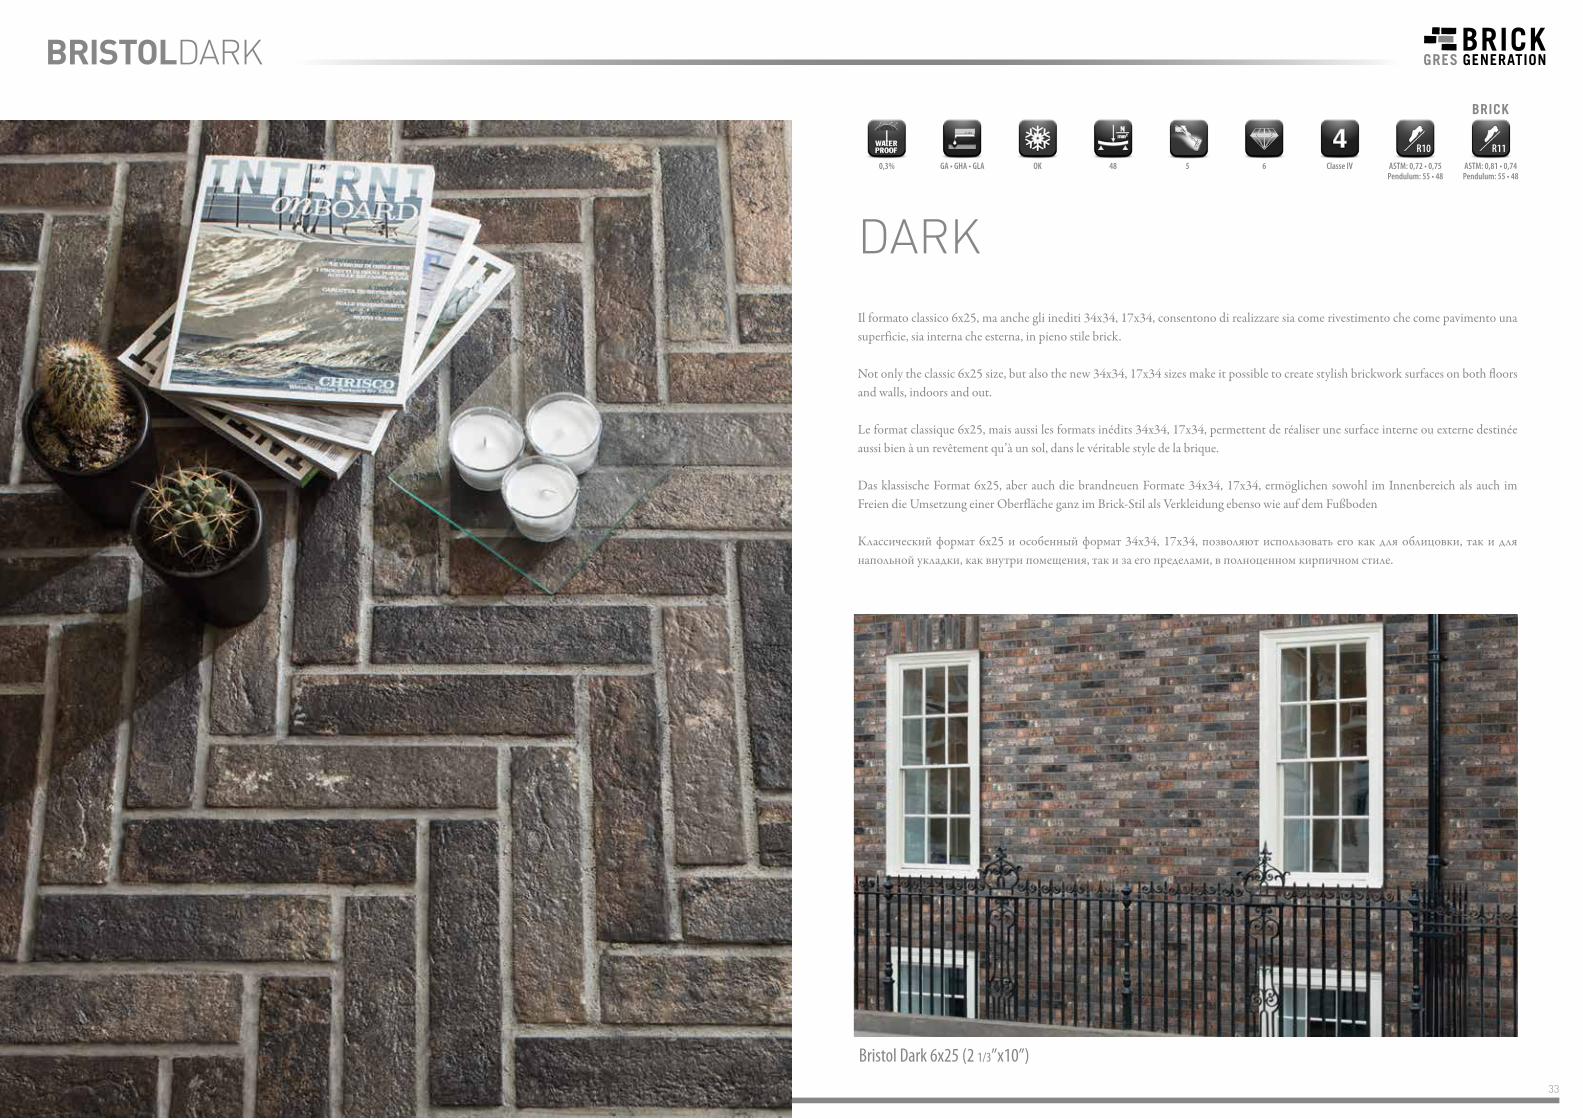
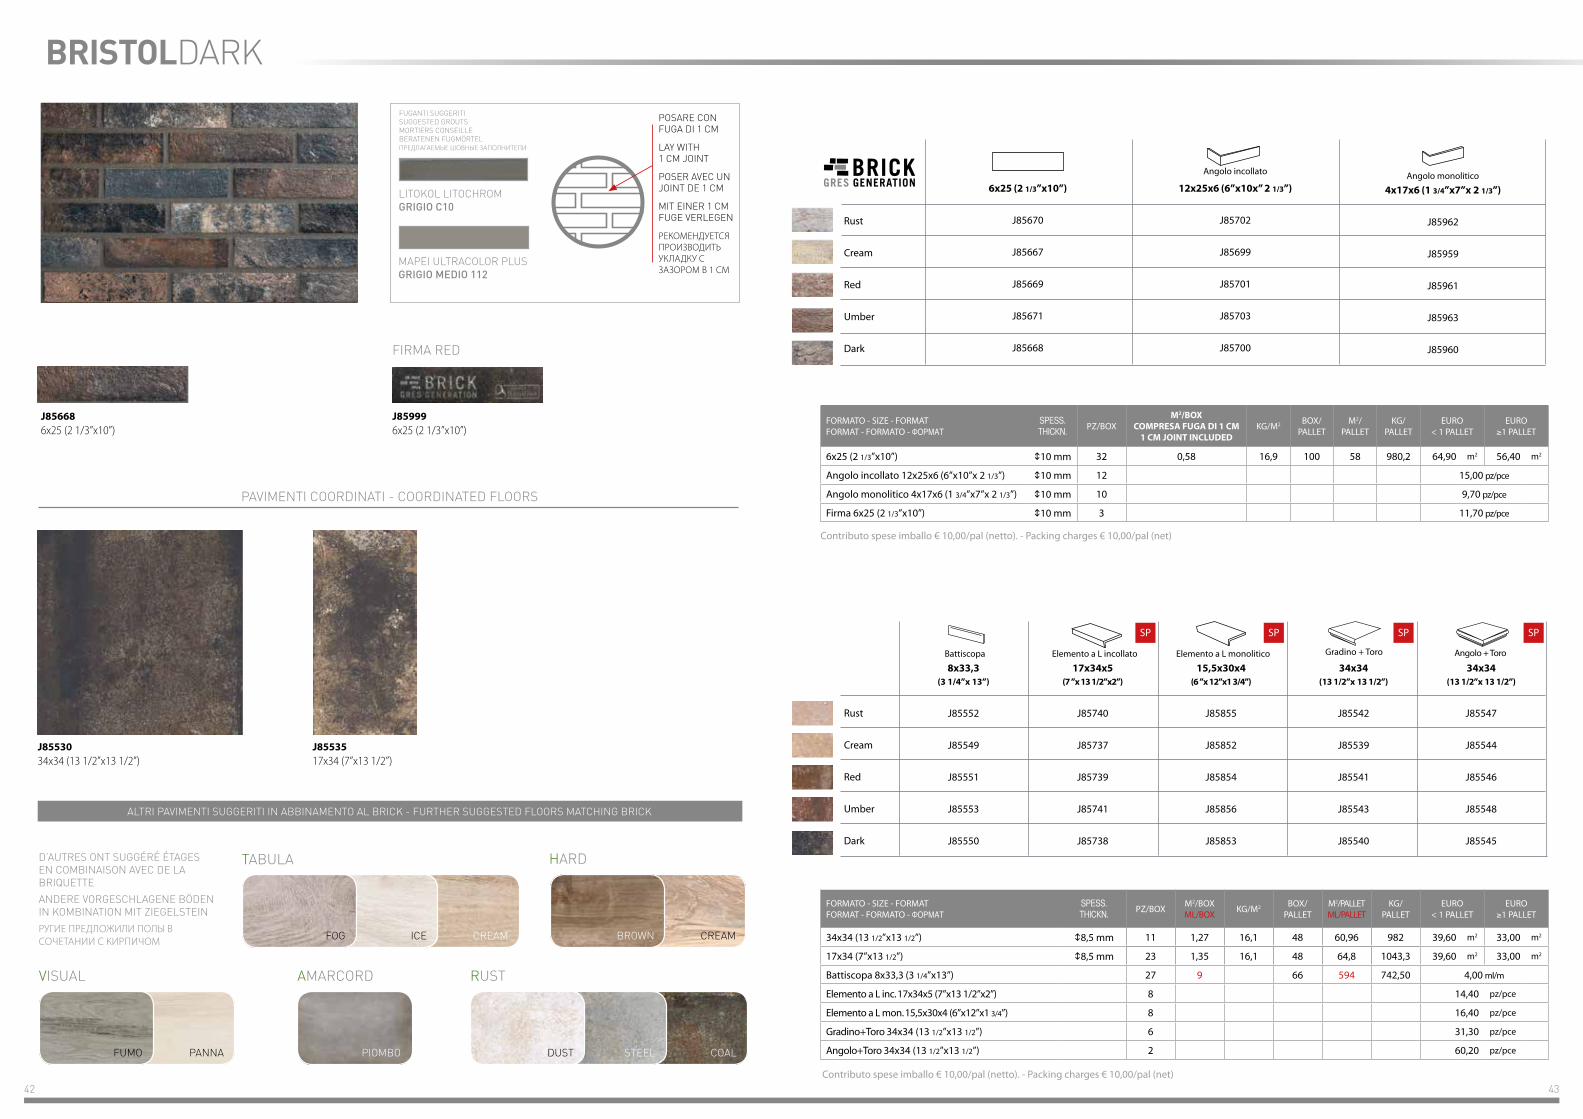
DARKIl formato classico 6x25, ma anche gli inediti 34x34, 17x34, consentono di realizzare sia come rivestimento che come pavimento una superficie, sia interna che esterna, in pieno stile brick.
Not only the classic 6x25 size, but also the new 34x34, 17x34 sizes make it possible to create stylish brickwork surfaces on both floors and walls, indoors and out.
Le format classique 6x25, mais aussi les formats inédits 34x34, 17x34, permettent de réaliser une surface interne ou externe destinée aussi bien à un revêtement qu’à un sol, dans le véritable style de la brique.
Das klassische Format 6x25, aber auch die brandneuen Formate 34x34, 17x34, ermöglichen sowohl im Innenbereich als auch im Freien die Umsetzung einer Oberfläche ganz im Brick-Stil als Verkleidung ebenso wie auf dem Fußboden
Классический формат 6x25 и особенный формат 34x34, 17x34, позволяют использовать его как для облицовки, так и для напольной укладки, как внутри помещения, так и за его пределами, в полноценном кирпичном стиле.
0,3% GA • GHA • GLA OK 48 5 6 Classe IV ASTM: 0,81 • 0,74Pendulum: 55 • 48
ASTM: 0,72 • 0,75Pendulum: 55 • 48
Bristol Dark 6x25 (2 1/3”x10”)
BRISTOLDARK
34 35
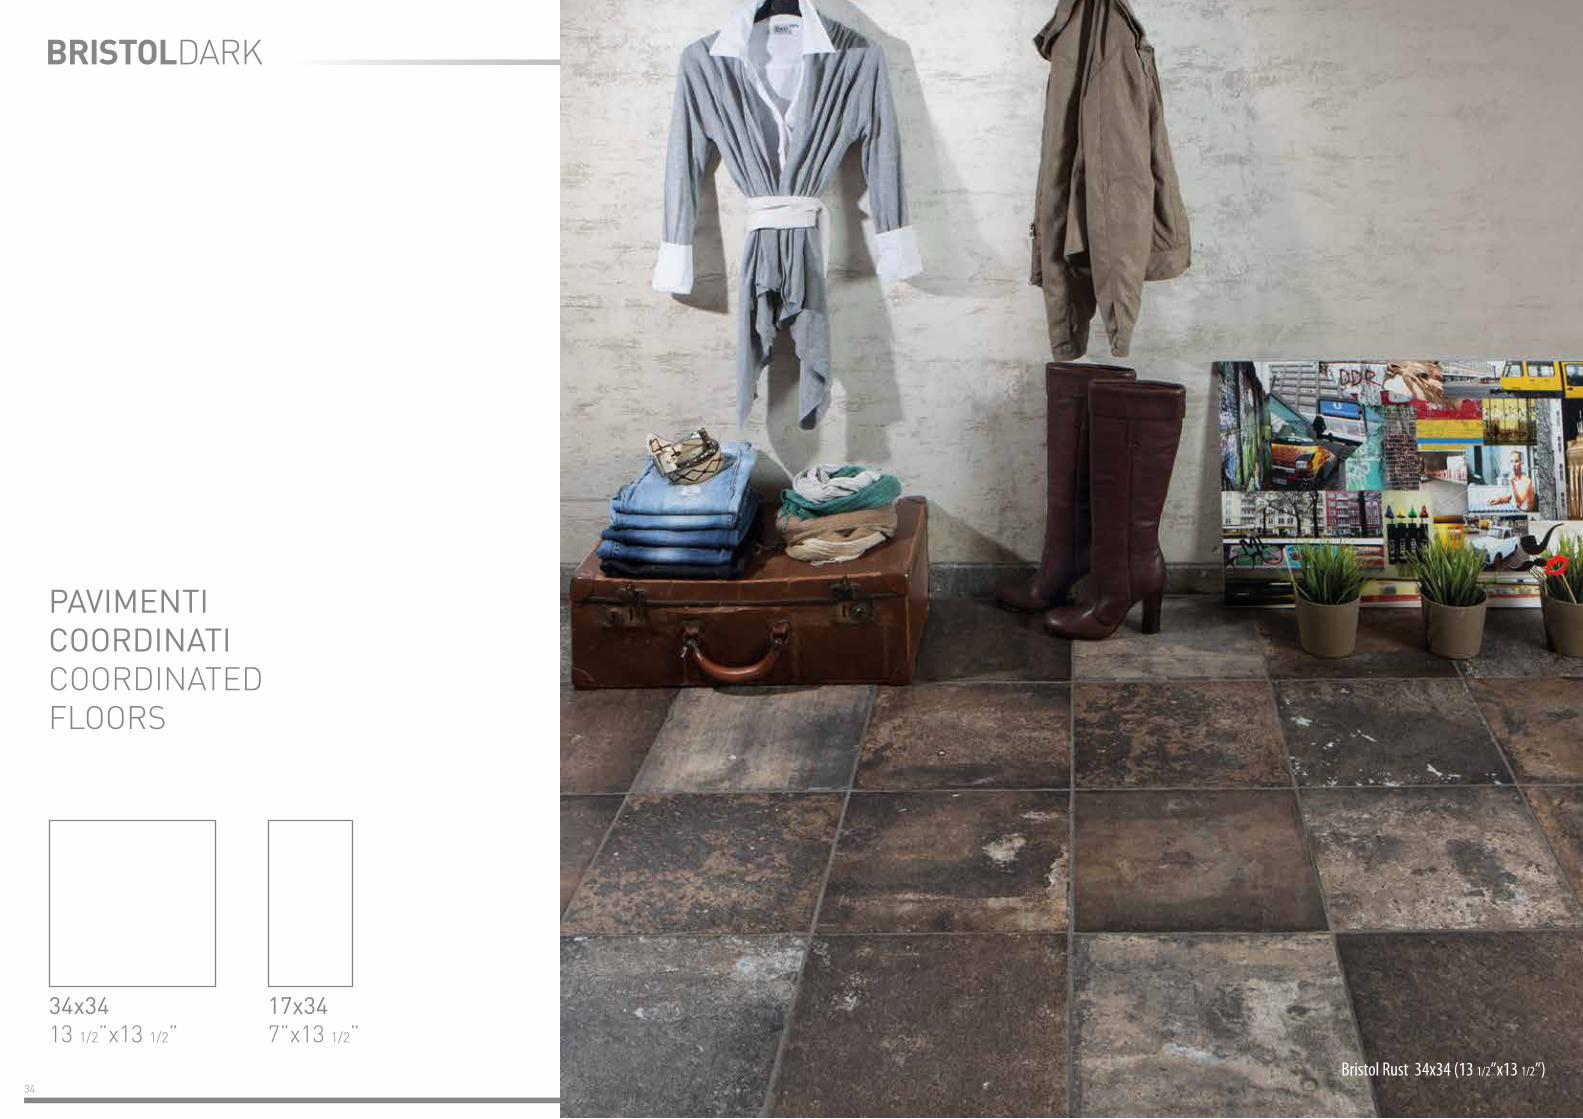
BRISTOLDARK
PAVIMENTI COORDINATI COORDINATED FLOORS
34x34 13 1/2”x13 1/2”
17x34 7”x13 1/2”
Bristol Rust 34x34 (13 1/2”x13 1/2”)
36 37
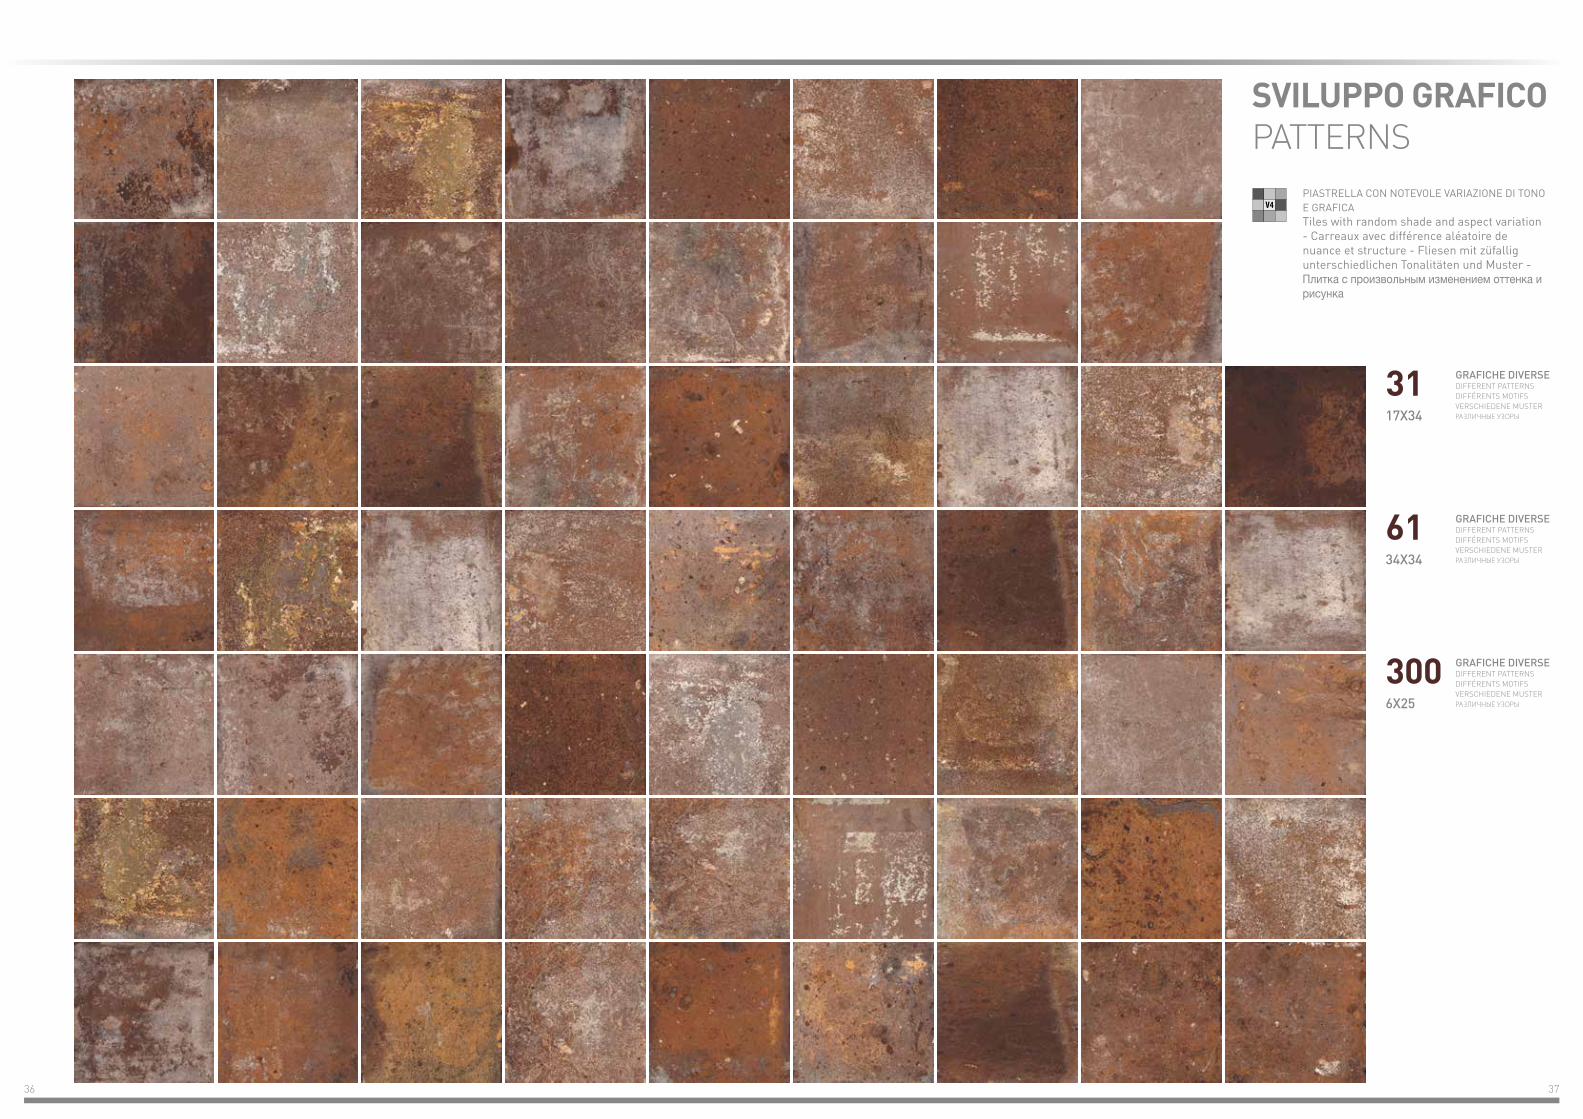
SVILUPPO GRAFICO PATTERNS
V4PIASTRELLA CON NOTEVOLE VARIAZIONE DI TONO E GRAFICA Tiles with random shade and aspect variation - Carreaux avec différence aléatoire de nuance et structure - Fliesen mit züfallig unterschiedlichen Tonalitäten und Muster - Плитка с произвольным изменением оттенка и рисунка
31
17X34
GRAFICHE DIVERSEDIFFERENT PATTERNSDIFFÉRENTS MOTIFSVERSCHIEDENE MUSTERРАЗЛИЧНЫЕ УЗОРЫ
61
34X34
GRAFICHE DIVERSEDIFFERENT PATTERNSDIFFÉRENTS MOTIFSVERSCHIEDENE MUSTERРАЗЛИЧНЫЕ УЗОРЫ
300
6X25
GRAFICHE DIVERSEDIFFERENT PATTERNSDIFFÉRENTS MOTIFSVERSCHIEDENE MUSTERРАЗЛИЧНЫЕ УЗОРЫ
38 39
J856676x25 (2 1/3”x10”)
J8552934x34 (13 1/2”x13 1/2”)
J8553417x34 (7”x13 1/2”)
TABULA
VISUAL AMARCORD
MYTHOS
BROWNCHOCOLATE CAPPUCCINO
HARD
BROWN
NATURALE SABBIA
RUST
DUST MUSK CORTEN COAL
BRISTOLCREAMFUGANTI SUGGERITI SUGGESTED GROUTSMORTIERS CONSEILLEBERATENEN FUGMÖRTELПРЕДЛАГАЕМЫЕ ШОВНЫЕ ЗАПОЛНИТЕЛИ
LITOKOL LITOCHROMGRIGIO CHIARO C20
MAPEI ULTRACOLOR PLUSARGENTO 111
POSARE CON FUGA DI 1 CM
LAY WITH 1 CM JOINT
POSER AVEC UN JOINT DE 1 CM
MIT EINER 1 CM FUGE VERLEGEN
РЕКОМЕНДУЕТСЯ ПРОИЗВОДИТЬ УКЛАДКУ С ЗАЗОРОМ В 1 СМ
J856706x25 (2 1/3”x10”)
J8553234x34 (13 1/2”x13 1/2”)
J8553717x34 (7”x13 1/2”)
TABULA MYTHOS
BROWNCHOCOLATE CAPPUCCINO
HARD
BROWN
FUGANTI SUGGERITI SUGGESTED GROUTSMORTIERS CONSEILLEBERATENEN FUGMÖRTELПРЕДЛАГАЕМЫЕ ШОВНЫЕ ЗАПОЛНИТЕЛИ
LITOKOL LITOCHROMGRIGIO PERLA C30
MAPEI ULTRACOLOR PLUSMANHATTAN 2000 110
POSARE CON FUGA DI 1 CM
LAY WITH 1 CM JOINT
POSER AVEC UN JOINT DE 1 CM
MIT EINER 1 CM FUGE VERLEGEN
РЕКОМЕНДУЕТСЯ ПРОИЗВОДИТЬ УКЛАДКУ С ЗАЗОРОМ В 1 СМ
VISUAL AMARCORD
MORO MIELE TORTORA
RUST
DUST MUSK COAL
BRISTOLRUST
J859986x25 (2 1/3”x10”)
FIRMA CREAM
J860016x25 (2 1/3”x10”)
FIRMA RUST
PAVIMENTI COORDINATI - COORDINATED FLOORS
D’AUTRES ONT SUGGÉRÉ ÉTAGES EN COMBINAISON AVEC DE LA BRIQUETTE
ANDERE VORGESCHLAGENE BÖDEN IN KOMBINATION MIT ZIEGELSTEIN
РУГИЕ ПРЕДЛОЖИЛИ ПОЛЫ В СОЧЕТАНИИ С КИРПИЧОМ
ALTRI PAVIMENTI SUGGERITI IN ABBINAMENTO AL BRICK - FURTHER SUGGESTED FLOORS MATCHING BRICK
40 41
J856696x25 (2 1/3”x10”)
J8553134x34 (13 1/2”x13 1/2”)
J8553617x34 (7”x13 1/2”)
D’AUTRES ONT SUGGÉRÉ ÉTAGES EN COMBINAISON AVEC DE LA BRIQUETTE
ANDERE VORGESCHLAGENE BÖDEN IN KOMBINATION MIT ZIEGELSTEIN
РУГИЕ ПРЕДЛОЖИЛИ ПОЛЫ В СОЧЕТАНИИ С КИРПИЧОМ
FUGANTI SUGGERITI SUGGESTED GROUTSMORTIERS CONSEILLEBERATENEN FUGMÖRTELПРЕДЛАГАЕМЫЕ ШОВНЫЕ ЗАПОЛНИТЕЛИ
LITOKOL LITOCHROMGRIGIO CHIARO C20
MAPEI ULTRACOLOR PLUSARGENTO 111
POSARE CON FUGA DI 1 CM
LAY WITH 1 CM JOINT
POSER AVEC UN JOINT DE 1 CM
MIT EINER 1 CM FUGE VERLEGEN
РЕКОМЕНДУЕТСЯ ПРОИЗВОДИТЬ УКЛАДКУ С ЗАЗОРОМ В 1 СМ
J856716x25 (2 1/3”x10”)
J8553334x34 (13 1/2”x13 1/2”)
J8553817x34 (7”x13 1/2”)
FUGANTI SUGGERITI SUGGESTED GROUTSMORTIERS CONSEILLEBERATENEN FUGMÖRTELПРЕДЛАГАЕМЫЕ ШОВНЫЕ ЗАПОЛНИТЕЛИ
LITOKOL LITOCHROMGRIGIO C10
MAPEI ULTRACOLOR PLUSGRIGIO MEDIO 112
POSARE CON FUGA DI 1 CM
LAY WITH 1 CM JOINT
POSER AVEC UN JOINT DE 1 CM
MIT EINER 1 CM FUGE VERLEGEN
РЕКОМЕНДУЕТСЯ ПРОИЗВОДИТЬ УКЛАДКУ С ЗАЗОРОМ В 1 СМ
AMARCORD SALVAGE
SIENNABRUNO BRUCIATO
HARD
BROWN
VISUAL
MIELE
RUST
DUST STEEL MUSK CORTEN COAL
VISUALAMARCORD
BRUNO BRUCIATO MIELE
RUST
DUST STEEL MUSK CORTEN COAL
BRISTOLRED BRISTOLUMBER
PAVIMENTI COORDINATI - COORDINATED FLOORS
J860006x25 (2 1/3”x10”)
FIRMA RED
J860026x25 (2 1/3”x10”)
FIRMA UMBER
ALTRI PAVIMENTI SUGGERITI IN ABBINAMENTO AL BRICK - FURTHER SUGGESTED FLOORS MATCHING BRICK
PAVIMENTI COORDINATI - COORDINATED FLOORS
D’AUTRES ONT SUGGÉRÉ ÉTAGES EN COMBINAISON AVEC DE LA BRIQUETTE
ANDERE VORGESCHLAGENE BÖDEN IN KOMBINATION MIT ZIEGELSTEIN
РУГИЕ ПРЕДЛОЖИЛИ ПОЛЫ В СОЧЕТАНИИ С КИРПИЧОМ
ALTRI PAVIMENTI SUGGERITI IN ABBINAMENTO AL BRICK - FURTHER SUGGESTED FLOORS MATCHING BRICK
42 43
BRISTOLDARK
TABULA
VISUAL AMARCORD
FOG ICE CREAM
HARD
BROWN CREAM
FUMO PANNA PIOMBO
RUST
DUST STEEL COAL
J856686x25 (2 1/3”x10”)
J8553034x34 (13 1/2”x13 1/2”)
J8553517x34 (7”x13 1/2”)
FUGANTI SUGGERITI SUGGESTED GROUTSMORTIERS CONSEILLEBERATENEN FUGMÖRTELПРЕДЛАГАЕМЫЕ ШОВНЫЕ ЗАПОЛНИТЕЛИ
LITOKOL LITOCHROMGRIGIO C10
MAPEI ULTRACOLOR PLUSGRIGIO MEDIO 112
POSARE CON FUGA DI 1 CM
LAY WITH 1 CM JOINT
POSER AVEC UN JOINT DE 1 CM
MIT EINER 1 CM FUGE VERLEGEN
РЕКОМЕНДУЕТСЯ ПРОИЗВОДИТЬ УКЛАДКУ С ЗАЗОРОМ В 1 СМ
Angolo incollato
Rust
Cream
Red
Umber
Dark
12x25x6 (6”x10x” 2 1/3”)
J85702
J85699
J85701
J85703
J85700
Contributo spese imballo € 10,00/pal (netto). - Packing charges € 10,00/pal (net)
6x25 (2 1/3”x10”)
J85670
J85667
J85669
J85671
J85668
Gradino + Toro Angolo + Toro
Rust
Cream
Red
Umber
Dark
34x34(13 1/2”x 13 1/2”)
J85542
J85539
J85541
J85543
J85540
34x34(13 1/2”x 13 1/2”)
J85547
J85544
J85546
J85548
J85545
SP SP
Battiscopa
8x33,3(3 1/4”x 13”)
J85552
J85549
J85551
J85553
J85550
Elemento a L monolitico
15,5x30x4(6 ”x 12”x1 3/4”)
J85855
J85852
J85854
J85856
J85853
Elemento a L incollato
17x34x5(7 ”x 13 1/2”x2”)
J85740
J85737
J85739
J85741
J85738
FORMATO - SIZE - FORMATFORMAT - FORMATO - ФОРМАТ
SPESS.THICKN.
PZ/BOXM2/BOXML/BOX
KG/M2 BOX/PALLET
M2/PALLETML/PALLET
KG/PALLET
EURO< 1 PALLET
EURO≥1 PALLET
34x34 (13 1/2”x13 1/2”) o8,5 mm 11 1,27 16,1 48 60,96 982 39,60 m2 33,00 m2
17x34 (7”x13 1/2”) o8,5 mm 23 1,35 16,1 48 64,8 1043,3 39,60 m2 33,00 m2
Battiscopa 8x33,3 (3 1/4”x13”) 27 9 66 594 742,50 4,00 ml/m
Elemento a L inc. 17x34x5 (7”x13 1/2”x2”) 8 14,40 pz/pce
Elemento a L mon. 15,5x30x4 (6”x12”x1 3/4”) 8 16,40 pz/pce
Gradino+Toro 34x34 (13 1/2”x13 1/2”) 6 31,30 pz/pce
Angolo+Toro 34x34 (13 1/2”x13 1/2”) 2 60,20 pz/pce
Contributo spese imballo € 10,00/pal (netto). - Packing charges € 10,00/pal (net)
J859996x25 (2 1/3”x10”)
FIRMA RED
SPSP
4x17x6 (1 3/4”x7”x 2 1/3”)
J85962
J85959
J85961
J85963
J85960
Angolo monolitico
FORMATO - SIZE - FORMATFORMAT - FORMATO - ФОРМАТ
SPESS.THICKN.
PZ/BOXM2/BOX
COMPRESA FUGA DI 1 CM1 CM JOINT INCLUDED
KG/M2 BOX/PALLET
M2/PALLET
KG/PALLET
EURO< 1 PALLET
EURO≥1 PALLET
6x25 (2 1/3”x10”) o10 mm 32 0,58 16,9 100 58 980,2 64,90 m2 56,40 m2
Angolo incollato 12x25x6 (6”x10”x 2 1/3”) o10 mm 12 15,00 pz/pce
Angolo monolitico 4x17x6 (1 3/4”x7”x 2 1/3”) o10 mm 10 9,70 pz/pce
Firma 6x25 (2 1/3”x10”) o10 mm 3 11,70 pz/pce
PAVIMENTI COORDINATI - COORDINATED FLOORS
D’AUTRES ONT SUGGÉRÉ ÉTAGES EN COMBINAISON AVEC DE LA BRIQUETTE
ANDERE VORGESCHLAGENE BÖDEN IN KOMBINATION MIT ZIEGELSTEIN
РУГИЕ ПРЕДЛОЖИЛИ ПОЛЫ В СОЧЕТАНИИ С КИРПИЧОМ
ALTRI PAVIMENTI SUGGERITI IN ABBINAMENTO AL BRICK - FURTHER SUGGESTED FLOORS MATCHING BRICK
44 45
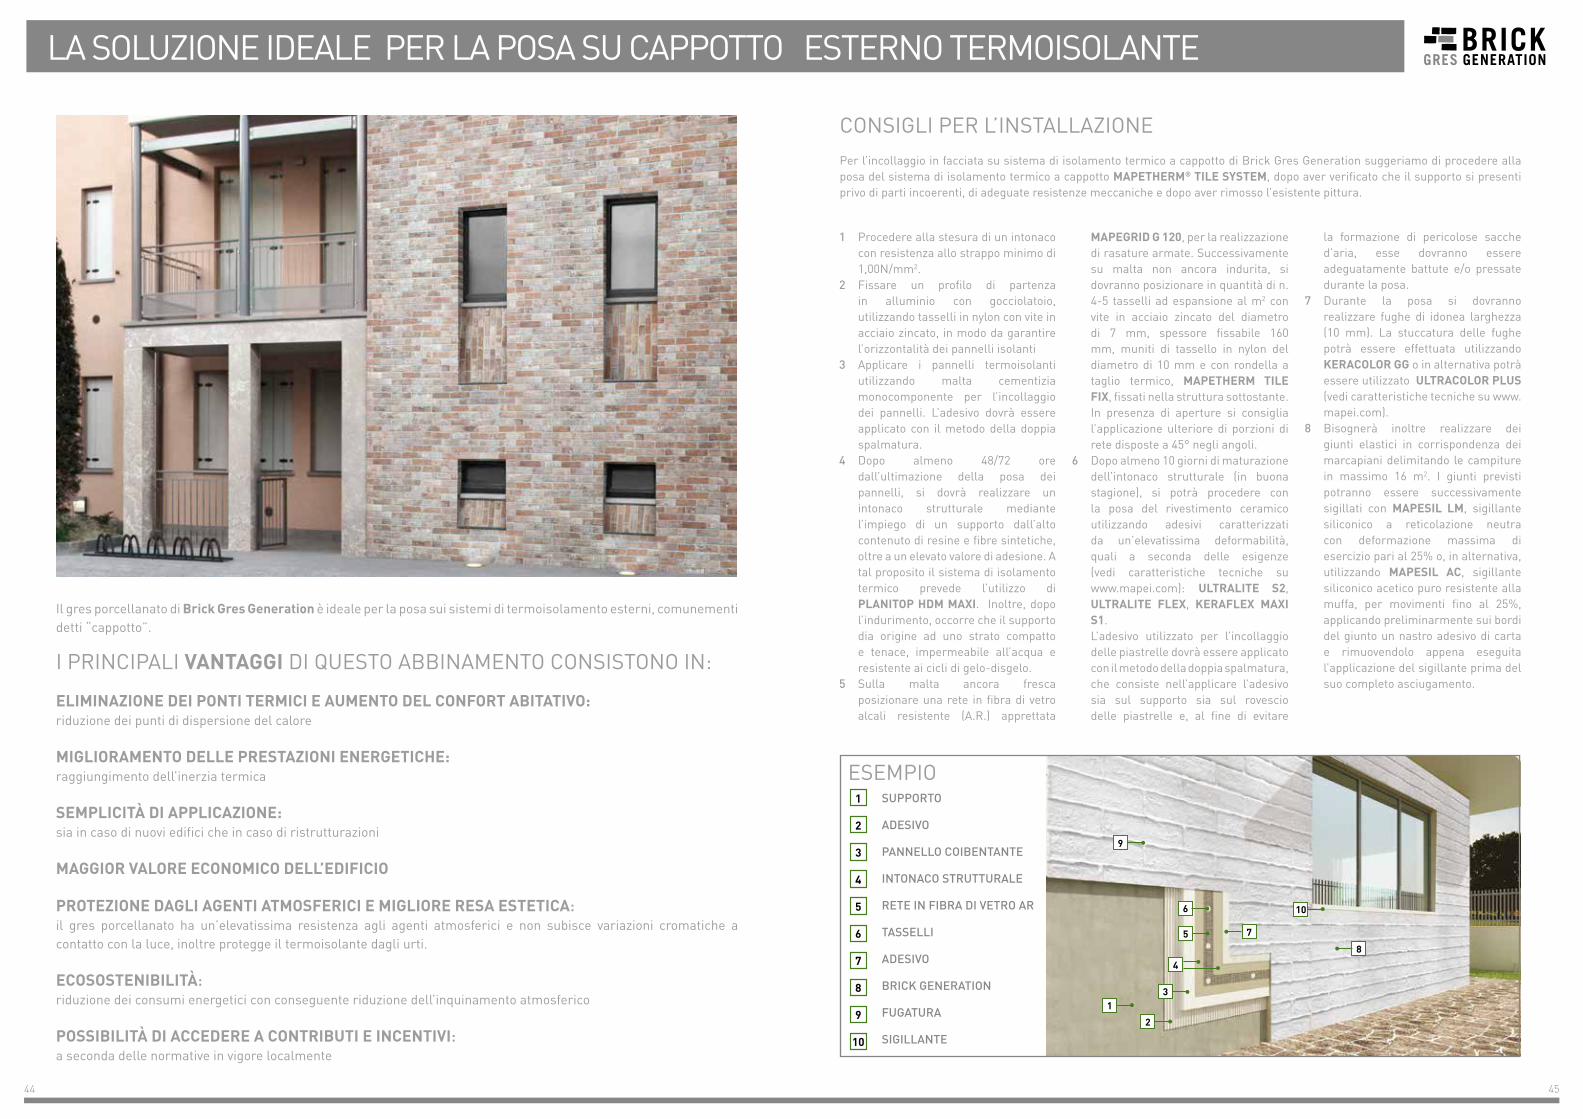
LA SOLUZIONE IDEALE PER LA POSA SU CAPPOTTO ESTERNO TERMOISOLANTE
Il gres porcellanato di Brick Gres Generation è ideale per la posa sui sistemi di termoisolamento esterni, comunementi detti “cappotto”.
I PRINCIPALI VANTAGGI DI QUESTO ABBINAMENTO CONSISTONO IN:
ELIMINAZIONE DEI PONTI TERMICI E AUMENTO DEL CONFORT ABITATIVO: riduzione dei punti di dispersione del calore
MIGLIORAMENTO DELLE PRESTAZIONI ENERGETICHE: raggiungimento dell’inerzia termica
SEMPLICITÀ DI APPLICAZIONE: sia in caso di nuovi edifici che in caso di ristrutturazioni
MAGGIOR VALORE ECONOMICO DELL’EDIFICIO
PROTEZIONE DAGLI AGENTI ATMOSFERICI E MIGLIORE RESA ESTETICA: il gres porcellanato ha un’elevatissima resistenza agli agenti atmosferici e non subisce variazioni cromatiche a contatto con la luce, inoltre protegge il termoisolante dagli urti.
ECOSOSTENIBILITÀ: riduzione dei consumi energetici con conseguente riduzione dell’inquinamento atmosferico
POSSIBILITÀ DI ACCEDERE A CONTRIBUTI E INCENTIVI: a seconda delle normative in vigore localmente
1
2
3
4
5
6
7
9
10
1
2
3
8
4
5
6
7
8
9
10
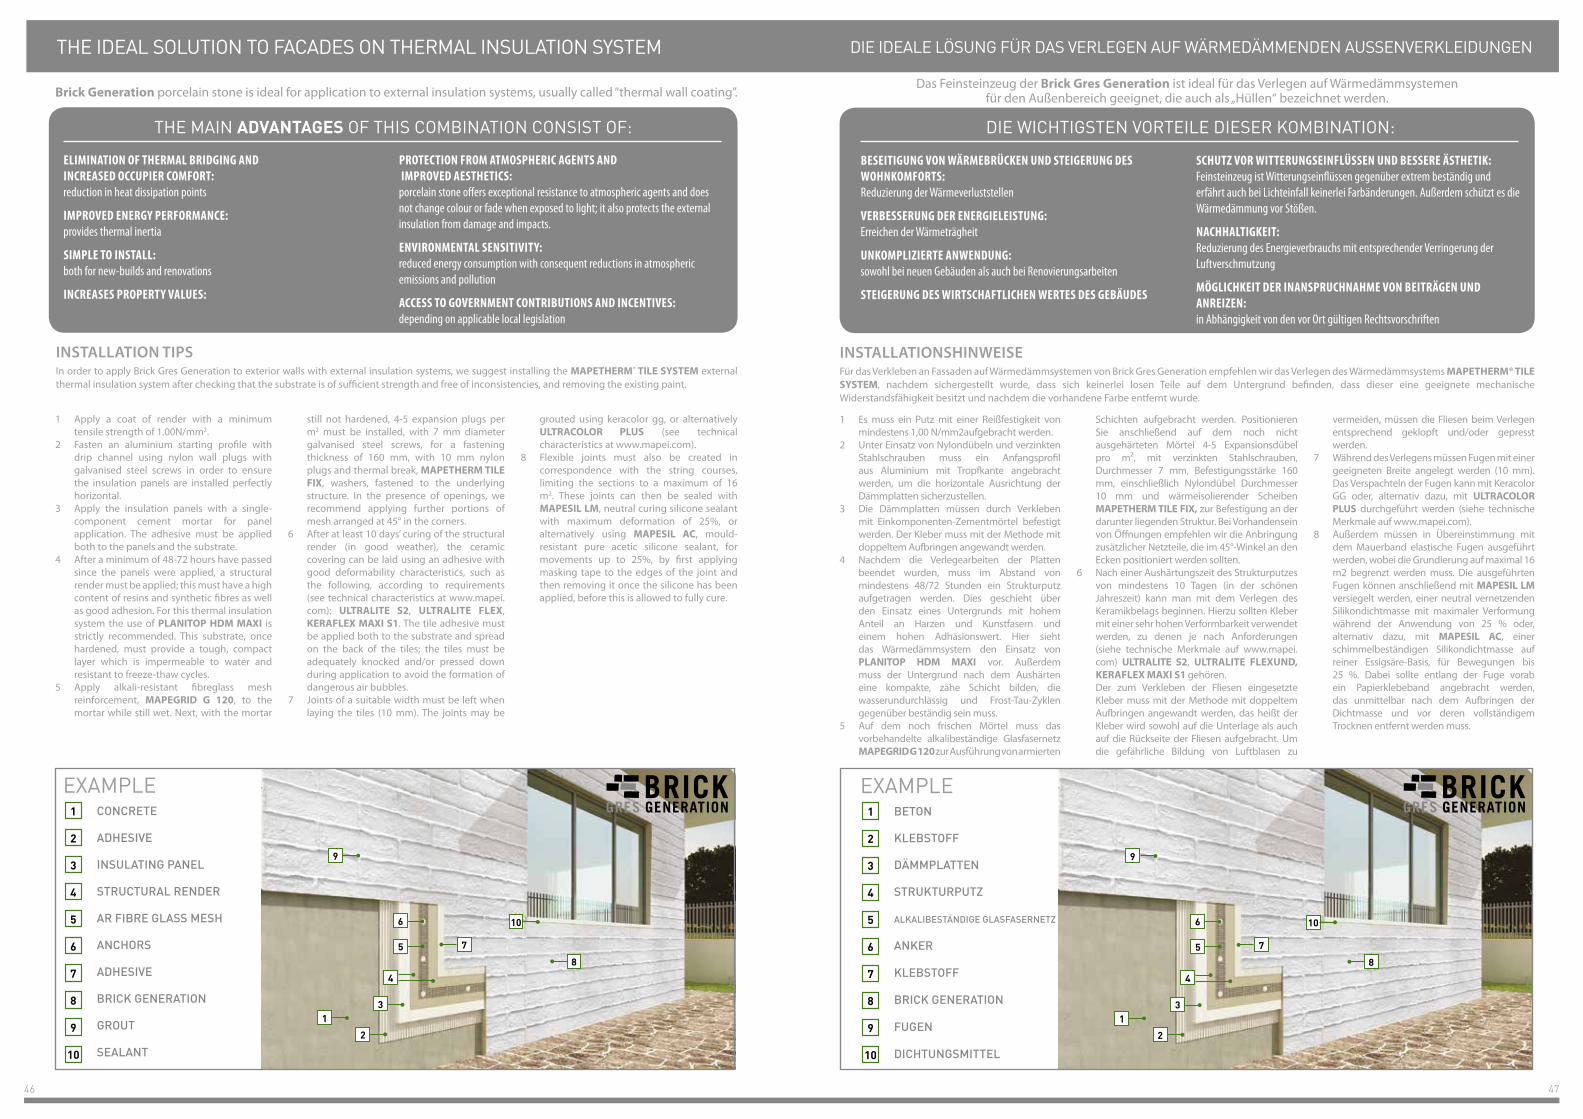
SUPPORTO
ADESIVO
PANNELLO COIBENTANTE
INTONACO STRUTTURALE
RETE IN FIBRA DI VETRO AR
TASSELLI
ADESIVO
BRICK GENERATION
FUGATURA
SIGILLANTE
1 Procedere alla stesura di un intonaco con resistenza allo strappo minimo di 1,00N/mm2.
2 Fissare un profilo di partenza in alluminio con gocciolatoio, utilizzando tasselli in nylon con vite in acciaio zincato, in modo da garantire l’orizzontalità dei pannelli isolanti
3 Applicare i pannelli termoisolanti utilizzando malta cementizia monocomponente per l’incollaggio dei pannelli. L’adesivo dovrà essere applicato con il metodo della doppia spalmatura.
4 Dopo almeno 48/72 ore dall’ultimazione della posa dei pannelli, si dovrà realizzare un intonaco strutturale mediante l’impiego di un supporto dall’alto contenuto di resine e fibre sintetiche, oltre a un elevato valore di adesione. A tal proposito il sistema di isolamento termico prevede l’utilizzo di PLANITOP HDM MAXI. Inoltre, dopo l’indurimento, occorre che il supporto dia origine ad uno strato compatto e tenace, impermeabile all’acqua e resistente ai cicli di gelo-disgelo.
5 Sulla malta ancora fresca posizionare una rete in fibra di vetro alcali resistente (A.R.) apprettata
MAPEGRID G 120, per la realizzazione di rasature armate. Successivamente su malta non ancora indurita, si dovranno posizionare in quantità di n. 4-5 tasselli ad espansione al m2 con vite in acciaio zincato del diametro di 7 mm, spessore fissabile 160 mm, muniti di tassello in nylon del diametro di 10 mm e con rondella a taglio termico, MAPETHERM TILE FIX, fissati nella struttura sottostante. In presenza di aperture si consiglia l’applicazione ulteriore di porzioni di rete disposte a 45° negli angoli.
6 Dopo almeno 10 giorni di maturazione dell’intonaco strutturale (in buona stagione), si potrà procedere con la posa del rivestimento ceramico utilizzando adesivi caratterizzati da un’elevatissima deformabilità, quali a seconda delle esigenze (vedi caratteristiche tecniche su www.mapei.com): ULTRALITE S2, ULTRALITE FLEX, KERAFLEX MAXI S1.
L’adesivo utilizzato per l’incollaggio delle piastrelle dovrà essere applicato con il metodo della doppia spalmatura, che consiste nell’applicare l’adesivo sia sul supporto sia sul rovescio delle piastrelle e, al fine di evitare
la formazione di pericolose sacche d’aria, esse dovranno essere adeguatamente battute e/o pressate durante la posa.
7 Durante la posa si dovranno realizzare fughe di idonea larghezza (10 mm). La stuccatura delle fughe potrà essere effettuata utilizzando KERACOLOR GG o in alternativa potrà essere utilizzato ULTRACOLOR PLUS (vedi caratteristiche tecniche su www.mapei.com).
8 Bisognerà inoltre realizzare dei giunti elastici in corrispondenza dei marcapiani delimitando le campiture in massimo 16 m2. I giunti previsti potranno essere successivamente sigillati con MAPESIL LM, sigillante siliconico a reticolazione neutra con deformazione massima di esercizio pari al 25% o, in alternativa, utilizzando MAPESIL AC, sigillante siliconico acetico puro resistente alla muffa, per movimenti fino al 25%, applicando preliminarmente sui bordi del giunto un nastro adesivo di carta e rimuovendolo appena eseguita l’applicazione del sigillante prima del suo completo asciugamento.
CONSIGLI PER L’INSTALLAZIONEPer l’incollaggio in facciata su sistema di isolamento termico a cappotto di Brick Gres Generation suggeriamo di procedere alla posa del sistema di isolamento termico a cappotto MAPETHERM® TILE SYSTEM, dopo aver verificato che il supporto si presenti privo di parti incoerenti, di adeguate resistenze meccaniche e dopo aver rimosso l’esistente pittura.
ESEMPIO
46 47
Brick Generation porcelain stone is ideal for application to external insulation systems, usually called “thermal wall coating”.
1 Apply a coat of render with a minimum tensile strength of 1.00N/mm2.
2 Fasten an aluminium starting profile with drip channel using nylon wall plugs with galvanised steel screws in order to ensure the insulation panels are installed perfectly horizontal.
3 Apply the insulation panels with a single-component cement mortar for panel application. The adhesive must be applied both to the panels and the substrate.
4 After a minimum of 48-72 hours have passed since the panels were applied, a structural render must be applied; this must have a high content of resins and synthetic fibres as well as good adhesion. For this thermal insulation system the use of PLANITOP HDM MAXI is strictly recommended. This substrate, once hardened, must provide a tough, compact layer which is impermeable to water and resistant to freeze-thaw cycles.
5 Apply alkali-resistant fibreglass mesh reinforcement, MAPEGRID G 120, to the mortar while still wet. Next, with the mortar
still not hardened, 4-5 expansion plugs per m2 must be installed, with 7 mm diameter galvanised steel screws, for a fastening thickness of 160 mm, with 10 mm nylon plugs and thermal break, MAPETHERM TILE FIX, washers, fastened to the underlying structure. In the presence of openings, we recommend applying further portions of mesh arranged at 45° in the corners.
6 After at least 10 days’ curing of the structural render (in good weather), the ceramic covering can be laid using an adhesive with good deformability characteristics, such as the following, according to requirements (see technical characteristics at www.mapei.com): ULTRALITE S2, ULTRALITE FLEX, KERAFLEX MAXI S1. The tile adhesive must be applied both to the substrate and spread on the back of the tiles; the tiles must be adequately knocked and/or pressed down during application to avoid the formation of dangerous air bubbles.
7 Joints of a suitable width must be left when laying the tiles (10 mm). The joints may be
grouted using keracolor gg, or alternatively ULTRACOLOR PLUS (see technical characteristics at www.mapei.com).
8 Flexible joints must also be created in correspondence with the string courses, limiting the sections to a maximum of 16 m2. These joints can then be sealed with MAPESIL LM, neutral curing silicone sealant with maximum deformation of 25%, or alternatively using MAPESIL AC, mould-resistant pure acetic silicone sealant, for movements up to 25%, by first applying masking tape to the edges of the joint and then removing it once the silicone has been applied, before this is allowed to fully cure.
INSTALLATION TIPSIn order to apply Brick Gres Generation to exterior walls with external insulation systems, we suggest installing the MAPETHERM® TILE SYSTEM external thermal insulation system after checking that the substrate is of sufficient strength and free of inconsistencies, and removing the existing paint.
ELIMINATION OF THERMAL BRIDGING AND INCREASED OCCUPIER COMFORT:reduction in heat dissipation points
IMPROVED ENERGY PERFORMANCE:provides thermal inertia
SIMPLE TO INSTALL: both for new-builds and renovations
INCREASES PROPERTY VALUES:
PROTECTION FROM ATMOSPHERIC AGENTS AND IMPROVED AESTHETICS:porcelain stone offers exceptional resistance to atmospheric agents and does not change colour or fade when exposed to light; it also protects the external insulation from damage and impacts.
ENVIRONMENTAL SENSITIVITY: reduced energy consumption with consequent reductions in atmospheric emissions and pollution
ACCESS TO GOVERNMENT CONTRIBUTIONS AND INCENTIVES: depending on applicable local legislation
THE MAIN ADVANTAGES OF THIS COMBINATION CONSIST OF:
1
2
3
4
5
6
7
9
10
1
2
3
8
4
5
6
7
8
9
10
CONCRETE
ADHESIVE
INSULATING PANEL
STRUCTURAL RENDER
AR FIBRE GLASS MESH
ANCHORS
ADHESIVE
BRICK GENERATION
GROUT
SEALANT
EXAMPLE
THE IDEAL SOLUTION TO FACADES ON THERMAL INSULATION SYSTEM
Das Feinsteinzeug der Brick Gres Generation ist ideal für das Verlegen auf Wärmedämmsystemen für den Außenbereich geeignet, die auch als „Hüllen“ bezeichnet werden.
1 Es muss ein Putz mit einer Reißfestigkeit von mindestens 1,00 N/mm2aufgebracht werden.
2 Unter Einsatz von Nylondübeln und verzinkten Stahlschrauben muss ein Anfangsprofil aus Aluminium mit Tropfkante angebracht werden, um die horizontale Ausrichtung der Dämmplatten sicherzustellen.
3 Die Dämmplatten müssen durch Verkleben mit Einkomponenten-Zementmörtel befestigt werden. Der Kleber muss mit der Methode mit doppeltem Aufbringen angewandt werden.
4 Nachdem die Verlegearbeiten der Platten beendet wurden, muss im Abstand von mindestens 48/72 Stunden ein Strukturputz aufgetragen werden. Dies geschieht über den Einsatz eines Untergrunds mit hohem Anteil an Harzen und Kunstfasern und einem hohen Adhäsionswert. Hier sieht das Wärmedämmsystem den Einsatz von PLANITOP HDM MAXI vor. Außerdem muss der Untergrund nach dem Aushärten eine kompakte, zähe Schicht bilden, die wasserundurchlässig und Frost-Tau-Zyklen gegenüber beständig sein muss.
5 Auf dem noch frischen Mörtel muss das vorbehandelte alkalibeständige Glasfasernetz MAPEGRID G 120 zur Ausführung von armierten
Schichten aufgebracht werden. Positionieren Sie anschließend auf dem noch nicht ausgehärteten Mörtel 4-5 Expansionsdübel pro m², mit verzinkten Stahlschrauben, Durchmesser 7 mm, Befestigungsstärke 160 mm, einschließlich Nylondübel Durchmesser 10 mm und wärmeisolierender Scheiben MAPETHERM TILE FIX, zur Befestigung an der darunter liegenden Struktur. Bei Vorhandensein von Öffnungen empfehlen wir die Anbringung zusätzlicher Netzteile, die im 45°-Winkel an den Ecken positioniert werden sollten.
6 Nach einer Aushärtungszeit des Strukturputzes von mindestens 10 Tagen (in der schönen Jahreszeit) kann man mit dem Verlegen des Keramikbelags beginnen. Hierzu sollten Kleber mit einer sehr hohen Verformbarkeit verwendet werden, zu denen je nach Anforderungen (siehe technische Merkmale auf www.mapei.com) ULTRALITE S2, ULTRALITE FLEXUND, KERAFLEX MAXI S1 gehören.
Der zum Verkleben der Fliesen eingesetzte Kleber muss mit der Methode mit doppeltem Aufbringen angewandt werden, das heißt der Kleber wird sowohl auf die Unterlage als auch auf die Rückseite der Fliesen aufgebracht. Um die gefährliche Bildung von Luftblasen zu
vermeiden, müssen die Fliesen beim Verlegen entsprechend geklopft und/oder gepresst werden.
7 Während des Verlegens müssen Fugen mit einer geeigneten Breite angelegt werden (10 mm). Das Verspachteln der Fugen kann mit Keracolor GG oder, alternativ dazu, mit ULTRACOLOR PLUS durchgeführt werden (siehe technische Merkmale auf www.mapei.com).
8 Außerdem müssen in Übereinstimmung mit dem Mauerband elastische Fugen ausgeführt werden, wobei die Grundierung auf maximal 16 m2 begrenzt werden muss. Die ausgeführten Fugen können anschließend mit MAPESIL LM versiegelt werden, einer neutral vernetzenden Silikondichtmasse mit maximaler Verformung während der Anwendung von 25 % oder, alternativ dazu, mit MAPESIL AC, einer schimmelbeständigen Silikondichtmasse auf reiner Essigsäre-Basis, für Bewegungen bis 25 %. Dabei sollte entlang der Fuge vorab ein Papierklebeband angebracht werden, das unmittelbar nach dem Aufbringen der Dichtmasse und vor deren vollständigem Trocknen entfernt werden muss.
INSTALLATIONSHINWEISEFür das Verkleben an Fassaden auf Wärmedämmsystemen von Brick Gres Generation empfehlen wir das Verlegen des Wärmedämmsystems MAPETHERM® TILE SYSTEM, nachdem sichergestellt wurde, dass sich keinerlei losen Teile auf dem Untergrund befinden, dass dieser eine geeignete mechanische Widerstandsfähigkeit besitzt und nachdem die vorhandene Farbe entfernt wurde.
BESEITIGUNG VON WÄRMEBRÜCKEN UND STEIGERUNG DES WOHNKOMFORTS:Reduzierung der Wärmeverluststellen
VERBESSERUNG DER ENERGIELEISTUNG:Erreichen der Wärmeträgheit
UNKOMPLIZIERTE ANWENDUNG: sowohl bei neuen Gebäuden als auch bei Renovierungsarbeiten
STEIGERUNG DES WIRTSCHAFTLICHEN WERTES DES GEBÄUDES
SCHUTZ VOR WITTERUNGSEINFLÜSSEN UND BESSERE ÄSTHETIK:Feinsteinzeug ist Witterungseinflüssen gegenüber extrem beständig und erfährt auch bei Lichteinfall keinerlei Farbänderungen. Außerdem schützt es die Wärmedämmung vor Stößen.
NACHHALTIGKEIT: Reduzierung des Energieverbrauchs mit entsprechender Verringerung der Luftverschmutzung
MÖGLICHKEIT DER INANSPRUCHNAHME VON BEITRÄGEN UND ANREIZEN: in Abhängigkeit von den vor Ort gültigen Rechtsvorschriften
DIE WICHTIGSTEN VORTEILE DIESER KOMBINATION:
1
2
3
4
5
6
7
9
10
1
2
3
8
4
5
6
7
8
9
10
BETON
KLEBSTOFF
DÄMMPLATTEN
STRUKTURPUTZ
ALKALIBESTÄNDIGE GLASFASERNETZ
ANKER
KLEBSTOFF
BRICK GENERATION
FUGEN
DICHTUNGSMITTEL
EXAMPLE
DIE IDEALE LÖSUNG FÜR DAS VERLEGEN AUF WÄRMEDÄMMENDEN AUSSENVERKLEIDUNGEN
48 49
Piastrelle indicate per pavimenti Tiles specifically used for floors Carreaux pour carrelages de solBodenfliesen Плитка, предназначенная для облицовки пола
Piastrelle indicate per rivestimenti interni Tiles specifically used for wall coverings Carreaux pour faïencesWandfliesen für den InnenbereichПлитка, предназначенная для облицовки внутренних стен
Piastrelle indicate per abitazioni residenzialiTiles for dwelling housesCarreaux pour habitations résidentiellesFliesen für den WohnbereichПлитка, предназначенная для жилых помещений
Piastrelle indicate per luoghi pubblici a traffico leggeroTiles suitable for low traffic public and commercial areasCarreaux recommandés pour lieux publics et commerciaux à piétinement légerFür Bodenbeläge in Bereichten mit gewöhnlicher Begehungsfrequenz und Schleifschmutz Oбщественные и коммерческие площади с низкой интенсивностью движения
Resistenza allo scivolamento Slip resistanceRésistance au glissement Rutschfestigkeit Сопотивление сколвженю
Resistenza al geloFrost resistanceRésistance au gelFrostwiderstandsfähigkeitМорозостойкость
R
Facilità di rimozione dello sporcoEasy dirt removalFacilité d’élimination de la saletéLeichte Entfernung des SchmutzesЛегкое удаление грязи
CONSIGLI DI POSA E PULIZIA PER I PRODOTTI DI CERAMICA RONDINE
PremessaLa norma UNI EN 14411 - “Piastrelle di ceramica - definizione, classificazione, caratteristiche e marcatura” - si propone di definire e fornire i termini, i requisiti ed i criteri di contrassegno per le piastrelle di ceramica di Prima scelta. Rondine S.p.A. sulle proprie piastrelle esegue costantemente tutti i test previsti dalla norma succitata, avvalendosi di laboratori accreditati. Vengono, inoltre, attuate costantemente procedure interne per il controllo della qualità del prodotto.
PosaIl posatore sul cantiere prima della posa deve verificare il tono, il calibro, la scelta del materiale, mentre durante la posa deve prelevare sempre il materiale attingendo da più scatole per ottenere un mix cromatico ideale. Deve, altresì, verificare la congruità del prodotto anche per eventuali difetti già evidenti prima della posa, per i quali sono escluse le garanzie qualora la segnalazione avvenisse dopo la posa.Il posatore deve utilizzare i collanti idonei per le varie destinazioni d’uso e seguire le indicazioni del produttore riportate sulle confezioni. Deve verificare attentamente che il sottofondo sia stabile, asciutto e maturo, non gelato e non eccessivamente caldo. Deve effettuare la spalmatura del collante a regola d’arte affinché non si creino vuoti tra piastrella e sottofondo.Il posatore, in modo particolare per i prodotti con superfici levigate, satinate o lappate, deve stare attento a non segnare il materiale sulla superficie di utilizzo con matite (grafite) o pennarelli indelebili. Per realizzare i tagli e le sagomature richieste dalla Direzione dei Lavori, deve utilizzare appositi dischi diamantati e attrezzature specifiche, in particolar modo per il gres porcellanato.La dimensione della fuga tra le piastrelle può variare in funzione del formato che si utilizza, dell’angolazione della posa in ortogonale o in diagonale, e della destinazione d’uso. Si consiglia una fuga minima di 3 mm. pera i prodotti non rettificati e una fuga minima di 2 mm. per i prodotti rettificati. Negli ambienti di grande dimensione è necessario posizionare dei giunti di dilatazione con regolarità, mentre, per i piccoli ambienti è sufficiente lasciare un leggero stacco fra piastrellato e muri perimetrali, coperto poi dal battiscopa.
Stuccatura e pulizia dopo posaL’utilizzo di malte o riempitivi colorati con pigmenti deve essere fatto dopo aver eseguito una prova preliminare.Per le superfici levigate, satinate o lappate del gres porcellanato, a causa della microporosità provocata dall’azione abrasiva delle mole durante il processo di lavorazione, non si possono usare malte o riempitivi colorati a contrasto (piastrelle bianche e stuccatura antracite, rossa...).Con l’utilizzo di stucchi cementizi dopo la stuccatura delle piastrelle, a stucco ancora fresco, è necessario rimuovere immediatamente, in modo accurato con spugna e abbondante acqua lo stucco in eccesso. Alcuni giorni dopo la posa, eseguire la pulizia di fondo mediante l’utilizzo di acidi tamponati al fine di sciogliere ed asportare completamente tutti i residui di cantiere.
Piastrelle particolarmente indicate per l’esternoTiles especially suitable for outodoor applications Carreaux particuliérment indiqués pour application à l’extérieur Besonders für Aussenbereiche geeignete FliesenПлитка особо подходит для наружной облицовки
Piastrella con leggera variazione di tono e grafica Tiles with slight shade and aspect variation - Carreaux avec faible différence de nuance et structure - Fliesen mit leicht unterschiedlichen Tonalitäten und Muster - Плитка с легким изменением оттенка и рисунка
Piastrella con discreta variazione di tono e grafica Tiles with moderate shade and aspect variation - Carreaux avec moderate différence de nuance et structure - Fliesen mit gemäßigt unterschiedlichen Tonalitäten und Muster - Плитка с умеренным изменением оттенка и рисунка
Piastrella con notevole variazione di tono e grafica Tiles with random shade and aspect variation - Carreaux avec différence aléatoire de nuance et structure - Fliesen mit züfallig unterschiedlichen Tonalitäten und Muster - Плитка с произвольным изменением оттенка и рисунка
V2
V4
V3
Piastrella uniformeTiles with uniform appearance - Carreaux avec une apparence uniforme - Fliesen mit einheitliche Erscheinungsbild - Плитка с однородного вида
V1
LAYING AND CLEANING RECOMMENDATIONS FOR CERAMICA RONDINE PRODUCTS
IntroductionStandard UNI EN 14411 – Ceramic tiles: Definition, Classification, Characteristics and Marking, defines and provides the marking terms, requirements and criteria for high quality ceramic tiles.Rondine S.p.A. continually tests all its tiles in accredited workshops, in accordance with the aforementioned standard. Moreover, internal quality control procedures are implemented on an ongoing basis.
LayingBefore laying at the site, the tiler should check the shade, size, and choice of material, whereas when laying the tiler should always use tiles from several boxes to obtain the ideal colour mix. The tiler should also check the product for any obvious flaws before laying, which would not be covered by the guarantee if pointed out after laying.The tiler should use adhesives which are suitable for the various types of use, and follow the instructions on the packaging. The surface to be tiled should be checked to ensure it is stable, dry and ready for tiling, and is not excessively hot or cold. The adhesive should be applied professionally such that there are no gaps between the tile and the surface.The tiler should be careful not to mark the material on the outer surface with pencils (graphite) or permanent markers, especially on products with smooth, glazed or lapped surfaces. Appropriate diamond tile cutters and special equipment should be used for the cutting and outlining operations requested by the Works Manager, especially with porcelain stoneware. The dimension of the tile joint may vary depending on the format used, orthogonal or diagonal laying angles, and final use. A minimum tile joint of 3 mm is recommended for non-rectified products and a minimum joint of 2 mm for rectified products. In large rooms expansion joints must be positioned with regularity, whereas in small rooms it is sufficient to leave a slight gap between the tiles and perimeter walls, which are then covered with skirting.
Grouting and cleaning after layingFillers or mortar coloured with pigments should only be used after carrying out an initial test. For porcelain stoneware surfaces which are smooth, glazed or lapped, mortar or fillers which are contrast coloured (white tiles and anthracyte, red grouting etc.) cannot be used due to the microporosity caused by the abrasive action of the cutter during processing.With the use of cement surfacers after grouting the tiles, with the grout still fresh, any excess grout should be removed immediately with a sponge and plenty water. A few days after laying, clean thoroughly with buffered acids to completely remove and dissolve any residue. It is also important to rinse well until the wash water runs clean. Liquid extractors are useful for removing dirty wash water, which avoids moving it from one place to another. When work has been completed the tiler should wash the floors with a water and buffered acid solution, to avoid the insufficient or late removal of grout residue leaving marks which may be difficult to remove.Rondine recommends FILA Deterdek for this operation (follow the recommendations on the container for dilution percentages closely), which is an acid descaling agent that does not give off harmful fumes and combines the descaling action with effective cleaning.For special areas of application, if waterproof grouting is required, epoxy mortar can be used. Follow the manufacturer’s instructions on the packaging exactly and adhere to the procedures for use. When using these products, always consult expert, qualified tilers, as the incorrect application of epoxy mortars could irreversibly compromise the colour and appearance of the tiles.The use of detergents (anti-corrosive products) which contain hydrofluoric acid could permanently damage the surface of any type of tile. It should be noted that more than 90% of the problems which arise on site are due to incorrect, or even non-existent, washing after laying. Appropriate washing after laying removes laying residue (mortar, adhesive, various types of dirt from the work site) and any remaining surface dirt.
Standard maintenanceFor floors with smooth surfaces we recommend cleaning daily with Fila Cleaner (adhere to the recommended dilution percentages on the container), and treat regularly with an anti-stain treatment to protect the tiles from damage caused by markers, ink, rust or other damaging products. We recommend the use of FILA products for the standard maintenance of Rondine tiles. For further information on these products visit www.filachim.com.
PréambuleLa norme UNI EN 14411 - « Carreaux de céramique - définition, classification, caractéristiques et marquages » – entend définir et fournir les termes, les standards et les critères spécifiques aux carreaux de céramique de Premier choix.Sur les carreaux qu’elle produit, la société Rondine S.p.A. effectue systématiquement tous les tests prévus par la norme susmentionnée, en faisant appel à cet effet à des laboratoires accrédités. Par ailleurs, sont constamment mises en oeuvre des procédures internes pour le contrôle de la qualité du produit.
PoseSur le chantier, avant la pose, le poseur doit contrôler la teinte, le calibre, le choix du matériau et durant la pose, il doit toujours prélever les carreaux dans plusieurs boîtes à la fois pour obtenir un mix chromatique idéal. Il doit par ailleurs s’assurer de la conformité du produit, entre autres au regard d’éventuels défauts visibles avant la pose, pour lesquels toute garantie est exclue dans le cas où la réclamation serait présentée après la pose.Le poseur doit utiliser les colles appropriées en fonction du type d’utilisation prévu et doit suivre les recommandations du fabricant indiquées sur les emballages. Il doit effectuer un soigneux contrôle pour s’assurer que le support est stable et sec, non gelé et non excessivement chaud. Il doit étaler la colle dans les règles de l’art de façon à éviter la formation de vides entre le carreau et le support. En particulier pour les produits polis, satinés et adoucis, le poseur doit veiller à ne pas marquer le matériau sur la surface supérieure avec un crayon de papier (graphite) ou des feutres indélébiles. Pour réaliser les coupes et les profilages requis par la Direction des travaux, il doit utiliser des disques diamantés et des équipements spécifiques, en particulier pour le grès cérame.La largeur des joints entre les carreaux peut varier en fonction du format utilisé, de l’angle de pose (orthogonal ou diagonal) et de l’utilisation prévue. Il est recommandé de réaliser un joint d’au moins 3 mm pour les produits non rectifiés et d’au moins 2 mm pour les produits rectifiés.Dans les espaces de grandes dimensions, il est nécessaire de positionner des joints de dilatation avec régularité, alors que pour les espaces de petites dimensions, il suffit de maintenir un léger espace entre la surface carrelée et les murs de pourtour, qui sera ensuite recouvert par la plinthe.
CONSEILS DE POSE ET DE NETTOYAGE POUR LES PRODUITS DE CERAMICA RONDINE
Altrettanto importante è risciacquare bene fin quando l’acqua di lavaggio risulti essere limpida. Utile è l’utilizzo di aspiratori per liquidi, con lo scopo di rimuovere l’acqua sporca di lavaggio, evitando di spostarla da una parte all’altra. Anche a fine cantiere il posatore deve lavare i pavimenti con soluzioni di acqua e acido tamponato per evitare che la rimozione inadeguata o tardiva dei residui della stuccatura utilizzata per le fughe, lasci aloni difficili da rimuovere.Per questa operazione Rondine propone Deterdek di FILA (attenersi rigorosamente alle percentuali di diluizione consigliate sul flacone), disincrostante acido che non sviluppa fumi nocivi e unisce all’azione disincrostante anche un’efficace azione pulente. Per particolari campi di applicazione, qualora si desideri ottenere una stuccatura impermeabile è possibile procedere con l’utilizzo di una malta epossidica. Seguire le precise indicazioni del produttore riportate sulle confezioni e attenersi rigorosamente alle modalità d’uso. Per l’impiego di tali prodotti, rivolgersi sempre a posatori esperti con alta professionalità poiché, la non corretta applicazione di stucchi epossidici, comprometterebbe in modo irreparabile l’aspetto estetico e cromatico delle piastrelle. Di recente FILA ha introdotto un innovativo pulitore per residui epossidici: FILACR10.L’utilizzo di prodotti detergenti (tipo antiruggine) che spesso contengono acido fluoridrico danneggerebbe definitivamente la superficie di qualsiasi tipo di piastrella.E’ bene sapere, inoltre, che oltre il 90% delle contestazioni in cantiere è dovuto a un cattivo, o addirittura inesistente, lavaggio dopo posa. Con un corretto lavaggio dopo posa si eliminano i residui di posa (malta, colla, vernice, sporco da cantiere di varia natura) e si rimuovono eventuali residui superficiali di sporco.
Manutenzione ordinariaPer i pavimenti con superficie levigata consigliamo di effettuare la pulizia giornaliera con il detergente neutro Fila Cleaner (attenersi rigorosamente alle percentuali di diluizione consigliate sul flacone) e di effettuare periodici trattamenti impregnanti antimacchia al fine di proteggerli da eventuali danni provocati da pennarelli, inchiostro, ruggine o altri prodotti ad altissima penetrabilità. Per quanto riguarda la manutenzione ordinaria delle nostre piastrelle, suggeriamo l’utilizzo dei prodotti di FILA. Per conoscerli consultare il sito www.filachim.com.
50 51
• Tutti i pezzi speciali e decori sono acquistabili solo a confezioni intere - All special trims and decors can be purchased as a whole - Achat des pieces speciales seulement par boites completes - Las piezas especiales y las decoraciones podrán adquirirse sólo en cajas enteras. - Formstuecke und Dekore werden nur in vollen Kartons geliefert - Все специальные элементы и декоры продаются только полными упаковками
SP
PRODUZIONE SPECIALE: QUESTI ARTICOLI NECESSITANO DI UNA QUANTITÀ MINIMA E SONO PRODOTTI IN 3/4 SETTIMANE.SPECIAL PRODUCTION: A MINIMUM QUANTITY IS REQUIRED FOR THE ORDER OF SPECIAL TRIMS ON REQUEST. PIECES WILL BE PRODUCED IN 3/4 WEEKS. PRODUCTION SPÉCIALE: LES PIÈCES SPÉCIALES SUR DEMANDE COMPORTENT UNE QUALITÉ MINIMUM OBLIGATOIRE. ELLES SONT PRODUITES DANS UN DÉLAI DE 3/4 SEMAINES.SONDERFERTIGUNG: DIE NACH WUNSCH GEFERTIGTEN FORMTEILE BENÖTIGEN EINE MINDESTQUALITÄT UND WERDEN IN 3-4 WOCHEN
ВступлениеСтандарт UNI EN 14411 “Керамическая плитка – определение, классификация, характеристики и маркировка» определяет и представляет условия, требования и критерии соответствия керамической плитки Первому сорту.Rondine S.p.A. постоянно проводит все предусмотренные вышеупомянутым стандартом испытания своей плитки в аккредитованных лабораториях. Кроме того, постоянно выполняются внутренние процедуры проверки качества продукта.
УкладкаПеред тем, как приступить к укладке, укладчик должен проверить оттенок, калибр и сорт материала. Во время укладки необходимо использовать материал вперемешку из разных коробок для получения идеального цветового сочетания. Укладчик должен также проверить продукт на соответствие и на предмет дефектов, наличие которых очевидно до начала укладки и на которые не распространяется гарантия в случае, если о них будет сообщено после укладки. Укладчик должен использовать клеящие составы, подходящие для различных видов применения, и следовать инструкциям производителя, приведенным на упаковке. Он должен убедиться в том, что подстилающий слой устойчивый, сухой и созревший, не заморожен и не перегрет. Укладчик должен наложить клей по всем правилам, так, чтобы между плиткой и подстилающим слоем не осталось пустот.При работе с продуктами, в особенности с полированной, полуматовой или полуполированной поверхностью, укладчик должен следить за тем, чтобы на лицевой поверхности материала не оставалось следов от карандашей (графита), или несмываемых фломастеров. Для обычной и фигурной резки (особенно для резки керамогранита), требуемой Управлением Работами, укладчик должен использовать специальные алмазные диски и оборудование. Размер швов между плитками может варьироваться в зависимости от формата, угла наклона укладки по ортогонали или по диагонали и от назначения. Рекомендуемый минимальный размер шва – 3 мм для неректифицированных продуктов и 2 мм для ректифицированных продуктов.В больших помещениях необходимо аккуратно установить крестообразные распорки, а в маленьких помещениях достаточно оставить небольшой зазор между облицованной поверхностью и периметральными стенами, который потом закрывается плинтусом.
Заделка швов и очистка после укладкиРастворы или цветные заполнители с пигментами должны применяться после проведения предварительного тестирования. Для полированных, полуматовых и полуполированных поверхностей в связи с микропористостью, вызванной абразивным действием шлифовальных кругов в процессеобработки, нельзя использовать контрастных растворов или цветных заполнителей (белая плитка и антрацитовая, красная и т.д. затирка).При использовании затирочных смесей на цементной основе после заделки межплиточных швов, пока затирка еще не потеряла пластичность, необходимо сразу тщательно удалить ее излишки с помощью губки и большого количества воды. Через несколько дней после укладки нужно произвести окончательную очистку с помощью кислотных средств буферного действия, чтобы растворить и полностью удалить все остатки загрязнений, образующихся во время укладки. Важно, чтобы поверхность была хорошо промыта: ее необходимо промывать до тех пор, пока вода не станет чистой. Для удаления грязной воды и во избежание ее перенесения с одного участка на другой можно также использовать пылесосы для сбора жидкостей. Также по завершении укладочных работ укладчик должен вымыть полы раствором воды и кислотных средств буферного действия, чтобы избежать возникновения плохо поддающихся удалению разводов, которые могут появиться в результате неправильного или запоздалого устранения остатков затирки, используемой для заделки швов.Для этой операции Rondine предлагает Deterdek производства FILA (необходимо строго придерживаться пропорций разведения, указанных на флаконе), кислотный очиститель, не выделяющий вредных паров и служащий как для удаления твердых отложений, так и для эффективной очистки.Для особых сфер применения, в случае, когда требуется получить водонепроницаемую затирку, можно использовать эпоксидный раствор. Необходимо точно следовать указаниям производителя, приведенным на упаковке, и строго соблюдать правила использования. Для применения таких продуктов нужно всегда обращаться к опытным высококвалифицированным укладчикам, поскольку неправильное нанесение эпоксиднойзатирки может необратимо испортить внешний вид и цветовую окраску плитки.Использование моющих средств (антикоррозионного типа), которые зачастую содержат фтористоводородную кислоту, приводит к разрушению поверхности плитки любых видов.Кроме того, следует помнить о том, что свыше 90% рекламаций связано с неправильным промыванием или даже с отсутствием такового после укладки. Во время промывания после укладки устраняются остатки строительных материалов (раствора, клея, лака, других загрязнений) и удаляются остатки грязи на поверхности.
Повседневный уходПолы с полированной поверхностью рекомендуется ежедневно очищать с использованием нейтрального моющего средства Fila Cleaner (необходимо строго придерживаться пропорций разведения, указанных на флаконе); кроме того, такие полы необходимо периодически обрабатывать пропиткой, защищающей от загрязнения фломастерами, чернилами, ржавчиной и других субстанций, обладающих высокой проникающей способностью. Для повседневного ухода за нашей плиткой мы рекомендуем использовать продукты FILA, характеристики которых представлены на сайте www.filachim.com.
РЕКОМЕНДАЦИИ ПО УКЛАДКЕ И ОЧИСТКЕ КЕРАМИЧЕСКИХ ПРОДУКТОВПРОИЗВОДСТВА CERAMICA RONDINE
VorwortDie Norm DIN EN 14411 – „Keramische Fliesen und Platten - Begriffe, Klassifizierung, Gütemerkmale und Kennzeichnung” – hat das Ziel, die Begriffe, Voraussetzungen und Kennzeichnungskriterien für keramische Fliesen erster Wahl festzulegen.Rondine S.p.A. führt an seinen Fliesen ständig alle von der oben genannten Norm vorgesehenen Prüfungen durch, wobei die Dienste zugelassener Prüflabors in Anspruch genommen werden. Ferner werden durchgehend alle internen Prozeduren zur Qualitätssicherung des Produkts angewandt.
VerlegenDer Fliesenleger muss auf der Baustelle vor dem Verlegen den Farbton, die Größe und die Wahl des Materials prüfen, während er das Material beim Verlegen immer abwechselnd mehreren Packungen entnehmen muss, um eine ideale Farbmischung zu erhalten. Der Fliesenleger muss ferner die Eignung des Produkts auch bezüglich eventueller bereits vor dem Verlegen sichtbarer Mängel prüfen, auf die nach dem Verlegen keine Garantie mehr geleistet wird.Der Fliesenleger muss einen für die verschiedenen Bestimmungszwecke geeigneten Kleber verwenden und die auf den Packungen angegebenen Gebrauchsanweisungen des jeweiligen Herstellers beachten. Er muss sorgfältig kontrollieren, dass der Untergrund stabil, trocken und verlegereif, nicht gefroren und nicht zu warm ist. Der Kleber ist kunstgerecht zu verteilen, damit sich keine Hohlräume zwischen Fliese und Untergrund bilden.Der Fliesenleger muss insbesondere bei Produkten mit polierter, satinierter oder geläppter Oberfläche darauf achten, das Material auf der nach oben weisenden Seite nicht mit einem Bleistift (Graphit) oder untilgbarer Tinte zu kennzeichnen. Bei der Realisierung der von der Bauleitung geforderten Zuschnitte und Formen sind spezielle Diamantscheiben und spezifische Werkzeuge zu verwenden. Das gilt insbesondere für emailliertes Steinzeug.Die Größe der Fugen zwischen den einzelnen Fliesen kann je nach verwendetem Format, Verlegewinkel (orthogonal oder diagonal) und Bestimmungszweck variieren. Für nicht rechtwinklig geschliffene Produkte wird eine Mindestfuge von 3 mm, für rechtwinklig geschliffene Produkte von 2 mm empfohlen.In großen Räumlichkeiten müssen in regelmäßigem Abstand Dehnungsfugen vorgesehen werden, während in kleinen Räumen ein kleiner Freiraum zwischen Fliesen und Wänden ausreicht, der dann durch die Fußleiste abgedeckt wird.
Ausfugen und Reinigen nach dem VerlegenVor dem Gebrauch von mit Pigmenten gefärbten Mörteln oder Füllstoffen sollte eine entsprechende Probe durchgeführt werden.Für polierte, satinierte oder geläppte Oberflächen emaillierten Steinzeugs können aufgrund der durch die Schleifwirkung der Schleifscheiben während des Bearbeitungsprozesses verursachten Mikroporosität keine kontrastgefärbten Mörtel oder Füllstoffe verwendet werden (weiße Fliesen und Ausfugmaterial in Anthrazit, Rot usw.).Beim Gebrauch von Zementmörteln nach dem Ausfugen der Fliesen ist es bei noch frischem Mörtel erforderlich, den überschüssigen Mörtel umgehend mit einem Schwamm und reichlich Wasser zu entfernen. Einige Tage nach dem Verlegen wird eine gründliche Reinigung mit gepufferten Säuren durchgeführt, um alle Rückstände zu lösen und vollständig zu entfernen.Ebenso wichtig ist ein gründliches Nachspülen, bis das Reinigungswasser klar ist. Nützlich ist die Anwendung von Flüssigkeitsabsaugern, um das schmutzige Reinigungswasser zu entfernen, ohne es über die Fliesen zu schieben.Auch nach Abschluss aller Bauarbeiten muss der Fliesenleger die Böden mit einer Lösung aus Wasser und gepufferter Säure waschen, um zu verhindern, dass ein unsachgemäßes oder zu spätes Entfernen der Rückstände des für die Fugen verwendeten Mörtels schwer zu entfernende Schleier hinterlässt.Für diese Reinigungsarbeiten empfiehlt Rondine das Produkt Deterdek von FILA (den vom Hersteller auf der Flasche angegebenen Verdünnungsgrad strikt beachten), einen sauren Kraftreiniger, der keine schädlichen Dämpfe bildet und gleichzeitig auch eine sehr gute Reinigungswirkung besitzt. Für besondere Anwendungen, wenn zum Beispiel eine wasserundurchlässige Ausfugung gewünscht wird, kann ein Epoxidmörtel verwendet werden. Die Gebrauchsanweisung des Herstellers auf den Packungen genau befolgen. Für den Gebrauch solcher Produkte sollte man sich immer an Fliesenleger mit großer Berufserfahrung wenden, denn die falsche Aufbringung von Epoxidmörteln führt zu einer irreparablen Beeinträchtigung der Ästhetik und der Farbe der Fliesen.Der Gebrauch von Reinigungsmitteln (des Typs Rostschutzmittel), die oft Fluorsäure enthalten, führt zu einer irreparablen Beschädigung der Oberfläche aller Fliesenarten. Ferner sollte man wissen, dass über 90% der Beanstandungen auf der Baustelle auf ein ungenügendes oder gar fehlendes Waschen nach den Verlegearbeiten zurückzuführen sind.Durch das korrekte Waschen nach dem Verlegen werden Verlegungsrückstände (Mörtel, Kleber, Lack, Baustellenschmutz unterschiedlicher Art) eliminiert und eventuelle oberflächliche Schmutzablagerungen entfernt.
Instandhaltung und PflegeFür Böden mit polierter Oberfläche empfehlen wir eine tägliche Reinigung mit dem neutralen Reiniger Fila Cleaner (den auf der Flasche angegebenen Verdünnungsgrad strikt beachten) und eine regelmäßige Behandlung mit Imprägniermitteln zum Schutz gegen Flecken und Verunreinigungen durch Stifte, Tinte, Rost oder anderen Stoffen mit hohem Penetrationsvermögen. Für die Instandhaltung und Pflege unserer Fliesen empfehlen wir die Produkte von FILA. Diese Produkte finden Sie auf der Internetseite www.filachim.it.
RATSCHLÄGE FÜR DAS VERLEGEN UND REINIGEN DES PRODUKTS VON CERAMICA RONDINE
Jointoiement et nettoyage après poseL’utilisation de mortiers ou de produits de jointoiement colorés à l’aide de pigments doit s’effectuer à l’issue d’un essai préliminaire.Pour les surfaces polies, satinées ou adoucies en grès cérame, en raison de la microporosité créée par l’action abrasive des meules durant le processus appliqué à la surface, il n’est pas possible d’utiliser des mortiers ni des produits de jointoiement colorés en contraste (carreau blanc et joint anthracite, rouge, etc.).En cas d’utilisation de produits à base de ciment, après le jointoiement des carreaux, alors que le produit à joint est encore frais, il est nécessaire de retirer immédiatement et soigneusement, à l’aide d’une éponge et de beaucoup d’eau, l’excès de produit de jointoiement. Quelques jours après la pose, nettoyer à fond la surface en utilisant des acides tamponnés afin de dissoudre et d’éliminer totalement les résidus de chantier.Il est tout aussi important de bien rincer jusqu’à ce que l’eau de lavage soit limpide. Il est utile d’utiliser un aspirateur à liquides pour éliminer l’eau sale de lavage, en évitant de la déplacer d’une partie à l’autre.En fin de chantier également, le poseur doit laver les sols à l’aide d’une solution d’eau et d’acide tamponné pour éviter que la mauvaise élimination ou l’élimination tardive des résidus de produits de jointoiement ne laisse des auréoles dont il est ensuite difficile de venir à bout.Pour cette opération, Rondine propose Deterdek de FILA (en veillant à respecter scrupuleusement les pourcentages de dilution recommandés sur le flacon), il s’agit d’un désincrustant acide qui ne dégage pas de fumées nocives et qui allie une action désincrustante à une action efficace de nettoyage. Pour certains champs d’application particuliers, dans le cas où l’on souhaiterait obtenir un jointoiement imperméable, il est possible de procéder à l’application d’un mortier époxy. Suivre les indications précises du fabricant figurant sur les emballages et veiller à respecter scrupuleusement les modalités d’utilisation. Pour l’utilisation de ces produits, veiller à toujours s’adresser à des poseurs hautement qualifiés dans la mesure où la mauvaise application de produits de jointoiement époxy peut compromettre l’aspect esthétique et chromatique des carreaux.
L’utilisation de produits détergents (de type antirouille) qui contiennent souvent de l‘acide fluorhydrique a pour effet d’endommager définitivement la surface de tout type de carreau. Il convient par ailleurs de ne pas oublier que plus de 90 % des réclamations sur chantier sont dues à un mauvais lavage après pose voire à un lavage non effectué. Un bon lavage après pose permet d’éliminer les résidus de pose (mortier, colle, peinture et saletés de chantier de différentes natures) de même que les éventuels résidus de saletés superficielles.
Entretien courantPour les sols à surface polie, il est recommandé d’effectuer le nettoyage quotidien à l’aide du détergent neutre Fila Cleaner (en veillant à respecter scrupuleusement les pourcentages de dilution recommandés sur le flacon) et d’effectuer à intervalles réguliers des traitements imprégnants antitaches afin de les protéger contre les éventuels dommages causés par des feutres, de l’encre, de la rouille ou d’autres produits hautement pénétrants. Pour l’entretien courant des carreaux Rondine, nous conseillons l’utilisation des produits FILA. Pour les connaître, consulter le site www.filachim.it.

Rondine s.p.a. - Via Emilia Ovest 53/A 42048 Rubiera (RE) - Italy+39 0522 625111 - www.ceramicarondine.it
CARATTERISTICHE TECNICHE_TECHNICAL FEAUTURES_CARACTÉRISTIQUES TÉCHNIQUESTECHNISCHE EIGENSCHAFTEN_CARACTERÍSTICAS TÉCNICAS_ íÖïçàóÖëäàÖ ïÄêÄäíÖêàëíàäà
CARATTERISTICA TECNICAPHISICAL PROPERTYCARACTERISTIQUE TECHNIQUETECHNISCHE DATENCARACTERÍSTICA TÉCNICAíÖïçàóÖëäÄü ïÄêÄäíÖêàëíàäÄ
NUMERO O METODO
DI MISURA
NORMS/NORM/
NORME/NORMAS/
çéêåõ
VALORE PRESCRITTO DELLA NORMAREQUIRED STANDARDS
VALEUR PRESCRIPTE PAR LES NORMESVALORES REQUERIDOS
NORMVORGABEáçÄóÖçàÖ, èêÖÑèàëÄççéÖ çéêåéâ
Resistenza alla flessioneBending StrengthRésistance à la flexionBiegefestigkeitResistencia a la flexiónè‰ÂÎ ÔÓ˜ÌÓÒÚË ÔË ËÁ„Ë·Â
UNI EN ISO 10545-4
N ≥ 27N / mm2
Resistenza al geloFrost resistanceRésistance au gelFrostwiderstandsfähigkeitResistencia a la heladaåÓÓÁÓÒÚÓÈÍÓÒÚ¸
UNI EN ISO 10545-14
Resistenza alle macchieStain resistantResistance aux tachesGegen flecken beständigResistencia a las manchasСтойкость к пятнам
Classe ≥ 3Class ≥ 3
Classe ≥ 3Klasse ≥ 3Clase ≥ 3Класс ≥ 3
Assorbimento d’acquaWater AbsorptionAbsorption d’eauWasseraufnhmeAbsorción de aguaÇÓ‰ÓÔÓ„ÎÓ˘ÂÌËÂ
UNI EN ISO 10545-3
≤ 0,5%
UNI EN ISO 10545-12
Nessun campione deve presentare rotture o alterazioni apprezzabili della superficie.No sample must show alterations to the surface
Les échantillons ne doivent pas présenter de ruptures ou d’altérations considérables de la surface.
Die Muster dürfen weder Bruch noch Schäden an der Oberfläche aufweisen.
Ninguna muestra debe presentar roturas o alteraciones apreciables de la superficieçË Ó‰ËÌ ËÁ Ó·‡ÁˆÓ‚ Ì ‰ÓÎÊÂÌ ËÏÂÚ¸ Ú¢ËÌ ËÎË ‰Û„Ëı Á‡ÏÂÚÌ˚ı ËÁÏÂÌÂÌËÈ
ÔÓ‚ÂıÌÓÒÚË
Resistenza allo scivolamento (coefficiente di attrito)Slip resistance(coefficient of friction)Résistance au glissement (coefficient de friction)Rutschfestigkeit (Reibungskoeffizient)Resistencia al deslizamiento(coeficiente de roce)ëÓÔÓÚË‚ÎÂÌË ÒÍÓθÊÂÌ˲ (ÍÓ˝ÙÙˈËÂÌÚ ÚÂÌËfl)
DIN 51130
ASTM-C1028
Attrito soddisfacenteSatisfactory frictionFriction satisfaisante
Befriedigende ReibungRoce satisfactorio
ì‰Ó‚ÎÂÚ‚ÓËÚÂθÌ˚È ÍÓ˝ÙÙˈËÂÌÚ ÚÂÌËfl
UNI EN ISO 10545-13
Resistenza a basse concentrazioni di acidi/alcaliResistenza ad alte concentrazioni di acidi/alcali
Resistenza ai prodotti chimici di uso domestico e agli additivi per piscinaResistance to low concentrations of alkalis and acids
Resistance to high concentrati ons of alkalis and acidsResistance to household chemical products and swimming pool additives
Résistance à de faibles concentrations d’acides et d’alcalis Résistance à de fortes concentrations d’acides et d’alcalis
Résistance aux produits chimiques à usage domestique et aux additifs pour piscineAlkali- u. Säurebeständigkeit für niedrige Konzentrationen
Alkali- u. Säurebeständigkeit für hohe KonzentrationenBeständigkeit gegen chemische Haushaltsprodukte und Zusatzstoffe für Schwimmbäder
Устойчивость к воздействию кислот и щелочей низкой концентрацииУстойчивость к воздействию кислот и щелочей высокой концентрации
Устойчивость к воздействию бытовых химикалий и добавок для бассейнов
Resistenza chimicaChemical strengthResistance chimiqueChemische beständigkeitResistencia al ataque químicoхимическая стойкость
UNI EN 101
Durezza di MohsHardness in Mohs degreesDureté de MohsMoh’sche HärteDureza de MohsTвердость по Моосу
≥ 5° Mohs
Le c
arat
teri
stic
he
tecn
ich
e in
dic
ate
nei
cat
alo
gh
i di l
inea
e n
el C
atal
og
o G
ener
ale,
e in
qu
alsi
asi d
ocu
men
to d
i pro
mo
zio
ne
com
mer
cial
e d
i Ro
nd
ine
s.p
.a.,
han
no
lo s
cop
o d
i dar
e u
n’in
dic
azio
ne
dei
val
ori
ris
con
trat
i nei
var
i lo
tti e
nel
le v
arei
to
nal
ità
del
pro
do
tto
, per
tan
to d
iffe
ren
ze r
isp
etto
a t
ali v
alo
ri in
dic
ativ
i no
n p
oss
on
o e
sser
e o
gg
etto
di c
on
test
azio
ne.
All
tech
nic
al f
eatu
res
stat
ed in
leafl
ets,
in m
aste
r b
roch
ure
an
d in
mer
chan
dis
ing
of
Ro
nd
ine
Spa
are
mea
nt
to b
e an
ind
icat
ion
of
an a
vera
ge
of
fig
ure
s re
cord
ed w
ith
in a
sp
an(d
eter
min
ed b
y in
tern
atio
nal
law
) in
sev
eral
p
rod
uct
ion
ru
ns
, th
eref
ore
a s
ligh
t d
iscr
epan
cy in
qu
alit
y fi
gu
res
of
a ce
rtai
n b
atch
in r
elat
ion
to
th
ese
fig
ure
s ca
nn
ot
be
con
sid
ered
a p
rod
uct
ion
fai
lure
.Le
s ca
ract
éris
tiq
ues
tec
hn
iqu
es m
enti
on
née
s d
ans
les
cata
log
ues
de
lign
e et
dan
s le
cat
alo
gu
e g
énér
al e
t d
ans
tou
s le
s d
ocu
men
ts d
e p
rom
oti
on
co
mm
erci
ale
de
Ro
nd
ine
SpA
on
t le
bu
t d
e fo
urn
ir u
ne
ind
icat
ion
s d
es v
aleu
rs
ren
con
trés
dan
s le
s d
iffé
ren
ts lo
ts e
t d
ans
les
dif
fére
nte
s to
nal
ités
du
pro
du
it e
t d
on
c le
s d
iffé
ren
ces
par
rap
po
rt à
ces
val
eurs
ind
icat
ives
ne
peu
ven
t p
as f
aire
l’o
bje
t d
es r
écla
mat
ion
s.
Resistenza all’abrasioneAbrasion resistanceResistance a la abrasionAbriebfestigkeitResistencia a la abrasiónìëíéâóàÇéëíú ä àëíàêÄçàû
Classificazione Interna
InternalClassification
System
Piastrelle smaltate - Classi di abrasione da I a VGlazed tiles - Abrasion class from I to VCx émaillés - Classe d’abrasion de I à VGlasierte Fliesen - Abriebklassen I bis V
Azulejos esmaltados - Clase de la abrasión desde I a V„·ÁÛÓ‚‡Ì̇fl ÔÎËÚ͇ - Í·ÒÒ ËÒÚˇÌËfl ÓÚ I ‰Ó V