
YA-P10 Pointer.book 1 ページ 2011年3月16日 水曜 …YA-P10_Pointer_02_e.book 7 ページ...
30
取扱説明書 本書は、お読みになった後も大切に保管してください。 日本語 User’s Guide Be sure to keep all user documentation handy for future reference. English Bedienungsanleitung Bitte bewahren Sie die gesamte Benutzerdokumentation für späteres Nachschlagen auf. Deutsch Mode d’emploi Conservez la documentation à portée de main pour toute référence future. Français Guía del usuario Asegúrese de tener a mano toda la documentación del usuario para futuras consultas. Español Guida dell’utilizzatore Conservare l’intera documentazione dell’utente a portata di mano per riferimenti futuri. Italiano Instruktionshäfte Förvara all användardokumentation nära till hands för framtida referens. Svenska Guia do Usuário Certifique-se de guardar toda a documentação do usuário à mão para futuras referências. Português JEGFSISwChKTrRPo Interactive Pointer YA-P10 Interactive Pointer YA-P10 Z
Transcript of YA-P10 Pointer.book 1 ページ 2011年3月16日 水曜 …YA-P10_Pointer_02_e.book 7 ページ...
取扱説明書本書は、お読みになった後も大切に保管してください。
日本語
User’s GuideBe sure to keep all user documentation handy for future reference. English
BedienungsanleitungBitte bewahren Sie die gesamte Benutzerdokumentation für späteres Nachschlagen auf. Deutsch
Mode d’emploiConservez la documentation à portée de main pour toute référence future. Français
Guía del usuarioAsegúrese de tener a mano toda la documentación del usuario para futuras consultas. Español
Guida dell’utilizzatoreConservare l’intera documentazione dell’utente a portata di mano per riferimenti futuri. Italiano
InstruktionshäfteFörvara all användardokumentation nära till hands för framtida referens. Svenska
Guia do UsuárioCertifique-se de guardar toda a documentação do usuário à mão para futuras referências. Português
JEGFSISwChKTrRPo
Interactive Pointer YA-P10Interactive Pointer YA-P10Z
YA-P10_Pointer.book 1 ページ 2011年3月16日 水曜日 午後5時19分

E-1
Safety Precautions . . . . . . . . . . . . . . . . . . . . . . . . . . . . . . . . . . . . . . . . . . . . . . . . . . . . . . . . . . . .E-3
Operating Precautions. . . . . . . . . . . . . . . . . . . . . . . . . . . . . . . . . . . . . . . . . . . . . . . . . . . . . . . . . .E-7
Unpacking . . . . . . . . . . . . . . . . . . . . . . . . . . . . . . . . . . . . . . . . . . . . . . . . . . . . . . . . . . . . . . . . . . .E-8
Using the CD-ROM . . . . . . . . . . . . . . . . . . . . . . . . . . . . . . . . . . . . . . . . . . . . . . . . . . . . . . . . . . . .E-9
General Guide . . . . . . . . . . . . . . . . . . . . . . . . . . . . . . . . . . . . . . . . . . . . . . . . . . . . . . . . . . . . . . .E-10
Setup . . . . . . . . . . . . . . . . . . . . . . . . . . . . . . . . . . . . . . . . . . . . . . . . . . . . . . . . . . . . . . . . . . . . . .E-11
Using the Pointer. . . . . . . . . . . . . . . . . . . . . . . . . . . . . . . . . . . . . . . . . . . . . . . . . . . . . . . . . . . . .E-15
Indicators. . . . . . . . . . . . . . . . . . . . . . . . . . . . . . . . . . . . . . . . . . . . . . . . . . . . . . . . . . . . . . . . . . .E-18
Troubleshooting . . . . . . . . . . . . . . . . . . . . . . . . . . . . . . . . . . . . . . . . . . . . . . . . . . . . . . . . . . . . .E-19
Disposing of a Pointer . . . . . . . . . . . . . . . . . . . . . . . . . . . . . . . . . . . . . . . . . . . . . . . . . . . . . . . . .E-21
Specifications . . . . . . . . . . . . . . . . . . . . . . . . . . . . . . . . . . . . . . . . . . . . . . . . . . . . . . . . . . . . . . .E-23
Contents
YA-P10_Pointer_02_e.book 1 ページ 2011年3月23日 水曜日 午後3時5分

E-2
The term “pointer” in this manual refers the YA-P10 interactive pointer.
The contents of this User’s Guide are subject to change without notice.Copying of this manual, either in part or its entirety, is forbidden. You are allowed to use this manual for your own personal use. Any other use is forbidden without the permission of CASIO COMPUTER CO., LTD.CASIO COMPUTER CO., LTD. shall not be held liable for any lost profits or claims from third parties arising out of the use of this product or this manual.CASIO COMPUTER CO., LTD. shall not be held liable for any loss or lost profits due to loss of data caused by malfunction or maintenance of this product, or any other reason.
YA-P10_Pointer_02_e.book 2 ページ 2011年3月23日 水曜日 午後3時5分

E-3
About safety symbolsVarious symbols are used in this User’s Guide and on the product itself to ensure safe use, and to protect you and others against the risk of injury and against material damage. The meaning of each of the symbols is explained below.
Icon Examples
Safety Precautions
*Warning This symbol indicates information that, if ignored or applied incorrectly, could possibly create the risk of death or serious personal injury.
*Caution This symbol indicates information that, if ignored or applied incorrectly, could possibly create the risk of personal injury or material damage.
’ A triangle indicates a situation against which you need to exercise caution. The example shown here indicates you should take precaution against electric shock.
!A circle with a line through it indicates information about an action that you should not perform. The specific action is indicated by the figure inside the circle. The example shown here means disassembly is prohibited.
$A black circle indicates information about an action that you must perform. The specific action is indicated by the figure inside the circle. The example shown here indicates you must unplug the power cord from the power outlet.
YA-P10_Pointer_02_e.book 3 ページ 2011年3月23日 水曜日 午後3時5分

E-4
Avoid water and other liquids.
Do not disassemble or modify the pointer in any way.
Do not dispose of the pointer by burning it.
Do not use or leave the pointer in any of the following locations.Doing so creates the risk of fire and electric shock.• Areas subject to large amounts of moisture or dust• In a kitchen or other areas exposed to oil smoke• Near a heater, on a heated carpet, or in an area exposed to direct sunlight• Other areas subjected to temperature extremes
Never leave the pointer in a bathroom or anywhere else there is the chance that it will become wet.
Warning
Never allow the pointer to become wet. Water and other liquids create the risk of fire and electric shock.
Never try to take the pointer apart or modify it in any way. Doing so creates the risk of electric shock, burn injury, personal injury, or operational malfunction. Disassembling or modifying the pointer can void its warranty or make it ineligible for servicing. Request all servicing and repair from your original retailer or the contact specified for repair.
Never try to dispose of the pointer by burning it. Doing so can cause an explosion, which creates the risk of fire and personal injury.
*
+
!
-
YA-P10_Pointer_02_e.book 4 ページ 2011年3月23日 水曜日 午後3時5分
E-5
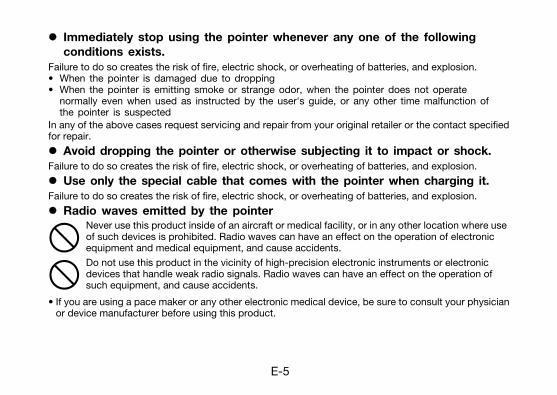
Immediately stop using the pointer whenever any one of the following conditions exists.
Failure to do so creates the risk of fire, electric shock, or overheating of batteries, and explosion.• When the pointer is damaged due to dropping• When the pointer is emitting smoke or strange odor, when the pointer does not operate
normally even when used as instructed by the user's guide, or any other time malfunction of the pointer is suspected
In any of the above cases request servicing and repair from your original retailer or the contact specified for repair.
Avoid dropping the pointer or otherwise subjecting it to impact or shock.Failure to do so creates the risk of fire, electric shock, or overheating of batteries, and explosion.
Use only the special cable that comes with the pointer when charging it.Failure to do so creates the risk of fire, electric shock, or overheating of batteries, and explosion.
Radio waves emitted by the pointer
• If you are using a pace maker or any other electronic medical device, be sure to consult your physician or device manufacturer before using this product.
Never use this product inside of an aircraft or medical facility, or in any other location where use of such devices is prohibited. Radio waves can have an effect on the operation of electronic equipment and medical equipment, and cause accidents.Do not use this product in the vicinity of high-precision electronic instruments or electronic devices that handle weak radio signals. Radio waves can have an effect on the operation of such equipment, and cause accidents.
--
YA-P10_Pointer_02_e.book 5 ページ 2011年3月23日 水曜日 午後3時5分

E-6
Be sure to follow all applicable local laws and regulations when disposing of the pointer.
Caution*
YA-P10_Pointer_02_e.book 6 ページ 2011年3月23日 水曜日 午後3時5分

E-7
Never use or store the pointer in the following locations. Doing so creates the risk of malfunction of and damage to the pointer.• Locations prone to electrostatic charge• Locations subjected to temperature extremes• Locations where there is extreme moisture• Locations subjected to sudden temperature changes• Locations where there is a lot of dust• Locations where there is the danger of getting wet
Do not use the pointer in environments subjected to temperature extremes. The pointer is designed for use within the temperatures of 5ºC to 35ºC (41ºF to 95ºF). Use outside of this temperature range creates the risk of malfunction of and damage to the pointer.When cleaning the pointer, wipe it with a soft, dry cloth. Any other type of cleaning method creates the risk of malfunction or breaking of the pointer.Use in Other CountriesThis product has been certified as complying with the wireless regulations in the country of purchase. Be sure to use it only in the country where you purchased it. Use of this product in another country may be illegal.
Operating Precautions
YA-P10_Pointer_02_e.book 7 ページ 2011年3月23日 水曜日 午後3時5分

E-8
StrapCD-ROMUser’s Guide (This Manual)Warranty
Unpacking
Pointer USB Cable (Type A to Type Mini B)
(For pointer charging)
USB Cable (Type A to Type B)
YA-P10_Pointer_02_e.book 8 ページ 2011年3月23日 水曜日 午後3時5分

E-9
The CD-ROM that comes with the pointer contains a Presentation Draw application that provides various projector presentation tools, and a PDF file version of its User’s Guide. Your computer will need to have Adobe® Reader® installed in order for you to view the PDF User’s Guide.The PDF User’s Guide also includes information about the minimum computer system requirements for Presentation Draw, and the procedure for installing it. Be sure to read the User’s Guide before installation.
To view the contents of a User’s Guide (PDF)1. Place the CD-ROM that comes with the pointer into your computer’s CD-ROM drive.
2. Perform either of the following operations.• If the CD-ROM menu screen appears:
• If the CD-ROM menu screen does not appear:
3. Double-click the User’s Guide file.
Using the CD-ROM
1 On the menu screen, click the [Open Folder] button to the right of “User’s Guide”.2 When the User’s Guide folder opens, open the folder that corresponds to the
language you want to use.
1 On your computer, navigate to the CD-ROM and then open it.2 Open the User’s Guide folder and then open the folder that corresponds to the
language you want to use.
YA-P10_Pointer_02_e.book 9 ページ 2011年3月23日 水曜日 午後3時5分

E-10
General Guide
RESET button
Strap holder
Charger connector (USB Type Mini B)
Link indicator (blue)
Left mouse button
Right mouse button
Battery indicator (red)
Pointer tip
Sensor
YA-P10_Pointer_02_e.book 10 ページ 2011年3月23日 水曜日 午後3時5分

E-11
Charging the PointerUse the supplied USB cable (Type A to Type Mini B) to connect the pointer to your computer as shown nearby.
The battery indicator is lit (red) while charging is in progress and goes out after charging is complete.Charging takes about 2.5 hours.
Setup
*WarningIf charging is not complete within the prescribed amount of time, disconnect the cable from the pointer and stop charging. Failure to do so creates the risk of battery overheating, fire, and explosion.
*Caution Fluid leaking from a battery that gets onto your skin or clothing can cause skin irritation. If this happens, immediately rinse the area with clean water.
A to Mini B
YA-P10_Pointer_02_e.book 11 ページ 2011年3月23日 水曜日 午後3時5分

E-12
Important!Important!Important!Connecting the pointer to a computer for charging, make sure that the computer is connected to an AC power source to ensure a stable power supply.If your computer does not supply power via its USB port when turned off, leave your computer turned on while charging the pointer.The pointer cannot be used while it is being charged.
Installing the Software that Comes with the Pointer on a ComputerSee the Presentation Draw User’s Guide on the CD-ROM that comes with the pointer.
YA-P10_Pointer_02_e.book 12 ページ 2011年3月23日 水曜日 午後3時5分

E-13
Connecting a Computer to the ProjectorIn order to use the pointer as a computer pointing device, there must be a USB connection between the computer and the projector. To project the computer screen contents with the projector, you also need to connect the analog RGB output terminal of the computer to the projector’s COMPUTER IN terminal. Connect as shown in the illustration below.
* Some models have only one COMPUTER IN and one AUDIO IN terminal.
<Projector>
Mini D-Sub cable that comes with projector
Audio cable (commercially available)
To monitor terminal(analog RGB output terminal)
COMPUTER IN terminal(1 or 2*)
To line output terminal
AUDIO IN terminal(1 or 2*)
USB cable (Type A to Type B) that comes with pointer
USB-B port To USB port
<Computer>
YA-P10_Pointer_02_e.fm 13 ページ 2011年3月23日 水曜日 午後3時40分
E-14
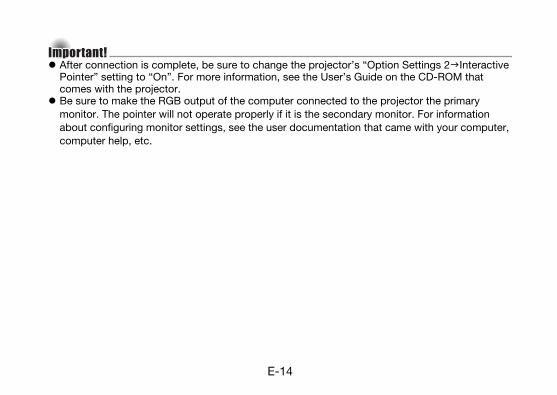
Important!Important!Important!After connection is complete, be sure to change the projector’s “Option Settings 2 Interactive Pointer” setting to “On”. For more information, see the User’s Guide on the CD-ROM that comes with the projector.Be sure to make the RGB output of the computer connected to the projector the primary monitor. The pointer will not operate properly if it is the secondary monitor. For information about configuring monitor settings, see the user documentation that came with your computer, computer help, etc.
YA-P10_Pointer_02_e.book 14 ページ 2011年3月23日 水曜日 午後3時5分

E-15
Holding the PointerHold the pointer securely as shown in the illustrations below.
Using the Pointer
or
YA-P10_Pointer_02_e.book 15 ページ 2011年3月23日 水曜日 午後3時5分

E-16
To start a pointer operation1. Press the pointer left mouse button or right mouse button.
• This turns on the pointer and causes the link indicator to start flashing.
2. Holding the pointer securely, point the pointer tip at the projected image.• The link indicator will go from flashing to lit when a link between the pointer and projector is
established.• Pointer operations (page E-17) are enabled at this time.
NOTE
After establishing a connection between the pointer and the projector, the link indicator will go out if you move the pointer tip so it is not pointed at the projected image. You can reestablish the connection by pointing the pointer tip at the projected image within about one minute after the link indicator goes out.If you do not perform any operation for a few minutes after the link indicator goes out, the pointer will turn off automatically.
YA-P10_Pointer_02_e.book 16 ページ 2011年3月23日 水曜日 午後3時5分

E-17
Pointer OperationsThe following pointer operations are supported on the projected image of a computer’s RGB output.
Important!Important!Important!When using the pointer, take care to ensure that the pointer tip is not within any shadow cast onto the projected image. The pointer will not function properly while its tip is within a shadow.
Left-click : Use the pointer tip to point at the location where you want to click (it is not necessary to touch the screen with the pointer tip), and then press the left mouse button. Or you could lightly touch the pointer tip to the location where you want to click.
Right-click : Use the pointer tip to point at the location where you want to click (it is not necessary to touch the screen with the pointer tip), and then press the right mouse button.
Drag : Point the pointer tip at the location from which you want to start dragging (it is not necessary to touch the screen with the pointer tip). Next, hold down the left mouse button as you drag the pointer tip. When you reach the end of the drag, release the left mouse button. You also could lightly touch the tip of the pointer at the drag start point and drag on the screen, keeping it lightly against the screen the whole way. When you reach the end of the drag, remove the pointer tip from the screen.
YA-P10_Pointer_02_e.book 17 ページ 2011年3月23日 水曜日 午後3時5分

E-18
The following shows the pointer status as indicated by the indicators.
: Battery indicator (red) : Link indicator (blue): Lit : Flashing : Unlit
* The pointer will turn off automatically and both indicators will go out if no pointer operation is performed for a few minutes or if a few minutes elapse after the link between the pointer and projector is broken. A few seconds immediately before this happens, the link indicator will flash and then both indicators will light.
Indicators
IndicatorPointer Status
Turned off
Searching for projector
Linked with projector and standing by for interactive pointer operation. Or in use as interactive pointer.
Powering down*
Battery is charging or battery power is low (approximately 20% of full charge).
Very low battery power (approximately 10 % of full charge)
YA-P10_Pointer_02_e.book 18 ページ 2011年3月23日 水曜日 午後3時5分

E-19
Check the following items whenever you experience any problem while using the pointer.
Troubleshooting
Problem Possible cause and recommended action
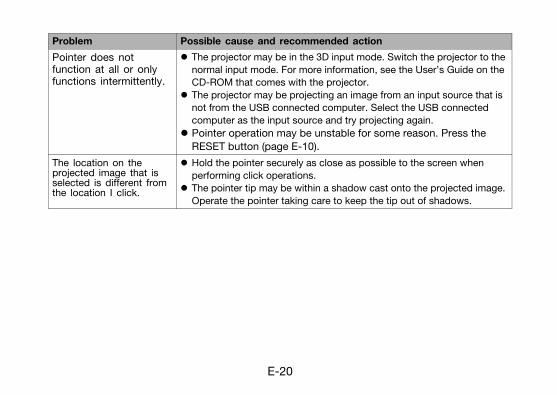
Pointer does not function at all or only functions intermittently.
If the pointer’s battery indicator is flashing or light, it means that the pointer battery level is low. Charge the pointer. See “Charging the Pointer” (page E-11).There may be a problem with the USB connection between the computer and projector. Check the connection. See “Connecting a Computer to the Projector” (page E-13).“Off” may be selected for the projector’s “Option Settings 2 Interactive Pointer” setting. Change the setting to “On”. For more information, see the User’s Guide on the CD-ROM that comes with the projector.Lighting in the location where you are projecting may be too bright. Take measures to reduce the brightness of the lighting.The pointer tip may be within a shadow cast onto the projected image. Operate the pointer taking care to keep the tip out of shadows.Another mouse operation may be being performed on the computer at the same time you are performing a pointer operation. Do not allow any mouse operations to be performed on the computer during pointer operations.
YA-P10_Pointer_02_e.book 19 ページ 2011年3月23日 水曜日 午後3時5分
E-20
Pointer does not function at all or only functions intermittently.
The projector may be in the 3D input mode. Switch the projector to the normal input mode. For more information, see the User’s Guide on the CD-ROM that comes with the projector.The projector may be projecting an image from an input source that is not from the USB connected computer. Select the USB connected computer as the input source and try projecting again.Pointer operation may be unstable for some reason. Press the RESET button (page E-10).
The location on the projected image that is selected is different from the location I click.
Hold the pointer securely as close as possible to the screen when performing click operations.The pointer tip may be within a shadow cast onto the projected image. Operate the pointer taking care to keep the tip out of shadows.
Problem Possible cause and recommended action
YA-P10_Pointer_02_e.book 20 ページ 2011年3月23日 水曜日 午後3時5分

E-21
When disposing of a pointer, use the procedure below to remove its built-in rechargeable lithium-ion battery and take the battery in for recycling.
Handling rechargeable batteries (Please recycle!)Be sure to recycle no longer needed batteries to help conserve precious resources. Contact your original dealer or authorized CASIO service center for information about recycling.
Precautions when handling old rechargeable batteriesInsulate the connectors with tape, etc.Do not remove the covering.Never try to take batteries apart.
Disposing of a Pointer
YA-P10_Pointer_02_e.book 21 ページ 2011年3月23日 水曜日 午後3時5分

E-22
Removing the rechargeable lithium-ion battery1. Remove the back label.
2. Use a Phillips head (+) screwdriver to remove the two screws.
3. Remove the front case (the side with the buttons and indicators).• If the front case is difficult to remove, insert
a flat blade (–) screwdriver into the gap of the case and then open it.
4. Disconnect the rechargeable lithium-ion battery connector and then remove the battery.
5. Do not dispose of the battery. Be sure to take it in for recycling.• Contact your original dealer or authorized
CASIO service center for information about recycling.
6. After removing the lithium-ion battery, be sure to dispose of the pointer in accordance with the laws, rules, and regulations in your geographic area.
Screws
YA-P10_Pointer_02_e.book 22 ページ 2011年3月23日 水曜日 午後3時5分

E-23
The above “Battery Operation Time” is a general reference value that indicates the time from the start of operation with a new, fully charged battery. This time is not guaranteed. Also note that repeated charging can cause a battery to gradually lose its ability to retain a charge.Use under low temperatures also can shorten the battery operation time.Specifications are subject to change without notice.
Specifications
Operating Frequency 2.4GHz ISM band
Power Requirements Lithium-ion batteryNormal voltage/capacitance: 3.7V DC, 800mAh
Battery Operation Time Approximately 30 to 35 hours (on a full charge)
Environment Operating temperature: 5 to 35°C (41 to 95°F)Operating humidity: 20 to 80% (non-condensation)
Rated Power 5V DC Approximately 2W
Dimensions Approximately 210mm/8.3" (long), 28.5mm/1.1" (diameter)
Weight Approximately 75g/2.6oz
YA-P10_Pointer_02_e.fm 23 ページ 2011年4月4日 月曜日 午前11時44分

The U.S.A. and Canada
GUIDELINES LAID DOWN BY FCC RULES FOR USE OF THIS UNIT IN THE U.S.A. (not applicable to other areas).
NOTICEThis equipment has been tested and found to comply with the limits for a Class B digital device, pursuant to Part 15 of the FCC Rules. These limits are designed to provide reasonable protection against harmful interference in a residential installation. This equipment generates, uses and can radiate radio frequency energy and, if not installed and used in accordance with the instructions, may cause harmful interference to radio communications. However, there is no guarantee that interference will not occur in a particular installation. If this equipment does cause harmful interference to radio or television reception, which can be determined by turning the equipment off and on, the user is encouraged to try to correct the interference by one or more of the following measures:• Reorient or relocate the receiving antenna.• Increase the separation between the equipment and receiver.• Connect the equipment into an outlet on a circuit different from that to which the receiver is connected.• Consult the dealer or an experienced radio/TV technician for help.
FCC WARNINGChanges or modifications not expressly approved by the party responsible for compliance could void the user’s authority to operate the equipment.Proper connectors must be used for connection to host computer and/or peripherals in order to meet FCC emission limits.
Caution Exposure to radio frequency radiation (below is for portable device)To comply with FCC RF exposure compliance requirements, this device must not be co-located or operating in conjunction with any other antenna or transmitter.
YA-P10_Pointer_Cov3-4.fm 18 ページ 2011年3月23日 水曜日 午後3時36分

For Users in CanadaThese Class B digital apparatuses comply with Canadian ICES-003.Cet appareil numériqué de la classes B est conformé à la norme NMB-003 du Canada.
These devices comply with RSS 210 of Industry Canada (IC).Operation is subject to the following two conditions:(1) These devices may not cause interference, and(2) These devices must accept any interference, including interference that may cause undesired
operation of this device.
L’utilisation de ce dispositif est autorisée seulement aux conditions suivantes:(1) il ne doit pas produire de brouillage et(2) I’utilisateur du dispositif doit étre prêt à accepter tout brouillage radioélectrique reçu, même
si ce brouillage est susceptible de compromettre le fonctionnement du dispositif.
Declaration of ConformityModel Number: YA-P10Trade Name: CASIOResponsible party: Casio America, Inc.Address: 570 Mt. Pleasant Avenue, Dover, New Jersey 07801, USATelephone number: 973-361-5400This device complies with Part 15 of the FCC Rules. Operation is subject to the following two conditions:(1) This device may not cause harmful interference, and (2) this device must accept any interference received, including interference that may cause undesired operation.
YA-P10_Pointer_Cov3-4.fm 19 ページ 2011年3月23日 水曜日 午後3時36分

Exposure to radio frequency radiationThe installer of this radio equipment must ensure that the antenna is located or pointed such that it does not emit RF field in excess of Health Canada limits for the general population;consult Safety Code 6, obtainable from Health Canada’s website at http://www.hc-sc.gc.ca/ewh-semt/pubs/radiation/index-eng.php
EuropeCertify and declare under our sole responsibility that the following equipments:
Product description / Intended use
EU/EFTA member states intended for use
EU: Austria, Belgium, Bulgaria, Cyprus, Czech Republic, Denmark, Estonia, Finland, France, Germany, Greece, Hungary, Ireland, Italy, Latvia, Lithuania, Luxembourg, Malta, The Netherlands, Poland, Portugal, Romania, Slovakia, Slovenia, Spain, Sweden, United KingdomEFTA: Switzerland, Iceland, Liechtenstein, Norway
Member states with restrictive use France, Belgium
Manufacturer CASIO COMPUTER CO., LTD.
Brand CASIO
Type YA-P10
YA-P10_Pointer_Cov3-4.fm 20 ページ 2011年3月23日 水曜日 午後3時36分

DECLARATION OF CONFORMITYWe, the under signed, CASIO Europe GmbH, hereby declare that the following equipments:
Product: Wireless Pen MouseModel: YA-P10Brand: CASIO
are in conformity with all the provisions of the following EC directive with meeting the related test standards:
Council Directive: 1999/5/EC (R&TTE Directive):Standards for all models:
EN 60950-1: 2006+A11:2009EN 62311: 2008EN 301 489-1 v1.8.1 (2008-04)EN 301 489-3 v1.4.1 (2002-08)EN 300 440-1 v1.6.1 (2010-08)EN 300 440-2 v1.4.1 (2010-08)
Hereunder, that this declaration is based on the above standards have been complied fully, constructing into a Technical File.
The information described above dates from June 2011 and may be subjected to future changes.
Products are for distribution within all member states of the EU. France limited to 2446.5-2483.5 MHz Indoor use. Belgium limited to 2400-2483.5 MHz Indoor, 2460-2483.5 MHz Outdoor use.
0560
B

Manufacturer:CASIO COMPUTER CO.,LTD.6-2, Hon-machi 1-chome, Shibuya-ku, Tokyo 151-8543, Japan
Responsible within the European Union:CASIO EUROPE GmbHCasio-Platz 1, 22848 Norderstedt, Germany
Batterij niet weggooien,maar inlevern als KCA
YA-P10_Pointer_Cov3-4.fm 22 ページ 2011年3月23日 水曜日 午後3時36分

P9K39-4800-00
Printed in ChinaImprimé en Chine
MA1105-B


![6 広報誌 hyo1-hyo4...[ TEL ]06-6155-1987 [ FAX ]06-6831-5087 [ 開館時間 ]10:00~18:00 [休館日]毎週月曜日、祝日、年末年始 ※祝日が月曜日のときはその翌日も休館](https://static.fdocumenti.com/doc/165x107/5fef7b77caf42a68861c2ba2/6-feoe-hyo1-hyo4-tel-06-6155-1987-fax-06-6831-5087-eee.jpg)