supporto per palo - Viabizzuno
20
istruzioni di montaggio installing instructions Gebrauchsanweisung instructions de montage instrucciones de montaje Viabizzuno Alvaline For m progettiamo la luce cubo supporto palo
Transcript of supporto per palo - Viabizzuno

istruzioni di montaggio
installing instructions
Gebrauchsanweisung
instructions de montage
instrucciones de montaje
Viabizzuno
Alva
line
For
m
pro
get
tia
mo
la
luce
cubo supporto palo

IT AVVERTENZE: All’atto dell’installazione, ed ogni volta che si interviene sulla lampada, assicurarsi che sia stata tolta la tensione di alimentazione. Le operazioni di installazione e collegamento alla rete elettrica devono essere effettuate esclusivamente da personale qualificato.
GB WARNING: When installing fixture and during unkeep take care that the mains voltage is switched off. The operations of installation and connection to power mains should be done by skilled personnel only.
DE HINWEISE: Während der Installation und bei allen nachfolgenden Arbeiten auf der Lampe sollte sichergestellt werden, daß die Versorgungsspannung vorher abgenommen wurde. Die Arbeiten zur Installation und zum Anschluss an das Stromnetz sind von Fachpersonal durchzuführen.
FR AVVERTISSEMENTS: Lors de l’installation et à chaque fois que l’on fait un entretien sur la lampe, s’assurer que la tension d’alimentation ait été coupée. Les opérations d’installation et de branchement au réseau électrique doivent être effectuées par un personnel qualifié.
ES ADVERTENCIA: Durante la instalación, y cada ve que se interviene sobre la lámpara, asegurarse que la alimentación haya sido desconectada. Las operaciones de instalación y conexión a la red eléctrica tienen que ser efectuadas exclusivamente por personal cualificado.
IT ATTENZIONE:La sicurezza dell’apparecchio è garantita solo rispettando queste istruzioni sia in fase di installazione che di impiego.
GB WARNING:Fitting safety is only guaranteed if the following instructionsare strictly observed both during installation and use.
DE ACHTUNG:Für die Sicherheit des Geräts kann nur dann die Garantie übernommen werden, wenn die in den vorliegenden Anweisungen enthaltenen Hinweise sowohl bei der Installation als auch beim Betrieb beachtet werden.
FR ATTENTION:La sécurité de l’appareil n’est assurée que lorsque les consignes portées sont respectées, tant lors de l’installation que durant l’utilisation de l’appareil.
ES ATENCIÓN: La seguridad del aparato está garantizada sólo si se respetan estas instrucciones durante la fase de instalación y de empleo. 2

3
SDM
-09
06
08
-06
170-2
IT garanzia
GB warranty
DE garantie
FR garantie
ES garantía
IT La presente garanzia è valida 24 mesi se timbrata e datata dal rivenditore autorizzato Viabizzuno. Il periodo di garanzia è di 2 anni a partire dalla data della timbratura e decade in caso di uso improprio, manomissione o cancellatura della data, perdita o illeggibilità del presente libretto di istruzioni.
GB The warranty covers 24 months if stamped and dated by the authorised Viabizzuno dealer. The 24 months warranty shall no apply in case of wrong use, altered or deleted date, or if this instructions booklet gets lost or becomes unreadable.
DE Die Garantie gilt 24 Monate nur, wenn sie von dem zugelassenen Verkäufer Viabizzuno gestempelt wird. Die Garantie gilt 2 Jahr seit dem Stempeldatum und verfällt bei unberechtigten Gebrauch, Manipulation des Datums, Verlust oder Unlesbarkeit von den Gebrauchsanweisungen.
FR La durée de la garantie est de 24 mois si elle est marquée par le distributer autorisé Viabizzuno. La garantie est valable 2 ans depuis le jour où elle a été marquée et échoit en cas d’usage impropre, alteration ou effacement de la date, e si le carnet d’instructions est perdu ou est indéchiffrable.
ES Esta garantìa es valida por 24 meses sòlo si està datada y sellada por el revendedor autorizado Viabizzuno. El período de garantía es de 2 años a partir de la fecha del sello, y decae en caso de empleo impropio, alteración o borrado de la fecha, pérdida o ilegibilidad del presente manual de instrucciones

4
F9.009.03 supporto palo Ø76-inox 316L satinatosupport for pole Ø76-satined stainless 316L steelStütze für Mast Ø76-satinerter Edelstahl 316Lsupport pour mât Ø76-inox 316L satinésuporte para palo Ø76-inoxidable 316L satinado
F9.009.07 supporto cartellonistica Ø76-inox 316L satinatosignage support Ø76-satined stainless 316L steelHalterung Werbegrafik Ø76-satinerter Edelstahl 316Lsupport signalétique Ø76-inox 316L satinésoporte para carteles Ø76-inoxidable 316L satinado
F9.009.06 supporto palo Ø60- ferro zincatosupport for pole Ø60-galvanized ironStütze für Mast Ø60-galvanisiertes Eisensupport pour mât Ø60-fer galvanisésuporte para palo Ø60-hierro galvanizado
cubo supporto palo
10
7107
107 107
107107
107
107
107
5
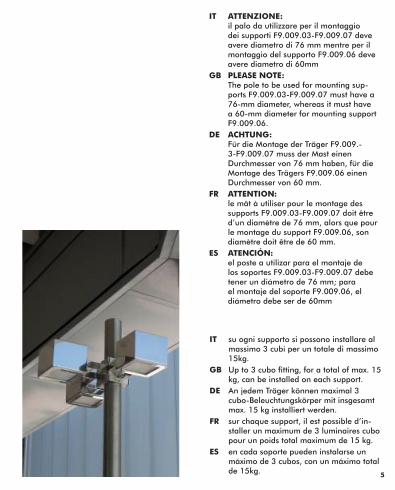
IT ATTENZIONE: il palo da utilizzare per il montaggio dei supporti F9.009.03-F9.009.07 deve avere diametro di 76 mm mentre per il montaggio del supporto F9.009.06 deve avere diametro di 60mm
GB PLEASE NOTE: The pole to be used for mounting sup-ports F9.009.03-F9.009.07 must have a 76-mm diameter, whereas it must have a 60-mm diameter for mounting support F9.009.06.
DE ACHTUNG: Für die Montage der Träger F9.009.-3-F9.009.07 muss der Mast einen Durchmesser von 76 mm haben, für die Montage des Trägers F9.009.06 einen Durchmesser von 60 mm.
FR ATTENTION: le mât à utiliser pour le montage des supports F9.009.03-F9.009.07 doit être d’un diamètre de 76 mm, alors que pour le montage du support F9.009.06, son diamètre doit être de 60 mm.
ES ATENCIÓN: el poste a utilizar para el montaje de los soportes F9.009.03-F9.009.07 debe tener un diámetro de 76 mm; para el montaje del soporte F9.009.06, el diámetro debe ser de 60mm
IT su ogni supporto si possono installare al massimo 3 cubi per un totale di massimo 15kg.
GB Up to 3 cubo fitting, for a total of max. 15 kg, can be installed on each support.
DE An jedem Träger können maximal 3 cubo-Beleuchtungskörper mit insgesamt max. 15 kg installiert werden.
FR sur chaque support, il est possible d’in-staller un maximum de 3 luminaires cubo pour un poids total maximum de 15 kg.
ES en cada soporte pueden instalarse un máximo de 3 cubos, con un máximo total de 15kg.

6
1. IT eseguire un foro Ø12mm sul palo per il passaggio dei cavi di alimentazione (attenzione a non lasciare bave che potrebbero danneggiare il cavo) e un foro di massimo 4,8mm per il fissaggio del supporto. tra i due fori mantenere un’interasse di 46mm (se vengono utiliz-zati i pali F9.009.14-F9.009.10 sono già muniti di fori)
GB make a Ø12mm hole on the pole for passage of the supply cables (be careful not to leave burrs that could damage the cable) and a hole of max. 4.8 mm for fastening the support. Keep a 46-mm distance between the two holes (if poles F9.009.14-F9.009.10 are used, they already come supplied with holes)
DE Am Mast eine Bohrung von Ø 12 mm für den Durchgang der Netzkabel an-bringen (darauf achten, dass keine Grate zurückbleiben, die das Kabel beschädigen können) und eine Bohrung von maximal 4,8 mm für die Befestigung des Trägers. Zwischen den beiden Bohrungen einen Abstand von 46 mm einhalten (wenn die Masten F9.009.14-F9.009.10 benutzt werden, sind die Bohrungen bereits angebracht).
FR réaliser un trou de Ø 12 mm sur le mât pour permettre le passage des câbles d’alimentation (veiller à ne pas laisser d’ébarbures qui pourraient endommager les câbles) et un trou de 4,8 mm maxi-mum pour la fixation du support. entre les deux trous, maintenir un espace de 46 mm (les mâts F9.009.14-F9.009.10 sont déjà pourvus de trous).
ES abrir un orificio de Ø12mm en el poste para pasar los cables de alimentación (asegurarse de no dejar rebabas que puedan dañar el cable) y un orificio con un diámetro máximo de 4,8mm para fijar el soporte. mantener entre los dos orificios un interaxis de 46mm (los postes F9.009.14-F9.009.10 llevan los orificios de serie)
46
max Ø 4.8 mm
Ø 12 mm

7
2. IT Allentare le viti a testa svasata (A) e separare le due parti del supporto (B).Inserire i cavi di alimentazione nel niplo centrale (C) e montare il supporto (B) sul palo (D) serrando nuovamente le viti a testa svasata (A).
GB Loosen the cuphead screws (A) and separate the two parts of the support (B). Pass the power cables through the central nipple (C) and fasten the support (B) to the post (D) by re-tightening the cuphead screws (A).
DE Die Senkschrauben (A) lösen und die beiden Teile der Stütze (B) trennen.Die Stromkabel in das mittlere Anschlussstück (C) einführen und die Stütze (B) durch erneutes Anziehen der Senkschrauben (A) auf dem Pfahl montieren.
FR Desserrer les vis à tête fraisée (A) et séparer les deux parties du support (B). Introduire les câbles d'alimentation dans le nipple central (C) et monter le support (B) sur le poteau (D), puis serrer les vis à tête fraisée (A).
ES Aflojar los tornillos de cabeza avellanada (A) y separar las dos partes del soporte (B).Introducir los cables de alimentación en el niple central (C) y montar el soporte (B) en el palo (D), volviendo a apretar los tornillos de cabeza avellanada (B).
B
C
D
A

8
3. IT Inserire la vite di sicurezza (F) nel foro superiore (G) del supporto e avvitarla nel foro eseguito nel punto 1, dopo di che eseguire un altro foro di max Ø 4.8 mm sulla parte opposta del palo utilizzando come guida il foro (G1) ed avvitare una seconda vite di sicurezza (F).
GB Insert the safety screw (F) into the upper hole (G) of the support and screw it up into the hole made on point 1, then make another hole of max Ø 4.8 mm on the opposite side of the post, by using the hole (G1) as a guide and screw up a second safety screw (F).
DE Die Sicherheitsschraube (F) in die obere Bohrung (G) der Stütze einsetzen und in der an Punkt 1 ausgeführten Bohrung verschrauben. Eine weitere Bohrung von max. Ø 4,8 mm auf der entgegenge-setzten Seite des Pfahls ausführen, dazu Bohrung (G1) als Führung benutzen und eine zweite Sicherheitsschraube (F) verschrauben.
FR Introduire la vis de sécurité (F) dans le trou supérieur (G) du support et la visser dans le trou pratiqué dans le point 1, puis pratiquer un autre trou de max Ø 4.8 mm sur la partie opposée du poteau en utilisant comme guide le trou (G1) et visser une seconde vis de sécurité (F).
ES Introducir el tornillo de seguridad (F) en el orificio superior (G) del soporte y enro-scarlo en el orificio realizado en el punto 1; posteriormente, realizar otro orificio con diámetro máx. de 4,8 mm en la parte opuesta del palo, utilizando como guía el orificio (G1) y enroscar un segundo tornillo de seguridad (F).
F
G
G1
FRONTERECTO
PARTE FRONTAL
RETROVERSO
PARTE POSTERIOR
9
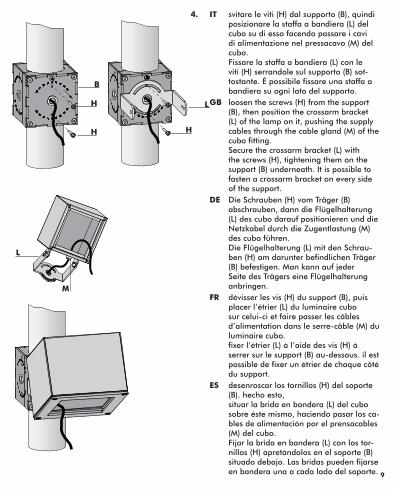
4. IT svitare le viti (H) dal supporto (B), quindiposizionare la staffa a bandiera (L) del cubo su di esso facendo passare i cavi di alimentazione nel pressacavo (M) del cubo.Fissare la staffa a bandiera (L) con le viti (H) serrandole sul supporto (B) sot-tostante. È possibile fissare una staffa a bandiera su ogni lato del supporto.
GB loosen the screws (H) from the support (B), then position the crossarm bracket (L) of the lamp on it, pushing the supply cables through the cable gland (M) of the cubo fitting.Secure the crossarm bracket (L) with the screws (H), tightening them on the support (B) underneath. It is possible to fasten a crossarm bracket on every side of the support.
DE Die Schrauben (H) vom Träger (B) abschrauben, dann die Flügelhalterung (L) des cubo darauf positionieren und die Netzkabel durch die Zugentlastung (M) des cubo führen.Die Flügelhalterung (L) mit den Schrau-ben (H) am darunter befindlichen Träger (B) befestigen. Man kann auf jeder Seite des Trägers eine Flügelhalterung anbringen.
FR dévisser les vis (H) du support (B), puis placer l’étrier (L) du luminaire cubo sur celui-ci et faire passer les câbles d’alimentation dans le serre-câble (M) du luminaire cubo.fixer l’étrier (L) à l’aide des vis (H) à serrer sur le support (B) au-dessous. il est possible de fixer un étrier de chaque côté du support.
ES desenroscar los tornillos (H) del soporte (B). hecho esto,situar la brida en bandera (L) del cubo sobre éste mismo, haciendo pasar los ca-bles de alimentación por el prensacables (M) del cubo.Fijar la brida en bandera (L) con los tor-nillos (H) apretándolos en el soporte (B) situado debajo. Las bridas pueden fijarse en bandera una a cada lado del soporte.
L
M
H H
LH
B

10
5. IT Per l’installazione di pannelli e cartelloni-stica, utilizzare il supporto F9.009.07. Per fissarli al suporto, utilizzare le viti (O).
GB To install panels and signage, use support F9.009.07. To fix them to the support, use the screws (O).
DE Die Installation der Werbegrafik erfolgt mithilfe der Halterung des Typs F9.009.07. Die Werbegrafik über die Schrauben (O) an der Halterung befestigen.
FR pour l'installation de panneaux, utiliser le support F9.009.07 pour les fixer aux supports, utiliser les vis (O).
ES Para la instalación de paneles y carteles, utilizar el soporte F9.009.07. Para fijarlos al soporte, utilizar los tornillos (O).
F9.009.07
O
O

11
6. IT con il supporto F9.009.06 per pali di diametro 60mm, è fornito un tappo da inserire sulla testa del palo nel caso in cui fosse aperto. il tappo va inserito appli-cando una leggera rotazione per evitare di rovinare la guarnizione di tenuta.
GB with support F9.009.06 for poles with a 60-mm diameter, a cover is supplied to put on the pole head if it is open. The cover is inserted by applying a slight rotation in order to prevent the seal from becoming damaged.
DE Beim Träger F9.009.06 für Masten von einem Durchmesser von 60 mm wird ein Verschluss mitgeliefert, der am oberen Mastende anzubringen ist, wenn dieses offen ist. Der Verschluss muss mit einer leichten Drehung aufgesetzt werden, um eine Beschädigung der Dichtung zu vermeiden.
FR avec le support F9.009.06 pour mâts de 60 mm de diamètre, est fourni un bouchon à placer sur la tête du mât dans le cas où elle serait ouverte. le bouchon doit être placé en exerçant une légère rotation pour éviter d’endommager la garniture de tenue.
ES con el soporte F9.009.06 para postes de diámetro 60mm, se sirve un tapón que se introducirá en la cabeza del poste en caso de que estuviese abierto. el tapón debe introducirse girándolo ligeramente para evitar estropear la junta estanca.
Ø60

Viabizzuno strada principale della frazione Bizzuno in provincia di ravenna dove tra la casa del popolo e la parrocchia, al n°17, sono nato il ventuno luglio millenovecentocinquantacinque.
Viabizzuno raccoglie attorno a sé esperienza, conoscenza e ricerca per poter meglio esprimere il proprio ‘modo di fare luce’. il pensiero progettuale di Viabizzuno si identifica in una pagina bianca. due linee di prodotti complementari occupano questo spazio esplorandolo, dilatandolo: si incrociano forti della propria identità, due anime rappresentate dalle collezioni For m e Alvaline. inoltre sviluppa e realizza apparecchi di illuminazione speciali e su misura. è fondamentale che il progetto sia stimolante e che l’ interlocutore sia preparato a una progettazione complessa, che richiede tempo e impegno.
mn
progettiamo la luce a 360°.
Viabizzuno is the name of the main road in the small village of Bizzuno in the province of Ravenna, where I was born on the 21st of july 1955 at No.17, between the “casa del popolo” (house of the people) and the local parish church.
Viabizzuno musters experience, knowledge and research to express its “way of making light” in the best way possible. Viabizzuno’s design philosophy corresponds to a blank page and two complementary product lines fill the space, exploring and expanding it; like kindred spirits, the For m and Alvaline collections interlock, confident in their own identity. Viabizzuno also designs and produces special and custom-made lighting equipment. it is essential that the project should be stimulating and that the other party is prepared for a complex design process, requiring time and commitment. we design ligh at 360°.
mn
chi
sia
mo

energia pulita
clean energy

For
m
For m divide lo spazio verticalmente: equilibrata, razionale, rigorosa. il corpo illuminante evolve nella sua funzione di fare luce:il suo uso é sempre più flessibile e la sua capacità di fondersi con l’architettura ne fa un vero materiale da costruzione, attraverso un design non invasivo, non mimetico, non sfacciatamente decorativo.i corpi illuminanti si ritraggono nelle pareti, a filo intonaco, a scomparsa, nascosti alla vista lasciando piena soggettività alla luce. il grigio dei materiali come cemento, alluminio, acciaio é il colore della collezione For m.
For m divides space vertically; it is balanced, rational and rigorous. the light fitting is evolving in the way it produces light: it is increasingly flexible and its ability to blend in with the architecture makes it a genuine building material, due to its non intrusive, non imitative design, which is not ostentatiously ornamental. the light fittings recede into the walls, flush with the plaster, concealed, hidden from view and leaving the whole scene to the light. the colour of the For m collection is grey, like the materials of cement, aluminium and steel. 14

englishespañoldeutschcod.19093-...
italianocod.19091-...
englishfrançais
cod.19092-...
cod. 19941-...
la l
ette
ratu
ra F
or
m -
Fo
r m
lit
era
ture
libro For mbook For m
cartella colori e finiturefolder sample finishesand colours
manuale For m 2007manual For m 2007
autore mario nanni progetto editoriale e grafico Viabizzuno edito da Viabizzunoeditoreseconda edizioneauthor mario nanni Viabizzuno publishing and graphics project editedby Viabizzunoeditoresecond editioncod. 15248
15

Alva
line
Alvaline attraversa lo spazio diagonalmente: dinamica, irriverente, ironica, giocosa. inizia il gesto, dove si muovono gli sguardi, dove la materia si fonde mescolandosi alla luce,si originano così colore e forma, che vivono per se stesse e per l’emozione che li circonda. il blu della notte é il suo colore.
Alvaline cuts through space diagonally; it is dynamic, irreverent, witty and playful. it makes the first move, marked by shifting glances and matter blending with the light, so colour and form are created, living a life of their own and of the emotion that surrounds them. its colour is midnight blue. 16

vol.7 mon amourcod.00282
vol.6 bibliocod.00288
vol.5 clv1cod.00286
vol.4 alva1cod.00291
vol.3 bamboocod.00289
vol.2 h2ocod.00283
vol.1 E27cod.00285
vol.18 toccamicod.17777
vol.14 steeloncod.17904
vol.13 UpOGalleggiocod.15215
vol.11 fileaucod.14564
vol.10 tulpcod.00290
vol.9 clv2cod.00284
vol.8 emmacod.00287
vol.19 la DOdòcod.17779
vol.20 plag incod.17778
cartella colori e finiturefolder sample finishesand colours
la l
ette
ratu
ra A
lva
lin
e -
Alv
ali
ne
lite
ratu
remanuale Alvaline 2007manual Alvaline 2007
volumi AlvalineAlvaline volumes
italianocod.16162-...
englishfrançais
cod.16164-...
englishespañoldeutschcod.16166-...
cod. 19941-... 17
il g
iorn
ale
- t
he
ma
ga
zin
e
Viabizzunoreport: strumento per incuriosirsi, conoscere ed esplorare progetti, eventi e personaggi di luce. per poter lavorare assieme é fondamentale che il lavoro da sviluppare sia un progetto stimolante e che il nostro interlocutore sia preparato ad una progettazione comunque complessa e elaborata che richiede tempo ed energia.
Viabizzunoreport: a means of gaining inspiration, getting to know and exploring projects, events and personalities in the world of light. working together requires that the project planned should be stimulating and that our partner is ready to take part in a complex and elaborate process that demands time and effort. 18

19

Viabizzuno
srl
10 v
ia r
om
ag
no
li40010 b
enti
vog
lio
bo
log
na
ita
lia
t+39 0
518908011
f+390518908089
ww
w.v
iab
izzu
no
.co
mvi
ab
izzu
no
@vi
ab
izzu
no
.co
m