manuale tecnico. - Home | Mosaico
84
manuale tecnico.
Transcript of manuale tecnico. - Home | Mosaico
manuale tecnico.

II
MA
NU
ALE
TE
CN
ICO
manualetecnico.
LA POSAINSTALLAT ION 0 3
COLLA E STUCCHI ADHESIVE & GROUTS 4 5
MATERIALI MATERIALS 55
COLLEZIONI COLLECT IONS 59
1 M
AN
UA
LE T
EC
NIC
O

la posainstallation
4 M
AN
UA
LE T
EC
NIC
O

Per Mosaico+ il mosaico non è solo un prodotto.È un mezzo per comunicare stile, cultura, eleganza, tradizione. Ecco perché la posa è importante e perché deve essere fatta “a regola d’arte”.
“A regola d’arte” significa raggiungere il miglior risultato grazie all’esperienza ed alla professionalità condivise. L’obiettivo di Mosaico+ è quello di raggiungere una clientela che sia in grado di riconoscere un nostro prodotto per la qualità del materiale e per la perfezione della posa.
Per questo motivo il nostro impegno è anche quello di realizzare mosaici che possano essere di semplice applicazione ed utilizzo. Un prodotto unico, esteticamente perfetto e qualitativamente innovativo.
La preparazione tecnica dei posatori e l’assistenza post-vendita di Mosaico+ sono il valore aggiunto che conferma la forte relazione tra qualità del prodotto, qualità del servizio e l’aspetto distintivo del brand dell’azienda.
La posa non è quindi solo la fase finale della lavorazione del rivestimento, ma ne è parte integrante sia nell’aspetto estetico che in quello funzionale ed identifica - proprio perché è l’ultima fase che consegna il prodotto nelle mani e negli occhi del cliente - i contenuti di eccellenza dei prodotti Mosaico+. I posatori diventano quindi partner importanti: la loro formazione, la loro esperienza e, perché no?, la loro sensibilità verso un prodotto così delicato e così denso di cultura e tradizione, fanno sì che un lavoro tecnico edilizio entri di diritto a far parte della nobile arte dell’artigianato. La preparazione di un sottofondo, la scelta dello stucco, la distanza delle fughe necessitano di mani esperte e menti aperte nella soluzione “a regola d’arte” di ogni tipologia di posa.
La responsabilità del posatore è dunque nella perfezione del suo lavoro che si riflette nell’immagine stessa del prodotto Mosaico+.
Questo manuale cerca di essere uno strumento completo per dare indicazioni e per ogni tipo di situazione.
Per dubbi e suggerimenti contattate il nostro ufficio tecnico.
tel. +39 347-6350119
For Mosaico+ mosaics are more than just a product. They are a medium for the communication of style, culture, elegance and tradition. This is why installation is important, and must be carried out “to the highest standards”.
“The highest standards” mean that impeccable results are achieved through shared experience and professional know-how.
Mosaico+ aims to serve a clientele capable of appreciating our product’s quality of materials and flawless installation.
So we are committed to ensuring that our mosaics are easy to apply and use. A unique product, perfect in appearance and innovative in quality.
The technical skill of the Mosaico+ installers and customer care service are the value-added that confirms the strong synergy between product quality, quality of service and the brand’s distinctive character.
So installation is not just the final phase in the covering’s production but rather an integral part of both its appearance and its performance; as the final phase, in which the product is consigned to the hands and eyes of the customer, it expresses all the excellences of the Mosaico+ products.
This means that installers are important partners. Their training, experience and - why not? - their love of this delicate product, so steeped in culture and tradition, raise a technical construction task to the status of genuine craftsmanship.
The preparation of the substrate, the choice of grout and the choice of joint size all need skilled hands and minds ready to find the “highest standard” solution to every installation type.
So the installer is responsible for turning in a perfect job, with implications for the image of the Mosaic+ product itself.
This manual is intended as a complete tool, providing guidance for every kind of situation.
For any queries or suggestions, please contact our Technical Department.
tel. +39 347-6350119
POSA A REGOLA D ’ARTE INSTALLAT ION TO THE H IGHEST STANDARDS
5 M
AN
UA
LE T
EC
NIC
O
1
1 3
5
7
2
3
7
3 4
4
8
6
6 M
AN
UA
LE T
EC
NIC
O
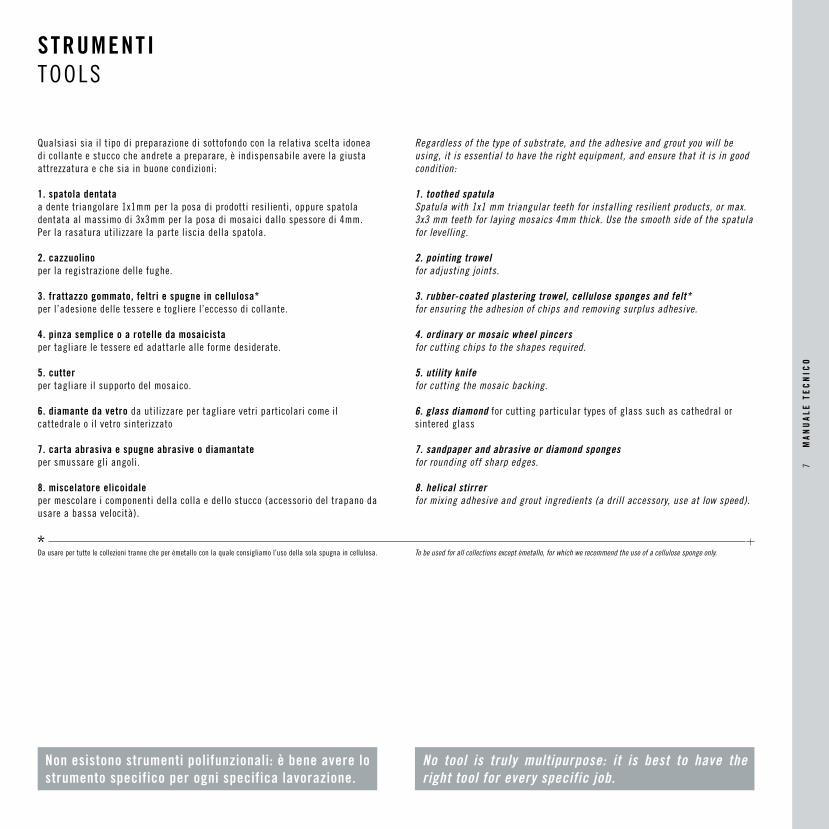
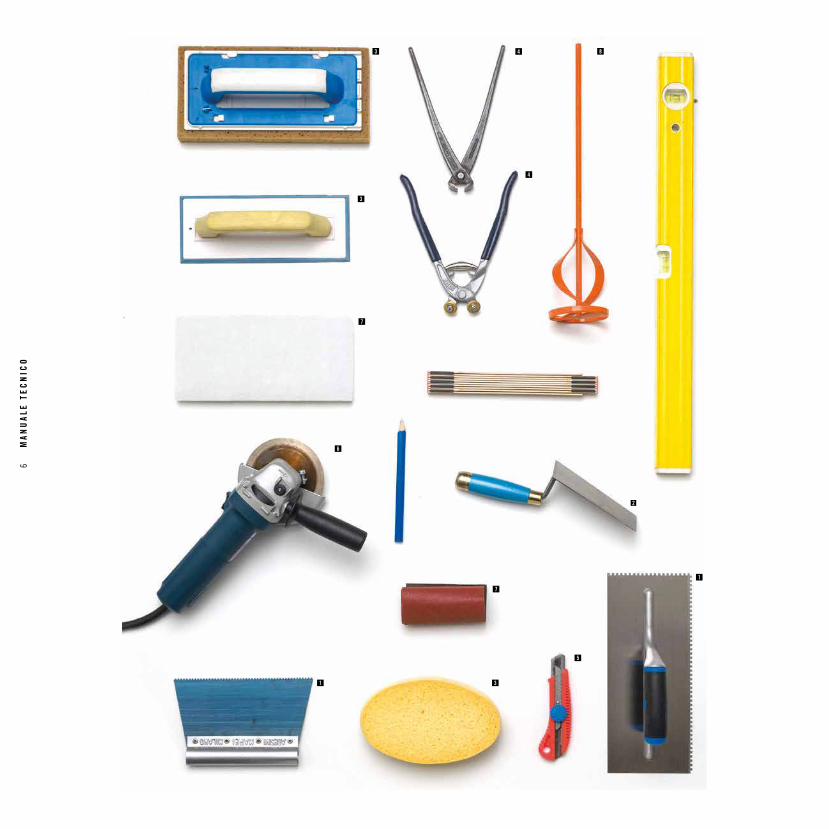
Qualsiasi sia il tipo di preparazione di sottofondo con la relativa scelta idonea di collante e stucco che andrete a preparare, è indispensabile avere la giusta attrezzatura e che sia in buone condizioni:
1. spatola dentata a dente triangolare 1x1mm per la posa di prodotti resilienti, oppure spatola dentata al massimo di 3x3mm per la posa di mosaici dallo spessore di 4mm. Per la rasatura utilizzare la parte liscia della spatola.
2. cazzuolinoper la registrazione delle fughe.
3. frattazzo gommato, feltri e spugne in cellulosa*per l’adesione delle tessere e togliere l’eccesso di collante.
4. pinza semplice o a rotelle da mosaicistaper tagliare le tessere ed adattarle alle forme desiderate.
5. cutterper tagliare il supporto del mosaico.
6. diamante da vetro da utilizzare per tagliare vetri particolari come il cattedrale o il vetro sinterizzato
7. carta abrasiva e spugne abrasive o diamantateper smussare gli angoli.
8. miscelatore elicoidaleper mescolare i componenti della colla e dello stucco (accessorio del trapano da usare a bassa velocità).
Regardless of the type of substrate, and the adhesive and grout you will be using, it is essential to have the right equipment, and ensure that it is in good condition:
1. toothed spatula Spatula with 1x1 mm triangular teeth for installing resilient products, or max. 3x3 mm teeth for laying mosaics 4mm thick. Use the smooth side of the spatula for levelling.
2. pointing trowelfor adjusting joints.
3. rubber-coated plastering trowel, cellulose sponges and felt*for ensuring the adhesion of chips and removing surplus adhesive.
4. ordinary or mosaic wheel pincersfor cutting chips to the shapes required.
5. utility knifefor cutting the mosaic backing.
6. glass diamond for cutting particular types of glass such as cathedral or sintered glass
7. sandpaper and abrasive or diamond spongesfor rounding off sharp edges.
8. helical stirrerfor mixing adhesive and grout ingredients (a drill accessory, use at low speed).
STRUMENTI TOOLS
Non esistono strumenti polifunzionali: è bene avere lo strumento specifico per ogni specifica lavorazione.
No tool is truly multipurpose: it is best to have the right tool for every specific job.
Da usare per tutte le collezioni tranne che per èmetallo con la quale consigliamo l’uso della sola spugna in cellulosa. To be used for all collections except èmetallo, for which we recommend the use of a cellulose sponge only.
7 M
AN
UA
LE T
EC
NIC
O
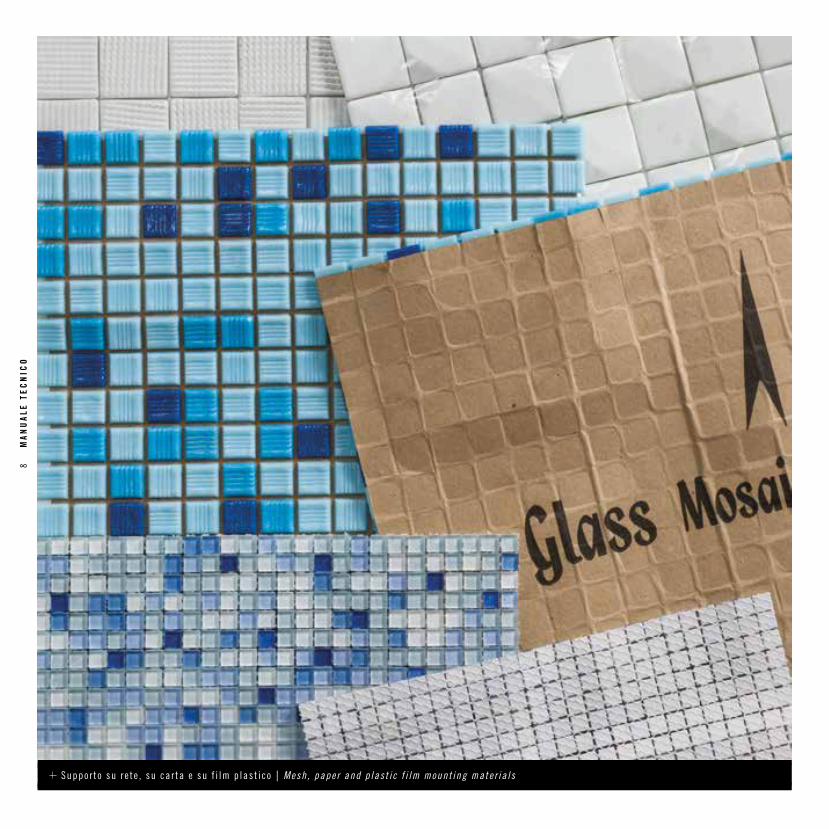
Suppor to su re te , su car ta e su f i lm p las t i co | Mesh , paper and p las t i c f i lm mount ing mate r ia ls
8 M
AN
UA
LE T
EC
NIC
O
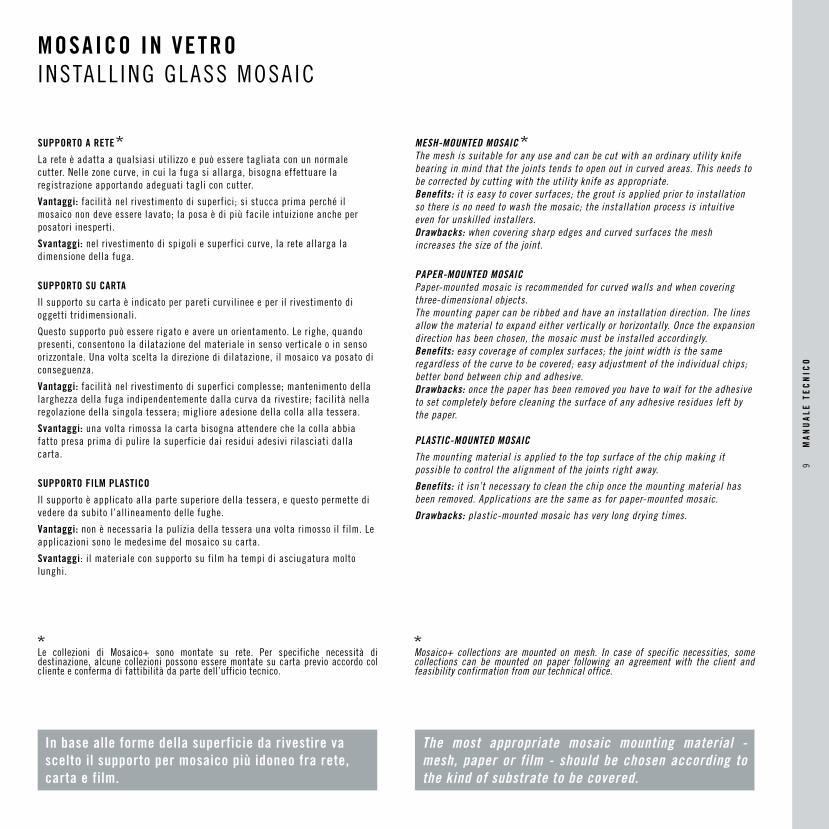
SUPPORTO A RETE
La rete è adatta a qualsiasi utilizzo e può essere tagliata con un normale cutter. Nelle zone curve, in cui la fuga si allarga, bisogna effettuare la registrazione apportando adeguati tagli con cutter.
Vantaggi: facilità nel rivestimento di superfici; si stucca prima perché il mosaico non deve essere lavato; la posa è di più facile intuizione anche per posatori inesperti.
Svantaggi: nel rivestimento di spigoli e superfici curve, la rete allarga la dimensione della fuga.
SUPPORTO SU CARTA
Il supporto su carta è indicato per pareti curvilinee e per il rivestimento di oggetti tridimensionali.
Questo supporto può essere rigato e avere un orientamento. Le righe, quando presenti, consentono la dilatazione del materiale in senso verticale o in senso orizzontale. Una volta scelta la direzione di dilatazione, il mosaico va posato di conseguenza.
Vantaggi: facilità nel rivestimento di superfici complesse; mantenimento della larghezza della fuga indipendentemente dalla curva da rivestire; facilità nella regolazione della singola tessera; migliore adesione della colla alla tessera.
Svantaggi: una volta rimossa la carta bisogna attendere che la colla abbia fatto presa prima di pulire la superficie dai residui adesivi rilasciati dalla carta.
SUPPORTO FILM PLASTICO
Il supporto è applicato alla parte superiore della tessera, e questo permette di vedere da subito l’allineamento delle fughe.
Vantaggi: non è necessaria la pulizia della tessera una volta rimosso il film. Le applicazioni sono le medesime del mosaico su carta.
Svantaggi: il materiale con supporto su film ha tempi di asciugatura molto lunghi.
MOSAICO IN VETRO INSTALL ING GLASS MOSAIC
In base alle forme della superficie da rivestire va scelto il supporto per mosaico più idoneo fra rete, carta e film.
The most appropriate mosaic mounting material - mesh, paper or film - should be chosen according to the kind of substrate to be covered.
MESH-MOUNTED MOSAICThe mesh is suitable for any use and can be cut with an ordinary utility knife bearing in mind that the joints tends to open out in curved areas. This needs to be corrected by cutting with the utility knife as appropriate.Benefits: it is easy to cover surfaces; the grout is applied prior to installation so there is no need to wash the mosaic; the installation process is intuitive even for unskilled installers.Drawbacks: when covering sharp edges and curved surfaces the mesh increases the size of the joint.
PAPER-MOUNTED MOSAIC Paper-mounted mosaic is recommended for curved walls and when covering three-dimensional objects.The mounting paper can be ribbed and have an installation direction. The lines allow the material to expand either vertically or horizontally. Once the expansion direction has been chosen, the mosaic must be installed accordingly. Benefits: easy coverage of complex surfaces; the joint width is the same regardless of the curve to be covered; easy adjustment of the individual chips; better bond between chip and adhesive.Drawbacks: once the paper has been removed you have to wait for the adhesive to set completely before cleaning the surface of any adhesive residues left by the paper.
PLASTIC-MOUNTED MOSAIC
The mounting material is applied to the top surface of the chip making it possible to control the alignment of the joints right away.
Benefits: it isn’t necessary to clean the chip once the mounting material has been removed. Applications are the same as for paper-mounted mosaic.
Drawbacks: plastic-mounted mosaic has very long drying times.
Le collezioni di Mosaico+ sono montate su rete. Per specifiche necessità di destinazione, alcune collezioni possono essere montate su carta previo accordo col cliente e conferma di fattibilità da parte dell’ufficio tecnico.
Mosaico+ collections are mounted on mesh. In case of specific necessities, some collections can be mounted on paper following an agreement with the client and feasibility confirmation from our technical office.
9 M
AN
UA
LE T
EC
NIC
O
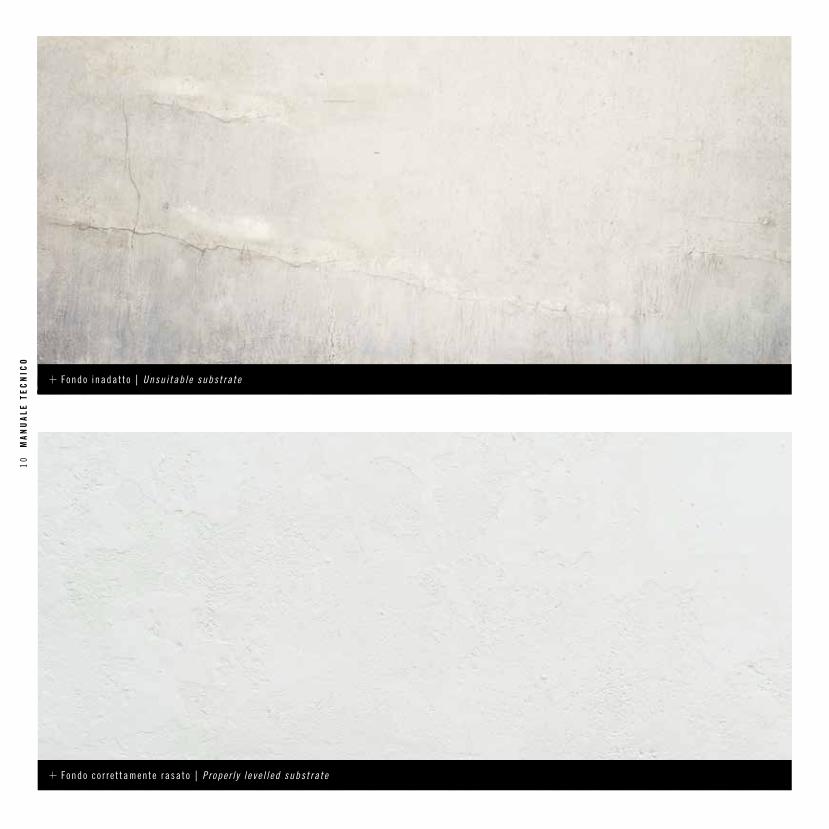
Fondo inadat to | Unsu i tab le subst ra te
Fondo co r re t tamente rasato | Proper l y l eve l l ed subst ra te
10
MA
NU
ALE
TE
CN
ICO
PREPARAZIONE DELLE SUPERFICI SUBSTRATE PREPARAT ION
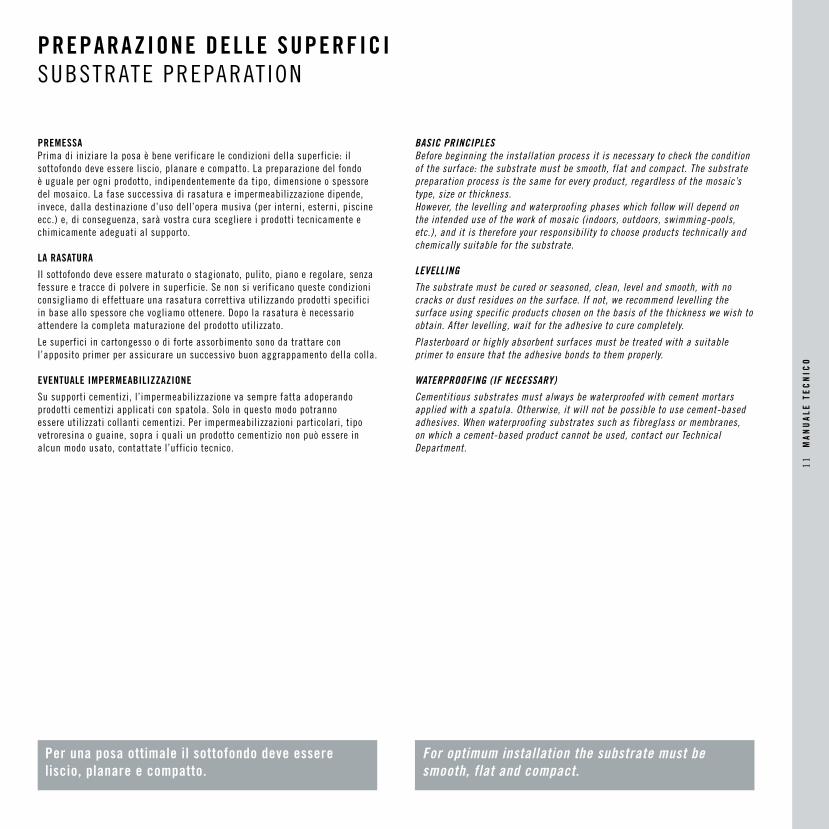
Per una posa ottimale il sottofondo deve essere liscio, planare e compatto.
For optimum installation the substrate must be smooth, flat and compact.
PREMESSAPrima di iniziare la posa è bene verificare le condizioni della superficie: il sottofondo deve essere liscio, planare e compatto. La preparazione del fondo è uguale per ogni prodotto, indipendentemente da tipo, dimensione o spessore del mosaico. La fase successiva di rasatura e impermeabilizzazione dipende, invece, dalla destinazione d’uso dell’opera musiva (per interni, esterni, piscine ecc.) e, di conseguenza, sarà vostra cura scegliere i prodotti tecnicamente e chimicamente adeguati al supporto.
LA RASATURA
Il sottofondo deve essere maturato o stagionato, pulito, piano e regolare, senza fessure e tracce di polvere in superficie. Se non si verificano queste condizioni consigliamo di effettuare una rasatura correttiva utilizzando prodotti specifici in base allo spessore che vogliamo ottenere. Dopo la rasatura è necessario attendere la completa maturazione del prodotto utilizzato.
Le superfici in cartongesso o di forte assorbimento sono da trattare con l’apposito primer per assicurare un successivo buon aggrappamento della colla.
EVENTUALE IMPERMEABILIZZAZIONE
Su supporti cementizi, l’impermeabilizzazione va sempre fatta adoperando prodotti cementizi applicati con spatola. Solo in questo modo potranno essere utilizzati collanti cementizi. Per impermeabilizzazioni particolari, tipo vetroresina o guaine, sopra i quali un prodotto cementizio non può essere in alcun modo usato, contattate l’ufficio tecnico.
BASIC PRINCIPLESBefore beginning the installation process it is necessary to check the condition of the surface: the substrate must be smooth, flat and compact. The substrate preparation process is the same for every product, regardless of the mosaic’s type, size or thickness.However, the levelling and waterproofing phases which follow will depend on the intended use of the work of mosaic (indoors, outdoors, swimming-pools, etc.), and it is therefore your responsibility to choose products technically and chemically suitable for the substrate.
LEVELLING
The substrate must be cured or seasoned, clean, level and smooth, with no cracks or dust residues on the surface. If not, we recommend levelling the surface using specific products chosen on the basis of the thickness we wish to obtain. After levelling, wait for the adhesive to cure completely.
Plasterboard or highly absorbent surfaces must be treated with a suitable primer to ensure that the adhesive bonds to them properly.
WATERPROOFING (IF NECESSARY)
Cementitious substrates must always be waterproofed with cement mortars applied with a spatula. Otherwise, it will not be possible to use cement-based adhesives. When waterproofing substrates such as fibreglass or membranes, on which a cement-based product cannot be used, contact our Technical Department.
11
MA
NU
ALE
TE
CN
ICO
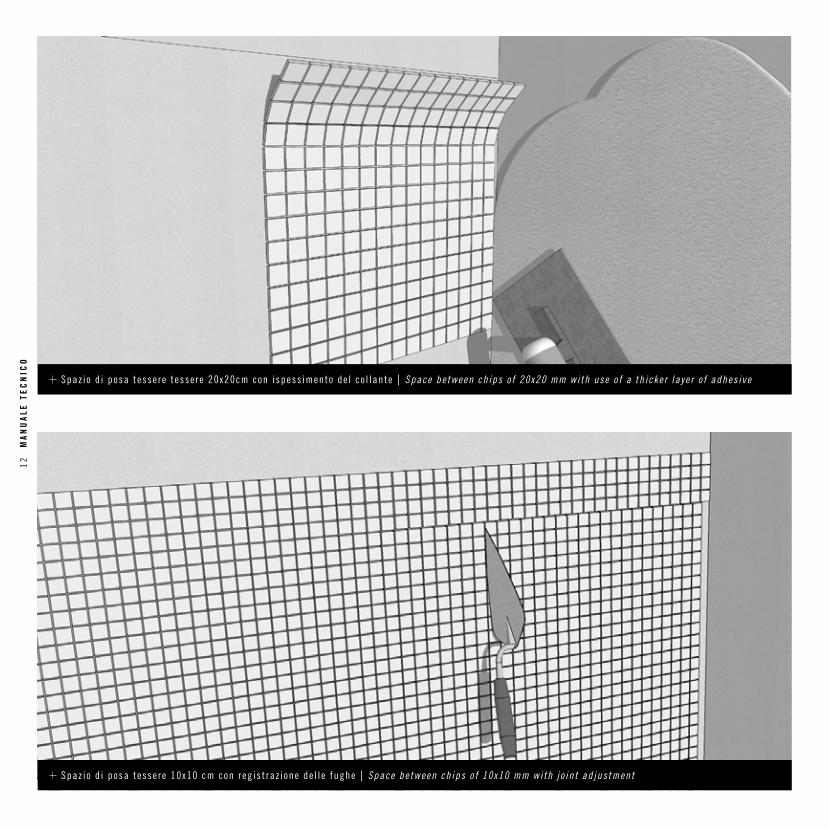
Spaz io d i posa tesse re tesse re 20x20cm con i spess imento de l co l lante | Space be tween ch ips o f 20x20 mm wi th use o f a th icke r laye r o f adhes ive
Spaz io d i posa tesse re 10x10 cm con reg is t raz ione de l l e fughe | Space be tween ch ips o f 10x10 mm wi th j o in t ad jus tment
12
MA
NU
ALE
TE
CN
ICO
POSA MOSAICO IN VETRO INSTALL ING GLASS MOSAIC
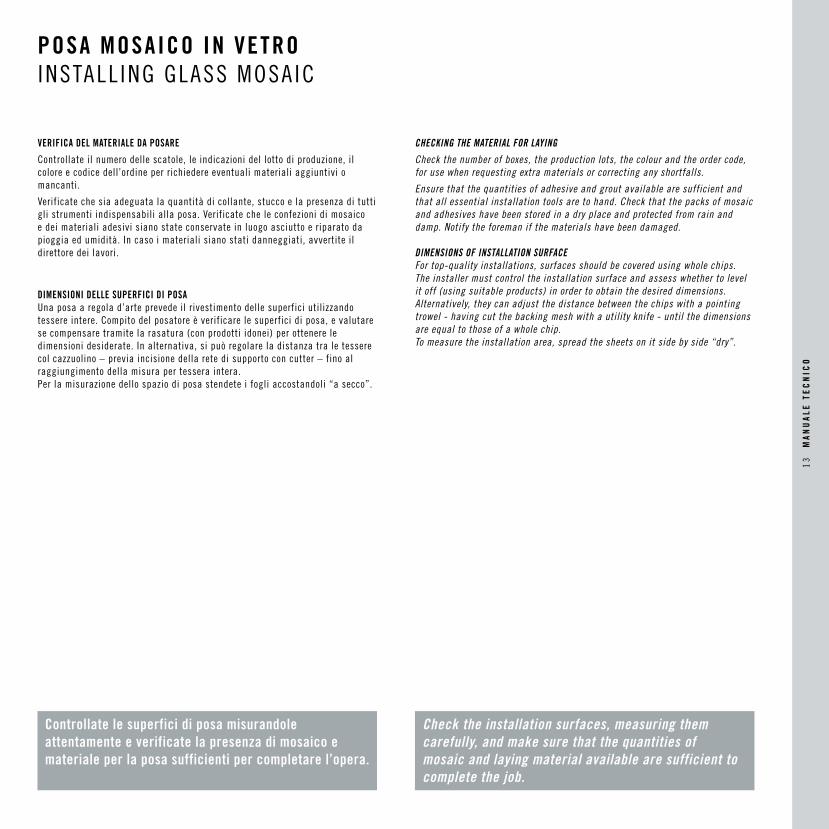
Controllate le superfici di posa misurandole attentamente e verificate la presenza di mosaico e materiale per la posa sufficienti per completare l’opera.
Check the installation surfaces, measuring them carefully, and make sure that the quantities of mosaic and laying material available are sufficient to complete the job.
VERIFICA DEL MATERIALE DA POSARE
Controllate il numero delle scatole, le indicazioni del lotto di produzione, il colore e codice dell’ordine per richiedere eventuali materiali aggiuntivi o mancanti.
Verificate che sia adeguata la quantità di collante, stucco e la presenza di tutti gli strumenti indispensabili alla posa. Verificate che le confezioni di mosaico e dei materiali adesivi siano state conservate in luogo asciutto e riparato da pioggia ed umidità. In caso i materiali siano stati danneggiati, avvertite il direttore dei lavori.
DIMENSIONI DELLE SUPERFICI DI POSAUna posa a regola d’arte prevede il rivestimento delle superfici utilizzando tessere intere. Compito del posatore è verificare le superfici di posa, e valutare se compensare tramite la rasatura (con prodotti idonei) per ottenere le dimensioni desiderate. In alternativa, si può regolare la distanza tra le tessere col cazzuolino – previa incisione della rete di supporto con cutter – fino al raggiungimento della misura per tessera intera. Per la misurazione dello spazio di posa stendete i fogli accostandoli “a secco”.
CHECKING THE MATERIAL FOR LAYING
Check the number of boxes, the production lots, the colour and the order code, for use when requesting extra materials or correcting any shortfalls.
Ensure that the quantities of adhesive and grout available are sufficient and that all essential installation tools are to hand. Check that the packs of mosaic and adhesives have been stored in a dry place and protected from rain and damp. Notify the foreman if the materials have been damaged.
DIMENSIONS OF INSTALLATION SURFACEFor top-quality installations, surfaces should be covered using whole chips. The installer must control the installation surface and assess whether to level it off (using suitable products) in order to obtain the desired dimensions. Alternatively, they can adjust the distance between the chips with a pointing trowel - having cut the backing mesh with a utility knife - until the dimensions are equal to those of a whole chip.To measure the installation area, spread the sheets on it side by side “dry”.
13
MA
NU
ALE
TE
CN
ICO
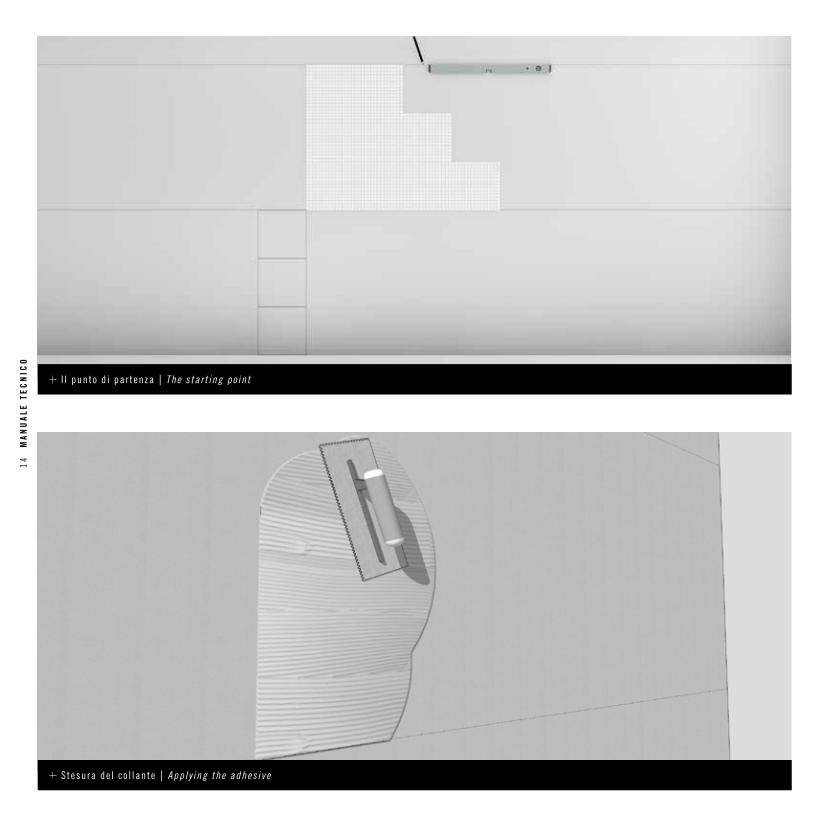
I l punto d i par tenza | The s ta r t ing po in t
S tesura de l co l lante | App l y ing the adhes ive
14
MA
NU
ALE
TE
CN
ICO

POSA MOSAICO IN VETRO INSTALL ING GLASS MOSAIC
Consultate sempre il piano di posa e cominciate ad applicare il collante solo quando avrete verificato tutte le fasi precedenti.
Always refer to the layout plan and do not start to apply adhesive until you have checked all the phases described above.
IL PUNTO DI PARTENZA
Prima di iniziare è importante tracciare delle linee per avere dei riferimenti per l’applicazione dei primi fogli. Consultate il piano di posa, se presente, o verificate la modularità dei fogli.
Individuate il punto di partenza più appropriato e disegnate, con l’aiuto di staggia e livella, una prima linea orizzontale che coinciderà col 1° livello pari a 3 fogli di altezza dal pavimento. Successivamente, partendo da questa linea va tracciata una 2° linea coincidente col 2° livello di 3 fogli di altezza.
Si dovrà iniziare col posare il materiale nell’area tra il 1° e il 2° livello. Si proseguirà quindi col posare nell’area sotto il 1° livello, concludendo la posa posando il materiale nell’area sopra il 2° livello fino all’altezza stabilita. Per non creare dislivelli, durante la posa dei fogli di mosaico, non dovrà mai eccedere la colla all’esterno dei fogli.
STESURA DEL COLLANTEIl collante va preparato seguendo le indicazioni riportate nella sua scheda tecnica. È in questo modo che si ottiene un composto omogeneo, senza grumi. Il collante va applicato in modo uniforme ed omogeneo sulla superficie da rivestire. Per farlo, va utilizzata la parte dentata della spatola. Stendete solo la quantità di colla necessaria a rivestire piccole porzioni. La colla non deve mai sbordare dal perimetro dei fogli che si vanno a posare.
THE STARTING POINT
Before starting, it is important to draw reference lines for application of the first sheets. Refer to the layout plan, if available, or check the modular sheet size.
Find the most appropriate starting point and use a straightedge and spirit level to draw a first horizontal line to mark the first level, the height of 3 sheets above the floor. Then draw a second line, a further 3 sheets high, starting from this line.
Installation of the material must be started in the area between the 1st and 2nd levels. Then move on to install the material in the area underneath the 1st level line and complete the job by installing in the area above the 2nd level, up to the chosen height. To ensure even laying of the mosaic sheets, do not apply excess adhesive to the outside of the sheets.
APPLYING THE ADHESIVEPrepare the adhesive in accordance with the instructions in its technical data sheet. This will allow the production of a uniform, lump-free mixture. The adhesive must be applied to the surface for coating smoothly and evenly. Use the toothed side of the spatula. Only apply the amount of adhesive needed to cover small areas. The adhesive should never flow out beyond the edges of the sheets being installed.
15
MA
NU
ALE
TE
CN
ICO
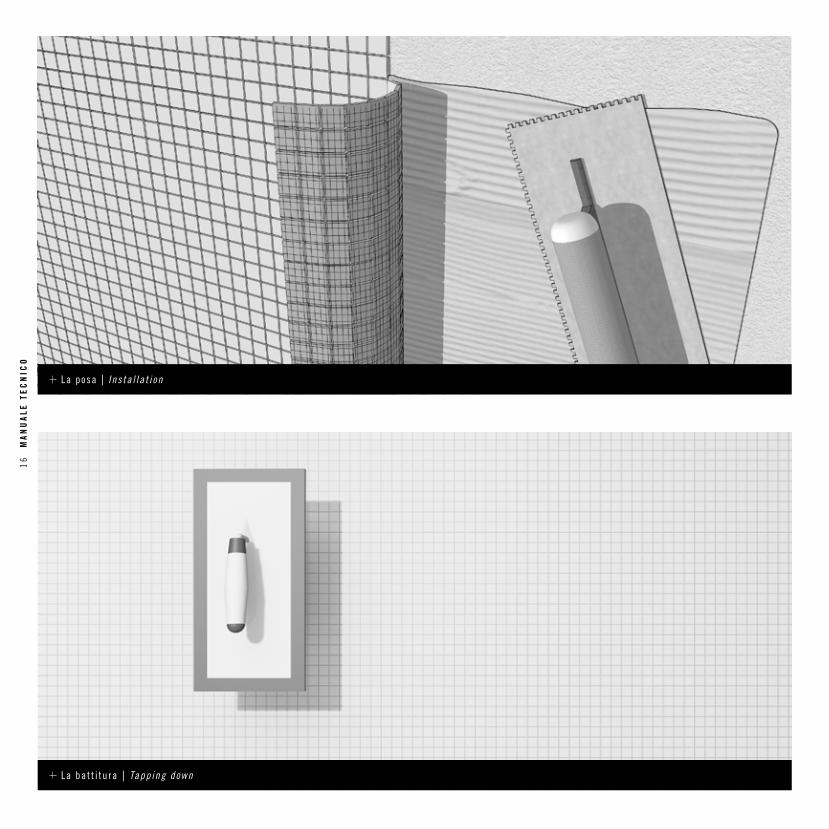
La posa | I ns ta l la t i on
La bat t i tu ra | Tapp ing down
16
MA
NU
ALE
TE
CN
ICO
POSA MOSAICO IN VETRO INSTALL ING GLASS MOSAIC
Attenetevi alle indicazioni dei fornitori sulle variabili dei tempi di apertura dei collanti e sulla loro preparazione; seguite le indicazioni sulla sicurezza presenti in etichetta.
Comply with suppliers’ recommendations concerning the adhesive preparation and the variability of adhesive open times and follow the safety instructions on the label.
POSA SU RETEAppoggiate il lato con la rete dei fogli di mosaico direttamente sullo strato di colla, premendo delicatamente e verificando che la distanza tra i fogli sia la stessa di quella tra le tessere.
BATTITURALa battitura con frattazzo gommato permette alla colla di penetrare tra le tessere.Il collante deve penetrare tra le maglie della rete e le tessere, cioè occupare gli spazi delle fughe (indicatore di buona compressione avvenuta) lasciando però circa 1,5 mm di spessore libero per la successiva stuccatura. Con la battitura potrete effettuare le eventuali correzioni laterali per allineare perfettamente le fughe. La colla non deve eccedere dalle fughe; se accade, ricordate di rimuovere tempestivamente la colla in eccesso dalle fughe, usando la punta del cazzuolino, o del cacciavite, o la punta di una spugna inumidita per permettere il riempimento delle fughe con lo stucco. Ricordate di rimuovere tempestivamente le eventuali tracce di colla dalla superficie del mosaico con una spugna inumidita.
INSTALLATION OF MESH-MOUNTED MOSAICSPlace the mesh-backed sides of the mosaic sheets directly on the layer of adhesive, pressing gently and making sure that the gap between the sheets is the same as that between the chips.
TAPPING DOWNTapping with a rubber-coated plastering trowel allows the adhesive to penetrate between the chips. The adhesive must penetrate between the openings in the mesh and the chips, so filling the gaps in the joints (indicating that the mosaic has been tapped down effectively), while leaving a thickness of about 1.5 mm free for the final grout.By gently tapping you can make the necessary sideways adjustments to align the joints properly. Excess adhesive must not come out of the joints. If this happens, remember to quickly eliminate the excess adhesive from the joints using the tip of the pointing trowel or screwdriver, or the tip of a wet sponge so the joints can be filled with grout. Remember to remove any adhesive residues from the surface of the mosaic with a damp sponge without delay.
17
MA
NU
ALE
TE
CN
ICO
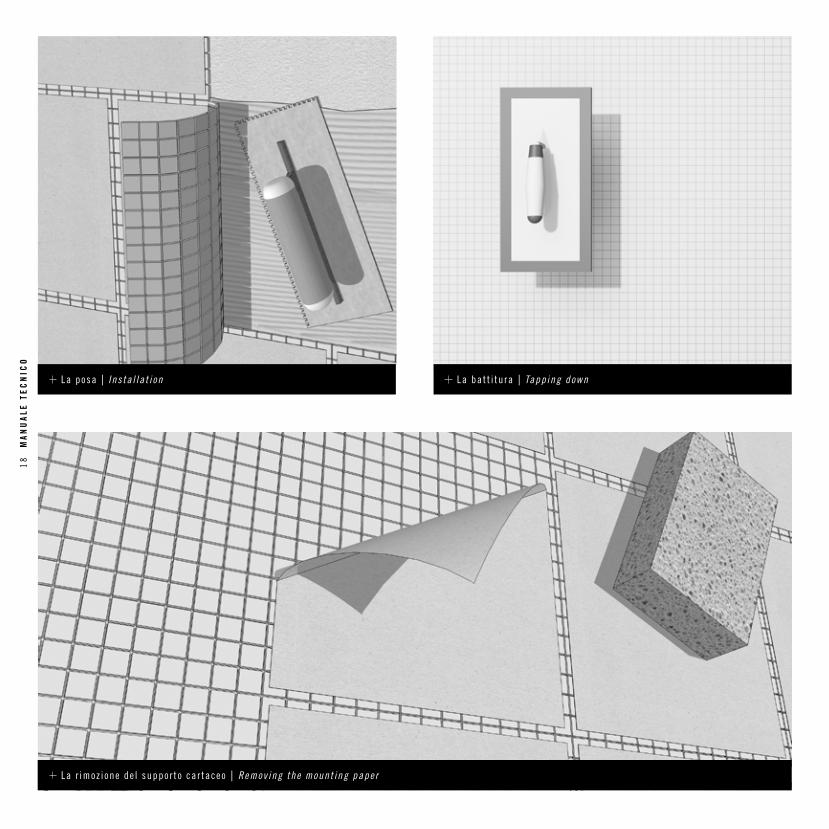
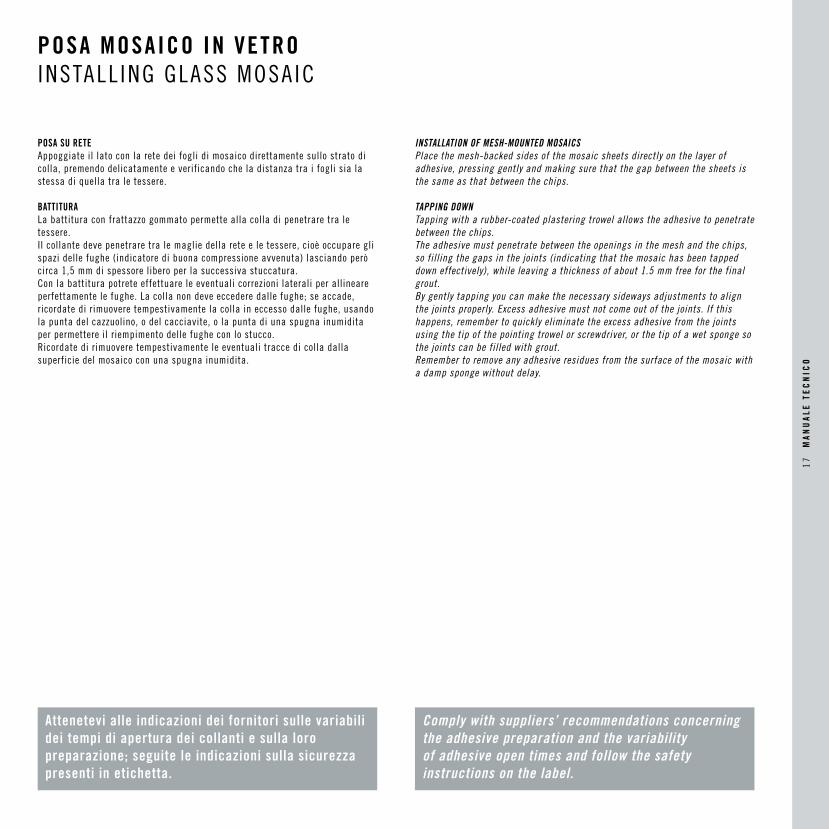
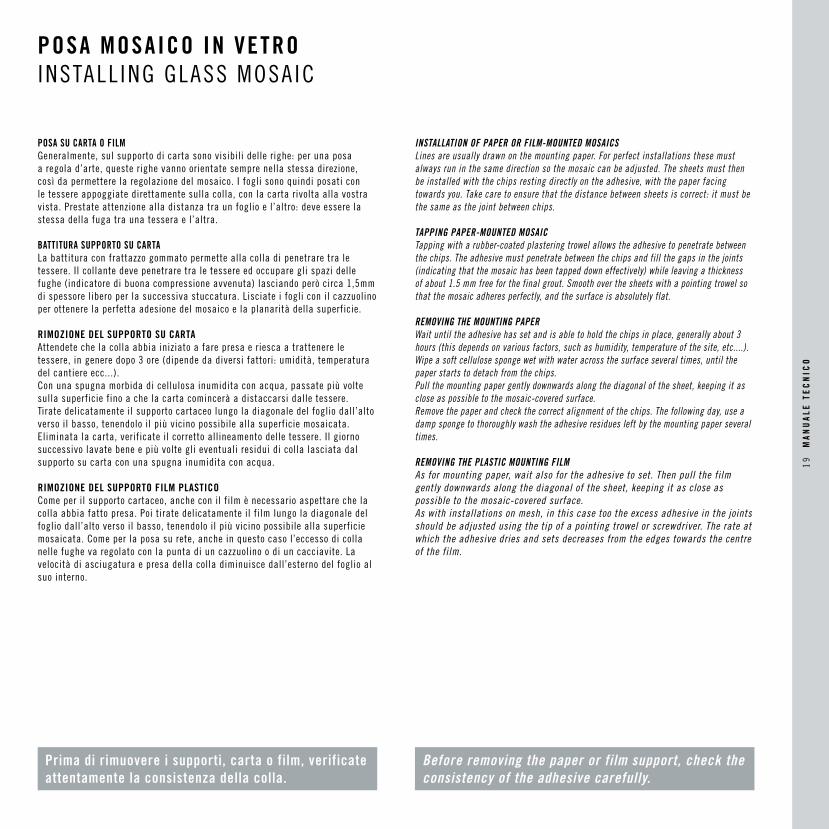
La posa | I ns ta l la t i on
La r imoz ione de l suppor to car taceo | Remov ing the mount ing paper
La bat t i tu ra | Tapp ing down
18
MA
NU
ALE
TE
CN
ICO
POSA MOSAICO IN VETRO INSTALL ING GLASS MOSAIC
Prima di rimuovere i supporti, carta o film, verificate attentamente la consistenza della colla.
POSA SU CARTA O FILMGeneralmente, sul supporto di carta sono visibili delle righe: per una posa a regola d’arte, queste righe vanno orientate sempre nella stessa direzione, così da permettere la regolazione del mosaico. I fogli sono quindi posati con le tessere appoggiate direttamente sulla colla, con la carta rivolta alla vostra vista. Prestate attenzione alla distanza tra un foglio e l’altro: deve essere la stessa della fuga tra una tessera e l’altra.
BATTITURA SUPPORTO SU CARTALa battitura con frattazzo gommato permette alla colla di penetrare tra le tessere. Il collante deve penetrare tra le tessere ed occupare gli spazi delle fughe (indicatore di buona compressione avvenuta) lasciando però circa 1,5mm di spessore libero per la successiva stuccatura. Lisciate i fogli con il cazzuolino per ottenere la perfetta adesione del mosaico e la planarità della superficie.
RIMOZIONE DEL SUPPORTO SU CARTAAttendete che la colla abbia iniziato a fare presa e riesca a trattenere le tessere, in genere dopo 3 ore (dipende da diversi fattori: umidità, temperatura del cantiere ecc...). Con una spugna morbida di cellulosa inumidita con acqua, passate più volte sulla superficie fino a che la carta comincerà a distaccarsi dalle tessere.Tirate delicatamente il supporto cartaceo lungo la diagonale del foglio dall’alto verso il basso, tenendolo il più vicino possibile alla superficie mosaicata. Eliminata la carta, verificate il corretto allineamento delle tessere. Il giorno successivo lavate bene e più volte gli eventuali residui di colla lasciata dal supporto su carta con una spugna inumidita con acqua.
RIMOZIONE DEL SUPPORTO FILM PLASTICOCome per il supporto cartaceo, anche con il film è necessario aspettare che la colla abbia fatto presa. Poi tirate delicatamente il film lungo la diagonale del foglio dall’alto verso il basso, tenendolo il più vicino possibile alla superficie mosaicata. Come per la posa su rete, anche in questo caso l’eccesso di colla nelle fughe va regolato con la punta di un cazzuolino o di un cacciavite. La velocità di asciugatura e presa della colla diminuisce dall’esterno del foglio al suo interno.
INSTALLATION OF PAPER OR FILM-MOUNTED MOSAICSLines are usually drawn on the mounting paper. For perfect installations these must always run in the same direction so the mosaic can be adjusted. The sheets must then be installed with the chips resting directly on the adhesive, with the paper facing towards you. Take care to ensure that the distance between sheets is correct: it must be the same as the joint between chips.
TAPPING PAPER-MOUNTED MOSAICTapping with a rubber-coated plastering trowel allows the adhesive to penetrate between the chips. The adhesive must penetrate between the chips and fill the gaps in the joints (indicating that the mosaic has been tapped down effectively) while leaving a thickness of about 1.5 mm free for the final grout. Smooth over the sheets with a pointing trowel so that the mosaic adheres perfectly, and the surface is absolutely flat.
REMOVING THE MOUNTING PAPERWait until the adhesive has set and is able to hold the chips in place, generally about 3 hours (this depends on various factors, such as humidity, temperature of the site, etc....).Wipe a soft cellulose sponge wet with water across the surface several times, until the paper starts to detach from the chips.Pull the mounting paper gently downwards along the diagonal of the sheet, keeping it as close as possible to the mosaic-covered surface.Remove the paper and check the correct alignment of the chips. The following day, use a damp sponge to thoroughly wash the adhesive residues left by the mounting paper several times.
REMOVING THE PLASTIC MOUNTING FILMAs for mounting paper, wait also for the adhesive to set. Then pull the film gently downwards along the diagonal of the sheet, keeping it as close as possible to the mosaic-covered surface.As with installations on mesh, in this case too the excess adhesive in the joints should be adjusted using the tip of a pointing trowel or screwdriver. The rate at which the adhesive dries and sets decreases from the edges towards the centre of the film.
Before removing the paper or film support, check the consistency of the adhesive carefully.
19
MA
NU
ALE
TE
CN
ICO
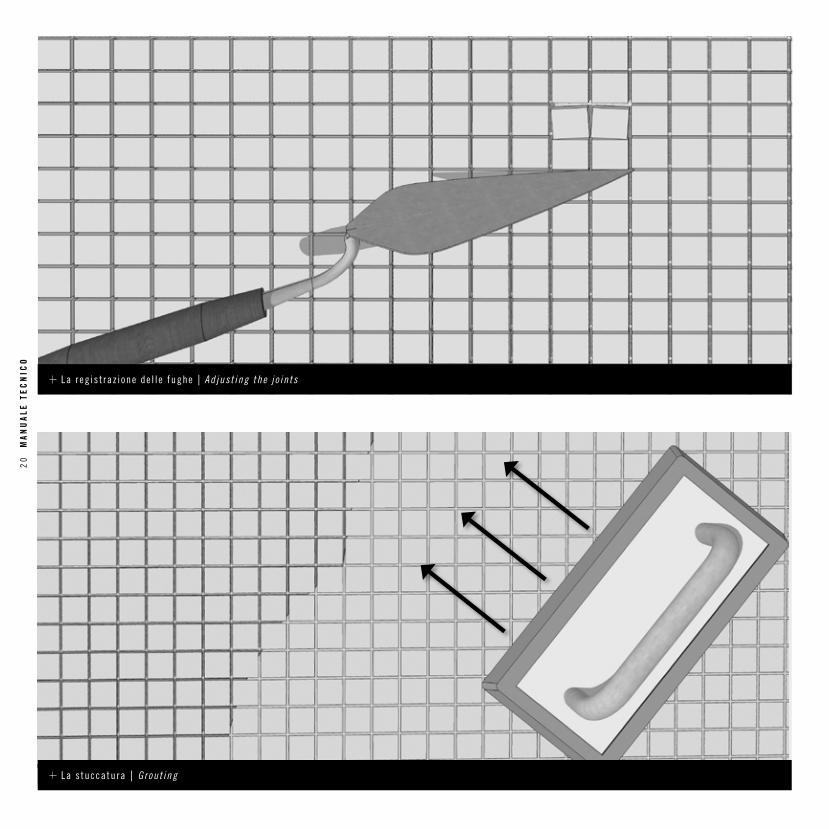
La reg is t raz ione de l l e fughe | Ad jus t ing the j o in ts
La s tuccatura | Grout ing
20
MA
NU
ALE
TE
CN
ICO
POSA MOSAICO IN VETRO INSTALL ING GLASS MOSAIC
Il valore di una corretta registrazione delle tessere sul risultato estetico finale è altissimo.
REGISTRAZIONE DELLE FUGHEPrima che la colla abbia fatto completamente presa è necessario registrare la distanza delle tessere, sia tra i fogli appena applicati che tra le singole tessere. Le tessere si avvicinano o si allontanano con il cazzuolino tagliando la rete sottostante, ancora immersa nella colla, con un cutter. È possibile evitare di tagliare le tessere variando le fughe impercettibilmente, per ottenere una posa a regola d’arte.
PREPARAZIONE STUCCO EPOSSIDICO / COLOREPOXYMescolate i due componenti seguendo le istruzioni riportate sull’etichetta e miscelate fino ad ottenere un impasto uniforme. Le confezioni sono predosate: non modificate il rapporto di miscelazione e non aggiungete altri prodotti (acqua, ecc.)Attenetevi alle norme di sicurezza indicate e indossate indumenti di protezione per il viso e per le mani durante tutta la fase di stuccatura.
STUCCATURA EPOSSIDICAPrima di procedere alla stuccatura verificate che la superficie sia perfettamente asciutta e che non ci siano residui di acqua o detergente tra le fughe; asportate con un cutter eventuali eccedenze di colla nelle fughe. Con la cazzuola deponete lo stucco sul frattazzo di gomma, e stendete Colorepoxy muovendo il frattazzo in diagonale rispetto all’andamento delle tessere e dal basso verso l’alto, avendo cura di riempire le fughe in tutta la loro profondità.Con lo stesso strumento in posizione a taglio, asportate l’eccesso di materiale. La pulizia degli attrezzi e delle mani può essere eseguita con acqua quando Colorepoxy è fresco, meccanicamente o con adeguato pulitore quando è indurito.
ADJUSTING THE JOINTSBefore the adhesive sets completely, the gaps between chips have to be corrected, both between the sheets just installed and between the individual chips. Chips are moved closer together or apart using a pointing trowel, using a utility knife to cut through the mesh still immersed in the adhesive. It is possible to avoid cutting the chips by varying the joints almost imperceptibly, to achieve a perfect installation.
PREPARING EPOXY GROUT / COLOREPOXYMix the two components following the instructions in the label and stir to a smooth paste. The packs are preweighed in the correct proportions: do not modify the mixing ratio and do not add any other products (water, etc.).Follow the safety instructions provided and wear protective clothing for the face and hands throughout the grouting process.
GROUTING WITH EPOXYBefore grouting, check that the surface is perfectly dry with no residues of water or cleaning products in the joints; use a utility knife to remove any excess adhesive from the joints. Use the pointing trowel to transfer the grout to the rubber-coated plastering trowel and apply the Colorepoxy by moving the plastering trowel in lines diagonal to the chip rows, working upward and taking care to fill the entire depth of the joints.Use the edge of the plastering trowel to wipe away the surplus material. Tools and hands can be cleaned with water as long as the Colorepoxy is fresh, or mechanically or with a suitable cleaning product once it has set.
Correct chip positioning is essential for the final overall effect.
21
MA
NU
ALE
TE
CN
ICO
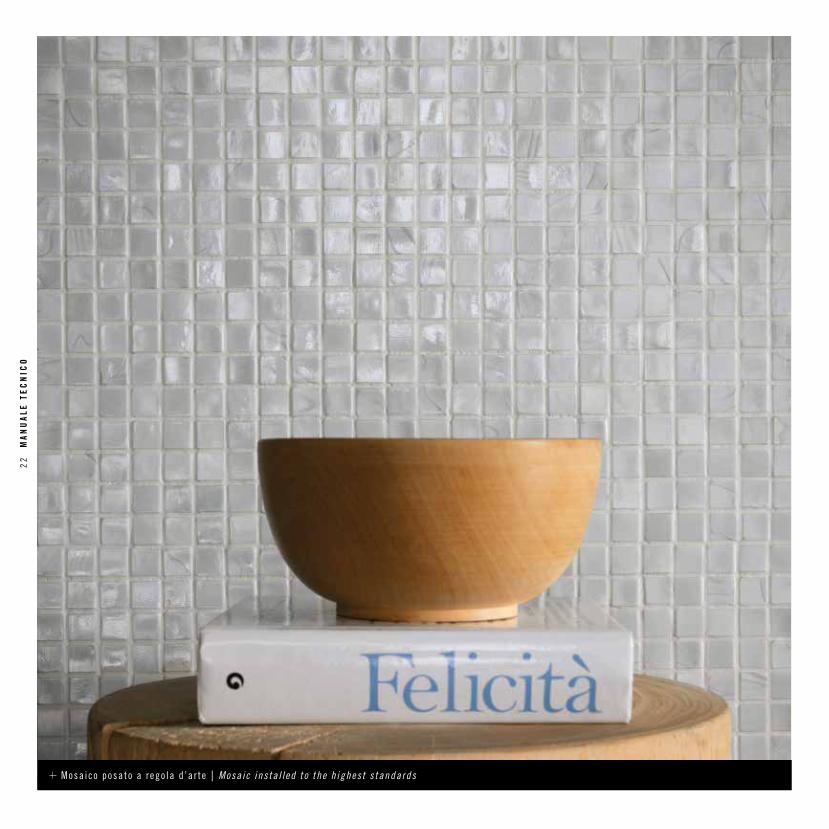
Mosa ico posato a rego la d ’a r te | Mosa ic ins ta l l ed to the h ighest s tandards
22
MA
NU
ALE
TE
CN
ICO
POSA MOSAICO IN VETRO INSTALL ING GLASS MOSAIC
Un mosaico ben posato e accuratamente pulito è sempre brillante e non mostra mai segni di invecchiamento.
PULIZIADopo l’applicazione dello stucco, poco prima del totale indurimento, cominciate la fase di pulizia utilizzando acqua o eventuali prodotti specifici (Kerapoxy Cleaner di Mapei).In un contenitore imbevete il feltro bianco (ad eccezione della collezione èmetallo per la quale è da utilizzare la spugna in cellulosa) e passatelo energicamente in senso circolare per rimuovere, emulsionandolo, lo stucco in eccesso e appianare le fughe. Risciacquate con una spugna ed acqua pulita.Per eliminare tutti gli aloni e restituire brillantezza al mosaico, ripetete l’operazione dopo qualche ora, terminando sempre con un ultimo risciacquo con acqua pulita e alcool.
MANUTENZIONE ORDINARIA
Per la pulizia giornaliera suggeriamo di usare detergenti neutri comuni, e non utilizzare oli, cera, acido fluoridrico, fosforico e ortofosforico o prodotti detergenti che li contengano.
Per la pulizia straordinaria di depositi di calcare o igienizzazione del mosaico, suggeriamo di utilizzare prodotti leggermente acidi e sconsigliamo l’uso di macchine a vapore su una stuccatura epossidica.
CLEANINGAfter grouting, just before the grout has totally set, start cleaning, using water or if preferred a specific cleaning product (Kerapoxy Cleaner by Mapei). Dip the white felt in a container of the preferred liquid (except for the èmetallo collection, when the cellulose sponge must be used) and rub briskly in a circular direction to remove the excess grout (by emulsifying it with the liquid) and smooth over the joints. Rinse with a sponge and clean water.To eliminate all smears and restore the mosaic’s shine, repeat this operation a few hours later, always ending by rinsing with clean water and alcohol.
ROUTINE CARE
For daily cleaning, we recommend the use of ordinary neutral cleaners; oils, wax and hydrofluoric, phosphoric or orthophosphoric acids or cleaners which contain them should not be used.
To remove limescale or clean the mosaic we suggest using slightly acidic products and advise against using steam cleaning appliances on epoxy grouting.
A clean and well-laid mosaic always has an attractive shine and never shows signs of age.
23
MA
NU
ALE
TE
CN
ICO
1
2
3
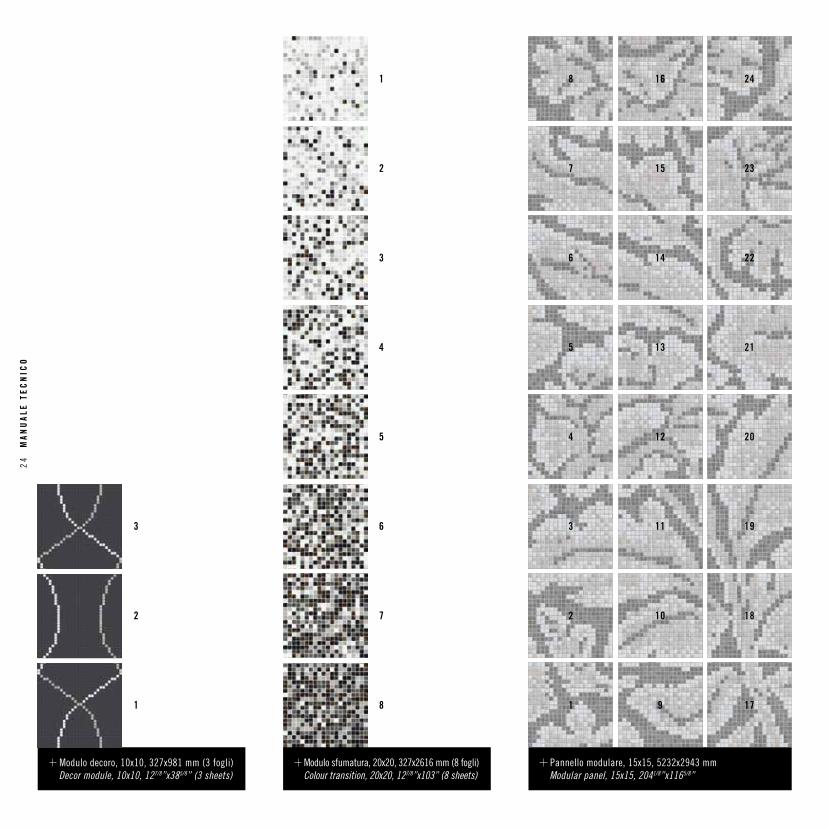
Modulo decoro, 10x10, 327x981 mm (3 fogli) Decor module, 10x10, 127/8”x385/8” (3 sheets)
Modulo sfumatura, 20x20, 327x2616 mm (8 fogli) Colour transition, 20x20, 127/8”x103” (8 sheets)
8
7
6
5
4
3
1
2
Pannello modulare, 15x15, 5232x2943 mm Modular panel, 15x15, 2041/8”x1165/8”
7
6
5
4
3
1
2
8
9
10
11
12
13
14
15
16
17
18
19
20
21
22
23
24
24
MA
NU
ALE
TE
CN
ICO

POSE PARTICOLARI SPECIAL INSTALLAT ION JOBS
Aprite tutte le confezioni e stendete a terra tutto lo sviluppo del decoro; verificate che la numerazione dei fogli sia in accordo con le indicazioni del piano di posa.
SFUMATURELe sfumature sono composte da moduli di 7-8 fogli - a seconda delle dimensioni delle tessere - di miscele di tonalità graduate. I fogli sono numerati ed il piano di posa vi indicherà se il modulo sarà verticale, orizzontale o con sfumatura dal chiaro allo scuro o viceversa. Procedete con la posa sempre tracciando sulla superficie delle linee di riferimento, tenendo presente lo sviluppo completo della sfumatura.Una confezione contiene un intero modulo.
DECORI MODULARII decori possono essere composti da uno o più fogli che creano il modulo. È molto importante osservare bene il piano di posa perché alcuni moduli sono molto complessi. Vi suggeriamo di verificare a terra o su un piano di lavoro accostando i fogli, la porzione del modulo che andrete a posare.Procedete con la posa sempre tracciando sulla superficie delle linee di riferimento.
MOSAICO ARTISTICO COMPUTERIZZATO E PROGETTI PERSONALIZZATISono opere realizzate con l’ausilio del computer con tessere montate ortogonalmente su carta o su rete. È indispensabile seguire il piano di posa fornito assieme al materiale; se non c’è richiedetene sempre una copia: non iniziate la posa senza questo indispensabile strumento, anche se il progetto vi sembra semplice.
Open all the packs and spread the entire decoration on the ground, checking that the number of the sheets is as marked in the layout plan.
SHADESShades consist of modules of 7-8 sheets, depending on chip size, of blends of gradually varying colours. The sheets are numbered and the layout plan will tell you whether the module will be vertical or horizontal, or with colours running from light to dark or vice-versa. Before installing, always draw reference lines of the surface, bearing in mind the complete colour transition.A pack contains a whole module.
MODULAR DECOR MOSAICSModular Decor mosaics may consist of one or more sheets. It is very important to follow the layout plan closely, because some modules are very complex. We advise you to check the portion of the module you are about to install by placing the sheets side by side on the ground or on a worktop. Before installing, always draw reference lines on the surface.
COMPUTER-AIDED ARTISTIC MOSAICS AND CUSTOMISED DESIGNSThese are created with the aid of a computer using chips mounted orthogonally on paper or mesh. It is essential to follow the installation plan provided with the material; if it is not there, always ask for a copy and never start installation without this essential aid, even if the design looks simple to you.
Prestate attenzione alla numerazione dei fogli e alla disposizione delle indicazioni numeriche sugli stessi.
Apart from the sheet numbers, also pay attention to their numerical indications.
Sfumature, decori modulari, mosaico artistico computerizzato e progetti personalizzati
Shades, modular decor mosaics and computer-aided artistic mosaics and customised designs
25
MA
NU
ALE
TE
CN
ICO
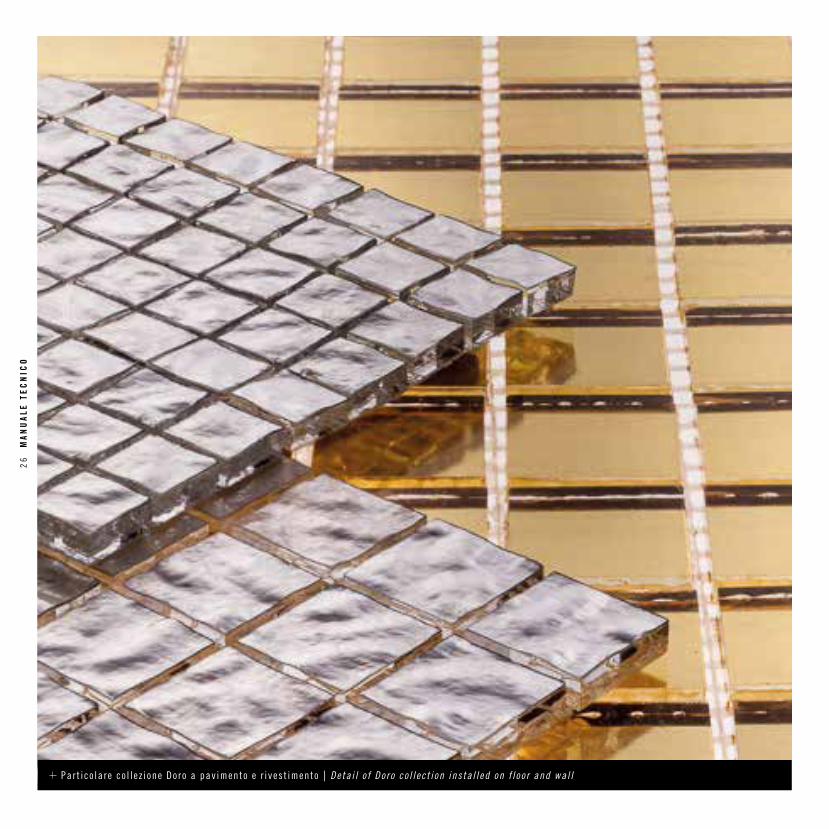
Pa r t i co la re co l l e z i one Doro a pav imento e r i ves t imento | De ta i l o f Do ro co l l ec t i on ins ta l l ed on f l oo r and wa l l
26
MA
NU
ALE
TE
CN
ICO

GOLD MOSAICS
The Doro collection comes in three sizes - 10x10 mm, 15x15 mm and 20x20 mm -, two finishes - smooth and corrugated - and in two colours - 24 carat yellow gold and white gold.
The sheet of gold leaf is enclosed between two layers of glass, one thicker and one thinner. For floor installations it is advisable to lay the thicker layer of the glass facing upwards.
Doro for wall coverings: the chip in which the gold is visible through the thin cover.
Doro for floor coverings: the chip in which the gold is visible through the supporting layer of glass, with an effect of greater depth.
Doro collection chips can be cut by hand when laying using the traditional artistic mosaic method, opus incertum and tessellatum, and to complete a running wall decoration.
Caution: in the case of the Doro mosaic with white gold leaf, only the floor-covering type must be laid immersed in water.
For further information contact the Mosaico+ Technical Department.
POSE PARTICOLARI SPECIAL INSTALLAT ION JOBS
IL MOSAICO IN ORO La collezione Doro è disponibile in tre formati - 10x10 mm, 15x15mm e 20x20mm -, in due finiture - liscia e ondulata - e in due colorazioni - oro giallo a 24 carati e oro bianco.
La foglia d’oro è racchiusa fra due strati di vetro, uno più sottile e uno più spesso. Per la posa a pavimento è consigliato posare il materiale con lo strato di vetro più spesso verso l’alto.
Doro per rivestimento: la tessera in cui l’oro è osservabile dopo il vetro della cartella.
Doro da pavimento: la tessera in cui l’oro è osservabile dopo il vetro di supporto, con un evidente effetto di profondità.
Le tessere della collezione Doro possono essere tagliate manualmente nella tecnica del mosaico artistico tradizionale, opus incertum e tessellatum e per la chiusura di pareti ad andamento.
Attenzione: in immersione il mosaico Doro con foglia d’oro bianco va posato solo nel tipo a pavimento.
Per ulteriori informazioni contattate l’ufficio tecnico di Mosaico+.
Per la posa a pavimento è consigliato posare il materiale con lo strato di vetro più spesso verso l’alto; in immersione, Doro con foglia d’oro bianco va posato esclusivamente nella versione a pavimento.
For floor installations it is advisable to lay the material with the thicker layer of the glass facing upwards; in the case of the Doro with white gold leaf, only the floor-covering type must be laid immersed in water.
Collezione Doro Collection Doro
27
MA
NU
ALE
TE
CN
ICO
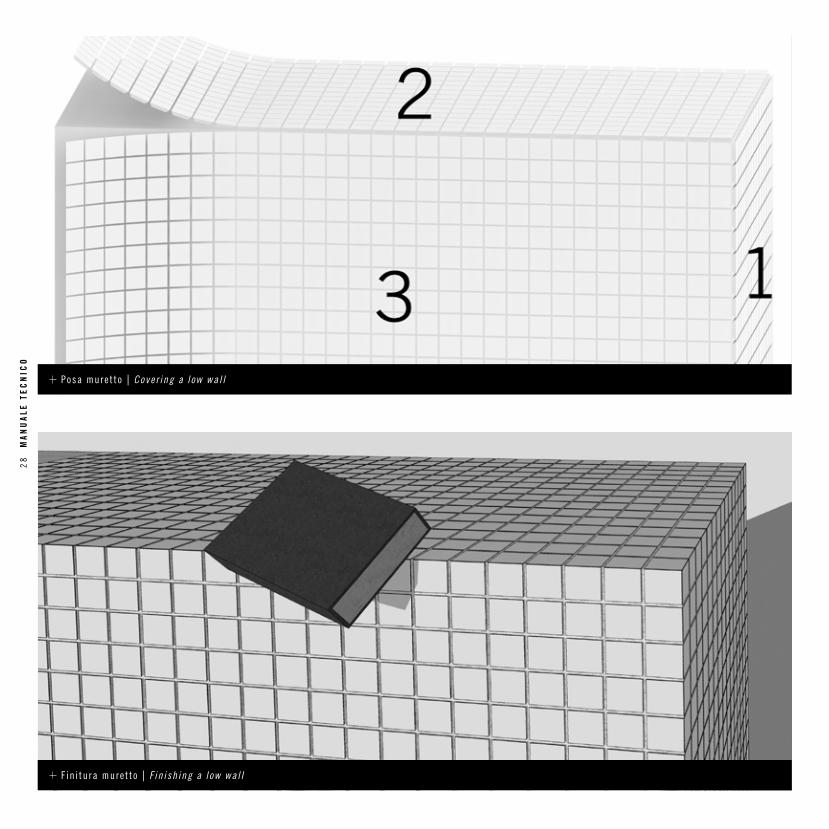
Posa mure t to | Cove r ing a l ow wa l l
F in i tu ra mure t to | F in ish ing a l ow wa l l
28
MA
NU
ALE
TE
CN
ICO
POSE PARTICOLARI SPECIAL INSTALLAT ION JOBS
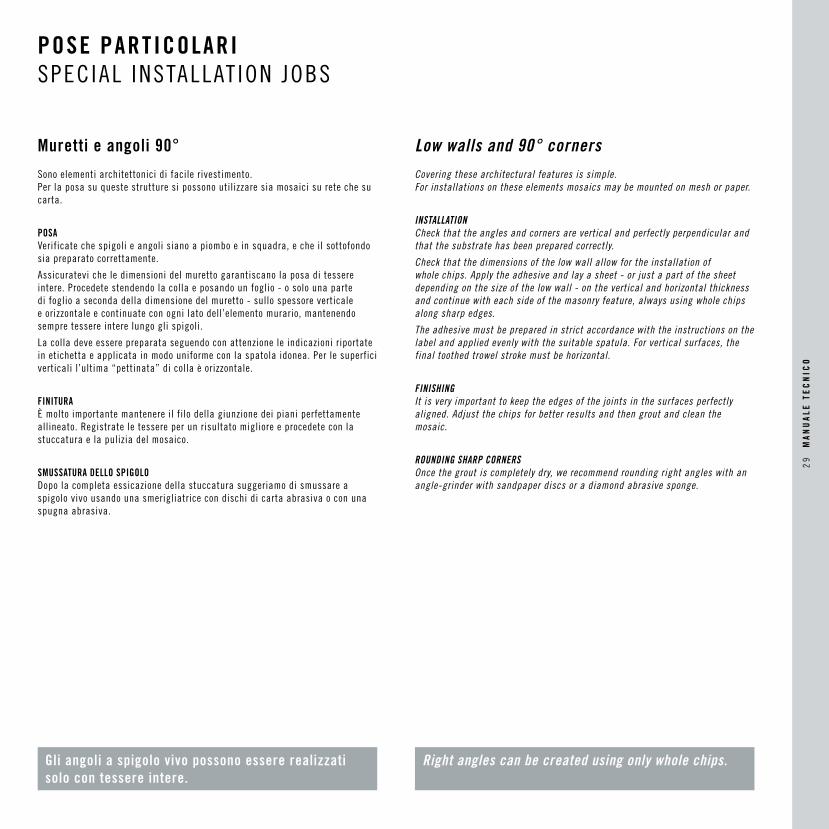
Sono elementi architettonici di facile rivestimento. Per la posa su queste strutture si possono utilizzare sia mosaici su rete che su carta.
POSA Verificate che spigoli e angoli siano a piombo e in squadra, e che il sottofondo sia preparato correttamente.
Assicuratevi che le dimensioni del muretto garantiscano la posa di tessere intere. Procedete stendendo la colla e posando un foglio - o solo una parte di foglio a seconda della dimensione del muretto - sullo spessore verticale e orizzontale e continuate con ogni lato dell’elemento murario, mantenendo sempre tessere intere lungo gli spigoli.
La colla deve essere preparata seguendo con attenzione le indicazioni riportate in etichetta e applicata in modo uniforme con la spatola idonea. Per le superfici verticali l’ultima “pettinata” di colla è orizzontale.
FINITURA È molto importante mantenere il filo della giunzione dei piani perfettamente allineato. Registrate le tessere per un risultato migliore e procedete con la stuccatura e la pulizia del mosaico.
SMUSSATURA DELLO SPIGOLO Dopo la completa essicazione della stuccatura suggeriamo di smussare a spigolo vivo usando una smerigliatrice con dischi di carta abrasiva o con una spugna abrasiva.
Covering these architectural features is simple. For installations on these elements mosaics may be mounted on mesh or paper.
INSTALLATION Check that the angles and corners are vertical and perfectly perpendicular and that the substrate has been prepared correctly.
Check that the dimensions of the low wall allow for the installation of whole chips. Apply the adhesive and lay a sheet - or just a part of the sheet depending on the size of the low wall - on the vertical and horizontal thickness and continue with each side of the masonry feature, always using whole chips along sharp edges.
The adhesive must be prepared in strict accordance with the instructions on the label and applied evenly with the suitable spatula. For vertical surfaces, the final toothed trowel stroke must be horizontal.
FINISHING It is very important to keep the edges of the joints in the surfaces perfectly aligned. Adjust the chips for better results and then grout and clean the mosaic.
ROUNDING SHARP CORNERS Once the grout is completely dry, we recommend rounding right angles with an angle-grinder with sandpaper discs or a diamond abrasive sponge.
Gli angoli a spigolo vivo possono essere realizzati solo con tessere intere.
Right angles can be created using only whole chips.
Muretti e angoli 90° Low walls and 90° corners
29
MA
NU
ALE
TE
CN
ICO
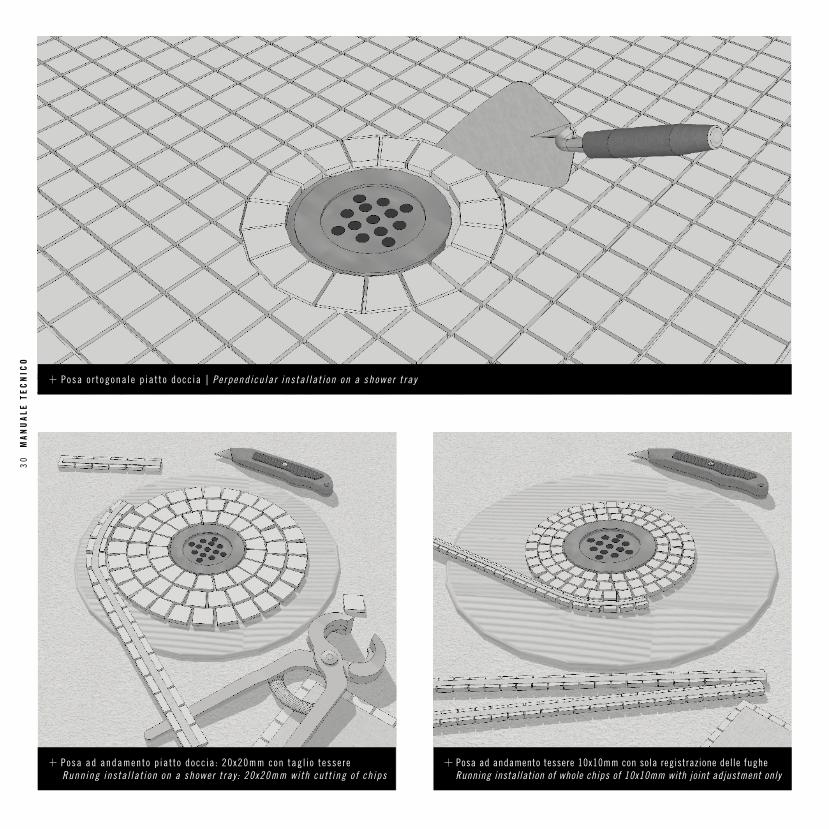
Posa o r togona le p ia t to docc ia | Pe rpend icu la r ins ta l la t i on on a shower t ray
Posa ad andamento p iatto doccia : 20x20mm con tagl io tessere Running instal lat ion on a shower t ray : 20x20mm with cutt ing of chips
Posa ad andamento tessere 10x10mm con sola registrazione delle fughe Running installation of whole chips of 10x10mm with joint adjustment only
30
MA
NU
ALE
TE
CN
ICO

POSE PARTICOLARI SPECIAL INSTALLAT ION JOBS
Rivestimento per realizzazioni personalizzate a filo pavimento di docce o vasche con uno scarico/piletta.
PREPARAZIONE Preparate adeguatamente il sottofondo secondo le indicazioni riguardanti gli ambienti a diretto contatto/immersione in acqua. Verificate quindi le pendenze, il supporto cementizio e che le procedure di impermeabilizzazione siano state eseguite correttamente.
La posa del mosaico può variare a seconda della tipologia di piletta.
Piletta rotonda: posa ad andamento o ortogonale.
Piletta rettangolare o quadrata: posa ortogonale alla piletta o al piatto doccia (se non sono ortogonali tra loro).
POSA ORTOGONALE Dopo la rasatura cominciate a posare la striscia di mosaico attorno alla piletta. Proseguite con la posa del piatto doccia indipendentemente dalla sua forma, e tagliate il foglio - o i fogli – con le pinze o la smerigliatrice in corrispondenza della striscia di mosaico che fa da cornice alla piletta.
POSA AD ANDAMENTO Tagliate i fogli in strisce: è molto importante per la posa a regola d’arte che siano file larghe solo una tessera. Iniziare a posare in cerchi concentrici intorno alla piletta; spostare le singole tessere col cazzuolino per rendere otticamente omogenea la fuga; nel caso di tessere 20x20 potrebbe essere necessario svasare le tessere nelle strisce più vicine alla piletta.
FINITURA Lasciate intorno alla piletta una fuga pari a quella del mosaico posato che riempirete, dopo la stuccatura, con un sigillante elastico adatto alle dilatazioni termiche cui sarà sottoposto il rivestimento.
Customised wall coverings, finishing flush with the floor, for showers or bathtubs with a floor drain/ siphon outlet.
PREPARATION Prepare the substrate properly following the instructions for locations in direct contact with/submerged in water. Then check the gradients and the concrete screed and that the waterproofing procedures have been carried out correctly.
The way the mosaic is installed may vary depending on the type of drain outlet.
Round drain: running or perpendicular installation.
Rectangular or square drain: installation perpendicular to the drain or the shower tray (if they are not perpendicular to each other).
PERPENDICULAR INSTALLATION After levelling, start laying the strip of mosaic around the drain. Proceed by installing the shower tray regardless of its shape and cut the sheet - or sheets - with pincers or an angle grinder where the strip of mosaic frames the drain.
RUNNING INSTALLATION Cut the sheets into strips: for installation to the highest standards these must be just one chip wide. Start laying in concentric circles around the drain; shift the individual chips with a pointing trowel to obtain even joints. With chips of 20x20 it may be necessary to taper the chips in the strips closest to the drain.
FINISHING Leave a joint equal to that in the mosaic installed around the drain and then fill it, after grouting, with an elastic sealant suitable for the thermal expansion and contraction that will occur in the covering.
Le pareti della doccia e il piatto doccia vanno sempre impermeabilizzati prima della posa del mosaico.
Custom-sized showers are constructed by creating a waterproofed area which is then covered with mosaic.
Piatto doccia Shower trays
31
MA
NU
ALE
TE
CN
ICO
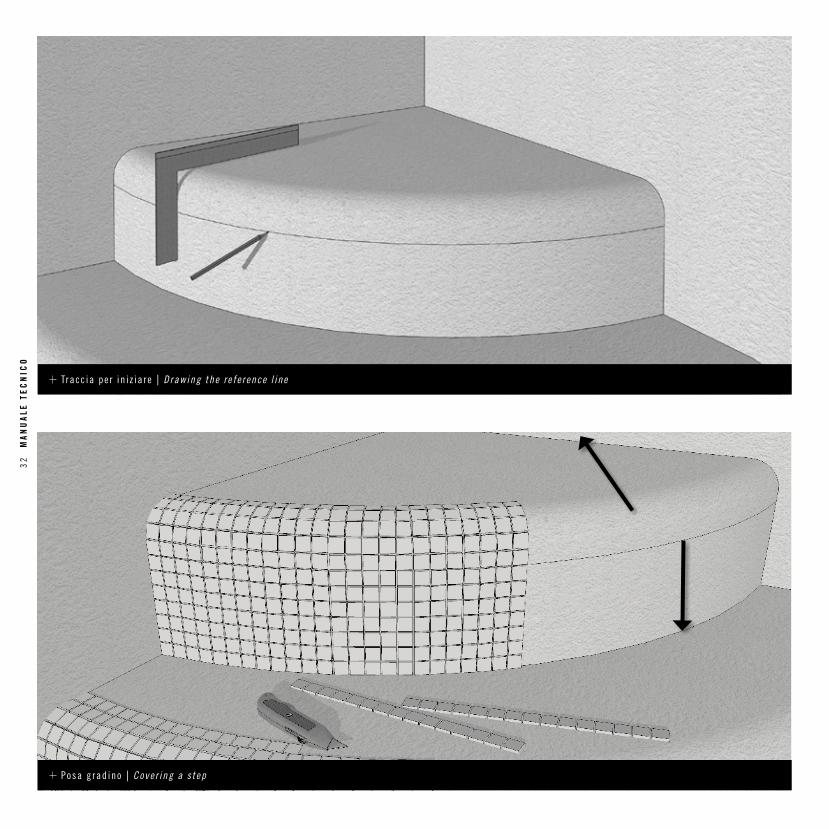
Tracc ia pe r in i z ia re | D rawing the re fe rence l ine
Posa g rad ino | Cove r ing a s tep
32
MA
NU
ALE
TE
CN
ICO
POSE PARTICOLARI SPECIAL INSTALLAT ION JOBS
Per esterni, interni, ambienti a contatto o immersi in acqua spesso si devono realizzare gradini, che generalmente vengono evidenziati con un segnapasso di colore diverso.
PREPARAZIONE DELLE STRISCE DI TESSERE Preparate un’adeguata quantità di strisce di tessere tagliando la rete o la carta di supporto dei fogli. Le tessere devono mantenere una mobilità per adeguarsi alle superfici arrotondate: questo si ottiene riducendo il supporto di carta o rete al minimo indispensabile per mantenere unite le tessere.
Lo stondamento (r = raggio) dei gradini varia a seconda delle dimensioni delle tessere, dallo spessore e dal supporto del mosaico; in generale vale questa tabella:
supporto dimensione tessere
10x10mm 15x15mm 20x20mm
SU RETE r = 30mm r = 35mm r = 50mm
SU CARTA r = 30mm r = 30mm r = 40mm
PER INIZIARE Prima di iniziare verificate sempre che il sottofondo, collante e stucco siano adeguati alla destinazione d’uso e pareggiate l’ortogonalità dei gradini. Tracciate una linea parallela al gradino più alto: vi servirà come riferimento per la posa dei primi fogli.
POSA La posa può essere fatta totalmente ad andamento o seguendo una tecnica mista. Nel primo caso il mosaico viene tagliato a strisce e posato seguendo l’andamento del gradino. Nel secondo caso, solamente l’angolo arrotondato verrà posato in andamento e successivamente tutta la restante parte andrà posata con mosaico ortogonale, tagliato in corrispondenza dell’ultima striscia messa ad andamento.
Iniziate la posa partendo dalla parte superiore dell’alzata del gradino, all’altezza della linea di riferimento che avete tracciato. Continuate a posare verso l’alto utilizzando le strisce o, a seconda della curvatura del gradino, le singole tessere tagliate e modellate. Successivamente posate l’alzata a partire dalla linea di riferimento verso il basso. Posate alle estremità della pedata una striscia di tessere che farà da limite esterno del rivestimento del gradino e usate uno spatolino per stendere la colla.
Steps often have to be created for exteriors, interiors and settings in contact with or submerged in water, and these are generally highlighted with marker strips in a different colour.
PREPARING THE STRIPS OF MOSAIC CHIPS Prepare a sufficient quantity of strips of mosaic chips by cutting the mesh or paper on which the sheets are mounted. The chips must be mobile enough to allow them to fit around the rounded surfaces: to do this, reduce the amount of paper or mesh to the minimum required to hold the chips together.
The rounding (r = radius) of the steps varies depending on the chip size and thickness and the mosaic mounting material; in general, this table applies:
mounting material chip size
10x10mm 15x15mm 20x20mm
ON MESH r = 30mm r = 35mm r = 50mm
ON PAPER r = 30mm r = 30mm r = 40mm
GETTING STARTED Before starting, always check that the substrate, adhesive and grout are suitable for the intended use, and level the steps so that they are perpendicular. Draw a line parallel to the top step: this will serve as reference when installing the first sheets.
INSTALLATION The entire mosaic can be installed by the running method or the techniques may be combined. In the first case, cut the mosaic into strips and lay it by fitting it onto the step. In the second case, only the rounded edge is covered by the running method, after which all the rest will be covered with mosaic laid perpendicular, cut to fit the last of the running strips.
Start installing from the top of the step riser, level with the line you have drawn. Keep adding mosaic upward, using the strips or, depending on the curvature of the step, the cut, shaped individual chips. Then install the mosaic on the riser and start working downwards from the reference line.
Lay a strip of chips at the end of the tread to form the outer edge of the step covering, and use a brush to apply the adhesive.
Gradini Steps
33
MA
NU
ALE
TE
CN
ICO
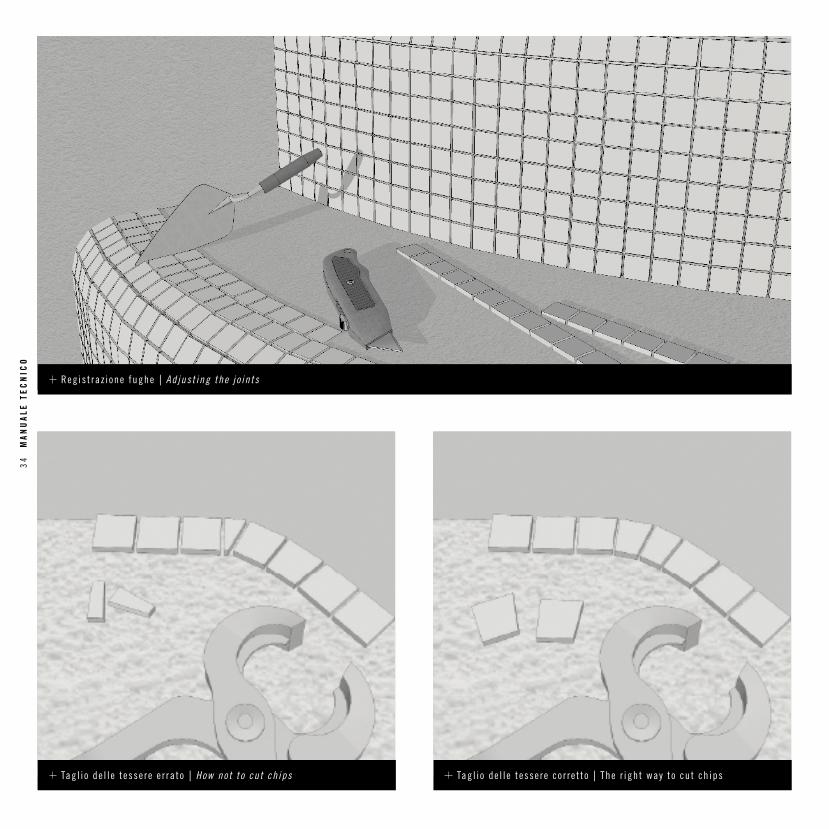
Reg is t raz ione fughe | Ad jus t ing the j o in ts
Tag l i o de l l e t esse re e r ra to | How not to cut ch ips Tag l i o de l l e t esse re co r re t to | The r ight way to cut ch ips
34
MA
NU
ALE
TE
CN
ICO
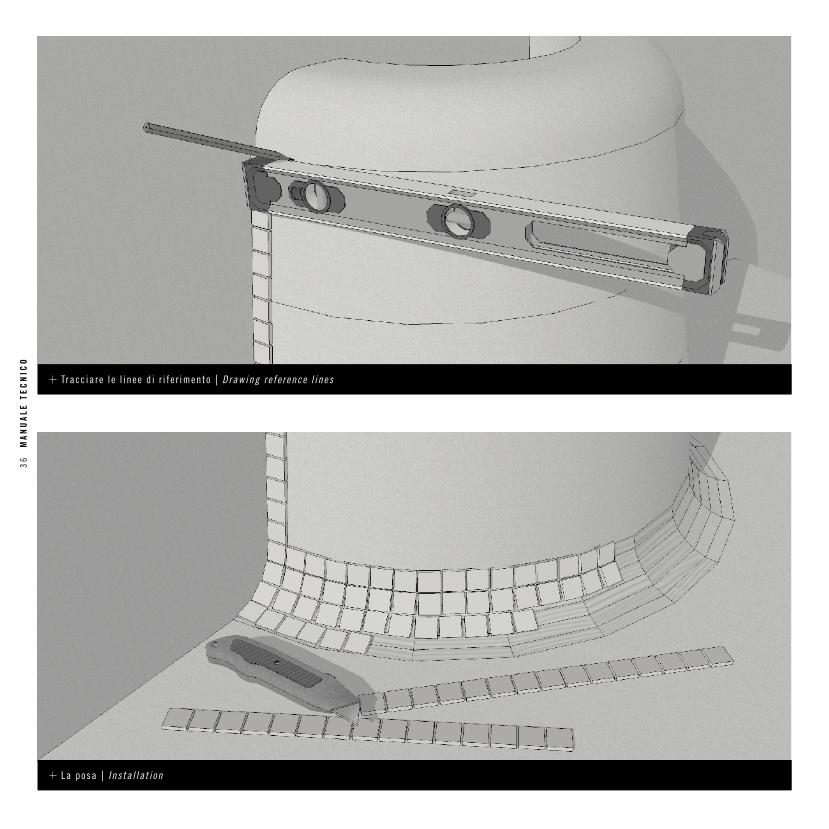
REGISTRAZIONE DELLE FUGHE Registrate le tessere col cazzuolino rendendo le fughe più uniformi possibile. Posate le strisce di mosaico seguendo l’”andamento” della struttura già posato partendo prima da un lato e poi dall’altro per alternare le strisce ed avere un effetto finale più omogeneo.
TAGLIO E MODELLAZIONE DELLE TESSERE Con le superfici curve vi troverete a dover riempire spazi molto piccoli tra le tessere: per un migliore effetto estetico vi suggeriamo in questi casi di togliere una tessera intera accanto allo spazio vuoto e sostituirla con due pezzi più grandi tagliati ad occupare la somma dello spazio vuoto.
Per queste tipologie di tagli potete utilizzare la pinza semplice.
STUCCATURA E PULIZIA Continuate a posare ponendo le strisce di tessere sul lato lungo della pedata del gradino successivo. Ripetete la stessa operazione per i gradini inferiori. Di seguito sistemate via via le fughe con il cazzuolino prima che il collante si rapprenda.
Procedete con stuccatura e pulizia come già illustrato in precedenza.
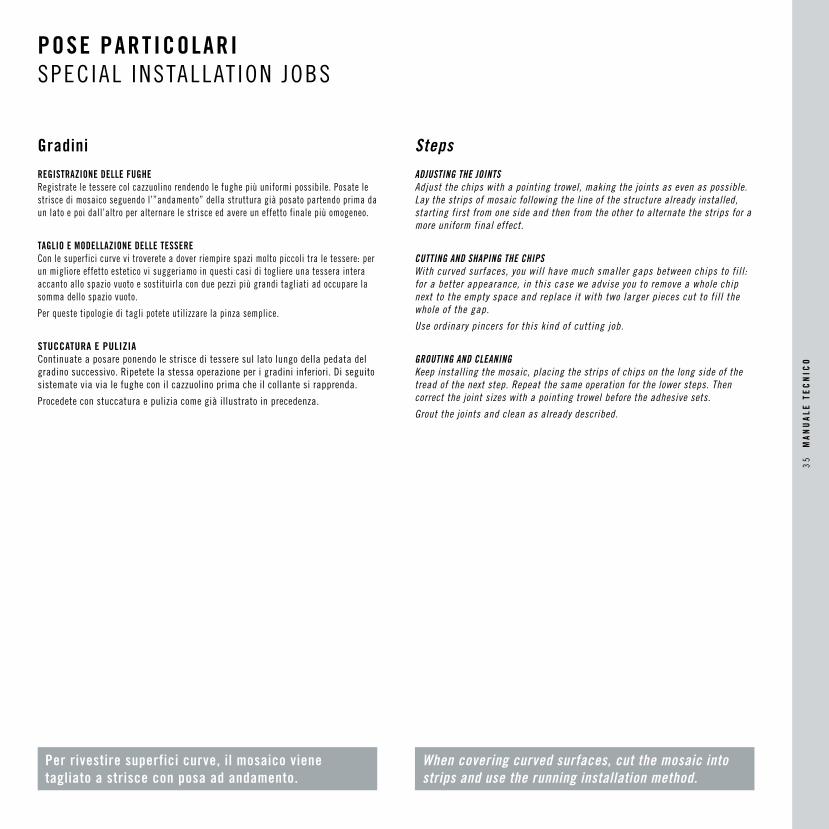
Per rivestire superfici curve, il mosaico viene tagliato a strisce con posa ad andamento.
When covering curved surfaces, cut the mosaic into strips and use the running installation method.
ADJUSTING THE JOINTS Adjust the chips with a pointing trowel, making the joints as even as possible. Lay the strips of mosaic following the line of the structure already installed, starting first from one side and then from the other to alternate the strips for a more uniform final effect.
CUTTING AND SHAPING THE CHIPS With curved surfaces, you will have much smaller gaps between chips to fill: for a better appearance, in this case we advise you to remove a whole chip next to the empty space and replace it with two larger pieces cut to fill the whole of the gap.
Use ordinary pincers for this kind of cutting job.
GROUTING AND CLEANING Keep installing the mosaic, placing the strips of chips on the long side of the tread of the next step. Repeat the same operation for the lower steps. Then correct the joint sizes with a pointing trowel before the adhesive sets.
Grout the joints and clean as already described.
POSE PARTICOLARI SPECIAL INSTALLAT ION JOBS
Gradini Steps
35
MA
NU
ALE
TE
CN
ICO
Tracc ia re l e l inee d i r i f e r imento | D rawing re fe rence l ines
La posa | I ns ta l la t i on
36
MA
NU
ALE
TE
CN
ICO
POSE PARTICOLARI SPECIAL INSTALLAT ION JOBS
Panca Bench
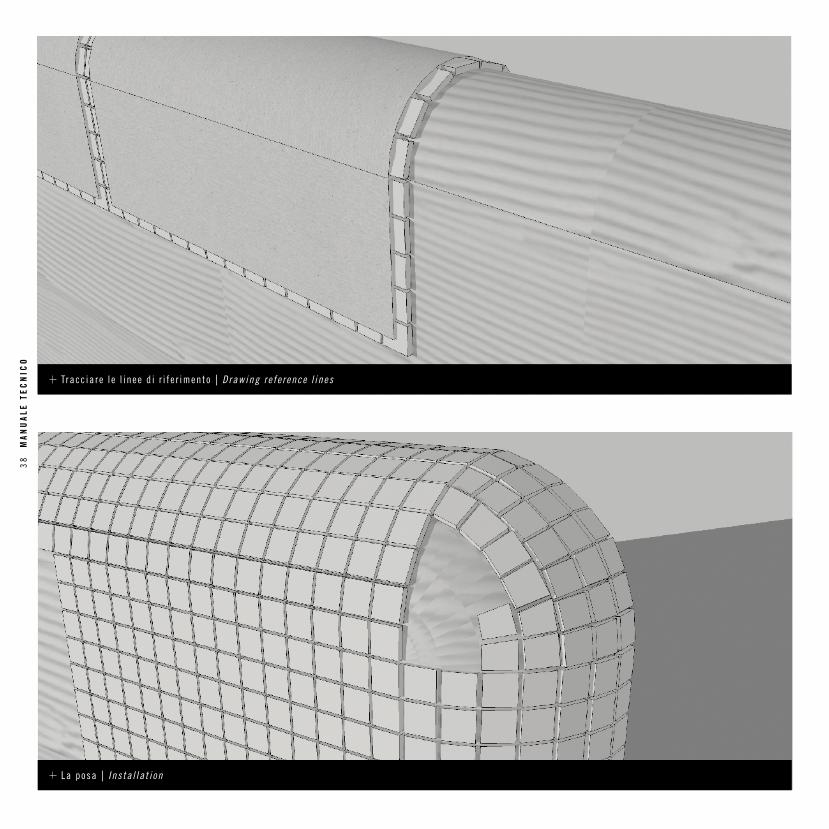
La panca, molto utilizzata in realizzazioni a contatto con acqua, è un elemento architettonico complesso fatto di diverse superfici curve.
PREPARAZIONE DELLE STRISCE DI TESSERE Preparate un’adeguata quantità di strisce di tessere tagliando la rete o la carta di supporto dei fogli come nel caso della posa dei gradini.
PER INIZIARE Occorre innanzitutto individuare il punto esatto di partenza per la posa del mosaico, visualizzando l’incrocio di angoli e spigoli anche se le superfici sono curve. La superficie dovrà essere regolare, liscia e compatta. Tracciate sullo schienale due segni perpendicolari accanto ai quali posate due file di tessere, che diventeranno i riferimenti principali. In generale, per le curve convesse (sgusce) vale questa tabella:
supporto dimensione tessere
10x10mm 15x15mm 20x20mm
SU RETE r = 50mm r = 50mm r = 80mm
SU CARTA r = 50mm r = 50mm r = 80mm
LA POSA Iniziate da uno spigolo, sempre posando una striscia di tessere orizzontale e una verticale, in corrispondenza con il reticolo del mosaico.
Continuate la posa con strisce orizzontali, aggiustando col cazzuolino la posizione delle tessere e seguendo “l’andamento” della superficie curva.
Nel caso il supporto del mosaico sia la carta, inumidirla con una spugna bagnata per adattare le tessere alla curva. Terminate così il rivestimento dello schienale. All’altezza della seduta, posate nuovamente le strisce di tessere di riferimento e continuate la posa seguendo il reticolo del mosaico.
Benches, very popular in contact with water, are complex architectural features made up of several curved surfaces.
PREPARING THE STRIPS OF MOSAIC CHIPS Prepare a sufficient quantity of strips of mosaic chips by cutting the mesh or paper on which the sheets are mounted, as when covering steps.
GETTING STARTED Firstly it is necessary to identify the exact starting point for the installation of the mosaic, envisaging the meeting of angles and edges even if the surfaces are smooth. The surface must be even, smooth and compact. Mark perpendicular lines on the back of the bench and install two rows of chips next to them; they form the main locator markers.
In general, for convex curves (shells), this table applies:
support chip size
10x10mm 15x15mm 20x20mm
MESH-BACKED r = 50mm r = 50mm r = 80mm
PAPER- FACED r = 50mm r = 50mm r = 80mm
INSTALLATION Start from a corner, always laying one horizontal and one vertical strip of chips, following the mosaic reference grid.
Keep installing horizontal strips, using a pointing trowel to adjust the position of the chips and following the form of the curved surface.
If the mosaic is mounted on paper, wet it with a damp sponge to adjust the chips to the curve. Complete covering the back in this way.
Lay more locator strips on the seat and continue the installation following the mosaic grid.
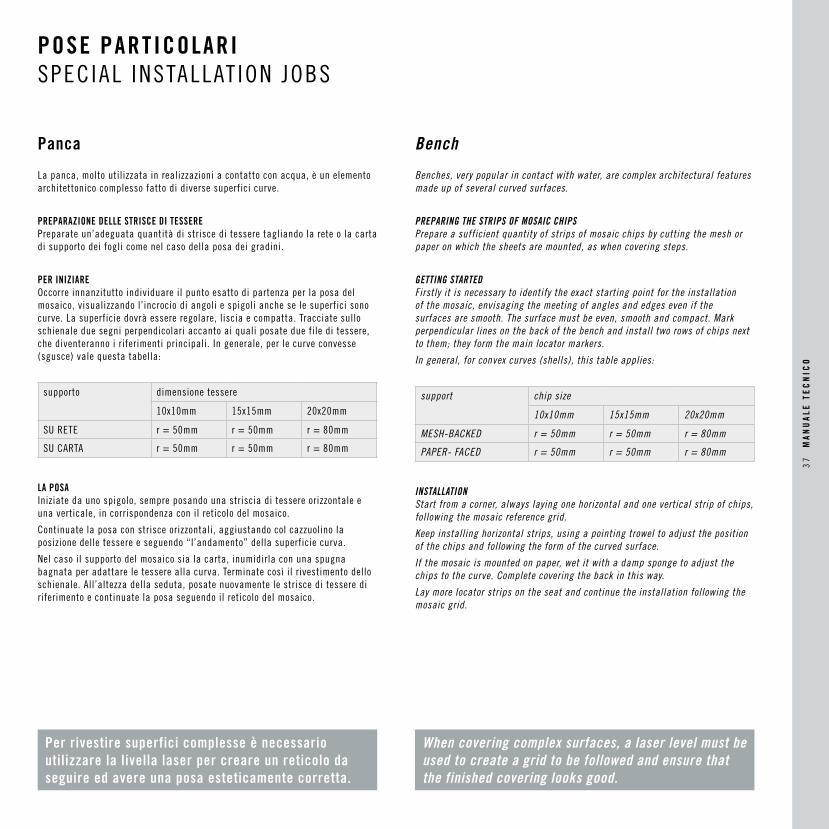
Per rivestire superfici complesse è necessario utilizzare la livella laser per creare un reticolo da seguire ed avere una posa esteticamente corretta.
When covering complex surfaces, a laser level must be used to create a grid to be followed and ensure that the finished covering looks good.
37
MA
NU
ALE
TE
CN
ICO
Tracc ia re l e l inee d i r i f e r imento | D rawing re fe rence l ines
La posa | I ns ta l la t i on
38
MA
NU
ALE
TE
CN
ICO
POSE PARTICOLARI SPECIAL INSTALLAT ION JOBS
Bordo arrotondato Rounded edge
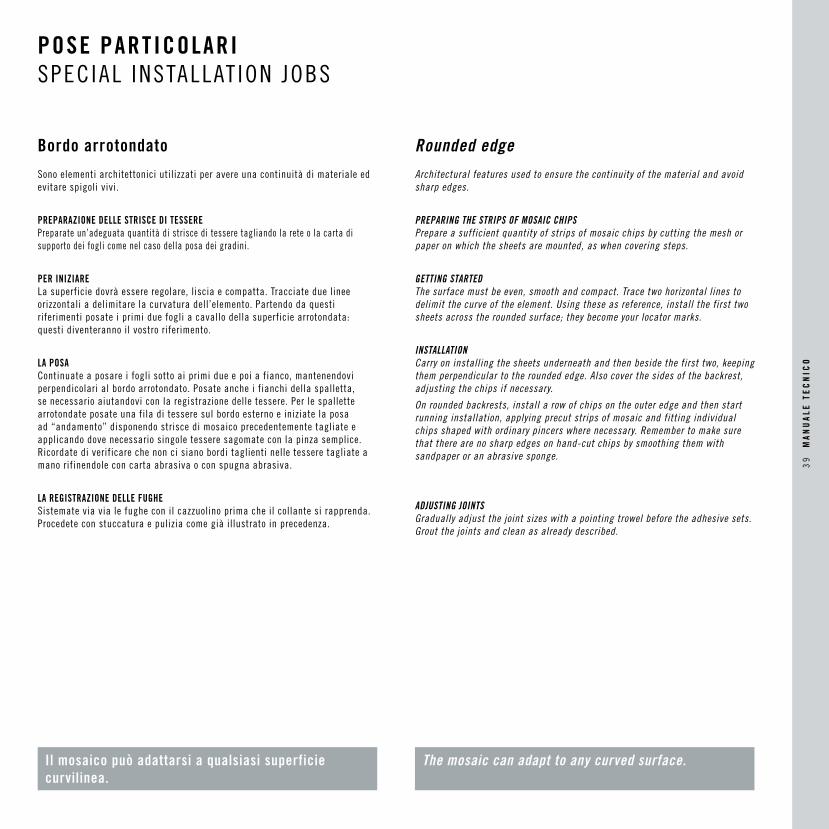
Il mosaico può adattarsi a qualsiasi superficie curvilinea.
The mosaic can adapt to any curved surface.
Sono elementi architettonici utilizzati per avere una continuità di materiale ed evitare spigoli vivi.
PREPARAZIONE DELLE STRISCE DI TESSERE Preparate un’adeguata quantità di strisce di tessere tagliando la rete o la carta di supporto dei fogli come nel caso della posa dei gradini.
PER INIZIARE La superficie dovrà essere regolare, liscia e compatta. Tracciate due linee orizzontali a delimitare la curvatura dell’elemento. Partendo da questi riferimenti posate i primi due fogli a cavallo della superficie arrotondata: questi diventeranno il vostro riferimento.
LA POSA Continuate a posare i fogli sotto ai primi due e poi a fianco, mantenendovi perpendicolari al bordo arrotondato. Posate anche i fianchi della spalletta, se necessario aiutandovi con la registrazione delle tessere. Per le spallette arrotondate posate una fila di tessere sul bordo esterno e iniziate la posa ad “andamento” disponendo strisce di mosaico precedentemente tagliate e applicando dove necessario singole tessere sagomate con la pinza semplice. Ricordate di verificare che non ci siano bordi taglienti nelle tessere tagliate a mano rifinendole con carta abrasiva o con spugna abrasiva.
LA REGISTRAZIONE DELLE FUGHE Sistemate via via le fughe con il cazzuolino prima che il collante si rapprenda. Procedete con stuccatura e pulizia come già illustrato in precedenza.
Architectural features used to ensure the continuity of the material and avoid sharp edges.
PREPARING THE STRIPS OF MOSAIC CHIPS Prepare a sufficient quantity of strips of mosaic chips by cutting the mesh or paper on which the sheets are mounted, as when covering steps.
GETTING STARTED The surface must be even, smooth and compact. Trace two horizontal lines to delimit the curve of the element. Using these as reference, install the first two sheets across the rounded surface; they become your locator marks.
INSTALLATION Carry on installing the sheets underneath and then beside the first two, keeping them perpendicular to the rounded edge. Also cover the sides of the backrest, adjusting the chips if necessary.
On rounded backrests, install a row of chips on the outer edge and then start running installation, applying precut strips of mosaic and fitting individual chips shaped with ordinary pincers where necessary. Remember to make sure that there are no sharp edges on hand-cut chips by smoothing them with sandpaper or an abrasive sponge.
ADJUSTING JOINTS Gradually adjust the joint sizes with a pointing trowel before the adhesive sets. Grout the joints and clean as already described.
39
MA
NU
ALE
TE
CN
ICO
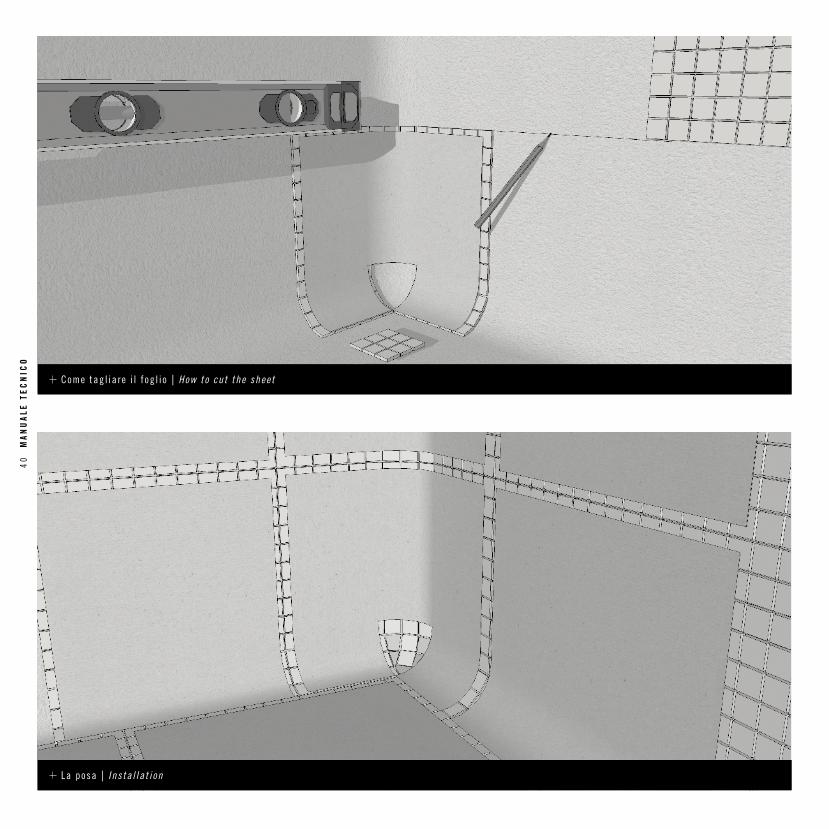
Come tag l ia re i l f og l i o | How to cut the sheet
La posa | I ns ta l la t i on
40
MA
NU
ALE
TE
CN
ICO
POSE PARTICOLARI SPECIAL INSTALLAT ION JOBS
Sguscia ShellLa “sguscia” è un componente di raccordo arrotondato tra superfici ortogonali; è utilizzato per il rivestimento di elementi convessi, ad esempio le vasche.
PER INIZIARE Verificate che gli angoli siano perfettamente ortogonali, arrotondati. La superficie dovrà essere regolare, liscia e compatta.
Per prima cosa appoggiate, a secco, un foglio sulle due pareti verticali che formano l’angolo e misurate, contando le tessere, quante di queste formano la parte arrotondata.
TOGLIERE LE TESSERE IN PIÙ Ora tagliate nella parte inferiore del foglio, centrato, un quadrato di tessere delle stesse dimensioni di quelle misurate. Appoggiate nuovamente il foglio nell’angolo facendo toccare i due spigoli che si sono formati tagliando il tassello di tessere, in basso sul fondo dell’elemento convesso da rivestire.
LA POSA Aggiustate la posizione del foglio tracciando con la livella una linea orizzontale e, con l’aiuto del laser, un reticolo che sarà il riferimento per gli altri fogli da posare. Stendete la colla e posate il foglio che avete tagliato a forma di U rovesciata e procedete con la posa in senso orizzontale a destra e sinistra poi via via sopra. Continuate lungo le pareti accostandovi ai fogli già posati e mantenendo allineati i giunti.
LO SPIGOLO In ultima fase tagliate a misura le tessere che formano l’angolo usando le pinze o la smerigliatrice con disco diamantato a corona continua.
A shell is a rounded connection between perpendicular surfaces; it is used to cover convex features such as pools.
GETTING STARTED Check that the corners are perfectly perpendicular and rounded. The surface must be even, smooth and compact. First, place a sheet dry on the two vertical surfaces that form the angle and measure the number of chips included in the rounded part.
REMOVE THE SURPLUS CHIPS Now cut a square of chips, of the same size as those measured, from the middle of the bottom of the sheet. Put the sheet back over the angle, placing the two edges formed by cutting out the block against each other, low down on the bottom of the convex form to be covered.
INSTALLATION Adjust the position of the sheet by drawing a horizontal line with the spirit level, and then use the laser to create a grid that will serve as reference for the other sheets to be installed. Apply the adhesive and install the sheet you have cut in the form of an upturned U; continue installing horizontally to the left and right and then gradually working upwards. Keep on along the walls, placing the new mosaic next to the sheets already installed and keeping the joints aligned.
THE SHARP EDGE Finally, cut the chips which form the sharp edge to size with pincers or an angle-grinder with continuous ring diamond disc.
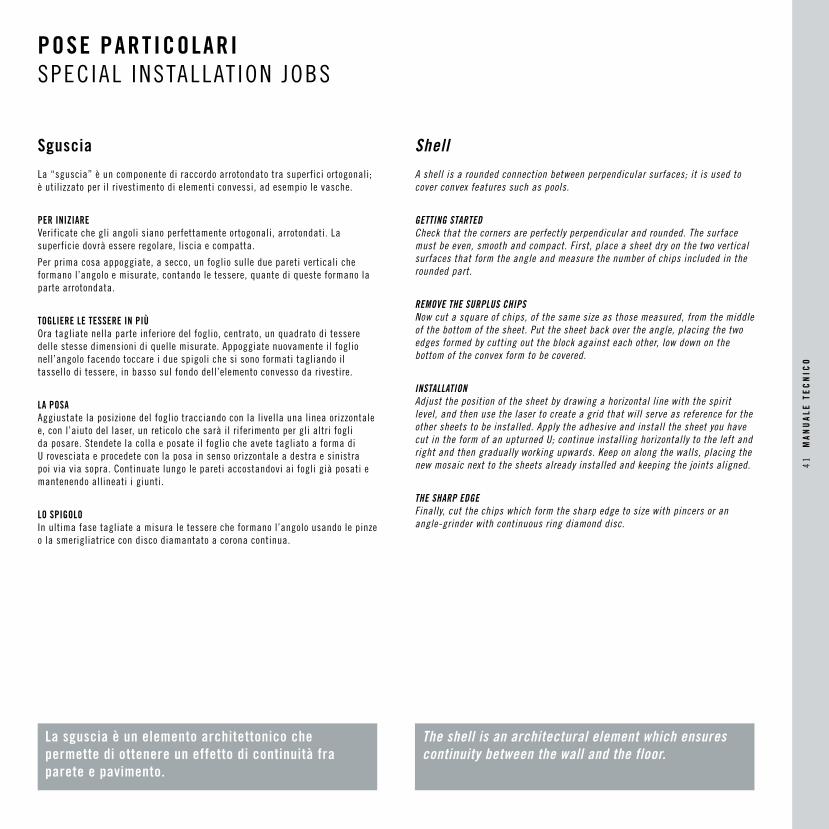
La sguscia è un elemento architettonico che permette di ottenere un effetto di continuità fra parete e pavimento.
The shell is an architectural element which ensures continuity between the wall and the floor.
41
MA
NU
ALE
TE
CN
ICO
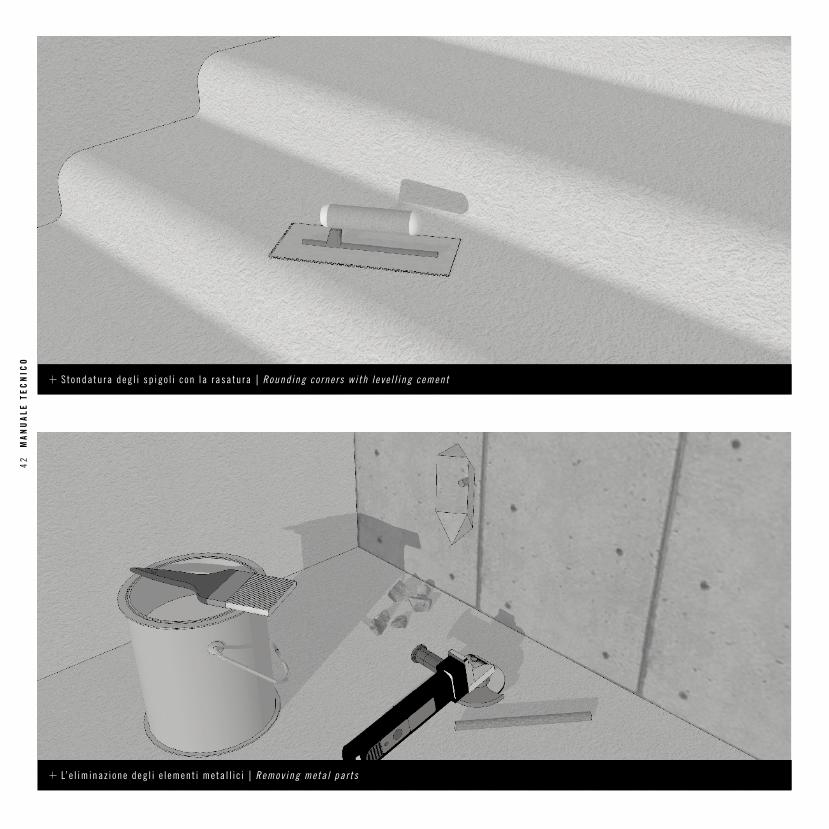
S tondatura deg l i sp igo l i con la rasatura | Round ing co rne rs w i th l eve l l ing cement
L’ e l iminaz ione deg l i e l ement i meta l l i c i | Remov ing meta l par ts
42
MA
NU
ALE
TE
CN
ICO
PISCINE SWIMMING-POOLS
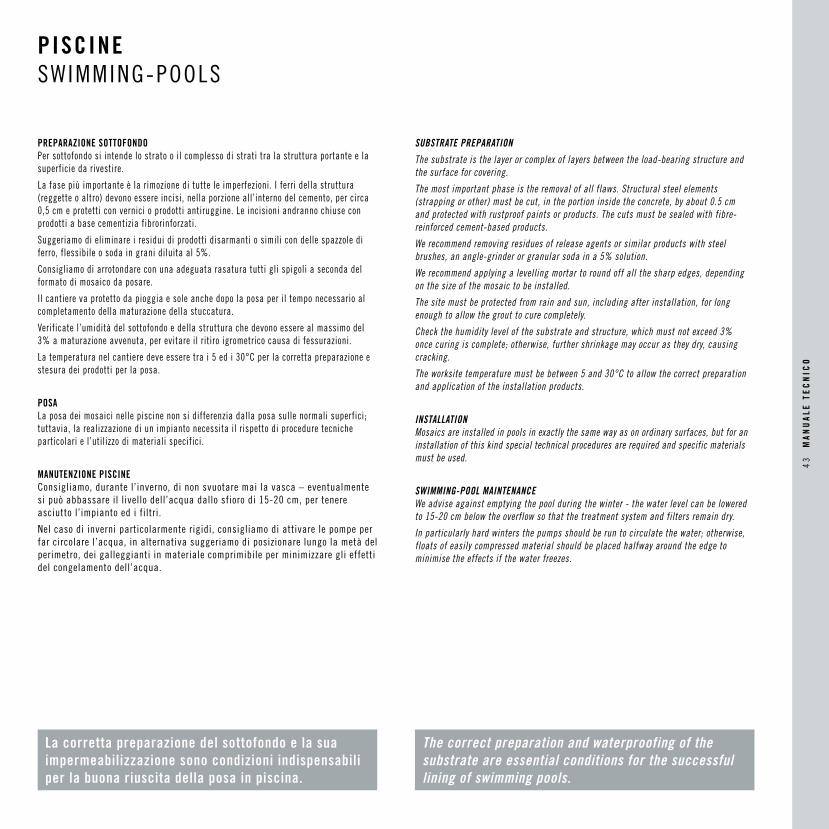
La corretta preparazione del sottofondo e la sua impermeabilizzazione sono condizioni indispensabili per la buona riuscita della posa in piscina.
The correct preparation and waterproofing of the substrate are essential conditions for the successful lining of swimming pools.
PREPARAZIONE SOTTOFONDO Per sottofondo si intende lo strato o il complesso di strati tra la struttura portante e la superficie da rivestire.
La fase più importante è la rimozione di tutte le imperfezioni. I ferri della struttura (reggette o altro) devono essere incisi, nella porzione all’interno del cemento, per circa 0,5 cm e protetti con vernici o prodotti antiruggine. Le incisioni andranno chiuse con prodotti a base cementizia fibrorinforzati.
Suggeriamo di eliminare i residui di prodotti disarmanti o simili con delle spazzole di ferro, flessibile o soda in grani diluita al 5%.
Consigliamo di arrotondare con una adeguata rasatura tutti gli spigoli a seconda del formato di mosaico da posare.
Il cantiere va protetto da pioggia e sole anche dopo la posa per il tempo necessario al completamento della maturazione della stuccatura.
Verificate l’umidità del sottofondo e della struttura che devono essere al massimo del 3% a maturazione avvenuta, per evitare il ritiro igrometrico causa di fessurazioni.
La temperatura nel cantiere deve essere tra i 5 ed i 30°C per la corretta preparazione e stesura dei prodotti per la posa.
POSA La posa dei mosaici nelle piscine non si differenzia dalla posa sulle normali superfici; tuttavia, la realizzazione di un impianto necessita il rispetto di procedure tecniche particolari e l’utilizzo di materiali specifici.
MANUTENZIONE PISCINE Consigliamo, durante l’inverno, di non svuotare mai la vasca – eventualmente si può abbassare il livello dell’acqua dallo sfioro di 15-20 cm, per tenere asciutto l’impianto ed i filtri.
Nel caso di inverni particolarmente rigidi, consigliamo di attivare le pompe per far circolare l’acqua, in alternativa suggeriamo di posizionare lungo la metà del perimetro, dei galleggianti in materiale comprimibile per minimizzare gli effetti del congelamento dell’acqua.
SUBSTRATE PREPARATION
The substrate is the layer or complex of layers between the load-bearing structure and the surface for covering.
The most important phase is the removal of all flaws. Structural steel elements (strapping or other) must be cut, in the portion inside the concrete, by about 0.5 cm and protected with rustproof paints or products. The cuts must be sealed with fibre-reinforced cement-based products.
We recommend removing residues of release agents or similar products with steel brushes, an angle-grinder or granular soda in a 5% solution.
We recommend applying a levelling mortar to round off all the sharp edges, depending on the size of the mosaic to be installed.
The site must be protected from rain and sun, including after installation, for long enough to allow the grout to cure completely.
Check the humidity level of the substrate and structure, which must not exceed 3% once curing is complete; otherwise, further shrinkage may occur as they dry, causing cracking.
The worksite temperature must be between 5 and 30°C to allow the correct preparation and application of the installation products.
INSTALLATION Mosaics are installed in pools in exactly the same way as on ordinary surfaces, but for an installation of this kind special technical procedures are required and specific materials must be used.
SWIMMING-POOL MAINTENANCE We advise against emptying the pool during the winter - the water level can be lowered to 15-20 cm below the overflow so that the treatment system and filters remain dry.
In particularly hard winters the pumps should be run to circulate the water; otherwise, floats of easily compressed material should be placed halfway around the edge to minimise the effects if the water freezes.
43
MA
NU
ALE
TE
CN
ICO

colla e stucchiadehsive & grouts
I COLLANTI
Gli adesivi sono sostanze di diversa natura - chimica, organica, inorganica e mista - che consentono di tenere unite le superfici di due corpi diversi. La giusta scelta del tipo di adesivo è alla base di una corretta operazione di posa.La presenza in commercio di molteplici prodotti impone un’adeguata informazione e, soprattutto, l’esigenza di attenersi scrupolosamente alle indicazioni delle aziende produttrici. Non esistono adesivi universali, ma prodotti idonei per le diverse situazioni, da scegliere in base al tipo di materiale da posare, alla struttura ed alla natura del fondo, alla destinazione d’uso dell’ambiente da rivestire e alla sua collocazione interna o esterna. I collanti possono essere classificati in 3 gruppi in base alla loro composizione, in accordo con il progetto di normativa europea:- adesivi cementizi (sia quelli tradizionali che quelli modificati bicomponenti)- adesivi in pasta (senza cemento)- adesivi reattivi a base di resine (epossidici, poliuretanici, ecc.)
ADESIVI CEMENTIZI TRADIZIONALICreano un aggancio meccanico e quindi non idoneo ai materiali di Mosaico+.
ADESIVI CEMENTIZI MODIFICATI Possono essere bicomponenti o monocomponenti. Oltre al cemento (grigio o bianco), vengono inserite resine (cellulose e derivati, resine sintetiche, viniliche ed acriliche), che permettono in questo modo un aggancio di tipo chimico. Per il mosaico dobbiamo utilizzare questi prodotti raccomandando sempre di utilizzare un collante bianco.NB. Su tutti i supporti a base cementizia, cemento armato, cartongesso e gesso (in questi ultimi due casi previo utilizzo di primer) che in poche parole corrisponde al 90% dei casi, si devono utilizzare adesivi cementizi modificati.
ADESIVI IN PASTAQuesti adesivi prodotti in pasta e forniti già pronti all’uso sono composti da resine in dispersione acquosa (viniliche o acriliche), da cariche ed altri additivi. Nel nostro caso potremo utilizzarli quando abbiamo dei supporti in legno, ma non devono essere a contatto con umidità.
ADESIVI A BASE DI RESINE REATTIVE Possono essere epossidici, poliuretanici, ecc. Questi prodotti si presentano sottoforma di pasta e di liquidi densi da miscelare al momento della posa. Sono costituiti da resine poliuretaniche, epossidiche e di poliestere, da cariche e da un prodotto indurente (liquido o pastoso).Sono sensibili alle temperature. La reazione avviene infatti con il calore indipendentemente dal grado di assorbimento del fondo di posa e del materiale. Consigliamo di osservare scrupolosamente le temperature d’utilizzo indicate dalle aziende produttrici perché in presenza di temperature molto basse la reazione avviene più lentamente, con
temperature elevate risulta invece troppo rapida e quindi poco pratica per l’utilizzo.
Collanti Epossidici: sono molto rigidi e accettano l’immersione in acquaCollanti Poliuretanici: sono molto elastici e non accettano l’immersione in acquaCollanti Epossipoliuretanici: hanno una parte epossidica e una parte poliuretanica e accettano l’immersione.Questi collanti vengono generalmente utilizzati quando si applica il mosaico su legno, vetro, acciaio, metal-metracrilato, vetroresina ecc.
I collanti a base di resine tendono a diventare gialli, fare attenzione quando li utilizzate nei prodotti semitrasparenti.
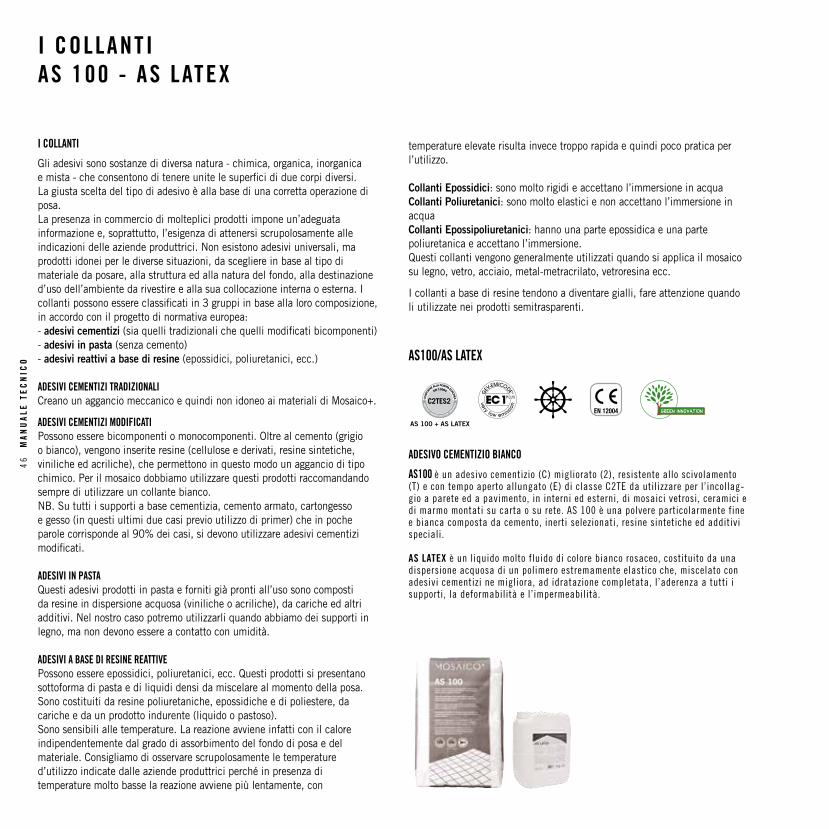
AS100/AS LATEX
ADESIVO CEMENTIZIO BIANCO
AS100 è un adesivo cementizio (C) migliorato (2), resistente allo scivolamento (T) e con tempo aperto allungato (E) di classe C2TE da utilizzare per l’incollag-gio a parete ed a pavimento, in interni ed esterni, di mosaici vetrosi, ceramici e di marmo montati su carta o su rete. AS 100 è una polvere particolarmente fine e bianca composta da cemento, inerti selezionati, resine sintetiche ed additivi speciali.
AS LATEX è un liquido molto fluido di colore bianco rosaceo, costituito da una dispersione acquosa di un polimero estremamente elastico che, miscelato con adesivi cementizi ne migliora, ad idratazione completata, l’aderenza a tutti i supporti, la deformabilità e l’impermeabilità.
I COLLANTI AS 100 - AS LATEX
AS 100 + AS LATEX
C2TES2
46
MA
NU
ALE
TE
CN
ICO
ADHESIVES AS 100 - AS LATEX
ADHESIVES
Adhesives are substances of different kinds (chemical, organic, inorganic and combined) which hold the surfaces of two different bodies together. The choice of the correct type of adhesive is fundamental for successful installation. Since there are a large number of different products on the market, it is important to be well informed and above all to comply strictly with the producers’ recommendations. There is no such thing as a universal adhesive; different products are required for different situations and must be chosen depending on the type of material to be installed, the type and structure of the substrate, the intended use of the structure for covering and whether it is indoors or outdoors.Adhesives can be subdivided into 3 categories by composition, in accordance with the draft European standard:- cementitious adhesives (both conventional and dual component modified types)- paste adhesives (without cement)- reaction resin adhesives (epoxy, polyurethane, etc.)
CONVENTIONAL CEMENTITIOUS ADHESIVESThey create a mechanical bond and are therefore not suitable for Mosaico+ materials.
MODIFIED CEMENTITIOUS ADHESIVESThese can be dual or single components.As well as cement (grey or white) they also include resins (cellulose and its derivates and vinylic or acrylic synthetic resins) which form a chemical bond. These products are suitable for mosaic; it is important always to use a white adhesive.NB. On all cement-based substrates, reinforced concrete, plasterboard and plaster (in the last two cases after a primer has been used), which basically account for 90% of cases, modified cementitious adhesives have to be used.
PASTE ADHESIVESThese adhesives, produced as pastes and supplied ready for use, consist of resins in aqueous dispersion (vinylic or acrylic), fillers and other additives. In our case, we may use them when dealing with wooden substrates, but they must not be in contact with damp.
REACTION RESIN ADHESIVESThese can be epoxies, polyurethanes, etc.These products are supplied in the form of pastes and dense liquids to be mixed immediately before use. They consist of polyurethane, epoxy and polyester resins, fillers and a hardener (liquid or paste). They are temperature-sensitive. The reaction takes place with heat, regardless of the degree of absorption of the substrate and the material. We recommend strict compliance with the temperatures of use stated by producers, because if temperatures are very low the reaction takes place more slowly, while with high temperatures it is too fast, making the use of the product impractical.
Epoxy Adhesives: these products are very stiff and withstand immersion in waterPolyurethane Adhesives: these products are very elastic and do not withstand immersion in waterEpoxy-Polyurethane Adhesives: they are part epoxy and part polyurethane and withstand immersion. These adhesives are generally used when mosaics are installed on wood, glass, steel, metal-methacrylate, fibreglass, etc.
Resin adhesives tend to become discoloured; take care when used with semi-clear products.
AS 100 + AS LATEX
C2TES2
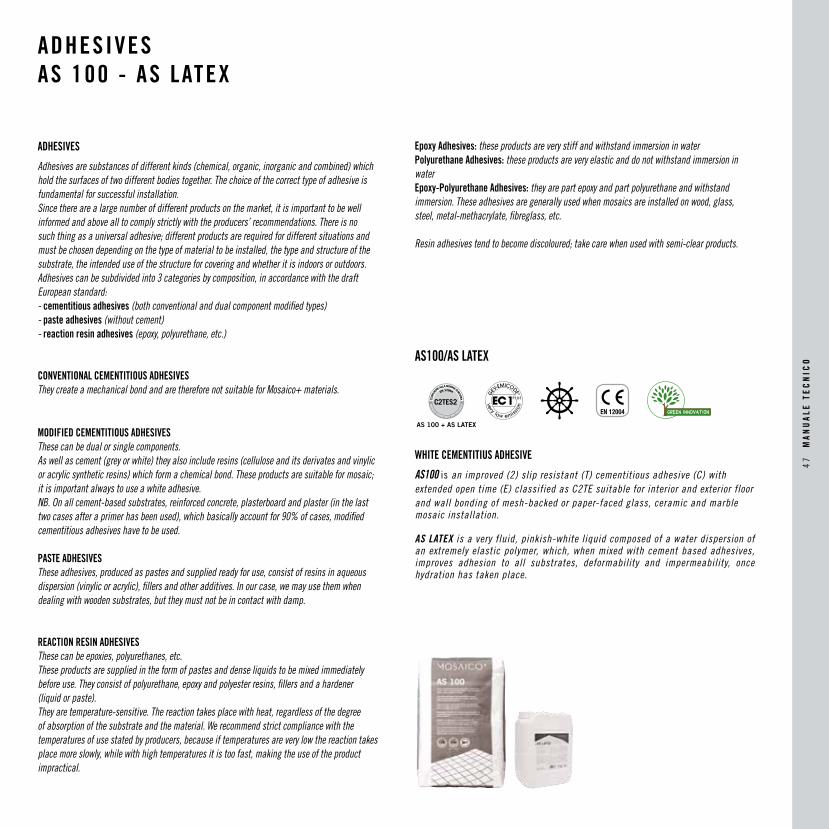
AS100/AS LATEX
WHITE CEMENTITIUS ADHESIVE
AS100 is an improved (2) slip resistant (T) cementitious adhesive (C) with extended open time (E) classified as C2TE suitable for interior and exterior floor and wall bonding of mesh-backed or paper-faced glass, ceramic and marble mosaic installation.
AS LATEX is a very fluid, pinkish-white liquid composed of a water dispersion of an extremely elastic polymer, which, when mixed with cement based adhesives, improves adhesion to all substrates, deformability and impermeability, once hydration has taken place.
47
MA
NU
ALE
TE
CN
ICO
GLI STUCCHI
Gli stucchi sono malte in polvere fine o granulosa oppure in pasta, di diverse tipologie – bicomponenti, cementizie, modificate con polimero – usate per colmare le fughe tra gli elementi posati.Ogni varietà di stucco è adatta a una destinazione d’uso, a materiali da posare specifici, al tipo di fondo, a dimensioni di fuga ben determinate e anche all’effetto finale che si vuole ottenere.La presenza in commercio di numerosi prodotti impone un’adeguata informazione e, soprattutto, l’esigenza di attenersi esattamente alle indicazioni delle aziende produttrici.Gli stucchi possono essere divisi in due grandi categorie:- stucchi epossidici (a grana fine e a grana grossa)- stucchi cementizi (a grana fine e a grana grossa)
STUCCHI EPOSSIDICI
Gli stucchi epossidici sono malte bicomponenti antiacide e decorative, a base di resine epossidiche, sabbie silicee e speciali componenti, con un’eccellente resistenza meccanica, duraturi e facilmente pulibili.La superficie finale risulterà liscia e compatta, ad elevata igienicità, semitrasparente e non assorbente, esente da ritiri e quindi da crepe e fessurazioni. I colori saranno uniformi, resistenti ai raggi ultravioletti e agli agenti atmosferici.Gli stucchi epossidici sono ideali per:- stuccatura di rivestimenti decorativi in ambienti di particolare valore estetico- stuccatura di pavimenti e di rivestimenti di docce e bagni- stuccatura di pavimenti e rivestimenti in saune, bagni turchi, ecc- stuccatura di piscine; particolarmente indicato per vasche contenenti acque termali o salmastre
STUCCHI EPOSSIDICI A GRANA FINE
Mosaico+ ha una propria gamma di stucchi epossidici, Colorepoxy, disponibile in 21 colori e in due finiture glitter.Gli stucchi epossidici a grana fine sono indicati per fughe inferiori ai 1.8-2 mm.
STUCCHI EPOSSIDICI A GRANA GROSSA
Sono riempitivi epossidici bicomponenti antiacido di facile applicazione ed ottima pulibilità e con un’eccellente resistenza agli acidi.Opportunamente applicato, lo stucco epossidico a grana grossa consente di ottenere stuccature con ottima resistenza meccanica e chimica e quindi ottima durabilità. La superficie finale sarà liscia e compatta, non assorbente e facilmente pulibile, altamente igienica e dall’elevata durezza, esente da ritiri e quindi da crepe e fessurazioni. I colori degli stucchi epossidici a grana
GLI STUCCHI
grossa sono uniformi, resistenti agli agenti atmosferici.Gli stucchi epossidici a grana grossa sono utilizzati in presenza di fughe superiori a 1.8-2 mm.
STUCCHI CEMENTIZI
Sono malte cementizie ad alte prestazioni in polvere fine o granulosa, modificate con polimero, suddivise in:- stucchi cementizi a grana fine migliorati- stucchi cementizi a grana grossa
STUCCO CEMENTIZIO A GRANA FINE MIGLIORATO
Si tratta di una malta ad alte prestazioni, modificata con polimero, antiefflorescenze, a presa ed asciugamento rapido, idrorepellente e resistente alla muffa. Opportunamente utilizzato, lo stucco cementizio a grana fine consente di ottenere stuccature con una buona resistenza alla compressione e buona durabilità. La superficie finale sarà liscia e compatta, facilmente pulibile, con una resistenza all’abrasione molto buona, bassi ritiri e una buona resistenza agli acidi con pH > 3.
GRANA GROSSA
Questa malta cementizia ad alte prestazioni, modificata con polimero e ridotto assorbimento d’acqua, è indicata per la stuccatura di fughe superiori ai 3 mm. È una miscela di cemento, inerti di granulometria calibrata, resine sintetiche, additivi speciali e pigmenti.Opportunamente utilizzato, lo stucco cementizio a grana grossa consente di ottenere stuccature con buona resistenza alla compressione, alla flessione ed ai cicli di gelo/disgelo e quindi buona durabilità, con una buona resistenza all’abrasione, bassi ritiri e buona resistenza agli acidi a pH > 3.
48
MA
NU
ALE
TE
CN
ICO
GROUTS
Grouts, of which there are different types – two-component, cement-based, polymer-modified – consists of mortar in a fine or granular powder or in the form of paste, which is used to fill the gaps between tiles after they have been laid.Each variety of grout is suitable for a particular type of use, specific cladding materials and substrates, accurately defined dimensions and also on the basis of the final effect required.Since there are so many different products on the market, adequate information is required while users must comply exactly with the manufacturers’ instructions.Grouting products can be divided into two broad categories:- epoxy grout (fine-grain and coarse-grain)- cement-based grout (fine-grain and coarse-grain)
EPOXY GROUT
Epoxy grouting products are decorative, two-component, acid-resistant mortars based on epoxy resins, silica sands and special components. They possess excellent mechanical strength, are long-lasting and easily cleaned.The final surface is smooth and compact, extremely hygienic, semitransparent and non-absorbent, free from shrinkage, thus from cracks. The colours are uniform, UV-resistant and weather-resistant.Epoxy grout is ideal for:- grouting decorative tiles in places where an attractive effect is of particular importance- grouting the floors and walls in showers and bathrooms- grouting the floors and walls in saunas, Turkish baths, etc.- grouting swimming pools, especially pool structures containing spa water or salt water
FINE-GRAIN EPOXY GROUT
Mosaico+ has its own range of epoxy grouts. Called Colorepoxy, the grouts are available in 21 different colours and two glitter finishes.Fine-grain epoxy grout is suitable for joints less than 1.8-2 mm.
COARSE-GRAIN EPOXY GROUT
Easily applied, two-component, acid-resistant epoxy fillers. This grout is very easy to clean and possesses excellent acid resistance.Properly applied, coarse-grain epoxy grout provides excellent mechanical strength, resistance to chemicals, thus optimum durability. The final surface is smooth and compact, extremely hygienic, non-absorbent, easily cleaned and extremely hard, free from shrinkage, thus from cracks. The colours of coarse-grain epoxy grout are uniform and weather-resistant.Coarse-grain epoxy grout is used for over 1.8-2 mm joints.
CEMENT-BASED GROUT
This sort of grout consists of high-performance fine powder or granular polymer-modified mortars in the following categories:- improved fine-grain cement-based grout- coarse-grain cement-based grout
IMPROVED FINE-GRAIN CEMENT-BASED GROUT
Polymer-modified, high-performance, quick drying and setting, anti-efflorescence, water-repellent and mould-resistant mortar. Properly used, fine-grain cement-based grout provides good compressive strength and durability. The final surface will be smooth and compact, easily cleaned, with very good resistance to abrasion, low shrinkage and a good acid resistance at pH > 3.
COARSE-GRAIN
This high-performance, polymer-modified, cement-based mortar with reduced water absorption is suitable for grouting joints over 3 mm. It is a mixture of cement, aggregates with calibrated particle size, synthetic resins, special additives and pigments.Used in the appropriate way, coarse-grain cement-based grout provides good compressive strength, flexural strength, resistance to freezing/thawing cycles, thus good durability, good resistance to abrasion, low shrinkage and good acid resistance at pH > 3. 4
9 M
AN
UA
LE T
EC
NIC
O

GLI STUCCHI
STUCCO EPOSSIDICO
Colorepoxy è uno stucco decorativo a 2 componenti, a base di resine epossidiche, sabbie silicee e speciali componenti, caratterizzato da un particolare effetto traslucido. Offre un’eccellente resistenza agli acidi ed un’ottima pulibilità: ideale per la stuccatura di tutti i tipi di mosaico, sia vetrosi che realizzati con materiali eterogenei. Colorepoxy nella sua versione Lux viene miscelato con glitter colorati metallizzati, per ottenere particolari effetti estetici con le stesse caratteristiche tecniche. CLASSIFICAZIONE SECONDO EN 13888: Colorepoxy è una malta reattiva (R) per fughe (G) di classe RG.
EPOXY GROUTColorepoxy is a bi-component decorative mortar composed of epoxy resins, si l ica sand and special components, with a dist inctive translucent effect. Highly resistant to acid aggression and easy to clean, i t is ideal for grouting mosaics of al l kinds, both vitreous and in a variety of other materials. In the Lux version, Colorepoxy is mixed with metal l ic colored gl itter to obtain part icular effects with the same technical characterist ics. CLASSIFICATION PER EN 13888: Colorepoxy is a reaction mortar (R) for grouting (G), class RG.
50
MA
NU
ALE
TE
CN
ICO
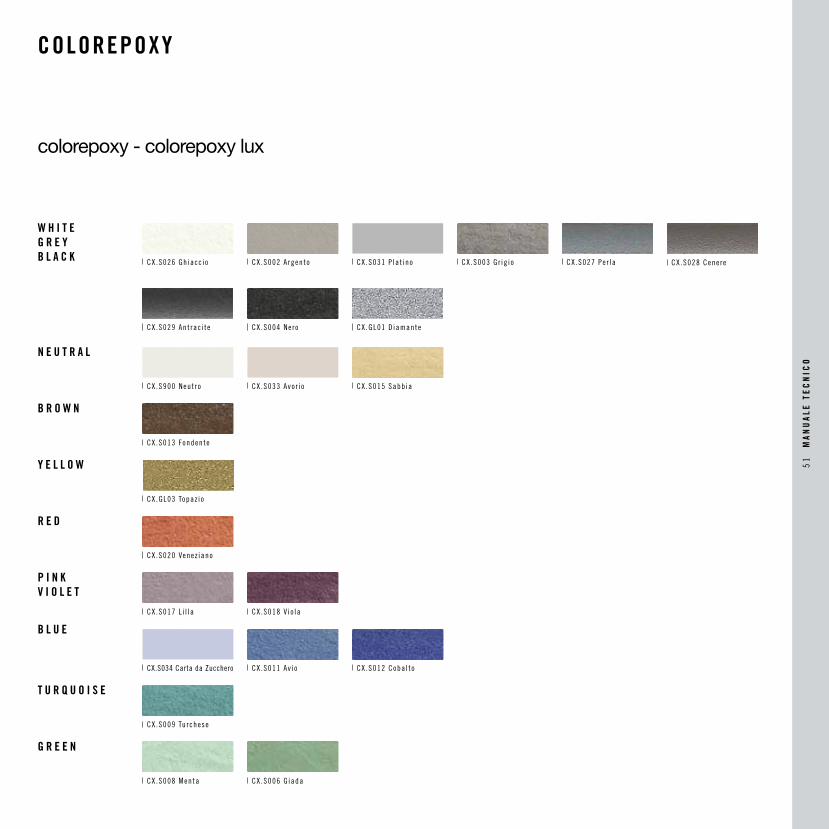
COLOREPOXY
colorepoxy - colorepoxy lux
B R O W N
W H I T EG R E YB L A C K
R E D
P I N KV I O L E T
CX.S026 Gh iacc io CX .S002 A rgento CX .S031 P la t ino CX .S003 Gr ig io
CX .S004 Nero
CX .S028 Cenere
CX .S029 Ant rac i te
CX .S027 Pe r la
CX .S013 Fondente
CX .S011 Av io CX .S012 Coba l to
CX .S009 Turchese
CX.S008 Menta CX.S006 G iada
N E U T R A L
CX.S015 Sabb ia
B L U E
T U R Q U O I S E
G R E E N
CX.S020 Venez iano
CX.S017 L i l la CX .S018 V io la
CX .S900 Neut ro
CX.S034 Carta da Zucchero
CX .S033 Avo r i o
CX .GL01 D iamante
Y E L L O W
CX.GL03 Topaz io
51
MA
NU
ALE
TE
CN
ICO
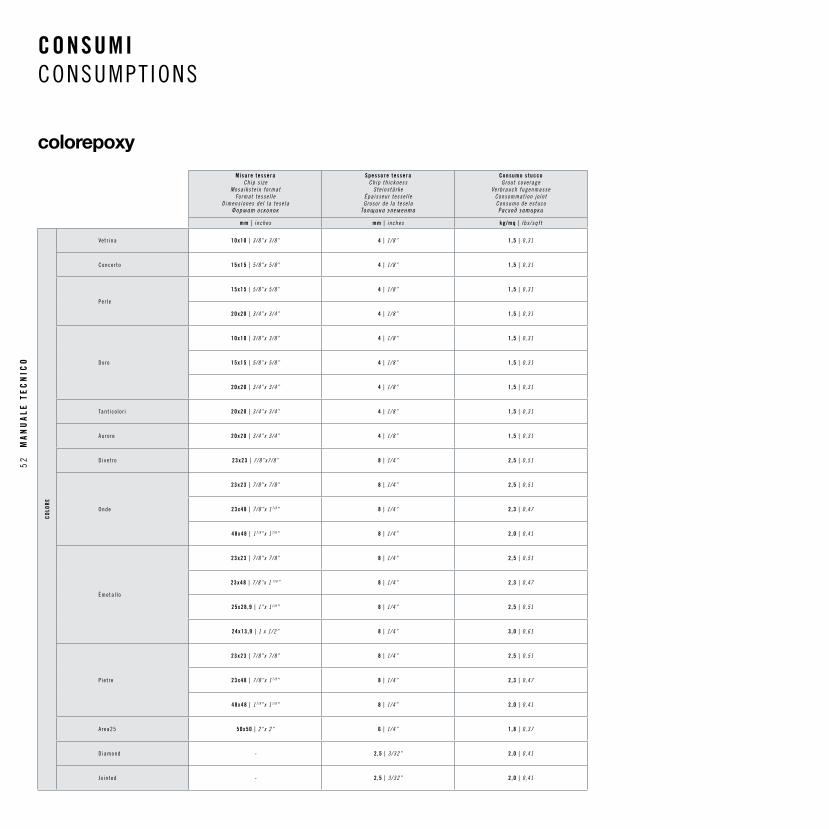
CONSUMI CONSUMPT IONS
Misure tesseraChip s i ze
Mosa iks te in fo rmatFo rmat tesse l l e
D imens iones de l la tese laФ о р м а т o с к о л о к
Spessore tesseraChip th ickness
Ste ins tä rkeÉpa isseur tesse l l eGroso r de la tese la
То л щ и н а э л е м е н т а
Consumo s tucco Grout cove rage
Verbrauch fugenmasseConsommat ion j o in tConsumo de es tuco
Р а с х о д з а т и р к и
mm | i nches mm | i nches kg/mq | l bs /sqf t
COL
ORE
Vet r ina 10x10 | 3/8”x 3 /8” 4 | 1/8” 1 ,5 | 0 ,31
Concer to 15x15 | 5/8”x 5 /8” 4 | 1/8” 1 ,5 | 0 ,31
Per le
15x15 | 5/8”x 5 /8” 4 | 1/8” 1 ,5 | 0 ,31
20x20 | 3/4”x 3 /4” 4 | 1/8” 1 ,5 | 0 ,31
Doro
10x10 | 3/8”x 3 /8” 4 | 1/8” 1 ,5 | 0 ,31
15x15 | 5/8”x 5 /8” 4 | 1/8” 1 ,5 | 0 ,31
20x20 | 3/4”x 3 /4” 4 | 1/8” 1 ,5 | 0 ,31
Tant ico lo r i 20x20 | 3/4”x 3 /4” 4 | 1/8” 1 ,5 | 0 ,31
Auro re 20x20 | 3/4”x 3 /4” 4 | 1/8” 1 ,5 | 0 ,31
Dive t ro 23x23 | 7/8”x7/8” 8 | 1/4” 2 ,5 | 0 ,51
Onde
23x23 | 7/8”x 7 /8” 8 | 1/4” 2 ,5 | 0 ,51
23x48 | 7/8”x 1 7/8” 8 | 1/4” 2 ,3 | 0 ,47
48x48 | 1 7/8” x 1 7/8” 8 | 1/4” 2 ,0 | 0 ,41
Èmeta l l o
23x23 | 7/8”x 7 /8” 8 | 1/4” 2 ,5 | 0 ,51
23x48 | 7/8”x 1 7/8” 8 | 1/4” 2 ,3 | 0 ,47
25x28 ,9 | 1”x 1 1/8” 8 | 1/4” 2 ,5 | 0 ,51
24x13 ,9 | 1 x 1 /2” 8 | 1/4” 3 ,0 | 0 ,61
P ie t re
23x23 | 7/8”x 7 /8” 8 | 1/4” 2 ,5 | 0 ,51
23x48 | 7/8”x 1 7/8” 8 | 1/4” 2 ,3 | 0 ,47
48x48 | 1 7/8” x 1 7/8” 8 | 1/4” 2 ,0 | 0 ,41
Area25 50x50 | 2”x 2” 6 | 1/4” 1 ,8 | 0 ,37
Diamond - 2 ,5 | 3/32” 2 ,0 | 0 ,41
Jo in ted - 2 ,5 | 3/32” 2 ,0 | 0 ,41
colorepoxy
52
MA
NU
ALE
TE
CN
ICO
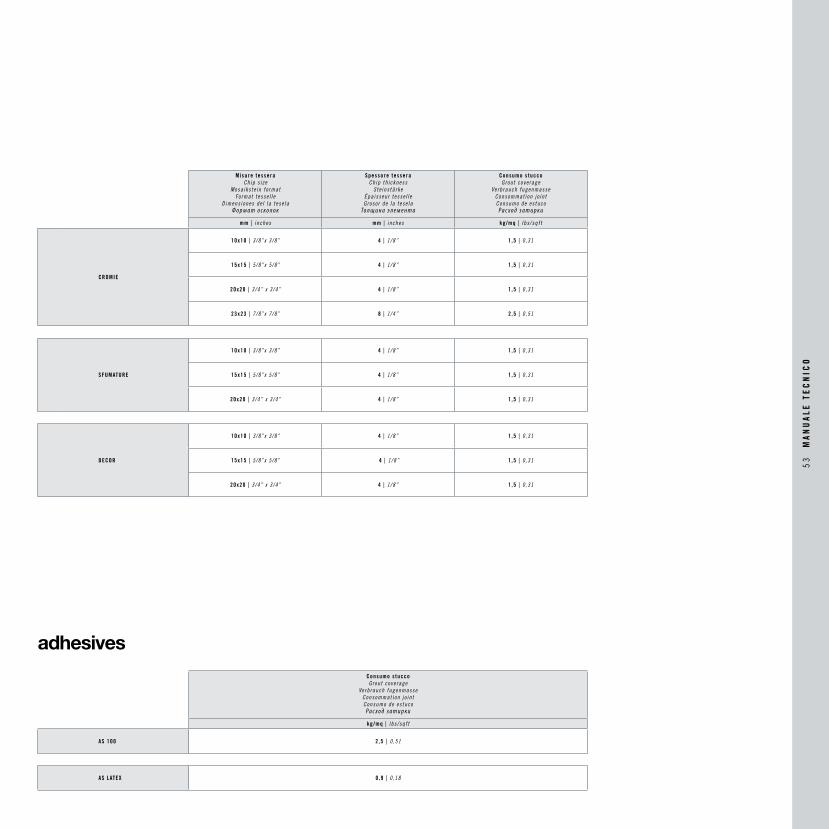
adhesives
Consumo s tucco Grout cove rage
Verbrauch fugenmasseConsommat ion j o in tConsumo de es tuco
Р а с х о д з а т и р к и
kg/mq | l bs /sqf t
AS 100 2 ,5 | 0 ,51
AS LATEX 0 ,9 | 0 ,18
Misure tesseraChip s i ze
Mosa iks te in fo rmatFo rmat tesse l l e
D imens iones de l la tese laФ о р м а т o с к о л о к
Spessore tesseraChip th ickness
Ste ins tä rkeÉpa isseur tesse l l eGroso r de la tese la
То л щ и н а э л е м е н т а
Consumo s tucco Grout cove rage
Verbrauch fugenmasseConsommat ion j o in tConsumo de es tuco
Р а с х о д з а т и р к и
mm | i nches mm | i nches kg/mq | l bs /sqf t
CROMIE
10x10 | 3/8”x 3 /8” 4 | 1/8” 1 ,5 | 0 ,31
15x15 | 5/8”x 5 /8” 4 | 1/8” 1 ,5 | 0 ,31
20x20 | 3/4” x 3 /4” 4 | 1/8” 1 ,5 | 0 ,31
23x23 | 7/8”x 7 /8” 8 | 1/4” 2 ,5 | 0 ,51
SFUMATURE
10x10 | 3/8”x 3 /8” 4 | 1/8” 1 ,5 | 0 ,31
15x15 | 5/8”x 5 /8” 4 | 1/8” 1 ,5 | 0 ,31
20x20 | 3/4” x 3 /4” 4 | 1/8” 1 ,5 | 0 ,31
DECOR
10x10 | 3/8”x 3 /8” 4 | 1/8” 1 ,5 | 0 ,31
15x15 | 5/8”x 5 /8” 4 | 1/8” 1 ,5 | 0 ,31
20x20 | 3/4” x 3 /4” 4 | 1/8” 1 ,5 | 0 ,31
53
MA
NU
ALE
TE
CN
ICO

materialimaterials
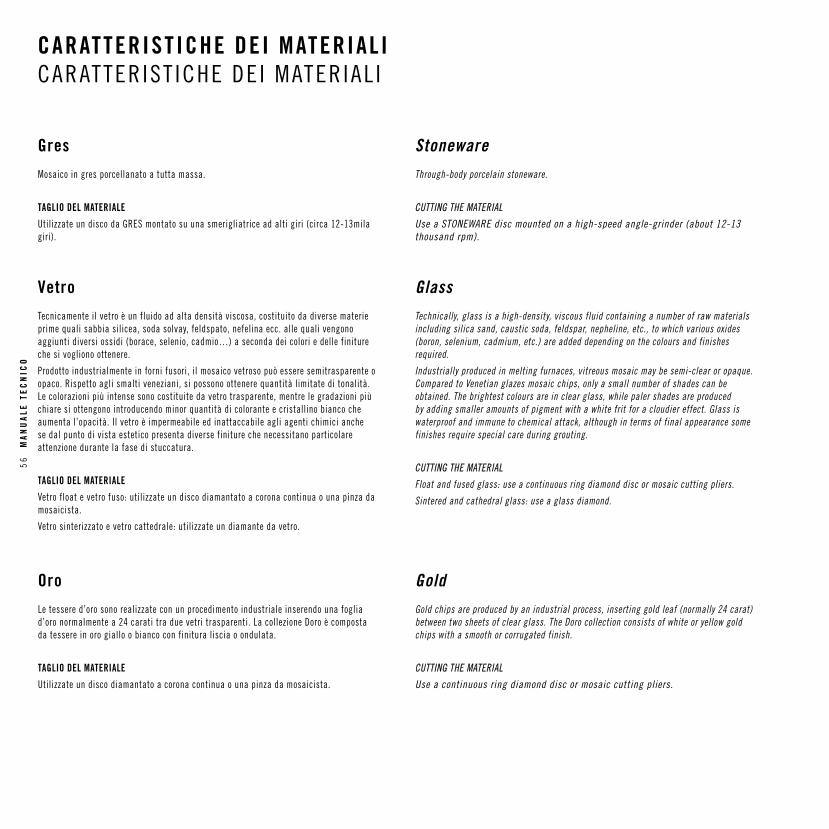
CARATTERISTICHE DEI MATERIALI CARATTERIST ICHE DE I MATERIAL I
Tecnicamente il vetro è un fluido ad alta densità viscosa, costituito da diverse materie prime quali sabbia silicea, soda solvay, feldspato, nefelina ecc. alle quali vengono aggiunti diversi ossidi (borace, selenio, cadmio…) a seconda dei colori e delle finiture che si vogliono ottenere.
Prodotto industrialmente in forni fusori, il mosaico vetroso può essere semitrasparente o opaco. Rispetto agli smalti veneziani, si possono ottenere quantità limitate di tonalità. Le colorazioni più intense sono costituite da vetro trasparente, mentre le gradazioni più chiare si ottengono introducendo minor quantità di colorante e cristallino bianco che aumenta l’opacità. Il vetro è impermeabile ed inattaccabile agli agenti chimici anche se dal punto di vista estetico presenta diverse finiture che necessitano particolare attenzione durante la fase di stuccatura.
TAGLIO DEL MATERIALE
Vetro float e vetro fuso: utilizzate un disco diamantato a corona continua o una pinza da mosaicista.
Vetro sinterizzato e vetro cattedrale: utilizzate un diamante da vetro.
Technically, glass is a high-density, viscous fluid containing a number of raw materials including silica sand, caustic soda, feldspar, nepheline, etc., to which various oxides (boron, selenium, cadmium, etc.) are added depending on the colours and finishes required.
Industrially produced in melting furnaces, vitreous mosaic may be semi-clear or opaque. Compared to Venetian glazes mosaic chips, only a small number of shades can be obtained. The brightest colours are in clear glass, while paler shades are produced by adding smaller amounts of pigment with a white frit for a cloudier effect. Glass is waterproof and immune to chemical attack, although in terms of final appearance some finishes require special care during grouting.
CUTTING THE MATERIAL
Float and fused glass: use a continuous ring diamond disc or mosaic cutting pliers.
Sintered and cathedral glass: use a glass diamond.
Vetro Glass
Le tessere d’oro sono realizzate con un procedimento industriale inserendo una foglia d’oro normalmente a 24 carati tra due vetri trasparenti. La collezione Doro è composta da tessere in oro giallo o bianco con finitura liscia o ondulata.
TAGLIO DEL MATERIALE
Utilizzate un disco diamantato a corona continua o una pinza da mosaicista.
Gold chips are produced by an industrial process, inserting gold leaf (normally 24 carat) between two sheets of clear glass. The Doro collection consists of white or yellow gold chips with a smooth or corrugated finish.
CUTTING THE MATERIAL
Use a continuous ring diamond disc or mosaic cutting pliers.
Oro Gold
Mosaico in gres porcellanato a tutta massa.
TAGLIO DEL MATERIALE
Utilizzate un disco da GRES montato su una smerigliatrice ad alti giri (circa 12-13mila giri).
Through-body porcelain stoneware.
CUTTING THE MATERIAL
Use a STONEWARE disc mounted on a high-speed angle-grinder (about 12-13 thousand rpm).
Gres Stoneware
56
MA
NU
ALE
TE
CN
ICO
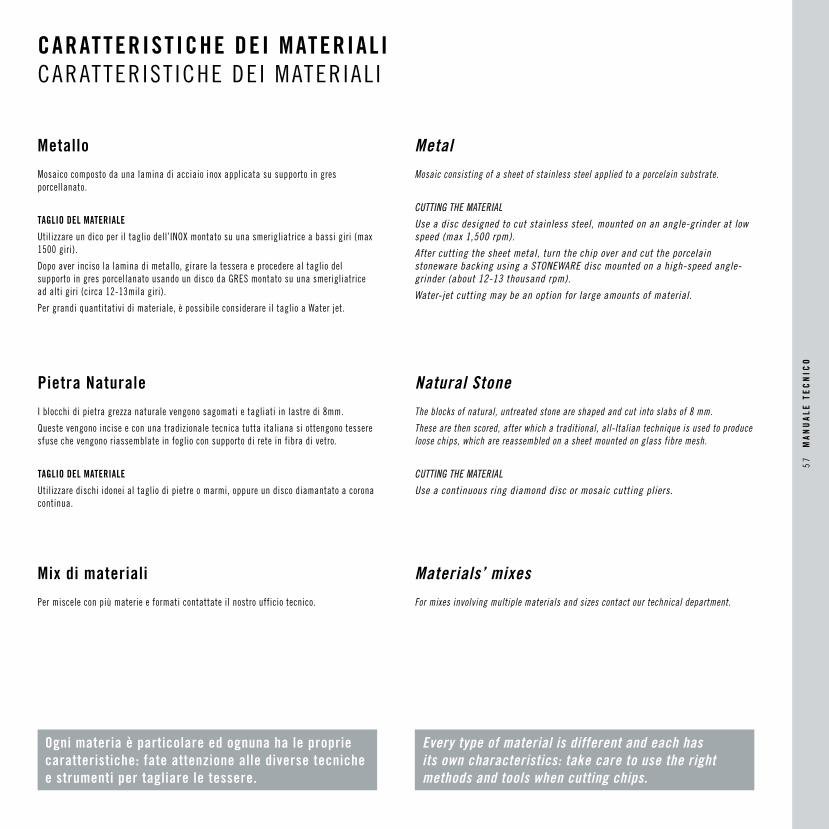
CARATTERISTICHE DEI MATERIALI CARATTERIST ICHE DE I MATERIAL I
I blocchi di pietra grezza naturale vengono sagomati e tagliati in lastre di 8mm.
Queste vengono incise e con una tradizionale tecnica tutta italiana si ottengono tessere sfuse che vengono riassemblate in foglio con supporto di rete in fibra di vetro.
TAGLIO DEL MATERIALE
Utilizzare dischi idonei al taglio di pietre o marmi, oppure un disco diamantato a corona continua.
The blocks of natural, untreated stone are shaped and cut into slabs of 8 mm.
These are then scored, after which a traditional, all-Italian technique is used to produce loose chips, which are reassembled on a sheet mounted on glass fibre mesh.
CUTTING THE MATERIAL
Use a continuous ring diamond disc or mosaic cutting pliers.
Pietra Naturale Natural Stone
Mosaico composto da una lamina di acciaio inox applicata su supporto in gres porcellanato.
TAGLIO DEL MATERIALE
Utilizzare un dico per il taglio dell’INOX montato su una smerigliatrice a bassi giri (max 1500 giri).
Dopo aver inciso la lamina di metallo, girare la tessera e procedere al taglio del supporto in gres porcellanato usando un disco da GRES montato su una smerigliatrice ad alti giri (circa 12-13mila giri).
Per grandi quantitativi di materiale, è possibile considerare il taglio a Water jet.
Mosaic consisting of a sheet of stainless steel applied to a porcelain substrate.
CUTTING THE MATERIAL
Use a disc designed to cut stainless steel, mounted on an angle-grinder at low speed (max 1,500 rpm).
After cutting the sheet metal, turn the chip over and cut the porcelain stoneware backing using a STONEWARE disc mounted on a high-speed angle-grinder (about 12-13 thousand rpm).
Water-jet cutting may be an option for large amounts of material.
Metallo Metal
Per miscele con più materie e formati contattate il nostro ufficio tecnico. For mixes involving multiple materials and sizes contact our technical department.
Mix di materiali Materials’ mixes
Ogni materia è particolare ed ognuna ha le proprie caratteristiche: fate attenzione alle diverse tecniche e strumenti per tagliare le tessere.
Every type of material is different and each has its own characteristics: take care to use the right methods and tools when cutting chips.
57
MA
NU
ALE
TE
CN
ICO

collezionicollections
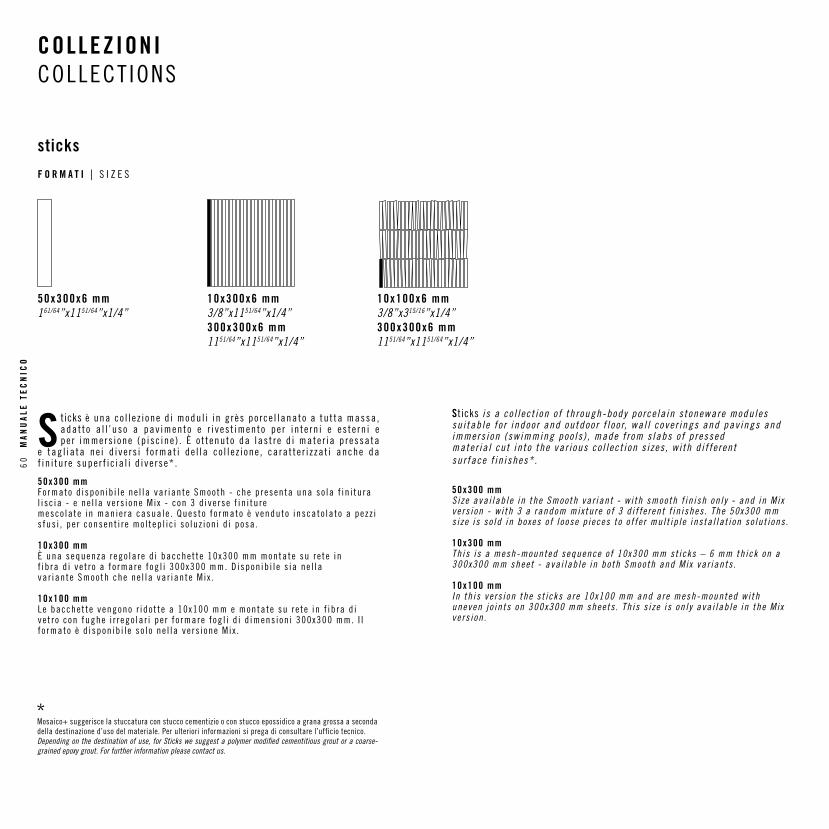
COLLEZIONI COLLECT IONS
sticks
F O R M A T I | S I Z E S
10x300x6 mm3/8”x1151/64”x1/4”300x300x6 mm1151/64”x1151/64”x1/4”
10x100x6 mm3/8”x315/16”x1/4”300x300x6 mm1151/64”x1151/64”x1/4”
50x300x6 mm161/64”x1151/64”x1/4”
S ticks è una co l l e z i one d i modu l i in g rès po rce l lanato a tu t ta massa , adat to a l l ’uso a pav imento e r i ves t imento pe r in te rn i e es te rn i e pe r immers ione (p isc ine ) . È o t tenuto da las t re d i mate r ia p ressata
e tag l ia ta ne i d ive rs i f o rmat i de l la co l l e z i one , ca ra t te r i z za t i anche da f in i tu re super f i c ia l i d ive rse* .
50x300 mmFormato d ispon ib i l e ne l la var iante Smooth - che p resenta una so la f in i tu ra l i sc ia - e ne l la ve rs ione Mix - con 3 d ive rse f in i tu re mesco la te in manie ra casua le . Questo fo rmato è venduto inscato la to a pezz i s fus i , pe r consent i re mo l tep l i c i so luz ion i d i posa .
10x300 mmÈ una sequenza rego la re d i bacchet te 10x300 mm montate su re te in f ib ra d i ve t ro a fo rmare fog l i 300x300 mm. D ispon ib i l e s ia ne l la var iante Smooth che ne l la var iante Mix .
10x100 mmLe bacchet te vengono r ido t te a 10x100 mm e montate su re te in f ib ra d i ve t ro con fughe i r r ego la r i pe r f o rmare fog l i d i d imens ion i 300x300 mm. I l f o rmato è d ispon ib i l e so lo ne l la ve rs ione Mix .
Sticks i s a co l l ec t i on o f th rough-body po rce la in s toneware modu les su i tab le fo r indoor and outdoor f l oo r, wa l l cove r ings and pav ings and immers ion (swimming poo ls ) , made f rom s labs o f p ressed mate r ia l cu t in to the var ious co l l ec t i on s i zes , w i th d i f fe rent sur face f in ishes* .
50x300 mmS i ze ava i lab le in the Smooth var iant - w i th smooth f in ish on l y - and in Mix ve rs ion - w i th 3 a random mix tu re o f 3 d i f fe rent f in ishes . The 50x300 mm s i ze i s so ld in boxes o f l oose p ieces to o f fe r mul t ip le ins ta l la t i on so lu t i ons .
10x300 mmTh is i s a mesh-mounted sequence o f 10x300 mm st icks – 6 mm th ick on a 300x300 mm sheet - ava i lab le in bo th Smooth and Mix var iants .
10x100 mmI n th is ve rs ion the s t i cks a re 10x100 mm and a re mesh-mounted w i th uneven j o in ts on 300x300 mm sheets . Th is s i ze i s on l y ava i lab le in the Mix ve rs ion .
Mosaico+ suggerisce la stuccatura con stucco cementizio o con stucco epossidico a grana grossa a seconda della destinazione d’uso del materiale. Per ulteriori informazioni si prega di consultare l’ufficio tecnico.Depending on the destination of use, for Sticks we suggest a polymer modified cementitious grout or a coarse-grained epoxy grout. For further information please contact us.
60
MA
NU
ALE
TE
CN
ICO
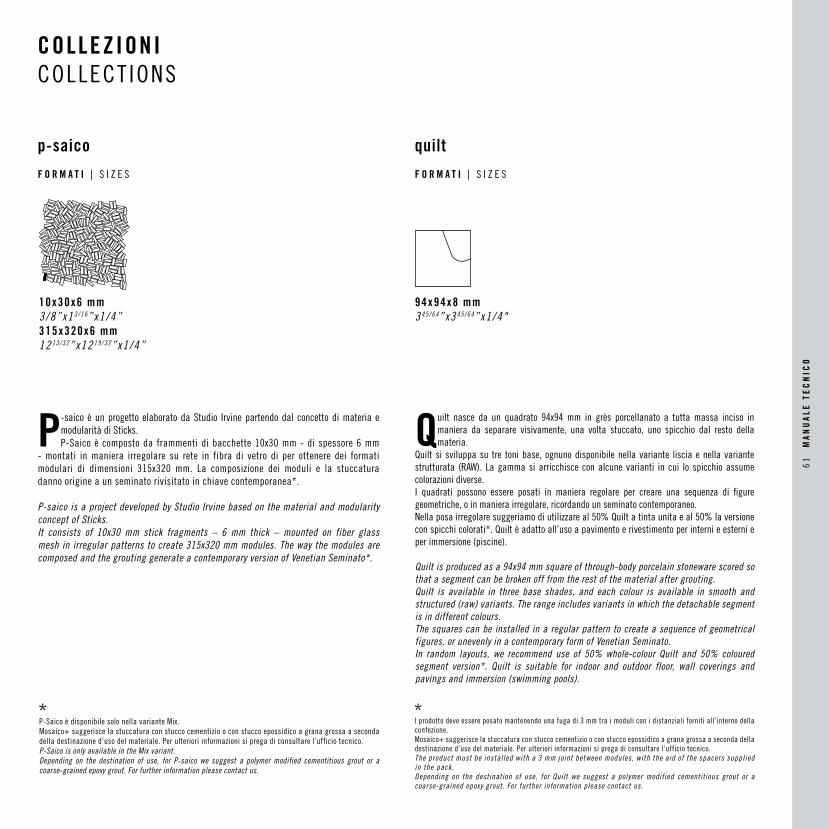
p-saico
F O R M A T I | S I Z E S
P-saico è un progetto elaborato da Studio Irvine partendo dal concetto di materia e modularità di Sticks.P-Saico è composto da frammenti di bacchette 10x30 mm - di spessore 6 mm
- montati in maniera irregolare su rete in fibra di vetro di per ottenere dei formati modulari di dimensioni 315x320 mm. La composizione dei moduli e la stuccatura danno origine a un seminato rivisitato in chiave contemporanea*.
P-saico is a project developed by Studio Irvine based on the material and modularity concept of Sticks.It consists of 10x30 mm stick fragments – 6 mm thick – mounted on fiber glass mesh in irregular patterns to create 315x320 mm modules. The way the modules are composed and the grouting generate a contemporary version of Venetian Seminato*.
10x30x6 mm3/8”x1 3/16” x1 /4”315x320x6 mm12 13/32” x12 19/32” x1 /4”
COLLEZIONI COLLECT IONS
P-Saico è disponibile solo nella variante Mix. Mosaico+ suggerisce la stuccatura con stucco cementizio o con stucco epossidico a grana grossa a seconda della destinazione d’uso del materiale. Per ulteriori informazioni si prega di consultare l’ufficio tecnico.P-Saico is only available in the Mix variant. Depending on the destination of use, for P-saico we suggest a polymer modified cementitious grout or a coarse-grained epoxy grout. For further information please contact us.
Quilt nasce da un quadrato 94x94 mm in grès porcellanato a tutta massa inciso in maniera da separare visivamente, una volta stuccato, uno spicchio dal resto della materia.
Quilt si sviluppa su tre toni base, ognuno disponibile nella variante liscia e nella variante strutturata (RAW). La gamma si arricchisce con alcune varianti in cui lo spicchio assume colorazioni diverse.I quadrati possono essere posati in maniera regolare per creare una sequenza di figure geometriche, o in maniera irregolare, ricordando un seminato contemporaneo.Nella posa irregolare suggeriamo di utilizzare al 50% Quilt a tinta unita e al 50% la versione con spicchi colorati*. Quilt è adatto all’uso a pavimento e rivestimento per interni e esterni e per immersione (piscine).
Quilt is produced as a 94x94 mm square of through-body porcelain stoneware scored so that a segment can be broken off from the rest of the material after grouting.Quilt is available in three base shades, and each colour is available in smooth and structured (raw) variants. The range includes variants in which the detachable segment is in different colours.The squares can be installed in a regular pattern to create a sequence of geometrical figures, or unevenly in a contemporary form of Venetian Seminato.In random layouts, we recommend use of 50% whole-colour Quilt and 50% coloured segment version*. Quilt is suitable for indoor and outdoor floor, wall coverings and pavings and immersion (swimming pools).
quilt
F O R M A T I | S I Z E S
94x94x8 mm3 45/64” x3 45/64” x1 /4"
l prodotto deve essere posato mantenendo una fuga di 3 mm tra i moduli con i distanziali forniti all’interno della confezione. Mosaico+ suggerisce la stuccatura con stucco cementizio o con stucco epossidico a grana grossa a seconda della destinazione d’uso del materiale. Per ulteriori informazioni si prega di consultare l’ufficio tecnico.The product must be installed with a 3 mm joint between modules, with the aid of the spacers supplied in the pack. Depending on the destination of use, for Quilt we suggest a polymer modified cementitious grout or a coarse-grained epoxy grout. For further information please contact us.
61
MA
NU
ALE
TE
CN
ICO
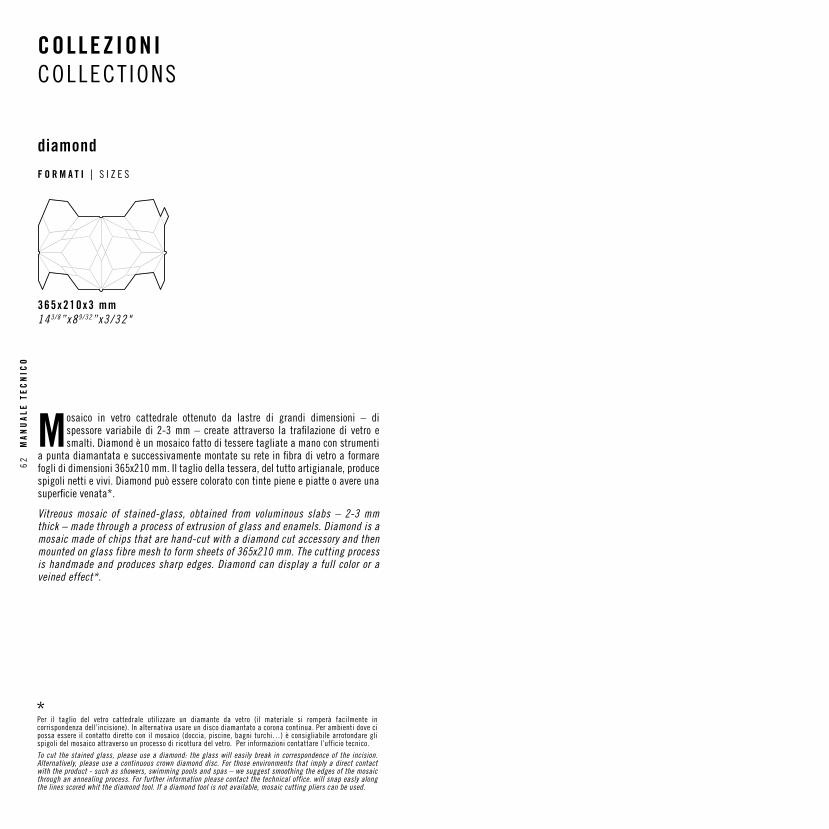
COLLEZIONI COLLECT IONS
diamond
F O R M A T I | S I Z E S
Mosaico in vetro cattedrale ottenuto da lastre di grandi dimensioni – di spessore variabile di 2-3 mm – create attraverso la trafilazione di vetro e smalti. Diamond è un mosaico fatto di tessere tagliate a mano con strumenti
a punta diamantata e successivamente montate su rete in fibra di vetro a formare fogli di dimensioni 365x210 mm. Il taglio della tessera, del tutto artigianale, produce spigoli netti e vivi. Diamond può essere colorato con tinte piene e piatte o avere una superficie venata*.
Vitreous mosaic of stained-glass, obtained from voluminous slabs – 2-3 mm thick – made through a process of extrusion of glass and enamels. Diamond is a mosaic made of chips that are hand-cut with a diamond cut accessory and then mounted on glass fibre mesh to form sheets of 365x210 mm. The cutting process is handmade and produces sharp edges. Diamond can display a full color or a veined effect*.
365x210x3 mm14 3/8” x8 9/32” x3 /32"
Per il taglio del vetro cattedrale utilizzare un diamante da vetro (il materiale si romperà facilmente in corrispondenza dell’incisione). In alternativa usare un disco diamantato a corona continua. Per ambienti dove ci possa essere il contatto diretto con il mosaico (doccia, piscine, bagni turchi…) è consigliabile arrotondare gli spigoli del mosaico attraverso un processo di ricottura del vetro. Per informazioni contattare l’ufficio tecnico.
To cut the stained glass, please use a diamond: the glass will easily break in correspondence of the incision. Alternatively, please use a continuous crown diamond disc. For those environments that imply a direct contact with the product - such as showers, swimming pools and spas – we suggest smoothing the edges of the mosaic through an annealing process. For further information please contact the technical office. will snap easly along the lines scored whit the diamond tool. If a diamond tool is not available, mosaic cutting pliers can be used.
62
MA
NU
ALE
TE
CN
ICO
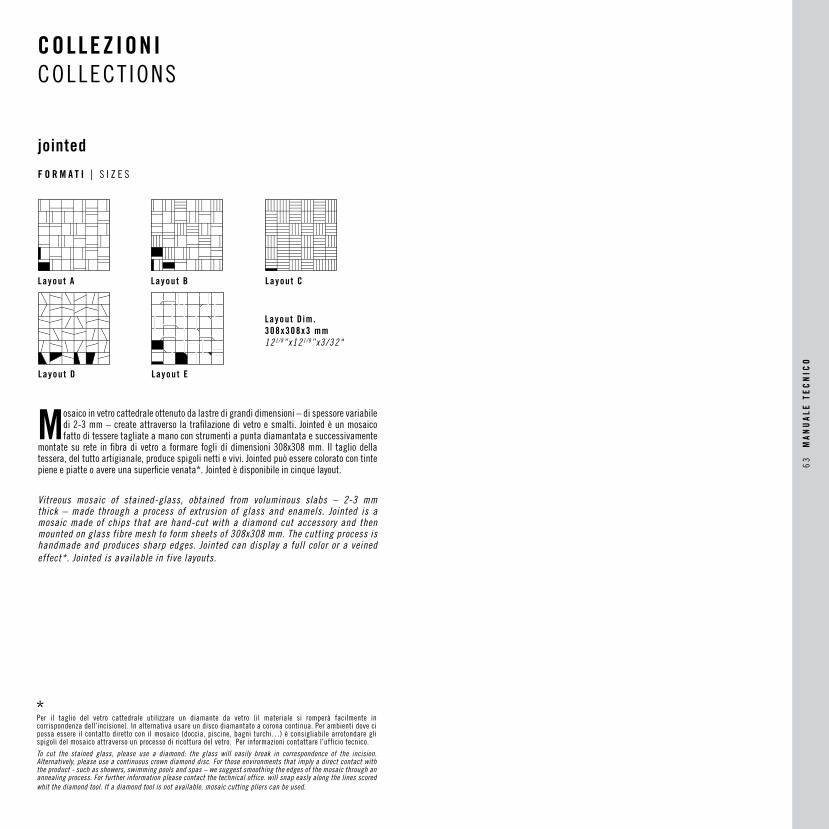
COLLEZIONI COLLECT IONS
jointed
F O R M A T I | S I Z E S
Mosaico in vetro cattedrale ottenuto da lastre di grandi dimensioni – di spessore variabile di 2-3 mm – create attraverso la trafilazione di vetro e smalti. Jointed è un mosaico fatto di tessere tagliate a mano con strumenti a punta diamantata e successivamente
montate su rete in fibra di vetro a formare fogli di dimensioni 308x308 mm. Il taglio della tessera, del tutto artigianale, produce spigoli netti e vivi. Jointed può essere colorato con tinte piene e piatte o avere una superficie venata*. Jointed è disponibile in cinque layout.
Vitreous mosaic of stained-glass, obtained from voluminous slabs – 2-3 mm thick – made through a process of extrusion of glass and enamels. Jointed is a mosaic made of chips that are hand-cut with a diamond cut accessory and then mounted on glass fibre mesh to form sheets of 308x308 mm. The cutting process is handmade and produces sharp edges. Jointed can display a full color or a veined effect*. Jointed is available in five layouts.
Per il taglio del vetro cattedrale utilizzare un diamante da vetro (il materiale si romperà facilmente in corrispondenza dell’incisione). In alternativa usare un disco diamantato a corona continua. Per ambienti dove ci possa essere il contatto diretto con il mosaico (doccia, piscine, bagni turchi…) è consigliabile arrotondare gli spigoli del mosaico attraverso un processo di ricottura del vetro. Per informazioni contattare l’ufficio tecnico.
To cut the stained glass, please use a diamond: the glass will easily break in correspondence of the incision. Alternatively, please use a continuous crown diamond disc. For those environments that imply a direct contact with the product - such as showers, swimming pools and spas – we suggest smoothing the edges of the mosaic through an annealing process. For further information please contact the technical office. will snap easly along the lines scored whit the diamond tool. If a diamond tool is not available, mosaic cutting pliers can be used.
Layout A
Layout E
Layout B Layout C
Layout D
Layout D im.308x308x3 mm12 1/8” x12 1/8” x3 /32"
63
MA
NU
ALE
TE
CN
ICO
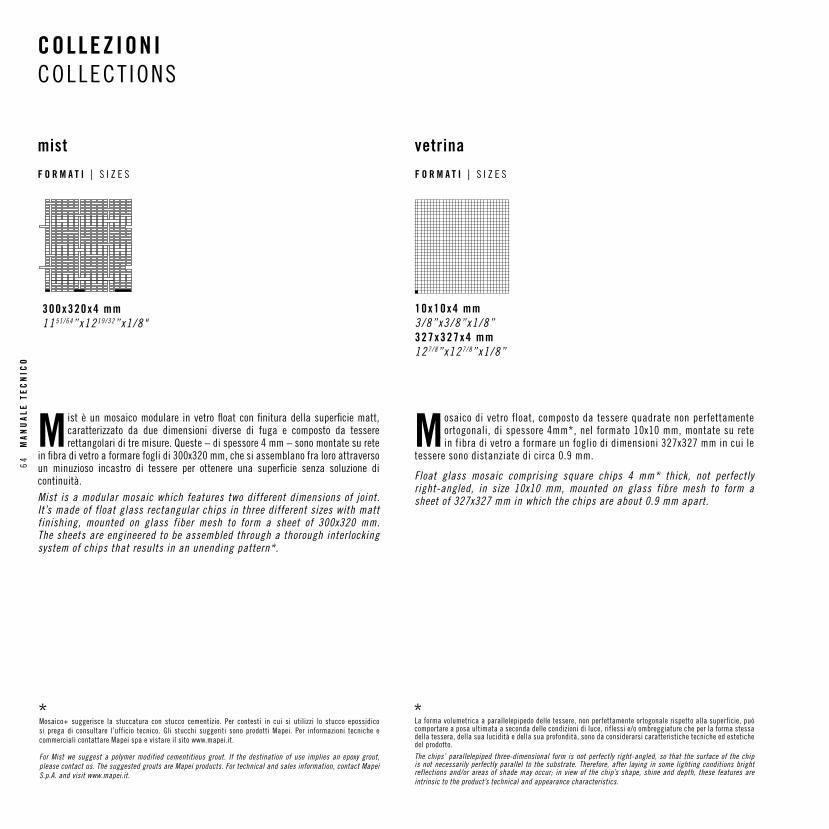
COLLEZIONI COLLECT IONS
mist
F O R M A T I | S I Z E S
M ist è un mosaico modulare in vetro float con finitura della superficie matt, caratterizzato da due dimensioni diverse di fuga e composto da tessere rettangolari di tre misure. Queste – di spessore 4 mm – sono montate su rete
in fibra di vetro a formare fogli di 300x320 mm, che si assemblano fra loro attraverso un minuzioso incastro di tessere per ottenere una superficie senza soluzione di continuità.Mist is a modular mosaic which features two different dimensions of joint. It’s made of float glass rectangular chips in three different sizes with matt finishing, mounted on glass fiber mesh to form a sheet of 300x320 mm. The sheets are engineered to be assembled through a thorough interlocking system of chips that results in an unending pattern*.
Mosaico+ suggerisce la stuccatura con stucco cementizio. Per contesti in cui si utilizzi lo stucco epossidico si prega di consultare l’ufficio tecnico. Gli stucchi suggeriti sono prodotti Mapei. Per informazioni tecniche e commerciali contattare Mapei spa e vistare il sito www.mapei.it.
For Mist we suggest a polymer modified cementitious grout. If the destination of use implies an epoxy grout, please contact us. The suggested grouts are Mapei products. For technical and sales information, contact Mapei S.p.A. and visit www.mapei.it.
M osaico di vetro float, composto da tessere quadrate non perfettamente ortogonali, di spessore 4mm*, nel formato 10x10 mm, montate su rete in fibra di vetro a formare un foglio di dimensioni 327x327 mm in cui le
tessere sono distanziate di circa 0.9 mm.
Float glass mosaic comprising square chips 4 mm* thick, not perfectly right-angled, in size 10x10 mm, mounted on glass fibre mesh to form a sheet of 327x327 mm in which the chips are about 0.9 mm apart.
vetrina
F O R M A T I | S I Z E S
La forma volumetrica a parallelepipedo delle tessere, non perfettamente ortogonale rispetto alla superficie, può comportare a posa ultimata a seconda delle condizioni di luce, riflessi e/o ombreggiature che per la forma stessa della tessera, della sua lucidità e della sua profondità, sono da considerarsi caratteristiche tecniche ed estetiche del prodotto.
The chips’ parallelepiped three-dimensional form is not perfectly right-angled, so that the surface of the chip is not necessarily perfectly parallel to the substrate. Therefore, after laying in some lighting conditions bright reflections and/or areas of shade may occur; in view of the chip’s shape, shine and depth, these features are intrinsic to the product’s technical and appearance characteristics.
300x320x4 mm11 51/64” x12 19/32” x1 /8"
10x10x4 mm3/8”x3/8”x1/8”327x327x4 mm12 7/8” x12 7/8” x1 /8”
64
MA
NU
ALE
TE
CN
ICO
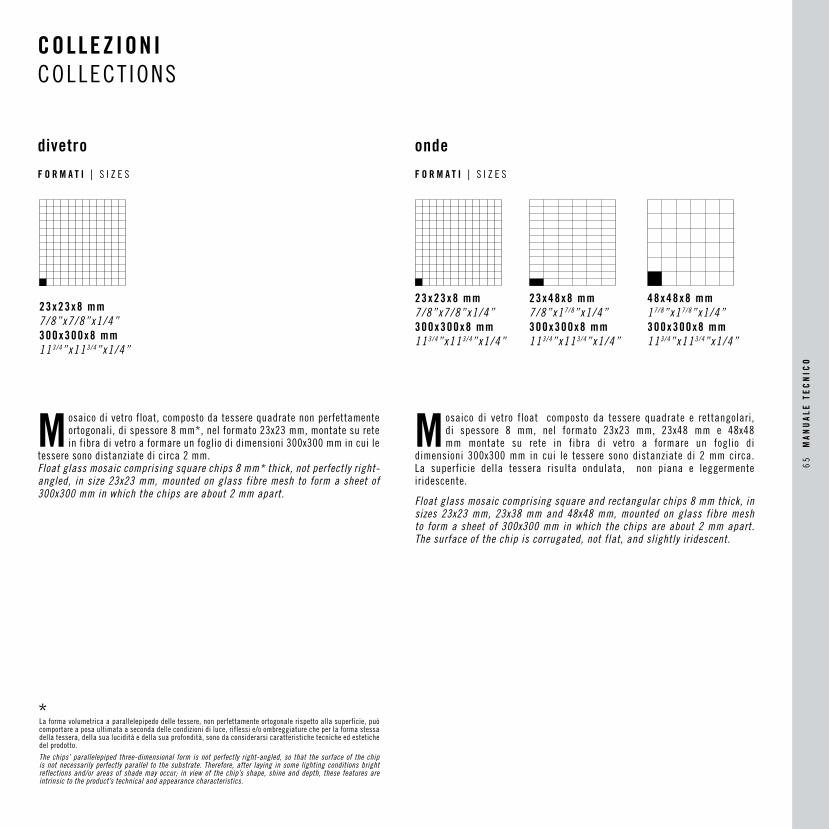
COLLEZIONI COLLECT IONS
divetro
F O R M A T I | S I Z E S
M osaico di vetro float, composto da tessere quadrate non perfettamente ortogonali, di spessore 8 mm*, nel formato 23x23 mm, montate su rete in fibra di vetro a formare un foglio di dimensioni 300x300 mm in cui le
tessere sono distanziate di circa 2 mm. Float glass mosaic comprising square chips 8 mm* thick, not perfectly right-angled, in size 23x23 mm, mounted on glass fibre mesh to form a sheet of 300x300 mm in which the chips are about 2 mm apart.
La forma volumetrica a parallelepipedo delle tessere, non perfettamente ortogonale rispetto alla superficie, può comportare a posa ultimata a seconda delle condizioni di luce, riflessi e/o ombreggiature che per la forma stessa della tessera, della sua lucidità e della sua profondità, sono da considerarsi caratteristiche tecniche ed estetiche del prodotto.
The chips’ parallelepiped three-dimensional form is not perfectly right-angled, so that the surface of the chip is not necessarily perfectly parallel to the substrate. Therefore, after laying in some lighting conditions bright reflections and/or areas of shade may occur; in view of the chip’s shape, shine and depth, these features are intrinsic to the product’s technical and appearance characteristics.
M osaico di vetro float composto da tessere quadrate e rettangolari, di spessore 8 mm, nel formato 23x23 mm, 23x48 mm e 48x48 mm montate su rete in fibra di vetro a formare un foglio di
dimensioni 300x300 mm in cui le tessere sono distanziate di 2 mm circa. La superficie della tessera risulta ondulata, non piana e leggermente iridescente.
Float glass mosaic comprising square and rectangular chips 8 mm thick, in sizes 23x23 mm, 23x38 mm and 48x48 mm, mounted on glass fibre mesh to form a sheet of 300x300 mm in which the chips are about 2 mm apart. The surface of the chip is corrugated, not flat, and slightly iridescent.
onde
F O R M A T I | S I Z E S
23x23x8 mm7/8”x7/8”x1/4”300x300x8 mm11 3/4” x11 3/4” x1 /4”
23x23x8 mm7/8”x7/8”x1/4”300x300x8 mm11 3/4” x11 3/4” x1 /4”
23x48x8 mm7/8”x1 7/8” x1 /4”300x300x8 mm11 3/4” x11 3/4” x1 /4”
48x48x8 mm1 7/8” x1 7/8” x1 /4”300x300x8 mm11 3/4” x11 3/4” x1 /4”
65
MA
NU
ALE
TE
CN
ICO
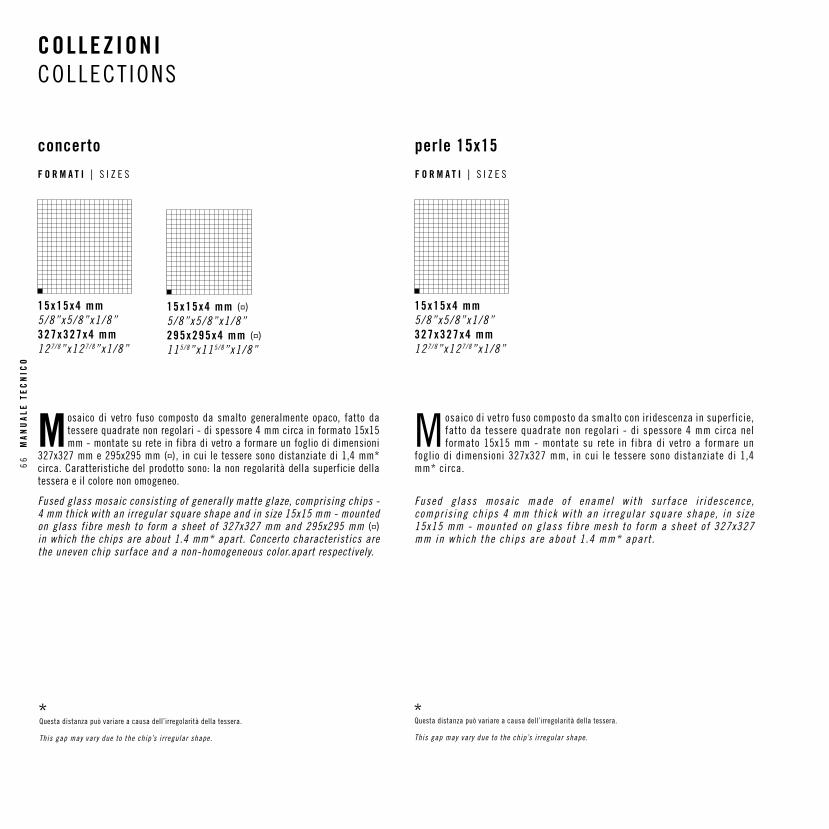
COLLEZIONI COLLECT IONS
concerto
F O R M A T I | S I Z E S
M osaico di vetro fuso composto da smalto generalmente opaco, fatto da tessere quadrate non regolari - di spessore 4 mm circa in formato 15x15 mm - montate su rete in fibra di vetro a formare un foglio di dimensioni
327x327 mm e 295x295 mm ( ), in cui le tessere sono distanziate di 1,4 mm* circa. Caratteristiche del prodotto sono: la non regolarità della superficie della tessera e il colore non omogeneo.
Fused glass mosaic consisting of generally matte glaze, comprising chips - 4 mm thick with an irregular square shape and in size 15x15 mm - mounted on glass fibre mesh to form a sheet of 327x327 mm and 295x295 mm ( ) in which the chips are about 1.4 mm* apart. Concerto characteristics are the uneven chip surface and a non-homogeneous color.apart respectively.
Questa distanza può variare a causa dell’irregolarità della tessera.
This gap may vary due to the chip’s irregular shape.
Mosaico di vetro fuso composto da smalto con iridescenza in superficie, fatto da tessere quadrate non regolari - di spessore 4 mm circa nel formato 15x15 mm - montate su rete in fibra di vetro a formare un
foglio di dimensioni 327x327 mm, in cui le tessere sono distanziate di 1,4 mm* circa.
Fused glass mosaic made of enamel wi th surface i r idescence, compris ing chips 4 mm thick with an i r regular square shape, in s ize 15x15 mm - mounted on g lass f ibre mesh to form a sheet of 327x327 mm in which the chips are about 1 .4 mm* apart .
perle 15x15
F O R M A T I | S I Z E S
Questa distanza può variare a causa dell’irregolarità della tessera.
This gap may vary due to the chip’s irregular shape.
15x15x4 mm5/8”x5/8”x1/8”327x327x4 mm12 7/8” x12 7/8” x1 /8”
15x15x4 mm ( )5/8”x5/8”x1/8”295x295x4 mm ( )11 5/8” x11 5/8” x1 /8”
15x15x4 mm5/8”x5/8”x1/8”327x327x4 mm12 7/8” x12 7/8” x1 /8”
66
MA
NU
ALE
TE
CN
ICO

COLLEZIONI COLLECT IONS
perle 20x20
F O R M A T I | S I Z E S
M osaico di vetro fuso con iridescenza in superficie, composto da tessere quadrate e bisellate - di spessore 4 mm nel formato 20x20 mm - e montate su rete in fibra di vetro a formare un foglio di dimensioni 327x327 mm, in
cui le tessere sono distanziate di 1,9 mm circa.
Fused glass mosaic made of enamel with surface iridescence, comprising chips 4 mm thick with an irregular square shape, in size 20x20 mm - mounted on glass fibre mesh to form a sheet of 327x327 mm in which the chips are about 1.9 mm apart.
Questa distanza può variare a causa dell’irregolarità della tessera.
This gap may vary due to the chip’s irregular shape.
Mosaico in vetro e oro composto da tessere quadrate non perfettamente ortogonali - di spessore 4 mm nei formati 10x10, 15x15 e 20x20 mm - alle quali è applicata una foglia d’oro a 24K (sottile lamina d’oro) protetta da
una cartella di vetro.Le tessere sono montate su rete in fibra di vetro a formare un foglio di dimensioni 327x327 mm in cui le tessere sono distanziate rispettivamente di 0,9, 1,4 e 1,9 mm circa.La collezione Doro è disponibile in 2 finiture chiamate “A Pavimento” e “A Rivestimento” *.
G lass and go ld mosa i c c ons i s t i ng o f squa re ch ips - 4 mm th i ck , no t pe r f ec t l y r i gh tang l ed and i n s i z es 10x10 , 15x15 and 20x20 mm - w i th a 24-ca ra t go ld f o i l ( t h i n f i lm o f go ld ) app l i ed , p r o t ec t ed b y a l a y e r o f g l ass .The ch ips a r e moun ted on g lass f i b r e mesh t o f o rm a shee t o f 327x327 mm in wh i ch the ch ips a r e abou t 0 .9 , 1 . 4 and 1 .9 mm apa r t r e spec t i v e l y.The Do r o c o l l e c t i on i s ava i l ab l e i n 2 f i n i shes , “A Pav imen to” and “A R i ves t imen to” * .
doro
F O R M A T I | S I Z E S
20x20x4 mm3/4”x3/4”x1/8”327x327x4 mm12 7/8” x12 7/8” x1 /8”
20x20x4 mm3/4”x3/4”x1/8”327x327x4 mm12 7/8” x12 7/8” x1 /8”
15x15x4 mm5/8”x5/8”x1/8”327x327x4 mm12 7/8” x12 7/8” x1 /8”
10x10x4 mm3/8”x3/8”x1/8”327x327x4 mm12 7/8” x12 7/8” x1 /8”
Nella finitura “A Pavimento” la foglia d’oro posta sul fondo, al di sotto della cartella di vetro, dona al mosaico un particolare effetto di profondità. Nella finitura “A Rivestimento” la foglia d’oro rimane in superficie per un risultato più compatto e materico.
In the “A Pavimento” finish, the gold foil applied to the back, underneath the glass layer, gives the mosaic a striking effect of depth. In the “A Rivestimento” finish, the gold foil is left on the surface, for a more compact, tactile look.
67
MA
NU
ALE
TE
CN
ICO
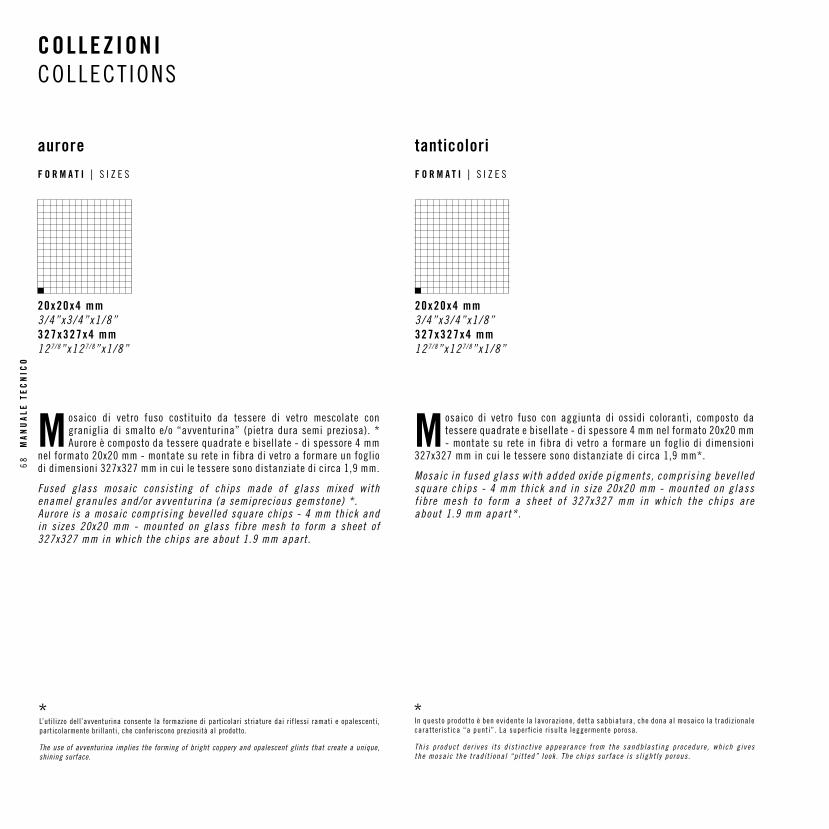
COLLEZIONI COLLECT IONS
aurore
F O R M A T I | S I Z E S
M osaico di vetro fuso costituito da tessere di vetro mescolate con graniglia di smalto e/o “avventurina” (pietra dura semi preziosa). * Aurore è composto da tessere quadrate e bisellate - di spessore 4 mm
nel formato 20x20 mm - montate su rete in fibra di vetro a formare un foglio di dimensioni 327x327 mm in cui le tessere sono distanziate di circa 1,9 mm.
Fused glass mosaic consisting of chips made of glass mixed with enamel granules and/or avventurina (a semiprecious gemstone) *.Aurore is a mosaic comprising bevel led square chips - 4 mm thick and in sizes 20x20 mm - mounted on glass f ibre mesh to form a sheet of 327x327 mm in which the chips are about 1.9 mm apart.
L’utilizzo dell’avventurina consente la formazione di particolari striature dai riflessi ramati e opalescenti, particolarmente brillanti, che conferiscono preziosità al prodotto.
The use of avventurina implies the forming of bright coppery and opalescent glints that create a unique, shining surface.
M osaico di vetro fuso con aggiunta di ossidi coloranti, composto da tessere quadrate e bisellate - di spessore 4 mm nel formato 20x20 mm - montate su rete in fibra di vetro a formare un foglio di dimensioni
327x327 mm in cui le tessere sono distanziate di circa 1,9 mm*.
Mosaic in fused glass with added ox ide p igments , compr is ing bevel led square chips - 4 mm thick and in s ize 20x20 mm - mounted on g lass f ibre mesh to form a sheet of 327x327 mm in which the chips are about 1 .9 mm apart*.
tanticolori
F O R M A T I | S I Z E S
In questo prodotto è ben evidente la lavorazione, detta sabbiatura, che dona al mosaico la tradizionale caratteristica “a punti”. La superficie r isulta leggermente porosa.
Th is p roduct de r i ves i t s d is t inc t i ve appearance f rom the sandb las t ing p rocedure , wh ich g ives the mosa ic the t rad i t i ona l “p i t ted” l ook . The ch ips sur face i s s l ight l y po rous .
20x20x4 mm3/4”x3/4”x1/8”327x327x4 mm12 7/8” x12 7/8” x1 /8”
20x20x4 mm3/4”x3/4”x1/8”327x327x4 mm12 7/8” x12 7/8” x1 /8”
68
MA
NU
ALE
TE
CN
ICO
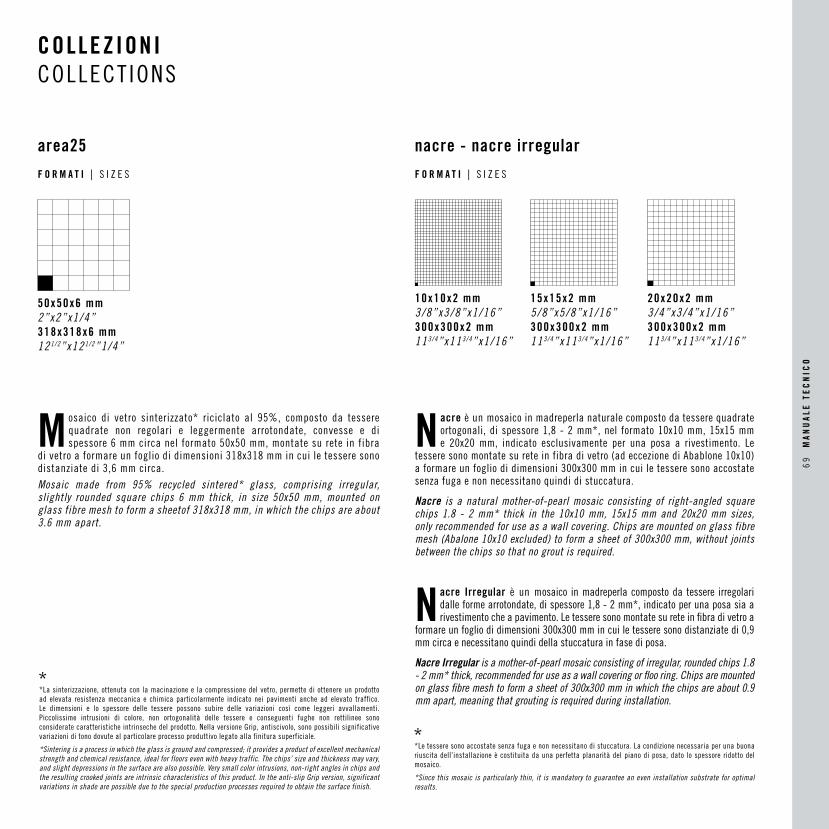
COLLEZIONI COLLECT IONS
area25
F O R M A T I | S I Z E S
M osaico di vetro sinterizzato* riciclato al 95%, composto da tessere quadrate non regolari e leggermente arrotondate, convesse e di spessore 6 mm circa nel formato 50x50 mm, montate su rete in fibra
di vetro a formare un foglio di dimensioni 318x318 mm in cui le tessere sono distanziate di 3,6 mm circa.Mosaic made from 95% recycled sintered* glass, comprising irregular, slightly rounded square chips 6 mm thick, in size 50x50 mm, mounted on glass fibre mesh to form a sheetof 318x318 mm, in which the chips are about 3.6 mm apart.
*La sinterizzazione, ottenuta con la macinazione e la compressione del vetro, permette di ottenere un prodotto ad elevata resistenza meccanica e chimica particolarmente indicato nei pavimenti anche ad elevato traffico. Le dimensioni e lo spessore delle tessere possono subire delle variazioni così come leggeri avvallamenti. Piccolissime intrusioni di colore, non ortogonalità delle tessere e conseguenti fughe non rettilinee sono considerate caratteristiche intrinseche del prodotto. Nella versione Grip, antiscivolo, sono possibili significative variazioni di tono dovute al particolare processo produttivo legato alla finitura superficiale.
*Sintering is a process in which the glass is ground and compressed; it provides a product of excellent mechanical strength and chemical resistance, ideal for floors even with heavy traffic. The chips’ size and thickness may vary, and slight depressions in the surface are also possible. Very small color intrusions, non-right angles in chips and the resulting crooked joints are intrinsic characteristics of this product. In the anti-slip Grip version, significant variations in shade are possible due to the special production processes required to obtain the surface finish.
Nacre è un mosaico in madreperla naturale composto da tessere quadrate ortogonali, di spessore 1,8 - 2 mm*, nel formato 10x10 mm, 15x15 mm e 20x20 mm, indicato esclusivamente per una posa a rivestimento. Le
tessere sono montate su rete in fibra di vetro (ad eccezione di Abablone 10x10) a formare un foglio di dimensioni 300x300 mm in cui le tessere sono accostate senza fuga e non necessitano quindi di stuccatura.
Nacre is a natural mother-of-pearl mosaic consisting of right-angled square chips 1.8 - 2 mm* thick in the 10x10 mm, 15x15 mm and 20x20 mm sizes, only recommended for use as a wall covering. Chips are mounted on glass fibre mesh (Abalone 10x10 excluded) to form a sheet of 300x300 mm, without joints between the chips so that no grout is required.
Nacre Irregular è un mosaico in madreperla composto da tessere irregolari dalle forme arrotondate, di spessore 1,8 - 2 mm*, indicato per una posa sia a rivestimento che a pavimento. Le tessere sono montate su rete in fibra di vetro a
formare un foglio di dimensioni 300x300 mm in cui le tessere sono distanziate di 0,9 mm circa e necessitano quindi della stuccatura in fase di posa.
Nacre Irregular is a mother-of-pearl mosaic consisting of irregular, rounded chips 1.8 - 2 mm* thick, recommended for use as a wall covering or floo ring. Chips are mounted on glass fibre mesh to form a sheet of 300x300 mm in which the chips are about 0.9 mm apart, meaning that grouting is required during installation.
nacre - nacre irregular
F O R M A T I | S I Z E S
*Le tessere sono accostate senza fuga e non necessitano di stuccatura. La condizione necessaria per una buona riuscita dell’installazione è costituita da una perfetta planarità del piano di posa, dato lo spessore ridotto del mosaico.
*Since this mosaic is particularly thin, it is mandatory to guarantee an even installation substrate for optimal results.
50x50x6 mm2”x2”x1/4”318x318x6 mm12 1/2” x12 1/2”1 /4”
10x10x2 mm3/8”x3/8”x1/16”300x300x2 mm11 3/4” x11 3/4” x1 /16”
15x15x2 mm5/8”x5/8”x1/16”300x300x2 mm11 3/4” x11 3/4” x1 /16”
20x20x2 mm3/4”x3/4”x1/16”300x300x2 mm11 3/4” x11 3/4” x1 /16”
69
MA
NU
ALE
TE
CN
ICO
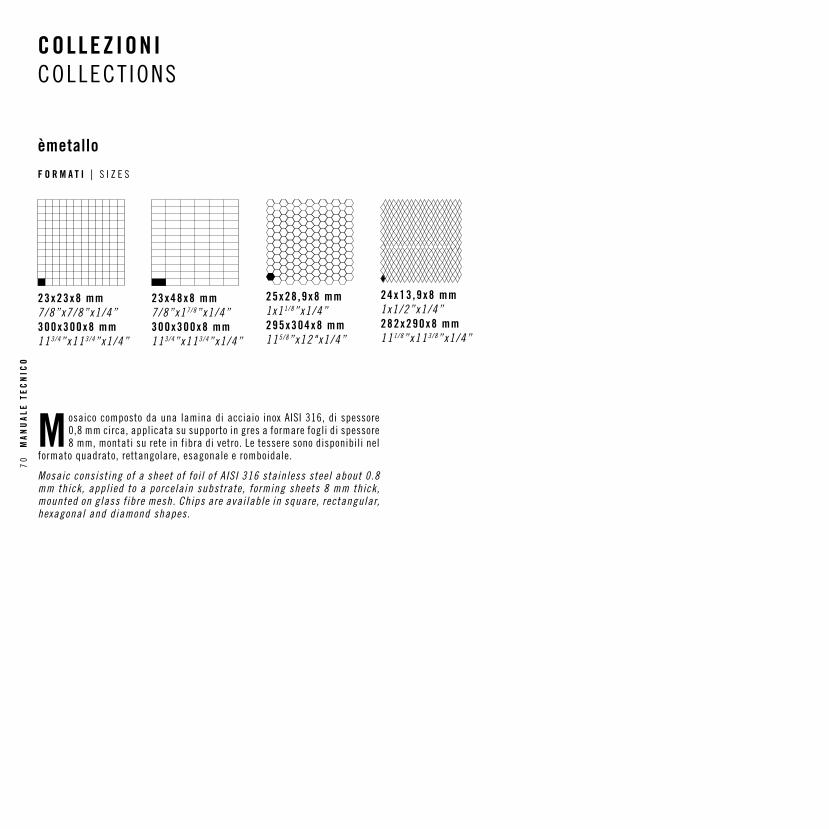
COLLEZIONI COLLECT IONS
èmetallo
F O R M A T I | S I Z E S
M osaico composto da una lamina di acciaio inox AISI 316, di spessore 0,8 mm circa, applicata su supporto in gres a formare fogli di spessore 8 mm, montati su rete in fibra di vetro. Le tessere sono disponibili nel
formato quadrato, rettangolare, esagonale e romboidale.
Mosaic consisting of a sheet of foi l of AISI 316 stainless steel about 0.8 mm thick, applied to a porcelain substrate, forming sheets 8 mm thick, mounted on glass fibre mesh. Chips are available in square, rectangular, hexagonal and diamond shapes.
23x23x8 mm7/8”x7/8”x1/4”300x300x8 mm11 3/4” x11 3/4” x1 /4”
25x28 ,9x8 mm1x1 1/8” x1 /4”295x304x8 mm11 5/8” x12"x1/4”
23x48x8 mm7/8”x1 7/8” x1 /4”300x300x8 mm11 3/4” x11 3/4” x1 /4”
24x13 ,9x8 mm1x1/2”x1/4”282x290x8 mm11 1/8” x11 3/8” x1 /4”
70
MA
NU
ALE
TE
CN
ICO
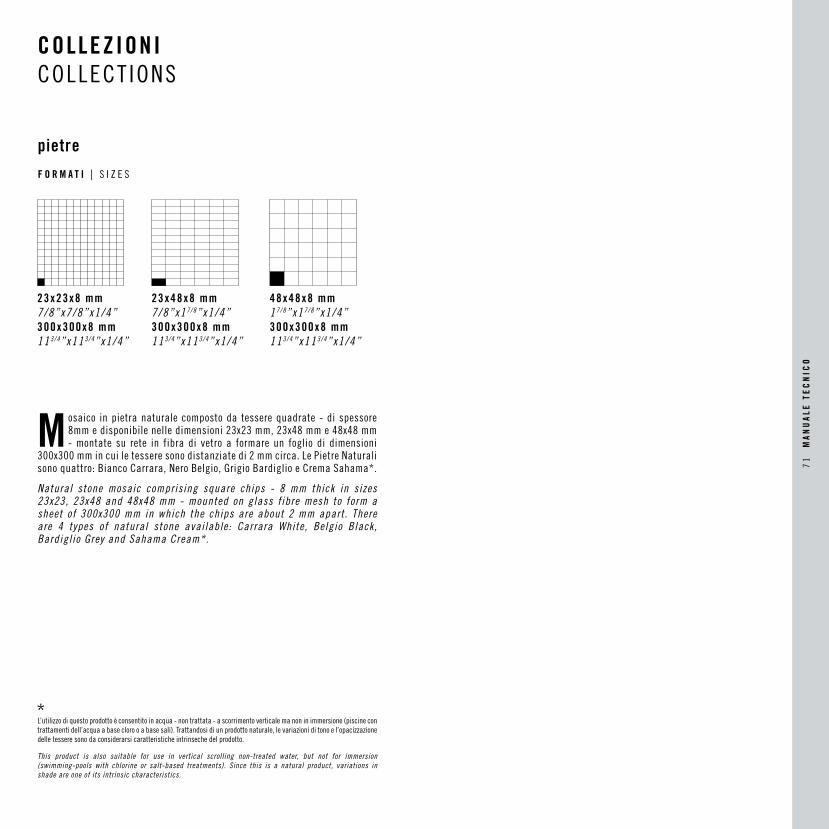
COLLEZIONI COLLECT IONS
M osaico in pietra naturale composto da tessere quadrate - di spessore 8mm e disponibile nelle dimensioni 23x23 mm, 23x48 mm e 48x48 mm - montate su rete in fibra di vetro a formare un foglio di dimensioni
300x300 mm in cui le tessere sono distanziate di 2 mm circa. Le Pietre Naturali sono quattro: Bianco Carrara, Nero Belgio, Grigio Bardiglio e Crema Sahama*.
Natural stone mosaic comprising square chips - 8 mm thick in sizes 23x23, 23x48 and 48x48 mm - mounted on glass fibre mesh to form a sheet of 300x300 mm in which the chips are about 2 mm apart. There are 4 types of natural stone available: Carrara White, Belgio Black, Bardiglio Grey and Sahama Cream*.
pietre
F O R M A T I | S I Z E S
L’utilizzo di questo prodotto è consentito in acqua - non trattata - a scorrimento verticale ma non in immersione (piscine con trattamenti dell’acqua a base cloro o a base sali). Trattandosi di un prodotto naturale, le variazioni di tono e l’opacizzazione delle tessere sono da considerarsi caratteristiche intrinseche del prodotto.
This product is also suitable for use in vertical scrolling non-treated water, but not for immersion (swimming-pools with chlorine or salt-based treatments). Since this is a natural product, variations in shade are one of its intrinsic characteristics.
23x23x8 mm7/8”x7/8”x1/4”300x300x8 mm11 3/4” x11 3/4” x1 /4”
23x48x8 mm7/8”x1 7/8” x1 /4”300x300x8 mm11 3/4” x11 3/4” x1 /4”
48x48x8 mm1 7/8” x1 7/8” x1 /4”300x300x8 mm11 3/4” x11 3/4” x1 /4”
71
MA
NU
ALE
TE
CN
ICO
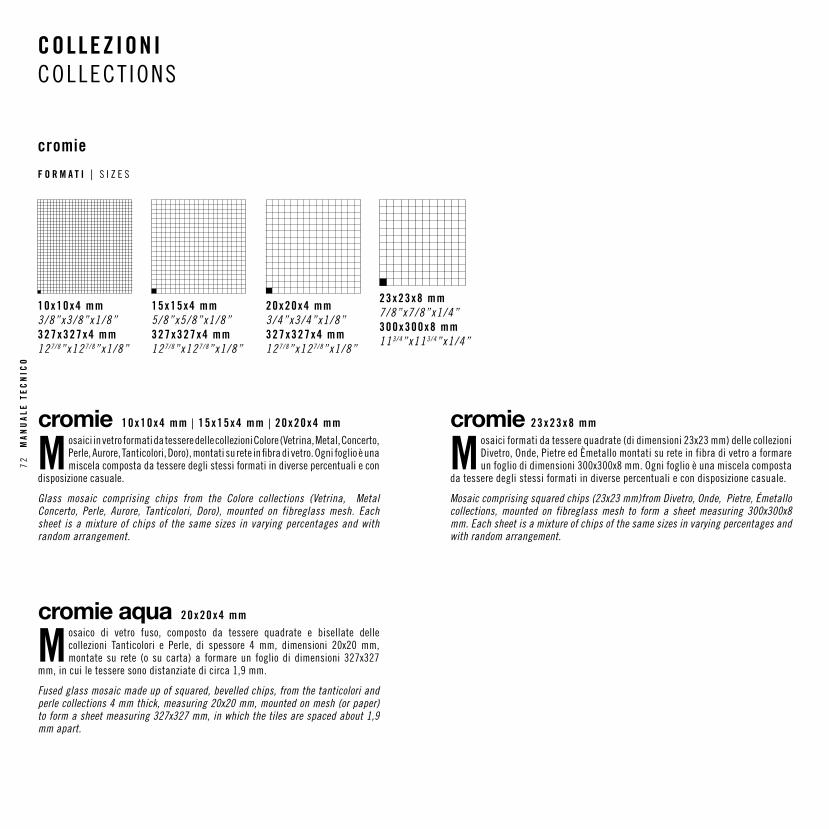
COLLEZIONI COLLECT IONS
cromie
F O R M A T I | S I Z E S
M osaici in vetro formati da tessere delle collezioni Colore (Vetrina, Metal, Concerto, Perle, Aurore, Tanticolori, Doro), montati su rete in fibra di vetro. Ogni foglio è una miscela composta da tessere degli stessi formati in diverse percentuali e con
disposizione casuale.
Glass mosaic comprising chips from the Colore collections (Vetrina, Metal Concerto, Perle, Aurore, Tanticolori, Doro), mounted on fibreglass mesh. Each sheet is a mixture of chips of the same sizes in varying percentages and with random arrangement.
23x23x8 mm7/8”x7/8”x1/4”300x300x8 mm11 3/4” x11 3/4” x1 /4”
cromie 10x10x4 mm | 15x15x4 mm | 20x20x4 mm
10x10x4 mm3/8”x3/8”x1/8”327x327x4 mm12 7/8” x12 7/8” x1 /8”
15x15x4 mm5/8”x5/8”x1/8”327x327x4 mm12 7/8” x12 7/8” x1 /8”
20x20x4 mm3/4”x3/4”x1/8”327x327x4 mm12 7/8” x12 7/8” x1 /8”
M osaico di vetro fuso, composto da tessere quadrate e bisellate delle collezioni Tanticolori e Perle, di spessore 4 mm, dimensioni 20x20 mm, montate su rete (o su carta) a formare un foglio di dimensioni 327x327
mm, in cui le tessere sono distanziate di circa 1,9 mm.
Fused glass mosaic made up of squared, bevelled chips, from the tanticolori and perle collections 4 mm thick, measuring 20x20 mm, mounted on mesh (or paper) to form a sheet measuring 327x327 mm, in which the tiles are spaced about 1,9 mm apart.
cromie aqua 20x20x4 mm
M osaici formati da tessere quadrate (di dimensioni 23x23 mm) delle collezioni Divetro, Onde, Pietre ed Èmetallo montati su rete in fibra di vetro a formare un foglio di dimensioni 300x300x8 mm. Ogni foglio è una miscela composta
da tessere degli stessi formati in diverse percentuali e con disposizione casuale.
Mosaic comprising squared chips (23x23 mm)from Divetro, Onde, Pietre, Émetallo collections, mounted on fibreglass mesh to form a sheet measuring 300x300x8 mm. Each sheet is a mixture of chips of the same sizes in varying percentages and with random arrangement.
cromie 23x23x8 mm
72
MA
NU
ALE
TE
CN
ICO
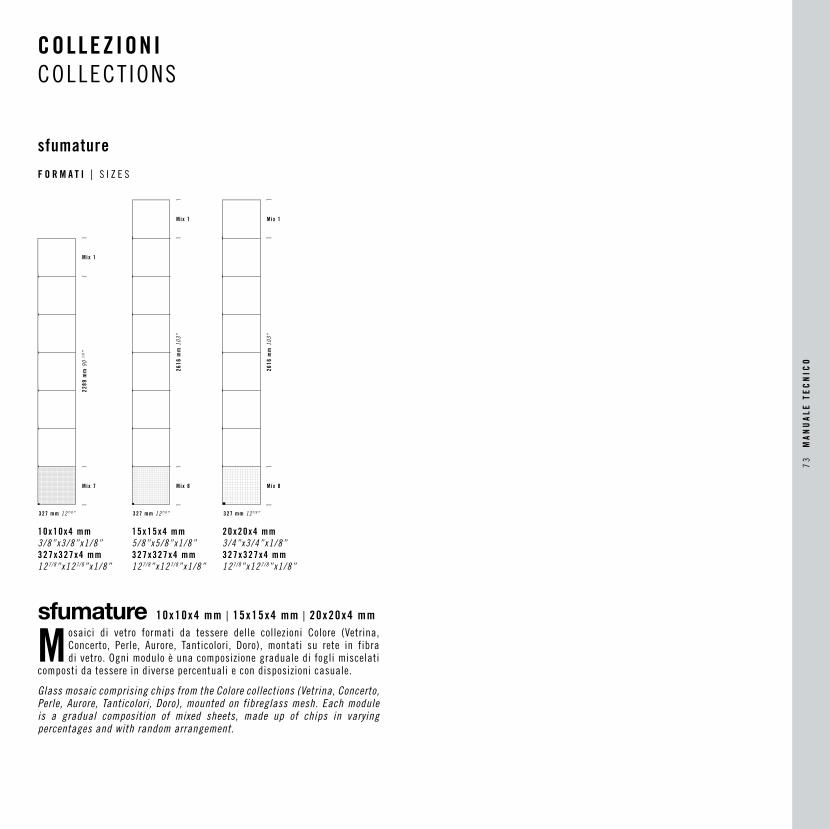
COLLEZIONI COLLECT IONS
sfumature
F O R M A T I | S I Z E S
M osaici di vetro formati da tessere delle collezioni Colore (Vetrina, Concerto, Perle, Aurore, Tanticolori, Doro), montati su rete in fibra di vetro. Ogni modulo è una composizione graduale di fogli miscelati
composti da tessere in diverse percentuali e con disposizioni casuale.
Glass mosaic comprising chips from the Colore collections (Vetrina, Concerto, Perle, Aurore, Tanticolori, Doro), mounted on fibreglass mesh. Each module is a gradual composition of mixed sheets, made up of chips in varying percentages and with random arrangement.
sfumature 10x10x4 mm | 15x15x4 mm | 20x20x4 mm
327 mm 12 7/8”
2289
mm
90
1/8 ”
Mix 1
Mix 7
10x10x4 mm3/8”x3/8”x1/8”327x327x4 mm12 7/8” x12 7/8” x1 /8”
327 mm 12 7/8”
2616
mm
103
”
Mix 1
Mix 8
15x15x4 mm5/8”x5/8”x1/8”327x327x4 mm12 7/8” x12 7/8” x1 /8”
327 mm 12 7/8”
2616
mm
103
”
Mix 1
Mix 8
20x20x4 mm3/4”x3/4”x1/8”327x327x4 mm 12 7/8” x12 7/8” x1 /8”
73
MA
NU
ALE
TE
CN
ICO
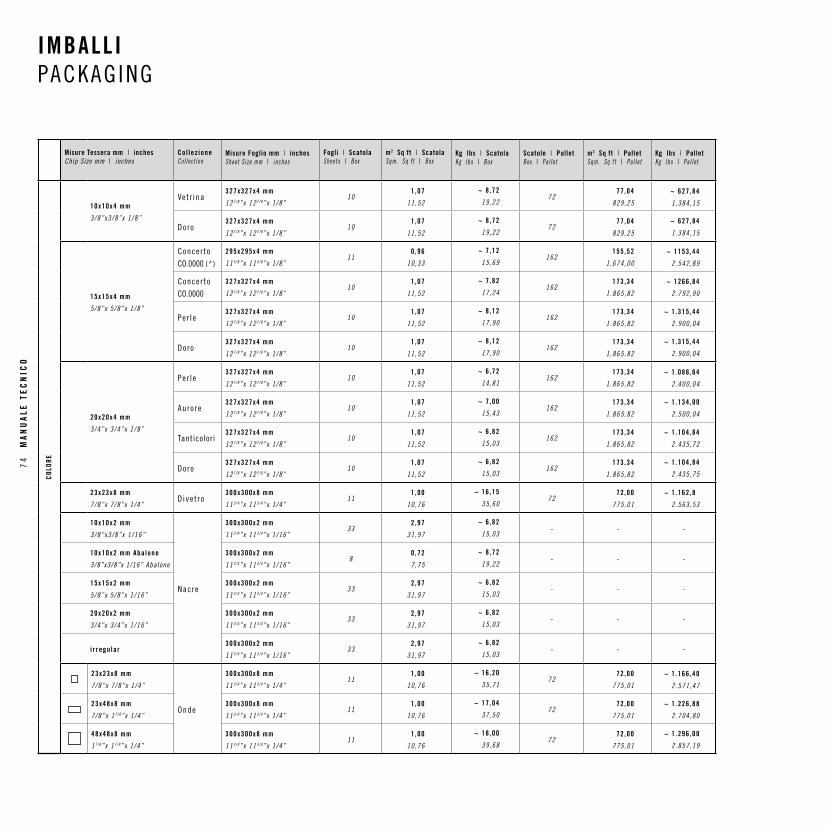
IMBALLI PACKAGING
Misure Tessera mm | inchesChip Size mm | inches
Col lez ioneCo l l ec t i on
Misure Foglio mm | inchesSheet S i ze mm | inches
Fogli | ScatolaSheets | Box
m2 Sq ft | ScatolaSqm. Sq f t | Box
Kg lbs | ScatolaKg lbs | Box
Scatole | PalletBox | Pa l l e t
m2 Sq ft | PalletSqm. Sq f t | Pa l l e t
Kg lbs | PalletKg lbs | Pa l l e t
COLO
RE
10x10x4 mm
3/8”x3/8”x 1 /8”
Vet r ina327x327x4 mm
12 7/8” x 12 7/8” x 1 /8”10
1 ,07
11 ,52
~ 8 ,72
19 ,2272
77 ,04
829 ,25
~ 627 ,84
1 .384 ,15
Doro327x327x4 mm
12 7/8” x 12 7/8” x 1 /8”10
1 ,07
11 ,52
~ 8 ,72
19 ,2272
77 ,04
829 ,25
~ 627 ,84
1 .384 ,15
15x15x4 mm
5/8”x 5 /8”x 1 /8”
Concer toCO.0000 (* )
295x295x4 mm
11 5/8” x 11 5/8” x 1 /8”11
0 ,96
10 ,33
~ 7 ,12
15 ,69162
155 ,52
1 .674 ,00
~ 1153 ,44
2 .542 ,89
Concer toCO.0000
327x327x4 mm
12 7/8” x 12 7/8” x 1 /8”10
1 ,07
11 ,52
~ 7 ,82
17 ,24162
173 ,34
1 .865 ,82
~ 1266 ,84
2 .792 ,90
Per le327x327x4 mm
12 7/8” x 12 7/8” x 1 /8”10
1 ,07
11 ,52
~ 8 ,12
17 ,90162
173 ,34
1 .865 ,82
~ 1 .315 ,44
2 .900 ,04
Doro327x327x4 mm
12 7/8” x 12 7/8” x 1 /8”10
1 ,07
11 ,52
~ 8 ,12
17 ,90162
173 ,34
1 .865 ,82
~ 1 .315 ,44
2 .900 ,04
20x20x4 mm
3/4”x 3 /4”x 1 /8”
Per le327x327x4 mm
12 7/8” x 12 7/8” x 1 /8”10
1 ,07
11 ,52
~ 6 ,72
14 ,81162
173 ,34
1 .865 ,82
~ 1 .088 ,64
2 .400 ,04
Auro re327x327x4 mm
12 7/8” x 12 7/8” x 1 /8”10
1 ,07
11 ,52
~ 7 ,00
15 ,43162
173 ,34
1 .865 ,82
~ 1 .134 ,00
2 .500 ,04
Tanticolori327x327x4 mm
12 7/8” x 12 7/8” x 1 /8”10
1 ,07
11 ,52
~ 6 ,82
15 ,03162
173 ,34
1 .865 ,82
~ 1 .104 ,84
2 .435 ,72
Doro327x327x4 mm
12 7/8” x 12 7/8” x 1 /8”10
1 ,07
11 ,52
~ 6 ,82
15 ,03162
173 ,34
1 .865 ,82
~ 1 .104 ,84
2 .435 ,75
23x23x8 mm
7/8”x 7 /8”x 1 /4”Dive t ro
300x300x8 mm
11 3/4” x 11 3/4” x 1 /4”11
1 ,00
10 ,76
~ 16 ,15
35 ,6072
72 ,00
775 ,01
~ 1 .162 ,8
2 .563 ,53
10x10x2 mm
3/8”x3/8”x 1 /16”
Nacre
300x300x2 mm
11 3/4” x 11 3/4” x 1 /16”33
2 ,97
31 ,97
~ 6 ,82
15 ,03- - -
10x10x2 mm Aba lone
3/8”x3/8”x 1/16” Abalone
300x300x2 mm
11 3/4” x 11 3/4” x 1 /16”8
0 ,72
7 ,75
~ 8 ,72
19 ,22- - -
15x15x2 mm
5/8”x 5 /8”x 1 /16”
300x300x2 mm
11 3/4” x 11 3/4” x 1 /16”33
2 ,97
31 ,97
~ 6 ,82
15 ,03- - -
20x20x2 mm
3/4”x 3 /4”x 1 /16”
300x300x2 mm
11 3/4” x 11 3/4” x 1 /16”33
2 ,97
31 ,97
~ 6 ,82
15 ,03- - -
i r regu lar300x300x2 mm
11 3/4” x 11 3/4” x 1 /16”33
2 ,97
31 ,97
~ 6 ,82
15 ,03- - -
23x23x8 mm
7/8”x 7 /8”x 1 /4”
Onde
300x300x8 mm
11 3/4” x 11 3/4” x 1 /4”11
1 ,00
10 ,76
~ 16 ,20
35 ,7172
72 ,00
775 ,01
~ 1 .166 ,40
2 .571 ,47
23x48x8 mm
7/8”x 1 7/8” x 1 /4”
300x300x8 mm
11 3/4” x 11 3/4” x 1 /4”11
1 ,00
10 ,76
~ 17 ,04
37 ,5072
72 ,00
775 ,01
~ 1 .226 ,88
2 .704 ,80
48x48x8 mm
1 7/8” x 1 7/8” x 1 /4”
300x300x8 mm
11 3/4” x 11 3/4” x 1 /4”11
1 ,00
10 ,76
~ 18 ,00
39 ,6872
72 ,00
775 ,01
~ 1 .296 ,00
2 .857 ,19
74
MA
NU
ALE
TE
CN
ICO
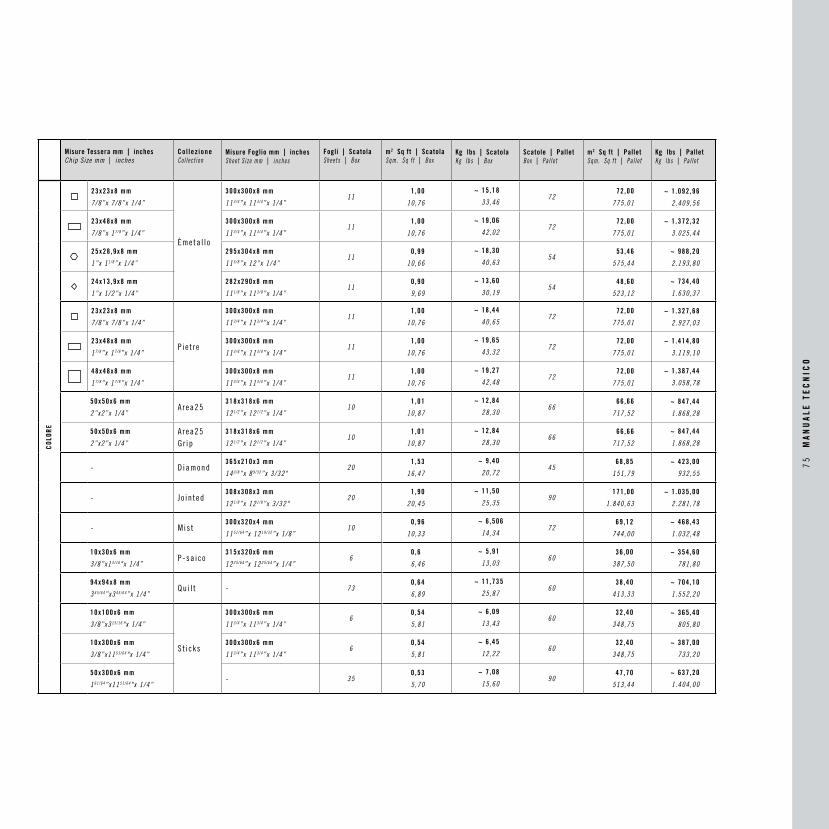
Misure Tessera mm | inchesChip Size mm | inches
Col lez ioneCo l l ec t i on
Misure Foglio mm | inchesSheet S i ze mm | inches
Fogli | ScatolaSheets | Box
m2 Sq ft | ScatolaSqm. Sq f t | Box
Kg lbs | ScatolaKg lbs | Box
Scatole | PalletBox | Pa l l e t
m2 Sq ft | PalletSqm. Sq f t | Pa l l e t
Kg lbs | PalletKg lbs | Pa l l e t
COLO
RE
23x23x8 mm
7/8”x 7 /8”x 1 /4”
Èmeta l l o
300x300x8 mm
11 3/4” x 11 3/4” x 1 /4”11
1 ,00
10 ,76
~ 15 ,18
33 ,4672
72 ,00
775 ,01
~ 1 .092 ,96
2 .409 ,56
23x48x8 mm
7/8”x 1 7/8” x 1 /4”
300x300x8 mm
11 3/4” x 11 3/4” x 1 /4”11
1 ,00
10 ,76
~ 19 ,06
42 ,0272
72 ,00
775 ,01
~ 1 .372 ,32
3 .025 ,44
25x28 ,9x8 mm
1”x 1 1/8” x 1 /4”
295x304x8 mm
11 5/8” x 12”x 1 /4”11
0 ,99
10 ,66
~ 18 ,30
40 ,6354
53 ,46
575 ,44
~ 988 ,20
2 .193 ,80
24x13 ,9x8 mm
1”x 1 /2”x 1 /4”
282x290x8 mm
11 1/8” x 11 3/8” x 1 /4”11
0 ,90
9 ,69
~ 13 ,60
30 ,1954
48 ,60
523 ,12
~ 734 ,40
1 .630 ,37
23x23x8 mm
7/8”x 7 /8”x 1 /4”
P ie t re
300x300x8 mm
11 3/4” x 11 3/4” x 1 /4”11
1 ,00
10 ,76
~ 18 ,44
40 ,6572
72 ,00
775 ,01
~ 1 .327 ,68
2 .927 ,03
23x48x8 mm
1 7/8” x 1 7/8” x 1 /4”
300x300x8 mm
11 3/4” x 11 3/4” x 1 /4”11
1 ,00
10 ,76
~ 19 ,65
43 ,3272
72 ,00
775 ,01
~ 1 .414 ,80
3 .119 ,10
48x48x8 mm
1 7/8” x 1 7/8” x 1 /4”
300x300x8 mm
11 3/4” x 11 3/4” x 1 /4”11
1 ,00
10 ,76
~ 19 ,27
42 ,4872
72 ,00
775 ,01
~ 1 .387 ,44
3 .058 ,78
50x50x6 mm
2”x2”x 1 /4”Area25
318x318x6 mm
12 1/2” x 12 1/2” x 1 /4”10
1 ,01
10 ,87
~ 12 ,84
28 ,3066
66 ,66
717 ,52
~ 847 ,44
1 .868 ,28
50x50x6 mm
2”x2”x 1 /4”
Area25 Gr ip
318x318x6 mm
12 1/2” x 12 1/2” x 1 /4”10
1 ,01
10 ,87
~ 12 ,84
28 ,3066
66 ,66
717 ,52
~ 847 ,44
1 .868 ,28
- Diamond365x210x3 mm
14 3/8” x 8 9/32” x 3 /32"20
1 ,53
16 ,47
~ 9 ,40
20 ,7245
68 ,85
151 ,79
~ 423 ,00
932 ,55
- Jo in ted308x308x3 mm
12 1/8” x 12 1/8” x 3 /32"20
1 ,90
20 ,45
~ 11 ,50
25 ,3590
171 ,00
1 .840 ,63
~ 1 .035 ,00
2 .281 ,78
- Mist300x320x4 mm
11 51/64” x 12 19/32” x 1 /8”10
0 ,96
10 ,33
~ 6 ,506
14 ,3472
69 ,12
744 ,00
~ 468 ,43
1 .032 ,48
10x30x6 mm
3/8”x1 3/16" x 1 /4”P-sa ico
315x320x6 mm
12 25/64” x 12 25/64” x 1 /4”6
0 ,6
6 ,46
~ 5 ,91
13 ,0360
36 ,00
387 ,50
~ 354 ,60
781 ,80
94x94x8 mm
3 45/64” x3 45/64” x 1 /4”Qui l t - 73
0 ,64
6 ,89
~ 11 ,735
25 ,8760
38 ,40
413 ,33
~ 704 ,10
1 .552 ,20
10x100x6 mm
3/8”x3 15/16" x 1 /4”
St icks
300x300x6 mm
11 3/4” x 11 3/4” x 1 /4”6
0 ,54
5 ,81
~ 6 ,09
13 ,4360
32 ,40
348 ,75
~ 365 ,40
805 ,80
10x300x6 mm
3/8”x11 51/64" x 1 /4”
300x300x6 mm
11 3/4” x 11 3/4” x 1 /4”6
0 ,54
5 ,81
~ 6 ,45
12 ,2260
32 ,40
348 ,75
~ 387 ,00
733 ,20
50x300x6 mm
1 61/64” x11 51/64" x 1 /4”- 35
0 ,53
5 ,70
~ 7 ,08
15 ,6090
47 ,70
513 ,44
~ 637 ,20
1 .404 ,00
75
MA
NU
ALE
TE
CN
ICO
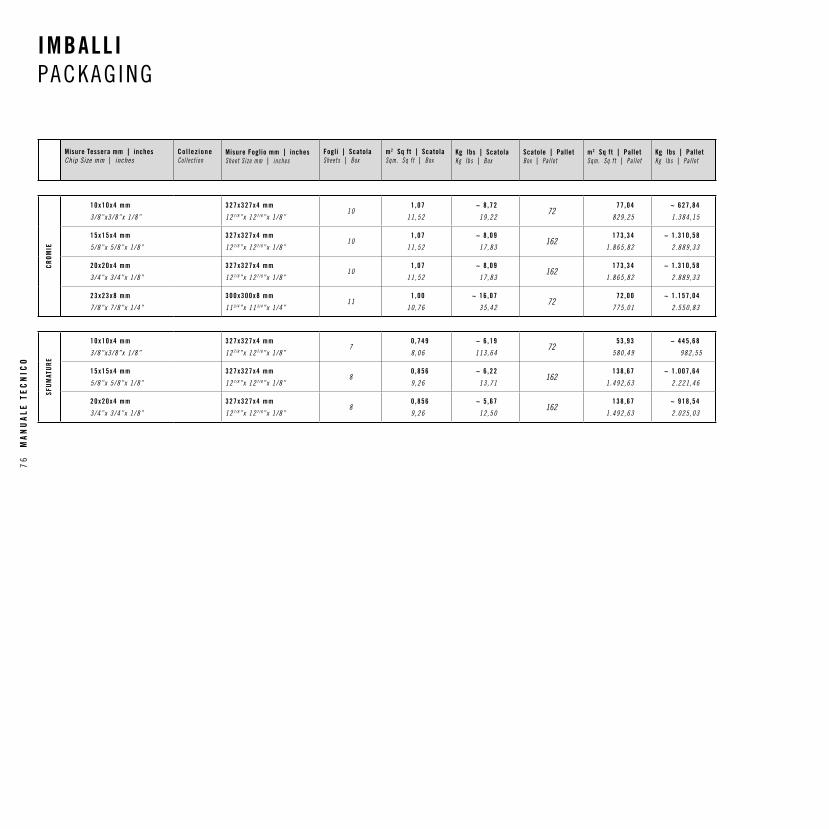
Misure Tessera mm | inchesChip Size mm | inches
Col lez ioneCo l l ec t i on
Misure Foglio mm | inchesSheet S i ze mm | inches
Fogli | ScatolaSheets | Box
m2 Sq ft | ScatolaSqm. Sq f t | Box
Kg lbs | ScatolaKg lbs | Box
Scatole | PalletBox | Pa l l e t
m2 Sq ft | PalletSqm. Sq f t | Pa l l e t
Kg lbs | PalletKg lbs | Pa l l e t
CROM
IE
1 0x10x4 mm
3/8”x3/8”x 1 /8”
327x327x4 mm
12 7/8” x 12 7/8” x 1 /8”10
1 ,07
11 ,52
~ 8 ,72
19 ,2272
77 ,04
829 ,25
~ 627 ,84
1 .384 ,15
15x15x4 mm
5/8”x 5 /8”x 1 /8”
327x327x4 mm
12 7/8” x 12 7/8” x 1 /8”10
1 ,07
11 ,52
~ 8 ,09
17 ,83162
173 ,34
1 .865 ,82
~ 1 .310 ,58
2 .889 ,33
20x20x4 mm
3/4”x 3 /4”x 1 /8”
327x327x4 mm
12 7/8” x 12 7/8” x 1 /8”10
1 ,07
11 ,52
~ 8 ,09
17 ,83162
173 ,34
1 .865 ,82
~ 1 .310 ,58
2 .889 ,33
23x23x8 mm
7/8”x 7 /8”x 1 /4”
300x300x8 mm
11 3/4” x 11 3/4” x 1 /4”11
1 ,00
10 ,76
~ 16 ,07
35 ,4272
72 ,00
775 ,01
~ 1 .157 ,04
2 .550 ,83
SFUM
ATUR
E
1 0x10x4 mm
3/8”x3/8”x 1 /8”
327x327x4 mm
12 7/8” x 12 7/8” x 1 /8”7
0 ,749
8 ,06
~ 6 ,19
113 ,6472
53 ,93
580 ,49
~ 445 ,68
982 ,55
15x15x4 mm
5/8”x 5 /8”x 1 /8”
327x327x4 mm
12 7/8” x 12 7/8” x 1 /8”8
0 ,856
9 ,26
~ 6 ,22
13 ,71162
138 ,67
1 .492 ,63
~ 1 .007 ,64
2 .221 ,46
20x20x4 mm
3/4”x 3 /4”x 1 /8”
327x327x4 mm
12 7/8” x 12 7/8” x 1 /8”8
0 ,856
9 ,26
~ 5 ,67
12 ,50162
138 ,67
1 .492 ,63
~ 918 ,54
2 .025 ,03
IMBALLI PACKAGING
76
MA
NU
ALE
TE
CN
ICO

APPUNTI NOTES
77
MA
NU
ALE
TE
CN
ICO
APPUNTI NOTES
78
MA
NU
ALE
TE
CN
ICO
APPUNTI NOTES
79
MA
NU
ALE
TE
CN
ICO
market ing d i rect ionSte fano Nenc ion i
creat ive d i rect ionMass imo Nada l in i
graph ic des ignMarket ing Mosa ico+Punto D ig i ta l8
0 M
AN
UA
LE T
EC
NIC
O

81
MA
NU
ALE
TE
CN
ICO
©m
osai
co+ M
anua
le T
ecni
co 2
02
0 0
7.2
0
V ia Va l l e d ’Aos ta 46 41049 Sassuo lo (MO)I ta l y t e l . +39 0536 995811 fax . +39 0536 995899 in fo@mosaicop iu . i t www.mosa icop iu . i twww.mosa icop iu .us


![Inviti mosaico 2011_d_light[1]](https://static.fdocumenti.com/doc/165x107/589e71f01a28ab300b8b49c7/inviti-mosaico-2011dlight1.jpg)