Manuale d’uso User manual - brionvega.it · SIM2 BV International Srl Viale Lino Zanussi, 11...
8
SIM2 BV International Srl Viale Lino Zanussi, 11 33170 Pordenone, Italy www.brionvega.it Manuale d’uso User manual
-
Upload
trinhquynh -
Category
Documents
-
view
222 -
download
0
Transcript of Manuale d’uso User manual - brionvega.it · SIM2 BV International Srl Viale Lino Zanussi, 11...

SIM2 BV International SrlViale Lino Zanussi, 1133170 Pordenone, Italy
www.brionvega.it
Manuale d’usoUser manual
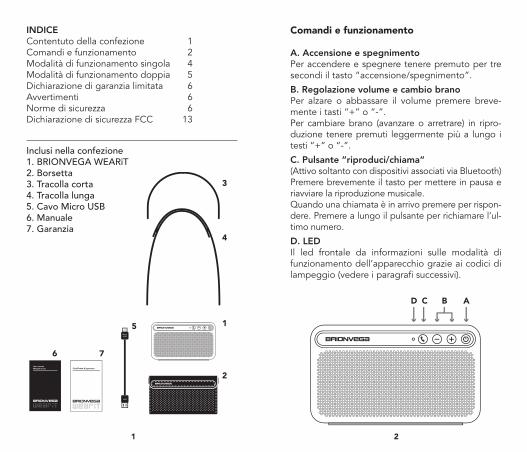
INDICEContentuto della confezione 1Comandi e funzionamento 2Modalità di funzionamento singola 4Modalità di funzionamento doppia 5Dichiarazione di garanzia limitata 6Avvertimenti 6Norme di sicurezza 6Dichiarazione di sicurezza FCC 13
Inclusi nella confezione1. BRIONVEGA WEARiT2. Borsetta 3. Tracolla corta4. Tracolla lunga5. Cavo Micro USB6. Manuale7. Garanzia
Comandi e funzionamento
A. Accensione e spegnimentoPer accendere e spegnere tenere premuto per tre secondi il tasto “accensione/spegnimento”.
B. Regolazione volume e cambio branoPer alzare o abbassare il volume premere breve-mente i tasti “+” o “-”.Per cambiare brano (avanzare o arretrare) in ripro-duzione tenere premuti leggermente più a lungo i testi “+” o “-”.
C. Pulsante “riproduci/chiama“(Attivo soltanto con dispositivi associati via Bluetooth)Premere brevemente il tasto per mettere in pausa e riavviare la riproduzione musicale. Quando una chiamata è in arrivo premere per rispon-dere. Premere a lungo il pulsante per richiamare l’ul-timo numero.
D. LEDIl led frontale da informazioni sulle modalità di funzionamento dell’apparecchio grazie ai codici di lampeggio (vedere i paragrafi successivi).
21
MicroUSB
USB
User manual Manuale d’uso Certificato di garanzia
MasterSlave
RIGHTLEFT
PrincipaleSecondario
DESTRASINISTRA
Connect withBRIONVEGA
WEARiT
USBMicro USB
AUX IN
1
7
5
6
ABCD
GE F
2
3
4
MicroUSB
USB
User manual Manuale d’uso Certificato di garanzia
MasterSlave
RIGHTLEFT
PrincipaleSecondario
DESTRASINISTRA
Connect withBRIONVEGA
WEARiT
USBMicro USB
AUX IN
1
7
5
6
ABCD
GE F
2
3
4

Porte di alimentazione USBE. - La porta USB tipo A è un alimentatore (output DC-5V1A) e può ricaricare dispositivi elettronici quali smartpho-ne, tablet etc. Quando in uso, emetterà una luce blu e ros-sa ad indicare il caricamento del dispositivo esterno.
F. - La porta Micro USB va utilizzata unicamente per la ricarica del vostro WEARiT. Quando è in ricarica il led emetterà una luce rossa lampeggiante. Il led rosso smet-terà di lampeggiare una volta che WEARiT è carico.
G. AUX IN (ingresso ausiliario)Questo ingresso permette di collegare a WEARiT una sorgente tramite cavo con terminazione jack.Attenzione: Quando il jack è inserito la connessione Blue-tooth viene automaticamente disabilitata anche quando connessi in modalità “stereo”. Per utilizzare il sistema in Bluetooth, scollegare il jack dall’ingresso AUX.
MicrofonoWEARiT è dotato di un microfono integrato che può es-sere utilizzato con un telefono connesso via Bluetooth.Quando due WEARiT sono accoppiati in modalità doppia, il microfono attivo sarà quello dell’unità primaria.
Spegnimento AutomaticoNel caso WEARiT non riceva alcun flusso audio via Blue-tooth per più di 15 minuti, si spegnerà automaticamente per risparmiare energia. Per riaccenderlo è sufficiente procedere come descritto nel paragrafo “accensione e spegnimento”. Nel caso sia inserito il jack nell’ingresso AUX, lo spegnimento automatico è disattivato.
Modalità di funzionamento normale - Singola
Accoppiare un dispositivo ANDROID a WEARiTvia Bluetooth.
Selezionare dal menu IMPOSTAZIONI > BLUETOOTHSe non è già attivo, attivare la funzione Bluetooth.Il dispositivo cercherà automaticamente apparecchi Bluetooth attivi nelle vicinanze. Selezionare BRION-VEGA WEARiT appena appare. Il dispositivo è ora ac-coppiato a BRIONVEGA WEARiT e pronto per l’uso.
Accoppiare un dispositivo APPLE iOS (iPhone e iPad)a WEARiT via Bluetooth.
Selezionare IMPOSTAZIONI > BLUETOOTHSe non è già attivo, attivare la funzione Bluetooth.Il dispositivo cercherà automaticamente apparecchi Bluetooth attivi nelle vicinanze. Selezionare BRION-VEGA WEARiT appena appare. Il dispositivo è ora ac-coppiato a BRIONVEGA WEARiT e pronto per l’uso.
Attenzione: Una volta acceso, aspettare 10 secon-di che WEARiT completi la ricerca per l’accoppia-mento “doppio” (paragrafo sucessivo). In seguito, WEARiT sarà pronto per la connessione al vostro dispositivo.
43
MicroUSB
USB
User manual Manuale d’uso Certificato di garanzia
MasterSlave
RIGHTLEFT
PrincipaleSecondario
DESTRASINISTRA
Connect withBRIONVEGA
WEARiT
USBMicro USB
AUX IN
1
7
5
6
ABCD
GE F
2
3
4
MicroUSB
USB
User manual Manuale d’uso Certificato di garanzia
MasterSlave
RIGHTLEFT
PrincipaleSecondario
DESTRASINISTRA
Connect withBRIONVEGA
WEARiT
USBMicro USB
AUX IN
1
7
5
6
ABCD
GE F
2
3
4
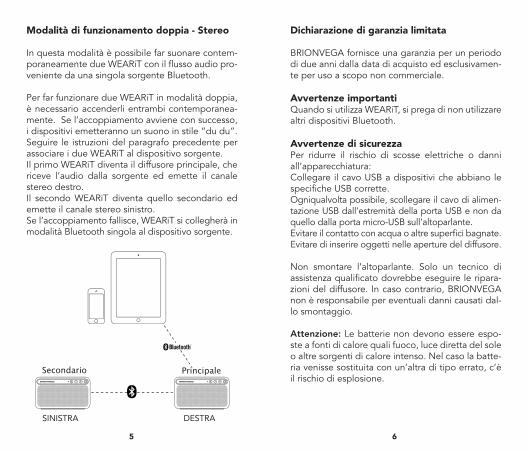
Modalità di funzionamento doppia - Stereo
In questa modalità è possibile far suonare contem-poraneamente due WEARiT con il flusso audio pro-veniente da una singola sorgente Bluetooth.
Per far funzionare due WEARiT in modalità doppia, è necessario accenderli entrambi contemporanea-mente. Se l’accoppiamento avviene con successo, i dispositivi emetteranno un suono in stile “du du”. Seguire le istruzioni del paragrafo precedente per associare i due WEARiT al dispositivo sorgente.Il primo WEARiT diventa il diffusore principale, che riceve l’audio dalla sorgente ed emette il canale stereo destro.Il secondo WEARiT diventa quello secondario ed emette il canale stereo sinistro.Se l’accoppiamento fallisce, WEARiT si collegherà in modalità Bluetooth singola al dispositivo sorgente.
Dichiarazione di garanzia limitata
BRIONVEGA fornisce una garanzia per un periodo di due anni dalla data di acquisto ed esclusivamen-te per uso a scopo non commerciale.
Avvertenze importantiQuando si utilizza WEARiT, si prega di non utilizzare altri dispositivi Bluetooth.
Avvertenze di sicurezzaPer ridurre il rischio di scosse elettriche o danni all’apparecchiatura:Collegare il cavo USB a dispositivi che abbiano le specifiche USB corrette.Ogniqualvolta possibile, scollegare il cavo di alimen-tazione USB dall’estremità della porta USB e non da quello dalla porta micro-USB sull’altoparlante.Evitare il contatto con acqua o altre superfici bagnate.Evitare di inserire oggetti nelle aperture del diffusore.
Non smontare l’altoparlante. Solo un tecnico di assistenza qualificato dovrebbe eseguire le ripara-zioni del diffusore. In caso contrario, BRIONVEGA non è responsabile per eventuali danni causati dal-lo smontaggio.
Attenzione: Le batterie non devono essere espo-ste a fonti di calore quali fuoco, luce diretta del sole o altre sorgenti di calore intenso. Nel caso la batte-ria venisse sostituita con un’altra di tipo errato, c’è il rischio di esplosione.
65
MicroUSB
USB
User manual Manuale d’uso Certificato di garanzia
MasterSlave
RIGHTLEFT
PrincipaleSecondario
DESTRASINISTRA
Connect withBRIONVEGA
WEARiT
USBMicro USB
AUX IN
1
7
5
6
ABCD
GE F
2
3
4

INDEXPackage contents 7Control Function 8Single Mode 10Stereo Mode 11Limited Warranty Statement 12Warning 12Safety Warning 12FCC Warning Statement 14
Package contents1. BRIONVEGA WEARiT2. Fashion bag 3. Carryng handle (short)4. Shoulder strap (long)5. Micro USB6. User manual7. Warranty
Control function
A. Power On/OffPress and hold the power button for 3 seconds to turn the unit on or off.
B. Volume control/track changeButton volume up/next track,Button volume down/previous track. Short press to control the volume, long press to skip track (next or previous).
C. Play/CallButton Play/Call, short press to control music play and pause. When receiving a call, short press button Play/Call to answer call on a paired phone. Long press button Play/Call to redial the last num-ber on a paired phone.Button Play/Call only works in Bluetooth mode, if the Aux in is used, this function is disabled.
D. LEDThe front led gives information on how to operate the device thanks to flashing codes. (see the fol-lowing paragraphs).
87
MicroUSB
USB
User manual Manuale d’uso Certificato di garanzia
MasterSlave
RIGHTLEFT
PrincipaleSecondario
DESTRASINISTRA
Connect withBRIONVEGA
WEARiT
USBMicro USB
AUX IN
1
7
5
6
ABCD
GE F
2
3
4
MicroUSB
USB
User manual Manuale d’uso Certificato di garanzia
MasterSlave
RIGHTLEFT
PrincipaleSecondario
DESTRASINISTRA
Connect withBRIONVEGA
WEARiT
USBMicro USB
AUX IN
1
7
5
6
ABCD
GE F
2
3
4
Single Mode
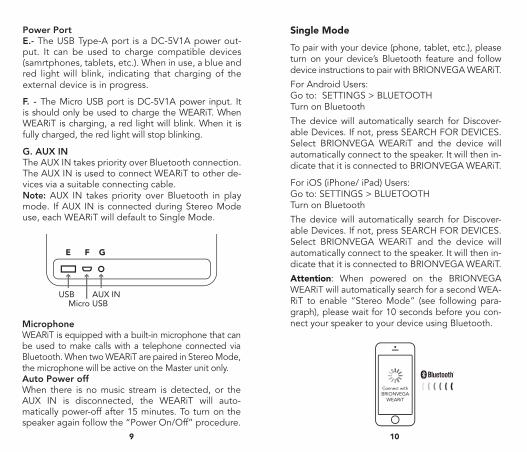
To pair with your device (phone, tablet, etc.), please turn on your device’s Bluetooth feature and follow device instructions to pair with BRIONVEGA WEARiT.
For Android Users:Go to: SETTINGS > BLUETOOTHTurn on Bluetooth
The device will automatically search for Discover-able Devices. If not, press SEARCH FOR DEVICES. Select BRIONVEGA WEARiT and the device will automatically connect to the speaker. It will then in-dicate that it is connected to BRIONVEGA WEARiT.
For iOS (iPhone/ iPad) Users:Go to: SETTINGS > BLUETOOTHTurn on Bluetooth
The device will automatically search for Discover-able Devices. If not, press SEARCH FOR DEVICES. Select BRIONVEGA WEARiT and the device will automatically connect to the speaker. It will then in-dicate that it is connected to BRIONVEGA WEARiT.
Attention: When powered on the BRIONVEGA WEARiT will automatically search for a second WEA-RiT to enable “Stereo Mode” (see following para-graph), please wait for 10 seconds before you con-nect your speaker to your device using Bluetooth.
Power PortE.- The USB Type-A port is a DC-5V1A power out-put. It can be used to charge compatible devices (samrtphones, tablets, etc.). When in use, a blue and red light will blink, indicating that charging of the external device is in progress.
F. - The Micro USB port is DC-5V1A power input. It is should only be used to charge the WEARiT. When WEARiT is charging, a red light will blink. When it is fully charged, the red light will stop blinking.
G. AUX INThe AUX IN takes priority over Bluetooth connection. The AUX IN is used to connect WEARiT to other de-vices via a suitable connecting cable. Note: AUX IN takes priority over Bluetooth in play mode. If AUX IN is connected during Stereo Mode use, each WEARiT will default to Single Mode.
MicrophoneWEARiT is equipped with a built-in microphone that can be used to make calls with a telephone connected via Bluetooth. When two WEARiT are paired in Stereo Mode, the microphone will be active on the Master unit only.Auto Power offWhen there is no music stream is detected, or the AUX IN is disconnected, the WEARiT will auto-matically power-off after 15 minutes. To turn on the speaker again follow the “Power On/Off” procedure.
109
MicroUSB
USB
User manual Manuale d’uso Certificato di garanzia
MasterSlave
RIGHTLEFT
PrincipaleSecondario
DESTRASINISTRA
Connect withBRIONVEGA
WEARiT
USBMicro USB
AUX IN
1
7
5
6
ABCD
GE F
2
3
4
MicroUSB
USB
User manual Manuale d’uso Certificato di garanzia
MasterSlave
RIGHTLEFT
PrincipaleSecondario
DESTRASINISTRA
Connect withBRIONVEGA
WEARiT
USBMicro USB
AUX IN
1
7
5
6
ABCD
GE F
2
3
4

Stereo Mode
Stereo ModeIntelligent Stereo Mode Pairing after power-on within10 seconds. Power on the two WEARiT units within 10 Seconds of each other.If Stereo Mode has paired successfully, you will hear a distinctive double-beep sound. Now follow the “Single Mode” procedure to connect the two WEARiT to your device. When operating in the Ste-reo Mode, the Master is the Right sound channel, and the slave the Left channel. If the Stereo Mode pairing procedure fails within 10 seconds of power-on, WEARiT will operate in Single Mode. After 10 seconds, there will be a single beep indicating that Single Mode is engaged. Please follow the instruc-tions in the above paragraph to start the Stereo Mode pairing process again. When successfully connected to Bluetooth the blue light will switch from a fast blink to a steady pulse.
Limited Warranty Statement
BRIONVEGA provides a warranty to the original purchaser of this new loudspeaker new speaker against defects in material and workmanship for a period of two years of non-commercial usage.
WarningWhile using WEARiT, please turn off all any other Bluetooth devices.
Safety warningTo reduce the risk of electric shock or damage to your equipment:Plug the USB cable into a device that has a correctly configured USB port.Disconnect power from the speaker by unplugging the USB cable from the USB port, not from the mi-cro-USB port on the speaker.Avoid contact with water or other liquids.Avoid inserting items into the openings of the speaker.
Do not disassemble your speaker. Only a certified service technician should perform repairs on your speaker. Otherwise, BRIONVEGA is not responsible for any damages that may result in the disassembly.
Caution: Batteries should not be exposed to exces-sive heat such as fire, sunlight, or other concentrated heat sources. There is a risk of explosion if the bat-tery is replaced with an incorrect battery type.
1211
MicroUSB
USB
User manual Manuale d’uso Certificato di garanzia
MasterSlave
RIGHTLEFT
PrincipaleSecondario
DESTRASINISTRA
Connect withBRIONVEGA
WEARiT
USBMicro USB
AUX IN
1
7
5
6
ABCD
GE F
2
3
4

FCC Warning Statement
Changes or modifications not expressly approved by the party responsible for compliance could void the user’s authority to operate the equipment. This equipment has been tested and found to comply with the limits for a Class B digital device, pursuant to Part 15 of the FCC Rules. These limits are de-signed to provide reasonable protection against harmful interference in a residential installation. This equipment generates uses and can radiate radio frequency energy and, if not installed and used in accordance with the instructions, may cau-se harmful interference to radio communications. However, there is no guarantee that interferen-ce will not occur in a particular installation. If this equipment does cause harmful interference to ra-dio or television reception, which can be determi-ned by turning the equipment off and on, the user is encouraged to try to correct the interference by one or more of the following measures:- Reorient or relocate the receiving antenna.- Increase the separation between the equipment and receiver.- Connect the equipment into an outlet on a circu-it different from that to which the receiver is con-nected.- Consult the dealer or an experienced radio/TV technician for help.
Dichiarazione di sicurezza FCC
Cambiamenti o modifiche non espressamente ap-provati dalla parte responsabile della conformità potrebbero invalidare la facoltà di utilizzare l’appa-recchiatura. Questo apparecchio è stato testato ed è risultato conforme ai limiti previsti per i dispositivi digitali di classe B, secondo l’articolo 15 delle nor-me FCC. Questi limiti sono progettati per fornire una ragionevole protezione contro interferenze dannose in installazioni residenziali. Questa appa-recchiatura genera, utilizza e può emettere energia a radiofrequenza e, se non installato e utilizzato in conformità alle istruzioni, può causare interferenze dannose alle comunicazioni radio. Tuttavia, non vi è alcuna garanzia che non si verifichino interferenze in ogni specifica installazione. Se questa apparec-chiatura causa interferenze dannose alla ricezione radio o televisiva, che possono essere identificate spegnendo ed accendendo il dispositivo, l’utente è invitato a cercare di correggere l’interferenza in uno o più dei seguenti modi:- Riorientare o riposizionare l’antenna ricevente.- Aumentare la distanza tra l’apparecchio e il rice-vitore. - Collegare il dispositivo ad una presa su un circuito diverso da quello a cui il ricevitore è collegato.- Consultare il rivenditore o un tecnico radio / TV esperto.
1413