Istruzioni di montaggio Istrucciones de montaje assembly ...

FLUTTUA C ISTRUZIONI DI MONTAGGIOASSEMBLY DIRECTIONS
page 1rev. 081020
ATASSELLOCHIMICO
(screwswithachimical
expandingplug)
E 5 fermacavoadesiviadhesive
cable holders
FA G WASHERSPER VITI M6
FOR M6 SCREWS
L WASHERSPER VITI M6
FOR M6 SCREWS
H B 18 VITII 3 TESTINEBLIND NUTS
Controllo componenti e materiale montaggio letto - Control of the bed assembly materials and parts1. dopo aver disimballato tutto il materiale, verificare che corrisponda esattamente al materiale rappresentato in disegno ed elencato nella tabella che segue.
1. after having unpacked all the materials, make sure that they correspond with the materi-als illustrated in the diagram and listed in the following table.
1. considerando un materasso di altezza 170 mm, indi-viduare sulla tabella l’altezza ottimale del letto (H).1. considering a 170 mm high mattress, find the ideal height of the bed (H) on the table .
Determinazione altezza letto - Bed height setting
1
22. dal disegno individuare il foro sulla gamba telescopica (1° foro, 2° foro, ...) corrispondente alla altezza scelta.2. from the drawing, find the hole on the telescopic leg (1st hole, 2nd hole, ...) that corresponds to the chosen height.
3. definire l’altezza (h) di foratura a muro su cui andrà fis-sato il profilo a ‘T’ con il pannello proteggi materasso.3. define the drilling height (h) on the wall to which the T-shaped bar with the mattress protective panel will be fixed.
Attrezzi necessari - Required tools
ISTRUZIONI DI MONTAGGIOASSEMBLY DIRECTIONS
page 2 rev. 081020
FLUTTUA C
B
B
A
I
39036
534031
529026
5240
1050
390
365
340
315
290
265
240
1050
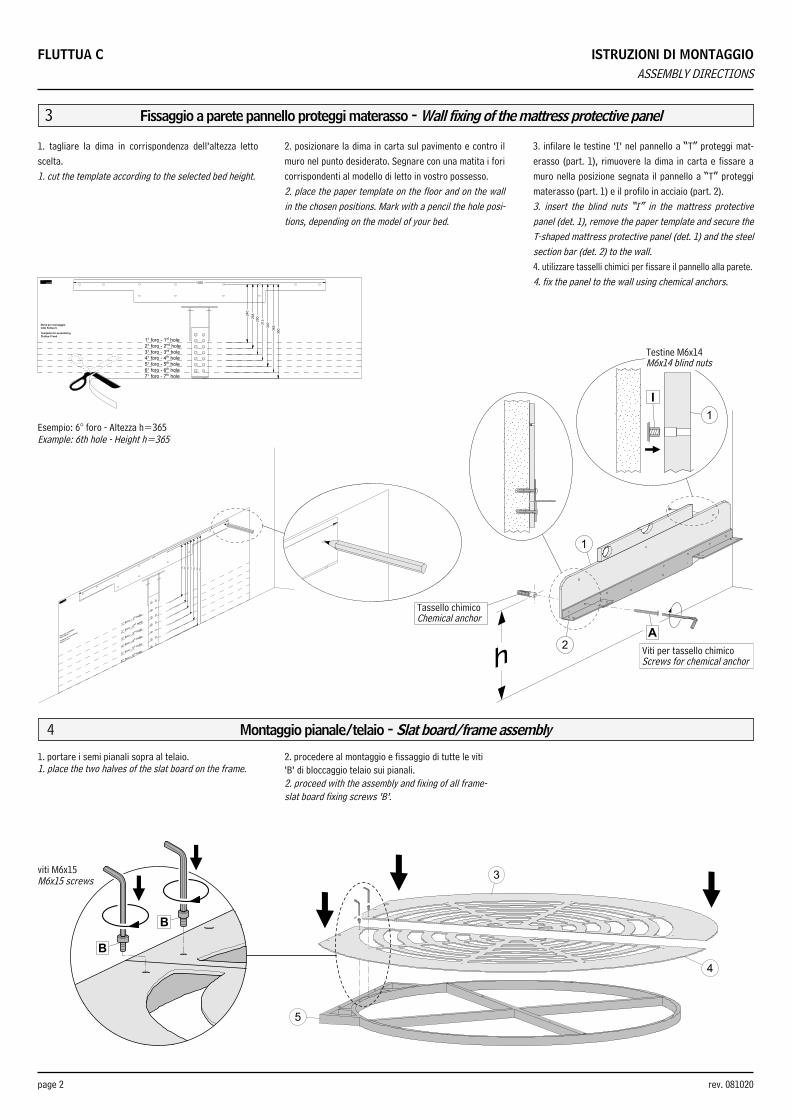
Fissaggio a parete pannello proteggi materasso - Wall fixing of the mattress protective panel 3
viti M6x15M6x15 screws
2. posizionare la dima in carta sul pavimento e contro il muro nel punto desiderato. Segnare con una matita i fori corrispondenti al modello di letto in vostro possesso. 2. place the paper template on the floor and on the wall in the chosen positions. Mark with a pencil the hole posi-tions, depending on the model of your bed.
3. infilare le testine ‘I’ nel pannello a “T” proteggi mat-erasso (part. 1), rimuovere la dima in carta e fissare a muro nella posizione segnata il pannello a “T” proteggi materasso (part. 1) e il profilo in acciaio (part. 2).3. insert the blind nuts “I” in the mattress protective panel (det. 1), remove the paper template and secure the T-shaped mattress protective panel (det. 1) and the steel section bar (det. 2) to the wall.4. utilizzare tasselli chimici per fissare il pannello alla parete.4. fix the panel to the wall using chemical anchors.
Tassello chimico Chemical anchor Viti per tassello chimico Screws for chemical anchor
1. tagliare la dima in corrispondenza dell’altezza letto scelta. 1. cut the template according to the selected bed height.
Esempio: 6° foro - Altezza h=365Example: 6th hole - Height h=365
Montaggio pianale/telaio - Slat board/frame assembly41. portare i semi pianali sopra al telaio.1. place the two halves of the slat board on the frame. 2. procedere al montaggio e fissaggio di tutte le viti
‘B’ di bloccaggio telaio sui pianali.2. proceed with the assembly and fixing of all frame-slat board fixing screws ‘B’.
Testine M6x14M6x14 blind nuts

page 3rev. 081020
FLUTTUA C ISTRUZIONI DI MONTAGGIOASSEMBLY DIRECTIONS
6
LATO TESTIERA - LATO TESTIERA
6a
9
D
L
Regolazione altezza gamba telescopica e montaggio su telaio - Adjustment of the telescopic leg height and assembly on frame5
viti M6x15M6x15 screws
1. sollevare il pianale con telaio, ruotarlo ed appoggiarlo al suolo.1. lift the slat board with frame, turn it over and rest it on the floor.
2. individuare sulla parte inferiore della gamba telescopi-ca (part. 6) il numero di foro corrispondente all’altezza del letto scelta precedentemente (vedi tabella pag. 1).2. locate the hole on the lower part of the telescopic leg (det. 6) that corresponds to the bed height (see table on page 1) selected in advance.
3. per la regolazione dell’altezza, agire sulle due viti pre-senti (part. 6a) e dopo averle rimosse, posizionarle sul foro corretto e fissarle nuovamente in posizione.3. to adjust the height, loosen the two screws (det. 6a) and remove them; position them on the correct hole and secure them again.4. rovesciare e montare la gamba assemblata in posizione centrale sul telaio; verificare che le due viti (part. 6a) si trovino rivolte verso il lato testiera e quindi fissare la gam-ba con le quattro viti ‘C’ .4. turn over the assembled leg and fix it in the centre of the frame; make sure that the two screws (det. 6a) are facing towards the headboard and then fix the leg with the four screws ‘C’.
Montaggio profili di sostegno - Assembly of the supporting arms61. individuare e montare in posizione i quattro profili di sostegno (part. 9) .1. locate and assemble the four supporting arms in posi-tion (det. 9).2. far corrispondere le forature, avvitare le quattro viti cen-trali ‘C’ senza fissarle. 2. line up the four holes, screw in the four central screws ‘C’ without over tightening them.
3. inserire le quattro rondelle ‘L’ tra i profili e il telaio in corrispondenza delle forature. Avvitare quindi le quattro viti esterne ‘D’ senza fissarle. 3. Insert the four washers “L” in the holes between the section bars and the frame. Screw the four external screws “D” without tightening them.
4. dopo averle montate tutte fissare progressivamente con forza tutte le viti ‘C’ della gamba centrale e tutte le viti ‘C’ e ‘D’ dei profili di sostegno.4. after having assembled all the arms, proceed to fully tighten all the screws ‘C’ on the central leg and all the screws ‘C’ and ‘D’ of the supporting arms.
viti M6x15M6x15 screwsviti M6x25M6x25 screws
rondella per viti M6washer for M6 screws

ISTRUZIONI DI MONTAGGIOASSEMBLY DIRECTIONS
page 4 rev. 081020
FLUTTUA C
E
H
8
1H
5
2
GF
GF
GF
Fissaggio pianale/telaio a muro - Wall fixing of the slat board/frame8
Montaggio testata imbottita (opzionale) - Assembly of coated headboard (optional)9
Per ulteriori delucidazioni contattare l’ufficio tecnico al n° 049 599 42 99 Importante: la Lago S.p.A. non risponde di eventuali danni a cose o persone derivanti da un errato montaggio. For further explanations contact our technical department at no. ++039 049 599 42 99 Important: Lago S.p.A. is not responsible for possible damages to property or injuries to people deriving from incorrect assembly.
viti M6x50M6x50 screws
viti M6x20M6x20 screws
1. fissare infine la testata imbottita (part. 8) sul pannello proteggi materasso (part. 1) con le tre viti ‘H’.1. finally, fix the coated headboard (det. 8) on the mattress protective panel (det. 1) with the three screws ‘H’.
rondella per viti M6washer for M6 screws
1. avvicinare ed infilare sul profilo a ‘T’ (part. 2) fissato a parete la parte poste-riore del telaio (part. 5) facendo attenzione che appoggi nella parte superiore. 1. position the rear part of the frame (det. 5) into the T-shaped bar (det. 2) se-cured to the wall, making sure that the frame rests on the upper part of the bar.2. far corrispondere le forature, infilare le quattro rondelle ‘G’ sulle quattro viti passanti ‘F’ quindi fissare le viti con forza.2. align the holes, insert the four washers ‘G’ on the four screws ‘F’ and fully tighten them.
Montaggio pannello illuminazione (opzionale) - Assembly of lighting panel (optional) 71. sollevare il pianale con telaio, ruotarlo ed appoggiarlo al suolo.1. lift the slat board with frame, turn it over and rest it on the floor.2. infilare l’illuminazione (part. 7) con le lampade rivolte verso il basso.2. insert the lighting panel (det. 7) with the bulbs facing down-wards.3. posizionarla con il cavo rivolto verso il lato testiera, individuare la coppia di fori corrispondenti e fissarla in posizione con le due viti ‘B’.3. position it with the wire facing towards the headboard, locate the two corresponding holes and secure it in position with the two screws ‘B’.
4. individuata la presa di alimentazione luci, stendere il cavo di alimentazione sul pianale e fissarlo con i cinque fermacavo adesivi ‘E’ in dotazione.4. locate the power supply socket, extend the power cable on the slat board and fix it with the five adhesive cable holders ‘E’ supplied.
viti M6x15M6x15 screws