Használati És KaRBantaRtási Istruzioni d’uso e ...€¦ · alumínium fóliával. A fólia...
11
HASZNÁLATI ÉS KARBANTARTÁSI útmutató beépíthető sütőhöz
Transcript of Használati És KaRBantaRtási Istruzioni d’uso e ...€¦ · alumínium fóliával. A fólia...

ES
RU
Instrucciones de uso y mantenimiento para hornos de encastre
Bedienungs-und Wartungsanleitungen für einbaubacköfen
Instructions pour l’usage et la maintenance des fours a encastrement
Operating and maintenance instructions for built-in ovens
Istruzioni d’uso e manutenzione per forni ad incasso
Gebruiksaanwijzing en instructies voor ovens
Instruções de uso e manutenção para fornos de encastrar
DE
FR
EN
NL
PT
IT
CH
嵌入式烤箱操作及维护指引
Használati És KaRBantaRtási útmutató beépíthető sütőhöz

2
Használati útmutató
Köszönjük, hogy termékünket választotta. Bízunk benne, hogy a megvásárolt háztartási készülék megfelel majd elvárásainak. Ennek érdekében kérjük figyelmesen tanulmányozza át jelen útmutatóban foglalt utasításokat és javaslatokat, így biztosan a kívánt módon fogja használni a készüléket.
A sütő műszaki adatait tartalmazó típustábla magán a sütőn ta-lálható. A típustábla az ajtó kinyitásával válik láthatóvá, az ösz-szes adat szerepel rajta, amelyre cserealkatrész rendelésekor szükség lehet.
általános tudnivalóK
Kérjük a készülék használatba vétele előtt olvassuk át az útmu-tatót. Fontos, hogy főzés előtt ismerjük az összes vezérlő funkció szerepét, kezelésének módját.Ügyeljünk a Biztonsági tudnivalók szakaszban foglalt utasítások-ra, figyelmeztetésekre.
• A készülék magánjellegű, háztartási célú használatra szolgál, normál konyhai szekrénybe építhető be.
• Lakóautókban történő használathoz a Beszerelési útmutatóban foglalt, erre vonatkozó utasítások szerint járjunk el.
• A gyártó külön engedélye nélkül, eltérő célú vagy eltérő környe-zetben történő használattal a garancia érvényét veszti.
• A készülék garanciája elektromos és mechanikus hibákra is vonatkozik, kivételt képeznek a gyártó Általános Szerződési Feltételeiben vagy a garancialevélen feltüntetett esetek.
• Fentiek nem érintik a tulajdonos törvény szerint járó jogait.
A készülék használatba vétele előtt ellenőrizzük, hogy eltávolí-tottuk a csomagolás, borítás minden elemét.Környezetünk védelme érdekében a csomagolóanyagokat anyagfajtájként szortírozzuk külön, majd mindegyik fajtát a hoz-zá tartozó szelektív hulladéktárolóban helyezzük el.A csomagolást úgy tervezték, hogy az a környezetet ne károsít-sa, annak minden eleme újrahasznosítható, újbóli felhasználás-ra helyreállítható. A csomagolás újrahasznosításával takarékos-kodunk a nyersanyaggal, és hozzájárulunk az ipari és lakossági szemét volumenének visszaszorításához.A hulladékok kezelésével kapcsolatos további információkért for-duljunk az illetékes helyi hatósághoz.Az első használatba vétel során a védőborítás enyhe szagot, pá-rát áraszthat, de ez rövid idő elteltével megszűnik.
A készüléken vagy a csomagoláson található
USER INSTRUCTIONS
Thank you for choosing one of our products. We hope this household appliance provides you with the best service. Therefore, we suggest you read the instructions and suggestions contained in this manual carefully in order to use our products correctly.The specifications plate for this oven is available on this appliance. This plate, visible by opening the door, displays all the necessary identification information for this appliance for ordering replacement parts.
GENERAL INFORMATION
Please read this manual carefully before using the appliance. It is important that all the control functions are understood before beginning to cook with this appliance.Heed the advice and warnings included under the title “IMPORTANT – Safety advice and instructions”.
• This appliance has been designed for private domestic use and can be integrated into standard kitchen furnishings or similar.
• In order to use in caravan-type vehicles, the suitable indications included in the Installation Instructions should be borne in mind.
• Use of this appliance for any other purpose or in any other environment without the manufacturer’s express agreement will invalidate any guarantee or liability.
• This new appliance is guaranteed against electrical or mechanical defects, subject to certain exclusions indicated in the Manufacturer’s Terms and Conditions of the Guarantee.
• The above does not affect your statutory rights.
Ensure that all protective packaging and covering has been removed before using this appliance. To collaborate in protecting the environment, separate the packaging materials into the different types and dispose of them according to local waste disposal regulations.The packaging is designed so as not to harm the environment; it can be recovered or recycled as it is an ecological product. By recycling the packaging, you will contribute to saving raw materials and reducing the volume of industrial and domestic waste.Any additional information on waste disposal may be requested from your local environmental agency.When used for the first time, a slight smell from the protective covering or damp may be noticeable, which will disappear after a short time.
The symbol on the product or its packaging indicates that this product cannot be treated as normal household waste. This product must be handed over to an electric and electronic equipment collection point for recycling. On ensuring that this product is disposed of correctly, you will help to avoid possible negative consequences for the environment and public health,
which could occur if this product is not handled correctly. To receive more detailed information about recycling this product, contact your local government, domestic waste disposal services or the outlet where the product was bought.
This appliance has been built and distributed in compliance with the essential requirements of the following EEC EUROPEAN LAWS AND DIRECTIVES:
EC Symbol - 93/68 Low voltage - 73/23 CEM-89/336Safety Rules - EN 60 335-1, EN 60 335 - 2 - 6.
This appliance respects laws of the suppression of radio-interference.As the Manufacturer has a policy of continuous product improvement, it reserves the right to adapt and carry out any modification considered necessary without prior warning.
IMPORTANT NOTICESAFETY INSTRUTIONS AND WARNING
• This appliance complies with all current European safety legislation, however, the Manufacturer must emphasise that this compliance does not prevent the surfaces of the appliance from heating up during use and remaining hot during its operation.
• Therefore, the Manufacturer highly recommends that this appliance is kept out of the reach of babies and small children.
• If children cannot be kept out of the kitchen, they must be watched at all times.
• We also recommend that great care is taken during use and cleaning. Read the cleaning and maintenance sections for this appliance carefully.
• Do not place heavy objects on this oven or lean on the door when opening it, as this may damage the hinges.
• Do not leave hot oil or fats unattended as they may catch light.
• Do not place oven dishes or trays of the lower part of the oven or cover it in aluminium foil.
• Never store flammable objects inside the oven as they may catch light.
• Do not allow the accessories or electric cables to touch the hot parts of the appliance.
• Do not use the appliance for special heating or drying clothes.• Do not install the appliance near curtains or upholstered
furniture.• Do not try to lift or move kitchen appliances by pulling any
door or handle as this may cause damage.• If the oven join is very dirty, the door will not close properly
when the oven is working. The fronts of neighbouring furniture may be damaged. Keep the oven join clean.
• During operation the appliance will heat up. Care must be taken to avoid touching heating elements inside the oven.
• Open the oven carefully. Steam may escape and burn anyone nearby.
• Do not pour water inside a very hot oven. The enamel may be damaged.
EN
szimbólum mutatja, hogy a készülék normál háztartási szemétként nem ke-zelhető. A készüléket selejtezéskor elektromos, elektronikus be-rendezések átvételére felkészített hulladékudvaron, telepen ad-juk le. A készülék megfelelő leselejtezésével elkerüljük azokat a környezetre, lakosságra káros hatásokat, melyek a készülék nem megfelelő kezelésével következnének be. A készülék új-rahasznosításával kapcsolatosan további információkat kapha-tunk az illetékes helyi hatóságtól, önkormányzattól, hulladékke-zelésért felelős szervért, valamint az üzlettől, ahol a készüléket vásároltuk.
A készülék tervezése, gyártása és forgalmazása a következő EEC Európai Uniós előírásokban és direktívákban foglalt elemi követelményeknek megfelelően történt.
eC-jelölés – 93/68; Kisfeszültségű irányelv – 73/23; Cem–89/336 elektromágneses kompabilitási irányelv; eN 60 335-1, eN 60 335-2-6 biztonsági előírások
A készülék megfelel az elektromágneses kompatibilitásra vonat-kozó előírásoknak.A gyártó üzletpolitikájának részét képezi termékeinek folyamatos fejlesztése, ezért fenntartja a jogot, hogy külön értesítés nélkül, amennyiben szükségesnek ítéli, módosításokat eszközöljön.
Fontos tudnivalóKBiztonsági utasításoK, FigyelmeztetÉseK
• A készülék megfelel az összes érvényes Európai Uniós biz-tonsági előírásnak, azonban a Gyártó kötelessége, hogy figyel-meztessen, ezen megfelelőség nem jelenti akadályát annak, hogy használat közben a készülék felületei átforrósodjanak, és forróak is maradjanak.
• Ebből kifolyólag a Gyártó javasolja, hogy a készüléktől a gyer-mekeket, csecsemőket tartsuk távol.
• Amennyiben a gyermekek a készüléktől nem tarthatók távol, tartsuk őket folyamatos felügyelet alatt.
• Gyártó emellett javasolja, hogy használat és tisztítás közben különös gondossággal járjunk el. Figyelmesen olvassuk el a tisztításra, karbantartásra vonatkozó részeket.
• Ne helyezzünk súlyos tárgyakat a sütőre, ne támaszkodjunk az ajtóra, amikor azt kinyitjuk, mivel ezzel a pántokat károsít-hatjuk.
• Forró olajat, zsírt ne hagyjunk felügyelet nélkül, mivel ezek tü-zet okozhatnak.
• Gyúlékony anyagot, tárgyat soha ne tegyünk a sütőbe, mivel ez tüzet okozhat.
• Ne hagyjuk, hogy kiegészítő vagy elektromos kábel a készülék forró részéhez érjen.
• Ne használjuk a sütőt ruhák szárítására.• Ne használjuk a sütőt függöny vagy kárpitozott bútor közelé-
ben.• Ne próbáljuk a készüléket ajtónál, fogantyúnál fogva megemel-
ni, elmozgatni.• Amennyiben a sütőben az ajtóval foglalatán vagy az ajtó pere-
mén kosz halmózodik fel, sütés közben az ajtó nem tud megfe-lelően záródni. A konyhabútor szomszédos elemei károsodhat-nak ezáltal. Tartsuk tisztán a sütőt.
• Működés közben a készülék átforrósodik. Óvatosan járjunk el, ügyeljünk hogy a sütő belsejében a fűtőelemekhez ne érjünk hozzá.
• Óvatosan nyissuk ki a sütő ajtaját. Gőz csapódhat ki, és a kö-zelben tartózkodó személyek égési sérülést szenvedhetnek.

3
• Nagyon átforrósodott sütőbe ne öntsünk vizet. A zománcréteg sérülhet.
• A készüléket egy szakember telepítse, a gyártói utasítások szi-gorú betartása mellett.
• A Gyártó elutasít bármilyen felelősséget, minden olyan szemé-lyi sérülésre vagy anyagi kárra vonatkozóan, amely nem meg-felelő használatból, beszerelésből ered.
• Működés közben hő, pára, nedvesség keletkezik, az ebből ere-dő személyi sérülések elkerülése érdekében gondoskodjunk a helyiség megfelelő szellőzéséről. Tartós használat esetén a szellőző rendszer bővítésére is szükség lehet, a szükséges légszállítási teljesítménnyel kapcsolatosan forduljunk szakem-berhez.
utasításoK
Az útmutatót későbbi használat céljából őrizzük meg, vagy ha később olyan személy használná a készüléket, aki nem ismeri annak működését.A készülék használata előtt gondosan töröljük át azt nem súroló jellegű tisztítószer és meleg víz elegyével. Helyezzük a rácsot és a tálcát az azokhoz tartozó sínekbe. Amint ezt megtettük, ál-lítsuk sütőt a legnagyobb hőmérsékletre, működtessük így kb. 20 percig a gyári zsírok, olajok, gyanta nyomainak eltávolításához, melyek sütés közben kellemetlen szagokat okozhatnak.vigyázat! Az első sütés során némi füst, kellemetlen szag lép-het fel. Ez esetben az első sütés végéig biztosítsunk fokozott szellőzést a helyiségben.A fenti első művelet végrehajtását követően a készülék készen áll a sütéshez.A készülék kizárólag háztartási jellegű használatra szolgál.Kizárólag ételt süssünk a készülékkel.
sütő haszNálata
A sütőt 50 és 250ºC között egy hőfokszabályzó vezérli, a kívánt hőmérsékletet biztosítva. A hőfokszabályzó visszajelző lámpa kigyullad majd elalszik, jelezve hogy működik a hőmérséklet- szabályozás.A kívánt sütési mód kiválasztása egy multifunkciós vezérlőgomb-bal történik. A kiválasztható módok a következők:
a) sütő világítás: Sütési mód kiválasztásakor auto-matikusan bekapcsol az összes modellnél. Működés közben a világítás bekapcsolva marad.
b) alsó-Felső sütési mód. Hagyományos sütés az alsó és a felső fűtőbetétektől érkező forró levegővel.
G) alsó-Felső sütési mód légKeveréssel. Légkeveréses sütés az alsó és felső fűtőbetétekkel teljes egyenletes eloszlatás mellett.
Hasznos tanácsoK
• Sütés előtt győződjünk meg arról, hogy az összes kiegészítőt, amelyekre nincs szükség, kivettünk a sütőből.
• Sütés előtt melegítsük elő a sütőt a kívánt hőmérsékletre.• A tepsit a sütő közepére helyezzük, és amennyiben egyszerre
többet is használunk, hagyjuk közöttük a levegő keringéséhez elegendő helyet.
• Ne töltsük meg teljesen a tepsit, amikor lédús, gyümölcsös sü-teményt készítünk. A tepsiből lecsepegő gyümölcslé foltot hagy maga után, melyet már nem tudunk eltávolítani.
• A sütő aljára ne helyezzünk tepsit, és a sütő alját ne is fedjük be alumínium fóliával. A fólia vagy a tepsi alatt a hő meggyűlhet. A sütési ideje kitolódhat, és a zománcréteg is károsodhat.
• Az étel ellenőrzéséhez próbáljuk a lehető legkisebb résre kinyit-ni az ajtót (a világítás sütés közben végig égni fog).
• Az ajtó kinyitásakor óvatosan járjunk el, mivel gőz, forró szaft csapódhat ki.
H) grill mód. Ételek pirításához, lesütéséhez.
J) grill mód légKeveréssel. Gyors lesütést, le-pirítást eredményez, azonban az étel lédús marad. Hagyományos sütemény sütéséhez ez a leghatéko-nyabb mód.
4
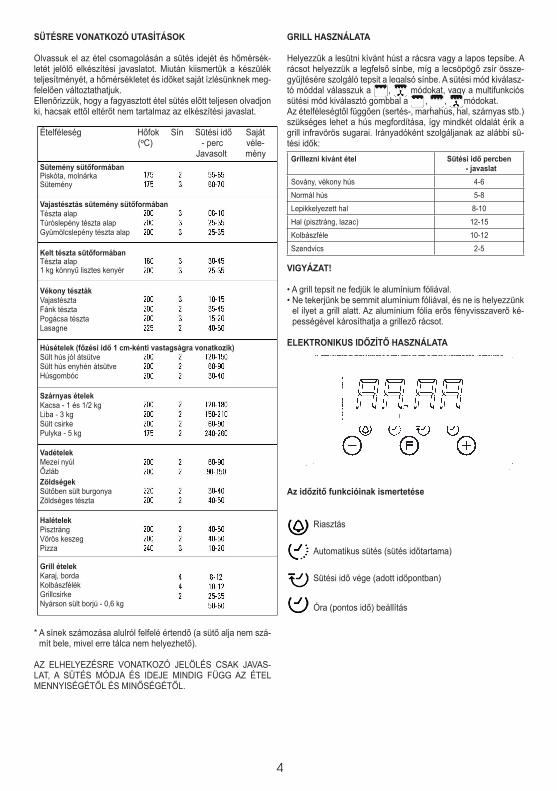
sütésre voNatKozó utasításoK
Olvassuk el az étel csomagolásán a sütés idejét és hőmérsék-letét jelölő elkészítési javaslatot. Miután kiismertük a készülék teljesítményét, a hőmérsékletet és időket saját ízlésünknek meg-felelően változtathatjuk.Ellenőrizzük, hogy a fagyasztott étel sütés előtt teljesen olvadjon ki, hacsak ettől eltérőt nem tartalmaz az elkészítési javaslat.
* A sínek számozása alulról felfelé értendő (a sütő alja nem szá-mít bele, mivel erre tálca nem helyezhető).
Az ELHELyEzÉSrE vONATKOzÓ jELöLÉS CSAK jAvAS-LAT, A SüTÉS MÓdjA ÉS idEjE MiNdiG FüGG Az ÉTEL MENNyiSÉGÉTőL ÉS MiNőSÉGÉTőL.
gRill Használata
Helyezzük a lesütni kívánt húst a rácsra vagy a lapos tepsibe. A rácsot helyezzük a legfelső sínbe, míg a lecsöpögő zsír össze-gyűjtésére szolgáló tepsit a legalsó sínbe. A sütési mód kiválasz-tó móddal válasszuk a , módokat, vagy a multifunkciós sütési mód kiválasztó gombbal a , , módokat.Az ételféleségtől függően (sertés-, marhahús, hal, szárnyas stb.) szükséges lehet a hús megfordítása, így mindkét oldalát érik a grill infravörös sugarai. irányadóként szolgáljanak az alábbi sü-tési idők:
grillezni kívánt étel sütési idő percben - javaslat
Sovány, vékony hús 4-6
Normál hús 5-8
Lepikkelyezett hal 8-10
Hal (pisztráng, lazac) 12-15
Kolbászféle 10-12
Szendvics 2-5
vigyázat!
• A grill tepsit ne fedjük le alumínium fóliával.• Ne tekerjünk be semmit alumínium fóliával, és ne is helyezzünk
el ilyet a grill alatt. Az alumínium fólia erős fényvisszaverő ké-pességével károsíthatja a grillező rácsot.
eleKtroNiKus időzítő haszNálata
az időzítő funkcióinak ismertetése
riasztás
Automatikus sütés (sütés időtartama)
Sütési idő vége (adott időpontban)
Óra (pontos idő) beállítás
Ételféleség Hőfok Sín Sütési idő Saját (ºC) - perc véle- javasolt ménysütemény sütőformában Piskóta, molnárkaSütemény
vajastésztás sütemény sütőformábanTészta alapTúróslepény tészta alapGyümölcslepény tészta alap
Kelt tészta sütőformábanTészta alap1 kg könnyű lisztes kenyér
vékony tésztákvajastésztaFánk tésztaPogácsa tésztaLasagne
húsételek (főzési idő 1 cm-kénti vastagságra vonatkozik)Sült hús jól átsütveSült hús enyhén átsütveHúsgombóc
szárnyas ételekKacsa - 1 és 1/2 kgLiba - 3 kgSült csirkePulyka - 5 kg
vadételekMezei nyúlőzlábzöldségekSütőben sült burgonyaZöldséges tészta
halételekPisztrángvörös keszegPizza
grill ételekKaraj, bordaKolbászfélékGrillcsirkeNyárson sült borjú - 0,6 kg
COOKING INSTRUCTIONS
Read the information of the food packaging for the cooking temperatures and times. Once familiar with the performance of the appliance, the temperatures and times may be varied to adapt them to your personal tastes.Check that frozen food is completely thawed before cooking, unless indicated otherwise.
Type of food Temp. ºC Runners Cooking time in minutes Suggested
Personal
Cake mixture desserts in mouldsSponges or buns 175 2 55-65Cake 175 3 60-70
Short pastry desserts in mouldsPie base 200 3 08-10Cheesecake pie base 200 3 25-35Fruit pie base 200 3 25-35
Raised dough desserts in mouldsPie base 180 3 30-45Soft bread 1 kg of flour 200 3 25-35
Small pastriesShort pastry 200 3 10-15Doughnut dough 200 2 35-45Biscuit dough 200 3 15-20Lasagne 225 2 40-50
Meats (Cooking time per cm of thickness)Long roasts 200 2 120-150Short roasts 200 2 60-90Meatballs 200 2 30-40
PoultryDuck 1 1/2 Kg 200 2 120-180Goose 3 Kg 200 2 150-210Roast chicken 200 2 60-90Turkey 5Kg 175 2 240-260
GameHare 200 2 60-90Leg of venison 200 2 90-150VegetablesOven-baked potatoes 220 2 30-40Cooked vegetable flan 200 2 40-50
FishTrout 200 2 40-50Sea Bream 200 2 40-50Pizza 240 3 10-20
GrillChops 4 8-12Sausages 4 10-12Grilled chicken 2 25-35Spit-roasted veal 0,6Kg 50-60
* The runner number is counted from the bottom of the oven up (Excluding the base of the oven as trays cannot be placed on it)
THE POSITION INFORMATION IS INDICATIVE BECAUSE THE COOKING TYPE AND TIMES CHANGE DEPENDING ON THE QUANTITY AND QUALITY OF THE FOOD.
HOW TO USE THE GRILL
Place the food to be browned on the grid or in the shallow tray. The grid has to be placed on the highest runner, whilst the tray for collecting fat should be on the lower runner. Connect the grill using the following positions of fan-assisted oven selector knob , or in the position , , of the multi-function oven selection knob.Depending on the type of food (meat, fish, poultry, etc.) it will be necessary to turn it over to expose both sides to the infra-red rays of the grill. For guidance only, we indicate some cooking times below:
Food to be grilled Cooking times in minutes SuggestedLean or thin meat 4-6Normal meat 5-8Fish without scales 8-10Fish (e.g. Trout, salmon) 12-15Sausages 10-12Sandwiches 2-5
WARNING
• Do not use aluminium foil to cover the grill tray or heat.• Do not wrap elements in aluminium foil or place them under
the grill - the great reflective quality of aluminium may damage the grill element.
USE OF THE ELECTRONIC TIMER
Description of the timer functions:
Warning alarm
Cooking in automatic mode (duration)
End of cooking time (time at end)
Setting the clock. Clock with 24-hour display.

5
gombok ismertetése
Érték csökkentése bármely programban
időzítő funkció kiválasztó gomb
Érték növelése bármely programban
Csengő riasztás Beállítható egy független időzítő, maximálisan 23 óra 59 perces visszaszámlálási időtartammal. Az idő beállításához nyomjuk meg egyszer a gombot. A csengő szimbólum öt másodper-cen át villogni kezd, ezalatt a és gombokkal beállíthatjuk a visszaszámlálási időtartamot. A visszaszámlálás azonal meg-kezdődik. Amikor a megadott időtartam lejárt, a csengő szimbó-lum villogni kezd, valamint egy szagatott hangjelzést ad a készü-lék, melyet bármelyik gomb lenyomásával megszüntethetünk. Amennyiben gombnyomással nem állítjuk le a hangjelzést, az 2 perc elteltével automatikusan kikapcsol. A visszaszámláló riasz-tás nem vezérel egyetlen egyéb funkciót sem.
Félautomata sütés
a) sütés adott időtartamig Nyomjuk meg kétszer a gombot, majd a és gombokkal állítsuk be, hogy milyen hosszan kívánunk sütni. A sütés azonnal elindul, a kijelzőn pedig a jel lesz látható. A megadott időtar-tam végén a sütés leáll, és hangjelzés hallható. A fent ismertetett módon leállíthatjuk a hangjelzést.Ne feledjük, hogy a sütő a megadott időtartam, és a hangjel-zés megszüntetését követően is bekapcsolva van, tehát külön le kell kapcsolnunk.
b) sütés adott időpontig Nyomjuk meg háromszor a gombot, majd a és gom-bokkal adjuk meg azt az időpontot, amikor a sütést be kívánjuk fejezni. A sütés azonnal elindul, a kijelzőn pedig a jel lesz lát-ható. A megadott időpontban a sütés leáll, és hangjelzés hallha-tó. A fent ismertetett módon leállíthatjuk a hangjelzést.Ne feledjük, hogy a sütő a megadott időpontot és a hangjel-zés megszüntetését követően is bekapcsolva van, tehát külön le kell kapcsolnunk.
automata sütés ( + )
Sütés adott időtartamon át adott időpontig1. Nyomjuk meg kétszer a gombot, majd a és gombok-
kal állítsuk be, hogy milyen hosszan kívánunk sütni.2. Nyomjuk meg háromszor a gombot, majd a és gom-
bokkal adjuk meg azt az időpontot, amikor a sütést be kíván-juk fejezni.
3. A hőmérséklet kapcsolóval valamint a sütési mód kiválasztó gombbal adjuk meg a kívánt hőmérsékletet és sütési módot.
Ezt a műveletsort követően a kijelzőn a és jelek látha-tók, jelezve, hogy a sütő automatikus időzítés szerint működik.
Gyakorlati példa:
45 percen át kívánunk sütni úgy, hogy a sütés délután 2 órakor (14.00) érjen véget.
• Nyomjuk meg kétszer a gombot, majd a és gombok-kal állítsuk be a 0.45 időtartamot.
• Nyomjuk meg háromszor a gombot, majd a és gom-bokkal állítsuk be a 14.00 időpontot.
• Ezután a kijelzőn a pontos idő, valamint a és jelek látha-tók, jelezve, hogy a program betáplálásra és elmentésre került.
• 1 óra 15 perckor (45 perccel délután két óra előtt) a sütő auto-matikusan bekapcsol és megkezdi a sütést.
• 2 órakor (14.00-kor) a sütés automatikusan leáll, valamint szagatott hangjelzést ad a készülék.
• A hangjelzést bármelyik gomb lenyomásával megszüntethet-jük.
Ne feledjük, hogy a sütő a sütés végét és a hangjelzés meg-szüntetését követően is bekapcsolva van, tehát külön le kell kap-csolnunk.
pontos idő beállítása A sütő első bekapcsolásakor (valamint minden egyes áramszü-net után) a 12.00 számjegyek és a jel villogva jelennek meg a kijelzőn egészen addig, amíg be nem állítjuk a pontos időt.A pontos időt a és gombokkal adhatjuk meg. Miután el-végeztük a beállítást, öt másodperc időtartamig ne nyomjunk le egyetlen gombot sem. A vagy gomb lenyomását követő-en pár másodperc után a számjegyek között gyorsabban lép-tethetünk.A pontos idő utólagos átállításához nyomjuk le négyszer a gombot: a jel villogni kezd, ekkor a vagy gombokkal módosíthatjuk a pontos időt.
Ne feledjük! Áramkimaradás esetén a pontos idő beállítás és az összes egyéb aktivált funkció, időzítés is törlődik. Az áramszol-gáltatás helyreállásakor a jel villogva jelenik meg, és a pon-tos időt újra meg kell adnunk.
KészüléK tisztítása
Fontos!
Biztonsági óvintézkedés gyanánt a tisztítást megelőzően áram-talanítsuk a készüléket: húzzuk a készülék dugvilláját az aljzat-ból vagy kapcsoljuk le a megszakítót.
Nem öntisztítós sütőt tisztítását a sütő használatát követően vé-gezzük, amikor már nem forró, de még meleg: ekkor a falakra ki-ülő zsírréteg még könnyen eltávolítható, valamint a zsírcseppek, fröccsenések sem keményedtek meg, nem száradtak ki.

6
vegyük ki a krómozott oldalsó konzolokat; emeljük fel az elülső részt, ezzel kiakasztjuk ezeket a falból, majd vegyük ki ezeket a hátsó nyílásokból. Puha, jól felhígított ammóniás oldattal meg-nedvesített ruhával mossuk át a sütő belsejét, zárjuk be az aj-tót, majd pár óra elteltével meleg víz és folyékony tisztítószer ele-gyével mossuk át a sütő belsejét, öblítsük le, majd gondosan szá-rítsuk meg. A külső fényes fém felületek tisztításához puha ruhát nedvesítsünk be enyhe szappanos vízzel (ne használjunk súroló, dörzsölő hatású tisztítószert).
Savas vagy lúgos tartalmú anyagok (citromlé, ecet, só, paradi-csom stb.) használatát szintén kerüljük. Kerüljük a klór, sav, vagy egyéb maró hatású anyagok használatát, különösen a lakkréteg-gel ellátott falak esetében. vastag acélforgácsvattát, vagy kemény kaparó szerszámokat szintén ne alkalmazzunk, mivel ezek szin-tén kárt tehetnek a felületi rétegekben.Ezenfelül nagynyomású készüléket, gőztisztító berendezést se al-kalmazzunk a sütő tisztításához.
Normál esetben az enyén tisztítószeres vízzel megnedvesített, puha ruhával történő áttörlés elegendő, azonban különösen ma-kacs foltoknál a következő eljárás javasolt:
sütő tisztítása a Kiegészítő aquasmaRt RendszeRRel
1. vegyük ki a belső elemeket: tálcát, rácsot, oldalrácsokat.
2. öntsünk 200 ml mennyiségben szappanos vizet a sütő aljára.
3. Az
• The alarm has three tone positions, low, medium and high. Toadjust the tone, check that the timer is in the manual mode, then press the button and hold down to hear the tone selected. On re-leasing the button , press again and hold down to select another tine. Repeat the procedure until the required tone is heard.
WARNING! a power cut will result in the programmed func-tions to be cancelled, including the clock. Once the power returns three flashing zeros will appear and the oven can bere-programmed.
USING THE MECHANICAL TIMER
Once the thermostat controls are in the desired position, turn the knob clockwise to the maximum position and then turn it anti-clockwise to the desired time; at the end of this set timethe buzzer will sound. The timer only indicates the end of the set time, but it does not stop the function being used.
CLEANING THE APPLIANCE
IMPORTANT
As a safety precaution, before beginning to clean the oven al-ways unplug it from the power supply or remove the appliance power lead.
Cleaning an oven that does not self-cleaning panels must bedone after use, when it is switched off but still warm, not hot, so that the film of grease produced by the cooking vapours on the walls is still easy to remove, as well as the drips and splashes of fat that are not yet hard and dry. Remove the chrome-plated wire side supports; pull the front partupwards to unattach them from the wall and remove them from the rear orifices. Clean the oven with a soft cloth soaked in a di-luted ammoniac solution; rinse and dry. If there are still stains and splashes, place a damp cloth soaked in ammoniac at the back, close the door and, after a few hours, wash the oven with warm water and liquid detergent, rinse and dry carefully. To clean the shiny metal outside doors, use a soft cloth with soap and water; do not use any powdered products that contain abrasive substances.
Also avoid the use of acid or alkaline substances (lemon juice, vinegar, salt, tomatoes, etc.). Avoid using products containing chlorine, acid or abrasive substances specially for cleaning the varnished walls. Do not use thick steel wool or hard uten-sils, as they can damage the surface finishes.Do not use high pressure cleaners or steam appliances for cleaning the oven.
Normally, wiping with a damp soft cloth and warm detergent is enough, but for stubborn stains the following is recommended:
OVEN CLEANING SYSTEM EQUIPPED WITH THE AQUAS-MART SYSTEM
1 Take out the internal components: tray, screen, side screens.2 Pour 200 ml of soapy water on the bottom of the oven 3. Turn on and set the oven at 200º for 15 minutes4. Move thetemperaturecontrol from 200ºC to 0ºC. Let the oven
cool down for 20 minutes. 5. Move the AquaSmart function to 0. Wipe clean with a rag
or soft cloth.
VITRIFIED ENAMELLED PARTS
Only use a recommended cleaner for this type of material – avoid chloride-based products such as bleach.
GLASS DOOR PANEL
Do not use abrasive products which could damage the glass. Remember that if the surface of the glass panel becomes scratched, it could cause a dangerous failure. To simplify the cleaning, the inner glass panel can be taken out of the door. The method for removing the glass from the three types of door is shown below.
Door type AAfter removing the screws fixing the glass, located on the inner face of the door, lift the glass out carefully. In versions with three glasses the intermediate glass can also be removed. The procedure is the same as above.
Door type B1 / B2After removing the screws fixing the upper support of the glass, remove the support in direction “A”. Then the glass can be pulled out. In versions with three glasses the intermediate glass can also be removed.
AA
funkciót kapcsoljuk be, majd működtessük a sütőt 200°C-on 15 perc hosszan.
4. A hőmérséklet szabályzó kapcsolót forgassuk 200°C-ról 0°C-ra. Úgy 20 percen át hagyjuk hűlni a sütőt.
5. Az AquaSmart funkciót állítsuk „0”-ra. Egy ruhával, puha kendő-vel töröljük át a készüléket.
üvegezett, zomáNCozott részeK
Kizárólag kifejezett ilyen anyagokhoz ajánlott tisztítószert használ-junk – kerüljük a klór-alapú termékeket, mint pl. a fehérítőt.
üvegbetétes aJtó
Ne hasznájlunk súroló, maró hatású szereket, melyek károsíthat-ják az üvegfelületet. Ne feledjük, hogy ha az üvegfelület karcossá válik, az veszélyes meghibásodáshoz vezethet.A tisztítás egyszerűbbé tétele érdekében az üvegbetét kivehető az ajtóból. Az alábbiakban kerül bemutatásra az üvegbetét kivé-telének módja a három eltérő típusú ajtóból.
A típusú ajtóAz üvegbetétet rögzítő, az ajtó belső oldalán található csavarok ki-vételét követően óvatosan emeljük ki az üveglapot. Három lapból álló üvegbetétes kivitel esetén a középső üveglap szintén kivehe-tő, a fenti művelet elvégzését követően.
B1 és B2 típusú ajtóAz üvegbetét felső tartóelemét rögzítő csavarokat távolítsuk el, majd az „A” irányba vegyük le a tartóelemet. Ezután már kihúz-hatjuk az üveglapot. Három lapból álló üvegbetétes kivitel esetén a középső üveglap szintén kivehető.
• The alarm has three tone positions, low, medium and high. Toadjust the tone, check that the timer is in the manual mode, then press the button and hold down to hear the tone selected. On re-leasing the button , press again and hold down to select another tine. Repeat the procedure until the required tone is heard.
WARNING! a power cut will result in the programmed func-tions to be cancelled, including the clock. Once the power returns three flashing zeros will appear and the oven can bere-programmed.
USING THE MECHANICAL TIMER
Once the thermostat controls are in the desired position, turn the knob clockwise to the maximum position and then turn it anti-clockwise to the desired time; at the end of this set timethe buzzer will sound. The timer only indicates the end of the set time, but it does not stop the function being used.
CLEANING THE APPLIANCE
IMPORTANT
As a safety precaution, before beginning to clean the oven al-ways unplug it from the power supply or remove the appliance power lead.
Cleaning an oven that does not self-cleaning panels must bedone after use, when it is switched off but still warm, not hot, so that the film of grease produced by the cooking vapours on the walls is still easy to remove, as well as the drips and splashes of fat that are not yet hard and dry. Remove the chrome-plated wire side supports; pull the front partupwards to unattach them from the wall and remove them from the rear orifices. Clean the oven with a soft cloth soaked in a di-luted ammoniac solution; rinse and dry. If there are still stains and splashes, place a damp cloth soaked in ammoniac at the back, close the door and, after a few hours, wash the oven with warm water and liquid detergent, rinse and dry carefully. To clean the shiny metal outside doors, use a soft cloth with soap and water; do not use any powdered products that contain abrasive substances.
Also avoid the use of acid or alkaline substances (lemon juice, vinegar, salt, tomatoes, etc.). Avoid using products containing chlorine, acid or abrasive substances specially for cleaning the varnished walls. Do not use thick steel wool or hard uten-sils, as they can damage the surface finishes.Do not use high pressure cleaners or steam appliances for cleaning the oven.
Normally, wiping with a damp soft cloth and warm detergent is enough, but for stubborn stains the following is recommended:
OVEN CLEANING SYSTEM EQUIPPED WITH THE AQUAS-MART SYSTEM
1 Take out the internal components: tray, screen, side screens.2 Pour 200 ml of soapy water on the bottom of the oven 3. Turn on and set the oven at 200º for 15 minutes4. Move the temperature control from 200ºC to 0ºC. Let the oven
cool down for 20 minutes. 5. Move the AquaSmart function to 0. Wipe clean with a rag
or soft cloth.
VITRIFIED ENAMELLED PARTS
Only use a recommended cleaner for this type of material – avoid chloride-based products such as bleach.
GLASS DOOR PANEL
Do not use abrasive products which could damage the glass. Remember that if the surface of the glass panel becomes scratched, it could cause a dangerous failure. To simplify the cleaning, the inner glass panel can be taken out of the door. The method for removing the glass from the three types of door is shown below.
Door type AAfter removing the screws fixing the glass, located on the inner face of the door, lift the glass out carefully. In versions with three glasses the intermediate glass can also be removed. The procedure is the same as above.
Door type B1 / B2After removing the screws fixing the upper support of the glass, remove the support in direction “A”. Then the glass can be pulled out. In versions with three glasses the intermediate glass can also be removed.
AA
Remove the chrome-plated wire side supports; pull the front part upwards to unattach them from the wall and remove them from the rear orifices. Clean the oven with a soft cloth soaked in a di-luted ammoniac solution; rinse and dry. If there are still stains and splashes, place a damp cloth soaked in ammoniac at the back, close the door and, after a few hours, wash the oven with warm water and liquid detergent, rinse and dry carefully. To clean the shiny metal outside doors, use a soft cloth with soap and water; do not use any powdered products that contain abrasive substances.
Also avoid the use of acid or alkaline substances (lemon juice, vinegar, salt, tomatoes, etc.). Avoid using products containing chlorine, acid or abrasive substances specially for cleaning the varnished walls. Do not use thick steel wool or hard uten-sils, as they can damage the surface finishes.Do not use high pressure cleaners or steam appliances for cleaning the oven.
Normally, wiping with a damp soft cloth and warm detergent is enough, but for stubborn stains the following is recommended:
OVEN CLEANING SYSTEM EQUIPPED WITH THE AQUA-CLEAN SYSTEM
1 Take out the internal components: tray, screen, side screens.
2 Pour 200 ml of soapy water on the bottom of the oven
3. Turn on and set the oven at 200º for 15 minutes
4. Move the temperature control from 200ºC to 0ºC. Let the oven cool down for 20 minutes.
5. Move the AQUACLEAN function to 0. Wipe clean with a rag or soft cloth.
VITRIFIED ENAMELLED PARTS
Only use a recommended cleaner for this type of material – avoid chloride-based products such as bleach.
GLASS DOOR PANEL
Do not use abrasive products which could damage the glass. Remember that if the surface of the glass panel becomes scratched, it could cause a dangerous failure. To simplify the cleaning, the inner glass panel can be taken out of the door. The method for removing the glass from the three types of door is shown below.
Door type AAfter removing the screws fixing the glass, located on the inner face of the door, lift the glass out carefully. In versions with three glasses the intermediate glass can also be removed. The procedure is the same as above.
Door type B1 / B2After removing the screws fixing the upper support of the glass, remove the support in direction “A”. Then the glass can be pulled out. In versions with three glasses the intermediate glass can also be removed.
AA
FONTOS:
1. A sütőajtó tisztítási célzattal való szétszerelése után különös figyelmet fordítson az összeszerelésre! A belső üveglapot a festett kerettel kifelé helyezze vissza a helyére, mert nem érintkezhet a festett felület a sütő tömítésével, amire az ajtó csukott állapotában felfekszik.2. Bizonyos modelleknél „OK” feliratot tartalmazó Bizonyos modelleknél „Az ajtó szétszerelése és tisztítása után, ha visszahelyezi az üveget az ajtóba, ügyeljen, hogy az üvegen lévő OK felirat felül legyen, az ajtó kivett állapotában, ha a sütőtér felé fordított üveget nézzük, akkor balról jobbra olvashatóan (OK). Az ajtó visszaszerelése után, ha az ajtót lenyitjuk, az ajtó fölé állva pedig tükörírással legyen olvasható az OK szó.
7
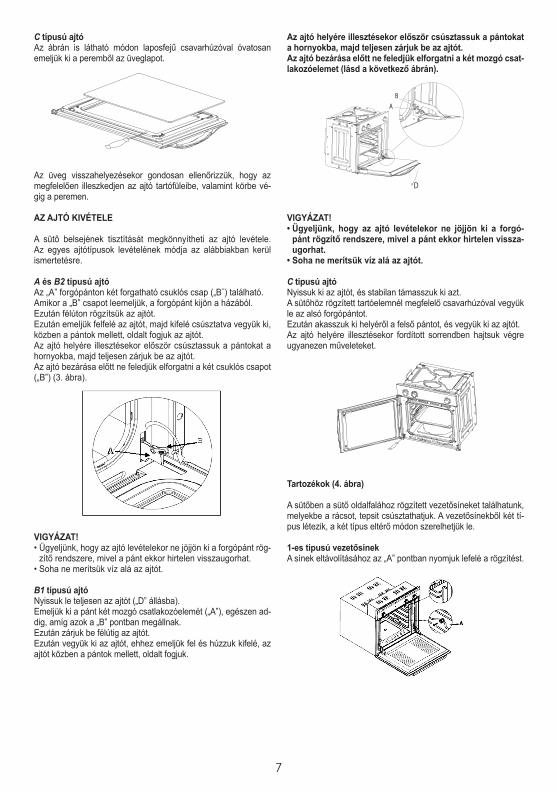
C típusú ajtóAz ábrán is látható módon laposfejű csavarhúzóval óvatosan emeljük ki a peremből az üveglapot.
Az üveg visszahelyezésekor gondosan ellenőrizzük, hogy az megfelelően illeszkedjen az ajtó tartófüleibe, valamint körbe vé-gig a peremen.
az ajtó KivÉtele
A sütő belsejének tisztítását megkönnyítheti az ajtó levétele. Az egyes ajtótípusok levételének módja az alábbiakban kerül ismertetésre.
A és B2 típusú ajtóAz „A” forgópánton két forgatható csuklós csap („B¨) található.Amikor a „B” csapot leemeljük, a forgópánt kijön a házából.Ezután félúton rögzítsük az ajtót.Ezután emeljük felfelé az ajtót, majd kifelé csúsztatva vegyük ki, közben a pántok mellett, oldalt fogjuk az ajtót.Az ajtó helyére illesztésekor először csúsztassuk a pántokat a hornyokba, majd teljesen zárjuk be az ajtót.Az ajtó bezárása előtt ne feledjük elforgatni a két csuklós csapot („B”) (3. ábra).
vigyázat!• ügyeljünk, hogy az ajtó levételekor ne jöjjön ki a forgópánt rög-
zítő rendszere, mivel a pánt ekkor hirtelen visszaugorhat.• Soha ne merítsük víz alá az ajtót.
B1 típusú ajtóNyissuk le teljesen az ajtót („d” állásba).Emeljük ki a pánt két mozgó csatlakozóelemét („A”), egészen ad-dig, amíg azok a „B” pontban megállnak.Ezután zárjuk be félútig az ajtót.Ezután vegyük ki az ajtót, ehhez emeljük fel és húzzuk kifelé, az ajtót közben a pántok mellett, oldalt fogjuk.
az ajtó helyére illesztésekor először csúsztassuk a pántokat a hornyokba, majd teljesen zárjuk be az ajtót.az ajtó bezárása előtt ne feledjük elforgatni a két mozgó csat-lakozóelemet (lásd a következő ábrán).
vigyázat!• ügyeljünk, hogy az ajtó levételekor ne jöjjön ki a forgó-
pánt rögzítő rendszere, mivel a pánt ekkor hirtelen vissza-ugorhat.
• soha ne merítsük víz alá az ajtót.
C típusú ajtóNyissuk ki az ajtót, és stabilan támasszuk ki azt.A sütőhöz rögzített tartóelemnél megfelelő csavarhúzóval vegyük le az alsó forgópántot.Ezután akasszuk ki helyéről a felső pántot, és vegyük ki az ajtót.Az ajtó helyére illesztésekor fordított sorrendben hajtsuk végre ugyanezen műveleteket.
tartozékok (4. ábra)
A sütőben a sütő oldalfalához rögzített vezetősíneket találhatunk, melyekbe a rácsot, tepsit csúsztathatjuk. A vezetősínekből két tí-pus létezik, a két típus eltérő módon szerelhetjük le.
1-es típusú vezetősínekA sínek eltávolításához az „A” pontban nyomjuk lefelé a rögzítést.
Door type CCarefullyleveruptheglasswithaflatscrewdriverlocatedinthe groove shown in the figure.
When refitting the glass, check that it is correctly fitted into the toothed joint of the door and all around.
REMOVING THE DOOR FROM THE OVEN
To simplify cleaning the interior of the oven, the door can be removed. The process of removing the door for the three types is shown below:
Door type A / B2The hinges “A” have two moving bolts “B”.When the bolt “B” is lifted, the hinge comes out of its housing.Thenclosethedoortothehalf-wayposition.Next, lift the door upwards and remove it, sliding it outwards; hold the door by the sides close to the hinges when doing this. To replace the door, first slide the hinges into their grooves and open the door completely. Remember to turn the two moving bolts “B” used to engage the two hinges before closing the door (Fig. 3).
WARNING •Takecarenottoremovethehingelockingsystemwhentak-
ing off the door, as the hinge mechanism can spring back suddenly.
•Neversubmergethedoorinwaterforanyreason.
Door type B1Open the door fully to position “D”Lift the two mobile links “A” of the hinges, until fixing at point “B”.Thenclosethedoortothehalf-wayposition.Next, lift the door upwards and remove it, sliding it outwards; hold the door by the sides close to the hinges when doing this.
To replace the door, first slide the hinges into their grooves and open the door completely. Remember to turn the two moving links “B” used to engage the two hinges before closing the door (Fig. X).
AB
D
WARNING• Take care not to remove the hinge locking system when
taking off the door, as the hinge mechanism can spring back suddenly.
• Never submerge the door in water for any reason.
Door type COpen the door and support it firmly.Using a suitable screwdriver remove the lower hinge by thepart fixed to the oven.Then remove the upper hinge from its place and take off the door.To replace the door, follow the same steps in reverse.
Oven accessories (Fig. 4)
The oven can be provided with lateral guides fitted to the oven wall. Insert the grid and oven sheet provided on the lateral guides. To remove the guides proceed as follows for the two types:
Bars type 1To remove the lateral guides press downwards at point A.

8
2-es típusú vezetősínekMegfelelő csavarhúzóval vegyük ki a csavart, majd emeljük fel a síneket felfelé, amíg azok ki nem ugranak helyükről.
szeRelÉsi útmutató
A készüléket kizárólag hozzáértő személy, szakember telepítheti és üzemelheti be, az irányadó Európai Uniós rendelkezések és törvényi előírások betartása mellett:
iEE bekötésre vonatkozó rendelkezések;Munkavédelmi előírások;Elektromos berendezésekre vonatkozó előírások betartásával.
szerelést megelőző műveleteK
Amikor a készüléket kicsomagoltuk, ellenőrizzük, hogy az alábbi tartozékok mind részét megtalálhatók-e a csomagban:• használati és szerelési útmutató,• sütőrács• 1 db tepsi,• csavarok és ütközők a készülék beépítéséhez.
KészüléK beépítése (5. ábra)
A készülék i. érintésvédelmi osztályba tartozik.A földelés törvényi előírás, megléte kötelező. A gyártó elutasít bármilyen felelősséget minden olyan kárral, eseménnyel kap-csolatosan, amely a biztonsági előírásokra vonatkozó utasítások elmulasztásából ered.
Fontos!
A sütővel szomszédos szekrényelem, bútor, valamint minden egyéb anyag, amely a beépítés során felhasználásra kerül, ellent kell álljon a készülék működésekor fellépő, a környezeti hőfokhoz viszonyított legalább 85ºC-os hőmérséklet-emelkedésének.Egyes laminált vagy műanyag alapú konyhabútorok hajlamosak elszínéződés jellegű károsodásra már a jelölt alatti hőmérséklet-változás esetén is. Amennyiben a készülék ezen hőmérséklet-változással szembe-ni ellenállóképesség felmérése nélkül került telepítésre, vagy a szomszédos szekrényelemhez 4 mm-nél közelebb került elhelye-zésre, a felelősség a tulajdonost terheli.
BeszeRelÉssel Kapcsolatos egyÉB tudnivalóK
1. A készülék szabványos 600 mm-es közbe behelyezhető (lásd az 5. ábrán), akár főzőlap alá, akár szekrényelembe.
2. Amennyiben szekrényelembe helyezzük a készüléket, gondos-kodjunk a megfelelő szellőzésről: vegyük le a szekrény hátsó borítását, valamint a szekrény tetején hozzunk létre egy 85-90 mm-es nyílást (lásd az 5. ábrán).
3. Ellenőrizzük, hogy a készülék stabilan rögzüljön a szekrény-elemben. A szekrényhez történő rögzítésre a négy db csavar szolgál (5. ábra, „A” elemek). Ezek az ajtóperem négy sarkában helyezkednek el.
5. ábra: Normál, 60 cm széles elektromos sütő beépítési mérete-zési rajza (a felső burkolat alakja eltérhet), valamint rögzí-tésének módja a szekrényelemhez
26 MM vASTAGSÁGÚ AjTÓPErEMMEL („diM A”) ELLÁTOTT SüTő BEÉPíTÉSi MÉrETEi
Bars type 2To remove the lateral guides take out the screw using a suita-ble screwdriver, lift the bars upwards until they are free.
INSTRUCTIONS FOR INSTALLATION
This appliance must be installed by a competent person, in ac-cordancewiththecurrentversionoftheUKSafetyRulesandRegulations or their European equivalent:
Urbandevelopmentregulations(publishedbytheDepartmentof Environment).Urbandevelopmentlaws(publishedbytheScottishExecutiveDevelopment Department).IEE wiring regulations.Electricity in labour regulations.
PRIOR START-UP OF THE APPLIANCE
When it is unpacked, check that the following parts are with the oven:•InstructionsandInstallationManual•Ovengrid•1tray•Screwsandstoppersforfittingtheapplianceinthehousing
FITTING THE APPLIANCE (see Fig. 5)
These appliances are classified as Class I.The earth is obligatory as provided for by law. The manufactur-er declines all liability in the event that the accident prevention rules have not been followed.
IMPORTANT
The adjacent piece or furniture or cupboard and all the materi-als used in the installation must resist a minimum temperature increase of 85 ºC above the ambient temperature during use of the appliance.Certain types of vinyl or laminated kitchen furniture are par-ticularly susceptible to damage due to decolouration at tem-peratures below those indicated.If the appliance is installed without paying attention to this temperaturelimitorifitisplacedlessthan4mmfromtheadja-cent cupboards, liability will belong to the owner.
INSTALLATION NOTES
1.Theovenhastobeinstalledinastandardgapof600mm,asindicated in Fig. 5, whether under a hob or in a column.
2. On inserting the oven in a column, it is essential in order to ensure there is enough ventilation, to remove the rear panel ofthefurnitureandhaveanopeningofatleast85-90mmasindicated in Fig. 5.
3. Check that the oven has been fixed securely in the housing. Fixingtheovenintothecupboardisdoneusing4screws“A”Fig.5. One in each corner of the oven door frame.
Fig.5:Installationdistancedforsimpleelectricovensof60cmswide (the shape of the upper casing may vary) and attachment to the cupboard.
BUILTINDIMENSIONFOROVENWITHDOORTHICKNESSOF26mm(dimA)

9
4. Kombinált sütő-főzőlap beszerelésekor a 6. ábrán látható mó-don járjunk el.
7. ábra: Szellőzésre és szellőzőnyílásokra vonatkozó előírások normál elektromos sütő szabványos konyhai szekrényelembe történő beépítése esetén.Minimális szellőzőnyílások a készülék hátulján a tartópolcra, a felső és hátsó oldalakra vonatkozóan.
A) A tartókonzolt vegyük le.B) A fal és a tartópolc hátulja vagy a szekrény alja
között 75-90 mm távolság maradjon.C) Alapd) Takarólemezt szereljünk fel.
8. ábra: Szellőzőre és szellőzőnyílásra vonatkozó minimális mé-retek normál elektromos sütő felső szekrényelembe történő be-szerelés során.
A) H átsó borításB) TárolópolcC) Ezen résznél a hátsó borítás eltávolítandód) Hátsó borításE) TárolópolcF) AlapG) Szellőzőnyílás legkisebb felülete: 80 cm2
eleKtRomos csatlaKozásoKA készülék elektromos csatlakozása előtt ellenőrizzük, hogy a hálózati áramkör névleges értékei megfelelnek-e a típustáblán feltüntetett értékekkel.
vigyázat! a KészüléKet Kötelező Földeléssel ellátNi!
A készüléket tápláló áramkörbe kötelező jelleggel csatlakoztas-suk egy 13A-es kétpólusú automatikus megszakítót, melynek érintkezői között 3 mm-es hézag van. A megszakító a készülék-hez közel legyen, jól hozzáférhető helyen.
Fontos!
A hálózati áramkör vezetékeinek érszínezése az alábbi:
zöld és sárga: földelővezeték.Kék - nulla.Barna - fázis.
• A zöld és sárga színű vezetéket csatlakoztassuk az „E” jelölésű kapocsra, vagy arra, amelyen a földelés szimbóluma látható, vagy amely maga is zöld és sárga színű.
• A kék vezetéket csatlakoztassuk az „N” jelölésű kapocshoz.• A barna vezetéket csatlakoztassuk az „L” jelölésű kapocshoz.• A vezetéket a környezeti hőmérséklet felett 50ºC-nál magasabb
hőmérséklet nem érheti.• Amennyiben a tápkábel megsérülne, kizárólag eredeti, gyári
tápkábellel cseréljük le, amelyet magától a gyártótól szerzünk be, vagy a viszonteladótól.
20 MM vASTAGSÁGÚ AjTÓPErEMMEL („diM B”) ELLÁTOTT SüTő BEÉPíTÉSi MÉrETEi
BUILTINDIMENSIONFOROVENWITHDOORTHICKNESSOF20mm (dim B)
(dim B)
4.When installing multipurpose ovens install the s shown infigurenº6.
A. The support runner must be removedB.Spacingof75-90mmbetweenthewallandtherearpartof
the support shelf and the base of the cupboardC. BaseD. False box front to be assembled
Fig. 7: Ventilation and gap requirements for the installation of e simple electric oven in a standard cooking unit.Minimum ventilation requirements for upper, base and support shelves for the rear part of the unit.
A. Rear panelB. Storage spaceC. Remove the rear part
of this sectionD. Real panelE. Storage spaceF. BaseG. Minimum ventilation gap 80 cm2
Fig. 8: Ventilation and gap requirements for the installation of a simple electric oven in an upper cupboard.
ELECTRICAL CONNECTIONBefore connecting the appliance, check that the voltage marked on the specifications plate coincides with the voltage of the electricity network.The NICEIC register is recommended for electrical installa-tions.
WARNING – THIS APPLIANCE MUST BE EARTHED
This appliance must be wired to a 13 A bipolar automatic switch with protected socket, which has a 3 mm separation between contacts and is placed in an easily accessible place next to the appliance.
IMPORTANT
The conductors of the network power supply lead are coded by colours are follows:
Greenandyellow-EarthBlue-NeutralBrown-Live
•Thegreenandyellowconductormustbeconnected to theterminal marked “E” or with the symbol of the earth or which is green and yellow.
•The blue conductor must be connected to the terminalmarked “N”.
•The brown conductor must be connected to the terminalmarked “L”.
•The lead must not reach a temperature higher than 50 ºCabove the ambient temperature at any point.
•Ifthepowerleadisdamaged,itmustbereplacedbyaspe-cialleadorunitsuppliedbythemanufactureroritafter-salesservice.
BUILT IN DIMENSION FOR OVEN WITH DOOR THICKNESS OF 20mm (dim B)
(dim B)
4. When installing multipurpose ovens install the s shown in figure nº6.
A. The support runner must be removedB. Spacing of 75-90 mm between the wall and the rear part of
the support shelf and the base of the cupboardC. BaseD. False box front to be assembled
Fig. 7: Ventilation and gap requirements for the installation of e simple electric oven in a standard cooking unit.Minimum ventilation requirements for upper, base and support shelves for the rear part of the unit.
A. Rear panelB. Storage spaceC. Remove the rear part
of this sectionD. Real panelE. Storage spaceF. BaseG. Minimum ventilation gap 80 cm2
Fig. 8: Ventilation and gap requirements for the installation of a simple electric oven in an upper cupboard.
ELECTRICAL CONNECTIONBefore connecting the appliance, check that the voltage marked on the specifications plate coincides with the voltage of the electricity network.The NICEIC register is recommended for electrical installa-tions.
WARNING – THIS APPLIANCE MUST BE EARTHED
This appliance must be wired to a 13 A bipolar automatic switch with protected socket, which has a 3 mm separation between contacts and is placed in an easily accessible place next to the appliance.
IMPORTANT
The conductors of the network power supply lead are coded by colours are follows:
Green and yellow -EarthBlue - NeutralBrown - Live
• The green and yellow conductor must be connected to the terminal marked “E” or with the symbol of the earth or which is green and yellow.
• The blue conductor must be connected to the terminal marked “N”.
• The brown conductor must be connected to the terminal marked “L”.
• The lead must not reach a temperature higher than 50 ºC above the ambient temperature at any point.
• If the power lead is damaged, it must be replaced by a spe-cial lead or unit supplied by the manufacturer or it after-sales service.
BUILTINDIMENSIONFOROVENWITHDOORTHICKNESSOF20mm (dim B)
(dim B)
4.When installing multipurpose ovens install the s shown infigurenº6.
A. The support runner must be removedB.Spacingof75-90mmbetweenthewallandtherearpartof
the support shelf and the base of the cupboardC. BaseD. False box front to be assembled
Fig. 7: Ventilation and gap requirements for the installation of e simple electric oven in a standard cooking unit.Minimum ventilation requirements for upper, base and support shelves for the rear part of the unit.
A. Rear panelB. Storage spaceC. Remove the rear part
of this sectionD. Real panelE. Storage spaceF. BaseG. Minimum ventilation gap 80 cm2
Fig. 8: Ventilation and gap requirements for the installation of a simple electric oven in an upper cupboard.
ELECTRICAL CONNECTIONBefore connecting the appliance, check that the voltage marked on the specifications plate coincides with the voltage of the electricity network.The NICEIC register is recommended for electrical installa-tions.
WARNING – THIS APPLIANCE MUST BE EARTHED
This appliance must be wired to a 13 A bipolar automatic switch with protected socket, which has a 3 mm separation between contacts and is placed in an easily accessible place next to the appliance.
IMPORTANT
The conductors of the network power supply lead are coded by colours are follows:
Greenandyellow-EarthBlue-NeutralBrown-Live
•Thegreenandyellowconductormustbeconnected to theterminal marked “E” or with the symbol of the earth or which is green and yellow.
•The blue conductor must be connected to the terminalmarked “N”.
•The brown conductor must be connected to the terminalmarked “L”.
•The lead must not reach a temperature higher than 50 ºCabove the ambient temperature at any point.
•Ifthepowerleadisdamaged,itmustbereplacedbyaspe-cialleadorunitsuppliedbythemanufactureroritafter-salesservice.

10
tápKáBel cseRÉje
Amennyiben szükségessé válik a tápkábel cseréje, tegyük a kö-vetkezőket.
1. Áramtalanítsuk a készüléket, csatlakoztassuk le a hálózati áramkörről. Csavarozzuk ki a rögzítőcsavarokat, és vegyük le a hátsó borítást.
2. Csavarozzuk ki a rögzítőcsavarokat, majd a kapcsokat a régi vezeték lecsatlakoztatásához.
3. Kössük be az új vezetéket, előzőleg azonban győződjünk meg arról, hogy az megfeleljen a műszaki adatok szakaszban jelölt paramétereknek. A bekötés során ügyeljünk a színkódokra, és hogy az összes csavar megfelelően rögzüljön.
KaRBantaRtás
Karbantartás elvégzése előtt áramtalanítsuk a készüléket, csatlakoztassuk le a hálózati áramkörről.a garanciális időszak alatt mindennemű javítást hivatalos márkaszerviz bevonásával végeztessünk el. Ne feledjük, hogy illetéktelen személy által végzett javítás, módosítás esetén a garancia érvényét veszti.
izzó cseRÉje(Nem garanciális javítás.)
A sütő a következő típusú izzóval van ellátva: 15 vagy 25W-os, 300ºC-os, E-14 foglalatú.vigyázat! Áramtalanítsuk a készüléket, csatlakoztassuk le a hálózati áramkörről. vegyük le a sütő ajtaját (lásd az erre vonat-kozó szakaszban), valamint vegyük ki a tálcákat is.
vegyük le az izzót védő üvegbúrát, ehhez fordítsuk azt az óra-mutató járásával ellentétes irányba. Csavarjuk ki régi izzót (ezt környezetbarát módon selejtezzük le). Helyezzük be a megadott paramétereknek megfelelő izzót, majd helyezzük vissza a fede-let.
Ne FeledJüK! az üvegbúra kilazítása kézzel nem mindig lehetséges, lehet hogy fogóra lesz szükségünk.
KatalítiKus betéteKKel ellátott belső FalaK ápolása, cseRÉje
(Beszerelve a borításra a garancia nem vonatkozik.)
A belső falak tisztán tartása érdekében, amikor makacs foltokat észlelünk ezeken, fűtsük fel a sütőt 200ºC feletti hőmérsékletre, ekkor a speciális, zománcba foglalt katalizátor anyagok a foltot gáz halmazállapotúvá alakítják. Amennyiben a belső falak ki-feketednek és kifényesednek, a betéteket cserélni kell. Ehhez vegyük ki az összes belső alkatrészt.A cserebetéteket közvetlen a gyártó alkatrészellátó központjá-ból vagy a viszonteladótól is beszerezhetjük. Tüntessük fel a tí-pustáblán látható típusazonosító számokat és/vagy a készülék sorozatszámát.
műszaKi adatoK
belső méreteK
Magasság: 340 mmSzélesség: 440 mmMélység: 390 mmHasznos űrtartalom: 59 liter.
eleKtRomos adatoK
Névleges feszültség:220v – 240 v ~ 50HzHálózati áramkörhöz történő csatlakozás: 13A-es kétpólusú au-tomata megszakító, az érintkezők között 3 mm-es hézaggal.
áRamFelvÉtel
Alsó fűtőbetét fogyasztása: 1,30 kWFelső fűtőbetét fogyasztása: 0,90 kWventilátor fogyasztása: 2,30 kWGrill funkció fogyasztása: 1,35 kW
tápkábel3 x 1,5 mm2 típusú H07rN-F <HAr>
lámpaizzó :15W – 25W / 300ºC / E-14 foglalat
gyártó elutasít bárminemű személyi sérülésre vagy anyagi kárra vonatkozó felelősséget, amely a készülék nem megfe-lelő beszereléséből, beüzemeléséből ered.
gyártó fenntartja a jogot, hogy amennyiben a terméket ille-tően azt szükségesnek vagy előnyösnek véli, külön értesí-tés nélkül módosításokat eszközöljön.
REPLACEMENT OF THE NETWORK POWER SUPPLY LEAD
If it is necessary to replace the network power supply lead, proceed as follows:
1. Disconnect the appliance from the power supply, unscrews the fastening screws and remove the rear panel.
2.Unscrewthefasteningscrewsandthoseoftheterminalstofree the existing lead.
3. Assemble the replacement lead which must comply with the information listed in the Specifications, ensuring the correct connection of the colour codes and that all the screws are correctly tightened.
MAINTENANCE
Before carrying out maintenance, disconnect the appliance from the power supply.During the guarantee period, if necessary all services should be commissioned to the Manufacturer’s Technical Assistance Service Department. Bear in mind that intervention or repair by unauthorised personnel will invalidate this guarantee.
REPLACEMENT OF THE OVEN LIGHTBULB(Not covered by the appliance guarantee.)
The oven has a light with the following characteristics: 15 W or 25W,300ºCandtypeE-14WARNING: Disconnect the appliance from the electricity sup-ply, remove the oven door (as described above), as well as the oven shelves.
Remove the glass cover that protects the light bulb by turning it anti-clockwise.Fig.9(A)
Unscrewtheoldlightbulbanddisposeofitsafelyandecolog-ically, change it for one as specified in the Specifications and replace the cover.
NOTE – The glass cover may be tight and, therefore, may need a grip to release it.
CARE AND REPLACEMENT OF THE CATALYTIC COVERING
(When assembled, the covering is not covered by the appli-ance guarantee).
In order to keep the covering “always clean” efficiently, the oven must be heated to a minimum of 200 ºC whenever there are stubborn stains, so that they do not become permanent.If the covering becomes black and shiny, they must be replaced. Remove all the internal accessories to facilitate the replacement of the covering.The replacement covering may be bought directly from the Manufacturer’s Replacement Part Department (see details included in the cover). Indicate the reference numbers of the product type described in the specifications plate and/or the series number of the appliance on ordering.
SPECIFICATIONS
INTERIOR DIMENSIONS
Height:340mmWidth:440mmDepth:390mmUsefulvolume:59litres
ELECTRICAL INFORMATION
Nominal voltage:220V-240V~50HzPower connection: 13A (automatic bipolar switch with protect-ed socket, with 3mm separation between contacts)
POWER ABSORPTION
Base Resistance: 1,30 kWRoofResistance:0,90kWFan Resistance: 2,30 kWGrill Resistance: 1,35 kW Network power cable:3 x 1.5 mm2typeH07RN-F<HAR>
Oven light bulb:15W-25W/300ºCscrewtypeE-14
The Manufacturer declines all liability for damage caused to persons and objects due to incorrect or improper installation of the appliance.
The Manufacturer reserves the right to make any modification it believes necessary and useful to the products, without prior warning.

Importőr:
MULTIKOMPLEX BUDAPEST KFT. a páraelszívók szakértője... 1995 óta
H - 1211 Budapest, Mansfeld Péter u. 27 (volt Bajáki Ferenc utca)
tel.: +(36-1) 427 0325, +(36-1) 427-0326; fax: +(36-1)427 0327
www.multikomplex.hu
6081
1205
.30.
11.2
010CATA ELECTRODOMÉSTICOS, S.L.
c/ Ter, 2 - 08570 TORELLÓ (Barcelona) SPAIN
6081
3150
.24.
04.2
014