Guida rapida di Installazione: Quick Installation Guide
16
Guida rapida di Installazione: Quick Installation Guide: www.hamletcom.com RICEVITORE GPS SiRF Star III 20CH SiRF Star III 20CH BLUETOOTH GPS
Transcript of Guida rapida di Installazione: Quick Installation Guide

Guida rapida di Installazione:
Quick Installation Guide:
www.hamletcom.com
RICEVITORE GPS SiRF Star III 20CH
SiRF Star III 20CH BLUETOOTH GPS

2
Informiamo che il prodotto è conforme alle normative europee e certificato CE secondo i seguenti standard: 89/336/EEC, 92/31/EEC, 93/68EEC, EN 301 489 - 17 : V 1.2.1 (2002-08) Gentile Cliente, La ringraziamo per la fiducia riposta nei nostri prodotti. La preghiamo di seguire le norme d'uso e manutenzione: al termine del funzionamento di questo prodotto, La preghiamo di non smaltirlo tra i rifiuti urbani misti, ma di effettuare per detti rifiuti, una raccolta separata negli appositi raccoglitori di materiale elettrico/elettronico o di riportare il prodotto dal rivenditore che lo ritirerà gratuitamente.
Dear Customer, Thanks for choosing Hamlet. Please carefully follow the instructions for its use and maintenance and, once this item has run its life span, we kindly ask You to: dispose of it in an environmentally friendly way, by putting it in the separate bins for electrical/electronic waste, or to bring it back to your retailer who will collect it for free.

3
Collegare il dispositivo al PC/PDA:
A. Premere il pulsante”Power” sul dispositivo BT per 2 secondi. B. Posizionare il ricevitore GPS in un punto adeguato (cielo aperto) affinché possa ricevere il segnale GPS. C. Accendere PC/PDA. D. Ricercare l’apparecchio BT dal PC/PDA. Il dispositivo GPS non richiede alcuna “passkey” per la connessione,ma alcuni system BT la richiedono; digitare quindi [0000]. E. Collegare l’apparecchio GPS e assicurarsi che nel programma “baud rate set” ci sia 9600 bps (standard). F. La prima volta che si userà il Ricevitore GPS BT, si raccomanda di provarlo all’aperto.
Connect to your PC/PDA:
A. Push the power button for 2 seconds, power on the Bluetooth GPS receiver . B. Put the Bluetooth GPS receiver at proper place (open to sky) to receive the GPS signal. C. Turn on the power of your PC/PDA. D. Search for Blue tooth device by your Blue tooth manager on your PC/PDA. The GPS device required no passkey for connection. But some Blue tooth system is forced to enter passkey, please use [0000] in such case. E. Connect to Bluetooth GPS Receiver and then make sure baud rate set at 9600 bps(standard) in your application program. F. In firstly Use of this Bluetooth GPS Receiver ,we strongly recommend you to bring Bluetooth GPS Receiver User Manual -3- Bluetooth GPS receiver outdoor or open sky.

4
Utilizzo: Start to Use: 1) Caricare la batteria per almeno 4 ore prima di utilizzare il ricevitore GPS per la prima volta. 1) Please fully-charge the battery with at least 4 hours before using the GPS receiver firstly. 2) Accendere il ricevitore GPS premendo il tasto Power On (vedi figura sotto). La spia blu (vedi figura sotto) comincerà a lampeggiare ogni 3 secondi, una volta connessa, lampeggerà ogni secondo. 2) Push the power switch 1~2 seconds to Power on; Bluetooth indicator : (1) Bluetooth host searching: 3 pulses per second (2) Bluetooth host connected: 1 pulse per second
Nota: Per alcuni PDA va riavviata la funzione Bluetooth per potersi riconnettere. Note: Some PDA needs to restart the Bluetooth function if you need to re-connect.
3) Mettere in funzione il ricevitore GPS per la prima volta all’aperto per almeno 15-20 minuti. 3) In firstly Use of this Receiver, we strongly recommend to bring your Bluetooth GPS Receiver outdoor and open sky at least 15~20 minutes for almanac update. Utilizzo Software/Hardware Software/Hardware Use:
1) Funzioni del Ricevitore GPS Bluetooth: 1) Bluetooth GPS Receiver device function description is shown as below:

5
1) Spia Bluetooth - Bluetooth indicator 2) Spia Power/GPS - Power/GPS LED 3) Interruttore Power - Power switch 4) Ingresso cavo USB - Charge plug 5) Pannello - Panel 6) Antenna esterna MMCX - External Antenna MMCX
Plug 7) Antenna interna - Active antenna inside
(face to open sky) 2) Descrizione delle funzioni dei LED - LED display description
Simbolo Symbol
Colore Color
Stato Behavior
Descrizione Description
Lampeggia 3 pulsaz/sec Blinking in 3 pulses/sec
Ricerca del segnale BT Searching for BT host Led Bluetooth
Bluetooth Indicator
Blu
Blue Lampeggia 1 pulsaz/sec Blinking in 1 pulse/sec
Collegamento e comunicazione con l’host Connected with host& communicating

6
Verde Green
Lampeggia con 3 secondi diintervallo Blinking with 3 secs interval
Batteria scarica Battery low
Verde Green
Lampeggia con 2 secondi diintervallo Blinking with 2 sec interval
Ricarica Charging
Verde Green
Acceso Light up
Ricarica completata (Quando si stacca il cavo LED spento) Charge completed (LED off when cable away)
Rosso Red
Acceso e fisso Light up continously
Posizionamento Positioning
Led Power/GPS Acquisition LED (Rosso/Verde) Power/GPS Acquisition LED (Red/Green combined)
Rosso Red
Lampeggia 1pulsaz/ 3sec Blink in 1pulse/ 3secs
Posizionamento fisso Position fixed
3) Acceso/Spento: - Power ON/OFF Premere l’interruttore “Power” per 1~2 secondi per accendere/spegnere l’apparecchio. Push button 1~2 seconds. Per l’installazione del Ricevitore GPS Bluetooth su Pc o su PDA e per ulteriori informazioni di utilizzo, prego utilizzare il manuale che troverete nel CD. Setup con il PC: Configuration Setup with PC connection: 1) Selezionare il PC tramite interfaccia Bluetooth. 1) First, select a PC with Bluetooth interface. Or you can purchase Bluetooth adapter for your PC. Please contact with your PC’s sales about this.
7
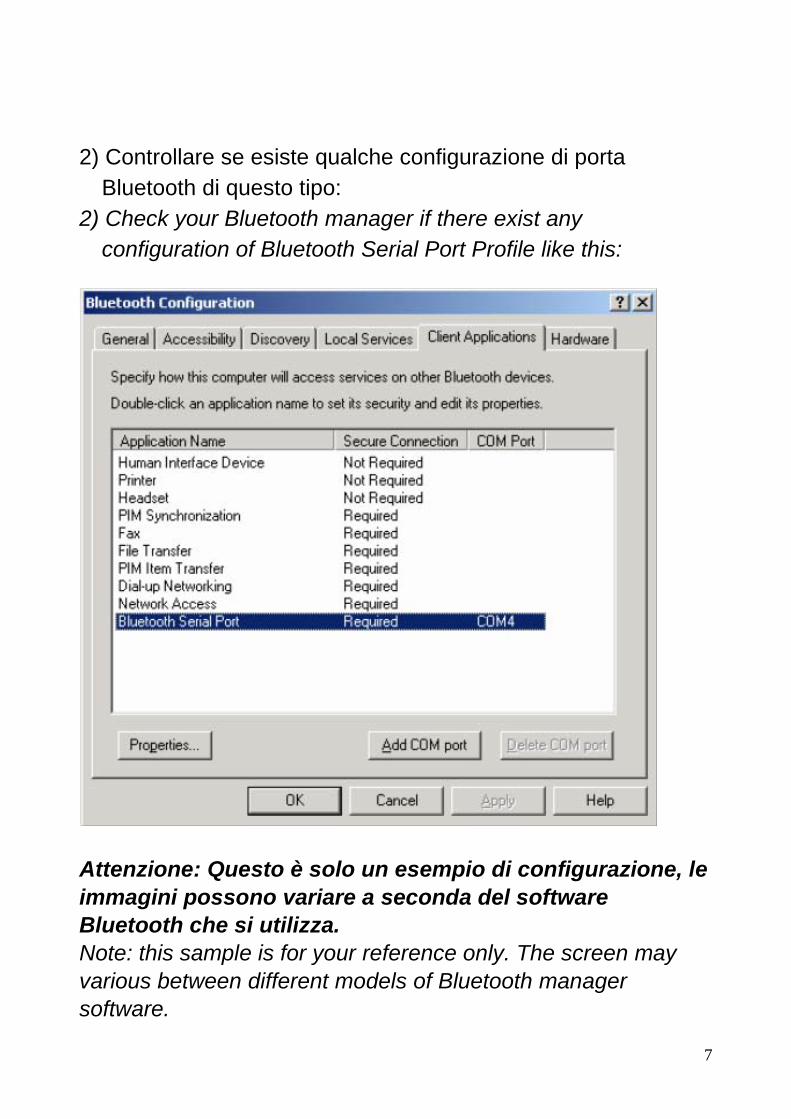
2) Controllare se esiste qualche configurazione di porta Bluetooth di questo tipo: 2) Check your Bluetooth manager if there exist any configuration of Bluetooth Serial Port Profile like this:
Attenzione: Questo è solo un esempio di configurazione, le immagini possono variare a seconda del software Bluetooth che si utilizza. Note: this sample is for your reference only. The screen may various between different models of Bluetooth manager software.

8
3) Se non si trova, creare una porta seriale Bluetooth. La configurazione dovrebbe essere fatta in questo modo: 3) If not found, please create a Bluetooth serial port by yourself. The configuration should be like this:
4) Accendere il GPS Bluetooth Hamlet, se la batteria è stata caricata correttamente, dovreste vedere 2 spie illuminate: la blu lampeggia 3 volte/sec, significa che il sistema Bluetooth è attivo e in attesa di collegamento. La spia rossa lampeggia e questo indica che il modulo GPS è partito e sta acquisendo le informazioni sulla posizione. 4) Power on your Solar Bluetooth GPS Receiver . If the battery is ready, you should see 2 LED light up: the blue LED blink 3 times/sec means Bluetooth is activated and waiting for connection. Another static red LED shows the GPS module is started and is inquiring position information. 5) Aprire la finestra “Bluetooth places”; non si vede niente la prima volta che si utilizza il navigatore solare. 5) Open your Bluetooth places; you should see nothing while using firstly.

9
6) Cliccare su “View devices in range” e apparirà l’icona della figura seguente: 6) Click the [View devices in range] and you should find a [Bluetooth GPS] show as below:
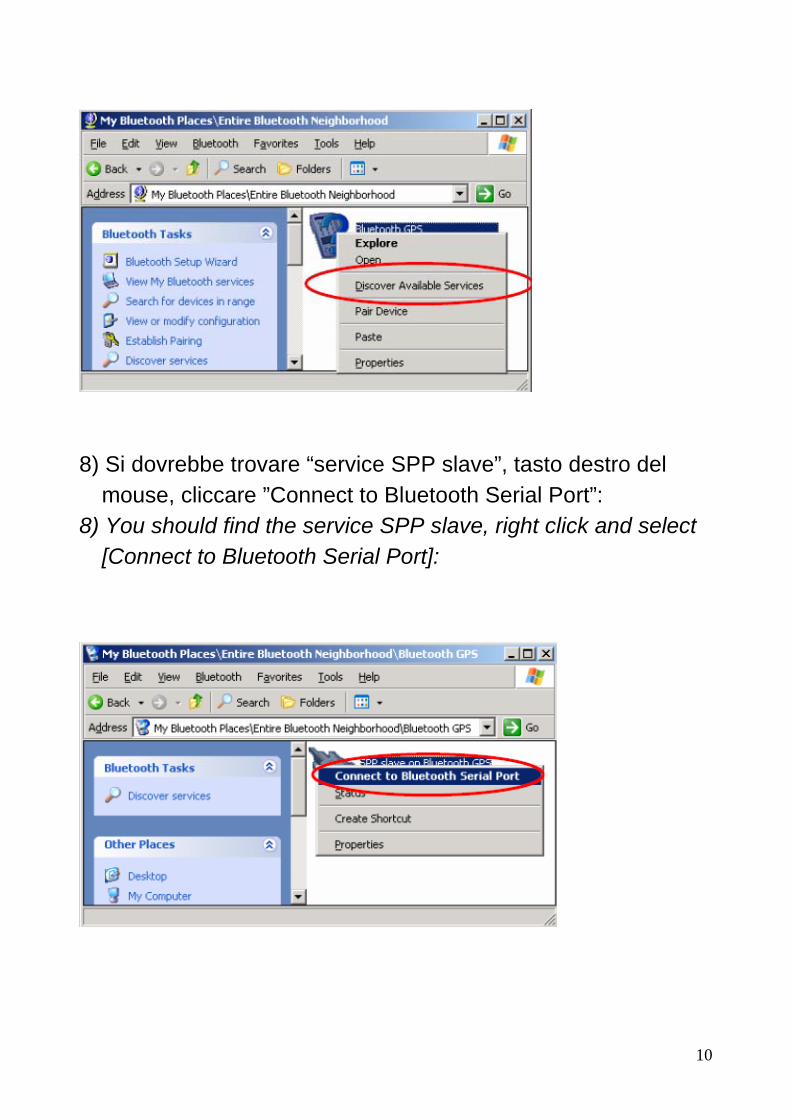
7) Tasto destro sull’icona, selezionare “Discover Available Services” 7) Right click on the icon, select the [Discover Available Services]:
10
8) Si dovrebbe trovare “service SPP slave”, tasto destro del mouse, cliccare ”Connect to Bluetooth Serial Port”: 8) You should find the service SPP slave, right click and select [Connect to Bluetooth Serial Port]: