Gabbia? No Problem! - faidate.myblog.itfaidate.myblog.it/files/Gabbia-_No_Problem.pdf · Troverete...
34
Gabbia? No Problem! Guida per Sprovveduti e non
-
Upload
truongnguyet -
Category
Documents
-
view
220 -
download
2
Transcript of Gabbia? No Problem! - faidate.myblog.itfaidate.myblog.it/files/Gabbia-_No_Problem.pdf · Troverete...
Gabbia? No
Problem!Guida per
Sprovveduti e non
Copyright (c) 2008 Haides.
è garantito il permesso di copiare, distribuire e/o
modificare questo documento seguendo i termini della
Licenza per Documentazione Libera GNU, Versione 1.2 o
ogni versionesuccessiva pubblicata dalla Free
Software Foundation; con Sezioni Non Modificabili
(Licenza; Copertina;), Testo Copertina non
modificabile, nessun Testo di Retro Copertina. Una
copia della licenza è acclusa nella sezione
intitolata "Licenza per Documentazione Libera GNU".

Intro
Ho deciso di scrivere questa guida per colmare una vera lacuna del web. Prima di costruire la mia prima gabbia ho cercato a lungo sul web senza trovare buoni spunti. Qualche pagina dedicata all'argomento esiste, ma è molto spoglia e per lo più contiene solo qualche spunto. Come se non bastasse alcune di queste pagine riportano idee poco interessanti che poco si adattano alle esigenze personali di ognuno di noi.
Premetto che la gabbia che andremo a realizzare ospiterà uno scoiattolo tamia, ma l'idea è riutilizzabile per molti animali. Le dimensioni sono 1m x 0,5m x 1m, ma si possono modificare facilmente una volta capito il meccanismo.
Il tempo di realizzazione è di circa una giornata, ma si riduce notevolmente, anche della metà, se siete dotati di una buona sparapunti, magari ad aria compressa. Insomma una sparapunti che faccia entrare completamente la graffetta senza la necessità di ripassarla con il martello
Motivazioni
I motivi che possono spingere a costruire da se la propria gabbia sono molteplici,ma tra questi, sicuramente, quelli di maggior rilievo sono tre:
✔ Le gabbie commerciali non si adattano alle proprie esigenze
✔ Motivi economici, le gabbie commerciali hanno un costo spropositato
✔ Il piacere indiscusso di creare con le proprie mani!
Se vi riconoscete in almeno uno dei motivi sopracitati allora questa è la guida che fa per voi. Scommetto che vi state chiedendo se economicamente il gioco vale la candela. Troverete alla fine della guida una dettagliata descrizione dei costi, vi anticipo fin d'ora che il risparmio varia dal 50% al 70%. Più è grande la gabbia più si risparmia.

Utensili
Gli utensili che servono alla realizzazione della gabbia sono:
Martello da 200 g
Spara punti da 8mm/ 10 mm
Pinza
Cacciavite a croce ( americano)
Tronchesina/ Tronchessa/ Tenaglia/ Forbice per il filo di ferro
Pinza
Matita
Metro
Opzionali:
➢ Martello da 100 g ( Opzionale)
➢ Trapano manuale con punta da 2/2,5 mm
➢ Seghetto per il legno
Il martello da 100g è molto utile per le rifiniture, ad esempio per fissare la rete agli angoli. Il trapano manuale verrà utilizzato per effettuare il preforo, ma utilizzando viti autofilettanti il suo impiego è opzionale.

Materiale
Vediamo cosa serve per realizzare il progetto, il simbolo # indica il numero di pezzi:
#16 listelli di abete piallato 2cm x 2cm x 1m
#12 listelli di abete piallato 2cm x 2cm x 50 cm
#28 (4 a telaio) Piastre rinforzo squadra (staffe a L) di 3cm x 3cm
#14 Staffa a L ad angolo retto di 4cm x 4cm
# 4 Cerniere 4cm x 2cm
# 4 Chiusini a leva con porta lucchetto da 5,2 cm
#4m di rete elettrosaldata di 1m x 1m con maglie alveolari da 1,3 cm
Punti da 0,7mm x 8 mm (per la sparapunti)
Viti autofilettanti per il legno (le dimensioni devono adattarsi alle staffe)
I listelli sono di abete piallato di sezione 2x2 cm, ma si possono utilizzare anche listelli di altro tipo di legno, l'importante è che sia idoneo al fissaggio di viti e chiodi. Sconsiglio il legno grezzo, costa di meno, ma è facile scheggiarsi, sia per l'uomo che per l'animale.
Utilizzando dei listelli così sottili è facile spaccarli con l'inserimento di chiodi, quindi li sconsiglio a favore delle viti. Scegliete rigorosamente viti autofilettanti, altrimenti dovrete necessariamente praticare un preforo con un trapano.
La rete deve essere elettrosaldata con maglie non superiori ad 1,5 cm, potrete optare per maglie quadrate o rettangolari. Io ho scelto le maglie alveolari perché il costo al metro è praticamente dimezzato.
La scelta delle staffe e delle cerniere non sarà difficile, basterà scegliere dei pezzi che sia adattino ai listelli, quindi con una larghezza non superiore ai 2 cm.
Ho utilizzato dei punti da 0,7x8 mm perché sono in dotazione alla mia spara punti, ma potete adottare anche punti da 1 cm.
Opzionalmente per rifinire la gabbia potrete adottare i seguenti materiali:
➢ #2 Pannelli di Polionda da 05m x 1m
➢ #1 Pannello di Plexiglass da 0,5m x 1m
➢ Fascette in plastica autoregolanti (fascette da elettricista)
Con questi materiali potrete creare ripiani, cornici, etc... che oltre ad abbellire la gabbia le daranno anche un tocco di colore.
Il pannello di plexiglass può essere sostituito da un terzo pannello di polionda, più modellabile ed economico.
Il numero di viti, punti e fascette da acquistare è arbitrario, in quanto varia di gabbia in gabbia, anche se delle stesse dimensioni. Un calcolo approssimativo potrebbe essere #100 fascette, #100 viti, #Punti a iosa. Spesso questi articoli non sono venduti singolarmente, ma in generose confezioni, quindi il numero di pezzi non dovrebbe essere un problema.
Tutti questi materiali sono facilmente reperibili in un qualunque centro per il “Fai da te”, ad un costo accessibile a chiunque. Una buona immagine chiarirà ogni perplessità.
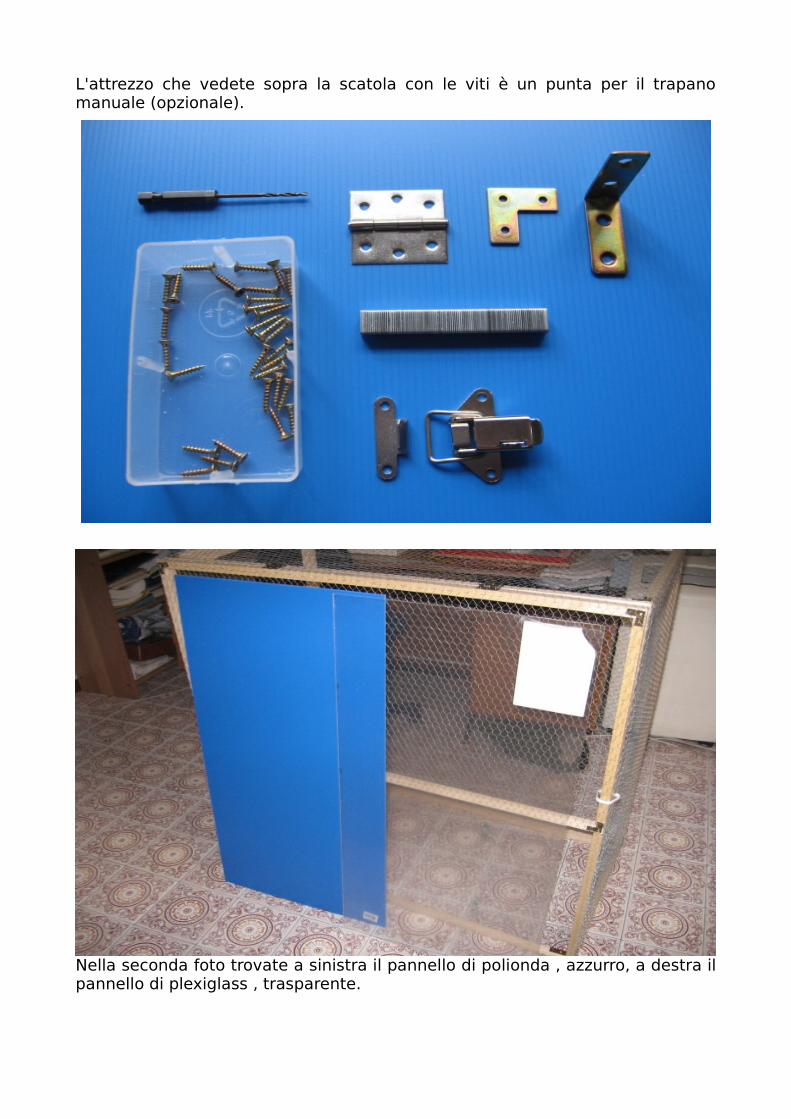
L'attrezzo che vedete sopra la scatola con le viti è un punta per il trapano manuale (opzionale).
Nella seconda foto trovate a sinistra il pannello di polionda , azzurro, a destra il pannello di plexiglass , trasparente.
Costruzione
L'idea base è di costruire la gabbia in moduli, quindi in vari pannelli che poi andranno assemblati. Ogni pannello forma un lato della gabbia. Questa idea è tanto semplice quanto brillante, perché permette di ottenere sottili rifiniture, elasticità, ma sopratutto facilita moltissimo la costruzione rendendola alla portata di chiunque persino chi non ha nessuna esperienza.
Per prima cosa procuratevi un buon banco da lavoro come una scrivania o un tavolo, se temete di rovinarla ricopritela con una cerata o del cartone.
Adesso fermiamoci un attimo a riflettere, consiglio a tutti di prendere carta e matita e di fare qualche schizzo. La gabbia avrà la forma di un parallelepipedo di dimensioni 1m (lunghezza) x 0,5 m (larghezza) x 1m (altezza). Servirà un pannello per lato ed uno per ogni sportello, per un totale di sette pannelli. Sono veramente stressato dalle aperture striminzite che le aziende montano sulle gabbie, quindi ho pensato a due grandi aperture frontali con movimento verticale. Gli sportelli sono della stessa larghezza della gabbia, uno si apre verso l'alto e l'altro verso il basso. Quando entrambi gli sportelli sono aperti è come se la gabbia fosse senza pannello frontale. Questa caratteristica è fondamentale in una gabbia così grande, vi permetterà di allestirla e pulirla, dandovi un accesso completo ad ogni angolo. Se avete paura che il vostro animale scappi vi consiglio di non rinunciare a questi pannelli, ma di dotarli di sotto sportelli più piccoli in modo da cambiare acqua e cibo senza timori di fughe improvvise. Queste aperture permetteranno di lavorare con le mani all'interno della gabbia, saranno utilissime per cambiare o modificare l'allestimento nel tempo.
Avremo un pannello di dimensioni 1m x 1m e ben sei pannelli da 1m x 0,5m. Queste dimensioni sono teoriche, adesso facciamo i conti con la realtà. Bisogna considerare che i listelli hanno uno spessore, in questo caso 2 cm. Supponiamo di inserire i listelli più corti all'interno di quelli lunghi, così facendo atterremo una lunghezza di 1m ed una larghezza di 54 cm perché i due listelli esterni hanno uno spessore di 2 cm ciascuno. Altro problema è che i listelli vengono venduti in pezzi da uno, due o tre metri di lunghezza che andranno tagliati in base alle nostre esigenze. Vi consiglio di chiedere il taglio in negozio, risparmierete molto tempo e otterrete un taglio molto più preciso di quello manuale, inoltre questo servizio è gratuito in molti negozi. Dovrete solo fare attenzione a farvi fare listelli di uguale misura, so che sembra banale, ma tagliando un listello da 2 m in quattro pezzi non otterrete quattro listelli da 50cm perché l'ultimo sarà più corto di pochi millimetri.
Per ovviare al problema scegliete una misura di poco inferiore a 50cm, ad esempio 49cm o 49,5cm, così facendo potremo ottenere quattro pezzi di uguale misura. Se avete qualche dubbio consultatevi con l'impiegato del negozio, basterà dirgli di dividere il listello in parti uguali. Un'immagine dovrebbe chiarire ogni perplessità.
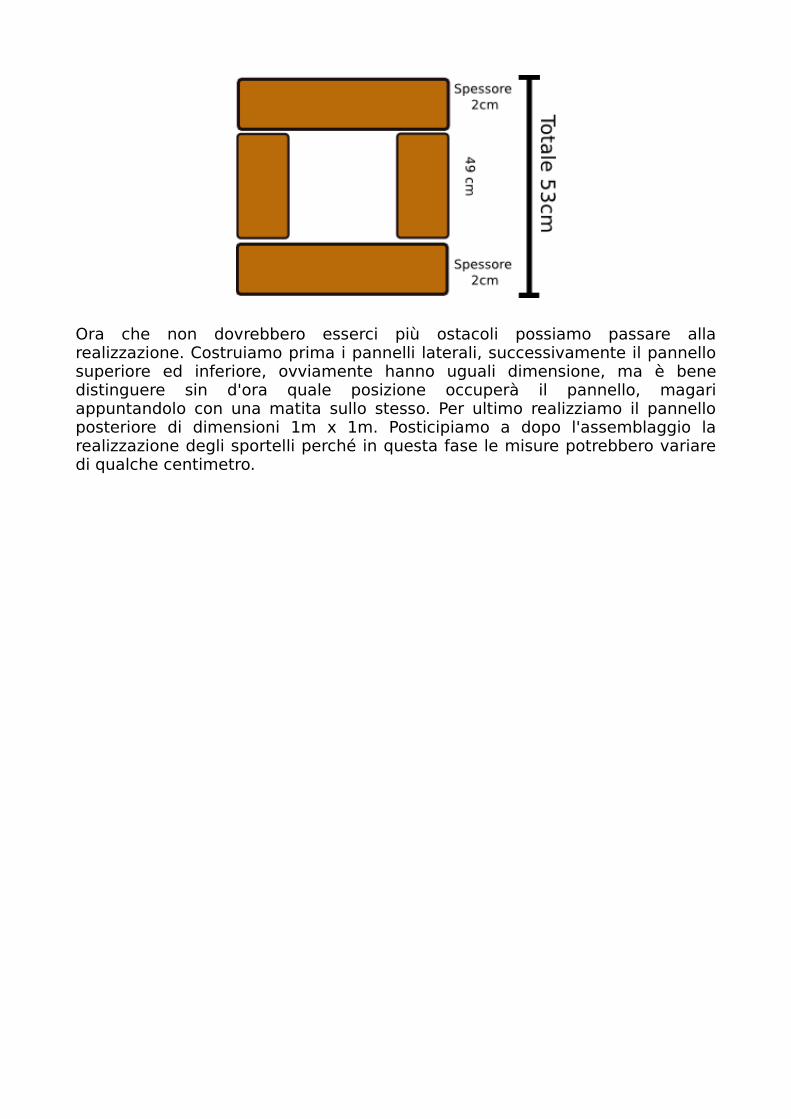
Ora che non dovrebbero esserci più ostacoli possiamo passare alla realizzazione. Costruiamo prima i pannelli laterali, successivamente il pannello superiore ed inferiore, ovviamente hanno uguali dimensione, ma è bene distinguere sin d'ora quale posizione occuperà il pannello, magari appuntandolo con una matita sullo stesso. Per ultimo realizziamo il pannello posteriore di dimensioni 1m x 1m. Posticipiamo a dopo l'assemblaggio la realizzazione degli sportelli perché in questa fase le misure potrebbero variare di qualche centimetro.

Pannelli
Procediamo al montaggio dei pannelli. Poggiamo sul tavolo i listelli accostandoli per dare la forma al pannello. Scegliamo una convenzione per decidere quale listello va inserito all'interno, io ho scelto il più corto.
Fissiamo i due listelli con la staffa ad L, osservate il piccolo preforo sul listello superiore servirà a dare la direzione alla vite.
Prima di forare posizionate bene la staffa sui due listelli e marcate il
punto con la matita!
Due viti sono più che sufficienti.

Ecco i listelli assemblati
Adesso fissiamo la rete. Questo tipo di rete viene venduta in rotoli, sia che la compriate al metro, sia che la compriate in confezione. Per togliere la piega acquistata durante il confezionamento vi consiglio di arrotolarla di traverso e in senso opposto al vizio della rete. Per tagliare il pezzo di rete che vi serve non affidatevi al metro, usate direttamente il pannello. Accertatevi di lasciare una o due maglie in più in modo che la rete copra bene il listello. Fissiamo la rete dallo stesso lato delle staffe ad L dedicando particolare cura agli angoli.

A destra potete osservare l'effetto devastante di un chiodo a U, l'unico di tutta la struttura. A sinistra si può osservare l'effetto molto meno invasivo della sparapunti, notate anche com'è possibile rifinire gli angoli con questo semplice attrezzo. Se come me non avete una spara punti professionale dovrete ripassare le graffette con un martello per farle entrare del tutto, ma l'effetto sarà ottimo. Il martello più piccolo sarà molto utile per rifinire gli angoli. La rete va graffettata da un lato e poi ben tirata dal lato opposto in modo da essere tesa, ma senza esagerare. Sparate i punti a maglie alterne.
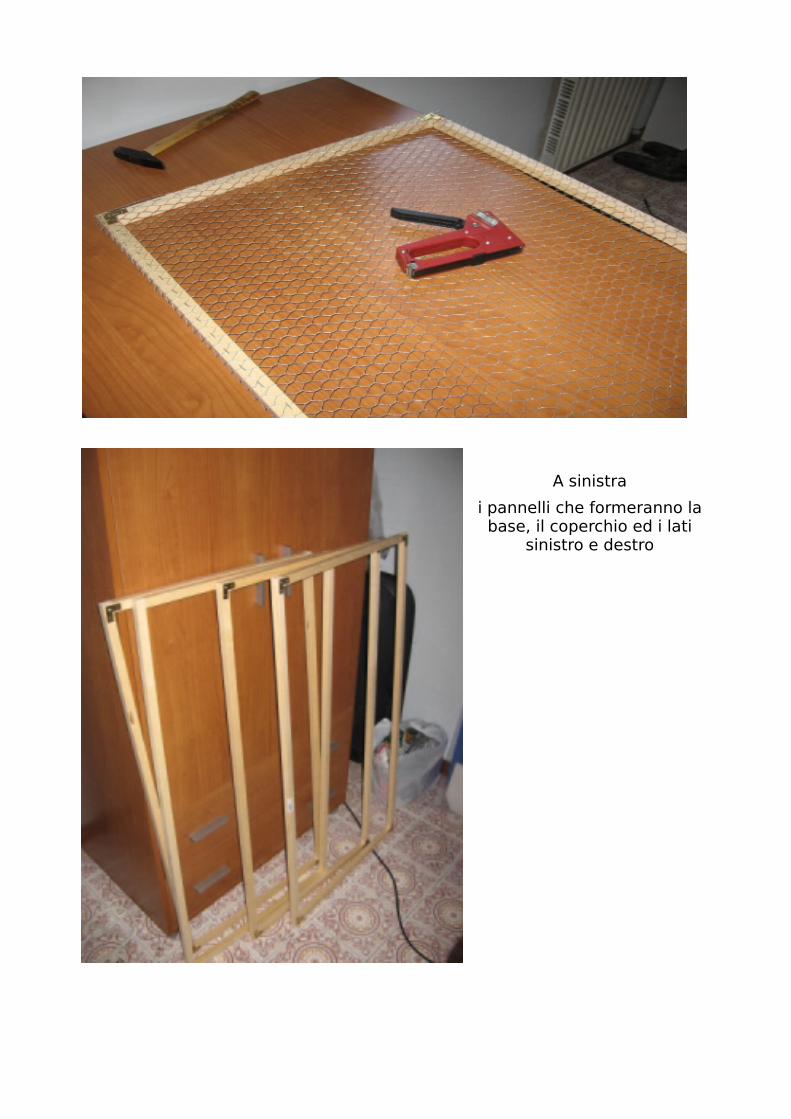
A sinistra
i pannelli che formeranno la base, il coperchio ed i lati
sinistro e destro

Il pannello che formerà il retro
della gabbia
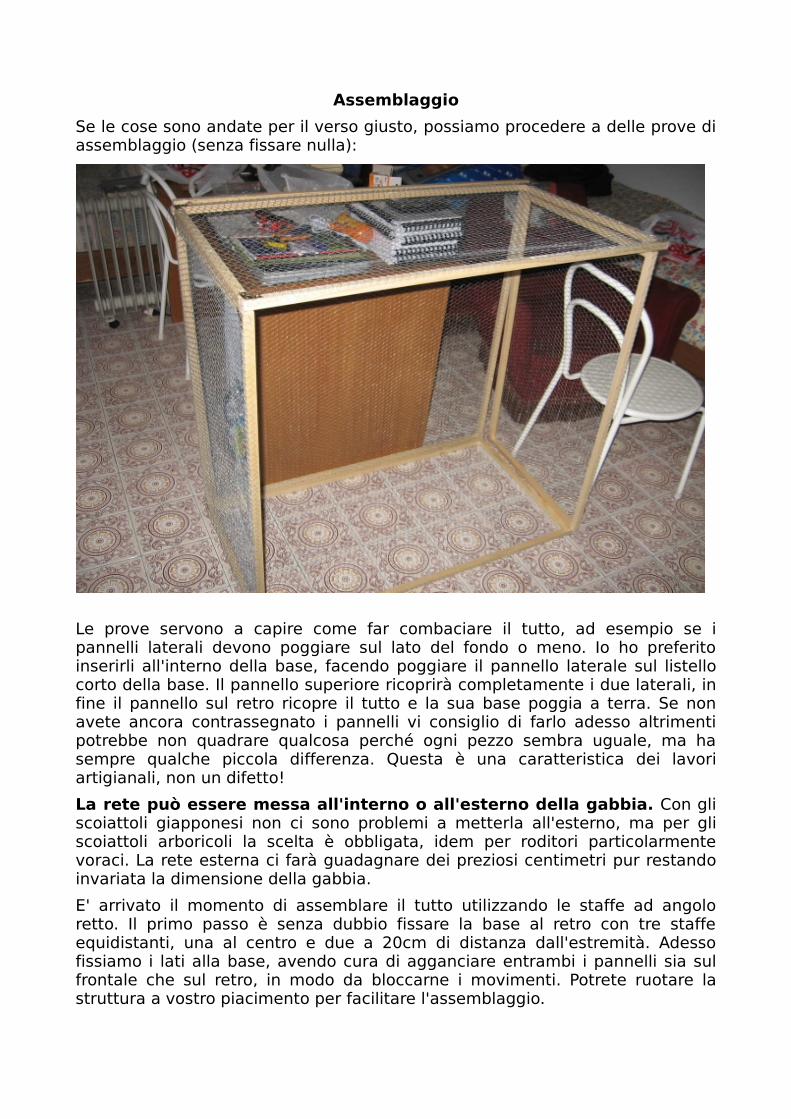
Assemblaggio
Se le cose sono andate per il verso giusto, possiamo procedere a delle prove di assemblaggio (senza fissare nulla):
Le prove servono a capire come far combaciare il tutto, ad esempio se i pannelli laterali devono poggiare sul lato del fondo o meno. Io ho preferito inserirli all'interno della base, facendo poggiare il pannello laterale sul listello corto della base. Il pannello superiore ricoprirà completamente i due laterali, in fine il pannello sul retro ricopre il tutto e la sua base poggia a terra. Se non avete ancora contrassegnato i pannelli vi consiglio di farlo adesso altrimenti potrebbe non quadrare qualcosa perché ogni pezzo sembra uguale, ma ha sempre qualche piccola differenza. Questa è una caratteristica dei lavori artigianali, non un difetto!
La rete può essere messa all'interno o all'esterno della gabbia. Con gli scoiattoli giapponesi non ci sono problemi a metterla all'esterno, ma per gli scoiattoli arboricoli la scelta è obbligata, idem per roditori particolarmente voraci. La rete esterna ci farà guadagnare dei preziosi centimetri pur restando invariata la dimensione della gabbia.
E' arrivato il momento di assemblare il tutto utilizzando le staffe ad angolo retto. Il primo passo è senza dubbio fissare la base al retro con tre staffe equidistanti, una al centro e due a 20cm di distanza dall'estremità. Adesso fissiamo i lati alla base, avendo cura di agganciare entrambi i pannelli sia sul frontale che sul retro, in modo da bloccarne i movimenti. Potrete ruotare la struttura a vostro piacimento per facilitare l'assemblaggio.
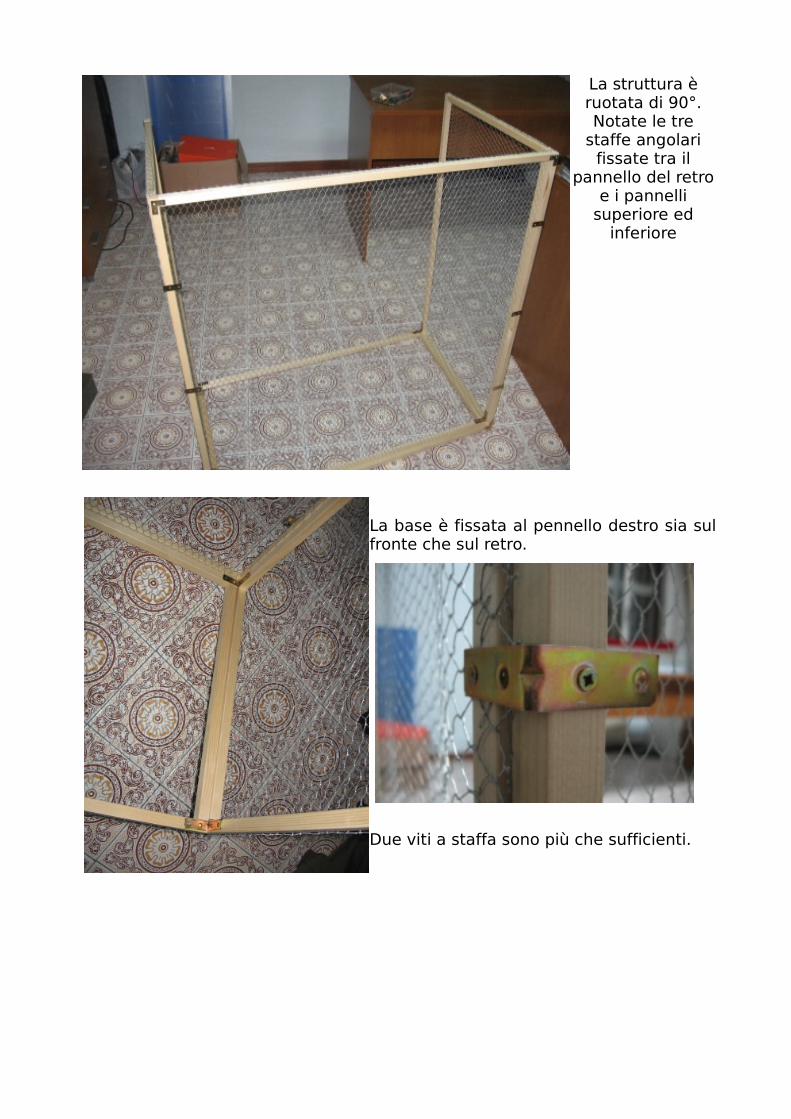
La struttura è ruotata di 90°. Notate le tre
staffe angolari fissate tra il
pannello del retro e i pannelli
superiore ed inferiore
La base è fissata al pennello destro sia sul fronte che sul retro.
Due viti a staffa sono più che sufficienti.

Poco per volta la gabbia prende forma.
Adesso è il momento di controllare le misure e di procedere alla costruzione degli sportelli. Il problema nasce dal fatto che la larghezza totale del pannello è di 53cm e non 50cm, mentre la gabbia è alta un metro. Ormai è chiaro che la ragione di questa incongruenza è lo spessore dei listelli. Se non si vuole accorciare tutti e quattro i listelli da 49 cm si può optare per accorciarne solo due, realizzando uno portello leggermente più grande dell'altro. Ad occhio la differenza sarà quasi impercettibile. Anche qui consiglio di fare prima uno sportello e montarlo, solo dopo procederemo con l'altro. Smontare la rete con tutti quei punti richiede ancora più tempo del fissaggio! Procediamo all'assemblaggio dello sportello tramite le due cerniere, equidistanti, a 20cm dalle estremità.
Attenzione al verso della cerniera, il perno va rivolto
all'esterno e centrato a cavallo del piccolo spazio,
che avremo cura di lasciare, tra lo sportello e
la gabbia
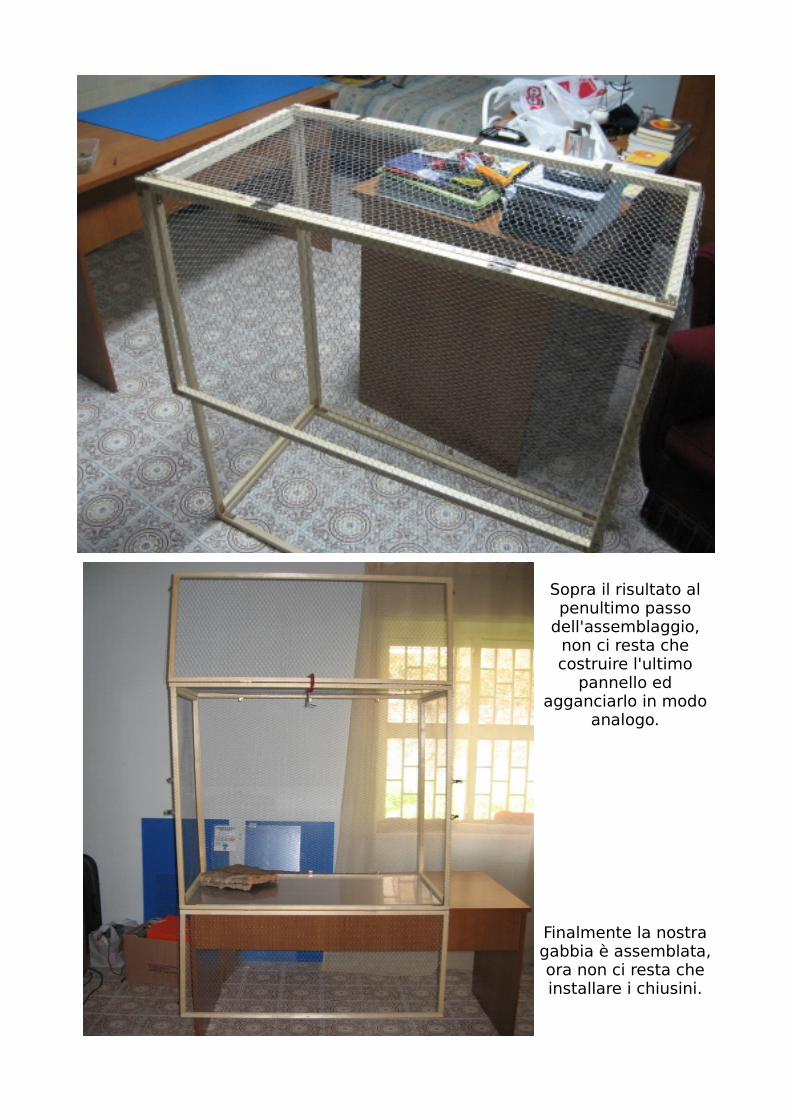
Sopra il risultato al penultimo passo
dell'assemblaggio, non ci resta che costruire l'ultimo
pannello ed agganciarlo in modo
analogo.
Finalmente la nostra gabbia è assemblata, ora non ci resta che installare i chiusini.
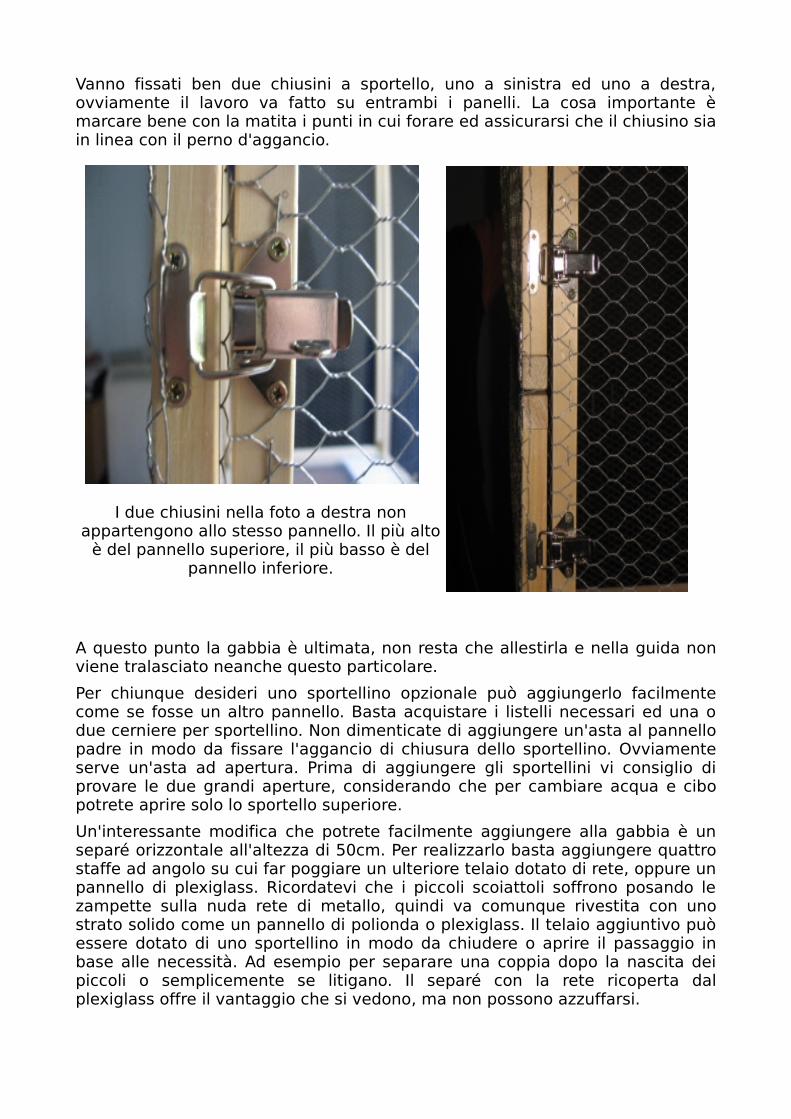
Vanno fissati ben due chiusini a sportello, uno a sinistra ed uno a destra, ovviamente il lavoro va fatto su entrambi i panelli. La cosa importante è marcare bene con la matita i punti in cui forare ed assicurarsi che il chiusino sia in linea con il perno d'aggancio.
I due chiusini nella foto a destra non appartengono allo stesso pannello. Il più alto
è del pannello superiore, il più basso è del pannello inferiore.
A questo punto la gabbia è ultimata, non resta che allestirla e nella guida non viene tralasciato neanche questo particolare.
Per chiunque desideri uno sportellino opzionale può aggiungerlo facilmente come se fosse un altro pannello. Basta acquistare i listelli necessari ed una o due cerniere per sportellino. Non dimenticate di aggiungere un'asta al pannello padre in modo da fissare l'aggancio di chiusura dello sportellino. Ovviamente serve un'asta ad apertura. Prima di aggiungere gli sportellini vi consiglio di provare le due grandi aperture, considerando che per cambiare acqua e cibo potrete aprire solo lo sportello superiore.
Un'interessante modifica che potrete facilmente aggiungere alla gabbia è un separé orizzontale all'altezza di 50cm. Per realizzarlo basta aggiungere quattro staffe ad angolo su cui far poggiare un ulteriore telaio dotato di rete, oppure un pannello di plexiglass. Ricordatevi che i piccoli scoiattoli soffrono posando le zampette sulla nuda rete di metallo, quindi va comunque rivestita con uno strato solido come un pannello di polionda o plexiglass. Il telaio aggiuntivo può essere dotato di uno sportellino in modo da chiudere o aprire il passaggio in base alle necessità. Ad esempio per separare una coppia dopo la nascita dei piccoli o semplicemente se litigano. Il separé con la rete ricoperta dal plexiglass offre il vantaggio che si vedono, ma non possono azzuffarsi.

Allestimento
Non ci resta che abbellire la gabbia per renderla confortevole ospitale.
Posizioniamo sul fondo il pannello di plexiglass, per tagliare l'eventuale eccedenza dotatevi di riga e cutter, saranno necessarie più passate di cutter, ma non scoraggiatevi. Quando riconoscerete che il solco è abbastanza profondo girate il pannello al contrario e intaccatelo anche da questo lato. Appena il solco sarà apprezzabile date un bel colpo secco, anche se il pannello non avrà più un lato liscio e levigato come prima non preoccupatevi perché non sarà tagliente o appuntito. In alternativa chiedete al centro per il “fai da te” per il taglio, oppure utilizzate il polionda che si taglierà con una o due passate di cutter proprio come il cartone.
Tagliamo tre strisce da 10cm da un pannello di polionda con una forbice, serviranno a fare una bella cornice alla gabbia. Avrà una funzione estetica e farà da bordo per evitare fuoriuscite della lettiera. Una delle tre strisce va divisa ulteriormente a metà per coprire i lati corti. Fissiamo le strisce con delle fascette autoregolanti da elettricista. Per forare il polionda possiamo usare il trapano manuale oppure l'attrezzo per forare i fogli di carta in modo da inserirli nei raccoglitori ad anelli. L'altro foglio di polionda va diviso a metà in modo da formare due quadrati da 50cm x 50cm. A questo punto tagliamo ogni quadrato sulla diagonale, in modo da formare due triangoli. Otterremo delle pratiche e colorate mensole. Ogni mensola andrà ritagliata con cura sull'angolo da 90°, in modo da aderire bene al listello verticale. Come al solito qualche immagine chiarirà il tutto.
Notate i tre fori per lato e il ritaglio sull'angola retto

Un ingrandimento dell'angolo, notate come
il listello trovi alloggio all'interno della mensola.
La cornice fatta con le strisce da 10cm di polionda. La fascetta entra da un buco ed esce dall'altro fino a rientrare nell'apposito anello di bloccaggio.

Adesso manca solo qualche ramo ed il gioco è fatto.
Per le ciotole del cibo e per la lettiera consiglio di acquistare nei centri per il fai da te dei simpatici contenitori vengono normalmente utilizzati per bulloni, viti, guarnizioni ed altri piccoli oggetti.
Nonostante non traspara dalla foto la ciotola rossa è sia grande che alta circa la metà della ciotola verde.
La ciotola rossa l'ho utilizzata come mangiatoia, mentre la ciotola verde come lettiera, si intuisce facilmente dal pellet.
L'unica cosa che manca è un beverino a sfera che potrete trovare in un qualsiasi negozio di animali o negli ipermercati più forniti.
Ricopriamo il fondo della gabbia (il pannello di plexiglass) con qualche foglio di giornale, in modo da foderare il fondo. Adesso spargiamo sul fondo abbondante

paglia e pezzetti di fogli di giornale. Questo strato di paglia e carta deve avere un spessore apprezzabile perché i tamia adorano scavare delle gallerie dove scorrazzare.
Non ci resta che aggiungere qualche ramo ed abbiamo veramente finito. Vanno bene quasi tutti i tipi di legno l'importante è che non siano stati trattati con prodotti chimici e che non si trovino a contatto con strade e smog. Il legno è un materiale poroso che si riempie di piombo lungo le strade!
Per il nido o tana consiglio di farselo da sé, ormai siamo diventati bravi, no? Non risparmiate troppo sulle dimensioni, almeno 25cm x 20cm x 15cm (h) con ingresso dall'alto e non dimenticate di fare un lato apribile per poterlo pulire ogni tre/quattro mesi. In alternativa potrete utilizzare una buona casetta per uccelli, ma attenzione alle dimensioni.
Finalmente è finita!
I rami che vedete sono d'ulivo. Per
fissarli ho utilizzato le solite fascette.
Come extra sono stati aggiunti la
ruota e la “ruota di sale”, un integratore di sali minerali. Lo
potete notare a sinistra poco sopra la prima mensola.
I due pezzi di sughero sono messi come decorazione, la mia scoiattolina
.ne va pazza.
Se volete potete aggiungere un paio
di pigne.
Economia
La gabbia è venuta veramente bene è molto bella e spaziosa, ma conviene?
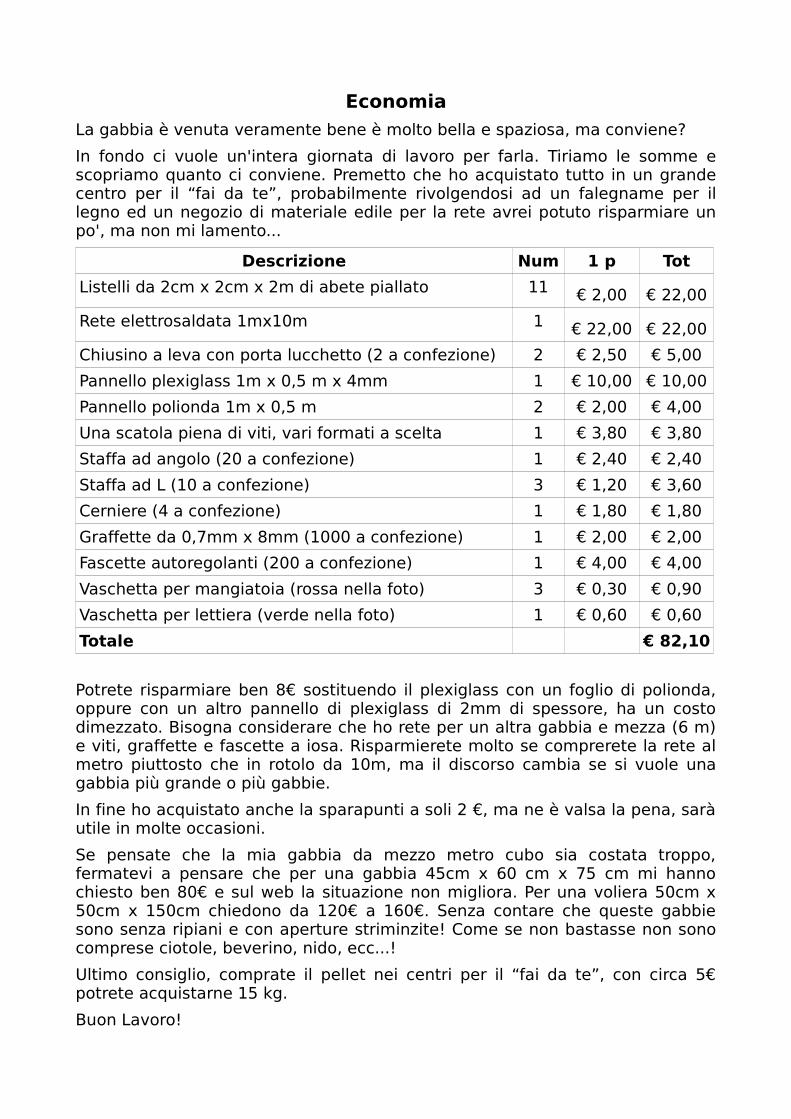
In fondo ci vuole un'intera giornata di lavoro per farla. Tiriamo le somme e scopriamo quanto ci conviene. Premetto che ho acquistato tutto in un grande centro per il “fai da te”, probabilmente rivolgendosi ad un falegname per il legno ed un negozio di materiale edile per la rete avrei potuto risparmiare un po', ma non mi lamento...
Descrizione Num 1 p Tot
Listelli da 2cm x 2cm x 2m di abete piallato 11 € 2,00 € 22,00
Rete elettrosaldata 1mx10m 1 € 22,00 € 22,00
Chiusino a leva con porta lucchetto (2 a confezione) 2 € 2,50 € 5,00
Pannello plexiglass 1m x 0,5 m x 4mm 1 € 10,00 € 10,00
Pannello polionda 1m x 0,5 m 2 € 2,00 € 4,00
Una scatola piena di viti, vari formati a scelta 1 € 3,80 € 3,80
Staffa ad angolo (20 a confezione) 1 € 2,40 € 2,40
Staffa ad L (10 a confezione) 3 € 1,20 € 3,60
Cerniere (4 a confezione) 1 € 1,80 € 1,80
Graffette da 0,7mm x 8mm (1000 a confezione) 1 € 2,00 € 2,00
Fascette autoregolanti (200 a confezione) 1 € 4,00 € 4,00
Vaschetta per mangiatoia (rossa nella foto) 3 € 0,30 € 0,90
Vaschetta per lettiera (verde nella foto) 1 € 0,60 € 0,60
Totale € 82,10
Potrete risparmiare ben 8€ sostituendo il plexiglass con un foglio di polionda, oppure con un altro pannello di plexiglass di 2mm di spessore, ha un costo dimezzato. Bisogna considerare che ho rete per un altra gabbia e mezza (6 m) e viti, graffette e fascette a iosa. Risparmierete molto se comprerete la rete al metro piuttosto che in rotolo da 10m, ma il discorso cambia se si vuole una gabbia più grande o più gabbie.
In fine ho acquistato anche la sparapunti a soli 2 €, ma ne è valsa la pena, sarà utile in molte occasioni.
Se pensate che la mia gabbia da mezzo metro cubo sia costata troppo, fermatevi a pensare che per una gabbia 45cm x 60 cm x 75 cm mi hanno chiesto ben 80€ e sul web la situazione non migliora. Per una voliera 50cm x 50cm x 150cm chiedono da 120€ a 160€. Senza contare che queste gabbie sono senza ripiani e con aperture striminzite! Come se non bastasse non sono comprese ciotole, beverino, nido, ecc...!
Ultimo consiglio, comprate il pellet nei centri per il “fai da te”, con circa 5€ potrete acquistarne 15 kg.
Buon Lavoro!
Licenza per Documentazione Libera GNU
GNU Free Documentation License Version 1.2, November 2002
Copyright (C) 2000,2001,2002 Free Software Foundation, Inc. 51 Franklin St, Fifth Floor, Boston, MA 021101301 USA Everyone is permitted to copy and distribute verbatim copies of this license document, but changing it is not allowed.
0. PREAMBLE
The purpose of this License is to make a manual, textbook, or otherfunctional and useful document "free" in the sense of freedom: toassure everyone the effective freedom to copy and redistribute it,with or without modifying it, either commercially or noncommercially.Secondarily, this License preserves for the author and publisher a wayto get credit for their work, while not being considered responsiblefor modifications made by others.
This License is a kind of "copyleft", which means that derivativeworks of the document must themselves be free in the same sense. Itcomplements the GNU General Public License, which is a copyleftlicense designed for free software.
We have designed this License in order to use it for manuals for freesoftware, because free software needs free documentation: a freeprogram should come with manuals providing the same freedoms that thesoftware does. But this License is not limited to software manuals;it can be used for any textual work, regardless of subject matter orwhether it is published as a printed book. We recommend this Licenseprincipally for works whose purpose is instruction or reference.
1. APPLICABILITY AND DEFINITIONS
This License applies to any manual or other work, in any medium, thatcontains a notice placed by the copyright holder saying it can bedistributed under the terms of this License. Such a notice grants aworldwide, royaltyfree license, unlimited in duration, to use thatwork under the conditions stated herein. The "Document", below,refers to any such manual or work. Any member of the public is alicensee, and is addressed as "you". You accept the license if youcopy, modify or distribute the work in a way requiring permissionunder copyright law.
A "Modified Version" of the Document means any work containing theDocument or a portion of it, either copied verbatim, or withmodifications and/or translated into another language.
A "Secondary Section" is a named appendix or a frontmatter section ofthe Document that deals exclusively with the relationship of thepublishers or authors of the Document to the Document's overall subject(or to related matters) and contains nothing that could fall directlywithin that overall subject. (Thus, if the Document is in part atextbook of mathematics, a Secondary Section may not explain anymathematics.) The relationship could be a matter of historicalistribute a

Modified Version of the Document underthe conditions of sections 2 and 3 above, provided that you releasethe Modified Version under precisely this License, with the ModifiedVersion filling the role of the Document, thus licensing distributionand modification of the Modified Version to whoever possesses a copyof it. In addition, you must do these things in the Modified Version:
A. Use in the Title Page (and on the covers, if any) a title distinct from that of the Document, and from those of previous versions (which should, if there were any, be listed in the History section of the Document). You may use the same title as a previous version if the original publisher of that version gives permission.B. List on the Title Page, as authors, one or more persons or entities responsible for authorship of the modifications in the Modified Version, together with at least five of the principal authors of the Document (all of its principal authors, if it has fewer than five), unless they release you from this requirement.C. State on the Title page the name of the publisher of the Modified Version, as the publisher.D. Preserve all the copyright notices of the Document.E. Add an appropriate copyright notice for your modifications adjacent to the other copyright notices.F. Include, immediately after the copyright notices, a license notice giving the public permission to use the Modified Version under the terms of this License, in the form shown in the Addendum below.G. Preserve in that license notice the full lists of Invariant Sections and required Cover Texts given in the Document's license notice.H. Include an unaltered copy of this License.I. Preserve the section Entitled "History", Preserve its Title, and add to it an item stating at least the title, year, new authors, and publisher of the Modified Version as given on the Title Page. If there is no section Entitled "History" in the Document, create one stating the title, year, authors, and publisher of the Document as given on its Title Page, then add an item describing the Modified Version as stated in the previous sentence.J. Preserve the network location, if any, given in the Document for public access to a Transparent copy of the Document, and likewise the network locations given in the Document for previous versions it was based on. These may be placed in the "History" section. You may omit a network location for a work that was published at least four years before the Document itself, or if the original publisher of the version it refers to gives permission.K. For any section Entitled "Acknowledgements" or "Dedications", Preserve the Title of the section, and preserve in the section all the substance and tone of each of the contributor acknowledgements and/or dedications given therein.L. Preserve all the Invariant Sections of the Document, unaltered in their text and in their titles. Section numbers or the equivalent are not considered part of the section titles.M. Delete any section Entitled "Endorsements". Such a section may not be included in the Modified Version.N. Do not retitle any existing section to be Entitled "Endorsements" or to conflict in title with any Invariant Section.O. Preserve any Warranty Disclaimers.
If the Modified Version includes new frontmatter sections orappendices that qualify as Secondary Sections and contain no materialcopied from the Document, you may at your option designate some or allof these sections as invariant. To do this, add their titles to thelist of Invariant Sections in the Modified Version's license notice.These titles must be distinct from any other section titles.

You may add a section Entitled "Endorsements", provided it containsnothing but endorsements of your Modified Version by variouspartiesfor example, statements of peer review or that the text hasbeen approved by an organization as the authoritative definition of astandard.
You may add a passage of up to five words as a FrontCover Text, and apassage of up to 25 words as a BackCover Text, to the end of the listof Cover Texts in the Modified Version. Only one passage ofFrontCover Text and one of BackCover Text may be added by (orthrough arrangements made by) any one entity. If the Document alreadyincludes a cover text for the same cover, previously added by you orby arrangement made by the same entity you are acting on behalf of,you may not add another; but you may replace the old one, on explicitpermission from the previous publisher that added the old one.
The author(s) and publisher(s) of the Document do not by this Licensegive permission to use their names for publicity for or to assert orimply endorsement of any Modified Version.
5. COMBINING DOCUMENTS
You may combine the Document with other documents released under thisLicense, under the terms defined in section 4 above for modifiedversions, provided that you include in the combination all of theInvariant Sections of all of the original documents, unmodified, andlist them all as Invariant Sections of your combined work in itslicense notice, and that you preserve all their Warranty Disclaimers.
The combined work need only contain one copy of this License, andmultiple identical Invariant Sections may be replaced with a singlecopy. If there are multiple Invariant Sections with the same name butdifferent contents, make the title of each such section unique byadding at the end of it, in parentheses, the name of the originalauthor or publisher of that section if known, or else a unique number.Make the same adjustment to the section titles in the list ofInvariant Sections in the license notice of the combined work.
In the combination, you must combine any sections Entitled "History"in the various original documents, forming one section Entitled"History"; likewise combine any sections Entitled "Acknowledgements",and any sections Entitled "Dedications". You must delete all sectionsEntitled "Endorsements".
6. COLLECTIONS OF DOCUMENTS
You may make a collection consisting of the Document and other documentsreleased under this License, and replace the individual copies of thisLicense in the various documents with a single copy that is included inthe collection, provided that you follow the rules of this License forverbatim copying of each of the documents in all other respects.
You may extract a single document from such a collection, and distributeit individually under this License, provided you insert a copy of thisLicense into the extracted document, and follow this License in allother respects regarding verbatim copying of that document.
7. AGGREGATION WITH INDEPENDENT WORKS
A compilation of the Document or its derivatives with other separateand independent documents or works, in or on a volume of a storage ordistribution medium, is called an "aggregate" if the copyrightresulting from the compilation is not used to limit the legal rightsof the compilation's users beyond what the individual works permit.When the Document is included in an aggregate, this License does notapply to the other works in the aggregate which are not themselvesderivative works of the Document.
If the Cover Text requirement of section 3 is applicable to thesecopies of the Document, then if the Document is less than one half ofthe entire aggregate, the Document's Cover Texts may be placed oncovers that bracket the Document within the aggregate, or theelectronic equivalent of covers if the Document is in electronic form.Otherwise they must appear on printed covers that bracket the wholeaggregate.
8. TRANSLATION
Translation is considered a kind of modification, so you maydistribute translations of the Document under the terms of section 4.Replacing Invariant Sections with translations requires specialpermission from their copyright holders, but you may includetranslations of some or all Invariant Sections in addition to theoriginal versions of these Invariant Sections. You may include atranslation of this License, and all the license notices in theDocument, and any Warranty Disclaimers, provided that you also includethe original English version of this License and the original versionsof those notices and disclaimers. In case of a disagreement betweenthe translation and the original version of this License or a noticeor disclaimer, the original version will prevail.
If a section in the Document is Entitled "Acknowledgements","Dedications", or "History", the requirement (section 4) to Preserveits Title (section 1) will typically require changing the actualtitle.
9. TERMINATION
You may not copy, modify, sublicense, or distribute the Document exceptas expressly provided for under this License. Any other attempt tocopy, modify, sublicense or distribute the Document is void, and willautomatically terminate your rights under this License. However,parties who have received copies, or rights, from you under thisLicense will not have their licenses terminated so long as suchparties remain in full compliance.
10. FUTURE REVISIONS OF THIS LICENSE
The Free Software Foundation may publish new, revised versionsof the GNU Free Documentation License from time to time. Such newversions will be similar in spirit to the present version, but maydiffer in detail to address new problems or concerns. Seehttp://www.gnu.org/copyleft/.
Each version of the License is given a distinguishing version number.If the Document specifies that a particular numbered version of thisLicense "or any later version" applies to it, you have the option offollowing the terms and conditions either of that specified version or

of any later version that has been published (not as a draft) by theFree Software Foundation. If the Document does not specify a versionnumber of this License, you may choose any version ever published (notas a draft) by the Free Software Foundation.
ADDENDUM: How to use this License for your documents
To use this License in a document you have written, include a copy ofthe License in the document and put the following copyright andlicense notices just after the title page:
Copyright (c) YEAR YOUR NAME. Permission is granted to copy, distribute and/or modify this document under the terms of the GNU Free Documentation License, Version 1.2 or any later version published by the Free Software Foundation; with no Invariant Sections, no FrontCover Texts, and no BackCover Texts. A copy of the license is included in the section entitled "GNU Free Documentation License".
If you have Invariant Sections, FrontCover Texts and BackCover Texts,replace the "with...Texts." line with this:
with the Invariant Sections being LIST THEIR TITLES, with the FrontCover Texts being LIST, and with the BackCover Texts being LIST.
If you have Invariant Sections without Cover Texts, or some othercombination of the three, merge those two alternatives to suit thesituation.
If your document contains nontrivial examples of program code, werecommend releasing these examples in parallel under your choice offree software license, such as the GNU General Public License,to permit their use in free software.
connection with the subject or with related matters, or of legal,commercial, philosophical, ethical or political position regardingthem.
The "Invariant Sections" are certain Secondary Sections whose titlesare designated, as being those of Invariant Sections, in the noticethat says that the Document is released under this License. If asection does not fit the above definition of Secondary then it is notallowed to be designated as Invariant. The Document may contain zeroInvariant Sections. If the Document does not identify any InvariantSections then there are none.
The "Cover Texts" are certain short passages of text that are listed,as FrontCover Texts or BackCover Texts, in the notice that says thatthe Document is released under this License. A FrontCover Text maybe at most 5 words, and a BackCover Text may be at most 25 words.
A "Transparent" copy of the Document means a machinereadable copy,represented in a format whose specification is available to thegeneral public, that is suitable for revising the documentstraightforwardly with generic text editors or (for images composed ofpixels) generic paint programs or (for drawings) some widely availabledrawing editor, and that is suitable for input to text formatters orfor automatic translation to a variety of formats suitable for inputto text formatters. A copy made in an otherwise Transparent fileformat whose markup, or absence of markup, has been arranged to thwartor discourage subsequent modification by readers is not Transparent.

An image format is not Transparent if used for any substantial amountof text. A copy that is not "Transparent" is called "Opaque".
Examples of suitable formats for Transparent copies include plainASCII without markup, Texinfo input format, LaTeX input format, SGMLor XML using a publicly available DTD, and standardconforming simpleHTML, PostScript or PDF designed for human modification. Examples oftransparent image formats include PNG, XCF and JPG. Opaque formatsinclude proprietary formats that can be read and edited only byproprietary word processors, SGML or XML for which the DTD and/orprocessing tools are not generally available, and themachinegenerated HTML, PostScript or PDF produced by some wordprocessors for output purposes only.
The "Title Page" means, for a printed book, the title page itself,plus such following pages as are needed to hold, legibly, the materialthis License requires to appear in the title page. For works informats which do not have any title page as such, "Title Page" meansthe text near the most prominent appearance of the work's title,preceding the beginning of the body of the text.
A section "Entitled XYZ" means a named subunit of the Document whosetitle either is precisely XYZ or contains XYZ in parentheses followingtext that translates XYZ in another language. (Here XYZ stands for aspecific section name mentioned below, such as "Acknowledgements","Dedications", "Endorsements", or "History".) To "Preserve the Title"of such a section when you modify the Document means that it remains asection "Entitled XYZ" according to this definition.
The Document may include Warranty Disclaimers next to the notice whichstates that this License applies to the Document. These WarrantyDisclaimers are considered to be included by reference in thisLicense, but only as regards disclaiming warranties: any otherimplication that these Warranty Disclaimers may have is void and hasno effect on the meaning of this License.
2. VERBATIM COPYING
You may copy and distribute the Document in any medium, eithercommercially or noncommercially, provided that this License, thecopyright notices, and the license notice saying this License appliesto the Document are reproduced in all copies, and that you add no otherconditions whatsoever to those of this License. You may not usetechnical measures to obstruct or control the reading or furthercopying of the copies you make or distribute. However, you may acceptcompensation in exchange for copies. If you distribute a large enoughnumber of copies you must also follow the conditions in section 3.
You may also lend copies, under the same conditions stated above, andyou may publicly display copies.
3. COPYING IN QUANTITY
If you publish printed copies (or copies in media that commonly haveprinted covers) of the Document, numbering more than 100, and theDocument's license notice requires Cover Texts, you must enclose thecopies in covers that carry, clearly and legibly, all these CoverTexts: FrontCover Texts on the front cover, and BackCover Texts onthe back cover. Both covers must also clearly and legibly identifyyou as the publisher of these copies. The front cover must present

the full title with all words of the title equally prominent andvisible. You may add other material on the covers in addition.Copying with changes limited to the covers, as long as they preservethe title of the Document and satisfy these conditions, can be treatedas verbatim copying in other respects.
If the required texts for either cover are too voluminous to fitlegibly, you should put the first ones listed (as many as fitreasonably) on the actual cover, and continue the rest onto adjacentpages.
If you publish or distribute Opaque copies of the Document numberingmore than 100, you must either include a machinereadable Transparentcopy along with each Opaque copy, or state in or with each Opaque copya computernetwork location from which the general networkusingpublic has access to download using publicstandard network protocolsa complete Transparent copy of the Document, free of added material.If you use the latter option, you must take reasonably prudent steps,when you begin distribution of Opaque copies in quantity, to ensurethat this Transparent copy will remain thus accessible at the statedlocation until at least one year after the last time you distribute anOpaque copy (directly or through your agents or retailers) of thatedition to the public.
It is requested, but not required, that you contact the authors of theDocument well before redistributing any large number of copies, to givethem a chance to provide you with an updated version of the Document.
4. MODIFICATIONS
You may copy and distribute a Modified Version of the Document underthe conditions of sections 2 and 3 above, provided that you releasethe Modified Version under precisely this License, with the ModifiedVersion filling the role of the Document, thus licensing distributionand modification of the Modified Version to whoever possesses a copyof it. In addition, you must do these things in the Modified Version:
A. Use in the Title Page (and on the covers, if any) a title distinct from that of the Document, and from those of previous versions (which should, if there were any, be listed in the History section of the Document). You may use the same title as a previous version if the original publisher of that version gives permission.B. List on the Title Page, as authors, one or more persons or entities responsible for authorship of the modifications in the Modified Version, together with at least five of the principal authors of the Document (all of its principal authors, if it has fewer than five), unless they release you from this requirement.C. State on the Title page the name of the publisher of the Modified Version, as the publisher.D. Preserve all the copyright notices of the Document.E. Add an appropriate copyright notice for your modifications adjacent to the other copyright notices.F. Include, immediately after the copyright notices, a license notice giving the public permission to use the Modified Version under the terms of this License, in the form shown in the Addendum below.G. Preserve in that license notice the full lists of Invariant Sections and required Cover Texts given in the Document's license notice.H. Include an unaltered copy of this License.I. Preserve the section Entitled "History", Preserve its Title, and add to it an item stating at least the title, year, new authors, and publisher of the Modified Version as given on the Title Page. If
there is no section Entitled "History" in the Document, create one stating the title, year, authors, and publisher of the Document as given on its Title Page, then add an item describing the Modified Version as stated in the previous sentence.J. Preserve the network location, if any, given in the Document for public access to a Transparent copy of the Document, and likewise the network locations given in the Document for previous versions it was based on. These may be placed in the "History" section. You may omit a network location for a work that was published at least four years before the Document itself, or if the original publisher of the version it refers to gives permission.K. For any section Entitled "Acknowledgements" or "Dedications", Preserve the Title of the section, and preserve in the section all the substance and tone of each of the contributor acknowledgements and/or dedications given therein.L. Preserve all the Invariant Sections of the Document, unaltered in their text and in their titles. Section numbers or the equivalent are not considered part of the section titles.M. Delete any section Entitled "Endorsements". Such a section may not be included in the Modified Version.N. Do not retitle any existing section to be Entitled "Endorsements" or to conflict in title with any Invariant Section.O. Preserve any Warranty Disclaimers.
If the Modified Version includes new frontmatter sections orappendices that qualify as Secondary Sections and contain no materialcopied from the Document, you may at your option designate some or allof these sections as invariant. To do this, add their titles to thelist of Invariant Sections in the Modified Version's license notice.These titles must be distinct from any other section titles.
You may add a section Entitled "Endorsements", provided it containsnothing but endorsements of your Modified Version by variouspartiesfor example, statements of peer review or that the text hasbeen approved by an organization as the authoritative definition of astandard.
You may add a passage of up to five words as a FrontCover Text, and apassage of up to 25 words as a BackCover Text, to the end of the listof Cover Texts in the Modified Version. Only one passage ofFrontCover Text and one of BackCover Text may be added by (orthrough arrangements made by) any one entity. If the Document alreadyincludes a cover text for the same cover, previously added by you orby arrangement made by the same entity you are acting on behalf of,you may not add another; but you may replace the old one, on explicitpermission from the previous publisher that added the old one.
The author(s) and publisher(s) of the Document do not by this Licensegive permission to use their names for publicity for or to assert orimply endorsement of any Modified Version.
5. COMBINING DOCUMENTS
You may combine the Document with other documents released under thisLicense, under the terms defined in section 4 above for modifiedversions, provided that you include in the combination all of theInvariant Sections of all of the original documents, unmodified, andlist them all as Invariant Sections of your combined work in itslicense notice, and that you preserve all their Warranty Disclaimers.
The combined work need only contain one copy of this License, and

multiple identical Invariant Sections may be replaced with a singlecopy. If there are multiple Invariant Sections with the same name butdifferent contents, make the title of each such section unique byadding at the end of it, in parentheses, the name of the originalauthor or publisher of that section if known, or else a unique number.Make the same adjustment to the section titles in the list ofInvariant Sections in the license notice of the combined work.
In the combination, you must combine any sections Entitled "History"in the various original documents, forming one section Entitled"History"; likewise combine any sections Entitled "Acknowledgements",and any sections Entitled "Dedications". You must delete all sectionsEntitled "Endorsements".
6. COLLECTIONS OF DOCUMENTS
You may make a collection consisting of the Document and other documentsreleased under this License, and replace the individual copies of thisLicense in the various documents with a single copy that is included inthe collection, provided that you follow the rules of this License forverbatim copying of each of the documents in all other respects.
You may extract a single document from such a collection, and distributeit individually under this License, provided you insert a copy of thisLicense into the extracted document, and follow this License in allother respects regarding verbatim copying of that document.
7. AGGREGATION WITH INDEPENDENT WORKS
A compilation of the Document or its derivatives with other separateand independent documents or works, in or on a volume of a storage ordistribution medium, is called an "aggregate" if the copyrightresulting from the compilation is not used to limit the legal rightsof the compilation's users beyond what the individual works permit.When the Document is included in an aggregate, this License does notapply to the other works in the aggregate which are not themselvesderivative works of the Document.
If the Cover Text requirement of section 3 is applicable to thesecopies of the Document, then if the Document is less than one half ofthe entire aggregate, the Document's Cover Texts may be placed oncovers that bracket the Document within the aggregate, or theelectronic equivalent of covers if the Document is in electronic form.Otherwise they must appear on printed covers that bracket the wholeaggregate.
8. TRANSLATION
Translation is considered a kind of modification, so you maydistribute translations of the Document under the terms of section 4.Replacing Invariant Sections with translations requires specialpermission from their copyright holders, but you may includetranslations of some or all Invariant Sections in addition to theoriginal versions of these Invariant Sections. You may include atranslation of this License, and all the license notices in theDocument, and any Warranty Disclaimers, provided that you also includethe original English version of this License and the original versionsof those notices and disclaimers. In case of a disagreement betweenthe translation and the original version of this License or a notice

or disclaimer, the original version will prevail.
If a section in the Document is Entitled "Acknowledgements","Dedications", or "History", the requirement (section 4) to Preserveits Title (section 1) will typically require changing the actualtitle.
9. TERMINATION
You may not copy, modify, sublicense, or distribute the Document exceptas expressly provided for under this License. Any other attempt tocopy, modify, sublicense or distribute the Document is void, and willautomatically terminate your rights under this License. However,parties who have received copies, or rights, from you under thisLicense will not have their licenses terminated so long as suchparties remain in full compliance.
10. FUTURE REVISIONS OF THIS LICENSE
The Free Software Foundation may publish new, revised versionsof the GNU Free Documentation License from time to time. Such newversions will be similar in spirit to the present version, but maydiffer in detail to address new problems or concerns. Seehttp://www.gnu.org/copyleft/.
Each version of the License is given a distinguishing version number.If the Document specifies that a particular numbered version of thisLicense "or any later version" applies to it, you have the option offollowing the terms and conditions either of that specified version orof any later version that has been published (not as a draft) by theFree Software Foundation. If the Document does not specify a versionnumber of this License, you may choose any version ever published (notas a draft) by the Free Software Foundation.
ADDENDUM: How to use this License for your documents
To use this License in a document you have written, include a copy ofthe License in the document and put the following copyright andlicense notices just after the title page:
Copyright (c) YEAR YOUR NAME. Permission is granted to copy, distribute and/or modify this document under the terms of the GNU Free Documentation License, Version 1.2 or any later version published by the Free Software Foundation; with no Invariant Sections, no FrontCover Texts, and no BackCover Texts. A copy of the license is included in the section entitled "GNU Free Documentation License".
If you have Invariant Sections, FrontCover Texts and BackCover Texts,replace the "with...Texts." line with this:
with the Invariant Sections being LIST THEIR TITLES, with the FrontCover Texts being LIST, and with the BackCover Texts being LIST.
If you have Invariant Sections without Cover Texts, or some othercombination of the three, merge those two alternatives to suit thesituation.
If your document contains nontrivial examples of program code, werecommend releasing these examples in parallel under your choice offree software license, such as the GNU General Public License,to permit their use in free software.