CARDIN ELETTRONICA spa ZVL453.02 Via Raffaello, 36 … · eliminate le cifre più significative in...
25
ZVL453.02 / 11-10-2004 SOFTWARE DI GESTIONE PER RCQ449W00/RCQ486W00 MANAGEMENT SOFTWARE FOR THE RCQ449W00/RCQ486W00 LOGICIEL DE GESTION POUR RCQ449W00/RCQ486W00 SOFTWARE ZUR VERWALTUNG DES RCQ449W00/RCQ486W00 CARDIN ELETTRONICA spa Via Raffaello, 36 3020 San Vendemiano (TV) Italy Tel: +39/0438.4040-4088 Fax: +39/0438.4083 email (Italy): Sales.offi[email protected] email (Europe):Sales.offi[email protected] Http: www.cardin.it This product has been tried and tested in the manufacturer's laboratory, during the installation of the product follow the supplied indications carefully. RCQ449W00 RCQ486W00 ZVL453.02 RCQ449W00 - RCQ486W00 NOZIONI IMPORTANTI Pag. 2 DESCRIZIONE DEI MENU FILE Pag. 3 ANAGRAFICA Pag. 3-5 CONSULTAZIONI Pag. 5-6 STRUMENTI Pag. 6-7 ITALIANO INDICATIONS IMPORTANTES Pag. 4 DESCRIPTION DES MENUS FICHIER Pag. 5 DONNÉES GÉNÉRALES Pag. 5-6 CONSULTATIONS Pag. 7-8 OUTILS Pag. 8-9 FRANÇAIS IMPORTANT POINTS Page 8 MENU DESCRIPTION FILE Page 9 DATA Page 9- BROWSE Page -2 TOOLS Pag. 2-3 ENGLISH WICHTIGE KENNTNISSE Seite 20 BESCHREIBUNG DER MENÜS DATEI Seite 2 ANGABEN Seite 2-23 EINSICHTNAHME Seite 23-24 EXTRAS Seite 24-25 DEUTSCH
Transcript of CARDIN ELETTRONICA spa ZVL453.02 Via Raffaello, 36 … · eliminate le cifre più significative in...
�
ZV
L453
.02
/ 11
-10-
2004
SOFTWARE DI GESTIONE PER RCQ449W00/RCQ486W00MANAGEMENT SOFTWARE FOR THE RCQ449W00/RCQ486W00 LOGICIEL DE GESTION POUR RCQ449W00/RCQ486W00SOFTWARE ZUR VERWALTUNG DES RCQ449W00/RCQ486W00
CARDIN ELETTRONICA spa Via Raffaello, 36 3�020 San Vendemiano (TV) ItalyTel: +39/0438.4040��-40�8�8Fax: +39/0438.40�83�email (Italy): [email protected] (Europe): [email protected]: www.cardin.it
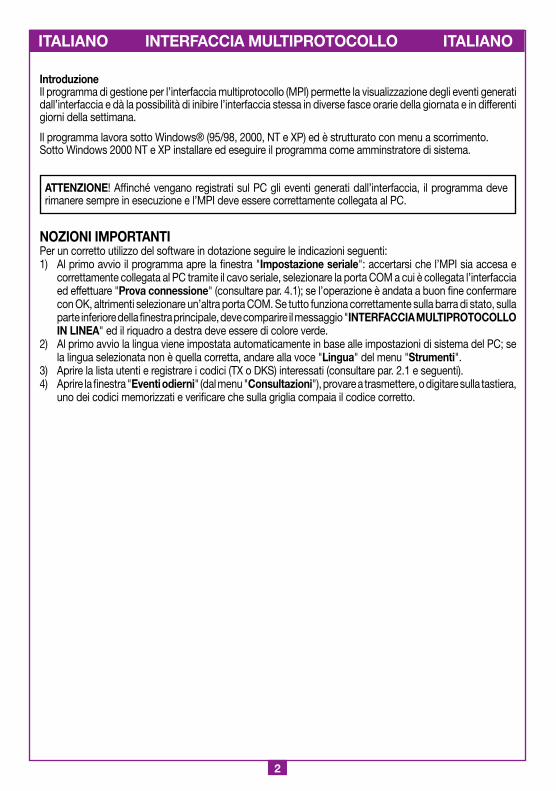
This product has been tried and tested in the manufacturer's laboratory, during the installation of the product follow the supplied indications carefully.
RCQ449W00RCQ486W00ZVL453.02
RCQ449W00 - RCQ486W00
NOZIONI IMPORTANTI Pag. 2
DESCRIZIONE DEI MENUFILE Pag. 3ANAGRAFICA Pag. 3-5CONSULTAZIONI Pag. 5-6STRUMENTI Pag. 6-7
ITALIANO
INDICATIONS IMPORTANTES Pag. �4
DESCRIPTION DES MENUSFICHIER Pag. �5DONNÉES GÉNÉRALES Pag. �5-�6CONSULTATIONS Pag. �7-�8OUTILS Pag. �8-�9
FRANÇAIS
IMPORTANT POINTS Page 8
MENU DESCRIPTION FILE Page 9DATA Page 9-��BROWSE Page ��-�2TOOLS Pag. �2-�3
ENGLISH
WICHTIGE KENNTNISSE Seite 20
BESCHREIBUNG DER MENÜS
DATEI Seite 2�ANGABEN Seite 2�-23EINSICHTNAHME Seite 23-24EXTRAS Seite 24-25
DEUTSCH
2
IntroduzioneIl programma di gestione per l’interfaccia multiprotocollo (MPI) permette la visualizzazione degli eventi generati dall’interfaccia e dà la possibilità di inibire l’interfaccia stessa in diverse fasce orarie della giornata e in differenti giorni della settimana.
Il programma lavora sotto Windows® (95/98, 2000, NT e XP) ed è strutturato con menu a scorrimento.Sotto Windows 2000 NT e XP installare ed eseguire il programma come amminstratore di sistema.
ATTENZIONE! Affinché vengano registrati sul PC gli eventi generati dall’interfaccia, il programma deve rimanere sempre in esecuzione e l’MPI deve essere correttamente collegata al PC.
NOZIONI IMPORTANTIPer un corretto utilizzo del software in dotazione seguire le indicazioni seguenti:1) Al primo avvio il programma apre la finestra "Impostazione seriale": accertarsi che l’MPI sia accesa e
correttamente collegata al PC tramite il cavo seriale, selezionare la porta COM a cui è collegata l’interfaccia ed effettuare "Prova connessione" (consultare par. 4.1); se l’operazione è andata a buon fine confermare con OK, altrimenti selezionare un’altra porta COM. Se tutto funziona correttamente sulla barra di stato, sulla parte inferiore della finestra principale, deve comparire il messaggio "INTERFACCIA MULTIPROTOCOLLO IN LINEA" ed il riquadro a destra deve essere di colore verde.
2) Al primo avvio la lingua viene impostata automaticamente in base alle impostazioni di sistema del PC; se la lingua selezionata non è quella corretta, andare alla voce "Lingua" del menu "Strumenti".
3) Aprire la lista utenti e registrare i codici (TX o DKS) interessati (consultare par. 2.1 e seguenti).4) Aprire la finestra "Eventi odierni" (dal menu "Consultazioni"), provare a trasmettere, o digitare sulla tastiera,
uno dei codici memorizzati e verificare che sulla griglia compaia il codice corretto.
ITALIANO INTERFACCIA MULTIPROTOCOLLO ITALIANO
3
DESCRIZIONE DEI MENU � File
"Imposta Stampante": seleziona la stampante."Exit": esce dal programma.
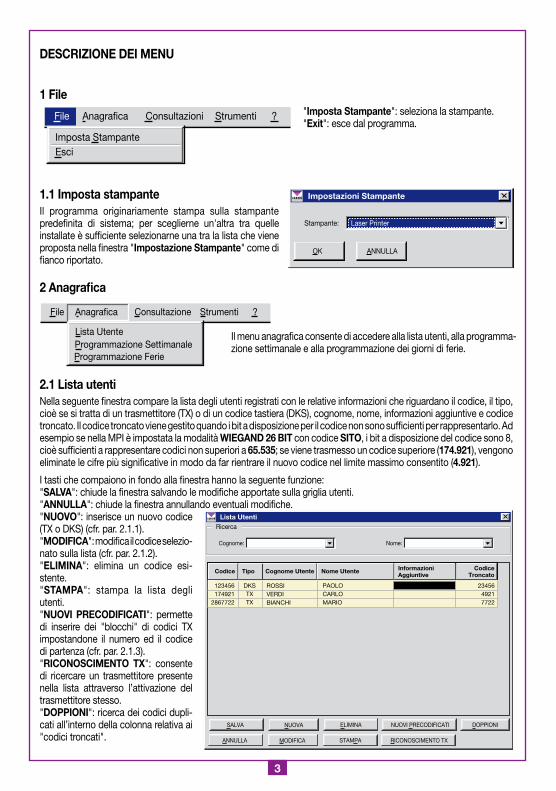
�.� Imposta stampanteIl programma originariamente stampa sulla stampante predefinita di sistema; per sceglierne un'altra tra quelle installate è sufficiente selezionarne una tra la lista che viene proposta nella finestra "Impostazione Stampante" come di fianco riportato. 2 Anagrafica
Il menu anagrafica consente di accedere alla lista utenti, alla programma-zione settimanale e alla programmazione dei giorni di ferie.
2.� Lista utentiNella seguente finestra compare la lista degli utenti registrati con le relative informazioni che riguardano il codice, il tipo, cioè se si tratta di un trasmettitore (TX) o di un codice tastiera (DKS), cognome, nome, informazioni aggiuntive e codice troncato. Il codice troncato viene gestito quando i bit a disposizione per il codice non sono sufficienti per rappresentarlo. Ad esempio se nella MPI è impostata la modalità WIEGAND 26 BIT con codice SITO, i bit a disposizione del codice sono 8, cioè sufficienti a rappresentare codici non superiori a 65.535; se viene trasmesso un codice superiore (�74.92�), vengono eliminate le cifre più significative in modo da far rientrare il nuovo codice nel limite massimo consentito (4.92�).
I tasti che compaiono in fondo alla finestra hanno la seguente funzione:"SALVA": chiude la finestra salvando le modifiche apportate sulla griglia utenti."ANNULLA": chiude la finestra annullando eventuali modifiche."NUOVO": inserisce un nuovo codice (TX o DKS) (cfr. par. 2.1.1)."MODIFICA": modifica il codice selezio-nato sulla lista (cfr. par. 2.1.2)."ELIMINA": elimina un codice esi-stente."STAMPA": stampa la lista degli utenti."NUOVI PRECODIFICATI": permette di inserire dei "blocchi" di codici TX impostandone il numero ed il codice di partenza (cfr. par. 2.1.3)."RICONOSCIMENTO TX": consente di ricercare un trasmettitore presente nella lista attraverso l’attivazione del trasmettitore stesso."DOPPIONI": ricerca dei codici dupli-cati all’interno della colonna relativa ai "codici troncati".
Imposta StampanteEsci
File Anagrafica Consultazioni Strumenti ?
Impostazioni Stampante
Stampante: Laser Printer
OK ANNULLA
Lista Utente
File Anagrafica Consultazione Strumenti ?
Programmazione SettimanaleProgrammazione Ferie
Lista Utenti
TipoCodice Nome Utente InformazioniAggiuntive
CodiceTroncato
DKSTXTX
123456174921
2867722
PAOLOCARLOMARIO
2345649217722
Ricerca
Cognome: Nome:
ANNULLA MODIFICA RICONOSCIMENTO TXSTAMPA
Cognome Utente
ROSSIVERDIBIANCHI
SALVA NUOVA NUOVI PRECODIFICATIELIMINA DOPPIONI
4
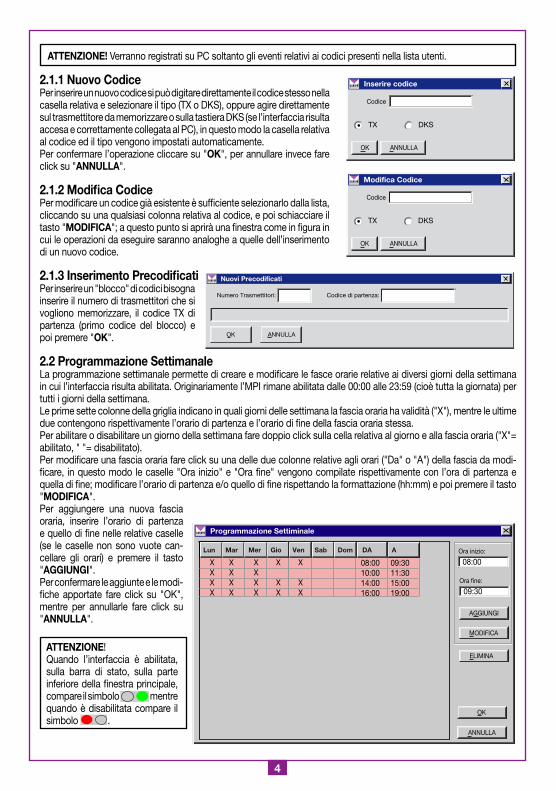
ATTENZIONE! Verranno registrati su PC soltanto gli eventi relativi ai codici presenti nella lista utenti.
2.�.� Nuovo CodicePer inserire un nuovo codice si può digitare direttamente il codice stesso nella casella relativa e selezionare il tipo (TX o DKS), oppure agire direttamente sul trasmettitore da memorizzare o sulla tastiera DKS (se l’interfaccia risulta accesa e correttamente collegata al PC), in questo modo la casella relativa al codice ed il tipo vengono impostati automaticamente.Per confermare l’operazione cliccare su "OK", per annullare invece fare click su "ANNULLA".
2.�.2 Modifica CodicePer modificare un codice già esistente è sufficiente selezionarlo dalla lista, cliccando su una qualsiasi colonna relativa al codice, e poi schiacciare il tasto "MODIFICA"; a questo punto si aprirà una finestra come in figura in cui le operazioni da eseguire saranno analoghe a quelle dell’inserimento di un nuovo codice.
2.�.3 Inserimento PrecodificatiPer inserire un "blocco" di codici bisogna inserire il numero di trasmettitori che si vogliono memorizzare, il codice TX di partenza (primo codice del blocco) e poi premere "OK".
2.2 Programmazione SettimanaleLa programmazione settimanale permette di creare e modificare le fasce orarie relative ai diversi giorni della settimana in cui l’interfaccia risulta abilitata. Originariamente l’MPI rimane abilitata dalle 00:00 alle 23:59 (cioè tutta la giornata) per tutti i giorni della settimana.Le prime sette colonne della griglia indicano in quali giorni delle settimana la fascia oraria ha validità ("X"), mentre le ultime due contengono rispettivamente l’orario di partenza e l’orario di fine della fascia oraria stessa.Per abilitare o disabilitare un giorno della settimana fare doppio click sulla cella relativa al giorno e alla fascia oraria ("X"= abilitato, " "= disabilitato).Per modificare una fascia oraria fare click su una delle due colonne relative agli orari ("Da" o "A") della fascia da modi-ficare, in questo modo le caselle "Ora inizio" e "Ora fine" vengono compilate rispettivamente con l’ora di partenza e quella di fine; modificare l’orario di partenza e/o quello di fine rispettando la formattazione (hh:mm) e poi premere il tasto "MODIFICA".Per aggiungere una nuova fascia oraria, inserire l’orario di partenza e quello di fine nelle relative caselle (se le caselle non sono vuote can-cellare gli orari) e premere il tasto "AGGIUNGI". Per confermare le aggiunte e le modi-fiche apportate fare click su "OK", mentre per annullarle fare click su "ANNULLA".
ATTENZIONE!Quando l’interfaccia è abilitata, sulla barra di stato, sulla parte inferiore della finestra principale, compare il simbolo mentre quando è disabilitata compare il simbolo .
Inserire codice
Codice
OK ANNULLA
TX DKS
Modifica Codice
Codice
OK ANNULLA
TX DKS
Nuovi Precodificati
Numero Trasmettitori: Codice di partenza:
OK ANNULLA
Programmazione Settiminale
ANNULLA
OK
Ora inizio:
08:00
Ora fine:
09:30
AGGIUNGI
MODIFICA
ELIMINA
Lun Mar Mer Gio Ven Sab Dom DA A
09:3011:3015:0019:00
08:0010:0014:0016:00
X X X X XX X XX X X X XX X X X X
5
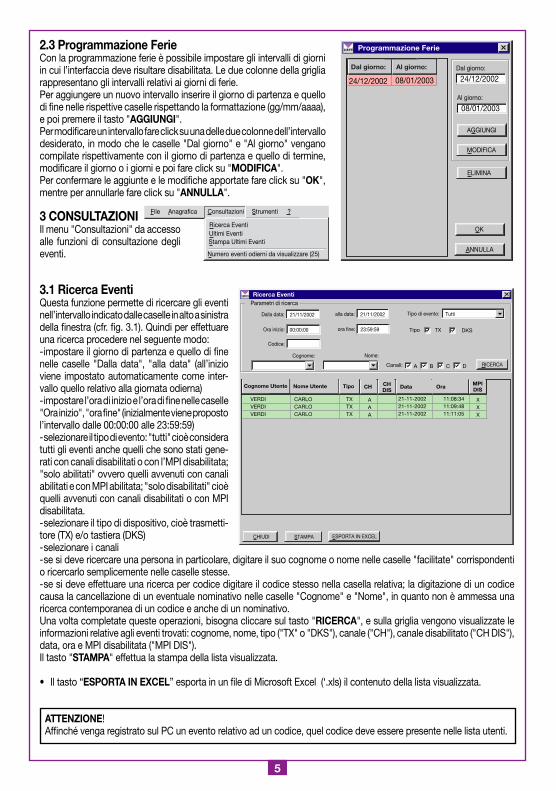
2.3 Programmazione FerieCon la programmazione ferie è possibile impostare gli intervalli di giorni in cui l’interfaccia deve risultare disabilitata. Le due colonne della griglia rappresentano gli intervalli relativi ai giorni di ferie.Per aggiungere un nuovo intervallo inserire il giorno di partenza e quello di fine nelle rispettive caselle rispettando la formattazione (gg/mm/aaaa), e poi premere il tasto "AGGIUNGI". Per modificare un intervallo fare click su una delle due colonne dell’intervallo desiderato, in modo che le caselle "Dal giorno" e "Al giorno" vengano compilate rispettivamente con il giorno di partenza e quello di termine, modificare il giorno o i giorni e poi fare click su "MODIFICA".Per confermare le aggiunte e le modifiche apportate fare click su "OK", mentre per annullarle fare click su "ANNULLA".
3 CONSULTAZIONIIl menu "Consultazioni" da accesso alle funzioni di consultazione degli eventi.
3.� Ricerca EventiQuesta funzione permette di ricercare gli eventi nell’intervallo indicato dalle caselle in alto a sinistra della finestra (cfr. fig. 3.1). Quindi per effettuare una ricerca procedere nel seguente modo:- impostare il giorno di partenza e quello di fine nelle caselle "Dalla data", "alla data" (all’inizio viene impostato automaticamente come inter-vallo quello relativo alla giornata odierna)- impostare l’ora di inizio e l’ora di fine nelle caselle "Ora inizio", "ora fine" (inizialmente viene proposto l’intervallo dalle 00:00:00 alle 23:59:59)- selezionare il tipo di evento: "tutti" cioè considera tutti gli eventi anche quelli che sono stati gene-rati con canali disabilitati o con l’MPI disabilitata; "solo abilitati" ovvero quelli avvenuti con canali abilitati e con MPI abilitata; "solo disabilitati" cioè quelli avvenuti con canali disabilitati o con MPI disabilitata.- selezionare il tipo di dispositivo, cioè trasmetti-tore (TX) e/o tastiera (DKS)- selezionare i canali- se si deve ricercare una persona in particolare, digitare il suo cognome o nome nelle caselle "facilitate" corrispondenti o ricercarlo semplicemente nelle caselle stesse.- se si deve effettuare una ricerca per codice digitare il codice stesso nella casella relativa; la digitazione di un codice causa la cancellazione di un eventuale nominativo nelle caselle "Cognome" e "Nome", in quanto non è ammessa una ricerca contemporanea di un codice e anche di un nominativo.Una volta completate queste operazioni, bisogna cliccare sul tasto "RICERCA", e sulla griglia vengono visualizzate le informazioni relative agli eventi trovati: cognome, nome, tipo ("TX" o "DKS"), canale ("CH"), canale disabilitato ("CH DIS"), data, ora e MPI disabilitata ("MPI DIS"). Il tasto "STAMPA" effettua la stampa della lista visualizzata.
• Il tasto “ESPORTA IN EXCEL” esporta in un file di Microsoft Excel (‘.xls) il contenuto della lista visualizzata.
ATTENZIONE!Affinché venga registrato sul PC un evento relativo ad un codice, quel codice deve essere presente nelle lista utenti.
Programmazione Ferie
ANNULLA
OK
Dal giorno:
24/12/2002
Al giorno:
08/01/2003
AGGIUNGI
MODIFICA
ELIMINA
Dal giorno: Al giorno:
24/12/2002 08/01/2003
Ricerca Eventi
File Anagrafica Consultazioni Strumenti ?
Ultimi EventiStampa Ultimi Eventi
Numero eventi odierni da visualizzare (25)
Ricerca Eventi
Cognome Utente Tipo MPIDIS
VERDIVERDIVERDI
21-11-200221-11-200221-11-2002
Parametri di ricerca
Dalla data: Tipo di evento:
CHIUDI STAMPA
Nome Utente
CARLOCARLOCARLO
CH CHDIS
Data Ora
TXTXTX
AAA
11:08:3411:09:4811:11:05
XXX
21/11/2002 alla data: 21/11/2002 Tutti
Ora inizio: 00:00:00 ora fine: 23:59:59
Codice:
Cognome: Nome:
RICERCA
Tipo TX DKS
Canali: A B C D
ESPORTA IN EXCEL
6
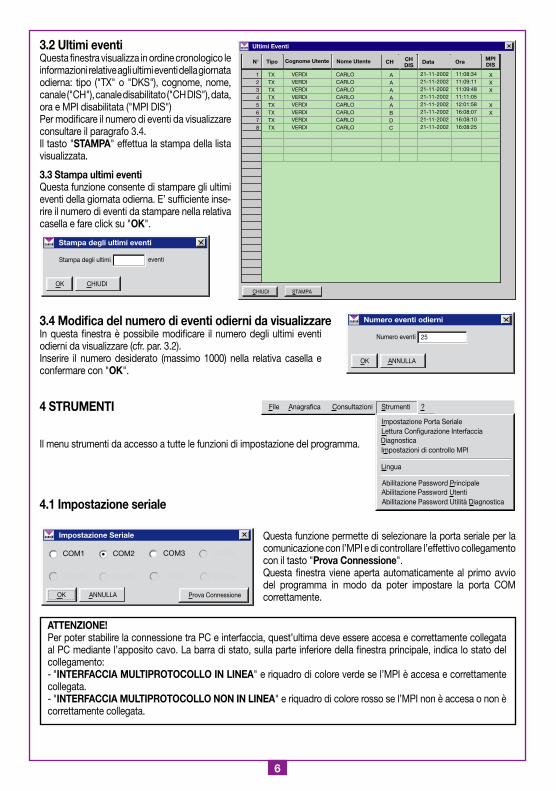
3.2 Ultimi eventiQuesta finestra visualizza in ordine cronologico le informazioni relative agli ultimi eventi della giornata odierna: tipo ("TX" o "DKS"), cognome, nome, canale ("CH"), canale disabilitato ("CH DIS"), data, ora e MPI disabilitata ("MPI DIS")Per modificare il numero di eventi da visualizzare consultare il paragrafo 3.4.Il tasto "STAMPA" effettua la stampa della lista visualizzata.
3.3 Stampa ultimi eventiQuesta funzione consente di stampare gli ultimi eventi della giornata odierna. E’ sufficiente inse-rire il numero di eventi da stampare nella relativa casella e fare click su "OK".
3.4 Modifica del numero di eventi odierni da visualizzareIn questa finestra è possibile modificare il numero degli ultimi eventi odierni da visualizzare (cfr. par. 3.2).Inserire il numero desiderato (massimo 1000) nella relativa casella e confermare con "OK".
4 STRUMENTI
Il menu strumenti da accesso a tutte le funzioni di impostazione del programma.
4.� Impostazione seriale
Questa funzione permette di selezionare la porta seriale per la comunicazione con l’MPI e di controllare l’effettivo collegamento con il tasto "Prova Connessione".Questa finestra viene aperta automaticamente al primo avvio del programma in modo da poter impostare la porta COM correttamente.
ATTENZIONE!Per poter stabilire la connessione tra PC e interfaccia, quest’ultima deve essere accesa e correttamente collegata al PC mediante l’apposito cavo. La barra di stato, sulla parte inferiore della finestra principale, indica lo stato del collegamento:- "INTERFACCIA MULTIPROTOCOLLO IN LINEA" e riquadro di colore verde se l’MPI è accesa e correttamente collegata.- "INTERFACCIA MULTIPROTOCOLLO NON IN LINEA" e riquadro di colore rosso se l’MPI non è accesa o non è correttamente collegata.
Ultimi Eventi
Cognome Utente MPIDIS
VERDIVERDIVERDIVERDIVERDIVERDIVERDIVERDI
21-11-200221-11-200221-11-200221-11-200221-11-200221-11-200221-11-200221-11-2002
CHIUDI STAMPA
Nome Utente
CARLOCARLOCARLOCARLOCARLOCARLOCARLOCARLO
CH CHDIS
Data Ora
AAAAABDC
11:08:3411:09:1111:09:4811:11:0512:01:5816:08:0716:08:1016:08:25
XXX
XX
TipoN°
12345678
TXTXTXTXTXTXTXTX
Stampa degli ultimi eventi
Stampa degli ultimi
OK CHIUDI
eventi
Numero eventi odierni
Numero eventi
OK ANNULLA
25
Impostazione Seriale
OK ANNULLA
COM5
COM1 COM2
COM6 COM7
COM3 COM4
COM8
Prova Connessione
Impostazione Porta Seriale
File Anagrafica Consultazioni Strumenti ?
Lettura Configurazione InterfacciaDiagnostica
Lingua
Impostazioni di controllo MPI
Abilitazione Password PrincipaleAbilitazione Password UtentiAbilitazione Password Utilità Diagnostica
7
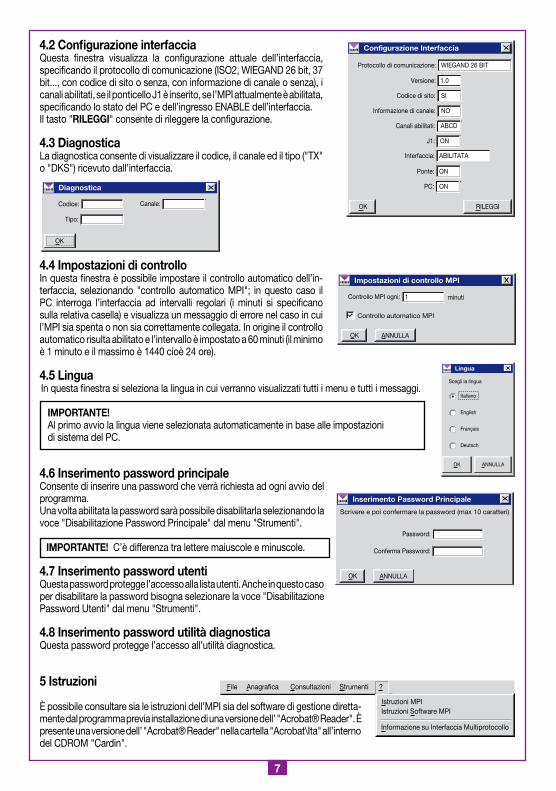
4.2 Configurazione interfacciaQuesta finestra visualizza la configurazione attuale dell’interfaccia, specificando il protocollo di comunicazione (ISO2, WIEGAND 26 bit, 37 bit..., con codice di sito o senza, con informazione di canale o senza), i canali abilitati, se il ponticello J1 è inserito, se l’MPI attualmente è abilitata, specificando lo stato del PC e dell’ingresso ENABLE dell’interfaccia.Il tasto "RILEGGI" consente di rileggere la configurazione.
4.3 DiagnosticaLa diagnostica consente di visualizzare il codice, il canale ed il tipo ("TX" o "DKS") ricevuto dall’interfaccia.
4.4 Impostazioni di controlloIn questa finestra è possibile impostare il controllo automatico dell’in-terfaccia, selezionando "controllo automatico MPI"; in questo caso il PC interroga l’interfaccia ad intervalli regolari (i minuti si specificano sulla relativa casella) e visualizza un messaggio di errore nel caso in cui l’MPI sia spenta o non sia correttamente collegata. In origine il controllo automatico risulta abilitato e l’intervallo è impostato a 60 minuti (il minimo è 1 minuto e il massimo è 1440 cioè 24 ore).
4.5 LinguaIn questa finestra si seleziona la lingua in cui verranno visualizzati tutti i menu e tutti i messaggi.
IMPORTANTE! Al primo avvio la lingua viene selezionata automaticamente in base alle impostazioni di sistema del PC.
4.6 Inserimento password principaleConsente di inserire una password che verrà richiesta ad ogni avvio del programma. Una volta abilitata la password sarà possibile disabilitarla selezionando la voce "Disabilitazione Password Principale" dal menu "Strumenti".
IMPORTANTE! C’è differenza tra lettere maiuscole e minuscole.
4.7 Inserimento password utentiQuesta password protegge l’accesso alla lista utenti. Anche in questo caso per disabilitare la password bisogna selezionare la voce "Disabilitazione Password Utenti" dal menu "Strumenti".
4.8 Inserimento password utilità diagnosticaQuesta password protegge l’accesso all’utilità diagnostica.
5 Istruzioni
È possibile consultare sia le istruzioni dell’MPI sia del software di gestione diretta-mente dal programma previa installazione di una versione dell’ "Acrobat® Reader". È presente una versione dell’ "Acrobat® Reader" nella cartella "Acrobat\Ita" all’interno del CDROM "Cardin".
Configurazione Interfaccia
Protocollo di comunicazione:
OK RILEGGI
WIEGAND 26 BIT
Codice di sito: SI
Informazione di canale: NO
Canali abilitati: ABCD
J1: ON
Interfaccia: ABILITATA
Ponte: ON
PC: ON
Versione: 1.0
Diagnostica
Codice:
OK
Canale:
Tipo:
Impostazioni di controllo MPI
Controllo MPI ogni:
Controllo automatico MPI
OK ANNULLA
minuti1
Lingua
ANNULLA
Italiano
Scegli la lingua
OK
English
Français
Deutsch
Inserimento Password Principale
Password:
Scrivere e poi confermare la password (max 10 caratteri)
OK ANNULLA
Conferma Password:
Istruzioni MPI
File Anagrafica Consultazioni Strumenti ?
Istruzioni Software MPI
Informazione su Interfaccia Multiprotocollo
8
IntroductionThe multiprotocol interface management program (MPI) allows you to display events generated by the interface and also allows you to deactivate access to the interface in different time bands during the day and in different days during the week. The program works under Windows® (95/98, 2000, NT and XP) and uses scrolling menus.If you use Windows 2000 NT and XP you must install and run the program as a "system administrator".
Attention! For the events generated by the interface to be registered on the PC the program must always be running and the MPI must be correctly connected to the PC.
IMPORTANT POINTSTo use the supplied software correctly follow these indications:1) The first time you start up the program the "Serial line setting" window will appear : make sure that the
MPI is switched on and correctly connected to the PC using a serial cable, select the COM port that is the interface is connected to and press "Trial connection" (consult par. 4.1); if everything works fine press OK, otherwise select another COM port. If everything is working correctly the message "MULTIPROTO-COL INTERFACE ON LINE" will appear, coloured green, in the status bar on the lower part of the main window.
2) The first time the software is started up the language will be set to the one chosen in the PC system settings; if the selected language is not correct use the "Language" in the "tools" menu to change it.
3) Open the user list and register the codes (TX or DKS) you are interested in (consult par. 2.1 onwards).4) Open the window "Daily events" (from the "Browse" menu), try and transmit or type a memorised code
into the keyboard and check that the correct code appears in the grid
ENGLISH MULTIPROTOCOL INTERFACE ENGLISH
9
MENU DESCRIPTION
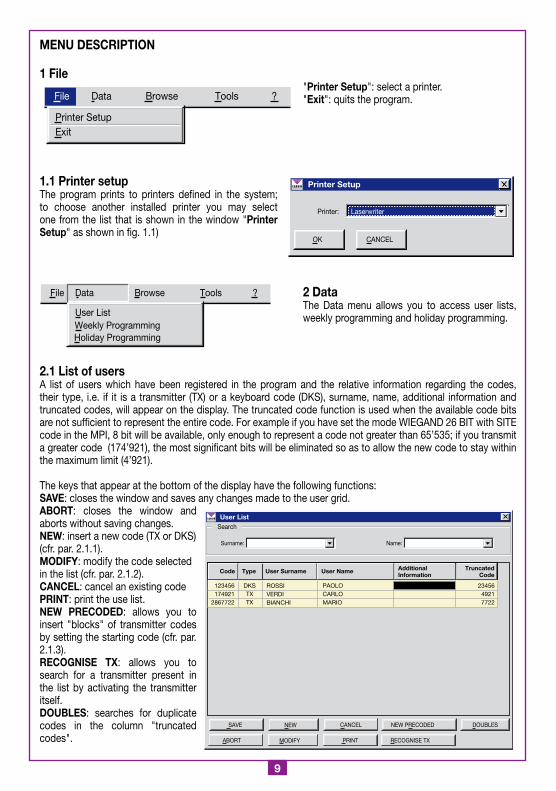
� File"Printer Setup": select a printer."Exit": quits the program.
�.� Printer setupThe program prints to printers defined in the system; to choose another installed printer you may select one from the list that is shown in the window "Printer Setup" as shown in fig. 1.1)
2 DataThe Data menu allows you to access user lists, weekly programming and holiday programming.
2.� List of usersA list of users which have been registered in the program and the relative information regarding the codes, their type, i.e. if it is a transmitter (TX) or a keyboard code (DKS), surname, name, additional information and truncated codes, will appear on the display. The truncated code function is used when the available code bits are not sufficient to represent the entire code. For example if you have set the mode WIEGAND 26 BIT with SITE code in the MPI, 8 bit will be available, only enough to represent a code not greater than 65’535; if you transmit a greater code (174’921), the most significant bits will be eliminated so as to allow the new code to stay within the maximum limit (4’921).
The keys that appear at the bottom of the display have the following functions:SAVE: closes the window and saves any changes made to the user grid.ABORT: closes the window and aborts without saving changes.NEW: insert a new code (TX or DKS) (cfr. par. 2.1.1).MODIFY: modify the code selected in the list (cfr. par. 2.1.2).CANCEL: cancel an existing codePRINT: print the use list.NEW PRECODED: allows you to insert "blocks" of transmitter codes by setting the starting code (cfr. par. 2.1.3).RECOGNISE TX: allows you to search for a transmitter present in the list by activating the transmitter itself.DOUBLES: searches for duplicate codes in the column "truncated codes".
Printer SetupExit
File Data Browse Tools ?
Printer Setup
Printer: Laserwriter
OK CANCEL
User List
File Data Browse Tools ?
Weekly ProgrammingHoliday Programming
User List
TypeCode User Name AdditionalInformation
TruncatedCode
DKSTXTX
123456174921
2867722
PAOLOCARLOMARIO
2345649217722
Search
Surname: Name:
ABORT MODIFY RECOGNISE TXPRINT
User Surname
ROSSIVERDIBIANCHI
SAVE NEW NEW PRECODEDCANCEL DOUBLES
�0
Attention! Only events relating to codes present in the user list will be saved on the PC.
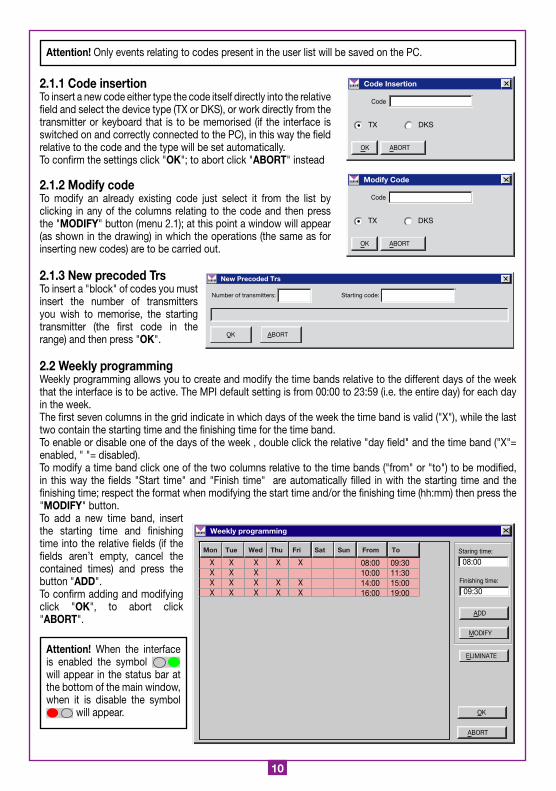
2.�.� Code insertionTo insert a new code either type the code itself directly into the relative field and select the device type (TX or DKS), or work directly from the transmitter or keyboard that is to be memorised (if the interface is switched on and correctly connected to the PC), in this way the field relative to the code and the type will be set automatically.To confirm the settings click "OK"; to abort click "ABORT" instead
2.�.2 Modify codeTo modify an already existing code just select it from the list by clicking in any of the columns relating to the code and then press the "MODIFY" button (menu 2.1); at this point a window will appear (as shown in the drawing) in which the operations (the same as for inserting new codes) are to be carried out.
2.�.3 New precoded Trs To insert a "block" of codes you must insert the number of transmitters you wish to memorise, the starting transmitter (the first code in the range) and then press "OK". 2.2 Weekly programmingWeekly programming allows you to create and modify the time bands relative to the different days of the week that the interface is to be active. The MPI default setting is from 00:00 to 23:59 (i.e. the entire day) for each day in the week.The first seven columns in the grid indicate in which days of the week the time band is valid ("X"), while the last two contain the starting time and the finishing time for the time band.To enable or disable one of the days of the week , double click the relative "day field" and the time band ("X"= enabled, " "= disabled).To modify a time band click one of the two columns relative to the time bands ("from" or "to") to be modified, in this way the fields "Start time" and "Finish time" are automatically filled in with the starting time and the finishing time; respect the format when modifying the start time and/or the finishing time (hh:mm) then press the "MODIFY" button.To add a new time band, insert the starting time and finishing time into the relative fields (if the fields aren’t empty, cancel the contained times) and press the button "ADD". To confirm adding and modifying click "OK", to abort click "ABORT".
Attention! When the interface is enabled the symbol will appear in the status bar at the bottom of the main window, when it is disable the symbol
will appear.
Code Insertion
Code
OK ABORT
TX DKS
Modify Code
Code
OK ABORT
TX DKS
New Precoded Trs
Number of transmitters: Starting code:
OK ABORT
Weekly programming
ABORT
OK
Staring time:
08:00
Finishing time:
09:30
ADD
MODIFY
ELIMINATE
Mon Tue Wed Thu Fri Sat Sun From To
09:3011:3015:0019:00
08:0010:0014:0016:00
X X X X XX X XX X X X XX X X X X
��
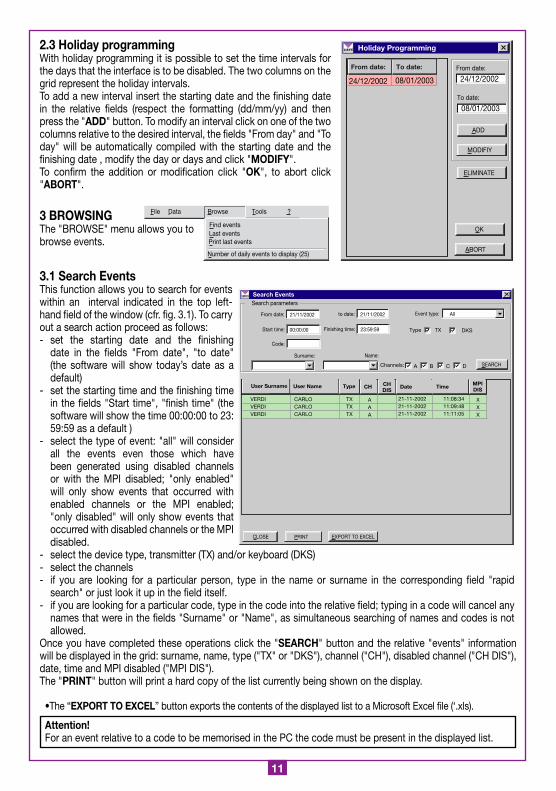
2.3 Holiday programmingWith holiday programming it is possible to set the time intervals for the days that the interface is to be disabled. The two columns on the grid represent the holiday intervals.To add a new interval insert the starting date and the finishing date in the relative fields (respect the formatting (dd/mm/yy) and then press the "ADD" button. To modify an interval click on one of the two columns relative to the desired interval, the fields "From day" and "To day" will be automatically compiled with the starting date and the finishing date , modify the day or days and click "MODIFY".To confirm the addition or modification click "OK", to abort click "ABORT".
3 BROWSINGThe "BROWSE" menu allows you to browse events.
3.� Search EventsThis function allows you to search for events within an interval indicated in the top left-hand field of the window (cfr. fig. 3.1). To carry out a search action proceed as follows:- set the starting date and the finishing
date in the fields "From date", "to date" (the software will show today’s date as a default)
- set the starting time and the finishing time in the fields "Start time", "finish time" (the software will show the time 00:00:00 to 23:59:59 as a default )
- select the type of event: "all" will consider all the events even those which have been generated using disabled channels or with the MPI disabled; "only enabled" will only show events that occurred with enabled channels or the MPI enabled; "only disabled" will only show events that occurred with disabled channels or the MPI disabled.
- select the device type, transmitter (TX) and/or keyboard (DKS)- select the channels- if you are looking for a particular person, type in the name or surname in the corresponding field "rapid
search" or just look it up in the field itself.- if you are looking for a particular code, type in the code into the relative field; typing in a code will cancel any
names that were in the fields "Surname" or "Name", as simultaneous searching of names and codes is not allowed.
Once you have completed these operations click the "SEARCH" button and the relative "events" information will be displayed in the grid: surname, name, type ("TX" or "DKS"), channel ("CH"), disabled channel ("CH DIS"), date, time and MPI disabled ("MPI DIS"). The "PRINT" button will print a hard copy of the list currently being shown on the display.
•The “EXPORT TO EXCEL” button exports the contents of the displayed list to a Microsoft Excel file (‘.xls).
Attention!For an event relative to a code to be memorised in the PC the code must be present in the displayed list.
Holiday Programming
ABORT
OK
From date:
24/12/2002
To date:
08/01/2003
ADD
MODIFIY
ELIMINATE
From date: To date:
24/12/2002 08/01/2003
Find events
File Data Browse Tools ?
Last eventsPrint last events
Number of daily events to display (25)
Search Events
User Surname Type MPIDIS
VERDIVERDIVERDI
21-11-200221-11-200221-11-2002
Search parameters
From date: Event type:
CLOSE PRINT
User Name
CARLOCARLOCARLO
CH CHDIS
Date Time
TXTXTX
AAA
11:08:3411:09:4811:11:05
XXX
21/11/2002 to date: 21/11/2002 All
Start time: 00:00:00 Finishing time: 23:59:59
Code:
Surname: Name:
SEARCH
Type TX DKS
Channels: A B C D
EXPORT TO EXCEL

�2
3.2 Last eventsThis window displays the information (in chronological order) relative to the last events in the current day: type "TX" or "DKS", surname, name, type "TX" or "DKS", channel "CH", disabled channel "CH DIS", date, time and MPI disabled "MPI DIS". To modify the number of events being displayed consult paragraph 3.4.The "PRINT" button will print a hard copy of the list currently being shown on the display.
3.3 Print last eventsThis function allows you to print the last events in the current day. Just insert the number of events to be printed in the relative field and click "OK".
3.4 Modifying the number of current day events to be displayed In this window it is possible to modify the number of last current day events to be displayed (cfr. par. 3.2).Insert the desired number (maximum 1000) in the relative field and press "OK".
4 TOOLS
The tools menu gives access to all program setting functions.
4.� Serial line settings
This function allows you to select the serial port to communicate with the MPI and to check the effective connection by pressing the button "Trial Connection".This window is opened automatically the first time the program is started up so as to allow you to set the COM port correctly.
ATTENTION!To establish a connection between the PC and the interface, the interface must be switched on and correctly connected to the PC using the correct cable. The status bar on the lower part of the main window will indicate the connection status:- "MULTIPROTOCOL INTERFACE ON LINE" will be shown in green if the MPI is switched on and correctly connected.- "MULTIPROTOCOL INTERFACE OFF LINE" will be shown in red if the MPI is not switched on and is incorrectly connected.
Last Events
User Surname MPIDIS
VERDIVERDIVERDIVERDIVERDIVERDIVERDIVERDI
21-11-200221-11-200221-11-200221-11-200221-11-200221-11-200221-11-200221-11-2002
CLOSE PRINT
User Name
CARLOCARLOCARLOCARLOCARLOCARLOCARLOCARLO
CH CHDIS
Date Time
AAAAABDC
11:08:3411:09:1111:09:4811:11:0512:01:5816:08:0716:08:1016:08:25
XXX
XX
TypeNr.
12345678
TXTXTXTXTXTXTXTX
Print last events
Print the last
OK CLOSE
events
Number of daily events
Number of events
OK ABORT
25
Serial port settings
File Data Browse Tools ?
Read interface settingsDiagnostics
Language
Control settings
Enable Main PasswordEnable User PasswordEnable Diagnostics Utility Password
Serial line settings
OK ABORT
COM5
COM1 COM2
COM6 COM7
COM3 COM4
COM8
Trial Connection

�3
4.2 Interface configurationThis window shows the actual configuration of the interface, specifying the communications protocol (ISO2, WIEGAND 26 bit, 37 bit..., with or without SITE code, with or without channel information), the enabled channels, if jumper J1 is inserted, if the MPI is actually enabled and also specifying the status of the PC and the ENABLE input on the interface.The "RESCAN" button allows you to read the configuration again.
4.3 DiagnosticsDiagnostics allows you to display a code, the channel and its type ("TX" or "DKS") that has been received by the interface.
4.4 Control settingsIn this window you can set the automatic control of the interface by selecting "MPI automatic control"; in this case the PC interrogates the interface at regular intervals (minutes are specified in the relative field) and shows an error message if the MPI is switched off or incorrectly connected. Automatic control is enabled by default and set to 60 minutes (the minimum is 1 minute and the maximum is 1440 i.e. 24 hours).
4.5 LanguageIn this window you can choose the language that will be used to display the menus and messages.
IMPORTANT! The first time the software is started the language is selected automatically according to the settings of the PC.
4.6 Insert main passwordThis allows you to insert a password which will be asked for each time you start up the program. Once you have enabled the password it can only be disabled by selecting the command "disable main password" from the "Tools" menu.
IMPORTANT! The program differentiates between small and capital letters.
4.7 Inserting user passwortsThis password protects access to the user lists. Also in this case it can only be disabled by selecting the command "disable user password" from the "Tools" menu.
4.8 Insert diagnostics utility passwordThis password protects access to the diagnostics utility.
5 InstructionsIt is possible to consult both the MPI instructions and the software management instructions directly from the program if you have installed "Acrobat® Reader". A version of "Acrobat® Reader" can be found in the directory "Acrobat\Ita" inside the CDROM "Cardin".
Interface settings
Communications protocol:
OK RESCAN
WIEGAND 26 BIT
Site code: SI
Channel information: NO
Enabled channels: ABCD
J1: ON
Interface: ABILITATA
Jumper: ON
PC: ON
Version: 1.0
Diagnostics
Code:
OK
Channel:
Type:
MPI control settings
Check MPI every
Automatic MPI control
OK ABORT
minutes1
Language
CANCEL
Italiano
Choose language
OK
English
Français
Deutsch
Insert Main Password
Password:
Type in and confirm password (max 10 characters)
OK ABORT
Confirm Password:
MPI Hardware instructions
File Data Browse Tools ?
MPI Software instructions
Multiprotocol Interface Information
�4
PréambuleLe programme de gestion pour l’interface multiprotocole (MPI) permet de visualiser les évènements créés par l’interface, et d’invalider cette dernière en différentes tranches horaires de la journée et en différents jours de la semaine. Le programme travaille sous Windows® (95/98, 2000, NT et XP), et est structuré avec des menus à dérou-lement.Avec Windows 2000 NT et XP il faut installer le logiciel en qualité d'administrateur du système. L'éxécution du logiciel sera possible seulement pour l'administrateur.
ATTENTION! Pour permettre l’enregistrement sur PC des évènements créés par l’interface, le programme doit toujours être activé et la MPI branchée correctement au PC.
INDICATIONS IMPORTANTES1) au premier démarrage, le programme ouvre la fenêtre “Configuration sérielle”: contrôler que la MPI soit
allumée et branchée correctement au PC au moyen du câble sériel, sélectionner le port COM auquel est branchée l’interface, et lancer “Test connexion” (voir parag. 4.1); si l’opération a une issue positive, con-firmer par OK; en cas contraire, sélectionner un autre port COM. L’apparition du message “INTERFACE MULTIPROTOCOLE EN LIGNE” avec encadré d’un coloris vert, à droite, sur la barre d’état, en partie basse de la fenêtre principale, est le signe que tout fonctionne correctement,
2) au premier démarrage, la langue est sélectionnée automatiquement selon les configurations du système du PC; si la langue sélectionnée ne convient pas, accéder à l’option “Langue” du menu “Outils”,
3) ouvrir la liste utilisateurs et enregistrer les codes (TX ou DKS) en question (voir parag. 2.1 et suivants),4) ouvrir la fenêtre “Évènements du jour courant” (du menu “Consultations”), essayer de transmettre ou
de saisir au clavier un des codes mémorisés et vérifier si le code correct apparaît sur la grille.
FRANÇAIS INTERFACE MULTIPROTOCOLE FRANÇAIS

�5
DESCRIPTION DES MENUS � Ficheur
"Configuration imprimante": sélectionner l’impri-mante."Quitter": pour sortir du programme.
�.� Configuration imprimanteLe programme imprime d’office à travers l’imprimante prééta-blie sur le système; pour en sélectionner une autre parmi celles qui ont été installées, il suffit de sélectionner une de celles qui apparaissent sur la liste visualisée dans la fenêtre ‘Configuration imprimante’, comme indiqué. 2 Données générales
Le menu inhérent aux données personnelles permet d’accéder à la liste utilisateurs, à la programmation hebdomadaire et à la programmation des jours de congé (fig. 2).
2.� Liste utilisateursLa fenêtre suivante visualise la liste des utilisateurs enregistrés avec les relatives informations concernant le code, le type, c’est-à-dire s’il s’agit d’un émetteur (TX) ou d’un code clavier (DKS), le nom, le prénom, les informations supplémentaires et le code abrégé. La gestion d’un code abrégé s’effectue quand les bits à disposition pour le code sont insuffisants pour le représenter. Par exemple, si dans la MPI est programmé le protocole WIEGAND 26 BITS avec code SITE, les bits à disposition du code sont au nombre de 8, ce qui suffit pour représenter des codes non supérieurs à 65’535; en cas de transmission d’un code supérieur (�74’92�), les chiffres plus importants sont éliminés, afin de limiter le nouveau code au nombre maximum admissible (4’92�).
Les touches qui apparaissent en partie basse de la fenêtre remplissent les fonctions suivantes:“SAUVER”: ferme la fenêtre en sauvegardant les modifications qui ont été apportées à la grille des utilisateurs.“ANNULER”: ferme la fenêtre en annulant les éventuelles modifications.“NOUVEAU”: entre un nouveau code (TX ou DKS) (cfr. parag. 2.1.1).“MODIFIER”: modifie le code sélectionné sur la liste (cfr. parag. 2.1.2).“EFFACER”: élimine un code existant.“IMPRIMER”: imprime la liste des utilisateurs.“NOUVEAUX PRÉCODÉS”: permet d’entrer des groupes de codes TX en programmant le nombre et le code de départ (cfr. parag. 2.1.3).“RECONNAISSANCE TX”: permet de rechercher un émetteur figurant sur la liste par l’activation de l’émetteur lui-même.“DOUBLES”: recherche des codes dou-bles dans la colonne inhérente aux “codes abrégés”.
Configuration ImprimanteSortie
Ficheur Données générales Scruter Outils ?
Configuration Imprimante
Imprimante: HP LaserJet 2200 Series PCL6
OK ANNULLER
Liste UtilisateursProgrammation HebdomadaireProgrammation Congés
Ficheur Données générales Scruter Outils ?
Liste Utilisateurs
TypeCode Prénom Utilisateur InformationsSupplémentaires
CodeAbrégé
DKSTXTX
123456174921
2867722
PAOLOCARLOMARIO
2345649217722
Recherche
Nom: Prénom:
ANNULLER MODIFICATION IDENTIFICATION TXIMPRIMER
Nom Utilisateur
ROSSIVERDIBIANCHI
SAUVEGARDER NOUVEAU NOUVEAUX PRÉCODÉSEFFACE DOUBLES
�6
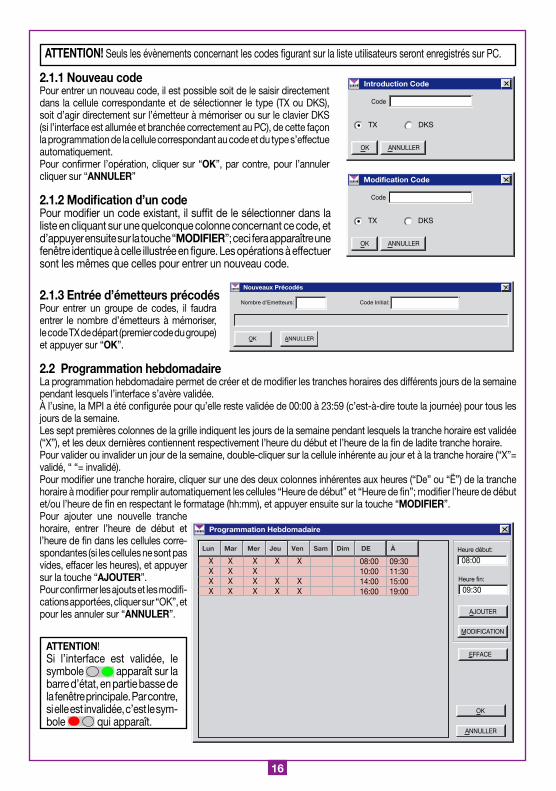
ATTENTION! Seuls les évènements concernant les codes figurant sur la liste utilisateurs seront enregistrés sur PC.
2.�.� Nouveau codePour entrer un nouveau code, il est possible soit de le saisir directement dans la cellule correspondante et de sélectionner le type (TX ou DKS), soit d’agir directement sur l’émetteur à mémoriser ou sur le clavier DKS (si l’interface est allumée et branchée correctement au PC), de cette façon la programmation de la cellule correspondant au code et du type s’effectue automatiquement.Pour confirmer l’opération, cliquer sur “OK”, par contre, pour l’annuler cliquer sur “ANNULER”
2.�.2 Modification d’un codePour modifier un code existant, il suffit de le sélectionner dans la liste en cliquant sur une quelconque colonne concernant ce code, et d’appuyer ensuite sur la touche “MODIFIER”; ceci fera apparaître une fenêtre identique à celle illustrée en figure. Les opérations à effectuer sont les mêmes que celles pour entrer un nouveau code.
2.�.3 Entrée d’émetteurs précodésPour entrer un groupe de codes, il faudra entrer le nombre d’émetteurs à mémoriser, le code TX de départ (premier code du groupe) et appuyer sur “OK”.
2.2 Programmation hebdomadaireLa programmation hebdomadaire permet de créer et de modifier les tranches horaires des différents jours de la semaine pendant lesquels l’interface s’avère validée. À l’usine, la MPI a été configurée pour qu’elle reste validée de 00:00 à 23:59 (c’est-à-dire toute la journée) pour tous les jours de la semaine.Les sept premières colonnes de la grille indiquent les jours de la semaine pendant lesquels la tranche horaire est validée (“X”), et les deux dernières contiennent respectivement l’heure du début et l’heure de la fin de ladite tranche horaire.Pour valider ou invalider un jour de la semaine, double-cliquer sur la cellule inhérente au jour et à la tranche horaire (“X”= validé, “ “= invalidé).Pour modifier une tranche horaire, cliquer sur une des deux colonnes inhérentes aux heures (“De” ou “Ë”) de la tranche horaire à modifier pour remplir automatiquement les cellules “Heure de début” et “Heure de fin”; modifier l’heure de début et/ou l’heure de fin en respectant le formatage (hh:mm), et appuyer ensuite sur la touche “MODIFIER”.Pour ajouter une nouvelle tranche horaire, entrer l’heure de début et l’heure de fin dans les cellules corre-spondantes (si les cellules ne sont pas vides, effacer les heures), et appuyer sur la touche “AJOUTER”. Pour confirmer les ajouts et les modifi-cations apportées, cliquer sur “OK”, et pour les annuler sur “ANNULER”.
ATTENTION!Si l’interface est validée, le symbole apparaît sur la barre d’état, en partie basse de la fenêtre principale. Par contre, si elle est invalidée, c’est le sym-bole qui apparaît.
Introduction Code
Code
OK ANNULLER
TX DKS
Modification Code
Code
OK ANNULLER
TX DKS
Nouveaux Précodés
Nombre d'Emetteurs: Code Initial:
OK ANNULLER
Programmation Hebdomadaire
ANNULLER
OK
Heure début:
08:00
Heure fin:
09:30
AJOUTER
MODIFICATION
EFFACE
Lun Mar Mer Jeu Ven Sam Dim DE À
09:3011:3015:0019:00
08:0010:0014:0016:00
X X X X X X X X X X X X X X X X X X
�7
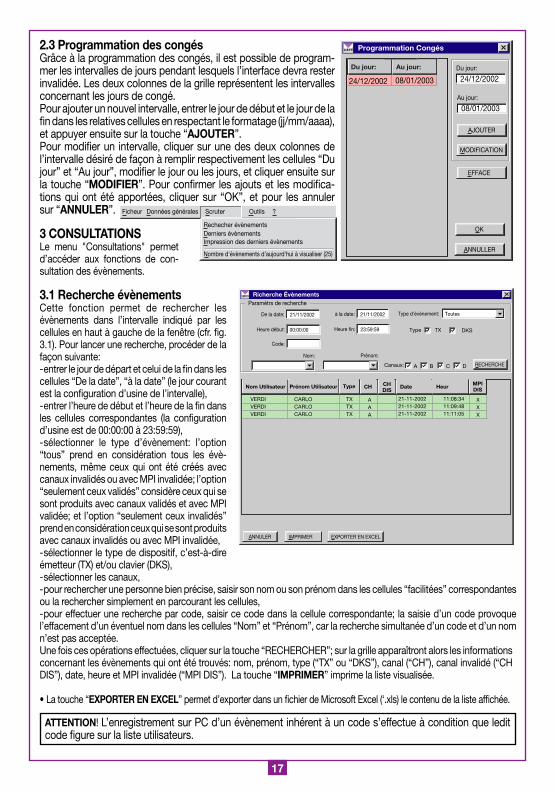
2.3 Programmation des congésGrâce à la programmation des congés, il est possible de program-mer les intervalles de jours pendant lesquels l’interface devra rester invalidée. Les deux colonnes de la grille représentent les intervalles concernant les jours de congé.Pour ajouter un nouvel intervalle, entrer le jour de début et le jour de la fin dans les relatives cellules en respectant le formatage (jj/mm/aaaa), et appuyer ensuite sur la touche “AJOUTER”. Pour modifier un intervalle, cliquer sur une des deux colonnes de l’intervalle désiré de façon à remplir respectivement les cellules “Du jour” et “Au jour”, modifier le jour ou les jours, et cliquer ensuite sur la touche “MODIFIER”. Pour confirmer les ajouts et les modifica-tions qui ont été apportées, cliquer sur “OK”, et pour les annuler sur “ANNULER”.
3 CONSULTATIONSLe menu "Consultations" permet d’accéder aux fonctions de con-sultation des évènements.
3.� Recherche évènementsCette fonction permet de rechercher les évènements dans l’intervalle indiqué par les cellules en haut à gauche de la fenêtre (cfr. fig. 3.1). Pour lancer une recherche, procéder de la façon suivante:- entrer le jour de départ et celui de la fin dans les cellules “De la date”, “à la date” (le jour courant est la configuration d’usine de l’intervalle),- entrer l’heure de début et l’heure de la fin dans les cellules correspondantes (la configuration d’usine est de 00:00:00 à 23:59:59),- sélectionner le type d’évènement: l’option “tous” prend en considération tous les évè-nements, même ceux qui ont été créés avec canaux invalidés ou avec MPI invalidée; l’option “seulement ceux validés” considère ceux qui se sont produits avec canaux validés et avec MPI validée; et l’option “seulement ceux invalidés” prend en considération ceux qui se sont produits avec canaux invalidés ou avec MPI invalidée,- sélectionner le type de dispositif, c’est-à-dire émetteur (TX) et/ou clavier (DKS),- sélectionner les canaux,- pour rechercher une personne bien précise, saisir son nom ou son prénom dans les cellules “facilitées” correspondantes ou la rechercher simplement en parcourant les cellules,- pour effectuer une recherche par code, saisir ce code dans la cellule correspondante; la saisie d’un code provoque l’effacement d’un éventuel nom dans les cellules “Nom” et “Prénom”, car la recherche simultanée d’un code et d’un nom n’est pas acceptée.Une fois ces opérations effectuées, cliquer sur la touche “RECHERCHER”; sur la grille apparaîtront alors les informations concernant les évènements qui ont été trouvés: nom, prénom, type (“TX” ou “DKS”), canal (“CH”), canal invalidé (“CH DIS”), date, heure et MPI invalidée (“MPI DIS”). La touche “IMPRIMER” imprime la liste visualisée.
• La touche “EXPORTER EN EXCEL” permet d’exporter dans un fichier de Microsoft Excel (‘.xls) le contenu de la liste affichée.
ATTENTION! L’enregistrement sur PC d’un évènement inhérent à un code s’effectue à condition que ledit code figure sur la liste utilisateurs.
Programmation Congés
ANNULLER
OK
Du jour:
24/12/2002
Au jour:
08/01/2003
AJOUTER
MODIFICATION
EFFACE
Du jour: Au jour:
24/12/2002 08/01/2003
Rechecher évènementsDerniers évènementsImpression des derniers évènements
Nombre d'évènements d'aujourd'hui à visualiser (25)
Ficheur Données générales Scruter Outils ?
Richerche Évènements
Nom Utilisateur Type MPIDIS
VERDIVERDIVERDI
21-11-200221-11-200221-11-2002
Paramètrs de recherche
De la date: Type d'évènement:
ANNULER IMPRIMER
Prénom Utilisateur
CARLOCARLOCARLO
CH CHDIS
Date Heur
TXTXTX
AAA
11:08:3411:09:4811:11:05
XXX
21/11/2002 à la date: 21/11/2002 Toutes
Heure début: 00:00:00 Heure fin: 23:59:59
Code:
Nom: Prénom:
RECHERCHE
Type TX DKS
Canaux: A B C D
EXPORTER EN EXCEL

�8
3.2 Derniers évènementsCette fenêtre visualise chronologiquement les informations inhérentes aux derniers évènements de la journée courante: type (“TX” ou “DKS”), nom, prénom, canal (“CH”), canal invalidé (“CH DIS”), date, heure et MPI invalidée (“MPI DIS”).Pour modifier le nombre d’évènements à visua-liser, voir paragraphe 3.4.La touche “IMPRIMER” imprime la liste visua-lisée.
3.3 Impression des derniers évènementsCette fonction permet d’imprimer les derniers évè-nements de la journée courante. Il suffit d’entrer le nombre d’évènements à imprimer dans la relative cellule et de cliquer sur “OK”.
3.4 Modification du nombre d’évènements du jour courant à visualiserCette fenêtre permet de modifier le nombre des derniers évènements du jour courant à visualiser (cfr. parag. 3.2). Entrer le nombre désiré (maxi. 1000) dans la relative cellule et confirmer par “OK”.
4 OUTILS
Le menu Outils donne accès à toutes les fonctions de configuration du programme.
4.� Configuration sérielle
Cette fonction permet de sélectionner le port sériel pour la com-munication avec la MPI et de contrôler le branchement effectif au moyen de la touche "Test Connexion".Cette fenêtre s’ouvre automatiquement au premier lancement du programme pour avoir la possibilité de configurer correctement le port COM.
ATTENTION!Pour pouvoir établir la connexion entre PC et interface, celle-ci doit être allumée et branchée correctement au PC au moyen du câble expressément prévu à cet effet. La barre d’état, en partie basse de la fenêtre principale, indique l’état de la connexion:- la mention “INTERFACE MULTIPROTOCOLE EN LIGNE” avec encadré d’un coloris vert signale que la MPI est allumée et branchée correctement,- la mention “INTERFACE MULTIPROTOCOLE NON EN LIGNE” avec encadré d’un coloris rouge signale que la MPI n’est pas allumée ou n’est pas branchée correctement.
Derniers évènements
Nom Utilisateur MPIDIS
VERDIVERDIVERDIVERDIVERDIVERDIVERDIVERDI
21-11-200221-11-200221-11-200221-11-200221-11-200221-11-200221-11-200221-11-2002
SORTIE IMPRIMER
Prénom Utilisateur
CARLOCARLOCARLOCARLOCARLOCARLOCARLOCARLO
CH CHDIS
Date Heur
AAAAABDC
11:08:3411:09:1111:09:4811:11:0512:01:5816:08:0716:08:1016:08:25
XXX
XX
TypeNmbr
12345678
TXTXTXTXTXTXTXTX
Impression les derniers évènements
Impression des derniers
OK SORTIE
évènements
Nombres d'évènements d'aujourd'hui
Nombre d'évènements
OK ANNULER
25
Configuration Port SérielLecture configuration interfaceDiagnostic
Langue
Configurations de Contrôle
Validation Password PrincipalValidation Password UtilisateursValidation Password Utilitaire Diagnostic
Ficheur Données générales Scruter Outils ?
Configuration Port Sériel
OK ANNULER
COM5
COM1 COM2
COM6 COM7
COM3 COM4
COM8
Test connexion
�9
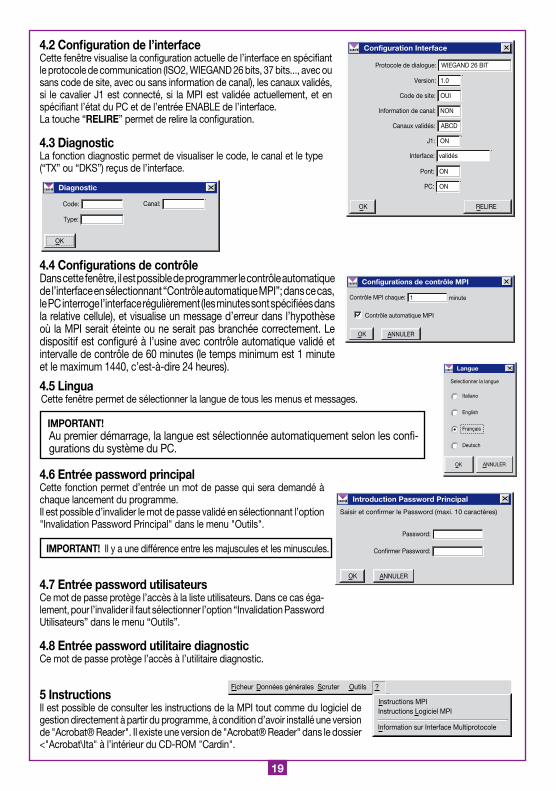
4.2 Configuration de l’interfaceCette fenêtre visualise la configuration actuelle de l’interface en spécifiant le protocole de communication (ISO2, WIEGAND 26 bits, 37 bits..., avec ou sans code de site, avec ou sans information de canal), les canaux validés, si le cavalier J1 est connecté, si la MPI est validée actuellement, et en spécifiant l’état du PC et de l’entrée ENABLE de l’interface.La touche “RELIRE” permet de relire la configuration.
4.3 DiagnosticLa fonction diagnostic permet de visualiser le code, le canal et le type (“TX” ou “DKS”) reçus de l’interface.
4.4 Configurations de contrôleDans cette fenêtre, il est possible de programmer le contrôle automatique de l’interface en sélectionnant “Contrôle automatique MPI”; dans ce cas, le PC interroge l’interface régulièrement (les minutes sont spécifiées dans la relative cellule), et visualise un message d’erreur dans l’hypothèse où la MPI serait éteinte ou ne serait pas branchée correctement. Le dispositif est configuré à l’usine avec contrôle automatique validé et intervalle de contrôle de 60 minutes (le temps minimum est 1 minute et le maximum 1440, c’est-à-dire 24 heures).
4.5 LinguaCette fenêtre permet de sélectionner la langue de tous les menus et messages.
IMPORTANT! Au premier démarrage, la langue est sélectionnée automatiquement selon les confi-gurations du système du PC.
4.6 Entrée password principalCette fonction permet d’entrée un mot de passe qui sera demandé à chaque lancement du programme.Il est possible d’invalider le mot de passe validé en sélectionnant l’option "Invalidation Password Principal" dans le menu "Outils".
IMPORTANT! Il y a une différence entre les majuscules et les minuscules.
4.7 Entrée password utilisateursCe mot de passe protège l’accès à la liste utilisateurs. Dans ce cas éga-lement, pour l’invalider il faut sélectionner l’option “Invalidation Password Utilisateurs” dans le menu “Outils”.
4.8 Entrée password utilitaire diagnosticCe mot de passe protège l’accès à l’utilitaire diagnostic.
5 InstructionsIl est possible de consulter les instructions de la MPI tout comme du logiciel de gestion directement à partir du programme, à condition d’avoir installé une version de "Acrobat® Reader". Il existe une version de "Acrobat® Reader" dans le dossier <"Acrobat\Ita" à l’intérieur du CD-ROM "Cardin".
Configuration Interface
Protocole de dialogue:
OK RELIRE
WIEGAND 26 BIT
Code de site: OUI
Information de canal: NON
Canaux validés: ABCD
J1: ON
Interface: validés
Pont: ON
PC: ON
Version: 1.0
Diagnostic
Code:
OK
Canal:
Type:
Configurations de contrôle MPI
Contrôle MPI chaque:
Contrôle automatique MPI
OK ANNULER
minute1
Langue
ANNULER
Italiano
Selectionner la langue
OK
English
Français
Deutsch
Introduction Password Principal
Password:
Saisir et confirmer le Password (maxi. 10 caractères)
OK ANNULER
Confirmer Password:
Instructions MPIInstructions Logiciel MPI
Information sur Interface Multiprotocole
Ficheur Données générales Scruter Outils ?
20
EinleitungMit dem Programm zur Verwaltung der Multiprotokoll-Schnittstelle (MPI) können die von der Schnittstelle erzeugten Ereignisse angezeigt und die gleiche Schnittstelle zu verschiedenen Tageszeiten und an verschie-denen Tagen gesperrt werden.
Das Programm läuft unter Windows® (95/98, 2000, NT und XP) und ist mittels Durchlaufmenüs strukturiert. Falls das Programm läuft unter Windows®, 2000 NT oder XP der Benutzer muss "System administrator" sein.
ACHTUNG! Damit die von der Schnittstelle erzeugten Ereignisse auf dem PC gespeichert werden, muss das Programm immer laufen und die MPI korrekt an den PC angeschlossen sein.
WICHTIGE KENNTNISSEZur korrekten Verwendung der mitgelieferten Software sind die nachfolgenden Angaben zu befolgen:1) Beim erstmaligen Start öffnet das Programm das Fenster "Serielle Einstellung": sich vergewissern, dass
die MPI eingeschaltet und korrekt an den PC mit einem seriellen Kabel angeschlossen ist, die COM-Port wählen, an die die Schnittstelle angeschlossen ist und "Anschluss prüfen" ausführen (siehe Abschnitt 4.1); wenn das Verfahren erfolgreich abgeschlossen ist, mit "OK" bestätigen, andernfalls eine andere COM-Port wählen. Wenn alles korrekt funktioniert, erscheint auf der Statusleiste auf der unteren Seite des Hauptfensters die Mitteilung "MULTIPROTOKOLL-SCHNITTSTELLE ONLINE" und das Rechteck auf der rechten Seite ist grün.
2) Beim erstmaligen Start wird die Sprache automatisch anhand der Systemeinstellungen des PC eingestellt; wenn die eingestellte Sprache nicht die richtige ist, sich auf das Untermenü "Sprache" unter dem Menü "Extras" begeben.
3) Die Liste der Benutzer öffnen und die Codes an denen man interessiert ist (Handsender oder DKS) speichern (siehe Abschnitt 2.1 und nachfolgende).
4) Das Fenster "Ereignisse des Tages" (aus dem Menü "Einsichtnahme") öffnen, versuchen einen der gespeicherten Codes abzusenden oder mittels der Tastatur einzutippen und überprüfen, ob auf dem Raster der richtige Code erscheint.
DEUTSCH MULTIPROTOKOLL-SCHNITTSTELLE DEUTSCH
2�
BESCHREIBUNG DER MENÜS
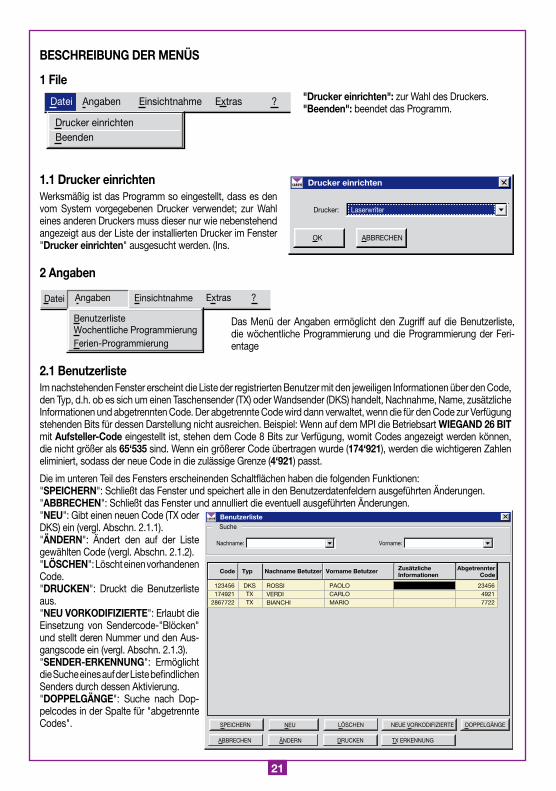
� File"Drucker einrichten": zur Wahl des Druckers."Beenden": beendet das Programm.
�.� Drucker einrichtenWerksmäßig ist das Programm so eingestellt, dass es den vom System vorgegebenen Drucker verwendet; zur Wahl eines anderen Druckers muss dieser nur wie nebenstehend angezeigt aus der Liste der installierten Drucker im Fenster "Drucker einrichten" ausgesucht werden. (Ins. 2 Angaben
Das Menü der Angaben ermöglicht den Zugriff auf die Benutzerliste, die wöchentliche Programmierung und die Programmierung der Feri-entage
2.� BenutzerlisteIm nachstehenden Fenster erscheint die Liste der registrierten Benutzer mit den jeweiligen Informationen über den Code, den Typ, d.h. ob es sich um einen Taschensender (TX) oder Wandsender (DKS) handelt, Nachnahme, Name, zusätzliche Informationen und abgetrennten Code. Der abgetrennte Code wird dann verwaltet, wenn die für den Code zur Verfügung stehenden Bits für dessen Darstellung nicht ausreichen. Beispiel: Wenn auf dem MPI die Betriebsart WIEGAND 26 BIT mit Aufsteller-Code eingestellt ist, stehen dem Code 8 Bits zur Verfügung, womit Codes angezeigt werden können, die nicht größer als 65‘535 sind. Wenn ein größerer Code übertragen wurde (�74‘92�), werden die wichtigeren Zahlen eliminiert, sodass der neue Code in die zulässige Grenze (4‘92�) passt.
Die im unteren Teil des Fensters erscheinenden Schaltflächen haben die folgenden Funktionen:"SPEICHERN": Schließt das Fenster und speichert alle in den Benutzerdatenfeldern ausgeführten Änderungen."ABBRECHEN": Schließt das Fenster und annulliert die eventuell ausgeführten Änderungen."NEU": Gibt einen neuen Code (TX oder DKS) ein (vergl. Abschn. 2.1.1)."ÄNDERN": Ändert den auf der Liste gewählten Code (vergl. Abschn. 2.1.2)."LÖSCHEN": Löscht einen vorhandenen Code."DRUCKEN": Druckt die Benutzerliste aus."NEU VORKODIFIZIERTE": Erlaubt die Einsetzung von Sendercode-"Blöcken" und stellt deren Nummer und den Aus-gangscode ein (vergl. Abschn. 2.1.3)."SENDER-ERKENNUNG": Ermöglicht die Suche eines auf der Liste befindlichen Senders durch dessen Aktivierung."DOPPELGÄNGE": Suche nach Dop-pelcodes in der Spalte für "abgetrennte Codes".
Drucker einrichtenBeenden
Datei Angaben Einsichtnahme Extras ?
Drucker einrichten
Drucker: Laserwriter
OK ABBRECHEN
Benutzerliste
Datei
Wochentliche ProgrammierungFerien-Programmierung
Angaben Einsichtnahme Extras ?
Benutzerliste
TypCode Vorname Betutzer ZusätzlicheInformationen
AbgetrennterCode
DKSTXTX
123456174921
2867722
PAOLOCARLOMARIO
2345649217722
Suche
Nachname: Vorname:
ABBRECHEN ÄNDERN TX ERKENNUNGDRUCKEN
Nachname Betutzer
ROSSIVERDIBIANCHI
SPEICHERN NEU NEUE VORKODIFIZIERTELÖSCHEN DOPPELGÄNGE
22
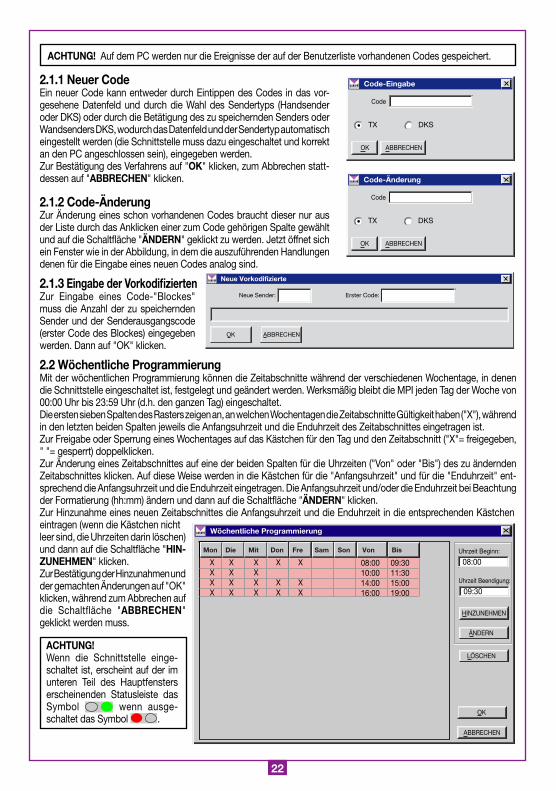
ACHTUNG! Auf dem PC werden nur die Ereignisse der auf der Benutzerliste vorhandenen Codes gespeichert.
2.�.� Neuer CodeEin neuer Code kann entweder durch Eintippen des Codes in das vor-gesehene Datenfeld und durch die Wahl des Sendertyps (Handsender oder DKS) oder durch die Betätigung des zu speichernden Senders oder Wandsenders DKS, wodurch das Datenfeld und der Sendertyp automatisch eingestellt werden (die Schnittstelle muss dazu eingeschaltet und korrekt an den PC angeschlossen sein), eingegeben werden.Zur Bestätigung des Verfahrens auf "OK" klicken, zum Abbrechen statt-dessen auf "ABBRECHEN" klicken.
2.�.2 Code-ÄnderungZur Änderung eines schon vorhandenen Codes braucht dieser nur aus der Liste durch das Anklicken einer zum Code gehörigen Spalte gewählt und auf die Schaltfläche "ÄNDERN" geklickt zu werden. Jetzt öffnet sich ein Fenster wie in der Abbildung, in dem die auszuführenden Handlungen denen für die Eingabe eines neuen Codes analog sind.
2.�.3 Eingabe der VorkodifiziertenZur Eingabe eines Code-"Blockes" muss die Anzahl der zu speichernden Sender und der Senderausgangscode (erster Code des Blockes) eingegeben werden. Dann auf "OK" klicken.
2.2 Wöchentliche ProgrammierungMit der wöchentlichen Programmierung können die Zeitabschnitte während der verschiedenen Wochentage, in denen die Schnittstelle eingeschaltet ist, festgelegt und geändert werden. Werksmäßig bleibt die MPI jeden Tag der Woche von 00:00 Uhr bis 23:59 Uhr (d.h. den ganzen Tag) eingeschaltet.Die ersten sieben Spalten des Rasters zeigen an, an welchen Wochentagen die Zeitabschnitte Gültigkeit haben ("X"), während in den letzten beiden Spalten jeweils die Anfangsuhrzeit und die Enduhrzeit des Zeitabschnittes eingetragen ist.Zur Freigabe oder Sperrung eines Wochentages auf das Kästchen für den Tag und den Zeitabschnitt ("X"= freigegeben, " "= gesperrt) doppelklicken. Zur Änderung eines Zeitabschnittes auf eine der beiden Spalten für die Uhrzeiten ("Von" oder "Bis") des zu ändernden Zeitabschnittes klicken. Auf diese Weise werden in die Kästchen für die "Anfangsuhrzeit" und für die "Enduhrzeit" ent-sprechend die Anfangsuhrzeit und die Enduhrzeit eingetragen. Die Anfangsuhrzeit und/oder die Enduhrzeit bei Beachtung der Formatierung (hh:mm) ändern und dann auf die Schaltfläche "ÄNDERN" klicken.Zur Hinzunahme eines neuen Zeitabschnittes die Anfangsuhrzeit und die Enduhrzeit in die entsprechenden Kästchen eintragen (wenn die Kästchen nicht leer sind, die Uhrzeiten darin löschen) und dann auf die Schaltfläche "HIN-ZUNEHMEN" klicken.Zur Bestätigung der Hinzunahmen und der gemachten Änderungen auf "OK" klicken, während zum Abbrechen auf die Schaltfläche "ABBRECHEN" geklickt werden muss.
ACHTUNG!Wenn die Schnittstelle einge-schaltet ist, erscheint auf der im unteren Teil des Hauptfensters erscheinenden Statusleiste das Symbol wenn ausge-schaltet das Symbol .
Code-Eingabe
Code
OK ABBRECHEN
TX DKS
Code-Änderung
Code
OK ABBRECHEN
TX DKS
Neue Vorkodifizierte
Neue Sender: Erster Code:
OK ABBRECHEN
Wöchentliche Programmierung
ABBRECHEN
OK
Uhrzeit Beginn:
08:00
Uhrzeit Beendigung:
09:30
HINZUNEHMEN
ÄNDERN
LÖSCHEN
Mon Die Mit Don Fre Sam Son Von Bis
09:3011:3015:0019:00
08:0010:0014:0016:00
X X X X XX X XX X X X XX X X X X
23
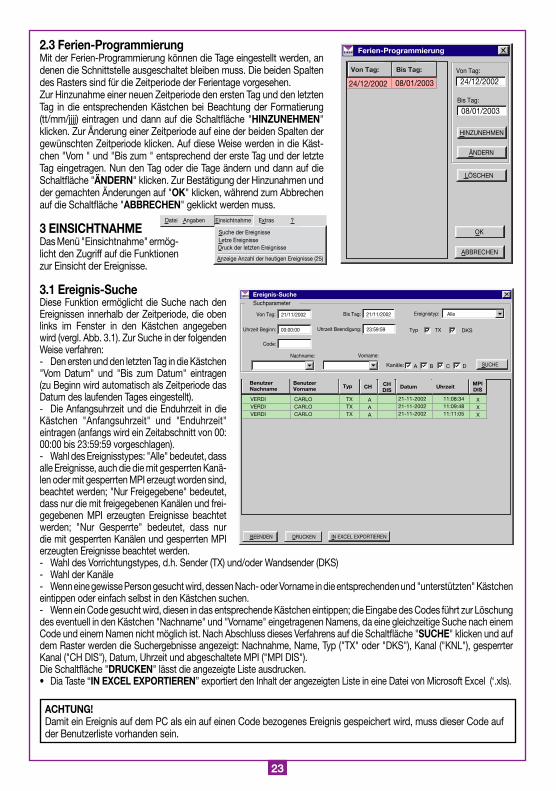
2.3 Ferien-ProgrammierungMit der Ferien-Programmierung können die Tage eingestellt werden, an denen die Schnittstelle ausgeschaltet bleiben muss. Die beiden Spalten des Rasters sind für die Zeitperiode der Ferientage vorgesehen.Zur Hinzunahme einer neuen Zeitperiode den ersten Tag und den letzten Tag in die entsprechenden Kästchen bei Beachtung der Formatierung (tt/mm/jjjj) eintragen und dann auf die Schaltfläche "HINZUNEHMEN" klicken. Zur Änderung einer Zeitperiode auf eine der beiden Spalten der gewünschten Zeitperiode klicken. Auf diese Weise werden in die Käst-chen "Vom " und "Bis zum " entsprechend der erste Tag und der letzte Tag eingetragen. Nun den Tag oder die Tage ändern und dann auf die Schaltfläche "ÄNDERN" klicken. Zur Bestätigung der Hinzunahmen und der gemachten Änderungen auf "OK" klicken, während zum Abbrechen auf die Schaltfläche "ABBRECHEN" geklickt werden muss.
3 EINSICHTNAHMEDas Menü "Einsichtnahme" ermög-licht den Zugriff auf die Funktionen zur Einsicht der Ereignisse.
3.� Ereignis-SucheDiese Funktion ermöglicht die Suche nach den Ereignissen innerhalb der Zeitperiode, die oben links im Fenster in den Kästchen angegeben wird (vergl. Abb. 3.1). Zur Suche in der folgenden Weise verfahren:- Den ersten und den letzten Tag in die Kästchen "Vom Datum" und "Bis zum Datum" eintragen (zu Beginn wird automatisch als Zeitperiode das Datum des laufenden Tages eingestellt).- Die Anfangsuhrzeit und die Enduhrzeit in die Kästchen "Anfangsuhrzeit" und "Enduhrzeit" eintragen (anfangs wird ein Zeitabschnitt von 00:00:00 bis 23:59:59 vorgeschlagen).- Wahl des Ereignisstypes: "Alle" bedeutet, dass alle Ereignisse, auch die die mit gesperrten Kanä-len oder mit gesperrten MPI erzeugt worden sind, beachtet werden; "Nur Freigegebene" bedeutet, dass nur die mit freigegebenen Kanälen und frei-gegebenen MPI erzeugten Ereignisse beachtet werden; "Nur Gesperrte" bedeutet, dass nur die mit gesperrten Kanälen und gesperrten MPI erzeugten Ereignisse beachtet werden.- Wahl des Vorrichtungstypes, d.h. Sender (TX) und/oder Wandsender (DKS)- Wahl der Kanäle- Wenn eine gewisse Person gesucht wird, dessen Nach- oder Vorname in die entsprechenden und "unterstützten" Kästchen eintippen oder einfach selbst in den Kästchen suchen.- Wenn ein Code gesucht wird, diesen in das entsprechende Kästchen eintippen; die Eingabe des Codes führt zur Löschung des eventuell in den Kästchen "Nachname" und "Vorname" eingetragenen Namens, da eine gleichzeitige Suche nach einem Code und einem Namen nicht möglich ist. Nach Abschluss dieses Verfahrens auf die Schaltfläche "SUCHE" klicken und auf dem Raster werden die Suchergebnisse angezeigt: Nachnahme, Name, Typ ("TX" oder "DKS"), Kanal ("KNL"), gesperrter Kanal ("CH DIS"), Datum, Uhrzeit und abgeschaltete MPI ("MPI DIS").Die Schaltfläche "DRUCKEN" lässt die angezeigte Liste ausdrucken.• Dia Taste “IN EXCEL EXPORTIEREN” exportiert den Inhalt der angezeigten Liste in eine Datei von Microsoft Excel (‘.xls).
ACHTUNG!Damit ein Ereignis auf dem PC als ein auf einen Code bezogenes Ereignis gespeichert wird, muss dieser Code auf der Benutzerliste vorhanden sein.
Ferien-Programmierung
ABBRECHEN
OK
Von Tag:
24/12/2002
Bis Tag:
08/01/2003
HINZUNEHMEN
ÄNDERN
LÖSCHEN
Von Tag: Bis Tag:
24/12/2002 08/01/2003
Suche der EreignisseLetze EreignisseDruck der letzten Ereignisse
Anzeige Anzahl der heutigen Ereignisse (25)
Datei Angaben Einsichtnahme Extras ?
Ereignis-Suche
BenutzerNachname Typ MPI
DIS
VERDIVERDIVERDI
21-11-200221-11-200221-11-2002
Suchparameter
Von Tag: Ereignistyp:
BEENDEN DRUCKEN
BenutzerVorname
CARLOCARLOCARLO
CH CHDIS
Datum Uhrzeit
TXTXTX
AAA
11:08:3411:09:4811:11:05
XXX
21/11/2002 Bis Tag: 21/11/2002 Alle
Uhrzeit Beginn: 00:00:00 Uhrzeit Beendigung: 23:59:59
Code:
Nachname: Vorname:
SUCHE
Typ TX DKS
Kanäle: A B C D
IN EXCEL EXPORTIEREN
24
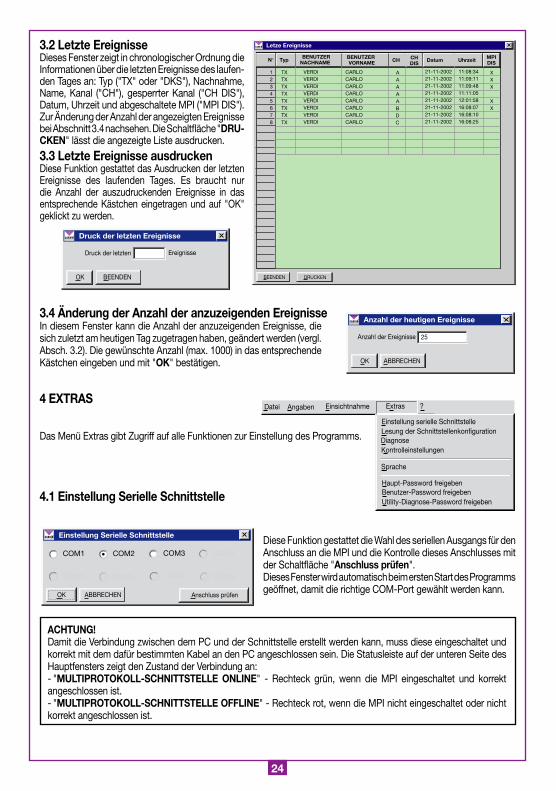
3.2 Letzte EreignisseDieses Fenster zeigt in chronologischer Ordnung die Informationen über die letzten Ereignisse des laufen-den Tages an: Typ ("TX" oder "DKS"), Nachnahme, Name, Kanal ("CH"), gesperrter Kanal ("CH DIS"), Datum, Uhrzeit und abgeschaltete MPI ("MPI DIS"). Zur Änderung der Anzahl der angezeigten Ereignisse bei Abschnitt 3.4 nachsehen. Die Schaltfläche "DRU-CKEN" lässt die angezeigte Liste ausdrucken.
3.3 Letzte Ereignisse ausdruckenDiese Funktion gestattet das Ausdrucken der letzten Ereignisse des laufenden Tages. Es braucht nur die Anzahl der auszudruckenden Ereignisse in das entsprechende Kästchen eingetragen und auf "OK" geklickt zu werden.
3.4 Änderung der Anzahl der anzuzeigenden EreignisseIn diesem Fenster kann die Anzahl der anzuzeigenden Ereignisse, die sich zuletzt am heutigen Tag zugetragen haben, geändert werden (vergl. Absch. 3.2). Die gewünschte Anzahl (max. 1000) in das entsprechende Kästchen eingeben und mit "OK" bestätigen.
4 EXTRAS
Das Menü Extras gibt Zugriff auf alle Funktionen zur Einstellung des Programms.
4.� Einstellung Serielle Schnittstelle
Diese Funktion gestattet die Wahl des seriellen Ausgangs für den Anschluss an die MPI und die Kontrolle dieses Anschlusses mit der Schaltfläche "Anschluss prüfen".Dieses Fenster wird automatisch beim ersten Start des Programms geöffnet, damit die richtige COM-Port gewählt werden kann.
ACHTUNG!Damit die Verbindung zwischen dem PC und der Schnittstelle erstellt werden kann, muss diese eingeschaltet und korrekt mit dem dafür bestimmten Kabel an den PC angeschlossen sein. Die Statusleiste auf der unteren Seite des Hauptfensters zeigt den Zustand der Verbindung an:- "MULTIPROTOKOLL-SCHNITTSTELLE ONLINE" - Rechteck grün, wenn die MPI eingeschaltet und korrekt angeschlossen ist.- "MULTIPROTOKOLL-SCHNITTSTELLE OFFLINE" - Rechteck rot, wenn die MPI nicht eingeschaltet oder nicht korrekt angeschlossen ist.
Letze Ereignisse
BENUTZERNACHNAME
MPIDIS
VERDIVERDIVERDIVERDIVERDIVERDIVERDIVERDI
21-11-200221-11-200221-11-200221-11-200221-11-200221-11-200221-11-200221-11-2002
BEENDEN DRUCKEN
BENUTZERVORNAME
CARLOCARLOCARLOCARLOCARLOCARLOCARLOCARLO
CH CHDIS
Datum Uhrzeit
AAAAABDC
11:08:3411:09:1111:09:4811:11:0512:01:5816:08:0716:08:1016:08:25
XXX
XX
TypN°
12345678
TXTXTXTXTXTXTXTX
Druck der letzten Ereignisse
Druck der letzten
OK BEENDEN
Ereignisse
Anzahl der heutigen Ereignisse
Anzahl der Ereignisse
OK ABBRECHEN
25
Einstellung serielle SchnittstelleLesung der SchnittstellenkonfigurationDiagnose
Sprache
Kontrolleinstellungen
Haupt-Password freigebenBenutzer-Password freigebenUtility-Diagnose-Password freigeben
Datei Angaben Einsichtnahme Extras ?
Einstellung Serielle Schnittstelle
OK ABBRECHEN
COM5
COM1 COM2
COM6 COM7
COM3 COM4
COM8
Anschluss prüfen
25
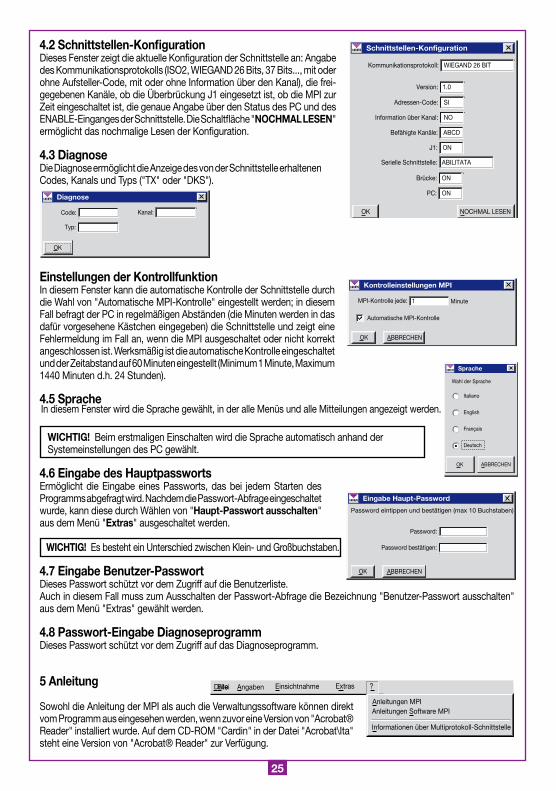
4.2 Schnittstellen-KonfigurationDieses Fenster zeigt die aktuelle Konfiguration der Schnittstelle an: Angabe des Kommunikationsprotokolls (ISO2, WIEGAND 26 Bits, 37 Bits..., mit oder ohne Aufsteller-Code, mit oder ohne Information über den Kanal), die frei-gegebenen Kanäle, ob die Überbrückung J1 eingesetzt ist, ob die MPI zur Zeit eingeschaltet ist, die genaue Angabe über den Status des PC und des ENABLE-Einganges der Schnittstelle. Die Schaltfläche "NOCHMAL LESEN" ermöglicht das nochmalige Lesen der Konfiguration.
4.3 DiagnoseDie Diagnose ermöglicht die Anzeige des von der Schnittstelle erhaltenen Codes, Kanals und Typs ("TX" oder "DKS").
Einstellungen der KontrollfunktionIn diesem Fenster kann die automatische Kontrolle der Schnittstelle durch die Wahl von "Automatische MPI-Kontrolle" eingestellt werden; in diesem Fall befragt der PC in regelmäßigen Abständen (die Minuten werden in das dafür vorgesehene Kästchen eingegeben) die Schnittstelle und zeigt eine Fehlermeldung im Fall an, wenn die MPI ausgeschaltet oder nicht korrekt angeschlossen ist. Werksmäßig ist die automatische Kontrolle eingeschaltet und der Zeitabstand auf 60 Minuten eingestellt (Minimum 1 Minute, Maximum 1440 Minuten d.h. 24 Stunden).
4.5 SpracheIn diesem Fenster wird die Sprache gewählt, in der alle Menüs und alle Mitteilungen angezeigt werden.
WICHTIG! Beim erstmaligen Einschalten wird die Sprache automatisch anhand der Systemeinstellungen des PC gewählt.
4.6 Eingabe des HauptpasswortsErmöglicht die Eingabe eines Passworts, das bei jedem Starten des Programms abgefragt wird. Nachdem die Passwort-Abfrage eingeschaltet wurde, kann diese durch Wählen von "Haupt-Passwort ausschalten" aus dem Menü "Extras" ausgeschaltet werden.
WICHTIG! Es besteht ein Unterschied zwischen Klein- und Großbuchstaben.
4.7 Eingabe Benutzer-PasswortDieses Passwort schützt vor dem Zugriff auf die Benutzerliste. Auch in diesem Fall muss zum Ausschalten der Passwort-Abfrage die Bezeichnung "Benutzer-Passwort ausschalten" aus dem Menü "Extras" gewählt werden.
4.8 Passwort-Eingabe DiagnoseprogrammDieses Passwort schützt vor dem Zugriff auf das Diagnoseprogramm.
5 Anleitung
Sowohl die Anleitung der MPI als auch die Verwaltungssoftware können direkt vom Programm aus eingesehen werden, wenn zuvor eine Version von "Acrobat® Reader" installiert wurde. Auf dem CD-ROM "Cardin" in der Datei "Acrobat\Ita" steht eine Version von "Acrobat® Reader" zur Verfügung.
Schnittstellen-Konfiguration
Kommunikationsprotokoll:
OK NOCHMAL LESEN
WIEGAND 26 BIT
Adressen-Code: SI
Information über Kanal: NO
Befähigte Kanäle: ABCD
J1: ON
Serielle Schnittstelle: ABILITATA
Brücke: ON
PC: ON
Version: 1.0
Diagnose
Code:
OK
Kanal:
Typ:
Kontrolleinstellungen MPI
MPI-Kontrolle jede:
Automatische MPI-Kontrolle
OK ABBRECHEN
Minute1
Sprache
ABBRECHEN
Italiano
Wahl der Sprache
OK
English
Français
Deutsch
Eingabe Haupt-Password
Password:
Password eintippen und bestätigen (max 10 Buchstaben)
OK ABBRECHEN
Password bestätigen:
Anleitungen MPI
File
Anleitungen Software MPI
Informationen über Multiprotokoll-Schnittstelle
Datei Angaben Einsichtnahme Extras ?