Audya Series - Ketron · Audya Series ISTRUZIONI PER IL MONTAGGIO DEL KIT SSD INSTRUCTIONS TO...
24
Audya Series ISTRUZIONI PER IL MONTAGGIO DEL KIT SSD INSTRUCTIONS TO INSTALL THE KIT SSD
Transcript of Audya Series - Ketron · Audya Series ISTRUZIONI PER IL MONTAGGIO DEL KIT SSD INSTRUCTIONS TO...

Audya Series
ISTRUZIONI PER IL MONTAGGIO DEL KIT SSD
INSTRUCTIONS TO INSTALL THE KIT SSD

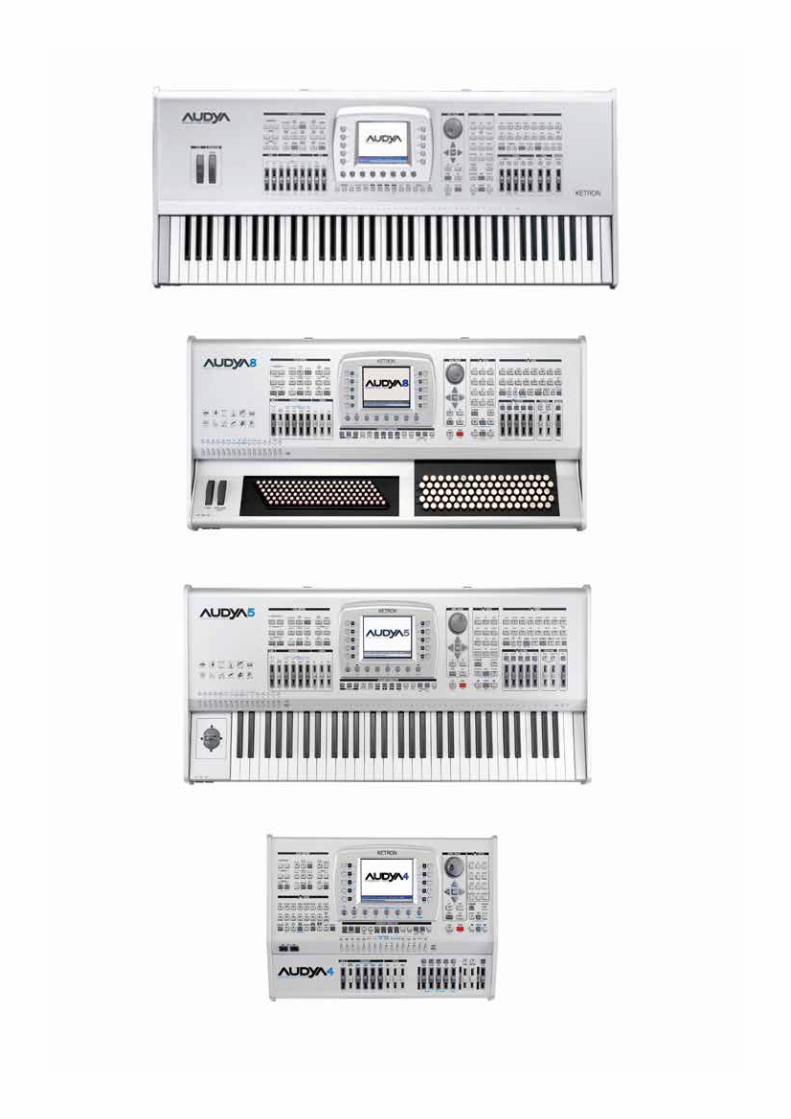


ISTRUZIONI PER L’APERTURA DI AUDYA (FIG. 1)
1. Svitare le 4 viti poste sul fondo2. Svitare le 2 viti poste sulle fiancate laterali3. Svitare le 8 viti poste sul lato posteriore4. Alzare di alcuni centimetri il coperchio comandi verso l’alto facendo attenzione a non danneggiare i cablaggi5. Ruotare il coperchio comandi ed appoggiarlo su un piano
OPEN AUDYA INSTRUCTIONS (FIG. 1)
1. Remove all (4) screws placed on bottom2. Remove (2) screws located on side panels3. Remove (8) screws located on back panel4. Lift up (for some inch) top panel and move it carefully to avoid unintentional unplug cable5. Rotate top panel even to lean working area
ISTRUZIONI PER L’APERTURA DI AUDYA5 (FIG. 2)
1. Svitare le 3 viti poste sul fondo2. Svitare le 2 viti poste sulle fiancate laterali3. Svitare le 7 viti poste sul lato posteriore4. Alzare di alcuni centimetri il coperchio comandi verso l’alto facendo attenzione a non danneggiare i cablaggi5. Ruotare il coperchio comandi ed appoggiarlo su un piano
OPEN AUDYA5 INSTRUCTIONS (FIG. 2)
1. Remove all (3) screws placed on bottom2. Remove (2) screws located on side panels3. Remove (7) screws located on back panel4. Lift up (for some inch) top panel and move it carefully to avoid unintentional unplug cable5. Rotate top panel even to lean working area
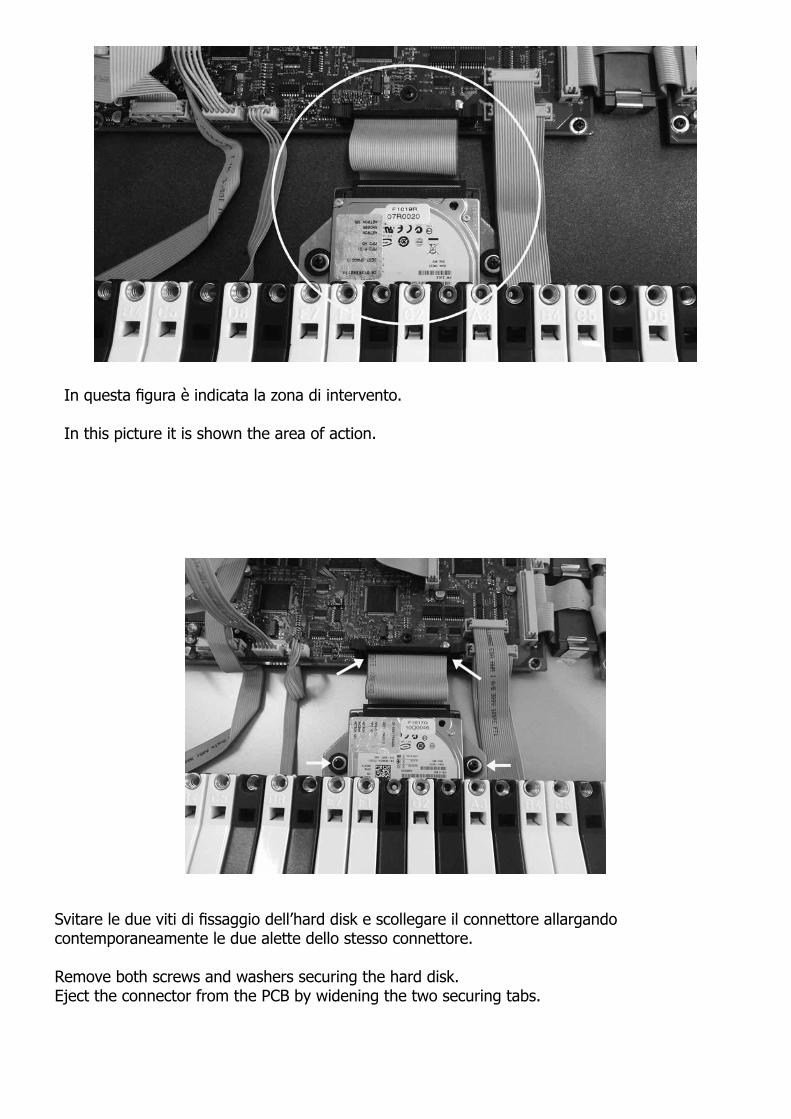
In questa figura è indicata la zona di intervento.
In this picture it is shown the area of action.
Svitare le due viti di fissaggio dell’hard disk e scollegare il connettore allargando contemporaneamente le due alette dello stesso connettore.
Remove both screws and washers securing the hard disk. Eject the connector from the PCB by widening the two securing tabs.

Sollevare l’hard disk e sfilarlo dalla sede.
Lift the hard drive and remove it from the instrument.
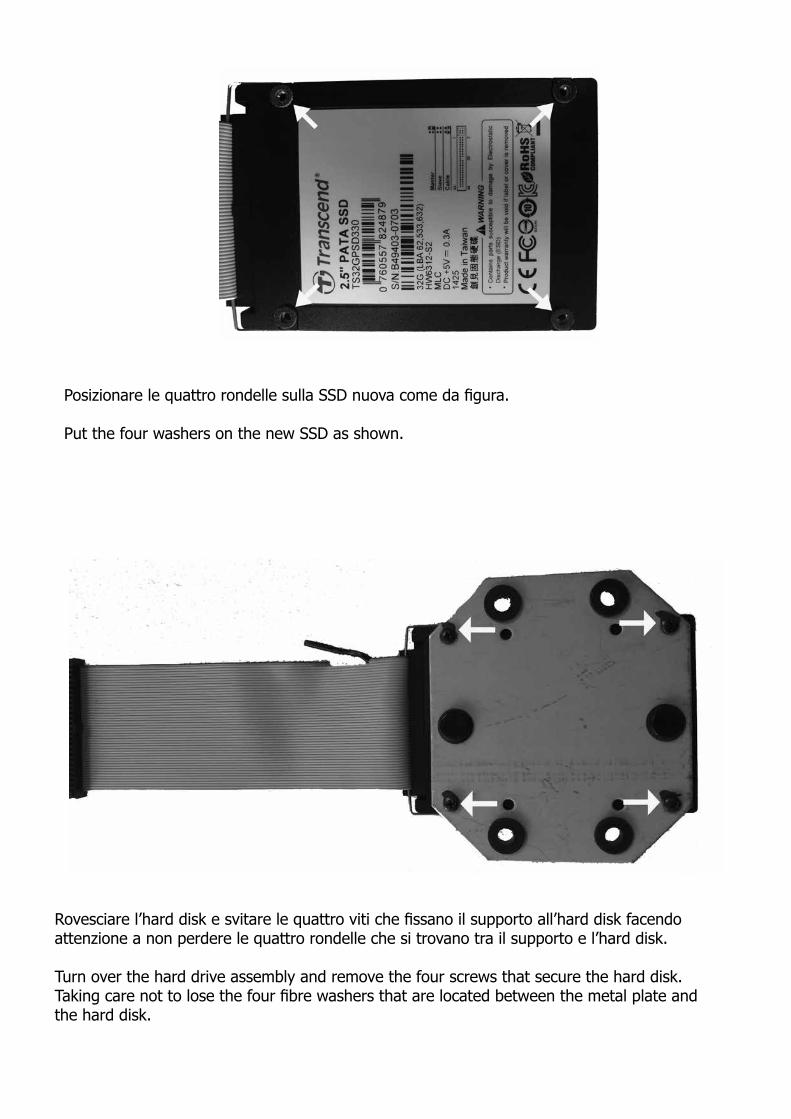
Rovesciare l’hard disk e svitare le quattro viti che fissano il supporto all’hard disk facendo attenzione a non perdere le quattro rondelle che si trovano tra il supporto e l’hard disk.
Turn over the hard drive assembly and remove the four screws that secure the hard disk. Taking care not to lose the four fibre washers that are located between the metal plate and the hard disk.

Posizionare le quattro rondelle sulla SSD nuova come da figura.
Put the four washers on the new SSD as shown.
Posizionare e avvitere il supporto sulla SSD nuova facendo attenzione a non spostare le rondelle posizionate precedentemente.
Place and screw the support of new SSD, taking care not move the washers positioned previously.

Infilare la SSD completa di supporto nella sede e avvitare le due viti precedentemente tolte. Per ultimo collegare il connettore posizionandolo in modo preciso e spingendolo verso il basso. Insert the complete SSD assembly into the instrument and attach with two screws and washers previously removed.Finally, install the connector into the PCB by carefully pushing it down into the PCB socket.
Chiudere lo strumento con cura e facendo attenzione.Utilizzare le viti tolte in precedenza.
Carefully refit the top panel taking care not to trap cables. Reassemble using the previously removed screws.


ISTRUZIONI PER L’APERTURA DI AUDYA4 (FIG. 4)
1. Svitare le 5 viti poste sul fondo2. Svitare le 5 viti poste sul lato posteriore3. Alzare di alcuni centimetri il coperchio comandi verso l’alto facendo attenzione a non danneggiare i cablaggi4. Ruotare il coperchio comandi ed appoggiarlo su un piano
OPEN AUDYA4 INSTRUCTIONS (FIG. 4)
1. Remove all (5) screws placed on bottom2. Remove all (5) screws located on back panel3. Lift up (for some inch) top panel and move it carefully to avoid unintentional unplug cable4. Rotate top panel even to lean working area
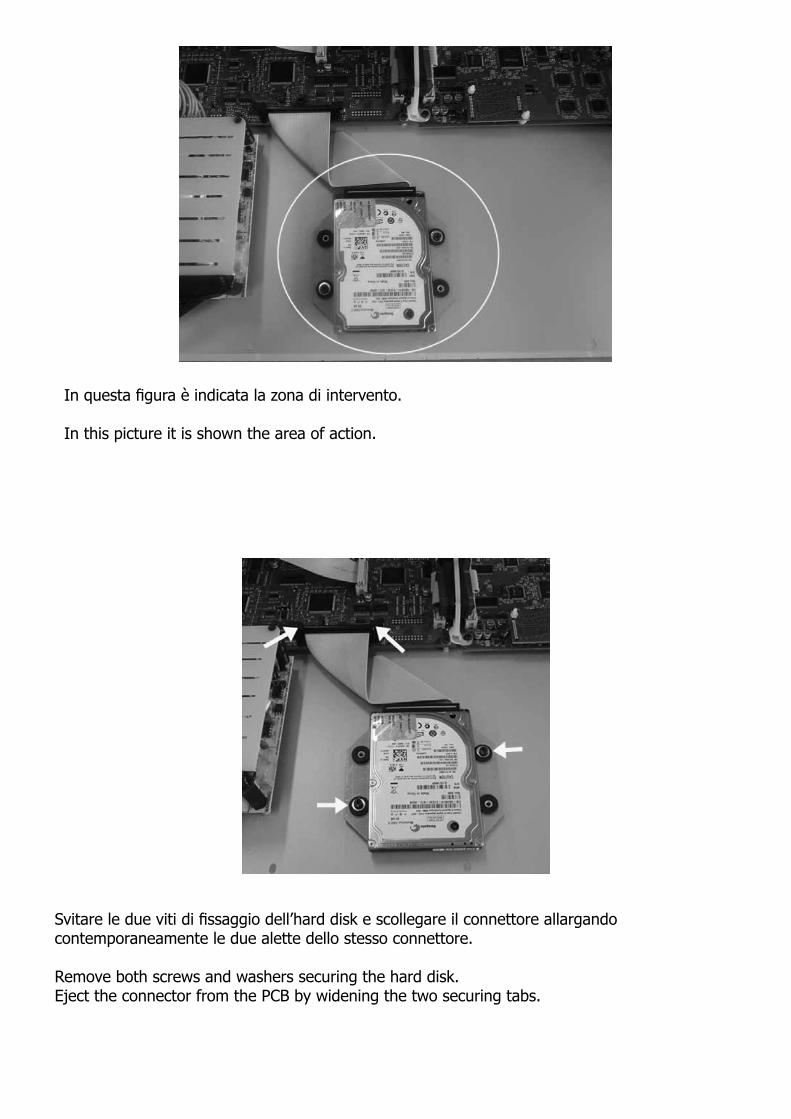
In questa figura è indicata la zona di intervento.
In this picture it is shown the area of action.
Svitare le due viti di fissaggio dell’hard disk e scollegare il connettore allargando contemporaneamente le due alette dello stesso connettore.
Remove both screws and washers securing the hard disk. Eject the connector from the PCB by widening the two securing tabs.

Sollevare l’hard disk e sfilarlo dalla sede.
Lift the hard drive and remove it from the instrument.
Rovesciare l’hard disk e svitare le quattro viti che fissano il supporto all’hard disk facendo attenzione a non perdere le quattro rondelle che si trovano tra il supporto e l’hard disk.
Turn over the hard drive assembly and remove the four screws that secure the hard disk. Taking care not to lose the four fibre washers that are located between the metal plate and the hard disk.
Posizionare le quattro rondelle sulla SSD nuova come da figura.
Put the four washers on the new SSD as shown.
Rovesciare l’hard disk e svitare le quattro viti che fissano il supporto all’hard disk facendo attenzione a non perdere le quattro rondelle che si trovano tra il supporto e l’hard disk.
Turn over the hard drive assembly and remove the four screws that secure the hard disk. Taking care not to lose the four fibre washers that are located between the metal plate and the hard disk.

Chiudere lo strumento con cura e facendo attenzione.Utilizzare le viti tolte in precedenza.
Carefully refit the top panel taking care not to trap cables. Reassemble using the previously removed screws.
Infilare la SSD completa di supporto nella sede e avvitare le due viti precedentemente tolte. Per ultimo collegare il connettore posizionandolo in modo preciso e spingendolo verso il basso. Insert the complete SSD assembly into the instrument and attach with two screws and washers previously removed.Finally, install the connector into the PCB by carefully pushing it down into the PCB socket.

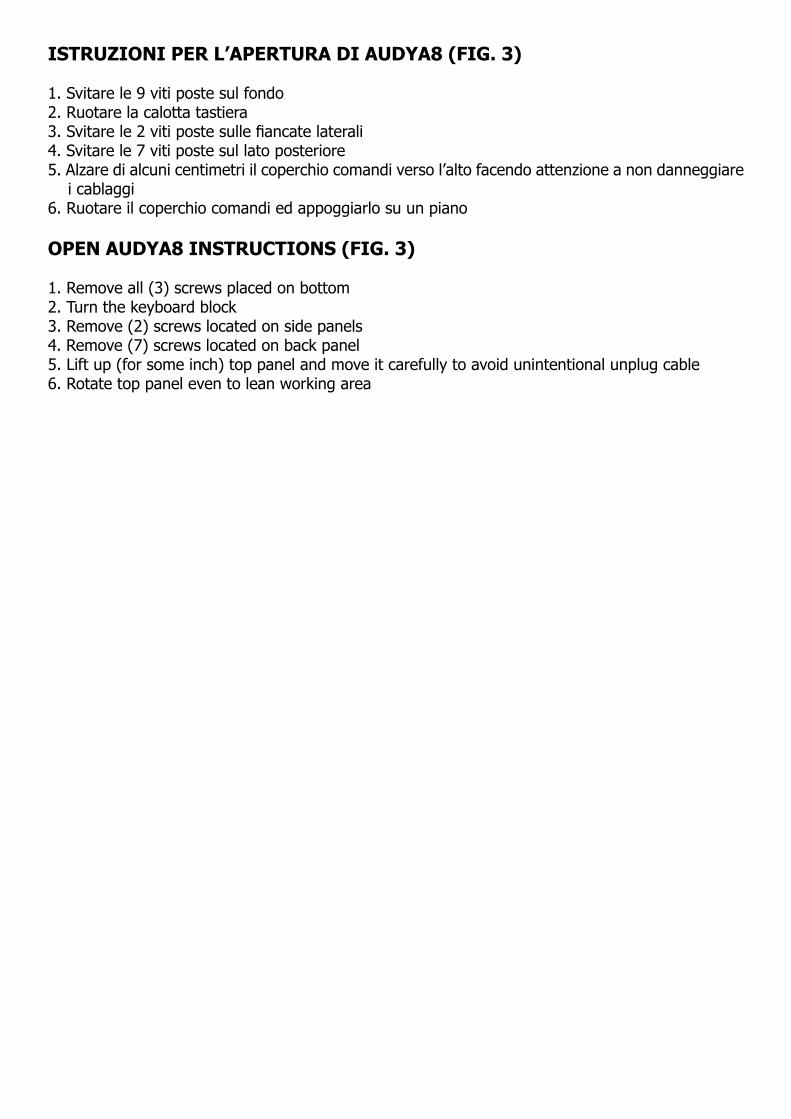
ISTRUZIONI PER L’APERTURA DI AUDYA8 (FIG. 3)
1. Svitare le 9 viti poste sul fondo2. Ruotare la calotta tastiera3. Svitare le 2 viti poste sulle fiancate laterali4. Svitare le 7 viti poste sul lato posteriore5. Alzare di alcuni centimetri il coperchio comandi verso l’alto facendo attenzione a non danneggiare i cablaggi6. Ruotare il coperchio comandi ed appoggiarlo su un piano
OPEN AUDYA8 INSTRUCTIONS (FIG. 3)
1. Remove all (3) screws placed on bottom2. Turn the keyboard block3. Remove (2) screws located on side panels4. Remove (7) screws located on back panel5. Lift up (for some inch) top panel and move it carefully to avoid unintentional unplug cable6. Rotate top panel even to lean working area

In questa figura è indicata la zona di intervento.
In this picture it is shown the area of action.
Svitare le due viti di fissaggio dell’hard disk e scollegare il connettore allargando contemporaneamente le due alette dello stesso connettore.
Remove both screws and washers securing the hard disk. Eject the connector from the PCB by widening the two securing tabs.

Sollevare l’hard disk e sfilarlo dalla sede.
Lift the hard drive and remove it from the instrument.
Rovesciare l’hard disk e svitare le quattro viti che fissano il supporto all’hard disk facendo attenzione a non perdere le quattro rondelle che si trovano tra il supporto e l’hard disk.
Turn over the hard drive assembly and remove the four screws that secure the hard disk. Taking care not to lose the four fibre washers that are located between the metal plate and the hard disk.

Posizionare le quattro rondelle sulla SSD nuova come da figura.
Put the four washers on the new SSD as shown.
Rovesciare l’hard disk e svitare le quattro viti che fissano il supporto all’hard disk facendo attenzione a non perdere le quattro rondelle che si trovano tra il supporto e l’hard disk.
Turn over the hard drive assembly and remove the four screws that secure the hard disk. Taking care not to lose the four fibre washers that are located between the metal plate and the hard disk.

Chiudere lo strumento con cura e facendo attenzione.Utilizzare le viti tolte in precedenza.
Carefully refit the top panel taking care not to trap cables. Reassemble using the previously removed screws.
Infilare la SSD completa di supporto nella sede e avvitare le due viti precedentemente tolte. Per ultimo collegare il connettore posizionandolo in modo preciso e spingendolo verso il basso. Insert the complete SSD assembly into the instrument and attach with two screws and washers previously removed.Finally, install the connector into the PCB by carefully pushing it down into the PCB socket.


KETRON s.r.l.Via Giuseppe Taliercio, 7
60131 Ancona (Italy)Tel. +39 071 285771Fax +39 071 2857748
Web www.ketron.itEmail [email protected]