126.2936.30…ZWF365.qxd 6/6/08 11:06 Página 1 · lavatrice oppure per selezionare l’opzione...
55
Libretto Istruzioni User's Manual Lava- biancheria Washing machine ZWF 365 126.2936.30…ZWF365.qxd 6/6/08 11:06 Página 1
Transcript of 126.2936.30…ZWF365.qxd 6/6/08 11:06 Página 1 · lavatrice oppure per selezionare l’opzione...

LibrettoIstruzioni
User'sManual
Lava-biancheria
Washingmachine
ZWF 365
126.2936.30…ZWF365.qxd 6/6/08 11:06 Página 1

2
Indice
Avvertenze.....................................................3
Descrizione dell’apparecchio .........................5
Cassetto detersivo .........................................5
Pannello comandi ..........................................6
Tabella dei programmi ...................................7
Guida al lavaggio...........................................9
Primo utilizzo................................................11
Sequenza delle operazioni ..........................12
Manutenzione e pulizia................................15
Anomalie di funzionamento .........................17
Caratteristiche tecniche ...............................20
Dati di consumo...........................................21
Installazione.................................................22
Ambiente......................................................24
Garanzia/Servizio clienti ..............................25
Garanzia Europea........................................25
Grazie per aver scelto il nostro prodotto
Le auguriamo che la sua nuova apparecchiatura soddisfi pienamente le sue attese e auspichiamoche scelga ancora la nostra marca quando acquisterà elettrodomestici per la sua casa. La preghiamo di leggere attentamente il libretto istruzioni e di conservarlo come documentazionedi riferimento.Raccomandiamo inoltre di consegnare il libretto istruzioni all'eventuale futuro possessoredell'apparecchio.
In questo manuale per l’uso sono utilizzati i seguenti simboli:
Informazioni importanti relative alla sicurezza e alla prevenzione di danni all’apparecchio
Informazioni generali
Informazioni ambientali
126.2936.30…ZWF365.qxd 6/6/08 11:06 Página 2

3
Avvertenze
Queste avvertenze sono state preparate perla vostra sicurezza e quella degli altri. Siprega di leggerle attentamente prima diinstallare e utilizzare l'apparecchio. Viringraziamo per l'attenzione. Conservarequesto manuale di istruzioni. In caso dirivendita o cessione ad un'altra persona, ilmanuale per l'uso deve accompagnarel'apparecchio. Il nuovo utente potràconoscere il funzionamento dellalavabiancheria ed essere a conoscenzadegli avvertimenti relativi.
Avvertenze generali● Non modificare o cercare di modificare le
caratteristiche di questo apparecchio.Questo comportamento potrebbe provocareun pericolo per l'utilizzatore.
● Togliere dalle tasche degli indumenti primadel lavaggio tutti gli oggetti come monete,spille di sicurezza, spille, viti, che potrebberocausare danni.
● Utilizzare la quantità di detersivo indicata nelparagrafo «Dosaggio dei detersivi».
● Raggruppare i piccoli indumenti comecalzini, cinture ecc. in un sacchetto di tela oin una retina.
● Staccare la presa di corrente e il rubinettodell'acqua dopo l'uso dell'apparecchio.
● Staccare la lavabiancheria dalla cor-renteprima di procedere alla pulizia o allamanutenzione.
● Non lavare a macchina articoli di biancheriacon ferretti, tessuti senza orlo o strappati.
Installazione● Al ricevimento dell'apparecchio, disimballare
immediatamente l'apparecchio. Verificarel'aspetto generale. Riportare le eventualiriserve sulla bolletta di spedizione di cui siconserverà una copia.
● L’apparecchio deve essere disimballatocompletamente prima del collegamento odell'utilizzo. L’eliminazione incompleta deidispositivi di protezione per il trasportopotrebbe causare danni all'apparec-chio o aimobili vicini.
● Eventuali interventi idraulici richiesti devonoessere eseguiti solo da un idraulicoqualificato.
● Se l'impianto elettrico dell'abitazione richiedeuna modifica per il collegamentodell'apparecchio, affidare il lavoro ad unelettricista qualificato.
● Dopo aver installato l'apparecchio assicurarsiche non posi sul cavo di alimentazione.
● Se la lavabiancheria è installata su unpavimento con moquette, assicurarsi che leaperture previste per la ventilazione, postenella parte bassa della macchina non sianoostruite.
● Prima di procedere al collegamentodell'apparecchio, leggere attentamente leistruzioni riportate nel capitolo«Collegamento elettrico».
● L'apparecchio deve essere collegato ad unapresa elettrica dotata di messa a terraconforme.
● La sostituzione del cavo di alimentazionedeve essere eseguita soltanto dal personaledel Servizio di Assistenza Tecnica.
● La responsabilità del produttore non potràessere richiesta per qualsiasi dannoderivante da una installazione non conforme.
126.2936.30…ZWF365.qxd 6/6/08 11:06 Página 3

4
Utilizzo● L'apparecchio è destinato ad un normale uso
domestico. Non utilizzarlo a fini commercialio industriali o a scopi diversi da quelli per cuiè stato progettato: lavaggio, risciacquo ecentrifuga.
● Non lavare a macchina articoli chepotrebbero non sopportare tale trattamento.Seguire le indicazioni riportate nelle etichettedei capi.
● Non mettere nella lavabiancheria capismacchiati con benzina, alcool, tricloretilene,ecc. Se si utilizzano questi prodotti,attendere che il prodotto sia evaporato primadi porre gli articoli nel cestello.
● Si consiglia di non staccare mai la spinadalla presa tirando il cavo di alimentazione;disinserire la spina stessa.
● Non utilizzare mai la lavabiancheria se ilcavo di alimentazione, il cruscotto, oppure iltop sono danneggiati in modo tale da poteraccedere all’interno della macchina stessa.
● Si consiglia di utilizzare la lavabiancheria inambienti la cui temperatura non sia inferiorea 0°C. In caso contrario consultare il capitolo«Manutenzione e Pulizia».
Sicurezza bambini● L'apparecchio è stato progettato per essere
usato da adulti. Assicuratevi che i bambininon lo tocchino e non lo utilizzino come ungioco.
● I componenti dell’imballo (ad esempiosacchetti di nylon, polistirolo etc.) possonodiventare estremamente pericolosi perrischio di soffocamento. Teneteli lontanodalla loro portata.
● Conservare tutti i detersivi in un luogo sicurolontano dalla portata dei bambini.
126.2936.30…ZWF365.qxd 6/6/08 11:06 Página 4

5
Descrizione dell’apparecchio
Cassetto detersivo
Pannello dei comandi
Maniglia oblò
Pompa scarico
Piedini regolabili5
4
3
2
1
Cassetto detesivo
Prelavaggio
Lavaggio
Ammorbidente
126.2936.30…ZWF365.qxd 6/6/08 11:06 Página 5

6
Pannello comandi
Selettore programmi
● Il selettore programmi permette la scelta del programmadesiderato. Puo’ essere ruotato sia in senso orario cheantiorario. Dopo aver selezionato il programma la spia del tastoAvvio/Pausa inizia a lampeggiare in verde.
Selettore per la regolazione dellatemperatura
● Questo selettore permette la scelta della temperaturadesiderata. Puo’ essere ruotato solo in senso orario.90°C temperatura massima - (freddo) lavaggio a freddo.
Tasto per la regolazione dellacentrifuga
● Premere questo tasto ripetutamente per cambiare la velocita’ dicentrifuga finale se desideri che la tua biancheria vengacentrifugata ad una velocita’ diversa da quella proposta dallalavatrice oppure per selezionare l’opzione Antipiega
Tasto Super Risciacquo ● Premendo questo tasto la lavatrice aggiunge uno o piurisciacqui durante il ciclo di lavaggio.
Tasto Avvio/Pausa
● Premere «Avvio/Pausa» per avviare il programma selezionato.La spia verde integrata nel tasto smette di lampeggiare.
● Per interrompere un programma in corso, premere nuovamente«Avvio/Pausa»: la spia verde integrata nel tasto inizialampeggiare.
Luci ● Une delle spie presenti si accende per indicare la fase dilavaggio attualmente in corso.
1
2
3
5
Tasto Opzioni● Premendo questo tasto è possibile selezionare una sola delle
seguenti opzioni (la spia corrispondente si accende): EASYIRON oppure SUPER QUICK.
4
6
7
126.2936.30…ZWF365.qxd 6/6/08 11:06 Página 6
7
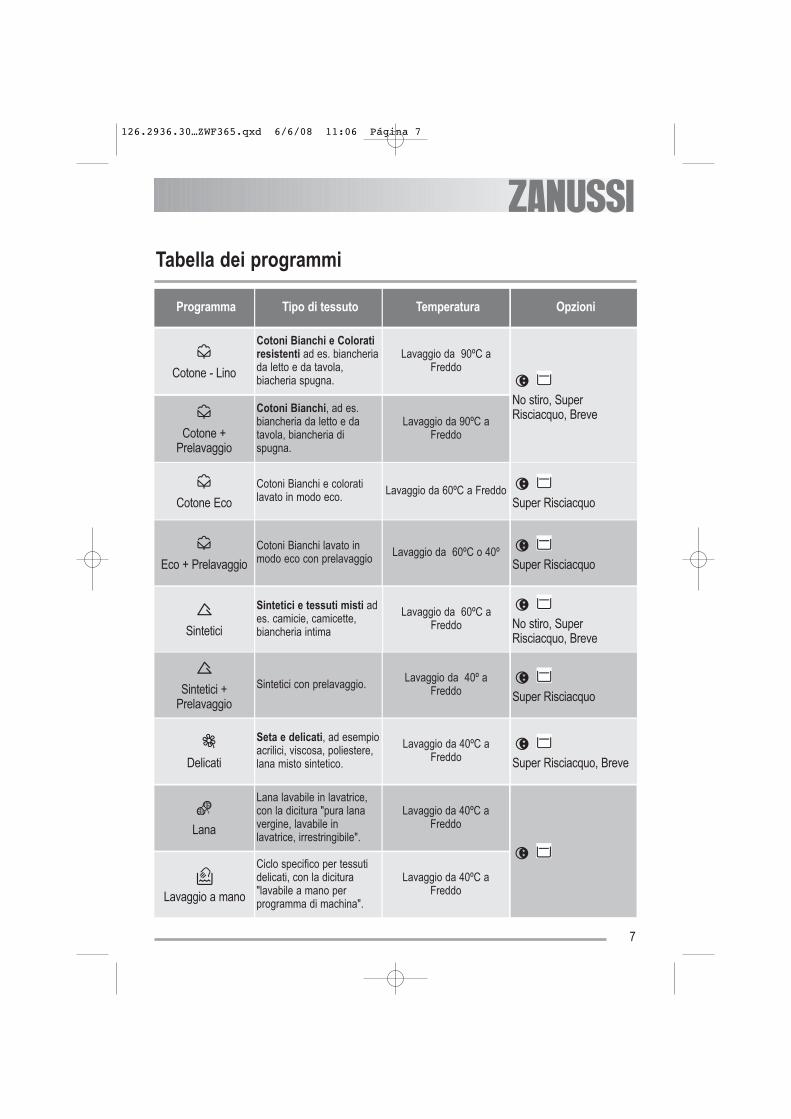
Tabella dei programmi
Cotone - Lino
Cotoni Bianchi e Coloratiresistenti ad es. biancheriada letto e da tavola,biacheria spugna.
Lavaggio da 90ºC aFreddo
No stiro, SuperRisciacquo, Breve
Cotone +Prelavaggio
Cotoni Bianchi, ad es.biancheria da letto e datavola, biancheria dispugna.
Lavaggio da 90ºC a Freddo
Cotone Eco
Cotoni Bianchi e coloratilavato in modo eco. Lavaggio da 60ºC a Freddo
Super Risciacquo
Eco + Prelavaggio
Cotoni Bianchi lavato inmodo eco con prelavaggio Lavaggio da 60ºC o 40º
Super Risciacquo
Sintetici
Sintetici e tessuti misti ades. camicie, camicette,biancheria intima
Lavaggio da 60ºC aFreddo No stiro, Super
Risciacquo, Breve
Sintetici +Prelavaggio
Sintetici con prelavaggio. Lavaggio da 40º a Freddo Super Risciacquo
Delicati
Seta e delicati, ad esempioacrilici, viscosa, poliestere,lana misto sintetico.
Lavaggio da 40ºC a Freddo Super Risciacquo, Breve
Programma Tipo di tessuto Temperatura Opzioni
Lana
Lana lavabile in lavatrice,con la dicitura "pura lanavergine, lavabile inlavatrice, irrestringibile".
Lavaggio da 40ºC a Freddo
Lavaggio a mano
Ciclo specifico per tessutidelicati, con la dicitura"lavabile a mano perprogramma di machina".
Lavaggio da 40ºC a Freddo
126.2936.30…ZWF365.qxd 6/6/08 11:06 Página 7

8
ATTENZIONE!Se la temperatura selezionata con ilprogramma non sono corretti, il pulsante diavvio lampeggerà per tre volte.
Tabella dei programmi
Jeans
Programma specifico perjeans.
Lavaggio da 60ºC a Freddo
Sport Intensive
Programama specifico perbiacheria più sporchi.
Lavaggio da40ºC a Freddo
RisciacquoLavanderia lavato a manopuò essere risciacquate conquesto programma.
Scarico
Esegue uno scarico dopoun arresto con acqua invasca (Antipiega) oppure altermine del programma.
Centrifuga
Centrifuga lunga allamassima vecità per capi dicotone lavati a mano opp.Dopo un arresto conl'opzione Antipiega oppureal termine del programma.
Programma Tipo di tessuto Temperatura Opzioni
126.2936.30…ZWF365.qxd 6/6/08 11:06 Página 8

9
Attenersi ai simboli per il trattamento dei tessutiposti sulle etichette dei singoli capi e seguire leistruzioni per il lavaggio indicate dal produttore.Suddividere la biancheria come segue: bianchi,colorati, sintetici, delicati, lana.
Temperature
Scelta e separazione dellabiancheriaRaggruppare i capi di piccole dimensioni, qualicalzini, calze, ecc., in una retina o in unafedera. Questo per evitare che questi capivadano a finire tra il cesto e la vasca.I capi bianchi e colorati non devono esserelavati assieme. I capi bianchi possono perdereil candore con il lavaggio.La biancheria colorata nuova può stingere alprimo lavaggio; è consigliabile quindi lavarla aparte, la prima volta.Accertarsi che nella biancheria nonrimangano oggetti di metallo (es. fermagli,spille di sicurezza, spilli).Abbottonare le federe, chiudere le cerniere, iganci e le asole. Legare eventuali cinture enastri lunghi.
Eliminare le macchie resistenti prima dellavaggio. Eventualmente strofinare i puntiparticolarmente sporchi con un detersivospeciale o con una pasta detergente.Trattare le tende con particolare cura. Togliere iganci dalle tende o legarli in una retina o in unsacchetto.
Carichi di biancheriaRegole generali:Cotone, lino. Riempire il cesto, ma non sovraccaricarlo. Sintetici e Delicati. Non più di metà del cesto.Tessuti di Seta, Stiro Facile da lavare amano e di lana.Non più di un terzo del cesto.Con un carico massimo si ottiene un utilizzoottimale di acqua ed energia.In caso di biancheria molto sporca, ridurre lequantità.
Pesi della biancheria asciuttaI pesi di seguito elencati hanno un valoreindicativo:
Guida al lavaggio
90°
per capi bianchi di lino o cotonemolto sporchi (es. strofinacci,asciugamani, biancheria datavola, lenzuola, ecc.)
50°/60°
per capi bianchi di cotonenormalmente sporchi (es.biancheria intima) e per capicolorati che non stingono,normalmente sporchi (es. camicieda notte, pigiami, ecc..) di cotone,lino o fibre sintetiche.
30°-40°-Freddo
per biancheria delicata (es.tende), o con colori delicati,biancheria mista con aggiunta difibre sintetiche e lana.
1200 gaccappatoi100 gtovaglioli, Strofinacci, camicette, slip700 gcopri piumino500 glenzuola200 gfedere, camicie da notte, da uomo250 gtovaglie200 gasciugamani in spugna, pigiami da uomo600 gcamicie da lavoro da uomo
126.2936.30…ZWF365.qxd 6/6/08 11:06 Página 9

10
Eliminazione delle macchieÈ possibile che macchie particolari non sieliminino solo con acqua e detersivo. Èconsigliabile, quindi, trattarle prima dellavaggio.Sangue: le macchie ancora fresche devonoessere trattate con acqua fredda. In caso dimacchie già asciutte, lasciare in ammollo labiancheria per una notte con un detersivospeciale e poi strofinarla nell’acqua e sapone.Colore ad olio: inumidire con benzinadetergente, tamponare le macchie dopo aversistemato il capo su un panno morbido,trattarle più volte con il detergente.Macchie asciutte di grasso: inumidire contrementina, tamponare le macchie con la puntadelle dita e un panno di cotone, dopo averappoggiato il capo su un ripiano morbido.Ruggine: sale ossalico (reperibile in drogheria)sciolto a caldo, o un prodotto antiruggine afreddo. Prestare attenzione alle macchie diruggine non recenti, poiché la struttura dicellulosa è già stata intaccata e il tessuto tendea bucarsi.Macchie di muffa: trattarle con candeggina,sciacquare bene (solo capi bianchi e coloratiresistenti al cloro).Erba: insaponare leggermente e trattare concandeggina diluita (capi bianchi, resistenti alcloro).Penna a biro e colla: inumidire con acetone(*), tamponare le macchie dopo averappoggiato il capo su un panno morbido.Rossetto: inumidire con acetone come sopraindicato, poi trattare le macchie con alcool.Eliminare i residui sui tessuti bianchi concandeggina.Vino rosso: lasciare in ammollo con deldetersivo, risciacquare e trattare con acidoacetico o acido citrico, poi risciacquare.Trattare eventuali residui con candeggina.
Inchiostro: a seconda della composizione dell’inchiostro, inumidire il tessuto prima conacetone (*), poi con acido acetico; trattareeventuali residui sui tessuti bianchi concandeggina e poi risciacquare bene.Macchie di catrame: trattare prima consmacchiatore, alcool o benzina, alla finestrofinare con pasta detergente.(*) non usare mai l’acetone sui tessuti
artificiali e colorati.
Detersivi e additiviUn buon risultato di lavaggio dipende dallascelta del detersivo e dal suo correttodosaggio. Dosare bene significa evitare sprechie proteggere l’ambiente. Nonostante sianobiodegradabili, i detersivi contengono elementiche danneggiano il delicato equilibrio ecologicodella natura.La scelta del detersivo dipende dal tipo ditessuto (delicati, lana, cotone ecc.), dal colore,dalla temperatura di lavaggio e dal grado disporco.In questa lavatrice si possono usare tutti idetersivi per lavatrici normalmente reperibili incommercio:– detersivi in polvere per tutti i tipi di tessuto,– detersivi in polvere per tessuti delicati e
lana,– detersivi liquidi, per tutti i tipi di tessuto, o
speciali solo per lana, in particolare per ilavaggi a bassa temperatura.
Il detersivo deve essere versato, primadell’inizio del programma di lavaggio,nell’apposita vaschetta oppure nel dosatore daporre direttamente nel cesto. In questo caso sidovrà selezionare un programma senzaprelavaggio.Anche nel caso di detersivi liquidi deve essereselezionato un programma senza prelavaggio.Versare il detersivo liquido immediatamenteprima dell’inizio del programma nelloscomparto del cassetto detersivo.
126.2936.30…ZWF365.qxd 6/6/08 11:06 Página 10

11
Eventuali additivi liquidi per ammorbidire oinamidare la biancheria devono essere versatinella vaschetta con il simbolo prima checominci il programma di lavaggio.Per il dosaggio degli additivi seguire leindicazioni dei produttori e comunque nonsuperare il piano del cassetto conriferimento «MAX».
Quantità di detersivo da utilizzareLa quantità di detersivo dipende dal tipo ditessuto, dal carico, dal grado di sporco e dalladurezza dell’acqua utilizzata.La durezza dell’acqua è classificata incosiddetti livelli di durezza. Informazioni su talilivelli si possono ottenere dall’ente erogatorecompetente o dall’amministrazione comunale.Seguire le istruzioni per il dosaggio indicate dalproduttore sulla confezione del detersivo.Utilizzare una quantità minore di detersivo se:– si lava poca biancheria,– la biancheria è poco sporca,– si forma molta schiuma durante il lavaggio,– l’acqua è poco dura (fino al livello dolce).
Durezza dell’acqua
LivelloGradi
Tedeschi°dH
Francesi°T.H.
Caratteristiche
1 0-7 0-15dolce
2 8-14 16-25media
3 15-21 26-37dura
4 > 21 > 37molto dura
Primo utilizzo
ATTENZIONE!Assicurarsi che i collegamenti elettrici eidraulici siano conformi alle istruzioni diinstallazione.IMPORTANTETogliere lo spessore di polistirolo e tutti gli altrielementi dal cesto.IMPORTANTEEseguire un lavaggio preliminare alla massimatemperatura, senza biancheria ma con 1/2misurino di detersivo, per pulire la vasca.
126.2936.30…ZWF365.qxd 6/6/08 11:06 Página 11
12
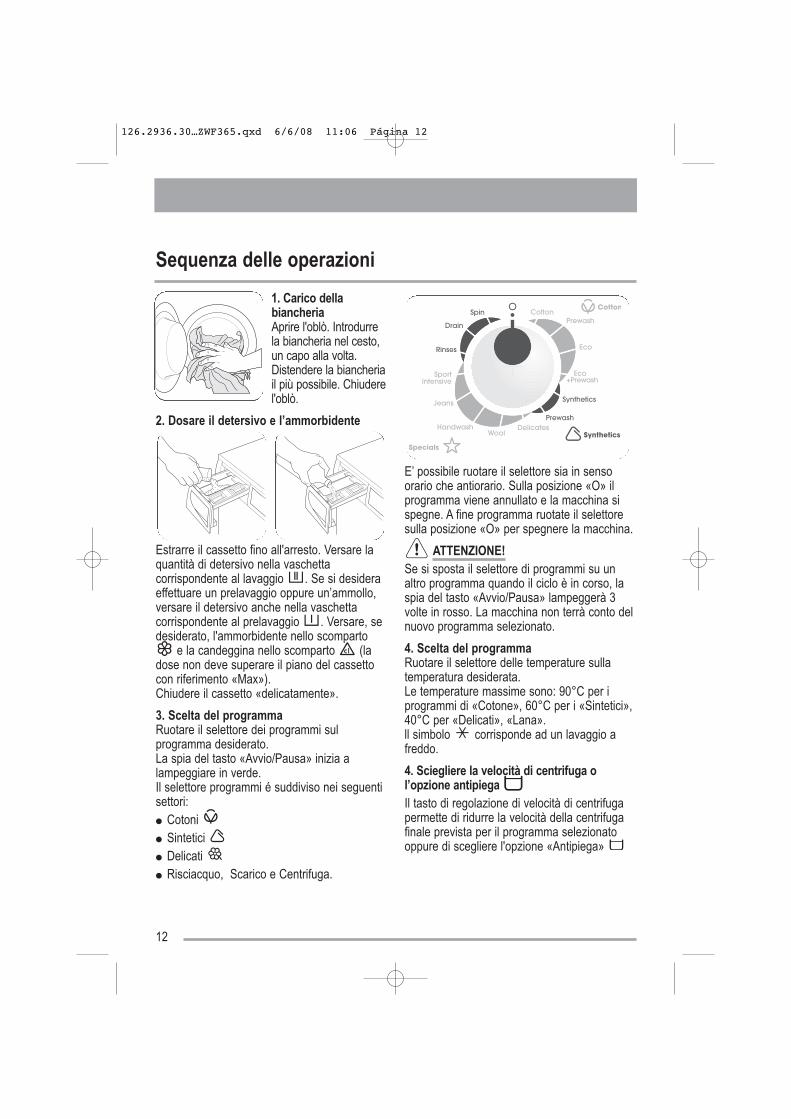
Sequenza delle operazioni
1. Carico dellabiancheriaAprire l'oblò. Introdurrela biancheria nel cesto,un capo alla volta. Distendere la biancheriail più possibile. Chiuderel'oblò.
2. Dosare il detersivo e l’ammorbidente
Estrarre il cassetto fino all'arresto. Versare laquantità di detersivo nella vaschettacorrispondente al lavaggio . Se si desideraeffettuare un prelavaggio oppure un’ammollo,versare il detersivo anche nella vaschettacorrispondente al prelavaggio . Versare, sedesiderato, l'ammorbidente nello scomparto
e la candeggina nello scomparto (ladose non deve superare il piano del cassettocon riferimento «Max»). Chiudere il cassetto «delicatamente».
3. Scelta del programmaRuotare il selettore dei programmi sulprogramma desiderato.La spia del tasto «Avvio/Pausa» inizia alampeggiare in verde.Il selettore programmi é suddiviso nei seguentisettori:● Cotoni ● Sintetici ● Delicati ● Risciacquo, Scarico e Centrifuga.
E’ possibile ruotare il selettore sia in sensoorario che antiorario. Sulla posizione «O» il programma viene annullato e la macchina sispegne. A fine programma ruotate il selettoresulla posizione «O» per spegnere la macchina.
ATTENZIONE!Se si sposta il selettore di programmi su unaltro programma quando il ciclo è in corso, laspia del tasto «Avvio/Pausa» lampeggerà 3volte in rosso. La macchina non terrà conto delnuovo programma selezionato.
4. Scelta del programmaRuotare il selettore delle temperature sullatemperatura desiderata.Le temperature massime sono: 90°C per iprogrammi di «Cotone», 60°C per i «Sintetici»,40°C per «Delicati», «Lana».ll simbolo corrisponde ad un lavaggio afreddo.
4. Sciegliere la velocità di centrifuga ol’opzione antipiega Il tasto di regolazione di velocità di centrifugapermette di ridurre la velocità della centrifugafinale prevista per il programma selezionatooppure di scegliere l'opzione «Antipiega»
126.2936.30…ZWF365.qxd 6/6/08 11:06 Página 12

13
per cotone, sintetici,jeans e sport intensive:600 giri/min perdelicati, lana elavaggio a mano: 450giri/min
Notte ciclo: L'acqua de la centrifuga non puòessere evacuati alla fine del programmaselezionato per evitare la lavanderia a pieghe.In tutte le fasi di centifugato, il suono è statorimosso e il dispositivo può essere usatodurante la notte. Oltre Cotone e Sinteticiprogrammi, risciacqui sono fatti con più acqua.
Antipiega (fine ciclo con acqua in vasca) La lavabiancheria non scarica l'acquadell'ultimo risciacquo, in modo da non sgualcirela biancheria. A fine programma, la spia del tasto«Avvio/Pausa», le spie si spengono, la spia
(Fine ciclo) si accende, ma la porta rimanebloccata per indicare che l’acqua deve esserescaricata.
Scarico dell’acqua:● portare il selettore alla posizione «O»● selezionare il programma «Scarico» o
Centrifuga.● se necessario, ridurre la velocità di
centrifuga con il tasto di regolazione divelocità
IMPORTANTE!Se il tasto di regolazione di centrifuga rimanesulla posizione la macchina effettueràcomunque una centrifuga lunga alla massimavelocità.
● premere il tasto «Avvio/Pausa», la spia si accende● a fine programma, la spia si spegne, la spia
si accende e la porta si sblocca.
Tasti opzione dei programmiÈ possibile combinare più opzioni a secondadel programma selezionato. Queste devonoessere attivate dopo aver selezionato ilprogramma e prima di premere il tasto«Avvio/Pausa».
5. Scegliere l’opzione desiderataPremendo questotasto è possibileselezionare una soladelle opzioni (la spiacorrispondente siaccende):
NO STIRO: Selezionando questa opzione labiancheria viene lavata e centrifugatadelicatamente per evitare la formazione di pieghe. Questa opzione è compatibile con li programmicotone (senza prelavaggio et breve) et sintetici(senza prelavaggio et breve).BREVE: Non opzionabile per il ciclo lana. Il ciclo dilavaggio viene accorciato ottenendo ottimi risultati inminor tempo. Il carico MAX consigliato è di 2,5 kg.
6. Scegliere l’opzione Super RisciacquoLa lavabiancheriaaggiunge uno o piùrisciacqui durante il ciclo.Questa opzione èraccomandata per pellisensibili e nelle aree incui l'acqua è molto dolce.(Per la compatibilità di
questa opzione con i vari programmi, riferirsi alcapitolo «Tabella dei programmi»).
7. Avviare il programmaPremere il tasto «Avvio/Pausa» per avviare ilprogramma selezionato. La spia verdeintegrata nel tasto smette di lampeggiare.
La spia «Prelavaggio/Lavaggio» si accende.La macchina inizia alavorare e l’oblò èbloccato.
Per interrompere un programma in corso,premere Avvio/Pausa: la spia verde integratanel tasto inizia lampeggiare.
126.2936.30…ZWF365.qxd 6/6/08 11:06 Página 13

14
Per riavviare il programma dal punto in cui erastato interrotto, premere nuovamenteAvvio/Pausa.Se è stata selezionata un’opzione noncompatibile con il programma scelto, la spiarossa del tasto Avvio/Pausa lampeggia per 3volte.
SpieAll’accensione della lavabiancheria si accendonoentrambe le spie (Prelavaggio/Lavaggio) e(Risciacqui/Centrifuga).
Dopo aver premuto iltasto Avvio/Pausarimane accesa solo laspia relativa alle fasi diprogramma in corso.La macchina inizia afunzionare e l’oblò èbloccato.
Se è stato selezionato il programma «Scarico»con il selettore programmi, non si si accenderàalcuna spia. A fine programma si accende laspia (Fine Ciclo) e l’oblò può essereaperto.
Modificare un’opzione o un programma incorsoÈ possibile modificare qualsiasi opzione primache il programma la esegua. Prima dieffettuare qualsiasi modifica bisogna mettere lamacchina in PAUSA premendo il tastoAvvio/Pausa.Per modificare un programma in corso bisognaannullarlo ruotando il selettore programmi sullaposizione «O» e poi sulla posizione del nuovoprogramma. Premere infine il tastoAvvio/Pausa per avviarlo. L’acqua non verràscaricata.
Interrompere un programmaPremere il tasto Avvio/Pausa. Lacorrispondente spia inizia a lampeggiare.Premere lo stesso tasto per riavviare ilprogramma.
Annullare un programmaPer annullare un programma in corso ruotare ilselettore programmi sulla posizione «O». Ora èpossibile selezionare il nuovo programma.Apertura dell’oblò in corso di programmaPremere innanzittutto il tasto Avvio/Pausa e poiattendere circa 2 minuti per poter aprire l’oblò.Se l’oblò non si apre entro due minuti, lamacchina potrebbe trovarsi in fase diriscaldamento oltre i 55°C oppure il livellodell’acqua potrebbe essere troppo alto. Inquesti casi l’oblò resta bloccato.Qualora non fosse possibile aprirlo e fosseassolutamente necessario farlo, bisogneràspegnere la macchina ruotando il selettoreprogrammi sulla posizione «O». Dopo circa 2minuti l’oblò può essere aperto. (Attenzione al livello e alla temperaturadell’acqua!).
Fine programmaLa macchina si ferma automaticamente, la spiadel tasto Avvio/Pausa e la spia relativa allafase di lavaggio appena eseguita si spengono,si accende la spia (fine ciclo).Se è stata scelta l’opzione Antipiegaoppure al termine del programma Ammollo, siaccenderà la spia ma l’oblò rimarràbloccato per segnalare che l’acqua deveessere scaricata.Per scaricare l’acqua, leggere le istruzionidel paragrafo Antipiega .A fine ciclo, ruotare il selettore programmi sullaposizione «O» per spegnere la lavabiancheria.Togliere la biancheria e controllare che il cestosia vuoto. Si consiglia di chiudere il rubinettodell'acqua ed estrarre la spina dalla presa dicorrente. Lasciare l'oblò socchiuso per arearela macchina.
126.2936.30…ZWF365.qxd 6/6/08 11:06 Página 14

15
Manutenzione e pulizia
ATTENZIONE!Procedere alla pulizia e alla manutenzionedell’apparecchio solo dopo averlo scollegatodalla rete elettrica.
Trattamento anticalcareIn caso di trattamento anticalcare, utilizzare unprodotto specifico non corrosivo, concepitoappositamente per la lavabiancheria.Rispettare il dosaggio e la frequenza indicatasulla confezione.
Dopo ogni lavaggioLasciare l’oblò aperto per un po’ di tempo perprevenire formazione di muffa e/o odoristagnanti all’interno della macchina e permantenere integra la guarnizione dell’oblòstesso.
Pulizia di mantenimentoEffettuando spesso lavaggi a basse temperturee’ posssibili che all’interno del cesto sidepositino dei residui di detersivo.Vi consigliamo di effettuare una regolare unapulizia di mantenimento:1 Il cesto non deve contenere bucato.2 Selezionare il programma cotone (90°C).3 Versare una normale quantità di detersivo.
Pulizia del mobilePulire l’esterno della lavabiancheria con acquatiepida e un detergente neutro. Non utilizzarealcool, solventi o prodotti simili.
Cassetto detersivoI detersivi e gli additivi formano, a lungoandare, delle incrostazioni.
Pulire il cassetto detersivo di tanto in tanto,passandolo sotto il rubinetto dell’acqua. Perestrarre completamente il cassetto dallamacchina, premere sul tasto in fondo a sinistra.Per poter pulire più facilmente il cassetto, èpossibile togliere la parte alta delle vaschetteriservate agli additivi.
Pulizia della zona cassettoTolto il cassetto,utilizzate unospazzolino per puliretutti i fori assicurandosidi rimuovere tutti iresidui di detersivodalla parte superioreed inferiore del suo
scomparto.Reinserite il cassetto ed avviate il programmadi risciacqui senza bucato.
Pulizia della zona di scaricoLa zona di scarico deve essere ispezionata se:● la macchina non scarica e/o non centrifuga;● la macchina fa un rumore strano durante lo
scarico, dovuto a oggetti come bottoni, spilledi sicurezza, fermagli che bloccano la pompadi scarico.
Procedere come segue:● staccare la spina dalla presa di corrente;● se l’operazione viene eseguita in corso di
programma, aspettare che l’acqua siraffreddi;
126.2936.30…ZWF365.qxd 6/6/08 11:06 Página 15

16
● aprire lo sportellino;● mettere una
bacinella sulpavimento perraccogliere l’acquache uscirà dallamacchina
● estrarre e togliere il filtro della pompa.Tenere a portata di mano uno straccio perasciugare eventualmente l’acqua chedovesse fuoriuscire quando si svita ilcoperchietto.
● togliere eventuali oggetti dalla pompa,ruotandola come indicato in figura edaiutandosi con uno spazzolino;
● Riavvitare il filtrodella pompa.
● Chiudere losportellino.
ATTENZIONE!Se è stato selezionato un programma con altatemperatura, attendere che l’acqua si raffreddiprima di intervenire sulla pompa poichè inquest’ultima potrebbe esserci dell’acqua calda.Non svitare mai il filtro durante un ciclo dilavaggio. Attendere sempre che la macchinaabbia terminato il programma selezionato e cheabbia scaricato l’acqua. Assicurarsi sempre diaver posizionato e richiuso correttamente il filtroper evitare eventuali perdite d’acqua ed un usoimproprio da parte dei bambini.
Filtrino del tubo di alimentazioneSe l’acqua della vostrazona è molto dura, ocontiene tracce dicalcare, il filtro del tubodi alimentazionedell’acqua puòintasarsi.Pertanto sarebbe
meglio pulirlo di tanto in tanto. Chiudere ilrubinetto delI’acqua. Pulire il filtrino con unospazzolino duro. Riavvitare il tubo.
Scarico d’emergenza dell’acquaSe la macchina non scarica, procedere comesegue per togliere l’acqua dalla vasca:● togliere la spina dalla presa di corrente;● chiudere il rubinetto dell’acqua;● aspettare che l’acqua si raffreddi (nel caso
fosse in corso un programma contemperatura di 60°C o superiore);
● aprire lo sportellinodella zona scarico;● prendere una bacinella, porla sul pavimento,
scaricare a più riprese l’acqua dalla macchina;● pulire la pompa come descritto
precedentemente;
Precauzioni contro il geloSe la macchina è installata in un locale dove latemperatura potrebbe scendere al disotto di0°C procedere come segue:● Staccare la spina dalla presa.● Chiudere il rubinetto dell’acqua e svitare il
tubo di alimentazione dal rubinetto.● Porre l’estremità del tubo di alimentazione in
una bacinella posta sul pavimento e farscaricare l’acqua.
● Riavvitare il tubo di alimentazione acqua.Eseguendo queste operazioni l’acqua rimastanella macchina verrà evacuata, evitando lapossibile formazione di ghiaccio e, diconseguenza, la rottura di eventuali parti interne.Quando si farà funzionare nuovamente lamacchina assicurarsi che la temperaturadell’ambiente sia superiore a 0°C.
126.2936.30…ZWF365.qxd 6/6/08 11:06 Página 16

17
Anomalia Possibili cause / Soluzione
La macchina non parte:
L’oblò non è ben chiuso (la spia rossa del tasto«Avvio/Pausa» lampeggia).● Chudere bene l’oblò.
La spina non è ben inserita nella presa.● Inserire correttamente la spina nella presa.
Il fusibile dell’impianto domestico è danneggiato.● Controllare il vostro impianto elettrico domestico.
Non è stato selezionato un programma e poi premuto iltasto «Avvio/Pausa».● Ruotare il selettore programmi sul programma desiderato
e premere il tasto «Avvio/Pausa».
La macchina non carica acqua:
Il rubinetto dell’acqua è chiuso (la spia rossa del tasto«Avvio/Pausa» lampeggia).Aprire il rubinetto.
Il tubo di alimentazione è incastrato o piegato.● Controllare l’allacciamento del tubo di alimentazione.
Il filtrino del tubo di alimentazione è ostruito (la spia rossadel tasto «Avvio/Pausa» lampeggia)● Pulire il filtro del tubo di alimentazione.
L'oblò non è chiuso (la spia rossa del tasto«Avvio/Pausa» lampeggia)● Chiudere bene l’oblò.
Anomalie di funzionamento
IMPORTANTE!Alcuni problemi possono essere facilmente risolti senza l’intervento di un tecnico. Prima dirivolgervi al centro di assistenza, verificate quanto segue:Durante il funzionamento della macchina può succedere che la luce rossa integrata nel tasto«Avvio/Pausa» inizi a lampeggiare per segnalare che la macchina non funziona:Dopo aver rimosso le eventuali cause, premere il pulsante «Avvio/Pausa» per riavviare ilprogramma interrotto. Se, dopo tutti i dovuti controlli, il problema persiste, rivolgersi al centro diassistenza più vicino.
La macchina carica acqua e la scaricaimmediatamente: ● Vedere il relativo paragrafo nel capitolo «Scarico».
126.2936.30…ZWF365.qxd 6/6/08 11:06 Página 17

18
Anomalia Possibili cause / Soluzione
La macchina non scarica e/o noncentrifuga:
La pompa di scarico è intasata (la spia rossa del tasto«Avvio/Pausa» lampeggia)● Pulire la pompa di scarico.
È stata selezionata l’opzione, Antipiega .● Disattivare l’opzione oppure
selezionare il programma Scarico.
Il carico di biancheria non è ben distribuito nel cesto.● Redistribuite la biancheria all’interno del cesto.
C’è acqua per terra:
C’è troppo detersivo o è stato usato un detersivo nonadatto (fa troppa schiuma).● Ridurre la quantità di detersivo oppure utilizzarne un
altro.
Il tappo della pompa di scarico è danneggiato.● Sostituire il tappo della pompa.
Il risultato del lavaggio non èsoddisfacente:
È stato usato poco detersivo o un detersivo non adatto.● Aumentare la quantità di detersivo od utilizzarne un altro.
Le macchie «difficili» non sono state sottoposte ad untrattamento preliminare.● Utilizzare i prodotti in commercio per trattare le macchie
«difficili».● Controllare di aver scelto una temperatura corretta.
Non è stata scelta la temperatura giusta, abbinata alprogramma corretto.● Introdurre nel cesto meno biancheria.Il cesto è
sovraccarico.
L’oblò non si apre:
Il programma è ancora in corso.● Attendere la fine del ciclo di lavaggio.
L’oblò non si è sbloccato.● Attendere che si accenda la spia .C’è acqua in vasca.
● Selezionare il programma di scarico o centifuga perscaricare l’acqua.
Non si vede acqua nel cestoLe lavabiancheria di ultima generazione lavano utilizzandouna ridotta quantità di acqua ed energia ma ottenendougualmente ottimi risultati di lavaggio.
126.2936.30…ZWF365.qxd 6/6/08 11:06 Página 18

19
La macchina vibra oppure è rumorosa:
L’apparecchio non è stato completamente liberato (vediparagrafo disimballo).● Rimuovere tutti i dispositivi di sicurezza.
L’apparecchio non è stato messo a livello correttamente.● Controllare il livellamento della macchina.
La biancheria non è equamente ripartita nel cesto.● Ridistribuite meglio la biancheria.
Il carico non è sufficiente.● Caricare più biancheria.
Anomalia Possibili cause / Soluzione
La centrifuga inizia in ritardo o non vieneeffettuata:
È intervenuta «la sicurezza antisbilanciamento» chepreviene vibrazioni eccessive in centrifuga ed assicurastabilità: se all'inizio della fase di centrifuga la biancherianon è uniformemente distribuita all'interno del cesto, lamacchina lo riconosce e cerca di ridistribuire il bucato inmaniera omogenea, attraverso alcune rotazioni del cesto.Solo quando il bucato si è distribuito in maniera uniforme,viene eseguita la fase di centrifuga, eventualmente ad unavelocità ridotta, se c’è ancora un lieve sbilanciamento.Se dopo alcuni tentativi la biancheria continua a rimanereappallottolata, la macchina salta la fase di centrifuga.Quindi, qualora a fine ciclo la biancheria rimanga bagnata,consigliamo di ridistribuirla manualmente all'interno delcesto e di selezionare il programma di centrifuga.● Ridistribuire la biancheria.
La macchina fa uno strano rumore
La lavabiancheria è provvista di un tipo di motore cheemette un rumore insolito paragonato ad altri motoritradizionali. Questo nuovo motore permette una partenzadolce ed una miglior distribuzione della biancheria nel cestodurante la centrifuga cosi’ come una maggior stabilità dellamacchina.
Se non si riesce ad individuare o risolvere ilproblema, rivolgersi al Servizio AssistenzaTecnica. In sede di richiesta di assistenza odordinazione dei ricambi è importante indicare ilcodice del prodotto, il numero di serie ed ilmodello della macchina, riportati sulla targhettamatricola.La data di acquisto è riportata sulla ricevutarilasciata dal negoziante.Conservare tale ricevuta.
Mod. ... ... ...Prod. No. ... ... ... Ser. No. ... ... ...
Mod
. ...
... ..
.
Prod
. No.
... .
.. ..
Ser
. No.
... .
.. ...
126.2936.30…ZWF365.qxd 6/6/08 11:06 Página 19

20
Caratteristiche tecniche
Dimensioni Larghezza 60 cm
85 cm
63 cm
Altezza
Profondità
Pressione dell’acqua Minima 0,05 MPa
0,8 MPaMassima
CotoniSintetici/DelicatiLana/ Lavaggio a manoTende
Carichi massimi 5 kg3 kg2 kg2 kg
MassimaVelocità di centrifuga 600 giri/min
Tensione / Frequenza / Potenzatotale di assorbimento
Le informazioni sulla tensione, potenza e frequenza sonoindicate sulla targhetta matricola situata sulla parte internadelll’oblò
126.2936.30…ZWF365.qxd 6/6/08 11:06 Página 20

21
Dati di consumo
Durata deiprogrammi(in minuti)
Programmi Consumi dienergia(in kWh)
Consumid’acqua(in litres)
155Cotone + Prelavaggio 90° 2,15 71
125Energico 60°+ Eco(*) 0,85 52
107Sintetici + Prelavaggio 60° 1,2 65
65Delicati 40° 0,55 60
55Lana 40° 0,4 53
45Risciacquo 0,1 42
2Scarico - -
10Centrifuga - -
90Sintetici 60° 1,0 54
INFORMAZIONI
* Dati indicativi soggetti a variazione infunzione delle condizioni di utilizzo. Iconsumi si riferiscono alla temperatura piùelevata prevista per ogni programma.
(*) Il programma «Cotoni + l’opzione Ecoselezionata» con un carico di 6 kg a 60°C èil programma di riferimento per le provesecondo la norma CEI 456.
126.2936.30…ZWF365.qxd 6/6/08 11:06 Página 21

22
Installazione
Dispositivi di sicurezza per il trasporto
Prima di mettere in funzione la macchina,accertarsi che siano stati tolti tutti i dispositivi disicurezza previsti per il trasporto.Si consiglia di conservare tutti i pezzi pertornare a montarli, qualora la macchinadovesse essere spostata di nuovo in futuro.
1. Svitate e togliete con una chiave le 3 vitiposteriore.
2. Aprire l'oblò, estrarre il tubo dialimentazione dell'acqua e liberare dalnastro adesivo il blocco di polistiolo fissatoalla guarnizione dell'oblò.
3. Estrarre i tre perni di plastica dai fori in cuialloggiavano le viti.
4. Tappare tutti i fori con i tappi che si trovanonel sacchetto stampati.
PosizionamentoInstallare la macchina su un pavimento piatto eduro. Fare attenzione che la circolazionedell'aria attorno alla macchina non vengaimpedita da tappeti, moquette, ecc. Controllareche la macchina non tocchi il muro o altrimobili della cucina.
Livellare accuratamente la macchina con unachiave adatta svitando o avvitando i piediniregolabili. Non mettere mai sotto i piedini dellamacchina cartone, legno o materiali simili percompensare eventuali disuguaglianze delpavimento. Se necessario, utilizzare una bolla.Dopo aver completato il livellamento bloccarela ghiera serrandola con una chiave.
Alimentazione dell’acquaCollegare il tubo di alimentazione a unrubinetto di acqua fredda filettato da 3/4" gas.Non utilizzare, per l’allacciamento, vecchi tubigià usati in precedenza.Prima di installare la macchina nella suaposizione definitiva, ruotare l’estremità del tubodi carico, sul retro della stessa, nella direzionepiù vicina al rubinetto. Svitare leggermente laghiera di fissaggio, girare l’estremità del tubo eriavvitare la ghiera, controllando che non cisiano perdite d'acqua.
126.2936.30…ZWF365.qxd 6/6/08 11:06 Página 22
23
Non si può allungare il tubo di alimentazione.Se il tubo è troppo corto e non si desideraspostare il rubinetto, bisogna comperare untubo completo più lungo, che sia previsto perquesto tipo di utilizzo.
Attenzione!
Se l’allacciamento viene effettuato a delletubazioni nuove o non utilizzate da lungotempo, è consigliabile far scorrere una certaquantità di acqua prima di allacciare il tubo dicarico.In tal modo si elimineranno eventuali depositidi sabbia o ossido presenti nelle tubature.
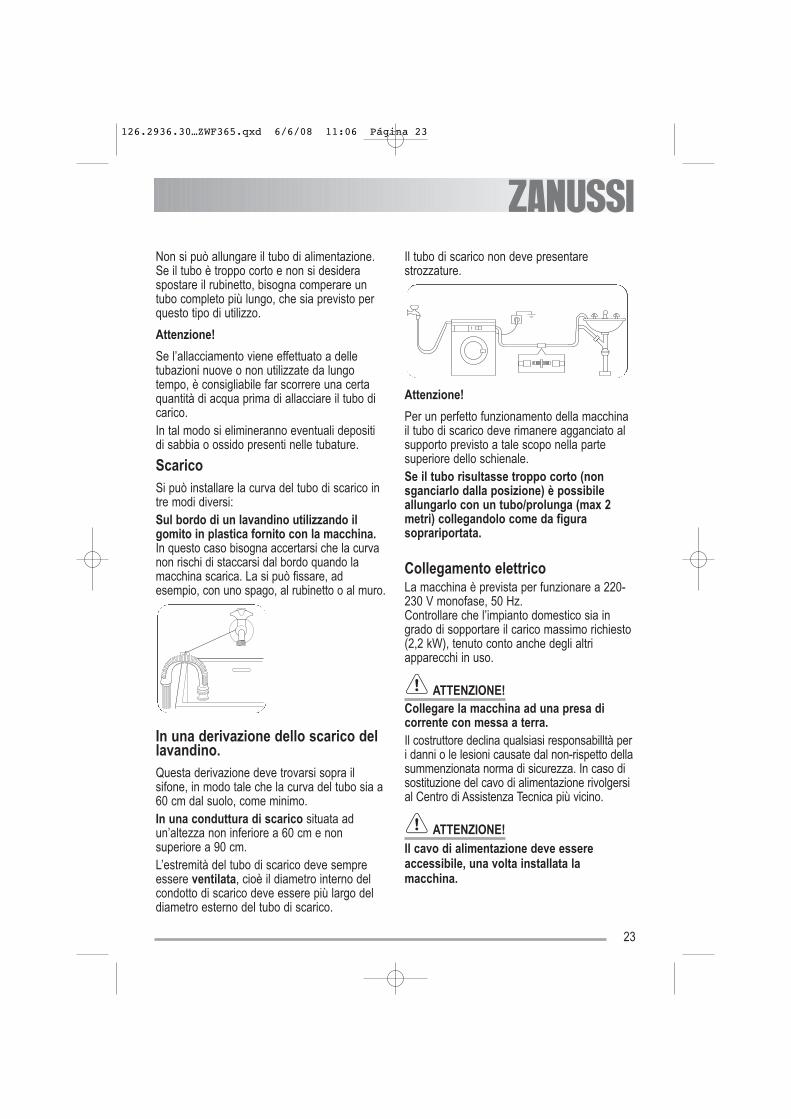
ScaricoSi può installare la curva del tubo di scarico intre modi diversi:Sul bordo di un lavandino utilizzando ilgomito in plastica fornito con la macchina.In questo caso bisogna accertarsi che la curvanon rischi di staccarsi dal bordo quando lamacchina scarica. La si può fissare, adesempio, con uno spago, al rubinetto o al muro.
In una derivazione dello scarico dellavandino.Questa derivazione deve trovarsi sopra ilsifone, in modo tale che la curva del tubo sia a60 cm dal suolo, come minimo.In una conduttura di scarico situata adun’altezza non inferiore a 60 cm e nonsuperiore a 90 cm.L’estremità del tubo di scarico deve sempreessere ventilata, cioè il diametro interno delcondotto di scarico deve essere più largo deldiametro esterno del tubo di scarico.
Il tubo di scarico non deve presentarestrozzature.
Attenzione!
Per un perfetto funzionamento della macchinail tubo di scarico deve rimanere agganciato alsupporto previsto a tale scopo nella partesuperiore dello schienale.Se il tubo risultasse troppo corto (nonsganciarlo dalla posizione) è possibileallungarlo con un tubo/prolunga (max 2metri) collegandolo come da figurasoprariportata.
Collegamento elettricoLa macchina è prevista per funzionare a 220-230 V monofase, 50 Hz.Controllare che l’impianto domestico sia ingrado di sopportare il carico massimo richiesto(2,2 kW), tenuto conto anche degli altriapparecchi in uso.
ATTENZIONE!Collegare la macchina ad una presa dicorrente con messa a terra.Il costruttore declina qualsiasi responsabilltà peri danni o le lesioni causate dal non-rispetto dellasummenzionata norma di sicurezza. In caso disostituzione del cavo di alimentazione rivolgersial Centro di Assistenza Tecnica più vicino.
ATTENZIONE!Il cavo di alimentazione deve essereaccessibile, una volta installata lamacchina.
126.2936.30…ZWF365.qxd 6/6/08 11:06 Página 23

24
Ambiente
ImballoTutti i materiali contrassegnati con il simbolo
sono riciclabili.
>PE<=polietilene
>PS<=polistirolo
>PP<=polipropilene Perchè possano essere recuperati devonoessere deposti negli appositi spazi (ocontenitori). Informarsi presso l’entecompetente.
SmaltimentoAl momento dello smaltimento del vostroapparecchio, mettere fuori uso tutto ciò chepuò rappresentare un pericolo: tagliare il cavodi alimentazione all'attacco dell'apparecchio.
Il simbolo sul prodotto o sulla confezioneindica che il prodotto non deve essereconsiderato come un normale rifiuto domestico,ma deve essere portato nel punto di raccoltaappropriato per il riciclaggio di apparecchiatureelettriche ed elettroniche. Provvedendo asmaltire questo prodotto in modo appropriato,si contribuisce a evitare potenzialiconseguenze negative, che potrebberoderivare da uno smaltimento inadeguato delprodotto. Per informazioni più dettagliate sulriciclaggio di questo prodotto, contattarel’ufficio comunale, il servizio locale dismaltimento rifiuti o il negozio in cui è statoacquistato il prodotto.
Consigli ecologiciAl fine di economizzare acqua ed ener-gia econtribuire alla protezione dell'ambiente, viconsigliano di rispettare le seguenti istruzioni:
● Utilizzare la funzione Prelavaggio solo per labiancheria molto sporca.
● Utilizzare l'apparecchio a pieno caricoquando possibile.
● Con un adeguato pretrattamento si possonoeliminare le macchie «difficili»; poi si potràeffettuare un lavaggio con una temperaturapiù bassa.
● Adattare la dose di detersivo sia alla durezzadell'acqua (rif. il paragrafo «Dosaggio deldetersivo») che al carico e al grado di sporcodella biancheria.
126.2936.30…ZWF365.qxd 6/6/08 11:06 Página 24
25
CERTIFICATO DI GARANZIACONVENZIONALE La presente Garanzia Convenzionale si attivaautomaticamente dalla data di consegnadell’apparecchiatura ed è emessa da:Electrolux Zanussi Italia S.p.A., Corso linoZanussi, 26, 33080 Porcia (PN) La presenteGaranzia Convenzionale copre i vizi e difettiderivanti dal processo di fabbricazione chepossono manifestarsi entro il periodo di 24mesi dalla data di consegnadell’apparecchiatura. La presente Garanzia èvalida a condizione che: • L’apparecchiatura venga utilizzata
esclusivamente per scopi domestici; • L’apparecchiatura venga installata ed
utilizzata secondo le prescrizioni indicate nelLibretto Istruzioni;
• Tutte le riparazioni siano eseguite dalpersonale dei Centri di Assistenza TecnicaAutorizzati e vengano utilizzati ricambioriginali.
Il consumatore decade dalla presente Garanziaove non denunci il difetto di conformità entro iltermine di due mesi dalla sua scoperta. Impegno per il rimedio al difetto durante ilperiodo di validità della GaranziaConvenzionale, nel caso in cui venga accertatoun vizio di fabbricazione, Per ogni richiesta di intervento il Consumatorepuò consultare le Pagine Gialle Casa alla voce“Elettrodomestici riparazione” oppure il sitoInternet www.electrolux.it. La riparazione o la sostituzione dei componentio dell’apparecchiatura non estendono, innessun caso, la durata prevista dalla GaranziaConvenzionale.
Questo electtrodomestico è garantito daElectrolux ciascuno dei paesi solto elencati peril periodo specificato nella garanziadell'apparecchiatura o, in alternativa, dallalegislazione vigente nel paese di utilizzo. Se vitrasferite da un paese ad un altro, tra quellisotto elencati, anche la garanziadell'apparecchiatura sarà trasferita alleseguenti condizioni:
● La garanzia dell'apparecchiatura inizia adecorrere a partire dalla data del primoacquisto, che dovrà essere dimostratopresentando un docu-mento d'acquistovalido emesso dal venditore.
● La durata della garanzia e le condi-zioniofferte (es. manodopera e/o ricambi) farannoriferimento alle con-dizioni esistenti nelnuovo paese di residenza per la stessatipologia di prodotti.
● La garanzia è strettamente personale ed èintestata all'acquirente originaledell'apparecchiatura e non può esseretrasferita ad un altro utilizzatore.
● L'apparecchiatura deve essere instal-lata eutilizzata in conformità alle istru-zioni forniteda Electrolux ed utilizzata solo in ambitodomestico e comunque non per attivitàimprenditoriali o professionali.
● L'apparecchiatura deve essere installata inconformità a tutte le normative vigenti nelnuovo paese di residenza.
Le disposizioni della presente GaranziaEuropea non pregiudicano i diritti previsti dallalegislazione di cui il consumatore è e rimanetitolare.
Garanzia/Servizio clienti Garanzia Europea
126.2936.30…ZWF365.qxd 6/6/08 11:06 Página 25

26
www.electrolux.com
126.2936.30…ZWF365.qxd 6/6/08 11:06 Página 26
27
Content
Safety information - - - - - - - - - - - - - - - - - -28
Description of the appliance - - - - - - - - - - -30
Detergent dispenser drawer - - - - - - - - - - -30
Control panel and functions - - - - - - - - - - -31
Programme table - - - - - - - - - - - - - - - - - -32
Washing Hints - - - - - - - - - - - - - - - - - - - - -34
Before the first use - - - - - - - - - - - - - - - - -36
Operating Sequence - - - - - - - - - - - - - - - -37
Care and cleaning - - - - - - - - - - - - - - - - - -40
Something not working - - - - - - - - - - - - - - 42
Technical data- - - - - - - - - - - - - - - - - - - - - 45
Consumption values - - - - - - - - - - - - - - - - 46
Installation instruction - - - - - - - - - - - - - - - 47
Environmental concerns - - - - - - - - - - - - - 51
Guarantee conditions - - - - - - - - - - - - - - - 52
European guarantee - - - - - - - - - - - - - - - - 53
Thank you for selecting our appliance
We wish you lots of enjoyment with your new appliance and we hope that you will consider ourbrand again when purchasing household appliances.Please read this user manual carefully and keep it throughout the product life cycle as a referencedocument. The user manual should be passed on to any future owner of the appliance.
The following symbols are used in this manual:
Important information concerning your personal safety and information on how to avoiddamaging the appliance.
General information and tips
Environmental information
126.2936.30…ZWF365.qxd 6/6/08 11:06 Página 27

28
Safety information
In the interest of your safety and to ensurethe correct use, before installing and firstusing the appliance, read this user manualcarefully, including its hints and warnings.To avoid unnecessary mistakes andaccidents, it is important to ensure that allpeople using the appliance are thoroughlyfamiliar with its operation and safetyfeatures. Save these instructions and makesure that they remain with the appliance if itis moved or sold, so that everyone using itthrough its life will be properly informed onappliance use and safety.
General safety● It is dangerous to alter the specifications or
attempt to modify this product in any way.● During high temperature wash programmes
the door glass may get hot. Do not touch it!● Make sure that small pets do not climb into
the drum. To avoid this, please check intothe drum before using.
● Any objects such as coins, safety pins, nails,screws, stones or any other hard, sharpmaterial can cause extensive damage andmust not be placed into the machine.
● Only use the advised quantities of fabricsoftener and detergent. Damage to the fabriccan ensue if you over-fill. Refer to themanufacturer’s recommendations ofquantities.
● Wash small items such as socks, laces,washable belts etc in a washing bag orpillow case as it is possible for such items toslip down between the tub and the innerdrum.
● Do not use your washing machine to washarticles with whalebones, material withouthems or torn material.
● Always unplug the appliance and turn off thewater supply after use, clean andmaintenance.
● Under no circumstances should you attemptto repair the machine yourself. Repairscarried out by inexperienced persons maycause injury or serious malfunctioning.Contact your local Service Centre. Alwaysinsist on genuine spare parts.
Installation● This appliance is heavy. Care should be
taken when moving it.● When unpacking the appliance, check that it
is not damaged. If in doubt, do not use it andcontact the Service Centre.
● All packing and transit bolts must beremoved before use. Serious damage canoccur to the product and to property if this isnot adhered to. See relevant section in theuser manual.
● After having installed the appliance, checkthat it is not standing on the inlet and drainhose and the worktop is not pressing theelectrical supply cable.
● If the machine is situated on a carpeted floor,please adjust the feet in order to allow air tocirculate freely
● Always be sure, that there is no waterleakage from hoses and their connectionsafter the installation.
● If the appliance is installed in a locationsubject to frost, please read the «dangers offreezing» chapter.
● Any plumbing work required to install thisappliance should be carried out by aqualified plumber or competent person.
● Any electrical work required to install thisappliance should be carried out by aqualified electrician or competent person.
126.2936.30…ZWF365.qxd 6/6/08 11:06 Página 28

29
Use● This appliance is designed for domestic use.
It must not be used for purposes other thanthose for which it was designed.
● Only wash fabrics which are designed to bemachine washed. Follow the instructions oneach garment label.
● Do not overload the appliance. See therelevant section in the user manual.
● Before washing, ensure that all pockets areempty and buttons and zips are fastened.Avoid washing frayed or torn articles andtreat stains such as paint, ink, rust, andgrass before washing. Underwired bras mustNOT be machine washed.
● Garments which have been in contact withvolatile petroleum products should not bemachine washed. If volatile cleaning fluidsare used, care should be taken to ensurethat the fluid is removed from the garmentbefore placing in the machine.
● Never pull the power supply cable to removethe plug from the socket; always take hold ofthe plug itself.
● Never use the washing machine if the powersupply cable, the control panel, the workingsurface or the base are damaged so that theinside of the washing machine is accessible.
Child safety● This washing machine is not intended for
use by young children or infirm personswithout supervision.
● Young children should be supervised toensure that they do not play with theappliance.
● The packaging components (e.g. plastic film,polystyrene) can be dangerous to children -danger of suffocation! Keep them out ofchildren’s reach
● Keep all detergents in a safe place out ofchildren’s reach.
● Make sure that children or pets do not climbinto the drum. To avoid this the machineincorporates special feature.
126.2936.30…ZWF365.qxd 6/6/08 11:06 Página 29

30
Description of the appliance
Detergent dispenser drawer
Control panel
Door opening handle
Drain pump
Adjustable feet5
4
3
2
1
Detergent dispenser drawer
Prewash
Wash
Fabric Softener
126.2936.30…ZWF365.qxd 6/6/08 11:06 Página 30
31
Control panel and functions
Programme selector dial andOn/Off switch
● The programme selector dial allows to select aprogramme and/or to switch the machine on/off. It can beturned either clockwise or anticlockwise. The lightStart/Pause starts to flash.
Programme selector temperature ● The programme selector temperature allows to select atemperature of washing for each kind of clothes.
Spin reduction button
● Press the Spin button repeatedly to change the spinspeed, if you want your laundry to be spun at a speeddifferent from the one proposed by the washing machineor to select the Night cycle and Rinse Hold. The relevantlight will light up.
Options button ● By means of the Options button, you can select only oneof the following option: Easy Iron or Super Quick.
Extra Rinse Button ● By means of this button, the machine performs someadditional rinses.
Programme progress display ● The different pilot lights illuminate depending on therunning programme phase.
Start/Pause button
● The Start/Pause button allows to start the selectedprogramme; the corresponding green pilot light stopsflashing.
● This button interrupts also a programme which is running,the correspondig green pilot light starts to flash.
1
2
3
4
5
7
6
126.2936.30…ZWF365.qxd 6/6/08 11:06 Página 31

32
Programme table
Program Type of laundry Temperature Options
Cotton
White or colored (forexample:bedcloths,tablecloths, etc)
Main wash at 90ºC to Cold
Easy Iron, Extra Rinse,Super Quick
Cotton + Prewash
White or colored cottonswhich needs prewash
Main wash at 90ºCto Cold
Cotton Eco
White and fact colouredcotton normally soiledcotton items): sheets,household linen, underwear.
Main wash at 60ºC to Cold Extra Rinse,
Eco + Prewash
Program which combineseco with prewashprogrammes.
Main wash at 60ºC or 40º Extra Rinse
Synthetic
Synthetics or mixedfabrics underwear, blouses,etc
Main wash at 60ºC to Cold Easy Iron, Extra Rinse,
Super Quick
Synthetic +Prewash
Synthetics or mixed fabricsvery soiled.
Main wash at 40ºto Cold Extra Rinse
Delicates
Delicate fabrics, forexample curtains.
Main wash at 40ºCto Cold Extra Rinse, Super Quick
Wool
Programme for wool "Purewool, moshrink, machinewashable" label.
Main wash at 40ºCto Cold
Handwash
Special programme forhand washing fabrics.
Main wash at 40ºCto Cold
126.2936.30…ZWF365.qxd 6/6/08 11:06 Página 32
33
Programme table
Program Type of laundry Temperature Options
Jeans
Specific programme forjeans, blouses and jackets.
Main wash at 60ºC to Cold Easy Iron
Sport Intensive
Programme for heavilysoiled synthetics items."Prewash" option isactivated.
Main wash at 40ºCto Cold Extra Rinse
RinseSeparate rinse cycle forhand washed items ofcotton fabric.
DrainFor emptying out the lastrinse water in programmeswith the Rinse Hold.
Spin Separate spin for cottons.
126.2936.30…ZWF365.qxd 6/6/08 11:06 Página 33

34
Washing hints
Sorting the laundryFollow the wash code symbols on eachgarment label and the manufacturer’s washinginstructions. Sort the laundry as follows: whites,coloureds, synthetics, delicates, woollens.
Temperatures
Before loading the laundryNever wash whites and coloureds together.Whites may lose their «whiteness» in thewash.New coloured items may run in the first wash;they should therefore be washed separatelythe first time.Make sure that no metal objects are left inthe laundry (e.g. hair clips, safety pins,pins). Button up pillowcases, close zipfasteners, hooks and poppers. Tie any beltsor long tapes.Remove persistent stains before washing. Rub particularly soiled areas with a specialdetergent or detergent paste.Treat curtains with special care. Remove hooksor tie them up in a bag or net.
Maximum loadsRecommended loads are indicated in theprogramme charts.General rules:Cotton, linen: drum full but not too tightlypacked;Synthetics: drum no more than half full;Delicate fabrics and woollens: drum no morethan one third full.Washing a maximum load makes the mostefficient use of water and energy.For heavily soiled laundry, reduce the loadsize.
Laundry weightsThe following weights are indicative:
Removing stainsStubborn stains may not be removed by justwater and detergent. It is therefore advisable totreat them prior to washing.Blood: treat fresh stains with cold water. Fordried stains, soak overnight in water with aspecial detergent then rub in the soap andwater.
90°for normally soiled white cottonsand linen (e.g. tea cloths, towels,tablecloths, sheets...)
50°/60°
for normally soiled, colour fastgarments (e.g. shirts, nightdresses, pyjamas....) in linen,cotton or synthetic fibres and forlightly soiled white cotton (e.g.underwear).
30°-40°-Cold
for delicate items (e.g. netcurtains), mixed laundry includingsynthetic fibres and woollensbearing the label «pure new wool,machine washable, non-shrink».
1200 gbathrobe100 gnapkin, tea cloth, lady's brief, blouse700 gquilt cover500 gsheet200 gpillow case, towelling towel, night dress250 gtable cloth200 gman's shirt600 gcamicie da lavoro da uomo100 gmen's underpanths
126.2936.30…ZWF365.qxd 6/6/08 11:06 Página 34

35
Oil based paint: moisten with benzine stainremover, lay the garment on a soft cloth anddab the stain; treat several times.Dried grease stains: moisten with turpentine,lay the garment on a soft surface and dab thestain with the fingertips and a cotton cloth.Rust: oxalic acid dissolved in hot water or arust removing product used cold. Be carefulwith rust stains which are not recent since thecellulose structure will already have beendamaged and the fabric tends to hole.Mould stains: treat with bleach, rinse well(whites and fast coloureds only).Grass: soap lightly and treat with bleach(whites and fast coloureds only).Ball point pen and glue: moisten withacetone (*), lay the garment on a soft cloth anddab the stain.Lipstick: moisten with acetone as above, thentreat stains with methylated spirits. Removeany residual marks from white fabrics withbleach.Red wine: soak in water and detergent, rinseand treat with acetic or citric acid, then rinse.Treat any residual marks with bleach.Ink: depending on the type of ink, moisten thefabric first with acetone (*), then with aceticacid; treat any residual marks on white fabricswith bleach and then rinse thoroughly.Tar stains: first treat with stain remover,methylated spirits or benzine, then rub withdetergent paste.(*) do not use acetone on artificial silk.
Detergents and additivesGood washing results also depend on thechoice of detergent and use of the correctquantities to avoid waste and protect theenvironment. Although biodegradable,detergents contain substances which, in largequantities, can upset the delicate balance ofnature.The choice of detergent will depend on thetype of fabric (delicates, woollens, cottons,
etc.), the colour, washing temperature anddegree of soiling.All commonly available washing machinedetergents may be used in this appliance:● powder detergents for all types of fabric,● powder detergents for delicate fabrics (60°C
max) and woollens,● liquid detergents, preferably for low
temperature wash programmes (60°C max)for all types of fabric, or special for woollensonly.
The detergent and any additives must beplaced in the appropriate compartments of thedispenser drawer before starting the washprogramme.If using concentrated powder or liquiddetergents, a programme without prewashmust be selected.The washing machine incorporates arecirculation system which allows an optimaluse of the concentrated detergent.Pour liquid detergent into the dispenser drawercompartment marked just before startingthe programme.Any fabric softener or starching additives mustbe poured into the compartment marked before starting the wash programme.Follow the product manufacturer’srecommendations on quantities to use and donot exceed the «MAX» mark in thedetergent dispenser drawer.
126.2936.30…ZWF365.qxd 6/6/08 11:06 Página 35

36
Quantity of detergent to be usedThe type and quantity of detergent will dependon the type of fabric, load size, degree ofsoiling and hardness of the water used.Water hardness is classified in so-called«degrees» of hardness. Information onhardness of the water in your area can beobtained from the relevant water supplycompany, or from your local authority.Follow the product manufacturers’ instructionson quantities to use.Use less detergent if:● you are washing a small load,● the laundry is lightly soiled,● large amounts of foam form during washing.
Degrees of water hardness
LevelDegrees
German°dH
French°T.H.
Characteristic
1 0-7 0-15soft
2 8-14 16-25medium
3 15-21 26-37hard
4 > 21 > 37very hard
Before the first use
WARNING!Ensure that the electrical and waterconnections comply with the installationinstructions.
IMPORTANT!Remove the polystyrene block and anymaterial from the drum.
IMPORTANT!Pour 2 litres of water into the main washcompartment of the detergent drawer inorder to activate the ECO valve. Then run acotton cycle at 95°C, without any laundry in themachine, to remove any manufacturing residuefrom the drum and tub. Pour 1/2 a measure ofdetergent into the dispenser drawer and startthe machine.
126.2936.30…ZWF365.qxd 6/6/08 11:06 Página 36

37
Operating sequence
1. Load the laundryOpen the door bycarefully pulling thedoor handle outwards.Place the laundry in thedrum, one item at atime, shaking them out
as much as possible. Close the door.
2. Measure out the detergent and the fabricsoftener
Pull out the dispenser drawer until it stops.Measure out the amount of detergent required,pour it into the main wash compartment and, if you wish to carry out a programme withthe prewash phase, pour it into thecompartment marked .If required, pour fabric softener into thecompartment marked (the amount used mustnot exceed the «MAX» mark in the drawer).Close the drawer gently.
3. Select the required programmeThe selector dial isdivided into followingsections:● Cottons,● Synthetics,● Special
The green Start/Pause light starts to flash.The selector dial can be turned eitherclockwise or anticlockwise.Position «Off» to Reset programme/SwitchingOFF of the machine.At the end of the programme the selectordial must be turned to position «Off», toswitch the machine off.
IMPORTANT!If you turn the programme selector dial to anotherprogramme when the machine is working, thered Start/Pause pilot light will flash 3 times toindicate a wrong selection. The machine will notperform the new selected programme.
4. Select the spin speed or Rinse HoldoptionPress the Spin button repeatedly to change thespin speed, if you want your laundry to be spunat a speed different from the one proposed bythe appliance. The relevant light will light up.
Maximum speeds are:Delicates, Wool andHandwash: 450 rpm
Rinse Hold : by selecting this option thewater of the last rinse is not emptied out toprevent the fabrics from creasing. When theprogramme has finished the pilot lights «Door»and «End» are alight, the Start/Pause and«Wash» lights are off and the door is locked toindicate that the water must be emptied out.Night Cycle : The water of the spin's endcan't be evacuated at the end of selectedprogram to avoid the creases on laundry.In all phases of spin, the sound has beenremoved and the appliance can be used duringnight. Over Cotton and Synthetics programs,rinses are made with more water.To empty out the water:1.turn the programme selector dial to «Off»2.select the Drain or Spin programme3.reduce the spin speed if needed, by means of
the relevant button4.depress Start/Pause button5. at the end of programme, only the pilot lightsEnd comes on.
126.2936.30…ZWF365.qxd 6/6/08 11:06 Página 37

38
Operating sequence
5. Select Easy Iron, Super Quick option
Press the «Options»button repeatedly, toselect only one of theavailable options. Therelevant light will lightup.
Easy Iron: by selecting this option, thewashing and rinse is performed softly. Thisoption avoid to crease laundry.This option isn't avaible for Handwash,Delicates, Prewash and Eco programmes.Super Quick: a very short cycle for slightlysoiled items that have been used or worn for ashort time.This option is not available with the Wool,Handwash, Sport 40° and Eco programmes.The max. load recommended for cotton: is 3 kgand for synthetic and delicate is 1.5 kg.
IMPORTANT!If an option is chosen that is not allowed with theselected programme, the red pilot light of theStart/Pause button will flash 3 times.The washing time will be reduced according tothe type of fabric and the selected temperature.
6. Select the Extra Rinse option
This button can beselected with allprogrammes except theWool and Hand washprogrammes. Themachine performs someadditional rinses.
This option is recommended for people who areallergic to detergents, and in areas where thewater is very soft.
7. Select the Start/PauseTo start the selected programme, press theStart/Pause button; the corresponding green pilotlight stops flashing.
The «Wash» and«Door» lights are alightto indicate that theappliance startsoperating and the dooris locked.
To interrupt a programme which is running,depress the Start/Pause button: thecorresponding green pilot light starts to flash.To restart the programme from the point atwhich it was interrupted, press the Start/Pausebutton again.If you have chosen a delayed start, the machinewill begin the countdown.
IMPORTANT!If an incorrect option is selected, the red pilotlight of the Start/ Pause button flashes for 3times.
126.2936.30…ZWF365.qxd 6/6/08 11:06 Página 38

39
Operating sequence
Altering an option or a running programmeIt is possible to change any option before theprogramme carries it out. Before you make anychange, you must pause the washing machineby pressing the Start/Pause button.Changing a running programme is possibleonly by resetting it. Turn the programmeselector dial to Off and then to the newprogramme position. The washing water in thetub will not emptied out. Start the newprogramme by depressing the Start/Pausebutton again.
Interrupting a programmeDepress the Start/Pause button to interrupt aprogramme which is running, thecorresponding light starts to flash. Depress thebutton again to restart the programme.
Cancelling a programmeTurn the selector dial to Off to cancel aprogramme which is running. Now you canselect a new programme.
Opening the door after the programme hasstartedFirst set the machine to pause by pressing theStart/Pause button.If the «Door» light flashes and after 2 minutesgoes off, the door can be opened.If the «Door» light does not flash, this meansthat the machine is already heating, that thewater level is above the bottom edge of thedoor or that the drum is turning.In this case the door can not be opened.If you cannot open the door but you need toopen it you have to switch the machine off byturning the selector dial to «Off».After about 2 minutes the door can be opened(pay attention to the water level andtemperature!).
At the end of the programmeThe machine stops automatically. TheStart/Pause and «wash» lights go off and the«end» phase light illuminates. The door can beopened (the Door light is off).If the «Rinse Hold» option has been selected,the «end» and «door» lights illuminates but thedoor remains locked to indicate that the watermust be emptied out before opening the door.To empty out the water please read the stepson the Rinse Hold option paragraph.Turn the programme selector dial to «Off» toswitch the machine off. Remove the laundryfrom the drum and carefully check that thedrum is empty.If you do not intend to carry out another wash,close the water tap. Leave the door open toprevent the formation of mildew andunpleasant smells.
126.2936.30…ZWF365.qxd 6/6/08 11:06 Página 39

40
IMPORTANT!You must DISCONNECT the appliance fromthe electricity supply, before you can carry outany cleaning or maintenance work.
DescalingThe water we use normally contains lime. It isa good idea to periodically use a watersoftening powder in the machine. Do thisseparately from any laundry washing, andaccording to the softening powdermanufacturer's instructions. This will help toprevent the formation of lime deposits.
Maintenance WashWith the use of low temperature washes it ispossible to get a build up of residues inside thedrum. We recommend that a maintenance wash beperformed on a regular basis.To run a maintenance wash:● The drum should be empty of laundry.● Select the hottest cotton wash programme.● Use a normal measure of detergent, must be
a powder with biological properties.
External cleaningClean the exterior cabinet of the appliance withsoap and water only, and then dry thoroughly.
Cleaning the dispenser drawerThe washing powder and additive dispenserdrawer should be cleaned regularly.
To aid cleaning, the top part of the additivecompartment should be removed.
Remove the drawer by pressing the catchdownwards and by pulling it out. Flush it outunder a tap, to remove any traces ofaccumulated powder.
Cleaning the drawer recess
Having removed thedrawer, use a smallbrush to clean therecess, ensuring that allwashing powderresidue is removed fromthe upper and lower
part of the recess.Replace the drawer and run the rinseprogramme without any clothes in the drum.
Cleaning the pumpThe pump should be inspected if● the machine does not empty and/or spin ● the machine makes an unusual noise during
draining due to objects such as safety pins,coins etc. blocking the pump.
Proceed as follows:● Disconnect the appliance. ● If necessary wait until the water has cooled
down. ● Open the pump door.
● Place a containferclose to the pump tocollect any spillage.
● Unscrew the pumpcover and remove it.Always keep a ragnearby to dry up
spillage of water when removing the cover.
Care and cleaning
126.2936.30…ZWF365.qxd 6/6/08 11:06 Página 40

41
● Remove any objects from the pump impellerby rotating it.
● Screw the pump coverfully in.
● Close the pump door.
IMPORTANT!
When the appliance is in use and dependingon the programme selected there can be hotwater in the pump.Never remove the pump cover during a washcycle, always wait until the appliance hasfinished the cycle, and is empty. Whenreplacing the cover, ensure it is securelyretightened so as to stop leaks and youngchildren being able to remove it.Cleaning the water inlet filterIf your water is very hard or contains traces oflime deposit, the water inlet filter may becomeclogged.It is therefore a good idea to clean it from timeto time.
Turn off the water tap.Unscrew the water inlethose. Clean the filterusing a hard bristlebrush. Tighten up theinlet hose.
The dangers of freezingIf the machine is exposed to temperaturesbelow 0°C, certain precautions should betaken.● Turn off the water tap.● Unscrew the inlet hose.● Place the inlet hose in a bowl placed on the
floor and let water drain out.● Screw the water inlet hose back on.● When you intend to start the machine up
again, make sure that the room temperatureis above 0°C.
IMPORTANT!Every time you drain the water through theemergency emptying hose you must pour 2litres of water into the main wash compartmentof the detergent drawer and then run the drainprogramme. This will activate the ECO VALVEdevice avoiding that part of the detergentremains unused at next washing.
Emergency emptying outIf the water is not discharged, proceed asfollows to empty out the machine:● pull out the plug from the power socket; ● close the water tap; ● if necessary, wait until the water has cooled
down;● open the pump door;● clean the pump if necessary as previously
described;● screw the pump cover again and close the
door.
126.2936.30…ZWF365.qxd 6/6/08 11:06 Página 41

42
Malfunction Possible Cause / Solution
The washing machine does not start:
The door has not been closed. (Red Start/Pausepilot light flashes)• Close firmly the door.
The plug is not properly inserted in the power socket.• Insert the plug into the power socket.
There is no power at the socket.• Please check your domestic electrical installation.
The main fuse has blown.• Replace the fuse.
The selector dial is not correctly positioned and theStart/Pause button has not been depressed.• Please turn the selector dial and press the
Start/Pause button again.
The machine does not fill:
The water tap is closed. (Red Start/Pause pilot lightflashes)
• Open the water tap.
The inlet hose is squashed or kinked. (Red Start/Pause pilot light flashes)
• Check the inlet hose connection.
The filter in the inlet hose is blocked. (Red Start/Pause pilot light flashes)
• Clean the water inlet hose filter.
The door is not properly closed. (Red Start/Pause pilot light flashes)
• Close firmly the door.
Something not working
IMPORTANT!Certain problems are due to lack of simple maintenance or oversights, which can be solved easilywithout calling out an engineer. Before contacting your local Service Centre, please carry out thechecks listed below.During machine operation it is possible that the red Start/Pause pilot light flashes to indicate thatthe machine is not working.Once the problem has been eliminated, press the Start/Pause button to restart the programme. Ifafter all checks, the problem persists, contact your local Service Centre.
The machine fills then emptiesimmediately:
The end of the drain hose is too low. • Refer to relevant paragraph in «water drainage»
section.
126.2936.30…ZWF365.qxd 6/6/08 11:06 Página 42

43
Malfunction Possible Cause / Solution
The machine does not empty and/ordoes not spin:
The drain hose is squashed or kinked. (Red Start/ Pause pilot light flashes)
• Check the drain hose connection.
The drain pump is clogged. (Red Start/Pause pilot light flashes)
• Clean the drain pump.
The option has been selected.• Select the Drain or Spin programmes
The laundry is not evenly distributed in the drum.• Redistribute the laundry.
There is water on the floor:
Too much detergent or unsuitable detergent (createstoo much foam) has been used.• Reduce the detergent quantity or use another one.
Check whether there are any leaks from one of theinlet hose fittings. It is not always easy to see this asthe water runs down the hose; check to see if it isdamp.• Check the water inlet hose connection.
The inlet hose is damaged.• Change it with a new one.
Unsatisfactory washing results:
Too little detergent or unsuitable detergent has beenused.• Increase the detergent quantity or use another one.
Stubborn stains have not been treated prior towashing.• Use commercial products to treat the stubborn
stains.
The correct temperature was not selected.• Check if you have selected the correct
temperature.
Excessive laundry load.• Introduce into the drum less laundry.
126.2936.30…ZWF365.qxd 6/6/08 11:06 Página 43

44
The machine vibrates or is noisy:
The transit bolts and packing have not beenremoved.• Check the correct installation of the appliance.
The support feet have not been adjusted.• Check the correct levelling of the appliance.
The laundry is not evenly distributed in the drum.• Redistribute the laundry.
Maybe there is very little laundry in the drum.• Load more laundry.
Malfunction Possible Cause / Solution
The door will not open:
The programme is still running.• Wait the end of washing cycle.
The door lock has not been released.• Wait about 2 minute.
There is water in the drum.• Select drain or spin programme to empty out the
water.
Spinning starts late or the machinedoes not spin:
The electronic unbalance detection device has cut inbecause the laundry is not evenly distributed in thedrum. The laundry is redistributed by reverse rotationof the drum. This may happen several times beforethe unbalance disappears and normal spinning canresume. If, after 10 minutes, the laundry is still notevenly distributed in the drum, the machine will notspin. In this case, redistribute the load manually andselect the spin programme.● Redistribute the laundry.
The machine makes an unusual noise
The machine is fitted with a type of motor whichmakes an unusual noise compared with othertraditional motors. This new motor ensures a softerstart and more even distribution of the laundry in thedrum when spinning, as well as increased stability ofthe machine.
No water is visible in the drumMachines based on modern technology operate veryeconomically using very little water without affectingperformance.
If you are unable to identify or solve theproblem, contact our service centre. Before telephoning, make a note of the model,serial number and purchase date of yourmachine: the Service Centre will require thisinformation.
Mod. ... ... ...Prod. No. ... ... ... Ser. No. ... ... ...
Mod
. ...
... ..
.
Prod
. No.
... .
.. ..
Ser
. No.
... .
.. ...
126.2936.30…ZWF365.qxd 6/6/08 11:06 Página 44

45
Technical data
Dimensions Width 60 cm
85 cm
63 cm
Height
Depth (inclunding the porthole)
Water supply pressure Minimum 0,05 MPa
0,8 MPaMaximum
Maximum Load 5 kg
MaximumSpin Speed 0 800 rpm
Electrical connection Voltage -Overall power - Fuse
Information on the electrical connection is given on the ratingplate on the inner edge of the appliance door
126.2936.30…ZWF365.qxd 6/6/08 11:06 Página 45

46
125Cottons 95°C 2.0 61
125Cottons 60° Eco(*) 0.85 52
100Cottons 60°C - 40°C 1.3 58
145Cottons 40°C Eco 1.14 52
55Delicates 40°C - 30°C 0.55 60
45Rinse 0.1 42
10Spin - -
2Drain - -
80Synthetics 50°C - 40°C 0.8 51
Consumption values
Programmeduration
(in minutes)
Programme Energyconsumption
(in kWh)
Waterconsumption
(in litres)
Infos
The consumption data shown on this chart is tobe considered purely indicative, as it may varydepending on the quantity and type of laundry,on the inlet water temperature and on theambient temperature. It refers to the highesttemperature for each wash programme.
(*) The “Cottons 60° Eco” is the referenceprogramme for the data entered in theenergy label, in compliance with EEC 92/75standards.
126.2936.30…ZWF365.qxd 6/6/08 11:06 Página 46
47
Installation instruction
Transit security barsBefore starting the machine up, the transportsecurity bars must be removed as follows:You are advised to keep all the transportsecurity bars. In case the appliance has to betransported again.
1. Unscrew and remove the three rear screwsby means of a key.
2. Open the porthole and remove thepolystyrene block fitted with adhesive tapeon the door seal.
3. Place the machine in an upright positionand remove the three plastic bolts.
4. Plug the 3 holes with the plastic plugs whichyou can find in the envelope containing theinstruction booklet.
PositioningInstall the machine on a flat hard floor. Makesure that air circulation around the machine isnot impeded by carpets, rugs etc. Check thatthe machine does not touch the wall or otherkitchen units. Level the washing machine byraising or lowering the feet. Once in the rightposition fix the feet by pushing the nuts againstthe base of the case. The feet may be tight toadjust as they incorporate but the machineMUST be level and stable.If necessary, check the setting with a spirit level.Accurate levelling prevents vibration, noise anddisplacement of the machine duringoperation.Never place cardboard, wood orsimilar materials under the machine tocompensate for any unevenness in the floor.Some vibration is inevitable, especially ifmounted on a wooden floor.Sprung wooden floors are particularlysusceptible to vibration. For advice, consult abuilder. If possible, always place the machineon a solid floor.
Water inletThere should be a COLD WATER tap near thewashing machine with a screwing on connectionpipe of 3/4" for the water supply, a sink, a washbasin or a drainage system in the wall.Previously check if:- it is not a hot water tap.- the running water is clean. If not, run off areasonable amount of water to flush out anydebris that may have collected in the pipes.Have the permanent drainage system in thewall checked by a plumber.
126.2936.30…ZWF365.qxd 6/6/08 11:06 Página 47

48
1. Connect the hose to a tap with a 3/4”thread. Always use the hose supplied withthe appliance. The inlet hose must not belengthened. If it is too short and you do notwish to move the tap, you will have topurchase a new, longer hose speciallydesigned for this type of use.
NOTEInstallation shouldcomply with localwater authority andbuilding regulations’requirements.
2. If necessary turn the hose adequately byunscrewing the nut at the rear of theappliance. Now tighten the nut anew toavoid leaks. (Open the tap and assure thatit does not leak and close it again.)
The appliance must be connected to a coldwater supply. A minimum water pressure of 0.05 MPa (0.5bar) is required for safe operation of theappliance.If you cannot make the cold water connectiondirect from the rising mains, you may be ableto operate the appliance from your cold waterstorage system.There should be a minimum distance of 5.02m(16.5 ft) between the appliance’s inlet and thebottom of the water storage tank.
Water drainageThis appliance is designed to be permanentlyplumbed into your home's drainage systemusing one of the following methods.
1. Into a drainage standpipe.
Firstly form a hook in the end of the drainhose using the «U» piece supplied. Place thedrain hose into your standpipe, which shouldhave an internal diameter of approximately38mm thus ensuring there is an air breakbetween the drain hose and standpipe.When discharging into a standpipe ensure thatthe top of the standpipe is no more than 90cm (35.4'') and no less than 60 cm (23.6'')above floor level.
The drain hose may be extended to amaximum of 4 metres. An additional drainhose and joining piece is available from yourlocal Service Force Centre. The joining piecemust have an internal diameter of 18mm.
���������������
126.2936.30…ZWF365.qxd 6/6/08 11:06 Página 48

49
If your drain hoselooks like this (seebelow) you do notrequire the «U» piece.Just push the hosefirmly into thestandpipe.
2. Onto a sink outlet spigot.If the outlet spigot has not been used before,remove any blanking plug that may be in place.
Push the drain hose onto the spigot and securewith a clip if required, ensure a loop is formedin the drain hose (see diagram) to preventwaste from the sink entering the washingmachine.Important!Before connecting the machine to newpipework or to pipework that has not beenused for some time, run off a reasonableamount of water to flush out any debris thatmay have collected in the pipes.
Special conditionsIf the floor is carpeted or covered with crumblyor soft material, insert a rigid support baseunder the feet to prevent noise, vibration ordisplacement. The base should protrude a fewcentimetres beyond the edges of the machine.
WARNING!The machine should NOT be placed on deeppile carpeting.
NOTEPlease ensure that when the appliance isinstalled it is easily accessible for the engineerin the event of a breakdown.
����
In the interest of the environmentWashing machines and dishwashers should beconnected to the FOUL drainage system, thewater will then be taken to a sewage works fortreatment before being discharged safely into ariver. It is essential that these appliances arenot connected to the surface water drainagesystem as this water is discharged directly intoa river or stream and may cause pollution.If you require any further advice please contactyour local water authority.
Electrical connectionAny electrical work required to install thisappliance should be carried out by a qualifiedelectrician or competent person.
WARNING!This appliance must be earthed.The manufacturer declines any liabilityshould this safety measure not beobserved.Before switching on, make sure the electricitysupply voltage is the same as that indicated onthe appliance’s rating plate. IMPORTANT!Information on the electrical connection isgiven on the rating plate on the inner edgeof the appliance door.
����
�� �
���� ���
���
������������� ��������
����� ��������
�������� �����������
�� � ��������
��
���������
��������
���� � ��
����
��
� ��������
126.2936.30…ZWF365.qxd 6/6/08 11:06 Página 49

50
The appliance is supplied with a 13amp plugfitted. In the event of having to change thefuse in the plug supplied, a 13amp ASTAapproved (BS1363/A) fuse must be used.Should the plug need to be replaced for anyreason, proceed as described below.The wires in the mains lead are coloured inaccordance with the following code:Green and Yellow ..............................- EarthBlue ....................................................- NeutralBrown..................................................- Live
The wire colouredgreen and yellowmust be connected tothe terminal markedwith the letter «E» orby the earth symbol
or coloured greenand yellow.
The wire coloured blue must be connected tothe terminal marked «N» or coloured black.The wire coloured brown must be connectedto the terminal marked «L» or coloured red.Upon completion there must be no cut, orstray strands of wire present and the cordclamp must be secure over the outer sheath.
WARNING!
A cut off plug inserted into a 13 ampsocket is a serious safety (shock) hazard.Ensure that the cut off plug is disposed ofsafely. Should the appliance power supplycable need to be replaced, this must becarried out by our Service Force Centre.The power supply cable must be easilyaccessible after installing the appliance.
������ ������
�����
��������������
���
�
��
Permanent connectionIn the case of permanent connection it isnecessary that you install a double pole switchbetween the appliance and the electricitysupply (mains), with a minimum gap of 3mmbetween the switch contacts and of a typesuitable for the required load in compliancewith the current electrical regulations.The switch must not break the yellow andgreen earth cable at any point.
126.2936.30…ZWF365.qxd 6/6/08 11:06 Página 50

51
Environmental concerns
Packaging materialsThe materials marked with the symbol arerecyclable.>PE<=polyethylene>PS<=polystyrene>PP<=polypropyleneThis means that they can be recycled bydisposing of them properly in appropriatecollection containers.
Old machineUse authorised disposal sites for your oldappliance. Help to keep your country tidy!
The symbol on the product or on itspackaging indicates that this product may notbe treated as household waste. Instead it shallbe handed over to the applicable collectionpoint for the recycling of electrical andelectronic equipment. By ensuring this productis disposed of correctly, you will help preventpotential negative consequences for theenvironment and human health, which couldotherwise be caused by inappropriate wastehandling of this product. For more detailedinformation about recycling of this product,please contact your local city office, yourhousehold waste disposal service or the shopwhere you purchased the product.
Ecological hintsTo save water, energy and to help protect theenvironment, we recommend that you followthese tips:● Normally soiled laundry may be washed
without prewashing in order to savedetergent, water and time (the environmentis protected too!).
● The machine works more economically if it isfully loaded.
● With adequate pre-treatment, stains andlimited soiling can be removed; the laundrycan then be washed at a lower temperature.
● Measure out detergent according to thewater hardness, the degree of soiling andthe quantity of laundry being washed.
126.2936.30…ZWF365.qxd 6/6/08 11:06 Página 51

52
Guarantee conditions
Standard guarantee conditionsWe, Zanussi-Electrolux, undertake that ifwithin12 months of the date of the purchasethis Zanussi-Electrolux appliance or any partthereof is proved to be defective by reasononly of faulty workmanship or materials, wewill, at our option repair or replace the sameFREE OFCHARGE for labour, materials orcarriage on condition that:● The appliance has been correctly
installedand used only on the electricitysupply statedon the rating plate.
● The appliance has been used for normaldomestic purposes only, and in accordancewith the manufacturer's instructions.
● The appliance has not been serviced,maintained, repaired, taken apart ortampered with by any person not authorisedby us.
● Electrolux Service Force Centre mustundertake all service work under thisguarantee.
● Any appliance or defective part replacedshall become the Company's property.
● This guarantee is in addition to yourstatutoryand other legal rights.
Service and Spare Parts.In the event of your appliance requiringservice, or if you wish to purchase spare parts,please contact your local Service Force Centreby telephoning:
355 4 27 047Your telephone call will be automatically routedto the Service Force Centre covering yourpostcode area. For the address of your localService Force Centre and further informationabout Service Force, please visit the website atwww.global-servis.com.al
Before calling out an engineer, please ensureyou have read the details under the heading«Something not working». When you contactthe Service Force Centre you will need to givethe following details:
1 Your name, address and postcode.2 Your telephone number.3 Clear concise details of the fault.4 The model and Serial number of the
appliance (found on the rating plate).5 The purchase date.Please note a valid purchase receipt orguarantee documentation is required for inguarantee service calls.
Customer CareFor general enquiries concerning yourElectrolux appliance, or for further informationon Electrolux products please contact ourCustomer Care Department by letter ortelephone at the address below or visit ourwebsite at www.electrolux.co.uk
Global Servis Sh. a. Rr. Don Bosko, Pall VisionplusTelf. +335 4 [email protected]
126.2936.30…ZWF365.qxd 6/6/08 11:06 Página 52

53
European guarantee
This appliance is guaranteed by Electrolux, ineach of the countries listed in the followingpage, for the period specified in the applianceguarantee or otherwise by law. If you movefrom one of these countries to another of thesecountries the appliance guarantee will movewith you subject to the following qualifications:
● The appliance guarantee starts from thedate you first purchased the appliancewhich will be evidenced by production of avalid purchase document issued by sellerof the appliance.
● The appliance guarantee is for the sameperiod and to the same extent for labourand parts as exists in your country ofresidence for this particular model or rangeof appliances.
● The appliance guarantee is personal to theoriginal purchaser of the appliance andcannot be transferred to another user.
● The appliance is installed and used inaccordance with instructions issued byElectrolux and is only used within thehome, i.e. is not used for commercialpurposes.
● The appliance is installed in accordancewith all relevant regulations in force withinyour new country of residence.
The provisions of this European Guarantee donot affect any of the rights granted to you bylaw.
126.2936.30…ZWF365.qxd 6/6/08 11:06 Página 53

54
126.2936.30…ZWF365.qxd 6/6/08 11:06 Página 54

www.electrolux.com
www.zanussi-electrolux.co.uk
Subject to change without notice126.2936.30
126.2936.30…ZWF365.qxd 6/6/08 11:06 Página 56