MINI CUCINE - Mobilier bureau Monaco, banque d’accueil ... · Villaggio Poseidone Ugento (Le) Bed...
56
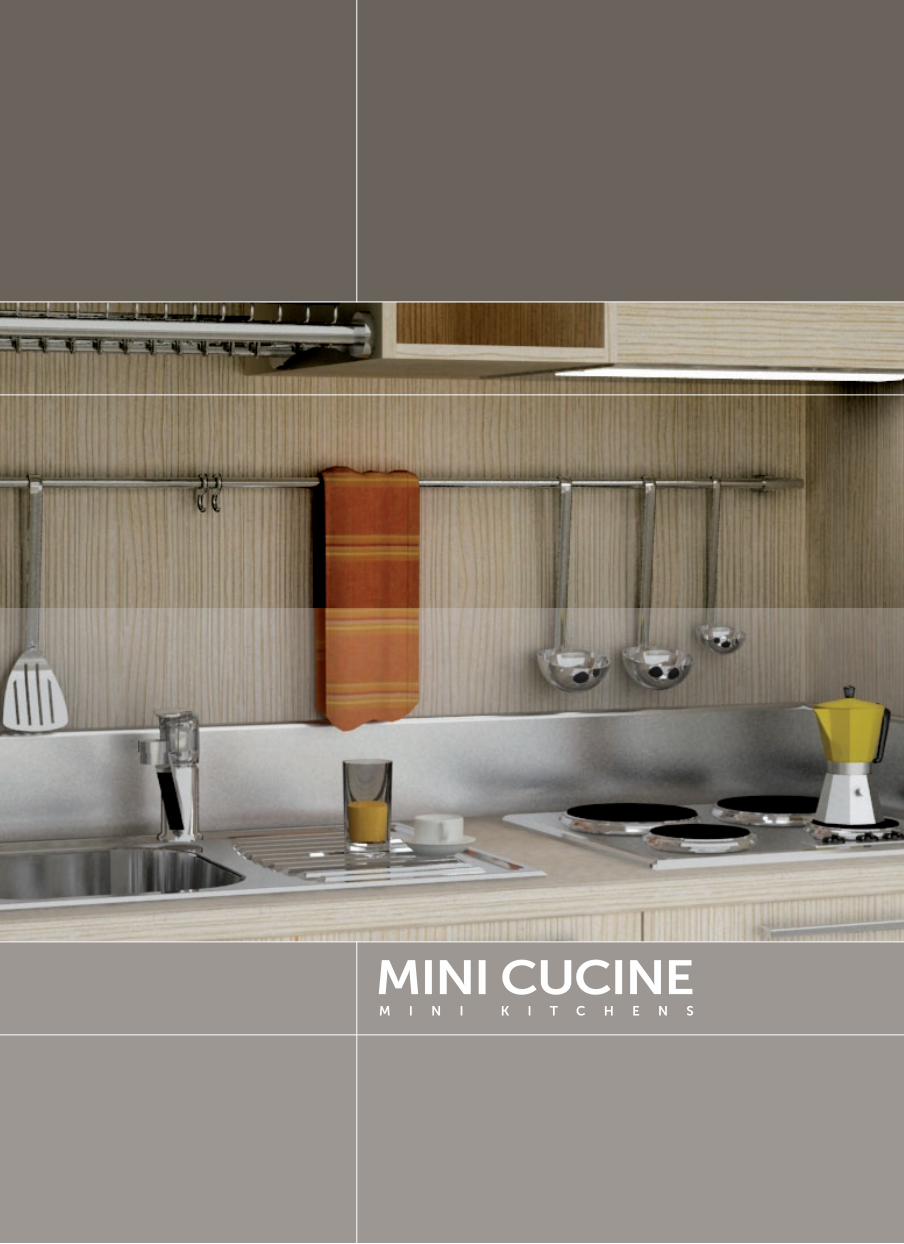
MINI CUCINE M I N I K I T C H E N S
Transcript of MINI CUCINE - Mobilier bureau Monaco, banque d’accueil ... · Villaggio Poseidone Ugento (Le) Bed...
MINI CUCINEM I N I K I T C H E N S
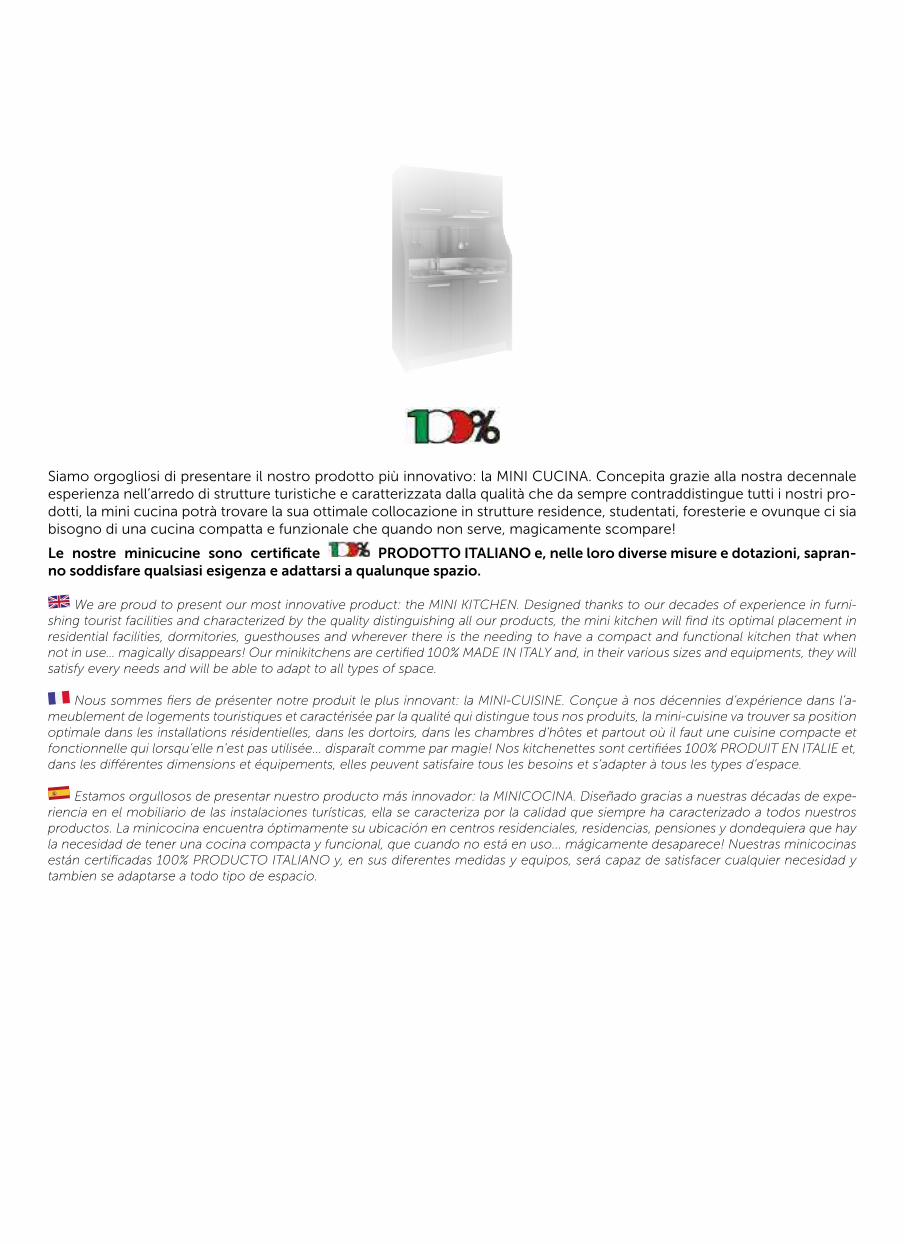
Siamo orgogliosi di presentare il nostro prodotto più innovativo: la MINI CUCINA. Concepita grazie alla nostra decennale esperienza nell’arredo di strutture turistiche e caratterizzata dalla qualità che da sempre contraddistingue tutti i nostri pro-dotti, la mini cucina potrà trovare la sua ottimale collocazione in strutture residence, studentati, foresterie e ovunque ci sia bisogno di una cucina compatta e funzionale che quando non serve, magicamente scompare!
Le nostre minicucine sono certificate PRODOTTO ITALIANO e, nelle loro diverse misure e dotazioni, sapran-no soddisfare qualsiasi esigenza e adattarsi a qualunque spazio.
We are proud to present our most innovative product: the MINI KITCHEN. Designed thanks to our decades of experience in furni-shing tourist facilities and characterized by the quality distinguishing all our products, the mini kitchen will find its optimal placement in residential facilities, dormitories, guesthouses and wherever there is the needing to have a compact and functional kitchen that when not in use… magically disappears! Our minikitchens are certified 100% MADE IN ITALY and, in their various sizes and equipments, they will satisfy every needs and will be able to adapt to all types of space.
Nous sommes fiers de présenter notre produit le plus innovant: la MINI-CUISINE. Conçue à nos décennies d’expérience dans l’a-meublement de logements touristiques et caractérisée par la qualité qui distingue tous nos produits, la mini-cuisine va trouver sa position optimale dans les installations résidentielles, dans les dortoirs, dans les chambres d’hôtes et partout où il faut une cuisine compacte et fonctionnelle qui lorsqu’elle n’est pas utilisée... disparaît comme par magie! Nos kitchenettes sont certifiées 100% PRODUIT EN ITALIE et, dans les différentes dimensions et équipements, elles peuvent satisfaire tous les besoins et s’adapter à tous les types d’espace.
Estamos orgullosos de presentar nuestro producto más innovador: la MINICOCINA. Diseñado gracias a nuestras décadas de expe-riencia en el mobiliario de las instalaciones turísticas, ella se caracteriza por la calidad que siempre ha caracterizado a todos nuestros productos. La minicocina encuentra óptimamente su ubicación en centros residenciales, residencias, pensiones y dondequiera que hay la necesidad de tener una cocina compacta y funcional, que cuando no está en uso... mágicamente desaparece! Nuestras minicocinas están certificadas 100% PRODUCTO ITALIANO y, en sus diferentes medidas y equipos, será capaz de satisfacer cualquier necesidad y tambien se adaptarse a todo tipo de espacio.
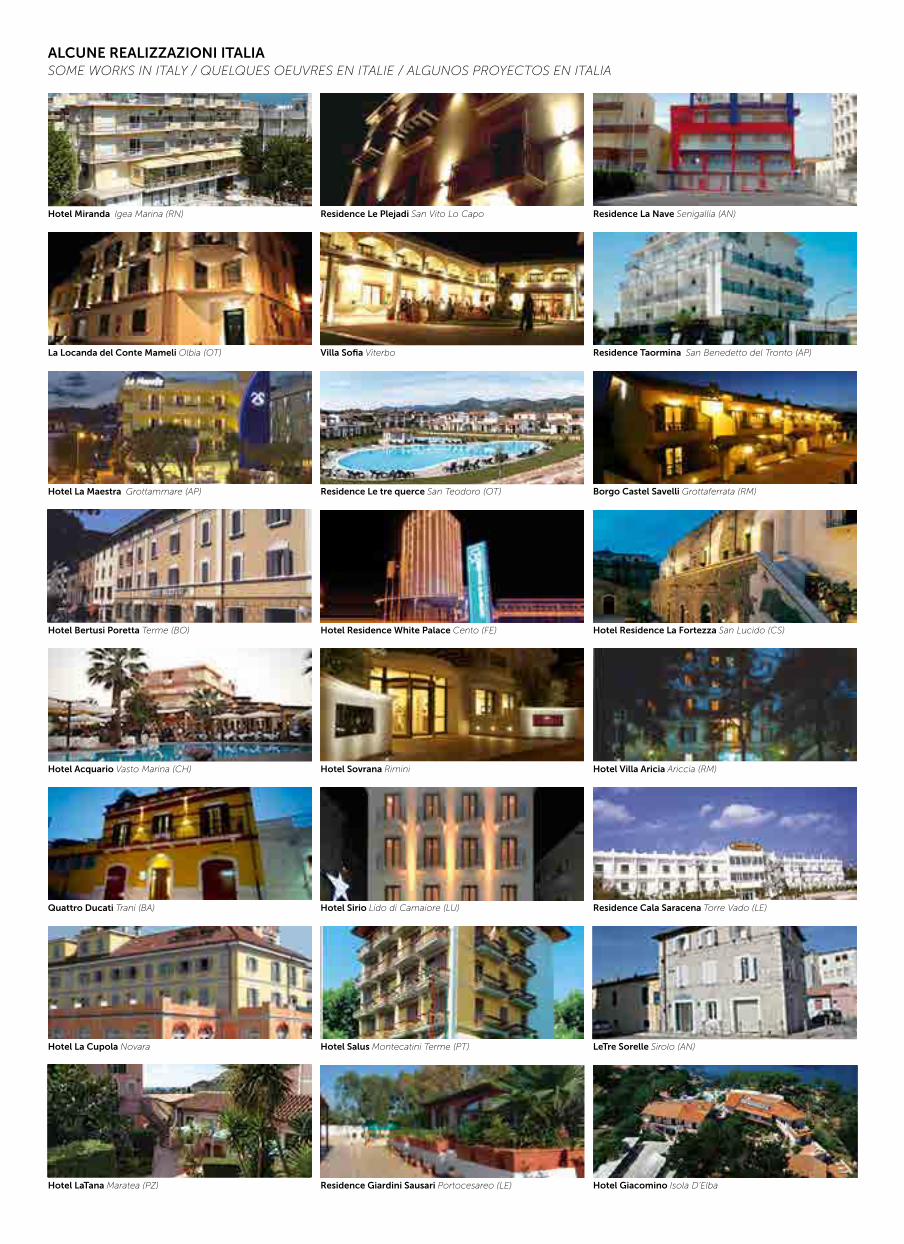
ALCUNE REALIZZAZIONI ITALIASOME WORKS IN ITALY / QUELQUES OEUVRES EN ITALIE / ALGUNOS PROYECTOS EN ITALIA
Hotel Miranda Igea Marina (RN)
La Locanda del Conte Mameli Olbia (OT)
Hotel La Maestra Grottammare (AP)
Hotel Bertusi Poretta Terme (BO)
Hotel Acquario Vasto Marina (CH)
Quattro Ducati Trani (BA)
Hotel La Cupola Novara
Hotel LaTana Maratea (PZ)
Residence Le Plejadi San Vito Lo Capo
Villa Sofia Viterbo
Residence Le tre querce San Teodoro (OT)
Hotel Residence White Palace Cento (FE)
Hotel Sovrana Rimini
Hotel Sirio Lido di Camaiore (LU)
Hotel Salus Montecatini Terme (PT)
Residence Giardini Sausari Portocesareo (LE)
Residence La Nave Senigallia (AN)
Residence Taormina San Benedetto del Tronto (AP)
Borgo Castel Savelli Grottaferrata (RM)
Hotel Residence La Fortezza San Lucido (CS)
Hotel Villa Aricia Ariccia (RM)
Residence Cala Saracena Torre Vado (LE)
LeTre Sorelle Sirolo (AN)
Hotel Giacomino Isola D’Elba

3
PIEMONTE
CosmopolitanNichelino (TO)
Golf MargaraFubine (AL)
Comune Di Cantoira Cantoira (To)
Residence AteneoTorino
Albergo Antico Distretto Torino
Convento San Domenico Chieri (TO)
Savanco Rovero Alba (Cn)
LOMBARDIA
Privilege ApartamentsVimercate (Mb)
Sc Group Immobiliare CamereVimercate (Mb)
Choco ApartamentMilano
Residence La PerlaLago D’Iseo (Bs)
Casa di riposoStefano BongionVilla di Tirano (SO)
Hotel Rotelli Sale Marasino (Bs)
Aziena Agrituristica Dabeni Rovato (Bs)
Piemonte - Albergo Renato Sesto San Giovanni (Mi)
Hotel Adler Milano
Residence Le 7 Cupole Milano
Villa Zaccaria Bordolano (Cremona)
VENETO
Camping Ca’SavioCavallino Treporti (VE)
Hotal RosaAbano Terme (PD)
LaghettoLazise (VR)
Seminario Vescovile Verona
Hotel Piccola FeniceVenezia
TRENTINO
Hotel SelectAndalo (Tn)
Hotel AlpinoPejo (Tn)
Hotel NevadaFolgaria (TN)
Garni SeventyDimaro (TN)
Campeggio al CorTorbole (TN)
La Terrazza Torbole Sul Garda (Tn)
Residence Miralago Pergine Valsugana (Tn)
Hotel Rosalpina Riva Del Garda (Tn)
LIGURIA
Business ResidenceGenova
Camping al mareSan Bartolomeo al Mare
Residence il LidoFinale Ligure (SV)
Genova City HotelGenova
Residence San ValentinoFinale Ligure (SV)
Hotel NologoGenova
Diano Sporting Diano Marina (Im)
Progetti E Costruzioni Genova
Hotel Punta Bella Varrazze (Sv)
Hotel Paradiso Sanremo (IM)
EMILIA ROMAGNA
Hotel Stella D’ItaliaViserba (Rn)
Residence Le ConchiglieMarina Romea (Ra)
Hotel ValverdeCesenatico (Fc)
Hotel Sant’AnnaCona (FE)
Grand Hotel di RicconeRiccione (RN)
Residence Alba ChiaraBellariva (RN)
Lago La Pescaccia San Clemente (Rn)
Hotel Trieste Riccione (Rn)
Hotel Paradise Airport Forlì
Residence Martinelli Miramare (RN)
Hotel Blu Suite Bellaria (RN)
Hotel Ariston Milano Marittima (RA)
Il Brugnolo Fellegara di Scandiano (RE)
Rimini Vallo (Cimino Hotels) Rimini
Azienda Agricola Montanari Sasso Marconi (BO)
Residence Smeraldo Viale Ceccarini (Rn)
Alma Mater Studiorum Universita Di Bologna Bologna
TOSCANA
Hotel BiondiMontecatini Terme (Pt)
Hotel CrystalMarina Pietrasanta (Lu)
Albergo VittoriaViareggio (LU)
Locanda degli ArtistiFirenze
Hotel MarineFirenze
Hotel CasciFirenze
Residence Mare BluPrincipina a Mare (GR)
Hotel CantoriaFirenze
Lodges Le Mura Firenze
Hotel Le Due Torri Isola D’Elba
Hotel Carrara Massa Carrara
Albergo San Pietro Quarrata (PT)
Hotel il Griffone Principina a Mare (GR)
Argentario Oasi Village Talamone (GR)
Hotel Etrusco Isola d’Elba (LI)
Albergo il Gorello Saturnia (GR)
UMBRIA
Hotel RoccaporenaCascia (Pg)
Grand Hotel EliteCascia (Pg)
Camping Pian Di Boccio Bevagna (Pg)
Camping VillaggioCerquestra Monte del Lago (PG)
MARCHE
Hotel AtlanticGabicce Mare (PU)
Residence AmericaSenigallia (AN)
Hotel La PerlaCamerano (AN)
Acqua Parco Cingoli (Mc)
Hotel Napoleon Pesaro
Boutique Hotel Camerano (An)
Residence Rosa dei Venti Fermo
B&B Campanelli Porto San Giorgio (FM)
La Capannina Sarnano (MC)
Albergo Belvedere Porto S. Elpidio (AP)
Marche Life Porto S. Elpidio (AP)
Hotel Beatrice Sirolo (AN)
Hotel Eden Park Marina Di Monte Marciano (An)
L’infinito Country Serra De Conti (An)
LAZIO
Hotel AmbasciatoriFiuggi (Fr)
Hotel San GiorgioFiuggi (FR)
Residence MalliaRoma
Residence Domus AnagninaRoma
Borgo Castel Savelli 2Rocca di Papa
Residenza Leonina Roma
Heart Of Rome Roma
Hotel Roma SudFrascati (Roma)
Hotel Center 2 Roma
Pontificio Collegio Internazionale M.M.E. Roma
Ambasciata della Federazione RussaRoma
Terme Viscine Castelforte (LT)
Residenza per anziani Quinta Stella Tolfa (RM)
Hotel La Ripa Torre Caietani (Fr)
Residence Alle Terme Palestrina (Roma)
ABRUZZO/MOLISE
Hotel Villa BiancaSan Salvo (CH)
Residence Poggio del SoleAquila
Residence OltremareFossacesia (CH)
Albergo Casarossa Alba Adriatica (Te)
Hotel Cristall Rocca di Cambio (AQ)
Hotel Cristina Rocca S.Giovanni (CH)
La Luna ed i Falò Fossa (AQ)
Hotel Bellavista Roseto Degli Abruzzi (TE)
Grand Hotel Adriatico Lido di Montesilvano (PE)
Petroro Mare Residence Vasto (CB)
Residence Butterfly Vasto (CB)
Hotel Giardino Roseto Degli Abruzzi (Te)
Antico Borgo - Gdo Casalincontrada (Ch)
PUGLIA
La Margherita Case VacanzeRodi Garganico (Fg)
Hotel FiniSan Giovanni Rotondo (Fg)
Hotel MontemesolaCeglie Messapica (BR)
B&B Villa PallottaCerignola (FG)
Perla Costruzioni Gallipoli (Le)
Villaggio Mira VacanzePeschici (FG)
Villaggio Poseidone Ugento (Le)
Bed And BreakfastDi Cataldo Castellana Grotte (Ba)
Hotel Club Ravezzo Lido Marini (LE)
Villaggio Puntadel Diamante Isole Tremiti (FG)
Hotel Residence Villaggio Nemo Brindisi
Relais Parallelo 41 Vieste (Fg)
Chiusurelle Resort Porto Cesareo (Le)
Hotel Le Macine S. Cesarea Terme (Le)
CAMPANIA
Il limonetto di ErcoleErchie Maiori (SA)
Hotel WeberCapri (NA)
Hotel Terme San Michele Serrata Fontana (Na)
Agriturismo Manone Marigliano (Na)
Ospedale Buonconsiglio Fatebenefratelli Napoli
Residenza Partenopea Napoli
Villaggio Quadrifoglio Pontecagnano (SA)
Residence Parco Vittoria Anacapri (NA)
RAI Centro diProduzione TV Napoli
Hotel Letizia Lacco Ameno - Ischia (Na)
CALABRIA
LidosabbiadoroBelvedere Marittimo (CS)
Hotel Stromboli San Domenico (Vv)
Residence Hotel Felix San Nicolo Di Ricadi (VV)
Residence Coccinella Torre Melissa (KR)
BASILICATA
Residence delMagico Mosto Matera
SICILIA
AgriturismoBaglio SicilianoNoto (SR)
Park Philip Hotel ClubMarina di Patti (ME)
Residence PetrusoBalestrate (PA)
Hotel Costazzurra San Leone (AG)
Antica PerlaResidence Hotel Agrigento
Residence Kalaskiso Giardini Naxos (ME)
Vecchia Masseria Caltagirone (Ct)
SARDEGNA
Residence ArgentieraArgentiera (Ss)
Hotel Isola RossaBosa Marina (Or)
Hotel Da CesareMarina di San Vero Milis
Stella Marina San Teodoro (Ot)
Albergo Florida Alghero (SS)
Residence Belvedere Sant’ Antioco (CI)
Hotel Al Gabbiano Bosa Marina (Nu)
Hotel Meridiana Arbus (Md)

Hotel Peristil Split (Croazia)
Hotel Denkmal Norderney (Germania)
Hotel Royal Club Victoria Elenite (Bulgaria)
Hotel La Pinede Ajaccio (Corsica)
Hotel Crowne Plaza Moscow (Russia)
Hotel du Musee Gare Mulhouse (Francia)
Hotel Le Parc Salbris (Francia)
Hotel Le Parc Salbris (Francia)
Residence Sidi Massoud Monastir (Tunisia)
Hotel Au Vieux Morvan Chateau Chinon (Francia)
Hotel Zawrat Zakopane (Polonia)
Residence Europa Atyrau (Kazaknstan)
Hotel Le Mirage Istres (Francia)
Hotel Florida Biarritz (Francia)
Hotel de la Poste Le Mele sur Sarthe (Francia)
Alexa Hotel Ostseebab Gohren (Germania)
Hotel Polonia Cracovia (Polonia)
Hotel Le Manoir Fleuri Chatelguyon (Francia)
Hotel L’Empereur Aleria (Corsica)
Hotel Ambassador Nice (Francia)
Hotel La Varrerie Gaillac (Francia)
Hotel La Citadelle Sisteron (Francia)
Hotel Le Meridien Nice (Francia)
Hotel Kappara San Gwann (Malta)
ALCUNE REALIZZAZIONI ESTEROSOME WORKS IN ABROAD / QUELQUES OEUVRES A L’ENTRANGER / ALGUNOS PROYECTOS EL EXTRANJERO

5
Dolmsundet HotellMelandsjo - Norvegia
Ocean point LtdAntiqua (Caraibi)
GG Realty Miami Miami (America)
The Paramount hotelLondon (Inghilterra)
Hotel SerineAachen (Germania)
King’s HotelMunchen (Germania)
Tang Bonn (Germania)
Language Alliance Gmbh Frankfurt (Germania)
OfitaracoTarragona (Spagna)
Llp AkpanKazakhstan
Residence Little Italy Atyrau (Kazakhstan)
Kama Motor C.A.Isla Margarita (Venezuela)
Royal Club Victoria Elenite - Nesebar (Bulgaria)
Extras Nigeria Limited Nigeria
Hotel Sidari Beach Corfu (Grecia)
Ibci Split (Croazia)
Bed & Breakfast Alexandra Zadar (Croazia)
Tiltawaybeds Tauranga (New Zealand)
Liptus International Tripoli (Libia)
Go-go Sempeter Pri Gorici Slovenia
Dek Inter Ltd Moscow (Russia)
Mixail Moscow (Russia)
Krok Kaliningrad (Russia)
OOO Business Desin Mebel Moscow (Russia)
Ltd ProdovoistvennayaEkaterimurg (Russia)
Fete KFT Komlo (Ungheria)
Hotel Hoirie Geneve (Svizzera)
Hotel Du Port Villeneuve (Svizzera)
Hotel Central Geneve (Svizzera)
Abdoun Malls & Real Estate LtdAmman (Giordania)
Sharg Co. Baku (Azerbaijan)
Kag Meble Szczecin (Polonia)
Wagner Werkendam (Olanda)
Don Pedro Isola di Madeira (Portogallo)
Artfix Kiev (Ucraina)
S.C. Master WoodBucarest (Romania)
The NewcastleNew Castle (Inghilterra)
Hotel SuppltGoteborg (Svezia)
Kasa KuwaitSafat (Kuwait)
Hotel Kyriad Queurdreville Hainnevill (Francia)
Hotel Le Commerce Navarrenx (Francia)
Hotel La Pietra Ile Rousse (Francia)
Hotel Le Miramar Le Grau Du Roi (Francia) Hotel Relais Des Corbieres Lezignan Corbieres (Francia)
Hotel Le Relais Du C. Rouge Saint Loup Lamaire (Francia)
Hotel Le Grand Large Palavas les Flotes (Francia) Hotel Le Huitieme Marseille (Francia)
Hotel Holzer Corsica (Francia)
Hotel Burg Marsannay La Cote (Francia)
Hotel National Ollioules (Francia)
Hotel Golfe Porto Vecchio (Francia) Hotel Des Bords De L’Ill Erstein (Francia)
Hotel Emeraude Confolens (Francia)
Hotel Castel Regina Chatel Guyon (Francia)
Hotel De La MerGolfe Juan (Francia) Hotel Le Florin Rennes (Francia)
Hotel Mermoz Mimizan Plage (Francia)
Hotel Le Richelieu Le Treport (Francia)
Hotel FumadesOrgon (Francia) Hotel Sant Louis Brest (Francia) Hotel West End Nice (Francia)
Hotel De France Cargese (Francia)
Hotel Paris BrestLens (Francia)
Hotel La Chumiere Seyne Les Alpes (Francia)
Hotel Le Chateau Tournon Sur Rhone (Francia) Hotel L’Europeen Tarbes (Francia) Hotel AstonParis (Francia)
Hotel Domaine De Maison Oytier Saint Oblas (Francia) Hotel Estuaire S. Brevin Les Pins (Francia)
Hotel Camelia Boulogne Billancourt (Francia)
Hotel Lonne Paris (Francia)
Hostellerie Du Cheval Blanc S.m. De Touraine (Francia) Hotel Residence Villieres Paris (Francia)
Hotel Tamaris La Lavandou (Francia)
Hotel Beaudouin Glenic (Francia)
Hotel Lou Paradou Greoux Les Bains (Francia) Hotel Allotel For Sur Mer (Francia)
Hotel L’Orion Rouen (Francia)
Hotel Le Traditionnel Villeguoin (Francia) Hotel Des Alpes Greoux Les Bains (Francia)
Hotel Le Moulin Des Gardelles M.Espace Mozac (Francia) Residence Hoteliere Des Indes Argenteuil (Francia)
Hotel Le Roya Breil Sur Roya (Francia) Hotel Top Motel Istres (Francia) Hotel Paris Nice Grenoble (Francia)
Hotel Terminus Perpignan (Francia) Hotel Savoy Juan les Pins (Francia)
Hotel Luxelthe Paris (Francia)
Hotel Du Commerce Fecamp (Francia)
Hotel Au Chapon Pointres (Francia)
Hotel La Siesta Mont De Marsan (Francia)
Hotel Le Grangousier Foix (Francia)
Hotel Lycee Des Metiers Le Havre (Francia)
Hotel Ferme Auberge Wierre - Effroy (Francia)
Hotel Odessa Paris (Francia)
Hotel Belle Etape Maisse (Francia)
Hotel Saint Severin Toulouse (Francia)
Hotel Relais Saint Jean Troyes (Francia)
Hotel Le Bon Plurien (Francia)
Hotel Leveque Paris (Francia)
Hotel Le Magnan Avignon (Francia)
Hotel Residea Paris (Francia)
Hotel Noctuel Lattes (Francia) Hotel Le Mistral Chateauneuf Du Rhone(Francia) Hotel A. De La Croix Blanche B. en Bresse (Francia)
Hotel Le Sanibel Fleury les Aubrais (Francia) Hotel Music Marseille (Francia)
Hotel Vauban Brest (Francia)
Hotel Chateaubriand Nantes (Francia)
Hotel Auberge Picarde Chepy (Francia)
Hotel Du Soleil Valff (Francia)
Hotel Du Centre Saint Paterne Racan (Francia) Hotel Villa Frontignan (Francia)
Hotel Parenthese Borne les Mimosas (Francia)
Hotel Les Logis Saint Georges (Francia)
Hotel Lion d’ArgentLe Chatre (Francia)
Hotel Villa BordesParis (Francia)
Hotel ParcLe Chapelle Saint Mesmin (Francia)
Hotel Haut Des LysVillandry (Francia)
Hotel OdessaParis (Francia)
Hotel La RotondeParis (Francia)
Hotel BadgetParis (Francia)
Hotel EsplanSt Paul Les Trois Chateaux (Francia)
Hotel Saint GeorgesParis (Francia)
Hotel La ChaumiereVoiron (Francia)
Hotel Le PerleParis (Francia)
Hotel Le Petit SireneParis (Francia)
Hotel OpalCap D’Agde (Francia)
Hotel CentralMontargis (Francia)
Hotel TerrasseBastidonne (Francia)
Hotel De l’EuropeSaint Flor (Francia)
Hotel QuetzalLe Grande Motte (Francia)
Hotel ParisianaParis (Francia)
Hotel ArizonaTallard (Francia)
Hotel KriadAnnecy (Francia)
Hotel Des AccaciasParis (Francia)
Hotel DigeoSaint Cyr Sur Mer (Francia)
Hotel Areo ClubParis (Francia)
Hotel Les OceanesLorient (Francia)
Hotel A La RegenceVichy (Francia)
Hotel LuxeltheParis (Francia)
Hotel La BoetieParis (Francia)
Hotel Le Petit Mas De MarieLa Tour D’aigues (Francia)
Hotel Trianon Vincennes (Francia)
Hotel Saint Daniel Nantes (Francia)
Hotel Le Magellan Epernay (Francia)
Hotel Ribera Paris (Francia)
Hotel L’Oree Du Bois Le Muy (Francia)
Hotel Du Tourisme Nantes (Francia) Hotel Bal Caravaning Tournehem (Francia)
Hotel Villa Motel Stenay (Francia)
Hotel Le Caldero Montpon Menesterol (Francia)
Hotel Arax Tignieu (Francia) Hotel Les Arcades Autun (Francia)
Hotel L’agneau Katzenthal (Francia)
Hotel Compagnie Oceane Quiberon (Francia) Hotel Aux Tauzins Montfort En Chalosse (Francia)
Hotel Maison Tournier Bourbonne les Bains (Francia)
Hotel Teranga Juan Les Pins (Francia)
Hotel Don QuichotteVallet
Hoyel Bonne NouvelleParis
Hotel Route VerteGerardmer
Hotel PavillonParis
Hotel DiligenceLes Sorinieres
Hotel AgornoParis
Hotel BeaurivageRoyan
Hotel DecourverteSaint Bonnet Le Froid
Hotel WilsonLe Mont Dore
Hotel Beverl’innFlers
Hotel Est - OvestDoyet
Hotel La PoulardeLouhans
Hotel Flots D’azurNice
Hotel KriadCarentan
Hotel AtlantisCannes
Hotel DenferParis
Hotel PanoramaBeaune
Hotel Golden TulipBarbery St Julien
6
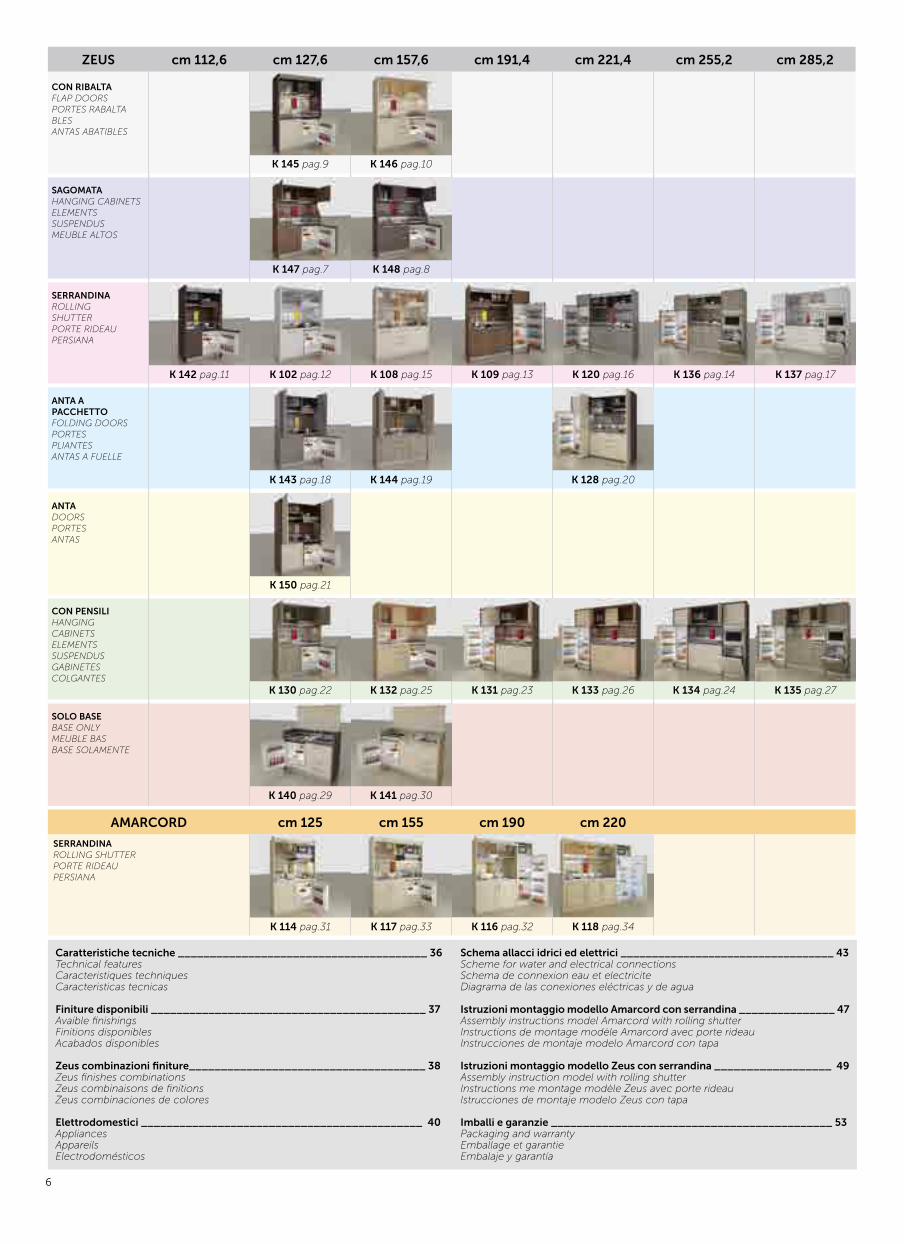
ZEUS cm 112,6 cm 127,6 cm 157,6 cm 191,4 cm 221,4 cm 255,2 cm 285,2
CON RIBALTA FLAP DOORSPORTES RABALTABLESANTAS ABATIBLES
K 145 pag.9
K 146 pag.10
SAGOMATA HANGING CABINETSELEMENTSSUSPENDUSMEUBLE ALTOS
K 147 pag.7
K 148 pag.8
SERRANDINA ROLLINGSHUTTER PORTE RIDEAU PERSIANA
K 142 pag.11
K 102 pag.12
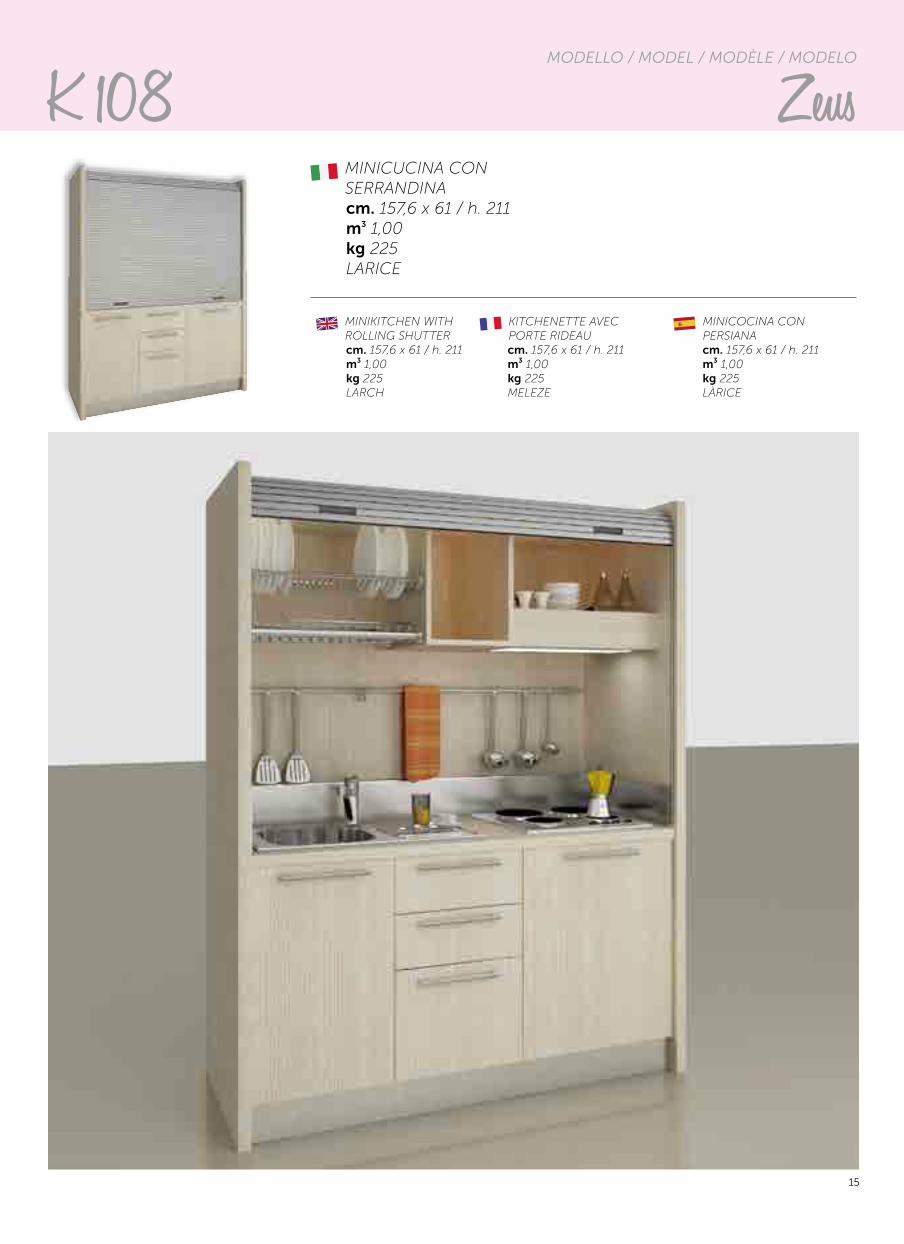
K 108 pag.15
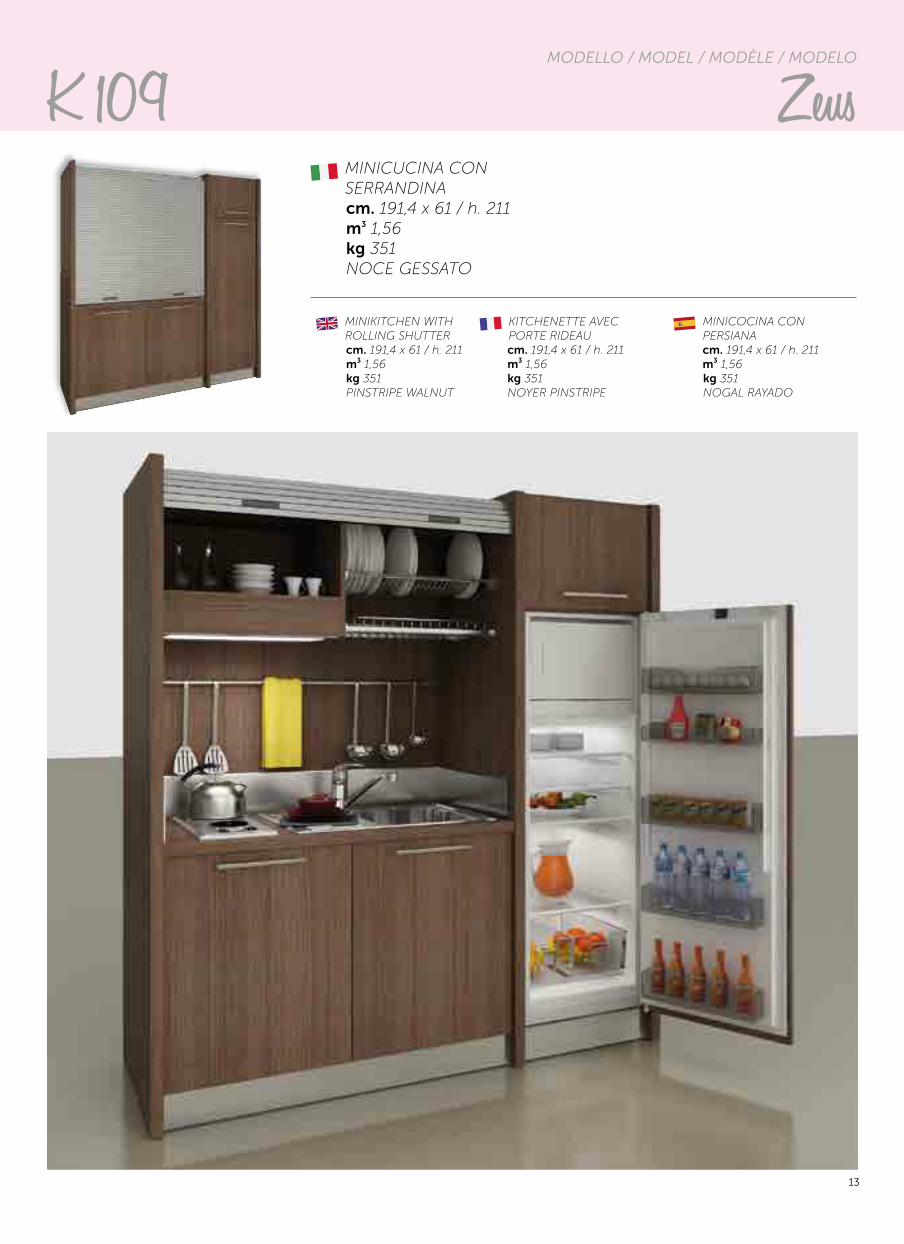
K 109 pag.13
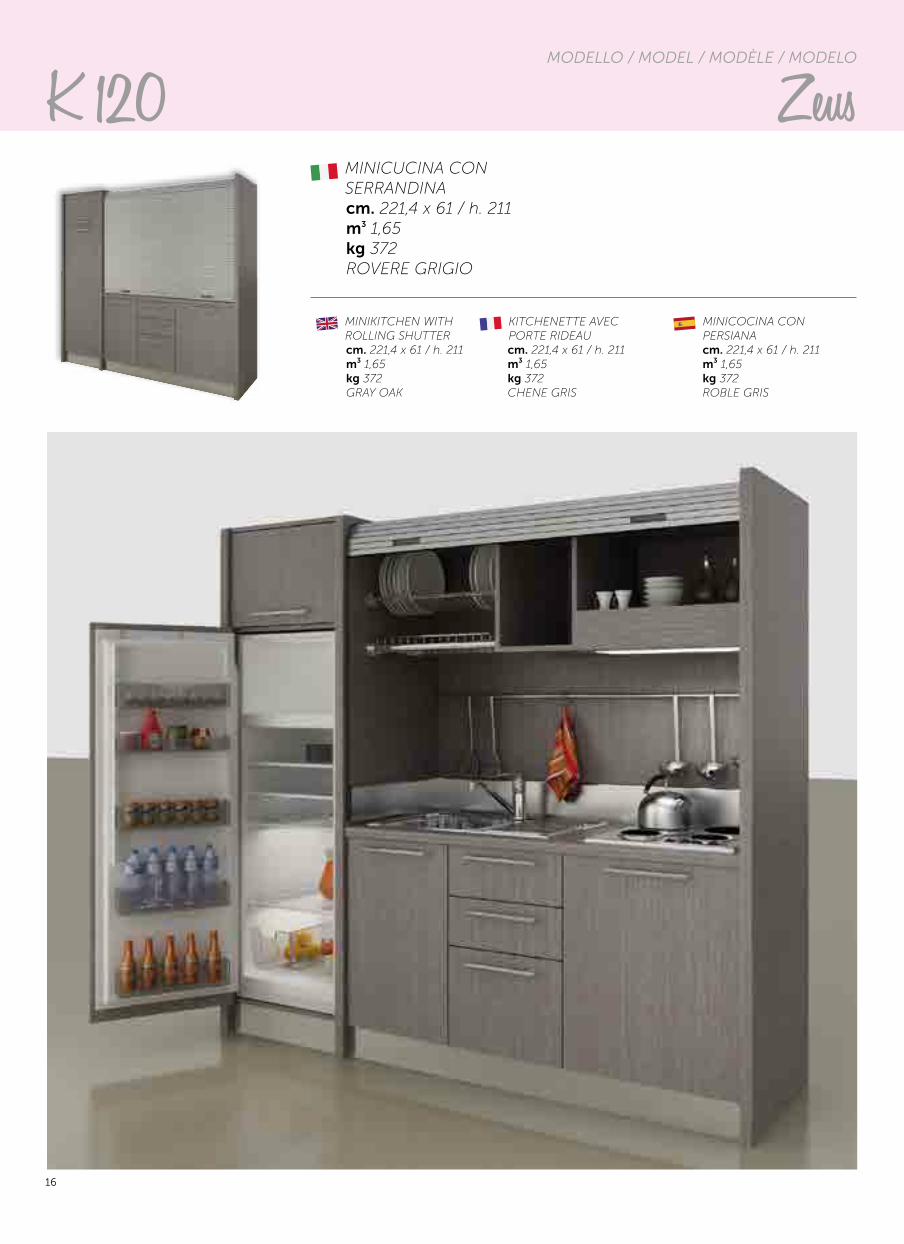
K 120 pag.16
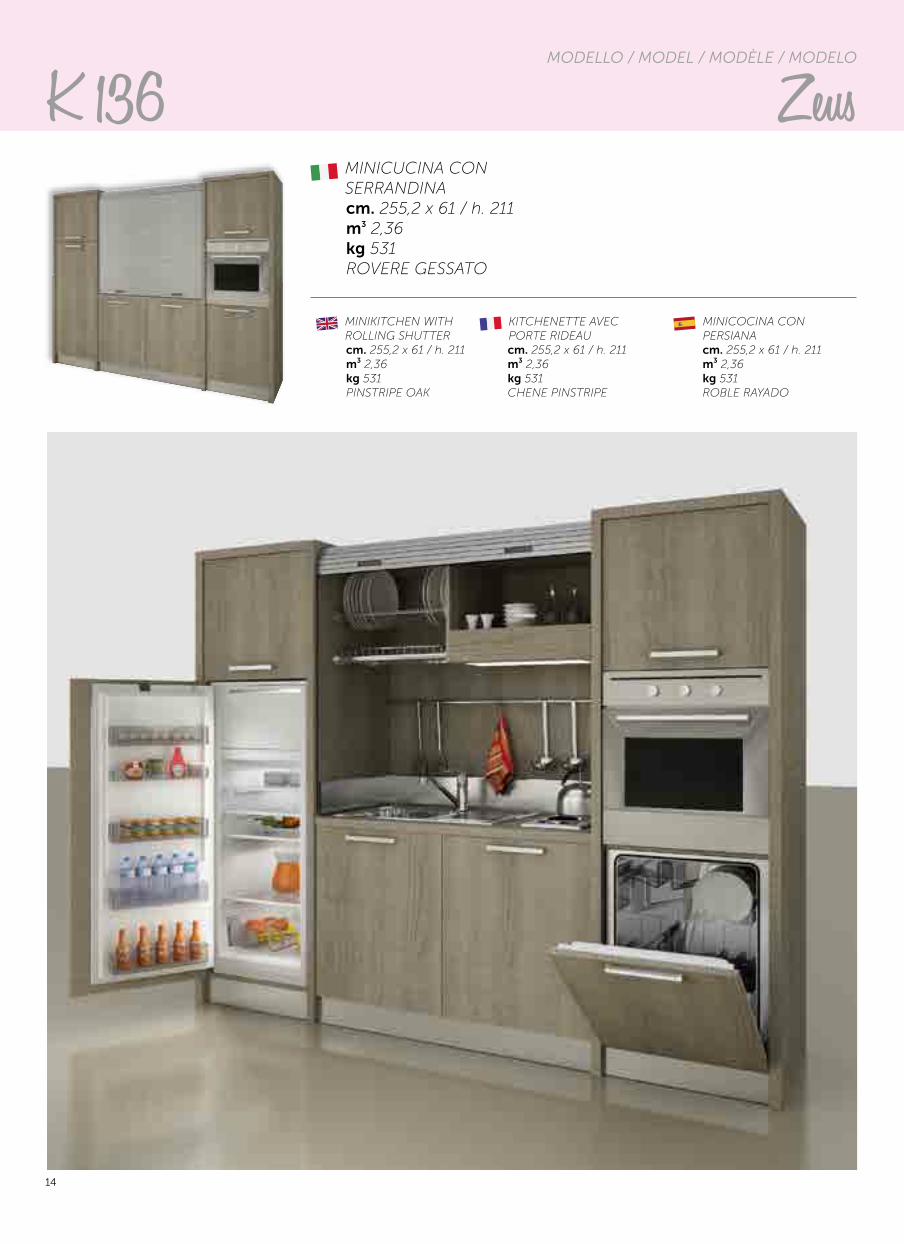
K 136 pag.14
K 137 pag.17
ANTA APACCHETTO FOLDING DOORS PORTESPLIANTES ANTAS A FUELLE
K 143 pag.18
K 144 pag.19
K 128 pag.20
ANTA DOORS PORTES ANTAS
K 150 pag.21
CON PENSILI HANGINGCABINETS ELEMENTSSUSPENDUS GABINETESCOLGANTES
K 130 pag.22
K 132 pag.25
K 131 pag.23
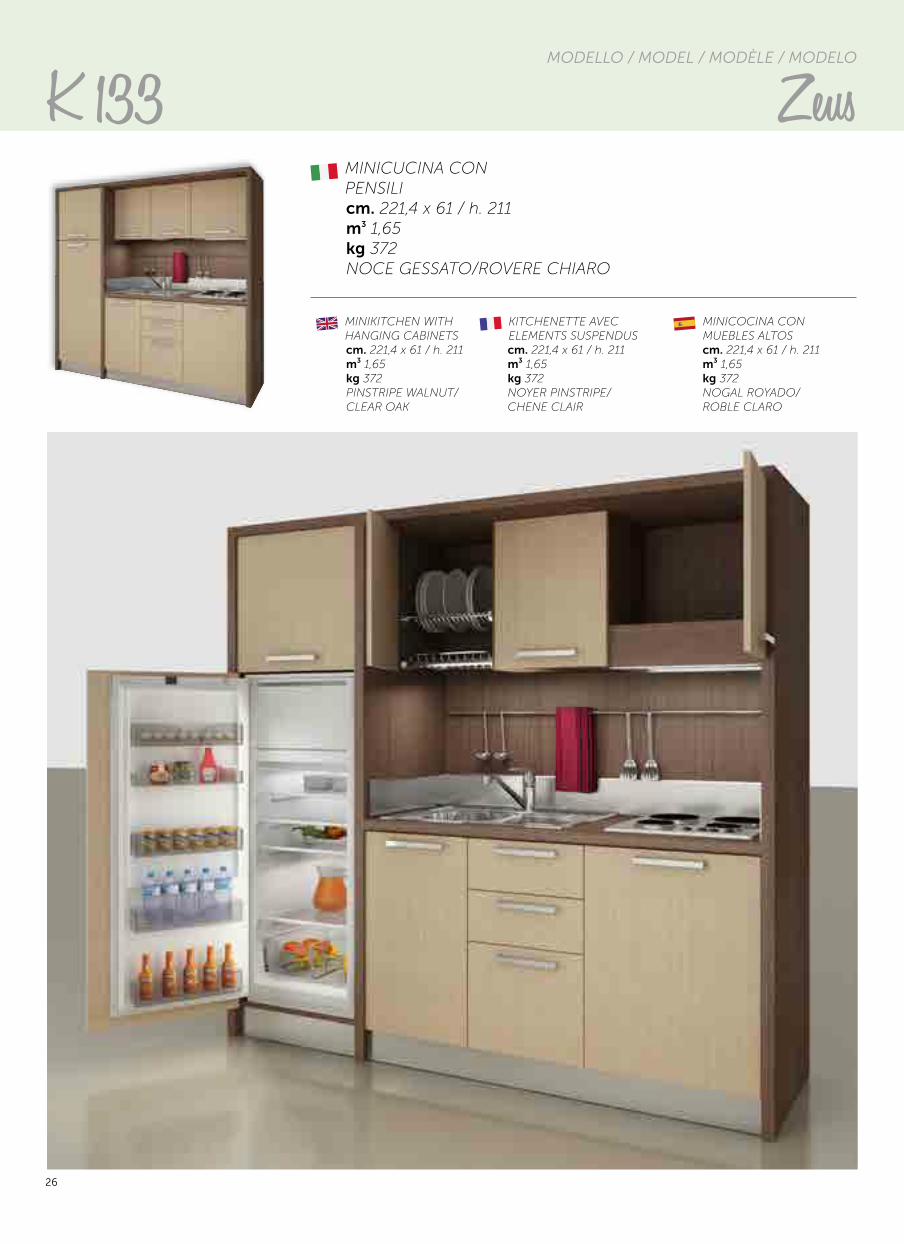
K 133 pag.26
K 134 pag.24
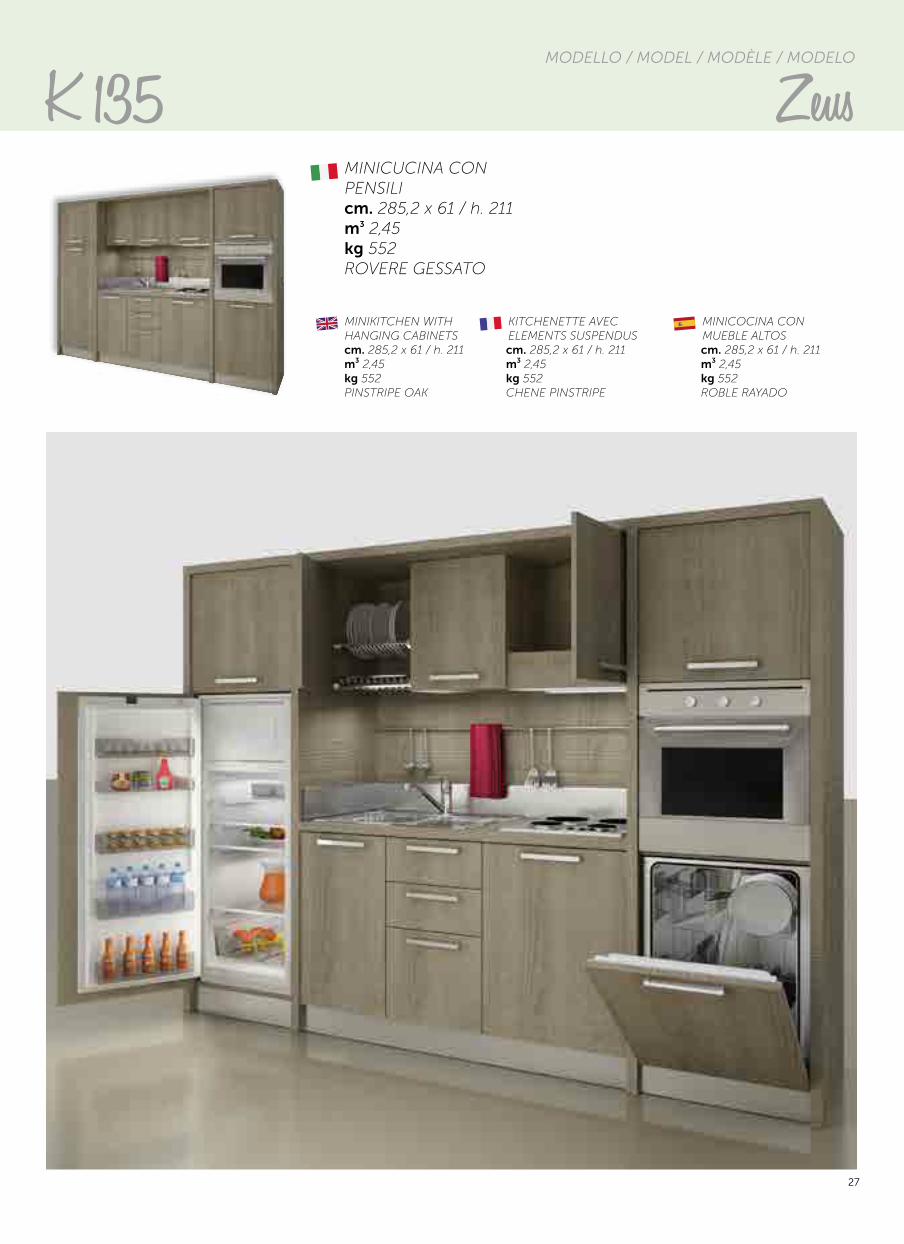
K 135 pag.27
SOLO BASE BASE ONLY MEUBLE BAS BASE SOLAMENTE
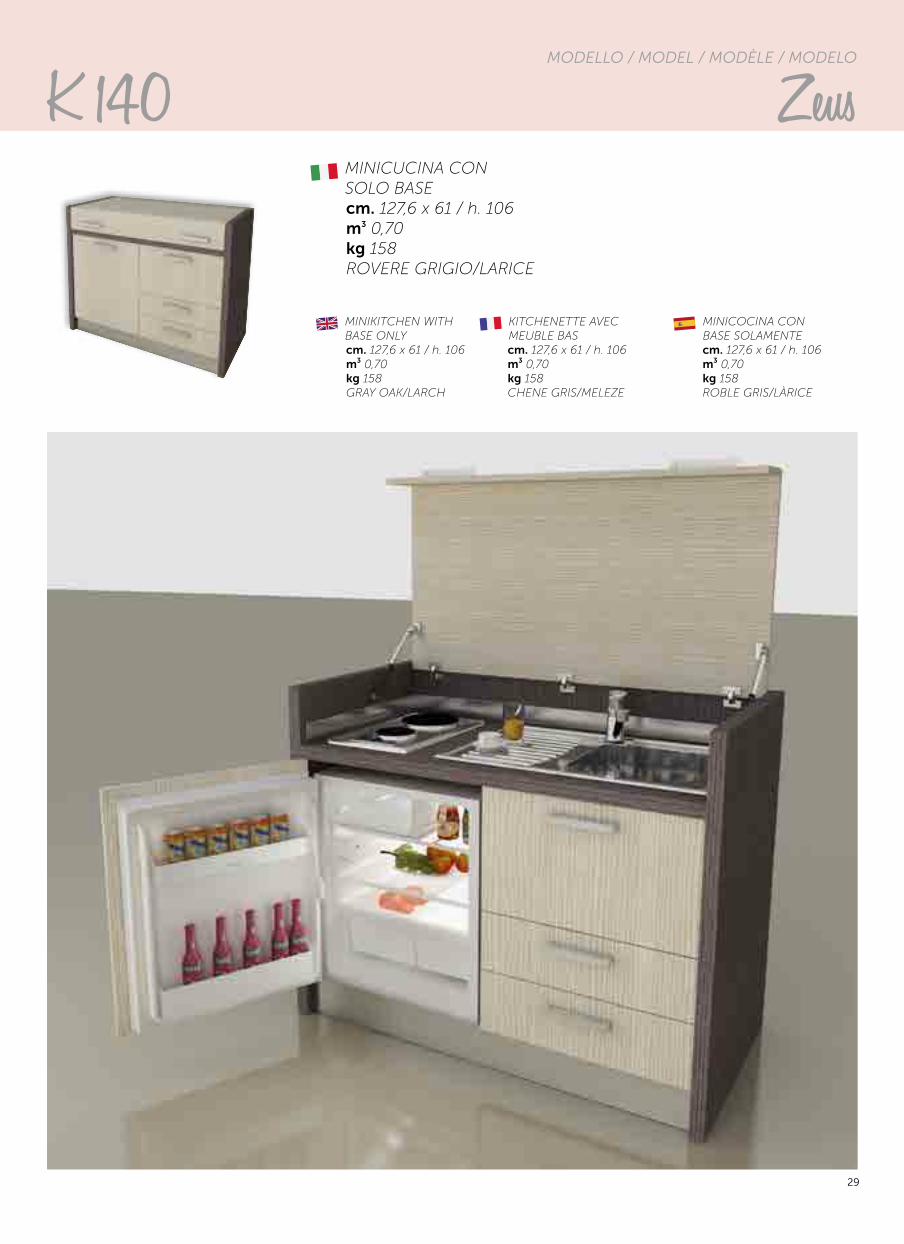
K 140 pag.29
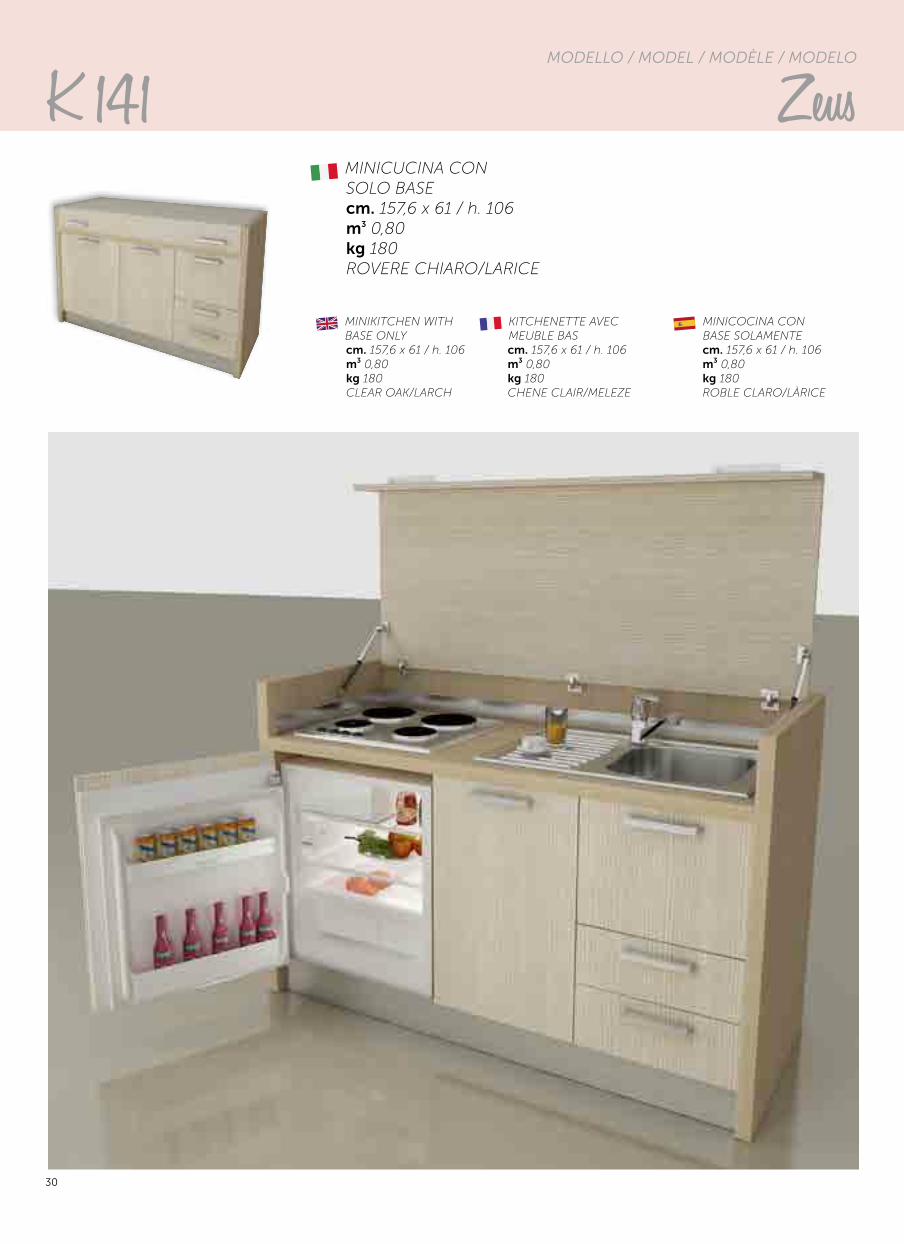
K 141 pag.30
AMARCORD cm 125 cm 155 cm 190 cm 220
SERRANDINA ROLLING SHUTTER PORTE RIDEAU PERSIANA
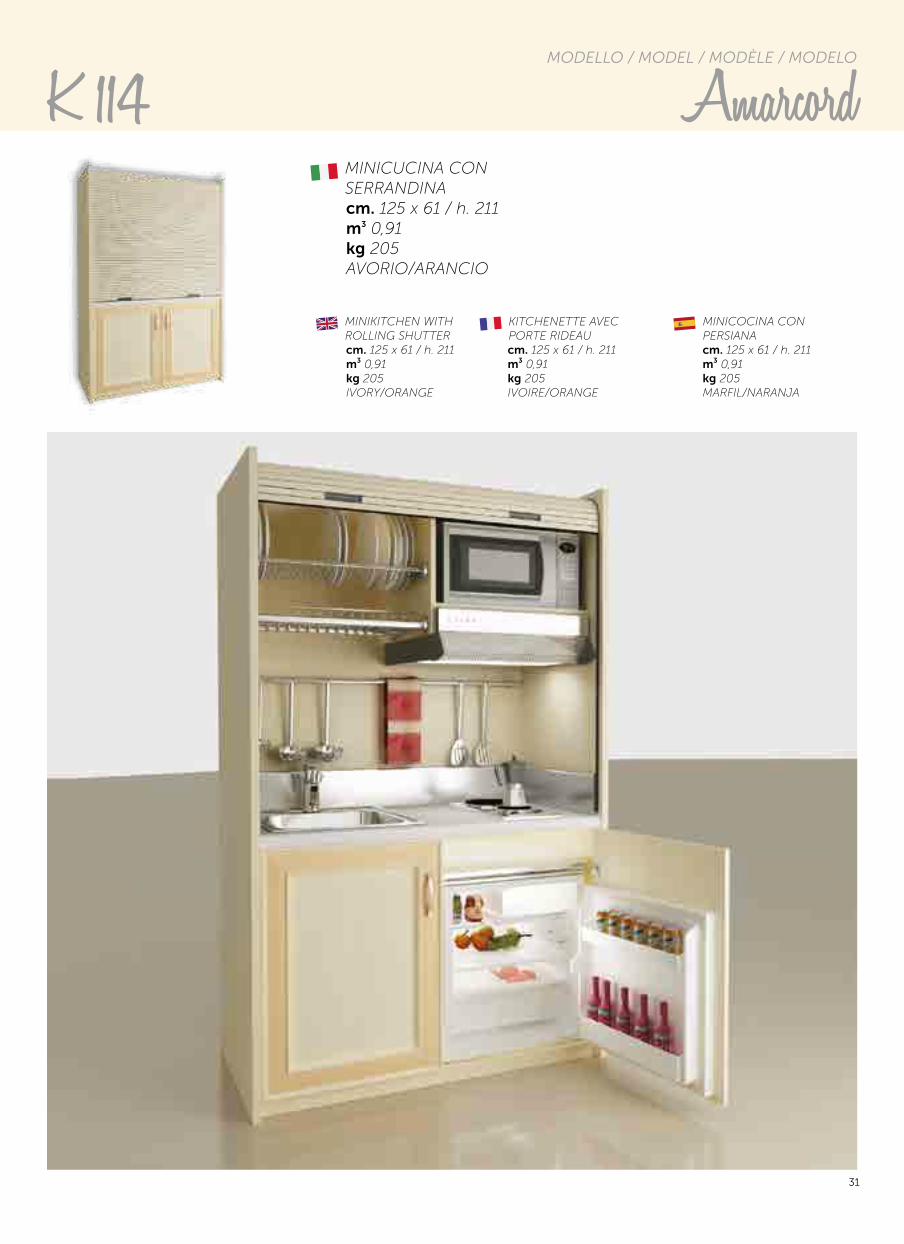
K 114 pag.31
K 117 pag.33
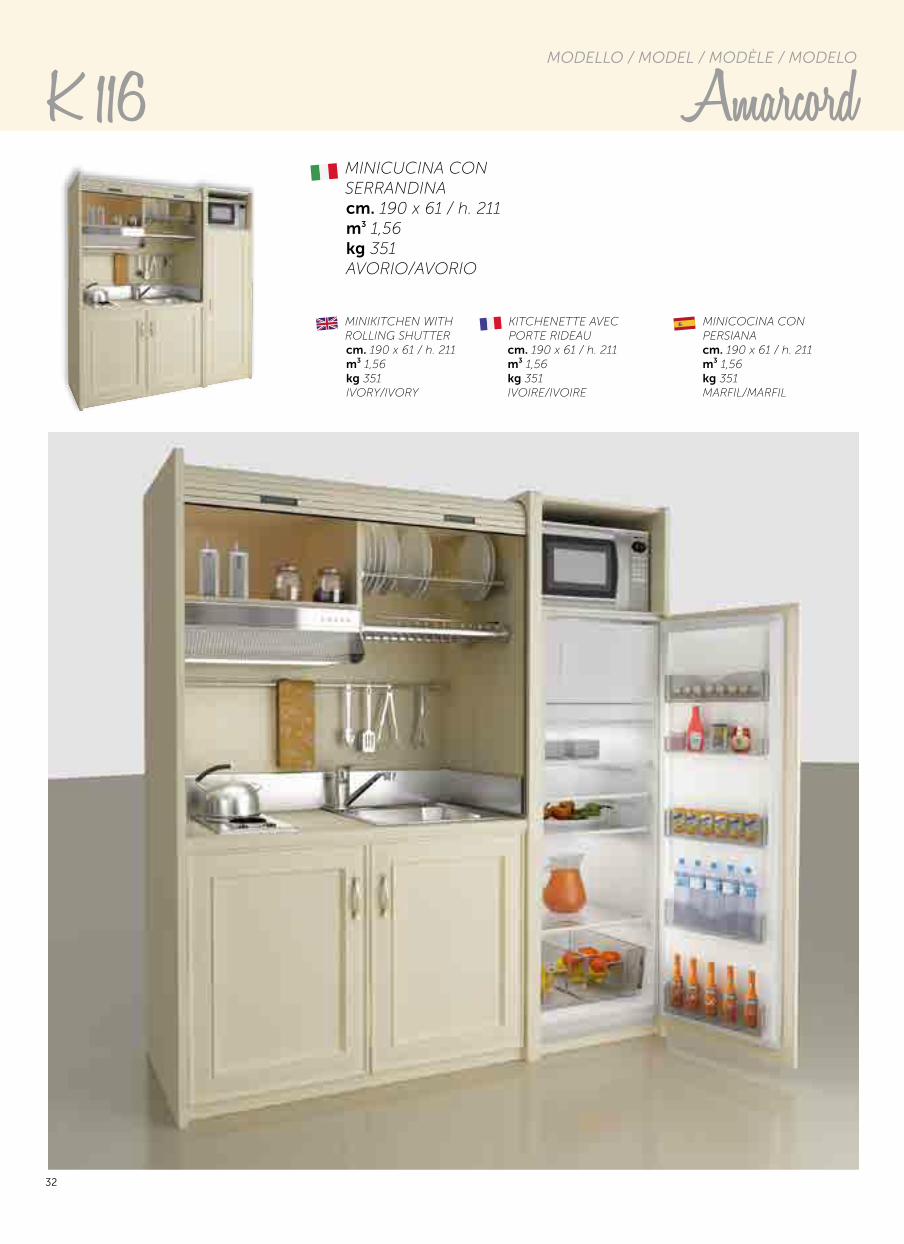
K 116 pag.32
K 118 pag.34
Caratteristiche tecniche _______________________________________ 36 Technical features Caracteristiques techniques Caracteristicas tecnicas
Finiture disponibili ___________________________________________ 37 Avaible finishingsFinitions disponiblesAcabados disponibles
Zeus combinazioni finiture_____________________________________ 38 Zeus finishes combinationsZeus combinaisons de finitionsZeus combinaciones de colores
Elettrodomestici ____________________________________________ 40 Appliances AppareilsElectrodomésticos
Schema allacci idrici ed elettrici __________________________________ 43 Scheme for water and electrical connectionsSchema de connexion eau et electriciteDiagrama de las conexiones eléctricas y de agua
Istruzioni montaggio modello Amarcord con serrandina _______________ 47 Assembly instructions model Amarcord with rolling shutter Instructions de montage modèle Amarcord avec porte rideau Instrucciones de montaje modelo Amarcord con tapa
Istruzioni montaggio modello Zeus con serrandina __________________ 49 Assembly instruction model with rolling shutter Instructions me montage modèle Zeus avec porte rideau Istrucciones de montaje modelo Zeus con tapa
Imballi e garanzie ____________________________________________ 53Packaging and warrantyEmballage et garantieEmbalaje y garantía
7
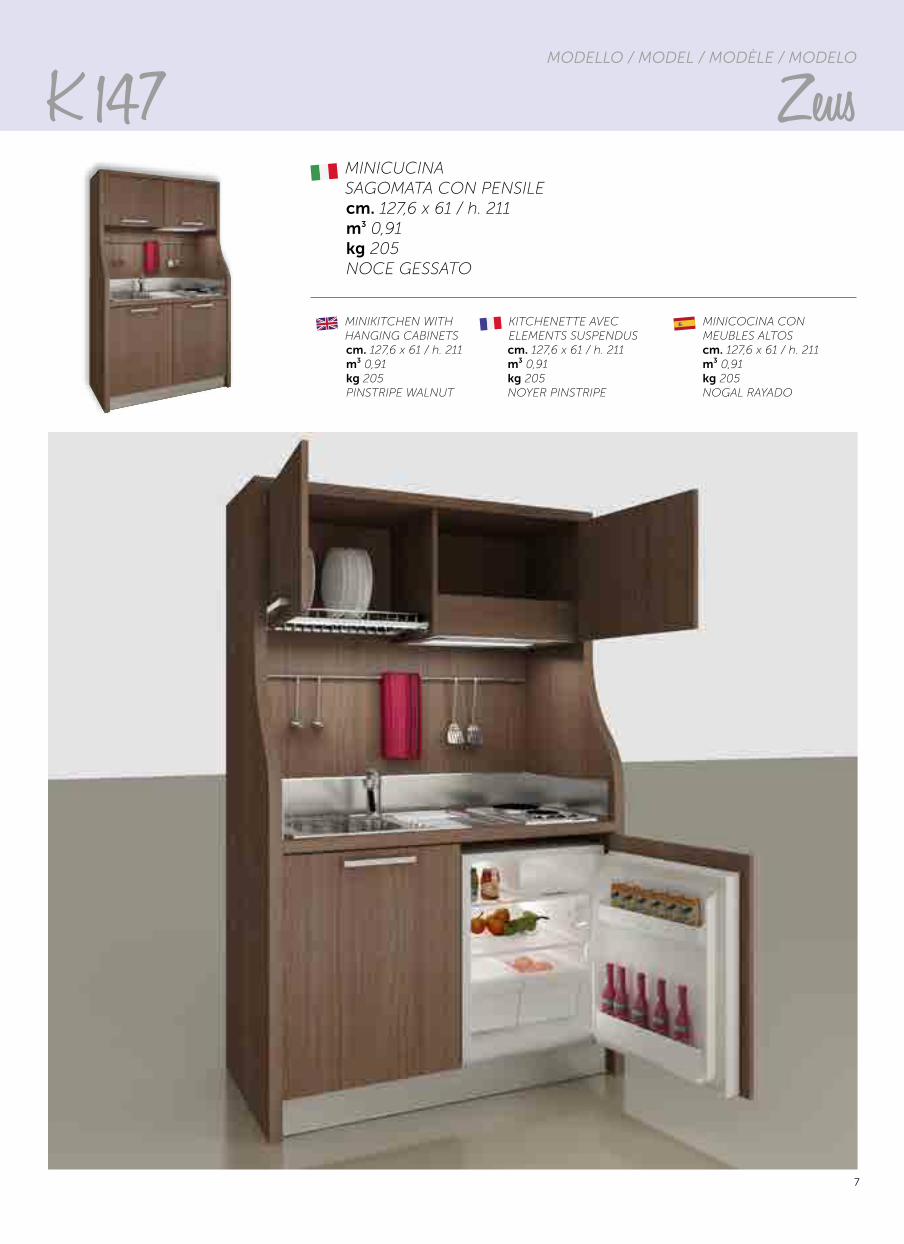
MINIKITCHEN WITHHANGING CABINETScm. 127,6 x 61 / h. 211m3 0,91kg 205PINSTRIPE WALNUT
KITCHENETTE AVECELEMENTS SUSPENDUScm. 127,6 x 61 / h. 211m3 0,91kg 205NOYER PINSTRIPE
MINICOCINA CONMEUBLES ALTOScm. 127,6 x 61 / h. 211m3 0,91kg 205NOGAL RAYADO
MINICUCINASAGOMATA CON PENSILEcm. 127,6 x 61 / h. 211m3 0,91kg 205NOCE GESSATO
K 147 ZeusMODELLO / MODEL / MODÈLE / MODELO
8
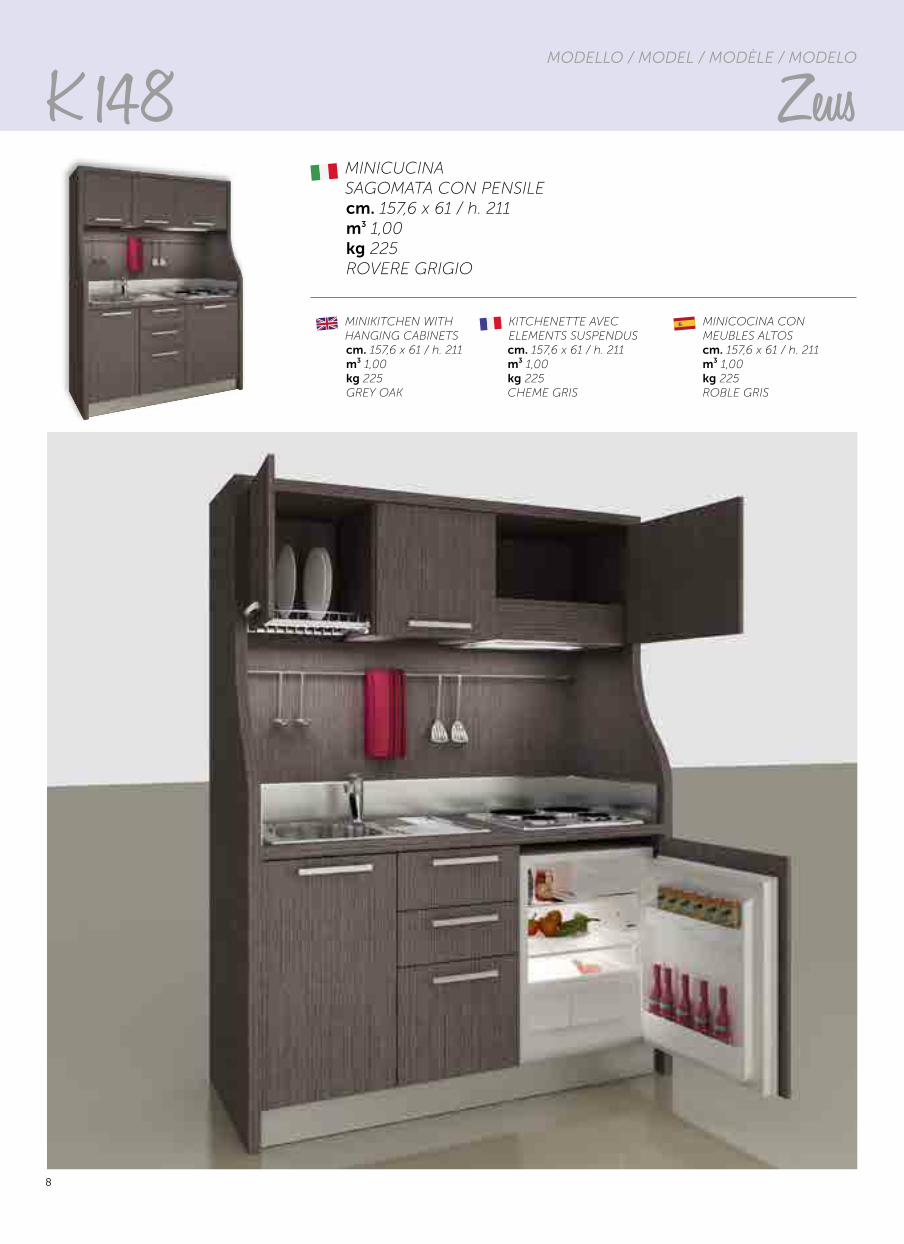
MINIKITCHEN WITHHANGING CABINETScm. 157,6 x 61 / h. 211m3 1,00kg 225GREY OAK
KITCHENETTE AVECELEMENTS SUSPENDUScm. 157,6 x 61 / h. 211m3 1,00kg 225CHEME GRIS
MINICOCINA CONMEUBLES ALTOScm. 157,6 x 61 / h. 211m3 1,00kg 225ROBLE GRIS
MINICUCINASAGOMATA CON PENSILEcm. 157,6 x 61 / h. 211m3 1,00kg 225ROVERE GRIGIO
K 148 ZeusMODELLO / MODEL / MODÈLE / MODELO
9
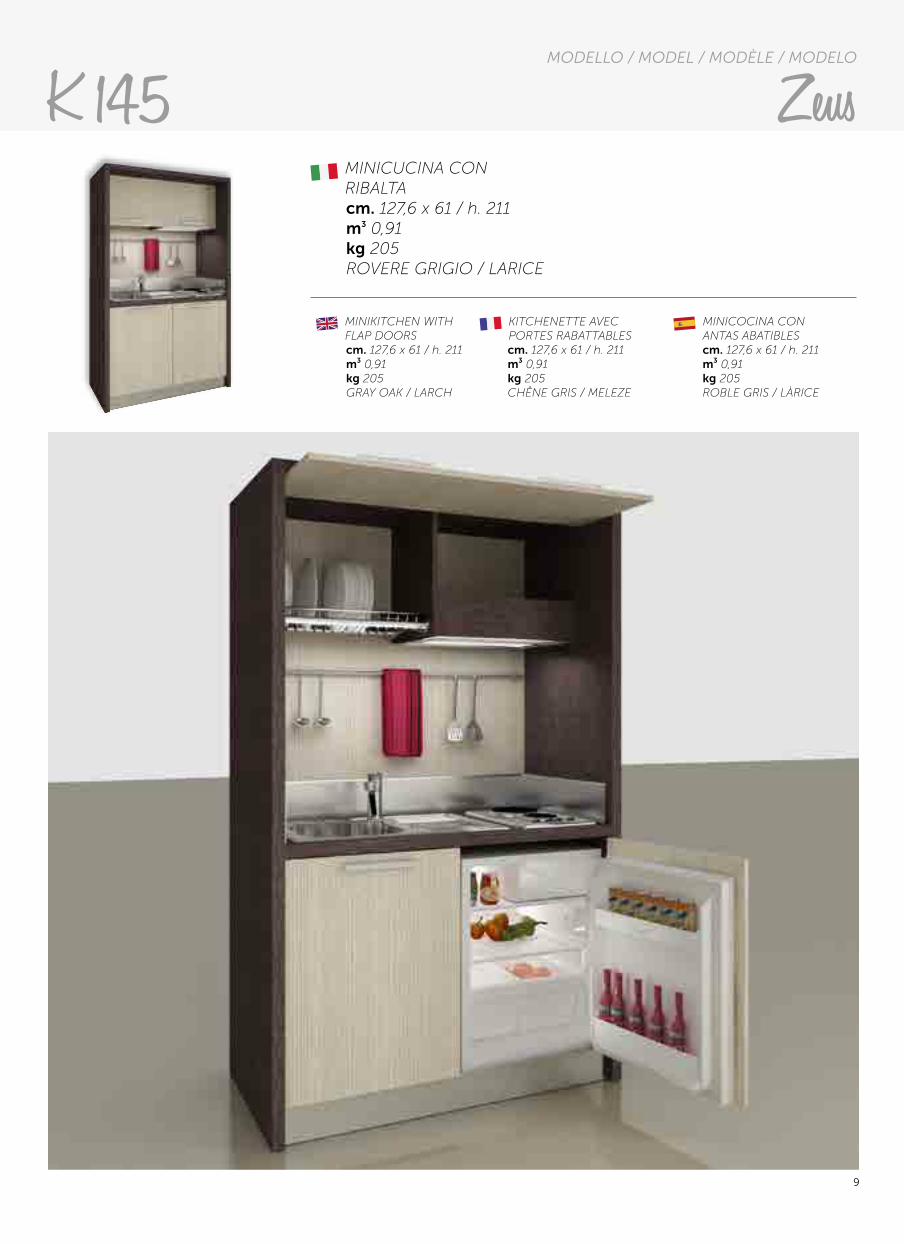
MINIKITCHEN WITHFLAP DOORScm. 127,6 x 61 / h. 211m3 0,91kg 205GRAY OAK / LARCH
KITCHENETTE AVECPORTES RABATTABLEScm. 127,6 x 61 / h. 211m3 0,91kg 205CHÊNE GRIS / MELEZE
MINICOCINA CONANTAS ABATIBLEScm. 127,6 x 61 / h. 211m3 0,91kg 205ROBLE GRIS / LÀRICE
K 145 ZeusMODELLO / MODEL / MODÈLE / MODELO
MINICUCINA CONRIBALTAcm. 127,6 x 61 / h. 211m3 0,91kg 205ROVERE GRIGIO / LARICE
10
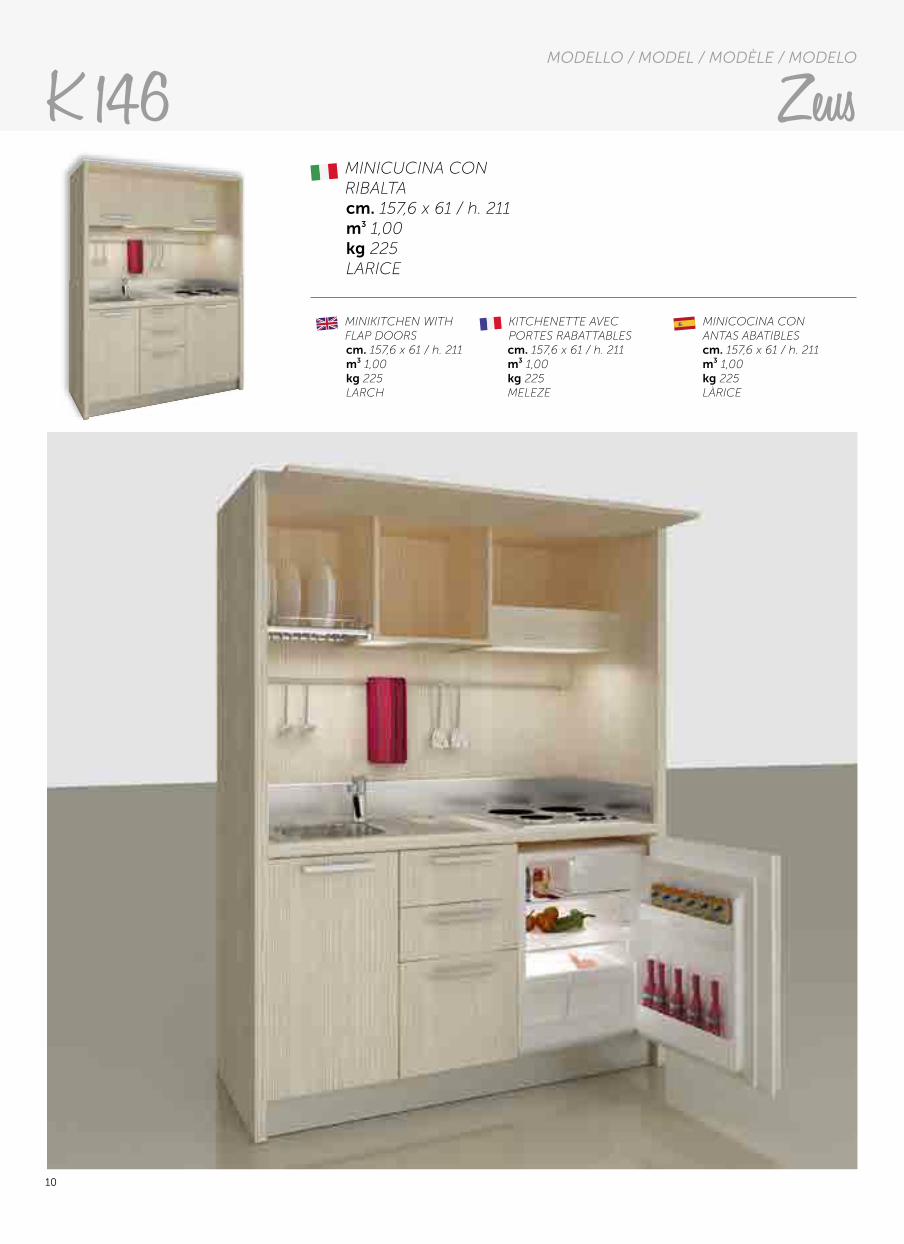
MINIKITCHEN WITHFLAP DOORScm. 157,6 x 61 / h. 211m3 1,00kg 225LARCH
KITCHENETTE AVECPORTES RABATTABLEScm. 157,6 x 61 / h. 211m3 1,00kg 225MELEZE
MINICOCINA CONANTAS ABATIBLEScm. 157,6 x 61 / h. 211m3 1,00kg 225LÀRICE
MINICUCINA CONRIBALTAcm. 157,6 x 61 / h. 211m3 1,00kg 225LARICE
K 146 ZeusMODELLO / MODEL / MODÈLE / MODELO
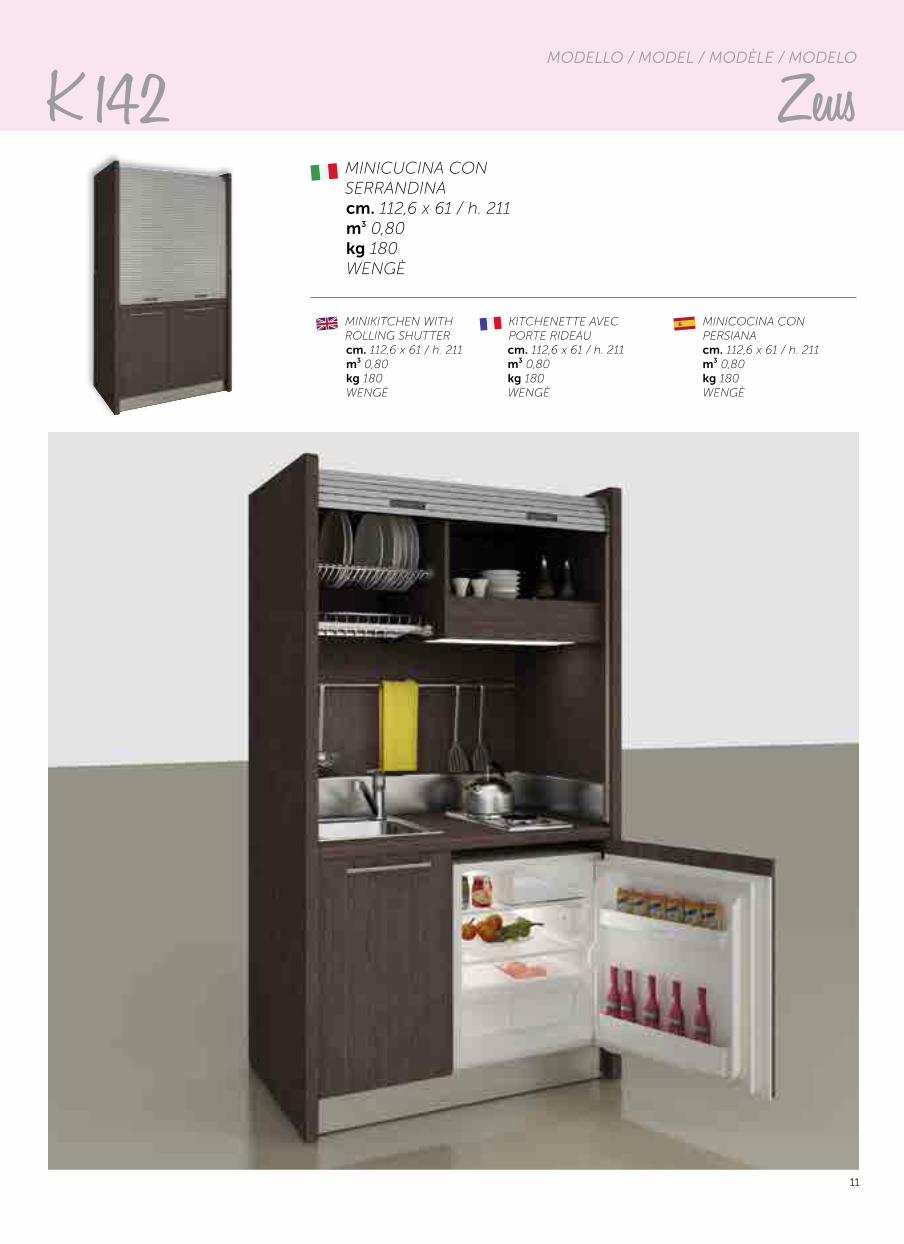
MINICUCINA CONSERRANDINAcm. 112,6 x 61 / h. 211m3 0,80kg 180WENGÈ
MINIKITCHEN WITHROLLING SHUTTERcm. 112,6 x 61 / h. 211m3 0,80kg 180WENGÈ
KITCHENETTE AVECPORTE RIDEAUcm. 112,6 x 61 / h. 211m3 0,80kg 180WENGÈ
MINICOCINA CONPERSIANAcm. 112,6 x 61 / h. 211m3 0,80kg 180WENGÈ
11
K 142 ZeusMODELLO / MODEL / MODÈLE / MODELO
12
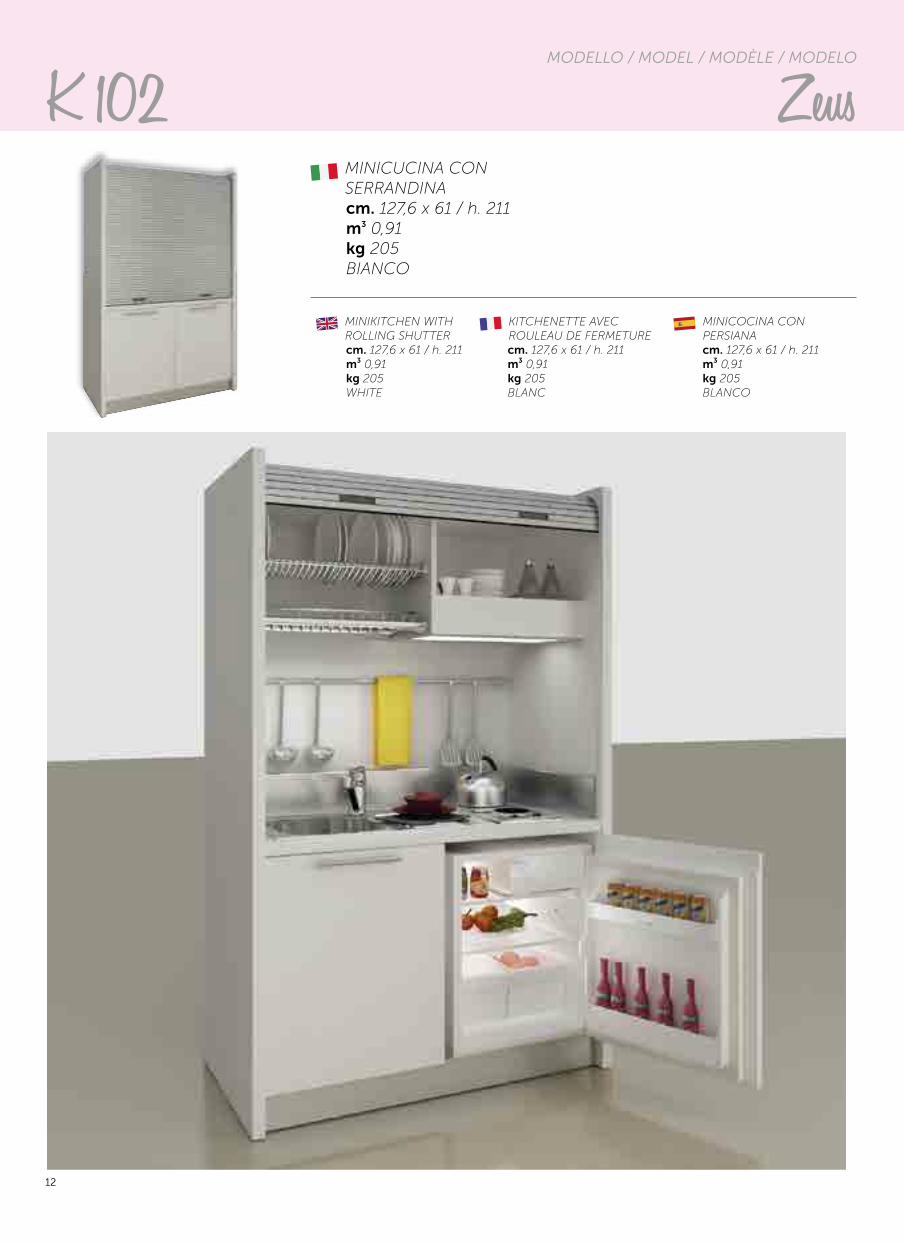
MINIKITCHEN WITHROLLING SHUTTERcm. 127,6 x 61 / h. 211m3 0,91kg 205WHITE
KITCHENETTE AVECROULEAU DE FERMETUREcm. 127,6 x 61 / h. 211m3 0,91kg 205BLANC
MINICOCINA CONPERSIANAcm. 127,6 x 61 / h. 211m3 0,91kg 205BLANCO
K 102 ZeusMODELLO / MODEL / MODÈLE / MODELO
MINICUCINA CONSERRANDINAcm. 127,6 x 61 / h. 211m3 0,91kg 205BIANCO
13
MINIKITCHEN WITHROLLING SHUTTERcm. 191,4 x 61 / h. 211m3 1,56kg 351PINSTRIPE WALNUT
KITCHENETTE AVECPORTE RIDEAUcm. 191,4 x 61 / h. 211m3 1,56kg 351NOYER PINSTRIPE
MINICOCINA CONPERSIANAcm. 191,4 x 61 / h. 211m3 1,56kg 351NOGAL RAYADO
MINICUCINA CONSERRANDINAcm. 191,4 x 61 / h. 211m3 1,56kg 351NOCE GESSATO
K 109 ZeusMODELLO / MODEL / MODÈLE / MODELO
14
MINIKITCHEN WITHROLLING SHUTTERcm. 255,2 x 61 / h. 211m3 2,36kg 531PINSTRIPE OAK
KITCHENETTE AVECPORTE RIDEAUcm. 255,2 x 61 / h. 211m3 2,36kg 531CHENE PINSTRIPE
MINICOCINA CONPERSIANAcm. 255,2 x 61 / h. 211m3 2,36kg 531ROBLE RAYADO
MINICUCINA CONSERRANDINAcm. 255,2 x 61 / h. 211m3 2,36kg 531ROVERE GESSATO
K 136 ZeusMODELLO / MODEL / MODÈLE / MODELO
15
MINIKITCHEN WITHROLLING SHUTTERcm. 157,6 x 61 / h. 211m3 1,00kg 225LARCH
KITCHENETTE AVECPORTE RIDEAUcm. 157,6 x 61 / h. 211m3 1,00kg 225MELEZE
MINICOCINA CONPERSIANAcm. 157,6 x 61 / h. 211m3 1,00kg 225LÀRICE
MINICUCINA CONSERRANDINAcm. 157,6 x 61 / h. 211m3 1,00kg 225LARICE
K 108 ZeusMODELLO / MODEL / MODÈLE / MODELO
16
MINIKITCHEN WITHROLLING SHUTTERcm. 221,4 x 61 / h. 211m3 1,65kg 372GRAY OAK
KITCHENETTE AVECPORTE RIDEAUcm. 221,4 x 61 / h. 211m3 1,65kg 372CHENE GRIS
MINICOCINA CONPERSIANAcm. 221,4 x 61 / h. 211m3 1,65kg 372ROBLE GRIS
MINICUCINA CONSERRANDINAcm. 221,4 x 61 / h. 211m3 1,65kg 372ROVERE GRIGIO
K 120 ZeusMODELLO / MODEL / MODÈLE / MODELO

17
MINIKITCHEN WITHROLLING SHUTTERcm. 285,2 x 61 / h. 211m3 2,45kg 552WHITE
KITCHENETTE AVECPORTE RIDEAUcm. 285,2 x 61 / h. 211m3 2,45kg 552BLANC
MINICOCINA CONPERSIANAcm. 258,2 x 61 / h. 211m3 2,45kg 552BLANCO
MINICUCINA CONSERRANDINAcm. 285,2 x 61 / h. 211m3 2,45kg 552BIANCO
K 137 ZeusMODELLO / MODEL / MODÈLE / MODELO
18
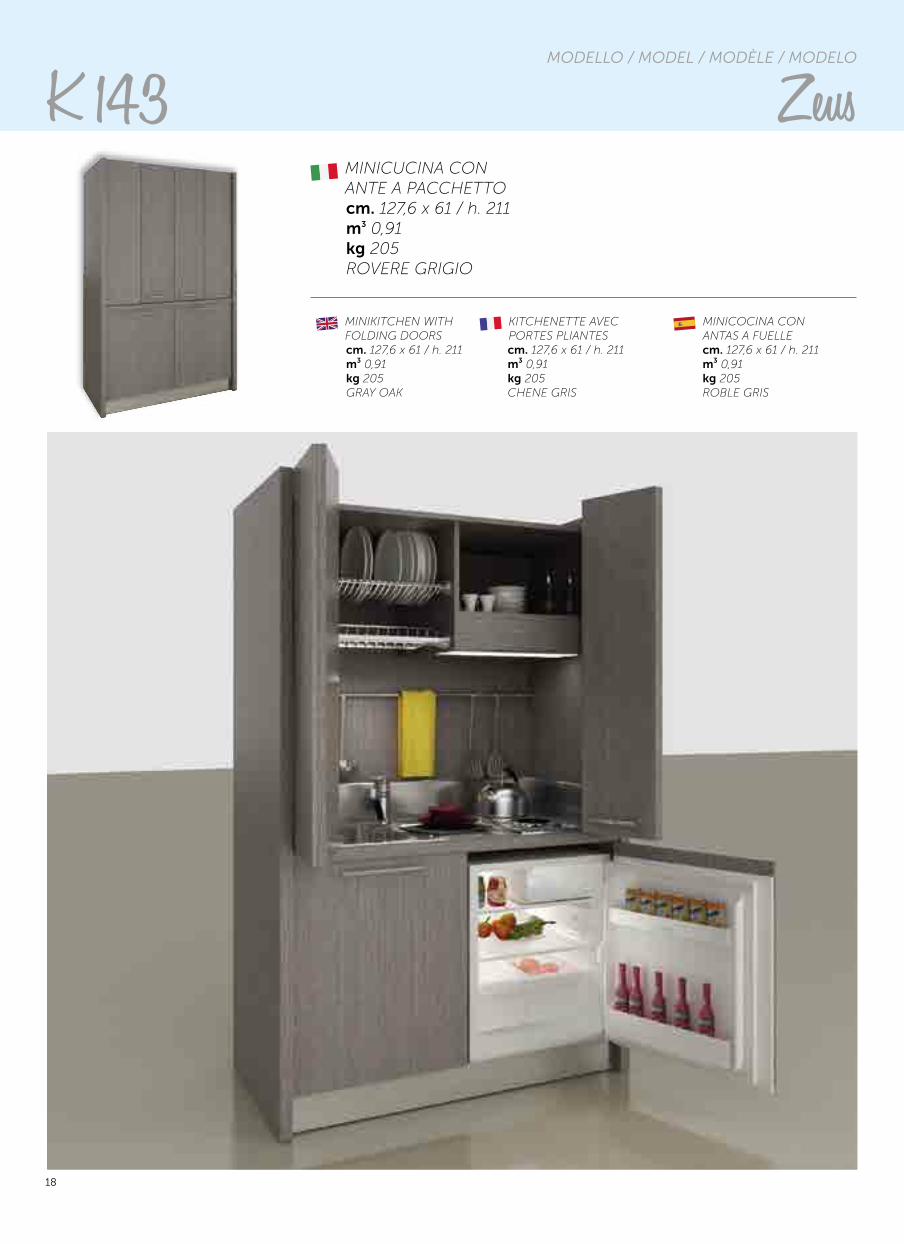
MINIKITCHEN WITHFOLDING DOORScm. 127,6 x 61 / h. 211m3 0,91kg 205GRAY OAK
KITCHENETTE AVECPORTES PLIANTEScm. 127,6 x 61 / h. 211m3 0,91kg 205CHENE GRIS
MINICOCINA CONANTAS A FUELLEcm. 127,6 x 61 / h. 211m3 0,91kg 205ROBLE GRIS
MINICUCINA CONANTE A PACCHETTO cm. 127,6 x 61 / h. 211m3 0,91kg 205ROVERE GRIGIO
K 143 ZeusMODELLO / MODEL / MODÈLE / MODELO
19
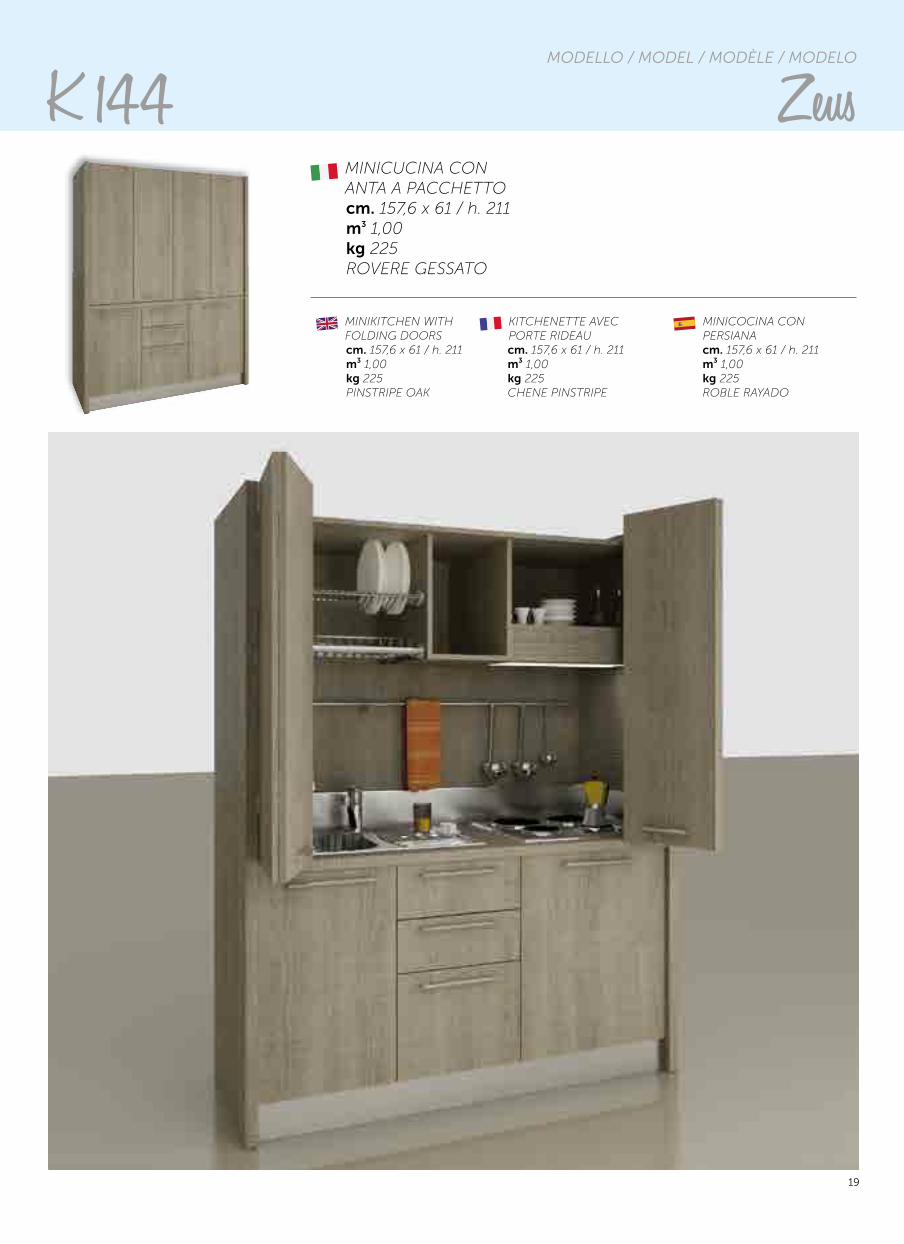
MINIKITCHEN WITHFOLDING DOORScm. 157,6 x 61 / h. 211m3 1,00kg 225PINSTRIPE OAK
KITCHENETTE AVECPORTE RIDEAUcm. 157,6 x 61 / h. 211m3 1,00kg 225CHENE PINSTRIPE
MINICOCINA CONPERSIANAcm. 157,6 x 61 / h. 211m3 1,00kg 225ROBLE RAYADO
MINICUCINA CONANTA A PACCHETTOcm. 157,6 x 61 / h. 211m3 1,00kg 225ROVERE GESSATO
K 144 ZeusMODELLO / MODEL / MODÈLE / MODELO
20
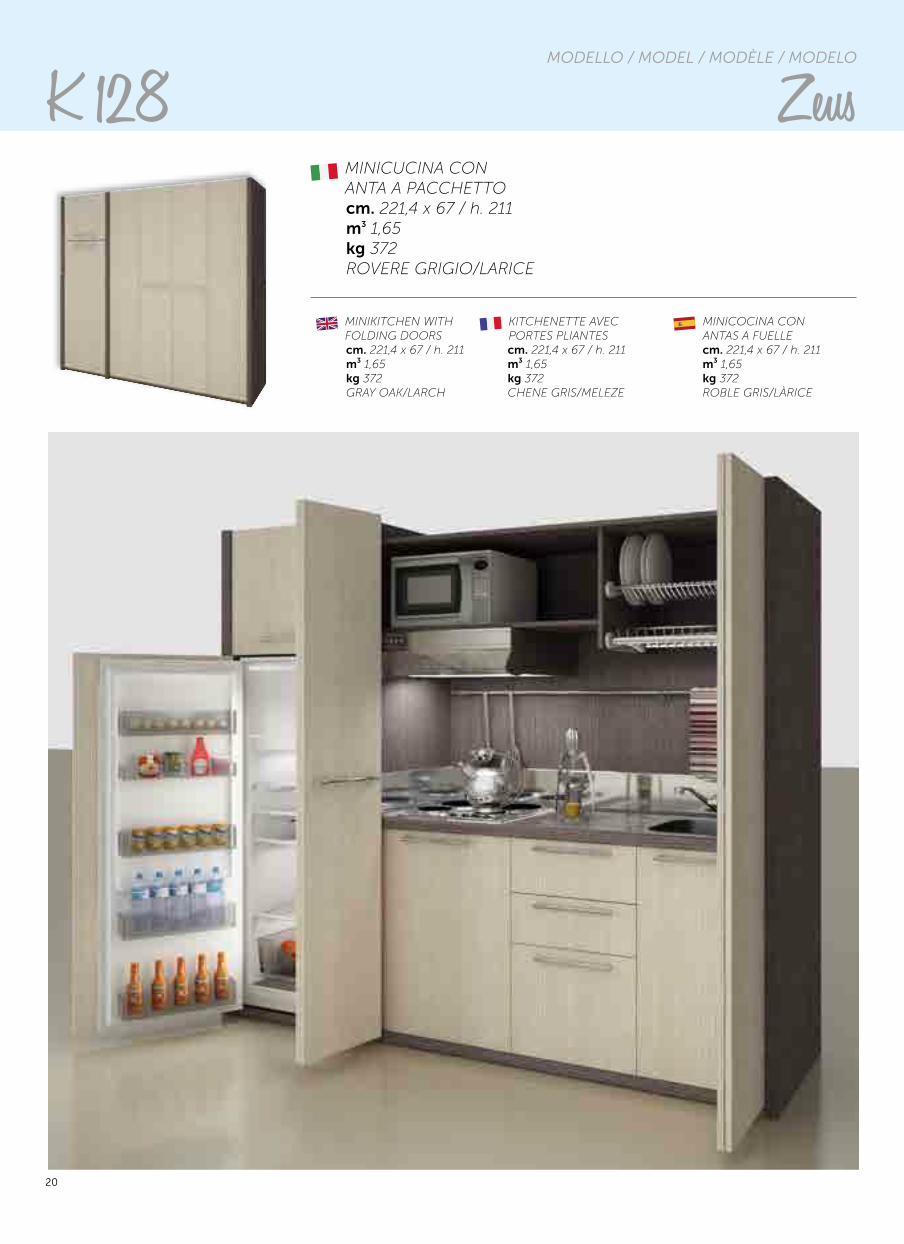
MINIKITCHEN WITHFOLDING DOORScm. 221,4 x 67 / h. 211m3 1,65kg 372GRAY OAK/LARCH
KITCHENETTE AVECPORTES PLIANTEScm. 221,4 x 67 / h. 211m3 1,65kg 372CHENE GRIS/MELEZE
MINICOCINA CONANTAS A FUELLEcm. 221,4 x 67 / h. 211m3 1,65kg 372ROBLE GRIS/LÀRICE
MINICUCINA CONANTA A PACCHETTOcm. 221,4 x 67 / h. 211m3 1,65kg 372ROVERE GRIGIO/LARICE
K 128 ZeusMODELLO / MODEL / MODÈLE / MODELO
21
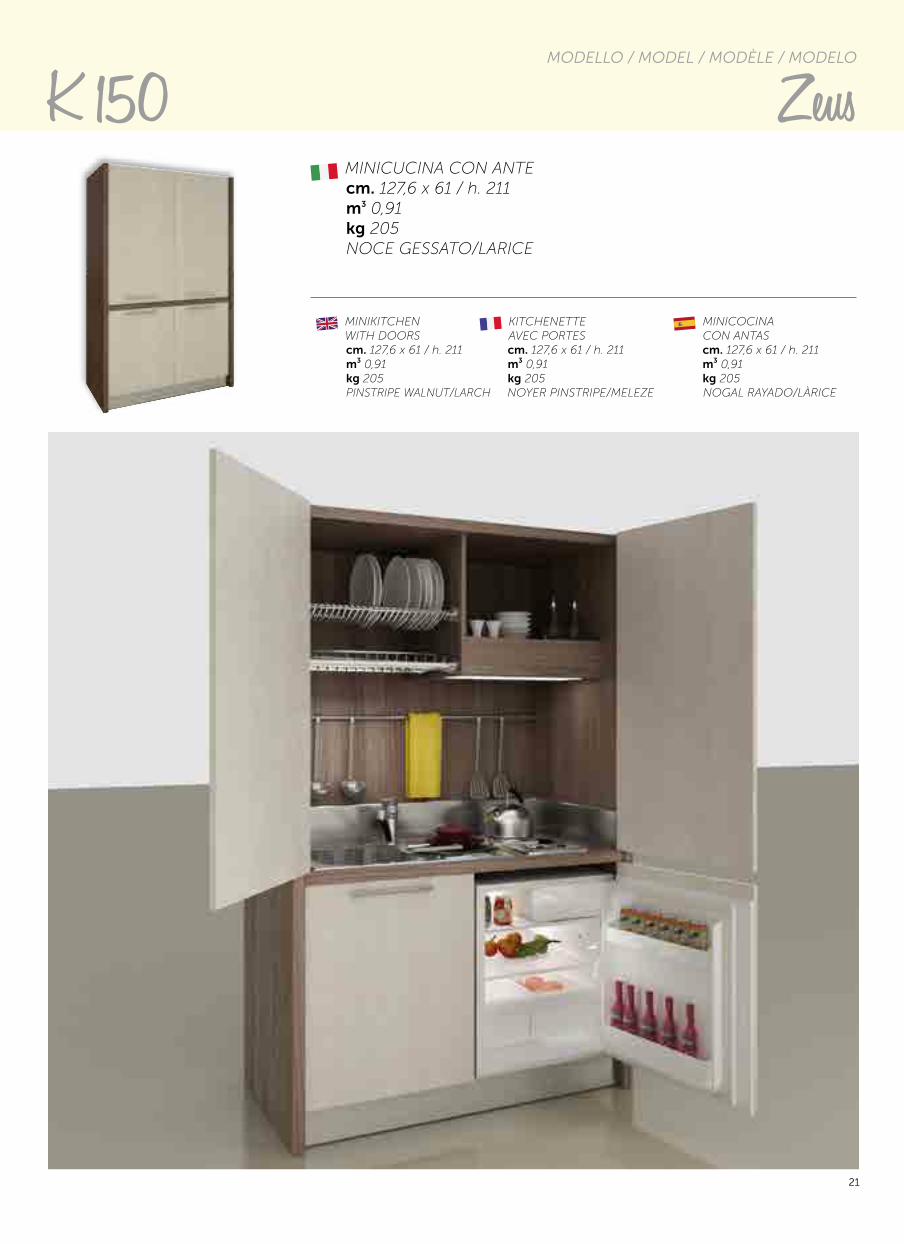
MINIKITCHENWITH DOORScm. 127,6 x 61 / h. 211m3 0,91kg 205PINSTRIPE WALNUT/LARCH
KITCHENETTEAVEC PORTEScm. 127,6 x 61 / h. 211m3 0,91kg 205NOYER PINSTRIPE/MELEZE
MINICOCINACON ANTAScm. 127,6 x 61 / h. 211m3 0,91kg 205NOGAL RAYADO/LÀRICE
MINICUCINA CON ANTE cm. 127,6 x 61 / h. 211m3 0,91kg 205NOCE GESSATO/LARICE
K 150 ZeusMODELLO / MODEL / MODÈLE / MODELO
22
MINIKITCHEN WITHHANGING CABINETScm. 127,6 x 61 / h. 211m3 0,91kg 205PINSTRIPE OAK
KITCHENETTE AVECELEMENTS SUSPENDUScm. 127,6 x 61 / h. 211m3 0,91kg 205CHENE PINSTRIPE
MINICOCINA CONMUEBLES ALTOScm. 127,6 x 61 / h. 211m3 0,91kg 205ROBLE RAYADO
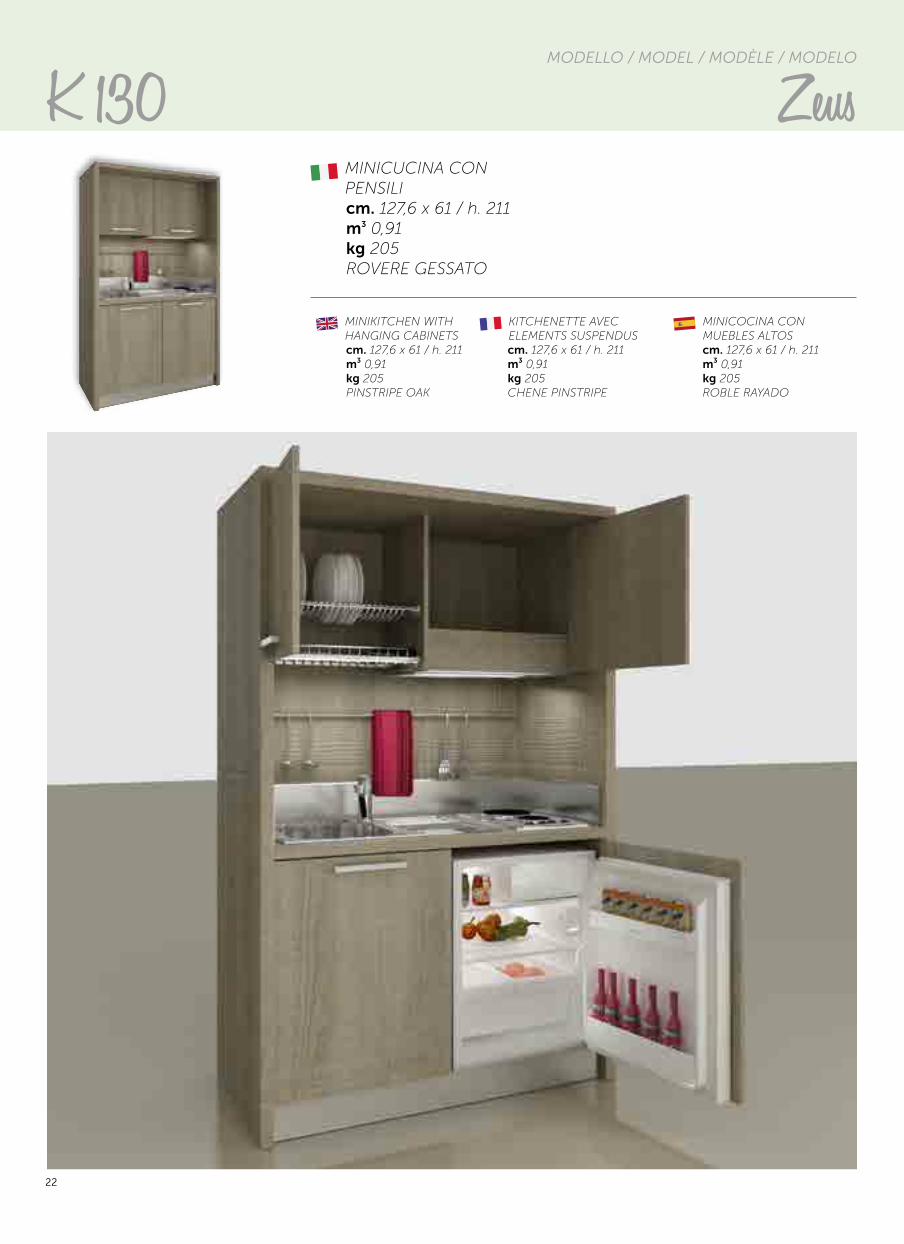
MINICUCINA CONPENSILIcm. 127,6 x 61 / h. 211m3 0,91kg 205ROVERE GESSATO
K 130 ZeusMODELLO / MODEL / MODÈLE / MODELO
23
MINIKITCHEN WITHHANGING CABINETScm. 191,4 x 61 / h. 211m3 1,56kg 351PINSTRIPE WALNUT/LARCH
KITCHENETTE AVECELEMENTS SUSPENDUScm. 191,4 x 61 / h. 211m3 1,56kg 351NOYER PINSTRIPE/MELEZE
MINICOCINA CONMUEBLES ALTOScm. 191,4 x 61 / h. 211m3 1,56kg 351NOGAL RAYADO/LÀRICE
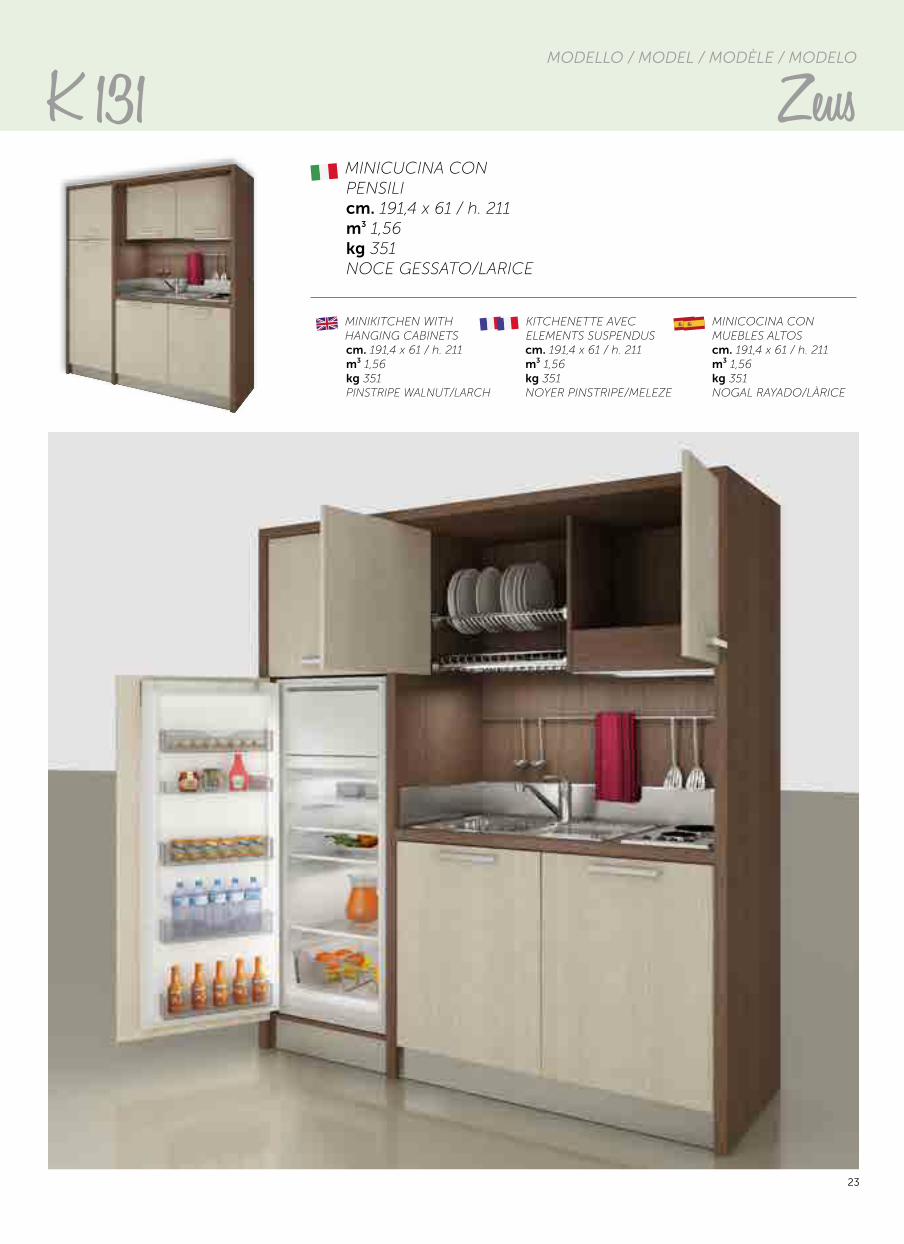
MINICUCINA CONPENSILIcm. 191,4 x 61 / h. 211m3 1,56kg 351NOCE GESSATO/LARICE
K 131 ZeusMODELLO / MODEL / MODÈLE / MODELO
24
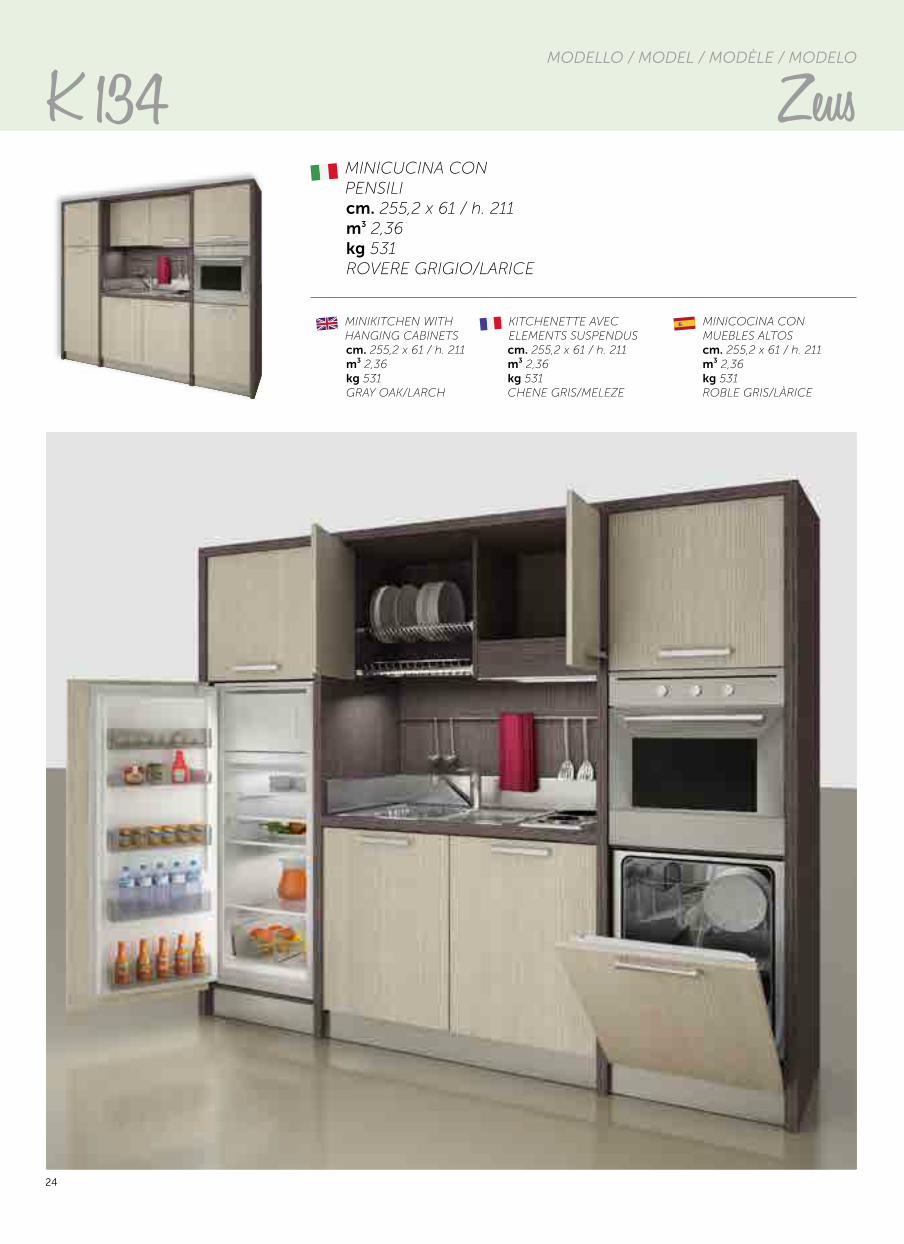
MINICUCINA CONPENSILI cm. 255,2 x 61 / h. 211m3 2,36kg 531ROVERE GRIGIO/LARICE
MINIKITCHEN WITHHANGING CABINETScm. 255,2 x 61 / h. 211m3 2,36kg 531GRAY OAK/LARCH
KITCHENETTE AVECELEMENTS SUSPENDUScm. 255,2 x 61 / h. 211m3 2,36kg 531CHENE GRIS/MELEZE
MINICOCINA CONMUEBLES ALTOScm. 255,2 x 61 / h. 211m3 2,36kg 531ROBLE GRIS/LÀRICE
K 134 ZeusMODELLO / MODEL / MODÈLE / MODELO
25
MINIKITCHEN WITHHANGING CABINETScm. 157,6 x 61 / h. 211m3 1,00kg 225CLEAR OAK
KITCHENETTE AVECELEMENTS SUSPENDUScm. 157,6 x 61 / h. 211m3 1,00kg 225CHENE CLAIR
MINICOCINA CONMUEBLES ALTOScm. 157,6 x 61 / h. 211m3 1,00kg 225ROBLE CLARO
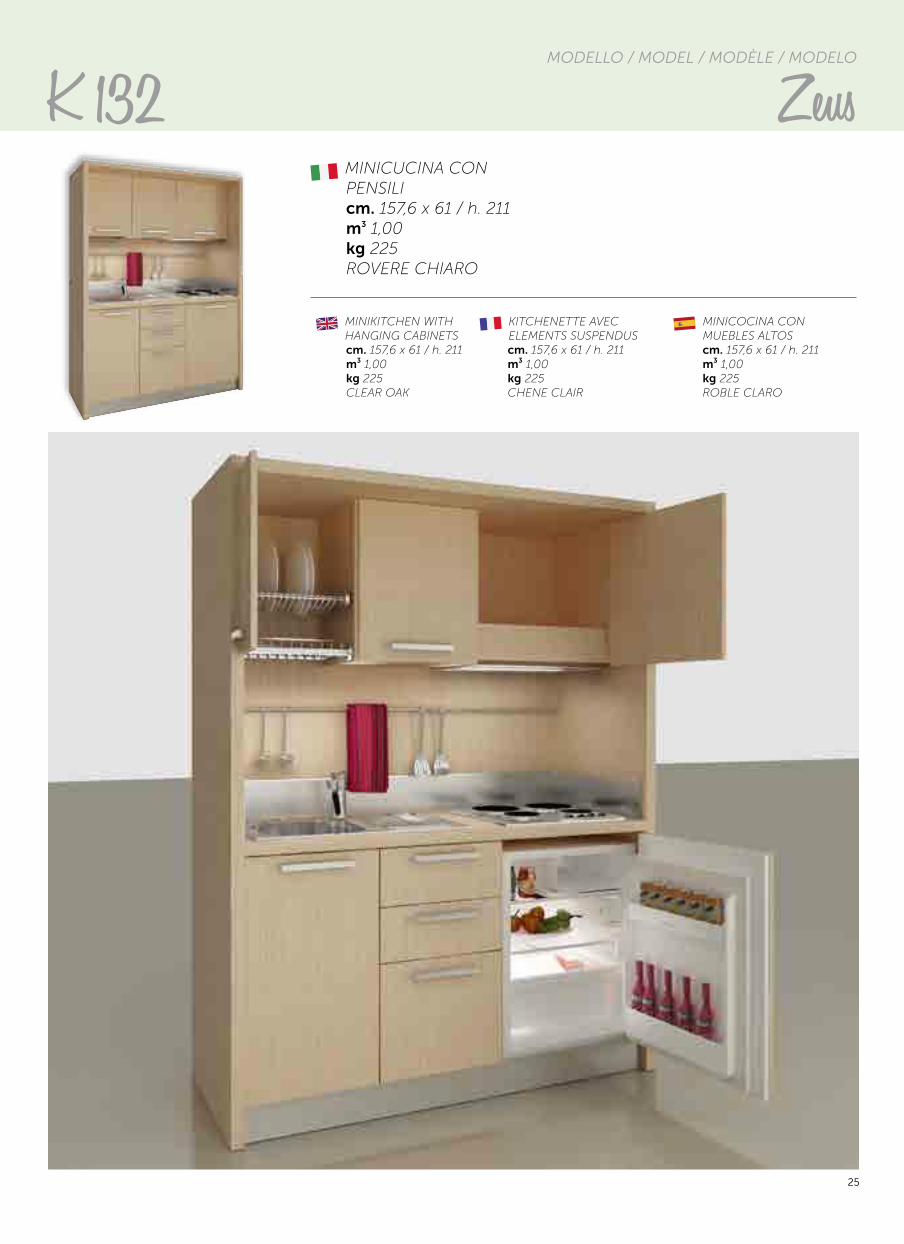
MINICUCINA CONPENSILIcm. 157,6 x 61 / h. 211m3 1,00kg 225ROVERE CHIARO
K 132 ZeusMODELLO / MODEL / MODÈLE / MODELO
26
MINIKITCHEN WITHHANGING CABINETScm. 221,4 x 61 / h. 211m3 1,65kg 372PINSTRIPE WALNUT/CLEAR OAK
KITCHENETTE AVECELEMENTS SUSPENDUScm. 221,4 x 61 / h. 211m3 1,65kg 372NOYER PINSTRIPE/CHENE CLAIR
MINICOCINA CONMUEBLES ALTOScm. 221,4 x 61 / h. 211m3 1,65kg 372NOGAL ROYADO/ROBLE CLARO
MINICUCINA CONPENSILIcm. 221,4 x 61 / h. 211m3 1,65kg 372NOCE GESSATO/ROVERE CHIARO
K 133 ZeusMODELLO / MODEL / MODÈLE / MODELO
27
K 135 ZeusMODELLO / MODEL / MODÈLE / MODELO
MINIKITCHEN WITHHANGING CABINETScm. 285,2 x 61 / h. 211m3 2,45kg 552PINSTRIPE OAK
KITCHENETTE AVECELEMENTS SUSPENDUScm. 285,2 x 61 / h. 211m3 2,45kg 552CHENE PINSTRIPE
MINICOCINA CONMUEBLE ALTOScm. 285,2 x 61 / h. 211m3 2,45kg 552ROBLE RAYADO
MINICUCINA CONPENSILIcm. 285,2 x 61 / h. 211m3 2,45kg 552ROVERE GESSATO
K 142 ZeusMODELLO / MODEL / MODÈLE / MODELO
28
MINIKITCHEN WITHFOLDING DOORScm. 311,4 x 61 / h. 211m3 2,40kg 519LARCH/PINSTRIPE WALNUT
KITCHENETTE AVECPORTES PLIANTEScm. 311,4 x 61 / h. 211m3 2,40kg 519MELEZE/NOYER PINSTRIPE
MINICOCINA CONANTAS A FUELLEcm. 311,4 x 61 / h. 211m3 2,40kg 519LÀRICE/NOGAL RAYADO
MINICUCINA CONPENSILEcm. 311,4 x 61 / h. 211m3 2,40kg 519LARICE/NOCE GESSATO
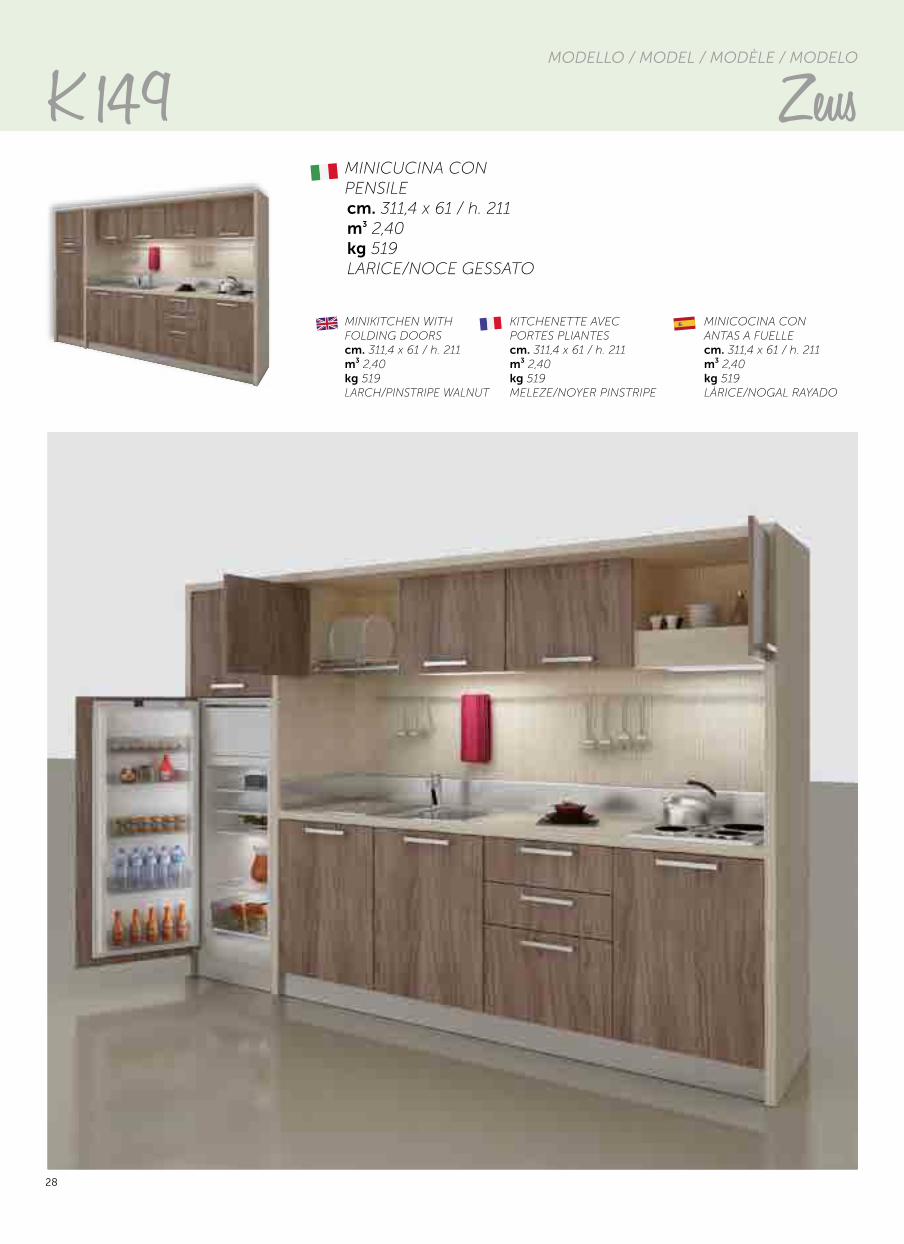
K 149 ZeusMODELLO / MODEL / MODÈLE / MODELO
K 142 ZeusMODELLO / MODEL / MODÈLE / MODELO
29
K 140 ZeusMODELLO / MODEL / MODÈLE / MODELO
MINIKITCHEN WITHBASE ONLYcm. 127,6 x 61 / h. 106m3 0,70kg 158GRAY OAK/LARCH
KITCHENETTE AVECMEUBLE BAScm. 127,6 x 61 / h. 106m3 0,70kg 158CHENE GRIS/MELEZE
MINICOCINA CONBASE SOLAMENTEcm. 127,6 x 61 / h. 106m3 0,70kg 158ROBLE GRIS/LÀRICE
MINICUCINA CONSOLO BASEcm. 127,6 x 61 / h. 106m3 0,70kg 158ROVERE GRIGIO/LARICE
K 142 ZeusMODELLO / MODEL / MODÈLE / MODELO
30
K 141 ZeusMODELLO / MODEL / MODÈLE / MODELO
MINIKITCHEN WITHBASE ONLYcm. 157,6 x 61 / h. 106m3 0,80kg 180CLEAR OAK/LARCH
KITCHENETTE AVECMEUBLE BAScm. 157,6 x 61 / h. 106m3 0,80kg 180CHENE CLAIR/MELEZE
MINICOCINA CONBASE SOLAMENTEcm. 157,6 x 61 / h. 106m3 0,80kg 180ROBLE CLARO/LÀRICE
MINICUCINA CONSOLO BASEcm. 157,6 x 61 / h. 106m3 0,80kg 180ROVERE CHIARO/LARICE
K 142 ZeusMODELLO / MODEL / MODÈLE / MODELO
31
K 114 AmarcordMODELLO / MODEL / MODÈLE / MODELO
MINIKITCHEN WITHROLLING SHUTTERcm. 125 x 61 / h. 211m3 0,91kg 205IVORY/ORANGE
KITCHENETTE AVECPORTE RIDEAUcm. 125 x 61 / h. 211m3 0,91kg 205IVOIRE/ORANGE
MINICOCINA CONPERSIANAcm. 125 x 61 / h. 211m3 0,91kg 205MARFIL/NARANJA
MINICUCINA CONSERRANDINAcm. 125 x 61 / h. 211m3 0,91kg 205AVORIO/ARANCIO
K 142 ZeusMODELLO / MODEL / MODÈLE / MODELO
32
K 116 AmarcordMODELLO / MODEL / MODÈLE / MODELO
MINIKITCHEN WITHROLLING SHUTTERcm. 190 x 61 / h. 211m3 1,56kg 351IVORY/IVORY
KITCHENETTE AVECPORTE RIDEAUcm. 190 x 61 / h. 211m3 1,56kg 351IVOIRE/IVOIRE
MINICOCINA CONPERSIANAcm. 190 x 61 / h. 211m3 1,56kg 351MARFIL/MARFIL
MINICUCINA CONSERRANDINAcm. 190 x 61 / h. 211m3 1,56kg 351AVORIO/AVORIO
K 142 ZeusMODELLO / MODEL / MODÈLE / MODELO
33
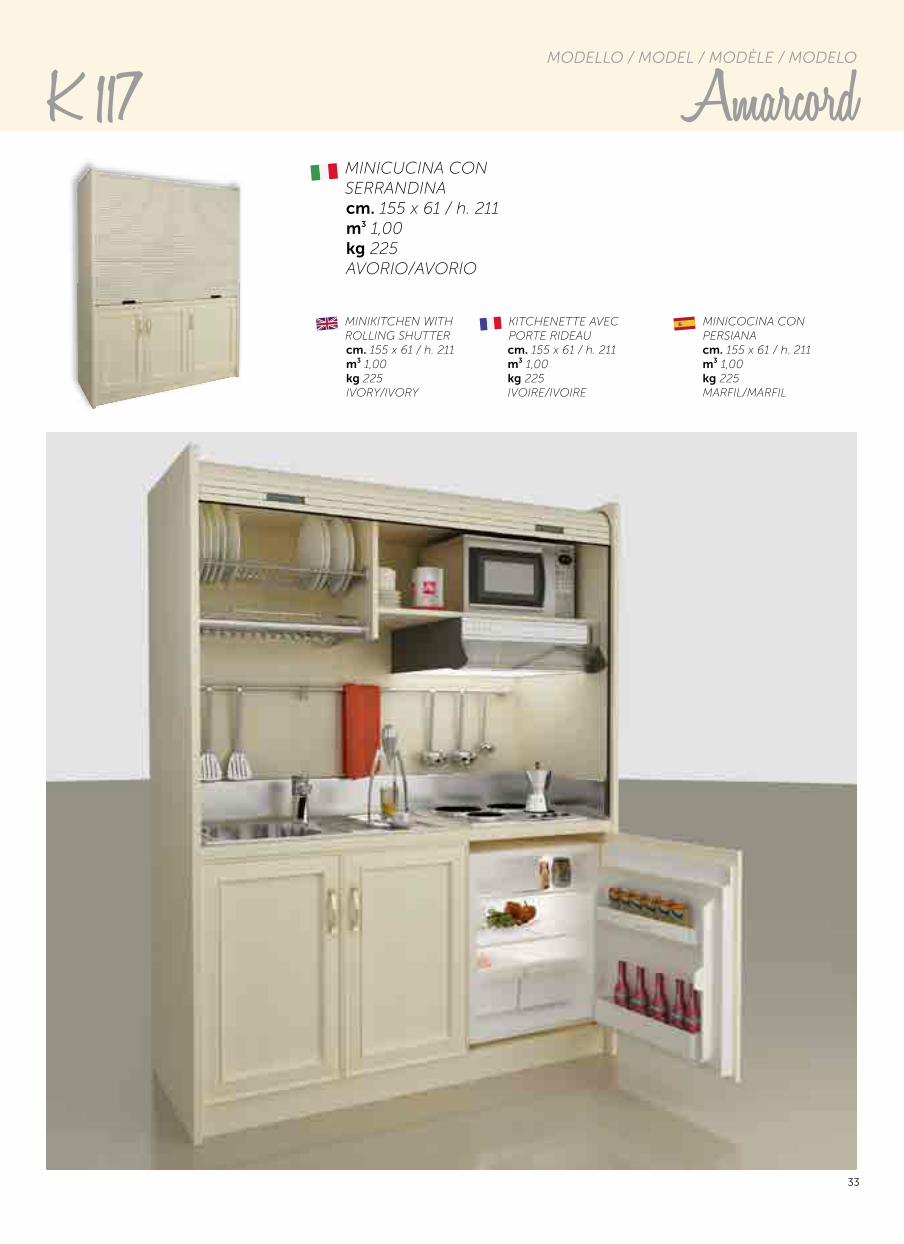
K 117 AmarcordMODELLO / MODEL / MODÈLE / MODELO
MINIKITCHEN WITHROLLING SHUTTERcm. 155 x 61 / h. 211m3 1,00kg 225IVORY/IVORY
KITCHENETTE AVECPORTE RIDEAUcm. 155 x 61 / h. 211m3 1,00kg 225IVOIRE/IVOIRE
MINICOCINA CONPERSIANAcm. 155 x 61 / h. 211m3 1,00kg 225MARFIL/MARFIL
MINICUCINA CONSERRANDINAcm. 155 x 61 / h. 211m3 1,00kg 225AVORIO/AVORIO
34
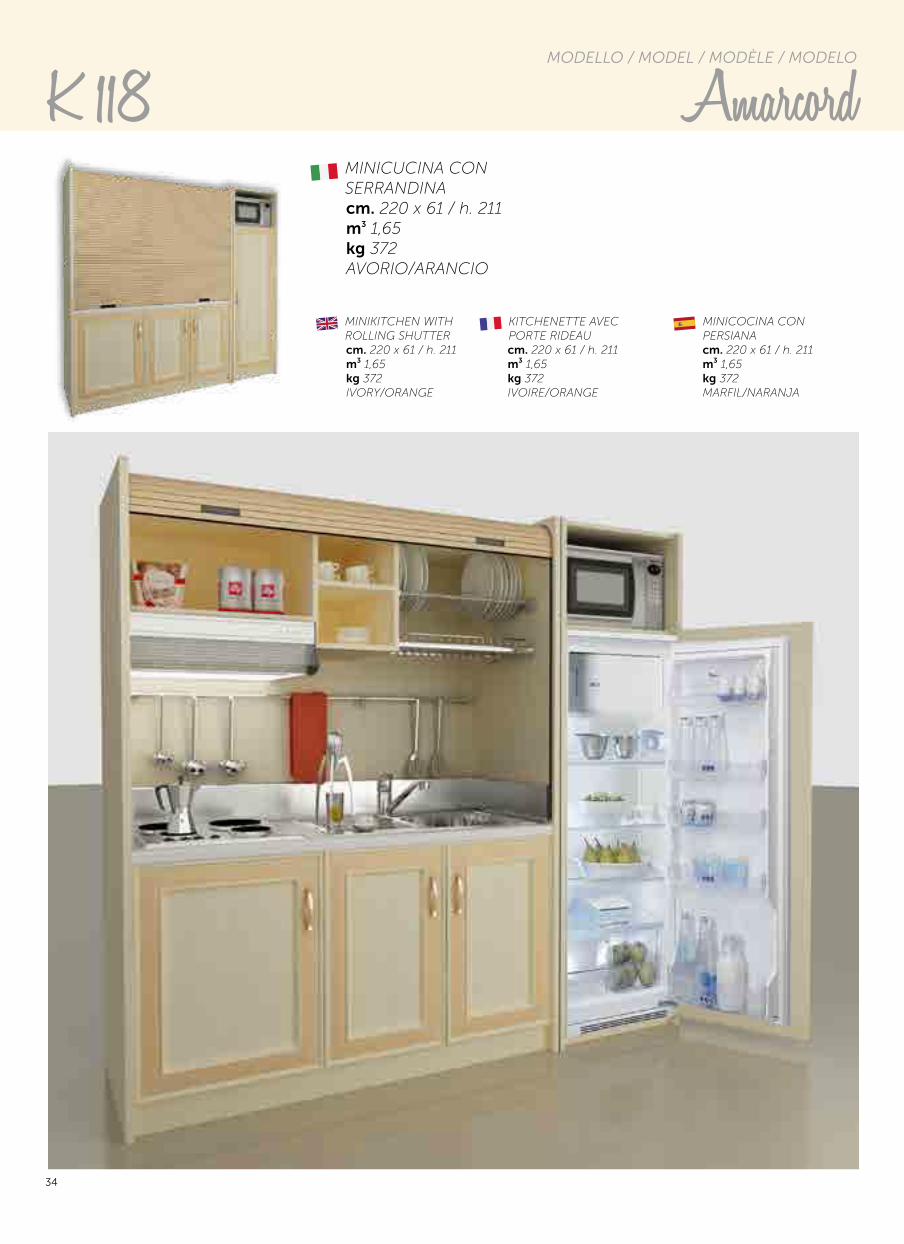
K 118 AmarcordMODELLO / MODEL / MODÈLE / MODELO
MINIKITCHEN WITHROLLING SHUTTERcm. 220 x 61 / h. 211m3 1,65kg 372IVORY/ORANGE
KITCHENETTE AVECPORTE RIDEAUcm. 220 x 61 / h. 211m3 1,65kg 372IVOIRE/ORANGE
MINICOCINA CONPERSIANAcm. 220 x 61 / h. 211m3 1,65kg 372MARFIL/NARANJA
MINICUCINA CONSERRANDINAcm. 220 x 61 / h. 211m3 1,65kg 372AVORIO/ARANCIO
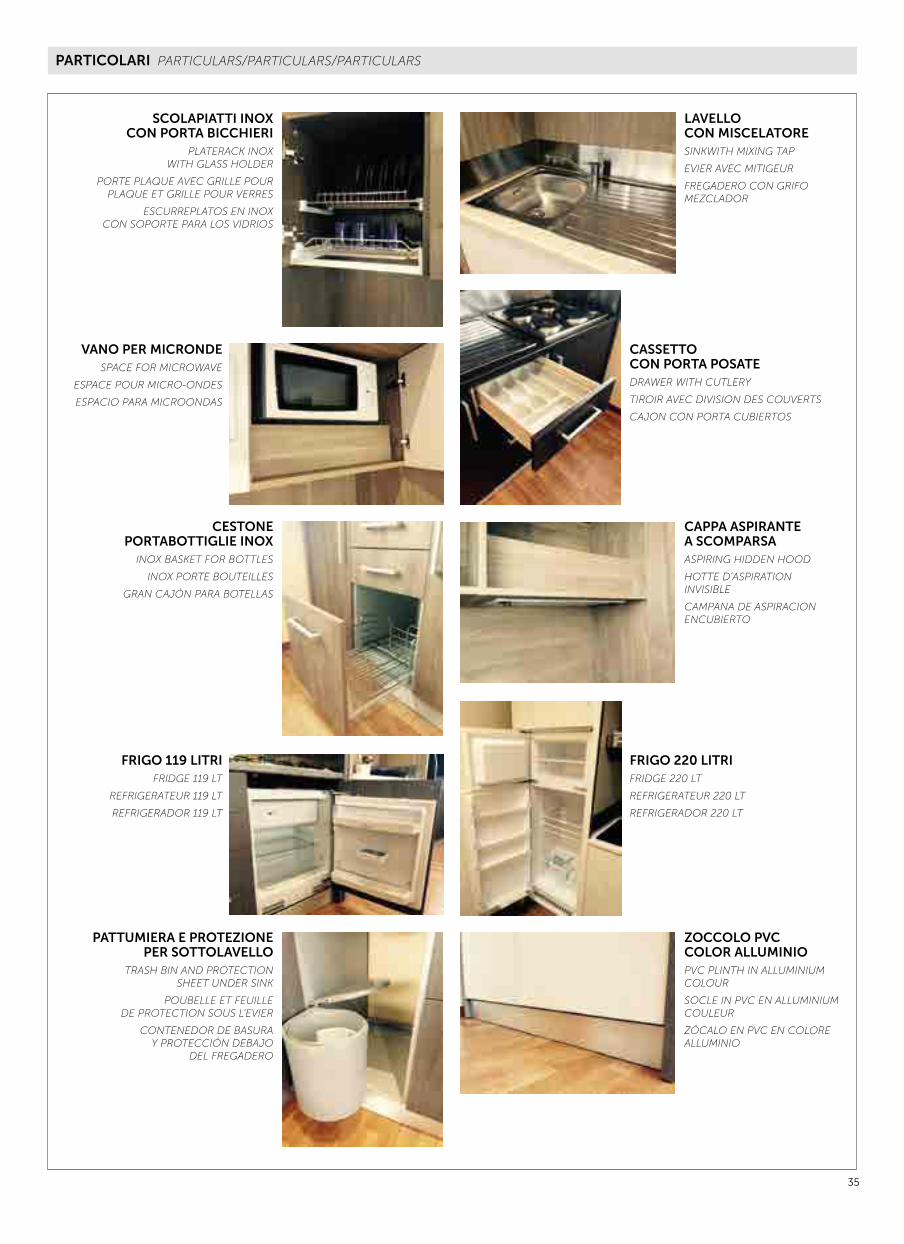
PARTICOLARI PARTICULARS/PARTICULARS/PARTICULARS
35
SCOLAPIATTI INOxCON PORTA BICCHIERI
PLATERACK INOXWITH GLASS HOLDER
PORTE PLAQUE AVEC GRILLE POUR PLAQUE ET GRILLE POUR VERRES
ESCURREPLATOS EN INOXCON SOPORTE PARA LOS VIDRIOS
VANO PER MICRONDESPACE FOR MICROWAVE
ESPACE POUR MICRO-ONDES
ESPACIO PARA MICROONDAS
FRIGO 119 LITRIFRIDGE 119 LT
REFRIGERATEUR 119 LT
REFRIGERADOR 119 LT
CESTONEPORTABOTTIGLIE INOx
INOX BASKET FOR BOTTLES
INOX PORTE BOUTEILLES
GRAN CAJÓN PARA BOTELLAS
PATTUMIERA E PROTEZIONE PER SOTTOLAVELLO
TRASH BIN AND PROTECTIONSHEET UNDER SINK
POUBELLE ET FEUILLEDE PROTECTION SOUS L’EVIER
CONTENEDOR DE BASURAY PROTECCIÓN DEBAJO
DEL FREGADERO
LAVELLOCON MISCELATORESINKWITH MIXING TAP
EVIER AVEC MITIGEUR
FREGADERO CON GRIFO MEZCLADOR
CASSETTOCON PORTA POSATEDRAWER WITH CUTLERY
TIROIR AVEC DIVISION DES COUVERTS
CAJON CON PORTA CUBIERTOS
FRIGO 220 LITRIFRIDGE 220 LT
REFRIGERATEUR 220 LT
REFRIGERADOR 220 LT
CAPPA ASPIRANTEA SCOMPARSAASPIRING HIDDEN HOOD
HOTTE D’ASPIRATIONINVISIBLE
CAMPANA DE ASPIRACION ENCUBIERTO
ZOCCOLO PVCCOLOR ALLUMINIOPVC PLINTH IN ALLUMINIUM COLOUR
SOCLE IN PVC EN ALLUMINIUM COULEUR
ZÓCALO EN PVC EN COLORE ALLUMINIO
36
CARATTERISTICHE TECNICHE TECHNICAL FEATURES/CARACTERISTIQUES TECHNIQUES/CARACTERISTICAS TECNICAS
SERRANDA ROLLING SHUTTER/ROULEAU DE FERMETURE/PERSIANA
Struttura:pannelli in particelle di legno no-bilitato con resine melaminiche in classe E1 a norme europee ed a abassa emissione di formaldeide bordato in ABS.ZEUS: spessore 38 mmAMARCORD: spessore 25 mm
Anta:pannelli in particelle di legno no-bilitato con resine melaminiche in classe E1 a norme europee ed a bassa emissione di formaldeide spessore 18 mm, bordato su quat-tro lati in ABS.AMARCORD: cornici MDF
Top:pannelli in particelle di legno idro-fugonobilitato con resine melami-niche in classe E1 a norme europee ed a bassa emissione di formaldei-de, spessore 38 mm.
Protezione:alzatina perimetrale h 150 mm in acciaio 18/10
Pattumiera:in PVC con coperchio
Structure:noble melamine on both sides, an-ti-scratch, non toxic, class E1, for-maldehyde low emissions, flanged in abs.ZEUS: thickness 38 mmAMARCORD: thickness 25 mm
Door:noble melamine on both sides, anti-scratch, non toxic, class E1, formal-dehyde low emissions, thickness 18 mm, flanged in abs.AMARCORD: frames in MDF
Top:panels in coated waterproof par-ticleboard, covered by melamine, class E1, thickness 38 mm.
Protection:steel 18/10 protection on 3 sides h 150 mm.
Trash bin:in PVC with lid.
Structure:mélaminé anti-rayures, non toxi-que, classe E1, faible émission de formaldéhyde, avec chants en ABS.ZEUS: épaisseur 38 mmAMARCORD: épaisseur 25 mm
Porte:mélaminé anti-reyures, non toxi-que, classe E1, faible émission de formaldéhyde, épaisseur 18 mm, à brides en ABS.AMARCORD: cadres en MDF
Paln de travail:panneau en aggloméré hydrofuge enduits, recouvert par de la méla-mine, classe E1, épaisseur 38 mm.
Protection:Protection inox 18/10 h sur côtés de 150 mm.
Poubelle:en PVC avec couvercle.
Estructura:Tableros con melamina con los estándares europeos en la clase E1 y baja emisión de formaldehído, bordes de ABSZEUS: espesor 38 mmAMARCORD: espesor 25 mm
Puerta:paneles en melamina con los estánderes europeos en la clase E1 y de baja emisión de formaldehído 18 mm de espespr, bordes de ABS en los cuatro lados.AMARCORD: marcos in MDF
Encimera:paneles de melamina con los estánderes europeos en la clase E1 y de baja emisión de formaldehído de espesor 38 mm. Hidrófugo
Zócalo:protecciòn de encimera en tres la-dos h 150 mm, acero 18/10
Cubo basura:en PVC con tapa
in PVC colorato, complete di bi-nario sulla struttura e fermo corsa
in colored PVC, complete with rails and blocking element
PVC coloré, piste compléte sur la structure et élément de blocage
PVC en diferentes colores, con guías y parada final
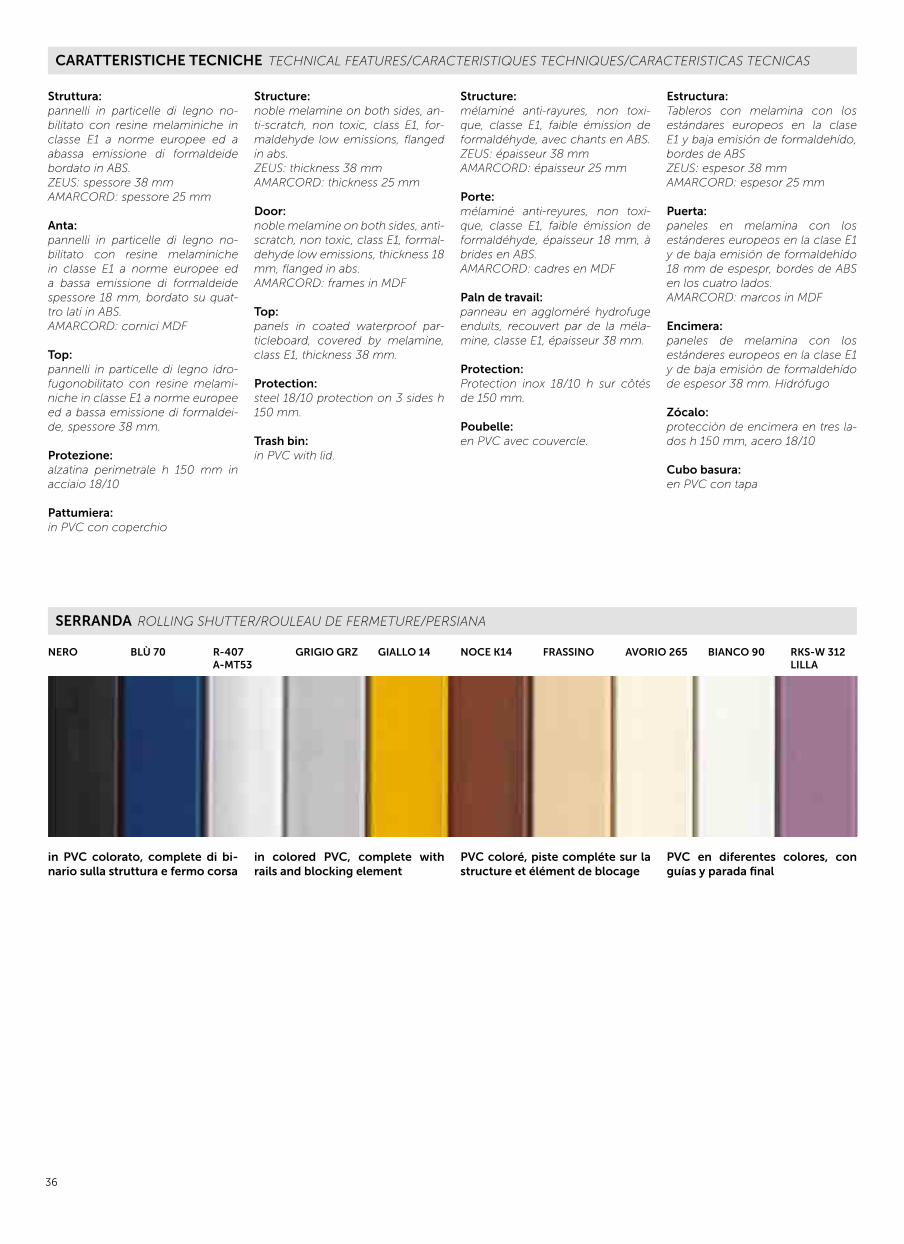
NERO BLÙ 70 R-407 A-MT53
GRIGIO GRZ GIALLO 14 NOCE K14 FRASSINO AVORIO 265 BIANCO 90 RKS-W 312LILLA
37
FINITURE DISPONIBILI AVAIBLE FINISHINGS/FINITIONS DISPONIBLES/ACABADOS DISPONIBLES
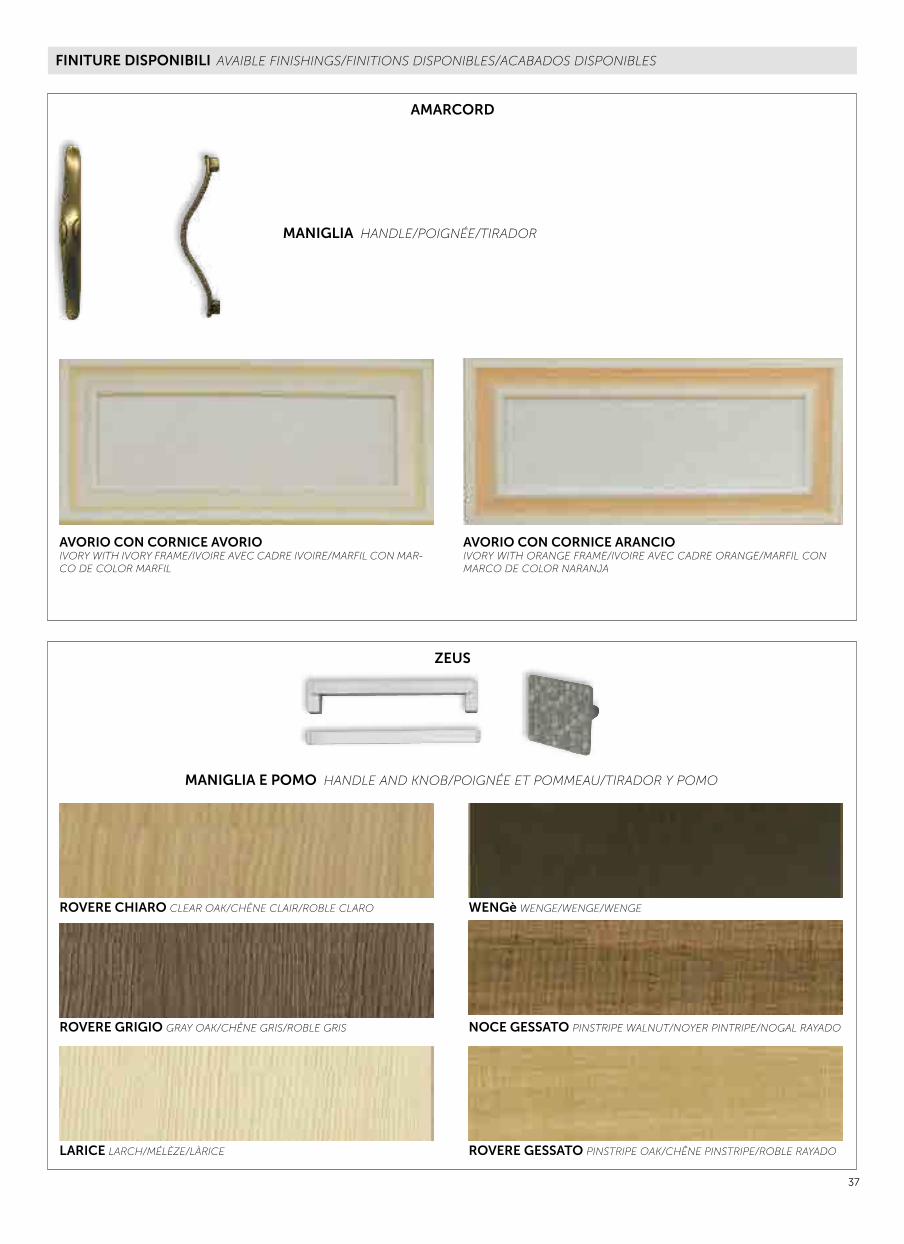
AMARCORD
ZEUS
MANIGLIA HANDLE/POIGNÉE/TIRADOR
MANIGLIA E POMO HANDLE AND KNOB/POIGNÉE ET POMMEAU/TIRADOR Y POMO
AVORIO CON CORNICE AVORIOIVORY WITH IVORY FRAME/IVOIRE AVEC CADRE IVOIRE/MARFIL CON MAR-CO DE COLOR MARFIL
ROVERE CHIARO CLEAR OAK/CHÊNE CLAIR/ROBLE CLARO WENGè WENGE/WENGE/WENGE
ROVERE GRIGIO GRAY OAK/CHÊNE GRIS/ROBLE GRIS NOCE GESSATO PINSTRIPE WALNUT/NOYER PINTRIPE/NOGAL RAYADO
LARICE LARCH/MÉLÈZE/LÀRICE ROVERE GESSATO PINSTRIPE OAK/CHÊNE PINSTRIPE/ROBLE RAYADO
AVORIO CON CORNICE ARANCIOIVORY WITH ORANGE FRAME/IVOIRE AVEC CADRE ORANGE/MARFIL CON MARCO DE COLOR NARANJA
38
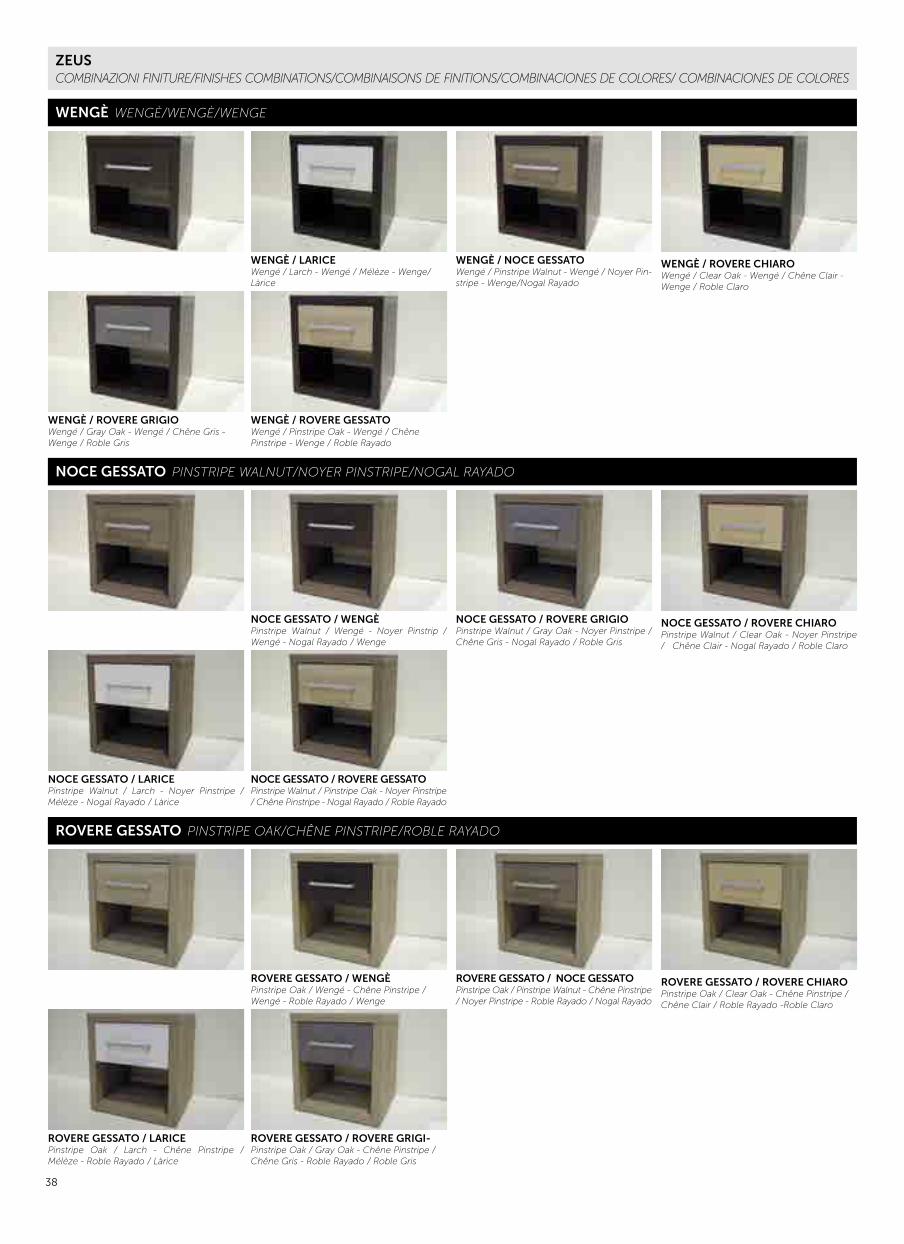
ZEUSCOMBINAZIONI FINITURE/FINISHES COMBINATIONS/COMBINAISONS DE FINITIONS/COMBINACIONES DE COLORES/ COMBINACIONES DE COLORES
WENGÈ WENGÈ/WENGÈ/WENGE
ROVERE GESSATO PINSTRIPE OAK/CHÊNE PINSTRIPE/ROBLE RAYADO
NOCE GESSATO PINSTRIPE WALNUT/NOYER PINSTRIPE/NOGAL RAYADO
WENGÈ / LARICEWengé / Larch - Wengé / Mélèze - Wenge/Làrice
ROVERE GESSATO / WENGÈPinstripe Oak / Wengé - Chêne Pinstripe / Wengé - Roble Rayado / Wenge
NOCE GESSATO / WENGÈPinstripe Walnut / Wengé - Noyer Pinstrip / Wengé - Nogal Rayado / Wenge
WENGÈ / ROVERE GRIGIOWengé / Gray Oak - Wengé / Chêne Gris - Wenge / Roble Gris
ROVERE GESSATO / LARICEPinstripe Oak / Larch - Chêne Pinstripe / Mélèze - Roble Rayado / Làrice
NOCE GESSATO / LARICEPinstripe Walnut / Larch - Noyer Pinstripe / Mélèze - Nogal Rayado / Làrice
WENGÈ / NOCE GESSATOWengé / Pinstripe Walnut - Wengé / Noyer Pin-stripe - Wenge/Nogal Rayado
ROVERE GESSATO / NOCE GESSATOPinstripe Oak / Pinstripe Walnut - Chêne Pinstripe / Noyer Pinstripe - Roble Rayado / Nogal Rayado
NOCE GESSATO / ROVERE GRIGIOPinstripe Walnut / Gray Oak - Noyer Pinstripe / Chêne Gris - Nogal Rayado / Roble Gris
WENGÈ / ROVERE CHIAROWengé / Clear Oak - Wengé / Chêne Clair - Wenge / Roble Claro
ROVERE GESSATO / ROVERE CHIAROPinstripe Oak / Clear Oak - Chêne Pinstripe / Chêne Clair / Roble Rayado -Roble Claro
NOCE GESSATO / ROVERE CHIAROPinstripe Walnut / Clear Oak - Noyer Pinstripe / Chêne Clair - Nogal Rayado / Roble Claro
WENGÈ / ROVERE GESSATOWengé / Pinstripe Oak - Wengé / Chêne Pinstripe - Wenge / Roble Rayado
ROVERE GESSATO / ROVERE GRIGI-Pinstripe Oak / Gray Oak - Chêne Pinstripe / Chêne Gris - Roble Rayado / Roble Gris
NOCE GESSATO / ROVERE GESSATOPinstripe Walnut / Pinstripe Oak - Noyer Pinstripe / Chêne Pinstripe - Nogal Rayado / Roble Rayado
39
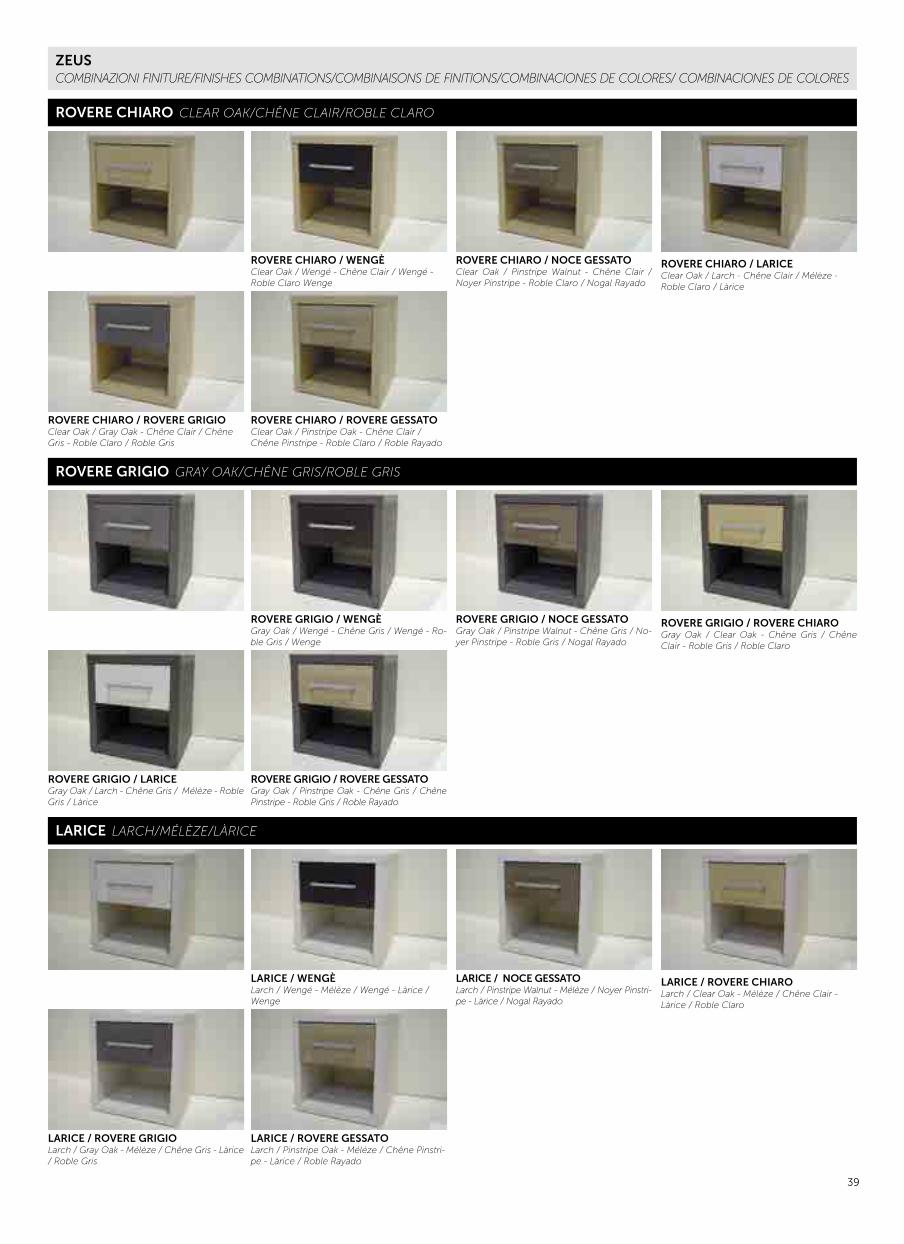
ZEUSCOMBINAZIONI FINITURE/FINISHES COMBINATIONS/COMBINAISONS DE FINITIONS/COMBINACIONES DE COLORES/ COMBINACIONES DE COLORES
ROVERE CHIARO CLEAR OAK/CHÊNE CLAIR/ROBLE CLARO
LARICE LARCH/MÉLÈZE/LÀRICE
ROVERE GRIGIO GRAY OAK/CHÊNE GRIS/ROBLE GRIS
ROVERE CHIARO / WENGÈClear Oak / Wengé - Chêne Clair / Wengé - Roble Claro Wenge
LARICE / WENGÈLarch / Wengé - Mélèze / Wengé - Làrice / Wenge
ROVERE GRIGIO / WENGÈGray Oak / Wengé - Chêne Gris / Wengé - Ro-ble Gris / Wenge
ROVERE CHIARO / ROVERE GRIGIOClear Oak / Gray Oak - Chêne Clair / Chêne Gris - Roble Claro / Roble Gris
LARICE / ROVERE GRIGIOLarch / Gray Oak - Mélèze / Chêne Gris - Làrice / Roble Gris
ROVERE GRIGIO / LARICEGray Oak / Larch - Chêne Gris / Mélèze - Roble Gris / Làrice
ROVERE CHIARO / NOCE GESSATOClear Oak / Pinstripe Walnut - Chêne Clair / Noyer Pinstripe - Roble Claro / Nogal Rayado
LARICE / NOCE GESSATOLarch / Pinstripe Walnut - Mélèze / Noyer Pinstri-pe - Làrice / Nogal Rayado
ROVERE GRIGIO / NOCE GESSATOGray Oak / Pinstripe Walnut - Chêne Gris / No-yer Pinstripe - Roble Gris / Nogal Rayado
ROVERE CHIARO / LARICEClear Oak / Larch - Chêne Clair / Mélèze - Roble Claro / Làrice
LARICE / ROVERE CHIAROLarch / Clear Oak - Mélèze / Chêne Clair - Làrice / Roble Claro
ROVERE GRIGIO / ROVERE CHIAROGray Oak / Clear Oak - Chêne Gris / Chêne Clair - Roble Gris / Roble Claro
ROVERE CHIARO / ROVERE GESSATOClear Oak / Pinstripe Oak - Chêne Clair / Chêne Pinstripe - Roble Claro / Roble Rayado
LARICE / ROVERE GESSATOLarch / Pinstripe Oak - Méléze / Chêne Pinstri-pe - Làrice / Roble Rayado
ROVERE GRIGIO / ROVERE GESSATOGray Oak / Pinstripe Oak - Chêne Gris / Chêne Pinstripe - Roble Gris / Roble Rayado
40
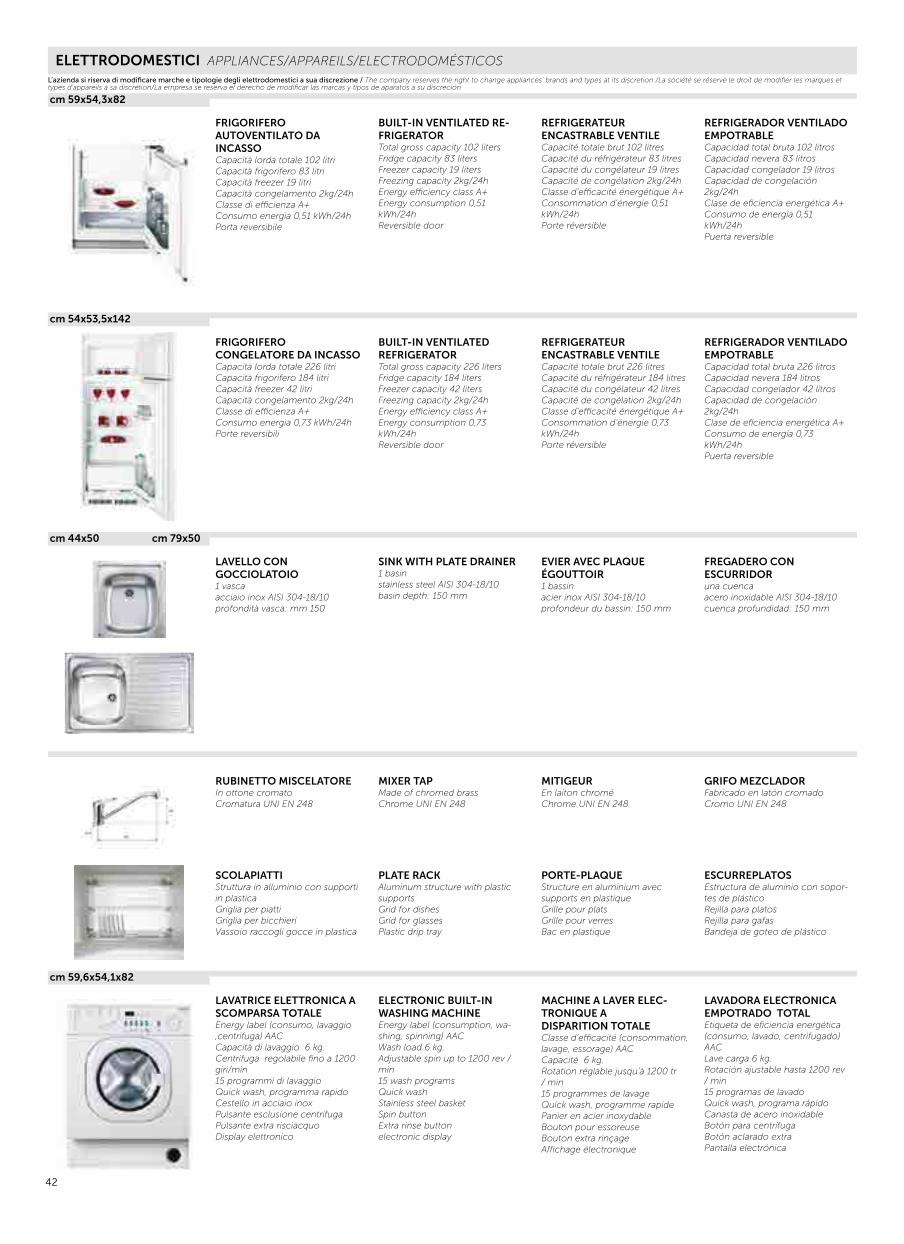
ELETTRODOMESTICI APPLIANCES/APPAREILS/ELECTRODOMÉSTICOS
cm 29x51 cm 59x51
cm 29x51 cm 59x51
cm 29x51 cm 59x51
cm 29x51 cm 58x51
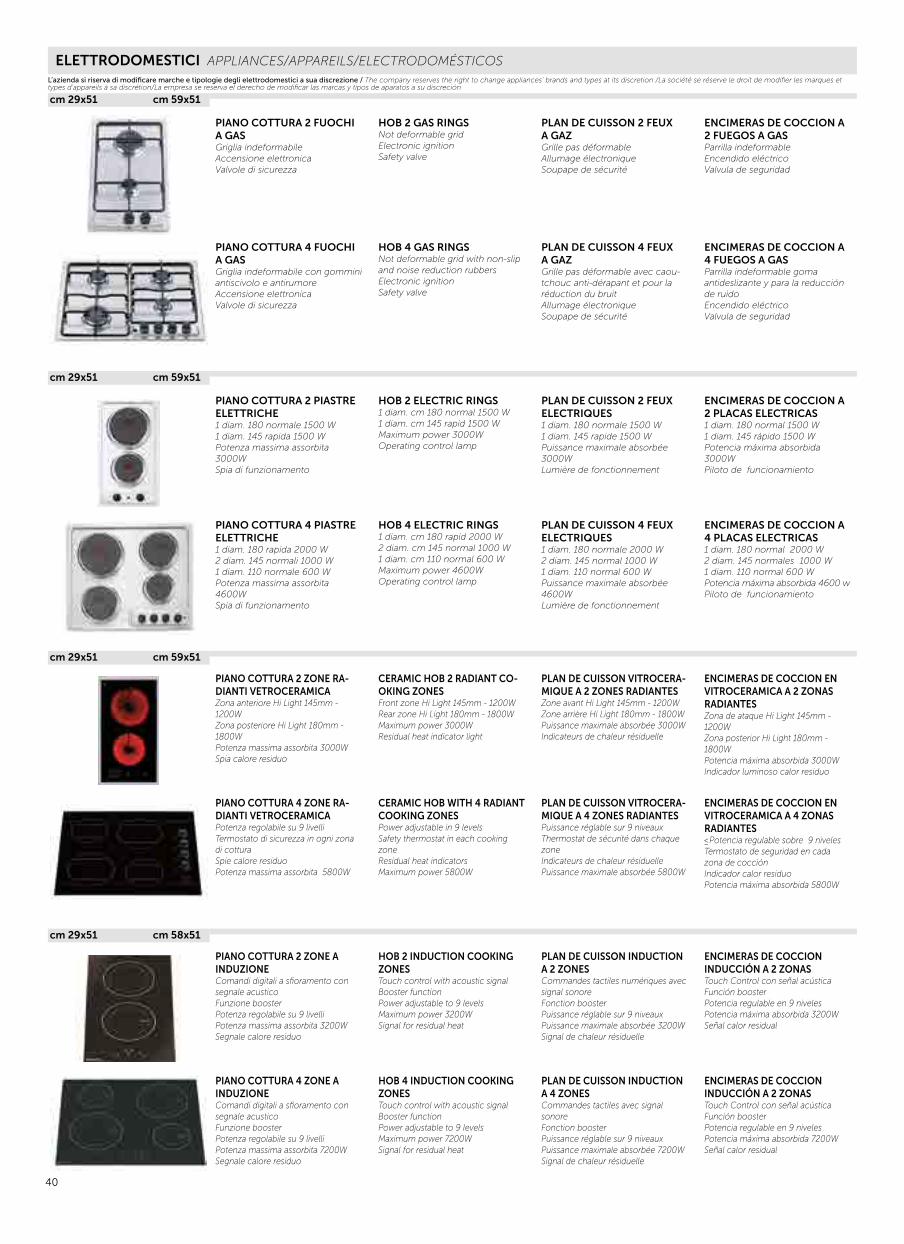
PIANO COTTURA 2 PIASTRE ELETTRICHE1 diam. 180 normale 1500 W1 diam. 145 rapida 1500 WPotenza massima assorbita 3000WSpia di funzionamento
HOB 2 ELECTRIC RINGS 1 diam. cm 180 normal 1500 W1 diam. cm 145 rapid 1500 WMaximum power 3000WOperating control lamp
PLAN DE CUISSON 2 FEUx ELECTRIQUES1 diam. 180 normale 1500 W1 diam. 145 rapide 1500 WPuissance maximale absorbée 3000WLumière de fonctionnement
ENCIMERAS DE COCCION A 2 PLACAS ELECTRICAS1 diam. 180 normal 1500 W1 diam. 145 rápido 1500 WPotencia máxima absorbida 3000WPiloto de funcionamiento
PIANO COTTURA 2 ZONE RA-DIANTI VETROCERAMICAZona anteriore Hi Light 145mm - 1200WZona posteriore Hi Light 180mm - 1800WPotenza massima assorbita 3000WSpia calore residuo
CERAMIC HOB 2 RADIANT CO-OKING ZONES Front zone Hi Light 145mm - 1200WRear zone Hi Light 180mm - 1800WMaximum power 3000WResidual heat indicator light
PLAN DE CUISSON VITROCERA-MIQUE A 2 ZONES RADIANTESZone avant Hi Light 145mm - 1200W Zone arrière Hi Light 180mm - 1800WPuissance maximale absorbée 3000WIndicateurs de chaleur résiduelle
ENCIMERAS DE COCCION EN VITROCERAMICA A 2 ZONAS RADIANTESZona de ataque Hi Light 145mm - 1200WZona posterior Hi Light 180mm - 1800WPotencia máxima absorbida 3000WIndicador luminoso calor residuo
PIANO COTTURA 2 ZONE A INDUZIONEComandi digitali a sfioramento con segnale acusticoFunzione boosterPotenza regolabile su 9 livelliPotenza massima assorbita 3200WSegnale calore residuo
HOB 2 INDUCTION COOKING ZONES Touch control with acoustic signalBooster functionPower adjustable to 9 levelsMaximum power 3200WSignal for residual heat
PLAN DE CUISSON INDUCTION A 2 ZONES Commandes tactiles numériques avec signal sonoreFonction boosterPuissance réglable sur 9 niveauxPuissance maximale absorbée 3200WSignal de chaleur résiduelle
ENCIMERAS DE COCCION INDUCCIÓN A 2 ZONASTouch Control con señal acústicaFunción boosterPotencia regulable en 9 nivelesPotencia máxima absorbida 3200WSeñal calor residual
PIANO COTTURA 2 FUOCHI A GASGriglia indeformabileAccensione elettronicaValvole di sicurezza
HOB 2 GAS RINGS Not deformable gridElectronic ignitionSafety valve
PLAN DE CUISSON 2 FEUx A GAZGrille pas déformableAllumage électroniqueSoupape de sécurité
ENCIMERAS DE COCCION A 2 FUEGOS A GASParrilla indeformableEncendido eléctricoValvula de seguridad
PIANO COTTURA 4 PIASTRE ELETTRICHE1 diam. 180 rapida 2000 W2 diam. 145 normali 1000 W1 diam. 110 normale 600 WPotenza massima assorbita 4600WSpia di funzionamento
HOB 4 ELECTRIC RINGS 1 diam. cm 180 rapid 2000 W2 diam. cm 145 normal 1000 W1 diam. cm 110 normal 600 WMaximum power 4600WOperating control lamp
PLAN DE CUISSON 4 FEUx ELECTRIQUES1 diam. 180 normale 2000 W2 diam. 145 normal 1000 W1 diam. 110 normal 600 WPuissance maximale absorbée 4600WLumière de fonctionnement
ENCIMERAS DE COCCION A 4 PLACAS ELECTRICAS1 diam. 180 normal 2000 W2 diam. 145 normales 1000 W1 diam. 110 normal 600 WPotencia máxima absorbida 4600 wPiloto de funcionamiento
PIANO COTTURA 4 ZONE RA-DIANTI VETROCERAMICAPotenza regolabile su 9 livelliTermostato di sicurezza in ogni zona di cotturaSpie calore residuoPotenza massima assorbita 5800W
CERAMIC HOB WITH 4 RADIANT COOKING ZONES Power adjustable in 9 levelsSafety thermostat in each cooking zoneResidual heat indicatorsMaximum power 5800W
PLAN DE CUISSON VITROCERA-MIQUE A 4 ZONES RADIANTES Puissance réglable sur 9 niveauxThermostat de sécurité dans chaque zoneIndicateurs de chaleur résiduellePuissance maximale absorbée 5800W
ENCIMERAS DE COCCION EN VITROCERAMICA A 4 ZONAS RADIANTES≤Potencia regulable sobre 9 nivelesTermostato de seguridad en cada zona de cocción Indicador calor residuoPotencia máxima absorbida 5800W
PIANO COTTURA 4 ZONE A INDUZIONEComandi digitali a sfioramento con segnale acusticoFunzione boosterPotenza regolabile su 9 livelliPotenza massima assorbita 7200WSegnale calore residuo
HOB 4 INDUCTION COOKING ZONES Touch control with acoustic signalBooster functionPower adjustable to 9 levelsMaximum power 7200WSignal for residual heat
PLAN DE CUISSON INDUCTION A 4 ZONES Commandes tactiles avec signal sonoreFonction boosterPuissance réglable sur 9 niveauxPuissance maximale absorbée 7200WSignal de chaleur résiduelle
ENCIMERAS DE COCCION INDUCCIÓN A 2 ZONASTouch Control con señal acústicaFunción boosterPotencia regulable en 9 nivelesPotencia máxima absorbida 7200WSeñal calor residual
PIANO COTTURA 4 FUOCHI A GASGriglia indeformabile con gommini antiscivolo e antirumoreAccensione elettronicaValvole di sicurezza
HOB 4 GAS RINGS Not deformable grid with non-slip and noise reduction rubbersElectronic ignitionSafety valve
PLAN DE CUISSON 4 FEUx A GAZGrille pas déformable avec caou-tchouc anti-dérapant et pour la réduction du bruitAllumage électroniqueSoupape de sécurité
ENCIMERAS DE COCCION A 4 FUEGOS A GASParrilla indeformable goma antideslizante y para la reducción de ruidoEncendido eléctricoValvula de seguridad
L’azienda si riserva di modificare marche e tipologie degli elettrodomestici a sua discrezione / The company reserves the right to change appliances’ brands and types at its discretion /La société se réserve le droit de modifier les marques et types d'appareils à sa discrétion/La empresa se reserva el derecho de modificar las marcas y tipos de aparatos a su discreción
41
ELETTRODOMESTICI APPLIANCES/APPAREILS/ELECTRODOMÉSTICOS
cm 60x48x15
cm 45x26x34
cm 59,5x54,5x59,5
cm 59,8x55x81,8
cm 45x57,5x81,8
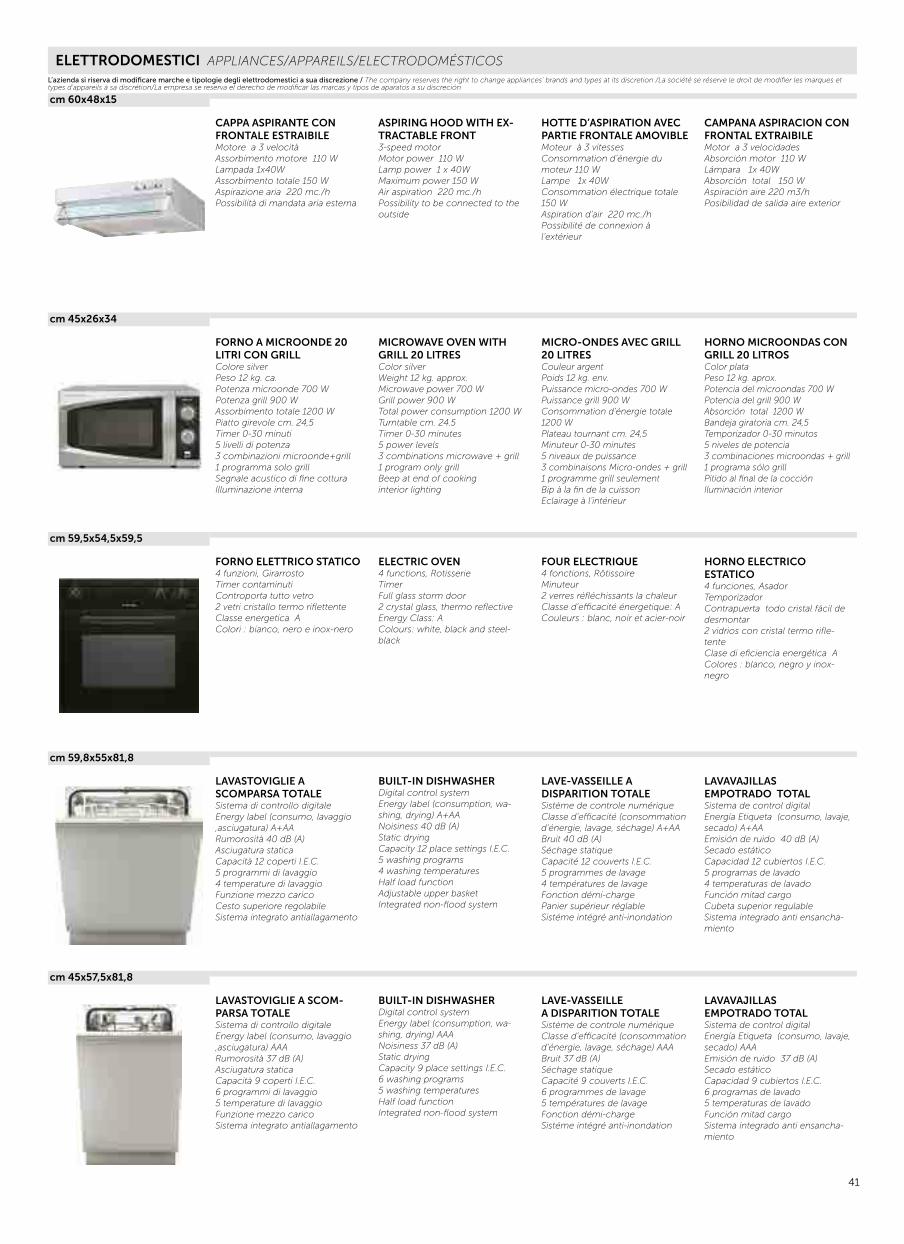
CAPPA ASPIRANTE CON FRONTALE ESTRAIBILEMotore a 3 velocitàAssorbimento motore 110 WLampada 1x40WAssorbimento totale 150 WAspirazione aria 220 mc./hPossibilità di mandata aria esterna
ASPIRING HOOD WITH Ex-TRACTABLE FRONT3-speed motorMotor power 110 WLamp power 1 x 40WMaximum power 150 WAir aspiration 220 mc./hPossibility to be connected to the outside
HOTTE D’ASPIRATION AVEC PARTIE FRONTALE AMOVIBLEMoteur à 3 vitessesConsommation d’énergie du moteur 110 WLampe 1x 40WConsommation électrique totale 150 WAspiration d’air 220 mc./hPossibilité de connexion à l’extérieur
CAMPANA ASPIRACION CON FRONTAL ExTRAIBILEMotor a 3 velocidades Absorción motor 110 WLámpara 1x 40WAbsorción total 150 WAspiración aire 220 m3/hPosibilidad de salida aire exterior
FORNO A MICROONDE 20 LITRI CON GRILLColore silverPeso 12 kg. ca.Potenza microonde 700 WPotenza grill 900 WAssorbimento totale 1200 WPiatto girevole cm. 24,5Timer 0-30 minuti5 livelli di potenza3 combinazioni microonde+grill1 programma solo grillSegnale acustico di fine cotturaIlluminazione interna
MICROWAVE OVEN WITH GRILL 20 LITRESColor silverWeight 12 kg. approx.Microwave power 700 WGrill power 900 WTotal power consumption 1200 WTurntable cm. 24.5Timer 0-30 minutes5 power levels3 combinations microwave + grill1 program only grillBeep at end of cookinginterior lighting
MICRO-ONDES AVEC GRILL 20 LITRESCouleur argentPoids 12 kg. env.Puissance micro-ondes 700 WPuissance grill 900 WConsommation d’énergie totale 1200 WPlateau tournant cm. 24,5Minuteur 0-30 minutes5 niveaux de puissance3 combinaisons Micro-ondes + grill1 programme grill seulementBip à la fin de la cuissonEclairage à l’intérieur
HORNO MICROONDAS CON GRILL 20 LITROSColor plataPeso 12 kg. aprox.Potencia del microondas 700 WPotencia del grill 900 WAbsorción total 1200 WBandeja giratoria cm. 24,5Temporizador 0-30 minutos5 niveles de potencia3 combinaciones microondas + grill1 programa sólo grillPitido al final de la cocciónIluminación interior
FORNO ELETTRICO STATICO4 funzioni, GirarrostoTimer contaminutiControporta tutto vetro 2 vetri cristallo termo riflettenteClasse energetica AColori : bianco, nero e inox-nero
ELECTRIC OVEN4 functions, RotisserieTimerFull glass storm door2 crystal glass, thermo reflective Energy Class: AColours: white, black and steel-black
FOUR ELECTRIQUE 4 fonctions, RôtissoireMinuteur2 verres réfléchissants la chaleurClasse d’efficacité énergetique: ACouleurs : blanc, noir et acier-noir
HORNO ELECTRICOESTATICO4 funciones, AsadorTemporizador Contrapuerta todo cristal fácil de desmontar2 vidrios con cristal termo rifle-tenteClase di eficiencia energética AColores : blanco, negro y inox-negro
LAVASTOVIGLIE ASCOMPARSA TOTALESistema di controllo digitaleEnergy label (consumo, lavaggio ,asciugatura) A+AARumorosità 40 dB (A)Asciugatura staticaCapacità 12 coperti I.E.C.5 programmi di lavaggio4 temperature di lavaggioFunzione mezzo caricoCesto superiore regolabileSistema integrato antiallagamento
BUILT-IN DISHWASHERDigital control systemEnergy label (consumption, wa-shing, drying) A+AANoisiness 40 dB (A)Static dryingCapacity 12 place settings I.E.C.5 washing programs4 washing temperaturesHalf load functionAdjustable upper basketIntegrated non-flood system
LAVE-VASSEILLE ADISPARITION TOTALESistème de controle numériqueClasse d’efficacité (consommation d’énergie, lavage, séchage) A+AABruit 40 dB (A)Séchage statiqueCapacité 12 couverts I.E.C.5 programmes de lavage4 températures de lavageFonction démi-chargePanier supérieur réglableSistéme intégré anti-inondation
LAVAVAJILLASEMPOTRADO TOTALSistema de control digitalEnergía Etiqueta (consumo, lavaje, secado) A+AAEmisión de ruido 40 dB (A) Secado estáticoCapacidad 12 cubiertos I.E.C.5 programas de lavado4 temperaturas de lavadoFunción mitad cargoCubeta superior regulableSistema integrado anti ensancha-miento
LAVASTOVIGLIE A SCOM-PARSA TOTALESistema di controllo digitaleEnergy label (consumo, lavaggio ,asciugatura) AAARumorosità 37 dB (A)Asciugatura staticaCapacità 9 coperti I.E.C.6 programmi di lavaggio5 temperature di lavaggioFunzione mezzo caricoSistema integrato antiallagamento
BUILT-IN DISHWASHERDigital control systemEnergy label (consumption, wa-shing, drying) AAANoisiness 37 dB (A)Static dryingCapacity 9 place settings I.E.C.6 washing programs5 washing temperaturesHalf load functionIntegrated non-flood system
LAVE-VASSEILLEA DISPARITION TOTALESistème de controle numériqueClasse d’efficacité (consommation d’énergie, lavage, séchage) AAABruit 37 dB (A)Séchage statiqueCapacité 9 couverts I.E.C.6 programmes de lavage5 températures de lavageFonction démi-chargeSistéme intégré anti-inondation
LAVAVAJILLASEMPOTRADO TOTALSistema de control digitalEnergía Etiqueta (consumo, lavaje, secado) AAAEmisión de ruido 37 dB (A) Secado estáticoCapacidad 9 cubiertos I.E.C.6 programas de lavado5 temperaturas de lavadoFunción mitad cargoSistema integrado anti ensancha-miento
L’azienda si riserva di modificare marche e tipologie degli elettrodomestici a sua discrezione / The company reserves the right to change appliances’ brands and types at its discretion /La société se réserve le droit de modifier les marques et types d'appareils à sa discrétion/La empresa se reserva el derecho de modificar las marcas y tipos de aparatos a su discreción
42
ELETTRODOMESTICI APPLIANCES/APPAREILS/ELECTRODOMÉSTICOS
cm 59x54,3x82
cm 54x53,5x142
cm 44x50 cm 79x50
cm 59,6x54,1x82
FRIGORIFEROAUTOVENTILATO DAINCASSOCapacità lorda totale 102 litriCapacità frigorifero 83 litriCapacità freezer 19 litriCapacità congelamento 2kg/24hClasse di efficienza A+Consumo energia 0,51 kWh/24hPorta reversibile
BUILT-IN VENTILATED RE-FRIGERATORTotal gross capacity 102 litersFridge capacity 83 litersFreezer capacity 19 litersFreezing capacity 2kg/24hEnergy efficiency class A+Energy consumption 0,51 kWh/24hReversible door
REFRIGERATEURENCASTRABLE VENTILECapacité totale brut 102 litresCapacité du réfrigérateur 83 litres Capacité du congélateur 19 litresCapacité de congélation 2kg/24hClasse d’efficacité énergétique A+Consommation d’énergie 0,51 kWh/24hPorte réversible
REFRIGERADOR VENTILADO EMPOTRABLECapacidad total bruta 102 litrosCapacidad nevera 83 litros Capacidad congelador 19 litrosCapacidad de congelación 2kg/24hClase de eficiencia energética A+Consumo de energía 0,51 kWh/24hPuerta reversible
FRIGORIFEROCONGELATORE DA INCASSOCapacità lorda totale 226 litriCapacità frigorifero 184 litriCapacità freezer 42 litriCapacità congelamento 2kg/24hClasse di efficienza A+Consumo energia 0,73 kWh/24hPorte reversibili
BUILT-IN VENTILATEDREFRIGERATORTotal gross capacity 226 litersFridge capacity 184 litersFreezer capacity 42 litersFreezing capacity 2kg/24hEnergy efficiency class A+Energy consumption 0,73 kWh/24hReversible door
REFRIGERATEURENCASTRABLE VENTILECapacité totale brut 226 litresCapacité du réfrigérateur 184 litres Capacité du congélateur 42 litresCapacité de congélation 2kg/24hClasse d’efficacité énergétique A+Consommation d’énergie 0,73 kWh/24hPorte réversible
REFRIGERADOR VENTILADO EMPOTRABLECapacidad total bruta 226 litrosCapacidad nevera 184 litros Capacidad congelador 42 litrosCapacidad de congelación 2kg/24hClase de eficiencia energética A+Consumo de energía 0,73 kWh/24hPuerta reversible
LAVELLO CONGOCCIOLATOIO1 vascaacciaio inox AISI 304-18/10profondità vasca: mm 150
SINK WITH PLATE DRAINER1 basinstainless steel AISI 304-18/10basin depth: 150 mm
EVIER AVEC PLAQUEÉGOUTTOIR1 bassinacier inox AISI 304-18/10profondeur du bassin: 150 mm
FREGADERO CONESCURRIDORuna cuencaacero inoxidable AISI 304-18/10cuenca profundidad: 150 mm
SCOLAPIATTIStruttura in alluminio con supporti in plasticaGriglia per piattiGriglia per bicchieriVassoio raccogli gocce in plastica
PLATE RACKAluminum structure with plastic supportsGrid for dishesGrid for glassesPlastic drip tray
PORTE-PLAQUEStructure en aluminium avec supports en plastiqueGrille pour platsGrille pour verresBac en plastique
ESCURREPLATOSEstructura de aluminio con sopor-tes de plásticoRejilla para platosRejilla para gafasBandeja de goteo de plástico
RUBINETTO MISCELATOREIn ottone cromatoCromatura UNI EN 248
MIxER TAPMade of chromed brassChrome UNI EN 248
MITIGEUREn laiton chroméChrome UNI EN 248
GRIFO MEZCLADORFabricado en latón cromadoCromo UNI EN 248
LAVATRICE ELETTRONICA A SCOMPARSA TOTALEEnergy label (consumo, lavaggio ,centrifuga) AACCapacità di lavaggio 6 kg.Centrifuga regolabile fino a 1200 giri/min15 programmi di lavaggioQuick wash, programma rapido Cestello in acciaio inoxPulsante esclusione centrifugaPulsante extra risciacquoDisplay elettronico
ELECTRONIC BUILT-INWASHING MACHINEEnergy label (consumption, wa-shing, spinning) AACWash load 6 kg.Adjustable spin up to 1200 rev / min15 wash programsQuick washStainless steel basketSpin buttonExtra rinse buttonelectronic display
MACHINE A LAVER ELEC-TRONIQUE ADISPARITION TOTALEClasse d’efficacité (consommation, lavage, essorage) AACCapacité 6 kg.Rotation réglable jusqu’à 1200 tr / min15 programmes de lavageQuick wash, programme rapidePanier en acier inoxydableBouton pour essoreuseBouton extra rinçageAffichage électronique
LAVADORA ELECTRONICA EMPOTRADO TOTAL Etiqueta de eficiencia energética (consumo, lavado, centrifugado) AACLave carga 6 kg.Rotación ajustable hasta 1200 rev / min15 programas de lavadoQuick wash, programa rápidoCanasta de acero inoxidableBotón para centrífugaBotón aclarado extra Pantalla electrónica
L’azienda si riserva di modificare marche e tipologie degli elettrodomestici a sua discrezione / The company reserves the right to change appliances’ brands and types at its discretion /La société se réserve le droit de modifier les marques et types d'appareils à sa discrétion/La empresa se reserva el derecho de modificar las marcas y tipos de aparatos a su discreción
43
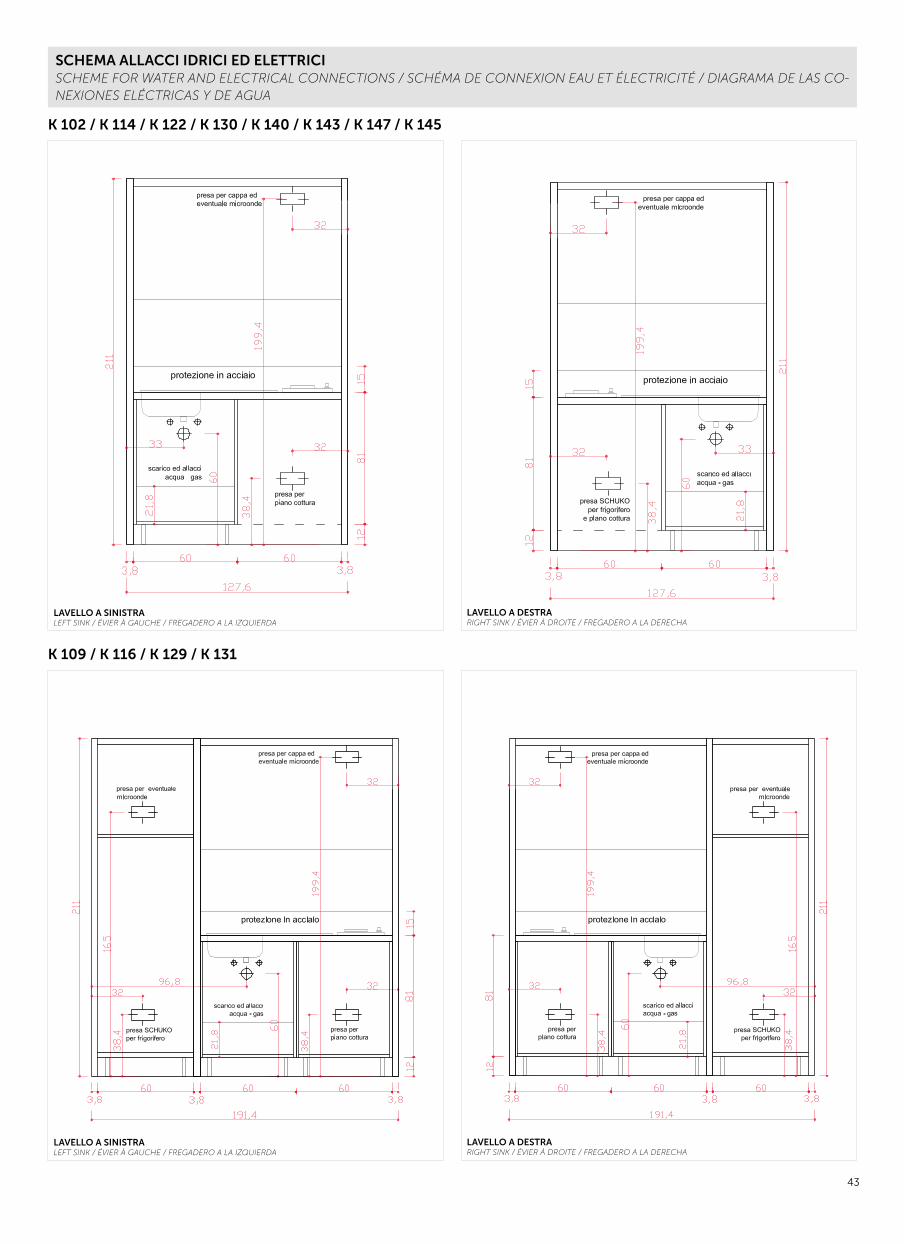
SCHEMA ALLACCI IDRICI ED ELETTRICISCHEME FOR WATER AND ELECTRICAL CONNECTIONS / SCHÉMA DE CONNEXION EAU ET ÉLECTRICITÉ / DIAGRAMA DE LAS CO-NEXIONES ELÉCTRICAS Y DE AGUA
K 102 / K 114 / K 122 / K 130 / K 140 / K 143 / K 147 / K 145
K 109 / K 116 / K 129 / K 131
LAVELLO A SINISTRALEFT SINK / ÉVIER À GAUCHE / FREGADERO A LA IZQUIERDA
LAVELLO A SINISTRALEFT SINK / ÉVIER À GAUCHE / FREGADERO A LA IZQUIERDA
LAVELLO A DESTRARIGHT SINK / ÉVIER À DROITE / FREGADERO A LA DERECHA
LAVELLO A DESTRARIGHT SINK / ÉVIER À DROITE / FREGADERO A LA DERECHA
44
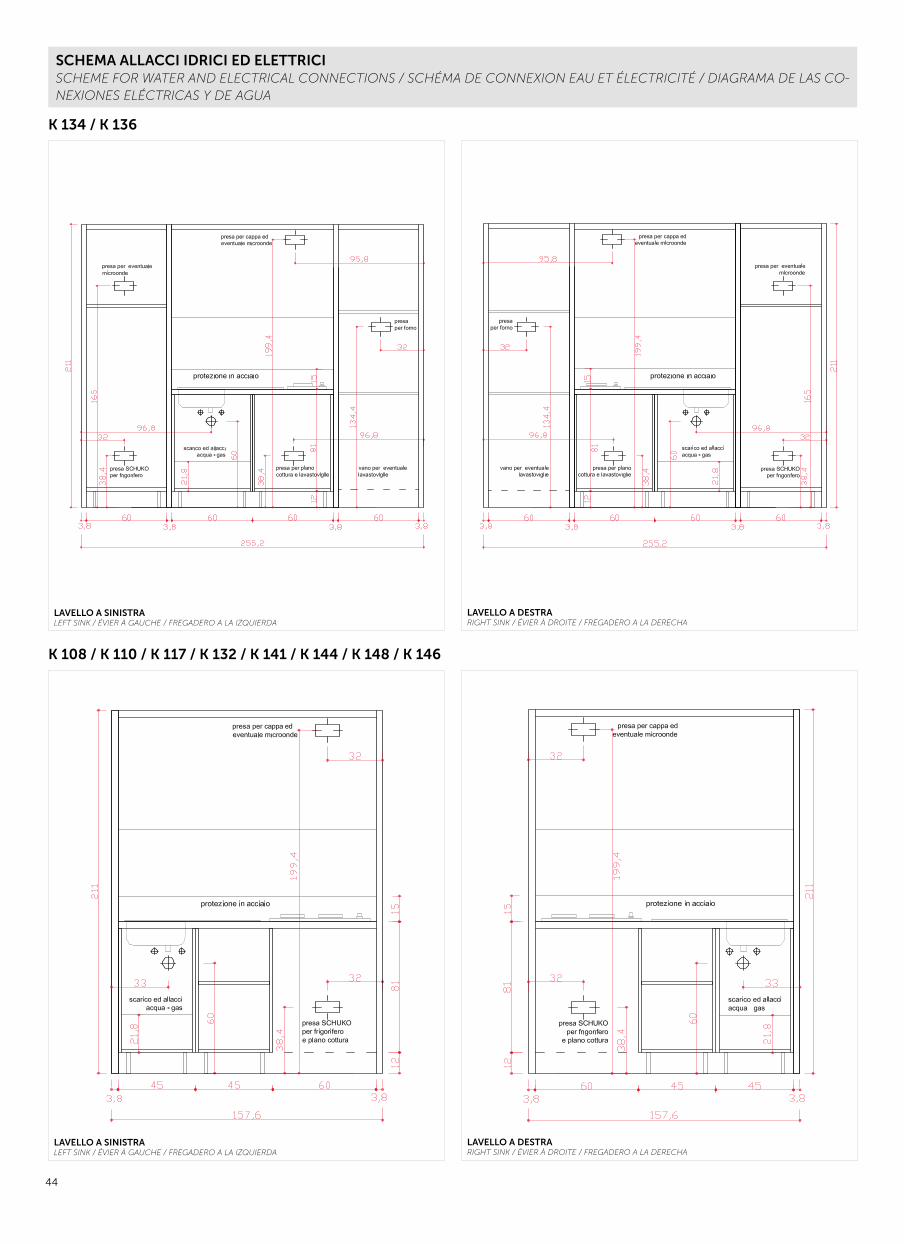
SCHEMA ALLACCI IDRICI ED ELETTRICISCHEME FOR WATER AND ELECTRICAL CONNECTIONS / SCHÉMA DE CONNEXION EAU ET ÉLECTRICITÉ / DIAGRAMA DE LAS CO-NEXIONES ELÉCTRICAS Y DE AGUA
K 134 / K 136
K 108 / K 110 / K 117 / K 132 / K 141 / K 144 / K 148 / K 146
LAVELLO A SINISTRALEFT SINK / ÉVIER À GAUCHE / FREGADERO A LA IZQUIERDA
LAVELLO A SINISTRALEFT SINK / ÉVIER À GAUCHE / FREGADERO A LA IZQUIERDA
LAVELLO A DESTRARIGHT SINK / ÉVIER À DROITE / FREGADERO A LA DERECHA
LAVELLO A DESTRARIGHT SINK / ÉVIER À DROITE / FREGADERO A LA DERECHA
45
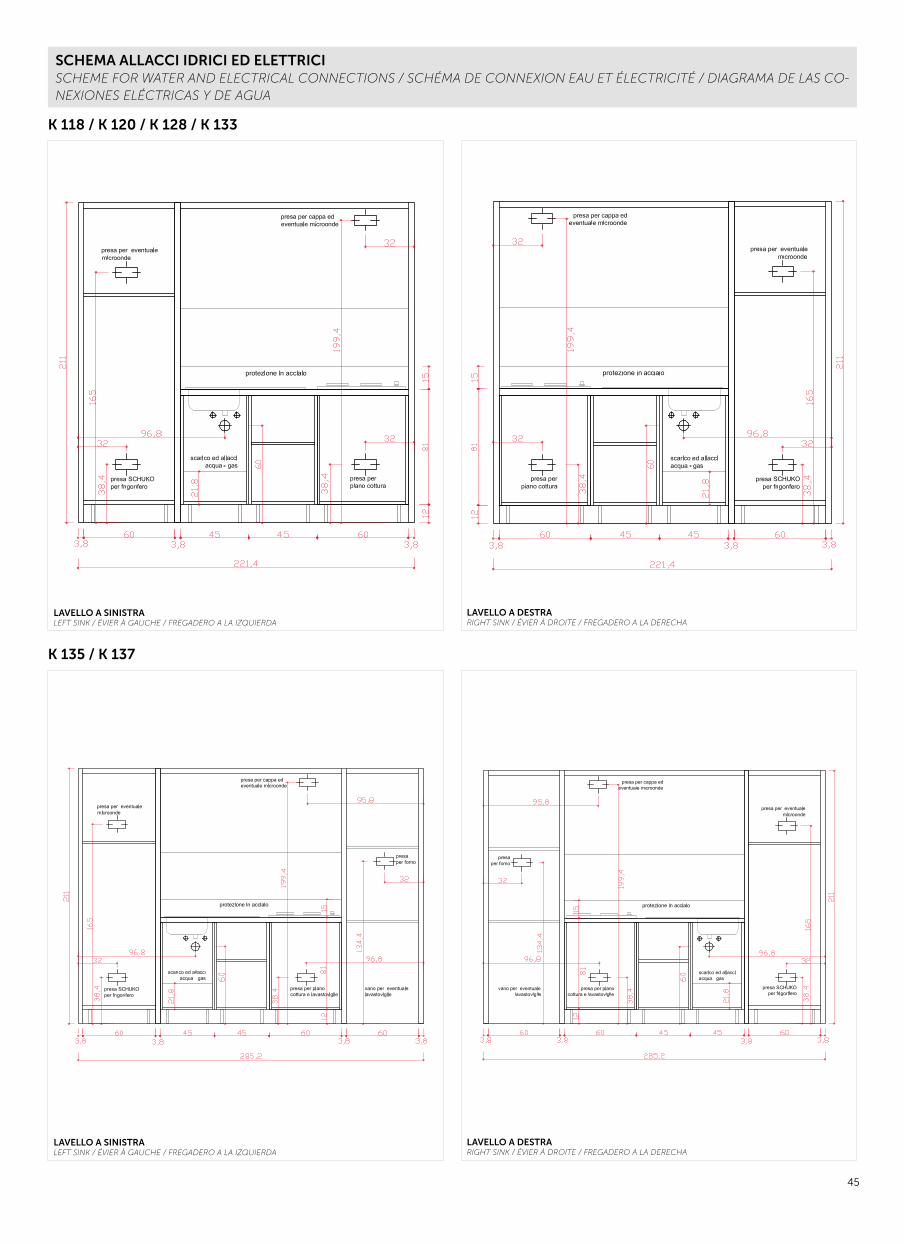
SCHEMA ALLACCI IDRICI ED ELETTRICISCHEME FOR WATER AND ELECTRICAL CONNECTIONS / SCHÉMA DE CONNEXION EAU ET ÉLECTRICITÉ / DIAGRAMA DE LAS CO-NEXIONES ELÉCTRICAS Y DE AGUA
K 118 / K 120 / K 128 / K 133
K 135 / K 137
LAVELLO A SINISTRALEFT SINK / ÉVIER À GAUCHE / FREGADERO A LA IZQUIERDA
LAVELLO A SINISTRALEFT SINK / ÉVIER À GAUCHE / FREGADERO A LA IZQUIERDA
LAVELLO A DESTRARIGHT SINK / ÉVIER À DROITE / FREGADERO A LA DERECHA
LAVELLO A DESTRARIGHT SINK / ÉVIER À DROITE / FREGADERO A LA DERECHA
46
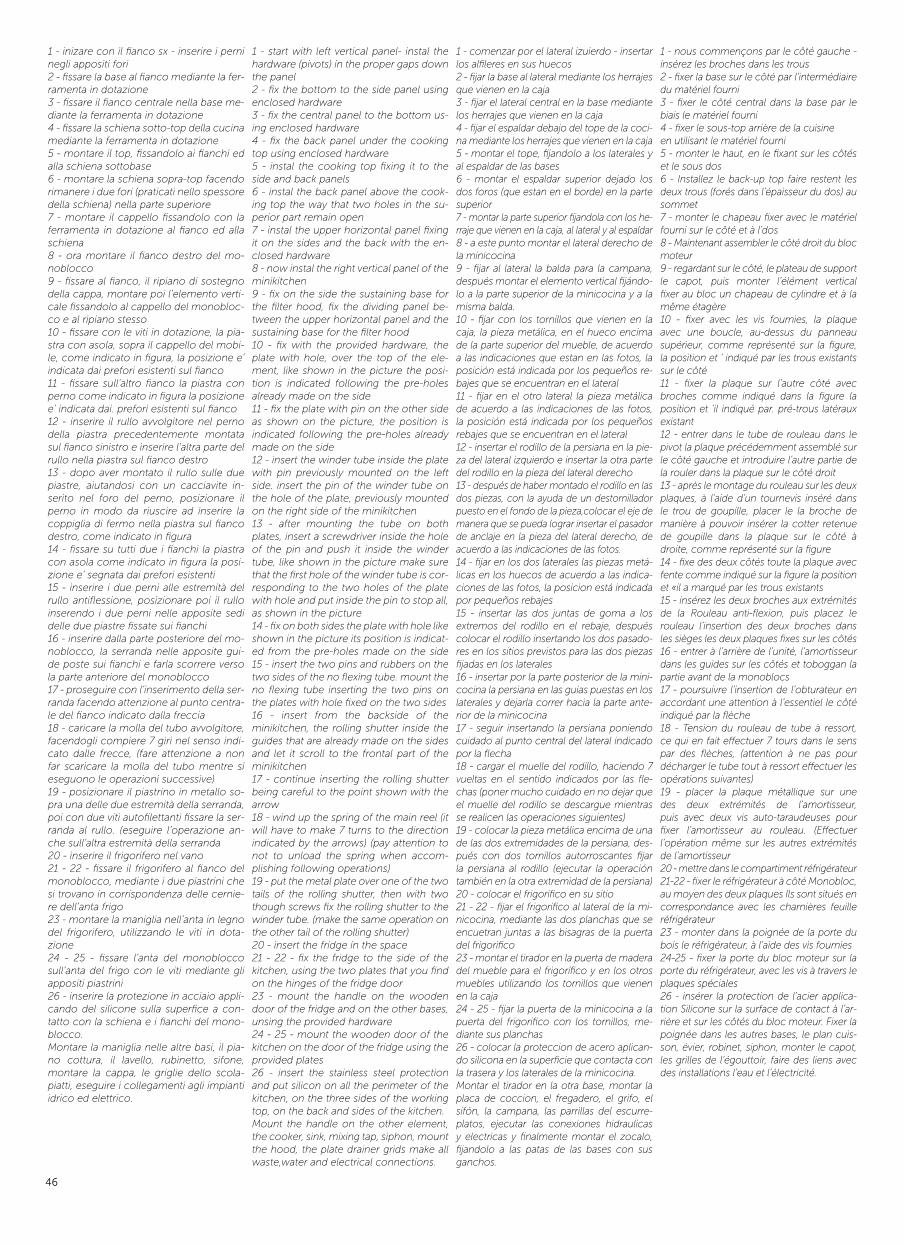
1 - inizare con il fianco sx - inserire i perni negli appositi fori2 - fissare la base al fianco mediante la fer-ramenta in dotazione 3 - fissare il fianco centrale nella base me-diante la ferramenta in dotazione4 - fissare la schiena sotto-top della cucina mediante la ferramenta in dotazione5 - montare il top, fissandolo ai fianchi ed alla schiena sottobase6 - montare la schiena sopra-top facendo rimanere i due fori (praticati nello spessore della schiena) nella parte superiore7 - montare il cappello fissandolo con la ferramenta in dotazione al fianco ed alla schiena8 - ora montare il fianco destro del mo-noblocco9 - fissare al fianco, il ripiano di sostegno della cappa, montare poi l’elemento verti-cale fissandolo al cappello del monobloc-co e al ripiano stesso10 - fissare con le viti in dotazione, la pia-stra con asola, sopra il cappello del mobi-le, come indicato in figura, la posizione e’ indicata dai prefori esistenti sul fianco11 - fissare sull’altro fianco la piastra con perno come indicato in figura la posizione e’ indicata dai. prefori esistenti sul fianco12 - inserire il rullo avvolgitore nel perno della piastra precedentemente montata sul fianco sinistro e inserire l’altra parte del rullo nella piastra sul fianco destro13 - dopo aver montato il rullo sulle due piastre, aiutandosi con un cacciavite in-serito nel foro del perno, posizionare il perno in modo da riuscire ad inserire la coppiglia di fermo nella piastra sul fianco destro, come indicato in figura14 - fissare su tutti due i fianchi la piastra con asola come indicato in figura la posi-zione e’ segnata dai prefori esistenti 15 - inserire i due perni alle estremità del rullo antiflessione, posizionare poi il rullo inserendo i due perni nelle apposite sedi delle due piastre fissate sui fianchi16 - inserire dalla parte posteriore del mo-noblocco, la serranda nelle apposite gui-de poste sui fianchi e farla scorrere verso la parte anteriore del monoblocco17 - proseguire con l’inserimento della ser-randa facendo attenzione al punto centra-le del fianco indicato dalla freccia18 - caricare la molla del tubo avvolgitore, facendogli compiere 7 giri nel senso indi-cato dalle frecce, (fare attenzione a non far scaricare la molla del tubo mentre si eseguono le operazioni successive)19 - posizionare il piastrino in metallo so-pra una delle due estremità della serranda, poi con due viti autofilettanti fissare la ser-randa al rullo. (eseguire l’operazione an-che sull’altra estremità della serranda20 - inserire il frigorifero nel vano21 - 22 - fissare il frigorifero al fianco del monoblocco, mediante i due piastrini che si trovano in corrispondenza delle cernie-re dell’anta frigo23 - montare la maniglia nell’anta in legno del frigorifero, utilizzando le viti in dota-zione24 - 25 - fissare l’anta del monoblocco sull’anta del frigo con le viti mediante gli appositi piastrini26 - inserire la protezione in acciaio appli-cando del silicone sulla superfice a con-tatto con la schiena e i fianchi del mono-blocco.Montare la maniglia nelle altre basi, il pia-no cottura, il lavello, rubinetto, sifone, montare la cappa, le griglie dello scola-piatti, eseguire i collegamenti agli impianti idrico ed elettrico.
1 - start with left vertical panel- instal the hardware (pivots) in the proper gaps down the panel 2 - fix the bottom to the side panel using enclosed hardware 3 - fix the central panel to the bottom us-ing enclosed hardware4 - fix the back panel under the cooking top using enclosed hardware5 - instal the cooking top fixing it to the side and back panels 6 - instal the back panel above the cook-ing top the way that two holes in the su-perior part remain open 7 - instal the upper horizontal panel fixing it on the sides and the back with the en-closed hardware 8 - now instal the right vertical panel of the minikitchen9 - fix on the side the sustaining base for the filter hood, fix the dividing panel be-tween the upper horizontal panel and the sustaining base for the filter hood 10 - fix with the provided hardware, the plate with hole, over the top of the ele-ment, like shown in the picture the posi-tion is indicated following the pre-holes already made on the side11 - fix the plate with pin on the other side as shown on the picture, the position is indicated following the pre-holes already made on the side 12 - insert the winder tube inside the plate with pin previously mounted on the left side. insert the pin of the winder tube on the hole of the plate, previously mounted on the right side of the minikitchen13 - after mounting the tube on both plates, insert a screwdriver inside the hole of the pin and push it inside the winder tube, like shown in the picture make sure that the first hole of the winder tube is cor-responding to the two holes of the plate with hole and put inside the pin to stop all, as shown in the picture 14 - fix on both sides the plate with hole like shown in the picture its position is indicat-ed from the pre-holes made on the side 15 - insert the two pins and rubbers on the two sides of the no flexing tube. mount the no flexing tube inserting the two pins on the plates with hole fixed on the two sides16 - insert from the backside of the minikitchen, the rolling shutter inside the guides that are already made on the sides and let it scroll to the frontal part of the minikitchen 17 - continue inserting the rolling shutter being careful to the point shown with the arrow 18 - wind up the spring of the main reel (it will have to make 7 turns to the direction indicated by the arrows) (pay attention to not to unload the spring when accom-plishing following operations)19 - put the metal plate over one of the two tails of the rolling shutter, then with two though screws fix the rolling shutter to the winder tube. (make the same operation on the other tail of the rolling shutter)20 - insert the fridge in the space21 - 22 - fix the fridge to the side of the kitchen, using the two plates that you find on the hinges of the fridge door23 - mount the handle on the wooden door of the fridge and on the other bases, unsing the provided hardware24 - 25 - mount the wooden door of the kitchen on the door of the fridge using the provided plates 26 - insert the stainless steel protection and put silicon on all the perimeter of the kitchen, on the three sides of the working top, on the back and sides of the kitchen. Mount the handle on the other element, the cooker, sink, mixing tap, siphon, mount the hood, the plate drainer grids make all waste,water and electrical connections.
1 - comenzar por el lateral izuierdo - insertar los alfileres en sus huecos2 - fijar la base al lateral mediante los herrajes que vienen en la caja 3 - fijar el lateral central en la base mediante los herrajes que vienen en la caja 4 - fijar el espaldar debajo del tope de la coci-na mediante los herrajes que vienen en la caja 5 - montar el tope, fijandolo a los laterales y al espaldar de las bases6 - montar el espaldar superior dejado los dos foros (que estan en el borde) en la parte superior7 - montar la parte superior fijandola con los he-rraje que vienen en la caja, al lateral y al espaldar8 - a este punto montar el lateral derecho de la minicocina9 - fijar al lateral la balda para la campana, después montar el elemento vertical fijándo-lo a la parte superior de la minicocina y a la misma balda.10 - fijar con los tornillos que vienen en la caja, la pieza metálica, en el hueco encima de la parte superior del mueble, de acuerdo a las indicaciones que estan en las fotos, la posición está indicada por los pequeños re-bajes que se encuentran en el lateral11 - fijar en el otro lateral la pieza metálica de acuerdo a las indicaciones de las fotos, la posición está indicada por los pequeños rebajes que se encuentran en el lateral12 - insertar el rodillo de la persiana en la pie-za del lateral izquierdo e insertar la otra parte del rodillo en la pieza del lateral derecho13 - después de haber montado el rodillo en las dos piezas, con la ayuda de un destornillador puesto en el fondo de la pieza,colocar el eje de manera que se pueda lograr insertar el pasador de anclaje en la pieza del lateral derecho, de acuerdo a las indicaciones de las fotos.14 - fijar en los dos laterales las piezas metá-licas en los huecos de acuerdo a las indica-ciones de las fotos, la posicion está indicada por pequeños rebajes 15 - insertar las dos juntas de goma a los extremos del rodillo en el rebaje, después colocar el rodillo insertando los dos pasado-res en los sitios previstos para las dos piezas fijadas en los laterales16 - insertar por la parte posterior de la mini-cocina la persiana en las guias puestas en los laterales y dejarla correr hacia la parte ante-rior de la minicocina17 - seguir insertando la persiana poniendo cuidado al punto central del lateral indicado por la flecha18 - cargar el muelle del rodillo, haciendo 7 vueltas en el sentido indicados por las fle-chas (poner mucho cuidado en no dejar que el muelle del rodillo se descargue mientras se realicen las operaciones siguientes)19 - colocar la pieza metálica encima de una de las dos extremidades de la persiana, des-pués con dos tornillos autorroscantes fijar la persiana al rodillo (ejecutar la operación también en la otra extremidad de la persiana)20 - colocar el frigorifico en su sitio21 - 22 - fijar el frigorifico al lateral de la mi-nicocina, mediante las dos planchas que se encuetran juntas a las bisagras de la puerta del frigorifico23 - montar el tirador en la puerta de madera del mueble para el frigorífico y en los otros muebles utilizando los tornillos que vienen en la caja24 - 25 - fijar la puerta de la minicocina a la puerta del frigorifico con los tornillos, me-diante sus planchas26 - colocar la proteccion de acero aplican-do silicona en la superficie que contacta con la trasera y los laterales de la minicocina.Montar el tirador en la otra base, montar la placa de coccion, el fregadero, el grifo, el sifón, la campana, las parrillas del escurre-platos, ejecutar las conexiones hidraulicas y electricas y finalmente montar el zocalo, fijandolo a las patas de las bases con sus ganchos.
1 - nous commençons par le côté gauche - insérez les broches dans les trous2 - fixer la base sur le côté par l’intermédiaire du matériel fourni3 - fixer le côté central dans la base par le biais le matériel fourni4 - fixer le sous-top arrière de la cuisineen utilisant le matériel fourni5 - monter le haut, en le fixant sur les côtés et le sous dos6 - Installez le back-up top faire restent les deux trous (forés dans l’épaisseur du dos) au sommet7 - monter le chapeau fixer avec le matériel fourni sur le côté et à l’dos8 - Maintenant assembler le côté droit du bloc moteur9 - regardant sur le côté, le plateau de supportle capot, puis monter l’élément vertical fixer au bloc un chapeau de cylindre et à la même étagère10 - fixer avec les vis fournies, la plaque avec une boucle, au-dessus du panneau supérieur, comme représenté sur la figure, la position et ‘ indiqué par les trous existants sur le côté11 - fixer la plaque sur l’autre côté avec broches comme indiqué dans la figure la position et ‘il indiqué par. pré-trous latéraux existant12 - entrer dans le tube de rouleau dans le pivot la plaque précédemment assemblé sur le côté gauche et introduire l’autre partie de la rouler dans la plaque sur le côté droit13 - après le montage du rouleau sur les deux plaques, à l’aide d’un tournevis inséré dans le trou de goupille, placer le la broche de manière à pouvoir insérer la cotter retenue de goupille dans la plaque sur le côté à droite, comme représenté sur la figure14 - fixe des deux côtés toute la plaque avec fente comme indiqué sur la figure la positionet «il a marqué par les trous existants15 - insérez les deux broches aux extrémités de la Rouleau anti-flexion, puis placez le rouleau l’insertion des deux broches dans les sièges les deux plaques fixes sur les côtés16 - entrer à l’arrière de l’unité, l’amortisseur dans les guides sur les côtés et toboggan la partie avant de la monoblocs17 - poursuivre l’insertion de l’obturateur en accordant une attention à l’essentiel le côté indiqué par la flèche18 - Tension du rouleau de tube à ressort, ce qui en fait effectuer 7 tours dans le sens par des flèches, (attention à ne pas pour décharger le tube tout à ressort effectuer les opérations suivantes)19 - placer la plaque métallique sur une des deux extrémités de l’amortisseur, puis avec deux vis auto-taraudeuses pour fixer l’amortisseur au rouleau. (Effectuer l’opération même sur les autres extrémités de l’amortisseur20 - mettre dans le compartiment réfrigérateur21-22 - fixer le réfrigérateur à côté Monobloc, au moyen des deux plaques Ils sont situés en correspondance avec les charnières feuille réfrigérateur23 - monter dans la poignée de la porte du bois le réfrigérateur, à l’aide des vis fournies24-25 - fixer la porte du bloc moteur sur la porte du réfrigérateur, avec les vis à travers leplaques spéciales26 - insérer la protection de l’acier applica-tion Silicone sur la surface de contact à l’ar-rière et sur les côtés du bloc moteur. Fixer la poignée dans les autres bases, le plan cuis-son, évier, robinet, siphon, monter le capot, les grilles de l’égouttoir, faire des liens avec des installations l’eau et l’électricité.
47
ISTRUZIONI MONTAGGIO MODELLO AMARCORD CON SERRANDINAASSEMBLY INSTRUCTIONS FOR MODEL ZEUS WITH ROLLING SHUTTER / INSTRUCTIONS DE MONTAGE POUR MODÈLE ZEUS AVEC ROULEAU DE FERME-TURE / ISTRUCCIONES DE MONTAJE PARA MODELO ZEUS CON OBTURADOR / COMBINAZIONI FINITURE/FINISHES COMBINATIONS/COMBINAISONS DE FINITIONS/COMBINACIONES DE COLORES/ COMBINACIONES DE COLORES
cm 125
1
11
21
10
20
2
12
22
3
13
23
4
14
5
15
6
16
7
17
8
18
9
19
24 25 26

48
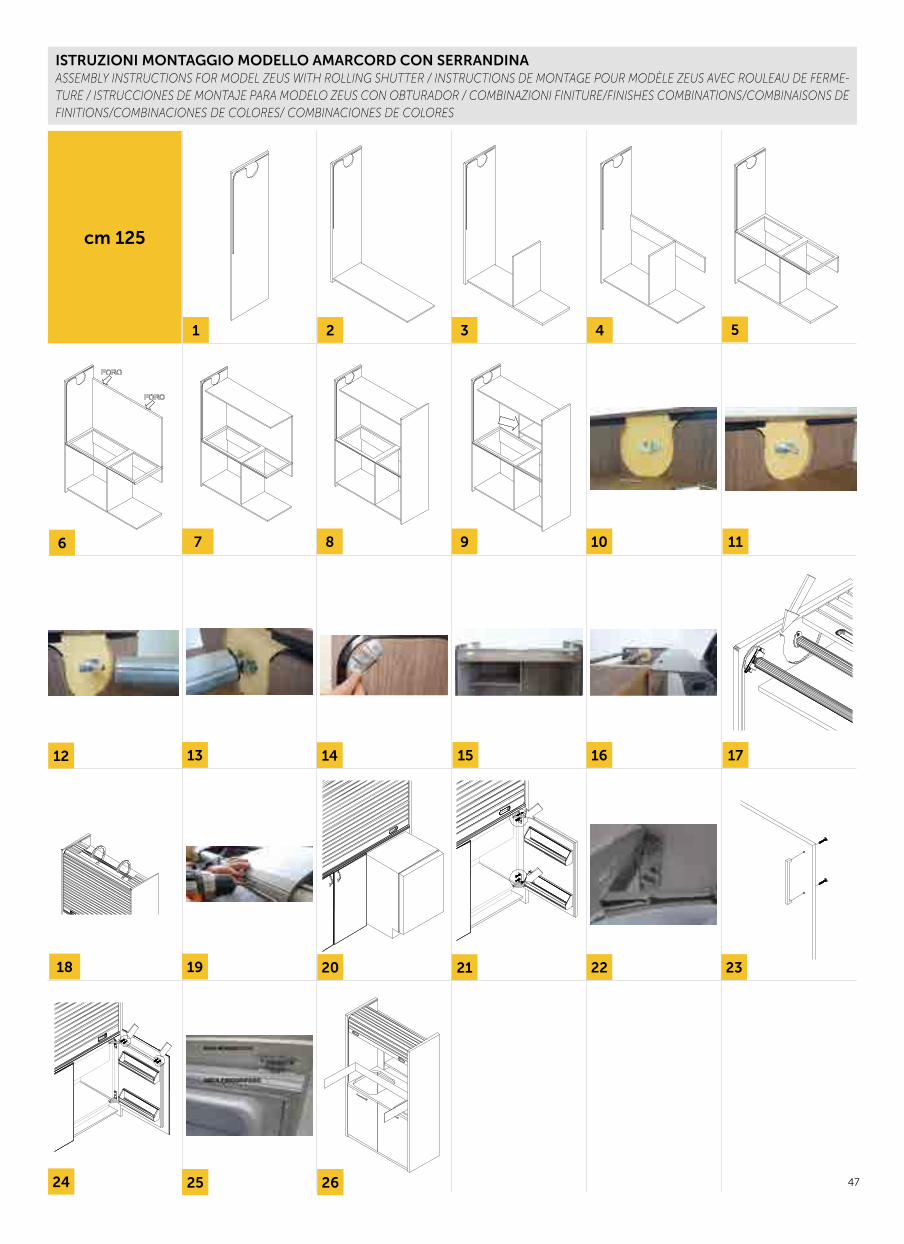
1 - montare i piedini regolabili sotto la base fis-sandoli con le viti in dotazione2 - fissare i due fianchi alla base utilizzando le apposite giunzioni3 - utilizzando la ferramenta in dotazione, mon-tare le due fascette a e b (nella base sottolavello va montata solo la fascetta a)4 - fisssare le basette sul fianco, le cerniere sull’anta, inserire le cerniere nelle basette e ser-rare le viti per montare l’anta sul mobile5 - appoggiare il top sopra la base e fissarlo al fianco sinistro con le giunzioni in dotazione6 - montare la schiena facendo rimanere i 2 fori (praticati nello spessore della schiena) nella parte superiore7 - montare il cappello fissandolo al fianco ed alla schiena, con la ferramenta in dotazione. - montare. poi la fascia di collegamento dei fian-chi fissandola in basso sul retro del fianco8 - montare il fianco destro fissandolo al cap-pello e al top con la ferramenta in dotazione. a questo punto si puo’ inserire la seconda base sotto al top (se prevista)9 - fissare al fianco, il ripiano di sostegno della cappa, montare poi l’elemento verticale fissan-dolo al cappello del monoblocco e al ripiano stesso10 - fissare con le viti in dotazione, la piastra con asola, sopra il cappello del mobile, come indicato in figura, la posizione e’ indicata dai prefori esistenti sul fianco11 - fissare sull’altro fianco la piastra con perno come indicato in figura la posizione e’ indicata dai. prefori esistenti sul fianco12 - inserire il rullo avvolgitore nel perno della piastra precedentemente montata sul fianco si-nistro e inserire l’altra parte del rullo nella piastra sul fianco destro13 - dopo aver montato il rullo sulle due piastre, aiutandosi con un cacciavite inserito nel foro del perno, posizionare il perno in modo da riu-scire ad inserire la coppiglia di fermo nella pia-stra sul fianco destro, come indicato in figura14 - fissare su tutti due i fianchi la piastra con asola come indicato in figura la posizione e’ se-gnata dai prefori esistenti 15 - inserire i due perni alle estremità del rullo antiflessione, posizionare poi il rullo inserendo i due perni nelle apposite sedi delle due piastre fissate sui fianchi16 - inserire dalla parte posteriore del mono-blocco, la serranda nelle apposite guide poste sui fianchi e farla scorrere verso la parte anterio-re del monoblocco17 - proseguire con l’inserimento della serranda facendo attenzione al punto centrale del fianco indicato dalla freccia18 - caricare la molla del tubo avvolgitore, fa-cendogli compiere 7 giri nel senso indicato dal-le frecce, (fare attenzione a non far scaricare la molla del tubo mentre si eseguono le opera-zioni successive)19 - posizionare il piastrino in metallo sopra una delle due estremità della serranda, poi con due viti autofilettanti fissare la serranda al rullo. (eseguire l’operazione anche sull’altra estremità della serranda20 - togliere i tappi in plastica dall’anta del fri-gorifero sia nella parte superiore che nella parte inferiore ed inserire nei fori le apposite viti con doppio filetto, facendo sporgere la parte filet-tata più corta21 - montare la maniglia nell’anta in legno del frigorifero, utilizzando le viti in dotazione22 - fissare nella parte superiore dell’anta legno del vano frigo, i due piastrini come indicato in figura23 - 24 - montare l’anta in legno sull’anta del fri-gorifero agganciando i due piastrini ad elle sulle due viti inserite ai punti precedenti25 - 25 - bis posizionata l’anta in legno, montare i due piastrini nella parte inferiore per il fissag-gio sull’anta del frigorifero e serrare il tutto con i dadi. inserire poi il frigorifero nelvano sotto la base e fissarlo ai fianchi con dei piastrini metal-lici ad angolo 26 - inserire la protezione in acciaio applican-do del silicone sulla superfice a contatto con la schiena e i fianchi del monoblocco.Montare la maniglia nell’altra base, il piano cot-tura, il lavello, rubinetto, sifone, montare la cap-pa, le griglie dello scolapiatti, eseguire i collega-menti agli impianti idrico ed elettrico,montare infine lo zoccolo, fissandolo con gli appositi ganci ai piedini sotto le basi.
1 - mount the adjustable feet under the base fixing them with the provided screws2 - fix the left and right side to the base using the provided hardware 3 - using the provided hardware, fix the two bands “a” and “b” to the sides. (on the undersink base you don’t have to mount the little band “b” on the back, but only the “a” band)4 - mount the bases on the side of the element, and the hinges on the door, fix the door to the side inserting the hinges on the bases 5 - put the working top on the mounted base and fix it to the left side with the provide hardware6 - mount the back and leave the two holes on the top of the back (they are visible on back ) on the upper part 7 - mount the top fixing it to the side and to the back, using the provided hardware- mount then the connection band for the sides fixing it at the bottom on the back of the side 8 - mount the right side fixing it to the upper top and to the working top using the provided hardware at this point you can insert the 2nd base under the working top (if provided)9 - fix to the side the shelf for the hood, mount the vertical element fixing it to the top of the kitchen and to the side of the hood 10 - fix with the provided hardware, the plate with hole, over the top of the element, like shown in the picture the position is indicated following the pre-holes already made on the side11 - fix the plate with pin on the other side as shown on the picture, the position is indicated following the pre-holes already made on the side 12 - insert the winder tube inside the plate with pin previously mounted on the left side. insert the pin of the winder tube on the hole of the plate, previously mounted on the right side of the minikitchen13 - after mounting the tube on both plates, insert a screwdriver inside the hole of the pin and push it inside the winder tube, like shown in the picture make sure that the first hole of the winder tube is corresponding to the two holes of the plate with hole and put inside the pin to stop all, as shown in the picture 14 - fix on both sides the plate with hole like shown in the picture its position is indicat-ed from the pre-holes made on the side 15 - insert the two pins and rubbers on the two sides of the no flexing tube. mount the no flex-ing tube inserting the two pins on the plates with hole fixed on the two sides16 - insert from the backside of the minikitchen, the rolling shutter inside the guides that are al-ready made on the sides and let it scroll to the frontal part of the minikitchen 17 - continue inserting the rolling shutter being careful to the point shown with the arrow 18 - wind up the spring of the main reel (it will have to make 7 turns to the direction indicated by the arrows) (pay attention to not to unload the spring when accomplishing following op-erations)19 - put the metal plate over one of the two tails of the rolling shutter, then with two though screws fix the rolling shutter to the winder tube. (make the same operation on the other tail of the rolling shutter)20 - remove the plastic caps from the fridge door on the top and bottom part and insert in-side the holes the provided screws with double thread, keep the shorter thread part outside 21 - mount the handle on the wooden door us-ing the provided screws22 - fix on the superior part of the wooden door of the fridge element the two little plates like shown on the picture 23 - 24 - mount the wooden door of the kitch-en on the door of the fridge, hooking the two plates “l” shape on the two screws already on the point before 25 - 25 - bis put the wooden door, mount the two plates on the bottom part, in order to fix the door of the fridge and tight with bolts. insert the fridge inside its space and fix it to the sides using the angular metal plates26 - insert the stainless steel protection and put silicon on all the perimeter of the kitchen, on the three sides of the working top, on the back and sides of the kitchen. Mount the handle on the other element, the cooker, sink, mixing tap, siphon, mount the hood, the plate drainer grids make all waste,wa-ter and electrical connections. mount then the plinth, fixing it with the provided hooks to the feet of the bases.
1 - montar las patas ajustables debajo de la base, fijándolas con los tornillos que vienen en la caja.2 - fijar los dos laterales a la base utilizando los herrajes de la foto3 - utilizando los herrajes que vienen en la caja, montar las dos franjas a y b (en la base del fre-gadero, hay que montar sólo la franja a)4 - fijar las bases de las bisagras en el lateral del mueble, las bisagras en la puerta, insertar las bi-sagras en las bases de las bisagras y apretar los tornillos para montar la puerta al mueble.5 - apoyar el tope encima de la base y fijarlo al late-ral izquierdo con los herrajes que vienen en la caja6 - montar la trasera dejando los 2 huecos (que estan en el borde de la trasera) en la parte superior7 - montar la parte superior fijándola al laterl y a la trasera, con los herrajes que vienen en la caja, montar el travesaño inferior que une los laterales, fijándolo debajo detrás del lateral8 - montar el lateral derecho fijándolo a la parte de arriba y a la encimera con los herrajes que vienen en la caja,después se puede colocar la segunda base debajo de la encimera (si está prevista)9 - fijar al lateral la balda para la campana, después montar el elemento vertical fijándolo a la parte su-perior de la minicocina y a la misma balda.10 - fijar con los tornillos que vienen en la caja, la pieza metálica, en el hueco encima de la parte superior del mueble, de acuerdo a las in-dicaciones que estan en las fotos, la posición está indicada por los pequeños rebajes que se encuentran en el lateral11 - fijar en el otro lateral la pieza metálica de acuerdo a las indicaciones de las fotos, la po-sición está indicada por los pequeños rebajes que se encuentran en el lateral12 - insertar el rodillo de la persiana en la pieza del lateral izquierdo e insertar la otra parte del rodillo en la pieza del lateral derecho13 - después de haber montado el rodillo en las dos piezas, con la ayuda de un destornillador puesto en el fondo de la pieza,colocar el eje de manera que se pueda lograr insertar el pasador de anclaje en la pieza del lateral derecho, de acuerdo a las indicaciones de las fotos.14 - fijar en los dos laterales las piezas metálicas en los huecos de acuerdo a las indicaciones de las fo-tos, la posicion está indicada por pequeños rebajes15 - insertar las dos juntas de goma a los extremos del rodillo en el rebaje, después colocar el rodillo insertando los dos pasadores en los sitios previs-tos para las dos piezas fijadas en los laterales16 - insertar por la parte posterior de la minicocina la persiana en las guias puestas en los laterales y de-jarla correr hacia la parte anterior de la minicocina17 - seguir insertando la persiana poniendo cuida-do al punto central del lateral indicado por la flecha18 - cargar el muelle del rodillo, haciendo 7 vueltas en el sentido indicados por las fle-chas (poner mucho cuidado en no dejar que el muelle del rodillo se descargue mientras se realicen las operaciones siguientes)19 - colocar la pieza metálica encima de una de las dos extremidades de la persiana, después con dos tornillos autorroscantes fijar la persiana al rodillo (ejecutar la operación también en la otra extremidad de la persiana)20 - quitar los tapones de plástico de la puerta del frigorífico,tanto en la parte superior como en la parte inferior e insertar en los huecos sus tornillos con doble rosca, dejando sobresalir la parte que tenga la rosca más corta21 - montar el tirador en la puerta de madera del mueble para el frigorífico y en los otros muebles utilizando los tornillos que vienen en la caja22 - fijar en la parte superior de la puerta del mueble del frigorífico, las dos piezas como indica la foto23 - 24 - montar la puerta del mueble sobre la puerta del frigorifico enganchando las dos piezas en forma de “l” sobre los tornillos antes insertados25 - 25 - bis una vez posicionada la puerta del mueble del frigorifico, montar las dos piezas de la parte inferior para poder fijar la puerta del frigorifico a la puerta del mueble y apretar todo con las tuercas. después, instalar el frigorifico en su lugar en la base y fijarlo a los laterales con las piezas metalicas en angulo 26 - colocar la proteccion de acero aplicando silicona en la superficie que contacta con la tra-sera y los laterales de la minicocina.Montar el tirador en la otra base, montar la placa de coccion, el fregadero, el grifo, el si-fón, la campana, las parrillas del escurreplatos, ejecutar las conexiones hidraulicas y electricas y finalmente montar el zocalo, fijandolo a las patas de las bases con sus ganchos.
1 - Monter les pieds réglables sous la base en les fixant avec les vis fournies2 - Fixer les deux côtés à la base en utilisant le joints spéciaux3 - en utilisant le matériel fourni, monter les deux pinces a et b (dans la base du dissipateurjuste il va monté dans la pince)4 - fisssare moustaches sur le côté, les char-nières sur la porte, placez les charnières dans les favoris et serrer vis pour monter la porte de l’armoire5 - placer le dessus sur la base et le fixer à côté gauche avec des joints fournis6 - Monter le dos rendant le séjour 2 des trous (percés dans l’épaisseur du dos) dans la haut7 - Monter le chapeau sur le côté et regarderen arrière, avec le matériel fourni. - monture. puis les côtés de la bande de liaison fixer au fond sur le dos de la gauche8 - monter le côté droit en regardant le cha-peau et en haut avec le matériel fourni. à Maintenant, vous pouvez ‘insérer la deuxième base au-dessous de la partie supérieure (le cas échéant)9 - regardant sur le côté, le support du plateau hotte, puis monter l’élément vertical fixant le bloc moteur et le plateau de chapeau même10 - fixer avec les vis fournies, la plaque avec une boucle, au-dessus du panneau supérieur, comme représenté sur la figure, la position et ‘elle indiquée par pré-trous latéraux existant11 - fixé sur l’autre plaque latérale avec la broche comme il est indiqué dans la figure et la position «indiquée par. pré-trous latéraux existant12 - Insérer le rouleau de guidage dans la tige Plaque préalablement monté sur le côté gauche et insérer l’autre côté du rouleau dans la plaque sur le côté droit13 - après le montage du rouleau sur les deux plaques, à l’aide d’un tournevis inséré dans le trou de la broche, pour positionner la broche pour réussir pour insérer le dispositif de retenue de la goupille dans la plaque sur le côté droit, comme représenté sur la figure14 - fixer sur toute la plaque avec les deux côtésfente, comme le montre la figure la position et ‘marqué de pré-trous existants15 - insérez les deux broches aux extrémités du rouleau anti-flexion, puis placez le rouleau en insérant les deux broches dans les empla-cements appropriés des deux plaques fixe sur ses hanches16 - entrer à l’arrière de l’unité, l’amortisseur dans les rainures sur les côtés et faites-le glisser vers l’avant monobloc17 - poursuivre l’insertion de l’obturateur prêter attention à la pointe de la gauche du centre in-diqué par la flèche18 - Tension du tube de rouleau de printemps, faisant de lui 7 à tour de rôle dans la direction indiquée par la flèches, (attention à ne pas té-lécharger tube de printemps tout en effectuant des opérations plus tard)19 - placer la plaque métallique sur une des deux extrémités de l’amortisseur, puis avec deux vis autotaraudeuses pour la fixation de l’amor-tisseur au rouleau. (Également effectuer l’opé-ration sur les autres extrémités de l’obturateur20 - décollage de la porte du réfrigérateur dans les bouchons en plastique aussi bien dans la partie supérieure et dans la partie fond et in-sérez les vis dans les trous avec double fil, en laissant dépasser la partie filetée la plus courte21 - monter dans la poignée de la porte de boisréfrigérateur, à l’aide des vis fournies22 - situé dans la partie supérieure du bois du compartiment de réfrigérateur, les deux plaques comme le montre la figure23-24 - monter la feuille dans la feuille réfrigé-rateur bois en accrochant les deux plaques en forme de L sur deux vis insérées dans les points précédents25-25 - bis placé la porte en bois, monter les deux plaques dans la partie inférieure de fixa-tion sur la porte du réfrigérateur et serrer tout avec écrous. puis insérez le réfrigérateur sous le nelvano base et le fixer sur les côtés avec des plaques de métal incliné26 - insérer la protection de l’acier application silicone sur la surface en contact avec le le dos et les côtés du bloc moteur. Monter la poi-gnée dans l’autre base, le poêle, évier, robinet, siphon, le montage de la hotte, les grilles de l’égouttoir, établir des liens les systèmes d’eau et d’électricité, montage Enfin, le socle, le fixant avec approprié crochets à broches sous les lits
k 102 da 128 cm.modello zeus
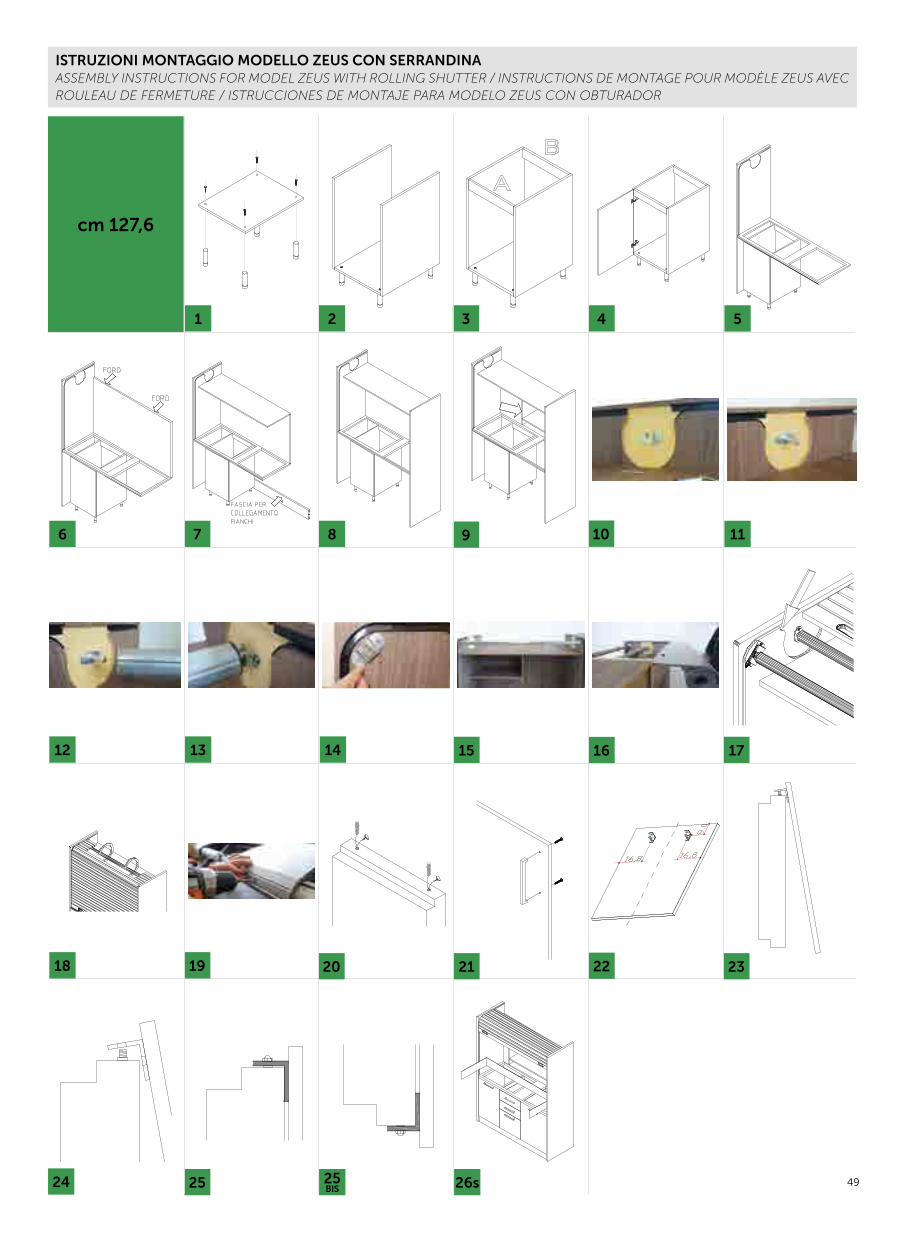
49
ISTRUZIONI MONTAGGIO MODELLO ZEUS CON SERRANDINAASSEMBLY INSTRUCTIONS FOR MODEL ZEUS WITH ROLLING SHUTTER / INSTRUCTIONS DE MONTAGE POUR MODÈLE ZEUS AVEC ROULEAU DE FERMETURE / ISTRUCCIONES DE MONTAJE PARA MODELO ZEUS CON OBTURADOR
cm 127,6
1
11
21
10
20
2
12
22
3
13
23
4
14
24
5
15
25
6
16
25BIS
7
17
26s
8
18
9
19
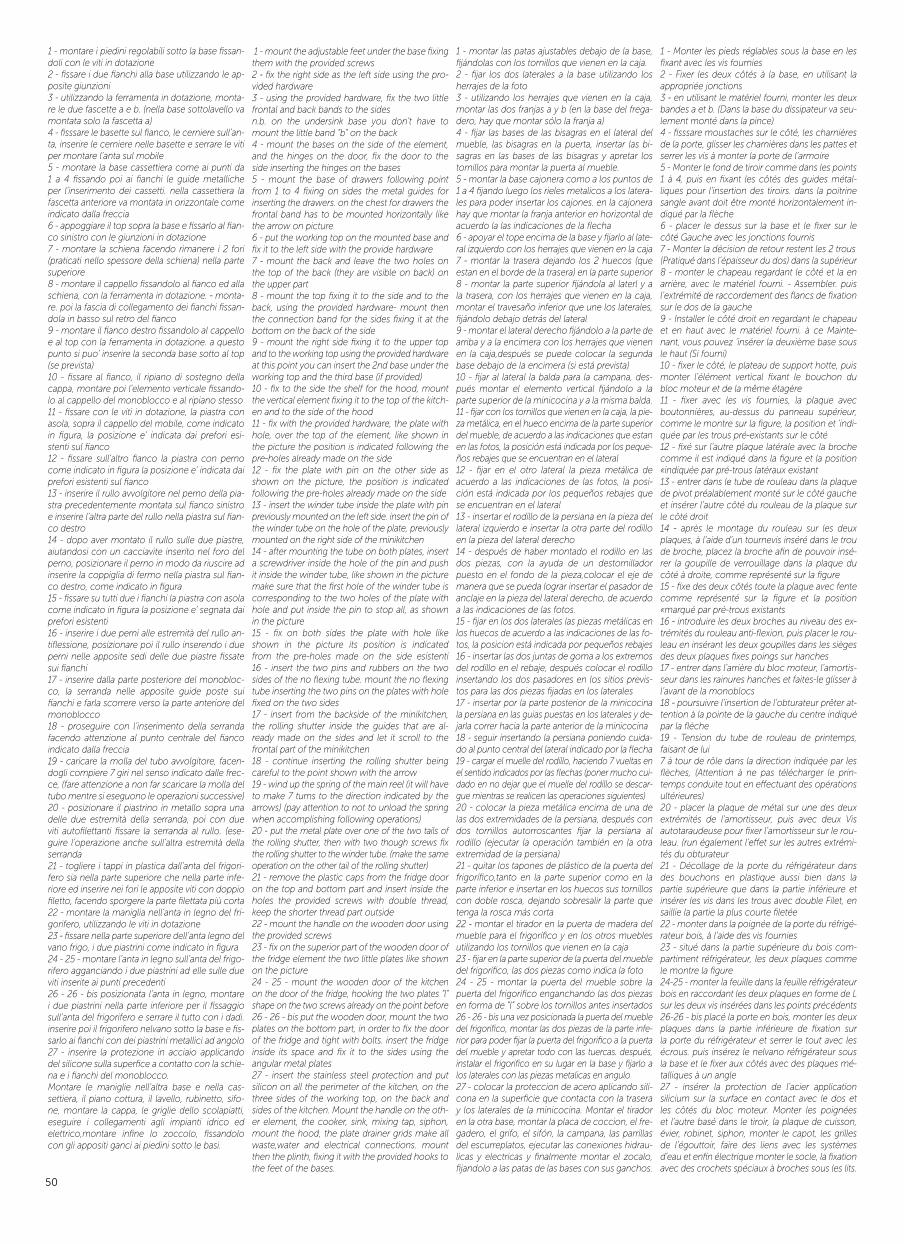
50
1 - montare i piedini regolabili sotto la base fissan-doli con le viti in dotazione2 - fissare i due fianchi alla base utilizzando le ap-posite giunzioni3 - utilizzando la ferramenta in dotazione, monta-re le due fascette a e b. (nella base sottolavello va montata solo la fascetta a)4 - fisssare le basette sul fianco, le cerniere sull’an-ta, inserire le cerniere nelle basette e serrare le viti per montare l’anta sul mobile5 - montare la base cassettiera come ai punti da 1 a 4 fissando poi ai fianchi le guide metalliche per l’inserimento dei cassetti. nella cassettiera la fascetta anteriore va montata in orizzontale come indicato dalla freccia6 - appoggiare il top sopra la base e fissarlo al fian-co sinistro con le giunzioni in dotazione7 - montare la schiena facendo rimanere i 2 fori (praticati nello spessore della schiena) nella parte superiore8 - montare il cappello fissandolo al fianco ed alla schiena, con la ferramenta in dotazione. - monta-re. poi la fascia di collegamento dei fianchi fissan-dola in basso sul retro del fianco9 - montare il fianco destro fissandolo al cappello e al top con la ferramenta in dotazione. a questo punto si puo’ inserire la seconda base sotto al top (se prevista)10 - fissare al fianco, il ripiano di sostegno della cappa, montare poi l’elemento verticale fissando-lo al cappello del monoblocco e al ripiano stesso11 - fissare con le viti in dotazione, la piastra con asola, sopra il cappello del mobile, come indicato in figura, la posizione e’ indicata dai prefori esi-stenti sul fianco12 - fissare sull’altro fianco la piastra con perno come indicato in figura la posizione e’ indicata dai prefori esistenti sul fianco13 - inserire il rullo avvolgitore nel perno della pia-stra precedentemente montata sul fianco sinistro e inserire l’altra parte del rullo nella piastra sul fian-co destro14 - dopo aver montato il rullo sulle due piastre, aiutandosi con un cacciavite inserito nel foro del perno, posizionare il perno in modo da riuscire ad inserire la coppiglia di fermo nella piastra sul fian-co destro, come indicato in figura15 - fissare su tutti due i fianchi la piastra con asola come indicato in figura la posizione e’ segnata dai prefori esistenti 16 - inserire i due perni alle estremità del rullo an-tiflessione, posizionare poi il rullo inserendo i due perni nelle apposite sedi delle due piastre fissate sui fianchi17 - inserire dalla parte posteriore del monobloc-co, la serranda nelle apposite guide poste sui fianchi e farla scorrere verso la parte anteriore del monoblocco18 - proseguire con l’inserimento della serranda facendo attenzione al punto centrale del fianco indicato dalla freccia19 - caricare la molla del tubo avvolgitore, facen-dogli compiere 7 giri nel senso indicato dalle frec-ce, (fare attenzione a non far scaricare la molla del tubo mentre si eseguono le operazioni successive)20 - posizionare il piastrino in metallo sopra una delle due estremità della serranda, poi con due viti autofilettanti fissare la serranda al rullo. (ese-guire l’operazione anche sull’altra estremità della serranda21 - togliere i tappi in plastica dall’anta del frigori-fero sia nella parte superiore che nella parte infe-riore ed inserire nei fori le apposite viti con doppio filetto, facendo sporgere la parte filettata più corta22 - montare la maniglia nell’anta in legno del fri-gorifero, utilizzando le viti in dotazione23 - fissare nella parte superiore dell’anta legno del vano frigo, i due piastrini come indicato in figura24 - 25 - montare l’anta in legno sull’anta del frigo-rifero agganciando i due piastrini ad elle sulle due viti inserite ai punti precedenti26 - 26 - bis posizionata l’anta in legno, montare i due piastrini nella parte inferiore per il fissaggio sull’anta del frigorifero e serrare il tutto con i dadi. inserire poi il frigorifero nelvano sotto la base e fis-sarlo ai fianchi con dei piastrini metallici ad angolo 27 - inserire la protezione in acciaio applicando del silicone sulla superfice a contatto con la schie-na e i fianchi del monoblocco.Montare le maniglie nell’altra base e nella cas-settiera, il piano cottura, il lavello, rubinetto, sifo-ne, montare la cappa, le griglie dello scolapiatti, eseguire i collegamenti agli impianti idrico ed elettrico,montare infine lo zoccolo, fissandolo con gli appositi ganci ai piedini sotto le basi.
1 - mount the adjustable feet under the base fixing them with the provided screws 2 - fix the right side as the left side using the pro-vided hardware3 - using the provided hardware, fix the two little frontal and back bands to the sidesn.b. on the undersink base you don’t have to mount the little band “b” on the back 4 - mount the bases on the side of the element, and the hinges on the door, fix the door to the side inserting the hinges on the bases 5 - mount the base of drawers following point from 1 to 4 fixing on sides the metal guides for inserting the drawers. on the chest for drawers the frontal band has to be mounted horizontally like the arrow on picture6 - put the working top on the mounted base and fix it to the left side with the provide hardware7 - mount the back and leave the two holes on the top of the back (they are visible on back) on the upper part 8 - mount the top fixing it to the side and to the back, using the provided hardware- mount then the connection band for the sides fixing it at the bottom on the back of the side 9 - mount the right side fixing it to the upper top and to the working top using the provided hardwareat this point you can insert the 2nd base under the working top and the third base (if provided)10 - fix to the side the shelf for the hood, mount the vertical element fixing it to the top of the kitch-en and to the side of the hood 11 - fix with the provided hardware, the plate with hole, over the top of the element, like shown in the picture the position is indicated following the pre-holes already made on the side12 - fix the plate with pin on the other side as shown on the picture, the position is indicated following the pre-holes already made on the side 13 - insert the winder tube inside the plate with pin previously mounted on the left side. insert the pin of the winder tube on the hole of the plate, previously mounted on the right side of the minikitchen14 - after mounting the tube on both plates, insert a screwdriver inside the hole of the pin and push it inside the winder tube, like shown in the picture make sure that the first hole of the winder tube is corresponding to the two holes of the plate with hole and put inside the pin to stop all, as shown in the picture 15 - fix on both sides the plate with hole like shown in the picture its position is indicated from the pre-holes made on the side esistenti 16 - insert the two pins and rubbers on the two sides of the no flexing tube. mount the no flexing tube inserting the two pins on the plates with hole fixed on the two sides17 - insert from the backside of the minikitchen, the rolling shutter inside the guides that are al-ready made on the sides and let it scroll to the frontal part of the minikitchen 18 - continue inserting the rolling shutter being careful to the point shown with the arrow 19 - wind up the spring of the main reel (it will have to make 7 turns to the direction indicated by the arrows) (pay attention to not to unload the spring when accomplishing following operations)20 - put the metal plate over one of the two tails of the rolling shutter, then with two though screws fix the rolling shutter to the winder tube. (make the same operation on the other tail of the rolling shutter)21 - remove the plastic caps from the fridge door on the top and bottom part and insert inside the holes the provided screws with double thread, keep the shorter thread part outside 22 - mount the handle on the wooden door using the provided screws23 - fix on the superior part of the wooden door of the fridge element the two little plates like shown on the picture 24 - 25 - mount the wooden door of the kitchen on the door of the fridge, hooking the two plates “l” shape on the two screws already on the point before 26 - 26 - bis put the wooden door, mount the two plates on the bottom part, in order to fix the door of the fridge and tight with bolts. insert the fridge inside its space and fix it to the sides using the angular metal plates27 - insert the stainless steel protection and put silicon on all the perimeter of the kitchen, on the three sides of the working top, on the back and sides of the kitchen. Mount the handle on the oth-er element, the cooker, sink, mixing tap, siphon, mount the hood, the plate drainer grids make all waste,water and electrical connections. mount then the plinth, fixing it with the provided hooks to the feet of the bases.
1 - montar las patas ajustables debajo de la base, fijándolas con los tornillos que vienen en la caja.2 - fijar los dos laterales a la base utilizando los herrajes de la foto3 - utilizando los herrajes que vienen en la caja, montar las dos franjas a y b (en la base del frega-dero, hay que montar sólo la franja a)4 - fijar las bases de las bisagras en el lateral del mueble, las bisagras en la puerta, insertar las bi-sagras en las bases de las bisagras y apretar los tornillos para montar la puerta al mueble.5 - montar la base cajonera como a los puntos de 1 a 4 fijando luego los rieles metalicos a los latera-les para poder insertar los cajones. en la cajonera hay que montar la franja anterior en horizontal de acuerdo la las indicaciones de la flecha6 - apoyar el tope encima de la base y fijarlo al late-ral izquierdo con los herrajes que vienen en la caja7 - montar la trasera dejando los 2 huecos (que estan en el borde de la trasera) en la parte superior8 - montar la parte superior fijándola al laterl y a la trasera, con los herrajes que vienen en la caja, montar el travesaño inferior que une los laterales, fijándolo debajo detrás del lateral9 - montar el lateral derecho fijándolo a la parte de arriba y a la encimera con los herrajes que vienen en la caja,después se puede colocar la segunda base debajo de la encimera (si está prevista)10 - fijar al lateral la balda para la campana, des-pués montar el elemento vertical fijándolo a la parte superior de la minicocina y a la misma balda.11 - fijar con los tornillos que vienen en la caja, la pie-za metálica, en el hueco encima de la parte superior del mueble, de acuerdo a las indicaciones que estan en las fotos, la posición está indicada por los peque-ños rebajes que se encuentran en el lateral12 - fijar en el otro lateral la pieza metálica de acuerdo a las indicaciones de las fotos, la posi-ción está indicada por los pequeños rebajes que se encuentran en el lateral13 - insertar el rodillo de la persiana en la pieza del lateral izquierdo e insertar la otra parte del rodillo en la pieza del lateral derecho14 - después de haber montado el rodillo en las dos piezas, con la ayuda de un destornillador puesto en el fondo de la pieza,colocar el eje de manera que se pueda lograr insertar el pasador de anclaje en la pieza del lateral derecho, de acuerdo a las indicaciones de las fotos.15 - fijar en los dos laterales las piezas metálicas en los huecos de acuerdo a las indicaciones de las fo-tos, la posicion está indicada por pequeños rebajes16 - insertar las dos juntas de goma a los extremos del rodillo en el rebaje, después colocar el rodillo insertando los dos pasadores en los sitios previs-tos para las dos piezas fijadas en los laterales17 - insertar por la parte posterior de la minicocina la persiana en las guias puestas en los laterales y de-jarla correr hacia la parte anterior de la minicocina18 - seguir insertando la persiana poniendo cuida-do al punto central del lateral indicado por la flecha19 - cargar el muelle del rodillo, haciendo 7 vueltas en el sentido indicados por las flechas (poner mucho cui-dado en no dejar que el muelle del rodillo se descar-gue mientras se realicen las operaciones siguientes)20 - colocar la pieza metálica encima de una de las dos extremidades de la persiana, después con dos tornillos autorroscantes fijar la persiana al rodillo (ejecutar la operación también en la otra extremidad de la persiana)21 - quitar los tapones de plástico de la puerta del frigorífico,tanto en la parte superior como en la parte inferior e insertar en los huecos sus tornillos con doble rosca, dejando sobresalir la parte que tenga la rosca más corta22 - montar el tirador en la puerta de madera del mueble para el frigorífico y en los otros muebles utilizando los tornillos que vienen en la caja23 - fijar en la parte superior de la puerta del mueble del frigorífico, las dos piezas como indica la foto24 - 25 - montar la puerta del mueble sobre la puerta del frigorifico enganchando las dos piezas en forma de “l” sobre los tornillos antes insertados26 - 26 - bis una vez posicionada la puerta del mueble del frigorifico, montar las dos piezas de la parte infe-rior para poder fijar la puerta del frigorifico a la puerta del mueble y apretar todo con las tuercas. después, instalar el frigorifico en su lugar en la base y fijarlo a los laterales con las piezas metalicas en angulo 27 - colocar la proteccion de acero aplicando sili-cona en la superficie que contacta con la trasera y los laterales de la minicocina. Montar el tirador en la otra base, montar la placa de coccion, el fre-gadero, el grifo, el sifón, la campana, las parrillas del escurreplatos, ejecutar las conexiones hidrau-licas y electricas y finalmente montar el zocalo, fijandolo a las patas de las bases con sus ganchos.
1 - Monter les pieds réglables sous la base en les fixant avec les vis fournies2 - Fixer les deux côtés à la base, en utilisant la appropriée jonctions3 - en utilisant le matériel fourni, monter les deux bandes a et b. (Dans la base du dissipateur va seu-lement monté dans la pince)4 - fisssare moustaches sur le côté, les charnières de la porte, glisser les charnières dans les pattes et serrer les vis à monter la porte de l’armoire5 - Monter le fond de tiroir comme dans les points1 à 4, puis en fixant les côtés des guides métal-liques pour l’insertion des tiroirs. dans la poitrine sangle avant doit être monté horizontalement in-diqué par la flèche6 - placer le dessus sur la base et le fixer sur le côté Gauche avec les jonctions fournis7 - Monter la décision de retour restent les 2 trous(Pratiqué dans l’épaisseur du dos) dans la supérieur8 - monter le chapeau regardant le côté et la en arrière, avec le matériel fourni. - Assembler. puis l’extrémité de raccordement des flancs de fixationsur le dos de la gauche9 - Installer le côté droit en regardant le chapeau et en haut avec le matériel fourni. à ce Mainte-nant, vous pouvez ‘insérer la deuxième base sous le haut (Si fourni)10 - fixer le côté, le plateau de support hotte, puis monter l’élément vertical fixant le bouchon du bloc moteur et de la même étagère11 - fixer avec les vis fournies, la plaque avec boutonnières, au-dessus du panneau supérieur, comme le montre sur la figure, la position et ‘indi-quée par les trous pré-existants sur le côté12 - fixé sur l’autre plaque latérale avec la broche comme il est indiqué dans la figure et la position «indiquée par pré-trous latéraux existant13 - entrer dans le tube de rouleau dans la plaque de pivot préalablement monté sur le côté gaucheet insérer l’autre côté du rouleau de la plaque sur le côté droit14 - après le montage du rouleau sur les deux plaques, à l’aide d’un tournevis inséré dans le trou de broche, placez la broche afin de pouvoir insé-rer la goupille de verrouillage dans la plaque du côté à droite, comme représenté sur la figure15 - fixe des deux côtés toute la plaque avec fentecomme représenté sur la figure et la position «marqué par pré-trous existants16 - introduire les deux broches au niveau des ex-trémités du rouleau anti-flexion, puis placer le rou-leau en insérant les deux goupilles dans les sièges des deux plaques fixes poings sur hanches17 - entrer dans l’arrière du bloc moteur, l’amortis-seur dans les rainures hanches et faites-le glisser à l’avant de la monoblocs18 - poursuivre l’insertion de l’obturateur prêter at-tention à la pointe de la gauche du centre indiqué par la flèche19 - Tension du tube de rouleau de printemps, faisant de lui7 à tour de rôle dans la direction indiquée par les flèches, (Attention à ne pas télécharger le prin-temps conduite tout en effectuant des opérations ultérieures)20 - placer la plaque de métal sur une des deux extrémités de l’amortisseur, puis avec deux Vis autotaraudeuse pour fixer l’amortisseur sur le rou-leau. (run également l’effet sur les autres extrémi-tés du obturateur21 - Décollage de la porte du réfrigérateur dans des bouchons en plastique aussi bien dans la partie supérieure que dans la partie inférieure et insérer les vis dans les trous avec double Filet, en saillie la partie la plus courte filetée22 - monter dans la poignée de la porte du réfrigé-rateur bois, à l’aide des vis fournies23 - situé dans la partie supérieure du bois com-partiment réfrigérateur, les deux plaques comme le montre la figure24-25 - monter la feuille dans la feuille réfrigérateur bois en raccordant les deux plaques en forme de L sur les deux vis insérées dans les points précédents26-26 - bis placé la porte en bois, monter les deux plaques dans la partie inférieure de fixation sur la porte du réfrigérateur et serrer le tout avec les écrous. puis insérez le nelvano réfrigérateur sous la base et le fixer aux côtés avec des plaques mé-talliques à un angle27 - insérer la protection de l’acier application silicium sur la surface en contact avec le dos et les côtés du bloc moteur. Monter les poignées et l’autre basé dans le tiroir, la plaque de cuisson, évier, robinet, siphon, monter le capot, les grilles de l’égouttoir, faire des liens avec les systèmes d’eau et enfin électrique monter le socle, la fixation avec des crochets spéciaux à broches sous les lits.
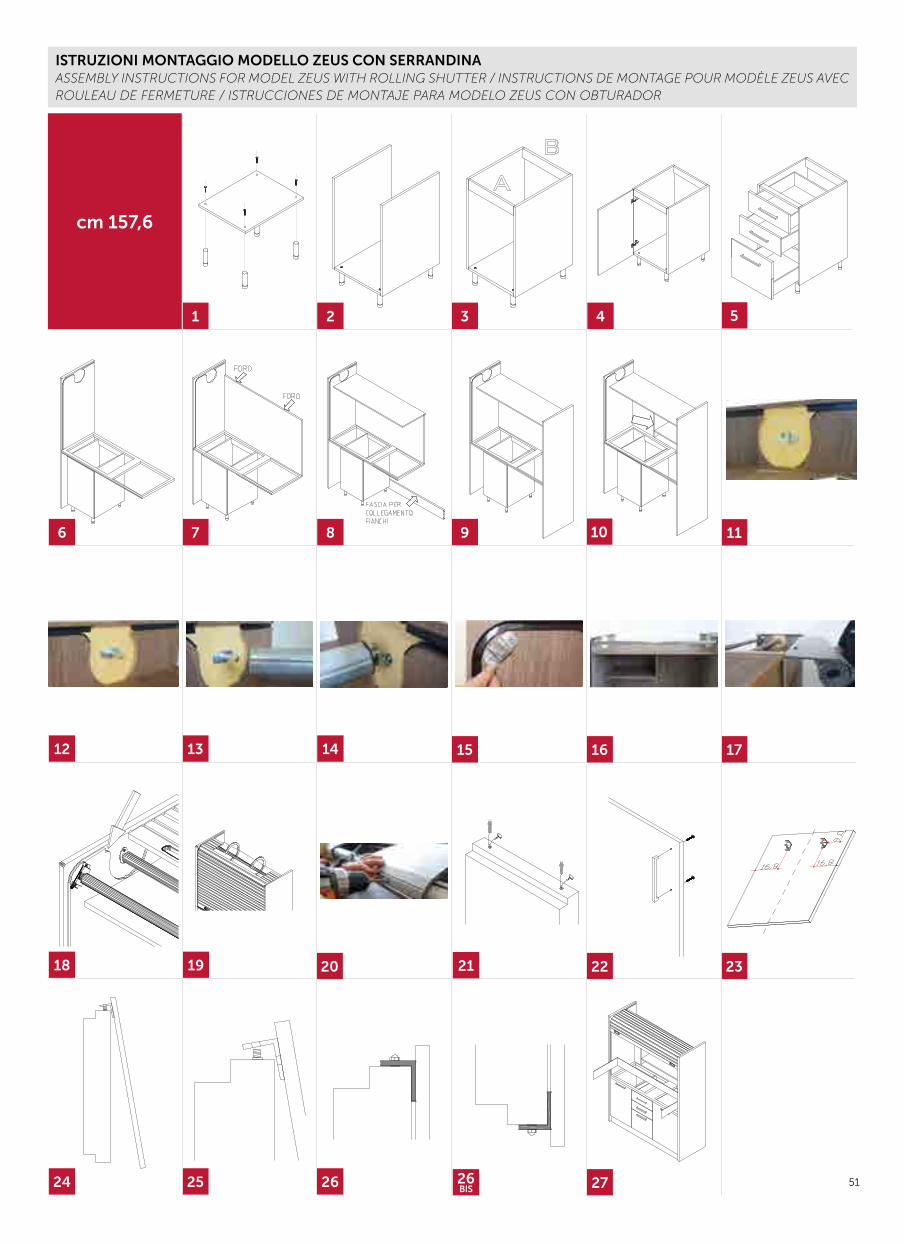
ISTRUZIONI MONTAGGIO MODELLO ZEUS CON SERRANDINAASSEMBLY INSTRUCTIONS FOR MODEL ZEUS WITH ROLLING SHUTTER / INSTRUCTIONS DE MONTAGE POUR MODÈLE ZEUS AVEC ROULEAU DE FERMETURE / ISTRUCCIONES DE MONTAJE PARA MODELO ZEUS CON OBTURADOR
cm 157,6
1
11
21
10
20
2
12
22
3
13
23
4
14
24
5
15
25
6
16
26
7
17
26 BIS
8
18
27
9
19
51
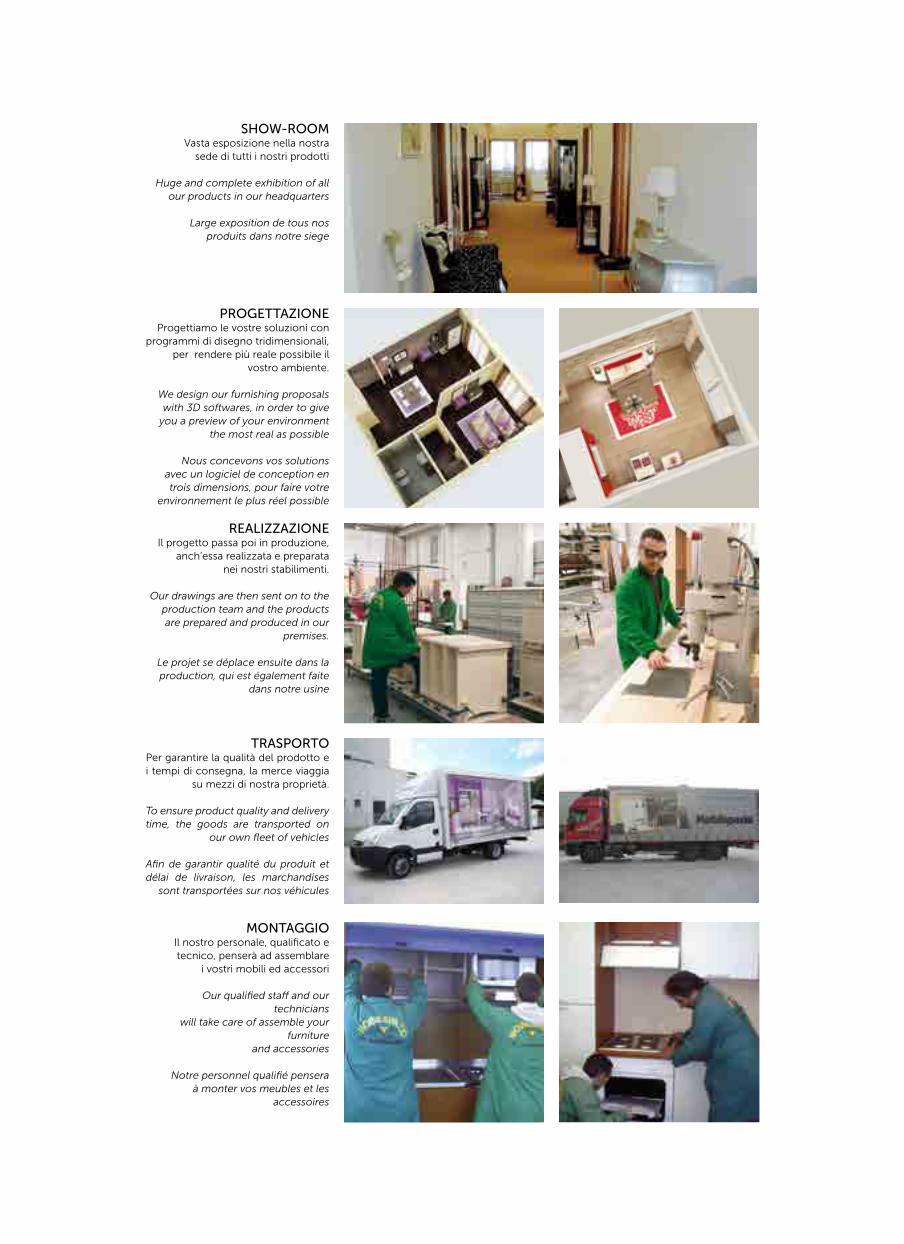
MONTAGGIO Il nostro personale, qualificato e tecnico, penserà ad assemblare
i vostri mobili ed accessori
Our qualified staff and our technicians
will take care of assemble your furniture
and accessories
Notre personnel qualifié pensera à monter vos meubles et les
accessoires
TRASPORTOPer garantire la qualità del prodotto e i tempi di consegna, la merce viaggia
su mezzi di nostra proprietà.
To ensure product quality and delivery time, the goods are transported on
our own fleet of vehicles
Afin de garantir qualité du produit et délai de livraison, les marchandises
sont transportées sur nos véhicules
REALIZZAZIONEIl progetto passa poi in produzione,
anch’essa realizzata e preparata nei nostri stabilimenti.
Our drawings are then sent on to the production team and the products are prepared and produced in our
premises.
Le projet se déplace ensuite dans la production, qui est également faite
dans notre usine
PROGETTAZIONEProgettiamo le vostre soluzioni con
programmi di disegno tridimensionali, per rendere più reale possibile il
vostro ambiente.
We design our furnishing proposals with 3D softwares, in order to give
you a preview of your environment the most real as possible
Nous concevons vos solutions avec un logiciel de conception en trois dimensions, pour faire votre
environnement le plus réel possible
SHOW-ROOM Vasta esposizione nella nostra
sede di tutti i nostri prodotti
Huge and complete exhibition of allour products in our headquarters
Large exposition de tous nosproduits dans notre siege
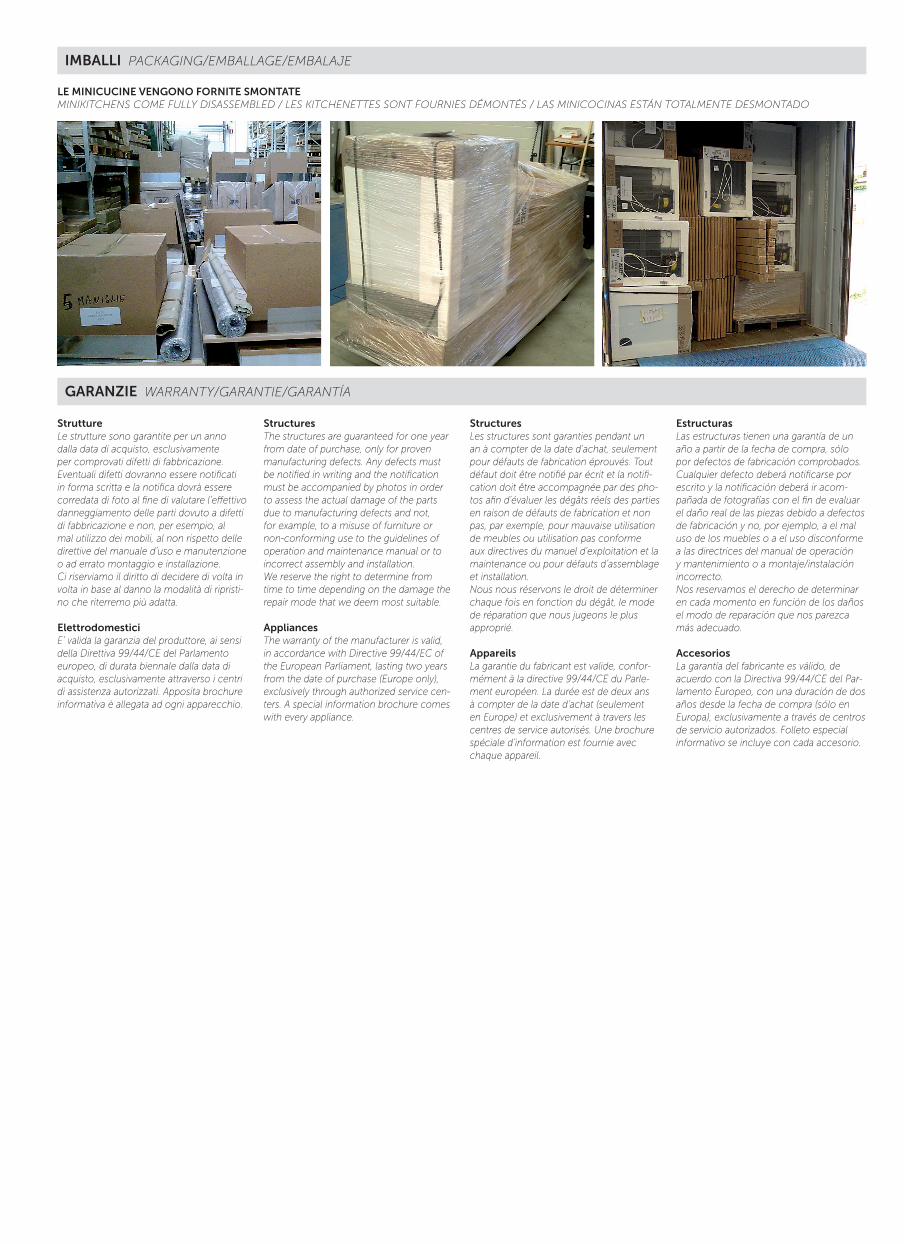
IMBALLI PACKAGING/EMBALLAGE/EMBALAJE
GARANZIE WARRANTY/GARANTIE/GARANTÍA
LE MINICUCINE VENGONO FORNITE SMONTATEMINIKITCHENS COME FULLY DISASSEMBLED / LES KITCHENETTES SONT FOURNIES DÉMONTÉS / LAS MINICOCINAS ESTÁN TOTALMENTE DESMONTADO
StruttureLe strutture sono garantite per un anno dalla data di acquisto, esclusivamente per comprovati difetti di fabbricazione. Eventuali difetti dovranno essere notificati in forma scritta e la notifica dovrà essere corredata di foto al fine di valutare l’effettivo danneggiamento delle parti dovuto a difetti di fabbricazione e non, per esempio, al mal utilizzo dei mobili, al non rispetto delle direttive del manuale d’uso e manutenzione o ad errato montaggio e installazione.Ci riserviamo il diritto di decidere di volta in volta in base al danno la modalità di ripristi-no che riterremo più adatta.
ElettrodomesticiE’ valida la garanzia del produttore, ai sensi della Direttiva 99/44/CE del Parlamento europeo, di durata biennale dalla data di acquisto, esclusivamente attraverso i centri di assistenza autorizzati. Apposita brochure informativa è allegata ad ogni apparecchio.
StructuresThe structures are guaranteed for one year from date of purchase, only for proven manufacturing defects. Any defects must be notified in writing and the notification must be accompanied by photos in order to assess the actual damage of the parts due to manufacturing defects and not, for example, to a misuse of furniture or non-conforming use to the guidelines of operation and maintenance manual or to incorrect assembly and installation.We reserve the right to determine from time to time depending on the damage the repair mode that we deem most suitable.
AppliancesThe warranty of the manufacturer is valid, in accordance with Directive 99/44/EC of the European Parliament, lasting two years from the date of purchase (Europe only), exclusively through authorized service cen-ters. A special information brochure comes with every appliance.
StructuresLes structures sont garanties pendant un an à compter de la date d'achat, seulement pour défauts de fabrication éprouvés. Tout défaut doit être notifié par écrit et la notifi-cation doit être accompagnée par des pho-tos afin d'évaluer les dégâts réels des parties en raison de défauts de fabrication et non pas, par exemple, pour mauvaise utilisation de meubles ou utilisation pas conforme aux directives du manuel d'exploitation et la maintenance ou pour défauts d’assemblage et installation.Nous nous réservons le droit de déterminer chaque fois en fonction du dégât, le mode de réparation que nous jugeons le plus approprié.
AppareilsLa garantie du fabricant est valide, confor-mément à la directive 99/44/CE du Parle-ment européen. La durée est de deux ans à compter de la date d'achat (seulement en Europe) et exclusivement à travers les centres de service autorisés. Une brochure spéciale d’information est fournie avec chaque appareil.
EstructurasLas estructuras tienen una garantía de un año a partir de la fecha de compra, sólo por defectos de fabricación comprobados. Cualquier defecto deberá notificarse por escrito y la notificación deberá ir acom-pañada de fotografías con el fin de evaluar el daño real de las piezas debido a defectos de fabricación y no, por ejemplo, a el mal uso de los muebles o a el uso disconforme a las directrices del manual de operación y mantenimiento o a montaje/instalación incorrecto.Nos reservamos el derecho de determinar en cada momento en función de los daños el modo de reparación que nos parezca más adecuado.
AccesoriosLa garantía del fabricante es válido, de acuerdo con la Directiva 99/44/CE del Par-lamento Europeo, con una duración de dos años desde la fecha de compra (sólo en Europa), exclusivamente a través de centros de servicio autorizados. Folleto especial informativo se incluye con cada accesorio.