LIPSI P48 CONSIGLI DI INSTALLAZIONE E ... P48 _ CONSIGLI DI INSTALLAZIONE E MANUTENZIONE /...
6
LIPSI P48 _ CONSIGLI DI INSTALLAZIONE E MANUTENZIONE / RECOMMENDATIONS FOR INSTALLATION AND MAINTENANCE www.tullizuccari.com Pag. 1 di 6 02.2008 CONSIGLI DI INSTALLAZIONE E MANUTENZIONE /RECOMMENDATIONS FOR INSTALLATION AND MAINTENANCE MOBILE PORTALAVABO COLLEZIONE LIPSI P48 Design: Emanuele Montanelli. All rights reserved. Made in Italy 1. Si declina ogni responsabilità relativa alle eventuali inesattezze contenute in queste informazioni che sono consigli utili per il montaggio del prodotto, che dovrà essere eseguito da installatore specializzato. Maneggiare sempre con cura ogni componente del prodotto. /The company declines any responsibility for inaccuracies in the present information providing suggestions useful for installation of the product. Remember installation must always be performed by a skilled installation technician. Always handle all product components with utmost care. 2. Tulli Zuccari invita il cliente a controllare l’integrità dei componenti contenuti nell’imballo prima del montaggio e comunicare immediata- mente eventuali difetti. /Tulli Zuccari invites you to check that the components contained in the package are intact before installation and immediately communicate any defects found. 3. LIPSI è un prodotto artigianale e le fasi di lavorazione sono eseguite a mano, pertanto piccoli imperfezioni riscontrabili non sono da con- siderarsi come difetti di produzione. /LIPSI furniture is an artisan crafted product and the processing phases are performed by hand; for this reason the minor imperfections found cannot be considered production defects. 4. Tulli Zuccari srl si riserva il diritto propri prodotti, senza obbligo di preavviso o di sostituzione. /Tulli Zuccari srl reserves the right to make any technical, construction, dimen- 5. Il montaggio del prodotto - istente nel locale alle norme di sicurezza vigenti. /Product installation must be performed by a skilled installation technician. We recommend checking that the electrical system in your room meets the currently applied standards. 6. Lo smaltimento dell’imballo - Always dispose of packaging, and the product when it is no longer used, in compliance with the standards in force and applied by the competent waste disposal company operating in the territory where the product is installed. 7. Tulli Zuccari srl. declina ogni responsabilità per un uso improprio del prodotto, per danneggiamenti a cose o persone dovute al non corretto montaggio del prodotto, o alla rottura accidentale o casuale dello stesso. /Tulli Zuccari srl declines any responsibility for improper use of the product, property damage or injury due to incorrect installation or accidental breakage of the product. LIPSI P48 Con top 8-15-20 mm, con piano integrato 15-19 mm, senza top /With top 8-15-20 mm, with integrated glass top 15-19 mm, without top Per maggiori informazioni contattare: [email protected] /For further information please contact: [email protected] Tulli Zuccari Srl. - Zona Industriale Bevagna (PG) ITALIA T +39 0742 362040 F +39 0742 361936 - www.tullizuccari.com Soluzione /Solution 1 Soluzione /Solution 5 Soluzione /Solution 2 Soluzione /Solution 3 Soluzione /Solution 4 Soluzione con piano integrato /Solution with integrated glass top Soluzione con top /Solution with glass top
-
Upload
vuongtuyen -
Category
Documents
-
view
216 -
download
0
Transcript of LIPSI P48 CONSIGLI DI INSTALLAZIONE E ... P48 _ CONSIGLI DI INSTALLAZIONE E MANUTENZIONE /...

LIPSI P48 _ CONSIGLI DI INSTALLAZIONE E MANUTENZIONE / RECOMMENDATIONS FOR INSTALLATION AND MAINTENANCE
www.tullizuccari.com Pag. 1 di 6
02.2008CONSIGLI DI INSTALLAZIONE E MANUTENZIONE/RECOMMENDATIONS FOR INSTALLATION AND MAINTENANCE
MOBILE PORTALAVABO COLLEZIONE LIPSI P48Design: Emanuele Montanelli. All rights reserved. Made in Italy
1. Si declina ogni responsabilità relativa alle eventuali inesattezze contenute in queste informazioni che sono consigli utili per il montaggio del prodotto, che dovrà essere eseguito da installatore specializzato. Maneggiare sempre con cura ogni componente del prodotto. /The company declines any responsibility for inaccuracies in the present information providing suggestions useful for installation of the product. Remember installation must always be performed by a skilled installation technician. Always handle all product components with utmost care.2. Tulli Zuccari invita il cliente a controllare l’integrità dei componenti contenuti nell’imballo prima del montaggio e comunicare immediata-mente eventuali difetti. /Tulli Zuccari invites you to check that the components contained in the package are intact before installation and immediately communicate any defects found.3. LIPSI è un prodotto artigianale e le fasi di lavorazione sono eseguite a mano, pertanto piccoli imperfezioni riscontrabili non sono da con-siderarsi come difetti di produzione. /LIPSI furniture is an artisan crafted product and the processing phases are performed by hand; for this reason the minor imperfections found cannot be considered production defects.4. Tulli Zuccari srl si riserva il dirittopropri prodotti, senza obbligo di preavviso o di sostituzione. /Tulli Zuccari srl reserves the right to make any technical, construction, dimen-
5. Il montaggio del prodotto -istente nel locale alle norme di sicurezza vigenti. /Product installation must be performed by a skilled installation technician. We recommend checking that the electrical system in your room meets the currently applied standards.6. Lo smaltimento dell’imballo -
Always dispose of packaging, and the product when it is no longer used, in compliance with the standards in force and applied by the competent waste disposal company operating in the territory where the product is installed.7. Tulli Zuccari srl. declina ogni responsabilità per un uso improprio del prodotto, per danneggiamenti a cose o persone dovute al non corretto montaggio del prodotto, o alla rottura accidentale o casuale dello stesso. /Tulli Zuccari srl declines any responsibility for improper use of the product, property damage or injury due to incorrect installation or accidental breakage of the product.
LIPSI P48Con top 8-15-20 mm, con piano integrato 15-19 mm, senza top/With top 8-15-20 mm, with integrated glass top 15-19 mm, without top
Per maggiori informazioni contattare: [email protected]/For further information please contact: [email protected]
Tulli Zuccari Srl. - Zona Industriale Bevagna (PG) ITALIA T +39 0742 362040 F +39 0742 361936 - www.tullizuccari.com
Soluzione/Solution 1
Soluzione/Solution 5
Soluzione/Solution 2
Soluzione/Solution 3
Soluzione/Solution 4
Soluzione con piano integrato/Solution with integrated glass top
Soluzione con top/Solution with glass top
LIPSI P48 _ CONSIGLI DI INSTALLAZIONE E MANUTENZIONE / RECOMMENDATIONS FOR INSTALLATION AND MAINTENANCE
www.tullizuccari.com Pag. 2 di 6
02.2008
02
03 04
05 06
ASSE X
ASSE Y AE
AE
AE
L1
L2
ASSE
Y
VD
AE VD
ASSE X
VB
SN
L
ASSE X
AE
AE
07
01
ASSE Y
ASSE Y
ASSE
Y
ASSE
Y
BA
BA
BA
SNSN
LIPSI P48 _ CONSIGLI DI INSTALLAZIONE E MANUTENZIONE / RECOMMENDATIONS FOR INSTALLATION AND MAINTENANCE
www.tullizuccari.com Pag. 3 di 6
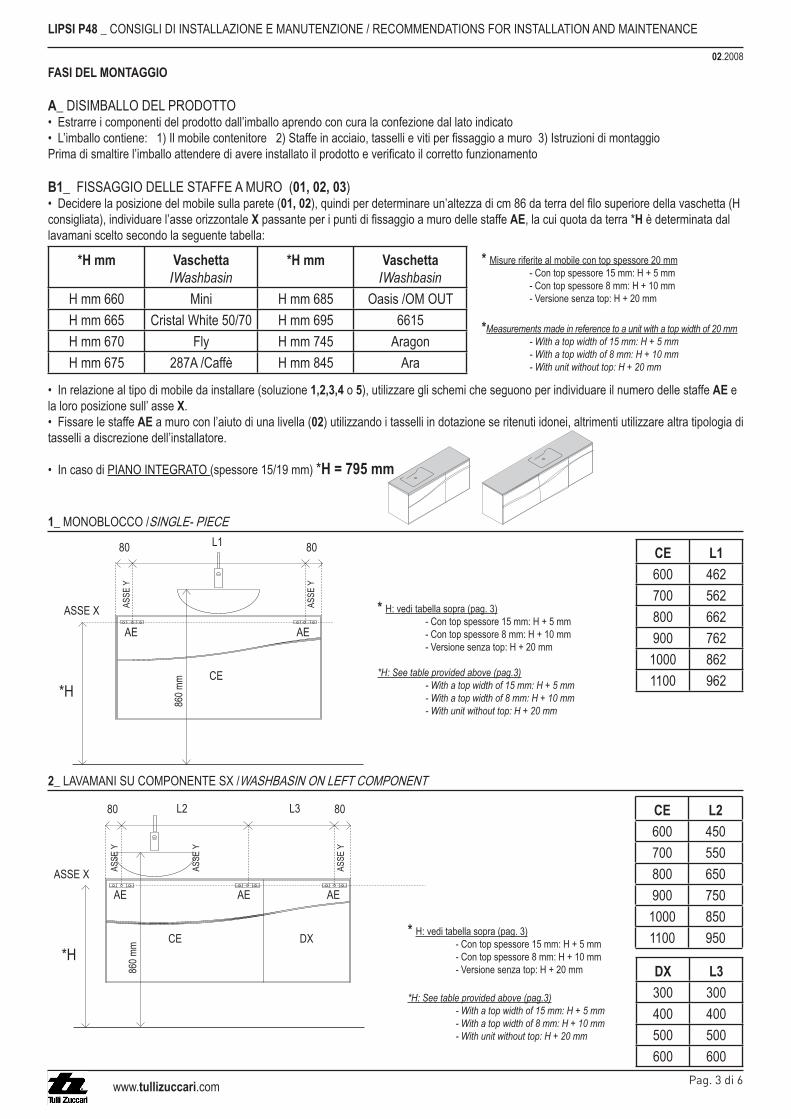
02.2008FASI DEL MONTAGGIO
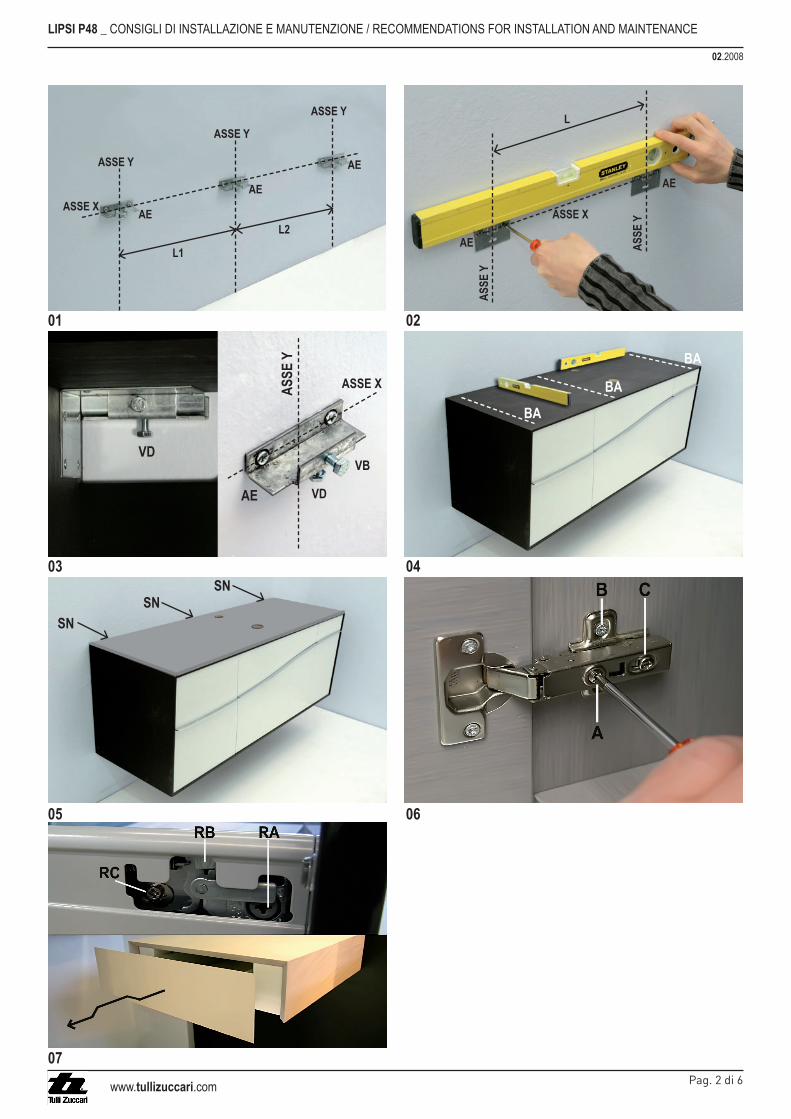
A_ DISIMBALLO DEL PRODOTTO• Estrarre i componenti del prodotto dall’imballo aprendo con cura la confezione dal lato indicato
B1_ FISSAGGIO DELLE STAFFE A MURO (01, 02, 03)• Decidere la posizione del mobile sulla parete (01, 02consigliata), individuare l’asse orizzontale X AE, la cui quota da terra *Hlavamani scelto secondo la seguente tabella:
• In relazione al tipo di mobile da installare (soluzione 1,2,3,4 o 5), utilizzare gli schemi che seguono per individuare il numero delle staffe AE e la loro posizione sull’ asse X.• Fissare le staffe AE a muro con l’aiuto di una livella (02) utilizzando i tasselli in dotazione se ritenuti idonei, altrimenti utilizzare altra tipologia di tasselli a discrezione dell’installatore.
• In caso di PIANO INTEGRATO (spessore 15/19 mm) *H = 795 mm
*H mm Vaschetta/Washbasin
*H mm Vaschetta/Washbasin
Mini Oasis /OM OUTCristal White 50/70 6615
Fly AragonAra
* Misure riferite al mobile con top spessore 20 mm
*Measurements made in reference to a unit with a top width of 20 mm- With a top width of 15 mm: H + 5 mm- With a top width of 8 mm: H + 10 mm- With unit without top: H + 20 mm
2_ LAVAMANI SU COMPONENTE SX /
CE L2600 450700 550800 650900 7501000 8501100 950
DX L3300 300400 400500 500600 600
*
*H: See table provided above (pag.3)- With a top width of 15 mm: H + 5 mm- With a top width of 8 mm: H + 10 mm- With unit without top: H + 20 mm
1_ MONOBLOCCO /SINGLE- PIECE
CE L1600 462700 562800 662900 762
1000 8621100 962
*
*H: See table provided above (pag.3)- With a top width of 15 mm: H + 5 mm- With a top width of 8 mm: H + 10 mm- With unit without top: H + 20 mm
ASSE X
L180
ASSE
Y
AE
80
ASSE
Y
AE
CE
860 m
m
8080 L2 L3
ASSE X ASSE
Y
ASSE
Y
ASSE
Y
AE AE AE
CE DX
860 m
m
LIPSI P48 _ CONSIGLI DI INSTALLAZIONE E MANUTENZIONE / RECOMMENDATIONS FOR INSTALLATION AND MAINTENANCE
www.tullizuccari.com Pag. 4 di 6
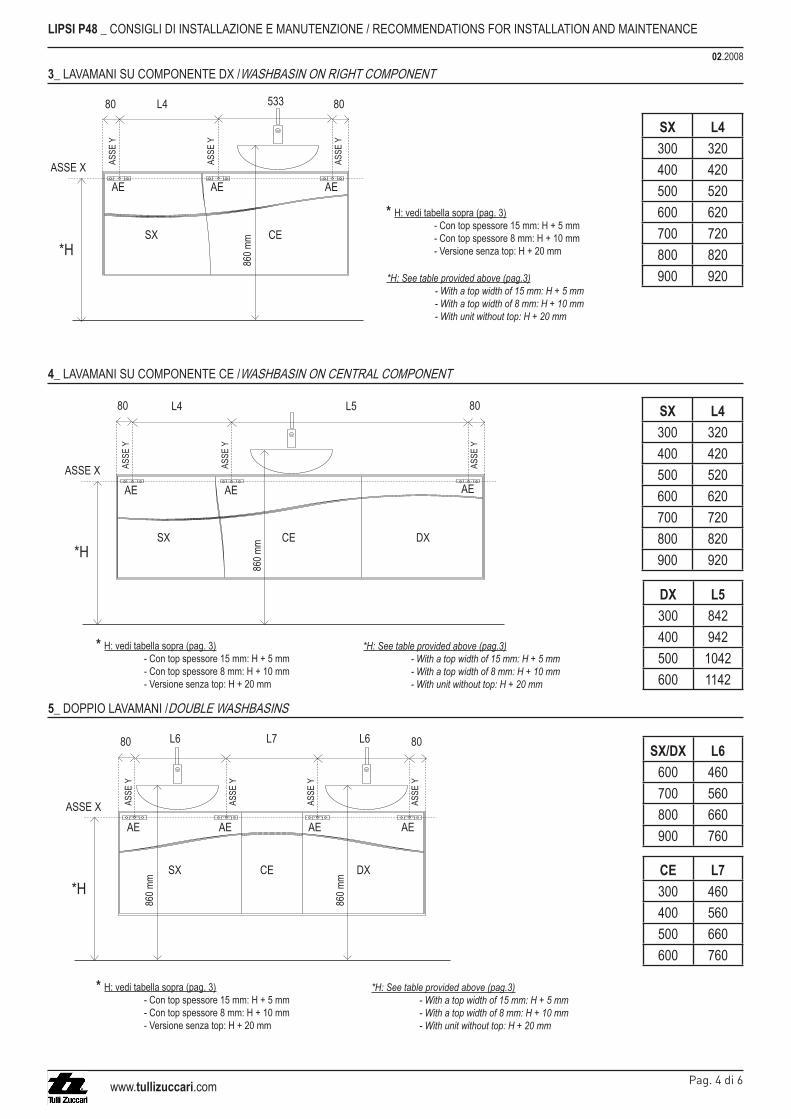
02.20083_ LAVAMANI SU COMPONENTE DX /
4_ LAVAMANI SU COMPONENTE CE /
5_ DOPPIO LAVAMANI /
SX/DX L6600 460700 560800 660900 760
CE L7300 460400 560500 660600 760
DX L5300 842400 942500 1042600 1142
SX L4300 320400 420500 520600 620700 720800 820900 920
SX L4300 320400 420500 520600 620700 720800 820900 920
*
*
*H: See table provided above (pag.3)- With a top width of 15 mm: H + 5 mm- With a top width of 8 mm: H + 10 mm- With unit without top: H + 20 mm
*H: See table provided above (pag.3)- With a top width of 15 mm: H + 5 mm- With a top width of 8 mm: H + 10 mm- With unit without top: H + 20 mm
* *H: See table provided above (pag.3)- With a top width of 15 mm: H + 5 mm- With a top width of 8 mm: H + 10 mm- With unit without top: H + 20 mm
80 80533L4
ASSE X ASSE
Y
ASSE
Y
ASSE
Y
AE AE AE
CESX86
0 mm
80 80L4 L5
ASSE X ASSE
Y
ASSE
Y
ASSE
Y
AE AE AE
SX CE DX
860 m
m
80 80L6 L7 L6
ASSE X ASSE
Y
ASSE
Y
ASSE
Y
ASSE
Y
AE AE AE AE
DXCESX
860 m
m
860 m
m

LIPSI P48 _ CONSIGLI DI INSTALLAZIONE E MANUTENZIONE / RECOMMENDATIONS FOR INSTALLATION AND MAINTENANCE
www.tullizuccari.com Pag. 5 di 6
02.2008C_ POSIZIONAMENTO DEL MOBILE (02, 03, 04)
AE sono perfettamente allineate (02), sollevare il mobile dai lati (necessari due operatori) ed agganciarlo con molta cura sulle staffe AE (03 04).• Per ottenere la perfetta planarità agire sulla vite distanziatrice VD presente nella parte inferiore della staffa AE (03)
VB della staffa AE (03)
D_ FISSAGGIO DEL TOP (8, 15, 20 mm) (04, 05)• Rimuovere le pellicole protettive dal nastro bi-adesivo (BA) e posizionare il top in modo che fuoriesca sui lati e davanti di circa 3 mm (04).• Eventualmente, utilizzando esclusivamente silicone neutro (SN 05).
E_ INSTALLAZIONE LAVAMANI
F_ REGOLAZIONE ANTE (06)• Rimuovere la targhetta presente sulla cerniera • Regolazione orizzontale: agire sulla vite A• Regolazione in altezza: agire sulle viti B• Regolazione in profondità: agire sulla vite C
G_ REGOLAZIONE DEI FRONTALI CASSETTI E LORO SMONTAGGIO (07)• Rimuovere la targhetta di copertura• Regolazione orizzontale: agire sulla vite RA• Smontaggio frontale cassetto: agire con il cacciavite sulla croce metallica RB• Regolazione in altezza: agire sulla vite RC• Riposizionare la targhetta di copertura
07• Aggancio cassetto: estrarre le guide, appoggiare il cassetto tenendolo sollevato anteriormente e chiuderlo sino all’avvenuto aggancio
H_ MANUTENZIONE E PULIZIA DEL PRODOTTO
abrasivi e prodotti acidi• Per la pulizia dei top in vetro utilizzare alcool etilico o prodotti per vetro in commercio. Evitare l’impiego di solventi, abrasivi e prodotti acidi

LIPSI P48 _ CONSIGLI DI INSTALLAZIONE E MANUTENZIONE / RECOMMENDATIONS FOR INSTALLATION AND MAINTENANCE
www.tullizuccari.com Pag. 6 di 6
02.2008ASSEMBLY INSTRUCTIONS
A_UNPACKING THE PRODUCT• Take the product components out of the packaging carefully from the indicated side.
B_ FIXING THE BRACKETS ON THE WALL (01, 02, 03)• Choose the position in which to place the cabinet on the wall (01, 02), in accordance with a height of 86 cm from the ground for the top cord of
X, passing through the points where the AEthe ground *H is determined by the sink, chosen according to table at page 3• Depending on the type of unit to be installed (solution 1,2,3,4 or 5), use the schemes at pages 3 and 4 to determine to number of AE brackets to be used and their position on the X
AE brackets to the wall with the help of a level (02) using the provided wedges where deemed suitable, otherwise use another type of wedge at the discretion of the assemblyman.
• With Lipsi P48SC with INTEGRATED GLASS TOP (15/19 mm thickness) *H = 795 mm
C_ POSITIONING THE UNIT (02, 03, 04)AE brackets are perfectly aligned (02), lift the unit by its sides (two workers are necessary) and hook it with care
on the AE brackets (03) making sure that it is perfectly level with the help of a level (04).• In order to obtain a perfectly level surface, adjust the VD distancing screw found on the bottom side of the AE bracket (03)• Secure the unit by adjusting the VB screw of the AE bracket (03)
D_SECURING THE TOP (8, 15, 20 mm) (04, 05)• Remove the protective plastic wrap from the double-sided tape (BAthe side and in front of the unit (04).
SN) (05).
E_SINK BASIN INSTALLATION
F_DOOR ADJUSTMENT (06)• Remove the label from the hinge • Horizontal adjustment: Use the screw labeled A• Height adjustment: Use the screw labeled B• Depth adjustment: Use the screw labeled C
G_DRAWER FRONT ADJUSTMENTS AND DISMANTLEMENT (07)• Remove the cover label• Horizontal adjustments: Use the screws labeled RA until the correct distance is obtained (+/- 2 mm)• Dismantlement of drawer front: Loosen the metallic RB cross with a screwdriver • Height adjustment: use the screws labeled RC until the correct distance is obtained (+/- 2mm) • Place the cover label back in the correct position
07• Drawer hinging: take out the runners, place the drawer on them, keeping the front end elevated and close it until it hooks in to the hinge
H_PRODUCT MAINTENANCE AND CLEANING
• To clean a glass top use ethyl alcohol or other glass-cleaning products on the market. Avoid the use of solvents, abrasives and products containing acids