I.M. Linea Luce Slim 1.95391 - Reggiani Illuminazione · Gli apparecchi della famiglia LINEA LUCE...
50
LINEA LUCE SLIM GUIDA ALL’ INSTALLAZIONE INSTALLATION GUIDE GUIDE D’INSTALLATION INSTRUCCIONES PARA LA INSTALACIÓN MONTAGEANWEISUNGEN РУКОВОДСТВО ПО УСТАНОВКЕ ITA 003 ENG 011 DEU 019 FRA 027 ESP 035 RUS 043
Transcript of I.M. Linea Luce Slim 1.95391 - Reggiani Illuminazione · Gli apparecchi della famiglia LINEA LUCE...
LINEA LUCE SLIM
GUIDA ALL’ INSTALLAZIONE
INSTALLATION GUIDE
GUIDE D’INSTALLATION
INSTRUCCIONES PARA LA INSTALACIÓN
MONTAGEANWEISUNGEN
РУКОВОДСТВО ПО УСТАНОВКЕ
ITA 003
ENG 011
DEU 019
FRA 027
ESP 035
RUS 043
www.reggiani.net 03
LINEA LUCE SLIM | ITA |
CARATTERISTICHE GENERALILINEA LUCE SLIM
La LINEA LUCE SLIM è conforme alle di-rettive:• BT 2006/95/CE• EMC 2004/108/CE• RAEE 2002/96/CE• RoHS 2011/65/CE• Ecodesign 2009/125/CE e alle norme di sicurezza:• EN 60598-1• EN 60598-2-1• EN 60598-2-2• EN 60598-2-22.
Per maggiori informazioni tecniche sul prodotto (dati fotometrici, elettrici, dimen-sionali, peso, certifi cazioni,…) consultare il catalogo o accedere alla scheda tecnica sul sito web: www.reggiani.net/codice.
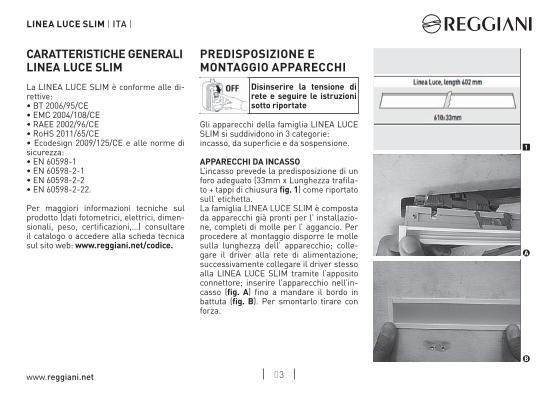
PREDISPOSIZIONE E MONTAGGIO APPARECCHI
Disinserire la tensione di rete e seguire le istruzioni sotto riportate
Gli apparecchi della famiglia LINEA LUCE SLIM si suddividono in 3 categorie: incasso, da superfi cie e da sospensione.
APPARECCHI DA INCASSOL’incasso prevede la predisposizione di un foro adeguato (33mm x Lunghezza trafi la-to + tappi di chiusura fi g. 1) come riportato sull’ etichetta.La famiglia LINEA LUCE SLIM è composta da apparecchi già pronti per l’ installazio-ne, completi di molle per l’ aggancio. Per procedere al montaggio disporre le molle sulla lunghezza dell’ apparecchio; colle-gare il driver alla rete di alimentazione; successivamente collegare il driver stesso alla LINEA LUCE SLIM tramite l’apposito connettore; inserire l’apparecchio nell’in-casso (fi g. A) fi no a mandare il bordo in battuta (fi g. B). Per smontarlo tirare con forza.
�
�
�

www.reggiani.net 04
LINEA LUCE SLIM | ITA |
ESEMPIO DI CONFIGURAZIONE (fi g.2)Per montare due o più apparecchi in fi la continua utilizzare gli accessori di con-giunzione: inserire le due piastrine in dota-zione nelle scanalature laterali del trafi la-to (fi g. G); avvicinare il trafi lato successivo in modo che le piastrine siano a metà tra un trafi lato e l’ altro (fi g. H); posizionare la staffa di congiunzione nel punto di giun-zione e bloccare la staffa tramite le viti in dotazione (fi g. I). Infi ne montare i tappi di testata (fi g. I2)
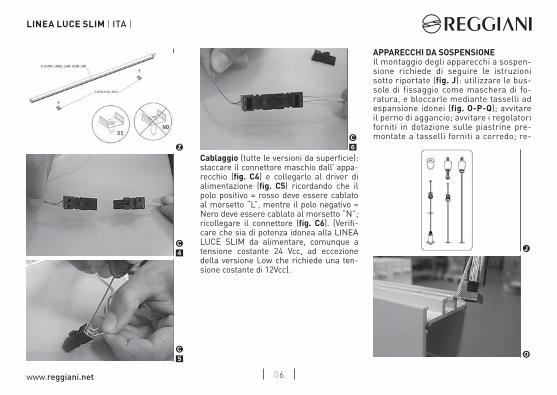
Cablaggio: staccare il connettore maschio dall’apparecchio (fi g. C1) e collegarlo al driver di alimentazione (fi g. C2) (ricor-dando che il polo positivo = Rosso e il polo negativo = Nero); ricollegare il connettore (fi g. C3). (Verifi care che sia di potenza ido-nea alla LINEA LUCE SLIM da alimentare, comunque a tensione costante 24 Vcc).
�
�
�
��
�
��

www.reggiani.net 05
LINEA LUCE SLIM | ITA |
APPARECCHI DA SUPERFICIE
AVVERTENZA: lateralmente all’apparec-chio si devono lasciare almeno 2mm di spazio libero per consentire un effi cace scambio termico.Il montaggio degli apparecchi da super-fi cie richiede di seguire le istruzioni sotto riportate (fi g. X e Y)
LINEA LUCE Slim High e Medium Utilizzare gli appositi accessori per il fi s-saggio (0.31735.0000) come maschera di foratura; allinearli mediante l’uso di un og-getto rigido o del trafi lato stesso e bloccar-li mediante tasselli ad espansione idonei. Infi ne accoppiare l’apparecchio.
Montaggio accessori snodo 0.31736.0000 (per profi li medium e high): allineare gli accessori mediante l’uso di un oggetto rigido o del trafi lato stesso; fi ssare le viti; orientare l’apparecchio (fi g. E); bloccarlo nella posizione desiderata mediante l’ap-posito utensile fornito in dotazione (fi g. F).
LINEA LUCE Slim LowUtilizzare l’apposito accessorio per il fi s-saggio (0.31705.0000) come maschera di foratura; allinearli mediante l’uso di un og-getto rigido o del trafi lato stesso e bloccar-li mediante tasselli ad espansione idonei, oppure sul legno usare le viti autofi lettanti a testa svasata fornite in dotazione. L’ap-parecchio può essere fi ssato negli incassi o a superfi cie utilizzando colla adatta op-pure nastro biadesivo con adeguata tenuta meccanica (fi g. Z).
�
�
�
www.reggiani.net 06
LINEA LUCE SLIM | ITA |
Cablaggio (tutte le versioni da superfi cie): staccare il connettore maschio dall’ appa-recchio (fi g. C4) e collegarlo al driver di alimentazione (fi g. C5) ricordando che il polo positivo = rosso deve essere cablato al morsetto “L”, mentre il polo negativo = Nero deve essere cablato al morsetto “N”; ricollegare il connettore (fi g. C6). (Verifi -care che sia di potenza idonea alla LINEA LUCE SLIM da alimentare, comunque a tensione costante 24 Vcc, ad eccezione della versione Low che richiede una ten-sione costante di 12Vcc).
APPARECCHI DA SOSPENSIONEIl montaggio degli apparecchi a sospen-sione richiede di seguire le istruzioni sotto riportate (fig. J): utilizzare le bus-sole di fissaggio come maschera di fo-ratura, e bloccarle mediante tasselli ad espansione idonei (fig. O-P-Q); avvitare il perno di aggancio; avvitare i regolatori forniti in dotazione sulle piastrine pre-montate a tasselli forniti a corredo; re-
�
�
�
�
�
�
www.reggiani.net 07
LINEA LUCE SLIM | ITA |
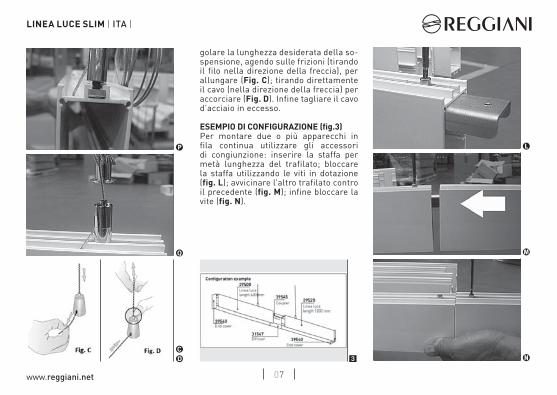
golare la lunghezza desiderata della so-spensione, agendo sulle frizioni (tirando il filo nella direzione della freccia), per allungare (Fig. C); tirando direttamente il cavo (nella direzione della freccia) per accorciare (Fig. D). Infine tagliare il cavo d’acciaio in eccesso.
ESEMPIO DI CONFIGURAZIONE (fi g.3)Per montare due o più apparecchi in fila continua utilizzare gli accessori di congiunzione: inserire la staffa per metà lunghezza del trafilato; bloccare la staffa utilizzando le viti in dotazione (fig. L); avvicinare l’altro trafilato contro il precedente (fig. M); infine bloccare la vite (fig. N).
�
�
�
�
�
�
www.reggiani.net 08
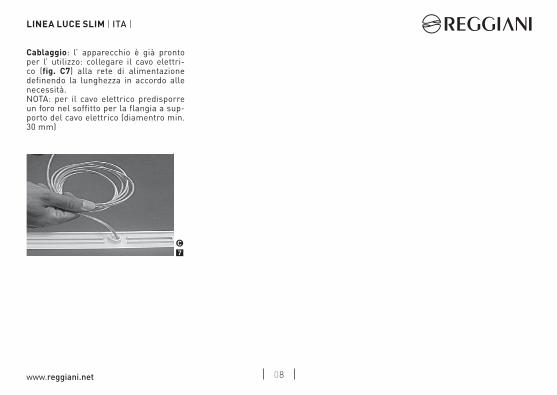
LINEA LUCE SLIM | ITA |
Cablaggio: l’ apparecchio è già pronto per l’ utilizzo: collegare il cavo elettri-co (fig. C7) alla rete di alimentazione definendo la lunghezza in accordo alle necessità.NOTA: per il cavo elettrico predisporre un foro nel soffitto per la flangia a sup-porto del cavo elettrico (diamentro min. 30 mm)
�
www.reggiani.net 09
LINEA LUCE SLIM | ITA |
NOTE GENERALI
Conformità: Norme europee EN 60598-1 , EN 60598-2-2Direttive Comunitarie 2006/95/CE (BT), 2004/108/CE (EMC), 2002/96/CE (RAEE), 2011/65/CE (RoHS), 2009/125/CE (Ecodesign)
IP40 Grado di protezione.
Gli apparecchi non devono in nessun caso essere coperti di materiale isolante o similare.
Apparecchi di Classe II.
Apparecchio di classe III. La conformità alla norma è garantita se e solo se la protezione contro la scossa elettrica si basa sulla tensione d’alimentazione a bassisima tensione di sicurezza (SELV) e in cui non si producono tensioni superiori alla stessa
Apparecchi in Emergenza.• la linea preferenziale non deve mai essere interrotta;• fl usso luminoso in emergenza, dopo 60s, ~20% fl usso lampadina in funzionamento ordinario;• l’autonomia in emergenza è di 1 ora;• il led verde indica il buon funzionamento del sistema inverter/batteria• la ricarica completa si ha in 24 ore;• le batterie, esenti da manutenzione, devono essere sostituite ogni 4 anni;• ogni semestre controllare la funzionalità dell’impianto, effettuando una scarica completa delle batterie;
Per il collegamento alla rete, utilizzare cavi multipolari tipo H05V2V2 con conduttori aventi sezione compresa tra 1 mm2 e 2,5 mm2.
www.reggiani.net 010
LINEA LUCE SLIM | ITA |
amministrative, il cui ammontare è stabilito a norma di legge.N.B. Il ritiro gratuito di un apparecchio di il-luminazione può essere rifi utato nel caso in cui vi sia un rischio di contaminazione del personale incaricato della raccolta o nel caso in cui risulta evidente che l’apparecchiatura in questione non contiene i suoi componenti es-senziali o contiene rifi uti diversi dai RAEE o nel caso in cui il peso dell’apparecchiatura ritirata sia superiore al doppio del peso dell’apparec-chiatura nuova acquistata.In queste circostanze lo smaltimento è a cari-co del detentore che conferisce.
RAEE n° IT08010000000055ELa Direttiva Europea 2012/19/UE dispone che gli apparecchi di illuminazione sono per defi nizione degli RAEE (Rifi uti di Apparecchiatu-re Elettriche ed Elettroniche) e, per
quanto tali, non possono essere assimilati a rifi uti solidi urbani.Perciò, al termine del loro ciclo di vita, gli RAEE devono essere correttamente trattati e smaltiti perché potenzialmente pericolosi sia per l’ambiente e sia per la salute umana a causa della presenza di sostanze pericolose nei componenti elettrici ed elettronici.Pertanto è fatto obbligo all’utilizzatore di consegnare gli apparecchi di illuminazione usati al Distributore, a fronte dell’acquisto di un’equivalente apparecchio nuovo, o esclu-sivamente per il territorio italiano diretta-mente al Consorzio per lo smaltimento degli Apparecchi di Illuminazione –Ecolight- come delegato dalla Reggiani S.p.A. Illuminazione, che si incaricheranno del ritiro gratuito e o e del conferimento presso i centri di raccolta specializzati, opportunamente costituiti dalle Amministrazioni Pubbliche atti al recupero, trattamento e smaltimento dei RAEE.Le lampade, se smaltite con l’apparecchio, non devono essere frantumate perché con-tengono sostanze altamente inquinanti per l’ambiente.Lo smaltimento abusivo o inadeguato di detti rifi uti comporterà sanzioni economiche e/o
www.reggiani.net 011
GENERAL FEATURES OF LINEA LUCE
LINEA LUCE conforms to directives:• LV 2006/95/CE• EMC 2004/108/EC• WEEE 2002/96/EC• RoHS 2011/65/EC• Ecodesign 2009/125/ECAnd safety standards:• EN 60598-1• EN 60598-2-1• EN 60598-2-2• EN 60598-2-22.
For more technical information about the product (photometric, electrical data, size, weight, certifi cation, accessories, product warranty) refer to the catalogue or see the product datasheet on the website: www.reggiani.net/reference.
PREPARATION AND ASSEMBLY OF THE LUMINAIRES
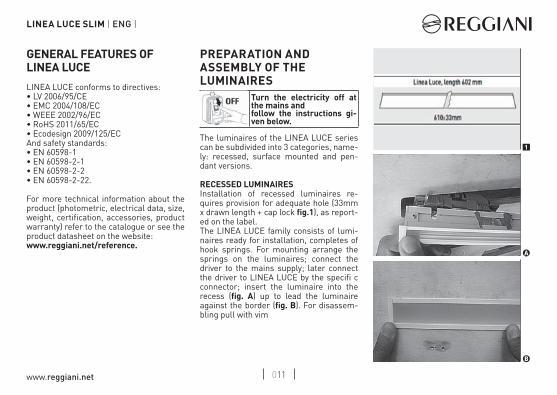
Turn the electricity off at the mains andfollow the instructions gi-ven below.
The luminaires of the LINEA LUCE series can be subdivided into 3 categories, name-ly: recessed, surface mounted and pen-dant versions.
RECESSED LUMINAIRESInstallation of recessed luminaires re-quires provision for adequate hole (33mm x drawn length + cap lock fi g.1), as report-ed on the label.The LINEA LUCE family consists of lumi-naires ready for installation, completes of hook springs. For mounting arrange the springs on the luminaires; connect the driver to the mains supply; later connect the driver to LINEA LUCE by the specifi c connector; insert the luminaire into the recess (fi g. A) up to lead the luminaire against the border (fi g. B). For disassem-bling pull with vim
�
�
�
LINEA LUCE SLIM | ENG |
www.reggiani.net 012
LINEA LUCE SLIM | ENG |
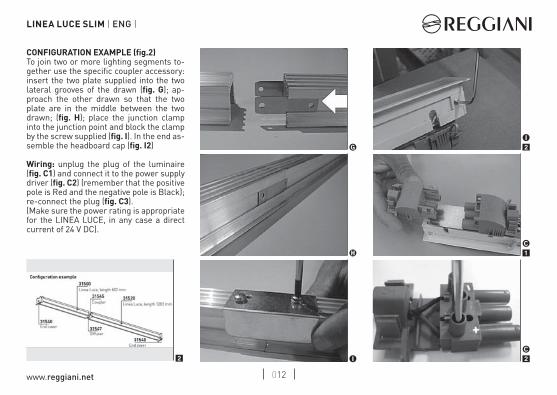
CONFIGURATION EXAMPLE (fi g.2)To join two or more lighting segments to-gether use the specifi c coupler accessory: insert the two plate supplied into the two lateral grooves of the drawn (fi g. G); ap-proach the other drawn so that the two plate are in the middle between the two drawn; (fi g. H); place the junction clamp into the junction point and block the clamp by the screw supplied (fi g. I). In the end as-semble the headboard cap (fi g. I2)
Wiring: unplug the plug of the luminaire (fi g. C1) and connect it to the power supply driver (fi g. C2) (remember that the positive pole is Red and the negative pole is Black); re-connect the plug (fi g. C3).(Make sure the power rating is appropriate for the LINEA LUCE, in any case a direct current of 24 V DC).
�
�
�
��
�
��
www.reggiani.net 013
LINEA LUCE SLIM | ENG |
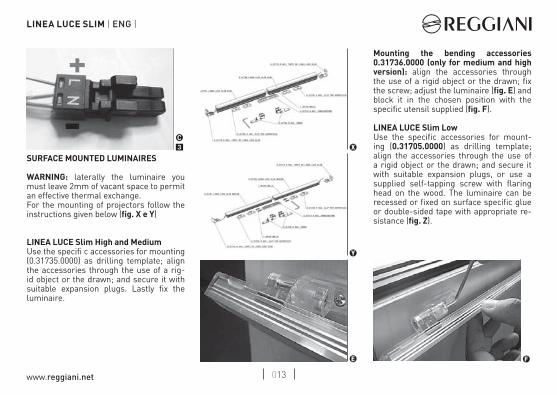
SURFACE MOUNTED LUMINAIRES
WARNING: laterally the luminaire you must leave 2mm of vacant space to permit an effective thermal exchange.For the mounting of projectors follow the instructions given below (fi g. X e Y)
LINEA LUCE Slim High and Medium Use the specifi c accessories for mounting (0.31735.0000) as drilling template; align the accessories through the use of a rig-id object or the drawn; and secure it with suitable expansion plugs. Lastly fi x the luminaire.
Mounting the bending accessories 0.31736.0000 (only for medium and high version): align the accessories through the use of a rigid object or the drawn; fi x the screw; adjust the luminaire (fi g. E) andblock it in the chosen position with the specifi c utensil supplied (fi g. F).
LINEA LUCE Slim LowUse the specifi c accessories for mount-ing (0.31705.0000) as drilling template; align the accessories through the use of a rigid object or the drawn; and secure it with suitable expansion plugs, or use a supplied self-tapping screw with fl aring head on the wood. The luminaire can be recessed or fi xed on surface specifi c glue or double-sided tape with appropriate re-sistance (fi g. Z).
�
�
�
www.reggiani.net 014
LINEA LUCE SLIM | ENG |
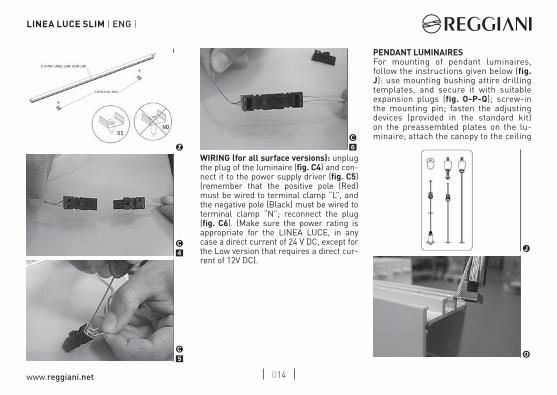
WIRING (for all surface versions): unplug the plug of the luminaire (fi g. C4) and con-nect it to the power supply driver (fi g. C5) (remember that the positive pole (Red) must be wired to terminal clamp “L”, and the negative pole (Black) must be wired to terminal clamp “N”; reconnect the plug (fi g. C6). (Make sure the power rating is appropriate for the LINEA LUCE, in any case a direct current of 24 V DC, except for the Low version that requires a direct cur-rent of 12V DC).
PENDANT LUMINAIRESFor mounting of pendant luminaires, follow the instructions given below (fig. J): use mounting bushing attire drilling templates, and secure it with suitable expansion plugs (fig. O-P-Q); screw-in the mounting pin; fasten the adjusting devices (provided in the standard kit) on the preassembled plates on the lu-minaire; attach the canopy to the ceiling
�
�
�
�
�
�

www.reggiani.net 015
LINEA LUCE SLIM | ENG |
by specific plugs supplied; adjust the required length of the pendant by act-ing on the frictions (pull the wire in the direction of the arrow) to lengthen (fig. C); or pull the cable directly (in the di-rection of the arrow) to shorten (fig. D); lastly cut the surplus steel cable.
CONFIGURATION EXAMPLE (fi g.3)To join two or more lighting segments together use the specific coupler acces-sory; insert the clamp up to the middle into the drawn; block the clamp using the screw supplied (fig. L); approach the other drawn against the fi rst one (fig.
�
�
�
�
�
�

www.reggiani.net 016
LINEA LUCE SLIM | ENG |
M); at the end block the screw (fig. N).Wiring: the luminaire is ready for using: connect the electric cable to the mains (fig. C7) defining the length according to the needs.Note: for the electric cable prepare an hole in the ceiling for the bezel support-ing the electriccable (diameter min. 30 mm).
�
www.reggiani.net 017
LINEA LUCE SLIM | ENG |
GENERAL NOTES
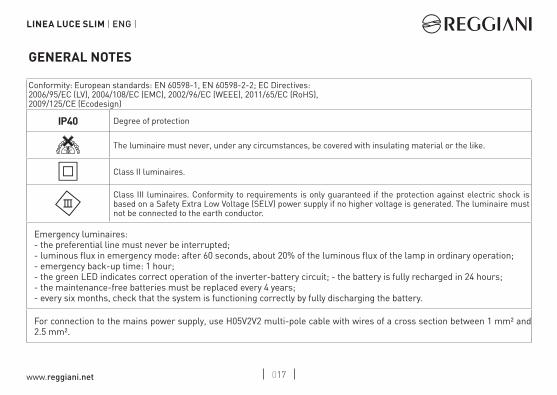
Conformity: European standards: EN 60598-1, EN 60598-2-2; EC Directives:2006/95/EC (LV), 2004/108/EC (EMC), 2002/96/EC (WEEE), 2011/65/EC (RoHS),2009/125/CE (Ecodesign)
IP40 Degree of protection
The luminaire must never, under any circumstances, be covered with insulating material or the like.
Class II luminaires.
Class III luminaires. Conformity to requirements is only guaranteed if the protection against electric shock is based on a Safety Extra Low Voltage (SELV) power supply if no higher voltage is generated. The luminaire must not be connected to the earth conductor.
Emergency luminaires:- the preferential line must never be interrupted;- luminous fl ux in emergency mode: after 60 seconds, about 20% of the luminous fl ux of the lamp in ordinary operation;- emergency back-up time: 1 hour;- the green LED indicates correct operation of the inverter-battery circuit; - the battery is fully recharged in 24 hours;- the maintenance-free batteries must be replaced every 4 years;- every six months, check that the system is functioning correctly by fully discharging the battery.
For connection to the mains power supply, use H05V2V2 multi-pole cable with wires of a cross section between 1 mm² and 2.5 mm².
www.reggiani.net 018
LINEA LUCE SLIM | ENG |
N.B. The free collection of a luminaire may be refused if there is a risk of contamination for the personnel performing the service, if it is evident that the luminaire does not con-tain the essential components or if it contains waste other than WEEE, or if the weight of the luminaire collected is more than double the weight of the luminaire acquired. In these circumstances, disposal is the responsibility of the holder.The WEEE symbol is shown on the packaging of each of our products.
WEEE n° IT08010000000055EAccording to European Directive 2002/96/EC, luminaires are defi ned as Waste Electrical and Electronic Equipment (WEEE) and as such, they cannot be disposed of as municipal
solid waste.At the end of their life cycle, they must there-fore be correctly treated and disposed of as substances of concern for both the environ-ment and human health due to the presence of dangerous substances in the electrical and electronic components.The user must therefore consign used lumi-naires to the distributor when purchasing an equivalent new luminaire or, exclusively in the case of Italy, directly to Ecolight, the Consor-tium for the Disposal of Waste Electrical and Electronic Equipment (Consorzio per lo Smal-timento degli Apparecchi di Illuminazione), delegated by Reggiani S.p.A. Illuminazione, who will collect the equipment free of charge and delivery it to the special collection facili-ties set up by the local authorities to recover, treat and dispose of WEEE.If lamps are disposed of with the luminaire, they must not be crushed becausethey contain highly polluting substances for the environment.The illegal or inappropriate disposal of said waste is punishable by economic and/or administrative sanctions of the amount es-tablished by the law.

www.reggiani.net 019
LINEA LUCE SLIM | DEU |
LINEA LUCE ALLGEMEINE EIGENSCHAFTEN
Die Produktreihe LINEA LUCE entspricht folgenden Richtlinien:Niederspannung 2006/95/EG• EMV 2004/108/EG• 2002/96/EG (WEEE)• 2011/65/EG (RoHS)• 2009/125/EG (Ökodesign) sowie den Si-cherheitsnormen:• EN 60598-1• EN 60598-2-1• EN 60598-2-2• EN 60598-2-22
Für weitere technische Informationen zum Produkt (fotometrische, elektrische Daten, Abmessungen, Gewicht, Zertifi zierun-gen,…) wird auf den Katalog oder das auf der Website verfügbare technische Daten-blatt verwiesen: www.reggiani.net/Art.-Nr.
VORBEREITUNG UND MONTAGE DER LEUCHTEN
Die Netzspannung unter-brechen und die nachste-henden Anweisungen be-folgen.
Die Produktreihe LINEA LUCE gliedert sich in 3 Kategorien: Einbau-, Anbau- und Pendelmontage.
EINBAULEUCHTEDie Einbaumontage erfordert die Herstel-lung eines geeigneten Ausschnitts (33mm x Länge des Trägerelements + Abschluss-kappen Abb. 1) (siehe Angaben auf dem Typenschild).Die Serie LINEA LUCE besteht aus bereits montagefertigen Leuchten mit Schnapp-federn. Zur Montage die Schnappfedern über die Länge der Leuchte anbringen; den Treiber an das Stromnetz anschlie-ßen; dann den Treiber mit dem vorge-sehenen Verbinder an die LINEA LUCE anschließen; die Leuchte kantenbündig in den Ausschnitt einsetzen (Abb. A + Abb. B). Zum Abmontieren kräftig herausziehen.
�
�
�

www.reggiani.net 020
LINEA LUCE SLIM | DEU |
INSTALLATIONSBEISPIEL (Abb. 2)Zur Montage von zwei oder mehr Leuchten in Reihe das Verbindungszubehör verwen-den: die beiden mitgelieferten Platten in die seitlichen Schlitze des Trägerelements einsetzen (Abb. G); das zweite Trägerele-ment so annähern, dass die Platten sich etwa in der Mitte zwischen den beiden Trägerelementen befi nden (Abb. H); den Verbindungsbügel an die Übergangsstel-le setzen und mit Hilfe der mitgelieferten Schrauben fi xieren (Abb. I). Zum Schluss die Verschlusskappen mon-tieren (Abb. i2) Anschluss: Den Steckeran-schluss der Leuchte (Abb. C1) abziehen und an den Treiber anschließen (Abb. C2); (dabei beachten, dass Pluspol = rot und Minuspol = schwarz ist); den Stecker wie-der anschließen (Abb. C3). (Sicherstellen, dass die Leistung zur Speisung der LINEA LUCE ausreicht, d.h. eine Konstantspan-nung von 24 V GS liefert).
�
�
�
��
�
��
www.reggiani.net 021
LINEA LUCE SLIM | DEU |
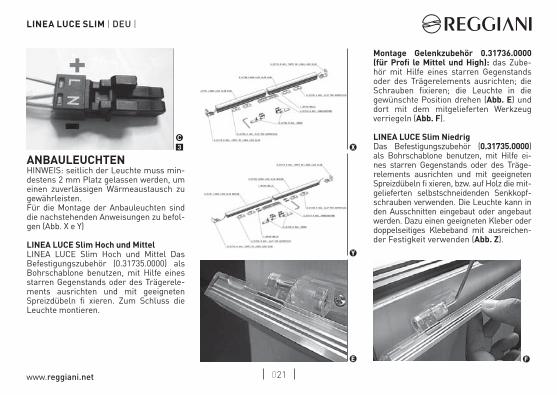
ANBAULEUCHTENHINWEIS: seitlich der Leuchte muss min-destens 2 mm Platz gelassen werden, um einen zuverlässigen Wärmeaustausch zu gewährleisten.Für die Montage der Anbauleuchten sind die nachstehenden Anweisungen zu befol-gen (Abb. X e Y)
LINEA LUCE Slim Hoch und Mittel LINEA LUCE Slim Hoch und Mittel Das Befestigungszubehör (0.31735.0000) als Bohrschablone benutzen, mit Hilfe eines starren Gegenstands oder des Trägerele-ments ausrichten und mit geeigneten Spreizdübeln fi xieren. Zum Schluss die Leuchte montieren.
Montage Gelenkzubehör 0.31736.0000 (für Profi le Mittel und High): das Zube-hör mit Hilfe eines starren Gegenstands oder des Trägerelements ausrichten; die Schrauben fi xieren; die Leuchte in die gewünschte Position drehen (Abb. E) und dort mit dem mitgelieferten Werkzeug verriegeln (Abb. F).
LINEA LUCE Slim NiedrigDas Befestigungszubehör (0.31735.0000) als Bohrschablone benutzen, mit Hilfe ei-nes starren Gegenstands oder des Träge-relements ausrichten und mit geeigneten Spreizdübeln fi xieren, bzw. auf Holz die mit-gelieferten selbstschneidenden Senkkopf-schrauben verwenden. Die Leuchte kann in den Ausschnitten eingebaut oder angebaut werden. Dazu einen geeigneten Kleber oder doppelseitiges Klebeband mit ausreichen-der Festigkeit verwenden (Abb. Z).
�
�
�
www.reggiani.net 022
LINEA LUCE SLIM | DEU |
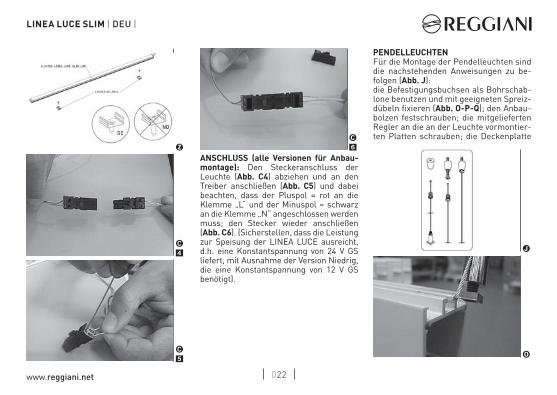
ANSCHLUSS (alle Versionen für Anbau-montage): Den Steckeranschluss der Leuchte (Abb. C4) abziehen und an den Treiber anschließen (Abb. C5) und dabei beachten, dass der Pluspol = rot an die Klemme „L“ und der Minuspol = schwarz an die Klemme „N“ angeschlossen werden muss; den Stecker wieder anschließen (Abb. C6). (Sicherstellen, dass die Leistung zur Speisung der LINEA LUCE ausreicht, d.h. eine Konstantspannung von 24 V GS liefert, mit Ausnahme der Version Niedrig, die eine Konstantspannung von 12 V GS benötigt).
PENDELLEUCHTENFür die Montage der Pendelleuchten sind die nachstehenden Anweisungen zu be-folgen (Abb. J):die Befestigungsbuchsen als Bohrschab-lone benutzen und mit geeigneten Spreiz-dübeln fi xieren (Abb. O-P-Q); den Anbau-bolzen festschrauben; die mitgelieferten Regler an die an der Leuchte vormontier-ten Platten schrauben; die Deckenplatte
�
�
�
�
�
�

www.reggiani.net 023
LINEA LUCE SLIM | DEU |
mit den mitgelieferten Dübeln an der Decke fi xieren; über die Kupplungen die gewünschte Pendellänge einstellen, (zum Verlängern das Seil in Pfeilrichtung zie-hen) (Abb. C); zum Verkürzen direkt (in Pfeilrichtung) am Seil ziehen (Abb. D). Zum Schluss das überschüssige Stahlseil abtrennen.
INSTALLATIONSBEISPIEL (Abb. 3)Zur Montage von zwei oder mehr Leuch-ten in Reihe das Verbindungszubehör verwenden:den Bügel zur Hälfte in das Trägerele-ment einschieben; den Verbindungsbü-gel an die Übergangsstelle setzen und mit Hilfe der mitgelieferten Schrauben fixieren (Abb. L); das zweite Trägerele-
�
�
�
�
�
�
www.reggiani.net 024
LINEA LUCE SLIM | DEU |
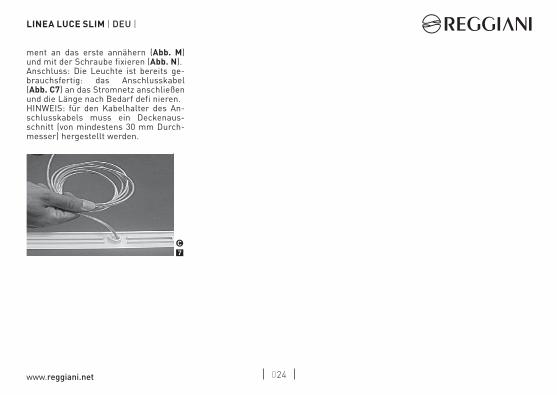
ment an das erste annähern (Abb. M) und mit der Schraube fixieren (Abb. N).Anschluss: Die Leuchte ist bereits ge-brauchsfertig: das Anschlusskabel (Abb. C7) an das Stromnetz anschließen und die Länge nach Bedarf defi nieren.HINWEIS: für den Kabelhalter des An-schlusskabels muss ein Deckenaus-schnitt (von mindestens 30 mm Durch-messer) hergestellt werden.
�
www.reggiani.net 025
LINEA LUCE SLIM | DEU |
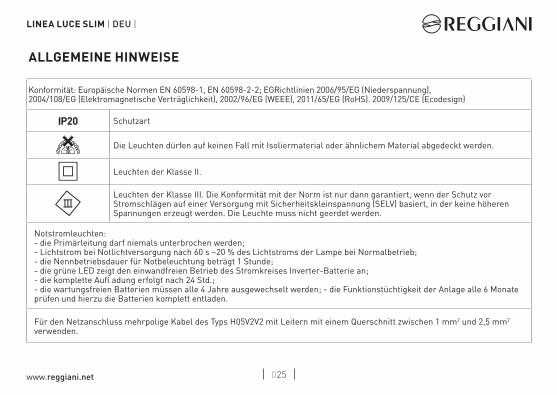
ALLGEMEINE HINWEISE
Konformität: Europäische Normen EN 60598-1, EN 60598-2-2; EGRichtlinien 2006/95/EG (Niederspannung), 2004/108/EG (Elektromagnetische Verträglichkeit), 2002/96/EG (WEEE), 2011/65/EG (RoHS). 2009/125/CE (Ecodesign)
IP20 Schutzart
Die Leuchten dürfen auf keinen Fall mit Isoliermaterial oder ähnlichem Material abgedeckt werden.
Leuchten der Klasse II.
Leuchten der Klasse III. Die Konformität mit der Norm ist nur dann garantiert, wenn der Schutz vor Stromschlägen auf einer Versorgung mit Sicherheitskleinspannung (SELV) basiert, in der keine höheren Spannungen erzeugt werden. Die Leuchte muss nicht geerdet werden.
Notstromleuchten:- die Primärleitung darf niemals unterbrochen werden;- Lichtstrom bei Notlichtversorgung nach 60 s ~20 % des Lichtstroms der Lampe bei Normalbetrieb;- die Nennbetriebsdauer für Notbeleuchtung beträgt 1 Stunde;- die grüne LED zeigt den einwandfreien Betrieb des Stromkreises Inverter-Batterie an;- die komplette Aufl adung erfolgt nach 24 Std.;- die wartungsfreien Batterien müssen alle 4 Jahre ausgewechselt werden; - die Funktionstüchtigkeit der Anlage alle 6 Monate prüfen und hierzu die Batterien komplett entladen.
Für den Netzanschluss mehrpolige Kabel des Typs H05V2V2 mit Leitern mit einem Querschnitt zwischen 1 mm2 und 2,5 mm2 verwenden.
www.reggiani.net 026
LINEA LUCE SLIM | DEU |
sgemäße Beseitigung dieser Altgeräte zieht Geld- oder Verwaltungssanktionen nach sich, deren Höhe gesetzlich festgelegt ist.N.B. Die kostenlose Rücknahme einer Leuchte kann abgelehnt werden, wenn die Gefahr ei-ner Kontaminierung des mit der Rücknahme beauftragten Personals besteht, oder wenn es offensichtlich ist, dass die Leuchten die we-sentlichen Bauteile nicht mehr enthalten bzw. andere Abfälle als Elektro- und Elektronik- Al-tgeräte enthalten oder dass sie mehr als das Doppelte des Gewichts bei Neuerwerb besitzt.In diesen Fällen obliegt die Beiseitigung dem Nutzer.Das Symbol zur WEEE-Kennzeichnung ist an der Packung all unserer Produkte angebracht.
WEEE n° IT08010000000055EDie europäische Richtlinie 2002/96/EG schreibt vor, dass Leuchten defi nitionsgemäß Elektro- und Elektro-nik-Altgeräte (WEEE) sind und als solche nicht mit festen Siedlung-
sabfällen gleichgesetzt werden können.Diese Elektro- und Elektronik-Altgeräte müssen am Ende ihrer Nutzungsdauer ord-nungsgemäß behandelt und beseitigt werden, da sie aufgrund des Anteils an gefährlichen Stoffen in elektrischen und elektronischen Bauteilen sowohl für die Umwelt als auch für die Gesundheit potentiell gefährlich sind.Daher ist der Nutzer verpfl ichtet, die ge-brauchten Leuchten an den Vertreiber zurückzugegeben, wenn er eine gleichwertige neue Leuchte erwirbt, bzw., in Italien, direkt an den von Reggiani S.p.A. Illuminazione be-auftragten Verband Ecolight (Consorzio per lo Smaltimento degli Apparecchi di Illumina-zione - Verband für die Beseitigung von ge-brauchten Leuchten), der für die kostenlose Rücknahme und die Zustellung an spezia-lisierte, entsprechend von den öffentlichen Verwaltungen eingerichtete Rücknahmestell-en zuständig ist, die in der Lage sind, WEEE zu verwerten, zu behandeln und zu beseitigen.Werden die Lampen zusammen mit der Leuchte entsorgt, dürfen sie nicht zerbrochen werden, da sie stark umweltverschmutzende Stoffe enthalten.Eine gesetzwidrige oder nicht ordnung-
www.reggiani.net 027
LINEA LUCE SLIM | FRA |
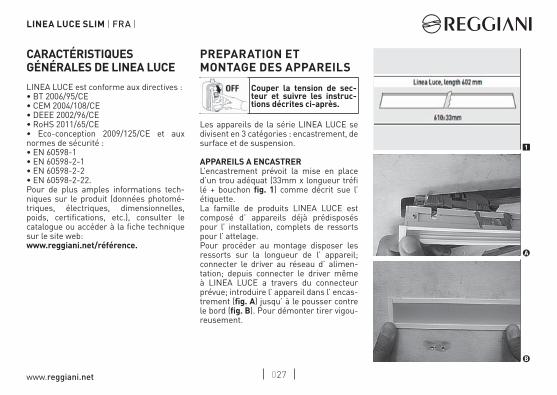
CARACTÉRISTIQUES GÉNÉRALES DE LINEA LUCE
LINEA LUCE est conforme aux directives :• BT 2006/95/CE• CEM 2004/108/CE• DEEE 2002/96/CE• RoHS 2011/65/CE• Eco-conception 2009/125/CE et aux normes de sécurité :• EN 60598-1• EN 60598-2-1• EN 60598-2-2• EN 60598-2-22.Pour de plus amples informations tech-niques sur le produit (données photomé-triques, électriques, dimensionnelles, poids, certifi cations, etc.), consulter le catalogue ou accéder à la fi che technique sur le site web:www.reggiani.net/référence.
PREPARATION ET MONTAGE DES APPAREILS
Couper la tension de sec-teur et suivre les instruc-tions décrites ci-après.
Les appareils de la série LINEA LUCE se divisent en 3 catégories : encastrement, de surface et de suspension.
APPAREILS A ENCASTRERL’encastrement prévoit la mise en place d’un trou adéquat (33mm x longueur tréfi lé + bouchon fi g. 1) comme décrit sue l’ étiquette.La famille de produits LINEA LUCE est composé d’ appareils déjà prédisposés pour l’ installation, complets de ressorts pour l’ attelage.Pour procéder au montage disposer les ressorts sur la longueur de l’ appareil; connecter le driver au réseau d’ alimen-tation; depuis connecter le driver même à LINEA LUCE a travers du connecteur prévue; introduire l’ appareil dans l’ encas-trement (fi g. A) jusqu’ à le pousser contre le bord (fi g. B). Pour démonter tirer vigou-reusement.
�
�
�

www.reggiani.net 028
LINEA LUCE SLIM | FRA |
EXEMPLE DE CONFIGURATION (fi g.2)Pour monter un ou plus appareils en ligne continue utiliser les accessoires de conjonction; introduire les plaques four-nies dans les rainures latérales du tréfi lé (fi g. G); rapprocher le tréfi lé suivant de manière que les deux plaques soyez à moitié entre un tréfi lé et l’ autre (fi g. H); placer la fi xation de jonction dans la place de jonction et bloquer les fi xations avec les vis fournies (fi g. I). En fi n monter les bou-chons de tête(fi g. i2)Câblage : détacher la fi che de l’ appareil (fi g. C1) et le connecter au driver d’ ali-mentation (fi g. C2) (en se souvenant que le pôle positif = Rouge et le pôle néga-tif = Noir) ; reconnecter la fi che (fi g. C3) (vérifi er qu’elle est de puissance adaptée à l’élément LINEA LUCE à alimenter, et dans tous les cas à tension constante 24 Vcc)
�
�
�
��
�
��

www.reggiani.net 029
LINEA LUCE SLIM | FRA |
APPAREILS DE SURFACE
PRECAUTION : latéralement à l’ appareil on doit lasser au moins 2mm d’ espace libre pour consentir un effi cace exchange thermique.Le montage des appareils suppose le res-pect des instructions reportées ci-dessous (fi g. X e Y)
LINEA LUCE Slim High e Medium Utiliser les appareils adéquats pour la fi xation (0.31735.0000) comme gabarit de perçage; aligner grâce à l’ utilisation d’ un objet rigide ou du tréfi lé même et le blo-quer à l’aide de vis tamponnées prévues à cet effet. Pour fi n raccorder l’ appareil.Montage des accesoires rotule 0.31736.0000 (pour les appareils medium
et high): aligner grâce à l’ utilisation d’ un objet rigide ou du tréfi lé même; fi xer les vis; en plus orienter l’ appareil (fi g. E); le bloquer dans la position choisie grâce à l’ ustensile prévu (fi g. F).
LINEA LUCE Slim LowUtiliser les appareils adéquats pour la fi xation (0.31705.0000) comme gabarit de perçage; aligner grâce à l’ utilisation d’ un objet rigide ou du tréfi lé même et le bloquer à l’aide de vis tamponnées prévues à cet effet, ou bien sur le bois utiliser les vis a tôle à tête bombée four-nies. L’ appareil peut être fixé dans les encastrement ou à surface en utilisant colle appropriée ou ruban bi-adhésif avec garniture mécanique appropriée (fig. Z).CABLAGE (pour toutes les versions de surface): détacher la fiche de l’ appareil
�
�
�

www.reggiani.net 030
LINEA LUCE SLIM | FRA |
(fig. C4) et le connecter au driver d’ ali-mentation (fig. C5) (en se souvenant que le pôle positif = Rouge doit être câblé à la borne « L » et le pôle négatif = Noir) doit être câblé à la borne « N » ; recon-necter la fiche (fig. C6) (vérifier qu’elle est de puissance adaptée à l’élément LINEA LUCE à alimenter, et dans tous les cas à tension constante 24 Vcc), sauf pour la version Low qui demande une tension constante de 12 Vcc).
APPAREILS DE SUSPENSIONLe montage des appareils de suspen-sion suppose le respect des instructions reportées ci-dessous (fig. J): utiliser les douilles de fi xation comme gabarit de perçage avant de les bloquer à l’ aide de vis tamponnées prévues à cet effet (fig. O-P-Q); visser le pivot de fi xation ; visser les régulateurs fournis sur les plaques montées sur préalable sur l’
�
�
�
�
�
�

www.reggiani.net 031
LINEA LUCE SLIM | FRA |
appareil; fixer l’ auvent au plafond avecprévues chevilles fournies ; régler la suspension à la longueur voulue en agissant sur les dispositifs de blocage à embrayage (tirer sur le fi l dans le sens de la flèche) pour allonger (fig. C); et en tirant directement sur le câble (dans le sens de la flèche) pour la raccourcir (fig. D). Pour fin couper la câble d’ acier qui dépasse.
EXEMPLE DE CONFIGURATION (fi g.3)Pour monter un ou plus appareils en ligne continue utiliser les accessoires de conjonction; introduire la fi xation à moitié longueur du tréfi lé; bloquer la fi xation en utilisant les vis fournies (fi g. L);rapprocher l’ autre tréfi lé contre le pré-
�
�
�
�
�
�
www.reggiani.net 032
LINEA LUCE SLIM | FRA |
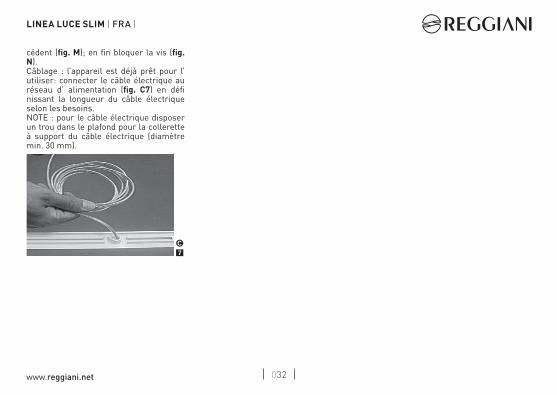
cédent (fi g. M); en fi n bloquer la vis (fi g. N).Câblage : l’appareil est déjà prêt pour l’ utiliser: connecter le câble électrique au réseau d’ alimentation (fi g. C7) en défi nissant la longueur du câble électrique selon les besoins.NOTE : pour le câble électrique disposer un trou dans le plafond pour la collerette à support du câble électrique (diamètre min. 30 mm).
�
www.reggiani.net 033
LINEA LUCE SLIM | FRA |
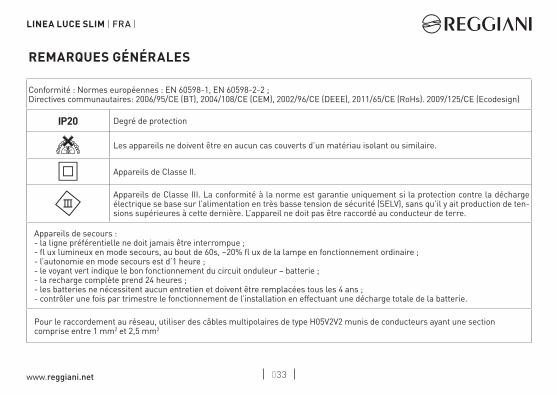
REMARQUES GÉNÉRALES
Conformité : Normes européennes : EN 60598-1, EN 60598-2-2 ; Directives communautaires: 2006/95/CE (BT), 2004/108/CE (CEM), 2002/96/CE (DEEE), 2011/65/CE (RoHs). 2009/125/CE (Ecodesign)
IP20 Degré de protection
Les appareils ne doivent être en aucun cas couverts d’un matériau isolant ou similaire.
Appareils de Classe II.
Appareils de Classe III. La conformité à la norme est garantie uniquement si la protection contre la décharge électrique se base sur l’alimentation en très basse tension de sécurité (SELV), sans qu’il y ait production de ten-sions supérieures à cette dernière. L’appareil ne doit pas être raccordé au conducteur de terre.
Appareils de secours :- la ligne préférentielle ne doit jamais être interrompue ;- fl ux lumineux en mode secours, au bout de 60s, ~20% fl ux de la lampe en fonctionnement ordinaire ;- l’autonomie en mode secours est d’1 heure ;- le voyant vert indique le bon fonctionnement du circuit onduleur – batterie ;- la recharge complète prend 24 heures ;- les batteries ne nécessitent aucun entretien et doivent être remplacées tous les 4 ans ;- contrôler une fois par trimestre le fonctionnement de l’installation en effectuant une décharge totale de la batterie.
Pour le raccordement au réseau, utiliser des câbles multipolaires de type H05V2V2 munis de conducteurs ayant une section comprise entre 1 mm2 et 2,5 mm2

www.reggiani.net 034
LINEA LUCE SLIM | FRA |
luantes pour l’environnement.L’élimination abusive ou inadéquate de ces déchets est passible de sanctions économ-iques et/ou administratives dont le montant sera fi xé aux termes de la loi.Remarque: l’enlèvement gratuit d’un appareil d’éclairage peut être refusé en cas de risque de contamination du personnel chargé de la collecte, s’il s’avère évident que l’appareil ne contient pas les composants essentiels ou qu’il contient des déchets autres que des DEEE ou encore si le poids de l’appareil enlevé est supérieur au double du poids de l’appareil nouvellement acquis.Dans tous ces cas de fi gure, l’élimination est à la charge du détenteur.Le symbole DEEE est apposé sur l’emballage de tous nos produits.
DEEE n° IT08010000000055ELa directive européenne 2002/96/CE établit que les appareils d’éclair-age sont par défi nition des DEEE (Déchets d’équipements électriques et électroniques) et qu’ils ne peu-
vent pas, en tant que tels, être assimilés aux déchets ménagers solides.C’est pourquoi les DEEE doivent être, une fois arrivés au terme de leur cycle de vie, conve-nablement traités et éliminés en raison de leur dangerosité potentielle aussi bien pour l’environnement que pour la santé de l’hom-me, dangerosité qui s’explique par la présence de substances nocives dans les composants électriques et électroniques.L’utilisateur se voit donc dans l’obligation de remettre les appareils d’éclairage usagés au distributeur en échange de l’achat d’un nou-vel appareil équivalent ou bien, mais unique-ment sur le territoire italien, directement au Groupement pour l’élimination des appareils d’éclairage – Ecolight – mandaté dans ce sens par la société Reggiani SPA Illumina-zione; tous deux se chargeront gratuitement de l’enlèvement et de la remise aux points de collecte spécialisés, dûment mis en place par les collectivités locales, qui sont responsables de la valorisation, du traitement et de l’élimin-ation des DEEE.Si elles sont éliminées avec l’appareil, les lampes ne doivent pas être cassées car elles contiennent des substances hautement pol-
www.reggiani.net 035
LINEA LUCE SLIM | ESP |
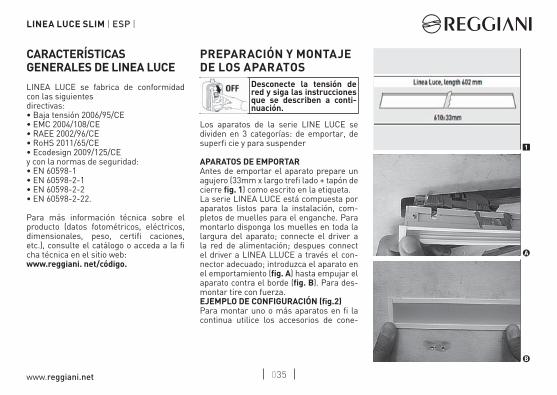
CARACTERÍSTICAS GENERALES DE LINEA LUCE
LINEA LUCE se fabrica de conformidad con las siguientesdirectivas:• Baja tensión 2006/95/CE• EMC 2004/108/CE• RAEE 2002/96/CE• RoHS 2011/65/CE• Ecodesign 2009/125/CEy con la normas de seguridad:• EN 60598-1• EN 60598-2-1• EN 60598-2-2• EN 60598-2-22.
Para más información técnica sobre el producto (datos fotométricos, eléctricos, dimensionales, peso, certifi caciones, etc.), consulte el catálogo o acceda a la fi cha técnica en el sitio web:www.reggiani. net/código.
PREPARACIÓN Y MONTAJE DE LOS APARATOS
Desconecte la tensión de red y siga las instrucciones que se describen a conti-nuación.
Los aparatos de la serie LINE LUCE se dividen en 3 categorías: de emportar, de superfi cie y para suspender
APARATOS DE EMPORTARAntes de emportar el aparato prepare un agujero (33mm x largo trefi lado + tapón de cierre fi g. 1) como escrito en la etiqueta.La serie LINEA LUCE está compuesta por aparatos listos para la instalación, com-pletos de muelles para el enganche. Para montarlo disponga los muelles en toda la largura del aparato; connecte el driver a la red de alimentación; despues connect el driver a LINEA LLUCE a través el con-nector adecuado; introduzca el aparato en el emportamiento (fi g. A) hasta empujar el aparato contra el borde (fi g. B). Para des-montar tire con fuerza.EJEMPLO DE CONFIGURACIÓN (fi g.2)Para montar uno o más aparatos en fi la continua utilice los accesorios de cone-
�
�
�
www.reggiani.net 036
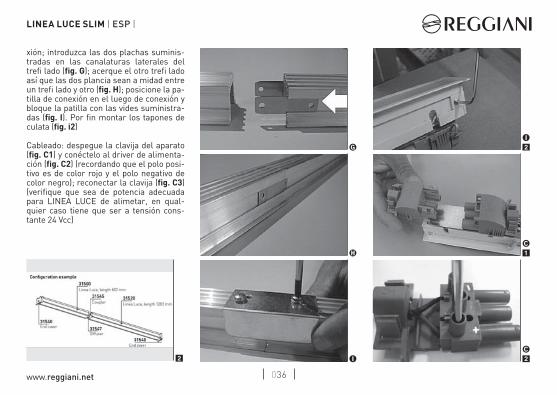
LINEA LUCE SLIM | ESP |
xión; introduzca las dos plachas suminis-tradas en las canalaturas laterales del trefi lado (fi g. G); acerque el otro trefi lado así que las dos plancia sean a midad entre un trefi lado y otro (fi g. H); posicione la pa-tilla de conexión en el luego de conexión y bloque la patilla con las vides suministra-das (fi g. I). Por fi n montar los tapones de culata (fi g. i2)
Cableado: despegue la clavija del aparato (fi g. C1) y conéctelo al driver de alimenta-ción (fi g. C2) (recordando que el polo posi-tivo es de color rojo y el polo negativo de color negro); reconectar la clavija (fi g. C3) (verifi que que sea de potencia adecuada para LINEA LUCE de alimetar, en qual-quier caso tiene que ser a tensión cons-tante 24 Vcc)
�
�
�
��
�
��

www.reggiani.net 037
LINEA LUCE SLIM | ESP |
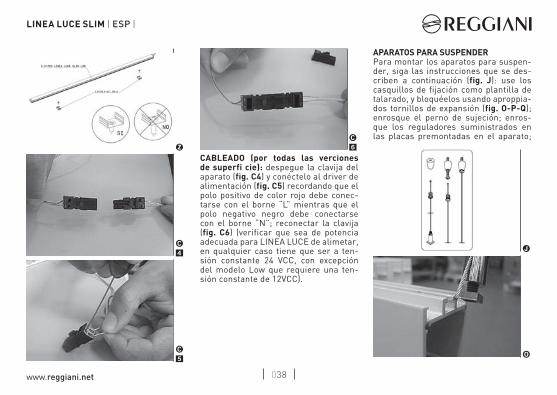
APARATOS DE SUPERFICIE
ATENCION: lateralmente al aparato se de-ben dejar por lo menos 2mm de espacio libre para consentire un cambio térmico efi caz.Para montar los aparatos siga las instruc-ciones que se describen a continuación (fi g. X e Y)
LINEA LUCE Slim High e Medium Use los accesorios adecuados para la fi -jación (0.31735.0000) como plantilla de taladrado; alinéelos a traves de un objeto rígido o del trefi lado mismo y bloquéelo usando aproppiados tornillos de expan-sión. Por último, acople el aparato.Montaje de los accesorios articulación 0.31736.0000 (para profi les medium y
high): alinéelos a traves de un objeto rígido o del trefi lado mismo; asegure las vides; además oriente el aparato (fi g. E); blo-quéelo en la posición escogida a través del utensil suministrado (fi g. F).
LINEA LUCE Slim LowUse los accesorios adecuados para la fi -jación (0.31705.0000) como plantilla de taladrado; alinéelos a traves de un objeto rígido o del trefi lado mismo y bloquéelo usando aproppiados tornillos de expan-sión, o bien para la madera use los tornillo autocortante con cabeza bombeada sumi-nistrados. El aparato puede ser asegurado en los emportamientos o en superfi cie utilizando un pegamento adecuado o bien biadhesivo con adecuada junta mécanica (fi g. Z).
�
�
�
www.reggiani.net 038
LINEA LUCE SLIM | ESP |
CABLEADO (por todas las verciones de superfi cie): despegue la clavija del aparato (fig. C4) y conéctelo al driver de alimentación (fig. C5) recordando que el polo positivo de color rojo debe conec-tarse con el borne “L” mientras que el polo negativo negro debe conectarse con el borne “N”; reconectar la clavija (fig. C6) (verificar que sea de potencia adecuada para LINEA LUCE de alimetar, en qualquier caso tiene que ser a ten-sión constante 24 VCC, con excepción del modelo Low que requiere una ten-sión constante de 12VCC).
APARATOS PARA SUSPENDERPara montar los aparatos para suspen-der, siga las instrucciones que se des-criben a continuación (fig. J): use los casquillos de fijación como plantilla de talarado, y bloquéelos usando aproppia-dos tornillos de expansión (fig. O-P-Q); enrosque el perno de sujeción; enros-que los reguladores suministrados en las placas premontadas en el aparato;
�
�
�
�
�
�

www.reggiani.net 039
LINEA LUCE SLIM | ESP |
asegure el toldo al techo con adecuados tacos suministrados; regule el largo de-seado de la suspensión: para alargarla actúe sobre los embragues (tire el cable hacia la dirección indicada por la flecha) (fig. C); para acortarla, tire directamen-te el cable hacia la dirección indicada por la flecha (fig. D); por ultimo, corte el cable de acero sobrante.
EJEMPLO DE CONFIGURACIÓN (fi g.3)Para montar uno o más aparatos en fi la continua utilice los accesorios de cone-xión; introduzca la patilla hasta la midad en el trefi lado; bloque las patillas con las vides suministradas (fi g. L);acercar el otro trefi lado contra el prece-dente (fi g. M); por fi n bloque la vid (fi g. N).
�
�
�
�
�
�

www.reggiani.net 040
LINEA LUCE SLIM | ESP |
Cableado: el aparato está listo para el utilizo: conectar el cable electrico a la red de alimentación (fi g. C7) estableciendo el largo del cable eléctrico según las nece-sidades.NOTA: por el cable electrico preparar un agujero en el techo para el aro a supor-te del cable electrico (diámentro min. 30mm)
�
www.reggiani.net 041
LINEA LUCE SLIM | ESP |
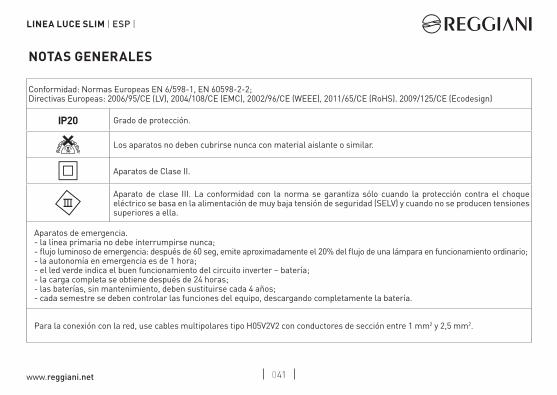
NOTAS GENERALES
Conformidad: Normas Europeas EN 6/598-1, EN 60598-2-2; Directivas Europeas: 2006/95/CE (LV), 2004/108/CE (EMC), 2002/96/CE (WEEE), 2011/65/CE (RoHS). 2009/125/CE (Ecodesign)
IP20 Grado de protección.
Los aparatos no deben cubrirse nunca con material aislante o similar.
Aparatos de Clase II.
Aparato de clase III. La conformidad con la norma se garantiza sólo cuando la protección contra el choque eléctrico se basa en la alimentación de muy baja tensión de seguridad (SELV) y cuando no se producen tensiones superiores a ella.
Aparatos de emergencia.- la línea primaria no debe interrumpirse nunca;- fl ujo luminoso de emergencia: después de 60 seg, emite aproximadamente el 20% del fl ujo de una lámpara en funcionamiento ordinario;- la autonomía en emergencia es de 1 hora;- el led verde indica el buen funcionamiento del circuito inverter – batería;- la carga completa se obtiene después de 24 horas;- las baterías, sin mantenimiento, deben sustituirse cada 4 años;- cada semestre se deben controlar las funciones del equipo, descargando completamente la batería.
Para la conexión con la red, use cables multipolares tipo H05V2V2 con conductores de sección entre 1 mm2 y 2,5 mm2.
www.reggiani.net 042
LINEA LUCE SLIM | ESP |
luantes pour l’environnement.L’élimination abusive ou inadéquate de ces dé-chets est passible de sanctions économiques et/ou administratives dont le montant sera fi xé aux termes de la loi.Remarque: l’enlèvement gratuit d’un appareil d’éclairage peut être refusé en cas de risque de contamination du personnel chargé de la collecte, s’il s’avère évident que l’appareil ne contient pas les composants essentiels ou qu’il contient des déchets autres que des DEEE ou encore si le poids de l’appareil enlevé est supérieur au double du poids de l’appareil nouvellement acquis.Dans tous ces cas de fi gure, l’élimination est à la charge du détenteur.Le symbole DEEE est apposé sur l’emballage de tous nos produits.
DEEE n° IT08010000000055ELa directive européenne 2002/96/CE établit que les appareils d’éclairage sont par défi nition des DEEE (Dé-chets d’équipements électriques et électroniques) et qu’ils ne peuvent
pas, en tant que tels, être assimilés aux dé-chets ménagers solides.C’est pourquoi les DEEE doivent être, une fois arrivés au terme de leur cycle de vie, convena-blement traités et éliminés en raison de leur dangerosité potentielle aussi bien pour l’en-vironnement que pour la santé de l’homme, dangerosité qui s’explique par la présence de substances nocives dans les composants électriques et électroniques.L’utilisateur se voit donc dans l’obligation de remettre les appareils d’éclairage usagés au distributeur en échange de l’achat d’un nou-vel appareil équivalent ou bien, mais unique-ment sur le territoire italien, directement au Groupement pour l’élimination des appareils d’éclairage – Ecolight – mandaté dans ce sens par la société Reggiani SPA Illumina-zione; tous deux se chargeront gratuitement de l’enlèvement et de la remise aux points de collecte spécialisés, dûment mis en place par les collectivités locales, qui sont responsables de la valorisation, du traitement et de l’élimi-nation des DEEE.Si elles sont éliminées avec l’appareil, les lampes ne doivent pas être cassées car elles contiennent des substances hautement pol-
www.reggiani.net 043
LINEA LUCE SLIM | RUS |
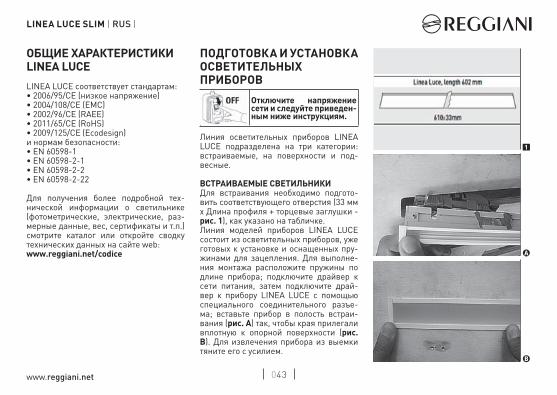
ОБЩИЕ ХАРАКТЕРИСТИКИ LINEA LUCELINEA LUCE соответствует стандартам:• 2006/95/CE (низкое напряжение)• 2004/108/CE (EMC)• 2002/96/CE (RAEE)• 2011/65/CE (RoHS)• 2009/125/CE (Ecodesign)и нормам безопасности:• EN 60598-1• EN 60598-2-1• EN 60598-2-2• EN 60598-2-22
Для получения более подробной тех-нической информации о светильнике (фотометрические, электрические, раз-мерные данные, вес, сертификаты и т.п.) смотрите каталог или откройте сводку технических данных на сайте web: www.reggiani.net/codice
ПОДГОТОВКА И УСТАНОВКА ОСВЕТИТЕЛЬНЫХ ПРИБОРОВ
Отключите напряжение сети и следуйте приведен-ным ниже инструкциям.
Линия осветительных приборов LINEA LUCE подразделена на три категории: встраиваемые, на поверхности и под-весные.
ВСТРАИВАЕМЫЕ СВЕТИЛЬНИКИДля встраивания необходимо подгото-вить соответствующего отверстия (33 мм x Длина профиля + торцевые заглушки - рис. 1), как указано на табличке.Линия моделей приборов LINEA LUCE состоит из осветительных приборов, уже готовых к установке и оснащенных пру-жинами для зацепления. Для выполне-ния монтажа расположите пружины по длине прибора; подключите драйвер к сети питания, затем подключите драй-вер к прибору LINEA LUCE с помощью специального соединительного разъе-ма; вставьте прибор в полость встраи-вания (рис. A) так, чтобы края прилегали вплотную к опорной поверхности (рис. B). Для извлечения прибора из выемки тяните его с усилием.
�
�
�
www.reggiani.net 044
LINEA LUCE SLIM | RUS |
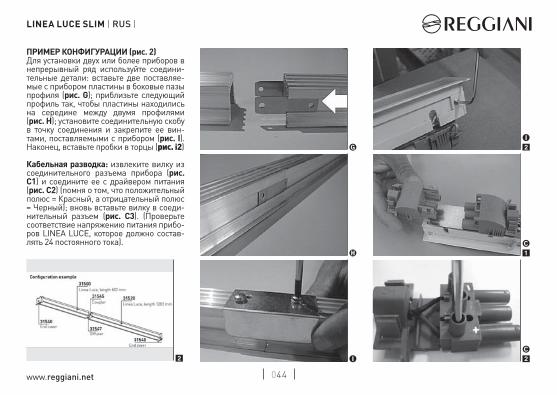
ПРИМЕР КОНФИГУРАЦИИ (рис. 2)Для установки двух или более приборов в непрерывный ряд используйте соедини-тельные детали: вставьте две поставляе-мые с прибором пластины в боковые пазы профиля (рис. G); приблизьте следующий профиль так, чтобы пластины находились на середине между двумя профилями (рис. H); установите соединительную скобу в точку соединения и закрепите ее вин-тами, поставляемыми с прибором (рис. I). Наконец, вставьте пробки в торцы (рис. i2)
Кабельная разводка: извлеките вилку из соединительного разъема прибора (рис. C1) и соедините ее с драйвером питания (рис. C2) (помня о том, что положительный полюс = Красный, а отрицательный полюс = Черный); вновь вставьте вилку в соеди-нительный разъем (рис. C3). (Проверьте соответствие напряжению питания прибо-ров LINEA LUCE, которое должно состав-лять 24 постоянного тока).
�
�
�
��
�
��
www.reggiani.net 045
LINEA LUCE SLIM | RUS |
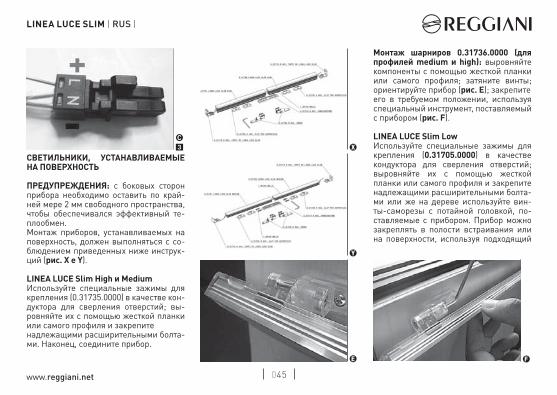
СВЕТИЛЬНИКИ, УСТАНАВЛИВАЕМЫЕ НА ПОВЕРХНОСТЬ
ПРЕДУПРЕЖДЕНИЯ: с боковых сторон прибора необходимо оставить по край-ней мере 2 мм свободного пространства, чтобы обеспечивался эффективный те-плообмен.Монтаж приборов, устанавливаемых на поверхность, должен выполняться с со-блюдением приведенных ниже инструк-ций (рис. X e Y).
LINEA LUCE Slim High и Medium Используйте специальные зажимы для крепления (0.31735.0000) в качестве кон-дуктора для сверления отверстий; вы-ровняйте их с помощью жесткой планки или самого профиля и закрепитенадлежащими расширительными болта-ми. Наконец, соедините прибор.
Монтаж шарниров 0.31736.0000 (для профилей medium и high): выровняйте компоненты с помощью жесткой планки или самого профиля; затяните винты; ориентируйте прибор (рис. E); закрепитеего в требуемом положении, используя специальный инструмент, поставляемый с прибором (рис. F).
LINEA LUCE Slim LowИспользуйте специальные зажимы для крепления (0.31705.0000) в качестве кондуктора для сверления отверстий; выровняйте их с помощью жесткой планки или самого профиля и закрепите надлежащими расширительными болта-ми или же на дереве используйте вин-ты-саморезы с потайной головкой, по-ставляемые с прибором. Прибор можно закреплять в полости встраивания или на поверхности, используя подходящий
�
�
�
www.reggiani.net 046
LINEA LUCE SLIM | RUS |
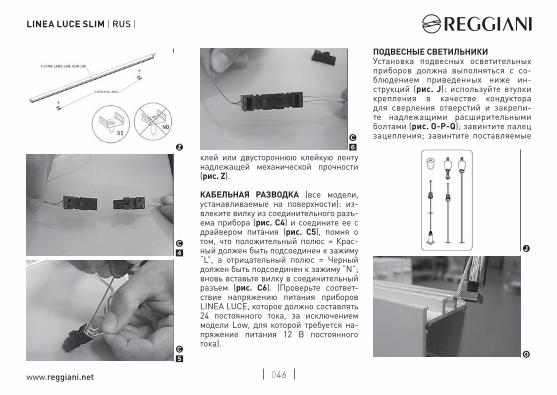
клей или двустороннюю клейкую ленту надлежащей механической прочности (рис. Z).
КАБЕЛЬНАЯ РАЗВОДКА (все модели, устанавливаемые на поверхности): из-влеките вилку из соединительного разъ-ема прибора (рис. C4) и соедините ее с драйвером питания (рис. C5), помня о том, что положительный полюс = Крас-ный должен быть подсоединен к зажиму “L”, а отрицательный полюс = Черный должен быть подсоединен к зажиму “N”; вновь вставьте вилку в соединительный разъем (рис. C6). (Проверьте соответ-ствие напряжению питания приборов LINEA LUCE, которое должно составлять 24 постоянного тока, за исключением модели Low, для которой требуется на-пряжение питания 12 В постоянного тока).
ПОДВЕСНЫЕ СВЕТИЛЬНИКИУстановка подвесных осветительных приборов должна выполняться с со-блюдением приведенных ниже ин-струкций (рис. J): используйте втулки крепления в качестве кондуктора для сверления отверстий и закрепи-те надлежащими расширительными болтами (рис. O-P-Q); завинтите палец зацепления; завинтите поставляемые
�
�
�
�
�
�
www.reggiani.net 047
LINEA LUCE SLIM | RUS |
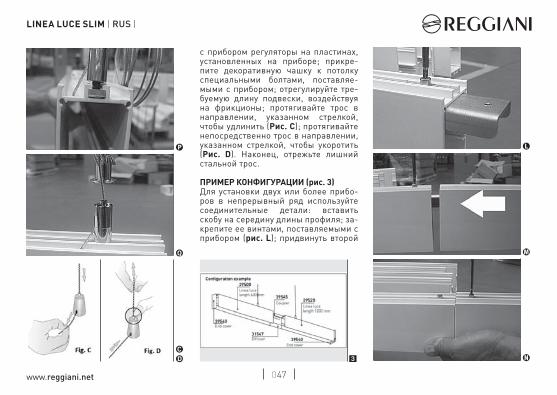
с прибором регуляторы на пластинах, установленных на приборе; прикре-пите декоративную чашку к потолку специальными болтами, поставляе-мыми с прибором; отрегулируйте тре-буемую длину подвески, воздействуя на фрикционы; протягивайте трос в направлении, указанном стрелкой, чтобы удлинить (Рис. C); протягивайте непосредственно трос в направлении, указанном стрелкой, чтобы укоротить (Рис. D). Наконец, отрежьте лишний стальной трос.
ПРИМЕР КОНФИГУРАЦИИ (рис. 3)Для установки двух или более прибо-ров в непрерывный ряд используйте соединительные детали: вставить скобу на середину длины профиля; за-крепите ее винтами, поставляемыми с прибором (рис. L); придвинуть второй
�
�
�
�
�
�
www.reggiani.net 048
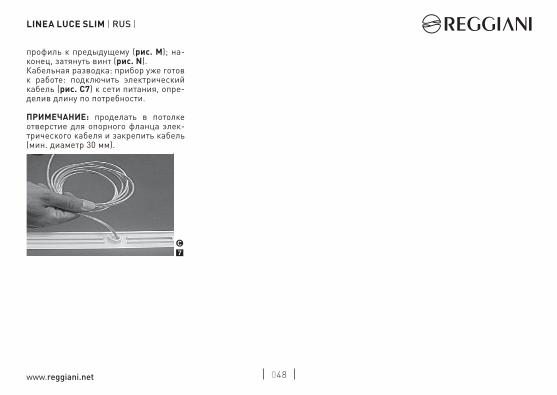
LINEA LUCE SLIM | RUS |
профиль к предыдущему (рис. M); на-конец, затянуть винт (рис. N).Кабельная разводка: прибор уже готов к работе: подключить электрический кабель (рис. C7) к сети питания, опре-делив длину по потребности.
ПРИМЕЧАНИЕ: проделать в потолке отверстие для опорного фланца элек-трического кабеля и закрепить кабель (мин. диаметр 30 мм).
�
www.reggiani.net 049
LINEA LUCE SLIM | RUS |
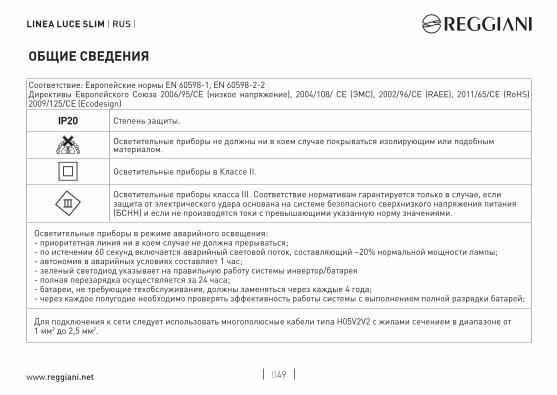
ОБЩИЕ СВЕДЕНИЯ
Соответствие: Европейские нормы EN 60598-1, EN 60598-2-2Директивы Европейского Союза 2006/95/CE (низкое напряжение), 2004/108/ CE (ЭМС), 2002/96/CE (RAEE), 2011/65/CE (RoHS) 2009/125/CE (Ecodesign)
IP20 Степень защиты.
Осветительные приборы не должны ни в коем случае покрываться изолирующим или подобным материалом.
Осветительные приборы в Классе II.
Осветительные приборы класса III. Соответствие нормативам гарантируется только в случае, если защита от электрического удара основана на системе безопасного сверхнизкого напряжения питания (БСНН) и если не производятся токи с превышающими указанную норму значениями.
Осветительные приборы в режиме аварийного освещения:- приоритетная линия ни в коем случае не должна прерываться;- по истечении 60 секунд включается аварийный световой поток, составляющий ~20% нормальной мощности лампы;- автономия в аварийных условиях составляет 1 час;- зеленый светодиод указывает на правильную работу системы инвертор/батарея- полная перезарядка осуществляется за 24 часа;- батареи, не требующие техобслуживания, должны заменяться через каждые 4 года;- через каждое полугодие необходимо проверять эффективность работы системы с выполнением полной разрядки батарей;
Для подключения к сети следует использовать многополюсные кабели типа H05V2V2 с жилами сечением в диапазоне от1 мм2 до 2,5 мм2.
www.reggiani.net 050
LINEA LUCE SLIM | RUS |
ющие окружающую среду. Неразрешенный или ненадлежащий сброс указанных отхо-дов влечет за собой наложение экономиче-ских и (или) административных санкций в размере, установленном законом.ПРИМЕЧАНИЕ: Консорциум может отказать в бесплатном вывозе осветительного при-бора в случаях, когда имеется риск для здо-ровья персонала, осуществляющего вывоз отходов, или же в случаях, когда является очевидным, что приборы не содержат опас-ных компонентов или относятся к отходам, не входящим в класс RAEE, или в случаях, если вес прибора вдвое превышает вес но-вого приобретенного прибора.При таких обстоятельствах сброс отходов должен производиться самим пользовате-лем.Знак типа обработки отходов электрической и электронной аппаратуры (RAEE) приведен на упаковке каждого нашего изделия.
RAEE n° IT08010000000055EВ соответствии с предписаниями Европейской директивы 2012/96/UE отработанные осветительные приборы по своей природе входят в класс RAEE (Отходы электриче-
ской и электронной аппаратуры) и, следо-вательно, не должны рассматриваться как твердые бытовые отходы.Таким образом, осветительные приборы класса RAEE по окончании срока службы должны подвергаться надлежащей обра-ботке перед сбросом, так как являются по-тенциально опасными как для окружающей среды, так и для здоровья человека по при-чине наличия опасных веществ в электри-ческих и электронных компонентах.По этой причине пользователь обязан сдать окончившие срок службы осветительные приборы продавцу при условии приобре-тения нового эквивалентного прибора или, исключительно для территории Италии, непосредственно в Консорциум утилиза-ции осветительных приборов “Ecolight”, уполномоченный компанией “Reggiani S.p.A. Illuminazione”, который осуществит бесплатный вывоз отходов и их сдачу в специализированные центры, учрежденные государственными органами управления для сбора, обработки и уничтожения RAEE.Не допускается разбивать лампы, сбрасы-ваемые вместе с осветительным прибором, так как они содержат вещества, загрязня-

REGGIANI GROUP
REGGIANI SPA ILLUMINAZIONEviale Monza, 16 P.O. Box 9920845 Sovico (MB) ItalyT. (+39) 039 20711 F. (+39) 039 2071999Skype: reggiani.spa.illuminazionecontact @reggiani.net
REGGIANI LTD LIGHTING12 Chester RoadBorehamwood HertsWD6 1LT London_United KingdomT. (+44) 020 82363000F. (+44) 020 [email protected]
REGGIANI SPA ILLUMINAZIONEShowroom Bureau Projets_Paris35 Bd. Richard Lenoir_Bastille75011 Paris_FranceT. (+33) 01 43382704F. (+33) 01 [email protected]
REGGIANI LIGHTING USA, INC.372 Starke RoadCarlstadt NJ07072 United States of AmericaT. (+1) 201 372 1717F. (+1) 201 372 [email protected]
REGGIANI LIGHTING RUSSIAKalanchevskaya street,16, building 1, room 4a 129090, MoscowT. +7 (495) 269 01 13 +7 (846) 332 02 66F. +7 (495) 269 01 12 [email protected]
REGGIANI NINGBO ITG LIGHTING CO.LTDShenjia Village_Qiuai Town_Yinzhou315010 Ningbo_ChinaT. (+86) 574 88418655_88412627F. (+86) 574 [email protected]
Show Room923-927 Zhong Shan East Road 315040 Ningbo_China T. (+86) 574 87800077 F. (+86) 574 [email protected]
www.reggiani.net
Co
d.
1.9
53
91
. 0
00
0
09
.20
15