FN 66 XA S - Towngas · FN 66 XA S FN 66 S FNG 66 S FN 66 T XA S FN 66 T S English Operating...
24
Transcript of FN 66 XA S - Towngas · FN 66 XA S FN 66 S FNG 66 S FN 66 T XA S FN 66 T S English Operating...

FN 66 XA SFN 66 SFNG 66 SFN 66 T XA SFN 66 T S
English
Operating InstructionsOVEN
Français
Mode d’emploiFOUR
Español
Manual de instruccionesHORNO
Italiano
Istruzioni per l’usoFORNO
Portuges
Instruções para a utilizaçãoFORNO
SommarioIstruzioni per l’uso,1Avvertenze,2Assistenza,5Descrizione dell’apparecchio,7Descrizione dell’apparecchio,8Installazione,11Avvio e utilizzo,13Precauzioni e consigli,19Manutenzione e cura,19
ContentsOperating Instructions,1Warnings,2Assistance,5Description of the appliance,7Description of the appliance,8Installation,22Start-up and use,24Precautions and tips,30Maintenance and care,30
SommaireMode d’emploi,1Avertissements,3Assistance,5Description de l’appareil,7Description de l’appareil,9Installation,33Mise en marche et utilisation,35Précautions et conseils,41Nettoyage et entretien,41
SumarioManual de instrucciones,1Advertencias,3Asistencia,6Descripción del aparato,7Descripción del aparato,9Instalación,44Puesta en funcionamiento y uso,46Precauciones y consejos,52Mantenimiento y cuidados,52
ÍndiceInstruções para a utilização,1Advertências,4Assistência,6Descrição do aparelho,7Descrição do aparelho,10Instalação,55Início e utilização,57Precauções e conselhos,63Manutenção e cuidados,63
2
AvvertenzeATTENZIONE: Questo apparecchio e le sue parti accessibili diventano molto caldi durante l’uso. Bisogna fare attenzione ed evitare di toccare gli elementi riscaldanti. Tenere lontani i bambini inferiori agli 8 anni se non continuamente sorvegliati. Il presente apparecchio può essere utilizzato dai bambini a partire dagli 8 anni e da persone con ridotte capacità fisiche, sensoriali o mentali oppure con mancanza di esperienza e di conoscenza se si trovano sotto adeguata sorveglianza oppure se sono stati istruiti circa l’uso dell’apparecchio in modo sicuro e se si rendono conto dei pericoli correlati. I bambini non devono giocare con l’apparecchio. Le operazioni di pulizia e di manutenzione non devono essere effettuate dai bambini senza sorveglianza.
Non utilizzare prodotti abrasivi né spatole di metallo taglienti per pulire lo sportello in vetro del forno in quanto potrebbero graffiare la superficie, provocando, così, la frantumazione del vetro.
“Prima di attivare la funzione di pulizia automatica:• pulire la porta del forno• con una spugna umida togliere
dall’interno del forno i residui più consistenti. Non usare detergenti;
• estrarre tutti gli accessori e il kit guide scorrevoli (se presente);
• non lasciare strofinacci o presine sulla maniglia.”
Durante la pulizia automatica, le superfici possono diventare molto calde: tenere i bambini a distanza.
Non utilizzare mai pulitori a vapore o ad alta pressione per la pulizia dell’apparecchio.
ATTENZIONE: Ass icu ra rs i che l’apparecchio sia spento prima di sostituire la lampada per evitare la possibilità di scosse elettriche.
WarningsWARNING: The appliance and its accessible parts become hot during use. Care should be taken to avoid touching heating elements. Children less than 8 years of age shall be kept away unless continuously supervised. This appliance can be used by children aged from 8 years and above and persons with reduced physical, sensory or mental capabilities or lack of experience and knowledge if they have been given supervision or instruction concerning use of the appliance in a safe way and understand the hazards involved. Children shall not play with the appliance. Cleaning and user maintenance shall not be made by children without supervision.
Do not use harsh abrasive cleaners or sharp metal scrapers to clean the oven door glass since they can scratch the surface, which may result in shattering of the glass.
“Before initiating the automatic cleaning cycle:• clean the oven door;• remove large or coarse food residues
from the inside of the oven using a damp sponge. Do not use detergents;
• remove all accessories and the sliding rack kit (where present);
• do not place tea towels”
Keep children away from the appliance during the automatic cleaning cycle as surfaces may become very hot.
3
Never use steam cleaners or pressure cleaners on the appliance.
WARNING: Ensure that the appliance is switched off before replacing the lamp to avoid the possibility of electric shock.
AvertissementsATTENTION : Cet appareil ainsi que ses parties accessibles deviennent très chauds pendant leur fonctionnement. Il faut faire attention à ne pas toucher les éléments chauffants. Ne pas faire approcher les enfants de moins de 8 ans à moins qu’ils ne soient sous surveillance constante. Le présent appareil peut être utilisé par des enfants de plus de 8 ans et par des personnes présentant des capacités physiques, sensorielles ou mentales réduites ou n’ayant pas l’expérience ou les connaissances indispensables, à condition qu’ils soient sous bonne surveillance ou qu’ils aient reçu les instructions nécessaires pour une utilisation de l’appareil en toute sécurité et à condition qu’ils se rendent compte des dangers encourus. Les enfants ne doivent pas jouer avec l’appareil. Les opérations de nettoyage et d’entretien ne doivent pas être effectuées par des enfants non surveillés.
Ne pas utiliser de produits abrasifs ni de spatules métalliques coupantes pour nettoyer la porte du four en verre, sous peine d’érafler la surface et de briser le verre.
Avant d’activer la fonction de nettoyage automatique :• nettoyer la porte du four• enlever avec une éponge humide les
résidus les plus gros. Ne pas utiliser de détergents ;
• sortir tous les accessoires ainsi que le kit éventuel de glissières coulissantes ;
• ne pas placer de torchons ou de maniques sur la poignée du four.
Lors du nettoyage automatique, les surfaces peuvent devenir chaudes, c’est pourquoi il convient d’éloigner les jeunes enfants.
Ne jamais nettoyer l’appareil avec des nettoyeurs vapeur ou haute pression.
ATTENTION : s’assurer que l’appareil est éteint avant de procéder au remplacement de l’ampoule, afin d’éviter tout risque d’électrocution.
AdvertenciasATENCIÓN: Este aparato y sus partes accesibles se vuelven muy calientes durante el uso. Por lo tanto, es importante evitar tocar los elementos calentadores. Mantenga alejados a los niños menores de 8 años si no son continuamente vigilados. El presente aparato puede ser utilizado por niños mayores de 8 años y por personas con capacidades físicas, sensoriales o mentales disminuidas o sin experiencia ni conocimientos, si se encuentran bajo una adecuada vigilancia o si han sido instruidos sobre el uso del aparato de modo seguro y comprenden los peligros relacionados con el mismo. Los niños no deben jugar con el aparato. Las operaciones de limpieza y de mantenimiento no deben ser realizadas por niños sin vigilancia.
No utilice productos abrasivos ni espátulas de metal cortantes para limpiar la puerta de cristal del horno ya que podrían rayar la superficie y quebrar el cristal.
4
Antes de activar la función de limpieza automática:• limpie la puerta del horno• con una esponja húmeda quite los
residuos más consistentes del interior del horno. No utilice detergentes;
• quite todos los accesorios y el kit guías deslizables (si existe);
• no deje paños de cocina o manoplas en la manija.
Durante la limpieza automática, las superficies pueden calentarse mucho: mantenga alejados a los niños.
No utilice nunca limpiadores a vapor o de alta presión para la limpieza del aparato.
ATENCIÓN: Antes de sustituir la lámpara controle que el aparato esté apagado para evitar la posibilidad de choques eléctricos.
AdvertênciasATENÇÃO: Este aparelho e as suas partes acessíveis aquecem muito durante a utilização. É preciso ter atenção e evitar tocar os elementos que aquecem. Manter afastadas as crianças com menos de 8 anos, caso não estejam a ser vigiadas. O presente aparelho pode ser utilizado por crianças com mais de 8 anos e por pessoas com capacidades físicas, sensoriais ou mentais reduzidas ou com pouca experiência e conhecimentos, caso sejam adequadamente vigiadas ou caso tenham recebido instruções em relação ao uso do aparelho de forma segura e tenham conhecimento dos perigos associados. As crianças não devem brincar com o aparelho. As operações de limpeza e manutenção não devem ser efectuadas por crianças sem vigilância.
Não utilizar produtos abrasivos nem espátulas de metal cortantes para limpar a porta em vidro do forno, uma vez que pode riscar a superfície, provocando a ruptura do vidro.
Antes de activar a função de limpeza automática:• limpe a porta do forno• com uma esponja húmida retire do
interior do forno os resíduos maiores. Não utilize detergentes;
• remova todos os acessórios e o kit de guias corrediças (se presentes);
• não deixe panos de prato nem pegas de tecido na maçaneta.
Durante a limpeza automática, as superfícies podem ficar muito quentes: mantenha as crianças afastadas.
Nunca utilize equipamento de limpeza a vapor ou de alta pressão para limpar o aparelho.
ATENÇÃO: Assegure-se de que o aparelho esteja desligado antes de substituir a lâmpada, para evitar a possibilidade de choques eléctricos.
5
AssistenzaAttenzione:L’apparecchio è dotato di un sistema di diagnostica automatica che consente di rilevare eventuali malfunzionamenti. Questi vengono comunicati dal display tramite messaggi del tipo: “F--” seguito da numeri.In questi casi è necessario l’intervento dell’assistenza tecnica.
Prima di contattare l’Assistenza:• Ver i f icare se l ’anomal ia può essere r iso l ta
autonomamente;• Riavviare il programma per controllare se l’inconveniente
è stato ovviato;• In caso negativo, contattare il Servizio Assistenza
Tecnico Autorizzato.! Non ricorrere mai a tecnici non autorizzati.
Comunicare:• Il tipo di anomalia;• il messaggio visibile sul display TEMPERATURA• Il modello della macchina (Mod.)• Il numero di serie (S/N)Queste ultime informazioni si trovano sulla targhetta caratteristiche posta sull’apparecchio
Assistenza Attiva 7 giorni su 7
Se nasce il bisogno di assistenza o manutenzione basta chiamare il Numero Unico Nazionale 199.199.199* per essere messi subito in contatto con il Centro Assistenza Tecnica più vicino al luogo da cui si chiama.È attivo 7 giorni su 7, sabato e domenica compresi, e non lascia mai inascoltata una richiesta.
Estensione di garanzia Airbag
Airbag è il servizio esclusivo creato da Ariston che integra e prolunga nel tempo i contenuti della garanzia standard: con una modica cifra protegge il cliente da ogni imprevisto riguardante l’assistenza e la manutenzione dell’elettrodomestico. Per i 5 anni successivi alla data di acquisto il cliente che aderisce al programma Airbag avrà diritto gratuitamente a:
• l’intervento entro 48 ore dalla chiamata;• il contributo per spese di trasferta del Tecnico (diritto di
chiamata);• la manodopera;• le parti di ricambio originali;
• il trasporto dell’elettrodomestico non riparabile in loco. Inoltre, qualora l’elettrodomestico non sia riparabile la
garanzia prevede la sostituzione a prezzo agevolato in funzione dell’anzianità del prodotto.
* Al costo di 14,25 centesimi di Euro al minuto (iva inclusa) dal Lun. al Ven. dalle 08:00 alle 18:30, il Sab. dalle 08:00 alle 13:00 e di 5,58 centesimi di Euro al minuto (iva inclusa) dal Lun. al Ven. dalle 18:30 alle 08:00, il Sab. dalle 13:00 alle 08:00 e i giorni festivi, per chi chiama dal telefono fisso.Per chi chiama da radiomobile le tariffe sono legate al piano tariffario dell’operatore telefonico utilizzato.Le suddette tariffe potrebbero essere soggette a variazione da parte dell’operatore telefonico; per maggiori informazioni consultare il sito www.indesit.com.
AssistanceWarning:The appliance is fitted with an automatic diagnostic system which detects any malfunctions. Malfunctions are signalled through messages of the following type: “F—” followed by numbers.Call for technical assistance in the event of a malfunction.
Before calling for Assistance:• Check whether you can fix the problem yourself.• Restart the programme to check whether the malfunction
has disappeared.• If it has not, contact the Authorised Technical Assistance
Service.
! Never use the services of an unauthorised technician.
Please have the following information to hand:• The type of problem encountered.• The message shown on the TEMPERATURE display.• The appliance model (Mod.).• The serial number (S/N).The latter two pieces of information can be found on the data plate located on the appliance.
AssistanceAttention :L’appareil dispose d’un système d’autotest qui permet de détecter toute anomalie de fonctionnement. Ces anomalies sont affichées sous la forme: «F—» suivi de chiffres.Contacter alors un service d’assistance technique.
Avant d’appeler le service de dépannage :• Vérifier s’il est possible de résoudre le problème soi-
même ;• Redémarrer le programme pour contrôler si le problème
a été résolu;
6
• Si ce n’est pas le cas, contacter le service d’Assistance technique agréé.
! Ne jamais faire appel à des techniciens non agréés.
Indiquer :• le type d’anomalie;• le code erreur affiché sur l’écran TEMPERATURE• le modèle de l’appareil (Mod.);• son numéro de série (S/N).Ces informations figurent sur la plaque signalétique apposée sur l’appareil
AsistenciaAtención:El aparato está dotado de un sistema de diagnóstico que permite detectar problemas de funcionamiento. Los mismos son comunicados en la pantalla mediante mensajes como: “F—” seguido por números.En esos casos es necesaria la intervención del servicio de asistencia técnica.
Antes de llamar al Servicio de Asistencia Técnica:
• Verifique que la anomalía no pueda ser resuelta por Ud. mismo;
• Vuelva a poner en marcha el programa para controlar si el inconveniente ha sido resuelto;
• Si no es así, llame al Servicio de Asistencia Técnica Autorizado.
! Nunca solicite la asistencia de técnicos no autorizados.
Comunique:• El tipo de anomalía;• el mensaje que se observa en el display TEMPERATURA• El modelo del aparato (Mod.)• El número de serie (S/N)Esta información se encuentra en la placa de características colocada en el aparato.
La siguiente información es válida solo para España.Para otros países de habla hispana consulte a su vendedor.
Ampliación de garantíaLlame al 902.363.539 y le informaremos sobre el fantástico plan de ampliación de garantía hasta 5 años.Consiga una cobertura total adicional de• Piezas y componentes• Mano de obra de los técnicos• Desplazamiento a su domicilio de los técnicos
Y NO PAGUE AVERIAS NUNCA MAS
Servicio de asistencia técnica (SAT)Llame al 902.133.133 y nuestros técnicos intervendrán con rapidez y eficacia, devolviendo el electrodoméstico a sus condiciones óptimas de funcionamiento.En el SAT encontrará recambios, accesorios y productos específicos para la limpieza y mantenimiento de su electrodoméstico a precios competitivos.
ESTAMOS A SU SERVICIO
AssistênciaAtenção:Este aparelho é equipado com um sistema de diagnóstico que possibilita detectar eventuais mau funcionamentos. Estes são comunicados no visor mediante mensagens do seguinte tipo: “F—” seguido por números.Nestes casos será necessária uma intervenção da Assistência técnica.
Antes de contactar a Assistência:
• Ver i f ique se a anomal ia pode ser resolvida autonomamente;
• Reiniciar o programa para controlar se o inconveniente foi resolvido;
• Em caso negativo, contacte o Serviço de Assistência Técnica Autorizado.
! Nunca recorra a técnicos não autorizados.
Comunique:• o tipo de avaria;• a mensagem visível no display da TEMPERATURA• o modelo da máquina (Mod.)• o número de série (S/N).Estas últimas informações encontram-se na placa de identificação situada no aparelho.

7
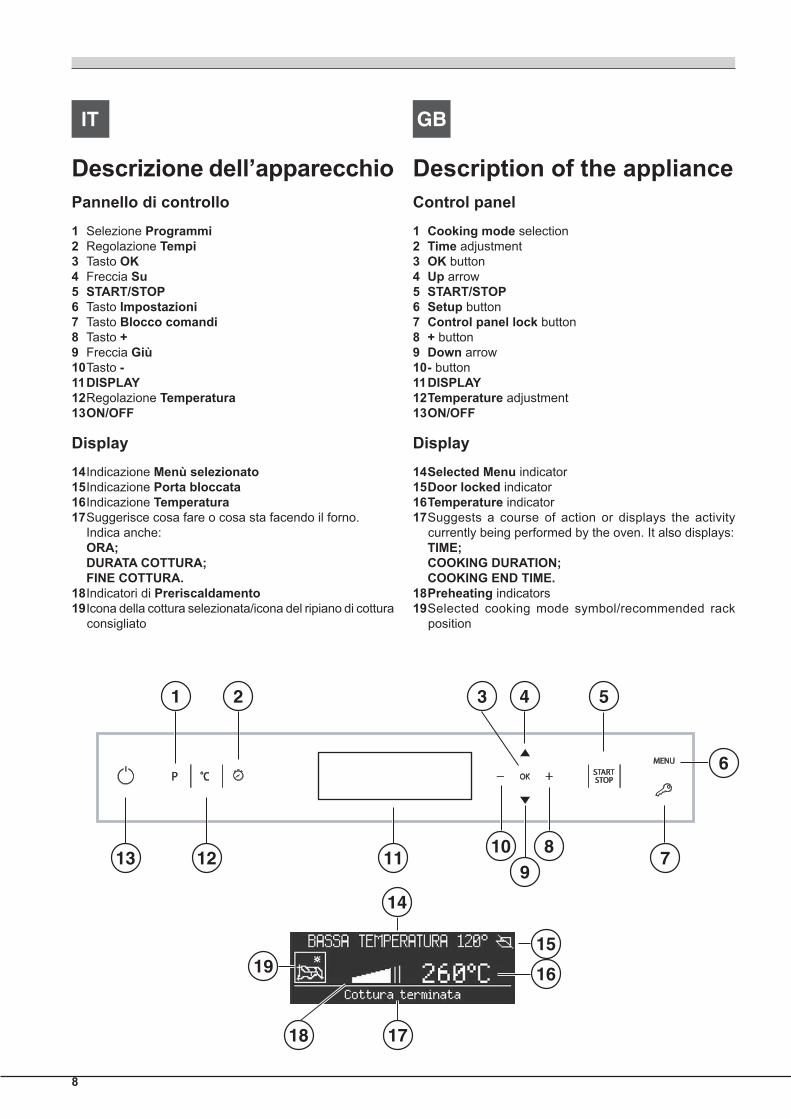
Descrizione dell’apparecchioVista d’insieme
1 POSIZIONE 12 POSIZIONE 23 POSIZIONE 34 POSIZIONE 45 POSIZIONE 56 GUIDE di scorrimento dei ripiani7 Ripiano LECCARDA8 Ripiano GRIGLIA9 Pannello di controllo
Description of the applianceOverall view
1 POSITION 12 POSITION 23 POSITION 34 POSITION 45 POSITION 56 GUIDES for the sliding racks7 DRIPPING PAN8 GRILL9 Control panel
Description de l’appareilVue d’ensemble
1 NIVEAU 12 NIVEAU 23 NIVEAU 34 NIVEAU 45 NIVEAU 56 GLISSIERES de coulissement7 Support LECHEFRITE8 Support GRILLE9 Tableau de bord
Descripción del aparatoVista en conjunto
1 POSICIÓN 12 POSICIÓN 23 POSICIÓN 34 POSICIÓN 45 POSICIÓN 56 GUÍAS de deslizamiento de las bandejas7 Bandeja GRASERA8 Bandeja PARRILLA9 Panel de control
Descrição do aparelhoVista de conjunto
1 POSIÇÃO 12 POSIÇÃO 23 POSIÇÃO 34 POSIÇÃO 45 POSIÇÃO 56 GUIAS de escorrimento das prateleiras7 Prateleira BANDEJA PINGADEIRA8 Prateleira GRADE9 Painel de comandos
7
8
9 6
12
34
5
8
Descrizione dell’apparecchioPannello di controllo
1 Selezione Programmi2 Regolazione Tempi3 Tasto OK4 Freccia Su5 START/STOP6 Tasto Impostazioni7 Tasto Blocco comandi8 Tasto +9 Freccia Giù10 Tasto -11 DISPLAY12 Regolazione Temperatura13 ON/OFF
Display
14 Indicazione Menù selezionato15 Indicazione Porta bloccata16 Indicazione Temperatura17 Suggerisce cosa fare o cosa sta facendo il forno. Indica anche: ORA; DURATA COTTURA; FINE COTTURA.18 Indicatori di Preriscaldamento19 Icona della cottura selezionata/icona del ripiano di cottura
consigliato
Description of the applianceControl panel
1 Cooking mode selection2 Time adjustment3 OK button4 Up arrow5 START/STOP6 Setup button7 Control panel lock button8 + button9 Down arrow10 - button11 DISPLAY12 Temperature adjustment13 ON/OFF
Display
14 Selected Menu indicator15 Door locked indicator16 Temperature indicator17 Suggests a course of action or displays the activity
currently being performed by the oven. It also displays: TIME; COOKING DURATION; COOKING END TIME.18 Preheating indicators19 Selected cooking mode symbol/recommended rack
position
1 2 3 4 5
6
78
910
111213
16
1718
19
14
15

9
1 2 3 4 5
6
78
910
111213
16
1718
19
14
15
Description de l’appareilTableau de bord
1 Sélection Programmes2 Réglage Temps3 Touche OK4 Flèche vers le Haut5 START/STOP6 Touche Sélections7 Touche Verrouillage Commandes8 Touche +9 Flèche vers le Bas10 Touche -11 AFFICHEUR12 Réglage Température13 ON/OFF
Afficheur
14 Indication du Menu sélectionné15 Indication Porte verrouillée16 Indication Température17 Indique que faire ou ce que le four est en train de faire,
il indique aussi : HEURE; DUREE CUISSON ; FIN CUISSON18 Indicateurs de Préchauffage19 Icône de la cuisson sélectionnée/icône du niveau
d’enfournement préconisé
Descripción del aparatoPanel de control
1 Selección de Programas2 Programación de Tiempos3 Botón OK4 Flecha hacia Arriba5 START/STOP6 Botón de Programaciones7 Botón Bloqueo de mandos8 Botón +9 Flecha hacia Abajo10 Botón -11 PANTALLA12 Programación de Temperatura13 ON/OFF
Display
14 Indicación Menú seleccionado15 Indicación de Puerta bloqueada16 Indicación de Temperatura17 Sugiere qué hacer o qué está haciendo el horno HORA; DURACIÓN DE LA COCCIÓN; FINAL DE LA COCCIÓN.18 Indicadores de Precalentamiento19 Icono de la cocción seleccionada/icono del nivel de
cocción aconsejado
10
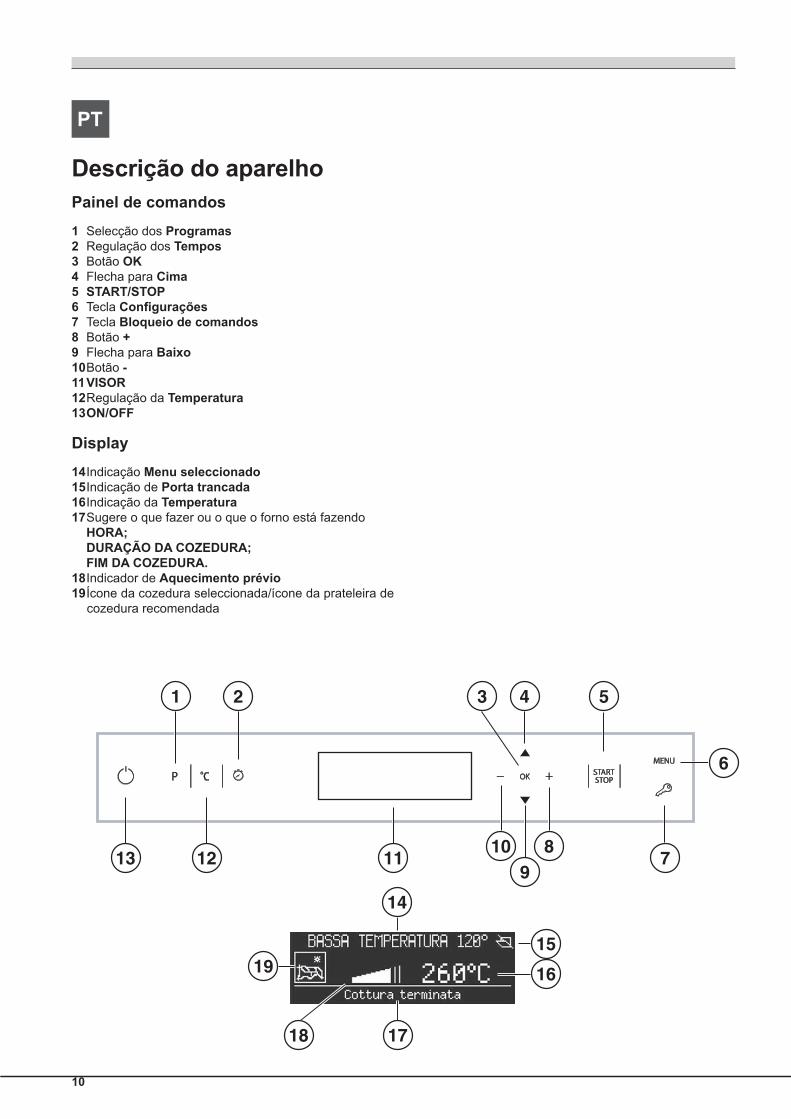
Descrição do aparelhoPainel de comandos
1 Selecção dos Programas2 Regulação dos Tempos3 Botão OK4 Flecha para Cima5 START/STOP6 Tecla Configurações7 Tecla Bloqueio de comandos8 Botão +9 Flecha para Baixo10 Botão -11 VISOR12 Regulação da Temperatura13 ON/OFF
Display
14 Indicação Menu seleccionado15 Indicação de Porta trancada16 Indicação da Temperatura17 Sugere o que fazer ou o que o forno está fazendo HORA; DURAÇÃO DA COZEDURA; FIM DA COZEDURA.18 Indicador de Aquecimento prévio19 Ícone da cozedura seleccionada/ícone da prateleira de
cozedura recomendada
1 2 3 4 5
6
78
910
111213
16
1718
19
14
15
22
GB Installation! Please keep this instruction booklet in a safe place for future reference. If the appliance is sold, given away or moved, please make sure the booklet is also passed on to the new owners so that they may benefit from the advice contained within it.
! Please read this instruction manual carefully: it contains important information concerning the safe operation, installation and maintenance of the appliance.
Positioning! Do not let children play with the packaging material; it should be disposed of in accordance with local separated waste collection standards (see Precautions and tips).
! The appliance must be installed by a qualified professional in accordance with the instructions provided. Incorrect installation may damage property or cause harm to people or animals.
Built-in appliancesUse an appropriate cabinet to ensure that the appliance operates properly:
• The panels adjacent to the oven must be made of heat-resistant material.
• Cabinets with a veneer exterior must be assembled with glues which can withstand temperatures of up to 100°C.
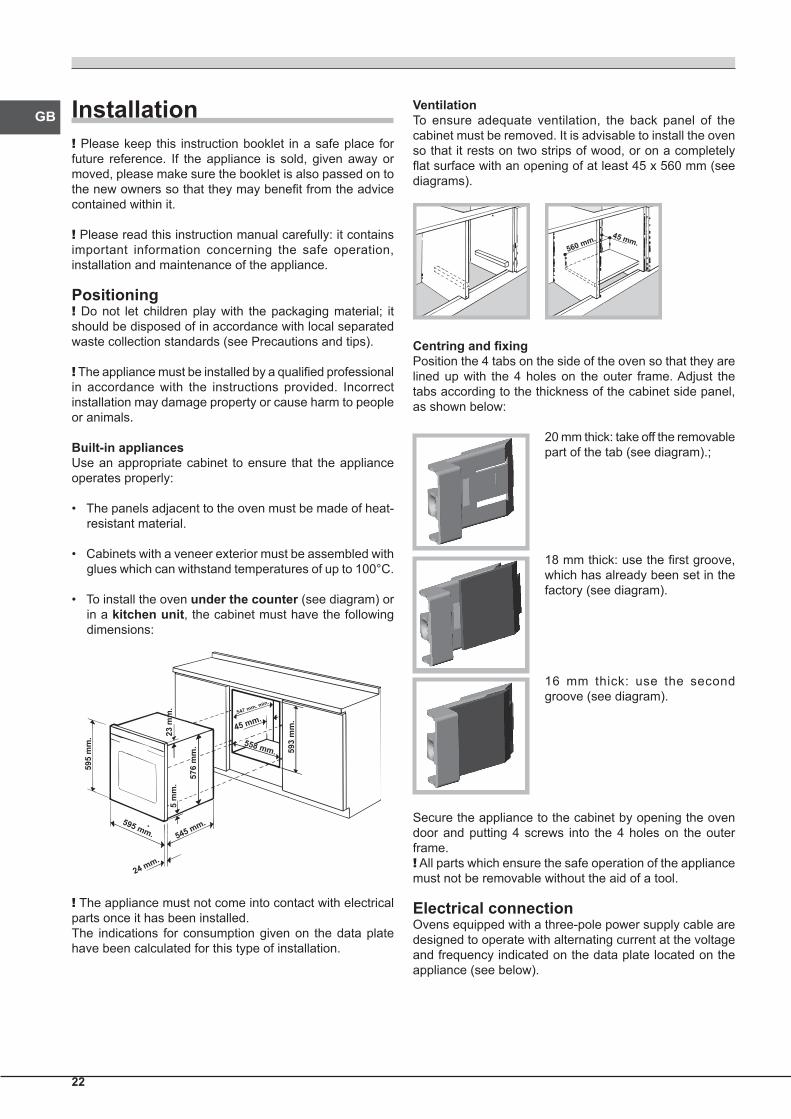
• To install the oven under the counter (see diagram) or in a kitchen unit, the cabinet must have the following dimensions:
595
mm
.
595 mm.
24 mm.
545 mm.
5 m
m.
576
mm
.
23 m
m.
593
mm
.
45 mm.
558 mm.
547 mm. min.
! The appliance must not come into contact with electrical parts once it has been installed. The indications for consumption given on the data plate have been calculated for this type of installation.
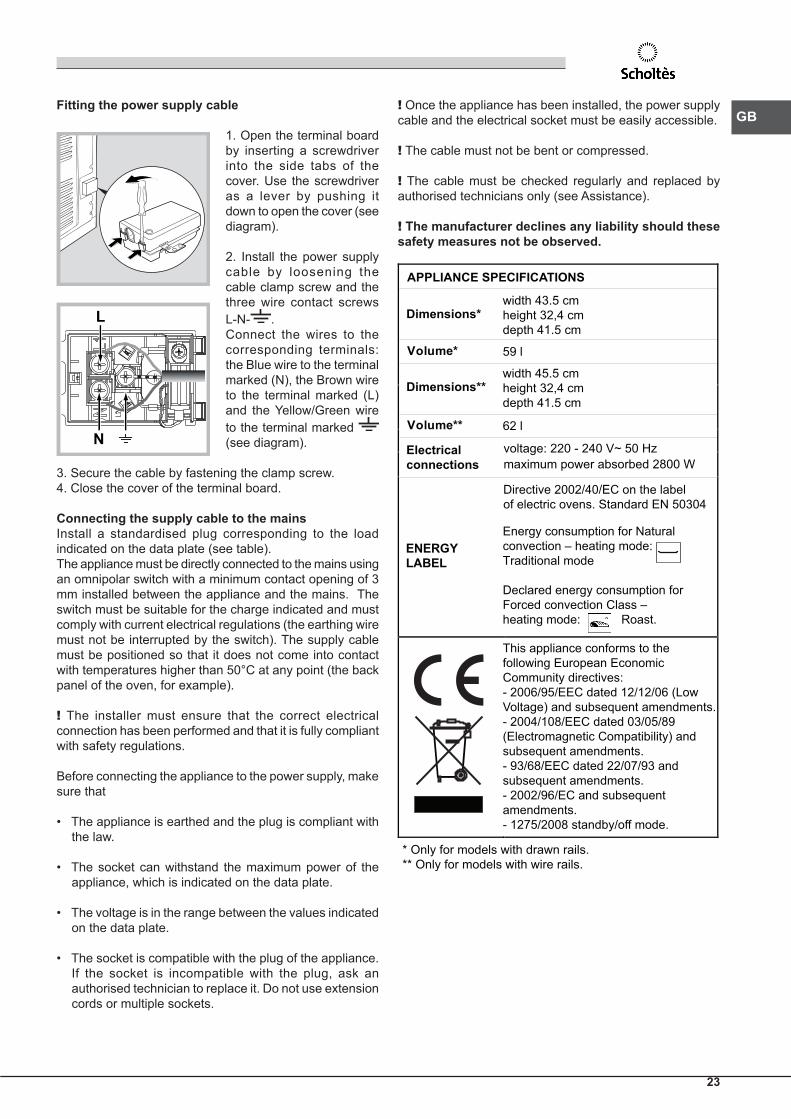
VentilationTo ensure adequate ventilation, the back panel of the cabinet must be removed. It is advisable to install the oven so that it rests on two strips of wood, or on a completely flat surface with an opening of at least 45 x 560 mm (see diagrams).
560 mm. 45 mm.
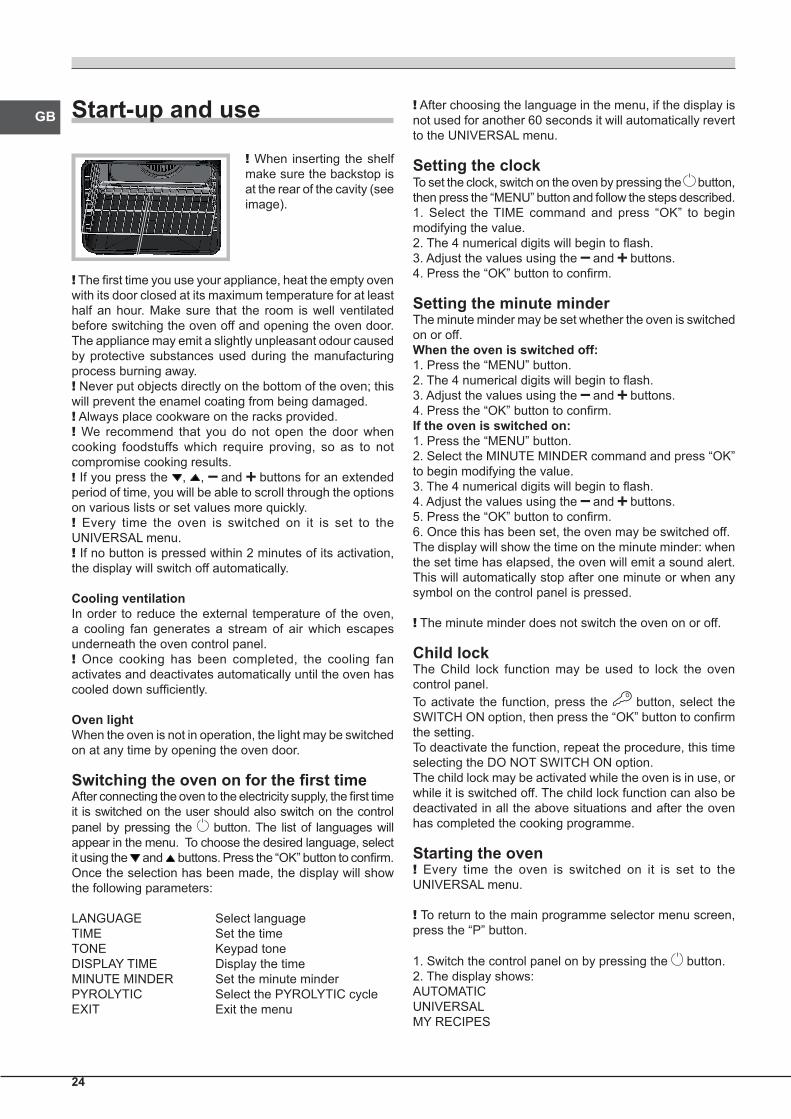
Centring and fixingPosition the 4 tabs on the side of the oven so that they are lined up with the 4 holes on the outer frame. Adjust the tabs according to the thickness of the cabinet side panel, as shown below:
20 mm thick: take off the removable part of the tab (see diagram).;
18 mm thick: use the first groove, which has already been set in the factory (see diagram).
16 mm thick: use the second groove (see diagram).
Secure the appliance to the cabinet by opening the oven door and putting 4 screws into the 4 holes on the outer frame.! All parts which ensure the safe operation of the appliance must not be removable without the aid of a tool.
Electrical connectionOvens equipped with a three-pole power supply cable are designed to operate with alternating current at the voltage and frequency indicated on the data plate located on the appliance (see below).
GB
23
Fitting the power supply cable
1. Open the terminal board by inserting a screwdriver into the side tabs of the cover. Use the screwdriver as a lever by pushing it down to open the cover (see diagram).
2. Install the power supply cable by loosening the cable clamp screw and the three wire contact screws L-N- .Connect the wires to the corresponding terminals: the Blue wire to the terminal marked (N), the Brown wire to the terminal marked (L) and the Yellow/Green wire to the terminal marked (see diagram).
3. Secure the cable by fastening the clamp screw.4. Close the cover of the terminal board.
Connecting the supply cable to the mainsInstall a standardised plug corresponding to the load indicated on the data plate (see table). The appliance must be directly connected to the mains using an omnipolar switch with a minimum contact opening of 3 mm installed between the appliance and the mains. The switch must be suitable for the charge indicated and must comply with current electrical regulations (the earthing wire must not be interrupted by the switch). The supply cable must be positioned so that it does not come into contact with temperatures higher than 50°C at any point (the back panel of the oven, for example).
! The installer must ensure that the correct electrical connection has been performed and that it is fully compliant with safety regulations.
Before connecting the appliance to the power supply, make sure that
• The appliance is earthed and the plug is compliant with the law.
• The socket can withstand the maximum power of the appliance, which is indicated on the data plate.
• The voltage is in the range between the values indicated on the data plate.
• The socket is compatible with the plug of the appliance. If the socket is incompatible with the plug, ask an authorised technician to replace it. Do not use extension cords or multiple sockets.
N
L
! Once the appliance has been installed, the power supply cable and the electrical socket must be easily accessible.
! The cable must not be bent or compressed.
! The cable must be checked regularly and replaced by authorised technicians only (see Assistance).
! The manufacturer declines any liability should these safety measures not be observed.
APPLIANCE SPECIFICATIONS
Dimensions*width 43.5 cm height 32,4 cm depth 41.5 cm
Volume* 59 l
Dimensions**width 45.5 cm height 32,4 cm depth 41.5 cm
Volume** 62 l
Electrical connections
voltage: 220 - 240 V~ 50 Hz maximum power absorbed 2800 W
* Only for models with drawn rails.** Only for models with wire rails.
ENERGY LABEL
Directive 2002/40/EC on the label of electric ovens. Standard EN 50304
Energy consumption for Natural convection – heating mode:Traditional mode
Declared energy consumption for Forced convection Class – heating mode: Roast.
This appliance conforms to the following European Economic Community directives: - 2006/95/EEC dated 12/12/06 (Low Voltage) and subsequent amendments. - 2004/108/EEC dated 03/05/89 (Electromagnetic Compatibility) and subsequent amendments.- 93/68/EEC dated 22/07/93 and subsequent amendments. - 2002/96/EC and subsequent amendments.- 1275/2008 standby/off mode.
24
GB Start-up and use
! When inserting the shelf make sure the backstop is at the rear of the cavity (see image).
! The first time you use your appliance, heat the empty oven with its door closed at its maximum temperature for at least half an hour. Make sure that the room is well ventilated before switching the oven off and opening the oven door. The appliance may emit a slightly unpleasant odour caused by protective substances used during the manufacturing process burning away.! Never put objects directly on the bottom of the oven; this will prevent the enamel coating from being damaged.! Always place cookware on the racks provided.! We recommend that you do not open the door when cooking foodstuffs which require proving, so as to not compromise cooking results.! If you press the , , and buttons for an extended period of time, you will be able to scroll through the options on various lists or set values more quickly.! Every time the oven is switched on it is set to the UNIVERSAL menu.! If no button is pressed within 2 minutes of its activation, the display will switch off automatically.
Cooling ventilationIn order to reduce the external temperature of the oven, a cooling fan generates a stream of air which escapes underneath the oven control panel.! Once cooking has been completed, the cooling fan activates and deactivates automatically until the oven has cooled down sufficiently.
Oven lightWhen the oven is not in operation, the light may be switched on at any time by opening the oven door.
Switching the oven on for the first timeAfter connecting the oven to the electricity supply, the first time it is switched on the user should also switch on the control panel by pressing the button. The list of languages will appear in the menu. To choose the desired language, select it using the and buttons. Press the “OK” button to confirm. Once the selection has been made, the display will show the following parameters:
LANGUAGE Select languageTIME Set the timeTONE Keypad toneDISPLAY TIME Display the timeMINUTE MINDER Set the minute minderPYROLYTIC Select the PYROLYTIC cycleEXIT Exit the menu
! After choosing the language in the menu, if the display is not used for another 60 seconds it will automatically revert to the UNIVERSAL menu.
Setting the clockTo set the clock, switch on the oven by pressing the button, then press the “MENU” button and follow the steps described.1. Select the TIME command and press “OK” to begin modifying the value. 2. The 4 numerical digits will begin to flash.3. Adjust the values using the and buttons.4. Press the “OK” button to confirm.
Setting the minute minderThe minute minder may be set whether the oven is switched on or off.When the oven is switched off:1. Press the “MENU” button.2. The 4 numerical digits will begin to flash.3. Adjust the values using the and buttons.4. Press the “OK” button to confirm.If the oven is switched on:1. Press the “MENU” button.2. Select the MINUTE MINDER command and press “OK” to begin modifying the value. 3. The 4 numerical digits will begin to flash.4. Adjust the values using the and buttons.5. Press the “OK” button to confirm.6. Once this has been set, the oven may be switched off.The display will show the time on the minute minder: when the set time has elapsed, the oven will emit a sound alert. This will automatically stop after one minute or when any symbol on the control panel is pressed.
! The minute minder does not switch the oven on or off.
Child lockThe Child lock function may be used to lock the oven control panel.To activate the function, press the button, select the SWITCH ON option, then press the “OK” button to confirm the setting.To deactivate the function, repeat the procedure, this time selecting the DO NOT SWITCH ON option.The child lock may be activated while the oven is in use, or while it is switched off. The child lock function can also be deactivated in all the above situations and after the oven has completed the cooking programme.
Starting the oven! Every time the oven is switched on it is set to the UNIVERSAL menu.
! To return to the main programme selector menu screen, press the “P” button.
1. Switch the control panel on by pressing the button.2. The display shows:AUTOMATICUNIVERSALMY RECIPES
GB
25
with the first option selected (black text on a white background).3. Use the or buttons to select the desired option and confirm by pressing “OK”. The display will then show the list of cooking programmes.4. Use the or buttons to select the desired cooking programme and confirm by pressing “OK”. 5. Press the “START/STOP” button to begin cooking.6. The oven will begin its preheating stage.7. When the preheating process has finished, a buzzer sounds and all the preheating indicator lights show that this stage has been completed:8. During cooking it is always possible to:- modify the temperature by pressing the “°C” button, adjust the figure using the and buttons and confirm by pressing “OK” (for UNIVERSAL cooking modes only);- set the cooking duration (for UNIVERSAL cooking modes only);- stop cooking by pressing the “START/STOP” button;- set the minute minder ;- switch off the oven by pressing the button.9. If a blackout occurs while the oven is already in operation, an automatic system within the appliance will reactivate the cooking mode from the point at which it was interrupted, provided that the temperature has not dropped below a certain level. Programmed cooking modes which have not yet started will not be restored and must be reprogrammed.
UNIVERSAL COOKING MODES! All cooking modes have a default cooking temperature which may be adjusted manually as desired, between 30 °C and 300 °C (where possible).
UNIVERSAL cooking modes include all manual programmes. The oven controls all essential aspects of each of these cooking modes and makes it easier for you to create the perfect dish, from the simplest recipe to the most sophisticated culinary delights: the temperature, heat source, humidity and fan assisted operation are all controlled automatically.This chapter was written with the help of our very own culinary expert. We invite you to follow his advice so you can benefit from his experience and perfect your cooking skills.The recommended cooking modes, temperatures and oven shelf heights reflect our expert’s own experience in the kitchen and will help you achieve the very best results.The table below specifies whether it is best to pre-heatyour oven or not for each UNIVERSAL cooking mode. Observing these suggestions will guarantee perfect results.If you wish to place food in a preheated oven, wait for the preheating stage to be completed (this will be signalled by a series of beeps).The temperature is set automatically, according to the cooking mode selected; however, you may adjust it to suit your recipe. You can also set a cooking duration with an immediate or delayed start.
MULTILEVEL modeAll heating elements and the fan are activated. Since the heat remains constant throughout the oven, the air cooks and browns food in a uniform manner. A maximum of four racks may be used at the same time.
GRILL modeThe top heating element comes on. The high and direct temperature of the grill is recommended for food which requires a high surface temperature. Always cook in this mode with the oven door closed.
ROTISSERIE modeThe top heating element and the rotisserie spit will be activated. The function is ideal for rotisserie spit cooking. Always cook in this mode with the oven door closed.
FAN GRILLING modeThe top and circular heating elements switch on and the fan begins to operate. This combination of features increases the effectiveness of the unidirectional thermal radiation provided by the heating elements through the forced circulation of the air throughout the oven. This mode is ideal for cooking gratin dishes, lasagne, etc...Always cook in this mode with the oven door closed.
CONVENTIONAL OVEN modeWhen using this traditional cooking mode, it is best to use one cooking rack only. Recommended for slow cooking, or cooking with a bain-marie. When using a bain-marie, the water should be poured directly into the dripping pan.
ROAST modeThe top and circular heating elements switch on and the fan begins to operate. This combination of features increases the effectiveness of the unidirectional thermal radiation provided by the heating elements through the forced circulation of the air throughout the oven. This helps prevent food from burning on the surface and allows the heat to penetrate right into the food.Always cook in this mode with the oven door closed.
PROVING modeThe circular heating element will come on and the fan will operate during the preheating stage only. The oven temperature is ideal for activating the rising process. Always cook in this mode with the oven door closed.
BRIOCHE modeThe parameters used make this cooking mode ideal for desserts containing natural yeast.
TARTS modeThe parameters used make this cooking mode ideal for all tart recipes.
DESSERTS modeThis cooking mode is suitable for all baked desserts which do not fall into the PASTRIES or TARTS category (for example, small choux pastries, sponge cake, etc...).
26
GB TRADITIONAL/QUICK MERINGUE modeThe default temperatures cannot be modified.The TRADITIONAL MERINGUE cooking mode is ideal for drying meringues. The QUICK MERINGUE cooking mode is ideal for browning meringues.
DEFROST modeThe fan at the bottom of the oven circulates room-temperature air around the food. This mode is suitable for defrosting any type of food, especially delicate items that should not be heated, for example: ice-cream cakes or cakes made with custard, cream or fruit.
LOW TEMPERATURE modesThis type of cooking mode, used for years by industry professionals, enables food (meat, fish, fruit and vegetables) to be cooked at very low temperatures (85, 95 and 120°C), thereby guaranteeing a perfect level of cooking and enhancing the taste as much as possible.The value of these advantages should not be underestimated:• as the cooking temperatures are very low (in general they
are lower than the temperature required for evaporation), the dispersion of cooking sauces due to evaporation is substantially reduced and the food becomes softer;
• when cooking meat, the muscle fibres contract less than they would during a classic cooking cycle. The result is a more tender meat which does not need to be rested after it is cooked. Meat should be browned before it is placed in the oven.
Cooking vacuum-packed foods at low temperatures, a technique used for over 30 years by the most prestigious chefs, brings many advantages:• culinary: flavours are concentrated and the taste, softness
and tenderness of the food are maintained;• hygienic: provided that hygiene regulations are respected,
this type of cooking protects the food from the harmful effects of oxygen, thus ensuring that the dishes may be stored for longer in the refrigerator;
• organisational: thanks to the longer storage period, dishes may be prepared well in advance.
• diet-related: this type of cooking limits the amount of fatty substances used and therefore means that the food is lighter and easier to digest;
• financial: the food shrinks less so there is more of the product left after it has been cooked.
To use this technique, you must use a vacuum-packing machine and the appropriate bags. Follow the instructions supplied relating to vacuum-packing food carefully.The vacuum-packing technique may also be used for raw products (fruit, vegetables, etc.) as well as pre-cooked products (traditional cooking).
PASTEURISATION modeThis cooking mode is suitable for fruit, vegetables, etc...Small containers may be positioned on 2 levels (dripping pan on the 1st shelf and rack on the 3rd shelf). Let the containers cool inside the oven. Place the food inside the oven while it is still cold.
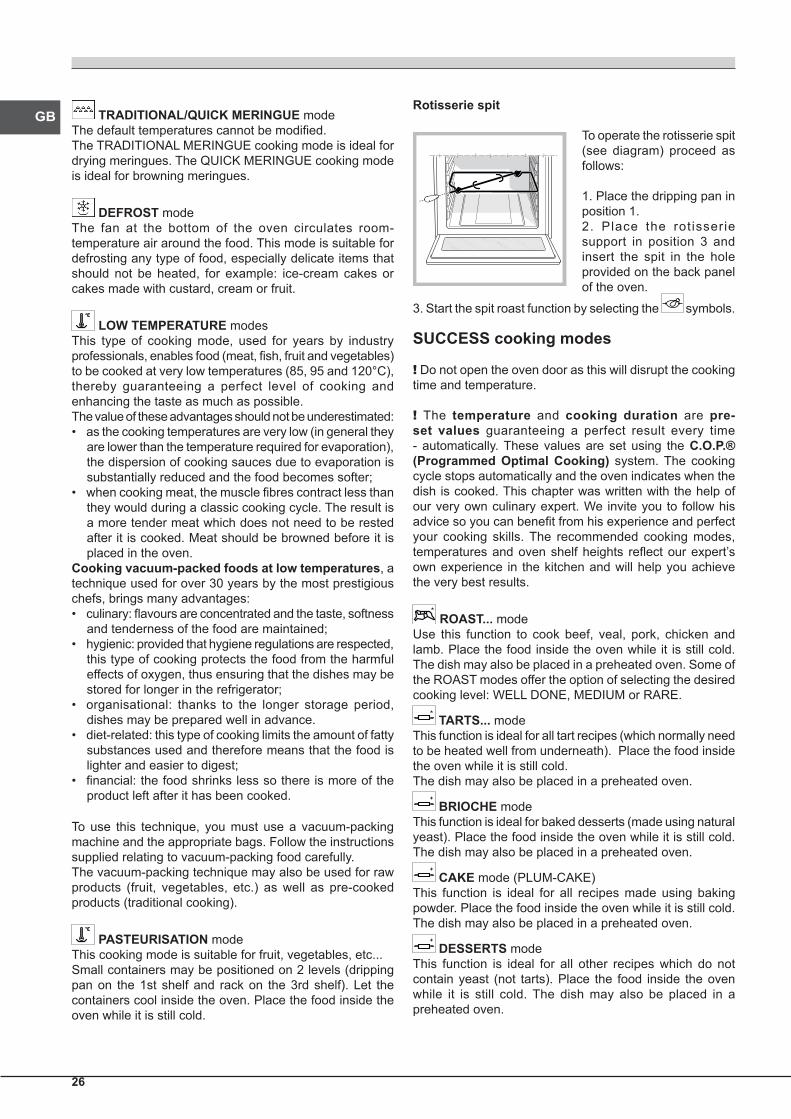
Rotisserie spit
To operate the rotisserie spit (see diagram) proceed as follows:
1. Place the dripping pan in position 1.2. Place the rot isserie support in position 3 and insert the spit in the hole provided on the back panel of the oven.
3. Start the spit roast function by selecting the symbols.
SUCCESS cooking modes
! Do not open the oven door as this will disrupt the cooking time and temperature.
! The temperature and cooking duration are pre-set values guaranteeing a perfect result every time - automatically. These values are set using the C.O.P.® (Programmed Optimal Cooking) system. The cooking cycle stops automatically and the oven indicates when the dish is cooked. This chapter was written with the help of our very own culinary expert. We invite you to follow his advice so you can benefit from his experience and perfect your cooking skills. The recommended cooking modes, temperatures and oven shelf heights reflect our expert’s own experience in the kitchen and will help you achieve the very best results.
ROAST... modeUse this function to cook beef, veal, pork, chicken and lamb. Place the food inside the oven while it is still cold. The dish may also be placed in a preheated oven. Some of the ROAST modes offer the option of selecting the desired cooking level: WELL DONE, MEDIUM or RARE.
TARTS... modeThis function is ideal for all tart recipes (which normally need to be heated well from underneath). Place the food inside the oven while it is still cold. The dish may also be placed in a preheated oven.
BRIOCHE modeThis function is ideal for baked desserts (made using natural yeast). Place the food inside the oven while it is still cold. The dish may also be placed in a preheated oven.
CAKE mode (PLUM-CAKE)This function is ideal for all recipes made using baking powder. Place the food inside the oven while it is still cold. The dish may also be placed in a preheated oven.
DESSERTS modeThis function is ideal for all other recipes which do not contain yeast (not tarts). Place the food inside the oven while it is still cold. The dish may also be placed in a preheated oven.
GB
27
BREAD modeUse this function to make bread. Please see the following chapter for further details.To obtain the best results, we recommend that you carefully observe the instructions below:• follow the recipe;• remember to pour 100 g (1 dl) of cold water into the
dripping pan, which should be placed in position 5.Place the food inside the oven while it is still cold. If you wish to place the food in the oven after it has been preheated, immediately following a high-temperature cooking programme, the text “Oven too hot” will appear on the display until the temperature of the oven has fallen to 40°. At this point it will be possible to place the bread in the oven.
Recipe for BREAD (maximum amount of dough):Ingredients:• 650 g flour• 350 g water• 12 g salt• 25 g fresh baker’s yeast or 4 sachets dried yeast powder
Method:• Mix the flour and salt in a large bowl.• Dilute the yeast in lukewarm water (approximately 35
degrees).• Make a small well in the mound of flour.• Pour in the water and yeast mixture.• Knead the dough by stretching and folding it over itself
with the palm of your hand for 10 minutes, until it has a uniform consistency and is not too sticky.
• Form the dough into a ball shape, place it in a large bowl and cover it with transparent plastic wrap to prevent the surface of the dough from drying out. Place the bowl in the oven, set to 40° using the PROVING manual function, and leave to rise for approximately 30–45 minutes. Alternatively, leave at room temperature for approximately 1 hour (until the dough has doubled in volume).
• Break up the dough, kneading gently, and divide it to create several loaves.
• Place them on a sheet of baking paper (cut to the same size as the inside of the dripping pan) on top of the rack and dust them lightly with flour.
• Make a few incisions in the top using a sharp blade. • Place the rack in the oven, on shelf level 2.• Place the dripping pan on shelf level 5 and pour in
100 g cold water.• Place the food inside the oven while it is still cold.
• Start the automatic (Success) function BREAD.• When the cooking process has finished, leave the loaves
to rest on the rack until they have completely cooled.
PIZZA modeUse this function when making pizza (dough of a particular thickness). Please see the following chapter for further details. It is possible to select the desired cooking level: MEDIUM, CRISPY or SOFT.To obtain the best results, we recommend that you carefully observe the instructions below:
• follow the recipe;• the weight of the dough should be between 350 g and
500 g;• lightly grease the dripping pan and the baking trays.Place the food inside the oven while it is still cold. If you wish to place the food in the oven after it has been preheated, immediately following a high-temperature cooking programme, the text “Oven too hot” will appear on the display until the temperature of the oven has fallen to 120°. At this point it will be possible to place the pizza in the oven.
Recipe for PIZZA:Makes 3 or 4 pizzas: 1000 g flour, 500 ml water, 20 g salt, 20 g sugar, 100 ml olive oil, 20 g fresh yeast (or 2 sachets of powder yeast)• Proving at room temperature: 1 hour, or manual PROVING
function set to 40°. Leave to rise for approximately 30-45 minutes.
• Place the food inside the oven while it is still cold.• Start the PIZZA cooking mode.
PIZZA OVEN modeUse this function to make pizza (thin dough). Use the firebrick pizza stone supplied, placing it on the relevant rack on shelf level 6. For the list of ingredients required, please consult the PIZZA recipe section. The oven will signal when the dish should be placed inside, using the buzzer and the message PUT DISH IN THE OVEN AND PRESS START (shown on the display).
My recipes! If a CREATION cooking mode is selected and a duration set, at the end of the cooking cycle the display will present a screen which asks you whether you would like to save that particular cooking programme.
The MY RECIPES function can only be activated for CREATION cooking modes, and modes for which a duration has been set.The recipe is only stored in the memory of the appliance once the cooking cycle has ended.A set number of procedures with different temperatures and durations may be stored (10 in total), if at least one minute passes between one procedure and the next. A maximum of 10 cooking cycles may be stored in the memory. You may also select the memory slot you wish to use. In order to differentiate between saved recipes so that it is easier to search the list, the name under which each cooking cycle will be saved consists of:- MY RECIPE + progressive number (1, 2, 3, etc.)- INITIAL TEMPERATURE + SYMBOL (IF AVAILABLE)*
(e.g. 170°C)- DURATION (e.g. 00:30)
* Meaning of the symbols:- no symbol: the initial temperature was set and remained
unchanged;- : the initial temperature was only decreased;- : the initial temperature was only increased;- : the initial temperature was both increased and
decreased.
28
GBProgramming cooking
Programming the duration
! Only the duration of CREATION cooking programmes may be set.
! Programming may also take place before a cooking cycle is begun, using the “START/STOP” button.
Press the button, then:1. Select the DURATION command and press “OK” to confirm.2. The 4 numerical digits will begin to flash.3. Adjust the values using the and buttons.4. Press the “OK” button to confirm.5. When the cooking time has elapsed, a buzzer sounds and the oven switches off.• For example: it is 9:00 a.m. and a duration of 1 hour and 15 minutes is programmed. The cooking programme will stop automatically at 10:15 a.m.
Programming delayed cooking
! A delayed cooking programme may be scheduled when setting the duration.
! A cooking mode must be selected – but not started – before programming can take place.
1. Press the button and repeat steps 1 to 3 as described for the duration setting.2. Select the “END COOKING” command and press “OK” to confirm.3. The 4 numerical digits will begin to flash.4. Adjust the values using the and buttons.5. Press the “OK” button to confirm.6. Press the “START” button to enable the programming process. 7. When the cooking time has elapsed, a buzzer sounds and the oven switches off.• For example: it is 9:00 a.m. and a duration of 1 hour and 15 minutes is programmed, while the end time is set to 12:30. The programme will start automatically at 11:15 a.m.The message WAITING shows that a programme has been scheduled. The display shows the cooking end time and the cooking duration alternately.The cooking end time may be modified while the oven is waiting to start, by following the procedure detailed above. To cancel programming, switch the oven off .
Practical cooking advice
! Do not place racks in position 1 and 5 during fan-assisted cooking. This is because excessive direct heat can burn temperature sensitive foods.
! In the GRILL cooking mode, place the dripping pan in position 1 to collect cooking residues (fat and/or grease).
MULTILEVEL
• Place the dripping pan at the bottom and the rack at the top.
PIZZA or FOCACCIA
• Use a lightweight aluminium tray with a maximum diameter of 30 cm, placing it on top of the rack supplied.
• If the pizza has a lot of toppings, we recommend adding the mozzarella cheese on top of the pizza halfway through the cooking process.
GRILL
• Preheat the oven for 5 minutes.• Keep the oven door closed when cooking in this mode.• Place the rack in position 3 or 4. Position the food in the
centre of the rack.• This function is particularly suitable for browning food,
cooking gratins, colouring meringues, making toasted sandwiches and grilling small quantities of thin, lean meat.
• We recommend that the power level is set to maximum. The top heating element is regulated by a thermostat and may not always operate constantly.
GB
29
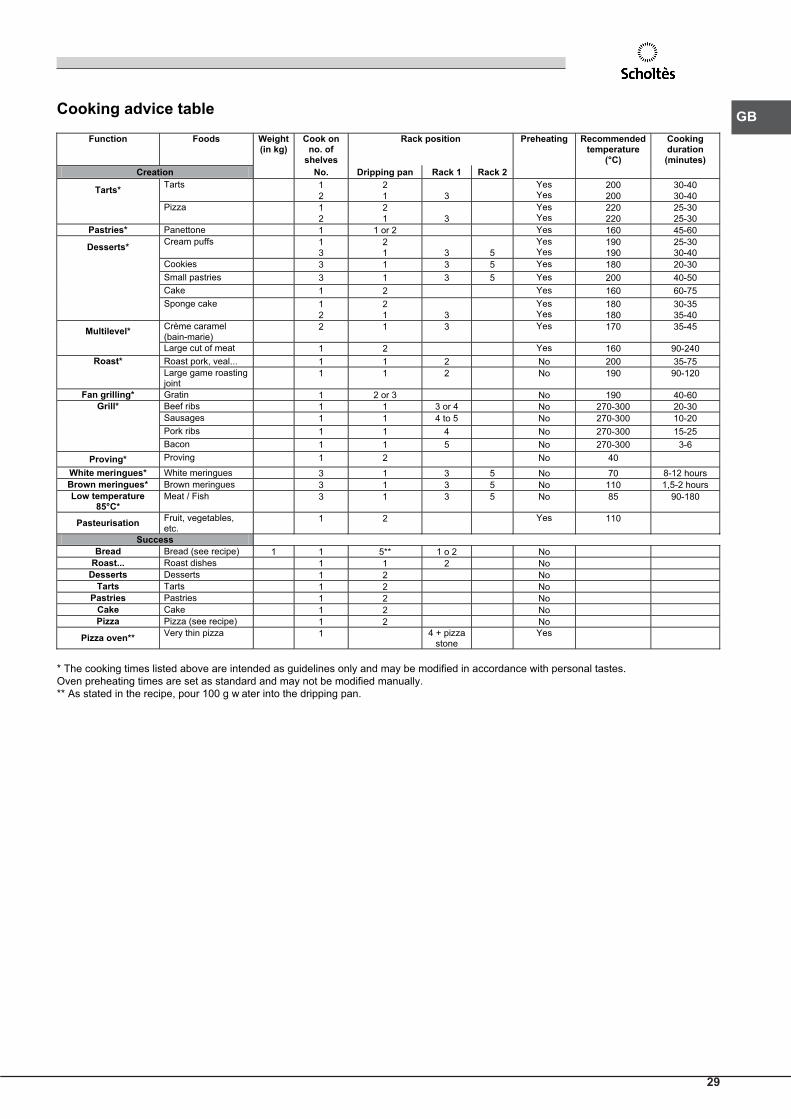
Cooking advice table
Function Foods Weight (in kg)
Cook on no. of
shelves
Rack position Preheating Recommended temperature
(°C)
Cooking duration (minutes)
Creation No. Dripping pan Rack 1 Rack 2 Tarts* Tarts 1
2 2 1
3
Yes Yes
200 200
30-40 30-40
Pizza 1 2
2 1
3
Yes Yes
220 220
25-30 25-30
Pastries* Panettone 1 1 or 2 Yes 160 45-60
Desserts* Cream puffs 1 3
2 1
3
5
Yes Yes
190 190
25-30 30-40
Cookies 3 1 3 5 Yes 180 20-30 Small pastries 3 1 3 5 Yes 200 40-50 Cake 1 2 Yes 160 60-75
Sponge cake 1 2
2 1
3
Yes Yes
180 180
30-35 35-40
Multilevel* Crème caramel (bain-marie)
2 1 3 Yes 170 35-45
Large cut of meat 1 2 Yes 160 90-240 Roast* Roast pork, veal... 1 1 2 No 200 35-75
Large game roasting joint
1 1 2 No 190 90-120
Fan grilling* Gratin 1 2 or 3 No 190 40-60 Grill* Beef ribs 1 1 3 or 4 No 270-300 20-30
Sausages 1 1 4 to 5 No 270-300 10-20 Pork ribs 1 1 4 No 270-300 15-25 Bacon 1 1 5 No 270-300 3-6
Proving* Proving 1 2 No 40 White meringues* White meringues 3 1 3 5 No 70 8-12 hours Brown meringues* Brown meringues 3 1 3 5 No 110 1,5-2 hours Low temperature
85°C* Meat / Fish 3 1 3 5 No 85 90-180
Pasteurisation Fruit, vegetables, etc.
1 2 Yes 110
Success Bread Bread (see recipe) 1 1 5** 1 o 2 No
Roast... Roast dishes 1 1 2 No Desserts Desserts 1 2 No
Tarts Tarts 1 2 No Pastries Pastries 1 2 No
Cake Cake 1 2 No Pizza Pizza (see recipe) 1 2 No
Pizza oven** Very thin pizza 1 4 + pizza stone
Yes
* The cooking times listed above are intended as guidelines only and may be modified in accordance with personal tastes. Oven preheating times are set as standard and may not be modified manually. ** As stated in the recipe, pour 100 g w ater into the dripping pan.
30
GB Precautions and tips! This appliance has been designed and manufactured in compliance with international safety standards. The following warnings are provided for safety reasons and must be read carefully.
General safety• The appliance was designed for domestic use inside the
home and is not intended for commercial or industrial use.• The appliance must not be installed outdoors, even in
covered areas. It is extremely dangerous to leave the appliance exposed to rain and storms.
• When moving or positioning the appliance, always use the handles provided on the sides of the oven.
• Do not touch the appliance while barefoot or with wet or damp hands and feet.
• The appliance must be used by adults only for the preparation of food, in accordance with the instructions provided in this booklet. Any other use of the appliance (e.g. for heating the room) constitutes improper use and is dangerous. The manufacturer may not be held responsible for any damage caused as a result of improper, incorrect and unreasonable use of the appliance.
• Do not touch the heating elements or certain parts of the oven door when the appliance is in use; these parts become extremely hot. Keep children well away from the appliance.
• Make sure that the power supply cables of other electrical appliances do not come into contact with the hot parts of the oven.
• The ventilation and heat dispersal openings must never be obstructed.
• Always grip the oven door handle in the centre: the ends may be hot.
• Always use oven gloves when placing cookware in the oven or when removing it.
• Do not use aluminium foil to line the bottom of the oven.• Do not place flammable materials in the oven: if the
appliance is switched on accidentally, the materials could catch fire.
• Always make sure the knobs are in the “●”/“○” position when the appliance is not in use.
• When unplugging the appliance, always pull the plug from the mains socket; do not pull on the cable.
• Do not perform any cleaning or maintenance work without having disconnected the appliance from the electricity mains.
• If the event of malfunctions, under no circumstances should you attempt to perform the repairs yourself. Contact an authorised Service Centre (see Assistance).
• Do not rest objects on the open oven door.• Do not let children play with the appliance.• The appliance should not be operated by people (including
children) with reduced physical, sensory or mental capacities, by inexperienced individuals or by anyone who is not familiar with the product. These individuals should, at the very least, be supervised by someone who assumes responsibility for their safety or receive preliminary instructions relating to the operation of the appliance.
• The appliance is not intended to be operated by means of an external timer or separate remote-control system.
Disposal• When disposing of packaging material: observe local
legislation so that the packaging may be reused.• The European Directive 2002/96/EC on Waste
Electrical and Electronic Equipment (WEEE), requires that old household electrical appliances must not be disposed of in the normal unsorted municipal waste stream. Old appliances must be collected separately in order to optimise the recovery and recycling of the materials they contain and reduce the impact on human health and the environment. The crossed out “wheeled bin” symbol on the product reminds you of your obligation, that when you dispose of the appliance it must be separately collected.
Consumers should contact their local authority or retailer for information concerning the correct disposal of their old appliance.
Respecting and conserving the environment• You can help to reduce the peak load of the electricity
supply network companies by using the oven in the hours between late afternoon and the early hours of the morning. The cooking mode programming options, the “delayed cooking” mode (see Cooking modes) and “delayed automatic cleaning” mode (see Care and Maintenance) in particular, enable the user to organise their time efficiently.
• Always keep the oven door closed when using the ROTISSERIE mode: this will achieve improved results while saving energy (approximately 10%).
• Check the door seals regularly and wipe them clean to ensure they are free of debris so that they adhere properly to the door, thus avoiding the dispersal of heat.
! This product complies with the requirements of the latest European Directive on the limitation of power consumption of the standby mode.If no operations are carried out for a period of 2 minutes, the appliance automatically switches to the standby mode.The standby mode is visualised by the high luminosity “Watch Icon”. As soon as interaction with the machine resumes, the system’s operating mode is restored.
Maintenance and careSwitching the appliance offDisconnect your appliance from the electricity supply before carrying out any work on it.
Cleaning the appliance• The stainless steel or enamel-coated external parts and
the rubber seals may be cleaned using a sponge that has been soaked in lukewarm water and neutral soap. Use specialised products for the removal of stubborn stains. After cleaning, rinse and dry thoroughly. Do not use abrasive powders or corrosive substances.
GB
31
• The inside of the oven should ideally be cleaned after each use, while it is still lukewarm. Use hot water and detergent, then rinse well and dry with a soft cloth. Do not use abrasive products.
• All accessories - with the exception of the sliding racks - can be washed like everyday crockery, and are even dishwasher safe.
! Never use steam cleaners or pressure cleaners on the appliance.
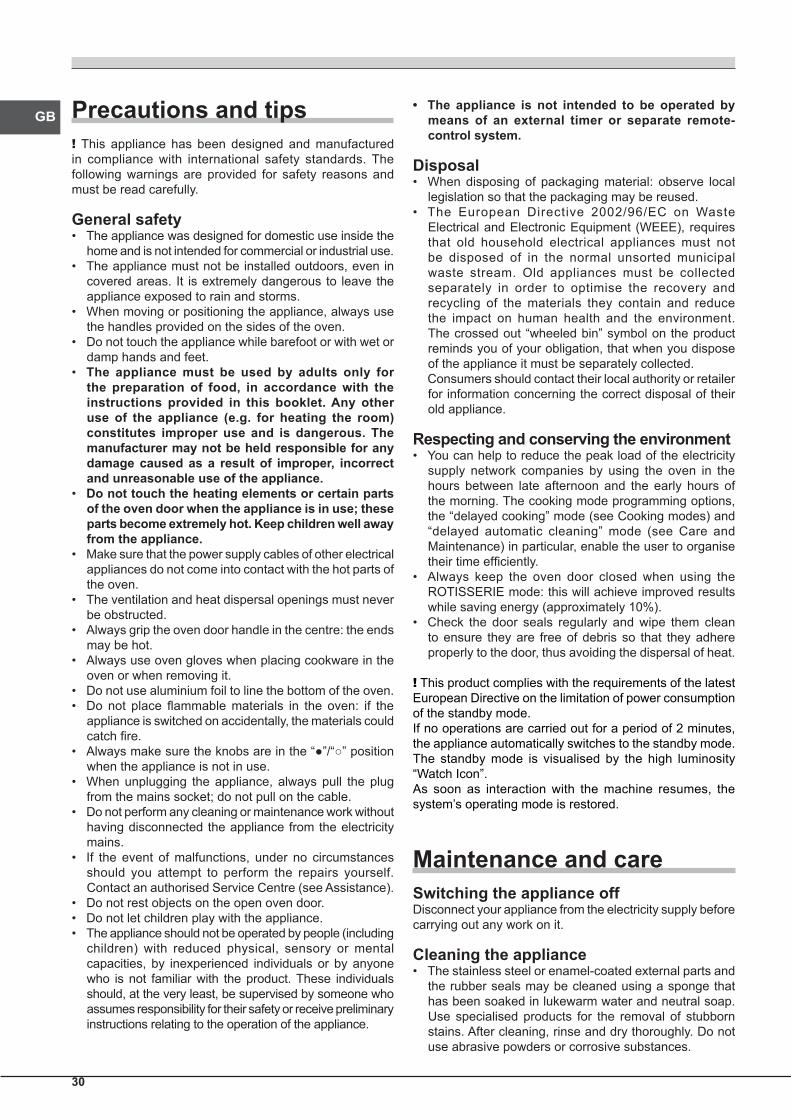
Cleaning the oven doorClean the glass part of the oven door using a sponge and a non-abrasive cleaning product, then dry thoroughly with a soft cloth. Do not use rough abrasive material or sharp metal scrapers as these could scratch the surface and cause the glass to crack. For more thorough cleaning purposes, the oven door may be removed:1. Open the oven door fully (see diagram).2. Lift up and turn the small levers located on the two hinges (see diagram).
F
3. (with glass panel fitted to the inside of the door) Grip the door on the two outer sides and close it approximately half way. Unlock the door by pressing on the clamps F, then pull the door towards you, lifting it out of its slot (see diagram).
To replace the door, reverse this sequence.
Inspecting the sealsCheck the door seals around the oven regularly. If the seals are damaged, please contact your nearest Service Centre (see Assistance). We recommend that the oven is not used until the seals have been replaced.
Replacing the light bulb
To replace the oven light bulb:1. Remove the glass cover of the lamp-holder.2. Remove the light bulb and replace it with a similar one: halogen lamp voltage 230 V, wattage 25 W, cap G 9.3. Replace the glass cover (see diagram).
! Do not touch the light bulb directly with your hands.
! Do not use the oven lamp as/for ambient lighting.
F
Glass cover
Lamp
Lamp Holder compartment
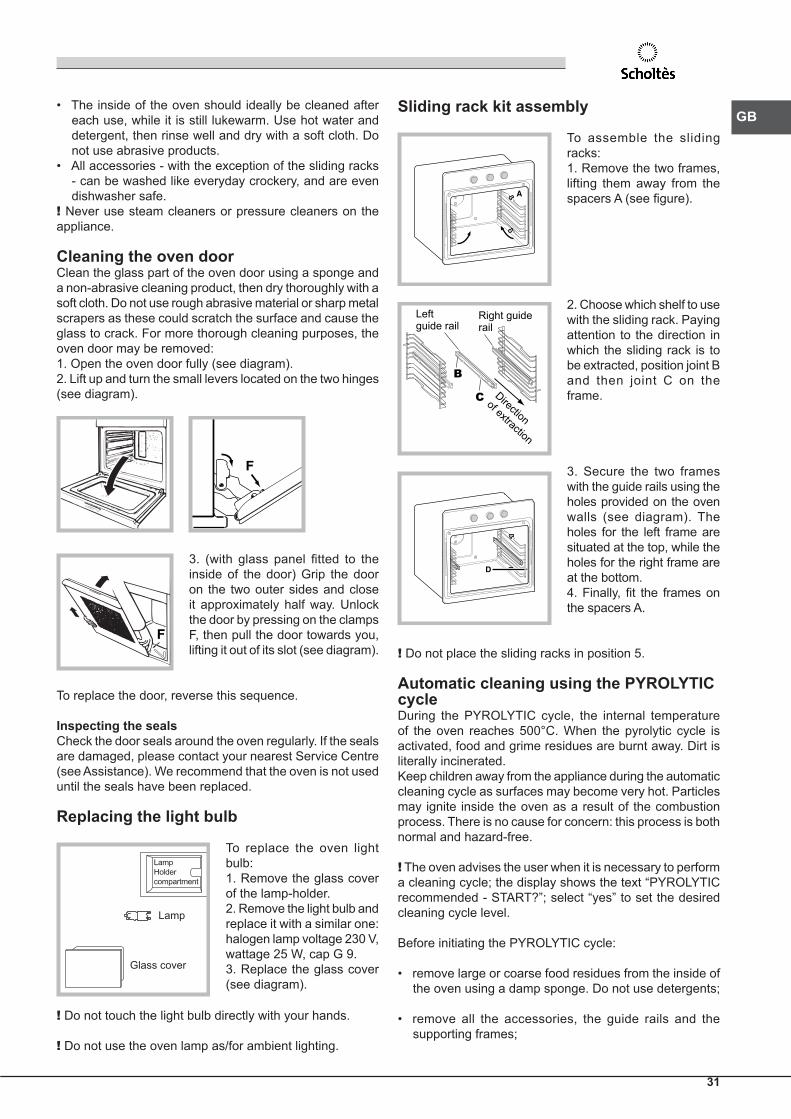
Sliding rack kit assembly
To assemble the sliding racks:1. Remove the two frames, lifting them away from the spacers A (see figure).
2. Choose which shelf to use with the sliding rack. Paying attention to the direction in which the sliding rack is to be extracted, position joint B and then joint C on the frame.
3. Secure the two frames with the guide rails using the holes provided on the oven walls (see diagram). The holes for the left frame are situated at the top, while the holes for the right frame are at the bottom.4. Finally, fit the frames on the spacers A.
! Do not place the sliding racks in position 5.
Automatic cleaning using the PYROLYTIC cycleDuring the PYROLYTIC cycle, the internal temperature of the oven reaches 500°C. When the pyrolytic cycle is activated, food and grime residues are burnt away. Dirt is literally incinerated.Keep children away from the appliance during the automatic cleaning cycle as surfaces may become very hot. Particles may ignite inside the oven as a result of the combustion process. There is no cause for concern: this process is both normal and hazard-free.
! The oven advises the user when it is necessary to perform a cleaning cycle; the display shows the text “PYROLYTIC recommended - START?”; select “yes” to set the desired cleaning cycle level.
Before initiating the PYROLYTIC cycle:
• remove large or coarse food residues from the inside of the oven using a damp sponge. Do not use detergents;
• remove all the accessories, the guide rails and the supporting frames;
A
B
C
Leftguide rail
Right guiderail
Directionof extraction
D
32
GB• do not place tea towels or pot holders over the oven
handle.
! If the oven is too hot, the pyrolytic cycle may not start. Wait for the oven to cool down.
! The cycle may only be started once the oven door has been closed.
To activate the PYROLYTIC cycle, press the button followed by the “MENU” button.1. Select the PYROLYTIC command and press “OK”. 2. Select the desired PYROLYTIC cycle level by adjusting the or buttons. The PYROLYTIC cycle has three default time settings which cannot be modified:1. Economy (ECO): duration 1 hour;2. Normal (NOR): duration 1 hour and 30 minutes;3. Intensive (INT): duration 2 hours.Press the “OK” button to confirm.Press the “START/STOP” button to begin the PYROLYTIC cycle.
Safety devices
• the door is locked automatically as soon as the temperature exceeds a certain value;
• if a malfunction occurs, the heating elements will be switched off;
• once the oven door has been locked, you cannot change the duration and end time settings.
! Programming is possible only after selecting the PYROLYTIC cycle mode.
Programming delayed automatic cleaning
1. Press the button.2. Select the END command and press “OK” to confirm.3. The 4 numerical digits will begin to flash.4. Adjust the values using the and buttons.5. Press the “OK” button to confirm.6. Press the “START/STOP” button to enable the programming process. 7. When the cooking time has elapsed, a buzzer sounds and the oven switches off.• For example: it is 9:00 a.m. and the Economy PYROLYTIC cycle has been selected: default set duration 1 hour. 12:30 is scheduled as the end time. The programme will start automatically at 11:30 a.m.The message “waiting for pyrolytic” shows that a programme has been scheduled. The display shows the pyrolytic cycle end time and the duration alternately.To cancel programming, switch the oven off .
Once the automatic cleaning cycle is over
You will have to wait until the temperature inside the oven has cooled down sufficiently before you can open the oven door. You will notice some white dust deposits on the bottom and the sides of your oven; remove these deposits with a damp sponge once the oven has cooled down completely. Alternatively, you can make use of the already heated oven, in which case it is not necessary to remove the deposits, they are completely harmless and will not affect your food in any way.

67
PT


![Razionalità limitata e modelli dinamici adattivi in Economia...Razionalità limitata e modelli dinamici adattivi in Economia 103 x i (t + 1) = fi (t xa(t + 1), m) [2] dove t xa(t](https://static.fdocumenti.com/doc/165x107/5f4fbc9b57712b67c20c8aab/razionalit-limitata-e-modelli-dinamici-adattivi-in-razionalit-limitata-e.jpg)