BUL-50 manuale utente software per telecamere IP Serie RH manuale utente software per...
46
USER MANUAL SOFTWARE FOR IP CAMERAS RH Page: 1 Page: 1 DSE SRL - ITALY - WWW.DSE.EU NetVMS Introduction The NetVMS software is a tool NVR (network video recorder) supplied with the cameras RH Series to allow viewing and recording of images coming from up to 128 cameras IP networked. images coming from up to 128 cameras IP networked. images coming from up to 128 cameras IP networked. It is a very powerful and flexible tool that can handle streaming video input and process them with its many functions. Unlike ordinary video recording software, NetVMS also allows the automatic search for cameras on the network and the programming of configuration options to the CMOS sensor adjustments.
Transcript of BUL-50 manuale utente software per telecamere IP Serie RH manuale utente software per...
USER MANUAL
SOFTWARE FOR IP CAMERAS RH
Page: 1 Page: 1
DSE SRL - ITALY - WWW.DSE.EU
NetVMS
Introduction
The NetVMS software is a tool NVR (network video recorder) supplied with the cameras RH Series to allow viewing and recording of
images coming from up to 128 cameras IP networked. images coming from up to 128 cameras IP networked. images coming from up to 128 cameras IP networked.
It is a very powerful and flexible tool that can handle streaming video input and process them with its many functions.
Unlike ordinary video recording software, NetVMS also allows the automatic search for cameras on the network and the
programming of configuration options to the CMOS sensor adjustments.

USER MANUAL
SOFTWARE FOR IP CAMERAS RH
Page: 2 Page: 2
DSE SRL - ITALY - WWW.DSE.EU
Minimum System Requirements
The NetVMS software must of course be installed on a computer connected through a local area network or the Internet with the
cameras to handle. These are the minimum requirements to the PC on which to install the software:
CPU: Intel Pentium 4 2.0 GHz or higher RAM: 1GB minimum
OS: Windows Server2003 / 2000 / XP / Vista / 7 Video: 128MB
or above Video Format: 16: 9
Video card with support HARDWARE ACCELERATION (tested models: NVIDIA GeForce
6200/6600/7400/8600/9500/9600 ATI Radeon 7000/7200/7500/8500 / 9000/9200/9500/9600

USER MANUAL
SOFTWARE FOR IP CAMERAS RH
Page: 3 Page: 3
DSE SRL - ITALY - WWW.DSE.EU
Installing Software
Insert the CD into the player and follow these steps:
Explore the CD and find the folder NetVMS the installation program (SETUP.EXE), double-click to start the installation
Choose the program's installation folder
Wait while

USER MANUAL
SOFTWARE FOR IP CAMERAS RH
Page: 4 Page: 4
DSE SRL - ITALY - WWW.DSE.EU
Click FINISH to complete the installation
When the installation will appear on the desktop a new icon . Double-click
icon to start the program.
USER MANUAL
SOFTWARE FOR IP CAMERAS RH
Page: 5 Page: 5
DSE SRL - ITALY - WWW.DSE.EU
Log-in
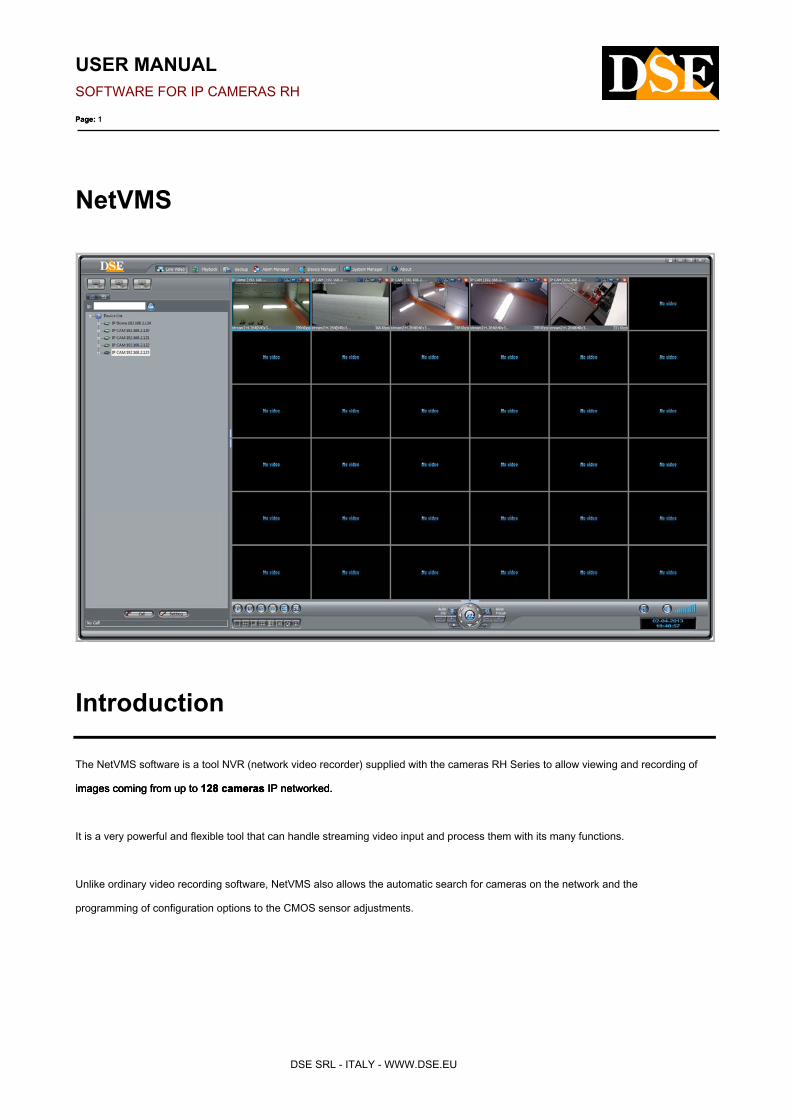
Access to NetVMS program is password protected. The Factory Data Access:
USERNAME: admin
PASSWORD: admin
Password is case sensitive
Of course you can customize the password in the settings.
CAUTION - If a user types 3 times an incorrect password is locked by the system. The administrator ofCAUTION - If a user types 3 times an incorrect password is locked by the system. The administrator of
program can unlock the user blocked in the SYSTEM
MANAGEMENT / USER / UNLOCK.
In the Log-in NetVMS you can enable REMEMBER MY PASSWORD to avoid having to enter the password on each login and SIGN IN
AUTOMATICALLY to skip altogether the log-in window.
USER MANUAL
SOFTWARE FOR IP CAMERAS RH
Page: 6 Page: 6
DSE SRL - ITALY - WWW.DSE.EU
Connection with cameras
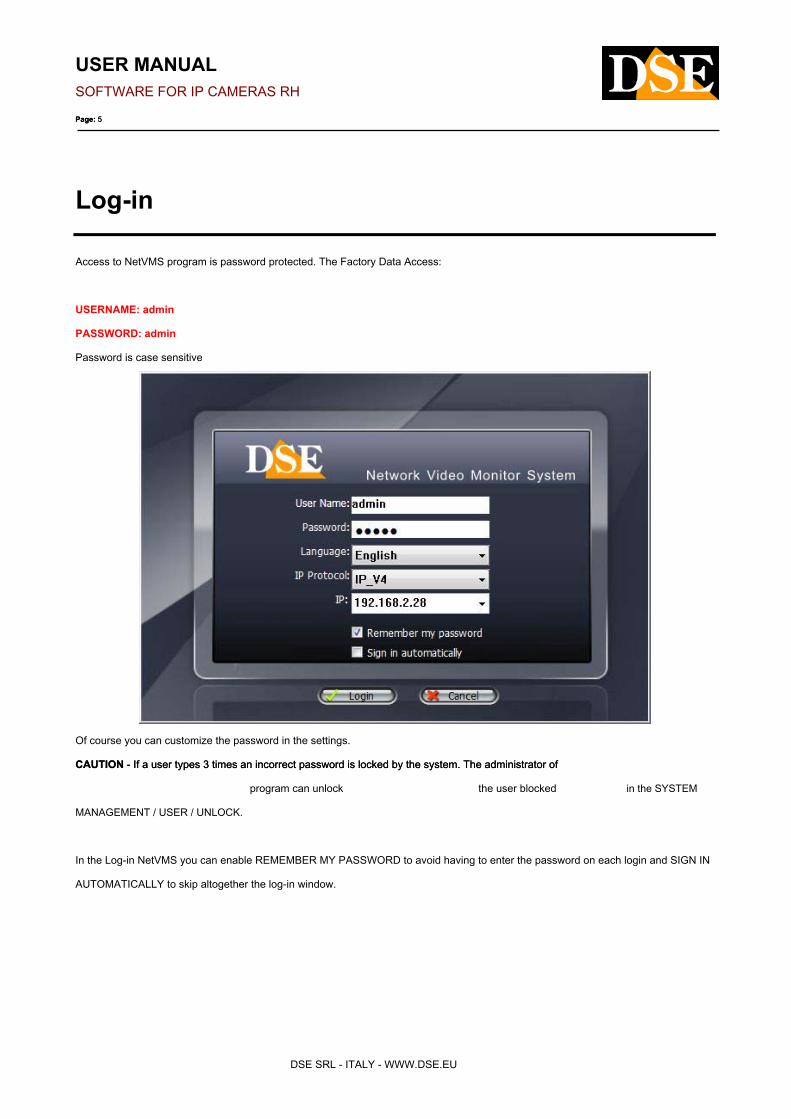
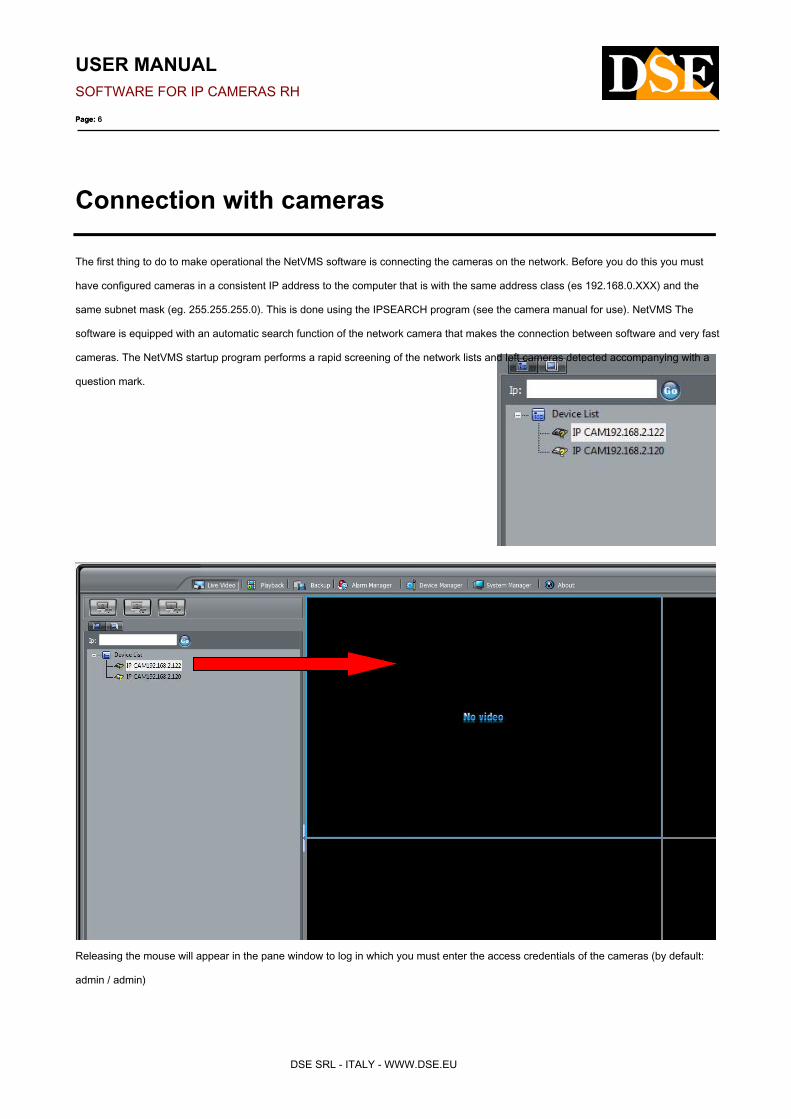
The first thing to do to make operational the NetVMS software is connecting the cameras on the network. Before you do this you must
have configured cameras in a consistent IP address to the computer that is with the same address class (es 192.168.0.XXX) and the
same subnet mask (eg. 255.255.255.0). This is done using the IPSEARCH program (see the camera manual for use). NetVMS The
software is equipped with an automatic search function of the network camera that makes the connection between software and very fast
cameras. The NetVMS startup program performs a rapid screening of the network lists and left cameras detected accompanying with a
question mark.
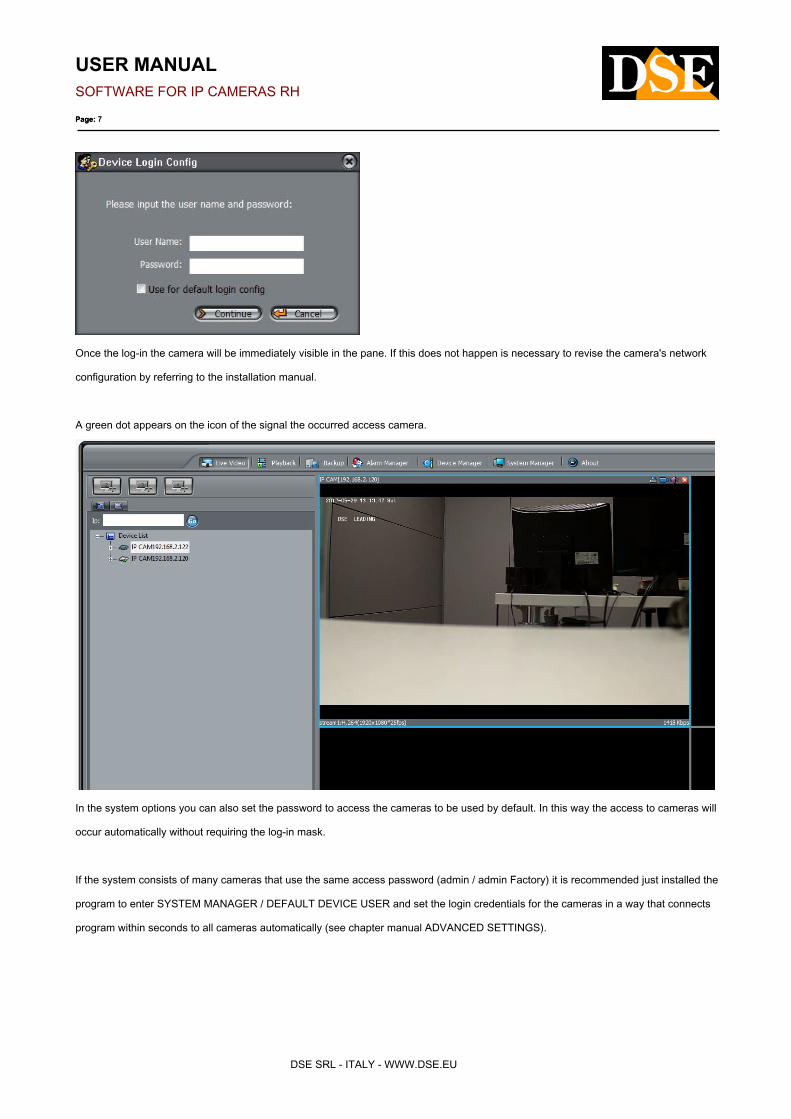
Releasing the mouse will appear in the pane window to log in which you must enter the access credentials of the cameras (by default:
admin / admin)
USER MANUAL
SOFTWARE FOR IP CAMERAS RH
Page: 7 Page: 7
DSE SRL - ITALY - WWW.DSE.EU
Once the log-in the camera will be immediately visible in the pane. If this does not happen is necessary to revise the camera's network
configuration by referring to the installation manual.
A green dot appears on the icon of the signal the occurred access camera.
In the system options you can also set the password to access the cameras to be used by default. In this way the access to cameras will
occur automatically without requiring the log-in mask.
If the system consists of many cameras that use the same access password (admin / admin Factory) it is recommended just installed the
program to enter SYSTEM MANAGER / DEFAULT DEVICE USER and set the login credentials for the cameras in a way that connects
program within seconds to all cameras automatically (see chapter manual ADVANCED SETTINGS).
USER MANUAL
SOFTWARE FOR IP CAMERAS RH
Page: 8 Page: 8
DSE SRL - ITALY - WWW.DSE.EU
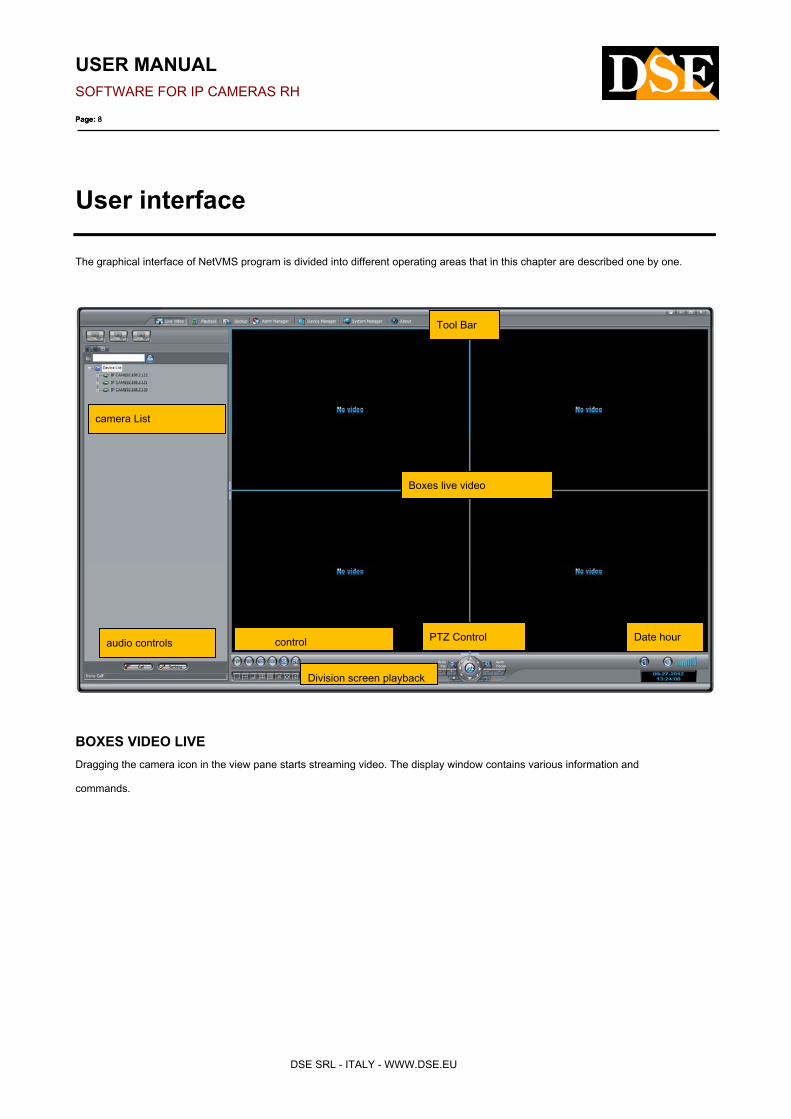
User interface
The graphical interface of NetVMS program is divided into different operating areas that in this chapter are described one by one.
BOXES VIDEO LIVE
Dragging the camera icon in the view pane starts streaming video. The display window contains various information and
commands.
Boxes live video
camera List
audio controls
Tool Bar
PTZ Control
Division screen playback
control
Date hour
USER MANUAL
SOFTWARE FOR IP CAMERAS RH
Page: 9 Page: 9
DSE SRL - ITALY - WWW.DSE.EU
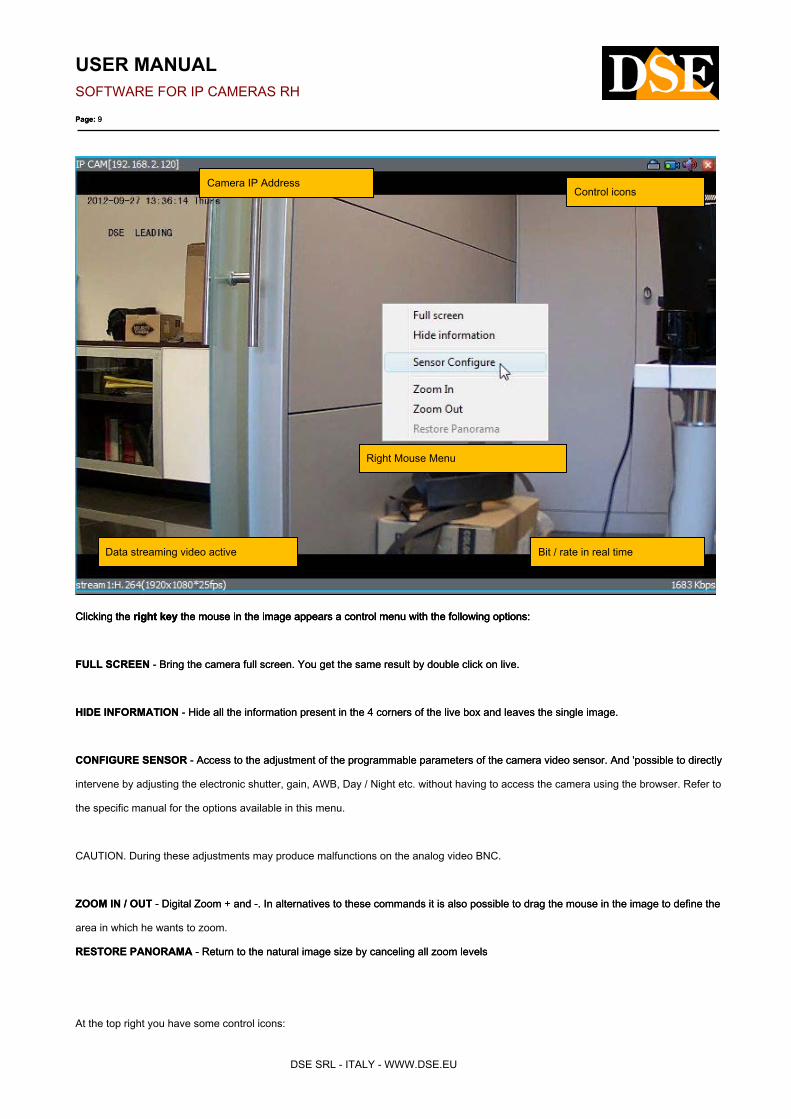
Clicking the right key the mouse in the image appears a control menu with the following options: Clicking the right key the mouse in the image appears a control menu with the following options: Clicking the right key the mouse in the image appears a control menu with the following options:
FULL SCREEN - Bring the camera full screen. You get the same result by double click on live.FULL SCREEN - Bring the camera full screen. You get the same result by double click on live.
HIDE INFORMATION - Hide all the information present in the 4 corners of the live box and leaves the single image. HIDE INFORMATION - Hide all the information present in the 4 corners of the live box and leaves the single image.
CONFIGURE SENSOR - Access to the adjustment of the programmable parameters of the camera video sensor. And 'possible to directly CONFIGURE SENSOR - Access to the adjustment of the programmable parameters of the camera video sensor. And 'possible to directly
intervene by adjusting the electronic shutter, gain, AWB, Day / Night etc. without having to access the camera using the browser. Refer to
the specific manual for the options available in this menu.
CAUTION. During these adjustments may produce malfunctions on the analog video BNC.
ZOOM IN / OUT - Digital Zoom + and -. In alternatives to these commands it is also possible to drag the mouse in the image to define the ZOOM IN / OUT - Digital Zoom + and -. In alternatives to these commands it is also possible to drag the mouse in the image to define the
area in which he wants to zoom.
RESTORE PANORAMA - Return to the natural image size by canceling all zoom levels RESTORE PANORAMA - Return to the natural image size by canceling all zoom levels
At the top right you have some control icons:
Camera IP Address
Data streaming video active Bit / rate in real time
Control icons
Right Mouse Menu

USER MANUAL
SOFTWARE FOR IP CAMERAS RH
Page: 10 Page: 10
DSE SRL - ITALY - WWW.DSE.EU
3D PTZ POSITIONING - This icon is used to enable / disable a special PTZ speed dome cameras called 3D POSITIONING.
With the 3D positioning enabled it is possible to draw a rectangle with the mouse in the image from top to bottom and obtain
the automatic movement and zoom of the camera to frame. By tracking the rectangle from the bottom otherwise you get
zoom out. Enabling the 3D positioning it inhibits the ability to make the digital zoom in the image by dragging the mouse. This
is why this option is disabled by default. MANUAL RECORD - Starts
manual recording of channel
regardless dale automatic schedules. Because the recording is started you must have set the options regarding the recording
that we will see later. AUDIO ON / OFF - Enables or disables audio playback on the computer station
RECORDING INDICATOR - If the channel is recording the icon turns red.
SPLIT SCREEN CONTROLS
NetVMS The program allows you to simultaneously display screen up to 36 cameras. With these buttons you can split the screen in the
most appropriate manner.
From left to right:
SINGLE CAMERA DIVISION IN 4, 8, 9, 16, 36 panes. SINGLE CAMERA DIVISION IN 4, 8, 9, 16, 36 panes.
FULL SCREEN - It hides the frame of the program is the buttons and shows only the cameras. Press Esc to exit.FULL SCREEN - It hides the frame of the program is the buttons and shows only the cameras. Press Esc to exit.
HIDE INFORMATION - Hides data printed at the corners of the image containing information on streaming video. HIDE INFORMATION - Hides data printed at the corners of the image containing information on streaming video.
CONTROLS PTZ SPEED DOME
The NetVMS program can control and configure the motorized speed dome cameras RH series. The common navigation commands,
zoom, iris, focus can be made directly with the on-screen buttons

USER MANUAL
SOFTWARE FOR IP CAMERAS RH
Page: 11 Page: 11
DSE SRL - ITALY - WWW.DSE.EU
However, you can also access a more complete control menu that lets you set and also control all the automatic movements of the
camera as presets, tour, scan etc. Pressing the PTZ button in the center window opens that allows and which is described in the next
chapter
CHECK / SETTING SPEED DOME
Pressing the PTZ button in the center of the dome control panel opens the following window:
To avoid misunderstandings in the reading of this first part of the manual should be clarified that the IP speed dome RH series cameras
can perform 4 types of automatic movements:
• PRESET - The presets are preset camera positions characterized by a precise value of X / Y coordinates, zoom and focus. You can PRESET - The presets are preset camera positions characterized by a precise value of X / Y coordinates, zoom and focus. You can
easily call from the client if necessary.
• TOUR - Also called PATROL or CRUISE. It means the automatic movement of the camera between presets with a residence time TOUR - Also called PATROL or CRUISE. It means the automatic movement of the camera between presets with a residence time
on each of them programmable.
• SCAN - It is understood the continuous movement RIGHT-LEFT between two end positions SCAN - It is understood the continuous movement RIGHT-LEFT between two end positions
• TRACK - Also called PATTERN. It 'similar to the TOUR. The camera, however, does not follow in sequence the various presets, but TRACK - Also called PATTERN. It 'similar to the TOUR. The camera, however, does not follow in sequence the various presets, but
a custom continuous movement recorded by the user in the programming phase.

USER MANUAL
SOFTWARE FOR IP CAMERAS RH
Page: 12 Page: 12
DSE SRL - ITALY - WWW.DSE.EU
PRESET
For set a preset position
the camera
the desired location and click the ADD
button. It is given the opportunity to edit a
name for the preset and then must
confirm
Press SETTING. For
call back the presets
select it in the list and
press APPLY. To cancel it, press DELETE.
TOUR
For set a tour
Press ADD and appoint the tour (the
cameras can manage up to 12 different
tours). Choose the first preset from where
the tour will start and the camera dwell time
then press
START.
Select the second preset and time to
stay on it, then press ADD. Proceed by adding all the presets you want to
include in the tour. At the end, after you press the last ADD, press END.
To start the TOUR select it in the list and press APPLY. To cancel it, press
DELETE.
To stop a tour running just call any other of the camera movement command.
USER MANUAL
SOFTWARE FOR IP CAMERAS RH
Page: 13 Page: 13
DSE SRL - ITALY - WWW.DSE.EU
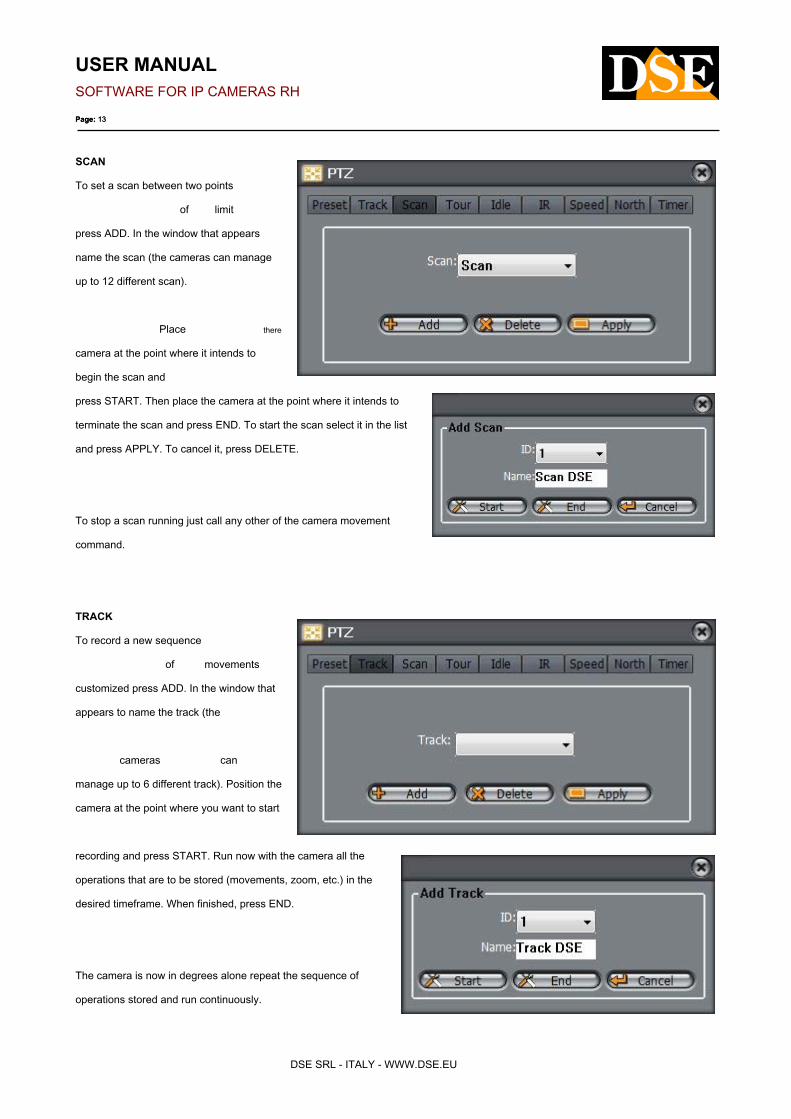
SCAN
To set a scan between two points
of limit
press ADD. In the window that appears
name the scan (the cameras can manage
up to 12 different scan).
Place there
camera at the point where it intends to
begin the scan and
press START. Then place the camera at the point where it intends to
terminate the scan and press END. To start the scan select it in the list
and press APPLY. To cancel it, press DELETE.
To stop a scan running just call any other of the camera movement
command.
TRACK
To record a new sequence
of movements
customized press ADD. In the window that
appears to name the track (the
cameras can
manage up to 6 different track). Position the
camera at the point where you want to start
recording and press START. Run now with the camera all the
operations that are to be stored (movements, zoom, etc.) in the
desired timeframe. When finished, press END.
The camera is now in degrees alone repeat the sequence of
operations stored and run continuously.

USER MANUAL
SOFTWARE FOR IP CAMERAS RH
Page: 14 Page: 14
DSE SRL - ITALY - WWW.DSE.EU
To start the esecuziopne select the track list and press APPLY. To delete a track, press DELETE.
To stop a track running just call any other of the camera movement command.
IDLE
The IDLE function is used to perform
an action
automatically after a certain time the
absence of commands by the operator.
It is an important setting to prevent the
camera from being inadvertently left on
insignificant positions.
E 'can program the camera so that invokes a particular preset, tour, track scan or after a certain time (IDLE TIME) absence of commands
(from 1 to 240 minutes). To store the setting
Press SETTING. The OPEN button is used to
activate / deactivate IDLE to allow the operator to suspend
temporarily automatic return.
IR
This window is used to adjust the
infrared lighting settings in the speed dome
cameras that are equipped.
In the OPEN MODE box rule
defines that
the lighting of the IR LED should
occur automatically at nightfall (AUTO) but it is also possible to make so that the LEDs are always lit (OPEN) or always off (CLOSE).
In the box BRIGHTNESS adjusts the brightness of the LEDs that can be left automatically or manually set. In the latter case it is possible
to set (0 to 100) from the brightness near (NEAR) medium distance (MIDDLE) and far (FAR).
USER MANUAL
SOFTWARE FOR IP CAMERAS RH
Page: 15 Page: 15
DSE SRL - ITALY - WWW.DSE.EU
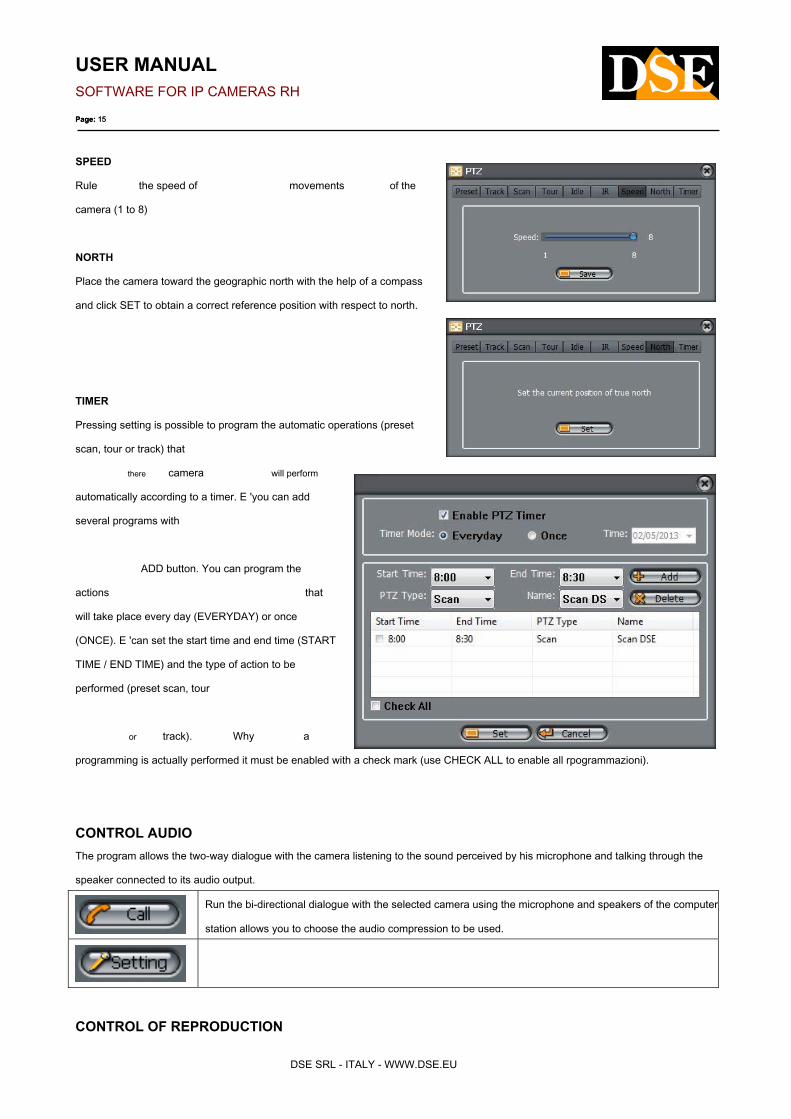
SPEED
Rule the speed of movements of the
camera (1 to 8)
NORTH
Place the camera toward the geographic north with the help of a compass
and click SET to obtain a correct reference position with respect to north.
TIMER
Pressing setting is possible to program the automatic operations (preset
scan, tour or track) that
there camera will perform
automatically according to a timer. E 'you can add
several programs with
ADD button. You can program the
actions that
will take place every day (EVERYDAY) or once
(ONCE). E 'can set the start time and end time (START
TIME / END TIME) and the type of action to be
performed (preset scan, tour
or track). Why a
programming is actually performed it must be enabled with a check mark (use CHECK ALL to enable all rpogrammazioni).
CONTROL AUDIO
The program allows the two-way dialogue with the camera listening to the sound perceived by his microphone and talking through the
speaker connected to its audio output.
Run the bi-directional dialogue with the selected camera using the microphone and speakers of the computer
station allows you to choose the audio compression to be used.
CONTROL OF REPRODUCTION
USER MANUAL
SOFTWARE FOR IP CAMERAS RH
Page: 16 Page: 16
DSE SRL - ITALY - WWW.DSE.EU
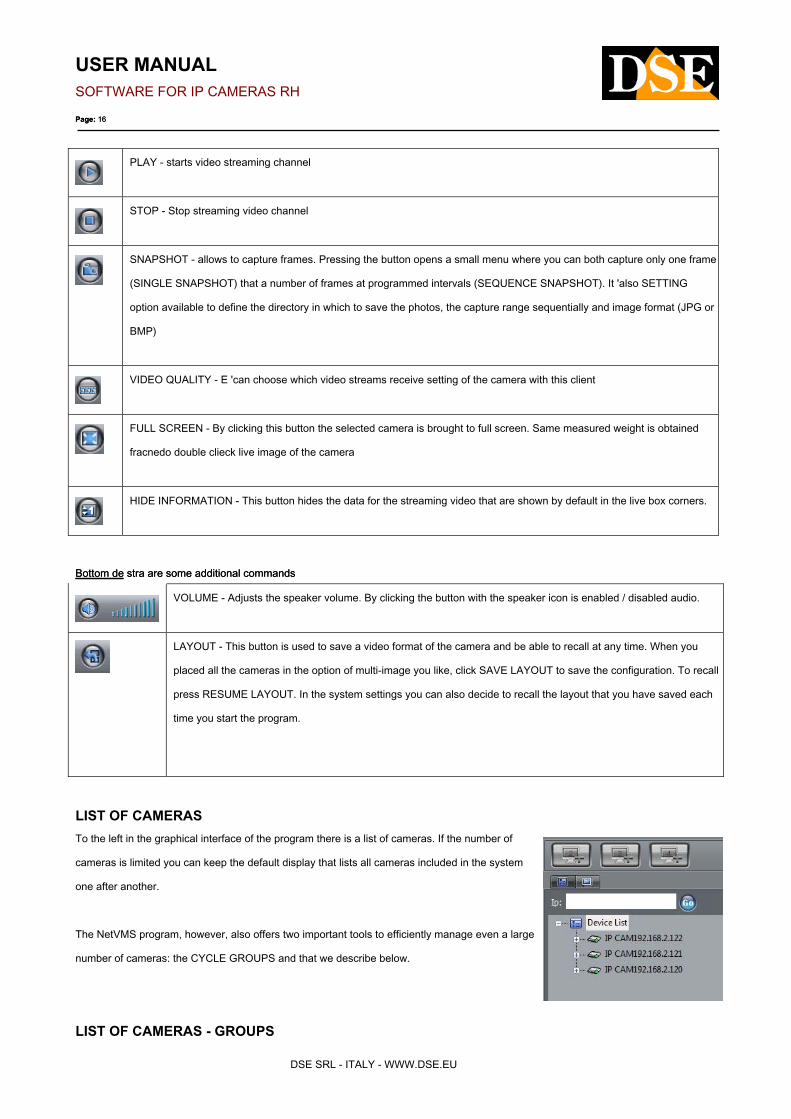
PLAY - starts video streaming channel
STOP - Stop streaming video channel
SNAPSHOT - allows to capture frames. Pressing the button opens a small menu where you can both capture only one frame
(SINGLE SNAPSHOT) that a number of frames at programmed intervals (SEQUENCE SNAPSHOT). It 'also SETTING
option available to define the directory in which to save the photos, the capture range sequentially and image format (JPG or
BMP)
VIDEO QUALITY - E 'can choose which video streams receive setting of the camera with this client
FULL SCREEN - By clicking this button the selected camera is brought to full screen. Same measured weight is obtained
fracnedo double clieck live image of the camera
HIDE INFORMATION - This button hides the data for the streaming video that are shown by default in the live box corners.
Bottom de stra are some additional commands Bottom de stra are some additional commands
VOLUME - Adjusts the speaker volume. By clicking the button with the speaker icon is enabled / disabled audio.
LAYOUT - This button is used to save a video format of the camera and be able to recall at any time. When you
placed all the cameras in the option of multi-image you like, click SAVE LAYOUT to save the configuration. To recall
press RESUME LAYOUT. In the system settings you can also decide to recall the layout that you have saved each
time you start the program.
LIST OF CAMERAS
To the left in the graphical interface of the program there is a list of cameras. If the number of
cameras is limited you can keep the default display that lists all cameras included in the system
one after another.
The NetVMS program, however, also offers two important tools to efficiently manage even a large
number of cameras: the CYCLE GROUPS and that we describe below.
LIST OF CAMERAS - GROUPS
USER MANUAL
SOFTWARE FOR IP CAMERAS RH
Page: 17 Page: 17
DSE SRL - ITALY - WWW.DSE.EU
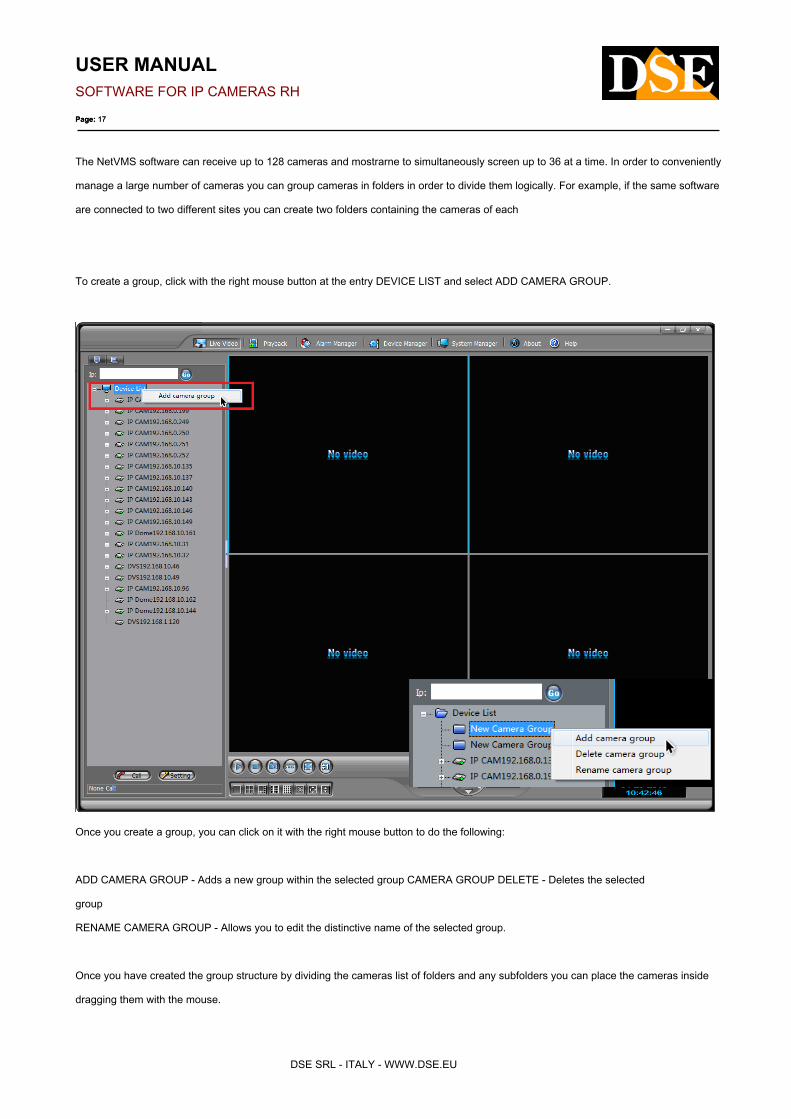
The NetVMS software can receive up to 128 cameras and mostrarne to simultaneously screen up to 36 at a time. In order to conveniently
manage a large number of cameras you can group cameras in folders in order to divide them logically. For example, if the same software
are connected to two different sites you can create two folders containing the cameras of each
To create a group, click with the right mouse button at the entry DEVICE LIST and select ADD CAMERA GROUP.
Once you create a group, you can click on it with the right mouse button to do the following:
ADD CAMERA GROUP - Adds a new group within the selected group CAMERA GROUP DELETE - Deletes the selected
group
RENAME CAMERA GROUP - Allows you to edit the distinctive name of the selected group.
Once you have created the group structure by dividing the cameras list of folders and any subfolders you can place the cameras inside
dragging them with the mouse.
USER MANUAL
SOFTWARE FOR IP CAMERAS RH
Page: 18 Page: 18
DSE SRL - ITALY - WWW.DSE.EU
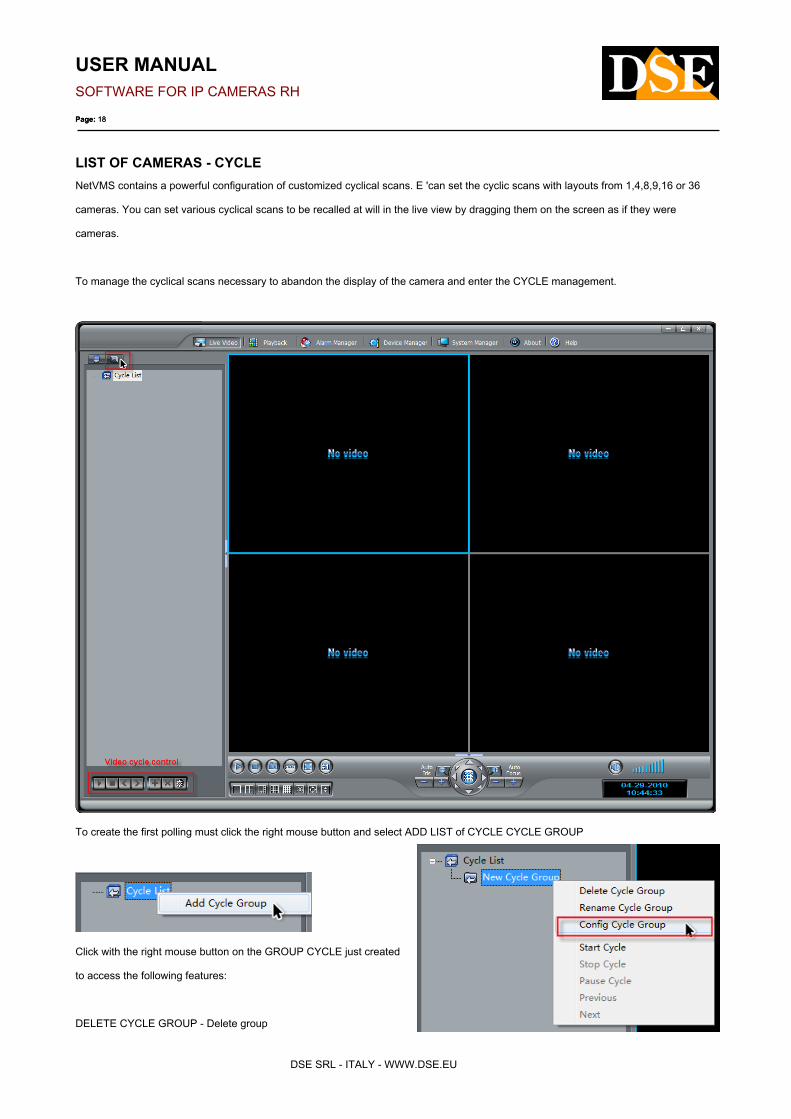
LIST OF CAMERAS - CYCLE
NetVMS contains a powerful configuration of customized cyclical scans. E 'can set the cyclic scans with layouts from 1,4,8,9,16 or 36
cameras. You can set various cyclical scans to be recalled at will in the live view by dragging them on the screen as if they were
cameras.
To manage the cyclical scans necessary to abandon the display of the camera and enter the CYCLE management.
To create the first polling must click the right mouse button and select ADD LIST of CYCLE CYCLE GROUP
Click with the right mouse button on the GROUP CYCLE just created
to access the following features:
DELETE CYCLE GROUP - Delete group

USER MANUAL
SOFTWARE FOR IP CAMERAS RH
Page: 19 Page: 19
DSE SRL - ITALY - WWW.DSE.EU
scan cyclic
RENAME CYCLE GROUP - Allows you to edit the distinctive name of the selected group. CONFIG CYCLE GROUP - Allows you to enter
the configuration page of the cyclical scan that is explained below.
• At the top left, under DISPLAY define whether this cyclical scanning cover of the screens from 1,4,8,9,16 or 36 cameras.
Alongside, the INTERVAL item defines the dwell time in seconds of each screen during the scan.
• In the left column, select the cameras that will be part of the scan and transfer them to the right column by pressing the arrow
RIGHT MOVE.

USER MANUAL
SOFTWARE FOR IP CAMERAS RH
Page: 20 Page: 20
DSE SRL - ITALY - WWW.DSE.EU
• In the right column to set the screens that make up the scan, and will cycle on the screen in sequence. The number of cameras
per screen depends on the initial DISPLAY upper left. To add, delete or rename a screen, click the right button. In the '' above,
for example, has set
the cyclical rotation of 5 screens composed of 4 cameras each. Each screen will remain on screen for 10 seconds.
• Press SAVE to save the scan

USER MANUAL
SOFTWARE FOR IP CAMERAS RH
Page: 21 Page: 21
DSE SRL - ITALY - WWW.DSE.EU
To start the scheduled scan, click the right button and choose from the list CYCLE START CYCLE. E 'can also press the play button
below, or simply drag the scan on the live view screen, the position where you want to happen playback
Obviously the cyclic scan will occupy a number of boxes equal to the cameras that make up its screens (1,4.8.9.16 or 36).

USER MANUAL
SOFTWARE FOR IP CAMERAS RH
Page: 22 Page: 22
DSE SRL - ITALY - WWW.DSE.EU

USER MANUAL
SOFTWARE FOR IP CAMERAS RH
Page: 23 Page: 23
DSE SRL - ITALY - WWW.DSE.EU
System Configuration
Click the button to access the configuration of NetVMS program.
GENERAL
• LANGUAGE - NetVMS Although the program is designed to manage other languages it is recommended to keep this option
ENGLISH since for international uniformity, this is only option that is conducted every reference functional tests.
• REMEMBER MY PASSWORD - This option is used to speed up log in as you will not have to type every time the access password
to log in. Obviously this option should be enabled only if you do not need to manage multiple user access with different
authorization levels.
• SIGN-IN AUTOMATICALLY - This option is only available if you have enabled the previous option REMEMBER MY PASSWORD.
In this case the system will not only remember your password dell'utenet but not even appear the window to log in. This option is
useful if you want to start the program automatically becomes operational
USER MANUAL
SOFTWARE FOR IP CAMERAS RH
Page: 24 Page: 24
DSE SRL - ITALY - WWW.DSE.EU
without requiring operator actions. Obviously, enabling this feature, the system remains unprotected against unauthorized access.
• AUTO START-UP - With this option, the program will start automatically when Windows starts.
• RESTORE LAYOUT AUTOMATICALLY - Enabling this option each time will be automatically recalled the last layout of live images
you have saved with the SAVE LAYOUT button.
• RECORDING AUTO SERVICE STARTS - With this function enabled, when the program enters the same recording immediately
starting all automatic recordings services programmed in the configuration (see below). It 'not advisable to disable this function.
With this function disabled, the startup program does not record anything and will need to go to advanced configuration and
manually start individual TASK recording that you have configured.
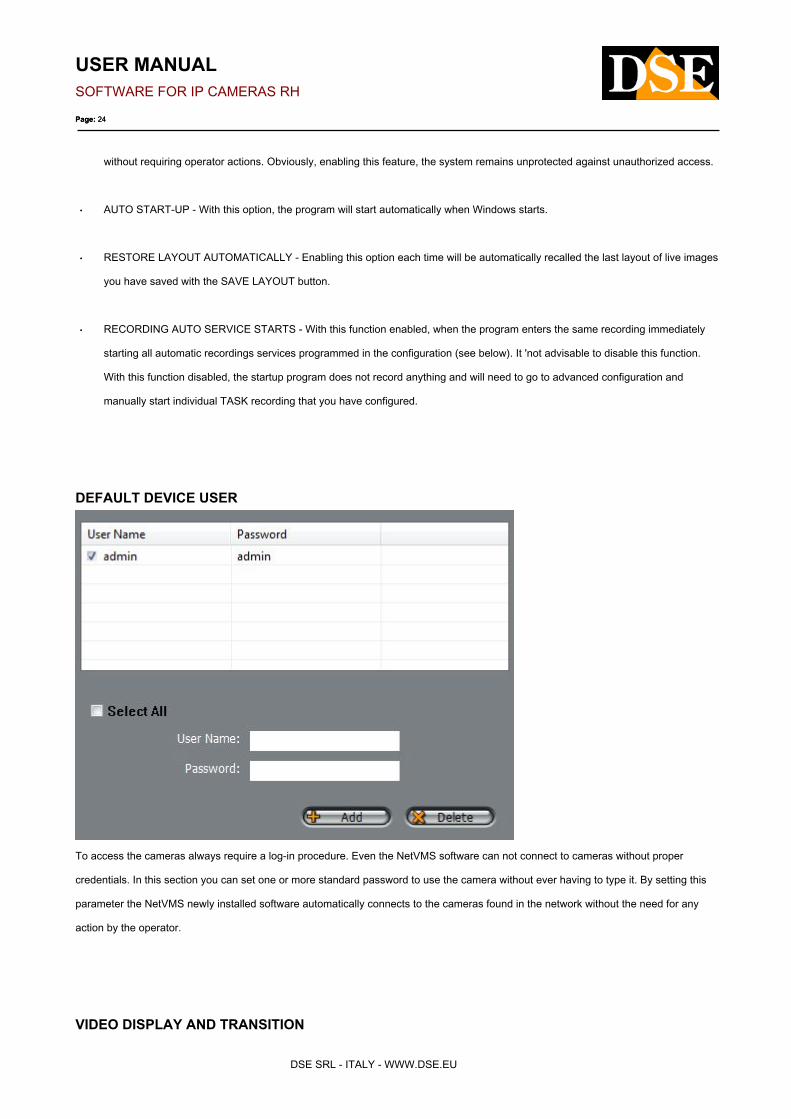
DEFAULT DEVICE USER
To access the cameras always require a log-in procedure. Even the NetVMS software can not connect to cameras without proper
credentials. In this section you can set one or more standard password to use the camera without ever having to type it. By setting this
parameter the NetVMS newly installed software automatically connects to the cameras found in the network without the need for any
action by the operator.
VIDEO DISPLAY AND TRANSITION

USER MANUAL
SOFTWARE FOR IP CAMERAS RH
Page: 25 Page: 25
DSE SRL - ITALY - WWW.DSE.EU
• WINDOW DISPLAY MODE - Defines as quadrants will split the screen at startup (1,4,8,9,16, or 36). Obviously the multivision can
then be modified as desired by the operator.
• DEFAULT TRANSFER PROTOCOL - The protocol to use by default in network communication with the cameras (TCP / UDP /
RTP). Default TCP.
• STRETCH VIDEO MODE - The NetVMS program is totally resizable in order to be able to adapt to any monitor resolution.
Depending on the size of the live playback panes program could change proportions window. Enabling this feature allows the live
image of the camera will always be automatically resized so as to perfectly fill the pane. The downside is that this function qi
images might be more or less deformed if proporzioi the panel should be very different from the 16: 9 Native dell'immagini camera.
Leaving this option disabled the image will be preserved in its native format instead of 16: 9 and any unoccupied in the box will be
filled with black bands areas.
• IMAGE FORMAT AUTOADAPTATION - The video resolution of the program automatically adapts to the size of the monitor in use
• USE TIME STAMP - Enter the "time stamp" in the recorded video management allows perfect synchronization of picture and sound
with the system clock during playback. However, this function affects data heavy, so if you enable this function, you can set the
delay between the time stamps (Max. DELAY). A high value (max. 5000 msec) is a guarantee of greater fluidity of play.
ALARM

USER MANUAL
SOFTWARE FOR IP CAMERAS RH
Page: 26 Page: 26
DSE SRL - ITALY - WWW.DSE.EU
NetVMS The program is able to receive alarm signals from individual cameras. Enabling this function when an alarm will
appear in the bottom right of the screen the icon of a red flashing and clicking on it will open immediately the alarm log
window.
PTZ KEYBOARD
NetVMS The program is designed to connect to a computer station PTZ control keyboard for speed dome cameras. This will make it
possible to control the movements of network speed dome cameras also conveniently with the joystick on the console instead of just
using the mouse. The Keypad must be connected to the RS232 serial port (COM) of the PC or in the absence of it to a USB port using a
converter as in the following example

USER MANUAL
SOFTWARE FOR IP CAMERAS RH
Page: 27 Page: 27
DSE SRL - ITALY - WWW.DSE.EU
In the window above you enter data do the communication protocol to be used in dialogue with the console PTZ
COMMUNICATION
This is the default communication ports that the program will use the network. It 'not recommended to change the factory settings of
unnecessarily ALARM CENTER PORT - Used to receive events from REGISTER SERVICE cameras - currently unused - Available for
future developments BROADCAST - Used to detect the cameras on the network
DEVICE SEARCH

USER MANUAL
SOFTWARE FOR IP CAMERAS RH
Page: 28 Page: 28
DSE SRL - ITALY - WWW.DSE.EU
The NetVMS program automatically performs a search of IP cameras on the network. This function, as we saw earlier makes fast set up
new cameras without uploading them manually. In this section you can specify one or more ranges of IP addresses in order to limit and
make research more efficient and faster. You can also specify the communication port which defaults to 30001 and should not be
modified rule. Why NetVMS Consider the interval in research need to enable it with a check mark.
CONCENTRATE RECORD - STORE CONFIGURATION
In this section you define the storage unit where the program will NetVMS to store the recordings. NetVMS can record to hard drive but
also on external NAS (network storage stations). NetVMS not necessarily record all video files together in the same storage unit, but is
able to handle different UNIT DISC (folders) within which you can define which cameras record and in what mode.

USER MANUAL
SOFTWARE FOR IP CAMERAS RH
Page: 29 Page: 29
DSE SRL - ITALY - WWW.DSE.EU
To add a UNITA 'DISCO click ADD. In the window that appears you can choose to add a folder on a local hard disk or on a network NAS.
ADD LOCAL DISK DRIVE
• ENABLE - Because the unit is actually used by the program is necessary that this tick is present
• DIRECTORY - Locate with the BROWSE button to devote to the recording folder. E 'can select an entire hard drive or just a folder
contained in it.
• GROUP ID - The storage folders can be grouped into 8 GROUPS. In

USER MANUAL
SOFTWARE FOR IP CAMERAS RH
Page: 30 Page: 30
DSE SRL - ITALY - WWW.DSE.EU
next programming section can be defined for each camera in which disk group storing the images. In this box you choose the disk
group to which it belongs this archive folder.
• USA ALL SPACE - Enabling this function does not arise limit to the size of the folder and the program will occupy all the free space
available. This option must never be enabled if you are setting up a main mail folder on the hard disk where even the operating
system resides. In this case, you set a size limit to the folder in order to preserve a space of a few GB for the proper functioning of
the operating system.
• USABLE SPACE - If you disable the previous option Here you can set the maximum size of the folder (in MB), after which the
program will consider out of space. The space occupied by the recordings varies depending on the bit / rate of the stream that is
recorded. Consider recording streaming FullHD can occupy too much disk space, roughly 1 to 3 GB per hour of a camera
recording.
ADD DISK DRIVE NETWORK (NAS)
• ENABLE - Because the unit is actually used by the program is necessary that this tick is present
• IP - The IP address of the NAS.
• PATH - The name of the folder to be used within the NAS
• ACCOUNTS / PASSWORD / CONFIRM - Enter the login credentials to NAS
• GROUP ID - The storage folders can be grouped into 8 GROUPS. In the next programming section you can be defined for each
camera in which disk group storing the images. In this box you choose the disk group to which it belongs this
USER MANUAL
SOFTWARE FOR IP CAMERAS RH
Page: 31 Page: 31
DSE SRL - ITALY - WWW.DSE.EU
archive folder.
• USA ALL SPACE - Enabling this function does not arise limit to the size of the folder and the program will occupy all the free space
available.
• USABLE SPACE - If you disable the previous option Here you can set the maximum size of the folder (in MB), after which the
program will consider out of space. The space occupied by the recordings varies depending on the bit / rate of the stream that is
recorded. Consider recording streaming FullHD can occupy too much disk space, roughly 1 to 3 GB per hour of a camera
recording.
For the changes to take effect, press before going out.
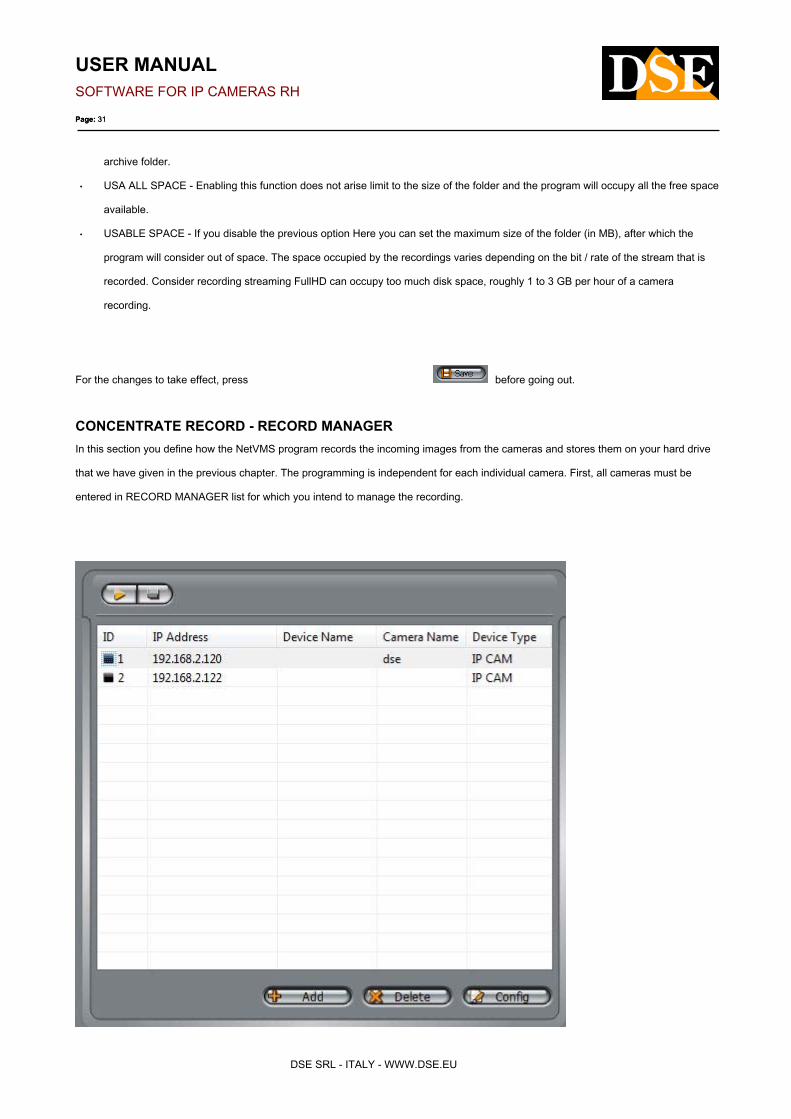
CONCENTRATE RECORD - RECORD MANAGER
In this section you define how the NetVMS program records the incoming images from the cameras and stores them on your hard drive
that we have given in the previous chapter. The programming is independent for each individual camera. First, all cameras must be
entered in RECORD MANAGER list for which you intend to manage the recording.

USER MANUAL
SOFTWARE FOR IP CAMERAS RH
Page: 32 Page: 32
DSE SRL - ITALY - WWW.DSE.EU
To add and remove cameras act on ADD and DELETE buttons. Once you have added all the cameras will be recording in the list you
must select them one by one and press CONFIG to define the recording mode of each of them.
SCHEDULE RECORD
• ENABLE - This option enables continuous recording or scheduled on an hourly basis
• 7 * 24H RECORD - By choosing this option the camera will be
recorded continuously 24 hours a day.
• SCHEDULE RECORD - By choosing this option the camera
will be recorded only at specific times. Pressing the TIME
SETTING button you can define more than one time slot for the
different days of the week within which the recording should
take place. In the example on the camera side it is recorded for

USER MANUAL
SOFTWARE FOR IP CAMERAS RH
Page: 33 Page: 33
DSE SRL - ITALY - WWW.DSE.EU
all day on holidays and only from 8 to 18 on weekdays.
• MOTION DETECTION RECORD ENABLE - This option enables the recording of motion detection. NetVMS can in fact also record
in case of motion alarm is generated from the camera. This option can be enabled independently of the scheduled recording.
• PRE-TIME - E 'can set a period of time to be recorded before the alarm (max. 30 sec.) In order to have a more complete idea of
what happened.
• DELAY TIME - This determines how long to record after a motion alarm
• AUDIO RECORD - E 'can record audio along with the video
• DISK GROUP - Defines what DISCO GROUP (see previous chapter) store camera video files
• DISK IS FULL CIRCLE WHILE STORE - When enabled, it runs out of disk space allocated, the program will continue recording by
overwriting the older images. Unlike stop recording.
• SAVE DAYS - This feature allows you to program a maximum number of days to keep on file to comply with any requirement of
privacy protection.
• STREAM - Choose the camera video stream record
START RECORDING
To start and stop manually programmed recordings press the PLAY / STOP button on the top left
A green dot will indicate the services of registration in the list who were able to start up properly. E ', however, advisable to program the
start of the recording automatically when the program starts to prevent this (see above)

USER MANUAL
SOFTWARE FOR IP CAMERAS RH
Page: 34 Page: 34
DSE SRL - ITALY - WWW.DSE.EU
PRIVILEGES - GROUP
The NetVMS program provides access via a log-in procedure that allows to identify the user. And 'possible to manage different users with
different levels of access to the program. First in this section you have to create USER GROUPS to assign a certain level of access to the
system. Each user can be associated with one of these groups.
The ADMINISTRATORS group is the group that provides access to all functions and can not canacellare. And 'possible to add other
groups using the Add button. Each group can be enabled and less to the following functions:
• LIVE VIDEO - Live viewing of images
• ALARM MANAGER - access to alarm management
• SYSTEM CONFIGURATION -access to the program configuration
• PLAYBACK - access to playback of recordings
• DEVICE MANAGER - access to the configuration of the cameras
PRIVILEGES - USERS

USER MANUAL
SOFTWARE FOR IP CAMERAS RH
Page: 35 Page: 35
DSE SRL - ITALY - WWW.DSE.EU
Here it is' possible to add users. For each user you must specify NAME and PASSWORD (to be confirmed), and group membership.
Besides the usual DELETE / MODIFY commands the UNLOCK button is available that can be used by your main (default admin / admin)
to unlock users who have been blocked for three consecutive times typed an incorrect password.
SYSTEM LOG
USER MANUAL
SOFTWARE FOR IP CAMERAS RH
Page: 36 Page: 36
DSE SRL - ITALY - WWW.DSE.EU
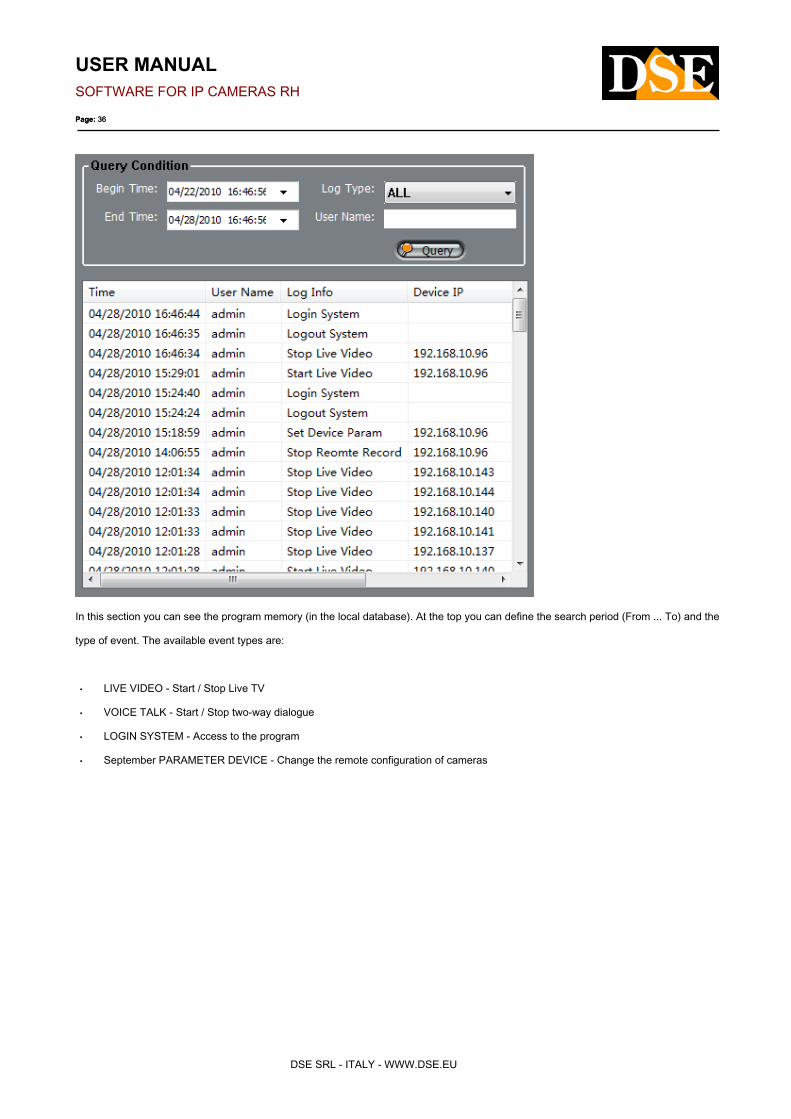
In this section you can see the program memory (in the local database). At the top you can define the search period (From ... To) and the
type of event. The available event types are:
• LIVE VIDEO - Start / Stop Live TV
• VOICE TALK - Start / Stop two-way dialogue
• LOGIN SYSTEM - Access to the program
• September PARAMETER DEVICE - Change the remote configuration of cameras
USER MANUAL
SOFTWARE FOR IP CAMERAS RH
Page: 37 Page: 37
DSE SRL - ITALY - WWW.DSE.EU
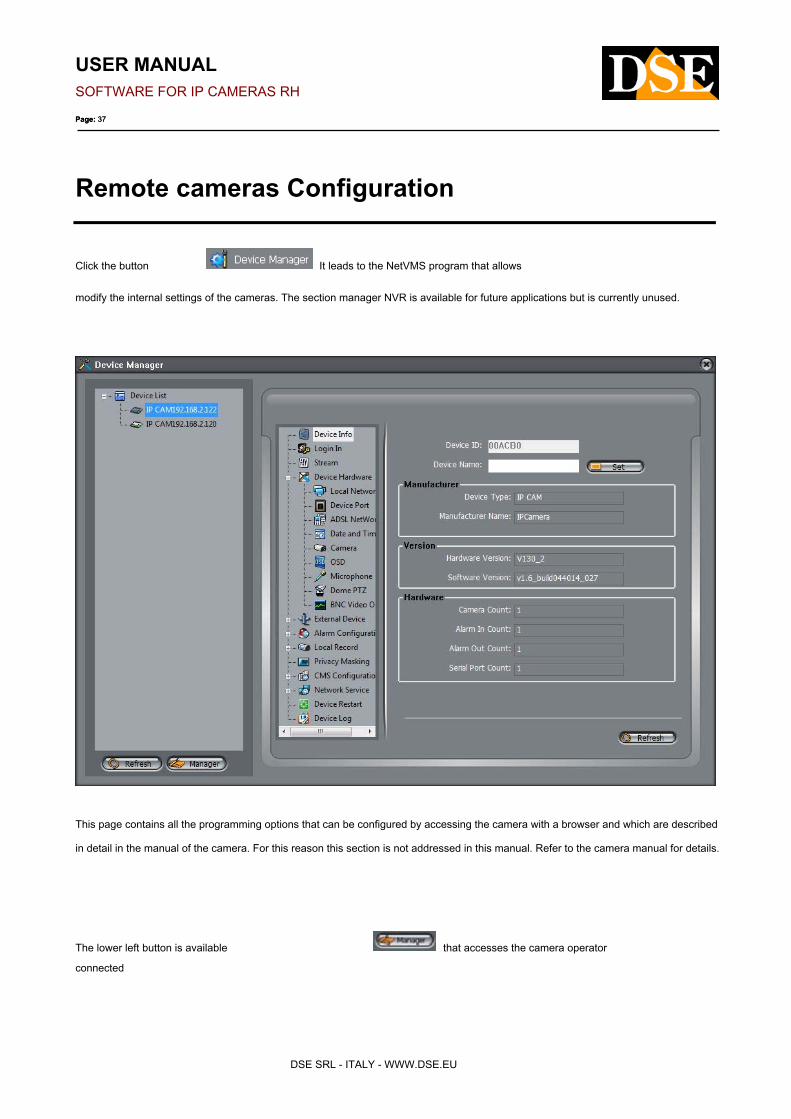
Remote cameras Configuration
Click the button It leads to the NetVMS program that allows
modify the internal settings of the cameras. The section manager NVR is available for future applications but is currently unused.
This page contains all the programming options that can be configured by accessing the camera with a browser and which are described
in detail in the manual of the camera. For this reason this section is not addressed in this manual. Refer to the camera manual for details.
The lower left button is available that accesses the camera operator
connected

USER MANUAL
SOFTWARE FOR IP CAMERAS RH
Page: 38 Page: 38
DSE SRL - ITALY - WWW.DSE.EU
Here you can delete already configured manually add new cameras or cameras.
ROUTER ENABLE MAPPING: Function when not in use

USER MANUAL
SOFTWARE FOR IP CAMERAS RH
Page: 39 Page: 39
DSE SRL - ITALY - WWW.DSE.EU
Playback
NetVMS is in degrees of playing both video files recorded on their hard drives (Hard Drives, NAS) is on board cameras on the SD card.
Video files are stored in the database folders .TS format. The program creates within its hard drive a folder for each camera, and within
them a folder for each day of recording.
E 'can browse the memory unit with Windows Explorer and copy the file of interest at will. For playback of .TS files you can use the free
player VLC MEDIA PLAYER.
For a smoother playback of movies recorded on NetVMS PLAYBACK program includes a section where you can search and play back
movies using a handy timeline.
To access, press the playback environment .
E 'it is given the opportunity to choose from RECORD PLAYBACK is FTP RECORD PLAYBACKE 'it is given the opportunity to choose from RECORD PLAYBACK is FTP RECORD PLAYBACKE 'it is given the opportunity to choose from RECORD PLAYBACK is FTP RECORD PLAYBACKE 'it is given the opportunity to choose from RECORD PLAYBACK is FTP RECORD PLAYBACK
RECORD PLAYBACK
This section allows you to search recorded video on local hard drives (including both hard disk of the PC that the network NAS) and even
those registered installed on board cameras on the SD card.

USER MANUAL
SOFTWARE FOR IP CAMERAS RH
Page: 40 Page: 40
DSE SRL - ITALY - WWW.DSE.EU
1 - CAMERAS CHOICE - This section in the upper left appear the cameras managed by NetVMS program. Select the cameras to play. E 1 - CAMERAS CHOICE - This section in the upper left appear the cameras managed by NetVMS program. Select the cameras to play. E 1 - CAMERAS CHOICE - This section in the upper left appear the cameras managed by NetVMS program. Select the cameras to play. E
'can play back up to 16 cameras. 2 - SEARCH PARAMETERS - Select LOCAL PLAYBACK to search the local database. As a local 'can play back up to 16 cameras. 2 - SEARCH PARAMETERS - Select LOCAL PLAYBACK to search the local database. As a local 'can play back up to 16 cameras. 2 - SEARCH PARAMETERS - Select LOCAL PLAYBACK to search the local database. As a local
database means all storage devices (HDD and NAS) that have been set in the configuration (see above). Select REMOTE PLAYBACK to
search in the SD card onboard the individual cameras. In the START TIME / END TIME boxes indicate the beginning and end of the time
period within which to search. And 'possible to select a maximum period of one week. The button
is
Available to add on the subject of search folders occasional folders, as it could be for example a folder to backup video files copied to
your desktop. Press SEARCH to start the search. 3 - TIMELINE - At the end of this time line search is all the researched period. In the top your desktop. Press SEARCH to start the search. 3 - TIMELINE - At the end of this time line search is all the researched period. In the top your desktop. Press SEARCH to start the search. 3 - TIMELINE - At the end of this time line search is all the researched period. In the top
of the timeline are reported subdivisions with date and time. Further down there are the bars representing the cameras. The colored
sections green containing video recorded in continuous recording mode, the features in color red contain recorded video while the alarm sections green containing video recorded in continuous recording mode, the features in color red contain recorded video while the alarm sections green containing video recorded in continuous recording mode, the features in color red contain recorded video while the alarm sections green containing video recorded in continuous recording mode, the features in color red contain recorded video while the alarm sections green containing video recorded in continuous recording mode, the features in color red contain recorded video while the alarm
1
2
3
4

USER MANUAL
SOFTWARE FOR IP CAMERAS RH
Page: 41 Page: 41
DSE SRL - ITALY - WWW.DSE.EU
sections Grey no data. sections Grey no data. sections Grey no data.
On the timeline left are the ZOOM buttons that allow you to change the scale of the timeline to center in the best interest period.
E 'can act on the ZOOM + / ZOOM buttons - or on the lower buttons that define directly the timeline subdivision steps (10 sec, 30 sec, 1
min, 5 min, 10 min). These buttons function as the tool to turn on or off. For example, to enlarge the scale click on the zoom button, then
click on the time line several times until you reach the desired zoom level, finally press the zoom + button to exit the zoom tool. 4 - REPRODUCTIONclick on the time line several times until you reach the desired zoom level, finally press the zoom + button to exit the zoom tool. 4 - REPRODUCTION
- Once you have researched and brought to the center line of the time period of interest you move the playback panel that is automatically
divided into different quadrants depending on how many cameras were selected in step number 1 above. In this different commands are
present pane
1 2 3 4 5 6 7 8 9 10 11 12 13 14
From left to right:
1 - PLAY - Start playing the timeline
2 - PAUSE - Stops playback while keeping the image on the screen 3 - STOP - Exits the playback to a
new search
4/5 - FRAME BACK / FORWARD - This button allows you to play one frame at a time to analyze with great care a sequence of interest 6
- BACK FAST
7/8/9/10 - BUTTON SLOW MOTION
11/12/13/14 - BUTTON FAST FORWARD
In addition to the playback control buttons you can double-click directly on the timeline to move the desired play on the instant. It 'also
possible when playing the mouse to drag the scroll bar under the video playback boxes. For each camera it is available in the upper right
the speaker icon to enable or disable audio playback.
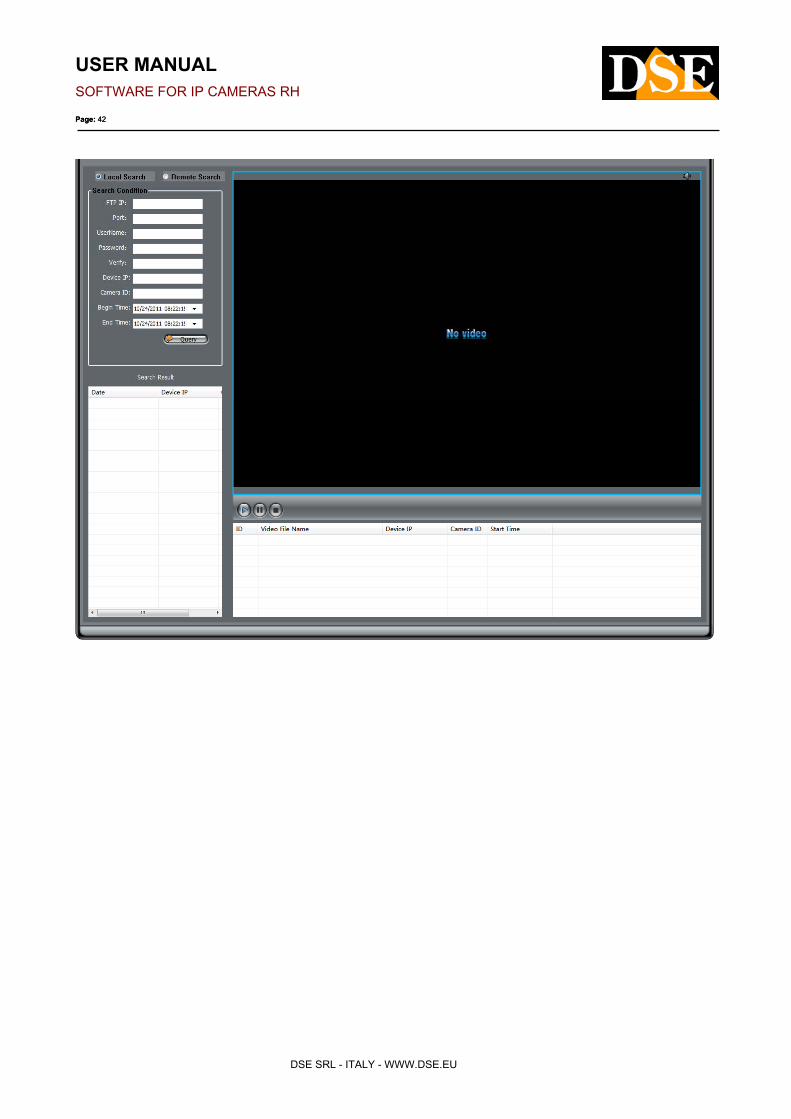
FTP RECORD PLAYBACK
The RH series cameras are able to record on FTP server. This section of NetVMS program is used to search video files saved via FTP or
local disk, if the program is installed on the same FTP server, or on remote FTP server. The display and controls are quite similar to the
local playback
USER MANUAL
SOFTWARE FOR IP CAMERAS RH
Page: 42 Page: 42
DSE SRL - ITALY - WWW.DSE.EU

USER MANUAL
SOFTWARE FOR IP CAMERAS RH
Page: 43 Page: 43
DSE SRL - ITALY - WWW.DSE.EU
Export and backup movies
NetVMS BACKUP has a convenient feature to export your recordings and save them in a folder or on a removable media like a USB
stick. This feature allows you to export both the local PC hard disk and those recorded files stored on external NAS and even those
recorded onboard cameras in the SD card. To export recorded files you first have to search for them using the PLAYBACK window as
just described in the previous chapter.
Once you have found the video files (green or red stripes in the timeline) select the period you want to export by dragging the mouse
inside the red line and holding the left button. The period delimited with the mouse will take on the color blue. Click on it with the right
button and choose BACKUP
It will start saving immediately. For the control of export operations
BACKUP access the section by pressing the button
In the window you can set the mode of export and also follow the progress of operations. This advancement vision are convenient when
you have to save long recording periods.

USER MANUAL
SOFTWARE FOR IP CAMERAS RH
Page: 44 Page: 44
DSE SRL - ITALY - WWW.DSE.EU
• PATH - Press the + button to search the PC the destination folder where you want to save the exported files.
• FILE SIZE - Define the size in MB of each video file in which to divide the period
• DIRECTORY TYPE - E 'can save the files grouped in folders, each appointed by the camera's IP address (IP Device) or its identifier
(Device ID) or even without grouping them in folders (None)
• RECORD MERGE FILES - Select whether you want to merge the exported files with others already present in the backup folder.
• SAVE - Save the backup settings
In the white box in the center you can see the backup operations. With the buttons on the left you can see all the operations (ALL
TASKS) or only those under way (BE COPING), or even just those already completed (COPY FINISHED).
With the buttons below you can pause a backup (PAUSE) and resume it later (START) or delete (DELETE).
With the DIRECTORY button to directly explore the folder where the files are saved (see above PATH).
For playback of files saved in .TS format you can use the free VLC player

USER MANUAL
SOFTWARE FOR IP CAMERAS RH
Page: 45 Page: 45
DSE SRL - ITALY - WWW.DSE.EU
or the SNPlayer player included in the camera CD.
USER MANUAL
SOFTWARE FOR IP CAMERAS RH
Page: 46 Page: 46
DSE SRL - ITALY - WWW.DSE.EU
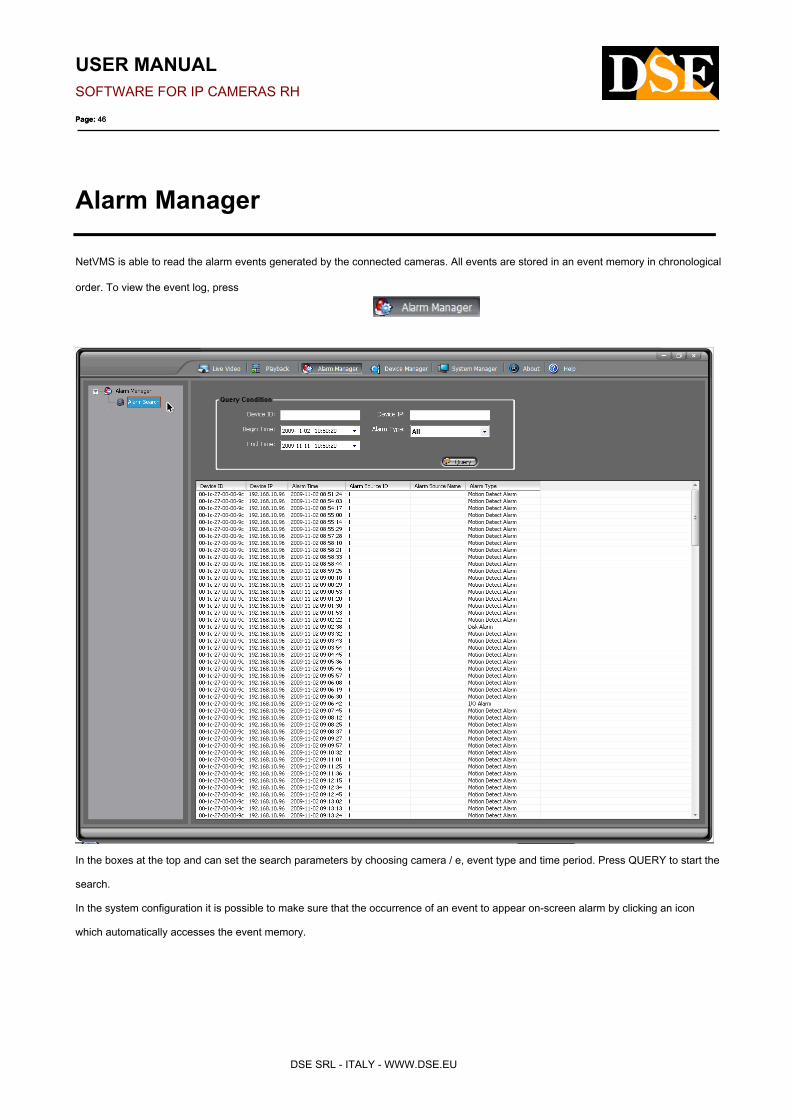
Alarm Manager
NetVMS is able to read the alarm events generated by the connected cameras. All events are stored in an event memory in chronological
order. To view the event log, press
In the boxes at the top and can set the search parameters by choosing camera / e, event type and time period. Press QUERY to start the
search.
In the system configuration it is possible to make sure that the occurrence of an event to appear on-screen alarm by clicking an icon
which automatically accesses the event memory.