APPARECCHIO DI EMERGENZA EMERGENCY LUMINAIRE … · apparecchio di emergenza emergency luminaire...
4
APPARECCHIO DI EMERGENZA EMERGENCY LUMINAIRE CRISTAL ENERGY TEST RINA IP65 ISTRUZIONI PER L'USO L'INSTALLAZIONE E INSTALLATION AND USE INSTRUCTIONS I UK Attenzione: In caso di installazione a parete il prodotto deve essere disposto con i led verso il BASSO BATTERIE: Sostituire la batteria ogni quattro anni o quando l'autonomia non è più quella nominale. Il tipo di batteria e la data di produzione sono indicati con una marcatura sulla batteria (Fig.1). Inoltre c'è uno spazio da riempire a cura dell'installatore con la data di entrata in funzione. Attenzione: Le batterie al Ni-Cd e Ni-MH sono inizialmente scariche, la prima ricarica deve durare almeno 48h. Warning: In case of wall mounting the product must be positioned with the leds down. BATTERIES: It is recommended to substitute each battery every four years or when the nominal autonomy is not guaranteed. The model and the date of production of the battery are written on it. Fill the field with the date of the first starting (Fig.1). Warning: The Ni-Cd and Ni-MH batteries are sold uncharged: the first charge must be 48h long. GENERAL CHARACTERISTICS: - Indicator green Led for the presence of the power supply. - Indicatore red Led for the warnings signallings. - Operation with rechargeable NiMH batteries. - Constant current electronic device for the charge of the battery. - Electrical protection device for the excessive discharge of battery. - Possibility to be put in the stand-by mode by remote control Commander (optional) - Possibility to put a green signal label . - Plastic body in accordance with the rules in force. CARATTERISTICHE GENERALI: - Led spia verde per presenza rete. - Led spia rosso per segnalazione anomalie. - Funzionamento con batterie ricaricabili al NiMH. - Dispositivo di ricarica delle batterie a corrente costante. - Dispositivo di protezione contro la scarica eccessiva della batteria. - Possibilità di messa in stato di riposo tramite il comando remoto Commander (opzionale). - Possibilità di applicare dei pittogrammi di segnalazione. - Corpo in materiale plastico conforme alle normative vigenti. EN 60598-1 EN 60598-2-22 2002/95/CE RoHS Compliant MADE IN ITALY INSTALLAZIONE: (FIG.2) -Rimuovere il diffusore trasparente facendo leva con 1 dei cacciaviti nei punti . 2 -Sganciare il riflettore dalla base facendo leva con un cacciavite nel punto . 3 4 5 -Forare se necessario uno dei tre possibili ingressi laterali per il cavo di alimentazione ed applicare la base al muro tramite gli appositi fori per il fissaggio. 4 -Eseguire i cablaggi come esposto in fig.3,4,5,6 -Riagganciare il riflettore alla base facendo scattare il denti nel punto . 3 4 5 -Riagganciare il diffusore trasparente alla base facendo scattare i denti nei 1 4 punti . 2 INSTALLATION: (FIG.2) -Remove the transparent cover pushing with a screwdriver 1 in the points . 2 -Unhook the body of the lamp from the base with a screwdriver in the point . 3 4 5 -Drill in necessary one of the three possible entries for the power supply cable and fix the base to the wall using the holes on the base. 4 -Make the connections as shown on fig.3,4,5,6. -Hook the body to the base making release the tooth on point . 3 4 5 -Hook the transparent cover to the base making release the tooth on points . 1 4 2 Linergy Batteria Ricaricabile / Rechargeable Battery Entrata in funzione / Coming in operation......................... mm.aaaa 6V Ni-Cd XXX C2500*5 Fig.1 N.B. inserire i tappi in dotazione negli appositi spazi laddove viene inserito il tassello per l’installazione, al fine di per garantire la tenuta stagna dell’apparecchio. N.B. In order to ensure the watertight integrity of the fitting insert the covers coming with the product in the reserved places where the screws anchors are inserted. INSERIRE IL RACCORDO IN DOTAZIONE PER GARANTIRE LA TENUTA STAGNA. INSERT THE IP65 CONNECTOR SUPPLIED TO ENSURE THE WATER- TIGHT INTEGRITY OF THE FITTING. 5 5 4 3 2 2 2 2 1 Fig.2 Fig.2b
Transcript of APPARECCHIO DI EMERGENZA EMERGENCY LUMINAIRE … · apparecchio di emergenza emergency luminaire...

APPARECCHIO DI EMERGENZAEMERGENCY LUMINAIRE
CRISTALENERGY TEST
RINA
IP65
ISTRUZIONI PER L'USOL'INSTALLAZIONE E
INSTALLATION AND USE INSTRUCTIONS
I
UK
Attenzione: In caso di installazione a parete il prodotto deve essere disposto con i led verso il BASSO
BATTERIE:Sostituire la batteria ogni quattro anni o quando l'autonomia non è più quella nominale. Il tipo di batteria e la data di produzione sono indicati con una marcatura sulla batteria (Fig.1). Inoltre c'è uno spazio da riempire a cura dell'installatore con la data di entrata in funzione.Attenzione: Le batterie al Ni-Cd e Ni-MH sono inizialmente scariche, la prima ricarica deve durare almeno 48h.
Warning: In case of wall mounting the product must be positioned with the leds down.
BATTERIES: It is recommended to substitute each battery every four years or when the nominal autonomy is not guaranteed. The model and the date of production of the battery are written on it. Fill the field with the date of the first starting (Fig.1).Warning: The Ni-Cd and Ni-MH batteries are sold uncharged: the first charge must be 48h long.
GENERAL CHARACTERISTICS:- Indicator green Led for the presence of the power supply.- Indicatore red Led for the warnings signallings.- Operation with rechargeable NiMH batteries.- Constant current electronic device for the charge of the battery.- Electrical protection device for the excessive discharge of battery.- Possibility to be put in the stand-by mode by remote control Commander (optional)- Possibility to put a green signal label .- Plastic body in accordance with the rules in force.
CARATTERISTICHE GENERALI:- Led spia verde per presenza rete.- Led spia rosso per segnalazione anomalie.- Funzionamento con batterie ricaricabili al NiMH.- Dispositivo di ricarica delle batterie a corrente costante.- Dispositivo di protezione contro la scarica eccessiva della batteria.- Possibilità di messa in stato di riposo tramite il comando remoto Commander (opzionale).- Possibilità di applicare dei pittogrammi di segnalazione.- Corpo in materiale plastico conforme alle normative vigenti.
EN 60598-1 EN 60598-2-22
2002/95/CE RoHS Compliant
MADE IN ITALY
INSTALLAZIONE: (FIG.2)-Rimuovere il diffusore trasparente facendo leva con1dei cacciaviti nei punti .2-Sganciare il riflettore dalla base facendo leva con un cacciavite nel punto .3 4 5-Forare se necessario uno dei tre possibili ingressi laterali per il cavo di alimentazione ed applicare la base al muro tramite gli appositi fori per il fissaggio. 4-Eseguire i cablaggi come esposto in fig.3,4,5,6-Riagganciare il riflettore alla base facendo scattare il denti nel punto .3 4 5-Riagganciare il diffusore trasparente alla base facendo scattare i denti nei 1 4punti .2
INSTALLATION: (FIG.2)-Remove the transparent cover pushing with a screwdriver1in the points .2-Unhook the body of the lamp from the base with a screwdriver in the point .3 4 5-Drill in necessary one of the three possible entries for the power supply cable and fix the base to the wall using the holes on the base.4-Make the connections as shown on fig.3,4,5,6.-Hook the body to the base making release the tooth on point .3 4 5-Hook the transparent cover to the base making release the tooth on points .1 4 2
LinergyBatteria Ricaricabile / Rechargeable BatteryEntrata in funzione / Coming in operation.........................
mm.aaaa 6V Ni-Cd XXX C2500*5
Fig.1
N.B.inserire i tappi in dotazione negli appositi spazi laddove viene inserito il tassello per l’installazione, al fine di per garantire la tenuta stagna dell’apparecchio.
N.B.In order to ensure the watertight integrity of the fitting insert the covers coming with the productin the reserved places where the screws anchors areinserted.
INSERIRE IL RACCORDO IN DOTAZIONE PER GARANTIRE LA TENUTA STAGNA.
INSERT THE IP65 CONNECTOR SUPPLIED TO ENSURE THE WATER-TIGHT INTEGRITY OF THE FITTING.
5
5
4
3
2
2
2
2
1
Fig.2
Fig.2b
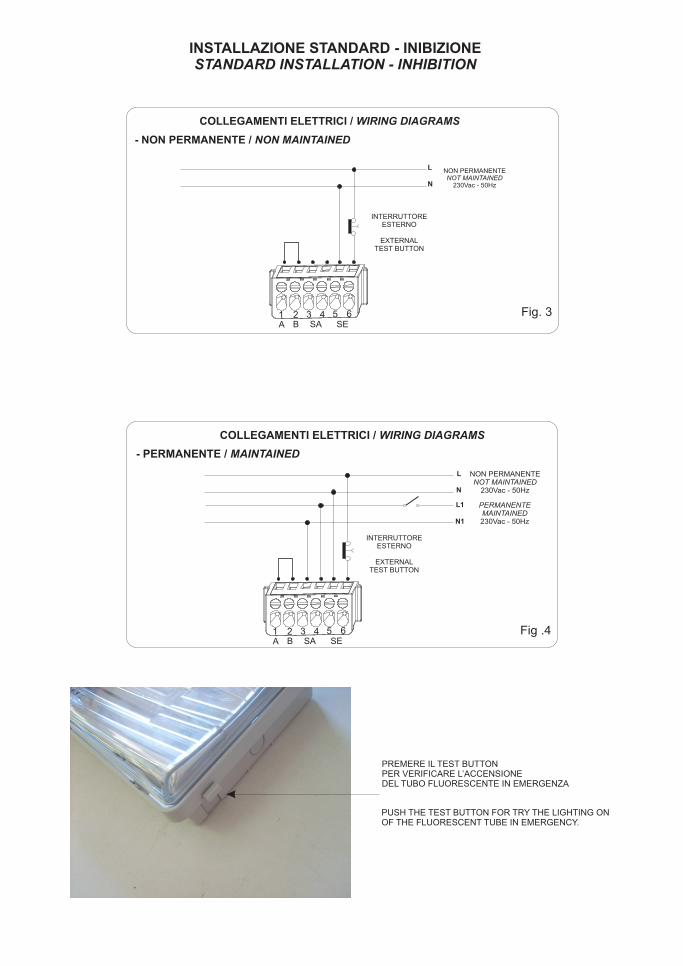
PREMERE IL TEST BUTTON PER VERIFICARE L’ACCENSIONEDEL TUBO FLUORESCENTE IN EMERGENZA
PUSH THE TEST BUTTON FOR TRY THE LIGHTING ONOF THE FLUORESCENT TUBE IN EMERGENCY.
INSTALLAZIONE STANDARD - INIBIZIONESTANDARD INSTALLATION - INHIBITION
NON PERMANENTE NOT MAINTAINED
230Vac - 50Hz
- NON PERMANENTE / NON MAINTAINED
COLLEGAMENTI ELETTRICI / WIRING DIAGRAMS
NON PERMANENTENOT MAINTAINED
230Vac - 50Hz
PERMANENTEMAINTAINED230Vac - 50Hz
- PERMANENTE / MAINTAINED
COLLEGAMENTI ELETTRICI / WIRING DIAGRAMS
INTERRUTTORE ESTERNO
EXTERNALTEST BUTTON
INTERRUTTORE ESTERNO
EXTERNALTEST BUTTON
Fig. 3
Fig .4
L
N
L
N
L1
N1
2 3 4 5 6SESA B A
1
2 3 4 5 6SESA B A
1
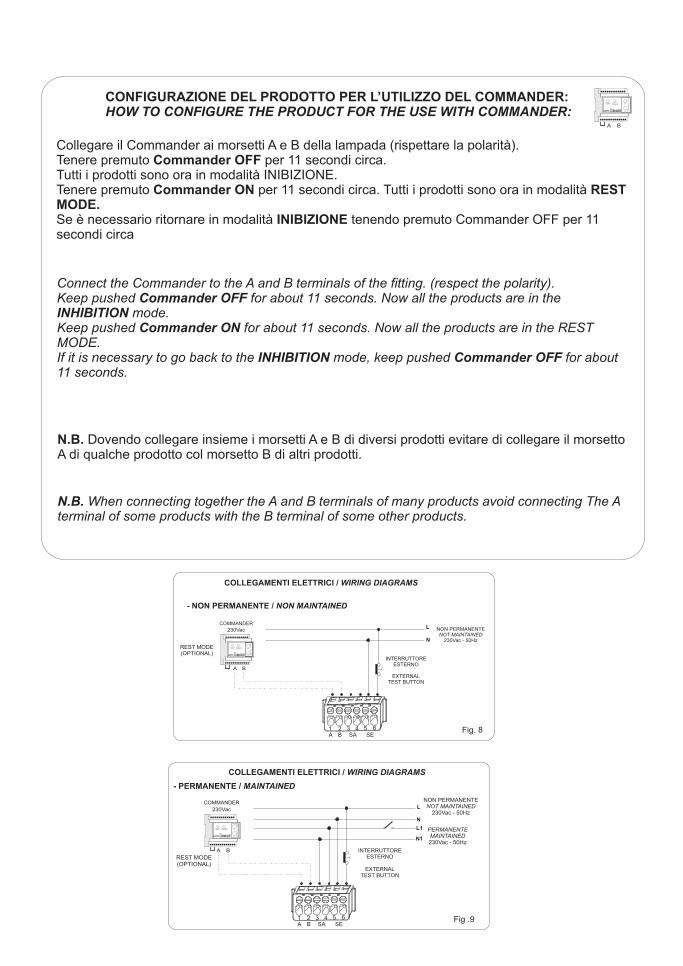
BA
230Vac
COMMANDER
PresenzaRETE
AbilitazioneEmergenza
COMMANDER
ON
OFF
ABILITAZIONE
REST MODE(OPTIONAL)
Fig. 8
- NON PERMANENTE / NON MAINTAINED
COLLEGAMENTI ELETTRICI / WIRING DIAGRAMS
Fig .9
230Vac
COMMANDER
BA
PresenzaRETE
AbilitazioneEmergenza
COMMANDER
ON
OFF
ABILITAZIONE
REST MODE(OPTIONAL)
- PERMANENTE / MAINTAINED
COLLEGAMENTI ELETTRICI / WIRING DIAGRAMS
INTERRUTTORE ESTERNO
EXTERNALTEST BUTTON
INTERRUTTORE ESTERNO
EXTERNALTEST BUTTON
NON PERMANENTE NOT MAINTAINED
230Vac - 50Hz
NON PERMANENTENOT MAINTAINED
230Vac - 50Hz
PERMANENTEMAINTAINED230Vac - 50Hz
L
N
L
N
L1
N1
2 3 4 5 6SESA B A
1
2 3 4 5 6SESA B A
1
CONFIGURAZIONE DEL PRODOTTO PER L’UTILIZZO DEL COMMANDER: HOW TO CONFIGURE THE PRODUCT FOR THE USE WITH COMMANDER:
Collegare il Commander ai morsetti A e B della lampada (rispettare la polarità).Tenere premuto Commander OFF per 11 secondi circa. Tutti i prodotti sono ora in modalità INIBIZIONE.Tenere premuto Commander ON per 11 secondi circa. Tutti i prodotti sono ora in modalità REST MODE.Se è necessario ritornare in modalità INIBIZIONE tenendo premuto Commander OFF per 11 secondi circa
Connect the Commander to the A and B terminals of the fitting. (respect the polarity).Keep pushed Commander OFF for about 11 seconds. Now all the products are in the INHIBITION mode.Keep pushed Commander ON for about 11 seconds. Now all the products are in the REST MODE.If it is necessary to go back to the INHIBITION mode, keep pushed Commander OFF for about 11 seconds.
N.B. Dovendo collegare insieme i morsetti A e B di diversi prodotti evitare di collegare il morsetto A di qualche prodotto col morsetto B di altri prodotti.
N.B. When connecting together the A and B terminals of many products avoid connecting The A terminal of some products with the B terminal of some other products.
BA
PresenzaRETE
AbilitazioneEmergenza
COMMANDER
ON
OFF
ABILITAZIONE

LINERGY S.R.L. - via A. De Gasperi 9 - Acquaviva Picena (AP) - ITALY - tel.0735.5974 - fax 0735.597474 - www.linergy.it - [email protected] - ISTCR-RINA - Ver. 2.0
Il cassonetto barrato sull’apparecchio specifica che il prodotto deve essere consegnato ai centri di raccolta autorizzati per un corretto smaltimento. Rivolgersi all’ufficio competente del proprio ente locale per informazioni sulla raccolta e sui termini di legge.The crossed out waste bin symbol indicates that the product should be taken to an authorized waste collection centre which can dispose of it properly. For information on waste collection centres and on current waste disposal legislation, please contact your local waste disposal authority.
CONDIZIONI DI GARANZIA / WARRANTY CONDITION
La garanzia sugli apparecchi di emergenza è di 2 anni dalla data di vendita. La garanzia decade se il prodotto è stato manomesso o riparato da personale non autorizzato LINERGY.The warranty on the emergency luminaire is 2 years from the sales date. The warranty voids if the product has been mishandled or repaired by personnel not authorized by LINERGY.
Le caratteristiche degli articoli e dei dati tecnici possono subire variazioni senza preavviso ed obbligo di comunicazione per le ns.esigenze di fabbricazione e per il miglioramento degli apparecchi.
The characteristics of the articles and the technical data contained in this paper can be modified without notice according to our exigency.
CARATTERISTICHE TECNICHE COMUNILAMP AUT. BATTERY
NiMH 6V 3,3Ah3h18W - 2G11
FLUX (lm)
220
FLUX (lm)
304
8W - G5 NiMH 6V 3,3Ah3h 184 307
BATTERY
24h
24h
POWER
11
15
W
RCS18N30AGRT RCS08N30AGRT
COD. IP65RETE
main supply
230 Vac
230 Vac
TEST FUNCTIONS:-The lamp makes two kinds of deliberate time tests: the functional test and the duration test. The functional test and the duration test can be made also in the manual way with the use of the Commander in the normal charge mode.-All the manual tests can be made only if there is the good ambient condition of external light. If the external conditions aren't good the test is postponed to the first coming of the good conditions. In the time of waiting the green led flashes to indicate that the lamp is waiting for the test.The functional test: is done every 15 days and consists in the lighting of the fluorescent lamp for a duration of 5 seconds. To start the manual functional test push one time the Commander ON (make a short push no more than 2 seconds)The duration test: is done every 90 days and consists in the complete discharge of the battery. To start the duration test push one time the Commander ON (make a long push no less than 5 seconds).Disabilitation of the tests: all deliberate time tests can be disabled with a pushing of the button of Commander OFF, with a second pushing of the Commander ON deliberate time tests will be enabled.
FUNZIONI DI TEST:- La lampada esegue due tipi di test temporizzati: il test funzionale e il test di autonomia. I test funzionale e di autonomia possono essere effettuati anche manualmente con il Commander quando la batteria è in ricarica di mantenimento.- Tutti i test manuali vengono eseguiti se ci sono le condizioni ambientali idonee di luce esterna. Se le condizioni esterne non sono idonee il test viene rinviato al primo verificarsi delle condizioni idonee. Durante il tempo di attesa il led verde lampeggia per segnalare che la lampada sta aspettando di potere compiere i test.Test funzionale: iene effettuato ogni 15 giorni v e consiste nella accensione della lampada fluorescente per una durata di 5 secondi. Per attivare il test funzionale manuale premere una volta il Commander ON (effettuare una pressione breve della durata non superiore a 2 secondi)Test di autonomia: viene effettuato ogni 90 giorni e consiste nella completa scarica della batteria. P e il test di autonomia premere una volta il er far partirCommander ON (effettuare una pressione lunga della durata non inferiore a 5 secondi).Disabilitazione dei test: tutti i test temporizzati possono essere inibiti tramite la pressione di un tasto del Commander OFF, ad una seconda pressione del tasto ON i test temporizzati verranno riabilitati.
VERDE ACCESO FISSO / GREEN ON, NOT FLASHING PRESENZA RETE, NESSUNA ANOMALIA / MAINS SUPPLY ON, NO WARNING
TEST IN CORSO / TEST IN PROGRESS
TEST DISABILITATI - LAMPADA INIBITA* / TEST DISABLED - LUMINAIRE INHIBITED*
GUASTO BATTERIA / BATTERY FAULT
LAMPADA GUASTA / LUMINAIRE FAULT
VERDE LAMPEGGIANTE / GREEN FLASHING
ROSSO LAMPEGGIANTE LENTO / RED SLOW FLASHING
ROSSO LAMPEGGIANTE VELOCE / RED SLOW FLASHING
ROSSO ACCESO FISSO / RED ON, NOT FLASHING
SIGNIFICATO / LED MEANINGSEGNALAZIONI LED / LED SIGNALLING