1. For Safe Operation - Castelgardenmanuals.castelgarden.com/PRUNING_PR270.pdf · Motosserra -...
19
171501050/0 Realizzazione: EDIPROM / bergamo GGP ITALY SPA Via del Lavoro, 6 I-31033 Castelfranco Veneto (TV) ITALY Motosega - MANUALE DI ISTRUZIONI ATTENZIONE: prima di utilizzare la macchina, leggere attentamente il presente libretto. Chain-saw - OPERATOR’S MANUAL WARNING: read thoroughly the instruction booklet before using this machine. Scie à chaîne - MANUEL D’UTILISATION ATTENTION: lire attentivement le manuel avant d'utiliser cette machine. Motorsäge - GEBRAUCHSANWEISUNG ACHTUNG: vor Inbetriebnahme des Geräts die Gebrauchsanleitung aufmerksam lesen. Motosierra - MANUAL DE INSTRUCCIONES CUIDADO: antes de utilizar esta máquina, lea atentamente el manual de instrucciones. Kettingzaag - GEBRUIKERSHANDLEIDING LET OP: Voordat u de deze machine gaat gebruiken dient u eerst deze handleiding aandachtig door te lezen. Motosserra - MANUAL DE INSTRUÇÕES ATENCAO! Antes de usar a moto-roçadeira, ler com atenção este manual de instruções. ∞Ï˘ÛÔÚ›ÔÓÔ - ∂°Ã∂πƒπ¢π√ √¢∏°πø¡ ¶ÚÔÛÔ¯‹: ÚÈÓ ¯ÚËÛÈÌÔÔÈ‹ÛÂÙ ÙÔ Ì˯¿ÓËÌ·, ‰È·‚¿ÛÙ ÚÔÛÂÎÙÈο ÙÔ ·ÚfiÓ ÂÁ¯ÂÈÚ›‰ÈÔ. Motorlu testere - KULLANIM KILAVUZU D‹KKAT! Makineyi kullanmadan önce talimatlar içeren kılavuzu dikkatle okuyun. Spalinowa piła łańcuchowa - INSTRUKCJE OBSŁUGI UWAGA: Przed użyciem urządzenia przeczytaj uważnie niniejszą instrukcję. Motorna verižna žaga - PRIROČNIK ZA UPORABU POZOR: Preden uporabite stroj, pazljivo preberite priročnik z navodili. ÅÂÌÁÓÔË· - êìKéÇéÑëíÇé èé ùKëèãìÄíÄñàà ÇçàåÄçàÖ: èÂʉ ˜ÂÏ ÔÓθÁÓ‚‡Ú¸Òfl Ó·ÓÛ‰Ó‚‡ÌËÂÏ, ‚ÌËχÚÂθÌÓ ÔÓ˜ÚËÚ ÁÚÓ ÛÍÓ‚Ó‰ÒÚ‚Ó ÔÓ ÁÍÒÔÎÛ‡Ú‡ˆËË. Motorna pila - PRIRUČNIK ZA UPORABO POZOR: Prije nego pristupite uporabi stroja, pažljivo pročitajte upute. FR EN IT NL DE ES PT EL TR SL PL RU HR
Transcript of 1. For Safe Operation - Castelgardenmanuals.castelgarden.com/PRUNING_PR270.pdf · Motosserra -...

1715
0105
0/0
Rea
lizza
zione:
ED
IPR
OM
/ b
ergam
o
GGP ITALY SPA
Via del Lavoro, 6
I-31033 Castelfranco Veneto (TV) ITALY
Motosega - MANUALE DI ISTRUZIONIATTENZIONE: prima di utilizzare la macchina, leggere attentamente ilpresente libretto.
Chain-saw - OPERATOR’S MANUALWARNING: read thoroughly the instruction booklet before using thismachine.
Scie à chaîne - MANUEL D’UTILISATIONATTENTION: lire attentivement le manuel avant d'utiliser cettemachine.
Motorsäge - GEBRAUCHSANWEISUNGACHTUNG: vor Inbetriebnahme des Geräts die Gebrauchsanleitungaufmerksam lesen.
Motosierra - MANUAL DE INSTRUCCIONESCUIDADO: antes de utilizar esta máquina, lea atentamente el manualde instrucciones.
Kettingzaag - GEBRUIKERSHANDLEIDINGLET OP: Voordat u de deze machine gaat gebruiken dient u eerst dezehandleiding aandachtig door te lezen.
Motosserra - MANUAL DE INSTRUÇÕESATENCAO! Antes de usar a moto-roçadeira, ler com atenção este manualde instruções.
∞Ï˘ÛÔÚ›ÔÓÔ - ∂°Ã∂πƒπ¢π√ √¢∏°πø¡¶ÚÔÛÔ¯‹: ÚÈÓ ¯ÚËÛÈÌÔÔÈ‹ÛÂÙ ÙÔ Ì˯¿ÓËÌ·, ‰È·‚¿ÛÙ ÚÔÛÂÎÙÈο ÙÔ·ÚfiÓ ÂÁ¯ÂÈÚ›‰ÈÔ.
Motorlu testere - KULLANIM KILAVUZUD‹KKAT! Makineyi kullanmadan önce talimatlar içeren kılavuzu dikkatleokuyun.
Spalinowa piła łańcuchowa - INSTRUKCJE OBSŁUGIUWAGA: Przed użyciem urządzenia przeczytaj uważnie niniejsząinstrukcję.
Motorna verižna žaga - PRIROČNIK ZA UPORABUPOZOR: Preden uporabite stroj, pazljivo preberite priročnik z navodili.
ÅÂÌÁÓÔË· - êìKéÇéÑëíÇé èé ùKëèãìÄíÄñààÇçàåÄçàÖ: èÂʉ ˜ÂÏ ÔÓθÁÓ‚‡Ú¸Òfl Ó·ÓÛ‰Ó‚‡ÌËÂÏ,‚ÌËχÚÂθÌÓ ÔÓ˜ÚËÚ ÁÚÓ ÛÍÓ‚Ó‰ÒÚ‚Ó ÔÓ ÁÍÒÔÎÛ‡Ú‡ˆËË.
Motorna pila - PRIRUČNIK ZA UPORABOPOZOR: Prije nego pristupite uporabi stroja, pažljivo pročitajteupute.
FR
EN
IT
NL
DE
ES
PT
EL
TR
SL
PL
RU
HR

1. For Safe Operation EN 1
Dear Customer,
Firstly, we wish to thank you for having chosen our products and hope that the use of this machine willbe extremely satisfying for you and fully meet your expectations. This manual has been drawn up toallow your to get to know your machine well and use it in safe and efficient conditions; please do notforget that it is an integral part of the machine and keep it to hand to be consulted at all times and con-sign it with the machine if you should sell or lend it to others.
Your new machine has been designed and manufactured to current standards and is safe and reliableif used in full respect of the instructions contained in this manual (forecast use); any other use or fail-ure to comply with the instructions for safe use, maintenance and repair shall be considered as“improper use”, cause the warranty to become null and void and relieve the Manufacturer from allresponsibility, with the user becoming responsible for charges for damages or personal or third partyinjury.
If any slight differences are found between the description herein and the machine you own, pleasebear in mind that due to continual product improvement, the information contained in this manual issubject to modification without prior notice or obligatory updating, although the essential features forthe purposes of safety and operation remain unchanged. In the event of doubt, please contact yourdealer. Enjoy your work!
1. For Safe Operation ......................................................... 12. Explanation of Symbols on the Machine ....................... 63. Installing Guide Bar and Saw Chain .............................. 74. Fuel and Chain Oil ......................................................... 85. Operating the Engine ................................................... 106. Sawing .......................................................................... 137. Maintenance ................................................................. 158. Maintenance of Saw Chain and Guide Bar ................. 179. Troubleshooting Guide ................................................. 18
Contents
This chainsaw has been espe-cially designed for tree mainte-
nance and should thereforeonly be used by trained opera-
tors when working on trees.
�! WARNING!
EXPLANATION OF SYMBOLSAND SAFETY WARNINGS
1. Read, understand and follow all warnings.2. Warning! Danger of kickback.3. Use the chain saw with two hands.4. Read operator's instruction book before operating this
machine.5. Wear head, eye and ear protection.6. Wear strong working gloves.7. Wear boots or protective shoes with grippy soles and steel
toecaps.8. Use appropriate protections for foot-leg and hand-arm .9. This saw is for trained tree service operators only.
WARNING!!!RISK OF DAMAGING HEARING
IN NORMAL CONDITIONS OF USE, THIS MACHINE MAY INVOLVE A DAILY LEVELOF PERSONAL EXPOSURE TO NOISE FOR THE OPERATOR EQUAL TO OR
GREATER THAN85 dB(A)
1. For Safe Operation

EN 2 1. For Safe Operation
1. Never operate a chain sawwhen you are fatigued, ill, orupset, or under the influence ofmedication that may make youdrowsy, or if you are under theinfluence of alcohol or drugs.
2. Use safety footwear, snug fit-ting clothing and eye, hearing andhead protection devices.Use the vibration-proof glove.
3. Keep the saw chain sharp andthe saw, including the AV system,well maintained. A dull chain willincrease cutting time, and press-ing a dull chain through wood willincrease the vibrations transmit-ted to your hands. A saw withloose components or with dam-aged or worn AV buffers will alsotend to have higher vibration lev-els.
4. All the above mentioned pre-cautions do not guarantee thatyou will not sustain whitefingerdiseaseor carpal tunnel syn-drome.Therefore, continual and regularusers should monitor closely thecondition of their hands and fin-gers. If any of the above symp-toms appear, seek medical adviceimmediately.
5. Always use caution when han-dling fuel. Wipe up all spills andthen move the chain saw at least 3m from the fueling point beforestarting the engine.
6. Eliminate all sources of sparksor flame (i.e. smoking, openflames, or work that can causesparks) in the areas where fuel ismixed, poured, or stored.
7. Do not smoke while handlingfuel or while operating the chainsaw.
8. Do not allow other persons tobe near the chain saw when start-ing or cutting. Keep bystandersand animals out of the work area.Children, pets and bystandersshould be a minimum of 10 maway when you start or operatethe chain saw.
9. Never start cutting until youhave a clear work area, securefooting, and a planned retreatpath from the falling tree.
10. Always hold the chain sawfirmly with both hands when theengine is running. Use a firm gripwith thumb and fingers encirclingthe chain saw handles.
11. Keep all parts of your bodyaway from the saw chain when theengine is running.
12. Before you start the engine,make sure the saw chain is notcontacting anything.
13. Always carry the chain sawwith the engine stopped, theguide bar and saw chain to therear, and the muffler away fromyour body.
14. Always carry the chain sawwith the engine stopped, theguide bar and saw chain to therear, and the muffler away fromyour body.
15. All chain saw service, otherthan the items listed in theOwner’s Manual, should be per-formed by competent chain sawservice personnel. (E.g., if improp-er tools are used to remove theflywheel, or if an improper tool isused to hold the flywheel in orderto remove the clutch, structural
1. For Safe Operation

1. For Safe Operation EN 3
damage to the flywheel couldoccur which could subsequentlycause the flywheel to disinte-grate.)
16. Always shut off the enginebefore setting it down.
17. Use extreme caution whencutting small size brush andsaplings because slender materialmay catch the saw chain and bewhipped toward you or pull youoff balance.
18. When cutting a limb that isunder tension, be alert for spring-back so that you will not be struckwhen the tension in the woodfibers is released.
19. Never cut in high wind, badweather, when visibility is poor orin very high or low temperatures.Always check the tree for deadbranches which could fall duringthe felling operation.
20. Keep the handles dry, cleanand free of oil or fuel mixture.
21. Operate the chain saw only inwell ventilated areas. Never startor run the engine inside a closedroom or building. Exhaust fumescontain dangerous carbonmonoxide.
22. Do not operate the chain sawin a tree unless specially trained todo so.
23. Guard against kickback.Kickback is the upward motion ofthe guide bar which occurs whenthe saw chain at the nose of theguide bar contacts an object.Kickback can lead to dangerousloss of control of the chain saw.
24. When transporting your chainsaw, make sure the appropriateguide bar scabbard is in place.
1.1 KICKBACK SAFETY PRECAUTIONS FORCHAIN SAW USERS
Kickback may occur whenthe nose or tip of the guide bar touches anobject, or when the wood closes in andpinches the saw chain in the cut. Tip contactin some cases may cause a lightning fast
reverse reaction, kick-ing the guide bar upand back towards theoperator.Pinching the sawchain along the top ofthe guide bar maypush the guide bar
rapidly back towards the operator. Either ofthese reactions may cause you to lose controlof the saw, which could result in serious per-sonal injury.
• Do not rely exclusively on the safety devicesbuilt into your saw. As a chain saw user youshould take several steps to keep cuttingjobs free from accident or injury.
1. With a basic understanding of kickback youcan reduce or eliminate the element of surprise.Sudden surprise contributes to accidents.
2. Keep a good grip on the sawwith both hands, the right hand onthe rear handle, and the left handon the front handle, when theengine is running. Use a firm gripwith thumbs and fingers encirclingthe chain saw handles. A firm gripwill help you reduce kickback andmaintain control of the saw.
3. Make certain that the area inwhich you are cutting is free fromobstructions. Do not let the noseof the guide bar contact a log,branch, or any other obstructionwhich could be hit while you areoperating the saw.
4. Cut at high engine speeds.
5. Do not overreach or cut aboveshoulder height.
6. Follow the manufacturer’ssharpening and maintenanceinstructions for the saw chain.
7. Only use replacement bars andchains specified by the manufac-turer or the equivalent.
�! WARNING!

1.2 WORKING WITH TREE SERVICE CHAIN-SAWS FROM A ROPE AND HARNESS
This chapter sets out working practices toreduce the risk of injury from tree service chain-saws when working at height from a rope andharness.
While it may form the basis of guidance andtraining literature, it should not be regarded as asubstitute for formal training.
General requirements working at height
Operators of tree service chainsaws working atheight from a rope and harness should neverwork alone. A competent ground worker trained in appropri-ate emergency procedures should assist them.
Operators of tree service chainsaws for this workshould be trained in general safe climbing andwork positioning techniques and shall properlyequipped with harnesses, ropes, strops, kara-biners and other equipment for maintainingsecure and safe working positions for boththemselves and the saw.
Preparing to use the saw in the tree
The chainsaw should checked,fuelled, started and warmed upby the ground worker before it issent up to the operator in thetree.
The chainsaw should be fittedwith a suitable strop for attach-ing to the operator’s harness:
a) choke the strop around the attachment pointon the rear of the saw (A);
b) provide suitable karabiners to allow indirect(i.e. via the strop) and direct attachment (i.e.
at the attachment point on the saw) of saw tothe operators harness;
c) ensure the saw is securely attached when it isbeing sent up to the operator;
d) ensure the saw it secured to the harnessbefore it is disconnected from the means ofascent.
The saw should only be attached to the recom-mended attachment points on the harness.These may be at mid-point (front or rear) or atthe sides.
Where possible attaching the saw to centre rearmid-point will keep it clear of climbing lines andsupport its weight centrally down the operator’sspine.
When moving the saw fromany attachment point toanother, operators shouldensure it is secured in thenew position before releasingit from the previous attach-ment point.
Using the chainsaw in the tree
An analysis of accidents with these saws duringtree service operations shows the primary causeas being inappropriate one-handed use of thesaw. In the vast majority of accidents, operatorsfail to adopt a secure work position witch allowsthem to hold both handles of the saw.
This results in an increased risk of injury due to:
• not having a firm grip on the saw if it kicksback;
• a lack of control of the saw such that it ismore liable to contact climbing lines andoperators body (particularly the left hand andarm)
• losing control from insecure work positionresulting in contact with the saw (unexpectedmovement during operation of the saw)
EN 4 1. For Safe Operation
(A)
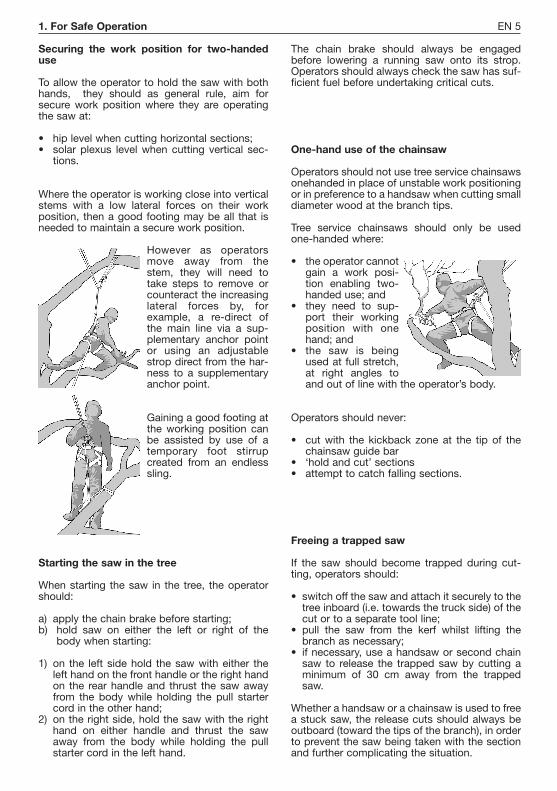
Securing the work position for two-handeduse
To allow the operator to hold the saw with bothhands, they should as general rule, aim forsecure work position where they are operatingthe saw at:
• hip level when cutting horizontal sections;• solar plexus level when cutting vertical sec-
tions.
Where the operator is working close into verticalstems with a low lateral forces on their workposition, then a good footing may be all that isneeded to maintain a secure work position.
However as operatorsmove away from thestem, they will need totake steps to remove orcounteract the increasinglateral forces by, forexample, a re-direct ofthe main line via a sup-plementary anchor pointor using an adjustablestrop direct from the har-ness to a supplementaryanchor point.
Gaining a good footing atthe working position canbe assisted by use of atemporary foot stirrupcreated from an endlesssling.
Starting the saw in the tree
When starting the saw in the tree, the operatorshould:
a) apply the chain brake before starting;b) hold saw on either the left or right of the
body when starting:
1) on the left side hold the saw with either theleft hand on the front handle or the right handon the rear handle and thrust the saw awayfrom the body while holding the pull startercord in the other hand;
2) on the right side, hold the saw with the righthand on either handle and thrust the sawaway from the body while holding the pullstarter cord in the left hand.
The chain brake should always be engagedbefore lowering a running saw onto its strop.Operators should always check the saw has suf-ficient fuel before undertaking critical cuts.
One-hand use of the chainsaw
Operators should not use tree service chainsawsonehanded in place of unstable work positioningor in preference to a handsaw when cutting smalldiameter wood at the branch tips.
Tree service chainsaws should only be usedone-handed where:
• the operator cannotgain a work posi-tion enabling two-handed use; and
• they need to sup-port their workingposition with onehand; and
• the saw is beingused at full stretch,at right angles toand out of line with the operator’s body.
Operators should never:
• cut with the kickback zone at the tip of thechainsaw guide bar
• ‘hold and cut’ sections• attempt to catch falling sections.
Freeing a trapped saw
If the saw should become trapped during cut-ting, operators should:
• switch off the saw and attach it securely to thetree inboard (i.e. towards the truck side) of thecut or to a separate tool line;
• pull the saw from the kerf whilst lifting thebranch as necessary;
• if necessary, use a handsaw or second chainsaw to release the trapped saw by cutting aminimum of 30 cm away from the trappedsaw.
Whether a handsaw or a chainsaw is used to freea stuck saw, the release cuts should always beoutboard (toward the tips of the branch), in orderto prevent the saw being taken with the sectionand further complicating the situation.
1. For Safe Operation EN 5
EN 6 2. Explanation of Symbols on the Machine
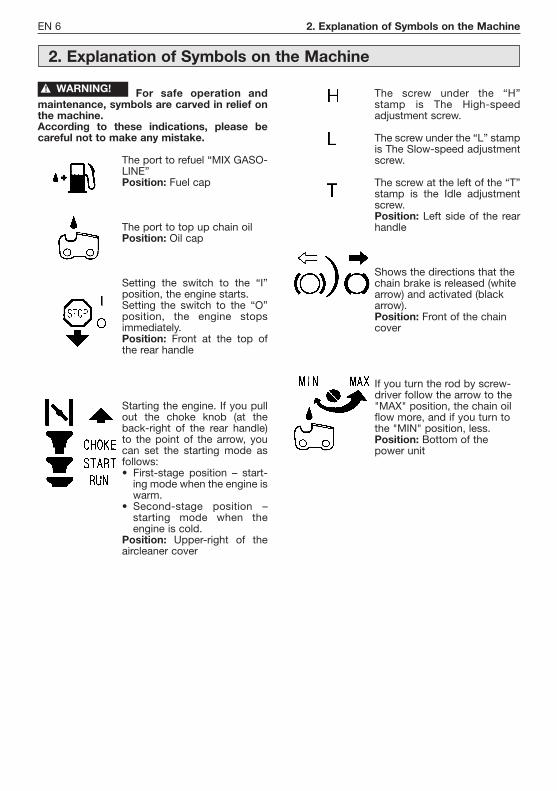
For safe operation andmaintenance, symbols are carved in relief onthe machine.According to these indications, please becareful not to make any mistake.
The port to refuel “MIX GASO-LINE”Position: Fuel cap
The port to top up chain oilPosition: Oil cap
Setting the switch to the “I”position, the engine starts.Setting the switch to the “O”position, the engine stopsimmediately.Position: Front at the top ofthe rear handle
Starting the engine. If you pullout the choke knob (at theback-right of the rear handle)to the point of the arrow, youcan set the starting mode asfollows:• First-stage position – start-
ing mode when the engine iswarm.
• Second-stage position –starting mode when theengine is cold.
Position: Upper-right of theaircleaner cover
�! WARNING! The screw under the “H”stamp is The High-speedadjustment screw.
The screw under the “L” stampis The Slow-speed adjustmentscrew.
The screw at the left of the “T”stamp is the Idle adjustmentscrew.Position: Left side of the rearhandle
Shows the directions that thechain brake is released (whitearrow) and activated (blackarrow).Position: Front of the chaincover
If you turn the rod by screw-driver follow the arrow to the"MAX" position, the chain oilflow more, and if you turn tothe "MIN" position, less.Position: Bottom of thepower unit
2. Explanation of Symbols on the Machine

3. Installing Guide Bar and Saw Chain EN 7
A standard saw unit package contains the itemsas illustrated.
Open the box and install the guide bar and thesaw chain on the power unit as follows:
The saw chain has verysharp edges. Use thick protective gloves forsafety.
1. Pull the guard towards the front handle tocheck that the chain brake is not engaged.
2. Loosen the nuts and remove the chain cover.
3. Fix the hanger on the rear of power unit byscrew.
4. Mount the guide bar then fit the saw chainaround the bar and sprocket.
�! WARNING!
Pay attention to the correctdirection of the saw chain.
5. Fit the chain tensioner nut into the lower holeof the guide bar, then install the chain cover,and fasten the mounting nut to finger tight-ness.
When installing thechain cover, besure to fit the hookcompletely at therear end of thecover.
6. While holding up the tip of the bar, adjust thechain tension by turning the tensioner screwuntil the tie straps just touch the bottom sideof the bar rail.
7. Tighten the nuts securely with the bar tip heldup (12 ~ 15 Nm). Then check the chain forsmooth rotation and proper tension whilemoving it by hand. If necessary, readjust withthe chain cover loose.
8. Tighten the tensioner screw.
A new chain will expand itslength in the beginning of use. Check and read-just the tension frequently as a loose chain caneasily derail or cause rapid wear of itself and theguide bar.
NOTE
�! WARNING!
NOTE
3. Installing Guide Bar and Saw Chain
(1) Power unit(2) Bar protector(3) Guide bar(4) Saw chain(5) Plug wrench(6) Screwdriver for carburetor adjustment
1) Chain cover(2) Chain Tensioner
nut(3) Hole
(1)
(1) Hanger
(1) Movingdirection
(1) Loosen(2) Tighten(3) Tensioner
screw
(1) Tighten

EN 8 4. Fuel and Chain Oil
• FUEL
Gasoline is very flamma-ble. Avoid smoking or bringing any flame orsparks near fuel.
Make sure to stop the engine and allow it coolbefore refueling the unit.
Select outdoor bare ground for fueling andmove at least 3 m (10 ft) away from the fuel-ing point before starting the engine.
• The engines are lubricated by oil specially for-mulated for air-cooled 2-cycle gasoline engineuse. Use an anti-oxidant added quality oilexpressly labeled for air-cooled 2-cycle engineuse (JASO FC GRADE OIL or ISO EGCGRADE).
• Do not use BIA or TCW (2-stroke water-cool-ing type) mixed oil.
• RECOMMENDED MIXING RATIO GASO-LINE 50: OIL 1
• Exhaust emission are controlled by the funda-mental engine parameters and components(eq., carburation, ignition timing and port tim-ing) without addition of any major hardware orthe introduction of an inert material duringcombustion.
• These engines are certified to operate onunleaded gasoline.
• Make sure to use gasoline with a minimumoctane number of 89RON (USA/Canada:87AL).
• If you use a gasoline of a lower octane value
�! WARNING!
than prescribed, there is a danger that theengine temperature may rise and an engineproblem such as piston seizing may conse-quently occur.
• Unleaded gasoline is recommended to reducethe contamination of the air for the sake ofyour health and the environment.
• Poor quality gasolines or oils may damagesealing rings, fuel lines or fuel tank of theengine.
• HOW TO MIX FUEL
Pay attention to agitation.
1. Measure out the quantities of gasoline and oilto be mixed.
2. Put some of the gasoline into a clean,approved fuel container.
3. Pour in all of the oil and agitate well.
4. Pour in the rest of gasoline and agitate againfor at least one minute. As some oils may bedifficult to agitate depending on oil ingredi-ents, sufficient agitation is necessary for theengine to last long. Be careful that, if the agi-tation is insufficient, there is an increaseddanger of early piston seizing due to abnor-mally lean mixture.
5. Put a clear indication on the outside of thecontainer to avoid mixing up with gasoline orother containers.
6. Indicate the contents on outside of containerfor easy identification.
• FUELING THE UNIT
1. Untwist and remove the fuel cap. Rest thecap on a dustless place..
2. Put fuel into the fuel tank to 80% of the fullcapacity.
3. Fasten the fuel cap securely and wipe up anyfuel spillage around the unit.
�! WARNING!
4. Fuel and Chain Oil
4. Fuel and Chain Oil EN 9
1. Select flat and bare ground for fueling.2. Move at least 10 feet (3 meters) away from
the fueling point before starting theengine.
3. Stop the engine before refueling the unit.At that time, be sure to sufficiently agitatethe mixed gasoline in the container.
• FOR YOUR ENGINE LIFE, AVOID:
1. FUEL WITH NO OIL (RAW GASOLINE) – It willcause severe damage to the internal engineparts very quickly.
2. GASOHOL – It can cause deterioration ofrubber and/or plastic parts and disruption ofengine lubrication.
3. OIL FOR 4-CYCLE ENGINE USE – It cancause spark plug fouling, exhaust port block-ing, or piston ring sticking.
4. Mixed fuels which have been left unusedfor a period of one month or more may clogthe carburetor and result in the engine failingto operate properly.
5. In the case of storing the product for a longperiod of time, clean the fuel tank after ren-dering it empty. Next, activate the engine andempty the carburetor of the composite fuel.
6. In the case of scrapping the used mixed oilcontainer, scrap it only at an authorizedrepository site.
Moreover, normal wear andchange in product with no functional influenceare not covered by the warranty. Also, be carefulthat, if the usage in the instruction manual is notobserved as to the mixed gasoline, etc.described therein, it may not be covered by thewarranty.
• CHAIN OIL
Only use special oil for chainsaws or adhesive oil for chain saws. Do not useoil containing impurities so as not to block the oilfilter and to prevent irreparable damage to the oilpump.
The special oil for lubricatingthe chain is biodegradable. Use of a mineral oilor engine oil causes serious damage to the envi-ronment.
IMPORTANT
IMPORTANT
NOTE
�! WARNING! It is essential that you use good quality oil tolubricate the cutting parts effectively. Used orpoor quality oil does not guarantee good lubri-cation and reduces the duration of the chain andbar.
It is always worth topping up the oil tank com-pletely (using a funnel) every time you refuel.Since the oil tank capacity is enough to guaran-tee that the fuel runs out first, you will avoid therisk of operating the machine without lubricant.

EN 10 5. Operating the Engine
It is very dangerous to runa chainsaw that mounts broken parts or lacksany parts. Before starting engine, make surethat all the parts including bar and chain areinstalled properly.
• STARTING THE ENGINE
• Before starting the engine
1. Fill fuel and chain oil tanks respectively, andtighten the caps securely.
2. Continuously push the priming bulb until fuelcomes in the bulb.
3. Set the switch to “I” position.
4. Pull out the choke knob to the second-stageposition. The choke will close and the throttlelever will then be set in the starting position.
When restarting immediatelyafter stopping the engine, set the Choke knob in
NOTE
�! WARNING!
the first-stage position (choke open and throttlelever in the starting position).
Once the choke knob hasbeen pulled out, it will not return to the operatingposition even if you press down on it with yourfinger. When you wish to return the choke knobto the operating position, pull out the throttlelever instead.
Before you start theengine, make sure the saw chain is not con-tacting anything.
• Starting the engine on the ground
Do not start the enginewhile the chain saw hangs in one hand. Thesaw chain may touch your body. This in verydangerous.
Keep clear of the sawchain as it will start rotating upon starting ofengine.
5. While holding the saw unit securely on theground, pull the starter rope vigorously.
6. When engine has ignited, first push in thechoke knob to the first-stage position andthen pull the starter again to start the engine.
7. Allow the engine to warm up with the throttlelever pulled slightly.
�! WARNING!
�! WARNING!
�! WARNING!
NOTE
5. Operating the Engine
(1) Chain oil(2) Fuel
(1) Throttle interlock(2) Throttle lever
Choke knob:
(1) When the engine iscool
(2) When the engine iswarm up
(3) After the enginestarts
(1) Switch

5. Operating the Engine EN 11
• Starting the engine on a tree
Carefully follow theinstructions under “For your safety” (1.2).
• CHECKING THE OIL SUPPLY
Make sure to set up the barand the chain when checking the oil supply.If not, the rotating parts may be exposed. It isvery dangerous.
After starting the engine, run the chain at medi-um speed and see if chain oil is scattered off asshown in the figure.
The chain oil flow can be changed by inserting ascrewdriver in the hole on bottom of the clutchside. Adjust according to your work conditions.
The oil tank should becomenearly empty by the time fuel is used up. Be sureto refill the oil tank every time when refueling thesaw.
• ADJUSTING THE CARBURETOR
The carburetor on your unit has been factoryadjusted, but may require fine tuning due to achange in operating conditions.Before adjusting the carburetor, make sure thatthe provided air/fuel filters are clean and freshand the fuel properly mixed.
NOTE
�! WARNING!
�! WARNING!
When adjusting, take the following steps:
Be sure to adjust the carbu-retor with the bar chain attached.
1. “H” and “L” needles are restricted within thenumber of turn as shown below.
“H” needle: -1/4“L” needle: -1/4
2. Start the engine and allow it to warm up inlow speed for a few minutes.
3. Turn the idle adjusting screw (T) counter-clockwise so that the saw chain does notturn. If the idling speed is too slow, turn thescrew clockwise.
4. Make a test cut and adjust the “H” needle forbest cutting power, not for maximum speed.
• CHAIN BRAKE
The chain brake is a device which stops thechain instantaneously if the chain saw recoilsdue to kickback.
Normally, the brake is activated automatically byinertial force. It can also be activated manuallyby pushing the brake lever (left-hand guard)down toward the front.
When the brake operates, a yellow cone pops upfrom the base of the brake lever.
Releasing the Brake
Pull the brake lever up toward the left-hand han-dle until it clicks into place.
When the brake operates,release the throttle lever to slow down theengine speed. Continuous operation with thebrake engaged will generate heat from theclutch and may cause trouble.At machine inspection prior to each job,check the operating condition of the brakefollowing the steps.
�! WARNING!
NOTE
(1) Chain oil flowadjusting shaft
(2) Rich(3) Lean
(1) “L” needle(2) “H” needle(3) Idle adjusting
screw
(1) Chain oil

EN 12 5. Operating the Engine
1. Start the engine and grasp the handle secure-ly with both hands.
2. Pulling the throttle lever to maintain the chainoperation, push the brake lever (left-handguard) down toward the front using the backof your left hand.
3. When the brake operates and the chain isstopped, release the throttle lever.
4. Release the brake.
• STOPPING THE ENGINE
1. Release the throttle lever to allow the engineto idle for a few minutes
2. Set the switch to the “O” (STOP) position.
(1) Switch
(1) Release(2) Activate the brake.

6. Sawing EN 13
• Before proceeding toyour job, read the sec-tion “For Safe Oper-ation”. It is recommend-ed to first practice saw-ing easy logs. This alsohelps you get accus-tomed to your unit.
• Always follow the safetyregulations. The chainsaw must only be usedfor cutting wood. It isforbidden to cut othertypes of material.Vibrations and kickbackvary with different mate-rials and the require-ments of the safety reg-ulations would not berespected. Do not usethe chain saw as a leverfor lifting, moving orsplitting objects. Do notlock it over fixed stands.It is forbidden to hitchtools or applications tothe PTO other thanthose specified by themanufacturer.
• It is not necessary to force the saw into thecut. Apply only light pressure while running theengine at full throttle.
• When the saw chain is caught in the cut, donot attempt to pull it out by force, but use awedge or a lever to open the way.
• GUARD AGAINST KICKBACK
�! WARNING! • This saw is equipped witha chain brake that willstop the chain in theevent of kickback if oper-ating properly. You mustcheck the chain brakeoperation before eachusage by running the sawat full the throttle for 1-2seconds and pushing thefront hand guard forward.The chain should stopimmediately with theengine at full speed. If thechain is slow to stop ordoes not stop, replace thebrake band and clutchdrum before use.
• It is extremely importantthat the chain brake bechecked for proper oper-ation before each use andthat the chain be sharp inorder to maintain the kick-back safety level of thissaw. Removal of the safe-ty devices, inadequatemaintenance, or incorrectreplacement of the bar orchain may increase therisk to serious personalinjury due to kickback.
• FELLING A TREE
1. Decide the felling direction considering thewind, lean of the tree, location of heavybranches, ease of completing the task afterfelling and other factors.
2. While clearing the area around the tree,arrange a good foothold and retreat path.
(1) Notch cut(2) Felling cut(3) Felling direction
6. Sawing

EN 14 6. Sawing
3. Make a notch cut one-third of the way intothe tree on the felling side.
4. Make a felling cut from the opposite side ofthe notch and at a level slightly higher thanthe bottom of the notch.
When you fell a tree, besure to warn neighboring workers of the dan-ger.
Bucking and Limbing
• Always ensure your foothold. Do not standon the log.
• Be alert to the rolling over of a cut log.Especially when working on a slope, standon the uphill side of the log.
• Follow the instructions in “For SafeOperation” to avoid kickback of the saw.
Before starting work, check the direction ofbending force inside the log to be cut. Alwaysfinish cutting from the opposite side of the bend-ing direction to prevent the guide bar from beingcaught in the cut.
A log lying on the ground
Saw down halfway, then roll the log over and cutfrom the opposite side.
A log hanging off the ground
In area “A”, saw up from the bottom one-thirdand finish by sawing down from the top. In area“B”, saw down from the top one-third and finishby sawing up from the bottom.
�! WARNING!
�! WARNING!
Cutting the limbs of Fallen Tree
First check to which side the limb is bent. Thenmake the initial cut from the bent side and finishby sawing from the opposite side.
Be alert to the springingback of a cut limb.
Pruning of Standing Tree
For pruning high up using arope and a belt slings, carefully follow theinstructions under “For your safety” (1.2).
Cut up from the bottom, finish down from thetop.
• Do not work standing on unstable bases orrung ladders.
• Do not overreach.• Do not cut above shoulder height.
�! WARNING!
�! WARNING!
�! WARNING!

7. Maintenance EN 15
Before cleaning, theinspecting or repairing the unit, make surethat engine has stopped and is cool.Disconnect the spark plug to prevent acci-dental starting.
• MAINTENANCE AFTER EACH USE
1. Air filter
Loosen the knob and remove the air cleanercover.
Take off the filter elements and tap off attachedsawdust. When they are extremely dirty, shake-wash with gasoline. Dry them completely beforereinstalling.
2. Oiling port
Dismount the guide bar and check the oiling portfor clogging.
3. Guide bar
When the guide bar is dismounted, remove saw-dust in the bar groove and the oiling port.
• Sprocket noseGrease the nose sprocket from the feeding porton the tip of the bar.
�! WARNING! 4. Others
Check for fuel leakage and loose fastenings anddamage to major parts, especially handle jointsand guide bar mounting.If any defects are found, make sure to have themrepaired before operating the saw again.
• PERIODICAL SERVICE POINTS
1. Cylinder fins
1. Remove the starter case.
2. Remove sawdust between the cylinder fins.
3. Clean the valute area.
2. Fuel filter
1. Using a wire hook, take out the filter from thefiller port.
2. Wash the filter with gasoline. Replace withnew one if clogged with dirt completely.
When returning the filter,use a pinch not to be folded the suction pipe.�! WARNING!
7. Maintenance
(1) Fuel filter
(1) Oiling port(2) Grease port(3) Sprocket
(1) Oiling port

EN 16 7. Maintenance
3. Oil filter
1. With a wire hook, take out the oil filter fromthe feeding port.
2. Wash the filter with gasoline.
When returning the filter,use a pinch not to be folded the suction pipe.
4. Spark plug
Clean the electrodes with a wire brush and resetthe gap to 0.65 mm as necessary.
5. Sprocket
Check for cracks and for excessive wear inter-fering with the chain drive. If the wear is consid-erable, replace it with new one. Never fit a newchain on a worn sprocket, or a worn chain on anew sprocket.
6. Way of the cooling air
• The engine metal parts can burn your skin.Never touch the cylinder, muffler or ignitionplug etc. during operation or right after stop-ping the engine.
• Before starting the engine, check around themuffler and take off sawdust. If you do not, it
�! WARNING!
�! WARNING!
will cause the overheating and a fire. For pre-venting the trouble, please keep clean aroundthe muffler.
This engine is air-cooled. Dust clogging betweenthe inlet port of the cooling air and cylinder finswill cause overheating of the engine. Periodicallycheck and clean the cylinder fins after removingthe air cleaner and the cylinder cover.
When installing the cylindercover, make sure that switch wires and grom-mets are positioned correctly in place.
7. Muffler
If you do not attach themuffler correctly, after engine starts, the muf-fler will be loosen and the hightemperatureexhaust gas spout. After cleaning the muffler,pay attention to fit up the muffler according tothe explanation as follows.
1. Muffler body, mufflercover and baffle willbe combined cor-rectly.
2. Be sure the gasketis not broken. If it isbroken, change tothe new one.
3. Before tighteningthe screw, rub thegross on it.
4. After making a test run, re-tighten the screw(TORQUE: 7-8 Nm).)
Right after stopping theengine, do not touch the muffler with one'sbare hands. It will cause to burn your hands.
If carbon clogs between the muffler, it will causethe poor-output and the trouble in starting. Aftereach 100 hours, check and clean inside the muf-fler.
�! WARNING!
�! WARNING!
IMPORTANT
ChampionRCJ-7Y
(1) Oil filter(1) Inlet port of the
cooling air

7. Maintenance of Saw Chain and Guide Bar EN 17
1. Saw Chain
It is very important forsmooth and safe operation to always keepthe cutters sharp.
The cutters need to be sharpened when:
• Sawdust becomes powder-like.• You need extra force to saw in.• The cut path does not go straight.• Vibration increases.• Fuel consumption increases.
Cutter setting standards
Be sure to wear safetygloves.
Before filing:
• Make sure the saw chain is held securely.• Make sure the engine is stopped.• Use a round file of proper size for the chain
(5/32 in. - 4.0 mm).
Place the file on the cutter and push straight for-ward.Keep the file position as illustrated.
After each cutter has been filed, check the depthgauge and file it to the proper level as illustrated.
Be sure to round off thefront edge to reduce the chance of kickbackor tie-strap breakage.
�! WARNING!
�! WARNING!
�! WARNING!
Make sure every cutter has the same length andedge angles as illustrated.
2. Guide Bar
• Reverse the bar occasionally to prevent partialwear.
• The bar rail should always be square.
Check for wear of the bar rail. Apply a ruler to thebar and the outside of a cutter. If a gap isobserved between them, the rail is normal.Otherwise, the bar rail is worn. Such a bar needsto be corrected or replaced.
(1) Appropriategauge checker
(2) Depth gaugestandard
(3) Make the shoul-der round: 0.25”- 0.64 mm
(A) Cutter length(30°) Filing angle(85°) Side plate angle(60°) Top plate cutting
angle
(1) Ruler(2) Gap(3) No gap(4) Chain tilts
8. Maintenance of Saw Chain and Guide Bar

EN 18 9. Troubleshooting Guide
9. Troubleshooting Guide
PROBLEME CAUSE REMEDY
1) Starting failure
2) Lack ofpower/Poor accel-eration/Roughidling
3) Oil does notcome out
– Check fuel for water or substandardmixture.
– Check for engine flooding.
– Check spark ignition.
– Check fuel for water or substandardmixture.
– Check air filter and fuel filter forclogging.
– Check carburetor for inadequateadjustment.
– Check oil for substandard quality.
– Check oil passage and ports forclogging.
– Replace with proper fuel.
– Remove and dry the spark plug.
– Then pull the starter again with nochoke.
– Replace with a new plug.
– Replace with proper fuel.
– Clean.
– Readjust speed needles.
– Replace.
– Clean.
If the unit seems to need further serv-ice, please consult with an authorizedservice shop in your area.